#IoT Implementation using Arduino
Explore tagged Tumblr posts
Visit Tumblr Blog
Explore Tumblr blogs with no restrictions, modern design and the best experience.
Last Seen Tumblr Blogs


Fun Fact
Mobile US users spent an average of 115.8 minutes on Tumblr app monthly.
Text
From Classroom to Lab: Exploring SUAS’s Specialized Robotics & Automation Labs

At the heart of engineering excellence is the ability to build, test, and innovate — and that’s exactly what students at Symbiosis University of Applied Sciences, Indore (SUAS) experience every day. As a modern private university in Indore, SUAS blends academic knowledge with practical expertise, especially in its B.Tech in Automation & Robotics program. But what truly sets SUAS apart is its world-class laboratory infrastructure, designed to mirror the most advanced industry settings.
Real-World Learning Begins in the Lab
While many universities emphasize theory, Indore Symbiosis focuses on real-world application. Students spend a significant portion of their time in specialized labs, engaging with the same equipment, tools, and technologies used by industry professionals. SUAS follows a 70:30 model — 70% practical learning and 30% theoretical instruction — making it one of the top universities in Indore for hands-on engineering education.
Key Laboratories at SUAS
🔧 Automation Lab
This lab gives students access to industrial automation components like programmable logic controllers (PLCs), human-machine interfaces (HMIs), sensors, and actuators. Here, students simulate and implement automated systems just as they would in automotive, manufacturing, or packaging industries.
🤖 Robotics Lab
Equipped with robotic arms, Arduino kits, and programmable systems, this lab allows students to build and test robots from scratch. They learn everything from robotic movement and path planning to vision-guided robotics and AI integration.
⚙️ Microprocessors & Embedded Systems Lab
Students get hands-on with microcontrollers like 8051, PIC, and ARM boards, learning how to build embedded systems — the backbone of smart robots and automation devices. The lab supports courses in embedded C, IoT systems, and device-level programming.
🛠️ Lucas-Nülle Lab Setup
Through international collaboration, SUAS integrates Lucas-Nülle’s Germany-based training systems, known for bridging academic learning with practical engineering. These systems simulate real industrial environments and enhance technical training to a global standard.
Innovation Starts Here
Labs at SUAS are not just for coursework. Students regularly use them for capstone projects, hackathons, and startup prototypes — from 3D-printed robotic parts to drones and home automation systems. Supported by SUAS’s incubation center and mentorship programs, students can transform classroom ideas into real innovations.
Why It Matters
In a field like automation and robotics, real lab exposure gives students a serious edge. They not only understand theoretical models but can also wire, program, and troubleshoot physical systems — a skillset highly prized by employers in India and abroad.
Conclusion
For aspiring engineers seeking the perfect blend of academic learning and hands-on experience, Symbiosis University of Applied Sciences, Indore delivers through its specialized labs and industry-driven curriculum. It’s no wonder SUAS is widely regarded as one of the best universities in Indore for engineering in the automation era.
0 notes
Video
youtube
A GPRS-Based Automatic Vehicular Accident Detection and Rescue Alert System using IoT is a smart system that detects road accidents in real-time and sends alerts to emergency services and/or predefined contacts using mobile data (via GPRS). Here's a breakdown of the project concept and how you can implement it This system uses sensors to detect accidents, a microcontroller to process the data, and a GPRS module to send alerts over the internet. GPS provides location data. When an accident is detected (e.g., sudden impact or rollover), the system sends a rescue alert with vehicle location.***********************************************************If You Want To Purchase the Full Working Project KITMail Us: [email protected] Name Along With You-Tube Video LinkWe are Located at Telangana, Hyderabad, Boduppal. Project Changes also Made according to Student Requirementshttp://svsembedded.com/ https://www.svskits.in/ http://svsembedded.in/ http://www.svskit.com/M1: 91 9491535690 M2: 91 7842358459 We Will Send Working Model Project KIT through DTDC / DHL / Blue Dart We Will Provide Project Soft Data through Google Drive1. Project Abstract / Synopsis 2. Project Related Datasheets of Each Component3. Project Sample Report / Documentation4. Project Kit Circuit / Schematic Diagram 5. Project Kit Working Software Code6. Project Related Software Compilers7. Project Related Sample PPT’s8. Project Kit Photos9. Project Kit Working Video linksLatest Projects with Year Wise YouTube video Links152 Projects https://svsembedded.com/ieee_2024.php133 Projects https://svsembedded.com/ieee_2023.php157 Projects https://svsembedded.com/ieee_2022.php135 Projects https://svsembedded.com/ieee_2021.php 151 Projects https://svsembedded.com/ieee_2020.php103 Projects https://svsembedded.com/ieee_2019.php61 Projects https://svsembedded.com/ieee_2018.php171 Projects https://svsembedded.com/ieee_2017.php170 Projects https://svsembedded.com/ieee_2016.php67 Projects https://svsembedded.com/ieee_2015.php55 Projects https://svsembedded.com/ieee_2014.php43 Projects https://svsembedded.com/ieee_2013.php1600 Projects https://www.svskit.com/2025/01/1500-f...***********************************************************1. accident alert and vehicle tracking system project report,2. accident alert system ppt,3. accident avoiding system with crash detection and gps notification,4. accident detection and alert system using 8051,5. accident detection and alert system using Arduino,6. accident detection and alert system using arduino code,7. accident detection and alert system using arduino ppt,8. accident detection and prevention system,9. accident detection system project report,10. accident detection system using android application,11. accident detection system using mobile phones Wikipedia,12. accident detection using gps and gsm arduino pdf,13. accident detection using gps and gsm arduino ppt,14. accident detection using gps and gsm project report pdf,15. accident detection using mobile phones ppt,16. accident gps, gsm arduino project,17. accident prevention system for future vehicle,18. accident response system,19. advantages of accident detection and alert system,20. an iot based smart system for accident prevention and detection,21. application of accident detection system,22. arches related to wireless accident intimation system,23. Arduino based vehicle accident alert system using gps, gsm and vibration sensor,24. automatic accident detection system,25. automatic accident detection using iot,26. automatic accident report system,27. automatic vehicle accident detection and messaging system using gsm and gps modem,28. automatic vehicle accident detection and messaging system using gsm and gps modem ieee papers,29. car accident detection and reporting system,30. crash detection using accelerometer,31. intelligent accident detection and alert system for emergency medical assistance,32. iot based accident detection system,33. iot based accident prevention and tracking system,34. iot based accident prevention and tracking system,35. iot based accident prevention system,36. iot based automatic vehicle accident detection and rescue system,37. iot based vehicle tracking and accident detection system,38. iot based vehicle tracking and accident detection system pdf,39. iot based vehicle tracking system pdf,40. literature survey on accident detection,41. real time vehicle accident detection and tracking using gps and gsm,42. research paper on accident detection system43. road accident prevention using iot,44. sensor based accident prevention system,45. smart accident detection system,
0 notes
Text
Electrical Engineer Resume Examples That Get Hired
When it comes to landing a top-tier engineering job, your resume isn’t just a formality—it’s your first impression. In the competitive field of electrical engineering, hiring managers often sift through hundreds of applications. So how do you ensure yours stands out? Simple: by crafting a resume that showcases your technical expertise, problem-solving capabilities, and achievements in a concise, compelling format. This article will walk you through engineering resume examples that get noticed—and get hired.
Who This Guide Is For
This guide is designed for aspiring and experienced electrical engineers of all ages seeking to break into or grow within the engineering industry. Whether you're a recent graduate, a mid-level engineer making a career move, or a seasoned pro exploring leadership roles, this article is packed with value.
Ideal for:
Job seekers in the engineering industry
College graduates with degrees in Electrical Engineering
Professionals aiming to transition into higher-paying technical roles
Engineers looking for resume inspiration or formatting guidance
Why an Impressive Electrical Engineer Resume Matters
According to the U.S. Bureau of Labor Statistics, electrical engineering jobs are projected to grow by 5% from 2022 to 2032, which is about as fast as average. But that still means competition is stiff. A strategically written resume increases your chances of getting noticed by recruiters, HR software (ATS systems), and hiring managers.
Your resume should not only highlight your technical proficiency, but also emphasize:
Project achievements
Problem-solving experiences
Leadership qualities
Certifications and tools
Key Elements of a High-Converting Electrical Engineer Resume
To create a resume that checks all the boxes, follow this winning structure:
1. Professional Summary (Make a Powerful First Impression)
Your summary should be concise—3–4 sentences—and tailored to the job description. Mention your years of experience, core competencies, and a major achievement.
Example:
Results-driven Electrical Engineer with 6+ years of experience in designing, testing, and deploying electronic systems for automotive and aerospace applications. Skilled in CAD, MATLAB, and PLC programming. Successfully led a cost-reduction project that saved $500K annually.
2. Technical Skills (Show What You Know)
List tools, platforms, and programming languages you’re proficient in.
Popular skills to include:
AutoCAD
MATLAB
Simulink
PLC Programming
Circuit Design
Embedded Systems
Project Management Software
🔍 Tip: Tailor your skills to the job posting—many companies use ATS to filter resumes based on keywords.
3. Work Experience (Focus on Impact, Not Just Duties)
Use bullet points to highlight your contributions. Start with action verbs and quantify results wherever possible.
Example:
Designed and implemented PCB layouts for automotive sensors, reducing signal noise by 35%
Collaborated with cross-functional teams to complete a $2M project 2 months ahead of schedule
Conducted root cause analysis on faulty circuits, improving product reliability by 20%
4. Education (Credentials Still Count)
Mention your degrees, institutions, and graduation dates. Include GPA only if it's strong (3.5+).
Example: Bachelor of Science in Electrical Engineering Georgia Institute of Technology, 2021 GPA: 3.8/4.0
5. Certifications & Additional Training
These show your commitment to staying current in the field.
Certified Systems Engineering Professional (CSEP)
OSHA Electrical Safety Certification
IoT and Smart Grid Systems (Coursera)
Top Engineering Resume Examples That Work
Here are three high-performing engineering resume examples for different career stages:
1. Entry-Level Electrical Engineer Resume
Best for: Recent graduates and interns
Highlight: Academic projects, internships, and software skills.
Key Achievement:
Developed an Arduino-based smart lighting system as a capstone project, which reduced power usage by 40%.
2. Mid-Level Electrical Engineer Resume
Best for: Professionals with 3–7 years of experience
Highlight: Industry-specific tools and project leadership
Key Achievement:
Redesigned PCB architecture for a telecom product, increasing efficiency by 18% and reducing costs by $150K.
3. Senior Electrical Engineer / Engineering Manager Resume
Best for: Engineers with 10+ years and leadership experience
Highlight: Strategic thinking, budget management, team oversight
Key Achievement:
Led a team of 12 engineers on a multi-year defense project, managing a $5M budget and delivering on time and under cost.
Formatting Tips to Ensure Readability and Impact
Keep it to one page (two pages max for senior roles)
Use a clean, professional font like Calibri or Arial
Stick to chronological format
Bold job titles and use italics for companies
Save as PDF to preserve layout
Common Mistakes to Avoid
🚫 Using generic templates without customization 🚫 Listing job duties instead of accomplishments 🚫 Overstuffing with technical jargon 🚫 Skipping keywords relevant to the job description 🚫 Ignoring ATS optimization
Final Thoughts: Build a Resume That Opens Doors
In a fast-evolving tech world, your resume needs to reflect more than just your qualifications—it needs to tell a compelling story of value. By using the engineering resume examples outlined above, you can transform your job search and present yourself as the confident, capable engineer that employers are actively looking for.
✅ Ready to Build a Resume That Gets You Hired?
Visit our website today for more industry-approved templates, resume tips, and personalized guidance. Don’t just apply—stand out.
0 notes
Text
FAVORIOT Project: Step-by-Step Approach for Smart Robotic Arm for Pick & Place Using IoT & AI
1. Introduction The Smart Robotic Arm will be designed to pick, place, and sort objects automatically using servo motors, IR sensors, and Raspberry Pi. Optional AI vision can be implemented for object recognition-based sorting. 2. Recommended Hardware Components 2.1. Controllers & Processors Raspberry Pi 4/5 (Main controller for AI & IoT connectivity) Arduino Mega 2560 (For real-time motor…
0 notes
Text
raspberry pi pc
Yes, a Raspberry Pi would indeed work much better than an Arduino for implementing a system where two "computers" are communicating and learning from each other. The Raspberry Pi is a full-fledged single-board computer (SBC), which means it has far greater processing power, memory, and capabilities compared to an Arduino. This makes it much more suitable for complex tasks like data processing, machine learning, and communication between two devices.
Key Differences Between Arduino and Raspberry Pi for This Task:
1. Processing Power:
Arduino: Limited to simple microcontroller tasks (e.g., simple sensors, I/O operations, small control tasks). It has very little computational power and memory (e.g., 2 KB of RAM, 32 KB of flash memory).
Raspberry Pi: Has a powerful CPU, much more memory (e.g., 4 GB or 8 GB of RAM on newer models), and can run a full Linux-based operating system (e.g., Raspberry Pi OS). This makes it suitable for tasks like running machine learning models, more complex algorithms, and networking tasks.
2. Communication:
Arduino: Can communicate using simple protocols like Serial, I2C, or SPI, which are ideal for small-scale, low-speed communication between devices.
Raspberry Pi: Has multiple communication options including Ethernet, Wi-Fi, and Bluetooth, along with more advanced serial protocols. It can communicate over a local network or even the internet, making it ideal for real-time communication between two "computers."
3. Storage and Software:
Arduino: Does not have a storage system other than its limited onboard memory (though you can use SD cards for small amounts of storage). The code running on an Arduino is typically bare-metal (no operating system), and it can only run a single program at a time.
Raspberry Pi: Has access to a large amount of storage (via microSD card or external storage), and runs a full operating system, allowing you to install software libraries, run multiple processes simultaneously, and use advanced tools and frameworks for communication and learning (e.g., TensorFlow, OpenCV, etc.).
4. Machine Learning and Data Processing:
Arduino: You can implement simple algorithms (like decision trees or basic pattern recognition), but it’s not suited for real-time machine learning or complex data analysis.
Raspberry Pi: Can run machine learning models, handle large datasets, and run frameworks like TensorFlow, PyTorch, scikit-learn, etc. This makes it much more capable of "learning" from data, making decisions, and adapting based on feedback.
5. How a Raspberry Pi PC System Could Work Better
Given that Raspberry Pi is a full-fledged computer, you can implement the original idea of two computers communicating and learning from each other in a much more robust way. Here’s how you can achieve that:
Hardware Setup for Raspberry Pi PCs:
Two Raspberry Pi boards (e.g., Raspberry Pi 4, Raspberry Pi 3, or even Raspberry Pi Zero for smaller setups).
Display, keyboard, and mouse for local interaction, or run everything remotely via SSH (headless).
Networking: Use Wi-Fi or Ethernet to connect the two Raspberry Pi boards and enable communication.
Optional: Camera, microphone, sensors, or other input/output devices for more advanced interaction and learning tasks.
Communication Between Raspberry Pi PCs:
You can use several methods for communication between the two Raspberry Pi boards:
TCP/IP Communication: Set up a client-server model, where one Raspberry Pi acts as the server and the other as the client. They can communicate over a local network using sockets.
MQTT: A lightweight messaging protocol suitable for device-to-device communication, commonly used in IoT.
HTTP/REST APIs: You can use a web framework (e.g., Flask, FastAPI) to create APIs on each Raspberry Pi, allowing them to communicate via HTTP requests and responses.
WebSocket: For real-time bidirectional communication, you can use WebSockets.
Software/Frameworks for Machine Learning:
You can install frameworks like TensorFlow, Keras, or scikit-learn on the Raspberry Pi to allow for more advanced learning tasks.
Use Python as the programming language to communicate between the two Pi boards and implement machine learning algorithms.
Raspberry Pi can interact with real-world data (e.g., sensors, cameras, etc.) and learn from it by running algorithms like reinforcement learning, supervised learning, or unsupervised learning.
6. Example Use Case: Two Raspberry Pi PCs Learning from Each Other
Here’s an example scenario where two Raspberry Pi boards communicate and learn from each other using TCP/IP communication and basic machine learning (e.g., reinforcement learning).
Raspberry Pi 1 (PC1): This board makes a decision based on its current state (e.g., it guesses a number or makes a recommendation).
Raspberry Pi 2 (PC2): This board evaluates the decision made by PC1 and sends feedback. PC2 might "reward" or "punish" PC1 based on whether the decision was correct (e.g., in a game or optimization problem).
Feedback Loop: PC1 uses the feedback from PC2 to adjust its behavior and improve its future decisions.
Example Architecture:
PC1 (Raspberry Pi 1):
Makes a guess (e.g., guesses a number or makes a recommendation).
Sends the guess to PC2 via TCP/IP.
Receives feedback from PC2 about the quality of the guess.
Updates its model/behavior based on the feedback.
PC2 (Raspberry Pi 2):
Receives the guess or recommendation from PC1.
Evaluates the guess (e.g., checks if it’s close to the correct answer).
Sends feedback to PC1 (e.g., positive or negative reinforcement).
Basic Python Code for TCP Communication:
On both Raspberry Pis, you can use Python’s socket library to establish a client-server communication:
PC1 (Server) Code:
import socket import random # Create a TCP/IP socket server_socket = socket.socket(socket.AF_INET, socket.SOCK_STREAM) server_socket.bind(('0.0.0.0', 65432)) # Bind to any address, port 65432 server_socket.listen(1) print("PC1: Waiting for connection...") connection, client_address = server_socket.accept() print("PC1: Connected to PC2") while True: # Simulate a decision (e.g., guessing a number) guess = random.randint(1, 100) print(f"PC1: Guessing number {guess}") # Send the guess to PC2 connection.sendall(str(guess).encode()) # Wait for feedback from PC2 feedback = connection.recv(1024).decode() print(f"PC1: Received feedback: {feedback}") # Adjust behavior based on feedback (simple learning mechanism) if feedback == "correct": print("PC1: Correct guess!") else: print("PC1: Incorrect guess, trying again.") # Wait before making another guess time.sleep(2)
PC2 (Client) Code:
import socket # Create a TCP/IP socket client_socket = socket.socket(socket.AF_INET, socket.SOCK_STREAM) client_socket.connect(('PC1_IP_ADDRESS', 65432)) # Connect to PC1 while True: # Receive the guess from PC1 guess = int(client_socket.recv(1024).decode()) print(f"PC2: Received guess {guess}") # Evaluate the guess (simple decision: correct if guess is 50) if guess == 50: feedback = "correct" else: feedback = "incorrect" # Send feedback to PC1 client_socket.sendall(feedback.encode()) print(f"PC2: Sent feedback: {feedback}")
7. Expanding This System
Advanced Communication: If you're looking for real-time interaction, you can explore using WebSockets or MQTT for more efficient, bidirectional communication.
Machine Learning: You can train models on both Raspberry Pi devices, where one device sends data to the other for training, and they both improve over time.
Distributed Systems: With two Raspberry Pis, you can build a distributed system where each Pi runs part of the computation, and they collaborate to solve more complex tasks.
Conclusion:
Raspberry Pi is definitely a better choice for the task of two computers communicating and learning from each other, as it offers the computational power, memory, and flexibility needed for machine learning, real-time communication, and more advanced systems. The Arduino is more suitable for simple tasks and small embedded systems, whereas the Raspberry Pi can handle much more complex processing, communication, and learning systems.
If you want to build a more advanced learning system, I would recommend using Raspberry Pi boards. Would you like to dive deeper into a specific part of the setup or need help with more advanced machine learning on Raspberry Pi?
Creating a Raspberry Pi-based PC involves setting up a Raspberry Pi board to function as a full desktop computer, capable of running an operating system, connecting to the internet, and supporting peripherals like a keyboard, mouse, and display. Unlike an Arduino, which is used for embedded systems, a Raspberry Pi is a full-fledged computer, making it much easier to set up as a personal computer.
Here’s a step-by-step guide on how to turn a Raspberry Pi into a fully functional PC.
What You Need:
Raspberry Pi Board (e.g., Raspberry Pi 4, Raspberry Pi 3, or Raspberry Pi Zero)
MicroSD Card (at least 8 GB, recommended 16 GB or more) for the operating system
Power Supply (5V 3A USB-C for Raspberry Pi 4, or appropriate power for other models)
HDMI Cable and a Display (HDMI-compatible monitor or TV)
Keyboard and Mouse (USB or Bluetooth, depending on your preference)
Internet connection (Ethernet cable or Wi-Fi)
USB storage (optional, for additional storage)
MicroSD card reader (for flashing the operating system)
Step-by-Step Guide:
1. Prepare the MicroSD Card with Raspberry Pi OS
First, you'll need to install the operating system on your MicroSD card. The most common and recommended OS for Raspberry Pi is Raspberry Pi OS (formerly Raspbian).
Download Raspberry Pi Imager: Visit Raspberry Pi’s official website and download the Raspberry Pi Imager for your computer (Windows, macOS, or Linux).
Install Raspberry Pi OS:
Open the Raspberry Pi Imager, select "Choose OS", and select Raspberry Pi OS (32-bit) (recommended for most users).
Select your MicroSD card as the target.
Click Write to flash the OS onto the SD card.
Enable SSH or Wi-Fi (Optional): If you plan to use the Raspberry Pi headlessly (without a monitor, keyboard, or mouse), you can enable SSH or configure Wi-Fi before inserting the SD card into the Pi:
After flashing, insert the SD card into your computer.
Open the boot partition and create an empty file named "ssh" (no extension) to enable SSH.
For Wi-Fi, create a file called wpa_supplicant.conf with your Wi-Fi credentials: country=US ctrl_interface=DIR=/var/run/wpa_supplicant GROUP=netdev update_config=1 network={ ssid="Your_SSID" psk="Your_Password" }
2. Set Up the Raspberry Pi
Insert the SD card into the Raspberry Pi.
Connect your HDMI cable from the Raspberry Pi to the monitor.
Plug in your keyboard and mouse via the USB ports.
Connect the power supply to the Raspberry Pi.
3. First Boot and Raspberry Pi OS Setup
When you power on the Raspberry Pi, it should boot into Raspberry Pi OS.
Follow the on-screen instructions to:
Set up your language, timezone, and keyboard layout.
Set up your Wi-Fi connection (if not already done).
Update the system by running sudo apt update and sudo apt upgrade in the terminal.
4. Install Additional Software
Once your Raspberry Pi is running, you can install additional software based on your needs. For example:
Web Browsing: The default browser is Chromium, but you can install others like Firefox.
Office Suite: Install LibreOffice for document editing, spreadsheets, and presentations.
Command: sudo apt install libreoffice
Development Tools: If you want to use the Pi for programming, you can install IDEs like Thonny (for Python) or Visual Studio Code.
Command: sudo apt install code
Media Software: You can use VLC for media playback or Kodi for a home theater system.
5. Optimize Your Setup
To make your Raspberry Pi run smoothly and feel more like a desktop PC:
Increase Memory Allocation: If you're using a Raspberry Pi 4, you can allocate more memory to the GPU via sudo raspi-config.
Enable Auto-Login: To skip the login screen on boot, you can configure auto-login:
Run sudo raspi-config.
Select Boot Options → Desktop/CLI → Desktop Autologin.
Configure Performance Settings: You can tweak performance settings like CPU overclocking or enabling hardware acceleration for graphics in the Raspberry Pi configuration tool (raspi-config).
6. Optional: Adding a Large Storage Device
If the 8 GB or 16 GB of storage on the SD card isn’t enough, you can plug in a USB hard drive or USB flash drive to expand your storage. You can also configure the Raspberry Pi to boot from a USB drive (for faster performance compared to an SD card).
7. Set Up Remote Access (Optional)
If you prefer to control the Raspberry Pi from another computer:
SSH: You can access the Raspberry Pi's terminal remotely via SSH (if enabled during setup). To connect, use a tool like PuTTY (Windows) or the terminal (Linux/macOS):
Command: ssh pi@<raspberrypi-ip-address>
VNC: You can use VNC for remote desktop access.
Enable VNC using sudo raspi-config.
Download and install RealVNC on your computer to access the Raspberry Pi’s graphical desktop remotely.
8. Using Your Raspberry Pi as a Full PC
Once you’ve completed the setup, your Raspberry Pi will be ready to use like a regular desktop computer. You can:
Surf the web, check emails, and use social media with browsers like Chromium or Firefox.
Write documents, create spreadsheets, and presentations using LibreOffice.
Code in multiple languages (Python, Java, C++, etc.).
Play media files with VLC or stream content using Kodi.
9. Advanced Uses: Building a Raspberry Pi "Server"
If you want your Raspberry Pi to act as a server or take on additional tasks, you can configure it for various roles:
Home Automation: Set up a Home Assistant or OpenHAB server for smart home automation.
Web Server: You can install Apache or Nginx and run a web server.
Command: sudo apt install apache2
Cloud Server: Set up Nextcloud or ownCloud to create your own cloud storage.
Conclusion
Creating a Raspberry Pi PC is a great way to repurpose the Raspberry Pi as a low-cost, energy-efficient desktop computer. Whether you're using it for everyday tasks like browsing, programming, or media consumption, or even more advanced tasks like running servers or learning about Linux, the Raspberry Pi is incredibly versatile.
If you need help with specific configurations, software installation, or troubleshooting, feel free to ask!
0 notes
Text
Best Arduino Projects for Engineering Students – Takeoff Projects
Arduino is a popular microcontroller that helps students create innovative electronic projects. It is easy to use and perfect for beginners and advanced learners. Engineering students can develop various projects using Arduino, such as home automation, robotics, IoT applications, and sensor-based systems.

At Takeoff Projects, we offer a wide range of Arduino projects for students to learn and implement in real-time applications. These projects help students improve their technical skills and understand how hardware and software work together.
One of the best Arduino projects is home automation, where students can control lights, fans, and appliances using a smartphone or voice commands. Another interesting project is automatic street lights, which turn on and off based on the surrounding light conditions. These projects help students learn about automation and energy efficiency.
IoT-based Arduino projects are also very popular among engineering students. For example, a smart irrigation system uses Arduino to control water supply based on soil moisture levels. This project helps in water conservation and is useful for agriculture. Health monitoring systems are another great project idea, where students can build devices to measure heart rate, temperature, and oxygen levels.
#Arduinoprojects#engineeringstudents#Arduinominiprojects#TakeoffProjects#electronicsprojects#IoT projects#Arduino-based projects#simple Arduino projects#final year projects
0 notes
Text
Latest Trends and Innovations in Embedded Systems
Embedded systems continue to revolutionize the way we interact with technology. From consumer electronics to industrial applications, the latest advancements in embedded systems are driving efficiency, connectivity, and performance like never before. In this blog, we delve into the latest trends and news shaping the embedded systems landscape in 2025.

1. The Rise of AI at the Edge
One of the most significant trends in embedded systems is the integration of artificial intelligence (AI) at the edge. Edge AI allows devices to process data locally, reducing latency and improving efficiency. This technology is particularly impactful in applications such as autonomous vehicles, smart manufacturing, and healthcare.
Recent developments include:
Enhanced processing power in microcontrollers (MCUs) and system-on-modules (SoMs) to support AI workloads.
Tools like TensorFlow Lite and PyTorch for optimized AI model deployment on edge devices.
Use cases such as predictive maintenance, real-time object detection, and voice recognition.
2. Matter Standard in IoT
The Matter standard is shaping the future of IoT by enabling seamless interoperability between smart devices. Embedded engineers are leveraging this standard to create smarter, more user-friendly products.
Key highlights:
Major players like Apple, Google, and Amazon adopting the Matter standard.
Increased focus on security and scalability for smart home and industrial IoT (IIoT).
Development of Matter-compliant devices to ensure compatibility across platforms.
3. Open-Source Hardware Gaining Momentum
Open-source hardware is enabling engineers and hobbyists to accelerate development cycles while reducing costs. Platforms like Raspberry Pi, Arduino, and BeagleBone remain popular, but new entrants are offering specialized solutions for complex embedded applications.
Noteworthy updates include:
Growth in community-driven projects for niche applications.
Availability of development kits with pre-configured software and hardware.
Increased adoption in education and prototyping.
4. Low-Power Design for Sustainability
Sustainability is becoming a cornerstone of embedded system design. Low-power solutions are critical for battery-operated devices, wearables, and IoT sensors, ensuring prolonged operational life and reduced energy consumption.
Recent breakthroughs:
Advanced low-power MCUs like the ARM Cortex-M series.
Innovative energy harvesting techniques for self-sustaining devices.
Design strategies focusing on dynamic voltage scaling and efficient power management.
5. Advances in Real-Time Operating Systems (RTOS)
Real-Time Operating Systems (RTOS) are crucial for time-sensitive applications, such as robotics, aerospace, and medical devices. Recent updates in RTOS focus on improved security, scalability, and ease of integration.
Notable advancements:
Enhanced support for multi-core processors.
Lightweight RTOS options for constrained devices.
Growing popularity of platforms like FreeRTOS and Zephyr.
6. Embedded Security Takes Center Stage
With the proliferation of connected devices, embedded security is more critical than ever. The latest security measures are aimed at protecting data and ensuring device integrity.
Recent updates:
Adoption of hardware security modules (HSMs) for cryptographic operations.
Implementation of secure boot and trusted execution environments (TEEs).
Compliance with standards like IEC 62443 for industrial security.
Conclusion
The embedded systems industry is evolving rapidly, with innovations driving smarter, more efficient, and secure solutions. Staying updated on these trends is vital for engineers, developers, and businesses aiming to remain competitive in this dynamic field. From Edge AI to sustainable designs, the future of embedded systems holds immense potential to transform industries and improve everyday life.
Stay ahead with our insights on embedded technology trends. Contact us today to explore how we can help bring your embedded vision to life!
0 notes
Text
How to Learn Embedded Systems: A Comprehensive Guide
Embedded systems are integral to countless applications, from consumer electronics to industrial automation. Understanding how to learn embedded systems can open up a world of opportunities in various fields, including robotics, automotive, healthcare, and IoT. Here’s a structured approach to mastering embedded systems.

1. Understanding the Basics
Start with the fundamentals of embedded systems. Familiarize yourself with key concepts such as:
What are Embedded Systems?
Embedded systems are specialized computing systems that perform dedicated functions within larger mechanical or electrical systems. Unlike general-purpose computers, they are designed to execute specific tasks with high reliability.
Components of Embedded Systems:
Microcontrollers and Microprocessors: Understand the difference between the two. Microcontrollers are compact integrated circuits designed to govern a specific operation in an embedded system, while microprocessors are the central unit of a computer that performs calculations and logic operations.
Memory: Learn about different types of memory (RAM, ROM, Flash) used in embedded systems.
Input/Output Devices: Familiarize yourself with sensors, actuators, and communication interfaces (UART, SPI, I2C).
2. Choose Your Learning Resources
Select resources that match your learning style. Here are some options:
Books:
"Embedded Systems: Introduction to the MSP432 Microcontroller" by Jonathan Valvano
"Programming Embedded Systems in C and C++" by Michael Barr
Online Courses:
Platforms like Coursera, Udemy, and edX offer courses in embedded systems. Look for those that cover microcontrollers, programming, and interfacing.
YouTube Channels:
Channels like "The DIY Life" and "NPTEL" provide practical insights and tutorials on embedded systems.
3. Get Hands-On Experience
Theory is essential, but hands-on practice is crucial for mastering embedded systems. Consider the following:
Development Boards:
Start with popular development boards like Arduino, Raspberry Pi, or ESP32. These platforms are beginner-friendly and have extensive community support.
Build Projects:
Create simple projects like LED blinkers, temperature sensors, or motor controls. Gradually move to more complex projects like home automation systems or robotic applications.
Use Simulation Tools:
Familiarize yourself with simulation tools like Proteus or MATLAB/Simulink for testing your designs virtually.
4. Learn Programming Languages
Embedded systems often require programming skills. Focus on:
C/C++ Programming:
C is the most commonly used language for embedded systems due to its efficiency and control over hardware. Learn the syntax, data structures, and memory management.
Assembly Language:
Understanding assembly language can provide deeper insights into how microcontrollers operate.
5. Explore Real-Time Operating Systems (RTOS)
Many embedded systems require multitasking and real-time performance. Learning about RTOS concepts can be beneficial:
Understand the Basics:
Familiarize yourself with the concepts of task scheduling, inter-task communication, and resource management.
Hands-On with RTOS:
Try using an RTOS like FreeRTOS or Zephyr on your development board. Implement multitasking projects to get practical experience.
6. Join Online Communities
Engaging with fellow learners and professionals can enhance your learning experience:
Forums and Discussion Groups:
Platforms like Stack Overflow, Reddit, and specialized forums (e.g., Embedded Related) are great for seeking help and sharing knowledge.
Attend Workshops and Webinars:
Participate in online workshops or local meetups to learn from experts and network with peers.
7. Stay Updated with Industry Trends
The field of embedded systems is constantly evolving. Keep yourself updated with the latest trends and technologies:
Follow Industry News:
Subscribe to blogs, newsletters, and magazines related to embedded systems.
Participate in Hackathons:
Engage in hackathons or coding competitions focused on embedded systems to test your skills and learn from others.
Conclusion
Learning embedded systems requires a mix of theoretical knowledge and practical experience. By following this structured approach—starting from the basics, choosing the right resources, getting hands-on experience, and staying engaged with the community—you can build a strong foundation in embedded systems. Whether you aim to work in robotics, IoT, or automation, mastering embedded systems can significantly enhance your career prospects. Start your journey today, and embrace the exciting world of embedded systems!
0 notes
Text
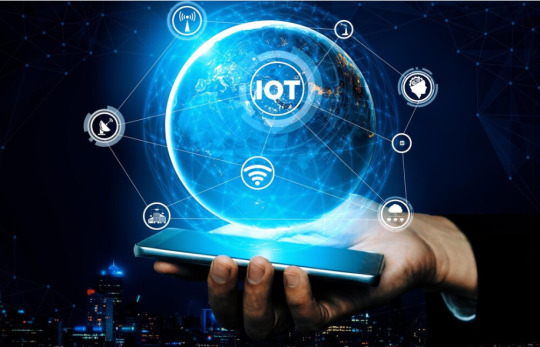
Why Choose IoT Architecture Courses for Embedded Systems?

When we consider the rapid advancements in technology, it’s clear that IoT architecture courses for embedded systems present a compelling opportunity for us all. These courses not only enhance our understanding of crucial components like gateways and cloud services but also sharpen our problem-solving skills through practical applications. By engaging in such programs, we position ourselves at the forefront of a sector that’s increasingly focused on automation and data-driven solutions. But what specific career advantages can we expect, and how do these skills translate into real-world applications?
Benefits of IoT Architecture Courses

Gaining expertise in IoT architecture courses offers us a multitude of benefits that are crucial in today’s tech-driven world. These courses equip us with essential skills needed to navigate the complexities of embedded systems and IoT integration. By understanding key components like internet gateways, edge IoT, and cloud services, we enhance our ability to design effective solutions tailored to diverse applications.
As we dive into the layers of IoT architecture, we learn to leverage the perception, network, and application layers, ensuring that our systems gather, process, and deliver data efficiently. This knowledge empowers us to create intelligent, connection-aware frameworks that enhance interaction among various IoT components.
Moreover, these courses prepare us to meet the demands of a rapidly evolving industry, enabling us to drive technological advancements. We gain insights into data integration, which combats fragmentation and promotes synergy between devices.
With a strong foundation in IoT architecture, we position ourselves as valuable assets in any organization, capable of facilitating automation and informed decision-making. Overall, pursuing IoT architecture courses opens doors to new opportunities and equips us with the tools to succeed in a connected world.
Enhancing Problem-Solving Skills

Enhancing our problem-solving skills is a crucial aspect of participating in IoT architecture courses, as these programs challenge us to tackle complex scenarios through innovative thinking. By engaging with hands-on projects that simulate real-world situations, we develop the ability to analyze problems, brainstorm solutions, and implement effective strategies.
The curriculum emphasizes microcontroller programming and sensor integration, pushing us to think critically and creatively about how to design and optimize embedded systems. Our learning experiences are directly tied to industry-relevant skills, ensuring we’re equipped to address the technological challenges we’ll encounter in our careers.
Additionally, the hybrid learning model allows us to balance theoretical knowledge with practical application, reinforcing our problem-solving abilities. Working with tools like Arduino and Raspberry Pi, we gain firsthand experience in troubleshooting and refining our designs.
Ultimately, these courses cultivate a mindset of innovation and resilience, preparing us to approach problems with confidence. As we enhance our skills, we not only position ourselves for personal growth but also contribute to the development of impactful IoT solutions that can transform industries and improve lives.
Real-World Applications of IoT
As we refine our problem-solving skills in IoT architecture courses, we also discover the vast range of real-world applications that IoT technology offers. One of the most impactful areas is healthcare, where wearable devices allow for remote monitoring of patients, leading to personalized treatment plans and reduced hospital stays.
In our homes, IoT enhances convenience and security, enabling us to control lighting, climate, and security systems remotely while optimizing energy use.
Industrial applications also thrive on IoT, as data analysis and sensors increase operational efficiency and minimize downtime. Smart cities benefit from IoT solutions, improving traffic management and waste disposal while promoting sustainable living.
In agriculture, IoT facilitates precise monitoring of crops and livestock, leading to better resource management. Transportation and logistics see significant advancements through IoT, with real-time data improving route planning and vehicle diagnostics.
Each of these applications not only enhances our daily lives but also underscores the critical role of IoT in shaping modern society. As we dive deeper into these applications, we’re better equipped to innovate and drive meaningful change in various sectors.
Career Opportunities in IoT

The world of IoT is brimming with career opportunities that promise not just competitive salaries but also a chance to shape the future of technology. Many roles in this dynamic field typically offer salaries exceeding annually, making it an attractive option for those looking to advance their careers.
Key positions include IoT Security Engineers, who focus on safeguarding systems against breaches, and Embedded Engineers, responsible for developing software for devices like sensors and microprocessors.
We can also aim for roles such as Platform Developers, Architects, and even Chief IoT Officers (CIoTO), who oversee interdepartmental collaboration and market strategies.
As industries increasingly adopt IoT solutions, the demand for skilled professionals continues to grow. Pursuing certifications in IoT-related fields and staying updated with industry trends can significantly enhance our employability.
Networking within the IoT community can lead to job opportunities and collaborative projects, further expanding our career prospects.
With continuous learning and skill development, we can position ourselves for fulfilling careers in this rapidly evolving landscape. The potential to impact technology is immense, and dedicated professionals can thrive in both multinational corporations and innovative startups.
Future Trends in Embedded Systems
With the growing demand for skilled professionals in IoT, we can’t overlook the exciting future trends shaping embedded systems. The market for embedded systems is projected to surpass $173 billion by 2032, fueled by IoT and IIoT technologies. As we integrate more smart tech into our lives, the complexity of managing these systems will increase, requiring us to adapt continuously.
Here’s a quick look at some key trends:
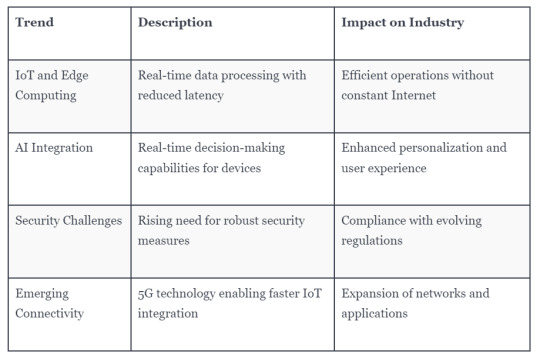
These trends highlight the importance of staying informed and skilled in embedded systems. By choosing IoT architecture courses, we position ourselves to lead in this dynamic landscape, driving innovation and efficiency in our connected world.
Frequently Asked Questions
Why Are You Interested in Embedded Systems and Iot?
We’re fascinated by embedded systems and IoT because they merge innovation with practicality. Together, they empower us to create smarter solutions, enhancing efficiency and connectivity in everyday life, which drives our passion for this evolving field.
What Is the Role of Iot in Embedded Systems?
IoT’s role in embedded systems is pivotal; it enables devices to connect and communicate seamlessly. By integrating IoT, we enhance functionality, improve efficiency, and foster innovative solutions that drive technological advancements in our interconnected world.
Why Is Iot Architecture Important?
IoT architecture’s importance lies in its ability to enable seamless device communication, enhance scalability, and ensure security. By understanding it, we can develop efficient embedded systems that drive innovation across various industries and improve our connected world.
Why Is the Architecture of an Embedded System Important?
The architecture of an embedded system’s crucial for optimizing performance and ensuring efficient resource use. It impacts integration with IoT components, enabling reliable communication and real-time processing, which are vital in today’s connected applications.
Conclusion
In conclusion, choosing IoT architecture courses for embedded systems opens up a world of opportunities for us. Not only do we enhance our problem-solving skills and gain hands-on experience, but we also prepare ourselves for a thriving career in a rapidly evolving field. By staying ahead of future trends, we position ourselves as valuable assets in an increasingly data-driven world. Let’s embrace this journey and unlock our potential in the exciting realm of IoT!
Sign up for free courses here.
Visit Zekatix for more information.
#courses#artificial intelligence#academics#edtech company#embeded#online courses#robotics#embedded systems#nanotechnology#zekatix#IoT Architecture Courses#IOT#iotsolutions#iot applications#iot platform
0 notes
Text
Mastering IoT Design: Building Smart Systems with ESP8266/ESP12, Arduino, MQTT, and Google Home Integration

The Internet of Things (IoT) has transformed the way we interact with devices and has opened up a world of possibilities for automation and remote control. In this blog post, we will explore the benefits of enrolling in the ESP8266/ESP12 IoT Design course, which offers a comprehensive learning experience in designing and developing IoT systems from scratch. We will highlight the career path and opportunities that await individuals skilled in IoT technologies.
The ESP8266/ESP12 IoT Design course offers a practical, hands-on approach to learning. Students will gain valuable insights into designing the hardware components of IoT devices and developing firmware using the Arduino Integrated Development Environment (IDE). Through interactive exercises, they will learn how to build and program smart devices that can be controlled remotely.
This course covers all major components of an IoT system, providing students with a holistic understanding of the entire ecosystem. They will learn to install and configure a cloud server, set up an MQTT broker within the cloud server, and deploy a Django web server. These skills are crucial for building scalable and secure IoT solutions. Students will also gain knowledge in designing user interfaces and integrating voice assistants such as Google Home for enhanced control and convenience.
By completing this course, students will acquire the skills to develop practical IoT applications that can be utilized in various settings. They will learn how to control equipment or electrical loads, operate garage doors, and create keyless entry systems using their smartphones. These applications can enhance convenience, security, and efficiency in homes, offices, and other environments. With their newfound knowledge, students can design and implement custom IoT solutions tailored to specific needs.
Professionals skilled in IoT technologies are in high demand across industries. By enrolling in the ESP8266/ESP12 IoT Design course, individuals can enhance their career prospects and open doors to new opportunities. IoT specialists can work as IoT developers, firmware engineers, IoT solution architects, or IoT consultants. Additionally, the versatility of the skills acquired in this course allows for entrepreneurship and product development, as students can leverage their knowledge to create marketable IoT products.
The IoT industry is continuously evolving, with new technologies and advancements emerging rapidly. By mastering IoT design principles and developing hands-on experience through this course, students will be well-equipped to adapt to the ever-changing landscape. They will have a solid foundation to explore emerging IoT platforms, protocols, and applications, ensuring they remain at the forefront of this dynamic field. Enrolling in the ESP8266/ESP12 IoT Design course is a valuable investment for anyone interested in IoT technology. With a practical, hands-on learning approach, students will acquire the skills to design, develop, and deploy IoT systems from the ground up. The comprehensive curriculum covers all essential components, including hardware design, firmware development, cloud server configuration, and Google Home integration. By mastering these skills, individuals can embark on a rewarding career path in IoT development, consulting, or entrepreneurship. Take the first step towards becoming an IoT expert by enrolling in the ESP8266/ESP12 IoT Design course today!

1 note
·
View note
Video
youtube
A vehicle theft detection device based on IoT, GPS, GSM, and SMS can use an ESP32 camera module to send a picture of the thief to the owner's Telegram account:GPS: Tracks the vehicle's location in real time and sends it to the owner via SMS, email, or TelegramGSM: Sends an alert message to the owner's phone via SMS or email when the system detects possible theftESP32 camera: Captures the thief's picture and sends it to the owner's Telegram account ***********************************************************If You Want To Purchase the Full Working Project KITMail Us: [email protected] Name Along With You-Tube Video LinkWe are Located at Telangana, Hyderabad, Boduppal. Project Changes also Made according to Student Requirementshttp://svsembedded.com/ https://www.svskits.in/ http://svsembedded.in/ http://www.svskit.com/M1: 91 9491535690 M2: 91 7842358459 We Will Send Working Model Project KIT through DTDC / DHL / Blue Dart / First Flight Courier ServiceWe Will Provide Project Soft Data through Google Drive1. Project Abstract / Synopsis 2. Project Related Datasheets of Each Component3. Project Sample Report / Documentation4. Project Kit Circuit / Schematic Diagram 5. Project Kit Working Software Code6. Project Related Software Compilers7. Project Related Sample PPT’s8. Project Kit Photos9. Project Kit Working Video linksLatest Projects with Year Wise YouTube video Links157 Projects https://svsembedded.com/ieee_2022.php135 Projects https://svsembedded.com/ieee_2021.php 151 Projects https://svsembedded.com/ieee_2020.php103 Projects https://svsembedded.com/ieee_2019.php61 Projects https://svsembedded.com/ieee_2018.php171 Projects https://svsembedded.com/ieee_2017.php170 Projects https://svsembedded.com/ieee_2016.php67 Projects https://svsembedded.com/ieee_2015.php55 Projects https://svsembedded.com/ieee_2014.php43 Projects https://svsembedded.com/ieee_2013.php1100 Projects https://www.svskit.com/2022/02/900-pr...***********************************************************1. Vehicle Theft Detection/Notification With Remote Engine Locking,2. Home Security System using ESP32-CAM and Telegram App,3. SMART ANTI-THEFT SECURITY SYTEM USING IOT,4. High-tech car theft: Photo Captures Driver Caught In Stolen Vehicle Using ESP32CAM and Arduino, GSM,5. ESP32 CAM Surveillance Car | SPY Camera Car | Send Captured Image to Telegram | GPS | GSM -SMS Alert,6. Implementation Of Vehicle Theft Detection and Identification System,7. “Theft Detecting Device Based On Internet Of Things”,8. Anti Theft Detecting Device Based On IOT | Send Captured Image to Telegram | GPS | GSM - SMS Alert,9. Digital Bank Locker System With Motion Triggered Capture Technology,10. Vehicle Theft Detection and Driver Identification System,11. IoT Based Vehicle (Car) Theft Detection,12. IOT BASED VEHICLE SAFETY AND SECURITY SYSTEM,13. Gsm Gps Based Vehicle Theft Detection And Tracking,14. IOT Based Vehicle Tracking and Monitoring System,15. Theft intimation of the vehicle over SMS to owner,16. VEHICLE THEFT DETECTION AND SECURE SYSTEM,17. IOT Based Vehicle Tracking and Monitoring System,18. SMART ANTI-THEFT SECURITY SYTEM USING IOT,19. Smart IoT Device for Vehicle Theft,20. Vehicle Theft Intimation and Control of its Engine over SMS,
0 notes
Text

Introducing the latest version of the NodeMcu ESP8266 CH340 Module – a cutting-edge, budget-friendly WiFi technology. This advanced board utilizes modern, high-level LUA based technology and offers an all-in-one design, making it incredibly easy to integrate into your current Arduino projects or any development board with available I/O pins.
Utilizing modern Internet development tools, like Node.js, can effectively accelerate the implementation of your ideas with the assistance of the built-in API provided by NodeMCU. Based on ESP8266 technology, NodeMCU harnesses a wealth of online resources to further enhance its capabilities.
The NodeMCU ESP8266 CH340 Module is equipped with ESP-12 based serial WiFi integration, allowing for easy access to GPIO, PWM, ADC, I2C, and 1-WIRE resources. It also features a built-in USB-TTL serial using the dependable CH340 for superior stability on all compatible platforms. Additionally, this wifi-module is one of the most cost-effective options currently available in the market. Its latest version is known as V3 or Version3. In this tutorial, we will provide instructions to connect any version of ESP8266 NodeMcu (V1, V2, or V3).
Hardware IO similar to Arduino – An advanced API for easily configuring and manipulating hardware, reducing repetitive tasks. Write code in Lua script, just like with Arduino but in a more interactive manner.
The Event-driven API for network applications in Nodejs style enables developers to easily write code for a compact 5mm5mm sized MCU. This greatly accelerates the development process for IOT applications.
The ESP8266 Development Kit combines GPIO, PWM, IIC, 1-Wire, and ADC on a single board. By using the NodeMCU Firmware, it allows for quick and efficient development.
The NodeMcu is a useful tool for creating IoT prototypes. It is an open-source firmware and development kit that allows you to write Lua scripts with ease. This Development Kit is built on the ESP8266 platform and includes integrated features such as GPIO, PWM, IIC, 1-Wire, and ADC, all conveniently housed on one board.
Attributes of NodeMcu ESP8266 CH340 Module are:
Utilizes CH340G in place of CP2102.
The standard for wireless technology, specifically 802.11 b/g/n, eliminates the need for cables.
The WiFi operates at 2.4GHz and offers WPA/WPA2 security mode.
Provide assistance for the three available operating modes: STA, AP, and STA AP.
The TCP/IP protocol stack is integrated to facilitate the handling of multiple connections from TCP Clients (up to a maximum of 5).
The data communication interface supports UART and GPIO.
OTA, or remote firmware upgrade, is a quick and efficient way to update your device’s firmware without having to physically connect it to another device.
Assist the enhancement of Smart Link Smart Networking.
The IO Pin is an integral part of ESP8266.
There is no need to download the reset function.
An excellent toolkit for enhancing ESP8266 capabilities.
The WI-FI with the most affordable price.
For hardware IO compatible with Arduino.
Maximize efficiency in developing your IOT applications.
This product boasts a range of impressive features, including its open-source capability, interactivity, programmability, affordability, user-friendly design, intelligent functions, and WI-FI connectivity.
The integrated WI-FI MCU ESP8266 development kit offers effortless prototyping capabilities.
Our platform offers the most cost-effective solution for developing IoT applications.
NodeMCU ESP8266 CH340 Module features a built-in USB-TTL serial port, equipped with the highly dependable industrial-grade CH340G chip, ensuring unrivaled stability across all compatible platforms.
The Advanced API offers hardware IO capabilities that greatly minimize the need for repetitive tasks involved in setting up and managing hardware.
The network application’s event-driven API enables developers to write Nodejs-style code for a compact 5mm*5mm MCU.
0 notes
Text
ESP8266 Wifi Module | Nodemcu ESP8266 for IoT Solution
The Internet of Things (IoT) is revolutionizing the way we interact with technology, making our lives smarter and more efficient. At the heart of this revolution is the ESP8266 WiFi module, a low-cost, powerful solution perfect for your IoT projects. Whether you're a hobbyist, a professional developer, or a business looking to integrate smart technology into your products, the ESP8266 WiFi module offers unmatched versatility and performance. Here's why you should consider buying the ESP8266 WiFi module and how the NodeMCU ESP8266 can be your gateway to a myriad of IoT solutions.
What is the ESP8266 WiFi Module?
The ESP8266 is a highly integrated chip designed for the needs of a new connected world. It offers a complete and self-contained WiFi networking solution, allowing it to either host the application or offload all WiFi networking functions from another application processor. With its low cost and high performance, the ESP8266 WiFi module has become a popular choice among IoT developers.
ESP8266 NodeMcu WiFi Development Board Features:-
It is based on ESP8266, integates GPIO, PWM, IIC, 1-Wire and ADC all in one board.
Power your developement in the fastest way combinating with NodeMCU Firmware!
USB-TTL included, plug&play
10 GPIO, every GPIO can be PWM, I2C, 1-wire
Open source IoT Platform
Easily Programmable
Low cost & Simple to Implement
WI-FI enabled
ESP8266 NodeMcu WiFi Development Board Applications:-
Home Appliances
Home Automation
Smart Plug and lights
Mesh Network
Industrial Wireless Control
Baby Monitors
IP Cameras
Sensor Networks
Wearable Electronics
Why Choose NodeMCU ESP8266 for Your IoT Projects?
Ease of Use: NodeMCU's integrated USB-to-serial interface and pre-flashed firmware allow for immediate programming and development.
Versatile Programming: You can program the NodeMCU using the Arduino IDE or NodeMCU’s native Lua scripting language, giving you flexibility in development.
Wide Community Support: As one of the most popular IoT development platforms, NodeMCU has extensive documentation and a large community, making it easier to find support and resources.
Cost-Effective: NodeMCU provides a highly cost-effective solution for IoT development, offering excellent value for money.
Rapid Prototyping: Its comprehensive feature set and ease of use make NodeMCU ideal for rapid prototyping and deployment of IoT solutions.
Conclusion
Purchase Your ESP8266 and NodeMCU ESP8266 Today!
Don't miss out on the opportunity to enhance your IoT projects with the best technology available. Purchase your ESP8266 WiFi module and NodeMCU ESP8266 development board today and join the growing community of IoT developers who are shaping the future of technology.
Innovation awaits at Campus Component, where you can buy genuine ESP8266 NodeMCU boards at competitive prices. Take the first step towards realizing your IoT dreams and explore the endless possibilities of connected devices. Order now and join the IoT revolution with Campus Component as your trusted partner.
0 notes
Text
5 Key Differences Between ESP32 PLC and Arduino PLC Systems
To enable programming control that is used to automate and control the behavior of electronic devices and processes, we have the Programmable Logic Controllers (PLCs). There are certain differences between them in terms of capability and application, although ESP32 and arduino boards can be programmed as PLCs.
This article will highlight 5 major differences between ESP32 PLC and Arduino PLC systems pertaining to connectivity, I/O interfaces, processing power, programming complexity, and industrial suitability. Identifying these contrasting features will help you determine which platform better matches your specific project requirements.
1. Processing Power and Speed
Compared to the Arduino PLC, the ESP32 PLC accelerates a great deal of power and pace. The interesting fact about ESP32 is that it has a dual-core processor, capable of working up to 240 MHz, while the basic Arduino processors are single-core and clocked at 16 MHz. The disparity in processing powers implies that the ESP32 can deal with progressively complex undertakings, gather and process information quicker, and bolster more gadgets at a go. It is perfect for use in systems that need on-the-go data operation like advanced substantially automation connections arrangements or industrial monitoring structures.
2. Connectivity Options
Regarding connectivity, the ESP32 undeniably stands out due to the integrated WiFi PLC and Bluetooth PLC modules. This makes it simple to implement within IoT (Internet of Things) projects and can be controlled from a distance, with data acquisition not requiring any additional modules.
Conversely to, Arduino PLC systems can be enabled with WiFi and Bluetooth functionality however, this often comes in the form of additional shields or modules that need to be introduced. This complicates not only your projects but also your setup's total cost and footprint.
3. Power Consumption
Another important aspect is that of power consumption. The main selling point of the ESP32 PLC is the built-in power-saving mechanisms, as it features a variety of sleep stages and power domains that enable the microcontroller’s built-in power management system to put the SoC into the REST sleep mode when the processor is not undertaking demanding operations. This makes it perfect for applications that normally use power from batteries or portable applications. On the other hand, Arduino PLC systems are not known for power consumption, but neither do they come with the exciting power management features of ESP32 that might result in limited battery life in cases where power conservation is important.
4. Industrial Suitability
Rugged form factors like DIN rail mounts along with screw terminal connections, make industrial-grade Arduino PLCs suitable for harsh plant environments. ESP32 lacks the protective casings and screw-type terminals commonly demanded in industrial settings.
5. I/O Interfaces
The available input/output pins are generally higher on standard Arduino boards than ESP32 dev boards. Expanding I/O ports on ESP32 requires additional multiplexer circuits. However, industrial ESP32 PLCs come integrated with sizeable I/O terminals comparable to that of Arduino PLCs.
Conclusion
To summarize, while Wi-Fi/BT connectivity, processing performance and I/O expandability favors ESP32 PLC, ease of programming and out-of-the-box industrial compatibility gives Arduino PLC an edge. Get the best of both worlds with hybrid ESP32-Arduino PLC solutions! Visit https://erqos.com/ for all your PLC and automation parts.
0 notes
Text
Innovative Arduino Based Projects for Final Year Projects
Hello students, Takeoff Edu group Provide unique Arduino Based project for engineering students. Here we give all Projects with best tools and resources to build your skills and explore your creativity.
The ability of the Arduino microcontrollers to be creatively versatile in generating projects that address the needs of any particular interest or industry. The hobbyists are able to develop engaged art installations, while engineers are able to prototype advanced systems in a quick and efficient manner. The use of Arduino has significantly gained popularity leading to creation of many online communities where people share their projects, codes and how to troubleshoot some of the features that are not working as desired.
Takeoff projects- Here are the Titles of Arduino Based Projects:
Latest
Prevention of Mobile Usage while Boarding and De-boarding through Bus Alert System
Sign Recognition and Voice Conversion Device for Dumb
Arduino based Medicine Reminder and Vending Machine
IoT Based Smart Multi Application Surveillance Robot
Robotic Arm for inspection, cleaning and painting of tanks on ships to save on time, cost and avoid accidents
Design and implementation of a vehicle to vehicle communication system using Li-Fi technology
Smart Soldier Strap
Junction Street Light System Automatic Control Using Renewable Energy Resource
Dual Axis Solar Tracking System with Weather Monitoring
Trendy
IoT Based Farming Robot Using WSN
IoT Based Organic Farming by Using Aquaponics Method
IoT Based Smart Factory Management System
Advanced Traffic Violation Control and Penalty System with Web Server
Advanced Laser Security System
Smart Medicine Reminder Box
Standard
Acoustic Sensor for Surveillance of Isolated Geographical Areas
Smart water controller in metro water supply lines
Smart gardening(A homegrown irrigation system)
Assistive Tools for Patients with Parkinson's
ATM Terminal Design Is Based On Fingerprint Recognition
SMART Speed Setter and Calibrator for Speed Control devices
Arduino-based projects have proven to be beneficial in the field of education, allowing students to learn STEM subjects practically rather than from theoretical standpoints. Arduino has become a widely accepted educational tool he ordered tool that schools and educational institutions worldwide have adopted in order to engage learners in practical electronics and programming exercises. Therefore, Arduino is now a symbolistic representation of democratized innovation, whereby creativity and problem-solving have become innately accessible in a number of technological fields.
Takeoff Edu Group not only provide Arduino Based projects, but also Furnishes the ideas and of Projects and give the range of educational resources, including tutorials & sample codes.
#Arduino Projects#ECE Projects#EEE Project#Academic Projects#Final Year Projects#Engineering projects.
0 notes
Text
The Future is Now: Unlocking the Potential of "Things" with IoT Engineering
IoT engineering is a field of engineering that focuses on designing, developing, and implementing IoT solutions. IoT stands for the Internet of Things, which is a network of devices, sensors, and systems that can communicate and exchange data over the internet, enabling various applications and solutions for different domains, such as smart homes, smart cities, smart industries, smart healthcare, and more.
IoT engineering involves various skills and technologies, such as:
• Hardware: IoT engineers need to understand the principles and components of embedded systems, such as microcontrollers, sensors, actuators, and communication modules, and how to integrate them into IoT devices and systems.
• Software: IoT engineers need to know how to program and configure IoT devices and systems, using languages and frameworks such as C, Python, Arduino, Raspberry Pi, and more. They also need to know how to use cloud computing platforms and services, such as AWS, Azure, or Google Cloud, to store, process, and analyze the data collected by IoT devices and systems.
• Networking: IoT engineers need to know how to connect IoT devices and systems to the internet and to each other, using protocols and standards such as Wi-Fi, Bluetooth, Zigbee, MQTT, CoAP, and more. They also need to know how to ensure the security and privacy of the data and the devices, using encryption, authentication, and authorization techniques.
• Data Science: IoT engineers need to know how to apply data science methods and tools, such as statistics, machine learning, and artificial intelligence, to extract insights and value from the data collected by IoT devices and systems. They also need to know how to visualize and present the data and the results, using tools such as Tableau, Power BI, or Matplotlib.
IoT engineering is a multidisciplinary and dynamic field that requires a combination of technical and creative skills, as well as a problem-solving and innovative mindset. IoT engineers can work on various projects and domains, such as smart home automation, smart energy management, smart agriculture, smart healthcare, smart transportation, and more. IoT engineering is also a rapidly growing and evolving field that offers many opportunities and challenges for engineers who want to create and implement IoT solutions that can improve the quality of life and the efficiency of businesses.
0 notes