#JSONEncoding
Explore tagged Tumblr posts
Visit Tumblr Blog
Explore Tumblr blogs with no restrictions, modern design and the best experience.
Last Seen Tumblr Blogs


Fun Fact
Total funding amounts to $125.3M.
Text
What is the definition of a PHP encoded string?
The definition of a PHP encoded string is a string that has been processed or manipulated using PHP, often for purposes like encryption, serialization, or encoding special characters for safe data transmission and storage.
Base64 Encoding: PHP can encode data into a base64 string, which is a common method for encoding binary data into a text string. For example:Original Binary Data: Hello, World!Base64 Encoded String: SGVsbG8sIFdvcmxkIQ==
URL Encoding: PHP can encode special characters in a URL to ensure they are transmitted and processed correctly. For example:Original URL: https://example.com/search?q=white&blackURL Encoded String: https%3A%2F%2Fexample.com%2Fsearch%3Fq%3Dwhite%26black
HTML Encoding: PHP can encode characters to their HTML entities to prevent cross-site scripting (XSS) vulnerabilities. For example:Original HTML: <script>alert("Hello, World!");</script>HTML Encoded String: <script>alert("Hello, World!");</script>
JSON Encoding: PHP can encode data into a JSON string, which is commonly used for data exchange between a server and a web application. For example:Original Data: {"name": "John", "age": 30}JSON Encoded String: {"name": "John", "age": 30}
#PHP#EncodedStrings#DataEncoding#WebDevelopment#Programming#Base64#URLEncoding#HTMLEncoding#JSONEncoding#PHPDevelopment#DataSecurity#WebDev#Tech#Coding#DataProtection#DataTransmission
1 note
·
View note
Text
Understanding OAI and OAC in AWS CloudFront: Concepts, Configuration, and Best Practices
Amazon CloudFront is a highly secure and scalable content delivery network (CDN) that improves the distribution of content to users with low latency and high transfer speeds. CloudFront offers two key features to enhance security when serving content from Amazon S3 buckets: Origin Access Identity (OAI) and Origin Access Control (OAC). In this blog, we’ll explore these features, their purpose, and how to configure them using Terraform. We’ll also discuss their advantages and disadvantages to help you decide which is suitable for your use case.

Target Audience
This blog is intended for cloud architects, DevOps engineers, and developers who are familiar with AWS and want to improve their understanding of secure content delivery using CloudFront and S3.
Key Concepts to Explain
What is OAI?
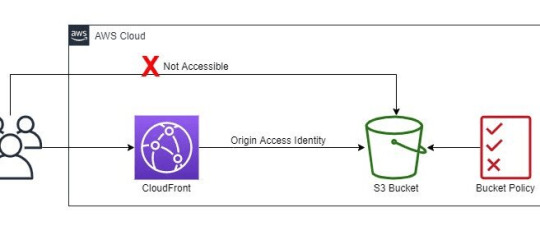
Origin Access Identity (OAI) is a special CloudFront user identity that ensures CloudFront can fetch objects securely from an S3 bucket without exposing them to the public.
What is OAC?

Origin Access Control (OAC) is an advanced feature providing fine-grained control over access permissions between CloudFront and S3. It builds on the benefits of OAI while offering additional flexibility and management improvements.
Terraform Configuration Examples
[ Good Read: Backup Stored in S3 to an EC2 Instance Using XtraBackup ]
Configuring OAI in Terraform
Here’s how you can configure an OAI to secure your S3 bucket:
1. Define the S3 Bucket
resource "aws_s3_bucket" "example" { bucket = "example-bucket"}
Here, we define an Amazon S3 bucket using Terraform. The bucket is named example-bucket. This will be the origin for our CloudFront distribution.
2. Create an OAI
resource "aws_cloudfront_origin_access_identity" "example" { comment = "Access identity for CloudFront"}
This block creates an Origin Access Identity (OAI) for CloudFront. The OAI acts as a virtual user that CloudFront uses to securely access the S3 bucket.
Why OAI?Without an OAI, your S3 bucket would need to allow public access for CloudFront to fetch objects. By using an OAI, you can block public access to your bucket while allowing CloudFront to serve content.
3. Attach a Bucket Policy to Allow OAI Access
resource "aws_s3_bucket_policy" "example" { bucket = aws_s3_bucket.example.id policy = jsonencode({ Version = "2012-10-17", Statement = [ { Effect = "Allow", Principal = { AWS = aws_cloudfront_origin_access_identity.example.iam_arn } Action = "s3:GetObject" Resource = "${aws_s3_bucket.example.arn}/*" } ] })}
This step is critical for securing the S3 bucket.
Bucket Policy: The policy grants the OAI permission to read objects (s3:GetObject) from the bucket.
Principal: Specifies the OAI as the entity allowed to access the bucket.
Resource: Applies the permission to all objects (*) within the S3 bucket.
4. Configure CloudFront Distribution
resource "aws_cloudfront_distribution" "example" { origin { domain_name = aws_s3_bucket.example.bucket_domain_name origin_id = "S3-example" s3_origin_config { origin_access_identity = aws_cloudfront_origin_access_identity.example.cloudfront_access_identity_path } } enabled = true default_cache_behavior { ... }}
This block sets up the CloudFront distribution.
Domain Name: Specifies the S3 bucket’s domain name as the origin for the CloudFront distribution.
Origin Access Identity: Links the OAI to the CloudFront distribution, ensuring only CloudFront can fetch content from the bucket.
You can check more info about: OAI and OAC in AWS CloudFront.
Cloud Engineering Services.
Platform Engineering Services.
DevOps Solutions and Services.
User Acceptance Testing.
0 notes
Text
Json decode

#JSON DECODE HOW TO#
#JSON DECODE CODE#
#JSON DECODE FREE#
With the help of the Online JSON Parser Tool, we can easily format our minify JSON Data and easily find key and value pairs and identify changes quickly.
JSON Data mainly used when we need to transfer data with different platforms and it’s easy to synchronize and used in any system.
All Data are available in Key and value pair. Decode a JSON document from s (a str beginning with a JSON document) and return a 2-tuple of the.
Here, In the above sample JSON data Name, Country, and Age are known as key and Jone, USA, and 39 known as a Value.
In Treeview, You can Search and highlight, and Sorting Data.
jsondecode converts JSON data types to the MATLAB data types in this table.
Minify or Compact JSON Data to resave and reduct its Size. JSON supports fewer data types than MATLAB.
JSON Validator for your Online Changes and your other JSON Data.
Redo and Undo facility when you edit your JSON online.
#JSON DECODE HOW TO#
How to Parse Large JSON Data with Isolates in Dart 2.The JSON Parser Tools have Below the main functionality:.
#JSON DECODE CODE#
How to Parse JSON in Dart/Flutter with Code Generation using FreezedĪnd if you need to parse large JSON data, you should do so in a separate isolate for best performance.In such cases, code generation is a much better option and this article explains how to use it: If you have a lot of different model classes, or each class has a lot of properties, writing all the parsing code by hand becomes time-consuming and error-prone. Restaurant Ratings example - JSON Serialization code.While the example JSON we used as reference wasn't too complex, we still ended up with a considerable amount of code: consider using the deep_pick package to parse JSON in a type-safe way.for nested JSON data (lists of maps), apply the fromJson() and toJson() methods.add explicit casts, validation, and null checks inside fromJson() to make the parsing code more robust.create model classes with fromJson() and toJson() for all domain-specific JSON objects in your app.When null, JSON objects will be returned as. When true, JSON objects will be returned as associative array s when false, JSON objects will be returned as object s. PHP implements a superset of JSON as specified in the original RFC 7159. use jsonEncode() and jsonDecode() from 'dart:convert' to serialize JSON data This function only works with UTF-8 encoded strings.But if we want our apps to work correctly, it's very important that we do it right and pay attention to details: JSON serialization is a very mundane task. You can build anything with Appwrite! Click here to learn more. Appwrite is a secure, self-hosted solution that provides developers with a set of easy-to-use REST APIs to manage their core backend needs. Open-Source Backend Server for Flutter Developers. Help me keep it that way by checking out this sponsor:
#JSON DECODE FREE#
Serializing Nested ModelsĪs a last step, here's the toJson() method to convert a Restaurant (and all its reviews) back into a Map:Ĭode with Andrea is free for everyone. You need to write the parsing code that is most appropriate for your use case. This specific implementation makes some assumptions about what may or may not be null, what fallback values to use etc.
if the reviews are missing, we use an empty list ( ) as a fallback.
map() operator to convert each dynamic value to a Review object using omJson()
the values in the list could have any type, so we use List.
the reviews may be missing, hence we cast to a nullable List.
1 note
·
View note
Text
Php json decode as object

#Php json decode as object how to#
Let’s take the first example, here we will convert the JSON string to PHP array using the json_decode() function. Reviver method object can be passed in JSON.parse() to return a modified object of JSON in case of custom logic requires to add and return the different.
options: It includes bitmask of JSON_OBJECT_AS_ARRAY, JSON_BIGINT_AS_STRING, JSON_THROW_ON_ERROR.
#Php json decode as object how to#
Let’s see how to do it in practice with a few examples. There exist specific built-in functions that allow encoding and decoding JSON data. The data structures of JSON are identical to PHP arrays. Follow the steps and you’ll manage to meet your goal easily. Chapter 2 JSON encoding Creating a JSON object with PHP is simple: You just need to use the jsonencode () function. In this snippet, you can find a step-by-step guide on how to create and parse JSON data with PHP. depth: It states the recursion depth specified by user. Decode a JSON object received by your PHP script.If it is true then objects returned will be converted into associative arrays. Normally, jsondecode() will return an object of stdClass if the top level item in the JSON object is a dictionary or an indexed array if the JSON object. It only works with UTF-8 encoded strings. json: It holds the JSON string which need to be decode.The syntax of JSON decode function is:- json_decode(string, assoc, depth=500, options) Parameters of json_decode() function PHP: json_decode() | How to decode json to array in PHPĭefination:- The PHP json_decode() function, which is used to decode or convert a JSON object to a PHP object. An optional Assoc boolean to instruct whether to bypass conversion to an object and to produce an associative array. The decode function has the following parameters. It basically accepts three parameters, but you will usually only need the first one, i.e. Now jsondecode() on the other hand, has a completely different goal, which is to only attempt to convert a JSON string to a PHP object or array. will decode the json string as array For some reason I’m able to extract the json string as array but when I try it to do it as object it breaks. Like, convert JSON string to array PHP, convert JSON string to multidimensional array PHP and JSON decode and access object value PHP. You can also turn your own data into a well-formatted JSON string in PHP with the help of the jsonencode () function. Be wary that associative arrays in PHP can be a 'list' or 'object' when converted to/from JSON, depending on the keys (of absence of them). When decoding that string with jsondecode, 10,000 arrays (objects) is created in memory and then the result is returned. In this tutorial, we will take examples using the json_decode() function. JSON can be decoded to PHP arrays by using the associative true option. Efficient, easy-to-use, and fast PHP JSON stream parser - GitHub - halaxa/json-machine: Efficient, easy-to-use, and fast PHP JSON stream parser. PHP JSON decode In this tutorial, we will discuss about php json_decode() function syntax, defination, parameters with examples.
0 notes
Text
How to Store Data as an Object in Shared Preferences in Flutter?

When designing the mobile application, you might want to save the custom object for future use, likewise, storing the user information when the application is closed and utilizing it again when it’s opened later. So, in this article, we will go through How to Store data as an object in shared preferences in Flutter?
Are you ready for the same? Let’s dive into the same.
How to Store data as an object in shared preferences in Flutter?
You need to serialize it to JSON before saving and deserialize it after reading. You can check flutter.dev.
You can store an object in Shared Preferences as Below:
SharedPreferences shared_User = await SharedPreferences.getInstance(); Map<String, dynamic> decode_options = jsonDecode(jsonString); String user = jsonEncode(User.fromJson(decode_options)); shared_User.setString('user', user);SharedPreferences shared_User = await SharedPreferences.getInstance(); Map<String, dynamic> userMap = jsonDecode(shared_User.getString('user')); var user = User.fromJson(userMap); class User { final String name; final String age; User({required this.name,required this.age}); factory User.fromJson(Map<String, dynamic> parsedJson) { return new User( name: parsedJson['name'] ?? "", age: parsedJson['age'] ?? ""); } Map<String, dynamic> toJson() { return { "name": this.name, "age": this.age }; } }To save the object to shared preferences:SharedPreferences pref = await SharedPreferences.getInstance();MapMap<String, dynamic> json = jsonDecode(jsonString);String user = jsonEncode(UserModel.fromJson(json));pref.setString('userData', user);To fetch the object from shared preferences:SharedPreferences pref = await SharedPreferences.getInstance();Map<String, dynamic> json = jsonDecode(pref.getString('userData'));var user = UserModel.fromJson(json);
You will need to import the below-mentioned packages:
import 'package:shared_preferences/shared_preferences.dart';import 'dart:convert';
The easiest way to create Model Follow our convert Json string to Json object in Flutter article.
When Getting Data from the API and Saving it Into Sharepreference
Getting Data from the API and Saving it Into Sharepreference with the Flutter will help you reduce the lengthy codes and supporting classes which are written in SQLite
Future<UserDetails> UserInfo({String sesscode, regno}) async{await Future.delayed(Duration(seconds: 1));SharedPreferences preferences = await SharedPreferences.getInstance(); var map = new Map<String, String>();map["sesscode"] = sesscode;map["regno"] = regno; var response = await http.post(Base_URL().user_info, body: map); Map decodedata = json.decode(response.body); if(decodedata != null){ String user = jsonEncode(UserDetails.fromJson(decodedata)); preferences.setString(SharePrefName.infoPref, user); return UserDetails.fromJson(decodedata);} return null; }
You can call this function anywhere in your App
Future<UserDetails> getSavedInfo()async{ SharedPreferences preferences = await SharedPreferences.getInstance(); Map userMap = jsonDecode(preferences.getString(SharePrefName.infoPref)); UserDetails user = UserDetails.fromJson(userMap); return user; }
Now, Call it inside a Class to get a username
Future<UserDetails> usd = getSavedInfo(); usd.then((value){ print(value.surname); });
Conclusion:
FlutterAgency.com is our dedicated and most trusted Platform for Flutter Technology, where we have Flutter mobile app developers with years of experience. They have a skill set in this platform and will deliver the best for your business. The portal is full of advanced resources related to Flutter like Flutter Widget Guide, Flutter Projects, Code libs, etc. Many visitors came to enhance their knowledge of Flutter development and get clear about it.
Connect with us at flutteragency.com. Flutteragency intends to provide the Flutter application with high quality. We give applications of the highest quality, and users can use them hassle-free.
Thanks for being with us on a Flutter Journey !!!
0 notes
Text
Opening multiple files in a single SwiftUI document on macOS
I’ve recently been dipping my toes into SwiftUI for the first time, with my first project being a document based app using the SwiftUI lifecycle. This post assumes you’re already familiar with the basics of writing a document based SwiftUI app.
My app lets you drag multiple photos into a document and has a basic photo browser for viewing the photos and various control for doing stuff with them. It has its own document type which is saved as JSON data, and that JSON contains URLs that reference the photo files that you dragged into the document. That all is relatively straightforward, and here is the basic code for my document.
struct MyDocument: FileDocument { var documentData: DocumentData static var readableContentTypes: [UTType] { [.myDocumentType] } init(configuration: ReadConfiguration) throws { guard let data = configuration.file.regularFileContents else { throw CocoaError(.fileReadCorruptFile) } let jsonDecoder = JSONDecoder() self.documentData = try jsonDecoder.decode(DocumentData.self, from: data) } func fileWrapper(configuration: WriteConfiguration) throws -> FileWrapper { let encoder = JSONEncoder() let data = try encoder.encode(self.documentData) return .init(regularFileWithContents: data) } }
And the relevant part of the data model:
struct DocumentData: Codable { var photos: [Photo] } struct Photo: Codable { let url: URL }
Where I hit a road bump was that I wanted the user to be able to drag multiple photo files from the Finder and drop them onto my dock icon, and have that open a new, untitled document that’s already populated with those photos. SwiftUI isn’t really set up for that scenario, so I had to try a few things before finding one that worked.
First, to get the dock icon to accept dropped image files, I added a new document type in the Info pane for my app target in Xcode, specifying “public.image” so it will accept any image formats, and a role of “Viewer”, since I’m not actually editing the photos themselves. Then, if I added .image to the list of readableContentTypes in my document, that would result in SwiftUI trying to open a separate document for each photo that was dragged to the app icon. That’s not what I want though, I want all the photos to go into a single document.
My next attempt was to see if I could handle the dropped files in my app delegate that I have set using SwiftUI’s @NSApplicationDelegateAdaptor property wrapper on my App instance. I tried implementing the application(_:openURLs:) method, and after removing the .image type from my document (so that SwiftUI would no longer route the dropped images there), it did call my app delegate. Yay!
Now I needed to actually create the new document. You can’t do this by directly calling SwiftUI, but all the SwiftUI stuff is handled using the underlying NSDocument architecture in AppKit, so this was my first stab at it:
func application(_ application: NSApplication, openURLs: [URL]) { do { let photos = urls.map { Photo(url: $0) } let documentData = DocumentData(photos: photos) let encoder = JSONEncoder() let encodedData = try encoder.encode(documentData) let fileWrapper = FileWrapper(regularFileWithContents: encodedData) let newDocument = try NSDocumentController.shared.openUntitledDocumentAndDisplay(true) try newDocument.read(from: fileWrapper, ofType: UTType.myDocumentType.identifier) } catch let error as NSError { NSApplication.shared.presentError(error) }
I ran this, but soon discovered that even though the delegate method accepts multiple URLs as input, and in a normal AppKit app a single drop of multiple files would all be passed at once, SwiftUI was still doing its thing behind the scenes and calling the delegate method multiple times with one URL passed each time. This resulted in multiple documents opening up, each with a single photo.
So, like so many things in SwiftUI, we need to do a dirty little hack to collect all the URLs we want before opening the document, like so.
var urlsBeingOpened: [URL]? = nil func application(_ application: NSApplication, open urls: [URL]) { //We start collecting URLs and set up a timer to fire the next time through the run //loop after we stop receiving URLs. if urlsBeingOpened == nil { self.urlsBeingOpened = [] Timer.scheduledTimer(withTimeInterval: 0.1, repeats: false) {_ in self.createDocumentFromOpenedURLs() } } self.urlsBeingOpened?.append(contentsOf: urls) } func createDocumentFromOpenedURLs() { do { guard let urls = self.urlsBeingOpened else { return } self.urlsBeingOpened = nil //reset the collection for the next drop let photos = urls.map { Photo(url: $0) } let documentData = DocumentData(photos: photos) let encoder = JSONEncoder() let encodedData = try encoder.encode(documentData) let fileWrapper = FileWrapper(regularFileWithContents: encodedData) let newDocument = try NSDocumentController.shared.openUntitledDocumentAndDisplay(true) try newDocument.read(from: fileWrapper, ofType: UTType.myDocumentType.identifier) } catch let error as NSError { NSApplication.shared.presentError(error) }}
Since SwiftUI calls our delegate method multiple times in a tight loop, we use an instance variable to collect all the URLs into an array, and fire off a one-shot timer that triggers the next time through the run loop after SwiftUI is done giving us all the URLs. That lets us take all the URLs and create a single document from them there. Note the use of a FileWrapper to pass the encoded document contents to the document for reading. I initially tried just passing a plain Data object to NSDocument to read, but apparently SwiftUI doesn’t implement that reading method, but putting it in a FileWrapper did the trick.
So, it’s not pretty, but that does get the job done. Now if you’ll excuse me, I’ve got about 17 radars feedbacks to file…
1 note
·
View note
Text
Codable
많은 프로그래밍 작업은 데이터를 어딘가로 전달하는 것과 관련된다. 네트워크를 통해서 전송하거나, 디스크와 같은 영구 저장소로 전달하여 기록할 수도 있다. 프로그램이 실행시간에 사용하는 데이터는 그 필요와 목적에 맞게 구조화되고 각 단위가 연결되어 입체적인 그래프를 형성하기도 하지만, 전달과정에서 만큼은 일렬로 늘어선 비트의 연속체가 되어야 한다. 따라서 필연적으로 어떤 데이터가 유용성을 가지려면 직렬화 될 수 있어야 하고 그 반대로 역직렬화도 가능해야 한다.
이러한 직렬화 / 역직렬화와 관련하여 Foundation은 오래전부터 NSCoding이라는 기술을 보유하고 있었다. 이는 간단하게 가장 기본이 되는 몇 가지 타입이 인코딩이 가능하다면, 각 객체의 속성을 키-값 쌍으로 묶어서 인코딩할 수 있다는…
View On WordPress
0 notes
Text
Ultimate Guide to JSON Parsing with Swift
http://bit.ly/2IQ494P Ultimate Guide to JSON Parsing with Swift, Covers JSONEncoder and JSONDecoder in Swift 4. Parsing JSON is an integral part of most of iOS applications. The new version of Swift introduced classes and APIs that make JSON parsing easy to handle. This course is all about JSON encoding and decoding using Swift language. You will encounter many different JSON responses and learn how to decode those responses to your models. This course is packed with real world examples and can help you gain a better understanding of consuming JSON APIs for your iOS applications.
0 notes
Text
Alamofire Tutorial: Getting Started
Update note: This tutorial has been updated to Xcode 9.3, iOS 11.3, Swift 4.1 and Alamofire 4.7.0 by Ron Kliffer. The original tutorial was written by Aaron Douglas.
Get the lowdown on Alamofire!
Alamofire is a Swift-based HTTP networking library for iOS and macOS. It provides an elegant interface on top of Apple’s Foundation networking stack that simplifies a number of common networking tasks.
Alamofire provides chainable request/response methods, JSON parameter and response serialization, authentication, and many other features.
In this Alamofire tutorial, you’ll use Alamofire to perform basic networking tasks like uploading files and requesting data from a third-party RESTful API.
Alamofire’s elegance comes from the fact it was written from the ground up in Swift and does not inherit anything from its Objective-C counterpart, AFNetworking.
You should have a conceptual understanding of HTTP networking and some exposure to Apple’s networking classes such as URLSession.
While Alamofire does obscure some implementation details, it’s good to have some background knowledge if you ever need to troubleshoot your network requests.
Getting Started
Use the Download Materials button at the top or bottom of this tutorial to download the starter project.
Note: Alamofire is normally integrated using CocoaPods. It has already been installed for you in the downloaded projects.
The app for this Alamofire tutorial is named PhotoTagger. When complete, it will let you select an image from your library (or camera if you’re running on an actual device) and upload the image to a third-party service called Imagga. This service will perform some image recognition tasks to come up with a list of tags and primary colors for the image:
This project uses CocoaPods, so open it using the PhotoTagger.xcworkspace file.
Note:To learn more about CocoaPods, check out this tutorial by Joshua Greene, published right here on the site.
Build and run the project. You’ll see the following:
Click Select Photo and choose a photo. The background image will be replaced with the image you chose.
Open Main.storyboard and you’ll see the additional screens for displaying tags and colors have been added for you. All that remains is to upload the image and fetch the tags and colors.
The Imagga API
Imagga is an image recognition Platform-as-a-Service that provides image tagging APIs for developers and businesses to build scalable, image-intensive cloud apps. You can play around with a demo of their auto-tagging service here.
You’ll need to create a free developer account with Imagga for this Alamofire tutorial. Imagga requires an authorization header in each HTTP request so only people with an account can use their services. Go to https://imagga.com/auth/signup/hacker and fill out the form. After you create your account, check out the dashboard:
Listed down in the Authorization section is a secret token you’ll use later. You’ll need to include this information with every HTTP request as a header.
Note: Make sure you copy the whole secret token, be sure to scroll over to the right and verify you copied everything.
You’ll be using Imagga’s content endpoint to upload the photos, tagging endpoint for the image recognition and colors endpoint for color identification. You can read all about the Imagga API at http://docs.imagga.com.
REST, HTTP, JSON — What’s that?
If you’re coming to this tutorial with very little experience in using third-party services over the Internet, you might be wondering what all those acronyms mean! :]
HTTP is the application protocol, or set of rules, web sites use to transfer data from the web server to your screen. You’ve seen HTTP (or HTTPS) listed in the front of every URL you type into a web browser. You might have heard of other application protocols, such as FTP, Telnet, and SSH. HTTP defines several request methods, or verbs, the client (your web browser or app) use to indicate the desired action:
GET: Retrieves data, such as a web page, but doesn’t alter any data on the server.
HEAD: Identical to GET but only sends back the headers and none of the actual data.
POST: Sends data to the server, commonly used when filling a form and clicking submit.
PUT: Sends data to the specific location provided.
DELETE: Deletes data from the specific location provided.
REST, or REpresentational State Transfer, is a set of rules for designing consistent, easy-to-use and maintainable web APIs. REST has several architecture rules that enforce things such as not persisting states across requests, making requests cacheable, and providing uniform interfaces. This makes it easy for app developers like you to integrate the API into your app, without needing to track the state of data across requests.
JSON stands for JavaScript Object Notation. It provides a straightforward, human-readable and portable mechanism for transporting data between two systems. JSON has a limited number of data types: string, boolean, array, object/dictionary, null and number. There’s no distinction between integers and decimals.
There are a few native choices for converting your objects in memory to JSON and vice-versa: the good old JSONSerialization class and the newly-added JSONEncoder and JSONDecoder classes. In addition, there are numerous third party libraries that help with handling JSON. You’ll use one of them, SwiftyJSON in this tutorial.
The combination of HTTP, REST and JSON make up a good portion of the web services available to you as a developer. Trying to understand how every little piece works can be overwhelming. Libraries like Alamofire can help reduce the complexity of working with these services, and get you up and running faster than you could without their help.
What is Alamofire Good For?
Why do you need Alamofire at all? Apple already provides URLSession and other classes for downloading content via HTTP, so why complicate things with another third party library?
The short answer is Alamofire is based on URLSession, but it frees you from writing boilerplate code which makes writing networking code much easier. You can access data on the Internet with very little effort, and your code will be much cleaner and easier to read.
There are several major functions available with Alamofire:
Alamofire.upload: Upload files with multipart, stream, file or data methods.
Alamofire.download: Download files or resume a download already in progress.
Alamofire.request: Every other HTTP request not associated with file transfers.
These Alamofire methods are global within Alamofire so you don’t have to instantiate a class to use them. There are underlying pieces to Alamofire that are classes and structs, like SessionManager, DataRequest, and DataResponse; however, you don’t need to fully understand the entire structure of Alamofire to start using it.
Here’s an example of the same networking operation with both Apple’s URLSession and Alamofire’s request function:
// With URLSession public func fetchAllRooms(completion: @escaping ([RemoteRoom]?) -> Void) { guard let url = URL(string: "http://localhost:5984/rooms/_all_docs?include_docs=true") else { completion(nil) return } var urlRequest = URLRequest(url: url, cachePolicy: .reloadIgnoringLocalAndRemoteCacheData, timeoutInterval: 10.0 * 1000) urlRequest.httpMethod = "GET" urlRequest.addValue("application/json", forHTTPHeaderField: "Accept") let task = urlSession.dataTask(with: urlRequest) { (data, response, error) -> Void in guard error == nil else { print("Error while fetching remote rooms: \(String(describing: error)") completion(nil) return } guard let data = data, let json = try? JSONSerialization.jsonObject(with: data) as? [String: Any] else { print("Nil data received from fetchAllRooms service") completion(nil) return } guard let rows = json?["rows"] as? [[String: Any]] else { print("Malformed data received from fetchAllRooms service") completion(nil) return } let rooms = rows.flatMap { roomDict in return RemoteRoom(jsonData: roomDict) } completion(rooms) } task.resume() }
Versus:
// With Alamofire func fetchAllRooms(completion: @escaping ([RemoteRoom]?) -> Void) { guard let url = URL(string: "http://localhost:5984/rooms/_all_docs?include_docs=true") else { completion(nil) return } Alamofire.request(url, method: .get, parameters: ["include_docs": "true"]) .validate() .responseJSON { response in guard response.result.isSuccess else { print("Error while fetching remote rooms: \(String(describing: response.result.error)") completion(nil) return } guard let value = response.result.value as? [String: Any], let rows = value["rows"] as? [[String: Any]] else { print("Malformed data received from fetchAllRooms service") completion(nil) return } let rooms = rows.flatMap { roomDict in return RemoteRoom(jsonData: roomDict) } completion(rooms) } }
You can see the required setup for Alamofire is shorter and it’s much clearer what the function does. You deserialize the response with responseJSON(options:completionHandler:) and calling validate() to verify the response status code is in the default acceptable range between 200 and 299 simplifies error condition handling.
Now the theory is out of the way, it’s time to start using Alamofire.
Uploading Files
Open ViewController.swift and add the following to the top, below import SwiftyJSON:
import Alamofire
This lets you use the functionality provided by the Alamofire module in your code, which you’ll be doing soon!
Next, go to imagePickerController(_:didFinishPickingMediaWithInfo:) and add the following to the end, right before the call to dismiss(animated:):
// 1 takePictureButton.isHidden = true progressView.progress = 0.0 progressView.isHidden = false activityIndicatorView.startAnimating() upload(image: image, progressCompletion: { [weak self] percent in // 2 self?.progressView.setProgress(percent, animated: true) }, completion: { [weak self] tags, colors in // 3 self?.takePictureButton.isHidden = false self?.progressView.isHidden = true self?.activityIndicatorView.stopAnimating() self?.tags = tags self?.colors = colors // 4 self?.performSegue(withIdentifier: "ShowResults", sender: self) })
Everything with Alamofire is asynchronous, which means you’ll update the UI in an asynchronous manner:
Hide the upload button, and show the progress view and activity view.
While the file uploads, you call the progress handler with an updated percent. This updates the progress indicator of the progress bar.
The completion handler executes when the upload finishes. This sets the controls back to their original state.
Finally the Storyboard advances to the results screen when the upload completes, successfully or not. The user interface doesn’t change based on the error condition.
Next, find upload(image:progressCompletion:completion:) at the bottom of the file. It is currently only a method stub, so give it the following implementation:
func upload(image: UIImage, progressCompletion: @escaping (_ percent: Float) -> Void, completion: @escaping (_ tags: [String]?, _ colors: [PhotoColor]?) -> Void) { // 1 guard let imageData = UIImageJPEGRepresentation(image, 0.5) else { print("Could not get JPEG representation of UIImage") return } // 2 Alamofire.upload(multipartFormData: { multipartFormData in multipartFormData.append(imageData, withName: "imagefile", fileName: "image.jpg", mimeType: "image/jpeg") }, to: "http://api.imagga.com/v1/content", headers: ["Authorization": "Basic xxx"], encodingCompletion: { encodingResult in }) }
Here’s what’s happening:
The image that’s being uploaded needs to be converted to a Data instance.
Here you convert the JPEG data blob (imageData) into a MIME multipart request to send to the Imagga content endpoint.
Note: Make sure to replace Basic xxx with the actual authorization header taken from the Imagga dashboard.
Next, add the following to the encodingCompletion closure:
switch encodingResult { case .success(let upload, _, _): upload.uploadProgress { progress in progressCompletion(Float(progress.fractionCompleted)) } upload.validate() upload.responseJSON { response in } case .failure(let encodingError): print(encodingError) }
This chunk of code calls the Alamofire upload function and passes in a small calculation to update the progress bar as the file uploads. It then validates the response has a status code in the default acceptable range between 200 and 299.
Note: Prior to Alamofire 4 it was not guaranteed progress callbacks were called on the main queue. Beginning with Alamofire 4, the new progress callback API is always called on the main queue.
Next, add the following code to the upload.responseJSON closure:
// 1 guard response.result.isSuccess, let value = response.result.value else { print("Error while uploading file: \(String(describing: response.result.error))") completion(nil, nil) return } // 2 let firstFileID = JSON(value)["uploaded"][0]["id"].stringValue print("Content uploaded with ID: \(firstFileID)") //3 completion(nil, nil)
Here’s a step-by-step explanation of the above code:
Check that the upload was successful, and the result has a value; if not, print the error and call the completion handler.
Using SwiftyJSON, retrieve the firstFileID from the response.
Call the completion handler to update the UI. At this point, you don’t have any downloaded tags or colors, so simply call this with no data.
Note: Every response has a Result enum with a value and type. Using automatic validation, the result is considered a success when it returns a valid HTTP Code between 200 and 299 and the Content Type is of a valid type specified in the Accept HTTP header field.
You can perform manual validation by adding .validate options as shown below:
Alamofire.request("https://httpbin.org/get", parameters: ["foo": "bar"]) .validate(statusCode: 200..<300) .validate(contentType: ["application/json"]) .response { response in // response handling code }
The UI won't show an error if you hit an error during the upload; it merely returns no tags or colors to the user. This isn't the best user experience, but it's fine for this tutorial.
Build and run your project; select an image and watch the progress bar change as the file uploads. You should see a note like the following in your console when the upload completes:
Congratulations, you've successfully uploaded a file over the Interwebs!
Retrieving Data
The next step after uploading the image to Imagga is to fetch the tags Imagga produces after it analyzes the photo.
Add the following method to the ViewController extension below upload(image:progress:completion:):
func downloadTags(contentID: String, completion: @escaping ([String]?) -> Void) { // 1 Alamofire.request("http://api.imagga.com/v1/tagging", parameters: ["content": contentID], headers: ["Authorization": "Basic xxx"]) // 2 .responseJSON { response in guard response.result.isSuccess, let value = response.result.value else { print("Error while fetching tags: \(String(describing: response.result.error))") completion(nil) return } // 3 let tags = JSON(value)["results"][0]["tags"].array?.map { json in json["tag"].stringValue } // 4 completion(tags) } }
Here's a step-by-step explanation of the above code:
Perform an HTTP GET request against the tagging endpoint, sending the URL parameter content with the ID you received after the upload. Again, be sure to replace Basic xxx with your actual authorization header.
Check that the response was successful, and the result has a value; if not, print the error and call the completion handler.
Using SwiftyJSON, retrieve the raw tags array from the response. Iterate over each dictionary object in the tags array, retrieving the value associated with the tag key.
Call the completion handler passing in the tags received from the service.
Next, go back to upload(image:progress:completion:) and replace the call to the completion handler in the success condition with the following:
self.downloadTags(contentID: firstFileID) { tags in completion(tags, nil) }
This simply sends along the tags to the completion handler.
Build and run your project; select a photo and you should see something similar to the following appear:
Pretty slick! That Imagga is one smart API. :] Next, you'll fetch the colors of the image.
Add the following method to the ViewController extension below downloadTags(contentID:completion:):
func downloadColors(contentID: String, completion: @escaping ([PhotoColor]?) -> Void) { // 1. Alamofire.request("http://api.imagga.com/v1/colors", parameters: ["content": contentID], headers: ["Authorization": "Basic xxx"]) .responseJSON { response in // 2 guard response.result.isSuccess, let value = response.result.value else { print("Error while fetching colors: \(String(describing: response.result.error))") completion(nil) return } // 3 let photoColors = JSON(value)["results"][0]["info"]["image_colors"].array?.map { json in PhotoColor(red: json["r"].intValue, green: json["g"].intValue, blue: json["b"].intValue, colorName: json["closest_palette_color"].stringValue) } // 4 completion(photoColors) } }
Taking each numbered comment in turn:
Perform an HTTP GET request against the colors endpoint, sending the URL parameter content with the ID you received after the upload. Again, be sure to replace Basic xxx with your actual authorization header.
Check that the response was successful, and the result has a value; if not, print the error and call the completion handler.
Using SwiftyJSON, retrieve the image_colors array from the response. Iterate over each dictionary object in the image_colors array, and transform it into a PhotoColor object. This object pairs colors in the RGB format with the color name as a string.
Call the completion handler, passing in the photoColors from the service.
Finally, go back to upload(image:progress:completion:) and replace the call to downloadTags(contentID:) in the success condition with the following:
self.downloadTags(contentID: firstFileID) { tags in self.downloadColors(contentID: firstFileID) { colors in completion(tags, colors) } }
This nests the operations of uploading the image, downloading tags and downloading colors.
Build and run your project again; this time, you should see the returned color tags when you select the Colors button:
This uses the RGB colors you mapped to PhotoColor structs to change the background color of the view. You've now successfully uploaded an image to Imagga and fetched data from two different endpoints. You've come a long way, but there's some room for improvement in how you're using Alamofire in PhotoTagger.
Improving PhotoTagger
You probably noticed some repeated code in PhotoTagger. If Imagga released v2 of their API and deprecated v1, PhotoTagger would no longer function and you'd have to update the URL in each of the three methods. Similarly, if your authorization token changed you'd be updating it all over the place.
Alamofire provides a simple method to eliminate this code duplication and provide centralized configuration. The technique involves creating a struct conforming to URLRequestConvertible and updating your upload and request calls.
Create a new Swift file by clicking File\New\File... and selecting Swift file under iOS. Click Next, name the file ImaggaRouter.swift, select the Group PhotoTagger with the yellow folder icon and click Create.
Add the following to your new file:
import Alamofire public enum ImaggaRouter: URLRequestConvertible { // 1 enum Constants { static let baseURLPath = "http://api.imagga.com/v1" static let authenticationToken = "Basic xxx" } // 2 case content case tags(String) case colors(String) // 3 var method: HTTPMethod { switch self { case .content: return .post case .tags, .colors: return .get } } // 4 var path: String { switch self { case .content: return "/content" case .tags: return "/tagging" case .colors: return "/colors" } } // 5 var parameters: [String: Any] { switch self { case .tags(let contentID): return ["content": contentID] case .colors(let contentID): return ["content": contentID, "extract_object_colors": 0] default: return [:] } } // 6 public func asURLRequest() throws -> URLRequest { let url = try Constants.baseURLPath.asURL() var request = URLRequest(url: url.appendingPathComponent(path)) request.httpMethod = method.rawValue request.setValue(Constants.authenticationToken, forHTTPHeaderField: "Authorization") request.timeoutInterval = TimeInterval(10 * 1000) return try URLEncoding.default.encode(request, with: parameters) } }
Here's a step-by-step explanation of the above code:
Declare constants to hold the Imagga base URL and your Basic xxx with your actual authorization header.
Declare the enum cases. Each case corresponds to an api endpoint.
Return the HTTP method for each api endpoint.
Return the path for each api endpoint.
Return the parameters for each api endpoint.
Use all of the above components to create a URLRequest for the requested endpoint.
Now all your boilerplate code is in single place, should you ever need to update it.
Go back to ViewController.swift and in upload(image:progress:completion:) replace:
Alamofire.upload( multipartFormData: { multipartFormData in multipartFormData.append(imageData, withName: "imagefile", fileName: "image.jpg", mimeType: "image/jpeg") }, to: "http://api.imagga.com/v1/content", headers: ["Authorization": "Basic xxx"],
with the following:
Alamofire.upload(multipartFormData: { multipartFormData in multipartFormData.append(imageData, withName: "imagefile", fileName: "image.jpg", mimeType: "image/jpeg") }, with: ImaggaRouter.content,
Next replace the call for Alamofire.request in downloadTags(contentID:completion:) with:
Alamofire.request(ImaggaRouter.tags(contentID))
Finally, update the call to Alamofire.request in downloadColors(contentID:completion:) with:
Alamofire.request(ImaggaRouter.colors(contentID))
Note: Be sure to leave the responseJSON handlers in place for both of the previous edits.
Build and run for the final time; everything should function just as before, which means you've refactored everything without breaking your app. However, you don't have to go through your entire source code if anything on the Imagga integration ever changes: APIs, your authorization token, parameters, etc. Awesome job!
Where To Go From Here?
You can download the completed version of the project using the Download Materials button at the top or bottom of this tutorial. Don't forget to replace your authorization token as appropriate!
This tutorial covered the very basics. You can take a deeper dive by looking at the documentation on the Alamofire site at https://github.com/Alamofire/Alamofire.
Also, you can take some time to learn more about Apple's URLSession which Alamofire uses under the hood:
Apple WWDC 2015 - 711 - Networking with NSURLSession
Apple URL Session Programming Guide
Ray Wenderlich - NSURLSession Tutorial
Please share any comments or questions about this tutorial in the forum discussion below!
The post Alamofire Tutorial: Getting Started appeared first on Ray Wenderlich.
Alamofire Tutorial: Getting Started published first on https://medium.com/@koresol
0 notes
Text
About Swift 4 JSONEncoder and JSONDecoder extensions
As a digital innovation agency, ChaiOne is constantly finding ourselves keeping tabs on the bleeding edge of technology. Events such as WWDC become a department-wide event in our offices. Developers...
The post About Swift 4 JSONEncoder and JSONDecoder extensions appeared first on ChaiOne.
from Blogger http://gustavowilh.blogspot.com/2017/08/about-swift-4-jsonencoder-and.html via IFTTT
0 notes
Text
About Swift 4 JSONEncoder and JSONDecoder extensions
As a digital innovation agency, ChaiOne is constantly finding ourselves keeping tabs on the bleeding edge of technology. Events such as WWDC become a department-wide event in our offices. Developers...
The post About Swift 4 JSONEncoder and JSONDecoder extensions appeared first on ChaiOne.
0 notes
Text
About Swift 4 JSONEncoder and JSONDecoder extensions
As a digital innovation agency, ChaiOne is constantly finding ourselves keeping tabs on the bleeding edge of technology. Events such as WWDC become a department-wide event in our offices. Developers…
The post About Swift 4 JSONEncoder and JSONDecoder extensions appeared first on ChaiOne.
from WordPress https://darincjohnson.wordpress.com/2017/08/04/about-swift-4-jsonencoder-and-jsondecoder-extensions/ via IFTTT
0 notes
Text
How to Convert JSON String to JSON Object In Flutter?
JSON is short for JavaScript Object Notation and is a way to store information in an organized, easy-to-access manner. generally, the entire communication between the app and the server is through JSON. so in this article, we will go through how to convert JSON string to JSON object in Flutter?
How to convert json string to json object In Flutter? You have to use json.decode. It takes in a JSON object and let you handle the nested key-value pairs. The code snippet will look like the below:
import 'dart:convert'; // actual data sent is {success: true, data:{token:'token'}} final jsonResponse = await client.post(url, body: reqBody); // Notice how you have to call body from the response if you are using http to retrieve json final body = json.decode(jsonResponse .body); // This is how you get success value out of the actual json if (body['success']) { //Token is nested inside data field so it goes one deeper. final String token = body['data']['token']; return {"success": true, "token": token}; } You can also convert JSON array to a list of Objects as following:
String jsonString = yourMethodThatReturnsJsonText(); Map<String,dynamic> d = json.decode(jsonString.trim()); List<MyModel> list = List<MyModel>.from(d['jsonArrayName'].map((x) => MyModel.fromJson(x))); And UserModle is something like this:
class UserModle{ String name; int age; UserModle({this.name,this.age}); UserModle.fromJson(Map<String, dynamic> json) { name= json['name']; age= json['age']; } Map<String, dynamic> toJson() { final Map<String, dynamic> data = new Map<String, dynamic>(); data['name'] = this.name; data['age'] = this.age; return data; } } You must need to use this sometimes:
Map<String, dynamic> toJson() { return { jsonEncode("phone"): jsonEncode(numberPhone), jsonEncode("country"): jsonEncode(country), }; } This code give you a like string {“numberPhone”:”+225657869″, “country”:”CI”}. So it’s easy to decode it’s after like that
json.decode({"numberPhone":"+22565786589", "country":"CI"})
Conclusion: Thank you for reading!!! We hope you liked the article!!!
In this article, we have learned how you can convert JSON strings to JSON objects in Flutter. Comment your questions if you feel any difficulties. Flutter Agency has a team of Flutter experts who will help you to solve your technical problems.
0 notes
Text
Alamofire Tutorial: Getting Started
Update note: This tutorial has been updated to Xcode 9.3, iOS 11.3, Swift 4.1 and Alamofire 4.7.0 by Ron Kliffer. The original tutorial was written by Aaron Douglas.
Get the lowdown on Alamofire!
Alamofire is a Swift-based HTTP networking library for iOS and Mac OS X. It provides an elegant interface on top of Apple’s Foundation networking stack that simplifies a number of common networking tasks.
Alamofire provides chainable request/response methods, JSON parameter and response serialization, authentication, and many other features.
In this Alamofire tutorial, you’ll use Alamofire to perform basic networking tasks like uploading files and requesting data from a third-party RESTful API.
Alamofire’s elegance comes from the fact it was written from the ground up in Swift and does not inherit anything from its Objective-C counterpart, AFNetworking.
You should have a conceptual understanding of HTTP networking and some exposure to Apple’s networking classes such as URLSession.
While Alamofire does obscure some implementation details, it’s good to have some background knowledge if you ever need to troubleshoot your network requests.
Getting Started
Use the Download Materials button at the top or bottom of this tutorial to download the starter project.
Note: Alamofire is normally integrated using CocoaPods. It has already been installed for you in the downloaded projects.
The app for this Alamofire tutorial is named PhotoTagger. When complete, it will let you select an image from your library (or camera if you’re running on an actual device) and upload the image to a third-party service called Imagga. This service will perform some image recognition tasks to come up with a list of tags and primary colors for the image:
This project uses CocoaPods, so open it using the PhotoTagger.xcworkspace file.
Note:To learn more about CocoaPods, check out this tutorial by Joshua Greene, published right here on the site.
Build and run the project. You’ll see the following:
Click Select Photo and choose a photo. The background image will be replaced with the image you chose.
Open Main.storyboard and you’ll see the additional screens for displaying tags and colors have been added for you. All that remains is to upload the image and fetch the tags and colors.
The Imagga API
Imagga is an image recognition Platform-as-a-Service that provides image tagging APIs for developers and businesses to build scalable, image-intensive cloud apps. You can play around with a demo of their auto-tagging service here.
You’ll need to create a free developer account with Imagga for this Alamofire tutorial. Imagga requires an authorization header in each HTTP request so only people with an account can use their services. Go to https://imagga.com/auth/signup/hacker and fill out the form. After you create your account, check out the dashboard:
Listed down in the Authorization section is a secret token you’ll use later. You’ll need to include this information with every HTTP request as a header.
Note: Make sure you copy the whole secret token, be sure to scroll over to the right and verify you copied everything.
You’ll be using Imagga’s content endpoint to upload the photos, tagging endpoint for the image recognition and colors endpoint for color identification. You can read all about the Imagga API at http://docs.imagga.com.
REST, HTTP, JSON — What’s that?
If you’re coming to this tutorial with very little experience in using third-party services over the Internet, you might be wondering what all those acronyms mean! :]
HTTP is the application protocol, or set of rules, web sites use to transfer data from the web server to your screen. You’ve seen HTTP (or HTTPS) listed in the front of every URL you type into a web browser. You might have heard of other application protocols, such as FTP, Telnet, and SSH. HTTP defines several request methods, or verbs, the client (your web browser or app) use to indicate the desired action:
GET: Retrieves data, such as a web page, but doesn’t alter any data on the server.
HEAD: Identical to GET but only sends back the headers and none of the actual data.
POST: Sends data to the server, commonly used when filling a form and clicking submit.
PUT: Sends data to the specific location provided.
DELETE: Deletes data from the specific location provided.
REST, or REpresentational State Transfer, is a set of rules for designing consistent, easy-to-use and maintainable web APIs. REST has several architecture rules that enforce things such as not persisting states across requests, making requests cacheable, and providing uniform interfaces. This makes it easy for app developers like you to integrate the API into your app, without needing to track the state of data across requests.
JSON stands for JavaScript Object Notation. It provides a straightforward, human-readable and portable mechanism for transporting data between two systems. JSON has a limited number of data types: string, boolean, array, object/dictionary, null and number. There’s no distinction between integers and decimals.
There are a few native choices for converting your objects in memory to JSON and vice-versa: the good old JSONSerialization class and the newly-added JSONEncoder and JSONDecoder classes. In addition, there are numerous third party libraries that help with handling JSON. You’ll use one of them, SwiftyJSON in this tutorial.
The combination of HTTP, REST and JSON make up a good portion of the web services available to you as a developer. Trying to understand how every little piece works can be overwhelming. Libraries like Alamofire can help reduce the complexity of working with these services, and get you up and running faster than you could without their help.
What is Alamofire Good For?
Why do you need Alamofire at all? Apple already provides URLSession and other classes for downloading content via HTTP, so why complicate things with another third party library?
The short answer is Alamofire is based on URLSession, but it frees you from writing boilerplate code which makes writing networking code much easier. You can access data on the Internet with very little effort, and your code will be much cleaner and easier to read.
There are several major functions available with Alamofire:
Alamofire.upload: Upload files with multipart, stream, file or data methods.
Alamofire.download: Download files or resume a download already in progress.
Alamofire.request: Every other HTTP request not associated with file transfers.
These Alamofire methods are global within Alamofire so you don’t have to instantiate a class to use them. There are underlying pieces to Alamofire that are classes and structs, like SessionManager, DataRequest, and DataResponse; however, you don’t need to fully understand the entire structure of Alamofire to start using it.
Here’s an example of the same networking operation with both Apple’s URLSession and Alamofire’s request function:
// With URLSession public func fetchAllRooms(completion: @escaping ([RemoteRoom]?) -> Void) { guard let url = URL(string: "http://localhost:5984/rooms/_all_docs?include_docs=true") else { completion(nil) return } var urlRequest = URLRequest(url: url, cachePolicy: .reloadIgnoringLocalAndRemoteCacheData, timeoutInterval: 10.0 * 1000) urlRequest.httpMethod = "GET" urlRequest.addValue("application/json", forHTTPHeaderField: "Accept") let task = urlSession.dataTask(with: urlRequest) { (data, response, error) -> Void in guard error == nil else { print("Error while fetching remote rooms: \(String(describing: error)") completion(nil) return } guard let data = data, let json = try? JSONSerialization.jsonObject(with: data) as? [String: Any] else { print("Nil data received from fetchAllRooms service") completion(nil) return } guard let rows = json?["rows"] as? [[String: Any]] else { print("Malformed data received from fetchAllRooms service") completion(nil) return } let rooms = rows.flatMap { roomDict in return RemoteRoom(jsonData: roomDict) } completion(rooms) } task.resume() }
Versus:
// With Alamofire func fetchAllRooms(completion: @escaping ([RemoteRoom]?) -> Void) { guard let url = URL(string: "http://localhost:5984/rooms/_all_docs?include_docs=true") else { completion(nil) return } Alamofire.request(url, method: .get, parameters: ["include_docs": "true"]) .validate() .responseJSON { response in guard response.result.isSuccess else { print("Error while fetching remote rooms: \(String(describing: response.result.error)") completion(nil) return } guard let value = response.result.value as? [String: Any], let rows = value["rows"] as? [[String: Any]] else { print("Malformed data received from fetchAllRooms service") completion(nil) return } let rooms = rows.flatMap { roomDict in return RemoteRoom(jsonData: roomDict) } completion(rooms) } }
You can see the required setup for Alamofire is shorter and it’s much clearer what the function does. You deserialize the response with responseJSON(options:completionHandler:) and calling validate() to verify the response status code is in the default acceptable range between 200 and 299 simplifies error condition handling.
Now the theory is out of the way, it’s time to start using Alamofire.
Uploading Files
Open ViewController.swift and add the following to the top, below import SwiftyJSON:
import Alamofire
This lets you use the functionality provided by the Alamofire module in your code, which you’ll be doing soon!
Next, go to imagePickerController(_:didFinishPickingMediaWithInfo:) and add the following to the end, right before the call to dismiss(animated:):
// 1 takePictureButton.isHidden = true progressView.progress = 0.0 progressView.isHidden = false activityIndicatorView.startAnimating() upload(image: image, progressCompletion: { [weak self] percent in // 2 self?.progressView.setProgress(percent, animated: true) }, completion: { [weak self] tags, colors in // 3 self?.takePictureButton.isHidden = false self?.progressView.isHidden = true self?.activityIndicatorView.stopAnimating() self?.tags = tags self?.colors = colors // 4 self?.performSegue(withIdentifier: "ShowResults", sender: self) })
Everything with Alamofire is asynchronous, which means you’ll update the UI in an asynchronous manner:
Hide the upload button, and show the progress view and activity view.
While the file uploads, you call the progress handler with an updated percent. This updates the progress indicator of the progress bar.
The completion handler executes when the upload finishes. This sets the controls back to their original state.
Finally the Storyboard advances to the results screen when the upload completes, successfully or not. The user interface doesn’t change based on the error condition.
Next, find upload(image:progressCompletion:completion:) at the bottom of the file. It is currently only a method stub, so give it the following implementation:
func upload(image: UIImage, progressCompletion: @escaping (_ percent: Float) -> Void, completion: @escaping (_ tags: [String]?, _ colors: [PhotoColor]?) -> Void) { // 1 guard let imageData = UIImageJPEGRepresentation(image, 0.5) else { print("Could not get JPEG representation of UIImage") return } // 2 Alamofire.upload(multipartFormData: { multipartFormData in multipartFormData.append(imageData, withName: "imagefile", fileName: "image.jpg", mimeType: "image/jpeg") }, to: "http://api.imagga.com/v1/content", headers: ["Authorization": "Basic xxx"], encodingCompletion: { encodingResult in }) }
Here’s what’s happening:
The image that’s being uploaded needs to be converted to a Data instance.
Here you convert the JPEG data blob (imageData) into a MIME multipart request to send to the Imagga content endpoint.
Note: Make sure to replace Basic xxx with the actual authorization header taken from the Imagga dashboard.
Next, add the following to the encodingCompletion closure:
switch encodingResult { case .success(let upload, _, _): upload.uploadProgress { progress in progressCompletion(Float(progress.fractionCompleted)) } upload.validate() upload.responseJSON { response in } case .failure(let encodingError): print(encodingError) }
This chunk of code calls the Alamofire upload function and passes in a small calculation to update the progress bar as the file uploads. It then validates the response has a status code in the default acceptable range between 200 and 299.
Note: Prior to Alamofire 4 it was not guaranteed progress callbacks were called on the main queue. Beginning with Alamofire 4, the new progress callback API is always called on the main queue.
Next, add the following code to the upload.responseJSON closure:
// 1 guard response.result.isSuccess, let value = response.result.value else { print("Error while uploading file: \(String(describing: response.result.error))") completion(nil, nil) return } // 2 let firstFileID = JSON(value)["uploaded"][0]["id"].stringValue print("Content uploaded with ID: \(firstFileID)") //3 completion(nil, nil)
Here’s a step-by-step explanation of the above code:
Check that the upload was successful, and the result has a value; if not, print the error and call the completion handler.
Using SwiftyJSON, retrieve the firstFileID from the response.
Call the completion handler to update the UI. At this point, you don’t have any downloaded tags or colors, so simply call this with no data.
Note: Every response has a Result enum with a value and type. Using automatic validation, the result is considered a success when it returns a valid HTTP Code between 200 and 299 and the Content Type is of a valid type specified in the Accept HTTP header field.
You can perform manual validation by adding .validate options as shown below:
Alamofire.request("https://httpbin.org/get", parameters: ["foo": "bar"]) .validate(statusCode: 200..<300) .validate(contentType: ["application/json"]) .response { response in // response handling code }
The UI won't show an error if you hit an error during the upload; it merely returns no tags or colors to the user. This isn't the best user experience, but it's fine for this tutorial.
Build and run your project; select an image and watch the progress bar change as the file uploads. You should see a note like the following in your console when the upload completes:
Congratulations, you've successfully uploaded a file over the Interwebs!
Retrieving Data
The next step after uploading the image to Imagga is to fetch the tags Imagga produces after it analyzes the photo.
Add the following method to the ViewController extension below upload(image:progress:completion:):
func downloadTags(contentID: String, completion: @escaping ([String]?) -> Void) { // 1 Alamofire.request("http://api.imagga.com/v1/tagging", parameters: ["content": contentID], headers: ["Authorization": "Basic xxx"]) // 2 .responseJSON { response in guard response.result.isSuccess, let value = response.result.value else { print("Error while fetching tags: \(String(describing: response.result.error))") completion(nil) return } // 3 let tags = JSON(value)["results"][0]["tags"].array?.map { json in json["tag"].stringValue } // 4 completion(tags) } }
Here's a step-by-step explanation of the above code:
Perform an HTTP GET request against the tagging endpoint, sending the URL parameter content with the ID you received after the upload. Again, be sure to replace Basic xxx with your actual authorization header.
Check that the response was successful, and the result has a value; if not, print the error and call the completion handler.
Using SwiftyJSON, retrieve the raw tags array from the response. Iterate over each dictionary object in the tags array, retrieving the value associated with the tag key.
Call the completion handler passing in the tags received from the service.
Next, go back to upload(image:progress:completion:) and replace the call to the completion handler in the success condition with the following:
self.downloadTags(contentID: firstFileID) { tags in completion(tags, nil) }
This simply sends along the tags to the completion handler.
Build and run your project; select a photo and you should see something similar to the following appear:
Pretty slick! That Imagga is one smart API. :] Next, you'll fetch the colors of the image.
Add the following method to the ViewController extension below downloadTags(contentID:completion:):
func downloadColors(contentID: String, completion: @escaping ([PhotoColor]?) -> Void) { // 1. Alamofire.request("http://api.imagga.com/v1/colors", parameters: ["content": contentID], headers: ["Authorization": "Basic xxx"]) .responseJSON { response in // 2 guard response.result.isSuccess, let value = response.result.value else { print("Error while fetching colors: \(String(describing: response.result.error))") completion(nil) return } // 3 let photoColors = JSON(value)["results"][0]["info"]["image_colors"].array?.map { json in PhotoColor(red: json["r"].intValue, green: json["g"].intValue, blue: json["b"].intValue, colorName: json["closest_palette_color"].stringValue) } // 4 completion(photoColors) } }
Taking each numbered comment in turn:
Perform an HTTP GET request against the colors endpoint, sending the URL parameter content with the ID you received after the upload. Again, be sure to replace Basic xxx with your actual authorization header.
Check that the response was successful, and the result has a value; if not, print the error and call the completion handler.
Using SwiftyJSON, retrieve the image_colors array from the response. Iterate over each dictionary object in the image_colors array, and transform it into a PhotoColor object. This object pairs colors in the RGB format with the color name as a string.
Call the completion handler, passing in the photoColors from the service.
Finally, go back to upload(image:progress:completion:) and replace the call to downloadTags(contentID:) in the success condition with the following:
self.downloadTags(contentID: firstFileID) { tags in self.downloadColors(contentID: firstFileID) { colors in completion(tags, colors) } }
This nests the operations of uploading the image, downloading tags and downloading colors.
Build and run your project again; this time, you should see the returned color tags when you select the Colors button:
This uses the RGB colors you mapped to PhotoColor structs to change the background color of the view. You've now successfully uploaded an image to Imagga and fetched data from two different endpoints. You've come a long way, but there's some room for improvement in how you're using Alamofire in PhotoTagger.
Improving PhotoTagger
You probably noticed some repeated code in PhotoTagger. If Imagga released v2 of their API and deprecated v1, PhotoTagger would no longer function and you'd have to update the URL in each of the three methods. Similarly, if your authorization token changed you'd be updating it all over the place.
Alamofire provides a simple method to eliminate this code duplication and provide centralized configuration. The technique involves creating a struct conforming to URLRequestConvertible and updating your upload and request calls.
Create a new Swift file by clicking File\New\File... and selecting Swift file under iOS. Click Next, name the file ImaggaRouter.swift, select the Group PhotoTagger with the yellow folder icon and click Create.
Add the following to your new file:
import Alamofire public enum ImaggaRouter: URLRequestConvertible { // 1 enum Constants { static let baseURLPath = "http://api.imagga.com/v1" static let authenticationToken = "Basic xxx" } // 2 case content case tags(String) case colors(String) // 3 var method: HTTPMethod { switch self { case .content: return .post case .tags, .colors: return .get } } // 4 var path: String { switch self { case .content: return "/content" case .tags: return "/tagging" case .colors: return "/colors" } } // 5 var parameters: [String: Any] { switch self { case .tags(let contentID): return ["content": contentID] case .colors(let contentID): return ["content": contentID, "extract_object_colors": 0] default: return [:] } } // 6 public func asURLRequest() throws -> URLRequest { let url = try Constants.baseURLPath.asURL() var request = URLRequest(url: url.appendingPathComponent(path)) request.httpMethod = method.rawValue request.setValue(Constants.authenticationToken, forHTTPHeaderField: "Authorization") request.timeoutInterval = TimeInterval(10 * 1000) return try URLEncoding.default.encode(request, with: parameters) } }
Here's a step-by-step explanation of the above code:
Declare constants to hold the Imagga base URL and your Basic xxx with your actual authorization header.
Declare the enum cases. Each case corresponds to an api endpoint.
Return the HTTP method for each api endpoint.
Return the path for each api endpoint.
Return the parameters for each api endpoint.
Use all of the above components to create a URLRequest for the requested endpoint.
Now all your boilerplate code is in single place, should you ever need to update it.
Go back to ViewController.swift and in upload(image:progress:completion:) replace:
Alamofire.upload( multipartFormData: { multipartFormData in multipartFormData.append(imageData, withName: "imagefile", fileName: "image.jpg", mimeType: "image/jpeg") }, to: "http://api.imagga.com/v1/content", headers: ["Authorization": "Basic xxx"],
with the following:
Alamofire.upload(multipartFormData: { multipartFormData in multipartFormData.append(imageData, withName: "imagefile", fileName: "image.jpg", mimeType: "image/jpeg") }, with: ImaggaRouter.content,
Next replace the call for Alamofire.request in downloadTags(contentID:completion:) with:
Alamofire.request(ImaggaRouter.tags(contentID))
Finally, update the call to Alamofire.request in downloadColors(contentID:completion:) with:
Alamofire.request(ImaggaRouter.colors(contentID))
Note: Be sure to leave the responseJSON handlers in place for both of the previous edits.
Build and run for the final time; everything should function just as before, which means you've refactored everything without breaking your app. However, you don't have to go through your entire source code if anything on the Imagga integration ever changes: APIs, your authorization token, parameters, etc. Awesome job!
Where To Go From Here?
You can download the completed version of the project using the Download Materials button at the top or bottom of this tutorial. Don't forget to replace your authorization token as appropriate!
This tutorial covered the very basics. You can take a deeper dive by looking at the documentation on the Alamofire site at https://github.com/Alamofire/Alamofire.
Also, you can take some time to learn more about Apple's URLSession which Alamofire uses under the hood:
Apple WWDC 2015 - 711 - Networking with NSURLSession
Apple URL Session Programming Guide
Ray Wenderlich - NSURLSession Tutorial
Please share any comments or questions about this tutorial in the forum discussion below!
The post Alamofire Tutorial: Getting Started appeared first on Ray Wenderlich.
Alamofire Tutorial: Getting Started published first on https://medium.com/@koresol
0 notes
Text
What’s New in Swift 4.1?
Xcode 9.3 and Swift 4.1 are finally out of beta! This release contains some long-awaited improvements to the standard library and language itself. If you haven’t been following the Swift Evolution Process closely, keep reading.
In this tutorial, you’ll learn about the most significant changes introduced in Swift 4.1.
This article requires Xcode 9.3, so make sure you have it installed and ready to go before getting started.
Getting Started
Swift 4.1 is source-compatible with Swift 4, so the new features won’t break your code if you’ve already migrated your project to Swift 4 using the Swift Migrator in Xcode.
In the sections below, you’ll see linked tags such as [SE-0001]. These are Swift Evolution proposal numbers. I’ve included the link to each proposal so you can dig into the full details of each particular change. I recommend you try out the features in a playground so you have a better understanding of everything that changes as you work.
To start, fire up Xcode 9.3 and select File ▸ New ▸ Playground. Choose iOS as the platform and Blank as its template. Name and save it as you like. To get the most out of this tutorial, try out each feature in your new playground as you work.
Note: Need to catch up the highlights of Swift 4? No problem! Check out the predecessor to this tutorial, Swift 4: What’s New in Swift 4.
Language Improvements
There are a number of language improvements in this release, including conditional conformance, recursive constraints on associated types in protocols and more.
Conditional Conformance
Conditional conformance enables protocol conformance for generic types where the type arguments satisfy certain conditions [SE-0143]. This is a powerful feature that makes your code more flexible. You can see how it works with a few examples.
Conditional conformance in the standard library
In Swift 4, you could compare arrays, dictionaries and optionals as long as their elements were Equatable. This worked absolutely fine for basic scenarios such as:
// Arrays of Int let firstArray = [1, 2, 3] let secondArray = [1, 2, 3] let sameArray = firstArray == secondArray // Dictionaries with Int values let firstDictionary = ["Cosmin": 10, "George": 9] let secondDictionary = ["Cosmin": 10, "George": 9] let sameDictionary = firstDictionary == secondDictionary // Comparing Int? let firstOptional = firstDictionary["Cosmin"] let secondOptional = secondDictionary["Cosmin"] let sameOptional = firstOptional == secondOptional
Using the == operator to test equality in these examples worked since Int is Equatable in Swift 4. However, comparing collections of optionals was a common situation you might have run into with Swift 4 since optionals do not conform to Equatable. Swift 4.1 fixes this issue using conditional conformance, letting optional types with underlying Equatable types to be compared:
// Array of Int? let firstArray = [1, nil, 2, nil, 3, nil] let secondArray = [1, nil, 2, nil, 3, nil] let sameArray = firstArray == secondArray // Dictionary with Int? values let firstDictionary = ["Cosmin": 10, "George": nil] let secondDictionary = ["Cosmin": 10, "George": nil] let sameDictionary = firstDictionary == secondDictionary // Comparing Int?? (Optional of Optional) let firstOptional = firstDictionary["Cosmin"] let secondOptional = secondDictionary["Cosmin"] let sameOptional = firstOptional == secondOptional
Int? is Equatable in Swift 4.1, so the == operator works for [Int?], [String: Int?] and Int??.
A similar problem has been solved when comparing arrays of arrays (e.g. [[Int]]). In Swift 4, you could only compare arrays of sets (e.g. [Set<Int>]), since sets conform to Equatable. Swift 4.1 solves this, since arrays (and dictionaries) are Equatable as long as their underlying values are, too.
let firstArrayOfSets = [Set([1, 2, 3]), Set([1, 2, 3])] let secondArrayOfSets = [Set([1, 2, 3]), Set([1, 2, 3])] // Will work in Swift 4 and Swift 4.1 // since Set<Int> is Equatable firstArrayOfSets == secondArrayOfSets let firstArrayOfArrays = [[1, 2, 3], [3, 4, 5]] let secondArrayOfArrays = [[1, 2, 3], [3, 4, 5]] // Caused an error in Swift 4, but works in Swift 4.1 // since Arrays are Equatable in Swift 4.1 firstArrayOfArrays == secondArrayOfArrays
Generally, Swift 4.1’s Optional, Array and Dictionary now conform to Equatable and Hashable whenever their underlying values or elements conform to these protocols.
This is how conditional conformance works in the standard library. Next, you will implement it in your own code.
Conditional conformance in code
You’re going to use conditional conformance to create your own band of musical instruments. Add the following block of code at the bottom of the playground to get started:
// 1 class LeadInstrument: Equatable { let brand: String init(brand: String) { self.brand = brand } func tune() -> String { return "Standard tuning." } static func ==(lhs: LeadInstrument, rhs: LeadInstrument) -> Bool { return lhs.brand == rhs.brand } } // 2 class Keyboard: LeadInstrument { override func tune() -> String { return "Keyboard standard tuning." } } // 3 class Guitar: LeadInstrument { override func tune() -> String { return "Guitar standard tuning." } }
Here’s what’s this does step-by-step:
LeadInstrument conforms to Equatable. It has a certain brand and a method named tune() that you’ll eventually use to tune the instrument.
You override tune() in Keyboard to return keyboard standard tuning.
You do the same thing for Guitar.
Next, declare the band of instruments:
// 1 class Band<LeadInstrument> { let name: String let lead: LeadInstrument init(name: String, lead: LeadInstrument) { self.name = name self.lead = lead } } // 2 extension Band: Equatable where LeadInstrument: Equatable { static func ==(lhs: Band<LeadInstrument>, rhs: Band<LeadInstrument>) -> Bool { return lhs.name == rhs.name && lhs.lead == rhs.lead } }
Here’s what you’re doing step-by-step:
You create a class called Band with a generic type – LeadInstrument. Each band has an unique name and lead instrument.
You use where to constrain Band to conform to Equatable as long as LeadInstrument does. Your ability to conform the Band‘s generic LeadInstrument to Equatable is exactly where conditional conformance comes into play.
Next, define your favorite bands and compare them:
// 1 let rolandKeyboard = Keyboard(brand: "Roland") let rolandBand = Band(name: "Keys", lead: rolandKeyboard) let yamahaKeyboard = Keyboard(brand: "Yamaha") let yamahaBand = Band(name: "Keys", lead: yamahaKeyboard) let sameBand = rolandBand == yamahaBand // 2 let fenderGuitar = Guitar(brand: "Fender") let fenderBand = Band(name: "Strings", lead: fenderGuitar) let ibanezGuitar = Guitar(brand: "Ibanez") let ibanezBand = Band(name: "Strings", lead: ibanezGuitar) let sameBands = fenderBand == ibanezBand
In this piece of code, you create two Keyboards and Guitars along with their appropriate Bands. You then compare the bands directly, thanks to the conditional conformance you defined earlier.
Conditional conformance in JSON parsing
Arrays, dictionaries, sets and optionals conform to Codable if their elements conform to Codable in Swift 4.1. Add the following code to your playground to try this:
struct Student: Codable, Hashable { let firstName: String let averageGrade: Int } let cosmin = Student(firstName: "Cosmin", averageGrade: 10) let george = Student(firstName: "George", averageGrade: 9) let encoder = JSONEncoder() // Encode an Array of students let students = [cosmin, george] do { try encoder.encode(students) } catch { print("Failed encoding students array: \(error)") } // Encode a Dictionary with student values let studentsDictionary = ["Cosmin": cosmin, "George": george] do { try encoder.encode(studentsDictionary) } catch { print("Failed encoding students dictionary: \(error)") } // Encode a Set of students let studentsSet: Set = [cosmin, george] do { try encoder.encode(studentsSet) } catch { print("Failed encoding students set: \(error)") } // Encode an Optional Student let optionalStudent: Student? = cosmin do { try encoder.encode(optionalStudent) } catch { print("Failed encoding optional student: \(error)") }
You use this code to encode [Student], [String: Student], Set<Student> and Student?. This works smoothly in Swift 4.1 since Student is Codable, which makes these collection types conform to it as well.
Convert Between Camel Case and Snake Case During JSON Encoding
Swift 4.1 lets you convert CamelCase properties to snake_case keys during JSON encoding:
var jsonData = Data() encoder.keyEncodingStrategy = .convertToSnakeCase encoder.outputFormatting = .prettyPrinted do { jsonData = try encoder.encode(students) } catch { print(error) } if let jsonString = String(data: jsonData, encoding: .utf8) { print(jsonString) }
When creating your encoder, you set keyEncodingStrategy to .convertToSnakeCase. Looking at your console, you should see:
[ { "first_name" : "Cosmin", "average_grade" : 10 }, { "first_name" : "George", "average_grade" : 9 } ]
You can also go back from snake case keys to camel case properties during JSON decoding:
var studentsInfo: [Student] = [] let decoder = JSONDecoder() decoder.keyDecodingStrategy = .convertFromSnakeCase do { studentsInfo = try decoder.decode([Student].self, from: jsonData) } catch { print(error) } for studentInfo in studentsInfo { print("\(studentInfo.firstName) \(studentInfo.averageGrade)") }
This time, you set keyDecodingStrategy to .convertFromSnakeCase.
Equatable and Hashable Protocols Conformance
Swift 4 required you to write boilerplate code to make structs conform to Equatable and Hashable:
struct Country: Hashable { let name: String let capital: String static func ==(lhs: Country, rhs: Country) -> Bool { return lhs.name == rhs.name && lhs.capital == rhs.capital } var hashValue: Int { return name.hashValue ^ capital.hashValue &* 16777619 } }
Using this code, you implemented ==(lhs:rhs:) and hashValue to support both Equatable and Hashable. You could compare countries, add them to sets and even use them as dictionary keys:
let france = Country(name: "France", capital: "Paris") let germany = Country(name: "Germany", capital: "Berlin") let sameCountry = france == germany let countries: Set = [france, germany] let greetings = [france: "Bonjour", germany: "Guten Tag"]
Swift 4.1 adds default implementations in structs for Equatable and Hashable as long as all of their properties are Equatable and Hashable as well [SE-0185].
This highly simplifies your code, which can simply be rewritten as:
struct Country: Hashable { let name: String let capital: String }
Enumerations with associated values also needed extra code to work with Equatable and Hashable in Swift 4:
enum BlogPost: Hashable { case tutorial(String, String) case article(String, String) static func ==(lhs: BlogPost, rhs: BlogPost) -> Bool { switch (lhs, rhs) { case let (.tutorial(lhsTutorialTitle, lhsTutorialAuthor), .tutorial(rhsTutorialTitle, rhsTutorialAuthor)): return lhsTutorialTitle == rhsTutorialTitle && lhsTutorialAuthor == rhsTutorialAuthor case let (.article(lhsArticleTitle, lhsArticleAuthor), .article(rhsArticleTitle, rhsArticleAuthor)): return lhsArticleTitle == rhsArticleTitle && lhsArticleAuthor == rhsArticleAuthor default: return false } } var hashValue: Int { switch self { case let .tutorial(tutorialTitle, tutorialAuthor): return tutorialTitle.hashValue ^ tutorialAuthor.hashValue &* 16777619 case let .article(articleTitle, articleAuthor): return articleTitle.hashValue ^ articleAuthor.hashValue &* 16777619 } } }
You used the enumeration’s cases to write implementations for ==(lhs:rhs:) and hashValue. This enabled you to compare blog posts and use them in sets and dictionaries:
let swift3Article = BlogPost.article("What's New in Swift 3.1?", "Cosmin Pupăză") let swift4Article = BlogPost.article("What's New in Swift 4.1?", "Cosmin Pupăză") let sameArticle = swift3Article == swift4Article let swiftArticlesSet: Set = [swift3Article, swift4Article] let swiftArticlesDictionary = [swift3Article: "Swift 3.1 article", swift4Article: "Swift 4.1 article"]
As the case was with Hashable, this code’s size is vastly reduced in Swift 4.1 thanks to default Equatable and Hashable implementations:
enum BlogPost: Hashable { case tutorial(String, String) case article(String, String) }
You just saved yourself from maintaining 20 lines of boilerplate code!
Hashable Index Types
Key paths may have used subscripts if the subscript parameter’s type was Hashable in Swift 4. This enabled them to work with arrays of double; for example:
let swiftVersions = [3, 3.1, 4, 4.1] let path = \[Double].[swiftVersions.count - 1] let latestVersion = swiftVersions[keyPath: path]
You use keyPath to get the current Swift version number from swiftVersions.
Swift 4.1 adds Hashable conformance to all index types in the standard library [SE-0188]:
let me = "Cosmin" let newPath = \String.[me.startIndex] let myInitial = me[keyPath: newPath]
The subscript returns the first letter of the string. It works since String index types are Hashable in Swift 4.1.
Recursive Constraints on Associated Types in Protocols
Swift 4 didn’t support defining recursive constraints on associated types in protocols:
protocol Phone { associatedtype Version associatedtype SmartPhone } class IPhone: Phone { typealias Version = String typealias SmartPhone = IPhone }
In this example, you defined a SmartPhone associated type, but it might have proved useful to constrain it to Phone, since all smartphones are phones. This is now possible in Swift 4.1 [SE-0157]:
protocol Phone { associatedtype Version associatedtype SmartPhone: Phone where SmartPhone.Version == Version, SmartPhone.SmartPhone == SmartPhone }
You use where to constrain both Version and SmartPhone to be the same as the phone’s.
Weak and Unowned References in Protocols
Swift 4 supported weak and unowned for protocol properties:
class Key {} class Pitch {} protocol Tune { unowned var key: Key { get set } weak var pitch: Pitch? { get set } } class Instrument: Tune { var key: Key var pitch: Pitch? init(key: Key, pitch: Pitch?) { self.key = key self.pitch = pitch } }
You tuned an instrument in a certain key and pitch. The pitch may have been nil, so you’d model it as weak in the Tune protocol.
But both weak and unowned are practically meaningless if defined within the protocol itself, so Swift 4.1 removes them and you will get a warning using these keywords in a protocol [SE-0186]:
protocol Tune { var key: Key { get set } var pitch: Pitch? { get set } }
Index Distances in Collections
Swift 4 used IndexDistance to declare the number of elements in a collection:
func typeOfCollection<C: Collection>(_ collection: C) -> (String, C.IndexDistance) { let collectionType: String switch collection.count { case 0...100: collectionType = "small" case 101...1000: collectionType = "medium" case 1001...: collectionType = "big" default: collectionType = "unknown" } return (collectionType, collection.count) }
typeOfCollection(_:) returned a tuple, which contained the collection’s type and count. You could use it for any kind of collections like arrays, dictionaries or sets; for example:
typeOfCollection(1...800) // ("medium", 800) typeOfCollection(greetings) // ("small", 2)
You could improve the function’s return type by constraining IndexDistance to Int with a where clause:
func typeOfCollection<C: Collection>(_ collection: C) -> (String, Int) where C.IndexDistance == Int { // same code as the above example }
Swift 4.1 replaces IndexDistance with Int in the standard library, so you don’t need a where clause in this case [SE-0191]:
func typeOfCollection<C: Collection>(_ collection: C) -> (String, Int) { // same code as the above example }
Structure Initializers in Modules
Adding properties to public structs could lead to source-breaking changes in Swift 4. For this tutorial, make sure the Project Navigator is visible in Xcode by going to View\Navigators\Show Project Navigator. Next, right-click on Sources and select New File from the menu. Rename the file DiceKit.swift. Replace its contents with the following block of code:
public struct Dice { public let firstDie: Int public let secondDie: Int public init(_ value: Int) { let finalValue: Int switch value { case ..<1: finalValue = 1 case 6...: finalValue = 6 default: finalValue = value } firstDie = finalValue secondDie = 7 - finalValue } }
The struct's initializer makes sure both dice have valid values between 1 and 6. Switch back to the playground and add this code at the end of it:
// 1 let dice = Dice(0) dice.firstDie dice.secondDie // 2 extension Dice { init(_ firstValue: Int, _ secondValue: Int) { firstDie = firstValue secondDie = secondValue } } // 3 let newDice = Dice(0, 7) newDice.firstDie newDice.secondDie
Here's what you did with this code:
You created a valid pair of dice.
You extended Dice with another initializer that has direct access to its properties.
You defined an invalid pair of dice with the struct's new initializer.
In Swift 4.1, cross-target initializers should call the default one. Change your extension on Dice to:
extension Dice { init(_ firstValue: Int, _ secondValue: Int) { self.init(abs(firstValue - secondValue)) } }
This change makes structs behave like classes: cross-module initializers must be convenience initializers in Swift 4.1 [SE-0189].
In Swift 4.1 you can no longer cheat in dice games!
Platform Settings and Build Configuration Updates
Swift 4.1 adds some much-needed platform and build features for code testing:
Build Imports
In Swift 4, you tested if a module was available on a certain platform by checking the operating system itself; for example:
#if os(iOS) || os(tvOS) import UIKit print("UIKit is available on this platform.") #else print("UIKit is not available on this platform.") #endif
UIKit is available on iOS and tvOS, so you imported it if the test succeeded. Swift 4.1 further simplifies this by letting you check for the module itself instead:
#if canImport(UIKit) print("UIKit is available if this is printed!") #endif
In Swift 4.1, you use #if canImport(UIKit) to confirm a certain framework is available for importing [SE-0075].
Target Environments
When writing Swift 4 code, the most well-known way to check whether you were running on a simulator or a physical device was by checking both the architecture and operation system:
#if (arch(i386) || arch(x86_64)) && (os(iOS) || os(tvOS) || os(watchOS)) print("Testing in the simulator.") #else print("Testing on the device.") #endif
If your architecture was Intel-based and your operating system was iOS, tvOS or watchOS, you were testing in the simulator. Otherwise, you were testing on the device.
This test was very cumbersome and was also very non-descriptive of the issue at hand. Swift 4.1 makes this test much more straightforward; just use targetEnvironment(simulator) [SE-0190] like so:
#if targetEnvironment(simulator) print("Testing in the simulator.") #endif
Miscellaneous Bits and Pieces
There are a few other updates in Swift 4.1 that are worth knowing:
Compacting Sequences
In Swift 4, it was fairly common to use flatMap(_:) to filter out nil values from a sequence:
let pets = ["Sclip", nil, "Nori", nil] let petNames = pets.flatMap { $0 } // ["Sclip", "Nori"]
Unfortunately, flatMap(_:) was overloaded in various ways and, in that specific scenario, the flatMap(_:) naming wasn't very descriptive of the action taken.
For these reasons, Swift 4.1 introduces a rename of flatMap(_:) to compactMap(_:) to make its meaning clearer and unique [SE-0187]:
let petNames = pets.compactMap { $0 }
Unsafe Pointers
Swift 4 used temporary unsafe mutable pointers to create and mutate unsafe mutable buffer pointers:
let buffer = UnsafeMutableBufferPointer<Int>(start: UnsafeMutablePointer<Int>.allocate(capacity: 10), count: 10) let mutableBuffer = UnsafeMutableBufferPointer(start: UnsafeMutablePointer(mutating: buffer.baseAddress), count: buffer.count)
Swift 4.1 lets you work with unsafe mutable buffer pointers directly, using the same approach as with unsafe mutable pointers [SE-0184]:
let buffer = UnsafeMutableBufferPointer<Int>.allocate(capacity: 10) let mutableBuffer = UnsafeMutableBufferPointer(mutating: UnsafeBufferPointer(buffer))
New Playground Features
Swift 4 allowed you to customize type descriptions in Xcode playgrounds:
class Tutorial {} extension Tutorial: CustomPlaygroundQuickLookable { var customPlaygroundQuickLook: PlaygroundQuickLook { return .text("raywenderlich.com tutorial") } } let tutorial = Tutorial()
You implemented CustomPlaygroundQuickLookable for Tutorial to return a custom quick-look playground description. The description’s type in customPlaygroundQuickLook was limited to PlaygroundQuickLook cases. This is no longer the case (pun intended) in Swift 4.1:
extension Tutorial: CustomPlaygroundDisplayConvertible { var playgroundDescription: Any { return "raywenderlich.com tutorial" } }
You implement CustomPlaygroundDisplayConvertible this time. The description’s type is Any now, so you can return anything from playgroundDescription. This simplifies your code and makes it more flexible [SE-0198].
Where to Go From Here?
You can download the final playground using the Download Materials link at either the top or bottom of this tutorial.
Swift 4.1 polishes up some Swift 4 features in preparation for more serious changes that will be coming in Swift 5 later this year. These include ABI stability, improved generics and strings, new memory ownership and concurrency models and more.
If you're feeling adventurous, head over and look at the Swift standard library diffs or to the official Swift CHANGELOG where you can read more information about all changes in this version. You can also use this to keep an eye out for what's coming in Swift 5!
If you're curious about what changes are coming in Swift 5 and beyond, we also recommend that you check out Swift Evolution proposals, where you can see which new features, changes and additions are being proposed. If you're really keen, why not give feedback on one of the current proposals under review or even pitch a proposal yourself!
What do you like or dislike about Swift 4.1 so far? Let us know in the forum discussion below!
The post What’s New in Swift 4.1? appeared first on Ray Wenderlich.
What’s New in Swift 4.1? published first on https://medium.com/@koresol
0 notes
Text
Encoding, Decoding and Serialization in Swift 4
This is an abridged chapter from our best-selling book Swift Apprentice, which has been completely updated for Swift 4 and includes several new chapters. This tutorial is presented as part of our iOS 11 Launch Party — enjoy!
There are several scenarios where you’ll need to save data to a file or to send it over the network. In this tutorial, you’ll learn how to achieve these tasks by converting your instances to another representation, like a string or a stream of bytes. This process is known as encoding, also known as serialization.
The reverse process of turning the data into an instance is called decoding, or deserialization.
Imagine you have an instance you want to write to a file. The instance itself cannot be written as-is to the file, so you need to encode it into another representation, like as a stream of bytes:
Once the data is encoded and saved to a file, you can turn it back into an instance whenever you want by using a decoder:
Encodable and Decodable Protocols
The Encodable protocol is used by types that can be encoded to another representation. It declares a single method:
func encode(to: Encoder) throws
…which the compiler generates for you if all the stored properties of that type conform to Encodable as well. You’ll learn more about this later on in the tutorial.
The Decodable protocol is used by types that can be decoded. It declares just a single initializer:
init(from decoder: Decoder) throws
You will know when and how to implement these methods by the end of this tutorial.
What is Codable?
Codable is a protocol that a type can conform to, to declare that it can be encoded and decoded. It’s basically an alias for the Encodable and Decodable protocols.
typealias Codable = Encodable & Decodable
Automatic Encoding and Decoding
There are many types in Swift which are codable out of the box: Int, String, Date, Array and many other types from the Standard Library and the Foundation framework. If you want your type to be codable, the simplest way to do it is by conforming to Codable and making sure all its stored properties are also codable.
For example, let’s say you own a toy factory and you have this struct to store employee data:
struct Employee { var name: String var id: Int }
All you need to do to be able to encode and decode this type is to conform to the Codable protocol, like so:
struct Employee: Codable { var name: String var id: Int }
Wow, that was easy! You were able to do it because both name (String) and id (Int) are codable.
This works well when you’re only using types that are already Codable. But what if your type includes other custom types as properties? For example, looking at your Employee struct, assume that it also has a favoriteToy property:
struct Employee: Codable { var name: String var id: Int var favoriteToy: Toy } struct Toy: Codable { var name: String }
By making sure Toy also conforms to Codable, you maintain the overall conformance to Codable for Employee as well.
All collections types, like Array and Dictionary are also codable if they contain codable types.
Encoding and Decoding Custom Types
There are several representations you can encode to or decode from, such as XML or a Property List. In this section, you’ll learn how to encode to and decode from JSON, by using Swift’s JSONEncoder and JSONDecoder classes.
JSON stands for JavaScript Object Notation, and is one of the most popular ways to serialize data. It’s easily readable by humans and easy for computers to parse and generate.
For example, if you were to encode an instance of type Employee to JSON, it might look something like this:
{ "name": "John Appleseed", "id": 7 }
You can easily understand how the Employee instance looked like before it was serialized into JSON.
JSONEncoder and JSONDecoder
Once you have a codable type, you can use JSONEncoder to convert your type to Data which can be either written to a file or sent over the network. Assume you have this employee instance:
let toy1 = Toy(name: "Teddy Bear"); let employee1 = Employee(name: "John Appleseed", id: 7, favoriteToy: toy1)
John’s birthday is coming up and you want to give him his favorite toy as a gift. You need to send over this data to the Gifts department. Before you can do that, you need to encode it like this:
let jsonEncoder = JSONEncoder() let jsonData = try jsonEncoder.encode(employee1)
You’ll notice that you need to use try because encode(_:) might fail and throw an error.
If you try to print jsonData like this:
print(jsonData)
You’ll see that Xcode omits the data and only provides the number of bytes in jsonData. This is fine, because jsonData contains an unreadable representation of employee1. If you would like to create a readable version of this JSON as a string, you can use String’s initializer:
let jsonString = String(data: jsonData, encoding: .utf8) print(jsonString) // {"name":"John Appleseed","id":7,"favoriteToy":{"name":"Teddy Bear"}}
Now you can send jsonData or jsonString over to the gifts department using their special gift API.
If you want to decode the JSON data back into an instance, you need to use JSONDecoder:
let jsonDecoder = JSONDecoder() let employee2 = try jsonDecoder.decode(Employee.self, from: jsonData)
Note that you need to tell the decoder what type to decode the JSON to, because the compiler can’t figure this out on its own.
Renaming Properties With CodingKeys
It turns out that the gifts department API requires that the employee ID appear as employeeId instead of id. Luckily, Swift provides a solution to this kind of problem.
CodingKey Protocol, CodingKeys Enum
The CodingKeys enum, which conforms to CodingKey protocol, lets you rename specific properties in case the serialized format doesn’t match the requirements of the API.
Add the nested enumeration CodingKeys like this:
struct Employee: Codable { var name: String var id: Int var favoriteToy: Toy enum CodingKeys: String, CodingKey { case id = "employeeId" case name case favoriteToy } }
There are several things to note here:
CodingKeys is a nested enumeration in your type.
It has to conform to CodingKey.
You also need String as the raw type, since the keys are always strings.
You have to include all properties in the enumeration, even if you don’t plan to rename them.
By default, this enumeration is created by the compiler, but when you need to rename a key you need to implement it yourself.
Now if you print the JSON, you’ll see that the stored property id key has changed to employeeId:
{ "employeeId": 7, "name": "John Appleseed", "favoriteToy": {"name":"Teddy Bear"}}
Manual Encoding and Decoding
You try to send the data over to the gifts department, and again the data gets rejected. This time they claim that the information of the gift you want to send to the employee should not be inside a nested type, but rather as a property called gift. So the JSON should actually look like this:
{ "employeeId": 7, "name": "John Appleseed", "gift": "Teddy Bear" }
In this case you can’t use CodingKeys, since you need to alter the structure of the JSON and not just rename properties. You need to write your own encoding and decoding logic.
The encode Function
As mentioned earlier in the tutorial, Codable is actually just a typealias for the Encodable and Decodable protocols. You need to implement encode(to: Encoder) and describe how to encode each property.
It might sound complicated, but it’s pretty simple. First, update CodingKeys to use the key gift instead of favoriteToy:
enum CodingKeys: String, CodingKey { case id = "employeeId" case name case gift }
Then, you need to remove Employee’s conformance to Codable and then add this extension:
extension Employee: Encodable { func encode(to encoder: Encoder) throws { var container = encoder.container(keyedBy: CodingKeys.self) try container.encode(name, forKey: .name) try container.encode(id, forKey: .id) try container.encode(favoriteToy.name, forKey: .gift) } }
First you get back the container of the encoder. This is a view into the storage of the encoder that you can access with keys. Note how you choose which properties to encode for which keys. Importantly, you flatten favoriteToy.name down to the .gift key.
If you stop now, you should get an error that says:
'Employee' does not conform to expected type 'Decodable'
This is because you removed the conformance to Codable and only added conformance to Encodable. For now you can comment out the code that decodes jsonString to employee2.
If you print jsonString once more, this is what you’ll get:
{"name":"John Appleseed","gift":"Teddy Bear","employeeId":7}
Success!
The decode Function
Once the data arrives at the gifts department, they need to be able to convert this JSON back to an instance in their system. For this they’ll need a decoder.
Add the following code to your playground to make Employee conform to Decodable (and thus also Codable):
extension Employee: Decodable { init(from decoder: Decoder) throws { let values = try decoder.container(keyedBy: CodingKeys.self) name = try values.decode(String.self, forKey: .name) id = try values.decode(Int.self, forKey: .id) let gift = try values.decode(String.self, forKey: .gift) favoriteToy = Toy(name: gift) } }
Here you’re pretty much doing the opposite of what you did in the encode method using the decoder’s keyed storage container.
Key Points
You need to encode (or serialize) an instance before you can save it to a file or send it over the web.
Your type should conform to the Codable protocol to make it codable. If all properties are codable, then the type is automatically codable as well.
JSON is the most common encoding in modern applications and web services, and you can use JSONEncoder and JSONDecoder to encode and decode your types to and from JSON.
Where to Go From Here?
You can download the final package from this tutorial here.
If you enjoyed what you learned in this tutorial, why not check out the complete Swift Apprentice book, available on our store?
Here’s a taste of what’s in the book:
Section I: Swift Basics: The first section of the book starts at the very beginning of the computing environment: first, how computers work, and then, how Swift’s playgrounds feature works. With those logistics out of the way, you’ll take a tour of the fundamentals of the Swift language and learn the basics of managing data, structuring your code, performing simple operations and calculations, working with types.
Section II: Collection Types: Stored data is a core component of any app, whether it’s a list of friends in your social networking app or a set of unlockable characters in your hit game. In this section, you’ll learn how to store collections of data in Swift.
Section III: Building Your Own Types: Swift comes with basic building blocks, but its real power is in the custom things you can build to model parts of your app. Swift has no idea about playable characters and monsters and power-ups, for example — these are things you need to build yourself! You’ll learn how to do that in this section.
Section IV: Advanced Topics: The final section of the book covers more advanced topics in Swift. You’ll learn about specific things, such as how to handle problems that come up as your code runs, as well as about more general things such as memory management, which will help you understand some of Swift’s behind-the-scenes mechanisms.
By the end of this book, you’ll have some great hands-on experience with all of the best features of the Swift 4 programming language.
And to help sweeten the deal, the digital edition of the book is on sale for $49.99! But don’t wait — this sale price is only available for a limited time.
Speaking of sweet deals, be sure to check out the great prizes we’re giving away this year with the iOS 11 Launch Party, including over $9,000 in giveaways!
To enter, simply retweet this post using the #ios11launchparty hashtag by using the button below:
Tweet !function(d,s,id){var js,fjs=d.getElementsByTagName(s)[0],p=/^http:/.test(d.location)?'http':'https';if(!d.getElementById(id)){js=d.createElement(s);js.id=id;js.src=p+'://platform.twitter.com/widgets.js';fjs.parentNode.insertBefore(js,fjs);}}(document, 'script', 'twitter-wjs');
We hope you enjoy this update to one of our most-loved books. Stay tuned for more book releases and updates coming soon!
The post Encoding, Decoding and Serialization in Swift 4 appeared first on Ray Wenderlich.
Encoding, Decoding and Serialization in Swift 4 published first on http://ift.tt/2fA8nUr
0 notes