#Linux BSP image
Explore tagged Tumblr posts
Visit Tumblr Blog
Explore Tumblr blogs with no restrictions, modern design and the best experience.
Last Seen Tumblr Blogs


Fun Fact
Tumblr.com is the 103rd most visited website in the world.
Text
youtube
NXP - Getting Started with NXP i.MX 93 EVK Evaluation Kit
https://www.futureelectronics.com/resources/featured-products/nxp-imx-93-evaluation-kit . In this video, you'll learn how to set up NXP's i.MX 93 EVK. Development kit contains: i.MX 93 EVK board, Power Supply: USB Type C 45W Power Delivery Supply, A supported Cable: Assembly, USB 2.0 , Type-C Male to Type-A Male, Software: Linux BSP image Programmed in eMMC and a Quick Start Guide. https://youtu.be/nGdCfwjl0sI
#NXP#NXP i.MX93 EVK#i.MX93#EVK#i.MX 93 EVK board#Power Supply#USB Type C 45W Power Delivery Supply#Cable#Assembly#USB 2.0#Type-C Male to Type-A Male#Linux BSP image#eMMC#Quick Start Guide#evaluation kit#Youtube
1 note
·
View note
Text
youtube
NXP - Getting Started with NXP i.MX 93 EVK Evaluation Kit
https://www.futureelectronics.com/resources/featured-products/nxp-imx-93-evaluation-kit . In this video, you'll learn how to set up NXP's i.MX 93 EVK. Development kit contains: i.MX 93 EVK board, Power Supply: USB Type C 45W Power Delivery Supply, A supported Cable: Assembly, USB 2.0 , Type-C Male to Type-A Male, Software: Linux BSP image Programmed in eMMC and a Quick Start Guide. https://youtu.be/nGdCfwjl0sI
#NXP#NXP i.MX93 EVK#i.MX93#EVK#i.MX 93 EVK board#Power Supply#USB Type C 45W Power Delivery Supply#Cable#Assembly#USB 2.0#Type-C Male to Type-A Male#Linux BSP image#eMMC#Quick Start Guide#evaluation kit#Youtube
0 notes
Text
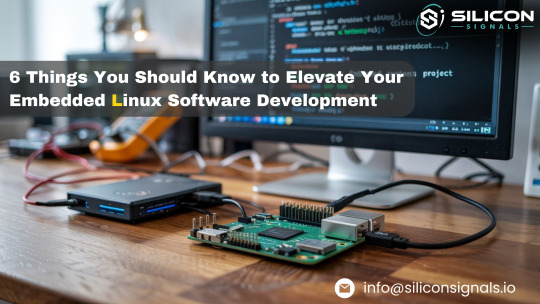
6 Things You Should Know to Elevate Your Embedded Linux Software Development
Getting started with embedded Linux development is now easier than ever. But to build a reliable, production-ready system, you need to go beyond the basics. Here are six critical areas to focus on to take your Linux-based embedded product to the next level.
1) Driver Development: Ensure Hardware Compatibility Before finalizing your hardware design, always verify whether Linux drivers are available for the components you choose. Most silicon vendors test their reference boards with Linux, so chances are drivers exist. But replacing parts to cut costs without checking driver availability can lead to time-consuming development efforts.
2) BSP Adaptation: Match Software to Hardware When working with a System-on-Module (SoM), you’ll need to tailor the BSP (Board Support Package) to your exact hardware setup. This involves configuring the Linux kernel and adjusting the device tree — a special file that describes the hardware layout. Learning to navigate device tree files (DTS) is essential, even if it seems complex at first.
3) Boot Time Optimization: Speed Up System Start Fast boot times matter in many industries — from automotive to consumer devices. By default, bootloaders and kernels aren’t optimized for speed. You’ll need to tweak U-Boot settings, delay non-critical driver loads, and streamline startup scripts to meet performance expectations.
4) Power Consumption: Build Energy-Efficient Products Battery-powered products demand smart power management. Standard Linux kernels often don’t use all the SoC’s power-saving features out of the box. Techniques like clock gating, power domains, and peripheral shutdowns require deep hardware-software collaboration to extend battery life.
5) Real-Time Requirements: Add Determinism If Needed Linux isn’t a real-time OS by default. For soft real-time tasks, standard Linux may suffice. But when you need hard real-time behavior, tools like Xenomai can be integrated — though they require careful driver and kernel-level modifications.
6) System Updates: Keep Your Product Secure & Up-To-Date Over-the-air (OTA) updates are essential today, but Linux doesn’t offer a one-size-fits-all solution. You’ll need to handle updates for the bootloader, kernel, and root file system, often using partitioning techniques like dual-image systems. Done right, it ensures system integrity even in cases of power loss during an update.
The Takeaway While Linux-based embedded systems are easier to launch than ever before, truly robust product development still requires thoughtful planning and technical know-how. The good news? If you know where to focus — like the six areas above — you can streamline development, reduce risks, and get to market faster.
✨ Need help optimizing your embedded Linux project? Silicon Signals specializes in building production-ready embedded systems on platforms like Toradex, NXP, and more.
📩 Get in touch to schedule a free consultation or request a custom demo.
🔗 www.siliconsignals.io
#embeddedtechnology#embeddedsoftware#embeddedsystems#androidbsp#linux kernel#android#linuxdebugging#aosp#iot development services#iotsolutions
0 notes
Text
Yocto poky clone

Here's How You Can Build Your Own Custom Linux Distro with Yocto.
Build a Raspberry Pi 2 Minimal Image with The Yocto Project.
Files · zeus · yoctoproject / poky · GitLab.
| How to fix unpack errors.
Yoctoproject / poky · GitLab.
Files · yocto-3.1.11 · yoctoproject / poky · GitLab.
ExorEmbedded/yocto-poky: Clone of Yocto poky repository - GitHub.
PDF Project why and how to use clang compiler with Yocto.
Yocto — conan 1.36.0 documentation.
Build image for raspberry pi using yocto - Welcome.
Yocto Project - DigitalGate Amg.
Git clone warrior git git yoctoproject org poky git.
Yocto Project Quick Build.
Here's How You Can Build Your Own Custom Linux Distro with Yocto.
* Fullpass Test Report for Yocto 1.1 M1 RC2 - 20110528 @ 2011-06-07 4:36 Xu, Jiajun 2011-06-07 14:15 ` Xu,... To: poky, yocto (-- Attachment #1.1: Type: text/plain, Size: 6031 bytes --) Hi all, This is the fullpass test report for Yocto 1.1 M1 RC2 build. There are 3 new bugs found in this testing compared with weekly testing. Non-GPLv3 build. More information is needed in order to help with this. Try looking. at the log file (the name should be printed alongside the message. quoted above). If it's not obvious from that, provide the log file. (send/publicize) so the community can help. This is the build output of the kernel unpack failure. We can run multiple containers in parallel to build multiple versions of the Linux image. Containers run in isolation and don't influence each other. All is set for running the Yocto build. We execute the following two commands in the same directory docker-cuteradio as the docker-build command. $ mkdir -p yocto/output.
Build a Raspberry Pi 2 Minimal Image with The Yocto Project.
Create a build folder at the same level of "poky" directory. $ mkdir yocto_build $ cd yocto_build. Assuming that you have downloaded the BSP tarball and extracted the content at top level of your development build tree, you need to prepare the build environment using "source" command. $ source../poky/oe-init-build-env. May 06, 2019 · The crops/poky-container enables us to start our first Yocto build within minutes. If not done yet, we must install Docker. The section Installing Docker of my previous post covers this. We create a working directory that will hold all the source files going into the Yocto build and all the files generated by the Yocto build. $ mkdir work-cuteradio. Clone the Yocto Project repository poky jethro. Below is an example from an Ubuntu build host that clones the poky repository and then checks out the latest Yocto Project Release.
Files · zeus · yoctoproject / poky · GitLab.
Poky ==== Poky is an integration of various components to form a complete prepackaged build system and development environment. It features support for building customised embedded device style images. There are reference demo images featuring a X11/Matchbox/GTK themed UI called Sato. The system supports cross-architecture application. Nov 14, 2016 · yocto release Clone the Yocto Project repository poky jethro. Below is an example from an Ubuntu build host that clones the poky repository and then checks out the latest Yocto Project Release.
| How to fix unpack errors.
Use the following commands to clone the Poky repository and then checkout the yocto-2.5 release. Files dunfell yoctoproject / poky GitLab. Thud git Clone via HTTPS Clone with Git or checkout with SVN using the repositorys web address. GitHub Gist: star and fork czoido#39;s gists by creating an a. There are two possible solutions to this problem: 1. Change the BIOS USB Device setting to HDD mode. The label will vary by device, but the idea is to force BIOS to read the Cylinder/Head/Sector geometry from the device. 2. Use a "; image with an EFI partition a) With a default grub-efi bootloader: # dd if=core-image-minimal-genericx86-64. Teams. Q&A for work. Connect and share knowledge within a single location that is structured and easy to search. Learn more.
Yoctoproject / poky · GitLab.
Yocto: відновити частину проекту - gstreamer, yocto Specifically, Yocto as has a root "poky" tree, which is one git repo, and then within the poky/ directory may be several other recipe directory trees, each possibly being their own SCM (git or otherwise) Specifically, Yocto as has a root "poky" tree, which is one git. What to do with the config fragment. This bit gets a little more tricky. I followed the instructions here and don't want to put a wordy explanation here, so I have put my code up here.. Fiddling with devicetree. To enable the USB OTG mode for the drivers in the kernel, we need to change the runtime configuration of the dwc2 driver in the kernel. Step 2. Download the necessary meta-layers to build the meta-toolchain. A ll meta-layers must match the same version as Poky you cloned from Github when setting up your Yocto Project environment.
Files · yocto-3.1.11 · yoctoproject / poky · GitLab.
Use Git to Clone Poky... (Poky). After Yocto Project Version 1.0, the Yocto Project and OpenEmbedded agreed to work together and share a common core set of metadata (OE-Core), which contained much of the functionality previously found in Poky. This collaboration achieved a long-standing OpenEmbedded objective for having a more tightly.
ExorEmbedded/yocto-poky: Clone of Yocto poky repository - GitHub.
Unable to clone yocto poky repo in ubuntu PC. 6. In Yocto, how to read a git repository via ssh on a nonstandard port. 0. MUSL C library does not work yocto project. 0. meta-oe of meta-openembedded vs meta of Poky. Hot Network Questions 14-50 outlet -- ok to mount on floor?. On Tue, Aug 21, 2018 at 11:54 PM pawanKumar <; wrote: Hi, I'm new to this clearlinux environment and I want to know how. Jun 19, 2015 · The Yocto project provides its own distribution layer called “Poky”, which makes use of bitbake and OpenEmbedded. However the Toradex BSP uses “Ångström”, another well known distribution layer for OpenEmbedded. One advantage of using Ångström instead of Poky is that Ångström also provides pre-built packages.
PDF Project why and how to use clang compiler with Yocto.
You can build a basic machine image for the handful of machines supported by the Yocto Reference BSP, but for optimal results you will probably need at least the BSP layer specific to your board (eg, RPi) plus the Yocto reference distribution BSP data for Poky and the OE meta layers. You can clone them all manually or use a repo manifest.
Yocto — conan 1.36.0 documentation.
May 17, 2020 · Clone the dependency repositories. For all upstream repositories, use the (dunfell) branch. The directory layout I am describing here is my preference. All of the paths to the meta-layers are configurable. If you choose something different, adjust the following instructions accordingly. First the main Yocto project poky layer. The 2 Yocto based Linux OS images we made for different case studies: 1. Yocto based Linux OS: Lite version - a lightweight Yocto image that weighs only 60MB and includes the basic packages that are needed in a "single-mission" IoT product, including: Vim and Nano editors, lsmode, ping, ifconfig, systemd service manager and reduced busybox.... Buildinfo is available in Yocto 1.8 and later. Run the "oe-init-build-env" script to initialize the built environment and it creates the build directory in the poky folder. Go inside the Poky directory and run the below command. This command creates a build directory inside the poky and it would be your current working directory. $ source oe-init-build-env. Build environment setup.
Build image for raspberry pi using yocto - Welcome.
The Yocto Project is an open-source project that delivers a set of tools that create operating system images for embedded Linux systems. The Yocto Project tools are based on the OpenEmbedded project, which uses the BitBake build tool, to construct complete Linux images. Yocto supports several Linux host distributions and it also provides a way. But I am able to clone the repo using git clone. SSH key is already added to the Gitlab. There is no config file in my ~/ Do I need to create a config file? What should be the content of the config file? Update. After following some discussion from other posts, I added "config" file. ~/. Format the two partitions using the following commands: -F 32 -n boot /dev/sdX1 mkfs.ext4 -L root /dev/sdX2. Copy the image files into the boot partition: Next you copy the files required for booting to the boot partition of the SD card. Here is an example for the Zedboard (ARMv7 32-bit - Cortex A9).
Yocto Project - DigitalGate Amg.
Create a build folder at the same level of "poky" directory. $ mkdir yocto_build $ cd yocto_build. Assuming that you have downloaded the BSP tarball and extracted the content at top level of your development build tree, you need to prepare the build environment using the "source" command. $ source../poky/oe-init-build-env.
Git clone warrior git git yoctoproject org poky git.
This course is for anyone who wants to create a minimum viable product (MVP) using a Raspberry pi 4 hardware and the Yocto Project. If you have a web app already or need to figure out everything else such as: Connecting to a wifi without SSH , Shutting down or Rebooting your Pi, and Logging your activities via a web app, then this is the course for you.. 15 hours ago · The Raspberry Pi 4. Jul 05, 2022 · Use Git to Clone Poky #182; Once you complete the setup instructions for your machine, you need to get a copy of the Poky repository on your build host. Use the following commands to clone the Poky repository and then checkout the yocto-2.5 release. Iptables conntrack not working in #yocto warrior - Yocto Project.
Yocto Project Quick Build.
Nov 01, 2015 · 11-02-2015 06:48 AM. I think you can try the latest 15.0 where getting a new yocto branch should be more stable version from the rocketboard. 11-02-2015 08:48 AM. You can start building the boot loader and then continue with the kernel, for first timer it should take up maybe 2-3 hours, my computer is a i7 processor.
Other links:
Top 10 Free Games On Pc Poki
Game Helicopter Poki
Poki Calories
Poki Bowl Palm Springa
Poki Cuphead
0 notes
Text
Poky pyro

(poky)(pyro)(PATCH 1/1) linux-libc-headers: fix duplicate IFF_LOWER_UP.
GettingStartedWithYocto < SystemOnChip < TWiki.
Poky/.gitignore at pyro-extra · ptsneves/poky.
Yocto で RaspberryPi3 OS を3種類の方法で build する - Qiita.
Re: Nothing PROVIDES 'python3-dev'.
(yocto) (bitbake) Failed to launch bitbake image -u -g depexp.
SKILL GAMES - Play Skill Games on Poki.
Pocket Pyro - Official TF2 Wiki | Official Team Fortress Wiki.
(x11)(Question) QXcbIntegration: Cannot create platform OpenGL context.
Polymyalgia rheumatica - Symptoms and causes - Mayo Clinic.
| conflicts between attempted.
Poky/README.hardware at pyro_gbm · joone/poky.
Yocto Project - Wikipedia.
Build status on poky pyro release · Issue #527 - GitHub.
(poky)(pyro)(PATCH 1/1) linux-libc-headers: fix duplicate IFF_LOWER_UP.
601k members in the tf2 community. This subreddit is dedicated to Team Fortress 2, created by Valve Corporation in 2007. After nine years in.
GettingStartedWithYocto < SystemOnChip < TWiki.
Contribute to joone/poky development by creating an account on GitHub. Mar 03, 2017 · Git Repository links are valuable resources for anyone interested in Yocto or Poky, especially when building for a custom embedded system with NXP’s i.MX processors: Yocto Git Page; NXP Git Page; For further documentation, visit these links: NXP BSP Developers Guide; Poky Pyro (2.3) BitBake Reference Manual (the ins and outs of constructing. Name Revision Poky Release Date Pyro 2.3 17.0 Apr, 2017 Rocko 2.4 18.0 Oct, 2017 Sumo 2.5 19.0 Apr, 2018... Poky is the starting point for building things with the.
Poky/.gitignore at pyro-extra · ptsneves/poky.
Pyro is one of the seven Elements. Its associated Archon is Murata, whose domain is Natlan. Having two Pyro characters in the group results in the Elemental Resonance: Fervent Flames: Affected by Cryo for 40% less time. Increases ATK by 25%. Pyro is the only element that reacts with every other element in the game. Pyro has the following Elemental Reactions: Overloaded: Deals AoE Pyro DMG and. Switch to the Poky Directory: If you have a local poky Git repository, switch to that directory. If you do not have the local copy of poky, see the "Cloning the poky Repository" section. Determine Existing Branch Names. Linux, Ubuntu, RaspberryPi, yocto, Raspberrypi3. RaspberryPi3 の OS を Yocto でビルドします。. 2017年夏時点で何種類かの OS がビルド出来るのでまとめます。. #他にも知ってるよという方は教えて頂ければ幸いです。.
Yocto で RaspberryPi3 OS を3種類の方法で build する - Qiita.
Here the glamor packageconfig seems to be missing a dependency on something that provides libgbm (again we probably don't normally notice this because the provider is mesa). Download poky and meta-mingw from Github to local machine. Meta-mingw is the toolchain recipe for Windows. “ pyro ” in the following commands refers to version of poky and meta-mingw. Build it and test it! Then, you can create the new image and test it, as described in the RPI3 tutorial. To build a more complete environment, I suggest you can to use this command.
Re: Nothing PROVIDES 'python3-dev'.
On 10/25/2017 02:51 PM, Tock, Roy (GE Healthcare, Non-GE) wrote: Is there a plan for adding poky pyro branch support to meta-amd? If so, is there an estimated date for pyro support?.
(yocto) (bitbake) Failed to launch bitbake image -u -g depexp.
.. QXcbIntegration: Cannot create platform OpenGL context, neither GLX nor EGL are enabled. Any help would be very much appreciated! Join to automatically receive all group messages. Report to Moderators I think this message isn't appropriate for our Group. The Group moderators are responsible for maintaining their.
SKILL GAMES - Play Skill Games on Poki.
Please download the Poky build system to your development machine. $ git clone -b pyro git:// Download the corresponding BSP tarball from this ‘Board Support Package (BSP) Downloads’ page of the Yocto Project website. Extract the downloaded BSP tarball into meta-intel folder $ tar -xvjf. Our skill games will test every aspect of your gaming talents. Go retro, and try a classic arcade challenge. Play games like Asteroids, Snake, and tons of other legendary adventures! Shoot enemies in classic 2D, with 8-bit graphics and low-fi sounds. Or, jump into the 21st century, and try a jumping or launching game. KILLY - PYRO (Official Music Video) Shop/Stream @ Directed by Gerard JosephDP: Ali KhurshidEditor: Pat AcenasKey Grip: Greg Paras.
Pocket Pyro - Official TF2 Wiki | Official Team Fortress Wiki.
Aug 23, 2017 · Hi everybody, i am using Poky/Pyro for one of my projects. The chosen Package Format is RPM. After some hours of debugging in ran into this pretty interesting behaviour were i would guess it is a bug. P poky Project information Project information Activity Members Repository Repository Files Commits Branches Tags Contributors Graph Compare Locked Files Deployments Deployments Releases Analytics... pyro. Switch branch/tag. Find file Select Archive Format. Oct 21, 2017 · Have a question about this project? Sign up for a free GitHub account to open an issue and contact its maintainers and the community.
(x11)(Question) QXcbIntegration: Cannot create platform OpenGL context.
(poky)(pyro)(PATCH 1/1) linux-libc-headers: fix duplicate IFF_LOWER_UP DORMANT ECHO on musl Alejandro Mery <amery@...> #101047. From: André Draszik <; musl _does_ define IFF_LOWER_UP DORMANT ECHO so we should prevent redefinition of these when on musl. As per the included patch, this can be triggered by.
Polymyalgia rheumatica - Symptoms and causes - Mayo Clinic.
.
| conflicts between attempted.
Security vulnerabilities related to Yocto Project List of vulnerabilities related to any product of this vendor. Cvss scores, vulnerability details and links to full CVE details and references. Nov 08, 2019 · Format the two partitions using the following commands: -F 32 -n boot /dev/sdX1 mkfs.ext4 -L root /dev/sdX2. Copy the image files into the boot partition: Next you copy the files required for booting to the boot partition of the SD card. Here is an example for the Zedboard (ARMv7 32-bit - Cortex A9).
Poky/README.hardware at pyro_gbm · joone/poky.
The 1/4 inch Consumer Pyro Poke brass fireworks safety awl is used to make a hole in a firework lift charge so that a shrouded (plastic cover) ematch or Firewire Initiator can be inserted into the lift charge. This awl is made from Aluminum Bronze and has a 3.5 inch nonsparking shaft with a sharp tip. The orange and black rubber handle fits in. Yocto Project. The Yocto Project is a Linux Foundation collaborative open source project whose goal is to produce tools and processes that enable the creation of Linux distributions for embedded and IoT software that are independent of the underlying architecture of the embedded hardware. The project was announced by the Linux Foundation in.
Yocto Project - Wikipedia.
Dos Pyro Unknown — 2012 I don't know who drew this and they did such a good job! Title: Dos Pyro: Date (approx.) Dec. 17th, 2012: Rating: SFW: Image: 1: Visibility: Public: Artist: Unknown: Character: Dos Raccoon: Sources None available. The source may be unknown or the artist may no longer have the art uploaded.. Conflicts between attempted installs of base-files-3.0.14-r89.prsg_x86_base and procps-3.3.12-r0.corei7_64.
Build status on poky pyro release · Issue #527 - GitHub.
Poky will have setup environmental variables such as CC to assist applications, such as make, find the correct tools. 5.1.6. Developing within Poky with an External SCM-based Package. If you're working on a recipe that pulls from an external SCM it is possible to have Poky notice new changes added to the SCM and then build the latest version.
Other links:
Free Pokies Az
Monster High Hry Poki
Where Is Closest Club To Acaiaca Ridge With Pokie Machines
0 notes
Text
Git poky repository

(PATCH) bitbake: fetch/git: Fix usehead for non-default names.
The Yocto Project Quick Start - GitHub Pages.
Hrd-git · GitHub.
Git Repo Bitbake.
Git Bitbake Repo.
How to Set Up Yocto Project on Your Machine Made Easy.
Yoctoproject/poky: Mirror of.
Duplicating a repository - GitHub Docs.
Yocto poky github.
Yocto Project Quick Start.
Reducing the pain of Yocto upgrades - eLinux.
How do I update a local git repository remotely?.
Installing Poky | Embedded Linux Projects Using Yocto Project Cookbook.
(PATCH) bitbake: fetch/git: Fix usehead for non-default names.
The previous instructions use Git (the source code management system command-line tool) to clone the Poky repository, which includes BitBake, into a new poky directory under /opt/yocto, and point it to the rocko stable branch. Other layers (especially BSP layers) tend to offer several variants for each release. Since most layers are stored in Git repositories, this translates to one branch per release. It is also possible to use the current development version of Yocto. This means that master branches of Poky and the layers are used.
The Yocto Project Quick Start - GitHub Pages.
Submit. git のリモートリポジトリを別の URL にリダイレクトして使う. ユースケース. 設定方法. 覚え方. 具体例 (URL の全部を置換する場合) 本家に直接アクセス. insteadOf の設定. insteadOf の設定後に、本家にアクセスしてるつもりでリダイレクト先にアクセスする. It is recommended that you get the latest Yocto Project release by setting up (cloning in Git terms) a local copy of the poky Git repository on your build host and then checking out the latest release. Doing so allows you to easily update to newer Yocto Project releases as well as contribute back to the Yocto Project..
Hrd-git · GitHub.
Defines under which name the repository is stored. If its missing the <repo-id> will be used. url: string (optional) The url of the git repository. If this is missing, no git operations are performed. refspec: string (optional) The refspec that should be used. Required if an url was specified. path: string (optional) The path where the.
Git Repo Bitbake.
On the other hand, if you know all about open-source development, Linux development environments, Git source repositories and the like and you just want some quick information that lets you try out the Yocto Project on your Linux system, skip right to the... a local copy of the poky Git repository on your host development system. Doing so.
Git Bitbake Repo.
Note The examples in this paper assume you are using a native Linux system running a recent Ubuntu Linux distribution. If the machine you want to use Yocto Project on to build an image is not a native Linux system, you can still perform these steps by using CROss PlatformS (CROPS) and setting up a Poky container. Your Git clone of the pseudo repository is missing the fddbe854 commit. This can happen if there has been any problems when updating the repository.
How to Set Up Yocto Project on Your Machine Made Easy.
Creating a multilib image for the ZCU102 using Yocto "The Yocto build system offers the ability to build libraries with different target optimizations or architecture formats and combine these together into one system image". Dec 28, 2020 · 1 Answer. Make new, empty git repository e.g. my-yocto on a drive with at least 50 GB of free space. Add poky as a git submodule of my-yocto. source poky/oe-init-build-env. Note the "." in that command; initializing the build environment in my-yocto instead of poky prevents Yocto's GB of temp files from accumulating under poky..
Yoctoproject/poky: Mirror of.
Jan 14, 2021 · Below are the pre-requisites for you to start with Poky. 1. 50 Gbytes of free disk space. 2. Runs a supported Linux distribution (i.e. recent releases of Fedora, openSUSE, CentOS, Debian, or Ubuntu). 3. Softwares shown below must be installed. Git 1.8.3.1 or greater. tar 1.27 or greater. Python 3.4.0 or greater.
Duplicating a repository - GitHub Docs.
Git repository storage limits can be reached 1 Getting a Git Repository com Linuxのビルドにはbitbakeを使用するので、Ubuntuの The Board Support Package is composed by a set files, patches, recipes, configuration files, etc conf` of bitbake conf` of bitbake.... (unless providing a mirror of the whole poky repository with this. Search: Bitbake Git Repo. git implies a Cloning the repository makes it easy to get bug fixes and have access to stable branches and the master branch url: string (optional) The url of the git repository It tries to shutdown the bitbake server but fails SRC_URI is set to point to the git repository SRC_REV corresponds to a particular commit into that repository (it is also possible to specify.
Yocto poky github.
Set PREFERRED_VERSION_linux-yocto-tiny to 5.4% add quilt-ptest and valgrind-ptest ovmf: update edk2-stable202005 -> edk2-stable202008.
Yocto Project Quick Start.
$ cd ; Pull in the repository's Git Large File Storage objects. $ git lfs fetch --all; Mirror-push to the new repository. $ git push --mirror.
Reducing the pain of Yocto upgrades - eLinux.
The future default branch used by tools and repositories is uncertain and we will therefore soon require this is set in all git urls. Explanation: There are two different items impacting the Git... You can look at the available license names in the poky git repository. To fix these warnings, a migration script is available. Automated fix.. # meta-raspberrypi Yocto BSP layer for the Raspberry Pi boards -.Documentation Status)(.
How do I update a local git repository remotely?.
Aug 28, 2018 · Next, open the project in Fork and click the Push button. It is the fourth button from the left. It looks like an arrow that goes upwards. Once you click on the push button, Fork will ask you to select a branch and a remote to push to. In this case, our branch will be master (because we only have one branch).
Installing Poky | Embedded Linux Projects Using Yocto Project Cookbook.
Now clear the link to the ORI repository with the following command: git remote rm origin. 8. Now link your local repository to your newly created NEW repository using the following command: git remote add origin <url to NEW repo>. 9. Now push all your branches and tags with these commands: git push origin --all. The next version of our product or another product may use a different SoC. Then, we add the BSP layers for these SoCs after the meta-qt5 layer and before the poky layer. Each layer resides in its own git repository. We install the repo tool on our development PCs to manage these repositories. The repo tool hides the complexity of git submodules.
See also:
Cash Frenzy App Win Real Money
Melissa Joan Hart Sabrina Pokies Reddit
Borgata Online Casino Comps
0 notes
Text
Find Best Nvidia Jetson Nano Developer Kit!!
Get started today with the Nvidia Jetson Nano Developer Kit by TANNA TechBiz!!
Nvidia Jetson Nano makes it easy for developers to connect a diverse set of the latest sensors to allow a range of AI applications. This SDK is used across the NVIDIA Jetson family of products and is fully compatible with NVIDIA's Artificial Intelligence frameworks for deploying and training deploying AI software.
Heavy applications can be executed using this Nvidia Jetson Nano. It also has an SD Card image boot like Raspberry pi, but with GPU (Graphical Processing Unit). It runs multiple neural networks in parallel and processes several high-resolution sensors concurrently.
Jetson Nano is used for various ML (Machine Learning) & DL (Deep Learning) research in various fields for Speech processing, Image processing, and sensor based analysis. It conveys & computes performance to run modern Artificial Intelligence workloads at unprecedented size. It is extremely power-efficient, consuming as little as 5 watts.
Buy Now!! Nvidia Jetson Nano with latest updated Specifications & features. Nvidia Jetson Nano Development Kit is a power-efficient and low cost. Best Online Purchase NVIDIA Jetson Nano in India at TANNA TechBiz.
Nvidia Jetson Nano Developer Kit is small but, supported by Nvidia JetPack, which includes, Linux OS, NVIDIA CUDA, cuDNN, board support package and TensorRT software libraries for multimedia processing, deep learning, computer vision, GPU computing, and much more.
Nvidia Jetson Nano frees you to innovate at the edge. You Experience powerful and efficient Artificial Intelligence, computer vision, and high-performance computing at just 5 to 10 watts. The software is even available using an easy-to-flash SD card image, making it fast and easy to get started.
Jetson Nano is also supported by NVIDIA JetPack, which includes a board support package (BSP), cuDNN, and TensorRT, Linux OS, NVIDIA CUDA other software libraries for deep learning, multimedia processing, computer vision, GPU computing, and much more.
0 notes
Text
Jetson image processing: ISP libargus and Fastvideo SDK
Jetson image processing for camera applications
Jetson hardware is absolutely unique solution from NVIDIA. This is essentially a mini PC with extremely powerful and versatile hardware. Apart from ARM processor it has a sophisticated high performance GPU with CUDA cores, Tensor cores (on AGX Xavier), software for CPU/GPU and AI.
Below you can see an example of how to build a camera system on Jetson. This is an important task if you want to create realtime solution for mobile imaging application. With a thoughtful design, one can even implement a multicamera system on just a single Jetson, and some NVIDIA partners showcase that this is in fact achievable.
How image processing could be done on NVIDIA Jetson
ISP inside Jetson (libargus library on the top of hardware solution)
V4L2 framework instead of argus/nvcamerasrc to get bayer data like v4l2-ctl
Image processing on CUDA (NPP library, Fastvideo SDK)
Image processing on ARM (C++, Python, OpenCV)
Hardware-based encoding and decoding with NVENC
AI on CUDA and/or Tensor cores
Here we consider just ISP and CUDA-based image processing pipelines to describe how the task could be solved, which image processing algorithms could be utilized, etc. For the beginning we consider NVIDIA camera architecture.
Camera Architecture Stack
The NVIDIA camera software architecture includes NVIDIA components for ease of development and customization:

Fig.1. Diagram from Development Guide for NVIDIA Tegra Linux Driver Package (31.1 Release, Nov.2018)
NVIDIA Components of the camera architecture
libargus - provides low-level API based on the camera core stack
nvarguscamerasrc - NVIDIA camera GStreamer plugin that provides options to control ISP properties using the ARGUS API
v4l2src - standard Linux V4L2 application that uses direct kernel IOCTL calls to access V4L2 functionality
NVIDIA provides OV5693 Bayer sensor as a sample and tunes this sensor for the Jetson platform. The drive code, based on the media controller framework, is available at ./kernel/nvidia/drivers/media/i2c/ov5693.c, NVIDIA further offers additional sensor support for BSP software releases. Developers must work with NVIDIA certified camera partners for any Bayer sensor and tuning support.
The work involved includes:
Sensor driver development
Custom tools for sensor characterization
Image quality tuning
These tools and operating mechanisms are NOT part of the public Jetson Embedded Platform (JEP) Board Support Package release. For more information on sensor driver development, see the NVIDIA V4L2 Sensor Driver Programming Guide.
Jetson includes internal hardware-based solution (ISP) which was created for realtime camera applications. To control these features on Jetson hardware, there is libargus library.
Camera application API libargus offers:
low-level frame-synchronous API for camera applications, with per frame camera parameter control
multiple (including synchronized) camera support
EGL stream outputs
RAW output CSI cameras needing ISP can be used with either libargus or GStreamer plugin. In either case, the V4L2 media-controller sensor driver API is used.
Sensor driver API (V4L2 API) enables:
video decode
encode
format conversion
scaling functionality
V4L2 for encode opens up many features like bit rate control, quality presets, low latency encode, temporal tradeoff, motion vector maps, and more.
Libargus library features for Jetson ISP
Bad pixel correction
Bayer domain hardware noise reduction
Per-channel black-level compensation
High-order lens-shading compensation
3A: AF/AE/AWB
Demosaic
3x3 color transform
Color artifact suppression
Downscaling
Edge enhancement (sharp)
To summarize, ISP is a fixed-function processing block which can be configured through the Argus API, Linux drivers, or the Technical Reference Manual which contains register information for particular Jetson.
All information about utilized algorithms (AF, AE, demosaicing, resizing) is closed and user needs to test them to evaluate quality and performance.
ISP is a hardware-based solution for image processing on Jetson and it was done for mobile camera applications with high performance and low latency.
How to choose the right camera
To be able to utilize ISP, we need a camera with CSI interface. NVIDIA partner - Leopard Imaging company is manufacturing many cameras with that interface and you can choose according to requirements. CSI interface is the key feature to send data from a camera to Jetson with a possibility to utilize ISP for image processing.
If we have a camera without CSI support (for example, GigE, USB-3.x, CameraLink, Coax, 10-GigE, PCIE camera), we need to create CSI driver to be able to work with Jetson ISP.
Even if we don't have CSI driver, there is still a way to connect your camera to Jetson.
You just need to utilize proper carrier board with correct hardware output. Usually this is either USB-3.x or PCIE. There is a wide choice of USB3 cameras on the market and one can easily choose any camera or carrier board you need. For example, from NVIDIA partner - XIMEA GmbH.

Fig.2. XIMEA carrier board for NVIDIA Jetson TX1/TX2
To work further with the camera, you need camera driver for L4T and ARM processor - this is minimum requirement to connect your camera to Jetson via carrier board.
However, keep in mind that in this case ISP is not available. Next part deals with such situation.
How to work with non-CSI cameras on Jetson
Let's assume that we've already connected non-CSI camera to Jetson and we can send data from the camera to system memory on Jetson.
Now we can't access Jetson ISP and we need to consider other ways of image processing. The fastest solution is to utilize Fastvideo SDK for Jetson GPUs.
That SDK actually exists for Jetson TK1, TX1, TX2, TX2i and AGX Xavier.
You just need to send data to GPU memory and to create full image processing pipeline on CUDA. This is the way to keep CPU free and to ensure fast processing due to excellent performance of mobile Jetson GPU on CUDA. Based on that approach you can create multicamera systems on Jetson with Fastvideo SDK together with USB-3.x or PCIE cameras.
For more info about realtime Jetson applications with multiple cameras you can have a look the site of NVIDIA partner XIMEA, which is manufacturing high quality cameras for machine vision, industrial and scientific applications.

Fig.3. NVIDIA Jetson with multiple cameras on TX1/TX2 carrier board from XIMEA
Image processing on Jetson with Fastvideo SDK
Fastvideo SDK is intended for camera applications and it has wide choice of features for realtime raw image processing on GPU. That SDK also exists for NVIDIA GeForce/Quadro/Tesla GPUs and consists of high quality algorithms which require significant computational power.
This is the key difference in comparison with any hardware-based solution. Usually ISP/FPGA/ASIC image processing modules offer low latency and high performance, but because of hardware restrictions, utilized algorithms are relatively simple and have moderate image quality.
Apart from image processing modules, Fastvideo SDK has high speed compression solutions: JPEG (8/12 bits), JPEG2000 (8-16 bits), Bayer (8/12 bits) codecs which are implemented on GPU. These codecs are working on CUDA and they were heavily tested, so they are reliable and very fast.
For majority of camera applications, 12 bits per pixel is a standard bit depth and it makes sense to store compressed images at least in 12-bit format or even at 16-bit.
Full image processing pipeline on Fastvideo SDK is done at 16-bit precision, but some modules that require better precision are implemented with float.

Fig.4. Image processing workflow on CUDA at Fastvideo SDK for camera applications
To check quality and performance of raw image processing with Fastvideo SDK, user can download GUI application which is called Fast CinemaDNG Processor. The software is fully based on Fastvideo SDK and it could be downloaded from www.fastcinemadng.com together with sample image series in DNG format.
That application has benchmarks window to check time measurements for each stage of image processing pipeline on GPU.
High-resolution multicamera system for UAV Aerial Mapping
Application: 5K vision system for Long Distance Remote UAV
Manufacturer: MRTech company
Cameras
One XIMEA 20 MPix PCIe camera MX200CG-CM
Two XIMEA 3.1 MPix PCIe cameras MX031CG-SY
Hardware
NVIDIA Jetson TX2 or TX2i module with custom carrier board
NVMe SSD 960 PRO M.2 onboard
Jetson GPU image processing
Full processing workflow on CUDA: acquisition, black level, white balance, LUT, high quality demosaicing, etc.
H.264/265 encoding, RTSP streaming via radio channel
Streaming of 4K images at 25 fps and 2× Full HD 1080p (1920 × 1080) images at 30 fps simultaneously
Save high resolution snapshot images to SSD
Power usage 35W (including all cameras)

Fig.5. NVIDIA Jetson TX2 with XIMEA MX200CG-CM (20 MPix) and two MX031CG-SY (3.1 MPix) cameras.
More information about MRTech solutions for Jetson image processing you can find here.
AI imaging applications on Jetson
With the arrival of AI solutions, the following task needs to be solved: how to prepare high quality input data for such systems?
Usually we get images from cameras in realtime and if we need high quality images, then choosing a high resolution color camera with bayer pattern is justified.
Next we need to implement fast raw processing and after that we will be able to feed our AI solution with good pictures in realtime.
The latest Jetson AGX Xavier has high performance Tensor cores for AI applications and these cores are ready to receive images from CUDA software. Thus we can send data directly from CUDA cores to Tensor cores to solve the whole task very fast.
Links:
XIMEA cameras for Jetson applications
MRTech software solutions for Jetson imaging systems
Fastvideo Image & Video Processing SDK for NVIDIA Jetson
Low latency H.264 streaming on Jetson TX2
Original article see here: https://www.fastcompression.com/blog/jetson-image-processing.htm
0 notes
Text
Tại sao Android lại ít được cập nhật phần mềm?
Vừa qua, đội ngũ phát triển Android đã tổ chức 1 buổi AMA (Ask Me Anything) trên mạng xã hội Reddit nhân dịp ra mắt phiên bản Android 11. Một người dùng đã đặt ra câu hỏi về nguyên nhân của vấn đề nhức nhối tồn tại nhiều năm trên các mẫu điện thoại Android: mức độ thường xuyên của các bản cập nhật, nhất là so với Apple. Và câu vấn đáp thẳng thắn và chi tiết của một lập trình viên từ Google – Iliyan Malchev – đã phần nào giải đáp thắc mắc suốt nhiều năm nay cho chúng ta. Sau đây là phần lược dịch câu vấn đáp của Malchev.
Điểm cốt yếu ở nơi này là vấn đề cơ bản mà các hãng sản xuất (OEM) gặp phải với các bản cập nhật: chi phí. Mọi OEM đều muốn thiết bị của mình có chức năng được cập nhật trong suốt vòng đời sử dụng. Nhưng họ bị hạn chế bởi những lựa chọn kinh tế khó khăn, thể hiện qua các loại chi phí. Vì vậy, để tăng tốc độ cập nhật, chúng tôi tập trung vào việc giảm những chi phí ấy.
Câu hỏi được đặt ra là, tại sao chi phí cập nhật lại cao? Với chúng tôi, câu vấn đáp có thể bao gồm các phần sau:
– Android là phần mềm mã nguồn mở và cho phép tùy biến
– Hệ sinh thái Android là rất rộng lớn
– Với mọi thiết bị, đều có vài công ty tham gia quá trình sản xuất
– Các nhà mạng phải tốn phí chứng chỉ cho mọi bản cập nhật lớn
Hai nguyên nhân đầu tiên có thể coi là đặc thù với Android, còn 2 nguyên nhân còn lại là vấn đề chung. Nguyên nhân thứ 3 thì có phần phổ biến hơn với hệ sinh thái Android. Kết hợp 3 nguyên nhân đầu tiên dẫn tới nguyên nhân thứ 4: chi phí chứng chỉ cao hơn.
Android là phần mềm mã nguồn mở
Mọi dự án mã nguồn mở, đúng như tên thường gọi của nó, đều cho phép những điều chỉnh, thay đổi được thực hiện. Sự linh hoạt trong vấn đề này là một tính chất cốt lõi của Bộ xử lý (HĐH) Android. Đó cũng là 1 trong những nguyên nhân chính tại sao Android lại có thể thành công như vậy. Khi đội ngũ chúng tôi ở Google tung ra một phiên bản mới của HĐH Android, chúng tôi thực ra chỉ phát hành phiên bản AOSP (Android Open Source Project – Dự án Android mã nguồn mở), tất nhiên là dưới dạng mã nguồn.
Điều quan trọng cần phải chỉ ra là: phiên bản AOSP không phải là 1 mặt hàng cuối cùng (để tới tay người dùng). Có thể coi là nó mang sứ mệnh giới thiệu một dạng lõi cho HĐH, với mọi thành phần khiến Android là Android: môi trường ART, các hệ thống quản lí hoạt động, quản lí cửa sổ và các gói phần mềm (package), các hệ thống phụ về đa phương tiện, các cảm biến, máy ảnh, logic khởi tạo,v.v… những thứ như thế.
Bản phát hành AOSP cũng bao gồm các phiên bản mã nguồn mở của nhiều thành phần của HĐH mà người dùng cuối (end user) sẽ tương tác nhiều hơn như giao diện hệ thống hay trình khởi chạy ứng dụng (App Launcher), nhiều ứng dụng bổ sung nữa. Nhưng đây chỉ là những phiên bản mã nguồn mở mang tính tham chiếu, và chúng tôi không hề định sử dụng chúng trên bất cứ thiết bị nào tới tay người dùng.
Android có chức năng tùy biến
Khi chúng tôi phát hành một phiên bản AOSP, chúng tôi muốn nó trở thành một bản tham chiếu. Các OEM cũng như các hãng sản xuất vi xử lí silicon có toàn quyền điều chỉnh mã nguồn này để phù hợp với nhu cầu của họ về sản phẩm, miễn là họ vượt qua một bộ những bài kiểm tra, để chắc hẳn rằng những điều chỉnh này không can thiệp vào hành vi của HĐH, điều có thể gây ra việc các ứng dụng không hoạt động. Hầu hết các đối tác của chúng tôi đều tận dụng sự linh hoạt này để tạo nên việc khác biệt cho các sản phẩm của họ.
Tùy biến sẽ có chi phí duy trì
Tôi phải nhắc lại một lần nữa, điều này là đúng với mọi dự án mã nguồn mở. Bạn sử dụng một bản phát hành (release), thực hiện nhiều thay đổi, tiếp theo đó lại phát hành phiên bản đã được thay đổi (ngay đến những kernel – lõi của HĐH Linux cũng thường được thay đổi theo cách này). Khi mà bản phát hành tiếp theo (của mã nguồn gốc) được công bố, bạn phải chuyển đổi (port) hoặc hoàn toàn tái cấu trúc lại phần mã lệnh cũ của những biến đổi bạn đã thực hiện. Việc này rất tốn thời gian và công sức, mà thời gian và công sức chính là chi phí.
Sẽ có 2 cách khắc phục chính để giảm thiểu chi phí: cách thứ nhất là bạn (chẳng hạn như trong hoàn cảnh này là các OEM) đóng góp những thay đổi của mình vào cả dự án mã nguồn mở, từ đó chi phí phát sinh sẽ được bao hàm bên trong (chi phí của) dự án chính và mọi đối tượng sẽ đảm nhiệm phụ trách về phần thay đổi của bạn. Đây là cách mà cộng đồng Linux kernel hoạt động. Nhưng trường hợp của Android thì lại khác. Điều hiển nhiên là rất nhiều tùy chỉnh đối với mã nguồn cơ sở của Android là độc quyền (bởi các hãng), chính điều này đã ngăn cản chúng được cập nhật (bởi Android Dev Team). Điều này có nghĩa rằng, các đối tác của chúng tôi phải tự đảm nhiệm phụ trách việc cập nhật những thay đổi của họ.
Đội ngũ phát triển Android vẫn luôn chia sẻ mã nguồn AOSP
Chúng ta cũng có thể nói: “Thế thì đừng tạo ra thay đổi gì (so với nguyên gốc) cả, và các anh sẽ chẳng phải chuyển đổi chúng mỗi khi cập nhật.”. Nhưng đó không phải là cách Android hoạt động: bản sắc của chúng tôi là sự linh hoạt và sự đa dạng, và chúng tôi muốn tạo cơ hội cho các đối tác của mình tận dụng tối đa khả năng này.
Một giải pháp khác để giảm thiểu chi phí là tạo ra một khoảng trung hòa giữa việc tạo ra thay đổi ở mọi nơi và không bao giờ thay đổi gì cả. Cụ thể hơn, chúng tôi tạo ra những ranh giới – những giao thức giữa các thành phần – và phải đạt được một thỏa thuận chung rõ ràng với các đối tác: phải xác định rõ những loại thành phần họ có thể (và sẽ) điều chỉnh, không hề đánh mất sự linh hoạt, và những loại thành phần mà phải được giữ hoàn toàn tương tự giữa mọi cá thể trong hệ sinh thái.
Từ đó, chúng tôi đã cho ra 2 dự án để giải quyết vấn đề cập nhật: Project Treble và Project Mainline. Hai dự án này đều nhằm giải quyết vấn đề ranh giới đã đề cập bên trên, theo cách khác nhau nhưng lại bổ khuyết đư���c cho nhau.
Project Treble
Với dự án Treble, chúng tôi tìm cách để tạo nên những giao thức chắc chắn giữa các thành phần không tùy thuộc vào phần cứng của HĐH, và những phần mà cần để tâm tới phần cứng. Chúng tôi thường nhắc tới loại đầu tiên trong tài liệu chính thức dưới tên gọi “chương trình khung” (framework), hay “bản hệ thống” (system image), hoặc “HĐH Lõi” (Core OS). Loại thứ hai thì chúng tôi thường đề cập đến như là “bản cho nơi cung cấp” (vendor image) hay “các HAL” (Hardware Abstraction Layer – lớp trừu tượng hóa phần cứng).
Làm như vậy có ích gì? Lời giải đáp giúp giải quyết một gạch đầu dòng phía bên trên: “Hệ sinh thái Android rất rộng lớn”. Với một hãng sản xuất điện thoại Android (một OEM), để sản xuất một thiết bị, họ phải sử dụng một hệ thống trên vi mạch (SoC – System on Chip, bao gồm bộ vi xử lí và cách thiết bị ngoại vi trên cùng một khuôn chip) từ một hãng sản xuất chip silicon, chẳng hạn như Qualcomm, Mediatek, Unisoc hay Rockchip. Nhưng hãng sản xuất chip không chỉ cung cấp SoC cho các OEM này, mà họ cũng phải cung cấp cả một môi trường phát triển cùng với nó, được xem là BSP (Board Support Package – gói (phần mềm) hỗ trợ bảng mạch). Chính BSP cũng là một phiên bản của Android! So với bản AOSP, nó chứa nhiều tinh chỉnh để có thêm các tính năng như khả năng gọi điện (chẳng hạn như thực hiện cuộc gọi 4G hay 5G), hay để hỗ trợ các thành phần phần cứng đặc trưng của SoC đó, và cũng để thêm giá trị đặc trưng cho SoC và OEM sử dụng SoC đó (chẳng hạn như cho riêng thị trường nào đó chẳng hạn). Nhìn chung, BSP cung cấp một phiên bản Android cho hãng sản xuất, điều kiện cần để có thể sản xuất bất cứ thiết bị nào sử dụng SoC đó. Những tinh chỉnh ở phiên bản BSP này lại thường xảy ra ở các tầng thấp hơn của bộ xử lý.
Sau đó, các OEM sẽ nhận được BSP rồi tiếp tục thực hiện những thay đổi mã nguồn để hoạt động được trên những thiết bị của họ. Không như BSP, những thay đổi này thường diễn ra ở tầng trên của HĐH Android, chẳng hạn như phần Cài đặt, trình khởi chạy ứng dụng hay trình quản lí cửa sổ.
Lượng người dùng cập nhật Android 9 là cao hơn hẳn một phần nhờ dự án Treble
Với dự án Treble, chúng tôi nhận xét sự chia tách này và nhận ra nó đã tạo ra một ranh giới tự nhiên giữa hãng sản xuất thiết bị và hãng sản xuất chip, và tổng quát hơn là giữa phần “trừu tượng” của HĐH Android và phần phụ thuộc phần cứng của nó.
Mục tiêu và kết quả của những nỗ lực của chúng tôi với Treble được liệt kê dưới đây, bao gồm:
– Để làm được một bản tham chiếu sẵn có và được chuẩn hóa, không chỉ ở dạng mã nguồn, mà ở dạng 1 mặt hàng thực, cho mọi phiên bản Android. Chúng tôi gọi nó là phiên bản hệ thống chung (Generic System Image – GSI)
– Các bản GSI có thể tương thích ngược với các phiên bản BSP cũ hơn cho hãng sản xuất
– Từ đó sẽ cho phép các OEM có thể duy trì những thay đổi của mình với các phiên bản hệ thống của họ mà không xung đột với những tầng bên dưới (của HĐH)
– Kết cấu này có chức năng mở rộng, để cả hãng sản xuất chip và OEM có chức năng mở rộng giao thức cho những khối phần cứng đặc trưng của họ.
Đáng nhớ nhất là, từ góc độ chi phí, những nỗ lực của chúng tôi sẽ tách riêng được chi phí duy trì của các OEM ra khỏi chi phí của các hãng sản xuất chip, và từ đó giúp giảm chi phí cho cả hai bên. Dự án này đã có những thành tích nhất định, được đăng tải trên blog của chúng tôi.
Dự án Mainline
Dự án Mainline lại tiếp cận với câu hỏi về ranh giới theo một hướng khác. Nếu như Treble sẽ nói “đây là một ranh giới, chúng ta hãy tinh chỉnh các bước làm bằng một cách nào đó, miễn là mọi thứ tiếp tục hoạt động qua ranh giới này”, thì Mainline lại có hướng: “đây là một bộ các ranh giới phân định một thành phần mà bản thân mỗi chúng ta nên đồng ý không thực hiện điều chỉnh”. Những thành phần kiểu này thường sẽ là những phần đáng nhớ nhất của HĐH Android – từ các góc độ như độ ổn định, khả năng bảo mật và khả năng bảo vệ riêng tư.
Chúng tôi gọi những thành phần này là các môđun Mainline (Mainline Module). Một môđun Mainline là một phần mã nguồn với các thuộc tính sau:
– Trước khi (bản) Android được phát hành, có thể được cả Google và các đối tác chung tay điều chỉnh
– Sau khi bản Android được phát hành, sẽ là hoàn toàn thống nhất với mọi thiết bị trong hệ sinh thái
– Chỉ thay đổi, cập nhật với những lỗi nghiêm trọng và liên quan đến bảo mật.
Phẩm chất quyết định của một môđun Mainline là mức ổn định giữa mọi thiết bị. Với các môđun Mainline, chúng tôi đều đồng ý rằng không có chỗ cho sự khác biệt có chủ đích (giữa các OEM). Dự án Mainline được bắt đầu với Android 10 và hiện đã được giao phó nhiệm vụ đưa những bản vá tới nhiều và nhiều hơn thế nữa các thiết bị, ở một tốc độ và chất lượng mà sẽ không bao giờ trở thành sự thực nếu không có nó.
Tổng kết lại: Lời giải đáp cho câu hỏi của bạn là: “chi phí duy trì” là lí do gây ra sự khó khăn cho việc cập nhật, và giải pháp của chúng tôi đã từng và đang (và sẽ tiếp tục) là một cách tiếp cận vấn đề thận trọng. Chúng tôi định nghĩa những ranh giới để giúp cho ngày càng nhiều phần của HĐH có thể được cập nhật một cách nhanh hơn, mà không phải hy sinh sự linh hoạt cũng như sức mạnh mà bản sắc mã nguồn mở của Android mang lại.
(Theo Trí Thức Trẻ)
Google đã đáp ứng được vấn đề trầm kha của Android?
Android 10 có tỉ lệ cài đặt nhanh nhất lịch sử Google nhưng vẫn kém xa iOS 13 của Apple.
Nguồn: ictnews
Bài viết Tại sao Android lại ít được cập nhật phần mềm? đã xuất hiện đầu tiên vào ngày Đồ Chơi Công Nghệ.
source https://dochoicongnghe.com.vn/tai-sao-android-lai-it-duoc-cap-nhat-phan-mem-18857.html
0 notes
Text
NVIDIA Jetson Nano Development Kit-B01
NVIDIA Jetson Nano Development Kit-B01
Nano Jetson NVIDIA Developer Kit is a development kit Artificial Intelligence (AI) that can be used to run a variety of modern AI load with amazing performance. With the NVIDIA Developer Kit Nano Jetson now the developers can run the AI framework and a model for application of image recognition, object detection, segmentation, speech recognition and many more. Jetson NVIDIA Developer Kit Nano is powered by a micro USB and equipped with many I / O pins, ranging from GPIO to CSI. Pin I / O are plentiful this allows developers to connect various sensors for AI application development purposes. Nano Jetson NVIDIA Developer Kit is also supported by NVIDIA JetPack, which includes Board Support Package (BSP), Linux OS, NVIDIA CUDA, cuDNN, and TensorRT for the purposes of deep learning, computer vision, GPU computing,
NOTE: This kit is the latest version of NVIDIA Jetson Nano which has undergone several revisions of the terms of the arrangement of the components of the previous version (A02). The different versions of A02 and B01 can be seen in the image below.
Specification
GPU: 128-core Maxwell
CPU:Quad-core ARM A57 @ 1.43 GHz
RAM: 4 GB 64-bit LPDDR4 25.6 GB/s
External Storage: microSD (not included)
Video Encoder: 4K @ 30 | 4x 1080p @ 30 | 9x 720p @ 30 (H.264/H.265)
Video Decoder: 4K @ 60 | 2x 4K @ 30 | 8x 1080p @ 30 | 18x 720p @ 30|(H.264/H.265)
Soket Kamera: 2x MIPI CSI-2 DPHY lanes
Konektifitas: Gigabit Ethernet, M.2 Key E
Display Output: HDMI 2.0 and eDP 1.4
USB: 4x USB 3.0, USB 2.0 Micro-B
Interface: GPIO, I2C, I2S, SPI, UART
Dimension: 100 mm x 80 mm x 29 mm
Document
NVIDIA JetPack SDK
Development Kit User Guide
Grove Python Libraries for Nvidia Jetson Nano
NVIDIA Jetson™ family for products
Sample Applications
Setting up Jetson with JetPack
Classifying Images with ImageNet
Locating Objects with DetectNet
Semantic Segmentation with SegNet
Transfer Learning with PyTorch
equipment Products
NVIDIA Jetson Nano module and carrier board
Quick Start Guide and Support Guide
https://ift.tt/3aSPOT1 March 10, 2020 at 11:16AM
0 notes
Text
LFD460 Embedded Linux Development with Yocto Project
Obtain a solid understanding of embedded development using the Yocto Project, including the Poky Reference Distribution and Bitbake, the use of emulators, building images for multiple architectures and the creation of board support packages (BSP).
from martinos https://www.linux.com/training/lfd460-embedded-linux-development-yocto-project-22
0 notes
Text
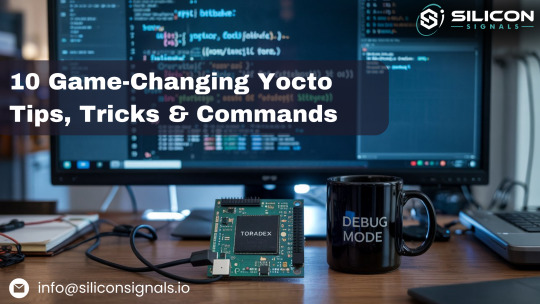
10 Life-Saving Yocto Tips, Tricks & Commands Every Developer Should Know
As embedded engineers, we know that Yocto is unmatched for building custom Linux distributions. But it’s also notoriously complex—small oversights can derail your entire build. Whether you're debugging u-boot, optimizing build time, or managing dependencies, these 10 advanced (non-generic) tips can be a game-changer in your daily Yocto workflow. They're pulled straight from the trenches—tested, impactful, and engineered to save your sanity.
1. 🔍 Use Devshell to Troubleshoot Complex Recipes
Command: bitbake u-boot -c devshell Launch an environment with all patches applied. Great for running commands like make menuconfig or tweaking u-boot/kernel directly. 👉 Speeds up debugging drastically. ⚠️ Be in the right build directory, and close the terminal after use.
2. ♻️ Invalidate sstate Cache for a True Rebuild
Sometimes the sstate cache doesn’t detect upstream changes. A quick comment tweak can trigger a rebuild:- # Package task + # Package task (force rebuild)
👉 Ensures your changes reflect in production builds. ⚠️ Use sparingly to avoid long rebuilds.
3. 🔗 Visualize Dependencies with Graphviz
Command:bitbake -g core-image-minimal dot -Tpng recipe-depends.dot -o dependencies.png
Explore recipe-depends.dot to analyze dependency chains. 👉 Crucial for resolving weird build issues. ⚠️ Keep focus—graphs can get heavy!
4. ⚡ Use Local Sources for Fast Dev Cycles
Add to conf/local.conf:INHERIT += "externalsrc" EXTERNALSRC_pn-yourpkg = "/local/path"
Edit code directly without constant patching. 👉 Game-changer for rapid driver or app iteration. ⚠️ Not ideal for final production images.
5. 🛠️ Automate with Post-Install Scripts
In your .bb recipe:pkg_postinst_${PN}() { cp /foo/bar.conf /etc/bar.conf systemctl enable my-service }
👉 Saves time by automating config and service setup. ⚠️ Ensure it's idempotent to avoid bricking the rootfs.
6. 🔍 Discover Layers Instead of Reinventing
Browse: https://layers.openembedded.org Find community-maintained layers like meta-qt5, meta-raspberrypi, etc. 👉 Cuts weeks off dev time. ⚠️ Double-check layer compatibility with your Yocto release.
7. 📁 Access Recipe Files Using FILESEXTRAPATHS
FILESEXTRAPATHS_prepend := "${THISDIR}/files:" SRC_URI += "file://your.conf"
👉 Keeps your recipes neat while bundling needed configs/patches. ⚠️ Ensure all referenced files exist—build will fail otherwise.
8. 🧰 Add Dev Packages to Your SDK
IMAGE_INSTALL_append = " cppzmq-dev" TOOLCHAIN_TARGET_TASK_append = " cppzmq-dev"
Also, modify SDK meta files if needed. 👉 Makes cross-compilation seamless. ⚠️ Check licenses before shipping SDKs externally.
9. 🚀 Speed Up Builds with Parallelization
In conf/local.conf:BB_NUMBER_THREADS = "8" PARALLEL_MAKE = "-j 8"
👉 Dramatically reduces build time on multi-core machines. ⚠️ Don’t max out your system—monitor memory and CPU usage.
10. 🐞 Troubleshoot Like a Pro with Verbose Logs
bitbake -v -D core-image-minimal bitbake -v -D log.domains=bb.fetch core-image-minimal
👉 Cuts down root-cause hunt time. ⚠️ Logs can get huge—redirect output to a file when needed.
🔁 Bonus: Debug Shared State with .siginfo Files
bitbake --dump-signatures core-image-minimal bitbake-diffsigs file1.siginfo file2.siginfo
Understand why sstate reuse fails by comparing task signatures. 👉 Fixes mysterious rebuild issues. ⚠️ Requires understanding of Python pickled data.
🚨 These Tips Save Time, Effort & Frustration
✅ Faster debugging (devshell, verbose logs, siginfo)
✅ Shorter dev cycles (externalsrc, parallel builds)
✅ Fewer bugs (dependency graphs, cache invalidation)
✅ Cleaner customization (postinst scripts, recipe file handling)
🔧 Working with Yocto?
Let Silicon Signals help you with custom BSPs, embedded Linux builds, and Yocto-based product development. Whether it's board bring-up, device driver integration, or image optimization—we’ve got you covered.
👉 DM us or drop a message to explore how we can support your Yocto needs! or Mail us on [email protected]
www.siliconsignals.io
#YoctoProject#EmbeddedLinux#BSPDevelopment#OpenEmbedded#BitBake#EmbeddedSystems#SiliconSignals#LinuxForDevices#FirmwareEngineering#TechTips
0 notes
Text
Starting with OpenCV on i.MX 6 Processors
Introduction
As the saying goes, a picture is worth a thousand words. It is indeed true to some extent: a picture can hold information about objects, environment, text, people, age and situations, among other information. It can also be extended to video, that can be interpreted as a series of pictures and thus holds motion information.
This might be a good hint as to why computer vision (CV) has been a field of study that is expanding its boundaries every day. But then we come to the question: what is computer vision? It is the ability to extract meaning from an image, or a series of images. It is not to be confused with digital imaging neither image processing, which are the production of an input image and the application of mathematical operations to images, respectively. Indeed, they are both required to make CV possible.
But what might be somehow trivial to human beings, such as reading or recognizing people, is not always true when talking about computers interpreting images. Although nowadays there are many well known applications such as face detection in digital cameras and even face recognition in some systems, or optical character recognition (OCR) for book scanners and license plate reading in traffic monitoring systems, these are fields that nearly didn't exist 15 years ago in people's daily lives. Self-driving cars going from controlled environments to the streets are a good measure of how cutting-edge this technology is, and one of the enablers of CV is the advancement of computing power in smaller packages.
Being so, this blog post is an introduction to the use of computer vision in embedded systems, by employing the OpenCV 2.4 and 3.1 versions in Computer on Modules (CoMs) equipped with NXP i.MX 6 processors. The CoMs chosen were the Colibri and Apalis families from Toradex.
OpenCV stands for Open Source Computer Vision Library, which is a set of libraries that contain several hundreds of computer vision related algorithms. It has a modular structure, divided in a core library and several others such as image processing module, video analysis module and user interface capabilities module, among others.
Considerations about OpenCV, i.MX 6 processors and the Toradex modules
OpenCV is a set of libraries that computes mathematical operations on the CPU by default. It has support for multicore processing by using a few external libraries such as OpenMP (Open Multi-processing) and TBB (Threading Building Blocks). This blog post will not go deeper into comparing the implementation aspects of the choices available, but the performance of a specific application might change with different libraries.
Regarding support for the NEON floating-point unit coprocessor, the release of OpenCV 3.0 states that approximately 40 functions have been accelerated and a new HAL (hardware abstraction layer) provides an easy way to create NEON-optimized code, which is a good way to enhance performance in many ARM embedded systems. I didn't dive deep into it, but if you like to see under the hood, having a look at the OpenCV source-code (1, 2) might be interesting.
This blog post will present how to use OpenCV 2.4 and also OpenCV 3.1 - this was decided because there might be readers with legacy applications that want to use the older version. It is a good opportunity for you to compare performance between versions and have a hint about the NEON optimizations gains.
The i.MX 6 single/dual lite SoC has graphics GPU (GC880) which supports OpenGL ES, while the i.MX 6 dual/quad SoC, has 3D graphics GPU (GC2000) which supports OpenGL ES and also OpenCL Embedded Profile, but not the Full Profile. The i.MX 6 also has 2D GPU (GC320), IPU and, for the dual/quad version, vector GPU (GC335), but this blog post will not discuss the possibility of using these hardware capabilities with OpenCV - it suffices to say that OpenCV source-code does not support them by default, therefore a considerable amount of effort would be required to take advantage of the i.MX 6 hardware specifics.
While OpenCL is a general purpose GPU programming language, its use is not the target of this blog post. OpenGL is an API for rendering 2D and 3D graphics on the GPU, and therefore is not meant for general purpose computing, although some experiments (1) have demonstrated that it is possible to use OpenGL ES for general purpose image processing, and there is even an application-note by NXP for those interested. If you would like to use GPU accelerated OpenCV out-of-the-box, Toradex has a module that supports CUDA – the Apalis TK1. See this blog post for more details.
Despite all the hardware capabilities available and possibly usable to gain performance, according to this presentation, the optimization of OpenCV source-code focusing only software and the NEON co-processor could yield a performance enhancement of 2-3x for algorithm and another 3-4x NEON optimizations.
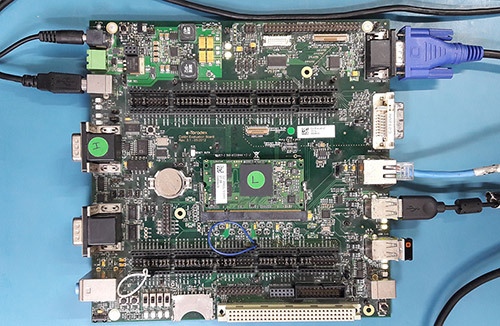
The Images 1 and 2 present, respectively, the Colibri iMX6DL + Colibri Evaluation Board and the Apalis iMX6Q + Apalis Evaluation Board, both with supply, debug UART, ethernet, USB camera and VGA display cables plugged in.
Colibri iMX6DL Colibri Evaluation Board setup

Apalis iMX6Q Apalis Evaluation Board setup
It is important to notice that different USB camera models had a performance offset, and that the camera employed in this blog post is a generic consumer camera – the driver was listed as “Aveo Technology Corp”. There are also professional cameras in the market, USB or not, such as the solutions provided by Basler AG, that are meant for embedded solutions when going to develop a real-world solution.

Professional camera from Basler AG
In addition, Toradex has the CSI Camera Module 5MP OV5640. It is an add-on board for the Apalis computer-on-module which uses MIPI-CSI Interface. It uses the OmniVision OV5640 camera sensor with built-in auto-focus. The OV5640 image sensor is a low voltage, high-performance, 1/4-inch 5 megapixel CMOS image sensor that provides the full functionality of a single chip 5 megapixel (2592x1944) camera. The CSI Camera Module 5MP OV5640 can be connected to the MIPI-CSI connector on the Ixora carrier board V1.1 using a 24 way 0.5mm pitch FFC cable.

Toradex CSI Camera Module 5MP OV5640
At the end of this blog post, a summary of the instructions to install OpenCV and deploy applications to the target is provided.
Building Linux image with OpenCV
Images for the OpenCV 2.4 and 3.1 are built with OpenEmbedded. You may follow this article to set up your host machine. The first step required is to install the system prerequisites for OpenEmbedded. Below an example is given for Ubuntu 16.04 - for other versions of Ubuntu and Fedora, please refer to the article link above:
sudo dpkg --add-architecture i386 sudo apt-get update sudo apt-get install g++-5-multilib sudo apt-get install curl dosfstools gawk g++-multilib gcc-multilib lib32z1-dev libcrypto++9v5:i386 libcrypto++-dev:i386 liblzo2-dev:i386 libstdc++-5-dev:i386 libusb-1.0-0:i386 libusb-1.0-0-dev:i386 uuid-dev:i386 cd /usr/lib; sudo ln -s libcrypto++.so.9.0.0 libcryptopp.so.6
The repo utility must also be installed, to fetch the various git repositories required to build the images:
mkdir ~/bin export PATH=~/bin:$PATH curl http://commondatastorage.googleapis.com/git-repo-downloads/repo > ~/bin/repo chmod a+x ~/bin/repo
Let's build the images with OpenCV 2.4 and 3.1 in different directories. If you are interested in only one version, some steps might be omitted. A directory to share the content downloaded by OpenEmbedded will also be created:
cd mkdir oe-core-opencv2.4 oe-core-opencv3.1 oe-core-downloads cd oe-core-opencv2.4 repo init -u http://git.toradex.com/toradex-bsp-platform.git -b LinuxImageV2.6.1 repo sync cd ../oe-core-opencv3.1 repo init -u http://git.toradex.com/toradex-bsp-platform.git -b LinuxImageV2.7 repo sync
OpenCV 2.4
OpenCV 2.4 will be included in the Toradex base image V2.6.1. Skip this section and go to the OpenCV3.1 if you are not interested in this version. The recipe included by
default uses the version 2.4.11 and has no support for multicore processing included.
Remove the append present in the meta-fsl-arm and the append present in the meta-toradex-demos:
rm layers/meta-fsl-arm/openembedded-layer/recipes-support/opencv/opencv_2.4.bbappend rm layers/meta-toradex-demos/recipes-support/opencv/opencv_2.4.bbappend
Let's create an append to use the version 2.4.13.2 (latest version so far) and add TBB as the framework to take advantage of multiple cores. Enter the oe-core-opencv2.4 directory:
cd oe-core-opencv2.4
Let's create an append in the meta-toradex-demos layer (layers/meta-toradex-demos/recipes-support/opencv/opencv_2.4.bbappend) with the following content:
gedit layers/meta-toradex-demos/recipes-support/opencv/opencv_2.4.bbappend ------------------------------------------------------------------------------------- SRCREV = "d7504ecaed716172806d932f91b65e2ef9bc9990" SRC_URI = "git://github.com/opencv/opencv.git;branch=2.4" PV = "2.4.13.2+git${SRCPV}" PACKAGECONFIG += " tbb" PACKAGECONFIG[tbb] = "-DWITH_TBB=ON,-DWITH_TBB=OFF,tbb,"
Alternatively, OpenMP could be used instead of TBB:
gedit layers/meta-toradex-demos/recipes-support/opencv/opencv_2.4.bbappend ------------------------------------------------------------------------------------- SRCREV = "d7504ecaed716172806d932f91b65e2ef9bc9990" SRC_URI = "git://github.com/opencv/opencv.git;branch=2.4" PV = "2.4.13.2+git${SRCPV}" EXTRA_OECMAKE += " -DWITH_OPENMP=ON"
Set up the environment before configuring the machine and adding support for OpenCV. Source the export script that is inside the oe-core-opencv2.4 directory:
. export
You will automatically enter the build directory. Edit the conf/local.conf file to modify and/or add the variables below:
gedit conf/local.conf ------------------------------------------------------------------------------- MACHINE ?= "apalis-imx6" # or colibri-imx6 depending on the CoM you have # Use the previously created folder for shared downloads, e.g. DL_DIR ?= "/home/user/oe-core-downloads" ACCEPT_FSL_EULA = "1" # libgomp is optional if you use TBB IMAGE_INSTALL_append = " opencv opencv-samples libgomp"
After that you can build the image, which takes a while:
bitbake –k angstrom-lxde-image
OpenCV 3.1
OpenCV 3.1 will be included in the Toradex base image V2.7. This recipe, different from the 2.4, already has TBB support included. Still, a compiler flag must be added or the compiling process will fail. Enter the oe-core-opencv3.1 directory:
cd oe-core-opencv3.1
Create a recipe append (layers/meta-openembedded/meta-oe/recipes-support/opencv/opencv_3.1.bb) with the following contents:
gedit layers/meta-toradex-demos/recipes-support/opencv/opencv_3.1.bbappend ------------------------------------------------------------------------------------- CXXFLAGS += " -Wa,-mimplicit-it=thumb"
Alternatively, OpenMP could be used instead of TBB. If you want to do it, create the bbappend with the following contents:
gedit layers/meta-toradex-demos/recipes-support/opencv/opencv_3.1.bbappend ------------------------------------------------------------------------------------- CXXFLAGS_armv7a += " -Wa,-mimplicit-it=thumb" PACKAGECONFIG_remove = "tbb" EXTRA_OECMAKE += " -DWITH_OPENMP=ON"
Set up the environment before configuring the machine and adding support for OpenCV. Source the export script that is inside the oe-core-opencv3.1 directory:
. export
You will automatically enter the build directory. Edit the conf/local.conf file to modify and/or add the variables below:
gedit conf/local.conf ------------------------------------------------------------------------------- MACHINE ?= "apalis-imx6" # or colibri-imx6 depending on the CoM you have # Use the previously created folder for shared downloads, e.g. DL_DIR ?= "/home/user/oe-core-downloads" ACCEPT_FSL_EULA = "1" # libgomp is optional if you use TBB IMAGE_INSTALL_append = " opencv libgomp"
After that you can build the image, which will take a while:
bitbake –k angstrom-lxde-image
Update the module
The images for both OpenCV versions will be found in the oe-core-opencv<version>/deploy/images/<board_name> directory, under the name <board_name>_LinuxImage<image_version>_<date>.tar.bz2. Copy the compressed image to some project directory in your computer, if you want. An example is given below for Apalis iMX6 with OpenCV 2.4, built in 2017/01/26:
cd /home/user/oe-core-opencv2.4/deploy/images/apalis-imx6/ cp Apalis_iMX6_LinuxImageV2.6.1_20170126.tar.bz2 /home/root/myProjectDir cd /home/root/myProjectDir
Please follow this article's instructions to update your module.
Generating SDK
To generate an SDK, that will be used to cross-compile applications, run the following command:
bitbake –c populate_sdk angstrom-lxde-image
After the process is complete, you will find the SDK under /deploy/sdk. Run the script to install – you will be prompted to chose an installation path:
./angstrom-glibc-x86_64-armv7at2hf-vfp-neon-v2015.12-toolchain.sh Angstrom SDK installer version nodistro.0 ========================================= Enter target directory for SDK (default: /usr/local/oecore-x86_64):
In the next steps it will be assumed that you are using the following SDK directories: For OpenCV 2.4: /usr/local/oecore-opencv2_4 For OpenCV 3.1: /usr/local/oecore-opencv3_1
Preparing for cross-compilation
After the installation is complete, you can use the SDK to compile your applications. In order to generate the Makefiles, CMake was employed. If you don't have CMake, install it:
sudo apt-get install cmake
Create a file named CMakeLists.txt inside your project folder, with the content below. Please make sure that the sysroot name inside your SDK folder is the same as the one in the script (e.g. armv7at2hf-vfp-neon-angstrom-linux-gnueabi):
cd ~ mkdir my_project gedit CMakeLists.txt -------------------------------------------------------------------------------- cmake_minimum_required(VERSION 2.8) project( MyProject ) set(CMAKE_RUNTIME_OUTPUT_DIRECTORY "${CMAKE_BINARY_DIR}/bin") add_executable( myApp src/myApp.cpp ) if(OCVV EQUAL 2_4) message(STATUS "OpenCV version required: ${OCVV}") SET(CMAKE_PREFIX_PATH /usr/local/oecore-opencv${OCVV}/sysroots/armv7at2hf-vfp-neon-angstrom-linux-gnueabi) elseif(OCVV EQUAL 3_1) message(STATUS "OpenCV version required: ${OCVV}") SET(CMAKE_PREFIX_PATH /usr/local/oecore-opencv${OCVV}/sysroots/armv7at2hf-neon-angstrom-linux-gnueabi) else() message(FATAL_ERROR "OpenCV version needs to be passed. Make sure it matches your SDK version. Use -DOCVV=<version>, currently supported 2_4 and 3_1. E.g. -DOCVV=3_1") endif() SET(OpenCV_DIR ${CMAKE_PREFIX_PATH}/usr/lib/cmake/OpenCV) find_package( OpenCV REQUIRED ) include_directories( ${OPENCV_INCLUDE_DIRS} ) target_link_libraries( myApp ${OPENCV_LIBRARIES} )
It is also needed to have a CMake file to point where are the includes and libraries. For that we will create one CMake script inside each SDK sysroot. Let's first do it for the 2.4 version:
cd /usr/local/oecore-opencv2_4/sysroots/armv7at2hf-vfp-neon-angstrom-linux-gnueabi/usr/lib/cmake mkdir OpenCV gedit OpenCV/OpenCVConfig.cmake ----------------------------------------------------------------------------------- set(OPENCV_FOUND TRUE) get_filename_component(_opencv_rootdir ${CMAKE_CURRENT_LIST_DIR}/../../../ ABSOLUTE) set(OPENCV_VERSION_MAJOR 2) set(OPENCV_VERSION_MINOR 4) set(OPENCV_VERSION 2.4) set(OPENCV_VERSION_STRING "2.4") set(OPENCV_INCLUDE_DIR ${_opencv_rootdir}/include) set(OPENCV_LIBRARY_DIR ${_opencv_rootdir}/lib) set(OPENCV_LIBRARY -L${OPENCV_LIBRARY_DIR} -lopencv_calib3d -lopencv_contrib -lopencv_core -lopencv_features2d -lopencv_flann -lopencv_gpu -lopencv_highgui -lopencv_imgproc -lopencv_legacy -lopencv_ml -lopencv_nonfree -lopencv_objdetect -lopencv_ocl -lopencv_photo -lopencv_stitching -lopencv_superres -lopencv_video -lopencv_videostab) if(OPENCV_FOUND) set( OPENCV_LIBRARIES ${OPENCV_LIBRARY} ) set( OPENCV_INCLUDE_DIRS ${OPENCV_INCLUDE_DIR} ) endif() mark_as_advanced(OPENCV_INCLUDE_DIRS OPENCV_LIBRARIES)
The same must be done for the 3.1 version - notice that the libraries change from OpenCV 2 to OpenCV 3:
cd /usr/local/oecore-opencv3_1/sysroots/armv7at2hf-vfp-neon-angstrom-linux-gnueabi/usr/lib/cmake mkdir OpenCV gedit OpenCV/OpenCVConfig.cmake ----------------------------------------------------------------------------------- set(OPENCV_FOUND TRUE) get_filename_component(_opencv_rootdir ${CMAKE_CURRENT_LIST_DIR}/../../../ ABSOLUTE) set(OPENCV_VERSION_MAJOR 3) set(OPENCV_VERSION_MINOR 1) set(OPENCV_VERSION 3.1) set(OPENCV_VERSION_STRING "3.1") set(OPENCV_INCLUDE_DIR ${_opencv_rootdir}/include) set(OPENCV_LIBRARY_DIR ${_opencv_rootdir}/lib) set(OPENCV_LIBRARY -L${OPENCV_LIBRARY_DIR} -lopencv_aruco -lopencv_bgsegm -lopencv_bioinspired -lopencv_calib3d -lopencv_ccalib -lopencv_core -lopencv_datasets -lopencv_dnn -lopencv_dpm -lopencv_face -lopencv_features2d -lopencv_flann -lopencv_fuzzy -lopencv_highgui -lopencv_imgcodecs -lopencv_imgproc -lopencv_line_descriptor -lopencv_ml -lopencv_objdetect -lopencv_optflow -lopencv_photo -lopencv_plot -lopencv_reg -lopencv_rgbd -lopencv_saliency -lopencv_shape -lopencv_stereo -lopencv_stitching -lopencv_structured_light -lopencv_superres -lopencv_surface_matching -lopencv_text -lopencv_tracking -lopencv_videoio -lopencv_video -lopencv_videostab -lopencv_xfeatures2d -lopencv_ximgproc -lopencv_xobjdetect -lopencv_xphoto) if(OPENCV_FOUND) set( OPENCV_LIBRARIES ${OPENCV_LIBRARY} ) set( OPENCV_INCLUDE_DIRS ${OPENCV_INCLUDE_DIR} ) endif() mark_as_advanced(OPENCV_INCLUDE_DIRS OPENCV_LIBRARIES)
After that, return to the project folder. You must export the SDK variables and run the CMake script:
# For OpenCV 2.4 source /usr/local/oecore-opencv2_4/environment-setup-armv7at2hf-vfp-neon-angstrom-linux-gnueabi cmake -DOCVV=2_4 . # For OpenCV 3.1 source /usr/local/oecore-opencv3_1/environment-setup-armv7at2hf-neon-angstrom-linux-gnueabi cmake –DOCVV=3_1 .
Cross-compiling and deploying
To test the cross-compilation environment, let's build a hello-world application that reads an image from a file and displays the image on a screen. This code is essentially the same as the one from this OpenCV tutorial:
mkdir src gedit src/myApp.cpp --------------------------------------------------------------------------------- #include #include <opencv2/opencv.hpp> using namespace std; using namespace cv; int main(int argc, char** argv ){ cout << "OpenCV version: " << CV_MAJOR_VERSION << '.' << CV_MINOR_VERSION << "\n"; if ( argc != 2 ){ cout << "usage: ./myApp \n"; return -1; } Mat image; image = imread( argv[1], 1 ); if ( !image.data ){ cout << "No image data \n"; return -1; } bitwise_not(image, image); namedWindow("Display Image", WINDOW_AUTOSIZE ); imshow("Display Image", image); waitKey(0); return 0; }
To compile and deploy, follow the instructions below. The board must have access to the LAN – you may plug an ethernet cable or use a WiFi-USB adapter, for instance. To find out the ip, use the ifconfig command.
make scp bin/myApp root@<board-IP>/home/root # Also copy some image to test! scp <path-to-image>/myimage.jpg root@<board-IP>:/home/root
In the embedded system, run the application:
root@colibri-imx6:~# ./myApp
You must see the image on the screen, as in Image 3:
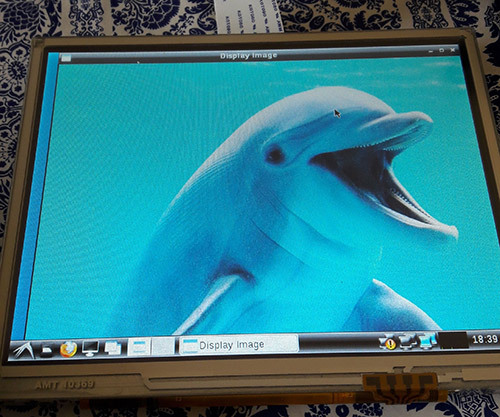
Hello World application
Reading from camera
In this section, a code that reads from the camera and processes the input using the Canny edge detection algorithm will be tested. It is just one out of many algorithms already implemented in OpenCV. By the way, OpenCV has a comprehensive documentation, with tutorials, examples and library references.
In the Linux OS, when a camera device is attached, it can be accessed from the filesystem. The device is mounted in the /dev directory. Let's check the directory contents of Apalis iMX6 before plugging the USB camera:
root@apalis-imx6:~# ls /dev/video* /dev/video0 /dev/video1 /dev/video16 /dev/video17 /dev/video18 /dev/video19 /dev/video2 /dev/video20
And after plugging in:
root@apalis-imx6:~# ls /dev/video* /dev/video0 /dev/video1 /dev/video16 /dev/video17 /dev/video18 /dev/video19 /dev/video2 /dev/video20 /dev/video3
Notice that it is listed as /dev/video3. It can be confirmed using the video4linux2 command-line utility (run v4l2-ctl –help for details):
root@apalis-imx6:~# v4l2-ctl --list-devices [ 3846.876041] ERROR: v4l2 capture: slave not found! V4L2_CID_HUE [ 3846.881940] ERROR: v4l2 capture: slave not found! V4L2_CID_HUE [ 3846.887923] ERROR: v4l2 capture: slave not found! V4L2_CID_HUE DISP4 BG ():[ 3846.897425] ERROR: v4l2 capture: slave not found! V4L2_CID_HUE /dev/video16 /dev/video17 /dev/video18 /dev/video19 /dev/video20 UVC Camera (046d:081b) (usb-ci_hdrc.1-1.1.3): /dev/video3 Failed to open /dev/video0: Resource temporarily unavailable
It is also possible to get the input device parameters. Notice that the webcam used in all the tests has a resolution of 640x480 pixels.
root@apalis-imx6:~# v4l2-ctl -V --device=/dev/video3 Format Video Capture: Width/Height : 640/480 Pixel Format : 'YUYV' Field : None Bytes per Line: 1280 Size Image : 614400 Colorspace : SRGB
In addition, since all of the video interfaces are abstracted by the Linux kernel, if you were using the CSI Camera Module 5MP OV5640 from Toradex, it would be listed as another video interface. On Apalis iMX6 the kernel drivers are loaded by default. For more information, please check this knowledge-base article.
Going to the code, the OpeCV object that does the camera handling, VideoCapture, accepts the camera index (which is 3 for our /dev/video3 example) or -1 to autodetect the camera device.
An infinite loop processes the video frame by frame. Our example applies the filters conversion to gray scale -> Gaussian blur -> Canny and then sends the processed image to the video output. The code is presented below:
#include #include #include <opencv2/core/core.hpp> #include <opencv2/imgproc/imgproc.hpp> #include <opencv2/highgui/highgui.hpp> using namespace std; using namespace cv; int main(int argc, char** argv ){ cout << "OpenCV version: " << CV_MAJOR_VERSION << '.' << CV_MINOR_VERSION << '\n'; VideoCapture cap(-1); // searches for video device if(!cap.isOpened()){ cout << "Video device could not be opened\n"; return -1; } Mat edges; namedWindow("edges",1); double t_ini, fps; for(; ; ){ t_ini = (double)getTickCount(); // Image processing Mat frame; cap >> frame; // get a new frame from camera cvtColor(frame, edges, COLOR_BGR2GRAY); GaussianBlur(edges, edges, Size(7,7), 1.5, 1.5); Canny(edges, edges, 0, 30, 3); // Display image and calculate current FPS imshow("edges", edges); if(waitKey(30) >= 0) break; fps = getTickFrequency()/((double)getTickCount() - t_ini); cout << "Current fps: " << fps << '\r' << flush; } return 0; }
Image 4 presents the result. Notice that neighter the blur nor the Canny algorithms parameters were tuned.
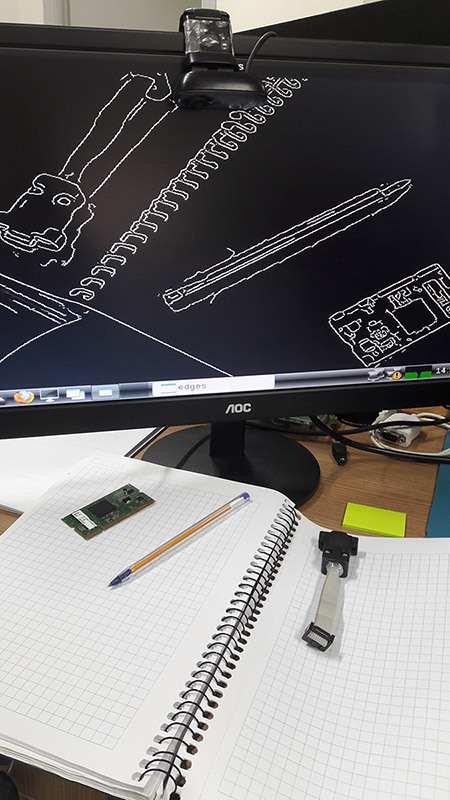
Capture from USB camera being processed with Canny edge detection
In order to compare between the Colibri iMX6S and iMX6DL and be assured that multicore processing is being done, the average FPS for 1000 samples was measured, and is presented in table 1. It was also done for the Apalis iMX6Q with the Apalis Heatsink. All of the tests had frequency scaling disabled.
Table 1 – Canny implementation comparison between modules and OpenCV configurations (640x480)
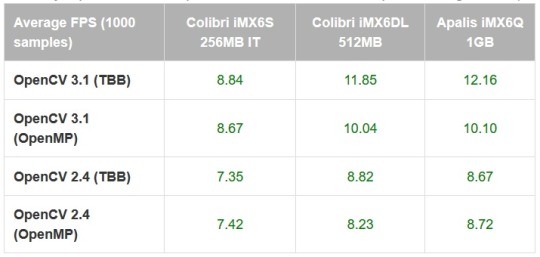
As a comparison, the Canny algorithm was replaced in the code with the Sobel derivatives, based on this example. The results are presented in table 2:
Table 2 – Sobel implementation comparison between modules and OpenCV configurations (640x480)
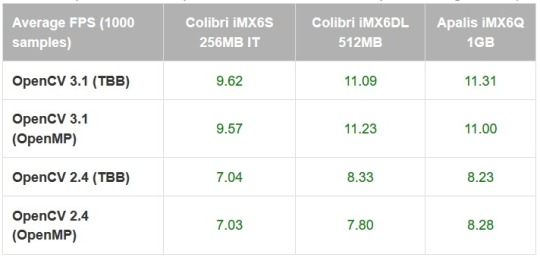
It is interesting to notice that using the TBB framework may be slightly faster than OpenMP in most of the situations, but not always. It is interesting to notice that there is a small performance difference even for the single-core results.
Also, the enhancements made from OpenCV 2.4 to OpenCV 3.1 have a significant impact in the applications performance – which might be explained by the NEON optimizations made so far, and also an incentive to try to optimize the algorithms that your application requires. Based on this preliminary results, it is interesting to test a specific application with several optimization combinations and using only the latest OpenCV version before deploying.
Testing an OpenCV face-tracking sample
There is also a face-tracking sample in the OpenCV source-code that was tested, since it is heavier than the previously made tests and might provide a better performance awareness regarding Colibri x Apalis when choosing the more appropriate hardware for your project.
The first step was to copy the application source-code from GitHub and replace the contents of myApp.cpp, or create another file and modify the CMake script if you prefer. You will also need the Haar cascades provided for face and eye recognition. You might as well clone the whole OpenCV git directory and later test other samples.
A few changes must be made in the source-code so it also works for OpenCV2.4: include the stdio.h library, modify the OpenCV included libraries (take a look in the new headers layout section here) and make some changes to the CommandLineParser, since the versions from OpenCV 2 and 3 are not compatible. Image 5 presents the application running:
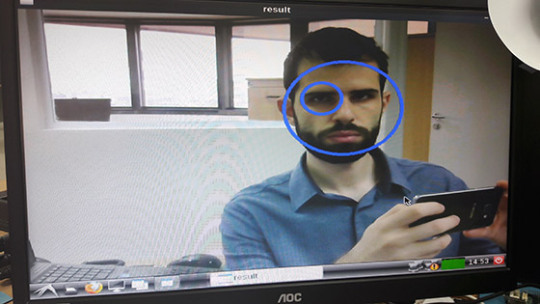
Face and eye tracking application
The code already prints the time it takes to run a face detection. Table 3, presented below, holds the results for 100 samples:
Table 3 – Face detection comparison between modules and OpenCV configurations (640x480)
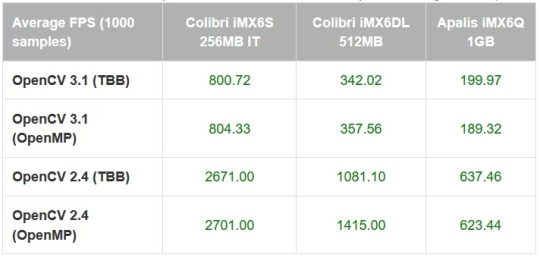
Again the difference between OpenCV versions is not negligible - for the Apalis iMX6Q (quad-core) the performance gain is 3x, and using OpenCV 3.1 with the dual-core Colibri iMX6DL delivers a better performance than OpenCV 2.4 with the quad-core Apalis iMX6Q.
The single-core IT version, thus with reduced clock compared to the others, has results far behind as expected. The reduced clock may explain why the performance improvement from single to dual core is higher than dual to quad core.
Conclusion
Since OpenCV is nowadays (probably) the most popular set of libraries for computer vision, and with the enhancement of performance in embedded systems, knowing how to start with OpenCV for embedded applications provides a powerful tool to solve problems of nowadays and the near future.
This blog post has chosen a widely known family of microprocessors as an example and a starting point, be for those only studying computer vision or those already focusing on developing real-world applications. It also has demonstrated that things are only starting – see for instance the performance improvements from OpenCV 2 to 3 for ARM processors – which also points towards the need to understand the system architecture and focus on optimizing the application as much as possible – even under the hood. I hope this blog post was useful and see you next time!
Summary
1) Building image with OpenCV To build an image with OpenCV 3.1, first follow this article steps to setup OpenEmbedded for the Toradex image V2.7. Edit the OpenCV recipe from meta-openembedded, adding the following line:
CXXFLAGS += " -Wa,-mimplicit-it=thumb"
In the local.conf file uncomment your machine, accept the Freescale license and add OpenCV:
MACHINE ?= "apalis-imx6" # or colibri-imx6 depending on the CoM you have ACCEPT_FSL_EULA = "1" IMAGE_INSTALL_append = " opencv"
2) Generating SDK Then you are able to run the build, and also generate the SDK:
bitbake –k angstrom-lxde-image bitbake –c populate_sdk angstrom-lxde-image
To deploy the image to the embedded system, you may follow this article's steps.
3) Preparing for cross-compilation After you install the SDK, there will be a sysroot for the target (ARM) inside the SDK directory. Create an OpenCV directory inside <path_to_ARM_sysroot>/usr/lib/cmake and, inside this new directory create a file named OpenCVConfig.cmake with the contents presented below:
cd /usr/lib/cmake mkdir OpenCV vim OpenCVConfig.cmake --------------------------------------------------------------------------- set(OPENCV_FOUND TRUE) get_filename_component(_opencv_rootdir ${CMAKE_CURRENT_LIST_DIR}/../../../ ABSOLUTE) set(OPENCV_VERSION_MAJOR 3) set(OPENCV_VERSION_MINOR 1) set(OPENCV_VERSION 3.1) set(OPENCV_VERSION_STRING "3.1") set(OPENCV_INCLUDE_DIR ${_opencv_rootdir}/include) set(OPENCV_LIBRARY_DIR ${_opencv_rootdir}/lib) set(OPENCV_LIBRARY -L${OPENCV_LIBRARY_DIR} -lopencv_aruco -lopencv_bgsegm -lopencv_bioinspired -lopencv_calib3d -lopencv_ccalib -lopencv_core -lopencv_datasets -lopencv_dnn -lopencv_dpm -lopencv_face -lopencv_features2d -lopencv_flann -lopencv_fuzzy -lopencv_highgui -lopencv_imgcodecs -lopencv_imgproc -lopencv_line_descriptor -lopencv_ml -lopencv_objdetect -lopencv_optflow -lopencv_photo -lopencv_plot -lopencv_reg -lopencv_rgbd -lopencv_saliency -lopencv_shape -lopencv_stereo -lopencv_stitching -lopencv_structured_light -lopencv_superres -lopencv_surface_matching -lopencv_text -lopencv_tracking -lopencv_videoio -lopencv_video -lopencv_videostab -lopencv_xfeatures2d -lopencv_ximgproc -lopencv_xobjdetect -lopencv_xphoto) if(OPENCV_FOUND) set( OPENCV_LIBRARIES ${OPENCV_LIBRARY} ) set( OPENCV_INCLUDE_DIRS ${OPENCV_INCLUDE_DIR} ) endif() mark_as_advanced(OPENCV_INCLUDE_DIRS OPENCV_LIBRARIES)
Inside your project folder, create a CMake script to generate the Makefiles for cross-compilation, with the following contents:
cd vim CMakeLists.txt -------------------------------------------------------------------------------- cmake_minimum_required(VERSION 2.8) project( MyProject ) set(CMAKE_RUNTIME_OUTPUT_DIRECTORY "${CMAKE_BINARY_DIR}/bin") add_executable( myApp src/myApp.cpp ) SET(CMAKE_PREFIX_PATH /usr/local/oecore-x86_64/sysroots/armv7at2hf-neon-angstrom-linux-gnueabi) SET(OpenCV_DIR ${CMAKE_PREFIX_PATH}/usr/lib/cmake/OpenCV) find_package( OpenCV REQUIRED ) include_directories( ${OPENCV_INCLUDE_DIRS} ) target_link_libraries( myApp ${OPENCV_LIBRARIES} )
Export the SDK environment variables and after that run the CMake script. In order to do so, you may run:
source /usr/local/oecore-x86_64/environment-setup-armv7at2hf-neon-angstrom-linux-gnueabi cmake .
4) Cross-compiling and deploying Now you may create a src directory and a file named myApp.cpp inside it, where you can write a hello world application, such as this one:
mkdir src vim src/myApp.cpp -------------------------------------------------------------------------------- #include #include <opencv2/opencv.hpp> using namespace std; using namespace cv; int main(int argc, char** argv ){ Mat image; image = imread( "/home/root/myimage.jpg", 1 ); if ( !image.data ){ cout << "No image data \n"; return -1; } namedWindow("Display Image", WINDOW_AUTOSIZE ); imshow("Display Image", image); waitKey(0); return 0; }
Cross-compile and deploy to the target:
make scp bin/myApp root@<board-ip>:/home/root # Also copy some image to test! scp <path-to-image>/myimage.jpg root@<board-ip>:/home/root
In the embedded system:
root@colibri-imx6:~# ./myApp
0 notes
Text
Find Jetson Nano Developer Kit at Best Price!!
Jetson Nano is also supported by NVIDIA JetPack, which includes a board support package (BSP), cuDNN, and TensorRT, Linux OS, NVIDIA CUDA other software libraries for deep learning, multimedia processing, computer vision, GPU computing, and much more. The software is even available using an easy-to-flash SD card image, making it fast and easy to get started.
With the Nvidia Jetson Nano, you can build stand-alone hardware systems that run GPU (Graphics Processing Unit) accelerated deep learning models on a tiny budget. Nvidia Jetson Nano Buy Now with latest updated Specifications & features. Nvidia Jetson Nano Development Kit is a power-efficient and low cost. Best Online Purchase Jetson Nano in India at TANNA TechBiz.
Jetson Nano delivers the total performance to run modern AI (Artificial Intelligence) workloads in a small form factor. At TANNA TechBiz Jetson Nano Price is very reasonable. It runs multiple neural networks in processes and parallel several high-resolution sensors at the same time. The New Designed Carrier Board is Compatible with Jetson Nano or Jetson Xavier NX, suitable for Hardware improvement.
Jetson Nano Developer Kit is still a pretty attractive proposition in terms of its base performance and the integrated Input/output. Developers, Manufacturers and Beginner can now run AI frameworks and models for applications and Module like segmentation, image classification, and speech processing and object detection.
You can learn how NVIDIA's Jetson Nano system can take your robotics projects to the next level. This article will outline everything you need to get up and running. NVIDIA Jetson Nano frees you to innovate at the edge.
The Jetson Nano is a small, powerful computer designed to power entry-level edge AI applications and devices. You Experience powerful and efficient Artificial Intelligence, computer vision, and high-performance computing at just 5 to 10 watts.
0 notes
Text
Buy NVIDIA Jetson Nano
With the Nvidia Jetson Nano, you can build stand-alone hardware systems that run GPU (Graphics Processing Unit) accelerated deep learning models on a tiny budget. NVIDIA Jetson Nano is still a pretty attractive proposition in terms of its base performance and the integrated Input/output.
Nvidia Jetson Nano Buy Now with latest updated Specifications & features. Nvidia Jetson Nano Development Kit is a power-efficient and low cost. Best Online Purchase NVIDIA Jetson Nano in India at TANNA TechBiz. Developers, Manufacturers and Beginner can now run AI frameworks and models for applications and Module like segmentation, image classification, and speech processing and object detection.
Nvidia Jetson Nano delivers the total performance to run modern AI (Artificial Intelligence) workloads in a small form factor. It runs multiple neural networks in processes and parallel several high-resolution sensors at the same time. The New Designed Carrier Board is Compatible with Jetson Nano or Jetson Xavier NX, suitable for Hardware improvement.
You can learn how NVIDIA's Jetson Nano system can take your robotics projects to the next level. This article will outline everything you need to get up and running. NVIDIA Jetson Nano frees you to innovate at the edge. You Experience powerful and efficient Artificial Intelligence, computer vision, and high-performance computing at just 5 to 10 watts.
Jetson Nano is also supported by NVIDIA JetPack, which includes a board support package (BSP), cuDNN, and TensorRT, Linux OS, NVIDIA CUDA other software libraries for deep learning, multimedia processing, computer vision, GPU computing, and much more. The software is even available using an easy-to-flash SD card image, making it fast and easy to get started.
0 notes
Text
LFD460 Embedded Linux Development with Yocto Project
Obtain a solid understanding of embedded development using the Yocto Project, including the Poky Reference Distribution and Bitbake, the use of emulators, building images for multiple architectures and the creation of board support packages (BSP).
from martinos https://www.linux.com/training/lfd460-embedded-linux-development-yocto-project-21
0 notes