#Linux File Replication
Explore tagged Tumblr posts
Visit Tumblr Blog
Explore Tumblr blogs with no restrictions, modern design and the best experience.
Last Seen Tumblr Blogs


Fun Fact
Post activity is at the highest at 4:00 pm EDT; notes peak at 10:00 pm EDT.
Text
#Linux File Replication#Linux Data Replication#big data#data protection#Cloud Solutions#data orchestration#Data Integration in Real Time#Data ingestion in real time#Cloud Computing
0 notes
Text
Install Splunk and Veeam App on Windows Server to monitor VBR
Splunk Enterprise is a powerful platform that automates the collection, indexing, monitoring, and alerting of data. This enables you to aggregate and analyze events efficiently. With Splunk, you can gain full control over your data flow and leverage it to drive business insights and decisions. Kindly read about data management and governance. n this acticle, we shall discuss how to install Splunk…
#Backup#Backup and Recovery#Backup Data#Backup Files and Folders#Linux#MacOS#Microsoft Windows#monitor#Monitor Backup#Monitor VBR with Splunk#Monitor Veeam Backup And Replication [VBR] with Splunk#Splunk#Splunk Enterprise#Veeam App for Splunk#Veeam App for Splunk Setup#Windows 10#Windows 11#Windows Server#Windows Server 2012#Windows Server 2016#Windows Server 2019#Windows Server 2022
0 notes
Text
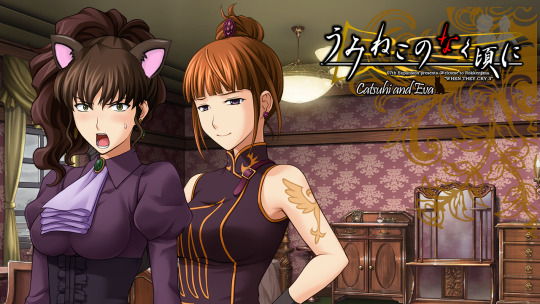
Catsuhi and Eva:
Natsuhi wakes up with cat ears. Eva's here to help.
An 8,415 words evanatsu visual novel by me. It is very comedic and also extremely suggestive. Available now on itch.io. More information and links below, please read ⬇️
If, for whatever reason, the links don't work, it is also here in google drive. One for pc (Windows, Linux), & one for Mac. I have no way of testing the Mac version, but I assume it should work properly for you. Remember to extract the folder after download.
Here is a google doc that has the entire script so it's easier to copy & paste the text into translators while playing if English is not your first language, or if anyone wants it for another reason. There is also a notepad version of this in the folder.
I made a LOT of custom sprites for this. Like, a lot. Many that I didn't even use. They are all in the files. Anyone is free to use them for anything they may like to. You don't need to credit me, but I would still appreciate it ❤️
Please have fun using them if you choose to.
I also included an extra folder in images that just has some funny evanatsu pictures and videos I wanted to share because I thought it would be fun lol
There is also a video version on my youtube, so if there is anyone who can't play the game themselves, you can still read it.
youtube
This was a two months long project that started as what was supposed to be a really quick joke to try and learn renpy and very quickly spiraled out of control.... I put a lot of time and effort into this, and the coding was absolute hell at times 😭 (mostly for the menus). I tried to replicate Umineko's feel, but could only get just so far before I had to finally give up and settle for what I got. I still like how it turned out, though, and am overall pretty pleased with the entire thing.
I hope you all enjoy, and if you like evanatsu, I would greatly appreciate if you would reblog this to help spread it around because I really did spend a lot of time on it. Please have fun reading this, evanatsu nation 🧡💜, it's extremely fanservicey 😭
#umineko#evanatsu#eva ushiromiya#natsuhi ushiromiya#eva#natsuhi#probably the biggest project for them i've ever done thus far#my posts
47 notes
·
View notes
Text
☆ UPSCALING LOW QUALITY FOOTAGE
what i used: • 2021 macbook pro with m1 chip (390/500gb storage used she's hanging in there) • photoshop 2020 • mpv (for screencaps but this isn't needed!) • handbrake (available for linux, mac and windows here) • video source to gif
what is handbrake? basically its a software that helps you change the format of videos, such as for certain devices or screens, or in the case that we're going to utilise, quality and frame rate!
disclaimer: handbrake is super easy to use and very beginner friendly for this procedure and it can make a video go from 30fps to 60fps however it does not replace the quality of true 4k/blue/master-pro res files. in the gif below, this is the level of detail in a master pro-res file.

getting started it's easiest first to note the timestamps of the video you want to encode, and keep in mind that unless your computer is incredibly powerful, i wouldn't try to encode an hour worth of footage in one run! my laptop could handle about 30 seconds in one go before she started toasting.
using handbrake: once you've downloaded the software, open the software and it will come up with a pop up window asking you to open the video source (that is presumably saved within your folders) and go ahead and do so!
in the range section, use the drop down button to navigate to seconds and enter your timestamp. the duration on the side will show how long of the footage you're gonna encode is!

then go down to the save as, and give your footage 'to be snipped' a name. this isn't necessary but useful because if you're planning to say, encode 3 or 4 small parts of footage in one sitting, each encoding instance will overwrite the previous one. so i just call mine 'cut 1', 'cut 2' and so on.

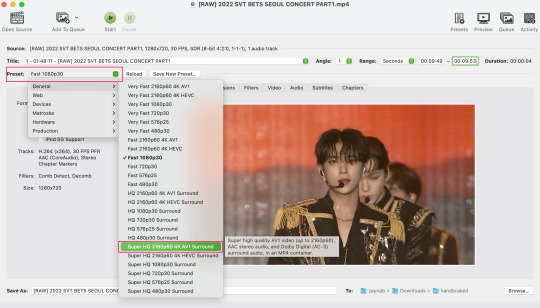
next go to preset, and there you'll see such a wide variety of options that you can play around with, with differing qualities, frame rates, sound options, and so on. for the sake of this tutorial, i'm using 'superhq 2160p60 4k av1 surround' and i've used the drop down menu to select it! then go ahead and press start! the time taken to complete depends on the duration of footage that you sent to encode! you'll find your encoded video as an .mp4 file in your designated folder (which you can change via browse at the bottom)
what next? • if you prefer to open footage directly into photoshop (my ps can't handle it), then go for it! • if you screencap as i do, then just use mpv or whatever screencapping program you prefer to make the screencaps and open in ps in your usual manner. • you can use the timestamps to further process the video through vapoursynth to denoise, but i've yet to try that!
the results for this first set of example footage, i used footage from the be the sun concert file, which is almost 2 hours in length and 4gb in file size.


you can see the difference in the smooth frame rate of the footage, as well as the quality of the sharpening!
and to utilise the bane of gifmaking, a gose episode, notorious for dodgy pixelated frames and less hd quality in 1080p on youtube, i ran it through the same settings!


these are the exact same files, downloaded using 4k video downloader and with the same sharpening, but see how on the original file, the sharpening looks a bit more harsh and 'outlined' while it seems to sit softer on the encoded 4k version!
so i mainly use handbrake for dvd files, or not-so-hd 1080p youtube videos or videos that seem a bit clunkier but i had never tried them on a tv/film file so take a look below! i used a 1gb (so not very good quality) of a show (as compared to its 4gb files).
as i said at the start in the disclaimer, handbrake can't replicate true file quality, as you'd expect to see in a proper hd bluray/t*rrent file of a show but there's an interesting difference in the frame rate. personally it's not something i would utilise much there but its all up to individual preference on how someone prefers to have their gifs <3
this is a very basic run-through of how i used handbrake, as i haven't really explored all its features and i use this as a quick process when i'm running through seventeen dvd/dl files but i feel like it would work well on general youtube videos (such as interviews, episodes, behind the scenes) and feel free to send an ask/message for any help/clarification! <33
#ps help#usergif#gif tutorial#kpop gif tutorial#seventeen#completeresources#2605#userace#niniblr#emification#usershreyu#heymax#arieslofi#tusermlee#userbloomingwarrior#uservivaldi#userzil#userfanni#userrozza#usermoonchild#userraffa#tuserjen#usernik
374 notes
·
View notes
Text
Ok so I talked about this in tags of a post earlier but I need to talk about it properly
So a couple weeks ago I finally pulled the trigger, I dual booted Linux Mint on my laptop
It has less of my vital files on it then my pc, but I use it more for videos and general Internet stuff, so I would know if I liked it
Installing was scary but after a bit of trouble shooting with disabling bit locker it was easy, and let me be clear, that's a windows thing, because Microsoft really really doesn't want you to have freedom over your machine.
So I booted in
And like
I literally love it so much
I knew people talked about how much better Linux is and how it speeds up literally anything it's put on over windows, but like WOW
It doesn't take 2 minutes to boot up or shut down, my CPU doesn't idle at 25% for no reason, the search for files feature doesn't take 40 minutes only to show me Internet results instead of files, its wonderful.
The default theme is (in my opinion) pretty ugly, sorry whoever made it, it's just not for me.
But that's the great thing, you can literally customize this almost however you would like.
Maybe you shouldn't trust my opinion on what looks nice because I instantly installed a theme that replicated Windows 7
But I got bored of the default colors so I literally found the files where the home bar is saved and changed them to be more "minty"
That along with some CSS color editing gave me this:

You just can't do anything like this in Windows 10/11. You can change the color on windows but if I wanted, in Mint, I could completely change everything, centered icons on the taskbar, icons left justified on the taskbar, no taskbar, make it look like windows 95, it's all yours to do with whatever you want.
There are issues, I won't lie, the biggest one that will probably haunt Linux forever is compatibility.
Simply put most developers don't make native Linux versions of their software, you are lucky if there is a Mac version.
Lots and lots of Windows software CAN work on Linux through compatibility layers like Wine and Steam's Proton, but it's not 100%
My biggest problem is FL Studio and Clip Studio, neither of these I could get working with Wine or Proton so far. I'm hoping in the future I will find a way to make this work, or transition to their free and open source alternatives, but for now I'm stuck with a win 10 pc.
The other issue I've faced is that Linux seems to have a hard time recognizing and remembering my wired headphones. Like sometimes it just works, but most of the time it fails to do so.
My solution to this until I have time to troubleshoot more is to use my stupid headphone jack to USB C dongle that I bought for my stupid phone with no headphone jack.
Luckily it works fine and the type C port on my laptop literally doesn't get used otherwise.
All in all, I'm like excited to use a computer again. I used to only be excited for the programs it allowed me to use, but for the first time in a long time, the "magic" of the PC has returned for me.
Once I save up the money, my next PC will be Linux, Windows doesn't cut it anymore for me.
Ok now I'm going to kinda just talk about Linux for a bit, unrelated to my experience because my brain has been buzzing about this topic lately.
I get why guys who run Linux are so annoying about it now, because it's me now, I love this stupid OS and everyone has to hear about it.
And chances are, you've used Linux before already!
Linux is used in a ridiculous number of places because of its open source nature.
Most servers and other cloud computing systems are running Linux, many public terminals and screens run Linux, every supercomputer in the world runs Linux, if you were in the education system for the past 13~ years you might have used ChromeOS, which is built on Linux, if you have ever used an Android device you have used Linux.
It's never going to take over Windows as the go to operating system in the home, most people don't even know they could switch, and if they don't know that there's no way they are willing to put up with some of the headaches Linux brings.
Although I've spent way more time troubleshooting Windows issues then I have Linux ones so far, so maybe Microsoft stuffing so much bloated spyware into their system is starting to cause windows to rip at the seams, idk.
When I try to explain Linux to people who literally don't understand any of this I use a car metaphor
Windows is like a hatchback SUV, you buy it from a dealer and it mostly works for everyone good enough that they don't complain.
Linux is like a project vehicle in a lot of ways, the mechanic can tune it up exactly to the specifications they want, tear a bit out and put a diffrent one in, it requires some work under the engine but once that mechanic gets it the way they want it, it's incredible.
It's not a perfect metaphor but I think it gets the idea across.
Uh IDK how to finish this post, please try Linux if you can, changed my life.
#Long post about Linux ahead don't click read more if you don't want that#Linux#Linux mint#open source#Mantis thoughts
26 notes
·
View notes
Text
i have opinions about how we fanfiction for the internet, and i don't mean literary or aesthetic ones: i mean your experience of writing it!
this is just my markdown manifesto again:
there is no reason to tangle with google or microsoft for writing copy that will ultimately be rendered as HTML on ao3 and tumblr!! rich text editors are slow as hell on desktop and mobile, both in performance and how much time you waste formatting, which takes your hands from the keyboard whether physical or touchscreen. most users end up redoing that formatting entirely in their destination site's embedded rich text editor and inevitably miss things anyway!! google docs and microsoft word and their ilk were made for printed documents no matter how much they try to mutate to stay relevant—i'm side-eying google's "paste markdown" here, nevermind gemini and copilot!
commonmark markdown is quick and easy to learn. enable markdown on tumblr and all you have to do to is copy and paste (only on desktop, unfortunately). if you don't bother with headers or dividers, the most you have to do afterwards is add a "read more" cut. ao3 is less perfect; you might have to ctrl+R formatting marks for the plain text editor and annoyingly add forward slashes to end tags, but there's still explicit fidelity to the formatting you defined while writing that the clipboard cannot lose. yes, i know "paste with formatting" exists, but it's not a problem for me because I live like this. in markdown, your writing isn't tied to any website or service; it's really yours.


that said, you still need a markdown editor, and there are several:
obsidian.md (windows/android/mac/iOS/linux): i used this for more than three years for grad school and writing. i still use its android app since i sync my notes with a git repo instead of the cloud. without paying for obsidian sync, you can keep your vault in your desktop icloud or google drive folder so you can access it from your phone. it's a great way to learn a version of markdown and get comfortable with just how lightweight and portable your drafts can be. this is a good fit if you've ever used and liked notion and want to focus on words
@ellipsus-writes (web app in open beta; no mobile app yet but the mobile site is functional): they don't market themselves as a markdown editor and clearly aim to replicate a gdocs/word-like, mouse-dependent formatting experience, but they support markdown! if you feel trapped by google because of file sync and being able to share docs privately, this is one of your best bets. i haven't tried this, but i think exporting your work from ellipsus as a .md file and then pasting it into tumblr is Great option
i haven't tried these extensively/recently but know they're out there:
simplenote (android/iOS/windows/macOS/linux): i used this forever ago and it looks like it's grown a lot!
bear (macOS/iOS only)
and another thing is: i think it's nice to use different programs for different parts of life. i use google docs for work and yes, using their awful markdown support, but it still makes a difference to write my fanfiction somewhere else (in the terminal, because i'm the most annoying person alive)!! compartmentalize beyond different accounts, don't let the bastards get you down
also i'm not gooning for a brand here i personally use neovim
6 notes
·
View notes
Text
it's hack week at work so I'm writing a Language Server for one of our build tooling files, and I forgot how much fun programming can be when you have a clear and measurable goal which can be achieved in a relatively predictable timespan.
Problems that arise here are like "Figure out how to send debug messages to the editor" and "Find out why only five matches are appearing" or "decide on how to structure the docstrings for faster access."
My normal day job problems are like "Hey. You know the entire Linux kernel multidisk subsystem. Well the customer says they're getting these three error messages. They cannot under any circumstances test code on their system, which is set up in a massive high availability cluster that you can't replicate, and no one on earth has ever hit this exact problem before. Actually one of those error messages is known to be a lie that just hasn't been fixed in that kernel version. So. Do you know what's up?"
It's not hard, really, the hard stuff is handled by system developers who know their shit, it's just slow and unrewarding and intractable.
20 notes
·
View notes
Text
How to copy permissions from one file to another on Linux
8 notes
·
View notes
Text
(Note that this post contains minor Our Wonderland final release spoilers)
The finale of Our Wonderland released and it appears that my previous Our Wonderland art was wrong.
I have now seen the light of my mistake, it is not Bucks that holds something triumphantly, it is Gidget. As soon as I read the line, I saw a shining beacon, a path to redempton.
Only one thing will free my soul of this horrible feeling, I had to make some more art (click read more to see it and the rest of this post including details on how I created the image)

Now I feel free.
Making of details!
Background image: Public domain and found here
Font used: Linux Libertine (I looked around the game files (by that, I just mean the game folder, the fonts are just... there, I know nothing about Ren'py) and I think this is the same font used in the game)
To get the sketch effect on the background, I used LunaPic's colour sketch effect (if anyone has details on how to replicate this in Krita, I would be very happy to learn)
The text backdrop and white around the background were painted in by mouse using Krita, nothing complex there
The art of Gidget was drawn by finger on my phone using Sketchbook. The only refrence used is a screenshot of the sceen this is replicating, I spent most of my free time today doing this and I didn't have the energy to add Orlam, sorry!
8 notes
·
View notes
Text
Project Updates - Aug 6, 2024
Back at it again! I'm hoping to get these devlogs up to at least once a month, if possible, assuming I can keep up this kind of pace with coding. Updates under the cut~
SWN GM Tool
When I decided to update my project list, I said I was moving my old SWN GM Tool down to a sort of backburner status. It felt a bit like the end of an era; the GM tool was my first real personal project that I had started after college and had been poking at it for the last ten years or so, so officially putting it on hold with a desire to come back to it one day was a little interesting.
Especially since I started working on it again that very same week.
I decided to start the whole project over, essentially, and use this as an opportunity to learn to use Godot more at the same time. Within a few days, I had made a simple Faction creation widget as well as a list of factions. In a week, I had a mechanism for saving that faction list to a file and loading it back up as well. All in a simple application made with Godot UI nodes!
I haven't touched the project again in a little over a month, now, but I'm feeling very good about returning and working more on it. Next steps are to make a Faction View scene that shows the stats and assets of the faction, and allows adding and removing assets. Once I feel like I have a good enough user experience for it - something that's not really my specialty - I'll probably upload it to itch.io with just the Faction and asset tracking. After that, I'd like to include a simple map and then a way to run the Faction Turn.
Libtcod Tutorials
Over a year after I received feedback from r/roguelikedev about my attempt at making a C++ tutorial for libtcod, I have begun making a concerted effort to continue working on the codebase again!
After the whole effort of getting a simple eventing system using double-dispatch in place, I took a pretty good break before returning. I decided to make sure the code was working on both Linux and Windows, and updated to the C++23 standard at the same time, which introduced some issues. At first I thought it was a problem with MSVC, but was able to replicate it with Clang as well. It turns out that the way I was doing virtual inheritance for the event handlers worked perfectly fine in C++20, but broke in C++23. Getting that figured out took a few days, but after that I confirmed it worked on GCC, Clang, and MSVC :D
Next I'm going to continue working on the actual tutorial code before I return to writing the tutorials for C++ again, to make sure that there's not more optimizations or architectural changes I'll want to do down the line that would be better to backport again.
3 notes
·
View notes
Text
#Linux#Linux data replication#cloud solutions#Big data security#cloud computing#secure data handling#data privacy#cloud infrastructure#cloud technology#Data Analytics#data integration#Big data solutions#Big data insights#data management#File transfer solutions
0 notes
Text
Customized system again!!
You might be surprised to find out this is Mac OS. I love Linux so much but it just does not work well on my m1 Mac, so customization is relatively minimal. I tried my best to replicate my other computers Linux rice which was Void-I3wm-Polybar, but I think this honestly looks better than anything I ever did with that. All software used to do this are open source!
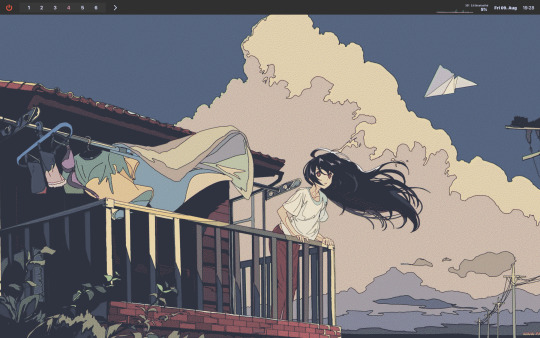
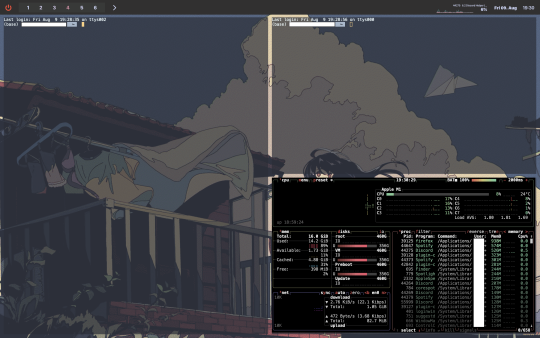
Top Bar: Sketchybar Window Manager: Yabai Operating System: Mac OS Color Scheme: Gruvbox Wallpaper: Gruvbox Wallpaper Terminal: Alacritty I'll post the dot files if enough people ask.
#linux#open source#void#void linux#macos#mac#macbook#customization#i3wm#polybar#nerd#rice#linux rice#macos rice#yabai#gruvbox#alacritty#sketchybar#theming#computer#computers#computer theming#desktop#desktop theming#software
4 notes
·
View notes
Text
Gaining Windows Credentialed Access Using Mimikatz and WCE
Prerequisites & Requirements
In order to follow along with the tools and techniques utilized in this document, you will need to use one of the following offensive Linux distributions:
Kali Linux
Parrot OS
The following is a list of recommended technical prerequisites that you will need in order to get the most out of this course:
Familiarity with Linux system administration.
Familiarity with Windows.
Functional knowledge of TCP/IP.
Familiarity with penetration testing concepts and life-cycle.
Note: The techniques and tools utilized in this document were performed on Kali Linux 2021.2 Virtual Machine
MITRE ATT&CK Credential Access Techniques
Credential Access consists of techniques for stealing credentials like account names and passwords. Techniques used to get credentials include: keylogging or credential dumping. Using legitimate credentials can give adversaries access to systems, make them harder to detect, and provide the opportunity to create more accounts to help achieve their goals.

The techniques outlined under the Credential Access tactic provide us with a clear and methodical way of extracting credentials and hashes from memory on a target system.
The following is a list of key techniques and sub techniques that we will be exploring:
Dumping SAM Database.
Extracting clear-text passwords and NTLM hashes from memory.
Dumping LSA Secrets
Scenario
Our objective is to extract credentials and hashes from memory on the target system after we have obtained an initial foothold. In this case, we will be taking a look at how to extract credentials and hashes with Mimikatz.
Note: We will be taking a look at how to use Mimikatz with Empire, however, the same techniques can also be replicated with meterpreter or other listeners as the Mimikatz syntax is universal.
Meterpreter is a Metasploit payload that provides attackers with an interactive shell that can be used to run commands, navigate the filesystem, and download or upload files to and from the target system.
Credential Access With Mimikatz
Mimikatz is a Windows post-exploitation tool written by Benjamin Delpy (@gentilkiwi). It allows for the extraction of plaintext credentials from memory, password hashes from local SAM/NTDS.dit databases, advanced Kerberos functionality, and more.
The SAM (Security Account Manager) database, is a database file on Windows systems that stores user’s passwords and can be used to authenticate users both locally and remotely.
The Mimikatz codebase is located at https://github.com/gentilkiwi/mimikatz/, and there is also an expanded wiki at https://github.com/gentilkiwi/mimikatz/wiki .
In order to extract cleartext passwords and hashes from memory on a target system, we will need an Empire agent with elevated privileges.
Extracting Cleartext Passwords & Hashes From Memory
Empire uses an adapted version of PowerSploit’s Invoke-Mimikatz function written by Joseph Bialek to execute Mimikatz functionality in PowerShell without touching disk.
PowerSploit is a collection of PowerShell modules that can be used to aid penetration testers during all phases of an assessment.
Empire can take advantage of nearly all Mimikatz functionality through PowerSploit’s Invoke-Mimikatz module.
We can invoke the Mimikatz prompt on the target agent by following the procedures outlined below.
The first step in the process involves interacting with your high integrity agent, this can be done by running the following command in the Empire client:
interact <AGENT-ID>/<NAME>
The next step is to Invoke Mimikatz on the Agent shell, this can be done by running the following command:
mimikatz
This will invoke Mimikatz on the target system and you should be able to interact with the Mimikatz prompt.
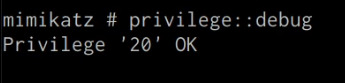
Before we take a look at how to dump cleartext credentials from memory with Mimikatz, you should confirm that you have the required privileges to take advantage of the various Mimikaz features, this can be done by running the following command in the Mimikatz prompt:
mimikatz # privilege::debug
If you have the correct privileges you should receive the message “Privilege ‘20’ OK” as shown in the following screenshot.
We can now extract cleartext passwords from memory with Mimikatz by running the following command in the Mimikatz prompt:
mimikatz # sekurlsa::logonpasswords
If successful, Mimikatz will output a list of cleartext passwords for user accounts and service accounts as shown in the following screenshot.
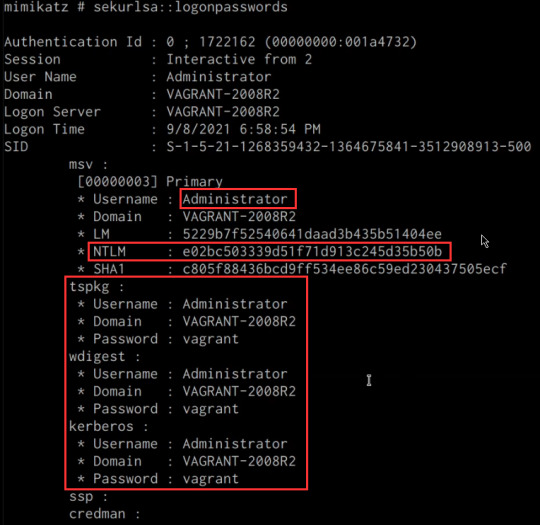
In this scenario, we were able to obtain the cleartext password for the Administrator user as well as the NTLM hash.
NTLM is the default hash format used by Windows to store passwords.
Dumping SAM Database
We can also dump the contents of the SAM (Security Account Manager) database with Mimikatz, this process will also require an Agent with administrative privileges.
The Security Account Manager (SAM) is a database file used on modern Windows systems and is used to store user account passwords. It can be used to authenticate local and remote users.
We can dump the contents of the SAM database on the target system by running the following command in the Mimikatz prompt:
mimikatz # lsadump::sam
If successful Mimikatz will output the contents of the SAM database as shown in the following screenshot.
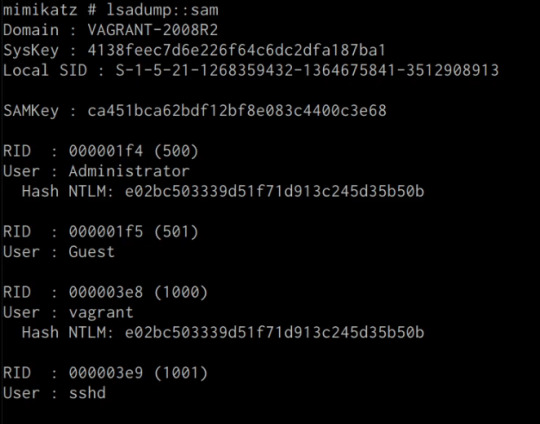
As highlighted in the previous screenshot, the SAM database contains the user accounts and their respective NTLM hashes.
LSA Secrets
Mimikatz also has the ability to dump LSA Secrets, LSA secrets is a storage location used by the Local Security Authority (LSA) on Windows.
You can learn more about LSA and how it works here: https://networkencyclopedia.com/local-security-authority-lsa/
The purpose of the Local Security Authority is to manage a system’s local security policy, as a result, it will typically store data pertaining to user accounts such as user logins, authentication of users, and their LSA secrets, among other things. It is to be noted that this technique also requires an Agent with elevated privileges.
We can dump LSA Secrets on the target system by running the following command in the Mimikatz prompt:
mimikatz # lsadump::secrets
If successful Mimikatz will output the LSA Secrets on the target system as shown in the following screenshot.
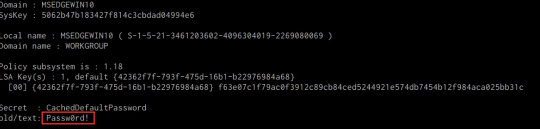
So far, we have been able to extract both cleartext credentials as well as NTLM hashes for all the user and service accounts on the system. These credentials and hashes will come in handy when we will be exploring lateral movement techniques and how we can legitimately authenticate with the target system with the credentials and hashes we have been able to extract.
3 notes
·
View notes
Text
How to archive your favourite podcasts before they disappear: a beginner's guide
Podcasts, unfortunately, disappear off the Internet quite often. The smaller the podcast, the more likely this is. Fortunately, we can do something to prevent this.
I have a very simple system for archiving podcasts that anyone can easily replicate:
Step 1. Search on archive.org to see if the podcast has already been saved there.
Step 2. Find the podcast’s RSS feed on the podcast’s website or on podcastindex.org.
Step 3. On Windows, paste the podcast’s RSS feed into the free, open source app Podcast Bulk Downloader: https://github.com/cnovel/PodcastBulkDownloader/releases
For Mac and Linux, you can use gPodder: https://gpodder.github.io It’s also free and open source.
Step 4. In Podcast Bulk Downloader, select “Date prefix”. This puts the episode release date in YYYY-MM-DD format at the beginning of the file name, which is important if someone wants to listen to the episodes in chronological order. Then hit “Download”.
In gPodder, go to Preferences → Extensions → check “Rename episodes after download” → Click “Edit config” → Check “extensions.rename_download.add_sortdate”.
Step 5. Create an account on archive.org with an email address you don’t care about. It’s bewildering, but your email address is publicly revealed when you upload any file to archive.org and they do not ever warn you about this. Firefox Relay is a good tool for this: https://relay.firefox.com
Step 6. Fill out the metadata fields on the archive.org, such as title, creator, description, and subject tags (e.g. “podcast”). I recommend including a jpeg or png file (jpeg displays better) of the podcast’s logo or album art in your upload. Whatever image you upload will automatically become the thumbnail. After that, go ahead and upload.
That’s it! You’re done!
If you have any questions or just want to chat about podcast preservation, feel free to email me at [email protected].
Everyone has my permission to copy/paste, republish, and modify this guide. It’s under a Creative Commons BY-NC-SA 4.0 license.
2 notes
·
View notes
Text
youtube
Zelda 64: Recompiled for PC - Majora's Mask
Zelda 64: Recompiled is a project that uses N64: Recompiled to statically recompile Majora's Mask (and soon Ocarina of Time) into a native port with many new features and enhancements. This project uses RT64 as the rendering engine to provide some of these enhancements.
Play Majora's Mask natively on PC! Download here for Windows or Linux:
Note: Project does not include game assets. Original game is required to play.
Features:
Plug and Play
Simply provide your copy of the North American version of the game in the main menu and start playing! This project will automatically load assets from the provided copy, so there is no need to go through a separate extraction step or build the game yourself. Other versions of the game may be supported in the future.
Fully Intact N64 Effects
A lot of care was put into RT64 to make sure all graphical effects were rendered exactly as they did originally on the N64. No workarounds or "hacks" were made to replicate these effects, with the only modifications to them being made for enhancement purposes such as widescreen support. This includes framebuffer effects like the grayscale cutscenes and the Deku bubble projectile, depth effects like the lens of truth, decals such as shadows or impact textures, accurate lighting, shading effects like the fire arrows and bomb explosions, and various textures that are often rendered incorrectly.
Easy-to-Use Menus
Gameplay settings, graphics settings, input mappings, and audio settings can all be configured with the in-game config menu. The menus can all be used with mouse, controller, or keyboard for maximum convenience.
High Framerate Support
Play at any framerate you want thanks to functionality provided by RT64! Game objects and terrain, texture scrolling, screen effects, and most HUD elements are all rendered at high framerates. By default, this project is configured to run at your monitor's refresh rate. You can also play at the original framerate of the game if you prefer. Changing framerate has no effect on gameplay.
Note: External framerate limiters (such as the NVIDIA Control Panel) are known to potentially cause problems, so if you notice any stuttering then turn them off and use the manual framerate slider in the in-game graphics menu instead.
Widescreen and Ultrawide Support
Any aspect ratio is supported, with most effects modded to work correctly in widescreen. The HUD can also be positioned at 16:9 when using ultrawide aspect ratios if preferred.
Note: Some animation quirks can be seen at the edges of the screen in certain cutscenes when using very wide aspect ratios.
Gyro Aim
When playing with a supported controller, first-person items such as the bow can be aimed with your controller's gyro sensor. This includes (but is not limited to) controllers such as the Dualshock 4, Dualsense, Switch Pro, and most third party Switch controllers (such as the 8BitDo Pro 2 in Switch mode).
Note: Gamepad mappers such as BetterJoy or DS4Windows may intercept gyro data and prevent the game from receiving it. Most controllers are natively supported, so turning gamepad mappers off is recommended if you want to use gyro.
Autosaving
Never worry about losing progress if your power goes out thanks to autosaving! The autosave system is designed to respect Majora's Mask's original save system and maintain the intention of owl saves by triggering automatically and replacing the previous autosave or owl save. However, if you'd still rather play with the untouched save system, simply turn off autosaving in the ingame menu.
Low Input Lag
This project has been optimized to have as little input lag as possible, making the game feel more responsive than ever!
Instant Load Times
Saving and loading files, going from place to place, and pausing all happen in the blink of an eye thanks to the game running natively on modern hardware.
Linux and Steam Deck Support
A Linux binary is available for playing on most up-to-date distros, including on the Steam Deck.
To play on Steam Deck, extract the Linux build onto your deck. Then, in desktop mode, right click the Zelda64Recompiled executable file and select "Add to Steam" as shown. From there, you can return to Gaming mode and configure the controls as needed. See the Steam Deck gyro aim FAQ section for more detailed instructions.
System Requirements:
A GPU supporting Direct3D 12.0 (Shader Model 6) or Vulkan 1.2 is required to run this project (GeForce GT 630, Radeon HD 7750, or Intel HD 510 (Skylake) and newer).
A CPU supporting the AVX instruction set is also required (Intel Core 2000 series or AMD Bulldozer and newer).
Planned Features:
Dual analog control scheme (with analog camera)
Configurable deadzone and analog stick sensitivity
Ocarina of Time support
Mod support and Randomizer
Texture Packs
Model Replacements
Ray Tracing (via RT64)
4 notes
·
View notes
Text
Top 10 Reasons to Choose Dell for Storage Networking
📦 Comprehensive Product Portfolio Dell offers a wide range of storage solutions—from SAN (Storage Area Networks) and NAS (Network Attached Storage) to all-flash and hybrid arrays—designed for businesses of all sizes.
🚀 High Performance & Scalability Dell EMC storage systems (like PowerStore, Unity XT, and PowerMax) deliver high IOPS, low latency, and scalability to meet growing workload demands.
🔐 Enterprise-Grade Security With built-in data encryption, secure boot, role-based access, and ransomware protection features, Dell storage ensures data integrity and security.
🤖 Intelligent Automation & AI Dell’s CloudIQ and PowerStore OS use machine learning for predictive analytics, automated monitoring, and performance optimization.
🔄 Seamless Integration Dell storage easily integrates with VMware, Microsoft, Linux, SAP, and cloud platforms—ensuring smooth operations across hybrid IT environments.
📈 Unified Storage Architecture Many Dell solutions support both block and file storage in a single platform, simplifying management and reducing total cost of ownership (TCO).
🌐 Robust Networking Capabilities Dell offers complete networking infrastructure including Fibre Channel, iSCSI, and NVMe-oF support for low-latency data transport across the enterprise.
🛡️ Reliable Data Protection & Recovery With built-in snapshots, replication, and support for third-party backup integrations, Dell ensures data is always recoverable and protected.
🧩 Modular, Flexible Design Dell’s modular storage systems allow businesses to start small and expand seamlessly, making them ideal for future-proofing infrastructure.
📞 World-Class Support & Services Dell ProSupport and ProDeploy services offer 24/7 assistance, next-business-day part replacement, and deployment expertise globally.
Bonus: 💡 Sustainability & Cost Efficiency
Dell is committed to sustainability through energy-efficient designs and hardware reuse/recycling programs—delivering value without compromising performance.

0 notes