#Linux vs Windows Hosting
Explore tagged Tumblr posts
Visit Tumblr Blog
Explore Tumblr blogs with no restrictions, modern design and the best experience.
Last Seen Tumblr Blogs


Fun Fact
If you dial 1-866-584-6757, you can leave an audio post for your followers.
Text

Welcome back, coding enthusiasts! Today we'll talk about Git & Github , the must-know duo for any modern developer. Whether you're just starting out or need a refresher, this guide will walk you through everything from setup to intermediate-level use. Let’s jump in!
What is Git?
Git is a version control system. It helps you as a developer:
Track changes in your codebase, so if anything breaks, you can go back to a previous version. (Trust me, this happens more often than you’d think!)
Collaborate with others : whether you're working on a team project or contributing to an open-source repo, Git helps manage multiple versions of a project.
In short, Git allows you to work smarter, not harder. Developers who aren't familiar with the basics of Git? Let’s just say they’re missing a key tool in their toolkit.
What is Github ?
GitHub is a web-based platform that uses Git for version control and collaboration. It provides an interface to manage your repositories, track bugs, request new features, and much more. Think of it as a place where your Git repositories live, and where real teamwork happens. You can collaborate, share your code, and contribute to other projects, all while keeping everything well-organized.
Git & Github : not the same thing !
Git is the tool you use to create repositories and manage code on your local machine while GitHub is the platform where you host those repositories and collaborate with others. You can also host Git repositories on other platforms like GitLab and BitBucket, but GitHub is the most popular.
Installing Git (Windows, Linux, and macOS Users)
You can go ahead and download Git for your platform from (git-scm.com)
Using Git
You can use Git either through the command line (Terminal) or through a GUI. However, as a developer, it’s highly recommended to learn the terminal approach. Why? Because it’s more efficient, and understanding the commands will give you a better grasp of how Git works under the hood.
GitWorkflow
Git operates in several key areas:
Working directory (on your local machine)
Staging area (where changes are prepared to be committed)
Local repository (stored in the hidden .git directory in your project)
Remote repository (the version of the project stored on GitHub or other hosting platforms)
Let’s look at the basic commands that move code between these areas:
git init: Initializes a Git repository in your project directory, creating the .git folder.
git add: Adds your files to the staging area, where they’re prepared for committing.
git commit: Commits your staged files to your local repository.
git log: Shows the history of commits.
git push: Pushes your changes to the remote repository (like GitHub).
git pull: Pulls changes from the remote repository into your working directory.
git clone: Clones a remote repository to your local machine, maintaining the connection to the remote repo.
Branching and merging
When working in a team, it’s important to never mess up the main branch (often called master or main). This is the core of your project, and it's essential to keep it stable.
To do this, we branch out for new features or bug fixes. This way, you can make changes without affecting the main project until you’re ready to merge. Only merge your work back into the main branch once you're confident that it’s ready to go.
Getting Started: From Installation to Intermediate
Now, let’s go step-by-step through the process of using Git and GitHub from installation to pushing your first project.
Configuring Git
After installing Git, you’ll need to tell Git your name and email. This helps Git keep track of who made each change. To do this, run:

Master vs. Main Branch
By default, Git used to name the default branch master, but GitHub switched it to main for inclusivity reasons. To avoid confusion, check your default branch:

Pushing Changes to GitHub
Let’s go through an example of pushing your changes to GitHub.
First, initialize Git in your project directory:

Then to get the ‘untracked files’ , the files that we haven’t added yet to our staging area , we run the command

Now that you’ve guessed it we’re gonna run the git add command , you can add your files individually by running git add name or all at once like I did here

And finally it's time to commit our file to the local repository

Now, create a new repository on GitHub (it’s easy , just follow these instructions along with me)
Assuming you already created your github account you’ll go to this link and change username by your actual username : https://github.com/username?tab=repositories , then follow these instructions :


You can add a name and choose wether you repo can be public or private for now and forget about everything else for now.

Once your repository created on github , you’ll get this :

As you might’ve noticed, we’ve already run all these commands , all what’s left for us to do is to push our files from our local repository to our remote repository , so let’s go ahead and do that

And just like this we have successfully pushed our files to the remote repository
Here, you can see the default branch main, the total number of branches, your latest commit message along with how long ago it was made, and the number of commits you've made on that branch.

Now what is a Readme file ?
A README file is a markdown file where you can add any relevant information about your code or the specific functionality in a particular branch—since each branch can have its own README.
It also serves as a guide for anyone who clones your repository, showing them exactly how to use it.
You can add a README from this button:

Or, you can create it using a command and push it manually:

But for the sake of demonstrating how to pull content from a remote repository, we’re going with the first option:

Once that’s done, it gets added to the repository just like any other file—with a commit message and timestamp.
However, the README file isn’t on my local machine yet, so I’ll run the git pull command:

Now everything is up to date. And this is just the tiniest example of how you can pull content from your remote repository.
What is .gitignore file ?
Sometimes, you don’t want to push everything to GitHub—especially sensitive files like environment variables or API keys. These shouldn’t be shared publicly. In fact, GitHub might even send you a warning email if you do:

To avoid this, you should create a .gitignore file, like this:

Any file listed in .gitignore will not be pushed to GitHub. So you’re all set!
Cloning
When you want to copy a GitHub repository to your local machine (aka "clone" it), you have two main options:
Clone using HTTPS: This is the most straightforward method. You just copy the HTTPS link from GitHub and run:

It's simple, doesn’t require extra setup, and works well for most users. But each time you push or pull, GitHub may ask for your username and password (or personal access token if you've enabled 2FA).
But if you wanna clone using ssh , you’ll need to know a bit more about ssh keys , so let’s talk about that.
Clone using SSH (Secure Shell): This method uses SSH keys for authentication. Once set up, it’s more secure and doesn't prompt you for credentials every time. Here's how it works:
So what is an SSH key, actually?
Think of SSH keys as a digital handshake between your computer and GitHub.
Your computer generates a key pair:
A private key (stored safely on your machine)
A public key (shared with GitHub)
When you try to access GitHub via SSH, GitHub checks if the public key you've registered matches the private key on your machine.
If they match, you're in — no password prompts needed.
Steps to set up SSH with GitHub:
Generate your SSH key:

2. Start the SSH agent and add your key:

3. Copy your public key:

Then copy the output to your clipboard.
Add it to your GitHub account:
Go to GitHub → Settings → SSH and GPG keys
Click New SSH key
Paste your public key and save.
5. Now you'll be able to clone using SSH like this:

From now on, any interaction with GitHub over SSH will just work — no password typing, just smooth encrypted magic.
And there you have it ! Until next time — happy coding, and may your merges always be conflict-free! ✨👩💻👨💻
#code#codeblr#css#html#javascript#java development company#python#studyblr#progblr#programming#comp sci#web design#web developers#web development#website design#webdev#website#tech#html css#learn to code#github
93 notes
·
View notes
Text
If you're a linux[1] user who deploys multiple devices, I implore you: learn the command `scp`. It will change your life
It lets you copy files over an ssh pipe; if there's an ssh server on that host, you can essentially directly address a known file on that filesystem and say pwease gimme. And it's roughly the same syntax as `cp`, just with a `[user]@[host]:` before *either source or destination*[2].
And the real kicker is that neither source nor destination need be local:
I copied a file from my web server to an icecast source client host by passing it through my phone.
Unreasonably handy tool to have on your toolbelt.
Footnotes under the cut.
[1] Okay, fine, you got me! It's not solely a linux util. SCP is part of the openssh suite, which means that it's available on virtually every OS under the sun... Including being included by default on Windows 10 1709 and later versions of Windows. It's already on your mac, your BSD system, and almost certainly your phone, too. SSH servers and *nix go together like picnics and baskets, though, so I wouldn't exactly pull the *average* windows user aside to recc' `scp`.
[2] What's most interesting to me is that the `[user]@[host]` is used for the SSH client to know where it's authenticating and how, but the actual filesystem location's format is not processed by the SSH client; it's the *server's* format, not the client, that matters for parsing the file location. In some cases this can lead to a mismatch on filenames that you're receiving vs requesting, but the -T flag disables that checking, and then use `[email protected]:D:\\Documents\\testdata.bin` (drive letter indicated and backslashes escaped) to refer to it
#openssh#scp#linux#i am sorry to secure contain protect fans who are uninterested in this being in your tags but. hash collisons happen
147 notes
·
View notes
Text

The more persistent control you have over a device, the more you and the device adapt to each other, becoming a more effective group organism. The higher the input and output bandwidth of the interface (i.e., the greater the number of distinct ways you can interact with it / it can respond to you), the faster the system can adapt.
So, the horse metaphor makes perfect sense: your desktop ships with a real keyboard on which you can probably do 300 WPM without blocking part of the display, and has a display that can hold half a dozen legible non-overlapping windows. If you have a screwdriver, you can open it up and replace basically any part. Even without a screwdriver, you can generally out of the box persistently dramatically change the UI settings to fit the needs of your environment (light vs dark mode, font size and style). You can stick linux on & that opens up a lot more. On a desktop computer, it's possible for a motivated 10 year old of average intelligence to progress from normal computer use to writing non-trivial application software for their own use within a couple years -- I am proof, & I'm far from alone.
Tablets are on the opposite end of the spectrum: simplified, locked down. The user does not collaborate with the tablet; instead, the tablet has only those affordances that channel the user's behavior into habits the developers of the tablet software consider desirable.
Mobile & web achieved the dream of proprietary software people: user-facing software that the user can't even disassemble because the important parts aren't accessible; since they did this through physical distance rather than the legal system, they can profit from other people's open source software too, circumventing many of the restrictions intended to keep improvements folded back into the community or to limit commercial use. But the side effect of this is that it gives professional computer touchers much more control over regular people's computers: not only can you not fix bugs in someone else's web app yourself, but you can't refuse to upgrade to a version that's a worse fit for your purposes. Where desktop computing encouraged the development of communities of amateur computer hobbyists who, together, would adapt or create alternatives to things that didn't work right (as well as creating lots of interesting, funny, unnecessary stuff that can only be classified as Art -- little games and toys, elaborate shitposts, weird mods and skins), mobile does not. The only thing you need to make your desktop computer do something brand new is a desktop computer, the software development tools & documentation that ship with the OS, and some free time -- you don't even need an internet connection; developing for web or mobile also functionally requires a desktop, on top of your mobile device for mobile (and if it's an iPhone you gotta have a Mac & pay Apple $99/year), & for web you need to pay for hosting and a domain name.
12 notes
·
View notes
Text
Setting Up Calibre + FanFicFare
I've talked before about using Calibre to download fic off of fiction archives, so that's where I decided to start with this series. If you're interested in learning more about how to download fanfic for offline reading/local archiving, then watch the #ficArchiving tag. And if you're not interested in seeing these posts then that's also the tag to block.
Edit (3/22/25) - I've updated the post due to changes in how FanFicFare works with regards to site ratings metadata - the type of column this information needs to be stored in has changed as it no longer works with selectable, pre-set options as originally outlined. Also adding note that additional plugins are required to make FanFicFare's anthology options available.
(Since this is a long post, I'm sticking it under the cut.)
First some background on what Calibre is. It's an open source eBook manager and is really quite versatile for it's usage, thanks in part to the robust library of plugins that it utilizes. The default Calibre app comes bundled not only with management software but an e-reader, server options for locally hosting your library (or libraries), and a whole host of options for managing metadata. Default metadata being tracked include title, author, series, publishing data, synopsis, and tags, but you can manually add columns for any additional data you want - which comes in handy when managing a local fanfiction archive. You can add columns for the fandom the fic is written for, the included ships, characters, completion status, whether it's a single fic or a series turned into an anthology. If the information is useful for you, then you can add a method to track it.
Now, for what Calibre does not do. Because it only runs on Windows/Mac/Linux systems - aka it only runs on a PC - you cannot install it on your phone or tablet. There's no official Calibre apps for Android or iPhones either, though there are unofficial ones that can work with Calibre in server mode. I've never tried the unofficial apps, however, as they tend to cost money that I don't really think they're worth. That's largely because in server mode you can log in to the local instance of Calibre with a regular old browser. Just book mark the page and, so long as your on a network where the local instance is running, your phone or tablet will have access to every book on your Calibre's library (or libraries, depending on how you set things up). You can then either read the eBook directly on the browser or, my preferred method, download the file and read it on the e-reader app of your choice. (You can also make the server available outside your local network, but I've never bothered to learn to set that up.)
Given everything Calibre can do, I'm not particularly bothered by the lack of official apps for phones or tablets - as far as I'm concerned it doesn't need one.
This post is going to be focused on using Calibre for fanfictions specifically, but if you want more information on the other things it can be used for, the Calibre FAQ pages are quite extensive and goes into detail about it's format support, eBook conversion abilities, device integration, news download services, library management, and more.
Alrighty, so first thing you'll want to do is download the version of Calibre that works with your computer. You can also create a portable version that runs off a USB drive if you prefer. Once you've downloaded and installed Calibre, it's time to decide where you want your fanfics to live. Do you want all your eBooks to live in one spot or do you want separate libraries for fanfiction vs original fiction? Since I like to collect more metadata for my fanfic collection than for my regular eBooks - and then completely different extra data for tracking my Star Trek books, or Doctor Who books - I like to have multiple libraries for managing my eBook files. And Calibre makes managing multiple libraries at one time very, very simple.
In Calibre's header there are going to be a lot of icons - I’ve modified the header toolbar for my Calibre instance, but most of the default options are still visible in the picture below.

Specifically you want the one that looks like four books leaning against each other on a shelf. It should have the default library name displayed there - Calibre Library.

Clicking on that will open the menu used for maintaining multiple libraries. While the application only sets up one library by default, it can link to multiple libraries located anywhere on your computer's filesystem. Since I like to use Dropbox to back up my libraries, I usually locate mine in my local Dropbox folder. You can import existing libraries from one instance of Calibre to another, which makes moving from one computer to another, or maintaining the same library across multiple computers, very simple.
Let’s assume you want to have a separate library just for fanfiction. To that end, you'll want the first option on the menu - labeled "Switch/create library".
From there you'll want to select the folder - or create a new folder - with the name of the library you want to use in Calibre. I'd recommend something straightforward and call it "Fanfiction". Then you'll select the radio button labeled "Create an empty library at the new location".
You don't need to copy the current library's structure since every library is created with Calibre's default structure and you won't have added any specialized data tracking at this point to copy over. Once you've set your library location and selected the option for creating a new library, hit the OK button. It'll create the new library and immediately change so that it's managing that library instance instead of the default Calibre Library instance.
If you aren't sure which library is currently open in the Calibre app, then the icon with the four books in the header is where you want to check. It will always be labeled with the name of the currently open library. The most recently opened libraries will be listed at the bottom of the menu opened by that icon for easy switching between libraries and the "Quick switch" option will list all the available libraries registered to your Calibre instance. The icon with the four books is the default icon for a library - if you change the icon for a library then keep in mind that the icon will change in the header when the library is the currently selected on.
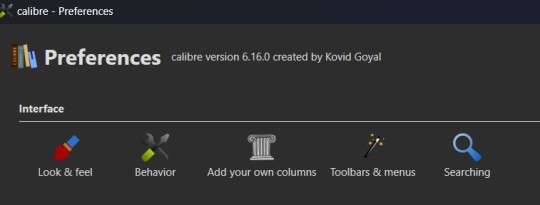
Alright, so step one is completed. You now have a dedicated Fanfiction library for maintaining any fics you choose to download. But the default metadata being tracked for the books isn't as robust as it could be. Time to bulk that information up. You'll want to look back at the header again, this time for an icon that looks like a crossed screwdriver and wrench. It's labeled Preferences. Click on that in the center of the icon to bring up the Preferences modal instead of just the menu (which you can access by clicking the associated down arrow beside the icon instead).
The Preferences modal is where you can access options to tweak the appearance, behavior, and various other functions of Calibre. And I certainly encourage experimenting with the application as it can be customized to your heart's desire to make it meet your accessibility needs. For now, however, we're only interested in the "Add your own columns" option on the top layer of the modal, under "Interface". The associated icon for the "Add your own columns" option is, appropriately, a small Greek column.
This will open the column maintenance modal which presents with a table listing all the existing columns - these all track some kind of metadata for the ebook - and will have checkboxes on the left most of the table indicating whether these columns are displayed on the main interface or are accessible only through the Edit Metadata modal. (We'll get to the Edit Metadata modal later.)
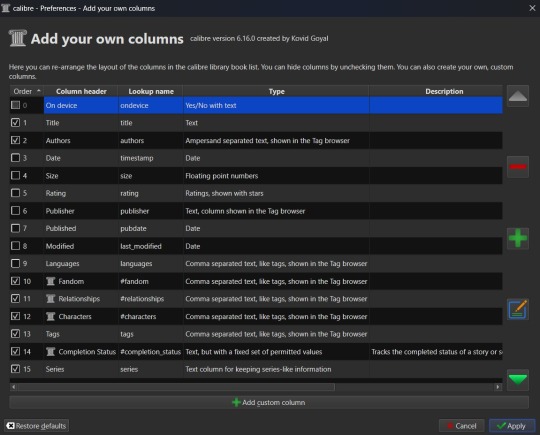
To the right of the table are options for moving a column up or down in the list order, a minus sign used for deleting unnecessary columns, a plus sign for adding new columns, and an edit option for editing existing columns. I'd recommend unchecking columns you don't want displayed in the main table, but not deleting columns. That way you can still store the metadata - and search on it - in that column, but it won't clutter up the main page.
Alright, so now it's time to add some columns. Click the plus button to bring up a custom column form.
The "Lookup name" is what Calibre uses to do searches, so it needs to be something that can be safely saved in a database. "Column heading" is the pretty name that displays either as a column heading in the main Calibre table or as the metadata entry name in the "Edit metadata" modal. "Column type" has a dropdown of the different types of metadata that can be stored in a column and has an option to show checkmarks (a checkbox) for additional true/false parsing. There are a lot of options in the dropdown for metadata types, some of which will offer up additional column creation form options, and this is something that cannot be changed once a column has been saved. If you select the wrong one and realize it later, you'll have to delete the column and create a new one to take it's place. "Description" is there to help clarify things if the "Column header" isn't descriptive enough to make clear what the metadata being tracked by the column is for. And, finally, you can use the optional "Default value" if you want that column to be auto filled with a value you can update later.
Note that the form may add further fields to it, depending on the selected “Column type”.
Since this is going to be tracking fanfiction metadata, some good ideas for creating tag-type metadata columns would be "Fandom", "Ship", and "Characters". You might also consider "Rating", "Content Warnings", “Chapters”, or other data which might be better suited for other types of metadata. We'll start with the "Fandom" column.
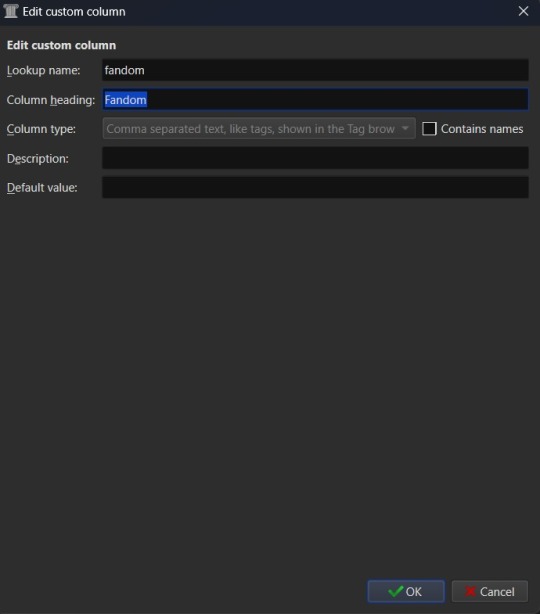
You'll want to set the "Lookup name" to "fandom" (note the lowercase here), the "Column heading" to "Fandom" (uppercase this time), and the "Column type" to "Comma separated text, like tags, shown in the Tag browser". The "Description" is optional, so add what you like (or don't) there and the same goes for "Default value", which you might want to list as "Unsorted" or simply leave blank to indicate the fandom is currently unlisted. Once you're satisfied with your selections, click "OK" and you can either then "Apply" your settings changes or continue on to add more columns.
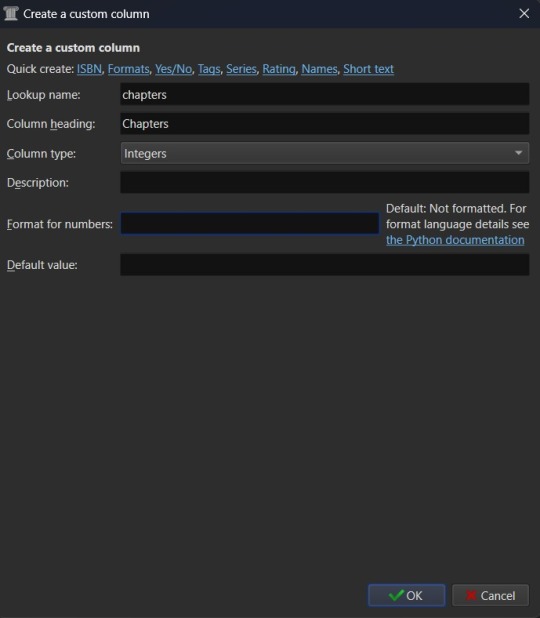
The "Ship" and "Character" data also work best as comma separated data, so I recommend making those columns in the same fashion as the "Fandom" column. “Chapters” you may want to add as an integer column, shown below.
If you're wanting to add "Rating" as a column, then you might want to have specific options for rating a fic, such as limiting the options to the same ones used by Ao3. To this end, you'd fill out the form more like this. "Lookup name" as "rating_level" so as not to confuse it with the existing rating column for star ratings, "Column heading" as "Rating" or maybe "Rating Level", and "Column type" as "Text, but with a fixed set of permitted values". This "Column type" selection will bring up two more inputs on the column creation form - "Values" and "Colors". These two inputs work together and can be edited later. In the "Values" input, you can add a list of comma separated values. In this case the list for "Values" would look like "General Audiences, Teen and Up Audiences, Mature, Explicit, Not Rated". "Colors" is an optional list that will assign a different color to every option on the "Values" list that corresponds to an entry in the "Colors" list. So if you want General Audiences to be blue and no other option to have a color, you'd list "blue" for colors. Or "blue, blue, red, red, red" to have the first to options on the "Values" list as blue and the last three as red. You can play around with this more or leave it blank to have the options all be the same default colors.
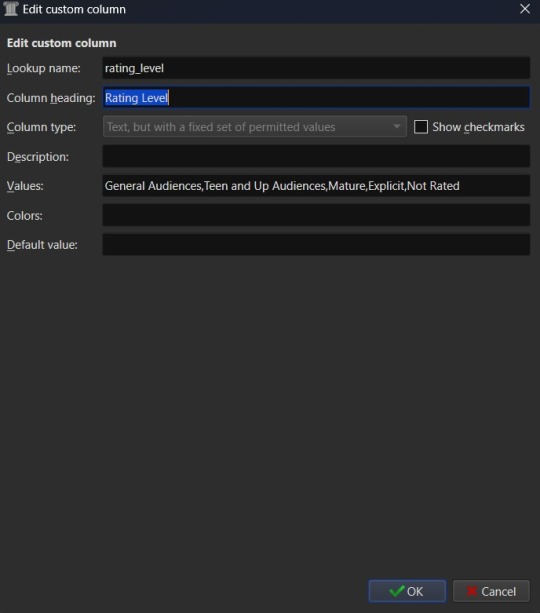
Once you've finalized your selections, hit OK to create the column.
Edit (3/22/25) - FanFicFare currently no longer accurately scrapes ratings data into a column setup as "Text, but with a fixed set of permitted values". Instead you will need to use the "Comma separated text, like tags, shown in the Tag browser" option. Fixed values should still work for things like fic status, which have the Completed and In-Progress settings only, but changes either to FanFicFare or Ao3 (and thus any Ao3 clones) have made the fixed values option for ratings fail to correctly connect site tags to the preset values. The good news is that this will now set the ratings for an anthology fic made from a series page with the ratings of all fics within the series - so if some are General Audiences and others are Mature within a single anthology, that will be accurately reflected in your captured metadata after downloading a fic.
After creating all your new columns and selecting which ones you want present on the main table, hit the "Apply" button. You'll likely be prompted to restart Calibre. Do so and when the program reloads it should display the main table with all the columns exactly how you set them up. Which means step two is complete. At this point if you have any fanfiction eBooks already, you can drag and drop them into the table from folder files or use the "Add books" option at the left most side of the header toolbar to start adding those. You can manually update the metadata either by clicking on newly added book and then selecting a column or by clicking the book and then selecting the "Edit metadata" option in the header. So now it's time to take a quick look at the metadata editor modal.
By default, the metadata modal will only have one screen but, because you've added custom columns, there should be tabs at the top. One for "Basic metadata" and one for "Custom metadata". The "Basic metadata" includes options for title, title sort, author(s), author sort, series, series number, file versions (for tracking if you have epub, mobi, pdf, etc files of the same book), cover management options, the star-based rating system, tags, ids, upload date, published date, associated publisher, languages, and "Comments" which is where the story summery/synopsis should go. For regular, non-fanfiction eBooks, you might also take note of the "Download metadata" button which allows for scrapping official metadata off of sites like Barnes and Noble, Amazon, or other eBook sellers or archives.
The "Custom metadata" is where your custom column data will be found. It should be found at the top of the page and fill space downwards with however many custom columns you've added. Inputs that allow for comma separated values will still have a dropdown option associated to allow adding tags you've entered previously for other ebooks. Columns that only allow using preselected data are more likely to appear as select boxes or other form types. This is where you might notice you created a column type incorrectly, so make sure to check over all the data entry options for each metadata type you're collecting. If it doesn't look like it's set up the way you wanted it to be, you can go back to the column editing modal and try again.

The big draw of using Calibre to manage fanfiction eBooks, however, is being able to use Calibre to download the fanfictions from the web and convert them to eBook format for you. And that's where Calibre's plugin library comes in handy.
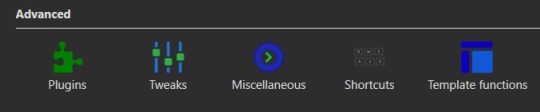
If you were making any edits to an existing eBook, save those and close the metadata editor. Head back over to the Preferences modal and check the Advanced settings options at the bottom of the modal. There should be a green puzzle piece icon labeled "Plugins" - click that to open the Plugins modal.
It will take you to a table used for monitoring and controlling existing plugins and, yes, it does already have 'plugins' installed. These are really more the application's default modules, but because of how Calibre works they can be edited and controlled in the same way that external plugins are. At the bottom of the page you'll see three buttons - "Get new plugins", "Check for updated plugins", and "Load plugin from file". These are concerned with the external plugins that you can add to Calibre. "Get new plugins" will allow you search through the official library of third party plugins available to Calibre - plugins that the Calibre team have vetted to confirm aren't actually malware. But they're by no means the only plugins you can install, as the "Load plugin from file" will allow you to load pretty much any plugin you want to. Such as a plugin for, say… stripping DRM off of purchased eBooks.

In this case, you want to select the "Get new plugins" option. This brings up a modal for User plugins and the displayed list will automatically be filtered by available plugins that have not yet been installed. You can filter this list further by typing "FanFicFare" into the "Filter by name" text input.
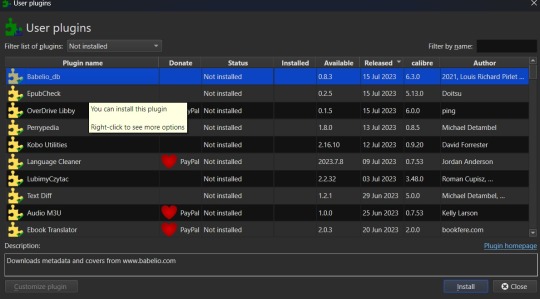
You can then select the FanFicFare plugin and install it. After installing the plugin, you should select the option to restart the application, to ensure that it installed properly. I'd also recommend adding the FanFicFare icon to the optional bottom toolbar instead of the header toolbar, since that'll make it much easier to find since, unless you add more plugins and assign them to that toolbar, it should be the only option on the bar right now.
Edit (3/22/25) - In addition to the FanFicFare plugin, you'll want to include two additional plugins so that FanFicFare can make it's anthology options available. These two plugins are EpubMerge and EpubSplit. These plugins can be used on their own to create anthologies by creating a new epub file from multiple epubs or splitting anthology books into separate epubs for each book contained within. Without these plugins FanFicFare's anthology options will be hidden, as it utilizes them for merging fics in a series together after downloading them separately.
So, full disclosure, you don't need Calibre to run FanFicFare. You could download it and run it from a command line interface instead. However, I prefer it's Calibre interface, especially since it really lets you take advantage of the best Calibre has to offer in metadata tracking, as it can be set up through Calibre to auto fill those columns I walked you through setting up earlier. But I'll get to more on that in a minute.Once Calibre has restarted, you should now have FanFicFare available on one of your toolbars. It's associated icon is a green text bubble with the letters "FF" in it pointing down at a picture of a book.

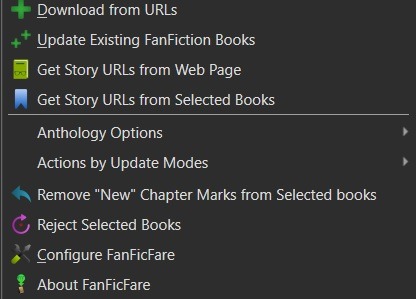
It'll have a small down arrow next to it, which you'll want to select in order to bring up FanFicFare's menu. At this point you can start downloading fics if you want - but let's do a little customizing first. Select the "Configure FanFicFare" option to bring up the configuration modal.
So this modal has a lot going on. And I do encourage doing some exploration on your own, because FanFicFare is a powerful tool made all the more powerful here in conjunction with Calibre's built in tools. Cover generation is very useful, "Reading lists" can be used to auto send new books to any devices you've linked to Calibre when they're connected to the computer, you can tie into email accounts to pull fanfics from email or pull URL links for downloading... there is just so much this plugin can do.
For now, however, we're interested in the column related options. First, check out the tab for "Standard Columns". Look over the options there carefully to make sure that the default settings are actually what you want. They're pretty straight foward - most are determining whether the metadata gets scraped and updated every time you update a fanfic eBook or if they're only scraped for new books. The rest have to do with title and author sorting, setting series related data, and setting the comment data for anthologies.
Once you've set that data how you want, head over to the "Custom Columns" tab where things get more interesting.
You should now be looking at a list of all those custom columns you created earlier, in alphabetical order. Each column will have a corresponding select box with nothing selected and an unchecked checkbox marked "New Only". This works in a pretty straightforward manner. Let's use "Fandom" as the example. Click the associated select box to open the dropdown and you'll see a bunch of potential metadata that FanFicFare scrapes listed there. It'll all go into the default tags column - found over in the "Standard Columns" section - but you can also parse it out to specific custom columns here. It might give you a few ideas for more columns you want to add for metadata sorting purposes. "Fandom" you'll want to link to "Category". I left "New Only" unchecked so that if I update an eBook later and it has a new fandom attached to the fic then that new metadata will be picked up and added to my Fandom tags for the fic.
Go through each custom column and set them up to be auto filled with the data you think fits it best. Select OK to save your changes and congratulations, this library has now been set up to import fanfiction.
Do keep in mind that FanFicFare's settings are on a per-library basis. So if you decide to do a separate library for different types of fanfics then you'll need to configure FanFicFare separate for every library. You may want separate libraries for different repositories, for example. Though FanFicFare is often smart enough to recognize when it already has an eBook version of a fanfiction from one repository - such as FFnet - when trying to download the same fic from another place - like Ao3.
You may need to make changes later to the personal.ini file associated with the library (which is also set up on a per-library basis) but I'll write up a separate post for that later. While sites protected by Cloud Flare more stringent protections will likely result in 403 responses and failed downloads, most fanfiction sites are going to work with the default FanFicFare settings. You could head over to, say, Archive of Our Own or Twisting the Hellmouth and grab a URL for a story from there. Or a URL for a series, which has links to multiple stories.
Now that the set up is done, it's time for the fun part. Downloading and maintaining fanfiction in your library. I'll be using a few of my fanfictions on Ao3 as example URLs. Awaken, which is already in my fanfiction library. What Balance Means, which is not already in my library. And the two series Hartmonfest 2023 and Eobard vs Eobard.
We'll start with the single URL uploads.
Click on the FanFicFare down arrow to bring up the menu and select the first option on the menu, labeled "Download from URLs". If you have a URL in your clipboard and have the option to grab URLs from the clipboard selected in the FanFicFare configuration (it's a default option, so you most likely do) then you should see that URL prepopulated in the text area when the Story URLs modal loads. You can add more URLs, one per line, to this text area and when you select OK each one will be individually downloaded as a separate epub file. For multi-chapter fics you only need to provide the url for the first chapter. FanFicFare will be able to detect the additional chapters and download them into the same epub file as the first chapter. All providing additional chapter URLs will do is lead to FanFicFare attempting to create multiple epubs of the same fanfic.
Once you've added your list of URLs to the text area, select OK. FanFicFare will do the rest, fetching metadata for the fic (or fics) and compiling the epub file(s). When it's finished compiling the data but hasn't officially saved the epubs, it will pop up a message letting you know how many "good" and "bad" entries it found.

"Good" means it made an epub file and it's good to go. "Bad" could mean that you've already got the fanfic downloaded and no updates - such as new chapters - were available. Or it could mean that it failed to grab the web pages for whatever reason… like Cloud Flare blocking the download. You can go forward with the download at this point, adding the good epubs to your library. Or you could cancel the download, meaning none of the epubs are saved. Before choosing one of those options you can also choose to look at the job output, seen in the pop up as a button labeled "View log". This will display a list of every url you tried to download a fanfic for and information on either it's success or why it failed, the associated URL, and how many chapters were downloaded.
Since I already had Awaken downloaded and there have been no updates since the last time I downloaded it, that is the bad update from my list and the result I was expecting. What Balance Means hadn't been downloaded before, so it was the expected good update. Once Yes is selected in the dialog, the new fanfiction eBooks will be added to the library and will appear at the top of the main list in the application.

That's great for updating one fic at a time or copy-pasting in a list of fanfictions, but let's get ambitious. Maybe you want to import an entire page of bookmarked fanfictions at once or a series of fanfictions as individual books. Instead of copying every single URL by hand, you can take the URL for the series main page or the Bookmarks URL. With that URL copied, you can head over to the FanFicFare menu again, but this time select the option "Get Story URLs from Web Page"
The modal that pops up only allows for inputting one URL - the URL for the page you want it to scour for fanfic URLs. Once you've inputted that URL click the button labeled "For Individual Books." It might take a bit but it's going to pull up the same Story URLs modal from before, this time prepopulated with every URL from the page you gave it. Pretty cool, right? Click OK and watch it run the job just like before.
I gave it the URL for my Hartmonfest 2023 series, which is a complete series and it downloaded all three books. Once they're populated on the list, I could scroll over to the Series column to see that they all are listed as being part of the Hartmonfest 2023 series in the same series order they're listed in on Ao3.
However, what if I'm uploading an unfinished series, like Eobard vs Eobard, and want to be able to track when it updates later on? Single books can track when new chapters are updated; is there any way to do the same thing but on a larger scale? The answer is yes, but you have to upload the series as an anthology.
Head back to the "Get Story URLs from Web Page" option on the FanFicFare menu and give it another series URL. But, this time, click the button labeled For Anthology Epub. This will trigger the Story URLs modal again once it's gathered all the story URLs, but this time it looks a little different.

This time there will be text indicating the Series and Comments/description, the information for which will have been taken from the series metadata. The series story URLs will be present in the text area, allowing you to remove a story from the anthology if there's a fic in there you don't want included. Click OK to run the import job, which will run like normal.
When the job completes, there should be multiple good updates listed - one for every URL - but when you click yes to add the eBook to the library, you'll only see one added. It should be named following the convention "<Series Name> Anthology". So now I've got the "Eobard vs Eobard Anthology" in my library.
Last but not least, how to check for updates to incomplete fanfictions or series. It's generally pretty easy to do. Select the fanfiction(s) on the list that you want to check for updates on. If it's a single fanfiction (or several single fanfictions), you go to the FanFicFare menu and click the option "Update Existing FanFiction Books"
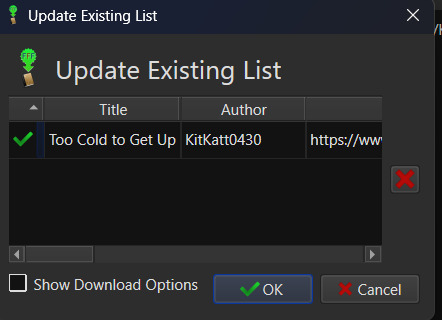
Click OK and let it run. Any fanfictions that don't have new chapters will return as bad entries. Any that have new chapters will be listed as good. Selecting Yes to add the good entries to the list will update the existing epub files with the new chapters.
However, if it's a series you want to update, I recommend doing those one at a time. Select the anthology from the eBook list and head back over to the FanFicFare menu. This time select "Anthology Options"; it'll open a fly-out menu. You want the bottom option, labeled "Update Anthology Epub". The associated URL for the series is saved as part of the eBook's metadata already, so it will pull the series metadata and associated URLs again, before returning you to that same modified Story URLs modal seen before. When you click OK, it'll pull all the fanfictions in the series - new and old - and any new chapters as well, bundling it up in a new eBook file that will replace the old one.
There's still a lot to talk about when it comes to managing fanfictions in Calibre, but I think I'll end here for now. You should be able to download, and manage, fanfiction from most websites at this point. So go back up your bookmarked fics and rest easy knowing that from this point forward a missing bookmark on your bookmarks list is no longer cause for sadness - it'll still be in your local archive to enjoy offline. Just don't go abusing this power, okay guys?
#kitkatt0430 explains#ficArchiving#calibre#fanficfare#the images all have alt text but if you find my image descriptions lacking feel free to add additional descriptions
61 notes
·
View notes
Text
Unchain Your Website's Potential: The Ultimate Guide to VPS Hosting!

Is your website sluggish, unreliable, and constantly battling for resources? Shared hosting might have been a lifesaver when you were starting out, but now it's holding you back. Upgrading to a Virtual Private Server (VPS) can be the game-changer you need. But what exactly is a VPS, and how can it unleash your website's true potential?
This comprehensive guide dives deep into the world of VPS hosting, explaining how it works, its benefits for tasks like Forex trading, and the key factors to consider when choosing the perfect plan for your needs. We'll even show you how to navigate the setup process and unlock the power of your VPS with tools like Remote Desktop Protocol (RDP).
By the end of this article, you'll be armed with the knowledge to confidently choose a reliable VPS hosting provider like Data Base Mart and propel your website or application to new heights of performance and security.
Unveiling the VPS: How It Works
Imagine a high-rise apartment building. The entire building represents a physical server owned by a hosting provider. Now, imagine dividing each floor into individual, self-contained units. These units are your VPS!
VPS hosting leverages virtualization technology to carve a single physical server into multiple virtual ones. Each VPS functions like a dedicated server, with its own operating system, software, and allocated resources like CPU, memory, and storage. This isolation ensures your website or application enjoys a stable environment, unaffected by activity on other virtual servers sharing the physical machine.
How VPS Hosting Works
VPS hosting builds upon the core principle explained above. Hosting providers like Data Base Mart offer various VPS plans with different resource allocations. You choose a plan that aligns with your needs and budget. The provider then sets up your virtual server on their physical infrastructure, granting you root access for complete control and customization.
Powering Forex Trading with VPS
Foreign exchange (Forex) trading thrives on speed and reliability. A VPS ensures uninterrupted access to the market, even during peak trading hours. With a VPS, you can run trading bots and automated strategies 24/7 without worrying about downtime caused by shared hosting issues.
Choosing the Right VPS
Selecting the ideal VPS hinges on your specific needs. Here's a breakdown of key factors to consider:
Resource Requirements: Evaluate your CPU, memory, and storage needs based on the website or application you'll be running.
Operating System: Choose a provider offering the operating system you're comfortable with, such as Linux or Windows.
Managed vs. Unmanaged: Managed VPS plans include maintenance and support, while unmanaged plans require you to handle server administration.
Scalability: If you anticipate future growth, choose a provider that allows easy scaling of your VPS resources.
How to Use VPS with Remote Desktop Protocol (RDP)
Many VPS providers offer remote access via RDP, a graphical interface that lets you manage your server from a remote computer. This is particularly useful for installing software, configuring settings, and troubleshooting issues.
Creating a VPS Account
The signup process for a VPS account is straightforward. Head to your chosen provider's website, select a plan, and follow the on-screen instructions. They'll typically guide you through the account creation and server setup process.
VPS Pricing
VPS plans are generally more expensive than shared hosting but significantly cheaper than dedicated servers. Pricing varies based on resource allocation and features. Providers like Data Base Mart offer competitive rates for reliable VPS solutions.
VPS Terminology Explained
VPS Stands For: Virtual Private Server
VPS Airport (doesn't exist): VPS is not an airport code.
VPS in Basketball (doesn't exist): VPS has no meaning specific to basketball.
VPS Hosting: As explained earlier, refers to a hosting service that provides virtual private servers.
VPS in Business: In a business context, VPS can refer to a virtual private server used for web hosting, application deployment, or other IT needs.
VPS in School (uncommon): While uncommon, schools might use VPS for specific applications requiring a dedicated server environment.
Final Thoughts
VPS offers a compelling middle ground between shared hosting and dedicated servers. It provides the power and control of a dedicated server at a fraction of the cost. By understanding how VPS works and choosing the right plan, you can unlock a secure and reliable platform for your website, application, or even Forex trading needs.
#How Do Vps Work#How Does Vps Work#How Does Vps Work In Forex Trading#How Does Vps Hosting Work#How Are Vps Chosen#How To Vps Rdp#How To Vps Account#How To Vps Price#What Does Vps Stand For#What Does Vps Airport Stand For#What Does Vps Mean In Basketball#What Does Vps Hosting Mean#What Does Vps Stand For In Business#What Does Vps Stand For In School#How Much Does Vps Cost
2 notes
·
View notes
Text
Windows vs. Linux: Unveiling the Ideal Choice for Your Affordable VPS Hosting Needs
Introduction
In the realm of Virtual Private Server (VPS) hosting, the choice between Windows and Linux operating systems is pivotal, shaping the performance, security, and overall efficiency of your virtual environment. In this comprehensive guide, we delve into the nuances of Windows and Linux VPS hosting, helping you make an informed decision to meet your specific requirements.
Understanding Windows VPS Hosting
Windows VPS hosting, known for its user-friendly interface, is an excellent choice for those accustomed to the Windows operating system. The familiarity and ease of use make it an appealing option for businesses and individuals looking for a seamless transition into the world of virtual servers.
Performance in the Windows Domain
When it comes to performance, Windows VPS stands out with its compatibility with a myriad of applications and software. The robust performance capabilities, coupled with regular updates and optimizations, ensure a smooth and efficient hosting experience.
Security Measures in the Windows Realm
Security is paramount in the digital landscape, and Windows VPS hosting doesn't disappoint. With advanced security features and regular patches, Windows VPS offers a secure environment for your data and applications, safeguarding against potential threats.
Linux: The Open Source Powerhouse
Linux VPS hosting, rooted in open-source principles, appeals to those who prioritize flexibility and customization. Its versatility makes it a favorite among developers and tech enthusiasts seeking a platform to tailor to their unique needs.
Optimizing Performance in Linux
Linux VPS is renowned for its robust performance and resource efficiency. The lightweight nature of Linux allows for optimal resource utilization, ensuring smooth operations even in resource-intensive tasks. This makes Linux VPS an excellent choice for those prioritizing performance and scalability.
Security Paradigm in Linux Hosting
Security is woven into the fabric of Linux VPS hosting. With a robust permission system, regular security updates, and a proactive community, Linux ensures a secure hosting environment. The community-driven nature of Linux development means that vulnerabilities are promptly identified and addressed.
Factors Influencing Your Decision
When choosing between Windows and Linux VPS hosting, several factors come into play. Consider your familiarity with the operating system, specific software requirements, and the level of customization and control you seek over your virtual environment.
Scalability and Future-Proofing
Scalability is a crucial consideration for growing businesses. Both Windows and Linux VPS hosting offer scalability options, but the choice depends on your long-term goals and the scalability features that align with your business trajectory.
Conclusion: Making the Final Call
In the vast landscape of affordable VPS hosting, the choice between Windows and Linux boils down to your individual needs and preferences. Windows offers a user-friendly interface and seamless integration, while Linux provides unmatched flexibility and performance efficiency.
As you embark on your VPS hosting journey, weigh the pros and cons meticulously, considering factors such as familiarity, performance, and security. Ultimately, the perfect match lies in aligning the chosen operating system with your unique hosting requirements.
2 notes
·
View notes
Text
Choosing the Right Control Panel for Your Hosting: Plesk vs cPanel Comparison

Whether you're a business owner or an individual creating a website, the choice of a control panel for your web hosting is crucial. Often overlooked, the control panel plays a vital role in managing web server features. This article compares two popular control panels, cPanel and Plesk, to help you make an informed decision based on your requirements and knowledge.
Understanding Control Panels
A control panel is a tool that allows users to manage various features of their web server directly. It simplifies tasks like adjusting DNS settings, managing databases, handling website files, installing third-party applications, implementing security measures, and providing FTP access. The two most widely used control panels are cPanel and Plesk, both offering a plethora of features at affordable prices.
Plesk: A Versatile Control Panel
Plesk is a web hosting control panel compatible with both Linux and Windows systems. It provides a user-friendly interface, offering access to all web server features efficiently.
cPanel: The Trusted Classic
cPanel is the oldest and most trusted web control panel, providing everything needed to manage, customize, and access web files effectively.
Comparing Plesk and cPanel
User Interface:
Plesk: Offers a user-friendly interface with a primary menu on the left and feature boxes on the right, similar to WordPress.
cPanel: Features an all-in-one page with visually appealing icons. Everything is sorted into groups for easy navigation.
Features and Tools:
Both offer a wide range of features, including email accounts, DNS settings, FTP accounts, and database management.
Plesk: Comes with more pre-installed apps, while cPanel may require additional installations.
Security:
Plesk: Provides useful security features like AutoSSL, ImunifyAV, Fail2ban, firewall, and spam defense.
cPanel: Offers features such as password-protected folders, IP address rejections, automated SSL certificate installations, and backups.
Performance:
Plesk and cPanel: Both offer good performance. cPanel is designed for faster performance by using less memory (RAM).
Distros:
Plesk: Compatible with both Linux and Windows systems.
cPanel: Works only on Linux systems, supported by distributions like CentOS, CloudLinux, and Red Hat.
Affordability:
cPanel: Known for its cost-effective pricing, making it preferred by many, especially new learners.
Preferred Hosting Options
If you are looking for a hosting solution with cPanel, explore web hosting services that offer it. For those preferring Plesk, Serverpoet provides fully managed shared, VPS, and dedicated hosting solutions. Serverpoet also offers server management support for both Plesk and cPanel, including troubleshooting, configuration, migration, security updates, and performance monitoring.
Conclusion
In the Plesk vs cPanel comparison, cPanel stands out for its cost-effective server management solution and user-friendly interface. On the other hand, Plesk offers more features and applications, making it a versatile choice. Consider your specific needs when choosing between the two, keeping in mind that cPanel is known for its Linux compatibility, while Plesk works on both Linux and Windows systems.
2 notes
·
View notes
Text
How to Choose the Best Dedicated Server Netherlands and Netherlands Server for Your Business?
Are businesses using their online space to its fullest by picking the right hosting? Today, having a strong online presence is key to success.
Choosing a dedicated server in the Netherlands is a smart choice. It's known for top-notch performance and reliability. The Netherlands is great for hosting servers because of its fast connectivity and strong data security.

With a dedicated server, businesses get better performance, more security, and the chance to tailor their hosting to fit their needs.
Key Takeaways
Understand the benefits of hosting a server in the Netherlands.
Learn how a dedicated server can improve business performance.
Discover the importance of customization options in a server.
Explore the security features offered by Netherlands-based servers.
Identify the key factors to consider when choosing a dedicated server.
Why Businesses Are Choosing Dedicated Server Netherlands
The Netherlands is becoming a top choice for businesses needing reliable dedicated server Netherlands. Its digital infrastructure is highly developed. The country's location in Europe and its advanced network make it perfect for data centers and server hosting.
The Strategic Advantage of Netherlands' Digital Infrastructure
The Netherlands offers a unique blend of connectivity, reliability, and security. This makes it a great place for businesses looking for dedicated server solutions. Key advantages include:
High-speed connectivity with multiple undersea cables ensuring low latency.
A business-friendly environment with favorable policies and regulations.
Advanced data centers with state-of-the-art security and infrastructure.
Comparing Shared Hosting vs. Dedicated Server Solutions
Businesses often compare shared hosting and dedicated servers. Shared hosting is cheaper, but dedicated servers offer better performance, security, and control. Dedicated servers are best for businesses with a lot of traffic or special security needs.
Business Benefits of Netherlands-Based Servers
Having a server in the Netherlands has many business benefits. These include:
Low latency and high connectivity, improving user experience.
A business-friendly environment with supportive policies.
Access to advanced digital infrastructure and reliable data centers.
Choosing a dedicated server in the Netherlands can help businesses improve their online presence and work more efficiently.
Key Features of Premium Netherlands Server Solutions
Netherlands server solutions have standout features like top-notch hardware and flexible operating systems. Businesses look for a top dedicated server company that offers performance, reliability, and value.
Hardware Performance and Intel Xeon Processors
Premium Netherlands servers use Intel Xeon processors for their power and efficiency. These servers handle demanding tasks well, perfect for businesses with complex needs.
Processing Power and Server Configurations
These servers' processing power can be tailored to fit business needs. You can choose from single to multiple processor setups. This flexibility allows businesses to grow their server capabilities as they need.
Storage Options and Redundancy Systems
Storage is also key. Netherlands servers offer various storage options, including SSD and HDD, and redundancy systems. These ensure data safety and availability.
Network Infrastructure and Bandwidth Capabilities
The network behind Netherlands servers is robust. With high-bandwidth and multiple data centers, they offer fast, reliable connections. This is great for businesses needing quick connections.
Operating System Flexibility: Linux and Windows Options
Netherlands servers offer flexibility in operating systems. You can choose from Linux and Windows, meeting different business needs. This lets businesses pick the best operating system for their applications.
With low-cost server hosting and high performance, Netherlands servers are a great choice. They offer reliable and efficient server solutions for businesses.
Technical Specifications That Define Quality Dedicated Server Netherlands
The technical specs of a dedicated server in the Netherlands are key. They help deliver premium dedicated server services and secure server hosting. These specs are vital for meeting the needs of today's digital businesses.
The AMS-01 Data Center: Infrastructure and Capabilities
The AMS-01 data center is top-notch. It houses the dedicated servers. Its design ensures maximum uptime and performance.
It has advanced cooling systems, redundant power, and strong security. These features protect the servers and the data they hold.
The data center offers high-density storage, advanced networks, and scalable architecture. These features help businesses host their apps and data securely and efficiently. They use the benefits of premium dedicated server services.
Uptime Guarantees and 99.98% Service Reliability
A server's uptime guarantee is critical. A 99.98% uptime guarantee means servers are almost always on. This is key for keeping customers happy and business running smoothly.
This high uptime comes from strong infrastructure, proactive monitoring, and quick issue fixes. It's a sign of secure server hosting and is vital for businesses that can't afford downtime.
Advanced Management Features
Advanced management features are important for quality dedicated server services. They help businesses manage their servers well.
IPMI Access and Remote Server Control
IPMI (Intelligent Platform Management Interface) access lets admins control servers remotely. This is essential for keeping servers running smoothly and fixing issues fast.
Dedicated Port Speed and Premium Bandwidth
Dedicated port speed and premium bandwidth are critical. They ensure servers can handle lots of traffic and data transfer well. A dedicated port reduces congestion and ensures steady performance.
Premium bandwidth gives businesses the capacity they need. This is important for hosting apps, storing data, or handling online transactions. It's key for businesses with changing needs or growth plans.
Support and Security Considerations for Your Netherlands Server
Choosing a dedicated server in the Netherlands means looking at more than just the hardware. It's also about the support and security it offers.
24/7 Pro-Active Monitoring and Technical Support
A top server provider in the Netherlands offers 24/7 pro-active monitoring and technical support. This ensures any problems are fixed quickly. It's key for keeping your business running smoothly.
Security Protocols and Data Protection Measures
Security is a big deal for businesses with data on dedicated servers. A good provider in the Netherlands will have strong security protocols and data protection measures. These help protect against cyber threats and data breaches.
Service Level Agreements and Performance Guarantees
When picking a dedicated server in the Netherlands, check the Service Level Agreements (SLAs) and performance guarantees. These show the provider's promise to keep your service running well.
Scalability Options for Growing Businesses
As your business grows, so do your hosting needs. A flexible Netherlands server provider will offer scalability options. This lets you upgrade your resources as your business expands.
Conclusion: Selecting the Ideal Dedicated Server for Your Business Needs
Choosing the right dedicated server is key for businesses wanting to boost their online presence. A dedicated server in the Netherlands offers top-notch performance, strong security, and reliable support.
The Netherlands server is known for its great digital setup, good prices, and business-friendly environment. By picking a top-notch dedicated server, businesses can make their websites run better, keep data safe, and give users a better experience.
When looking at dedicated server options, think about the hardware, network, and support. A good dedicated server in the Netherlands can really help a business grow and stay ahead in the market.
FAQ
What are the benefits of using a dedicated server in the Netherlands?
A dedicated server in the Netherlands boosts performance and security. It also gives you more control over your server settings. The Netherlands' location and digital infrastructure offer low latency and high connectivity. This makes it perfect for businesses targeting European customers.
How does a dedicated server differ from shared hosting?
A dedicated server is for one user or business, while shared hosting is for many. Dedicated servers offer better control, security, and performance. They're great for high-traffic sites, complex apps, or sensitive data.
What kind of hardware performance can I expect from a premium Netherlands server?
Premium Netherlands servers have top-notch hardware. They include Intel Xeon processors, lots of storage, and redundancy systems. These features ensure fast processing, efficient storage, and reliable operation for demanding tasks.
Can I choose my operating system for a dedicated server in the Netherlands?
Yes, you can pick from various operating systems with most providers in the Netherlands. You can choose from Linux distributions and Windows. This lets businesses pick the best OS for their needs.
What kind of support can I expect from a dedicated server provider?
Top dedicated server providers in the Netherlands offer 24/7 support. They monitor your server proactively and fix issues quickly. They also provide tools for easy server management, like IPMI access and remote control.
How reliable are dedicated servers in the Netherlands?
Dedicated servers in the Netherlands are very reliable. Many providers guarantee uptime and offer high service reliability. The AMS-01 data center, for example, provides a secure and reliable environment with advanced infrastructure.
Can I scale my dedicated server as my business grows?
Yes, many providers in the Netherlands offer scalable solutions. This means you can upgrade your server as your business grows. This flexibility helps your business adapt without being limited by server capacity.
What security measures are in place to protect my data on a dedicated server?
Dedicated server providers in the Netherlands use strong security measures. They include firewalls, intrusion detection, and encryption. These protect your data and prevent unauthorized access.
0 notes
Text
How to Build a White label Windows Reseller Hosting Business from Scratch?
In digital-first economy, more businesses and entrepreneurs in the UK are looking to launch their own hosting companies. One of the most cost-effective and scalable paths is through Windows reseller hosting. By starting a white label hosting business, you can offer full-fledged hosting services under your own brand without the complexity of server management.

In this guide, we'll walk you through everything you need to know to build a white label Windows reseller hosting business from scratch, including why it's a smart move in the market, how to get started, and how to scale it efficiently. We’ll also compare Linux vs. Windows reseller hosting, explore cheap and managed reseller hosting options, and highlight how you can pair your hosting services with webdesign offerings for maximum profit.
What is Windows Reseller Hosting?
Windows reseller hosting is a web hosting service where you rent server space and resources from a web hosting provider and resell them to clients under your own branding. It is powered by Windows Server OS and is ideal for customers who require technologies such as:
ASP.NET
MSSQL
Microsoft Access
Remote Desktop
Plesk control panel
Unlike Linux reseller hosting, which is built around PHP and MySQL, Windows hosting supports Microsoft-based applications and frameworks. This makes it suitable for businesses and developers who depend on Microsoft's ecosystem.
Why Choose White Label Reseller Hosting?
White label reseller hosting enables you to purchase hosting services from a web hosting provider and rebrand them as your own. Your clients interact solely with your business and never see the original provider’s branding, giving you complete control over pricing, package structure, and the overall customer experience. This approach allows you to build a unique brand identity in the market while offering additional services such as webdesign, domain registration, and email marketing. It's an ideal model for UK-based entrepreneurs, freelancers, and small businesses looking to enter the web hosting industry without the need for significant upfront investment in infrastructure.
Benefits of Starting a Reseller Hosting Business in the UK-
1. Growing Demand
More businesses are going online than ever before. With over 60% of small businesses still needing a website, offering hosting and webdesign packages is a high-demand combo.
2. Recurring Revenue
Hosting services are typically billed monthly or annually. This means once you acquire customers, you earn predictable, recurring revenue.
3. Minimal Startup Costs
Thanks to cheap Windows reseller hosting providers, you can get started for as low as £1 per month. Compare this with the thousands it takes to build and maintain your own server farm.
4. Local Market Advantage
Using UK-based data centres and payment systems ensures low latency and better SEO targeting, making it easier to rank locally.
Step-by-Step: How to Build Your White Label Hosting Business-
Step 1: Choose Between Linux and Windows Reseller Hosting
While Linux reseller hosting is common due to its compatibility with PHP and open-source apps like WordPress, Windows reseller hosting is ideal for businesses using ASP.NET, Microsoft Exchange, and Access databases.
Offering both Windows and Linux packages gives you broader appeal in the market.
Step 2: Select a Reliable Hosting Provider
The success of your reseller hosting business largely depends on the reliability of your hosting provider. It’s essential to choose a provider that offers full whitelabel support, allowing you to operate under your own brand without exposing the backend source. Look for features such as the Plesk control panel for Windows, UK-based data centres for improved local performance, and 24/7 managed support to ensure technical issues are resolved quickly. Automated backups and updates are crucial for maintaining site integrity, while integration with WHMCS or other billing platforms helps streamline client management and automate routine tasks. For instance, MyResellerHome is a trusted choice for cheap managed reseller hosting in the UK, offering customisable plans, robust infrastructure, and consistently high uptime for your clients.
Step 3: Set Up Your Hosting Packages
Once you’ve chosen a reliable provider, the next step is to create tailored hosting packages that appeal to a wide range of clients. Your plans should be structured to include essential features such as disk space and bandwidth limits, email hosting, free SSL certificates for secure connections, daily backups for data protection, and access to a website builder or free webdesign templates to support non-technical users. These features add value and make your offerings more attractive in the competitive UK market. To stay ahead, it's wise to research your competitors—especially those ranking on the first two pages of Google UK—to understand their pricing models, feature sets, and positioning. This will help you craft compelling packages that stand out while remaining cost-effective and customer-friendly.
Step 4: Register a Domain & Set Up Website
Choosing the right domain name is a crucial step in establishing your brand identity. For a UK audience, it's best to select a domain that is short, memorable, and ends in .co.uk to signal local relevance and trust. Once your domain is secured, use a professional CMS like WordPress or take advantage of a built-in site builder provided with your cheap web hosting plans to create a clean, SEO-friendly website. Your site should reflect your brand and clearly communicate your services. To optimise for search visibility and user engagement, include dedicated landing pages for Windows reseller hosting, Linux reseller hosting, managed reseller hosting, and webdesign services. Don’t forget to add a page for customer testimonials, which can build credibility and help convert visitors into paying clients.
Step 5: Automate Your Billing & Client Management
Efficient management is key to running a successful reseller hosting business, and automation can significantly reduce your workload. Tools like WHMCS are essential for streamlining operations. With WHMCS, you can automate client onboarding, hosting account provisioning, invoicing, renewals, and ticket-based support—all from a single platform. This not only improves customer experience but also ensures accuracy and consistency in your business processes. Ideally, your web hosting provider should either include a WHMCS license or support seamless integration with it or similar billing platforms. Automating these core functions helps keep your business scalable, professional, and ready for growth in the competitive UK hosting market.
Step 6: Customise Branding for Full White Label Experience
To take full advantage of the whitelabel model, it’s essential to customise every aspect of your hosting environment to reflect your own brand. Start by replacing any provider logos with your own, ensuring that your clients see only your branding throughout their experience. Customise the client area and control panel to match your business's visual identity, which helps reinforce trust and professionalism. Use branded email addresses for all customer communications to maintain consistency and credibility. Additionally, set up custom nameservers to give your hosting service a fully independent appearance. These branding efforts make your reseller hosting business look established and professional, helping you stand out in the competitive best web hosting landscape.
Step 7: Add Web Design Services
Integrating webdesign services into your hosting business gives you a powerful competitive advantage, especially in the UK market where many startups and small businesses prefer all-in-one digital solutions. By offering both hosting and design, you become a one-stop shop for clients looking to establish or improve their online presence. Create tiered webdesign packages that cater to different budgets and needs, including features like responsive website design for mobile compatibility, e-commerce setup for online stores, basic SEO to enhance visibility, and content writing to ensure professional messaging. Bundling these services with your cheap web hosting plans not only increases your average revenue per client but also provides greater value, improving customer satisfaction and retention.
Step 8: Marketing & SEO for the Audience
To establish a strong online presence, it’s crucial to tailor your marketing and SEO strategies to a local audience. Start by using specific spelling and grammar consistently across your website to align with local expectations and search behaviour. Implement structured data with local schema markup, such as LocalBusiness, to help search engines understand your business’s relevance to users. Optimise key pages for targeted phrases like cheap Windows reseller hosting, managed reseller hosting, whitelabel hosting for web designers, and affordable hosting for UK startups to improve visibility in search results.
To boost your site’s authority, build quality backlinks from reputable directories, forums, and blogs. Additionally, launch a blog featuring valuable content on webdesign, hosting tips, SEO advice, and tech insights to engage your audience and attract organic traffic. Don’t overlook the power of social media—platforms like LinkedIn and Twitter are ideal for reaching small business owners, freelancers, and tech startups who are actively seeking digital solutions.
Why Managed Reseller Hosting Makes Scaling Easier?
Managed reseller hosting gives you peace of mind. Your web hosting provider handles:
Server updates
Security patches
Monitoring and uptime
Technical support (even white-labeled)
This frees up your time to focus on marketing and customer acquisition. It’s especially helpful for non-technical founders.
MyResellerHome provides comprehensive managed reseller hosting packages with 24/7 support, making them ideal for UK-based businesses that want to grow fast without technical headaches.
Mistakes to Avoid When Starting Out-
Ignoring Linux Users: Even if you start with Windows reseller hosting, don’t neglect users who prefer Linux hosting. Offer both to maximise sales.
Overpricing Plans: The market is price-sensitive. Keep pricing cheap but value-packed.
Underestimating Support Needs: Technical support is critical. Choose the web hosting provider that offers white-labeled support if you’re not tech-savvy.
Lack of Branding: Without proper whitelabel branding, clients may know you’re a reseller, which can erode trust.
Not Upselling Webdesign: Hosting is great, but webdesign services can significantly boost your average client spend.
Final Thoughts: Build Your Best Web Hosting Empire-
Starting a white label Windows reseller hosting business is not just feasible—it’s a powerful way to generate recurring income with low startup costs. By offering cheap, reliable hosting with a professional whitelabel experience, and pairing it with services like webdesign, you can build a trusted digital brand.
Whether you're a freelancer, agency, or aspiring entrepreneur, platforms like MyResellerHome make it easy to get started with managed reseller hosting solutions that scale with your growth.
Take action today, tap into the booming digital economy, and turn your dream of owning a hosting company into a thriving reality.

Janet Watson
MyResellerHome MyResellerhome.com We offer experienced web hosting services that are customized to your specific requirements. Facebook Twitter YouTube Instagram
#myresellerhome#webhosting#webhostingservices#resellerhosting#hosting provider#cheap web hosting#affordablehosting#best web hosting
0 notes
Text
Best VPS Hosting for Gaming – Windows VPS vs Linux VPS Compared
Looking for the best VPS hosting for gaming? Discover the pros and cons of Windows VPS vs Linux VPS, and find out which one is right for hosting your favorite game servers. Choose performance, speed, and reliability with top-tier VPS Windows options from Petrosky.io.
0 notes
Text
Docker Architecture Explained: Containers vs VMs
In this video: ✔️ Docker Architecture Overview ✔️ Containers vs Virtual Machines ✔️ Shared Host OS & Linux Kernel Explanation ✔️ Why Containers are Lightweight & Fast ✔️ Can Docker Run Windows Containers on Linux? ✔️ Real-world examples of container deployment
youtube
0 notes
Text
A Brief Guide to SAP Business One Private Cloud

SAP Business One Private Cloud – A Comprehensive Guide
SAP SE has developed SAP Business One (SAP B1) specifically for small and mid-sized enterprises (SMEs) worldwide. This solution comes in two primary deployment models: SAP B1 On-Premise and SAP B1 Private Cloud. In a traditional on-premise setup, both hardware and software are maintained within the company’s infrastructure. Conversely, SAP Business One Private Cloud is hosted in a third-party data center.
The fundamental distinction between SAP Business One Private Cloud and On-Premise models lies in the level of control and resource allocation. For instance, SAP Business One Cloud operates in a multi-tenant SaaS environment, offering limited customization and reduced direct control. In contrast, on-premise deployment provides greater customization and full control over resources.
In this in-depth guide, we will explore how SAP B1 Private Cloud operates, its key benefits, and the necessary steps to ensure a seamless setup. Additionally, we will address common SAP Business One private hosting challenges and their practical solutions. Let’s begin by understanding how SAP Business One Private Cloud differs from public cloud and on-premise models.
SAP Business One Private Cloud vs. Public Cloud vs. On-Premise – Key Differences
Businesses seeking to implement SAP Business One ERP must carefully evaluate the differences among private cloud, public cloud, and on-premise solutions. Here’s a comparative analysis:
On-Premise
Hosted on a company’s in-house servers and hardware
Provides maximum control over data and systems but requires high upfront investment
Allows extensive customization and flexibility, but the business must handle security and system upgrades
Public Cloud
Hosted on shared cloud servers managed by a cloud provider
Offers cost-effective deployment and high scalability
Provides limited customization in a multi-tenant environment
Private Cloud
Hosted in a single-tenant environment, ensuring enhanced security
Offers more customization and scalability compared to the public cloud
Provides higher security due to a dedicated infrastructure, though it is slightly more costly than public cloud solutions
When selecting the most suitable model, businesses should assess their priorities in terms of control, scalability, and cost before making a decision.
Understanding How SAP Business One Private Cloud Works
Deploying SAP Business One in a private cloud requires the hosting partner’s infrastructure. The SAP B1 Private Cloud should be hosted in a segregated environment, ensuring data security and operational efficiency.
Core Components of SAP Business One Private Hosting
Application Server – Runs the SAP Business One software
Database Server – Stores and manages business data
Operating System – Typically Windows or Linux
Secure Remote Access – Tools for secure access to the system
Backup & Disaster Recovery – Ensures data safety and business continuity
Security Features – Firewalls, encryption, and compliance controls
Types of SAP Business One Private Cloud Hosting
Companies can choose from three different private cloud hosting options:
Provider-Managed Private Cloud – The hosting provider manages the infrastructure and SAP B1 services.
Partner-Hosted Private Cloud – SAP partners offer customized private cloud solutions for specific industries.
Customer-Managed Private Cloud – Businesses handle their own private cloud infrastructure (less common).
Since SAP Business One Private Cloud deployment is complex, consulting a trusted SAP hosting provider can help businesses maximize its benefits.
Key Benefits of SAP Business One Private Cloud
Adopting SAP Business One Private Cloud brings various advantages, including:
1. Enhanced Security & Compliance
A dedicated cloud environment ensures higher security for business data.
Companies can implement stricter security protocols and meet compliance requirements like HIPAA and GDPR.
2. Greater Customization & Control
The private cloud model offers extensive customization options tailored to business needs.
Unlike public cloud, businesses retain complete control over data and applications.
3. Scalability & Cost Efficiency
The private cloud allows businesses to scale resources as per demand.
Though it requires higher initial investment, it is cost-efficient in the long run.
4. Improved Performance & Reliability
With dedicated resources, businesses experience better performance with minimal downtime.
The private infrastructure can efficiently handle SAP Business One system needs.
To fully leverage these benefits, organizations must follow a structured SAP Business One Cloud deployment process.
How to Set Up SAP Business One in a Private Cloud
Setting up SAP Business One Private Cloud involves several critical steps:
1. Selecting a Hosting Provider
Choose a provider with proven SAP B1 hosting expertise and a deep understanding of business needs.
Ensure the data centers have high security and redundancy standards.
Evaluate backup, disaster recovery, and security certifications.
2. System Configuration & Customization
Define hardware & software requirements based on the number of users and data volume.
The hosting partner installs and configures SAP Business One components.
For existing SAP B1 users, migration planning is essential.
3. Security & Compliance Measures
Ensure data encryption and adherence to privacy regulations.
Conduct regular security audits to mitigate potential threats.
Implement a robust backup and disaster recovery plan.
Finding the right SAP B1 cloud hosting partner simplifies the deployment process and ensures long-term operational efficiency.
Common Challenges & Solutions
1. Data Migration & Integration
Migrating large volumes of data can lead to data loss or corruption.
Solution: Develop a comprehensive migration plan and work with SAP consultants.
2. Ongoing Maintenance & Support
Keeping the system updated and optimized requires constant monitoring.
Solution: Choose an SAP hosting provider with dedicated technical support.
3. Performance Optimization
Identifying performance bottlenecks is a common issue.
Solution: Conduct regular monitoring, optimize database performance, and use proper indexing strategies.
By proactively addressing these challenges, businesses can ensure smooth SAP Business One Private Cloud operations.
Final Thoughts
For businesses prioritizing security, compliance, and control, SAP Business One Private Cloud is an excellent choice. It offers scalability, flexibility, and dedicated resources, making it a valuable ERP solution. However, organizations must carefully evaluate their requirements, budget, and long-term strategy before choosing between cloud and on-premise models.
At B1 Partner Cloud, we specialize in SAP Business One Private Hosting and have successfully deployed SAP B1 Private Cloud across various industries. Get in touch with us to learn more about our SAP B1 hosting solutions and expert ERP implementation services.
Source - https://www.b1partner.cloud/your-concise-guide-to-sap-business-one-private-cloud/
0 notes
Text
Using Docker for Full Stack Development and Deployment

1. Introduction to Docker
What is Docker? Docker is an open-source platform that automates the deployment, scaling, and management of applications inside containers. A container packages your application and its dependencies, ensuring it runs consistently across different computing environments.
Containers vs Virtual Machines (VMs)
Containers are lightweight and use fewer resources than VMs because they share the host operating system’s kernel, while VMs simulate an entire operating system. Containers are more efficient and easier to deploy.
Docker containers provide faster startup times, less overhead, and portability across development, staging, and production environments.
Benefits of Docker in Full Stack Development
Portability: Docker ensures that your application runs the same way regardless of the environment (dev, test, or production).
Consistency: Developers can share Dockerfiles to create identical environments for different developers.
Scalability: Docker containers can be quickly replicated, allowing your application to scale horizontally without a lot of overhead.
Isolation: Docker containers provide isolated environments for each part of your application, ensuring that dependencies don’t conflict.
2. Setting Up Docker for Full Stack Applications
Installing Docker and Docker Compose
Docker can be installed on any system (Windows, macOS, Linux). Provide steps for installing Docker and Docker Compose (which simplifies multi-container management).
Commands:
docker --version to check the installed Docker version.
docker-compose --version to check the Docker Compose version.
Setting Up Project Structure
Organize your project into different directories (e.g., /frontend, /backend, /db).
Each service will have its own Dockerfile and configuration file for Docker Compose.
3. Creating Dockerfiles for Frontend and Backend
Dockerfile for the Frontend:
For a React/Angular app:
Dockerfile
FROM node:14 WORKDIR /app COPY package*.json ./ RUN npm install COPY . . EXPOSE 3000 CMD ["npm", "start"]
This Dockerfile installs Node.js dependencies, copies the application, exposes the appropriate port, and starts the server.
Dockerfile for the Backend:
For a Python Flask app
Dockerfile
FROM python:3.9 WORKDIR /app COPY requirements.txt . RUN pip install -r requirements.txt COPY . . EXPOSE 5000 CMD ["python", "app.py"]
For a Java Spring Boot app:
Dockerfile
FROM openjdk:11 WORKDIR /app COPY target/my-app.jar my-app.jar EXPOSE 8080 CMD ["java", "-jar", "my-app.jar"]
This Dockerfile installs the necessary dependencies, copies the code, exposes the necessary port, and runs the app.
4. Docker Compose for Multi-Container Applications
What is Docker Compose? Docker Compose is a tool for defining and running multi-container Docker applications. With a docker-compose.yml file, you can configure services, networks, and volumes.
docker-compose.yml Example:
yaml
version: "3" services: frontend: build: context: ./frontend ports: - "3000:3000" backend: build: context: ./backend ports: - "5000:5000" depends_on: - db db: image: postgres environment: POSTGRES_USER: user POSTGRES_PASSWORD: password POSTGRES_DB: mydb
This YAML file defines three services: frontend, backend, and a PostgreSQL database. It also sets up networking and environment variables.
5. Building and Running Docker Containers
Building Docker Images:
Use docker build -t <image_name> <path> to build images.
For example:
bash
docker build -t frontend ./frontend docker build -t backend ./backend
Running Containers:
You can run individual containers using docker run or use Docker Compose to start all services:
bash
docker-compose up
Use docker ps to list running containers, and docker logs <container_id> to check logs.
Stopping and Removing Containers:
Use docker stop <container_id> and docker rm <container_id> to stop and remove containers.
With Docker Compose: docker-compose down to stop and remove all services.
6. Dockerizing Databases
Running Databases in Docker:
You can easily run databases like PostgreSQL, MySQL, or MongoDB as Docker containers.
Example for PostgreSQL in docker-compose.yml:
yaml
db: image: postgres environment: POSTGRES_USER: user POSTGRES_PASSWORD: password POSTGRES_DB: mydb
Persistent Storage with Docker Volumes:
Use Docker volumes to persist database data even when containers are stopped or removed:
yaml
volumes: - db_data:/var/lib/postgresql/data
Define the volume at the bottom of the file:
yaml
volumes: db_data:
Connecting Backend to Databases:
Your backend services can access databases via Docker networking. In the backend service, refer to the database by its service name (e.g., db).
7. Continuous Integration and Deployment (CI/CD) with Docker
Setting Up a CI/CD Pipeline:
Use Docker in CI/CD pipelines to ensure consistency across environments.
Example: GitHub Actions or Jenkins pipeline using Docker to build and push images.
Example .github/workflows/docker.yml:
yaml
name: CI/CD Pipeline on: [push] jobs: build: runs-on: ubuntu-latest steps: - name: Checkout Code uses: actions/checkout@v2 - name: Build Docker Image run: docker build -t myapp . - name: Push Docker Image run: docker push myapp
Automating Deployment:
Once images are built and pushed to a Docker registry (e.g., Docker Hub, Amazon ECR), they can be pulled into your production or staging environment.
8. Scaling Applications with Docker
Docker Swarm for Orchestration:
Docker Swarm is a native clustering and orchestration tool for Docker. You can scale your services by specifying the number of replicas.
Example:
bash
docker service scale myapp=5
Kubernetes for Advanced Orchestration:
Kubernetes (K8s) is more complex but offers greater scalability and fault tolerance. It can manage Docker containers at scale.
Load Balancing and Service Discovery:
Use Docker Swarm or Kubernetes to automatically load balance traffic to different container replicas.
9. Best Practices
Optimizing Docker Images:
Use smaller base images (e.g., alpine images) to reduce image size.
Use multi-stage builds to avoid unnecessary dependencies in the final image.
Environment Variables and Secrets Management:
Store sensitive data like API keys or database credentials in Docker secrets or environment variables rather than hardcoding them.
Logging and Monitoring:
Use tools like Docker’s built-in logging drivers, or integrate with ELK stack (Elasticsearch, Logstash, Kibana) for advanced logging.
For monitoring, tools like Prometheus and Grafana can be used to track Docker container metrics.
10. Conclusion
Why Use Docker in Full Stack Development? Docker simplifies the management of complex full-stack applications by ensuring consistent environments across all stages of development. It also offers significant performance benefits and scalability options.
Recommendations:
Encourage users to integrate Docker with CI/CD pipelines for automated builds and deployment.
Mention the use of Docker for microservices architecture, enabling easy scaling and management of individual services.
WEBSITE: https://www.ficusoft.in/full-stack-developer-course-in-chennai/
0 notes
Text
Managed Server Enterprise Support: What You Need to Know
Enterprise IT environments demand reliable, secure, and high-performance server management to ensure business continuity. Managed server enterprise support provides proactive monitoring, maintenance, security, and troubleshooting for on-premises, cloud, or hybrid infrastructures.
1. Key Features of Managed Server Enterprise Support
🔹 24/7 Monitoring & Performance Optimization
✔ Real-time server health monitoring (CPU, memory, disk, network usage) ✔ Proactive issue detection to prevent downtime ✔ Load balancing & resource optimization
🔹 Security & Compliance Management
✔ Firewall & intrusion detection to block cyber threats ✔ Patch management & software updates to fix vulnerabilities ✔ Compliance audits (ISO 27001, HIPAA, GDPR)
🔹 Backup & Disaster Recovery
✔ Automated backups with offsite storage ✔ Disaster recovery solutions for business continuity ✔ RAID configuration & data redundancy
🔹 Server OS & Software Support
✔ Windows Server (2016, 2019, 2022) & Linux distributions (Ubuntu, CentOS, RHEL) ✔ Database management (MySQL, PostgreSQL, MS SQL) ✔ Virtualization & cloud integration (VMware, Hyper-V, AWS, Azure)
🔹 Helpdesk & Technical Support
✔ Dedicated IT support team with rapid response times ✔ Troubleshooting & issue resolution ✔ Custom SLAs for uptime guarantees
2. Types of Managed Server Enterprise Support
🔹 On-Premises Server Management
✔ Ideal for businesses with in-house data centers ✔ Supports hardware maintenance, OS updates, security patches ✔ Best for: Enterprises requiring full control over infrastructure
🔹 Cloud & Hybrid Server Management
✔ Managed services for AWS, Azure, Google Cloud ✔ Optimized for cloud security, scalability & cost-efficiency ✔ Best for: Enterprises adopting hybrid or multi-cloud strategies
🔹 Fully Managed vs. Co-Managed Support
✔ Fully Managed: Service provider handles everything (monitoring, security, backups, troubleshooting) ✔ Co-Managed: Internal IT team works alongside provider for collaborative management
3. Benefits of Enterprise Server Support
🔹 Minimized Downtime: 24/7 monitoring & quick response prevent disruptions 🔹 Stronger Security: Proactive firewall management, encryption & threat monitoring 🔹 Scalability: Adapt server resources as business grows 🔹 Cost Savings: Reduces IT staff workload & lowers infrastructure costs 🔹 Compliance Assurance: Meets industry security & legal requirements
4. How to Choose the Right Managed Server Provider
✔ Service Level Agreements (SLAs): Ensure 99.9%+ uptime guarantees ✔ Security Protocols: Must include firewalls, DDoS protection, and backups ✔ Support for Your Tech Stack: Compatible with Windows/Linux, databases, virtualization ✔ Customization & Scalability: Can adjust services based on business growth ✔ 24/7 Support & Response Time: Fast issue resolution & technical assistance
5. Cost of Managed Server Enterprise Support
💰 Pricing Models: ✔ Per Server: $100–$500/month (basic), $500–$2,500/month (enterprise) ✔ Per Resource Usage: Based on CPU, RAM, storage & bandwidth ✔ Custom Plans: Tailored pricing for hybrid & multi-cloud environments
6. Who Needs Managed Server Enterprise Support?
✔ Large Enterprises: Need mission-critical uptime & security ✔ eCommerce & SaaS Businesses: Require high-performance cloud hosting ✔ Financial & Healthcare Organizations: Must comply with data security regulations ✔ Growing Startups: Benefit from scalable, cost-effective infrastructure
Need a Custom Managed Server Plan?
Let me know your server type, workload, and business needs, and I can recommend the best managed enterprise support solution!

0 notes
Text
Windows or Linux? Finding Your Perfect Match in the VPS Hosting Arena
In the ever-evolving landscape of Virtual Private Server (VPS) hosting, the choice between Windows and Linux is pivotal. Your decision can significantly impact your website's performance, security, and overall user experience. At l3webhosting.com, we understand the importance of this decision, and we're here to guide you through the intricacies of choosing the perfect match for your hosting needs.
Understanding the Basics: Windows vs. Linux
Windows VPS Hosting: Unveiling the Dynamics
When it comes to Windows VPS hosting, users are drawn to its familiarity and seamless integration with Microsoft technologies. For websites built on ASP.NET or utilizing MSSQL databases, Windows VPS is the natural choice. The user-friendly interface and compatibility with popular software make it a preferred option for businesses relying on Microsoft-centric applications.
Windows VPS provides robust support for various programming languages, ensuring a versatile hosting environment. The seamless compatibility with Microsoft's IIS (Internet Information Services) enhances website performance, especially for those developed using .NET frameworks.
Linux VPS Hosting: Unleashing the Power of Open Source
On the other side of the spectrum, Linux VPS hosting thrives on the principles of open source software. The inherent flexibility and stability of Linux attract developers and businesses looking for a reliable hosting foundation. Websites built using PHP, Python, or Ruby on Rails often find Linux to be the optimal environment.
Linux's renowned security features, including the capability to customize firewall settings, contribute to a robust defense against potential cyber threats. Additionally, Linux VPS hosting typically comes at a lower cost, making it an economical choice without compromising performance.
Performance Benchmark: Windows vs. Linux
Windows Performance Metrics
Windows VPS excels in scenarios where compatibility with Microsoft technologies is paramount. The integration with .NET applications and MSSQL databases ensures optimal performance for websites that rely on these frameworks. The user-friendly interface also simplifies management tasks, providing a smooth experience for administrators.
However, it's essential to note that Windows VPS may require more system resources compared to Linux, impacting scalability and cost-effectiveness for resource-intensive applications.
Linux Performance Metrics
Linux VPS, being lightweight and resource-efficient, offers excellent performance for a wide range of applications. The open-source nature of Linux enables users to tailor the operating system to their specific needs, optimizing performance and resource utilization.
Linux excels in handling concurrent processes and multiple users simultaneously, making it an ideal choice for high-traffic websites. Its stability and ability to run efficiently on minimal hardware make it a cost-effective solution for businesses mindful of their hosting budget.
Security Considerations: Windows vs. Linux
Windows Security Features
Windows VPS prioritizes security with features like BitLocker encryption, Windows Defender, and regular security updates. The familiarity of Windows security protocols can be reassuring for users accustomed to the Microsoft ecosystem.
However, the popularity of Windows also makes it a target for cyber threats. Regular updates and a robust security posture are crucial to mitigating potential risks.
Linux Security Features
Linux VPS boasts a solid reputation for security, primarily due to its open-source nature. The community-driven development and constant scrutiny contribute to swift identification and resolution of security vulnerabilities.
The ability to customize firewall settings and the availability of robust security tools make Linux a secure choice for websites that prioritize data protection and threat prevention.
Making Your Decision: Tailoring Hosting to Your Needs
Factors Influencing Your Choice
When deciding between Windows and Linux VPS hosting, consider the nature of your website, the technologies it relies on, and your budgetary constraints. If your website is built on Microsoft-centric frameworks, Windows VPS might be the most seamless option. On the other hand, Linux VPS offers versatility, cost-effectiveness, and robust security, making it an attractive choice for many users.
Our Recommendation
At l3webhosting.com, we understand that each website is unique. Our recommendation is tailored to your specific needs, ensuring that you make an informed decision based on performance requirements, budget considerations, and long-term scalability.
Conclusion: Your Hosting Journey Begins
In the dynamic world of VPS hosting, choosing between Windows and Linux is a critical decision. Understanding the nuances of each platform allows you to make an informed choice, aligning your hosting environment with your website's specific requirements.
2 notes
·
View notes
Text
Linux Server vs Windows Server

Linux Server vs Windows Server compares two leading operating systems for hosting and server management. Linux offers cost-effectiveness, security, and flexibility, while Windows provides ease of use and seamless compatibility with Microsoft applications. This blog helps you decide which option best suits your hosting and business needs.
0 notes