#Lock Folder using CMD
Explore tagged Tumblr posts
Visit Tumblr Blog
Explore Tumblr blogs with no restrictions, modern design and the best experience.
Last Seen Tumblr Blogs


Fun Fact
Post activity is at the highest at 4:00 pm EDT; notes peak at 10:00 pm EDT.
Text
Lock Folder using CMD , बिना किसी सॉफ्टवेयर के फोल्डर लॉक करें , Folder Lock kaise kare Watch video on : https://youtu.be/iWyYJShObW4 #techalert #technical #howto #cmd #tipsandtricks #computer #course #computereducation #computerclasses #computerinhindi #teaching #lock #folder
#Lock Folder using CMD#बिना किसी सॉफ्टवेयर के फोल्डर लॉक करें#Folder Lock kaise kare#Watch video on : https://youtu.be/iWyYJShObW4#techalert#technical#howto#cmd#tipsandtricks#computer#course#computereducation#computerclasses#computerinhindi#teaching#lock#folder#watch video on tech alert yt#instagood#like#shorts#love#youtube#technology
2 notes
·
View notes
Text
Exploring macOS: Hidden Features Every MacBook Pro Owner Should Know
MacBook Pro users often rely on their devices for productivity, creativity, and entertainment. While macOS is known for its user-friendly interface, it also houses a variety of lesser-known features that can significantly enhance your experience. From time-saving shortcuts to advanced customisation options, here’s a guide to hidden macOS features every MacBook Pro owner should explore.
1. Quick Look for Instant File Previews
Quick Look allows you to preview files without opening them in their respective apps. Simply select a file in Finder and press the spacebar. This works for images, PDFs, and even videos. You can navigate through multiple files using arrow keys while Quick Look is active.
How to Maximise It:
For more functionality, use Quick Look to add annotations to PDFs or trim video clips without launching Preview or iMovie.
2. Split View for Multitasking
Working on multiple tasks? Split View lets you use two apps side by side, boosting productivity. To activate it, click and hold the green full-screen button in the top-left corner of a window, then drag it to one side of the screen. Choose another app for the opposite side.
Why It’s Handy:
Ideal for comparing documents, referencing research while writing, or attending a video call alongside note-taking.
3. Spotlight Calculator and Conversions
Spotlight is more than just a search tool. Press Cmd + Space to open Spotlight, and you can perform quick calculations or unit conversions. For instance, type “50 GBP to USD” or “10 kg to pounds” for instant results.
Bonus Tip:
Spotlight can also search for specific file types or locations using terms like “kind” or “folder.”
4. Customisable Hot Corners
Hot Corners transform your screen corners into triggers for specific actions. Go to System Settings > Desktop & Dock > Hot Corners. Assign functions like starting a screensaver, locking your screen, or displaying your desktop.
Best Uses:
Set up Hot Corners for quick privacy during work or rapid access to mission-critical files.
5. Text Replacement for Faster Typing
If you frequently type the same phrases, macOS has a built-in text replacement feature. Navigate to System Settings > Keyboard > Text. Add shortcuts like “omw” to expand into “On my way!” or “sig” for your email signature.
Pro Tip:
Combine this with customised keyboard shortcuts for seamless writing across applications.
6. Universal Clipboard for Seamless Copy-Pasting
Copy text or images on your iPhone or iPad and paste them directly onto your MacBook Pro. Universal Clipboard works across devices signed into the same Apple ID with Bluetooth and WiFi enabled.
How It Enhances Workflow:
Perfect for transferring content quickly without emailing or using cloud services.
7. Automator for Task Automation
Automator helps you automate repetitive tasks, such as renaming large batches of files or converting image formats. Open Automator from the Applications folder, choose a workflow type, and drag the desired actions into the workflow panel.
Examples of Use:
Set up a workflow to resize images for specific project needs or create custom alerts for calendar events.
8. Screen Time for Mac
Screen Time isn’t just for mobile devices. On macOS, it helps monitor your app usage and set limits to avoid distractions. Find it in System Settings > Screen Time.
Stay Focused:
Create App Limits to restrict time on social media or set Downtime for uninterrupted work sessions.
9. Safari Reader Mode
For a distraction-free reading experience, Safari’s Reader Mode strips away ads and clutter from web articles. When you’re on a compatible webpage, click the Reader button in the address bar or press Cmd + Shift + R.
Additional Perks:
Customise Reader Mode by changing the text size, background colour, or font to suit your preferences.
10. Secure Notes with Passwords
The Notes app lets you lock sensitive information. Select a note, click the Lock button in the toolbar, and set a password. This ensures that private information stays protected.
Best Practice:
Use this for storing personal details, secure project notes, or financial information.
Final Thoughts
These hidden macOS features can transform your MacBook Pro experience, making your workflow more efficient and your tasks more manageable. Whether you’re a creative professional or a business user, mastering these tools can help you unlock the full potential of your device.
For those considering upgrading their setup temporarily or for specific projects, a MacBook Pro rental is an excellent way to experience the latest macOS features without committing to a purchase.
0 notes
Text
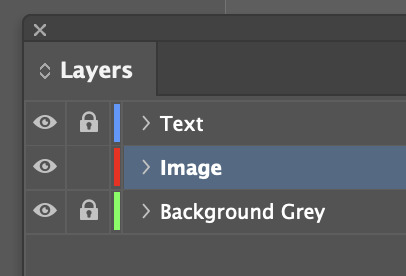
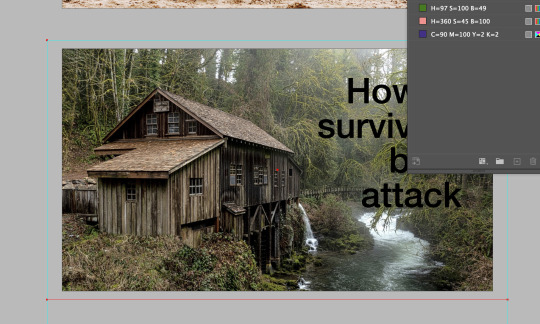
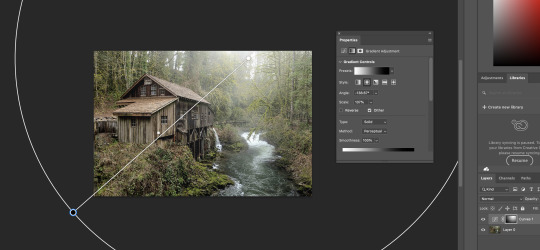
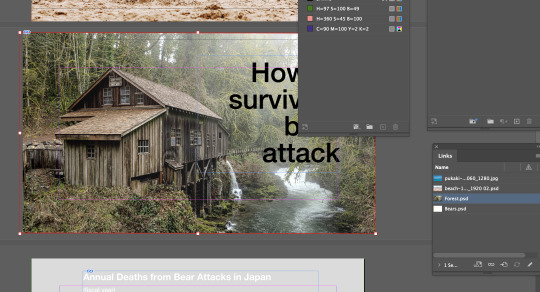
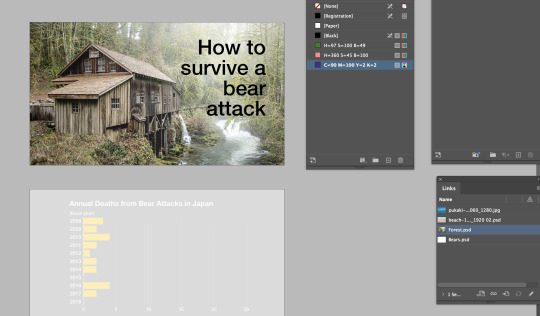
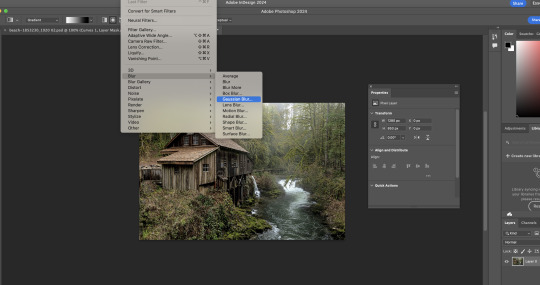
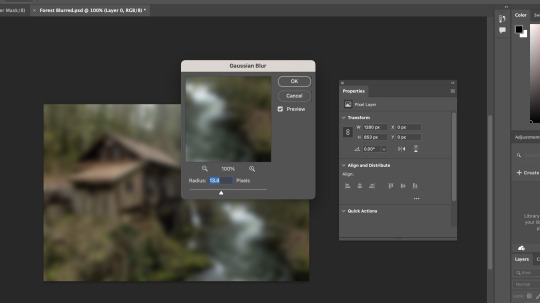
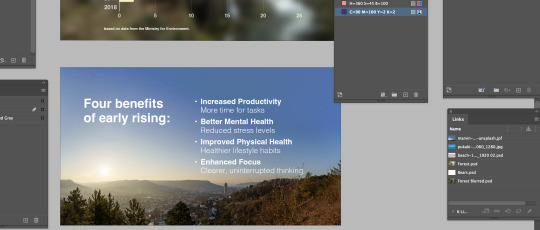
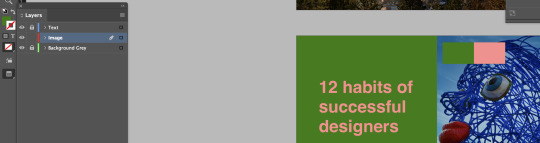
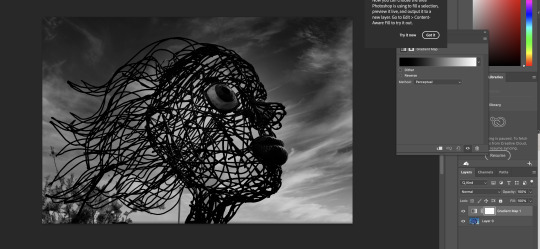
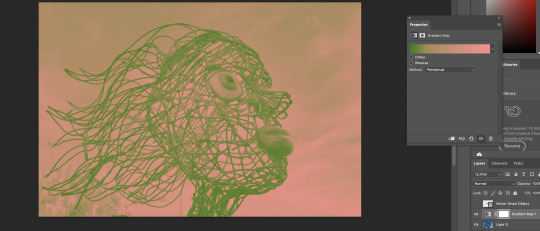
Toby Session 2: Combining Image & Type
we first began by bringing out all of the tabs we need to get started and unlocked the image

we then placed an image using file/place and making sure the background layer is locked (ended up making the image faded idk) and moved around using the left click and cmd+shift to resize the image.
contrasts enough and narrow enough. (considering legibility. could do maybe with a border)
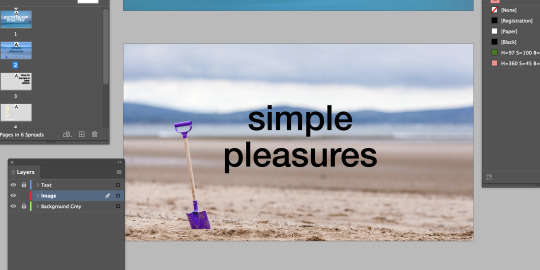
havign the image layer selected, we dragged and dropped the next image into the next slide

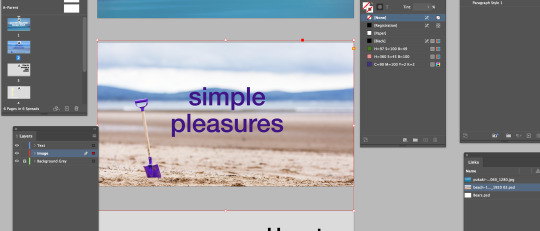
using the eyedropper tool, we applied the colour of the title to that of the shovel
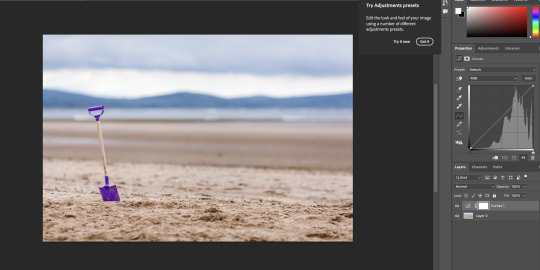
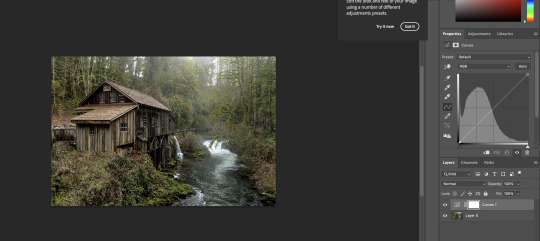
in photoshop we took the image into it and then applied the curve adjustment
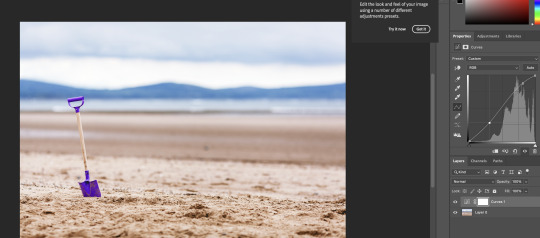
and adjusted like so

sadfdfgfsdgdfsg
locating the file we can see it updated the image
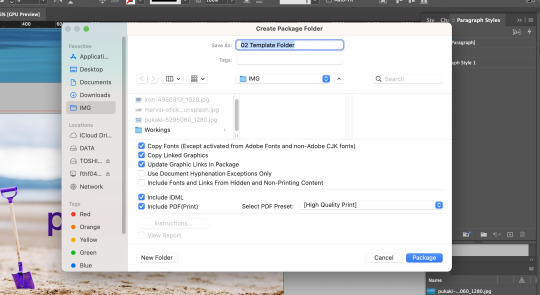
using the file/package we're able to make a folder that contains all the dependancies that may or may not be on another computer should we use this project on another computer
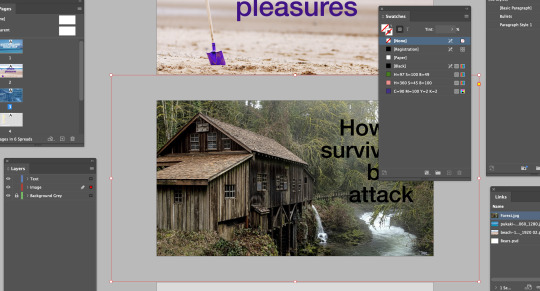
using the same method as seen above we dragged then dropped the image into the next slide.
pressing a brings up the gizmo (funny word)
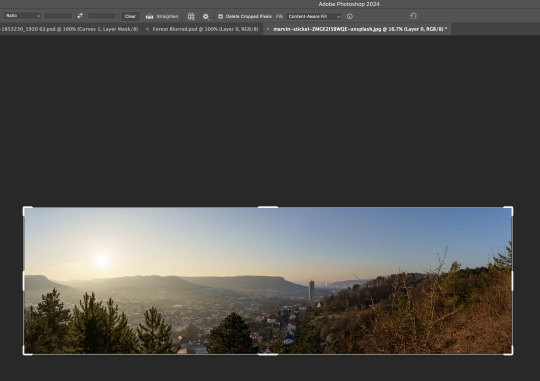
taking the image into photoshop we went to adjust the image
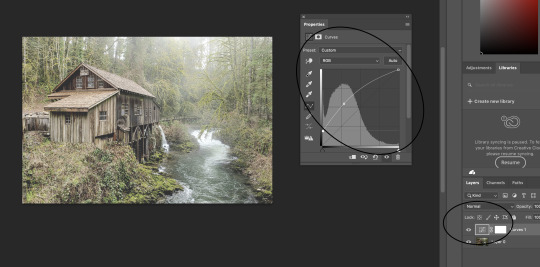
we then applied an adjustment to the image to make it lighter
option + cmd + I
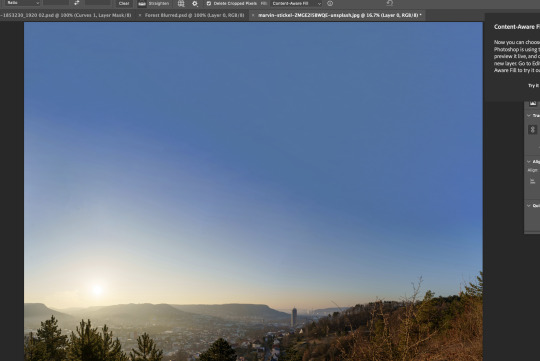
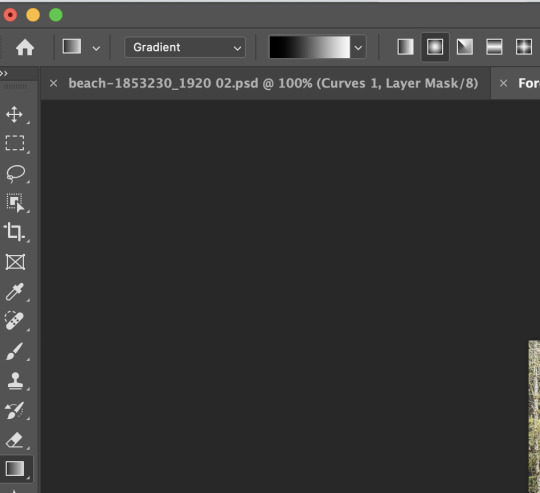
by dragging up the cropping, it made its own fill based on the skys colour and gradient


swatched the colours we copy pasted then opened the gradient map
0 notes
Video
youtube
Lock your Folder without using Software | Folder lock using cmd
0 notes
Text
Material Girl 🧿
Wala lang, haha, this post might make me look like I am a material girl but some things really just make you happy, you know.

At work, there's this cabinet called "Tech Cabinet". Andon lahat ng peripherals and other tech items, so from magic keyboard, magic mouse, extension, converter, etc. You just need to grab what you need, walang lista lista. Tagal ko pinag-isipan if I'll get the magic keyboard kasi sanay talaga ako sa light touch keyboards. But, when I was asked what laptop I wanted (Windows vs Mac), I initially chose the latter tapos nagpalit ako to Windows kasi akala ko Outlook ang gamit. Later on I found out na Gsuite pala so Mac would have all the features, unlike sa Outlook na walang vote buttons, folder grouping kapag Mac.
Anways, na-realize ko na okay din naman na Windows ang gamit ko kasi para ma-compartmentalize pa din sa utak ko na kapag Windows OS, work yun. Kapag Mac OS, personal. Important siya lately lalo at ilang beses na din akong kinukuha ng UP sa engagements as preceptor or resource speaker.
So, ayun na nga. Kinuha ko yun Magic Keyboard ang saya. Tapos anak ng tokwa, mga 1-2 hours akong nastress kasi walang Ctrl + Alt + Del function na naganaaaaaa! Even N-Tech wasn't able to help me, umabot na sa try ko daw set up yun on-screen keyboard. Luckily, I found through some Apple forums na Cmd + L daw. Tangina, ang saya ko after! Hahahaha! With that, I can type with the sleek and light touch, and still maximize the Windows view I am familiar with naman.
Lesson of the story: You can lock your Windows laptop using a magic keyboard using the Cmd + L keys. LOL.
Nakakatuwa din kasi I was supposed to save up to buy Logitech MX pero, since may magic keyboard na, oks na oks na ako. May Logi M65 mouse din na binigay sa work na fit na fit for small hands like mine.
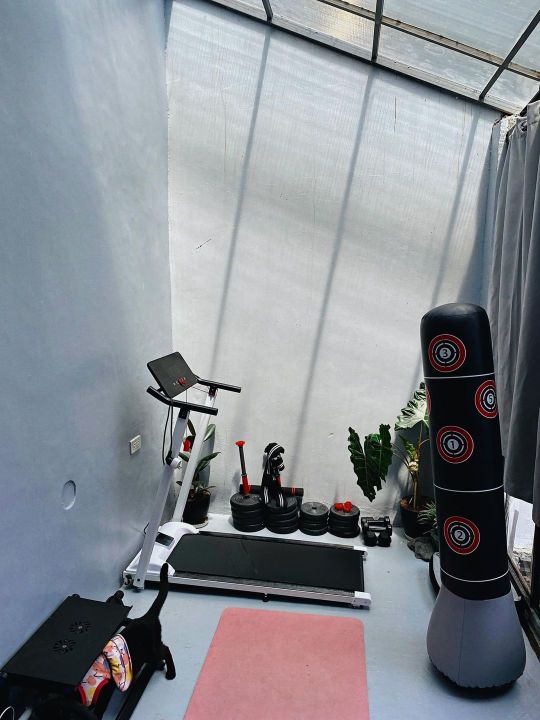
Dumating na din kahapon yun treadmill ko. It's under 10K so I don't expect it to be as heavy duty as the ones at the gym but it'll help me (1) do quick 1-3K runs and (2) complete 8K-10K steps even when it's raining outside.
So far, my current set-up works. I do hope to get some weights pa din, pero di talaga ubra yun cake. Maybe a rack? But, nakita ko kasi yun sa Wundergym na colorful plates and DBs and KBs, kaso max of 25.5KG lang sya... saka 30K sya haha! So, I'll just work with what I have. Ayoko na din i-pressure sarili ko lalo I now have 1hour maximum nalang talaga to work out in the morning. So, most of the time, 1min nalang talaga rest periods or I incorporate yoga or videos from Johana Soh. Yun program ni Faye, madalas nagagawa ko nalang once or twice a week.
Ang big purchases ko nalang na kailangan pagtrabahuhan (often sa side raket ko kinukuha) ay:
2 yoga mats (kasi slippery na and 3+ years na itong current lol)
Standing desk (pero naghahanap ako na under 15K lang sana)
Split type aircon (para di na kami pawis pawis sa master bedroom)
Automatic feeder and litter for the furkids (para din kahit umalis kami, wala na akong aalalahanin)
Minsan, naiisip ko bumili ng bagong Apple Watch (2 years old na itong sakin) or iPhone (1+ year old iPhone 11 itong sakin na from previous work pa)... but naisip ko, what I have still works. May added experience siguro yun new cameras and features, but I don't think it would significantly improve my life. LOL.
Madalas ganon na naiisip ko eh, lalo pag big purchases. Things make me happy, I accepted that at hindi na ako magpapaka-ipokrita about it. But, I want to start being mindful again of things I add into my life. It should enrich me, not take time away from me.
Ayun lang, happy Friday! 🧿
7 notes
·
View notes
Text
Stop Motion - technical post production - my workflow Photoshop
26 March 2021
Follow a tutorial and create a finished product. Having had a practice in your software options, suggest the workflow you are going to use? From Optimisation to Export. Note any problem areas / solutions.
I followed tutorial about stop motion video post production in Photoshop and based on this tutorial and notes taken during today’s afternoon class I created my video. There is my workflow:
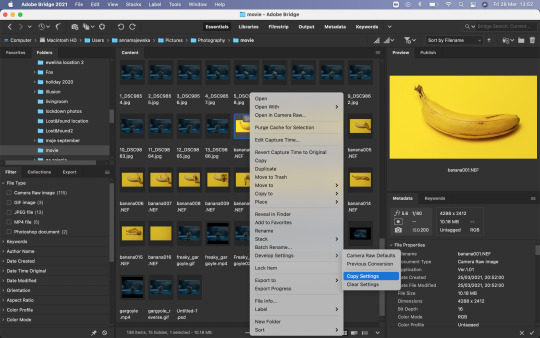
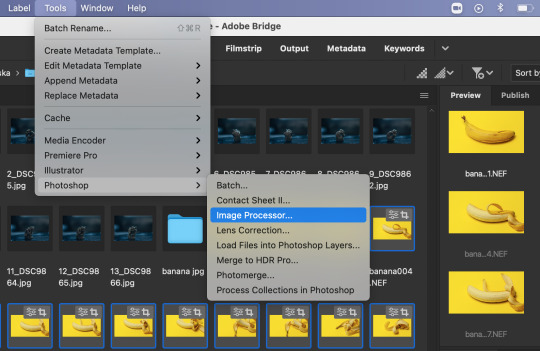
1. Download files from sd card onto laptop. Open in Adobe Bridge.
2. Select files I wanted to use for the brief and rename. I renamed files as banana and chose the sequence number starting from 001.

3. Open one of banana raw files in Camera Raw and make basic edition start from optics - remove chromatic aberration, geometry correction, then adjust sliders after applied auto correction.
4. In crop tool chose ratio 16:9 which is required for the brief and standard display option for most of the devices.
5. Saved settings (done) in this file then right click on the thumbnail >Develop Settings >Copy Settings.
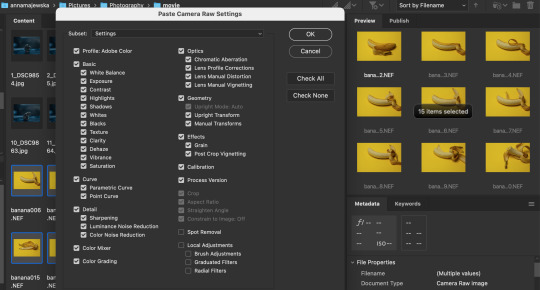
6. Select all banana files, hold shift + cmd and right click >Develop Settings >Paste Settings. I didn’t make any local adjustments so I selected all settings to paste.

7. Keep all those files selected and go the top Adobe Bridge toolbar >Tools >Photoshop >Image Processor and wait for the Photoshop to open and show the Image Processor window. Choose the location or create new folder where your processed images will be placed. Select save as jpg and make sure to change quality for the highest option which is 12, than click Run. It may take a while to finish the process. Then Photoshop home page will open.

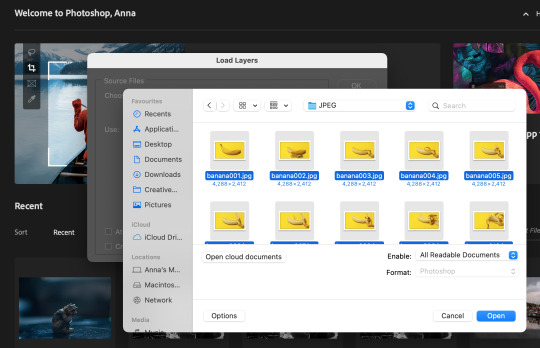
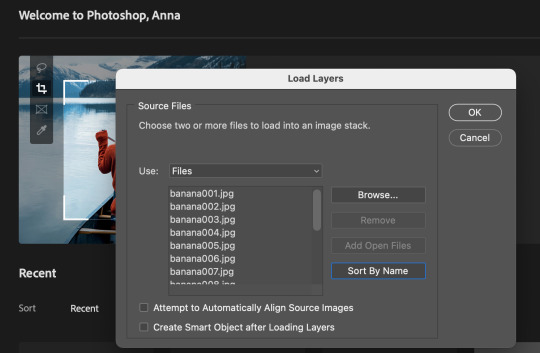
8. From top toolbar choose File > Scripts >Load Files Into Stack, browse files and don’t thick any small boxes. Sort files by names and ok to load layers.

9. Choose Window >Timeline and Timeline panel should open on the bottom of the screen


10. Then select Create Frame Animation and click on the bar, so the first frame should appear in the Timeline. Then go to Timeline option and select Make Frames From Layers.
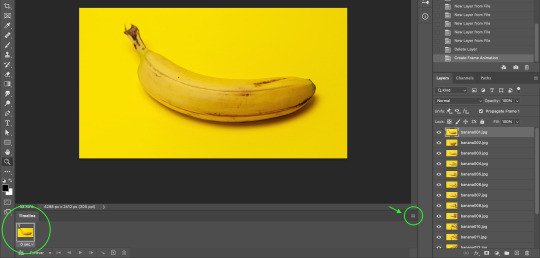

11. In Timeline panel options chose Make Frames From Layers and this should bring all images as frames into Timeline. If they appear not in order, go to Timeline options and select Reverse Frames and they should go in the right sequence.

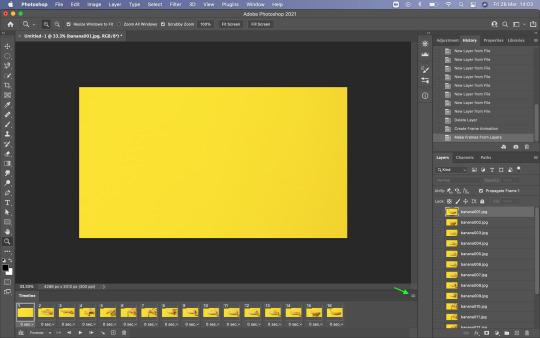


12. On the bottom of each frame is an option to choose frame delay time, that could be set for every frame individually or apply to all selected frames at the same time. You can change duration of the frames if they run too fast. To select all frames select first one and press and hold shift then click on last one.
13. There is an option to duplicate frames, when frame or frames are selected, by click the little square with + icon on the bottom Timeline bar. It is a good option to make video longer when we have just few frames.

14. Once happy with video it is good to save it as psd file, so we could go back to this at anytime if we need to make some changes.
15. To save video, go to the top Photoshop bar File >Export >Render Video and name your video so it would be saved as mp4 file (if you don’t name it Photoshop will save it as default untitled mp4 file). Then you can change the other properties and choose what will suit the best for you video and Render.

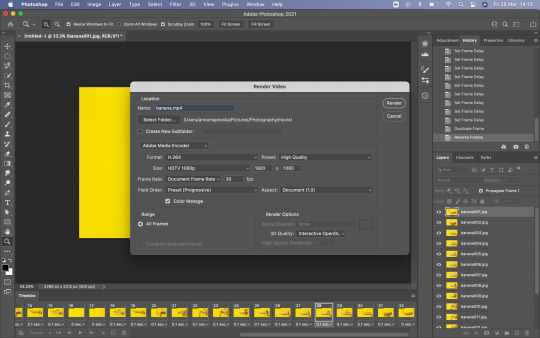
Problem occurs when Render Video?
If you see the spinning wheel for wee while that means that Photoshop needs more space in memory of your laptop. Click esc to stop the Render process as it will take forever. Clean up you hard drive from unused large files. You can change option in your Mac system preferences >Security & Privacy >Privacy >Full Disc Access, unlock as an admin and give Photoshop access to full disc, so it could use your laptop hard drive as a scratch disc for the space (it needs a lot of memory when working on large files) when required. If Photoshop is not listed you can add program by click on + and find it in Application, then select Photoshop. Click back on the padlock to lock the access. Close Photoshop and re-open. You can use an external hard drive to use as a scratch disc and you can set this option in Photoshop preferences, but I read that it is good to set scratch disc on the same hard drive where Photoshop is installed because it will improve the performance. Close all other applications if they are not necessary and web browser. That should also help to improve your laptop and Photoshop performance.


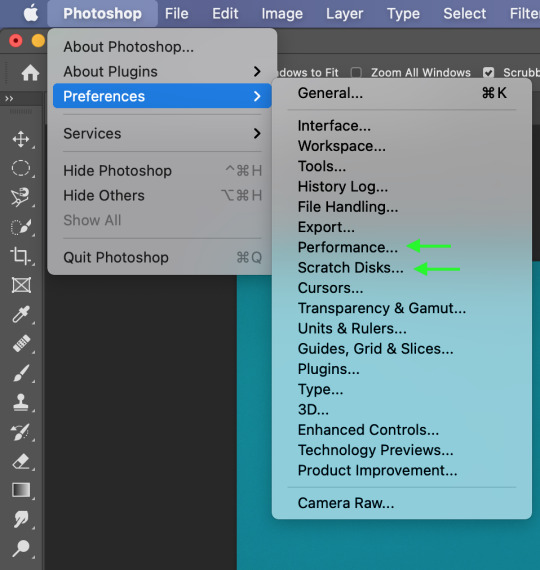
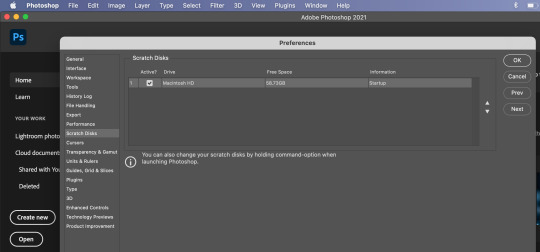
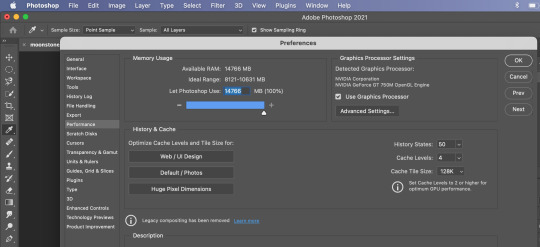
The Photoshop needs a lot memory to work well and fast. In Photoshop Preferences, go to Photoshop >Performance and check how much of your laptop memory usage is set for this program to use. Photoshop requires 4GB - 8GB of RAM. I moved the slider to give Photoshop maximum of RAM to use. Then click ok and reopen Photoshop. I would advise to restart your laptop before reopening Photoshop. If you keep your laptop working for long time it remembers all operations it made, so it is good to give it a reset and improve its performance. That should solve the problem.
16. If you want to export your video as gif you need to go File >Export >Save For Web and you can change resolution or other changes before you save the file.


I decided to use iMovie software to add audio to my stop motion video because it works more intuitive than Photoshop in this field and there is a lot of sound effects to choose from and suit the best audio for the video. I will create another post about it.
1 note
·
View note
Video
youtube
How To Lock/Protect File And Folder Using Command Prompt (CMD) In Windows 10
1 note
·
View note
Text
Just How To Force Windows To Delete File And Bat Delete Folder

Some times, for any cause, Windows will be certain that a given file is currently in use by a program and block it from being deleted, renamed or moved. This setup of data files is incredibly aggravating, especially once you know the file isn't, in fact, being used. Here are two methods to become around this matter.
Drive delete with Windows
To begin with, open the command prompt. Todo this, begin by opening the Start menu (Windows key), scanning streak , and hitting Input. From the conversation which appears, type cmd and hit Enter again.
With the command prompt open, input del /f filename, where filename is the name of the files or file (you are able to specify several files with commas) you want to delete. Microsoft's documentation describes more details on complex deletion techniques using this command.
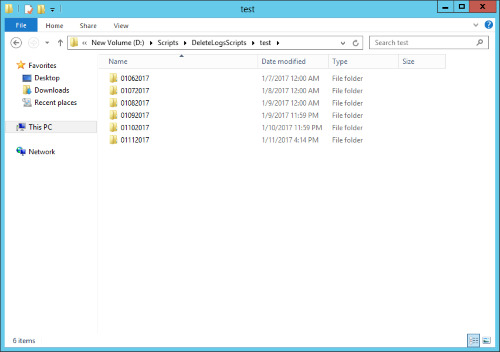
Note it to delete the file you would want to either include the complete path of the file exactly where you replace filename, or browse to the delete file and cmd delete folder it really is included in making use of cd folderpath, and then run into the del command. View the image below for the case of the latter method.
Utilize Unlocker
Unlocker is an completely free program that simplifies the deletion of files that are locked. It includes a context menu item on Windows Explorer, and will be activated by right-clicking. Additionally, it makes it possible for an individual to rename or move a file.
That you have it, two easy techniques for mending a stubborn matter!
The way to delete large folders inside Windows super fast, Your batch file needs to conduct two controls you to clear the files out you to eliminate the child directories. I've assumed the directory you windows batch file control delete-file. Share|improve this question|comply with | edited May 4 at 16:03. iliketocode. 6,372 4 4 gold Fans 38 38 silver badges 54 54
How exactly can I delete directory bushes by means of batch file on Windows-7?
"FolderName, Are you convinced (Y/N)?" . Where folderName would be the title of this folder (? And its particular sub-folders) you need to eliminate. Tested on Windows 7, 64-bit. The above control will delete file and batch delete folder test.bat in the current directory, in the event the file exists. Del c:\test.bat the aforementioned command will delete the file C:\test.bat in the present directory, even if the file exists. Del c:\*. Bat The * (asterisks) is really just a wild personality. *. Bat indicates that you simply would like to delete every one of bat files in the c:\listing.
The Best Way to Get Rid of a folder and all of its articles out of the present directory
Wild cards could possibly be utilised to delete many files. When your directory has been specified, all data files inside of the listing will be deleted. 2. /P. Prompts for confirmation before deleting? This batch file could be quite helpful when had to delete large folders. Employing the control line may be 20 times faster than likely right through Windows Explorer it self. Finally clearing out the download folder without needing to manually take care of it each week or month is facilitation.
1 note
·
View note
Text
How To Force Windows To Delete File And Cmd Delete Folder
Some times, for some reason, Windows will become convinced that a given file is currently in use with a program and keep it from being deleted, renamed or moved. This setup of files is incredibly disheartening, especially once you realize the file isn't, in fact, getting used. Here are two approaches to go around that matter.
Force delete with Windows
To begin with, open the command prompt. To do this, start with launching the Start menu (Windows main ), scanning run, and hitting Enter. From the dialogue that appears, type cmd and hit Enter again.
With all the command prompt start, input del /f filename, where filename is the title of the file or files (you may define many files using commas) you would like to delete. Microsoft's documentation clarifies more details on complex deletion techniques utilizing this command.
Note that to delete the file you would need to both include the total path of this file where you change filename, or browse to the delete file and batch delete folder it is contained in making use of c d folderpath, then run into the command. See the image below to get the example of the latter procedure.
Utilize Unlocker
Unlocker is a completely absolutely free app that simplifies the deletion of locked files. It includes a context menu item on Windows Explorer, and can be activated by right-clicking. Additionally, it enables an individual to rename or move a secured file.
That you've got it, two simple procedures for fixing a stubborn issue!
The best way to delete massive folders in Windows very quickly, Your batch file has to conduct two controls you to clean out the files you to clear away the child directories. I have supposed the listing that you dividers batch file command delete-file. Reveal |strengthen this question|abide by | edited May 4 in 16:03. iliketocode. 6,372 4 4 gold Fans 38 38 silver Beam 54 54
How do I delete directory bushes by way of batch file on Windows 7?
. Where folderName is the title of this folder (? And its particular sub-folders) that you intend to get rid of. Constructed on Windows 7, now 64 bit. The aforementioned control will delete file and bat delete folder test.bat in the current directory, if the file exists. Del do:\test.bat the above mentioned command will delete the file C:\test.bat in the present directory, even if the file exists. Del do:\*. Bat The (asterisks) is really a wild personality. *. Bat indicates that you simply want to delete every one of bat files in the c:\directory.
The Best Way to Get Rid of a folder and its material out of your current directory
Wild cards may be used to manually delete multiple documents. When your directory is specified, all data files within the listing will likely probably be deleted. 2. /P. Prompts for confirmation prior to deleting? This batch file may be rather helpful if needed to delete massive folders. Utilizing the control line might be over 20 times quicker than likely through Windows Explorer it self. Finally draining the download out folder without having to manually care of it each month or week will be facilitation.
1 note
·
View note
Text
How To Remove Malware From WordPress
Plugins and scans are a good way to examine if your website is infested with malicious code, malware or any other security threat. It is left to us to regularly scan WordPress for malware and examine our web sites, even those who appear ironclad, for malware. In the previous WordPress web sites have been the target of assaults that redirected traffic to malicious URLs which is why it's so important to frequently scan WordPress for malware.
Run the Anti-Malware Security and Brute-Force Firewall and scan the site totally. Scan the positioning with Sucuri's Sitecheck to ensure you didn't miss something. You do not need two firewall plugins running, so de-activate the Anti-Malware plugin after you have verified the clear web site. Referencing the backup of your web site, edit the wp-config.php file on the new install of WordPress to use the database credentials from the your former web site. If you can't run a backup plugin and your net host would not have a "snapshots" function, then you should use the online host's File Manager to make a zipper archive of your wp-content folder after which obtain that zip file. It is important to know that the malicious code is added to the top of each capabilities.php file which is discovered throughout the root listing of every installed theme. This plugin contained a malicious script referred to as woocp.php internet hosting some obfuscated PHP code which, on execution, injected the malicious code into all the functions.php information.
Watch out for outdated WordPress installations and backups. We usually see sites infected the place somebody says "But I saved my site up-to-date and had a safety plugin installed so why did I get hacked". If you are working WordPress and you have been hacked, you should use Wordfence to wash a lot of the malicious code from your website. The All In One WP Security & Firewall plugin is one other in style and easy to make use of possibility. The plugin provides tons of safety features corresponding to password power, brute force login safety, constructed-in captcha, database prefix choices, file permissions, htaccess/wp-config backups and firewall safety.
For professional help, check out malware removal service for WordPress.
The TimThumb scanner plugin scan your /wp-content/ folder to find any cases of outdated or insecure variations of the timThumb script which can be abused by hackers to deliver malware. Install the restoration plugin and keep in mind that to get well the site from a backup, use the same plugin that was used to again up your web site and re-scan the whole website with our WordPress malware scanner . If the above options have not yielded good results or you do not like them, we can at all times use a number of the online tools that we can find on-line and that are able to scan our web site for malware. WP Hacked Help is among the many hottest website which detects and remove malware from the WordPress. If your web site is hacked or contaminated with malware, but you possibly can still login and entry your WordPress admin space, then any of the WordPress plugins on this record may help you scan your site and restore web site health. The good plugins can scan your WordPress web site and establish and delete WordPress malware and other malicious code.
There are alternative ways the way to carry out WordPress database malware elimination. Now, after eradicating all of the suspicious information you could have detected, obtain the cleaned-up WordPress folder to Infected folder and compare it as soon as again with the Clean folder by using the Beyond Compare utility. If the location breaks, then just revert it by importing the same file back to the server from the Infected folder. Now open your beforehand made backup and find the WordPress installation from there and Copy this to the Infected folder. If there are extra sites in your internet hosting account (can you access all sites with the identical FTP account?), make sure to lock them down too before starting the whole malware removing process.
In one of many cases, the culprit behind the injection of the contaminated code into functions.php is a malicious plugin referred to as woocommerce-direct-download. There are lots of WordPress safety Plugin that can assist you scan your website. Recently you may need learn that almost 300,000 web sites been infected by a malware via a well-known recaptcha plugin. You can find plenty of free safety plugins that scan your WordPress site for malware. If you're keen to crack open your pockets, there are tons of high quality WordPress malware removing providers that you could choose from to wash your website.
Next, install free malware scanner plugins within the WordPress official free plugin repository. You can scan for any WordPress hack anytime on MalCare WordPress malware check. This WordPress malware scanner on-line is a free online software that can be used to scan any website.
For instance, if the WordPress website has a theme known as "MyTheme", then the malicious code could be added to the wp-content material/themes/MyTheme/functions.php ,file. Scan your theme files, database file and other important files by way of anti-virus/ anti-malware software program put in in your system earlier than you addContent them again in your net server. Again while checking this file for malicious code, make sure that you examine the entire file from high to bottom. While checking this file for malicious code, just be sure you examine the entire file from high to bottom. The malicious code can be within the form of a hyperlink to an executable file (like .exe, .cmd etc) or it can be a script which obtain malware or redirect customers to the websites which host malware. Hackers especially goal these recordsdata for inserting malicious code which may survive WordPress updates/re-installation like your theme recordsdata.
Downloaded by over 800,000+ WordPress customers, the iThemes Security plugin is likely one of the hottest decisions to protect your website and scan WordPress for malware. The free version of this plugin presents 30 layers of protection and security including a 1-click on "Secure Site" check, Malware scans (by way of Sucuri SiteCheck), robust password enforcement, brute drive protections, database backups, file change detection and much more. The plugin features top-of-the-line malware scanners, providing a software to monitor file adjustments, confirm the integrity of WordPress, plugins, and themes, and to take away malicious code and viruses from your web site. After cleansing your wp-content material folder and reinstalling the theme and plugins, also set up a safety plug-in named Anti-Malware and Brute-Force Security , then analyze your WordPress with this plugin.
Delete every little thing you see there apart from the wp-content folder, and the wp-config.php file. This could be because you are running an older model of WordPress or have installed a Plugin or Theme with a backdoor or identified safety vulnerability.
If you might be in search of priority malware removing from WordPress or Joomla, then SiteGuarding will assist you to to scrub within 1-3 hours. Great listing you put collectively for malware removal thanks I think I am going with gotmls.internet plenty of positive reviews on WordPress and across the Internet for this plugin. Install one of many listed malware elimination plugins and run a scan of your file system. One of the most effective malware scanning solutions for WordPress is the Anti-Malware Security plugin by ELI. – Malware scanner checks core files, themes, and plugins for malware, unhealthy URLs, backdoors, web optimization spam, malicious redirects and code injections.
1 note
·
View note
Text
youtube
Lock Folder using CMD , बिना किसी सॉफ्टवेयर के फोल्डर लॉक करें , Folder Lock kaise kare
Watch video : https://youtu.be/iWyYJShObW4
#techalert #technical #howto #cmd #tipsandtricks #computer #course #computereducation #computerclasses #computerinhindi #teaching #lock #folder #virałreels #trendingreel #instagram
#Lock Folder using CMD#बिना किसी सॉफ्टवेयर के फोल्डर लॉक करें#Folder Lock kaise kare#Watch video : https://youtu.be/iWyYJShObW4#techalert#technical#howto#cmd#tipsandtricks#computer#course#computereducation#computerclasses#computerinhindi#teaching#lock#folder#virałreels#trendingreel#instagram#love#watch video on tech alert yt#like#instagood#youtube#technology#shorts#Youtube
3 notes
·
View notes
Text
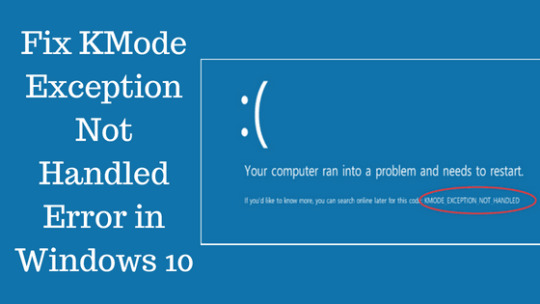
Kmode_Exception_Not_Handled
KMode Exception not handled is a Blue screen of death (BSOD) error that regularly happens in windows 10. It’s doubtless prompted by a erroneous driver and might intent your laptop to restart. When restarting, the error can show up again, leading to a restart loop.
Luckily, albeit frustrating, KMode Exception no longer dealt with it’s a instead easy error to repair. Listed below are a few approaches to repair KMode Exception no longer treated home windows 10 error:
Also, Read The Active Directory Domain Services is Currently Unavailable Windows 10
1. DISABLE fast STARTUP
that is, in general, the easiest procedure to repair KMode Exception not handled. You just must:
Go to the manage Panel
click on procedure and security
opt for power options
click on opt for what power buttons do
click on change settings which can be currently available
Uncheck the box that reads turn on quick -up
shop the changes
KMode Exception now not treated Error
Also, Read Free Download Bestline VPN for PC, Windows 7810 & Mac
These steps absolutely constant your trouble. Nevertheless, in the unlikely event that it persists, there are other solutions you can are trying in case you’re nonetheless getting the KMode Exception no longer dealt with BSOD to your windows 10 operative process.
2. Update YOUR DRIVERS
historic, corrupt drivers maybe triggering this BSOD. With a purpose to rule out this answer (or to fix your problem), you could want to update them.
Alas, trying to update your drivers will most of the time outcomes within the KMode Exception now not treated BSOD. Unless you do it in trustworthy mode.
The easiest solution to trigger the capability to boot into safe mode is to interrupt the usual booting procedure thrice. To take action you just must flip in your laptop and press the vigor button to show it off earlier than it finishes booting up. You could have got to maintain the vigor button pressed for up to four seconds to ensure that it to work.
Read Windows 10 Startup Folder now not Working – fix it with Our guide The fourth time you boot your laptop you’ll become aware of it’s robotically repairing. After diagnosing what’s improper and showing you the automatic restore monitor, chose advanced options, and then Troubleshoot.
Then you definitely simply have got to go to developed choices, into Startup Settings, press the quantity four on your keyboard and in the end Restart. When home windows start booting again, simply hit the number 4 key to your computer for it in addition up in secure mode.
Also, Read Free Download CamScanner for PC and Mac Windows 7810
When you’re finally in secure mode, simply comply with these steps:
Press the Windows Key + X at the same time and opt for device manager from the context menu a good way to pop-up.
As soon as in the gadget supervisor, appear for different gadgets
correct-click on the Unknown device (the probable purpose of your BSOD)
click on replace Driver program
within the monitor, a good way to pop-up click on Search robotically for updated driver application
Wait unless the drivers are up to date
Restart your laptop
although no longer as simple as the first procedure, this solution may also support you fix the KMode Exception no longer treated error.
3. LET windows repair ITSELF
At a first glance this would appear a variety of counterintuitive, however, windows have the ability to restore itself — when you inform it to do so.
SFC Scan is windows’ means to figure out what’s mistaken with it and take a look at to restore the problem. It inspects each windows file to peer if it’s working safely. It might work to get rid of the KMode Exception now not dealt with an error.
Also, Read Free Download Camsurf PC Windows 7810 Mac Computer
here’s how you do it:
Open the Command prompt by means of both pressing the Windows Key + R at the same time and typing cmd in the box that shows up, or with the aid of pressing the home windows Key and typing cmd into the quest field. Kind within the command sfc /scan now and press enter Wait except the approach is completed. It could take a while Restart your laptop read install Xbox Controller Driver on computer and repair fashioned errors! If the error doesn’t exhibit up again, then you realize sfc /scan now worked.
CONCLUSION
If the KMode Exception not handled BSOD still persists after making an attempt all of these options, you would wish to suppose about doing a smooth window 10 set up in your laptop. If even that doesn’t work, be conscious that a historical BIOS variant may be the root of your problems.
There are a couple of methods to replace your BIOS, relying on which motherboard you have. You must google tips on how to do replace your particular mannequin. It might repair your trouble.
After following all of these steps, your BSOD shall be gone and you’ll be capable to use your laptop without it locking up each short while.
Which manner did you employ to fix the KMode Exception not treated Error? Let us know if some other hindrance arises along with your computer. We’re right here to help.
More info Clicks Bestoftool.com
2 notes
·
View notes
Text
10 Mac Shortcuts Actions you’ll Use
Apple added some shortcuts while the update of macOS Monetary for MacBook to make workflow easier and smooth.
You can still edit some and decide how you want to use them. Trips and tricks are supposed to make life easier while saving yourself some time. Apple takes great care in offering a polished, user-friendly experience across all of its devices.
Macs are no different. However, with a computer capable of so much, clever techniques and shortcuts are certain to sneak through and go undiscovered.
Tricks and tips:
Activate Spotlight for Searching
Press Command + Space to bring up a helpful search interface that will help you discover files on your Mac. You can easily search for a file, search for a website and choose from which browser you want to search with. Covert currencies, from rupees to dollar. And can do basic maths Calculations like (8787*55) and (57687/54).
Switch Between Apps
Press Command + Tab to switch between your open apps. To cycle between the open apps, hold down the Command key and then hit Tab.
When the app you want is highlighted, let go. Similarly, if you want to close an open app directly from the desktop just press Command + Tab and then press the Q key to close an application.
Hot Corners
When you move the cursor to a corner on the screen, you may utilise it as a hot corner too fast to start actions. If you haven't tried Hot Corners yet, you should do so.
When your mouse hovers in a given location, you may perform things such as activating Mission Control, revealing the desktop, and more.
System Preferences > Mission Control > Hot Corners is where you set them up.
For example, the screen saver will start, when your pointer moves to the left-right corner and when you move the pointer to the top-right corner, the screen will lock. The bottom-right corner is set as Quick Note by default.
When setting up a Hot Corner, hold down the Option key if you wish to use Hot Corners but don't want to activate features accidentally. The Hot Corner will not activate after that until you hold down the Option key.
Hide a window
To hide a window in the background just press command + H and it will be hidden in the background, but you can get back to that window by clicking on the icon of that application or by pressing command + Tab.
And if you want to hide all the windows except the one you’re working on right now then just simply press Option + Command + H.
5) Switch Between App Windows - If you have numerous windows open for an app like Safari, you may switch between them by pressing Command + Tilde (~). If you have numerous desktops, you can rapidly switch between them by using Control and then the left or right arrow.
Quickly Open Folders
hold the command and press down the arrow key to open a folder in the finder or on your desktop. And press the command + Down arrow to go back.
Instant File Delete
To delete a file and skip Mac's Trash Can, which saves files before deleting them, selects the file and press Option + Command + Delete at the same time.
Produce an Auto Duplicating File
To create a duplicate file when you right-click on a certain file, go to "Get Info." and then check the Stationary Pad box.
It will open a replica of that file every time you access it, which is useful for templates and related file types.
Emoji keyboard
This speedy Emoji keyboard shortcut will help you discover the proper Emoji no matter where you're typing, thanks to a new set of Emoji coming to macOS later this year. Find any text box, click inside it, and then press CTL + CMD + SPACEBAR to bring up the Emoji keyboard. A little window overlay containing a collection of Emoji characters displays. Enjoy!
Moving files using the Option key
You may copy a file in Finder by right-clicking it or pressing CMD + C. But what if you only wanted to relocate one copy of the file? Instead of using CMD+ V to paste, you may use the option key (i.e. CMD + OPT + V) to transfer the files. Very useful!
1 note
·
View note
Text
unix commands cheat sheet working 0H6#
💾 ►►► DOWNLOAD FILE 🔥🔥🔥🔥🔥 Linux/Unix Command Line Cheat Sheet - Description pwd prints working directory (prints to screen, ie displays the. Unix, Linux, Mac OS Cheat Sheet commands. Unix/Linux Command Reference .com. File Commands ls – directory listing ls -al – formatted listing with hidden files cd dir - change directory to dir. Standard output (stdout) of cmd to file. The ULTIMATE Unix/Linux Command Cheat Sheet Command Line Options. 9 MacOS is a Unix-based operating system. Fix Your Stuff Community Store. Key Combination Shortcuts. Change Directory. List Directory Contents. File size and disk space. File and Directory Management. Command History. Environment Variable or Path. Add Comment. View Statistics:. List in a long format. Includes file mode, owner and group name, date and time file was modified, pathname, and more. Copy the contents of a folder to new folder. In here "-V" print a line of status for every file copied. Shows the previous commands you've typed. Add a number to limit to the last n items. Change the ownership of a file to user and group. Add -R to include folder contents. Output currently running processes. Here, a shows processes from all users and x shows processes that are not connected with the Terminal. View a list of all devices on your local network. Identify the path and the hops traversed by the packets from your device to the destination address. Remove stale lock files and outdated packages for all formula and casks. Display a list of currently set environment variables. Also tells you which shell you're using. Check the value of the PATH variable which storea a list of directories with executable files.
1 note
·
View note
Text
unix commands cheat sheet mod menu T85#
💾 ►►► DOWNLOAD FILE 🔥🔥🔥🔥🔥 Linux/Unix Command Line Cheat Sheet - Description pwd prints working directory (prints to screen, ie displays the. Unix, Linux, Mac OS Cheat Sheet commands. Unix/Linux Command Reference .com. File Commands ls – directory listing ls -al – formatted listing with hidden files cd dir - change directory to dir. Standard output (stdout) of cmd to file. The ULTIMATE Unix/Linux Command Cheat Sheet Command Line Options. 9 MacOS is a Unix-based operating system. Fix Your Stuff Community Store. Key Combination Shortcuts. Change Directory. List Directory Contents. File size and disk space. File and Directory Management. Command History. Environment Variable or Path. Add Comment. View Statistics:. List in a long format. Includes file mode, owner and group name, date and time file was modified, pathname, and more. Copy the contents of a folder to new folder. In here "-V" print a line of status for every file copied. Shows the previous commands you've typed. Add a number to limit to the last n items. Change the ownership of a file to user and group. Add -R to include folder contents. Output currently running processes. Here, a shows processes from all users and x shows processes that are not connected with the Terminal. View a list of all devices on your local network. Identify the path and the hops traversed by the packets from your device to the destination address. Remove stale lock files and outdated packages for all formula and casks. Display a list of currently set environment variables. Also tells you which shell you're using. Check the value of the PATH variable which storea a list of directories with executable files.
1 note
·
View note
Text
unix commands cheat sheet PC X1B&
💾 ►►► DOWNLOAD FILE 🔥🔥🔥🔥🔥 Linux/Unix Command Line Cheat Sheet - Description pwd prints working directory (prints to screen, ie displays the. Unix, Linux, Mac OS Cheat Sheet commands. Unix/Linux Command Reference .com. File Commands ls – directory listing ls -al – formatted listing with hidden files cd dir - change directory to dir. Standard output (stdout) of cmd to file. The ULTIMATE Unix/Linux Command Cheat Sheet Command Line Options. 9 MacOS is a Unix-based operating system. Fix Your Stuff Community Store. Key Combination Shortcuts. Change Directory. List Directory Contents. File size and disk space. File and Directory Management. Command History. Environment Variable or Path. Add Comment. View Statistics:. List in a long format. Includes file mode, owner and group name, date and time file was modified, pathname, and more. Copy the contents of a folder to new folder. In here "-V" print a line of status for every file copied. Shows the previous commands you've typed. Add a number to limit to the last n items. Change the ownership of a file to user and group. Add -R to include folder contents. Output currently running processes. Here, a shows processes from all users and x shows processes that are not connected with the Terminal. View a list of all devices on your local network. Identify the path and the hops traversed by the packets from your device to the destination address. Remove stale lock files and outdated packages for all formula and casks. Display a list of currently set environment variables. Also tells you which shell you're using. Check the value of the PATH variable which storea a list of directories with executable files.
1 note
·
View note