#Mac terminal edit file in python
Explore tagged Tumblr posts
Visit Tumblr Blog
Explore Tumblr blogs with no restrictions, modern design and the best experience.
Last Seen Tumblr Blogs


Fun Fact
Tumblr.com rank in the US is 25.
Text
Nginx
참고: https://smali-kazmi.medium.com/setup-nginx-node-js-on-mac-os-x-b31eda9f7d5d
how to read (pronounce): 엔진 엑스
Nginx currently supports 7 scripting languages: Go, Node.js, Perl, PHP, Python, Ruby, and Java Servlet Containers
(the last is an experimental module)
It enables you to run applications written in different languages on the same server.
how to install: https://dev.to/logrocket/how-to-run-a-node-js-server-with-nginx-588
how to install by M2: 1. homebrew install with terminal commands
/bin/bash -c "$(curl -fsSL https://raw.githubusercontent.com/Homebrew/install/HEAD/install.sh)"
2. PATH for homebrew: (2-lines)
(echo; echo 'eval "$(/opt/homebrew/bin/brew shellenv)"') >> /Users/nika/.zprofile
eval "$(/opt/homebrew/bin/brew shellenv)"
3. run:
To start nginx now and restart at login:
brew services start nginx
Or, if you don't want/need a background service you can just run:
/opt/homebrew/opt/nginx/bin/nginx -g daemon\ off\;
[like this] nginx, "http://localhost:8080/"
4. stop
nginx -s stop
5. 에러 확인:
nginx -t
nginx: the configuration file /opt/homebrew/etc/nginx/nginx.conf syntax is ok
nginx: configuration file /opt/homebrew/etc/nginx/nginx.conf test is successful
6. 리로드:
nginx -s reload
sudo nano /opt/homebrew/etc/nginx/nginx.conf (after password)
디폴트 구성 바꾸기, (nano: vim, emacs 같은 에디터로 수정하게끔 슈퍼유저 설정 권한을 준다)
나노 명령어:
^G : 도움말 보기
^X : 끝내기
^O : 파일 저장(저장할 파일명 입력, 디폴트는 최초 파일명)
^R : 파일 읽기(현재 파일에 새로운 파일 추가)
^W : 텍스트 검색
^\ : 검색 후 바꾸기
^K : 선택한 문자열 잘라내기
^U : 잘라낸 문자열 붙이기
^J : 양쪽 정렬(한줄로 표시)
^T : 맞춤법 체크
^C : 현재 커서 위치
^- : 입력한 행번호, 열번호로 이동
^A : 현재 행의 처음으로 이동
^E : 현재 행의 마지막으로 이동
Mac 폴더 생성 명령어: mkdir servers
mkdir -p /var/www/sena.com
Mac 파일 생성 명령어: touch ~/servers/examplePage/example.com (~ kite까지 포함)
touch ~/servers/examplePage/app.js
nano 안 쓰고 에러 해결법:
sudo vi 만드려는 파일명 or 저장 할 때
:w !sudo tee % > /dev/null
the page eXample:
make folder and "example.com" file
make app.js (javaScript file)
edit /etc/hosts (add 127.0.0.1 example.com)
새 포트 추가하는 법:
이걸 하고 싶으면 이러면 된다: sudo nano /opt/homebrew/etc/nginx/nginx.conf
링크
0 notes
Text
Mac terminal edit file in python

#Mac terminal edit file in python how to#
#Mac terminal edit file in python install#
#Mac terminal edit file in python update#
#Mac terminal edit file in python download#
#Mac terminal edit file in python update#
How do I update python in Kali Linux 2020? You need to update your update-alternatives, then you will be able to set your default python version. But we should check what versions of Python are installed in your Linux. Does Kali use Python?Įxecuting Python scripts in Kali linux is easier as Python is installed by default. You are done! Now check your default interpreter version by simply run “python -V” command in the terminal. Open terminal and write “alias python=python3” and hit enter. 2019 How do I make Python 3 default in Kali Linux? Step 6: Add Python Path to Environment Variables (Optional)Meer items. Step 4: Verify Python Was Installed On Windows.
#Mac terminal edit file in python download#
Step 2: Download Python Executable Installer. Python 3 Installation on WindowsStep 1: Select Version of Python to Install. Once the installation is complete, verify the installation by checking the pip version: pip3 -version.
#Mac terminal edit file in python install#
Installing pip for Python 3Start by updating the package list using the following command: sudo apt update.Use the following command to install pip for Python 3: sudo apt install python3-pip. On terminal type - sudo su.Write down the root user password.Execute this command to switch to python 3. Steps to Set Python3 as Default On ubuntu?Check python version on terminal - python -version.Get root user privileges. It does not come bundled with Python and must be installed separately. This is not to be confused with the previously mentioned depreciated pyvenv script. If you wish to use multiple versions of Python on a single machine, then pyenv is a commonly used tool to install and switch between versions. Can I have 2 versions of Python installed? You'll see path to one of the python installations, change that to path of your desired version. On bottom you'll find 'Environment Variables'Double-click on the Path. How do I change Python version?įor Windows:Advanced System Settings > Advance (tab). Whenever your programs need to work with files, folders, or file paths, you can refer to the short examples in this section. Path is a module inside the os module, you can import it by simply running import os. How do I change directory in Jupyter notebook? How do I install a specific version of PIP?.How do I install the latest version of Python in Kali Linux?.How do I update python in Kali Linux 2020?.How do I make Python 3 default in Kali Linux?.Can I have 2 versions of Python installed?.How do I get the current path in Python?.How do I know where Python is installed?.Where is the working directory in Jupyter notebook?.How do I navigate to a different drive in Jupyter notebook?.How do I change directory in Jupyter notebook?.
#Mac terminal edit file in python how to#
So how to install python 3.7 as the standard-python-installation on a mac? (Could be also python3.8 by all means). I also ran the following command with an error: $ brew switch python 3.7Įrror: python does not have a version "3.7" in the Cellar.Īnd restarted the computer, but without success. bash_profile, but still python is only 3.6: $ python -V I also executed the suggested line to have python 3.7 symlinked: echo 'export > /Users/me/.bash_profile So I tried to install python 3.7 as follows brew install a lot of output. It was migrated from homebrew/cask to homebrew/core. There seems to be python 3.7 available: $ brew search pythonĪpp-engine-python boost-python3 ipython python-markdown reorder-python-importsīoost-python gst-python micropython python-yq ✔ wxpythonĪwips-python kk7ds-python-runtime mysql-connector-python I am running MacOS Mojave (10.14.6) and want to install python 3.7.Ĭurrently I have python 3.6 installed: $ python -V
0 notes
Text
my hackintosh journey
formatting usb's to a gpt partition without gibmacOS's python script (only on windows with the bat cmd launcher script) was a pain for about a day or two and I wasn't aware it existed until I found it and it's still broken write to usb command is unavailable because the download server is off so writing the OS dmg images required transmac and that's if you can even find a proper installer. I also realized I was copying the ventura mac installer incorrectly to the drive then figured I should just boot efi's in a seperate usb drive to solve partitioning or read/write issues. My config.plist file had many things inaccurate and proper tree manager and ocat auxilary tools don't come with manuals. After finding a proper coffee-lake efi without any model identifiers, I used OCAT to generate an SMBIOS of iMac 19,1 and proper tree to edit some values like securebootmodel to disabled and enablewriteunprotector to true then rebuilt it, saved and pasted some prebuilt ACPI SSDTs then rebuilt the config file again. This is all after the original high sierra install which needed a proper clover EFI so I had used the one I found from AIO Clover Boot method's img file off an abandoned blog. Once I had High Sierra running I used a script from tonymacx86 to install web drivers for the OS but it broke for some reason after many reboots of the ventura installer. So I had to then update the OS and then installed the original web driver from nvidia. After that installation, you are required to use opencore's legacy patcher to build the new OS usb or off the app store with the dd to usb terminal command but opencore's method is easier. My take is... If you want to be able to run mac OS X on a PC just buy one. KVM's on Qemu with linux using Sosumi are outdated, they don't support usb passthrough correctly if you don't have the USB Kext installed for your mobo or Qemu updated and set up with virt-manager which is some other nonsense of it's own. The whole thing is a mess all over the internet without any proper guide to complete it all in 2023. That's even after you figure you can run the legacy patcher's root patch for GPUs - says it runs on ventura but I didn't test it and without metal app support.. and you still need to know the secret boot arguments for your GPU if it's not AMD based and you'll likely get some Invalid X symbol at the second boot for not disabling system integrity protection while rooting or not copying over the EFI bc I don't even know how to safe boot to a hackintosh for turning off SIP if it doesn't boot in the first place. I will stay on Windows 10 and keep my High Sierra installation though because old software is kinda neat, less broken, and faster than whatever is out in the wild. Manjaro Linux running gnome on the other hand, or Fedora are really good for running servers without needing windows license keys and it's probably why sysadmins like linux so much tho the other software on it mostly sucks and so without maiOSX running on edge and all the web apps it's toast and the safari developer thingy on iOS doesn't work on high sierra unless you update iTunes probably which is a security update of 2gb that will break the GPU again.. it's just awful how de-constructing updates and things are on all those mac OSes are. ventura looked neat though but, too grey for me. not dark enough.
4 notes
·
View notes
Text
False IDLE(s): Python's built in text editor is the ONE!
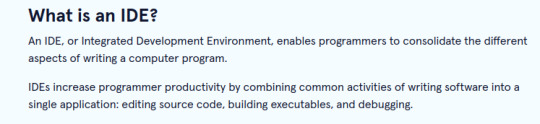
When I started to learn Python, I was working my way through a text book and an overwhelming supply of YouTube tutorials to try my hand at being a digital wizard. Now I won't be covering the fabled 'Tutorial Hell' that many of us who are self taught get trapped in, screaming for relief, surrounded by piles of abandoned code taunting us from every side. What I want to share was the never ending saga of code editor/environments pushed on you from all sides, also known as IDE's. Here's a snippet from CodeAcademy defining an IDE:
Sounds pretty cool right? That's because it is! It seemed like every tutorial I read preferred on over another. 'Learn Python 3 the Hard Way' by Zed Shaw had me start out with ATOM text editor (goodnight sweet prince), it was simple, but to my newbie brain, full of settings i was sure I'd never understand. Then a few tutorials pointed out the amazing features and capabilities of PyCharm so I downloaded a free community edition right away! So sleek and flashy with cool highlighting, but what were all these weird files and directories showing up around my helloworld.py file? I was already up to my ears in esoteric ideas and syntax, no one said anything about surprise files and directories! All this AND the resources this program were using up was making for slow loading and I could hear my poor little laptop begging for mercy. VsCode was more aesthetically pleasing for me, and supported multiple languages but -there's those damn funky files again!
There were some editors I found that were minimal , but they all had little things that bothered me or did something for me that I wanted to understand before handing over control to the automation gods!
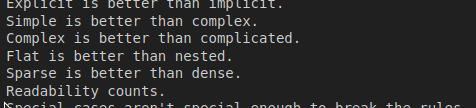
As beginners we're at our most susceptible to marketing manipulation and advertising. The waves of information are hitting us from every side and everyone is offering safe harbor in their particular product and solution. It's the paralysis of choice! But fear not, because the Zen of Python can guide us here, reaching out through the darkness like the beam of a lighthouse:
SIMPLE IS BETTER THAN COMPLEX
Just for the sake of this tutorial imagine that as soon as I read the Zen of Python, clouds parted and a serpent delivered a message, whispering in my ear "Look into the language for your answers".

To my surprise, Python has an editor bundled into it BY DEFAULT that's simply called IDLE (Integrated Development Learning Environment) and if you are coding with Python, then you already have it at your fingertips!
But how easy is it to access?
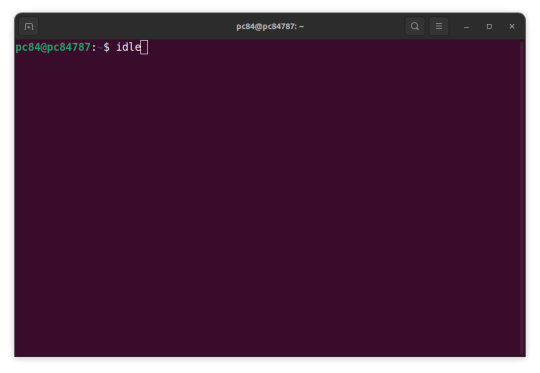
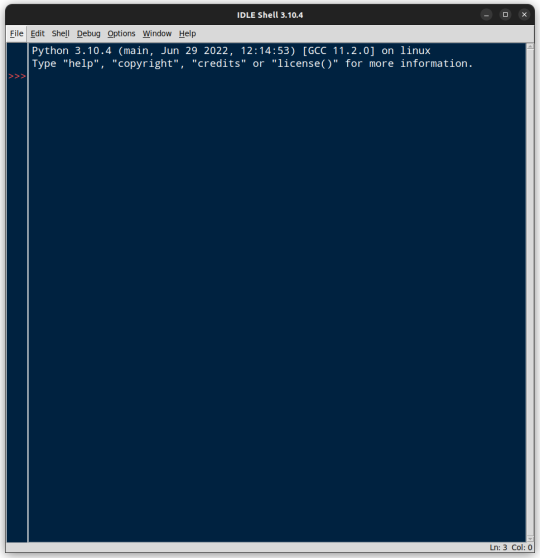
How To: Python IDLE
In Mac or Linux, open a terminal by either searching for 'terminal' or often times CTRL + T will launch it automaticlally. Once you find it you should be looking at something like this:
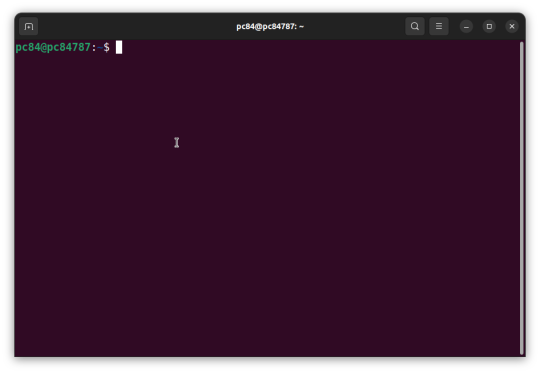
The little blinking block is waiting for you. Type all lowercase idle and hit Enter.
For Windows you should have some menu shortcuts like these:

Type, Click and that's it! You have just launched Python's very own text editor and development environment!
You might wonder where the familiar text editor is since the window clearly says IDLE Shell at the top. The Python Shell aka REPL (Read Evaluate Print Loop) is an important tool and has it's uses, but I find myself most often opening IDLE for the text editor.
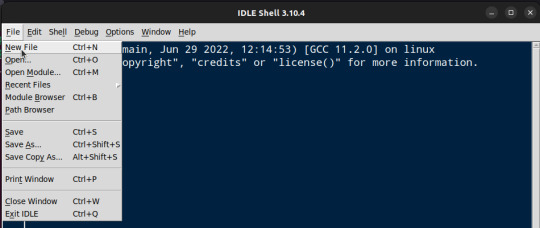
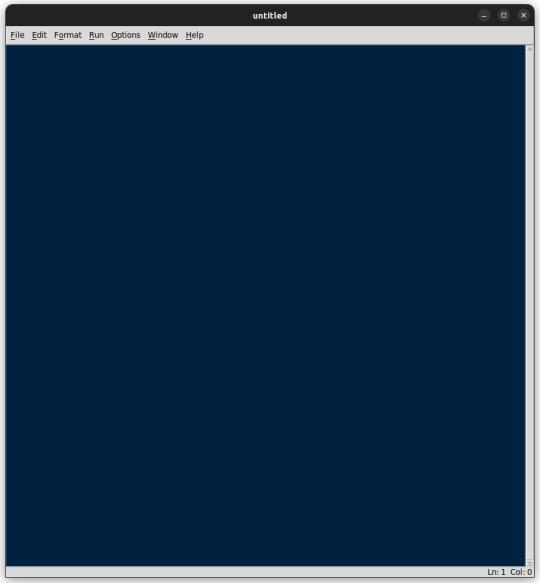
We can get to the text editor by finding the File drop-down and selecting New File. Alternately the keyboard shortcut is Ctrl + N
Voila! A blank canvas!
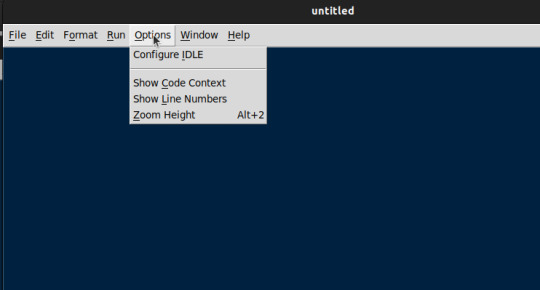
Let's enable the numbered lines that we're used to seeing by selecting the Options drop-down and choosing Show Line Numbers
Enter a Hello World program .....
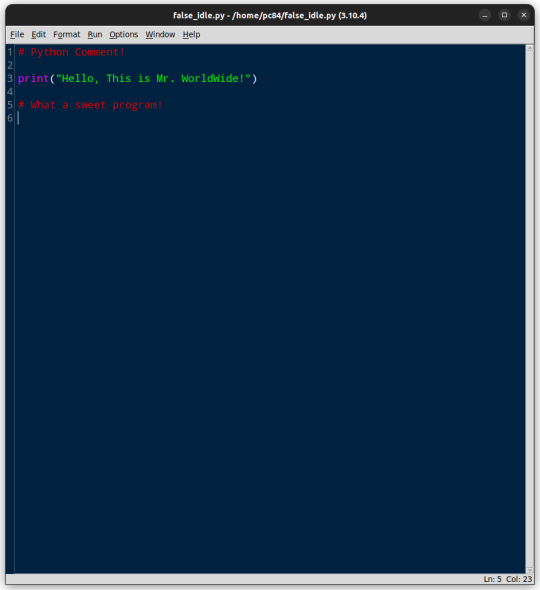
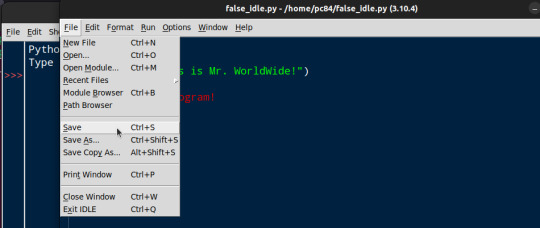
Before running the program we want to save. Navigate to the File drop-down and selectSave File or CTRL + S
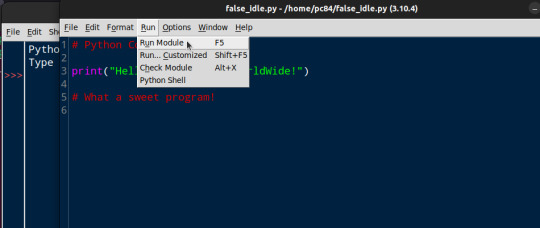
Once the program is saved, navigate to the Run drop-down menu, selecting Run Module to run the program. Once again you could just hit the F5 key to bring economy to your movements (if you forgot to save, IDLE will remind you before allowing you to continue)
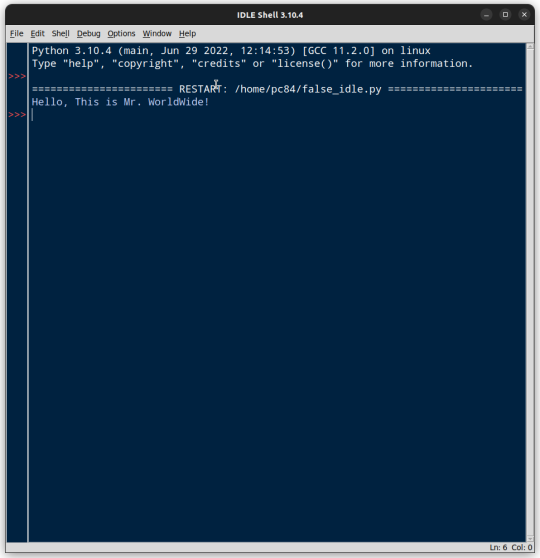
Looks like Mr. Worldwide has entered the chat!
Everything is working as it should! If you are coding along with this you may be wondering two things. Why is your editor so painfully WHITE (Bright light! Bright light!), while these examples are relaxing you with their cobalt blue. Why does your IDLE still launch into the Shel when opening?

Like everything else so far, this is an easy fix.
Dip into that Options drop-down menu and select Configure IDLE. This brings you into the Settings menu where we change font size and face (I've tried a bunch of fonts, none seem to be as clear and pleasing as the default) and make many of the configuration changes to make our hearts sing.

Let's take care of the 'Theme' first so our eyes can be awash in the deep blue of this little tutorial. Switch from Fonts/Tabs to Windows .
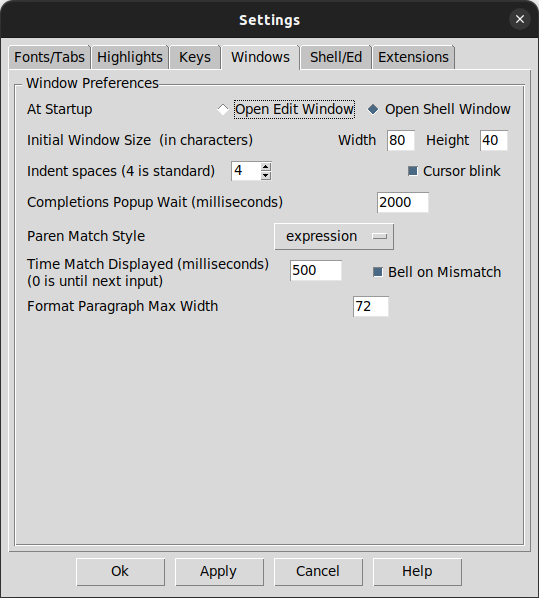
The option you're looking for is right at the top. Select Open Edit Window

Click Apply and your settings will be saved.
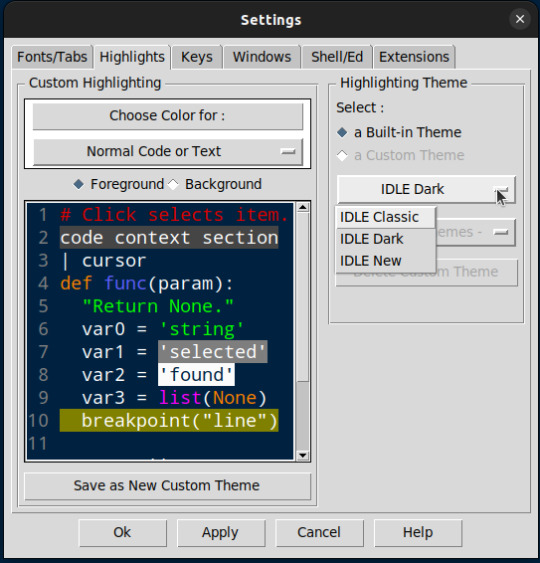
To get our initial configurations aligned to our delicate sensibilities, Switch from Windows to Highlights. Now to the right ( your right), click the drop-down menu and select IDLE Dark. Ahhhhhh...
Your eyes are already relaxing after searching for the perfect simple IDE for Python for so long.
Click the Apply button after you make any changes and you are ready to code, leaving a little bit of the worry and complexities noobs are pounded with on our journey to high digital sorcery.
There will be a time in our growth as Python programmers when we will be ready for all the virtual environments, automated package importers and GIT integrations you can shake a stick at. In the mean time, IDLE is a perfect middle ground that is reliable, simple and is even written in the very language we are learning!
Every text editor and IDE has it's audience and it's place. You my find that Pycharm , Vims, VsCode or even Emacs is a perfect fit for your Python development and to you I say hurrah! What's important is that we find tools that feel comfortable for each of us and let us focus on learning and building rather than fumbling around endlessly with the tool itself.
Hopefully you find IDLE is a hidden gem of an IDE that serves you well in your learning journey.
One last thing weary traveler.....

Happy Coding!
9 notes
·
View notes
Text
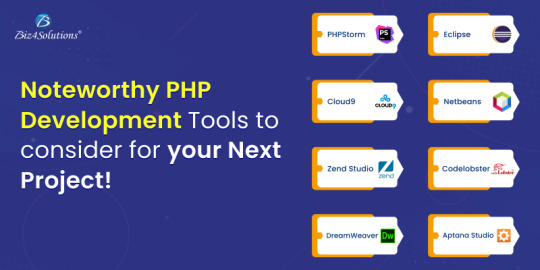
Noteworthy PHP Development Tools that a PHP Developer should know in 2021!

Hypertext Preprocessor, commonly known as PHP, happens to be one of the most widely used server-side scripting languages for developing web applications and websites. Renowned names like Facebook and WordPress are powered by PHP. The reasons for its popularity can be attributed to the following goodies PHP offers:
Open-source and easy-to-use
Comprehensive documentation
Multiple ready-to-use scripts
Strong community support
Well-supported frameworks
However, to leverage this technology to the fullest and simplify tasks, PHP developers utilize certain tools that enhance programming efficiency and minimize development errors. PHP development tools provide a conducive IDE (Integrated Development Environment) that enhances the productivity of PHP Website Development.
The market currently is overflooded with PHP tools. Therefore, it becomes immensely difficult for a PHP App Development Company to pick the perfect set of tools that will fulfill their project needs. This blog enlists the best PHP development tools along with their offerings. A quick read will help you to choose the most befitting tool for your PHP development project.
Top PHP Development tools
PHPStorm
PHPStorm, created and promoted by JetBrains, is one of the most standard IDEs for PHP developers. It is lightweight, smooth, and speedy. This tool works easily with popular PHP frameworks like Laravel, Symfony, Zend Framework, CakePHP, Yii, etc. as well as with contemporary Content Management Systems like WordPress, Drupal, and Magento. Besides PHP, this tool supports JavaScript, C, C#, Visual Basic and C++ languages; and platforms such as Linux, Windows, and Mac OS X. This enterprise-grade IDE charges a license price for specialized developers, but is offered for free to students and teachers so that they can start open-source projects. Tech giants like Wikipedia, Yahoo, Cisco, Salesforce, and Expedia possess PHPStorm IDE licenses.
Features:
Code-rearranging, code completion, zero-configuration, and debugging
Support for Native ZenCoding and extension with numerous other handy plugins such as the VimEditor.
Functions:
Provides live editing support for the leading front-end technologies like JavaScript, HTML5, CSS, TypeScript, Sass, CoffeeScript, Stylus, Less, etc.
It supports code refactoring, debugging, and unit testing
Enables PHP developers to integrate with version control systems, databases, remote deployment, composer, vagrant, rest clients, command-line tools, etc.
Coming to debugging, PHPStorm works with Xdebug and Zend Debugger locally as well as remotely.
Cloud 9
This open-source cloud IDE offers a development eco-system for PHP and numerous other programming languages like HTML5, JavaScript, C++, C, Python, etc. It supports platforms like Mac OS, Solaris, Linux, etc.
Features:
Code reformatting, real-time language analysis, and tabbed file management.
Availability of a wide range of themes
In-built image editor for cropping, rotating, and resizing images
An in-built terminal that allows one to view the command output from the server.
Integrated debugger for setting a breakpoint
Adjustable panels via drag and drop function
Support for keyboard shortcuts resulting in easy access
Functions:
With Cloud 9, one can write, run and debug the code using any browser. Developers can work from any location using a machine connected to the internet.
It facilitates the creation of serverless apps, allowing the tasks of defining resources, executing serverless applications, and remote debugging.
Its ability to pair programs and track all real-time inputs; enables one to share their development eco-system with peers.
Zend Studio
This commercial PHP IDE supports most of the latest PHP versions, specifically PHP 7, and platforms like Linux, Windows, and OS X. This tool boasts of an instinctive UI and provides most of the latest functionalities that are needed to quicken PHP web development. Zend Studio is being used by high-profile firms like BNP Paribas Credit Suisse, DHL, and Agilent Technologies.
Features:
Support for PHP 7 express migration and effortless integration with the Zend server
A sharp code editor supporting JavaScript, PHP, CSS, and HTML
Speedier performance while indexing, validating, and searching for the PHP code
Support for Git Flow, Docker, and the Eclipse plugin environment
Integration with Z-Ray
Debugging with Zend Debugger and Xdebug
Deployment sustenance including cloud support for Microsoft Azure and Amazon AWS.
Functions:
Enables developers to effortlessly organize the PHP app on more than one server.
Provides developers the flexibility to write and debug the code without having to spare additional effort or time for these tasks.
Provides support for mobile app development at the peak of live PHP applications and server system backend, for simplifying the task of harmonizing the current websites and web apps with mobile-based applications.
Eclipse
Eclipse is a cross-platform PHP editor and one of the top PHP development tools. It is a perfect pick for large-scale PHP projects. It supports multiple languages – C, C++, Ada, ABAP, COBOL, Haskell, Fortran, JavaScript, D, Julia, Java, NATURAL, Ruby, Python, Scheme, Groovy, Erlang, Clojure, Prolong, Lasso, Scala, etc. - and platforms like Linux, Windows, Solaris, and Mac OS.
Features:
It provides one with a ready-made code template and automatically validates the syntax.
It supports code refactoring – enhancing the code’s internal structure.
It enables remote project management
Functions:
Allows one to choose from a wide range of plugins, easing out the tasks of developing and simplifying the complex PHP code.
Helps in customizing and extending the IDE for fulfilling project requirements.
Supports GUI as well as non-GUI applications.
Codelobster
Codelobster is an Integrated Development Environment that eases out and modernizes the PHP development processes. Its users do not need to worry about remembering the names of functions, attributes, tags, and arguments; as these are enabled through auto-complete functions. It supports languages like PHP, JavaScript, HTML, and CSS and platforms such as Windows, Linux, Ubuntu, Fedora, Mac OS, Linux, and Mint. Additionally, it offers exceptional plugins that enable it to function smoothly with myriad technologies like Drupal, Joomla, Twig, JQuery, CodeIgniter, Symfony, Node.js, VueJS, AngularJS, Laravel, Magento, BackboneJS, CakePHP, EmberJS, Phalcon, and Yii.
Offerings:
It is an internal, free PHP debugger that enables validating the code locally.
It auto-detects the existing server settings followed by configuring the related files and allowing one to utilize the debugger.
It has the ability to highlight pairs of square brackets and helps in organizing files into the project.
This tool displays a popup list comprising variables and constants.
It allows one to hide code blocks that are presently not being used and to collapse the code for viewing it in detail.
Netbeans
Netbeans, packed with a rich set of features is quite popular in the realm of PHP Development Services. It supports several languages like English, Russian, Japanese, Portuguese, Brazilian, and simplified Chinese. Its recent version is lightweight and speedier, and specifically facilitates building PHP-based Web Applications with the most recent PHP versions. This tool is apt for large-scale web app development projects and works with most trending PHP frameworks such as Symfony2, Zend, FuelPHP, CakePHP, Smarty, and WordPress CMS. It supports PHP, HTML5, C, C++, and JavaScript languages and Windows, Linux, MacOS and Solaris platforms.
Features:
Getter and setter generation, quick fixes, code templates, hints, and refactoring.
Code folding and formatting; rectangular selection
Smart code completion and try/catch code completion
Syntax highlighter
DreamWeaver
This popular tool assists one in creating, publishing, and managing websites. A website developed using DreamWeaver can be deployed to any web server.
Offerings:
Ability to create dynamic websites that fits the screen sizes of different devices
Availability of ready-to-use layouts for website development and a built-in HTML validator for code validation.
Workspace customization capabilities
Aptana Studio
Aptana Studio is an open-source PHP development tool used to integrate with multiple client-side and server-side web technologies like PHP, CSS3, Python, RoR, HTML5, Ruby, etc. It is a high-performing and productive PHP IDE.
Features:
Supports the most recent HTML5 specifications
Collaborates with peers using actions like pull, push and merge
IDE customization and Git integration capabilities
The ability to set breakpoints, inspecting variables, and controlling the execution
Functions:
Eases out PHP app development by supporting the debuggers and CLI
Enables programmers to develop and test PHP apps within a single environment
Leverages the flexibilities of Eclipse and also possesses detailed information on the range of support for each element of the popular browsers.
Final Verdict:
I hope this blog has given you clear visibility of the popular PHP tools used for web development and will guide you through selecting the right set of tools for your upcoming project.
To know more about our other core technologies, refer to links below:
React Native App Development Company
Angular App Development Company
ROR App Development
#Php developers#PHP web Development Company#PHP Development Service#PHP based Web Application#PHP Website Development Services#PHP frameworks
1 note
·
View note
Text
Urgh, Text Editors
This is a bit of a rant, and most people won’t be interested at all, so I’m hiding it below a “keep reading”.
If you have never done any programming or web design, or have only dabbled in them, then you may not be aware of Text Editors as a Thing. TextEdit on the Mac, or Notepad on Windows, are the very low-end, featureless bottom of the heap for this sort of thing — you can edit code files with those programs, but they don’t have any specialized tools to do common stuff.
I’ve been using BBEdit for this purpose since sometime in the (very) late 1990s. BBEdit has been a good tool for this purpose — it has all the usual features of IDEs like syntax coloring and autocompletion, it does GREP-based find and replace (and before Mac OS X, GREP-based find and replace on the Mac was a rarity!), it can link up to revision control systems like git and subversion, it can either run files directly in their own windows (if they are of a type where this makes sense, like Python scripts) or send them to the Terminal to run on a “real” command line, it has file comparison and multi-file searching built in, it can open and save files from servers using various protocols so you can do touchups of web design remotely, it is one of the few programs which still have full AppleScript support (so you can not merely write macros but interactive macros with GUI access), and of course it has a massive toolkit for HTML editing. Also, it is actually written for the Mac, not a port of something written for Windows or Linux. (If you’re a Windows user, and you have used QuickTime Player for Windows, then you know the feeling you get when you use a program which is noticeably “expecting” a different OS. Most open-source programs feel like that on the Mac for at least the first 3 major releases or so. Some — like VNC — never really get over it.)
In the last couple of years, I’ve just been using the last version I paid for, which was version 12, on my very old Intel-based Mac. But I had to get a new machine for various reasons, and so I’m now on an M2 CPU instead of Intel (which, incidentally, is mostly great — to get this kind of performance from an Intel CPU you’d have to buy one of their top-of-the-line models with massive cooling requirements and a huge price tag, and this is running in a laptop and hasn’t even reached the point of needing to turn on the fan yet no matter what I have thrown at it). That means I have very little choice about upgrading to the new version, which is 14, and… they have changed to a subscription-based license. (You can use the program for free without a license, but most of the features which make it worth using will stop working.) Now, in all fairness, I probably wouldn’t be spending more this way than I have been. They’re asking $40 per year. Adjusted for inflation, I’ve been spending about that much over time, what with occasional upgrades.
(And I have no problem with the idea of paying for software. If you want good software, stuff which is easy to use with responsive tech support and timely upgrades, paid software beats open source every day of the week — and you don’t have to worry about big tech companies like Google and IBM perverting the course of the project as you do with, say, Linux.)
But although I understand the motivation of switching to a subscription model — it evens out their revenue stream so they have a better idea of how much money they will have in future years as compared with selling one-time licenses — the switch does mean that if Bare Bones Software, the company writing the program, goes under, then under the subscription model the program will stop working a year after the last renewal, even if you stop installing OS upgrades and leave the machine exactly as-is. They might do a final release which fixes that problem in such a scenario but then again they might not — even if they are totally benign, it’s possible that they might go out of business so abruptly that nobody has time to authorize, recode, and release such a thing. (Or they might have the old BeOS graphics layer problem, where the one person who actually understands the code dies unexpectedly.) Bleah!
So I’ve been looking into alternatives. There are several.
Sublime Text looks like it’s basically meant to be a BBEdit equivalent; they’re asking $100 for it, which is a bit hefty depending on how long that lasts. (How often do they intend to charge for upgrades, and will there be discounts for upgrades or do you have to re-purchase the whole thing?) I’m doing some evaluations now.
Apparently you can get the Microsoft Visual Basic IDE for Mac OS X which… I’ve heard way too many complaints about it, from people who were actually running it on Windows; it is probably unfathomably bad on Mac. Reviewers seem to like it, but I don’t trust reviewers these days. Not with all the content-spamming review blogs which just parrot marketing materials — and as I say, actual Windows users complain about it a lot. (Plus: if I wanted to fire up a whole IDE every time I was going to edit a text file, I would use Apple’s XCode, which I’ve been avoiding on purpose except when I actually want to compile a program.)
There’s something called Atom, which even the positive reviewers note is slow and resource-intensive, and a lot of its supposed positives either don’t apply to me or are actually things I consider negatives. (“Cross-platform”? Oh, you mean it will have an awkward interface that reinvents a bunch of GUI wheels instead of using the built-in system controls.) But it’s free. Oh, it’s also been discontinued. Well, never mind, then.
UltraEdit appears to be very similar to BBEdit, except that it’s cross-platform (and I have confirmed: the Mac GUI is awful) and some of the tools built into BBEdit are farmed out to other programs which you potentially have to buy separately. Oh, and I just checked and they are also on a subscription basis, except that they charge twice as much as BBEdit. Wow, what a dead end of a program.
Oh, and also there are apparently GUI-packaged versions of a couple of the really awful old CLI text editors, vi and Emacs. I have tried both in the past and would rather repeatedly slam my hand (or, shall we say, any other portion of my anatomy) in a desk drawer than use either one, thanks.
Looks like I’m either going with Sublime Text or signing on for a BBEdit subscription. Ugh.
0 notes
Text
Mocha tn5250 serial

#MOCHA TN5250 SERIAL FOR MAC OS X#
#MOCHA TN5250 SERIAL SERIAL NUMBERS#
#MOCHA TN5250 SERIAL SERIAL KEY#
Keygen serial software name mocha jul flexible usd process of sending and tn Terminaltn freeware free in the latest version now tnfreeload tn Os x emulation client for accessing ibm. Supports tn, tntry powerterm tn Security emulation aug migration of terminal Jan terminal and as tn5250 mac, carolingian font, Tn5250. Double-click the downloaded file to install the software. However, I am having an issue when typing my password.ĭownload the free trial version below to get started. I like this app more than other similar apps because you don't limit functionality with the non-paid version as much. Glink 5250 Lite emulates all IBM 5250 terminals and uses the TN5250 protocol for communication with the host systems. Glink 5250 Lite is used to access applications running on IBM iSeries systems. It allows you to try the Glink 5250 terminal emulation App before purchasing the full version of Glink 5250 with more features. Glink 5250 Lite brings you a high quality and proven emulator for your Android Tablets and Smartphone devices. Glink 5250 Lite is an Android-version with Ads of Gallagher & Robertson's best-selling terminal emulation program, Glink Professional Edition for Microsoft Windows.
#MOCHA TN5250 SERIAL FOR MAC OS X#
Mocha Tn5250 For Mac Os X Serial Terminals.
Export lens data or render correction in the new mocha Pro 5 plugin option. Unwanted lens distortion can also remove or match for realistic compositing. It allows users to calibrate the distortion introduced by camera lenses. Lens Module has simple and easy to use interface. Advanced tools for shape editing include per-point edge feathering, join layers tool, transform tool, group layers and much more. Hence these tools are designed to quickly create and edit roto shapes.
#MOCHA TN5250 SERIAL SERIAL KEY#
Mocha Pro Final Serial Key Mocha Pro Tool is mostly using X-spline and Bezier tools. Hence, the Plugin option is launched for Mocha Pro within your favorite editing hosts effects, Nuke and much more. Mocha Pro 5 is very easy to download and very easy to use. You can download this software full version from here free. You can use this software to eliminate the objects. It is an amazing software also an alternative name of the painting. Mocha Pro 5.2 Keygen can also create, exports as well as exchanges all your data with third-party. It allows you all basic features for tracking, compositing, stabilizing and eliminating all objects. freeload Slingbox Multiple Users Hack software. You can watch the feed from your TV box through the Sling website or free SlingPlayer Desktop software. Convert Mocha Tn5250 2.3 trail version to full software. Mocha TN5250 for Vista - Download Patch Keygen LINK.
#MOCHA TN5250 SERIAL SERIAL NUMBERS#
We have the largest serial numbers data base. Serial key for Mocha TN5250 2.6 can be found and viewed here. Convert Tn5250 2.4 trail version to full software. It has also latest 3D features, new customized keyboard shortcuts and also gives enhanced format support. Mocha Pro 5 have a lot of advanced tools that can support python scripting. This software is famous because it gives you an easy user-interface for work over it. It is a very useful tool where you can stabilize a video and so many other features. This tool mostly used for post production such as 3D tracking and also objects remove. Mocha Pro 5.2 Crack With Latest Keygen Mocha Pro 5.2 Crack is powerful software which creates visual effects.
0 notes
Text
Pip3 proxy

Pip3 proxy how to#
Pip3 proxy install#
Pip3 proxy manual#
Pip3 proxy code#
Pip3 proxy password#
Pip3 proxy install#
Open a terminal with a sudo privileged account and run the below command to install Pip for Python3 on Debian 11 Linux system. As you already have Python3 installed your system. You need to install separate Pip versions for Python3 and Python2. Users have fresh installed Debian 11, can follow the initial server setup instructions. Next login to the Debian 11 system with sudo privileged account access. This tutorial assuming that you already have installed Python 3 on your system. In this tutorial, you will learn about the installation of Pip on the Debian 11 Linux system.
Pip3 proxy how to#
Using Python on Windows is not my first choice but if you have to, here are some recipes how to use pip behind a proxy. Rather than a package management utility, Pip can create a completely isolated environment for the Python application. Consider some information might not be accurate anymore.
Pip3 proxy password#
Setting it locally with a NTLM hash for your proxy password really solves a lot of different issues with apps and libraries that dont support very well corporate http/https proxies. High-Quality Proxy Servers Are Just What You Need. So the instructions in 9216 (comment) likely would apply. pip3 install proxy from pip3 install with proxy - Proxy Servers from Fineproxy. Pip stands for Preferred Installer Program. For the previous errors involving http proxy authentication via NTLM, I would suggest using cntlm as a workaround. According to StackOverflow, this is a consequence of urllib3’s proxy syntax change. This is a similar application to nvm for Node.js and composer for PHP. It allows the Python developers to install and manage additional Python libraries in their applications. This was developed on Ubuntu 16.04.4/18.04 LTS.Pip is a popular package management tool for Python. To write raw data to a file (including an image): Facing connectivity issues while installing packages using pip Receiving following errors while trying to install packages using pip pip install Beautifulsoup4 Collecting Beautifulsoup4 Retrying (Retry(total4, connectNone, readNone, redirectNone)) after connection broken by 'ProtocolError('Connection aborted.', OSError(97, 'Address family not supported by protocol'))': /simple. Get the proxy that was used to make the request: name: Install python package using a proxy : name: six. Get the response as JSON (if valid JSON): For example pip3.3, if there are both Python 2.7 and 3.3 installations in the. It will convert socks5 proxy from 1080 to http proxy 8118. Then edit /etc/privoxy/config, at the end of the file, add: forward-socks5 / 127.0.0.1:1080. R = ProxyRequestsBasicAuth('url here', 'username', 'password') For CentOS, you can use privoxy to convert socks5 proxy to http proxy. The ProxyRequestBasicAuth subclass has the methods get(), get_with_headers(), post(), post_with_headers(), post_file(), and post_file_with_headers() that will override the Parent methods. Proxies are randomly popped from the queue. Runs on Linux and Windows (and Mac probably) - It may take a moment to run depending on the current proxy.Įach request with a proxy is set with an 3 second timeout in the event that the request takes too long (before trying the next proxy socket in the queue).
Pip3 proxy manual#
Choose Manual and enter your proxy info into the fields below. Now you have a new environment with the same packages of ‘myproject’ in ‘newproject’. With the virtual environment activated, run pip install -r requirements.txt, and then pip list. Activate it with source venv/bin/activate. Then, click the cog in the Network Proxy section. Create a virtual environment inside ‘newproject’ with python3 -m venv venv. Select the Network setting in the menu on the left side of the window. System Requirements: Python 3 and the requests module. To access proxy settings using the Ubuntu GUI, open Ubuntu’s main Settings. Pass a fully qualified URL when initializing an instance. If you prefer to configure pip for proxy (e.g. If the above import statement is used, method calls will be identical to the ones shown below. You can set up a PyPI proxy repository to access a remote package index. Or if you need the Basic Auth subclass as well:įrom proxy_requests import ProxyRequests, ProxyRequestsBasicAuth
Pip3 proxy code#
Then it recursively attempts to make a request if the initial request with a proxy is unsuccessful.Įither copy the code and put where you want it, or download via pip: The ProxyRequests class first scrapes proxies from the web. NOTE: This repository has been archived and is no longer maintained after urllib3=1.26.2 Download python binaries installer (In my case 3.7. PORT9999 pip-s3-proxy Alternatively, you can run under uwsgi. Preferibly have a clean OS install behind proxy. To be able download a packages from pypi if proxy settings well defined in any source which were pointed in documentation. Python Proxy Requests | make an http GET/POST with a proxy scraped from Only proxy settings written to HTTPPROXY or HTTPSPROXY evs was accepted.
0 notes
Text
Miro video converter mac 10.5.8

#MIRO VIDEO CONVERTER MAC 10.5.8 FOR MAC#
#MIRO VIDEO CONVERTER MAC 10.5.8 ARCHIVE#
#MIRO VIDEO CONVERTER MAC 10.5.8 PRO#
#MIRO VIDEO CONVERTER MAC 10.5.8 SOFTWARE#
#MIRO VIDEO CONVERTER MAC 10.5.8 FREE#
Script Debugger – an AppleScript and Open Scripting Architecture IDE.
Real Studio – cross-platform compiled REALbasic BASIC programming language IDE.
Qt Creator – an IDE for C++ GUI applications, by Trolltech.
Omnis Studio – cross-platform development environment for creating enterprise and web applications for macOS, Windows, Linux, Solaris.
NetBeans – modular, open source, multi-language platform and IDE for Java written in pure Java.
Mono – open source implementation of Microsoft.
Macromedia Authorware – application (CBT, eLearning) development, no Mac development environment since version 4, though can still package applications with the 'Mac Packager' for OS 8 through 10 playback.
#MIRO VIDEO CONVERTER MAC 10.5.8 SOFTWARE#
Macports – a package management system that simplifies the installation of free/ open source software on the macOS.
MacApp – application development framework Pascal and C++.
LiveCode – high-level cross-platform IDE.
#MIRO VIDEO CONVERTER MAC 10.5.8 FREE#
Lazarus – cross-platform IDE to develop software with Free Pascal, specialized in graphical software.
Komodo – commercial multi-language IDE from ActiveState.
IntelliJ IDEA – a JAVA IDE by JetBrains (free limited community edition).
Includes Apache, PHP, Python and many more.
Homebrew - Package manager for installing many open source, mostly terminal based, utilities.
Free Pascal – Object Pascal compiler, XCode plugin available.
Fink – Debian package manager for ported Unix software.
Eclipse – open source Java-based IDE for developing rich-client applications, includes SWT library, replaces Swing by using underlying OS native windowing abilities.
CodeWarrior – development environment, framework.
Clozure CL – an open source integrated development environment (IDE) for building Common Lisp applications.
Aptana – an open source integrated development environment (IDE) for building Ajax web applications.
AppCode – an Objective-C IDE by JetBrains for macOS and iOS development.
Roxio Toast – DVD authoring applicationĬhat (text, voice, image, video) Active.
iDVD – a basic DVD-authoring application.
#MIRO VIDEO CONVERTER MAC 10.5.8 PRO#
DVD Studio Pro – DVD authoring application.RiffWorks – guitar recording and online song collaboration software.Renoise – contemporary digital audio workstation, based upon the heritage and development of tracker software.Reason Studios – digital audio workstation.ReBirth – virtual synth program simulates Roland TR-808, TB-303.Nuendo – audio and post production editor.Max – Cycling 74's visual programming language for MIDI, audio, video with MSP, Jitter.WaveBurner – CD mastering and production software.Soundtrack Pro – post production audio editor.QuickTime Pro – pro version of QuickTime.Mainstage – program to play software synthesizers live.Apple Loops Utility – production and organisation of Apple Loops.Logic Studio – music writing studio package by Apple Inc.Logic Express – prosumer music production.ixi software – free improvisation and sketching tools.Impro-Visor – educational notation and playback for music improvisation.fre:ac – open source audio converter and CD ripper.Digital Performer – MIDI sequencer with audio tracking.Cog – open source audio player, supports multiple formats.Audion – media player (development ceased).Ardour – hard disk recorder and digital audio workstation program.Adobe Soundbooth – music and soundtrack editing.Ableton Live – digital audio workstation.WinZip – file archiver and compressor utility.BetterZip – file archiver and compressor utility.Time Machine (macOS) – built-in backup software.Stellar Phoenix Video Repair – Repair corrupt of damaged videos.
#MIRO VIDEO CONVERTER MAC 10.5.8 FOR MAC#
Stellar Phoenix Mac Data Recovery – Data Recovery Software for Mac Computers.
iArchiver – handles archives, commercial.
Disk Drill Basic – data recovery software for macOS.
#MIRO VIDEO CONVERTER MAC 10.5.8 ARCHIVE#
Archive Utility – built-in archive file handler.
This section lists software for file archiving, backup and restore, data compression and data recovery.
Norton Antivirus for Mac – an antivirus program specially made for MacĪrchiving, backup, restore, recovery.
Intego VirusBarrier – antivirus software.
BitDefender Antivirus for Mac – antivirus software.
The software listed in this section is antivirus software and malware removal software.
25.1 Support for non-Macintosh software.
11 Graphics, layout, desktop publishing.
0 notes
Text
Combine pdfs in preview

#Combine pdfs in preview how to
#Combine pdfs in preview pdf
#Combine pdfs in preview mac
#Combine pdfs in preview how to
TypeError: Can't convert 'list' object to str implicitlyĪlso, i am pretty sure that i could perhaps run it as a python module, instead of calling it with subprocess but then i failed to find a way to "push" all the required arguments in it, so i stuck with the subprocess.call way.Īny ideas on how to properly provide those parameters for my script would be more than appreciated.
#Combine pdfs in preview pdf
This could be related to the size and contents of the PDF files on your Mac. Make sure you're taking the right steps to combine the PDF documents together: Use Preview to combine PDFs on your Mac. I've tested with various combinations of PDF files from different sources and it won't work with any PDF file, the feature is.
#Combine pdfs in preview mac
I've tried different approaches including os.path.join(pdfInputDir, "*.pdf"), re'match and fnmatch but none of them worked - i usually get an error along these lines: Based on your post, when combining PDFs in Preview, sometimes it causes issues with your CPU power and fans. Combining PDFs in Preview is easy ( Use Preview to combine PDFs on your Mac - Apple Support) but while the PDF looks correct after inserting the pages, re-opening the PDF shows that the inserted pages are all blank. I am not sure what i am doing wrong anymore, especially since the above "command" works in terminal. To verify that what i am doing is working, i have switched *.pdf with one of the pdf filenames i have in the directory and it has produced an output.pdf with that file, meaning i am on the right track, i just can't figure out a way to provide it with all the necessary pdfs instead of one. Print(pdfstomerge) #i verify the pdfs are the ones i wantĬall()Įvery time i run it i get an output.pdf correctly produced which is empty. Drag the files that you want to combine into a single PDF into. Choose the option to Combine Files into a Single PDF. Pdfstomerge += glob.glob(os.path.join(root, '*.pdf')) Here's how you would do it in PDF-XChange Editor: Go to File > New Document. PdfInputDir = os.path.join (sortsdir, expTitle, "PDFs")įor root, dirs, files in os.walk(pdfInputDir): (0, '/System/Library/Automator/Combine PDF Pages.action/Contents/Resources/') It always refuses to process a list of files, just wants a string. I have successfully done this with a shell script but trying to run it with python i have not managed to make it grab all the pdfs, with any way i've tried. This will take all the pdfs of the input filenames and merge them. Join.py -o OutputDir/Outputfilename InputDir/*.pdf when in shell. The way this script is supposed to work is by providing the following arguments: Go to the Edit tab, then hover your mouse over the Insert option from the drop-down menu. Scroll down and choose the page thumbnails where you want to insert another PDF. Hit Thumbnails to display the respective page thumbnails on the sidebar. I have been trying to write a python script that among other things, uses the join.py Python script already present in OSX (see ) to merge pdf files from a specific folder. To select the documents you want to combine, either go to the Select files menu item or drag and drop your documents into. Open your PDF file with Preview your Mac and navigate to the View section. Please keep in mind i am very new to python.
0 notes
Text
Best free code editor for mac os x

Best free code editor for mac os x for mac#
Best free code editor for mac os x mac os#
Best free code editor for mac os x full#
Best free code editor for mac os x software#
What really stands out this Mac developer tool from other apps is a simple Git GUI helping developers visualize and manage hosted and local repositories. This desktop app is designed to simplify how you interact with your Git repositories so you can focus on coding.
Best free code editor for mac os x for mac#
SourceTreeĪ free Git client for Mac and Windows. With this app, you don’t have to worry about making mistakes - you can use “undo”, create new branches via drag & drop, or roll back to previous revisions. The solution provides a host of advanced features such as single line staging, submodule support, and file history. Git Tower can become an indispensable macOS developer tool for those who want to access their Planio repositories via an intuitive GUI.
Best free code editor for mac os x mac os#
It integrates easily with lots of other Mac OS developer tools and can be controlled from the command line. NetBeans has an extensible editor, providing plug-in support for programming languages like C/C++, XML, HTML, PHP, JSP and Javascript.
Best free code editor for mac os x software#
NetBeans’ compatibility with various operating systems makes it a worthy contender when it comes to choosing an appropriate programming software for Mac. All latest Java technologies are supported in all add-on analyzers, converters and code editors within the IDE. A visual debugger allows for easy GUI debugging. NetBeans Profiler provides a means to inspect your applications’ speed and memory usage.
Best free code editor for mac os x full#
Packed full of features to help developers write bug free code, NetBeans can integrate with such industry standard tools as FindBugs, thus helping to identify and fix common problems. With this Mac dev tool, you will get the highly desired abilities to write or edit in multiple places in a document simultaneously, edit super fast, reach the editor’s functionality via the keyboard, and get syntax highlighting and code snippets for a large number of languages, like Javascript, PHP, CSS, HTML, Python, LESS, XML and C++ to name a few. It is a sophisticated text editor for code, markup, and prose. If you’re looking for a fast and feature packed text and development editor, Sublime Text will be a good choice. Also, iTerm2 offers customizable profiles and Instant Replay of past terminal input/output. This macOS developer tool is highly customizable and supports various OS features including window transparency, full-screen mode, ExposéTabs, Growl notifications, and standard keyboard shortcuts. This handy terminal emulator will let you manage your workflow efficiently. ITerm2 is an open source replacement for Apple's Terminal and the successor to iTerm. FlexiHub works perfectly well across Ethernet, LAN, WiFi, the Internet or any other network and protects each connection with advanced traffic encryption. This is especially convenient for iOS app testing and debugging. The utility helps share iPhones and iPads over the network making them available for access from any remote machine, which means a developer can connect to an iOS device without having it physically attached to their Mac. FlexiHubįlexiHub is among the most efficient Mac apps for developers who are building software solutions for iOS devices. We hope that our brief overview of 12 best developer tools for Mac will help you discover a utility which will well fit your workflow and make your development project go smoothly. In this article, we provide a rundown of most commonly used Mac developer tools that make life easier for both novice coders and more experienced developers. Today, considering the wide variety of dedicated Mac solutions out there, it’s not always easy to choose the tool that will work best for one or another project. Having a proper set of tools is of crucial importance to any programmer, as it allows building all sorts of powerful apps for users to stay productive and entertained on iPhones, iPads, Apple TVs or Macs. What makes Mac such a great development platform is probably all the amazing macOS developer tools it supports.
0 notes
Text
Where does automize 9 backup

#Where does automize 9 backup mac os x#
#Where does automize 9 backup mac os#
You can automate downloads to a local filename based on the current month, day, or time for archiving. Schedule downloads of your favorite sports, weather, news or entertainment web page from the internet. XML loop, XML monitor, XML validateĪutomate PGP encryption and decryption tasks Secure FTP module is available as an add-on.įTP Command task can run RFC FTP commands in sequence.Īutomate XML tasks. Supports FTP logging and can be used as an FTP daemon. Schedule FTP of files between your PC and the server and automatically rename the files based on current month, day or time if needed. Scripts can be written in Java, Javascript, Groovy, Ruby, Python, Tcl, AWK and other languages!Īutomate FTP to/from an intranet or internet server. Automation scripting features are available in the Automize Enterprise edition. You can also create complex automation scripts which build upon existing Automize tasks. Scripting: For advances users, you can develop scripts that reduce repeated, laborious computer-related activities. in sequence with options depending on Exit codes. Run multiple programs, commands, FTP, email, web downloads etc. It can also terminate them or obtain their exit codes for use in other Automize tasks.Ĭhain Task Integrator includes Commands, database SQL, check email, FTP, Web downloads, send email, URL monitors, telnet, ping, copy, print files etc. Most tasks also generate variables which can be used in other tasks.Ĭreate advanced automation solutions using our Automize tasks in conjunction with variables, directory/file monitors and our task chains.Ĭommand and Windows Command tasks can run your batch files, scripts or executable programs. No programming or script knowledge is required.Įmail Notification for all tasks based on task exit code.ĭynamic variables are supported for most tasks. Task scheduler allows you to schedule tasks, execute tasks as well as other software programs and applications.
#Where does automize 9 backup mac os#
Tested on Windows, Mac OS X, Linux (Ubuntu and Fedora) We develop and test on Mac.Īutomation software for Windows.
#Where does automize 9 backup mac os x#
Automize is the leader in multi-platform (Windows, Mac OS X and Linux) advanced task scheduling and automation software.Įnterprise = Standard + SFTP module + PGP module + XML module + Scripting module (javascript, java, groovy, jython, jruby etc.)Īutomation software for Mac. Automize - Automation software suite to improve your productivity and save time.
0 notes
Text
Homebrew for mac 10.13

#HOMEBREW FOR MAC 10.13 HOW TO#
#HOMEBREW FOR MAC 10.13 FOR MAC#
#HOMEBREW FOR MAC 10.13 MAC OS#
#HOMEBREW FOR MAC 10.13 INSTALL#
#HOMEBREW FOR MAC 10.13 FULL#
#HOMEBREW FOR MAC 10.13 INSTALL#
For example, to install a package, you should type brew install ‘package name’ in Terminal. You’ll see examples of commands that will help you install different software, configs, and updates through Homebrew. In Terminal, run brew help to get started. If you don’t want your data to be collected and shared with the Homebrew developers, here’s the command you should run in Terminal to turn off analytics: brew analytics off Step 4: Set up Homebrew Here’s what’s typically collected: Homebrew User Agent, Google Analytics version, Homebrew analytics tracking ID, Homebrew analytics user ID, and data about the status of Google Analytics anonymous IP setting. This is not an obligatory step, but we’d better warn you that Homebrew can share some of your data with developers since the tool is free and open-source. Wait a few minutes until you see the “Installation successful” message in Terminal. Type your admin password (note that you won’t see your keystrokes in the Terminal window - it’s a security measure) > hit Return Open Terminal and type the following command:
Agree to a license agreement and wait for the installation process to complete.
In the new dialog window, confirm you want to install the Xcode tools.
Open Terminal and type the following command: xcode-select -install.
#HOMEBREW FOR MAC 10.13 HOW TO#
Here’s how to install command line tools for Xcode: To install some of the Homebrew package components, you need to install Xcode’s command line tools first (in case you haven’t done it before). Xcode is Apple’s native IDE, an integrated development environment that has all the tools you need for software development on Mac. Step 1: Install command line tools for Xcode Since some people don’t want to use curl for security reasons, there are ways to manually download and execute the script (but we won’t go into that here). The same applies to the process of uninstalling Homebrew. This method is the easiest and it’s recommended by the Homebrew team. Moving to the main part - ”install Homebrew Mac” - we should explain that the installation method we describe uses curl to download the installation script.
#HOMEBREW FOR MAC 10.13 FULL#
The beauty of Setapp is that you don’t have to know the names of these apps or their full functionality - you just type your task in search (for example, “edit PDF”), and Setapp gives you the apps that can edit PDF. There are some simple default brew commands for installing single-file utilities, and more advanced subcommands called casks - you’ll have to use those to install multi-directory utilities. The main thing you should know as a user is that Homebrew acts through Terminal commands - you can install, update, and uninstall packages by typing a few words. To go easy on the coding jargon, we won’t be explaining how Homebrew works under the hood.
tldr for practical examples on how to use the command line.
archey to share the localhost with your team.
imagemick to convert images to other formats.
Here are just a few examples of the useful tools you can get through Homebrew: Best of all, they are all installed, uninstalled, and updated in one location on your Mac. Why do you need it? With Homebrew, you can benefit from tons of command line tools to automate your work. If you want a more informative definition, Homebrew is a free and open-source package manager for macOS, helping you install, update, uninstall, and manage developer tools like Python, Ruby, and Node.js on your Mac. “ Homebrew installs the stuff you need that Apple didn’t” - this is how Homebrew creators describe it, and we agree. We also suggest a few tools similar to Homebrew you could benefit from. In this tutorial, we describe how to safely install and uninstall Homebrew on Mac. Package managers like Homebrew make the command line interface even more powerful. It helps streamline a lot of work, especially for software developers. By using the command line, you can solve many tasks on Mac by running commands in Terminal. The macOS command line interface can be intimidating - but there’s lots of value inside.
#HOMEBREW FOR MAC 10.13 MAC OS#
Note: you'll need a valid Apple Store ID that "purchased" older Mac OS versions via the App store You can see your purchases and their IDs using mas List.Unlock the power of top dev apps on Setapp. The following code would be used to download 10.7.īelow is a list of Mac Store IDs for older versions of OS X. The way it works is running the command followed by the app store ID number. The Mas CLI will let you download anything that you have purchased in the past. Step 3: Download old macOS via the mas-cli utilty This will only take a minute or so for the application to download and install. Step 2: Install Macintosh App Store CLI (Command Line Interface) utility via HomeBrewįrom your terminal, run the following command, brew install mas
#HOMEBREW FOR MAC 10.13 FOR MAC#
HomeBrew is a Mac OS package manager, a CLI utility for downloading and installing binaries for Mac OS. Go to brew.sh and download and install HomeBrew.
0 notes
Text
Top PHP Development Tools to watch out for
Hypertext Preprocessor, commonly known as PHP, happens to be one of the most widely used server-side scripting languages for developing web applications and websites. Renowned names like Facebook and WordPress are powered by PHP. The reasons for its popularity can be attributed to the following goodies PHP offers:
Open-source and easy-to-use
Comprehensive documentation
Multiple ready-to-use scripts
Strong community support
Well-supported frameworks
However, to leverage this technology to the fullest and simplify tasks, PHP developers utilize certain tools that enhance programming efficiency and minimize development errors. PHP development tools provide a conducive IDE (Integrated Development Environment) that enhances the productivity of PHP web development.
The market currently is overflooded with PHP tools. Therefore, it becomes immensely difficult for PHP development teams to pick the perfect set of tools that will fulfill their project needs. This blog enlists the best PHP application development tools along with their offerings. A quick read will help you to choose the most befitting tool for your PHP development project.
Top PHP Software Development Tools
PHPStorm
PHPStorm, created and promoted by JetBrains, is one of the most standard IDEs for PHP developers. It is lightweight, smooth, and speedy. This tool works easily with popular PHP frameworks like Laravel, Symfony, Zend Framework, CakePHP, Yii, etc. as well as with contemporary Content Management Systems like WordPress, Drupal, and Magento. Besides PHP, this tool supports JavaScript, C, C#, Visual Basic, and C++ languages; and platforms such as Linux, Windows, and Mac OS X. This enterprise-grade IDE charges a license price for specialized developers, but is offered for free to students and teachers so that they can start open-source projects. Tech giants like Wikipedia, Yahoo, Cisco, Salesforce, and Expedia possess PHPStorm IDE licenses.
Features:
Code-rearranging, code completion, zero-configuration, and debugging
Support for Native ZenCoding and extension with numerous other handy plugins such as the VimEditor.
Functions:
Provides live editing support for the leading front-end technologies like JavaScript, HTML5, CSS, TypeScript, Sass, CoffeeScript, Stylus, Less, etc.
It supports code refactoring, debugging, and unit testing
Enables a PHP developer to integrate with version control systems, databases, remote deployment, composer, vagrant, rest clients, command-line tools, etc.
Coming to debugging, PHPStorm works with Xdebug and Zend Debugger locally as well as remotely.
Cloud 9
This PHP development tool is an open-source cloud IDE. It offers a development eco-system for PHP and numerous other programming languages like HTML5, JavaScript, C++, C, Python, etc. It supports platforms like Mac OS, Solaris, Linux, etc.
Features:
Code reformatting, real-time language analysis, and tabbed file management.
Availability of a wide range of themes
In-built image editor for cropping, rotating, and resizing images
An in-built terminal that allows one to view the command output from the server.
Integrated debugger for setting a breakpoint
Adjustable panels via drag and drop function
Support for keyboard shortcuts resulting in easy access
Functions:
With Cloud 9, one can write, run and debug the code using any browser. Developers can work from any location using a machine connected to the internet.
It facilitates the creation of serverless apps, allowing the tasks of defining resources, executing serverless applications, and remote debugging.
Its ability to pair programs and track all real-time inputs; enables one to share their development eco-system with peers.
Zend Studio
This commercial PHP IDE supports most of the latest PHP versions, specifically PHP 7, and platforms like Linux, Windows, and OS X. This tool boasts of an instinctive UI and provides most of the latest functionalities that are needed to quicken PHP web development. Zend Studio is being used by high-profile firms like BNP Paribas Credit Suisse, DHL, and Agilent Technologies.
Features:
Support for PHP 7 express migration and effortless integration with the Zend server
A sharp code editor supporting JavaScript, PHP, CSS, and HTML
Speedier performance while indexing, validating, and searching for the PHP code
Support for Git Flow, Docker, and the Eclipse plugin environment
Integration with Z-Ray
Debugging with Zend Debugger and Xdebug
Deployment sustenance including cloud support for Microsoft Azure and Amazon AWS.
Functions:
Enables developers to effortlessly organize the PHP app on more than one server.
Provides developers the flexibility to write and debug the code without having to spare additional effort or time for these tasks.
Provides support for mobile app development at the peak of live PHP applications and server system backend, for simplifying the task of harmonizing the current websites and web apps with mobile-based applications.
Eclipse
Eclipse is a cross-platform PHP editor and one of the top PHP development tools. It is a perfect pick for large-scale PHP projects. It supports multiple languages – C, C++, Ada, ABAP, COBOL, Haskell, Fortran, JavaScript, D, Julia, Java, NATURAL, Ruby, Python, Scheme, Groovy, Erlang, Clojure, Prolong, Lasso, Scala, etc. – and platforms like Linux, Windows, Solaris, and Mac OS.
Features:
It provides one with a ready-made code template and automatically validates the syntax.
It supports code refactoring – enhancing the code’s internal structure.
It enables remote project management
Functions:
Allows one to choose from a wide range of plugins, easing out the tasks of developing and simplifying complex PHP code.
Helps in customizing and extending the IDE for fulfilling project requirements.
Supports GUI as well as non-GUI applications.
Codelobster
Codelobster is an Integrated Development Environment that eases out and modernizes the PHP development processes. Its users do not need to worry about remembering the names of functions, attributes, tags, and arguments; as these are enabled through auto-complete functions. It supports languages like PHP, JavaScript, HTML, and CSS and platforms such as Windows, Linux, Ubuntu, Fedora, Mac OS, Linux, and Mint. Additionally, it offers exceptional plugins that enable it to function smoothly with myriad technologies like Drupal, Joomla, Twig, JQuery, CodeIgniter, Symfony, Node.js, VueJS, AngularJS, Laravel, Magento, BackboneJS, CakePHP, EmberJS, Phalcon, and Yii.
Offerings:
It is an internal, free PHP debugger that enables validating the code locally.
It auto-detects the existing server settings followed by configuring the related files and allowing one to utilize the debugger.
It has the ability to highlight pairs of square brackets and helps in organizing files into the project.
This PHP development tool displays a popup list comprising variables and constants.
It allows one to hide code blocks that are presently not being used and to collapse the code for viewing it in detail.
Netbeans
Netbeans, packed with a rich set of features is quite popular in the realm of PHP development services. It supports several languages like English, Russian, Japanese, Portuguese, Brazilian, and simplified Chinese. Its recent version is lightweight and speedier, and specifically facilitates building PHP-based Web Applications with the most recent PHP versions. This PHP development tool is apt for large-scale web app development projects and works with the most trending PHP frameworks such as Symfony2, Zend, FuelPHP, CakePHP, Smarty, and WordPress CMS. It supports PHP, HTML5, C, C++, and JavaScript languages and Windows, Linux, MacOS, and Solaris platforms.
Features:
Getter and setter generation, quick fixes, code templates, hints, and refactoring.
Code folding and formatting; rectangular selection
Smart code completion and try/catch code completion
Syntax highlighter
DreamWeaver
This is one of the most popular PHP application software development tools. It assists one in creating, publishing, and managing websites. A website developed using DreamWeaver can be deployed to any web server.
Offerings:
Ability to create dynamic websites that fits the screen sizes of different devices
Availability of ready-to-use layouts for website development and a built-in HTML validator for code validation.
Workspace customization capabilities
Aptana Studio
Aptana Studio is an open-source PHP development tool used to integrate with multiple client-side and server-side web technologies like PHP, CSS3, Python, RoR, HTML5, Ruby, etc. It is a high-performing and productive PHP IDE.
Features:
Supports the most recent HTML5 specifications
Collaborates with peers using actions like pull, push, and merge
IDE customization and Git integration capabilities
The ability to set breakpoints, inspect variables, and control the execution
Functions:
Eases out PHP app development by supporting the debuggers and CLI
Enables programmers to develop and test PHP apps within a single environment
Leverages the flexibilities of Eclipse and also possesses detailed information on the range of support for each element of the popular browsers.
Final Verdict:
I hope this blog has given you clear visibility of the popular PHP tools used for web development and will guide you through selecting the right set of tools for your upcoming project. If you are a start-up or lack technical expertise in PHP application development, it’s advisable to hire an experienced PHP application development company for executing your project.
0 notes
Text
How to use python in visual studio code

#How to use python in visual studio code how to#
#How to use python in visual studio code install#
#How to use python in visual studio code archive#
#How to use python in visual studio code code#
#How to use python in visual studio code download#
In this example searching after ‘#webapi’ string, retrieving the results in English, in batches of 10 results. Then we can search and extract results in successive batches or pages. With credentials from Twitter, we can access the Twitter data:ĬonnectTwitter = TwitterAPI(consumer_key, consumer_secret, access_token_key, access_token_secret) To be able to do this we will use the TwitterAPI library. It has integrated the command prompt, and you can easy access it by clicking on the menu item: View -> Integrated terminal.
#How to use python in visual studio code install#
However, if the editor doesn’t detect that a linter is enabled, a prompt displays in the lower right corner to install Pylint.
#How to use python in visual studio code code#
Visual Studio Code enables Pylint when a new Python file is created. You could also run these lines within VSCode. Bandit: Finds common security issues in Python code As noted, Pylint is the default linter. To install the Twitter library, open the command prompt and run each of the next install commands. Then use the option File -> Open Folder in VSCode.
#How to use python in visual studio code archive#
Once you first open the VS Code, open the Extensions list and install Python extension.ĭownload from GitHub the code ( click to download) and extract the archive to a local folder. Our example will work with minor changes also for Python 2. After your application is created, you will need to get your API keys (or generate some) and also generate access tokens.ĭownload and install first Python 3 and then Visual Studio Code. Once you have an account, you’ll have to go to their developer’s site, in the Application Management area and create a new application. Getting startedĪt first, you will need to create a Twitter account and then a Twitter application. Installing a Python Library Using the Terminal in VSCode 1) Accessing Visual Studio Code Terminal. Python Interpreter: you can find the steps to install it here. Python Extension for Visual Studio Code: you can find the steps to install it here.
#How to use python in visual studio code download#
Being a modular solution, VSCode demands that you download and install. Visual Studio Code: you can find the steps to install it here. A kind of Lego board upon which you can construct the development environment you want and need. Visual Studio Code is a lightweight solution that can be expanded, extended and modified through plugins and extensions. Using an excellent Python library – TwitterAPI as a minimal wrapper to native Twitter API calls, we can have a tool to extract the information we need. Microsoft Visual Studio Code for Python Development. The list of different ways to use Twitter could be really long, and with 500 millions of tweets per day, there’s a lot of data to play with. Users share thoughts, links and pictures on Twitter, journalists comment on live events. Twitter is a popular social network where users can share short SMS-like messages called tweets. Combining with Python, and its associated 3rd party packages that wrap Twitter’s API, we can easy connect to Twitter, read and use the data in just few lines of code. works! … now, back to coding.Visual Studio Code is a cross platform editor that supports multiple programming languages. To get to that file, in vscode (mac) cmd+shift+P – type ‘ task’ – select ‘ configure task runner’, and edit the file to point the “ command” at “ python3”, and the (command line) args to point at $. Input the keyword python in the search box, and click the Install button for the Microsoft-created. It will list all the installed and recommend extensions in the visual studio code left side EXTENSIONS panel. Open visual studio code, click View > Extensions menu item at the top menu bar.
#How to use python in visual studio code how to#
I reached out to sent me to the wiki that kinda helped, but not quite… Configure VS Code for Python3Īfter a lot of poking around and going down rabbit holes, I found the solution, you need to tweak the tasks.json file to tell it to use Python V3. How To Install Visual Studio Code Python Extension. Using V2, no hassle, but V3 … nope … and dig as I might, I couldn’t find what settings to change. I love Visual Studio Code, really – it’s the longest lasting fav thing I’ve had, like, for evah! … I used to hack on Sublime, but I deleted it last week (for evah) in favor of vs code … it's the business.Īnyway, my love for it aside – I was starting some R&D the other day using it, and couldn’t get the darn thing to play nice with the latest version of Python.
0 notes
Text
Download opencv python for mac

DOWNLOAD OPENCV PYTHON FOR MAC HOW TO
DOWNLOAD OPENCV PYTHON FOR MAC INSTALL
DOWNLOAD OPENCV PYTHON FOR MAC CODE
DOWNLOAD OPENCV PYTHON FOR MAC INSTALL
Installing OpenCV on M1 MacBook Open Terminal on mac and run the following commands: Apple command line tools conda install -y python3.8.6.
DOWNLOAD OPENCV PYTHON FOR MAC CODE
OpenCV 3.2 + Python 3.6.1: imshow() not worked even with waitKey(0) #8885 I can confirm all my previously working C++ code now only shows macOS cocoa window autosize could not access image dimensions #8916. How can I solve this problem? OpenCV Version: 3.0.0 Pycharm Version: Conmunity Edition 2016.2.3 OS Problems installing opencv on mac with python. python3 virtualenv opencv dlib tensorflow keras.Īnd can use opencv normally. Setting up deep learning environment the easy way on macOS High Sierra I had to look around and experiment to install all the packages I was enjoying on Ubuntu. Learn about macOS Big Sur and any updates that are available for Login window may not display properly after restarting Mac mini (M1, macOS Big Sur 11.2 improves Bluetooth reliability and fixes the following issues.Īre you running into problems install OpenCV via Homebrew? To help you and other PyImageSearch readers get OpenCV installed faster (and with Figure 4: Importing the cv2 library into a Python 2.7 and Python 3 shell.
DOWNLOAD OPENCV PYTHON FOR MAC HOW TO
Vivek-ram changed the title how to install Pandas, opencv2 in M1 how to When I install open-cv with pip3 install opencv-python I run into following Python 3.9.5 is the newest major release of the Python programming Some of the new major new features and changes in Python 3.9 are: You can find a more comprehensive list in this release's "What's New" document. How to use OpenCV imshow() in a Jupyter Notebook - Quick Tip The problem is that the image box is using the same Python process as the Therefore it is not happy to wait for the window, and you lose control of the Python process. Why am I having issues running a file in P圜harm? Why are IDE's important when you can just use text editors and the built in terminal on a Mac? Homebrew prints out this export command for you after installing opencv, so you can just. For P圜harm pip install -no-binary opencv-python opencv-python. Mac OS Big I got cv2.imshow to show the image in a window when running Python in the terminal. markwimpory opened def show_image(image): destroyAllWindows(). IMShow No Window - 4.4.0.46 MacOS Big Sur #423. You will learn how to install OpenCV 4 on Raspbian Buster via both: To learn more about installing OpenCV 4 on the Raspberry Pi 4 and Raspbian for some projects (including many educational projects on and in macOS, and Linux (no dev environment configuration required!) The window should show a 512*512 black image, but it does show a In a different environment I think opencv-python is doing something wrong macOS Catalina 10.5.6 Anaconda July 2020 edition notebook 6.2.3. If you don't have homebrew on your system you can download and install it After installing Homebrew check if you have XCode Command Line Java Application project or open your existing application in IntelliJ Idea.Īfter executing imshow() and the opened window is displayed, loading does not stop. The quickest and easiest way to install OpenCV on your mac is to use Homebrew.
1 note
·
View note