#Most Useful Basic Common Terraform Commands
Explore tagged Tumblr posts
Visit Tumblr Blog
Explore Tumblr blogs with no restrictions, modern design and the best experience.
Last Seen Tumblr Blogs


Fun Fact
In 2020, 27% of US Tumblr users had an annual household income of over $100,000.
Video
youtube
Introduction to Linux for DevOps: Why It’s Essential
Linux serves as the backbone of most DevOps workflows and cloud infrastructures. Its open-source nature, robust performance, and extensive compatibility make it the go-to operating system for modern IT environments. Whether you're deploying applications, managing containers, or orchestrating large-scale systems, mastering Linux is non-negotiable for every DevOps professional.
Why Linux is Critical in DevOps
1. Ubiquity in Cloud Environments - Most cloud platforms, such as AWS, Azure, and Google Cloud, use Linux-based environments for their services. - Tools like Kubernetes and Docker are designed to run seamlessly on Linux systems.
2. Command-Line Mastery - Linux empowers DevOps professionals with powerful command-line tools to manage servers, automate processes, and troubleshoot issues efficiently.
3. Flexibility and Automation - The ability to script and automate tasks in Linux reduces manual effort, enabling faster and more reliable deployments.
4. Open-Source Ecosystem - Linux integrates with numerous open-source DevOps tools like Jenkins, Ansible, and Terraform, making it an essential skill for streamlined workflows.
Key Topics for Beginners
- Linux Basics - What is Linux? - Understanding Linux file structures and permissions. - Common Linux distributions (Ubuntu, CentOS, Red Hat Enterprise Linux).
- Core Linux Commands - File and directory management: `ls`, `cd`, `cp`, `mv`. - System monitoring: `top`, `df`, `free`. - Networking basics: `ping`, `ifconfig`, `netstat`.
- Scripting and Automation - Writing basic shell scripts. - Automating tasks with `cron` and `at`.
- Linux Security - Managing user permissions and roles. - Introduction to firewalls and secure file transfers.
Why You Should Learn Linux for DevOps
- Cost-Efficiency: Linux is free and open-source, making it a cost-effective solution for both enterprises and individual learners. - Career Opportunities: Proficiency in Linux is a must-have skill for DevOps roles, enhancing your employability. - Scalability: Whether managing a single server or a complex cluster, Linux provides the tools and stability to scale effortlessly.
Hands-On Learning - Set up a Linux virtual machine or cloud instance. - Practice essential commands and file operations. - Write and execute your first shell script.
Who Should Learn Linux for DevOps? - Aspiring DevOps engineers starting their career journey. - System administrators transitioning into cloud and DevOps roles. - Developers aiming to improve their understanding of server environments.
***************************** *Follow Me* https://www.facebook.com/cloudolus/ | https://www.facebook.com/groups/cloudolus | https://www.linkedin.com/groups/14347089/ | https://www.instagram.com/cloudolus/ | https://twitter.com/cloudolus | https://www.pinterest.com/cloudolus/ | https://www.youtube.com/@cloudolus | https://www.youtube.com/@ClouDolusPro | https://discord.gg/GBMt4PDK | https://www.tumblr.com/cloudolus | https://cloudolus.blogspot.com/ | https://t.me/cloudolus | https://www.whatsapp.com/channel/0029VadSJdv9hXFAu3acAu0r | https://chat.whatsapp.com/D6I4JafCUVhGihV7wpryP2 *****************************
*🔔Subscribe & Stay Updated:* Don't forget to subscribe and hit the bell icon to receive notifications and stay updated on our latest videos, tutorials & playlists! *ClouDolus:* https://www.youtube.com/@cloudolus *ClouDolus AWS DevOps:* https://www.youtube.com/@ClouDolusPro *THANKS FOR BEING A PART OF ClouDolus! 🙌✨*
#youtube#Linux Linux for DevOps Linux basics Linux commands DevOps basics DevOps skills cloud computing Linux for beginners Linux tutorial Linux for#LinuxLinux for DevOpsLinux basicslinux commandsDevOps basicsDevOps skillscloud computingLinux for beginnersLinux tutorialLinux scriptingLinu#aws course#aws devops#aws#devpos#linux
1 note
·
View note
Text
What is Terraform and How it Works?
What is Terraform and How it Works?
Facebook Twitter LinkedIn Pinterest Messenger Print WhatsApp Tumblr Email Reddit Viber What is Terraform and How it Works? In this article we are going to discuss about terraform.This will be really helpful to understand many thing related to terraform like what is terraform?, how terraform works? why to use terraform? and many more . Topics covered in this article is as below. Brief History of…

View On WordPress
#advantages of using terraform#Brief History of Terraform?#cloud#Cloud Automation#Cloud Infrastructure As Code#How Terraform Works?#How to Find Most Common Terraform Commands?#How To Find What Terraform Version You Are Using?#How to Install Terraform in Linux?#Most Useful Basic Common Terraform Commands#Terraform Vs CloudFormation#what is difference between terraform and cloudformation?#what is terraform provider?what is terraform used for?#what is terraform used for in aws?#what is terraform?#what is the purpose of terraform?#Why to use Terraform?
0 notes
Note
Imagine if Huggy's ship turned evil due to a glitch and started trying to terraform Fair City into Lexicon 2.
How would his ship have that power? What type of ship does he pilot? Is it common for lexicon ships to have a terraform function?
What would cause the glitch to activate terraform in the first place? Originally Huggy was going to do a test flight right, so what level of ship was he testing?
Was it a new type of ship? Or was it a common ship? What purpose did Huggy have in flying that day? Was it an order or was it something he planned on his own?
Clearly no one was watching the run ways. How did a baby find her way to a military bases hangers anyway?
These are the kind of things I have to think about and I don’t know if I could give a reasonable answer for that. I’m not good with complex plots, they don’t come naturally to me most of the time.
That being said, probably would hold someone maybe Becky in civilian form hostage and leave it up to Huggy and Kid Math (?) or some one else to help, to save her and stop the ship.
Becky would have been scanned by the ship and be seen as a high profile child or something and be safely detained within the ship for protection or to keep out of the way.
How would the ship be able to do so? Uh on Lexicon would she be considered strong or common for her age? The ship is from Lexicon so it probably is equipped to handle people from there, Huggy just doesn’t have any reason to use it.
He also doesn’t have all facilities to care for a child on the ship (If he did it was probably because he himself was not equipped to raise a child by himself).
The ship is fairly large with a library and obviously a bathroom with a bathtub and a basic kitchen and a storage room and maybe one sleeping room, and a brig (?).
I’m going to need to see the layout of the ship for this to be honest. I’m just estimating what a ship needs.
Depending on the type of ship, like I said, will be the amount of necessities inside. If it has a terraforming function then it must have been a special type of ship in it’s testing stages (probably wasn’t going to test the terraforming functions yet).
What does a terraforming ship need? I’m sure all Lexicon ships require a library but the size of the library is determined by the size of the ship and it’s importance.
It’s not a commanders ship is it? If it was, then how come there isn’t a homing beacon or tracking feature?
Was that part broken? Was it not installed? Ships must have the ability to communicate to command after all.
As the best Pilot, Huggy, has to know how all the ships he pilots work. Is that why Huggy was going to fly that day?
Why did they need a terraforming ship if the planet is not in any danger now or even in the near future? Was it because they were just scientifically curious?
Sorry if this is really long and if I didn’t really answer- it’s just a lot to think about. A story like this requires planning and I’m not a planner.
Too many questions and I don’t think I could handle this level of forethought. I mean the fanfiction I will eventually continue to write isn’t complicated like this- it’s actually not too complicated.
So this- yeah. Sorry, I’m done. I’m all questioned out. There’s probably more I can’t think of at the moment.
4 notes
·
View notes
Photo

Humans are weird: The Hand of Andromeda Ch. 2 ( Please come see me on my new patreon and support me for early access to stories and personal story requests :D https://www.patreon.com/NiqhtLord Every bit helps) (New chapters will be posted first to patreon and then moved here)
The Ageis system was not what one would consider a pinnacle world of civilization in an age of interstellar travel. At best it was a backwater system deep in unclaimed space between the Rylon Collective and Havatal Republic the system with only one habitable planet, Ageis Prime.
The planet itself was largely barren, consisting of entire continents of jagged rocks and acidic seas. Only a small belt of land near the equator was remotely capable of sustaining life and supported small clusters of forests isolated from the harsh surrounding landscape.
First development of the planet was made by the Xlaxon Mining Guild when a remote probe of theirs scanned the system and found valuable minerals scattered around the planet. Shortly after a group of indentured laborers were imported to the planet and a mining operation was established, initially consisting of a landing pad, machine shop, processing facility, and several other living quarters.
Just as the operation was about to get underway however the Xlaxon Mining Guild found itself drawn into what is now known as the “Guild Wars”, which were a series of escalating conflicts fought between rival mining organizations. To put it mildly the Xlaxon’s did not last long and were quickly consumed by a larger guild. In the confusion of the guild wars the newly establish mining operation on Ageis Prime was lost in paperwork and quickly became further isolated from the rest of the galaxy.
With no overseers left and a semi functional colony all to themselves the newly transplanted workers began to form their own society on the planet and carved out a small patch of the planet they could call their own. It was nothing to brag about, but given their limited resources they made due. Several years passed before the planet would encounter a small group of mercenaries that would change their destiny forever.
A group of mercenaries calling themselves “The Fishermen” landed on the planet, which had now grown into a dense urbanized city, looking to finally establish a base of operations. There was initial resentment from the inhabitants as the established ruler of the planet, a self-proclaimed warlord known as “Kevin the Heartless”, ordered his enforcers to drive off the mercenaries. The battle was swift and the better trained and armed mercenaries easily overpowered the enforcers with the struggle finally ending when the warlord himself had his head bitten off and spit out by the mercenary’s Predatorian leader.
The inhabitants were surprised to find their new overlord was much more merciful than they had expected. While the mercenaries did establish themselves on the planet they also brought with them a vast amount of wealth from numerous sources. The normal baggage train of any military group flocked to the planet and set up shop. Bars, brothels, weapons dealers, mechanic shops, and even an official branch of the intergalactic bank quickly set up as the mercenary band began to sell out their services. As their fame grew the group not only enriched themselves but oddly enough began investing in the planets community’s as well.
Schools and hospitals were built for the growing population, a new police force and government system was established for official recognition and participation by the people of Ageis Prime, and most beneficial of all were several terraforming towers that were installed around the planet which began replacing the harsh world with an increasingly comfortable climate. With all of these improvements the general population lauded the Fishermen and heaped praise after praise on to them.
In the span of three years Ageis Prime had gone from a forgotten backwater to the galactic hub of the dead zone of unclaimed space; a pillar of civilization in the dark void of forgotten space.
Yet for all their generosity, the Fishermen still controlled everything from the shadows. It was an unspoken law of the land that nothing of importance was done without their leader’s approval. Even to run in an election a nominee had to first come see their boss and present him or herself to see if they’d amuse the Predatorian; if he didn’t find them amusing than they were expected to drop out, lest an unfortunate accident befall them.
At any given time the mercenary group was contracted out between ten to fifteen jobs ranging from basic security details for high value personnel and facilities, to waging wars on distant planets on part of an ad hoc detachment. This abundance of work was rather common as both the Rylon Collective and Havatal Republic lacked the means to enforce their wills in the unclaimed systems between their two borders. This didn’t even come close to the dozen or so different criminal groups that inhabited this unclaimed space who were always in need of additional muscle.
There were of course rival organizations to the Fishermen such as the Abvara Syndicate, Pelpens Pirates, the Brotherhood of Orion, and the Band of the Hig who each had their own sizable forces; yet each of them were constantly switching between periods of stability and bloody internal struggles for leadership. This facet was not seen inside the Fishermen thanks not only to their structuring, but also to the visionary leader that formed and continued to lead the group even now.
Sitting at the very top of the organization was the Predatorian, a massive mound of raw muscle, sharpened teeth, and with a twisted sense of humor only psychopaths could fully appreciate. Rising from a former slave he had first formed the Fishermen from the same slaves he was freed alongside during a bloody slave uprising. After taking control of ship that had once held them captive he steered it to the nearest port and sold it off, then used the funds to train and equip the slaves into a standard fighting force.
His name was Mr. B.
No one in the organization knew if that was his real name or not but what they did know was not to mock it. The last person that did had their fingers bitten off one at a time by Mr. B before they were thrown out on to the street. Mr. B later said that hearing all their jokes about his name had made him hungry for some “finger food”. He was ruthlessly efficient in his work and he expected that from all those under him. His combat experience was rivaled only by the commando units of the galactic governments. Yet for all his combat talent and training he was not as skilled when it came to logistics and the day to day operations common for such a large group. Thus he was greatly benefited by his second in command who was aptly proficient in such matters at such a young age.
A nine and a half year old human child named Lizzy Stalwart.
If there was little known about Mr. B there was even less known about his adopted daughter Lizzy Stalwart. Freed from the same slave ship Mr. B had been previously held, she had been by his side ever since. Rumor was she had been the one to trigger the mass unlocking of cells on the ship which led to the ship wide revolt of slaves against their captors.
While Mr. B handled the military aspects of the group it was Lizzy that managed the books. She had a keen insight for numbers and was always able to keep the group well-armed and fed as they went contract to contract. A common saying among the grunts of the organization was that you’d never run out of blood with Mr. B, and never run out of bullets with Lizzy Stalwart.
Despite his brutish demeanor, Mr. B had a natural soft spot for Lizzy and he had taken her under his fin so to speak and had come to see her as his daughter. The two of them were set to take on whatever the galaxy could throw at them, and they had an army behind them to throw it right back for payback.
The transport shuttle slowly descended to street level before killing the thrusters. The bus driver checked his systems and pulled open the door latch to the street.
“Fisher HQ!” they called out to the passengers behind them.
Vick grabbed his satchel bag and hefted it over his should as he stood up and made his way to the door.
“Let me guess,” the bus driver said as he finally reached the front; his eyes taking him in for a moment before he smirked, “trying to swim with the big boys?”
Vick smiled at the man as he got off but didn’t answer him. The shuttle thrusters kicked back on and the craft once again rose upwards into the air before speeding off down the road leaving Vick in the billowing cloud of dust it left behind.
He coughed several times and swiped the dust from his eyes before the cloud parted and revealed his final destination; the headquarters of the mercenary Fisherman.
It was a vast compound just outside of the city limits easily taking up nine city blocks in size. It held its own private landing pads, medical facilities, housing and training grounds, munition depots and manufactures... It was like an entire city itself dedicated to killing for money.
From the moment he had quit his dead end job as a dish washer of Veega Ce, Vick Novikov had thought of nothing but this moment. He had spent every credit he had ever saved to purchase his passage off world and the compact pistol strapped to his right thigh.
No longer would he be looked down on by those around him, no longer would people shove him out of their way as if he was garbage in the street, no longer would kids throw fucking rocks at him and laugh like the little shits they were.
Today Vick was going to become someone new, someone better, someone to be respected and feared.
Today, Vick was going to become a Fisherman.
#HUMANS ARE WEIRD#humans are insane#humans are space orcs#humans are space oddities#story#Hand of Andromeda
49 notes
·
View notes
Text

@mstinteresting asked: “plots please” (Let. Me. Give. Diego. A. Star. Wars. Verse.)

Your wish is my command, M’Lady!
1. & 2. Star Wars
It’s both versions of the universe and even though what he is in both is basically the same, how that works out is different. But TBH, the thing that just sticks in my mind with him and Star Wars is being a commando... like he’s the one that knows the science things and is probably at least mildly if not full blown force sensitive but isn’t a jedi either because he was never interested or didn’t realize until after becoming a commando and doesn’t care to join the Jedi. This could easily shift to any part of the SW universe as most times and groups have commandoes but my ideas have to do with both versions of post OT.
In the new canon, he’d be potential past New republic, but definitely now a resistance commando, potentially one of the few who have survived this far into the war. He’s vital beyond his abilities as a commando in training others to some level of adeptness in hand to hand or sniping or clearing buildings, you know the drill. He probably meets Jaina when she’s still a teen, making a visit to a base with Leia or Han, a tiny teen with the sharpest tongue and mind for flying and mechanics. She doesn’t get much taller, just a touch more than Leia either btw... XD But as the new trilogy’s events approach, she’s an adult, finishing up what her mother can teach her in the force, almost one of those legendary jedi and she probably asks to spar with him and/or to help her learn some more hand to hand things. She might not have an x-wing, but she’s smuggling things for the resistance so he might even be asked to join her on a particularly stiff mission. THINGS LIKE THAT. and she does get her plane not long after TLJ at the latest, so she’ll become the hotshot pilot she always told him she’d be. XD
In Legends, he’d be just New republic, part of a large group of commandoes, plenty of comrades, but they’re facing the biggest threat the galaxy has seen in a least a thousand years: the Yuzhan Vong. Their lifeform based tech and terraforming threaten to destroy life as every being knows it and enslave the survivors under a society that worships death and pain on a level to make the Sith cringe. And they would... since these beings can’t be sensed in the Force. These being rip through the galaxy, including the jedi who are fighting as hard as anyone else. A year or two into the war, he’s assigned to the same ship as Jaina, who is the leader of her own squadron and a republic officer in her own right. Listen, they’d either get along great in this verse or butt heads constantly. She’s single mindedly determined to end this war before she loses someone else, and doesn’t care if she doesn’t survive it... let alone if this is after Intel has her playing Yun Harla, a vong goddess, for pyschops. But he’d be first to know some of the new ways to fight these beings and some of the intensest fighting.
3. Umbrella Academy
I SUPPOSE this is just related to her modern verse, but I could see them running into each other just by accident... yes, she happens to be the daughter of a prominent US politician, but she’s also a helicopter pilot for the special forces, so let them meet in a bar and idk if anything surprises Diego but maybe he’s surprised this pint sized woman is basically special forces. Especially if he happens to know who her mother is but not what she’s been doing.
4. Fantasy
Finally, come onnnnnnnn... Diego would fit well, as just a common person or a knight or some sort of other being or having magic. And give him and Jaina a reason to team up, perhaps her seeming like a damsel in distress at first but him quickly learning she’s an excellent horseback archer (and archer in general). Maybe it’s the Imperial au version where’s she’s the granddaughter of one of the evil overlords of the land and he’s part of a resistance against it.... but he doesn’t know at first who she is I MEAN THE POSSIBILITIES.
#ooc >> has needle‚ will costume...#wishlist >> we can hope this is what the force has in store...#stilllllll accepting#i know you#i know what you like#take these and run WOMAN
3 notes
·
View notes
Text
Git Visual Studio Code

GitDuck is a video chat tool built for developers that has direct integration to the IDE so you can talk, share your code in real-time and easily collaborate with your team. It enables remote developers to work as if they were side by side. With GitDuck you can code with people using different IDEs, like VSCode or WebStorm, IntelliJ or PyCharm.
Visual Studio Connect To Git
Git For Visual Studio Code
Chapters ▾
Visual Studio Code has git support built in. You will need to have git version 2.0.0 (or newer) installed. The main features are: See the diff of the file you are editing in the gutter.
The easiest way to connect to your GitHub repositories in Visual Studio. Download GitHub Extension for Visual Studio anyway. Download Download GitHub Extension for Visual Studio. By downloading the extension you agree to the End-User License Agreement. Requires Windows and Visual Studio.
1. Getting Started
1.1 About Version Control
1.2 A Short History of Git
1.3 What is Git?
1.4 The Command Line
1.5 Installing Git
1.6 First-Time Git Setup
1.7 Getting Help
1.8 Summary
2. Git Basics
2.1 Getting a Git Repository
2.2 Recording Changes to the Repository
2.3 Viewing the Commit History
2.4 Undoing Things
2.5 Working with Remotes
2.6 Tagging
2.7 Git Aliases
2.8 Summary
3. Git Branching
3.1 Branches in a Nutshell
3.2 Basic Branching and Merging
3.3 Branch Management
3.4 Branching Workflows
3.5 Remote Branches
3.6 Rebasing
3.7 Summary
4. Git on the Server
4.1 The Protocols
4.2 Getting Git on a Server
4.3 Generating Your SSH Public Key
4.4 Setting Up the Server
4.5 Git Daemon
4.6 Smart HTTP
4.7 GitWeb
4.8 GitLab
4.9 Third Party Hosted Options
4.10 Summary
5. Distributed Git
5.1 Distributed Workflows
5.2 Contributing to a Project
5.3 Maintaining a Project
5.4 Summary
6. GitHub
6.1 Account Setup and Configuration
6.2 Contributing to a Project
6.3 Maintaining a Project
6.4 Managing an organization
6.5 Scripting GitHub
6.6 Summary
7. Git Tools
7.1 Revision Selection
7.2 Interactive Staging
7.3 Stashing and Cleaning
7.4 Signing Your Work
7.5 Searching
7.6 Rewriting History
7.7 Reset Demystified
7.8 Advanced Merging
7.9 Rerere
7.10 Debugging with Git
7.11 Submodules
7.12 Bundling
7.13 Replace
7.14 Credential Storage
7.15 Summary
8. Customizing Git
8.1 Git Configuration
8.2 Git Attributes
8.3 Git Hooks
8.4 An Example Git-Enforced Policy
8.5 Summary
9. Git and Other Systems
9.1 Git as a Client
9.2 Migrating to Git
9.3 Summary
10. Git Internals
10.1 Plumbing and Porcelain
10.2 Git Objects
10.3 Git References
10.4 Packfiles
10.5 The Refspec
10.6 Transfer Protocols
10.7 Maintenance and Data Recovery
10.8 Environment Variables
10.9 Summary
A1. Appendix A: Git in Other Environments
A1.1 Graphical Interfaces
A1.2 Git in Visual Studio
A1.3 Git in Visual Studio Code
A1.4 Git in IntelliJ / PyCharm / WebStorm / PhpStorm / RubyMine
A1.5 Git in Sublime Text
A1.6 Git in Bash
A1.7 Git in Zsh
A1.8 Git in PowerShell
A1.9 Summary
A2. Appendix B: Embedding Git in your Applications
A2.1 Command-line Git
A2.2 Libgit2
A2.3 JGit
A2.4 go-git
A2.5 Dulwich
A3. Appendix C: Git Commands
A3.1 Setup and Config
A3.2 Getting and Creating Projects
A3.3 Basic Snapshotting
A3.4 Branching and Merging
A3.5 Sharing and Updating Projects
A3.6 Inspection and Comparison
A3.7 Debugging
A3.8 Patching
A3.9 Email
A3.10 External Systems
A3.11 Administration
A3.12 Plumbing Commands
2nd Edition
Git in Visual Studio Code
Visual Studio Code has git support built in.You will need to have git version 2.0.0 (or newer) installed.
See the diff of the file you are editing in the gutter.
The Git Status Bar (lower left) shows the current branch, dirty indicators, incoming and outgoing commits.
You can do the most common git operations from within the editor:
Initialize a repository.
Clone a repository.
Create branches and tags.
Stage and commit changes.
Push/pull/sync with a remote branch.
Resolve merge conflicts.
View diffs.
With an extension, you can also handle GitHub Pull Requests:https://marketplace.visualstudio.com/items?itemName=GitHub.vscode-pull-request-github.
The official documentation can be found here: https://code.visualstudio.com/Docs/editor/versioncontrol.
Those new to Visual Studio (VS) Code might just see a code editor. The true power of VS Code lies in it’s extensions, integrated terminal and other features. In this hands-on tutorial, you’re going to learn how to use Visual Studio Code by working with a Git repo.
Related:What You Need to Know about Visual Studio Code: A Tutorial
Using built-in VS Code tooling and a few extensions, you’re going to write code and commit that code to source control using a single interface.
This blog post is a snippet of a chapter from the eBook From Admin to DevOps: The BS Way to DevOps in Azure. If you like this chapter and want to learn about doing the DevOps in Azure, check it out!
Tutorial Overview
In this tutorial, you’re going to learn how to use various VS Code features on Windows by building a project using Visual Studio Code and Git. You’ve been tasked with figuring out how to build an Azure VM with Terraform as a small proof of concept (POC) project. You have VS Code and have heard of its capability as a full IDE and want to put it to the test.
You’re going to:
Create a VS Code workspace to share with your team
Install the Terraform extension
Modify the Terraform configuration file to fit your naming convention and Azure subscription
Create a snippet for a common task you’ve found yourself typing over and over
Commit the Terraform configuration file to a Git repo
This tutorial will not be meant to show how to use Terraform to deploy Azure VMs. We already have an article on Terraform and Azure VMs for that. This tutorial will focus on learning Visual Studio Code.
Does this sound like an interesting project? If so, read on to get started!
Prerequisites
To follow along with this Visual Studio Code Git tutorial, please be sure you have the following:
VS Code – All examples will be using VS Code 1.44 although earlier versions will likely work as well.
Terraform – All examples will be using Terraform for Windows v0.12.24.
Git for Windows installed – All examples will be using v2.26. If you’d like VS Code to be Git’s default editor, be sure to select it upon installation.
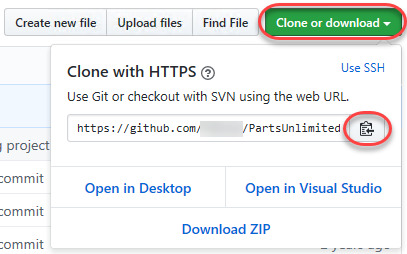
Clone the Git Repo
Since this tutorial is going to be focusing on working with code in a GitHub repo, your first task is cloning that GitHub repo to your local computer.
For this project, you’ll be working from a GitHub repo called VSCodeDemo. Since VS Code has native Git integration, you can clone a Git repo with no additional configuration. To do so:
Open the command palette with Ctrl-Shift-P, type git where you will notice various options, as shown below.
2. Choose Git: Clone which VS Code will then prompt you for the repo’s URL. Here, provide the URL https://github.com/NoBSDevOps/VSCodeDemo.gitand hit Enter.
3. Choose a folder to place the cloned project files. This project will place the repo folder in the root of C:. Once you select the repository location, VS Code will invoke git.exe in the background and clone the repo to your computer.
4. When it’s finished, VS Code will prompt if you would like to open the cloned repository immediately as shown below, click Open to do so.
You now have an open folder in VS Code for the Git repo. You now need to “save” this open folder and all settings you’ll be performing in a workspace.
Creating a Workspace
Now that you have a folder opened containing a Git repo, save a workspace by going up to the File menu and clicking on Save Workspace As….
Save the workspace as project in the project folder. VS Code will then create a file called project.code-workspace in the Git repo folder. This workspace now knows what folder you had opened. Now when the workspace is opened in the future, it will automatically open the C:VSCodeDemo folder.
Now, instead of a folder name, you will see the name of the workspace.
Setting up Extensions
Extensions are one of the most useful features of VS Code. Extensions allows you to bolt on functionality to help you manage many different projects. In this tutorial, you’re going to be working with Terraform.
Open up one of the Terraform configuration files in the workspace along the left sidebar. Notice how an editor tab opens up and shows the text but that’s about it. There’s no usual syntax highlighting or any other features. VS Code thinks this is a plain-text file and displays it accordingly. Let’s remedy that.
For VS Code to “understand” a Terraform configuration file, you need an extension. Extensions are a huge part of VS Code that opens up a world of new functionality. In this case, you need the Terraform extension to assist in building Terraform configuration files and deploying infrastructure with Terraform.
To install the Terraform extension, click on the extensions button on the Activity Bar and search for terraform. You’ll see multiple extensions show up but for this project, click on Install for the top result created by Mikael Olenfalk. VS Code will then install the extension.
Once installed, navigate back to the workspace and click on one of the TF files in the workspace. You’ll immediately see one of the most obvious differences when using an extension, syntax coloring.
Now you can see in the following screenshot that VS Code “knows” what a comment is (by making it green), what a string is (by making it red) and so on. It’s now much easier to read a Terraform configuration file.
There’s a lot more functionality included with Mikael’s Terrafom extension. Be sure to investigate all of the potential benefits you can get from this extension if using Terraform.
Code Editing
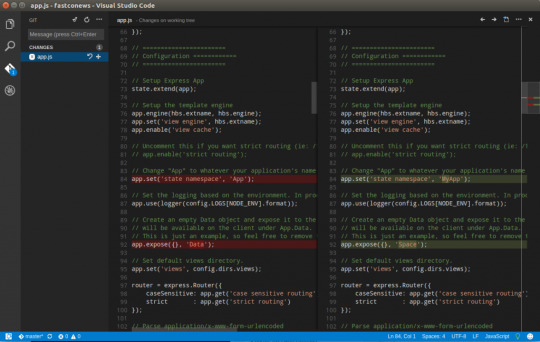
Chances are when you find a script or configuration file on the Internet, it’s not going to be exactly how you need it. You’re going to need to modify it in some way.
In this tutorial’s example, you’d like to change the main block label in the infrastructure-before.tf. Terraform configuration file to perhaps project. To do that, you’ll need to find and replace some text. In VS Code, there are multiple ways to do that.
One of the most common ways to find a string and replace it with another is the good ol’ find and replace functionality.
Hit Ctrl-F and you’ll see a dialog similar to the following screenshot. Here you can type in the string you’d like to find and if you click on the down arrow, it will expand and provide a spot to input a string to replace it with. In the screenshot below, you can see options like Aa and Ab| for case-sensitive searching and also regular expressions.
You can also perform a “find and replace” using Ctrl-D. Simply select the text you’d like to find and begin hitting Ctrl-D. You’ll find that VS Code will begin to highlight each instance of that string with a blinking cursor.
When you’ve selected all items, start typing and VS Code changes all instances at once just as if you had selected each one individually.
Saving Time with Snippets
Let’s say you’re really getting into Terraform and Azure and are tired of typing out the Terraform configuration file block to create a new Azure resource group in the following code snippet.
To save time creating these blocks, create a VS Code snippet.
Related:VS Code Snippets: Speed Up Coding with Shortcuts
To create a VS Code snippet:
Copy the azurerm_resource_group block from the Infrastructure-before.tf Terraform configuration file.
2. Open the command palette with Ctrl-Shift-P.
3. Type “snippets” to filter the list of options.
4. Select Preferences: Configure User Snippets. This brings up a list of all the snippet files typically separated by language.
5. Type “terraform” to filter by the Terraform snippets.
6. Select terraform (Terraform) to open the Terraform snippets file (terraform.json).
Visual Studio Connect To Git
With the Terraform snippets file open, remove all of the comments and copy/paste the following JSON element inside.
Note the use of t and the backslashes. You can’t directly place tab characters inside of a snippet. To represent a tab character, you must use t. Also, you must escape characters like double quotes, dollar signs, curly braces, and backslashes with a backslash.
8. Save the terraform.json file.
Git For Visual Studio Code
9. Go back to the Terraform configuration file and type “rg”. Notice now you see an option to expand a snippet.
10. Select the rg snippet as shown above. Notice that it now expands to the snippet you just created with three items highlighted.
VS Code highlighted each of the words to act as placeholders due to the variables defined in the terraform.json snippets file (${1:block label}).
At this point, you can hit Tab and simply type in the values you need without worrying about how to create the block itself.
For a full breakdown on snippet syntax, be sure to check out the Snippets in Visual Studio Code documentation.
Commit Code to Git
At this point, you’ve cloned a public GitHub repo that contains a couple of Terraform configuration files. You’ve edited some files and now you’re ready to get those changes back up to the GitHub repo.
To get changes back up to the GitHub repo, you must first use Visual Studio Code and Git to commit changes to your local cloned Git repo. When you cloned the GitHub repo earlier, you downloaded not only the configuration files but also a Git repo.
If you’ve been following along, you should now have the cloned Git repo open with a couple of pending changes, two to be exact. How do you know that? By noticing the number in the Activity Bar, as shown below.
When you have a Git repo opened in Visual Studio Code, you’ll get a glimpse on the number of files that you can stage and commit into a local Git repo in the Activity Bar.
Click on the Source Control item on the left and you’ll see two items; the infrastructure-before.tf Terraform configuration file and the workspace you saved earlier (project.code-workspace). The configuration file will have a red M to the right indicating it’s been modified. The workspace file will have a green U to the right of it because it’s untracked meaning it’s currently not under source control.
To ensure both of these files get back to the GitHub repo, first create a helpful commit message indicating why you’re committing these files. The message can be any descriptive summary. Once you’ve written a commit message, stage the changes. Staging changes in Visual Studio Code in Git adds the file contents to the staging area preparing for a commit to the repo.
While on the Source Control pane, click on the + icon beside each file to stage them as shown below.
Once staged, click on the check mark to commit all of the staged changed, as shown below.
You will probably receive an error message indicating you need to configure a user.name and user.email in Git.
No problem. You simply need to provide Git the information it needs. To do that, go into your VS Code integrated terminal and run the following two commands changing my email address and name for yours.
Now try to commit the files. You should now see that the files commit to the repo.
You can stage all changed files without manually clicking on the + beside each file by committing them all at once. VS Code will automatically stage all of the files for you.
If you were working on a team with a shared repo, the next step would be to push these changes back to the GitHub repo or opening a pull request.
Conclusion
VS Code is a feature-rich IDE. It can not only help you write and understand code better, it can also build and make changes to infrastructure, invoke utilities and more. VS Code provides you one place to manage all of your development efforts.
Although this tutorial only covered a portion of what VS Code can do, this IDE is capable of so much more. If you’d like to learn about what VS Code can do, check out What You Need to Know about Visual Studio Code: A Tutorial.
0 notes
Text
Getting Started with Ansible a.k.a. how to Automate your Infrastructure

After going through this tutorial, you’ll understand the basics of Ansible - an open-source software provisioning, configuration management, and application-deployment tool.
First, we’ll discuss the Infrastructure as Code concept, and we’ll also take a thorough look at the currently available IaC tool landscape. Then, we’ll dive deep into what is Ansible, how it works, and what are the best practices for its installation and configuration.
You’ll also learn how to automate your infrastructure with Ansible in an easy way.
Table of contents:
Understanding the Infrastructure as a Code concept
Why was Ansible created?
What is Ansible?
How to install Ansible
Ansible setup, configuration and automation
Creating an Ansible playbook
Understanding Ansible modules
Running our Ansible playbook
What to use Ansible for
Okay, let's start with understanding the IaC Concept!
What is Infrastructure as Code?
Since the dawn of complex Linux server architectures, the way of configuring servers was either by using the command line, or by using bash scripts. However, the problem with bash scripts is that they are quite difficult to read, but more importantly, using bash scripts is a completely imperative way.
When relying on bash scripts, implementation details or small differences between machine states can break the configuration process. There’s also the question of what happens if someone SSH-s into the server, configures something through the command line, then later someone would try to run a script, expecting the old state.
The script might run successfully, simply break, or things could completely go haywire. No one can tell.
To alleviate the pain caused by the drawbacks of defining our server configurations by bash scripts, we needed a declarative way to apply idempotent changes to the servers’ state, meaning that it does not matter how many times we run our script, it should always result in reaching the exact same expected state.
This is the idea behind the Infrastructure as Code (IaC) concept: handling the state of infrastructure through idempotent changes, defined with an easily readable, domain-specific language.
What are these declarative approaches?
First, Puppet was born, then came Chef. Both of them were responses to the widespread adoption of using clusters of virtual machines that need to be configured together.
Both Puppet and Chef follow the so-called “pull-based” method of configuration management. This means that you define the configuration - using their respective domain-specific language- which is stored on a server. When new machines are spun up, they need to have a configured client that pulls the configuration definitions from the server and applies it to itself.
Using their domain-specific language was definitely clearer and more self-documenting than writing bash scripts. It is also convenient that they apply the desired configuration automatically after spinning up the machines.
However, one could argue that the need for a preconfigured client makes them a bit clumsy. Also, the configuration of these clients is still quite complex, and if the master node which stores the configurations is down, all we can do is to fall back to the old command line / bash script method if we need to quickly update our servers.
To avoid a single point of failure, Ansible was created.
Ansible, like Puppet and Chef, sports a declarative, domain-specific language, but in contrast to them, Ansible follows a “push-based” method. That means that as long as you have Python installed, and you have an SSH server running on the hosts you wish to configure, you can run Ansible with no problem. We can safely say that expecting SSH connectivity from a server is definitely not inconceivable.
Long story short, Ansible gives you a way to push your declarative configuration to your machines.
Later came SaltStack. It also follows the push-based approach, but it comes with a lot of added features, and with it, a lot of added complexity both usage, and maintenance-wise.
Thus, while Ansible is definitely not the most powerful of the four most common solutions, it is hands down the easiest to get started with, and it should be sufficient to cover 99% of conceivable use-cases.
If you’re just getting started in the world of IaC, Ansible should be your starting point, so let’s stick with it for now.
Other IaC tools you should know about
While the above mentioned four (Pupper, Chef, Salt, Ansible) handles the configuration of individual machines in bulk, there are other IaC tools that can be used in conjunction with them. Let’s quickly list them for the sake of completeness, and so that you don’t get lost in the landscape.
Vagrant: It has been around for quite a while. Contrary to Puppet, Chef, Ansible, and Salt, Vagrant gives you a way to create blueprints of virtual machines. This also means that you can only create VMs using Vagrant, but you cannot modify them. So it can be a useful companion to your favorite configuration manager, to either set up their client, or SSH server, to get them started.
Terraform: Vagrant comes handy before you can use Ansible, if you maintain your own fleet of VMs. If you’re in the cloud, Terraform can be used to declaratively provision VMs, setup networks, or basically anything you can handle with the UI, API, or CLI of your favorite cloud provider. Feature support may vary, depending on the actual provider, and they mostly come with their own IaC solutions as well, but if you prefer not to be locked in to a platform, Terraform might be the best solution to go with.
Kubernetes: Container orchestration systems are considered Infrastructure as Code, as especially with Kubernetes, you have control over the internal network, containers, a lot of aspects of the actual machines, basically it’s more like an OS on it’s own right than anything. However, it requires you to have a running cluster of VMs with Kubernetes installed and configured.
All in all, you can use either Vagrant or Terraform to lay the groundwork for your fleet of VMs, then use Ansible, Puppet, Chef or Salt to handle their configuration continuously. Finally, Kubernetes can give you a way to orchestrate your services on them.
Are you looking for expert help with infrastructure related issues or project? Check out our DevOps and Infrastructure related services, or reach out to us at [email protected].
We’ve previously written a lot about Kubernetes, so this time we’ll take one step and take a look at our favorite remote configuration management tool:
What is Ansible?
Let’s take apart what we already know:
Ansible is a push-based IaC, providing a user-friendly domain-specific language so you can define your desired architecture in a declarative way.
Being push-based means that Ansible uses SSH for communicating between the machine that runs Ansible and the machines the configuration is being applied to.
The machines we wish to configure using Ansible are called managed nodes or hosts. In Ansible’s terminology, the list of hosts is called an inventory.
The machine that reads the definition files and runs Ansible to push the configuration to the hosts is called a control node.
How to Install Ansible
It is enough to install Ansible only on one machine, the control node.
Control node requirements are the following:
Python 2 (version 2.7) or Python 3 (versions 3.5 and higher) installed
Windows is not supported as a control node, but you can set it up on Windows 10 using WSL
Managed nodes also need Python to be installed.
RHEL and CentOS
sudo yum install ansible
Debian based distros and WSL
sudo apt update sudo apt install software-properties-common sudo apt-add-repository --yes --update ppa:ansible/ansible sudo apt install ansible
MacOS
The preferred way to install Ansible on a Mac is via pip.
pip install --user ansible
Run the following command to verify the installation:
ansible --version
Ansible Setup, Configuration, and Automation
For the purposes of this tutorial, we’ll set up a Raspberry Pi with Ansible, so even if the SD card gets corrupted, we can quickly set it up again and continue working with it.
Flash image (Raspbian)
Login with default credentials (pi/raspberry)
Change default password
Set up passwordless SSH
Install packages you want to use
With Ansible, we can automate the process.
Let’s say we have a couple of Raspberry Pis, and after installing the operating system on them, we need the following packages to be installed on all devices:
vim
wget
curl
htop
We could install these packages one by one on every device, but that would be tedious. Let Ansible do the job instead.
First, we’ll need to create a project folder.
mkdir bootstrap-raspberry && cd bootstrap-raspberry
We need a config file and a hosts file. Let’s create them.
touch ansible.cfg touch hosts // file extension not needed
Ansible can be configured using a config file named ansible.cfg. You can find an example with all the options here.
Security risk: if you load ansible.cfg from a world-writable folder, another user could place their own config file there and run malicious code. More about that here.
The lookup order of the configuration file will be searched for in the following order:
ANSIBLE_CONFIG (environment variable if set)
ansible.cfg (in the current directory)
~/.ansible.cfg (in the home directory)
/etc/ansible/ansible.cfg
So if we have an ANSIBLE_CONFIG environment variable, Ansible will ignore all the other files(2., 3., 4.). On the other hand, if we don’t specify a config file, /etc/ansible/ansible.cfg will be used.
Now we’ll use a very simple config file with contents below:
[defaults] inventory = hosts host_key_checking = False
Here we tell Ansible that we use our hosts file as an inventory and to not check host keys. Ansible has host key checking enabled by default. If a host is reinstalled and has a different key in the known_hosts file, this will result in an error message until corrected. If a host is not initially in known_hosts this will result in prompting for confirmation interactively which is not favorable if you want to automate your processes.
Now let’s open up the hosts file:
[raspberries] 192.168.0.74 192.168.0.75 192.168.0.76 [raspberries:vars] ansible_connection=ssh ansible_user=pi ansible_ssh_pass=raspberry
We list the IP address of the Raspberry Pis under the [raspberries] block and then assign variables to them.
ansible_connection: Connection type to the host. Defaults to ssh. See other connection types here
ansible_user: The user name to use when connecting to the host
ansible_ssh_password: The password to use to authenticate to the host
Creating an Ansible Playbook
Now we’re done with the configuration of Ansible. We can start setting up the tasks we would like to automate. Ansible calls the list of these tasks “playbooks”.
In our case, we want to:
Change the default password,
Add our SSH public key to authorized_keys,
Install a few packages.
Meaning, we’ll have 3 tasks in our playbook that we’ll call pi-setup.yml.
By default, Ansible will attempt to run a playbook on all hosts in parallel, but the tasks in the playbook are run serially, one after another.
Let’s take a look at our pi-setup.yml as an example:
- hosts: all become: 'yes' vars: user: - name: "pi" password: "secret" ssh_key: "ssh-rsa …" packages: - vim - wget - curl - htop tasks: - name: Change password for default user user: name: '""' password: '""' state: present loop: - '""' - name: Add SSH public key authorized_key: user: '""' key: '""' loop: - '""' - name: Ensure a list of packages installed apt: name: '""' state: present - name: All done! debug: msg: Packages have been successfully installed
Tearing down our Ansible Playbook Example
Let’s tear down this playbook.
- hosts: all become: 'yes' vars: user: - name: "pi" password: "secret" ssh_key: "ssh-rsa …" packages: - vim - wget - curl - htop tasks: [ … ]
This part defines fields that are related to the whole playbook:
hosts: all: Here we tell Ansible to execute this playbook on all hosts defined in our hostfile.
become: yes: Execute commands as sudo user. Ansible uses privilege escalation systems to execute tasks with root privileges or with another user’s permissions. This lets you become another user, hence the name.
vars: User defined variables. Once you’ve defined variables, you can use them in your playbooks using the Jinja2 templating system.There are other sources vars can come from, such as variables discovered from the system. These variables are called facts.
tasks: List of commands we want to execute
Let’s take another look at the first task we defined earlier without addressing the user modules’ details. Don’t fret if it’s the first time you hear the word “module” in relation to Ansible, we’ll discuss them in detail later.
tasks: - name: Change password for default user user: name: '""' password: '""' state: present loop: - '""'
name: Short description of the task making our playbook self-documenting.
user: The module the task at hand configures and runs. Each module is an object encapsulating a desired state. These modules can control system resources, services, files or basically anything. For example, the documentation for the user module can be found here. It is used for managing user accounts and user attributes.
loop: Loop over variables. If you want to repeat a task multiple times with different inputs, loops come in handy. Let’s say we have 100 users defined as variables and we’d like to register them. With loops, we don’t have to run the playbook 100 times, just once.
Understanding the Ansible User Module
Zooming in on the user module:
user: name: '""' password: '""' state: present loop: - '""'
Ansible comes with a number of modules, and each module encapsulates logic for a specific task/service. The user module above defines a user and its password. It doesn’t matter if it has to be created or if it’s already present and only its password needs to be changed, Ansible will handle it for us.
Note that Ansible will only accept hashed passwords, so either you provide pre-hashed characters or - as above - use a hashing filter.
Are you looking for expert help with infrastructure related issues or project? Check out our DevOps and Infrastructure related services, or reach out to us at [email protected].
For the sake of simplicity, we stored our user’s password in our example playbook, but you should never store passwords in playbooks directly. Instead, you can use variable flags when running the playbook from CLI or use a password store such as Ansible Vault or the 1Password module .
Most modules expose a state parameter, and it is best practice to explicitly define it when it’s possible. State defines whether the module should make something present (add, start, execute) or absent (remove, stop, purge). Eg. create or remove a user, or start / stop / delete a Docker container.
Notice that the user module will be called at each iteration of the loop, passing in the current value of the user variable . The loop is not part of the module, it’s on the outer indentation level, meaning it’s task-related.
The Authorized Keys Module
The authorized_keys module adds or removes SSH authorized keys for a particular user’s account, thus enabling passwordless SSH connection.
- name: Add SSH public key authorized_key: user: '""' key: '""'
The task above will take the specified key and adds it to the specified user’s ~/.ssh/authorized_keys file, just as you would either by hand, or using ssh-copy-id.
The Apt module
We need a new vars block for the packages to be installed.
vars: packages: - vim - wget - curl - htop tasks: - name: Ensure a list of packages installed apt: name: '""' state: present
The apt module manages apt packages (such as for Debian/Ubuntu). The name field can take a list of packages to be installed. Here, we define a variable to store the list of desired packages to keep the task cleaner, and this also gives us the ability to overwrite the package list with command-line arguments if we feel necessary when we apply the playbook, without editing the actual playbook.
The state field is set to be present, meaning that Ansible should install the package if it’s missing, or skip it, if it’s already present. In other words, it ensures that the package is present. It could be also set to absent (ensure that it’s not there), latest (ensure that it’s there and it’s the latest version, build-deps (ensure that it’s build dependencies are present), or fixed (attempt to correct a system with broken dependencies in place).
Let’s run our Ansible Playbook
Just to reiterate, here is the whole playbook together:
- hosts: all become: 'yes' vars: user: - name: "pi" password: "secret" ssh_key: "ssh-rsa …" packages: - vim - wget - curl - htop tasks: - name: Change password for default user user: name: '""' password: '""' state: present loop: - '""' - name: Add SSH public key authorized_key: user: '""' key: '""' loop: - '""' - name: Ensure a list of packages installed apt: name: '""' state: present - name: All done! debug: msg: Packages have been successfully installed
Now we’re ready to run the playbook:
ansible-playbook pi-setup.yml
Or we can run it with overwriting the config file:
$ ANSIBLE_HOST_KEY_CHECKING=False $ ansible-playbook - i “192.168.0.74, 192.168.0.75” ansible_user=john ansible_ssh_pass=johnspassword” -e ‘{“user”: [{ “name”: “pi”, “password”: “raspberry”, “state”: “present” }] }’ -e '{"packages":["curl","wget"]}' pi-setup.yml
The command-line flags used in the snippet above are:
-i (inventory): specifies the inventory. It can either be a comma-separated list as above, or an inventory file.
-e (or --extra-vars): variables can be added or overridden through this flag. In our case we are overwriting the configuration laid out in our hosts file (ansible_user, ansible_ssh_pass) and the variables user and packages that we have previously set up in our playbook.
What to use Ansible for
Of course, Ansible is not used solely for setting up home-made servers.
Ansible is used to manage VM fleets in bulk, making sure that each newly created VM has the same configuration as the others. It also makes it easy to change the configuration of the whole fleet together by applying a change to just one playbook.
But Ansible can be used for a plethora of other tasks as well. If you have just a single server running in a cloud provider, you can define its configuration in a way that others can read and use easily. You can also define maintenance playbooks as well, such as creating new users and adding the SSH key of new employees to the server, so they can log into the machine as well.
Or you can use AWX or Ansible Tower to create a GUI based Linux server management system that provides a similar experience to what Windows Servers provide.
Stay tuned and subscribe to our newsletter! You can find the subscribe box in the left column, on the top of the article.
Next time, we’ll dive deeper into an enterprise use case of Ansible with AWX.
Getting Started with Ansible a.k.a. how to Automate your Infrastructure published first on https://koresolpage.tumblr.com/
0 notes
Text
World Building June: Day 4
Given that this is basically giving two stories’ worth of history, all my info will be below the cut.
Kreota has a very tumultuous history. History began when the Creator planted the Archangels on Kreota and created the first humans and dragonkin. Kreota's earliest historical records all come from Metatron the Archangel, who records humanity's initial exploration of Kreota and the dragonkin's study of the Mazelands. Within 200 years, many major cities had sprouted up all over the largest continent of Kreota. In 204, the first reports of humans Awakening as angels appeared. Shortly after, the first demon sightings began to be linked to missing or fleeing persons, many fugitives from the law.
At around the year 540, the human city-states began vying for territory in small skirmishes, and the Archangels attempted to broker a peace and split up the land to allow everyone to coexist (with some success, even if it was somewhat limited). At this point, demons had not yet integrated into society, and most had fled to smaller pocket-societies in the mountains to escape persecution due to their association with the darkness.
In the Year 881, the dragonkin re-emerged from the Mazelands, bringing with them powerful technologies, a rich culture, and en economy that dwarfed even the biggest of the city-states. They used their cultural and economic influence to bargain for new territory on the Northwestern coast of the continent in the year 924, and expanded into the mountains in the late 900s.
In 1022, the human nations requested that the Dragon Empire halt their expansion into human territories. This led to rising tensions and eventually some small skirmishes between the humans and the dragonkin, before a dragonkin display of power known as the Three-Day Siege forced the humans and angels into negotiations in the year 1025. At this point, the Archangels intervened, and the dragonkin gained full control of the mountains and the Mazelands in exchange for the agricultural land they had taken from the human nations. In 1026, the Archangels began plans for the construction of the Acropolis on Mount Genesis in the hopes that it would give humanity a self-sufficient cultural center to rally around, which would hopefully get the dragonkin to take humanity more seriously.
Construction of the Acropolis began in 1033. In 1034, the Dragonkin Empire relinquished its territories in the mountains after pressure from some of the mage-monks to open the territory up to humanity. The mountains became a place that officially, belonged to no nation, but unofficially was governed by the orders that established monasteries there.
In 1044, the first demon raids began occurring, threatening many human settlements and eventually forcing back the human frontier. After the raid on the Order of the Blue Star in the mountains, the dragonkin mounted a military campaign to find and eradicate the demon strongholds. Before the campaign could get off the ground, the first Fracture happened in 1046, with Mordred and Legion leading separate raids on the Lunamancer monastery in the mountains and the dragonkin capital at Dragon's Peak in the Mazelands while the Fracture managed to sow disarray in their ranks. The capital was badly damaged, and the Lunamancers were all but eradicated except for a few specific survivors. Over the next 70 years, increasingly frequent demon-raids managed to all but eradicate most of the dragonkin, and had forced mankind back from their frontiers and inwards toward Mount Genesis. The Archangels, assisted by human angels, formed the Vanguard, and constructed the Citadel at the center of the Acropolis in an attempt to make a last stand in 1117. The Vanguard managed to drive the demon forces back, but were not able to find their stronghold nearby. This standoff laster for another 100 years, with the demon hordes increasing in number while the Acropolis became more and more of a fortress, causing the forces to engage in a lengthy war of attrition. As time wore on, it seemed like the demons might be winning.
Then, in 1215, a captain of the Vanguard named Andromeda was captured along with her lieutenant and partner, Orpheus. During their captivity, Andromeda awoke as the first Angelic Nephilim, a being who was fully angel but also still human, and could switch between either form at will. Using her newfound abilities, Andromeda struck down Azazel of the Nine, broke Orpheus and the other human captives out of the stronghold, and met the dragonkin warrior Draco and the ex-assassin Athena.
Azazel’s death and Andromeda’s Awakening set in motion two separate chains of events. The first was the Schism, wherein Lilith, a demon who also turned out to be a demonic Nephilim, denounced the Nine and broke off from their crusade, taking a large number of followers with her. The second event was the formation of the Immortals, a small group of elite warriors under Andromeda’s command who began dismantling key points in the Nine’s infrastructure with the help of a surviving Lunamancer, Nyx. Eventually, Lilith’s army joined forces with the Vangaurd once the existence of the Nine and Legion’s machinations to make the demon hordes appear mindless became common knowledge. Together, they pushed forward and took their fortress at the Maw. At the end of this battle, the Archangel Lucifer revealed himself as the mastermind behind the Nine and the Great war, and caused the Second Fracture, attempting to overrun Andromeda and Lilith’s forces with the demon-dragon Mordred. Both were defeated with the help of the demon defector Acraphor and his warriors, and by 1217, peace had been established.
In 1221, Andromeda helped the Archangel Michael establish the Genesis Republic, with the Acropolis being its main seat of power. Andromeda and Lilith were elected to the council, but both eventually gave up their seats on the council to live out the rest of their lives away from the spotlight. Andromeda remained in the Acropolis, while Lilith established the city that would become Lillim in the north.
Lilith and Andromeda both vanished mysteriously in 1289. Nobody has heard from them since.
In 1344, the first lunar mission was launched, coordinated by Andromeda’s son, Alexander. By 1356, the lunar surface had been fully charted, and a research base was established in 1372. Terraforming began in 1398, and the first colony mission was launched in 1407, leading to the founding of Nyssix.
After the invention of interplanetary travel in 1483, the Unification Wars broke out among the major nations. The angel Thomas (Andromeda’s grandson) and Lilith’s granddaughter Morgan (who was at this time an Awakened demon) rallied a large army with the help of Michael and Acraphor and forced negotiations after crushing victory at the Battle of the Basin. They established the Council of Solar Nations in 1486, and were elected the first Praetors of the council. They launched the first extrasolar colony mission in 1492.
By 1550, the Council of Solar Nations had become the Council of Planetary Nations, with over twelve systems attending their meetings. In 1570, they encountered the hostile Hellion Imperium, igniting the decades-long Hellion Wars. When a peace was finally established in 1602, enough planets had been conquered and re-conquered that the Council of Planetary Nations became less of a single ruling body and more of a diplomatic summit.
In 1633, Creta was established on Kreota’s moon, and the Planet of Creta officially became the Solar Empire.
In 1712, the first Lunar Revolt broke out, and the Emperor Marcus brutally massacred the lunar people in retaliation. In response, Enora Radianz, descendant of Thomas and Morgan, lead a rebellion against the Emperor and the Solar Council, imprisoning Marcus and reforming the Solar council in the Radianz Rebellion.
In 1724, Machina was established.
And most recently, in 1773, Eilya Radianz was crowned the new Solar Empress, and Lucina Radianz became governor of Luna.
As for @ladytabletop‘s bonus challenge, I will opt for the bonus challenge and say that the Great War, the Unification Wars, the Hellion Wars, and the Radianz Rebellion are all linked by bloodline: all involve descendants of Lilith or Andromeda (or both, in some cases), and many of them also involve either Acraphor or the Archangel Michael in some capacity, as both have dedicated themselves to guiding humanity down the right path.
1 note
·
View note
Text
Deployment with Kubernetes
I made an assumption you are already familiar with all of Kubernetes basic concepts and have a cluster available. Otherwise, you may want to read my previous article which will teach you initial elements and simple setup to begin with:
How to configure Google Kubernetes Engine using Terraform
Introduction
Objects in the Kubernetes API are abstractions that represent a state of your system: deployed containerized applications and workloads, their associated network and disk resources, and other information about what your cluster does.
From my recent blogpost, you should know that Kubernetes also contains a number of higher-level abstractions called Controllers built upon the basic objects, and provide additional functionality along with convenience features:
Kubernetes basic glossary
Must-know terminology to understand Kubernetes concepts
Objects are “records of intent” — once you create them, the Kubernetes will constantly work to ensure that these objects exist. By creating an object, you’re effectively telling the Kubernetes what you want your cluster’s workload to look like; this is your cluster’s desired state.
Installation
To work with Kubernetes objects — either to create, modify, or delete them — you’ll need to use the Kubernetes API. When you use the kubectl command-line interface, for example, the CLI makes the necessary Kubernetes API calls for you.
Using kubectl, you can inspect cluster resources — create, delete, and update components — look at your new cluster, and bring up example apps.
Edit This Page Use the Kubernetes command-line tool, kubectl, to deploy and manage applications on Kubernetes. Using…
YAML
When you create an object in Kubernetes, you must provide the object spec that describes its desired state, as well as some basic information about the object (such as a name).
When you use the Kubernetes API to create an object (either directly or via kubectl), the API request must include that information as JSON in a request body. Most often, you provide the information in a .yaml file and kubectl converts the information to JSON when making the API request.
Required Fields
In the .yaml file for the Kubernetes object you want to create, you’ll need to set values for the following fields:
apiVersion - which version of the Kubernetes API you’re using to create this object;
kind - what kind of object you want to create;
metadata - data that helps uniquely identify the object, including a name string and an optional namespace.
You’ll also need to provide the object spec field. The precise format of the object spec is different for every Kubernetes object, and contains nested fields specific to that object. The Kubernetes API Reference can help you find the spec format for all of the objects you can create using Kubernetes.
Deployment
A deployment controller lets you manage a set of identical pods, scale, roll out, and roll back versions of your applications. Everyone who runs applications on Kubernetes cluster uses a deployment. Without it, you’d need to create, update, and delete a bunch of pods manually.
For deployment, you declare a single object in a YAML file:
Firstly, have a look at theapiVersion value. apps/v1 is the most common API group in Kubernetes, with many core objects. It includes functionality related to running applications on Kubernetes like Deployments.
After that, let’s see the spec contents that describe your desired state for the object and governs its configuration. As you already know, it’s the characteristics you want the object to have.
When you create the Deployment, you might set its spec to define how many replicas of the application you want to run. The Kubernetes system updates the status to match your spec. Actually, .spec.replicas is an optional field that defaults to 1.
The selector field defines how the Deployment finds which Pods to manage. In our case, you simply select a label that is defined in the Pod template (app: api). .spec.selector.matchLabels must match .spec.template.metadata.labels and specify a label selector for the Pods targeted by this deployment.
The .spec.template has exactly the same schema as a Pod, except it is nested and does not have an apiVersion or kind. Deployment uses a Pod template to create the Pods for which it is responsible. The template field contains the following sub-fields:
The Pods are labeled as app: apiusing the labels field.
The Pod template’s specification (.template.spec field) indicates that the Pods run some container based on the given image.
Container is named example-container using the name field.
Port 4444 will be exposed so that the container can accept traffic.
And that’s basically the entire definition of Deployment in its minimal scope.
Last but not least, I’d like to explain the “magic” with environmental variables inside a YAML file. You may wonder how exactly it is supposed to work. Let me answer you briefly and explain what the envsubst command actually is.
The envsubst program substitutes the values of environment variables. In the normal operation mode, standard input is copied to standard output, with references to environment variables of the form $VARIABLE or ${VARIABLE} being replaced with the corresponding values.
Let’s see this in action:
~/Desktop » echo $USER
squixy
~/Desktop » echo 'You username is: $USER'
You username is: $USER
~/Desktop » echo 'You username is: $USER' | envsubst
You username is: squixy
This is how it works in the simplest form, reading input from the command line and replacing specific forms with your environmental variables. It’s pretty useful but we actually want to use it with .yaml files. We can do that as well:
~/Desktop » cat k8s.yml
---
apiVersion: apps/v1
kind: Deployment
spec:
replicas: ${NO_REPLICAS}
~/Desktop » echo $NO_REPLICAS
~/Desktop » export NO_REPLICAS=3
~/Desktop » echo $NO_REPLICAS
3
~/Desktop » envsubst < k8s.yml
---
apiVersion: apps/v1
kind: Deployment
spec:
replicas: 3
As you can see, there’s a variable definition inside the YAML file. We substitute it with what we have defined in our environment by redirecting the file contents to the envsubst command.
Applying the configuration
To finally apply the Kubernetes configuration, you should pipe YAML file definition into variables substitution and pass the result as a file:
~/Desktop » cat k8s.yml | envsubst | kubectl apply -f -
deployment.apps/example-deployment configured
ingress.extensions/example-ingress unchanged
service/example-api unchanged
As your last concern, you may wonder how to automate this process. What I usually do is to invoke the above script in a CI server where all the necessary environment variables are exported. This way I’m able to delegate the entire workflow and provide continuous delivery of the applications I build.
Hopefully, this article introduced you to Kubernetes configuration definition, deployment, and automation of the entire process quite well.
With the knowledge you have now, you are able to describe your Kubernetes structure and apply it to a cluster. You can have a YAML file which explains your architecture or infrastructure to anyone else.
You should be also already familiar with the basic concepts and practical strategies so you can finally start deploying your applications. Do not hesitate to try that in your team and don’t be afraid of experimenting with any changes.[Source]-https://blog.lelonek.me/deployment-with-kubernetes-e74cd6a8974
Basic & Advanced Kubernetes Courses using cloud computing, AWS, Docker etc. in Mumbai. Advanced Containers Domain is used for 25 hours Kubernetes Training.
0 notes