#PCB Tutorial
Explore tagged Tumblr posts
Visit Tumblr Blog
Explore Tumblr blogs with no restrictions, modern design and the best experience.
Last Seen Tumblr Blogs


Fun Fact
12.7% of mobile users access Tumblr.
Text
Robot girl, finally back online after a year and a half, looking at the newly outfitted soldering station. There's a lot more tools on it than there were when she last closed her eyes: Inspection microscopes, hot air reflow, EEPROM programmers, logic analyzers, thermal cameras and regulated power supplies. She starts to tear up when she sees the video history of her partner (and repairperson): months and months of electronic tutorials, starting simple ("what is a circuit?") and towards the end there's PCB design classes and CCC videos about reverse engineering secure processor firmware.
"You did all this, for me?" she asks, her voice sounding different from how she remembers it, lacking the stutterglitch and 8-bit audio harshness. Her partner smiles. "I thought I'd lost you... I couldn't live with that. I had to!"
She hugs them in a pile of spare parts, servos moving smoothly for the first time in decades, pressure sensors finally accurate enough to hold them without risk of crushing them.
Sometimes, love is stored in the soldering iron.
972 notes
·
View notes
Text


I’m getting it figured out faster than I expected, which is nice. the biggest roadblock at this point are the two different types of mystery transistors. one is a metal can that only says 3BX3 and has a 4th pin that has been cut off, the other is this yellow one ⬆️. luckily it seems like they’re all related to the buffered bypass, which I would exclude from my version anyway.


pretty exciting that the dual op amp used in the Crock DS-4 Supra Distortion is comparable to a TL082. (it says 083 but the 083 is the same dual op amp as the 082 with an additional shutdown function in a 14-pin package, and I only need the two op amps in an 8-pin config, which the 082 is.) And I’m already using the TL082 as the op amps in my pedal, ASD! Tracing, documenting and breadboarding my own clone of the DS-4 is going to be my next project while I wait for the second batch of pink ASD enclosures to get painted and printed up
#now I just need to be able to focus enough to watch tutorial videos on how to make a schematic and pcb file#i want to learn so bad but I get so bored when I try to watch any software tutorials i regress into a terrible student
8 notes
·
View notes
Text
The first test for our WLED board codename "Sparkle Motion" 🌈💖💡 … 🐇⏳🌌
We got our WLED-friend PCBs today, and we only made one mistake: the wrong resistor on the 3.3V feedback line. Now that it's fixed, the board seems to work great with the latest version of WLED
We are checking all 4 signal outputs with this handy 256-LED grid that sits on our desk. Next, we will test the onboard IR receiver, USB PD, I2S microphone, extra I/O pins, and I2C. We'll also do an Arduino IDE board definition in case folks want to use it as a generic ESP32-to-LED-driver board. We're calling the board "Sparkle Motion" for now, but if you have other naming ideas, let us know - if we pick your name, you get a free board
Sign up, coming soon.
#wled#sparklemotion#leddriver#esp32#electronics#pcbs#arduino#makerprojects#openhardware#opensource#coding#leds#hardwaredesign#innovation#techgeeks#smartlighting#microcontrollers#hardwareengineering#esp32projects#ledmatrix#diyhardware#iotprojects#arduinoide#hardwaretesting#ledtechnology#techmakers#electronicscommunity#prototyping#hardwarehacking#adventuresintech
17 notes
·
View notes
Note
hellooooo may i ask where you get the voice lines from deadfire?
pillars of eternity voice lines tutorial!
in steam version voice lines can be found here: C:\Program Files (x86)\Steam\steamapps\common\Pillars of Eternity II\PillarsOfEternityII_Data\StreamingAssets\Audio\Windows\Voices
all of them are in .wem format so they can’t be listened to normally. to listen to them you have to convert them into a different format. i learned how to do it by watching this video on youtube (i’m linking it in case i missed something in my tutorial or you want to see how it’s done)
the video starts with converting .bnk files to .wem, which isn’t applicable to poe
how to prepare tools for converting .wem to .ogg
1. download ww2ogg024 (for conversion) and ReVorb (for cleanup).
2. create a folder wherever under whatever name you wish. put ww2ogg024 and ReVorb inside
2. create a Script.txt file in the same folder. this is what is supposed to be in it:

for %%f in (*.wem) do "./ww2ogg024/ww2ogg.exe" %%f --pcb "./ww2ogg024/packed_codebooks_aoTuV_603.bin"
pause
for %%f in (*.ogg) do revorb.exe %%f
pause
3. save Script.txt file as .bat. you’re free to delete the .txt if you want
now your folder should look like this:

how to convert .wem to .wav
1. copy the voicelines you want to convert into the same folder as ww2ogg024 and ReVorb (remember to copy them, not move them)

2. run Script and do what it instructs you to
3. success!

.ogg files can be listened to but if you want to post them on Tumblr you have to convert them to .mp3. i do it in VLC media player. i did have a problem with some of karū’s lines where they couldn’t be played after being converted to .mp3. i have no idea what the problem was or why only some lines were affected, but i managed to circumvent this by saving them in a different program as .mp4 and converting that to .mp3
some files can’t be accessed for some reason, not in any way i know. i found and copied the watcher’s and hazanui karū’s lines without a problem, but i couldn’t get to ooze noises
happy file converting!
#i almost deleted a chunk of karū’s lines two separate times because i moved them instead of copying#i wanted ooze noises because they sound like i what imagine teddy bears could sound like#pillars of eternity#pillars of eternity references#converting wem to wav
25 notes
·
View notes
Text
4x4x4 PCB LED CUBE
youtube
Bring life to your home with this enchanting 4x4x4 LED cube. From static to flashing, chasing, or fading this cube can be programmed to display many different types of 3D LED transitions. This customizable PCB LED cube is super easy to make and fun to have in your home. Go ahead and create a forest of these cubes using various color LEDs to enhance the beauty of your Christmas Tree this Christmas. This cube has 64 Blue LEDs organized in 4 layers. These LEDs are wired up to an Arduino Nano. Each LED can be addressed individually using Arduino IDE, enabling it to display amazing 3D transitions! There are hundreds of tutorials of these cubes made using exposed metal wires and by using crazy soldering techniques, which just gives me shivers. In this tutorial I'll show you guys how to make this super simple 4x4x4 PCB LED cube "without over complicating anything". With just basic soldering skills, you can create this PCB cube and light up your living room making everyone jealous.
3 notes
·
View notes
Text
Devlog 1 (1/25/24): Why This Is Pointless
In my intro post, I mentioned how it would be much easier to map the 12 chromatic notes of Western music to the 3 action buttons and 8 directions of Undertale, and how I won't be doing that for purely aesthetic reasons. I also want to mention why everything I'm doing to my violin is completely stupid.
If you want to follow in my footsteps, you shouldn't do it the way I'm doing it. You probably can't.
My violin is a Yamaha EV-205 five-string electric from the late aughts/early 10's. I recently learned that this violin is no longer in production, so there's no way your standard Joe Schmoe can pick up this tutorial, nor would they want to if they were in the market for an electric violin, because they already sell electric violins that are MIDI controller enabled. You should buy that and follow the software specs of CZR drums and their MIDI-to-controller software partner/whatever. I simply do not want to spend more money on an electric violin when I already have one with the right hardware (individual pickups for each of the five strings). So I will be voiding the warranty that likely no longer exists and busting open my violin to see what I can patch together.
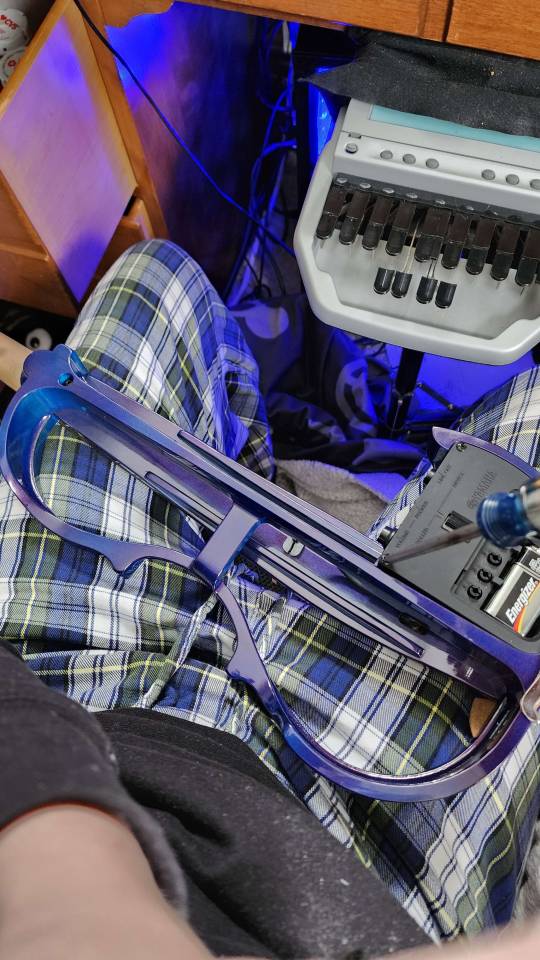
When I busted this component (pictured above) open I immediately found a not-so-complex PCB where I could locate each of the individual string inputs. I have yet to see whether those ports will give me the inputs I need - golly, I have yet to learn how to solder enough to access those ports!! - but the visibility gives me hope. it doesn't look hard, especially for someone who has been low-key interested in soldering for like 15 years (since my Pokemon Gold copy's battery died and I learned the ways to replace it) but I can't say I know exactly what data flows through that part of the circuit and how easy it would be to extract and manipulate.
I've done a lot of research into what I would need to take analog audio signal(s) and transform them into MIDI or some other binary/digital data. The first thing I found was an Arduino library, so I knew this wouldn't be hard. I only have one Arduino (knock-off) and I didn't like the idea of buying four more (one for each string) to get the MIDI values when I would probably be connected to a computer the whole time no matter what.
This led me to where I'm sitting pretty right now, at a Python library (Python being my favorite language) that uses its GitHub .md file to explain why Markov chains are important. Reader, do you know how much I love Markov chains? Did you know that in my sophomore year of college I created a musical AI by programming Markov chains in Python??? How is it that all of my interests loop in upon each other in the same way that my first and only job out of college involved natural language processing in Python just like my senior project where I did language analysis on okcupid profiles???? Is time in fact a flat circle? I don't have time to think about this because I want to program violin to play undertale pleas
Where I'll be starting is with this library and with monophonic input (one note at a time rather than interpreting multiple notes at once e.g. multiple strings played simultaneously) to make a controller of any kind work. But I have a lot of reading to do to see how Markov chains are involved. With it being both Python and linear algebra, I have the capacity to adjust the code to do whatever I want it to do. Given this insane opportunity I can't not do all the research possible to finetune things to my precise desires. If I were satisfied with "good enough", I would be playing monophonic input the whole way through. Let's go insane, boys.
5 notes
·
View notes
Text
another new toy


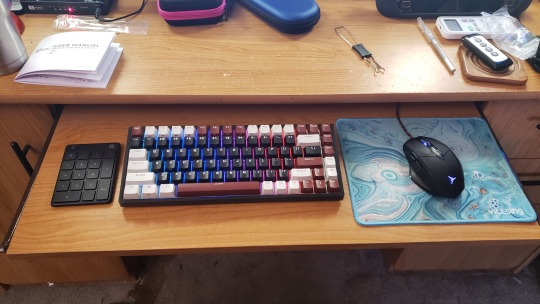
I've been planning to get a number of accessories for my new computer. A new monitor, microphone, maybe one of those vr headsets. But after having it for a few weeks, one thing jumped out as needing an upgrade more urgently than anything else - the stock full size keyboard that came with it was just too large and awkward for my little keyboard shelf. I was tempted to go back to the Microsoft Compact Bluetooth keyboard that I was using with the Steam Deck... but I haven't had a "real" computer, like a proper desktop computer in decades, I wanted a "real" keyboard to go with it. Like a proper mechanical keyboard with switches and buttons and such. And so I typed "mechanical keyboard reviews" into a youtube search, blissfully unaware of the rabbit hole I was about to fall down.
If you know then you already know, but it came as a surprise to me that membrane keyboards are so cheap and so easy to mass produce that they've taken over the casual market altogether, forcing mechanical keyboards into the domain of the ⋆ ˚。⋆˚enthusiast⋆ ˚。⋆˚
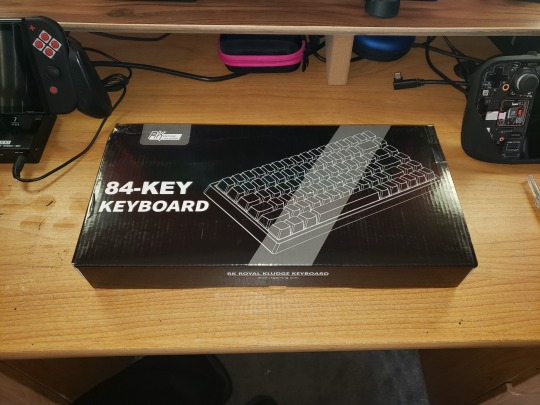
Yes, it seems proper keyboards are a hobby now, not a very cheap one either, and the very last thing I need is another expensive hobby. But every hobby has its more affordable and approachable on ramps, and there are a number of pre-built budget boards occupying this space in world of mechanical keyboards. After watching a few dozen hours of youtube videos and reading a bunch of reviews and tutorials, I eventually settled on the RK84 'limited edition' from Royal Kludge for us$80. Which is like twice what I expected to pay when I in my naive innocence began shopping for keyboards, but I've come to understand that eighty bucks absolutely counts as "budget" in this hobby.
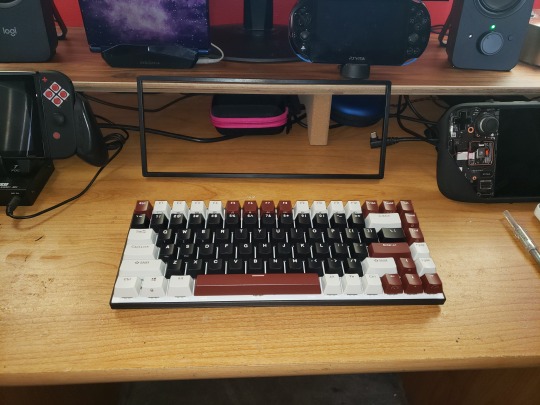
Pricing aside, I really do love my new keyboard. The 75% form factor is ideal, better centering the typing keys and saving a bunch of extra space on my little shelf while maintaining all the functionality of a full size board save only for the number pad. While I do like to use a number pad, I don't mind taking one out when I need it, and the keyboard even has a couple usb ports to easily plug a mouse and separate number pad into, which is super convenient and such an obvious idea that I really have to wonder why all keyboards aren't doubling as USB multi-dongles at this point, with additional usb ports, sd card ports, and so on.
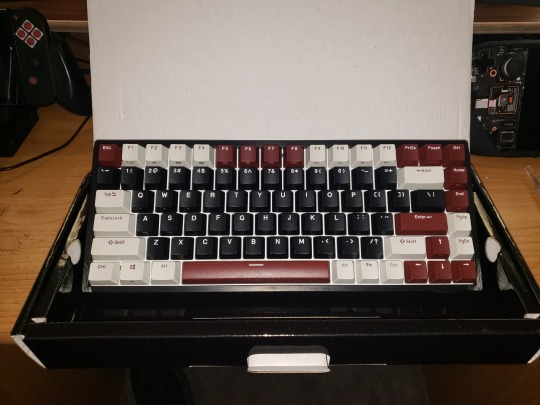
For $10 more than the regular RK84 wireless, the 'limited edition' version has better keycaps, factory-lubed switches, some filler foam in the housing to reduce the hollow sound, an additional layer of sound dampening foam sandwiched between the top plate and the pcb, and a snazzy color scheme, the version I chose combining a black body and mostly black keys with a white top plate that better reflects the swirly rainbow rgb backlighting. The sound is decent, at least to my untrained ear, right out of the box. Which is ideal, as I'd like to avoid the temptation to start modding it.
Because I've gone about as far down this particular rabbit hole as I want to go.
Though I suppose it is tempting to open it up, as some basic tape & band aid mods would be cheap and easy and might improve the sound a bit...
And as much as the pre-lubed yellow linear switches are nice, I did make sure to get a hot-swappable board so it's easy to change them out later if I want to try alternatives, and I do think I might prefer tactile switches for typing...
And the rgb lighting is nice enough that it really is a shame these caps aren't shine though. Yeah, yeah, shine-through is tacky, but Cringe is Dead, and some black top pudding caps might really make the lighting pop. Or maybe a mix of black, white and some accent color to match the color layout that the board came with?
The abyss, it tempts me so...
#mechanical keyboard#keyboards#computers#I really can't be starting any expensive new hobbies#student loan payments start back up in September
3 notes
·
View notes
Text
I designed my LED matrix PCB with code
https://docs.tscircuit.com/tutorials/building-led-matrix
0 notes
Text
Learning Blender.
Progress is slow with trying to learn Blender, as I'm not using any tutorials. Currently I've learned how to extrude and dissolve faces, which although it isn't the easiest way to go about things, allows me to work on the case design in my own time instead of relying on somebody else to do it. While learning blender I found some 3D models of the components I use to create slimes, specifically JST pin plugs (both 2 pin and 6 pin), Weimos D1 Mini and a TP4046 model.
I've used these models to use Blender as a sort of piece of CAD software, using this plugin to take the model of my PCB from KiCAD (where the PCB was designed) and put it into blender, although it didn't work. Instead I found a plugin for blender that allowed me to import .step models, which is how I got all of these models inside of blender, now letting me have a fully size accurate 3D model where I can work on fitting the pieces into place well enough. To help with this I got the measurements of the battery I've been using, using a cube to represent it and making the cube slightly larger to give the battery some wiggle room.
Here is the example of it in blender, it shows how the holes for any component that requires a pin do not line up with the size of the pins, which is what I learned when building my first prototype. I am tempted to learn PCB design in KiCAD now, as I would love to edit the design of this PCB to improve the layout a ton more.
1 note
·
View note
Text

A technician carefully examines and handles a stack of printed circuit boards (PCBs) and hard drives, showcasing the detailed process of electronics repair, hardware testing, and component recycling. Perfect for use in tech blogs, hardware engineering articles, or PCB repair tutorials.
#PCBRepair#ElectronicsEngineering#HardwareDesign#CircuitBoard#TechRepair#EmbeddedSystems#ElectronicsTesting#PCBDiagnostics#ElectronicComponents#RecyclingTech#HardwareEngineer#IoTSolutions#IndustrialElectronics#TechLab#ElectronicsManufacturing
0 notes
Text
A Comprehensive Guide to Printed Circuit Board (PCB) Manufacturing
Title: A Comprehensive Guide to Printed Circuit Board (PCB) Manufacturing
Introduction Printed Circuit Boards (PCBs) are the backbone of modern electronic devices, providing a platform for electrical connections between components. The manufacturing process of PCBs requires precision, technical expertise, and adherence to industry standards to ensure high functionality and reliability. This guide will walk you through the PCB manufacturing process, covering essential topics, strategies, and step-by-step tutorials.
Outline
Overview of PCB Manufacturing
Importance of PCBs in modern electronics
Types of PCBs (Single-layer, double-layer, multi-layer, rigid, flexible, rigid-flex) pcb assembly
Common materials used in PCB fabrication
PCB Design and Layout
Introduction to PCB design software (Eagle, Altium, KiCad, OrCAD)
Key design considerations (trace width, spacing, via placement)
Design for manufacturability (DFM) guidelines
Prototyping and testing the design before manufacturing
PCB Fabrication Process
Substrate material selection
Copper cladding and etching process
Layer alignment and lamination in multilayer boards
Drilling and plating through-holes and vias
Component Assembly and Soldering Techniques
Surface Mount Technology (SMT) vs. Through-Hole Technology (THT)
Pick-and-place machines and manual component placement
Reflow soldering and wave soldering processes
Inspection methods (Automated Optical Inspection, X-ray, Functional Testing)
Quality Control and Testing Strategies
Electrical testing (Flying probe, bed-of-nails testing)
Environmental stress testing (thermal cycling, humidity testing)
Common defects and troubleshooting techniques
Tutorials for DIY and Small-Scale PCB Manufacturing
How to create a PCB at home using etching techniques
Using a CNC machine for PCB prototyping
Ordering PCBs from a professional manufacturer (Gerber file preparation and submission)
Future Trends in PCB Manufacturing
Advances in flexible and stretchable PCBs
3D printed circuit boards
AI-driven PCB design and automated manufacturing
Conclusion The PCB manufacturing process is a blend of design, engineering, and precise execution. Understanding the various steps, from design to assembly and testing, helps ensure the production of high-quality and reliable PCBs. With advancing technology, the industry continues to evolve, offering more efficient and sophisticated solutions. Whether you're a hobbyist, an engineer, or a manufacturer, mastering PCB manufacturing techniques is essential for innovation in electronics.
By following the strategies and tutorials outlined in this guide, you can confidently design and manufacture PCBs that meet your specific requirements.
0 notes
Text


PCB of the day! MCP9808 High Accuracy I2C Temperature Sensor Breakout Board 🌡️🔌💻
The MCP9808 I2C digital temperature sensor provides high accuracy and precision, with a typical accuracy of ±0.25°C over its -40°C to +125°C range, and works with any microcontroller using i2c, supporting up to 8 sensors on a single bus. Unlike the DS18B20, this sensor is attached to a breakout board PCB for easy use, with a wide voltage range of 2.7V to 5.5V, and is accompanied by a comprehensive tutorial and library compatible with Arduino & CircuitPython.
#adafruit#electronics#pcb#opensource#opensourcehardware#pcboftheday#MCP9808#TemperatureSensor#arduino#circuitpython
4 notes
·
View notes
Text
A Comprehensive Guide to Printed Circuit Board (PCB) Manufacturing
Introduction Printed Circuit Boards (PCBs) are the backbone of modern electronic devices, providing a platform for electrical connections between components. The manufacturing process of PCBs requires precision, technical expertise, and adherence to industry standards to ensure high functionality and reliability. This guide will walk you through the PCB manufacturing process, covering essential topics, strategies, and step-by-step tutorials.
Outline
Overview of PCB Manufacturing
Importance of PCBs in modern electronics pcb assembly
Types of PCBs (Single-layer, double-layer, multi-layer, rigid, flexible, rigid-flex)
Common materials used in PCB fabrication
PCB Design and Layout
Introduction to PCB design software (Eagle, Altium, KiCad, OrCAD)
Key design considerations (trace width, spacing, via placement)
Design for manufacturability (DFM) guidelines
Prototyping and testing the design before manufacturing
PCB Fabrication Process
Substrate material selection
Copper cladding and etching process
Layer alignment and lamination in multilayer boards
Drilling and plating through-holes and vias
Component Assembly and Soldering Techniques
Surface Mount Technology (SMT) vs. Through-Hole Technology (THT)
Pick-and-place machines and manual component placement
Reflow soldering and wave soldering processes
Inspection methods (Automated Optical Inspection, X-ray, Functional Testing) pcb manufacturing
Quality Control and Testing Strategies
Electrical testing (Flying probe, bed-of-nails testing)
Environmental stress testing (thermal cycling, humidity testing)
Common defects and troubleshooting techniques
Tutorials for DIY and Small-Scale PCB Manufacturing
How to create a PCB at home using etching techniques
Using a CNC machine for PCB prototyping
Ordering PCBs from a professional manufacturer (Gerber file preparation and submission)
Future Trends in PCB Manufacturing
Advances in flexible and stretchable PCBs
3D printed circuit boards
AI-driven PCB design and automated manufacturing
Conclusion The PCB manufacturing process is a blend of design, engineering, and precise execution. Understanding the various steps, from design to assembly and testing, helps ensure the production of high-quality and reliable PCBs. With advancing technology, the industry continues to evolve, offering more efficient and sophisticated solutions. Whether you're a hobbyist, an engineer, or a manufacturer, mastering PCB manufacturing techniques is essential for innovation in electronics.
By following the strategies and tutorials outlined in this guide, you can confidently design and manufacture PCBs that meet your specific requirements.
0 notes
Text
youtube
Ever wondered how electronic components withstand impact during a drop? In this video, we demonstrate a drop test simulation for a PCB board using SolidWorks. Discover how to analyze stresses, displacement, and optimize designs for durability! Perfect for engineers and enthusiasts looking to enhance their simulation skills. Key Highlights: Understanding the importance of drop tests for PCB boards
💡 Step-by-step setup of drop test simulation ⚙️ Material definition and gravity orientation 🎯 Interpreting stress and displacement results 🔍 Tips for improving design to avoid component failures 📈
🔔 Subscribe for more engineering insights and tutorials! Check out the episodes of this series here! https://www.youtube.com/playlist?list=PL9-f9hWLZS61PrvBWiw94i5Kx3xjaFRnx
If you’re interested in speaking with our experts from Scania, Mercedes, and Nissan, and scheduling a personalized career plan, call us at +91-9342691281 or register here: https://bit.ly/3ZlHeH0
#SolidWorksSimulation#DropTest#PCBSimulation#MechanicalEngineering#CAE#EngineeringTutorials#StressAnalysis#DisplacementAnalysis#ProductDesign#LearnEngineering#SkillDevelopment#skilllync#Youtube
1 note
·
View note
Text
Choosing the Right X-Ray Inspection System: Key Factors to Consider

X-ray inspection systems have become an essential tool for quality control and safety assurance across industries such as manufacturing, food processing, electronics, and aerospace. These systems provide unparalleled accuracy in detecting defects, contaminants, and structural anomalies without damaging the product. However, selecting the right X-ray inspection system for your business requires careful consideration of several factors to ensure it meets your specific needs and delivers maximum value. This article explores the key factors to consider when choosing the right X-ray inspection system.
1. Understand Your Application Requirements
The first step in selecting an X-ray inspection system is understanding your specific application and its requirements. Different industries and products demand unique inspection capabilities, such as:
Food Industry: Detecting foreign objects like metal, glass, or plastic in packaged or processed foods.
Electronics: Examining solder joints, PCB assemblies, or internal component integrity.
Manufacturing: Inspecting welds, castings, or composite materials for structural defects.
Identifying the purpose of the inspection helps narrow down the features and capabilities required from the system.
2. Resolution and Image Quality
The resolution and image quality of an X-ray inspection system are critical for accurately identifying defects or contaminants. High-resolution systems are essential for applications where minute details need to be examined, such as in electronics or medical device manufacturing. Key considerations include:
Pixel Size: Smaller pixel sizes offer greater detail and precision.
Dynamic Range: A higher dynamic range provides better contrast and differentiation between materials.
Evaluate the level of detail needed for your inspections and choose a system capable of delivering clear, high-quality images.
3. Penetration Power
The penetration power of the X-ray system determines its ability to inspect dense or thick materials. For instance:
Low-energy systems are suitable for lightweight materials like food or plastics.
High-energy systems are necessary for dense materials like metals or composites.
Ensure the system you choose has the appropriate penetration power for your specific materials and product configurations.
4. Throughput and Speed
In high-volume industries, the inspection system’s throughput and speed are vital for maintaining efficiency. Consider systems that can integrate seamlessly into production lines and inspect products in real time without causing bottlenecks. Look for features like:
Automated Conveyor Systems: For continuous, high-speed inspections.
Batch Inspection Capability: For applications requiring detailed analysis of multiple items simultaneously.
Balancing speed with accuracy is crucial to ensure both quality and productivity.
5. System Versatility and Adaptability
Choose a system that can adapt to your evolving needs. Versatility in an X-ray inspection system ensures it remains useful as your business grows or product lines diversify. Features to consider include:
Adjustable Settings: Systems with customizable energy levels and inspection parameters for different products.
Multi-Product Capability: The ability to inspect a variety of sizes, shapes, and materials without requiring extensive reconfiguration.
This flexibility minimizes the need for additional equipment as your inspection requirements change.
6. Ease of Use and Training
A user-friendly interface and intuitive controls are important for reducing operator training time and ensuring consistent operation. Look for systems with:
Touchscreen Interfaces: For easy navigation and control.
Built-in Tutorials and Support: Features that assist operators in setting up and running inspections.
The ease of use directly impacts productivity and minimizes the risk of errors during operation.
7. Compliance with Industry Standards
X-ray inspection systems must adhere to the regulatory and safety standards of your industry. Ensure the system complies with certifications such as:
ISO Standards: For quality management and performance.
Radiation Safety Regulations: Compliance with local and international guidelines to protect operators and the environment.
Adhering to these standards not only ensures safety but also instills confidence in the reliability of the inspection system.
8. Maintenance and Support
The reliability of an X-ray inspection system depends on regular maintenance and access to technical support. When choosing a system, consider:
Warranty and Service Plans: Comprehensive warranties and scheduled maintenance plans to ensure long-term performance.
Technical Support: Availability of remote or on-site support for troubleshooting and repairs.
Spare Parts Availability: Ensure that replacement parts are easily accessible to minimize downtime.
9. Cost vs. Value
While the cost of the X-ray inspection system is a significant factor, it’s essential to evaluate it in terms of value. Consider:
Initial Investment: The upfront cost of purchasing the system.
Operating Costs: Energy consumption, maintenance, and training expenses.
Return on Investment (ROI): Enhanced quality control, reduced product recalls, and improved customer satisfaction.
Investing in a high-quality system that aligns with your needs ensures long-term savings and operational efficiency.
Conclusion
Choosing the right X ray inspection system requires a careful balance of technical capabilities, operational requirements, and cost considerations. By focusing on factors like resolution, penetration power, versatility, compliance, and support, you can select a system that meets your specific needs and enhances your quality control processes.
An effective X-ray inspection system not only safeguards product quality and compliance but also strengthens your reputation for reliability and excellence in your industry. With the right system in place, you can achieve greater operational efficiency, reduce risks, and build trust with your customers.
0 notes