#arduinoide
Explore tagged Tumblr posts
Visit Tumblr Blog
Explore Tumblr blogs with no restrictions, modern design and the best experience.
Last Seen Tumblr Blogs


Fun Fact
Kazakhstan’s Minister of Communications and Informatics has blocked the Tumblr site because it contained 60 sites of terrorism, extremism, and pornography in 2015.
Text
The first test for our WLED board codename "Sparkle Motion" 🌈💖💡 … 🐇⏳🌌
We got our WLED-friend PCBs today, and we only made one mistake: the wrong resistor on the 3.3V feedback line. Now that it's fixed, the board seems to work great with the latest version of WLED
We are checking all 4 signal outputs with this handy 256-LED grid that sits on our desk. Next, we will test the onboard IR receiver, USB PD, I2S microphone, extra I/O pins, and I2C. We'll also do an Arduino IDE board definition in case folks want to use it as a generic ESP32-to-LED-driver board. We're calling the board "Sparkle Motion" for now, but if you have other naming ideas, let us know - if we pick your name, you get a free board
Sign up, coming soon.
#wled#sparklemotion#leddriver#esp32#electronics#pcbs#arduino#makerprojects#openhardware#opensource#coding#leds#hardwaredesign#innovation#techgeeks#smartlighting#microcontrollers#hardwareengineering#esp32projects#ledmatrix#diyhardware#iotprojects#arduinoide#hardwaretesting#ledtechnology#techmakers#electronicscommunity#prototyping#hardwarehacking#adventuresintech
17 notes
·
View notes
Link
8 notes
·
View notes
Video
instagram
IoT Based Patient Health Monitoring on ESP32 Web Server By Mr Alam! - - This project is an IoT Based Patient Health Monitoring System & Monitor the Health Status of Patients on an ESP32 Web Server - - For the full video and instructions DM! - - - - #nextpcb @nextpcb_official #diyelectronics #arduino #engineering #iot #healthmonitoring #esp32 #webserver #innovation #arduinoproject #diyproject #custompcb #coding #arduinoide #pulseoximetry #powersupply #irsensor #infrared #infraredlight #temperaturesensor #healthstatus (at Busan, South Korea) https://www.instagram.com/p/B94QbvGnhhR/?igshid=5mfp4pn4go10
#nextpcb#diyelectronics#arduino#engineering#iot#healthmonitoring#esp32#webserver#innovation#arduinoproject#diyproject#custompcb#coding#arduinoide#pulseoximetry#powersupply#irsensor#infrared#infraredlight#temperaturesensor#healthstatus
1 note
·
View note
Photo

Just getting started. Now for boot loaders, troubleshooting, programming languages, and design decisions. #samd21g18 #circuitpython #makecode #javascript #arduinoide #atmelstudio #makersmovement #branding #startup #usfengineering #usfconnect2019 (at Bits4Bots LLC) https://www.instagram.com/p/B4SEbt4JXaH/?igshid=utq3qat8bko8
#samd21g18#circuitpython#makecode#javascript#arduinoide#atmelstudio#makersmovement#branding#startup#usfengineering#usfconnect2019
1 note
·
View note
Photo

#Coding dengan #ardublock menggunakan #arduino UNO pada #helmetrobot #cosplay merupakan perangkat untuk demo mengajar @coding.is.fun di kelas coding @millenniabookstore setiap Sabtu pukul 13:00 hingga 15:00 #scratch #mblock #arduinoide #codingame #codingclass (di Pondok Petir, Sawangan, Depok) https://www.instagram.com/kakzulfa/p/Bu5WUavglKq/?utm_source=ig_tumblr_share&igshid=1ghp8b76sfdf8
1 note
·
View note
Photo

ESP32 C3 @seeedstudio #ESP32 #esp32 #esp32c3 #wifi #iot #microcontroller #programming #electronics #robotics #arduinoide https://www.instagram.com/p/Cl_cw8oP7rK/?igshid=NGJjMDIxMWI=
0 notes
Link
Arduino hakkındaki yazımızı okumak için linke tıklayabilirsiniz.
1 note
·
View note
Photo
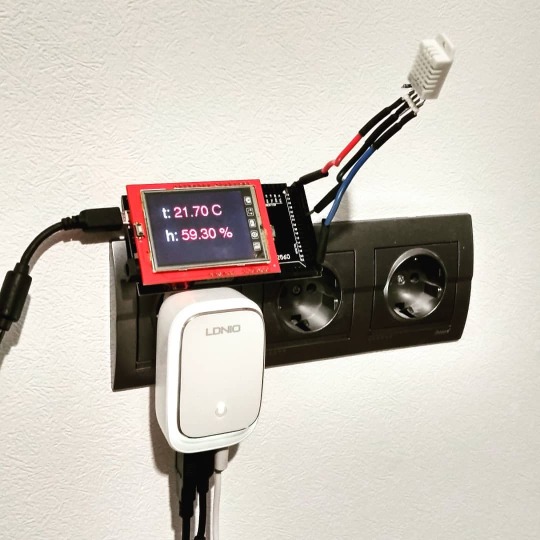
@aelmaker #dht22 sensor is better than #dht11.🌡️ Stable, but you still need to average the data. What do you think? 😏 #arduinolove #arduinoide #arduinobrasil #arduinofun #arduinolover #arduinorobot #sensorselfie #sensors #arduinouno #arduinomega #arduinoprogramming #aelmaker (Wanchai Hongkong) https://www.instagram.com/p/CM6he5oLpr_/?igshid=1pqe087c8axo5
#dht22#dht11#arduinolove#arduinoide#arduinobrasil#arduinofun#arduinolover#arduinorobot#sensorselfie#sensors#arduinouno#arduinomega#arduinoprogramming#aelmaker
0 notes
Photo
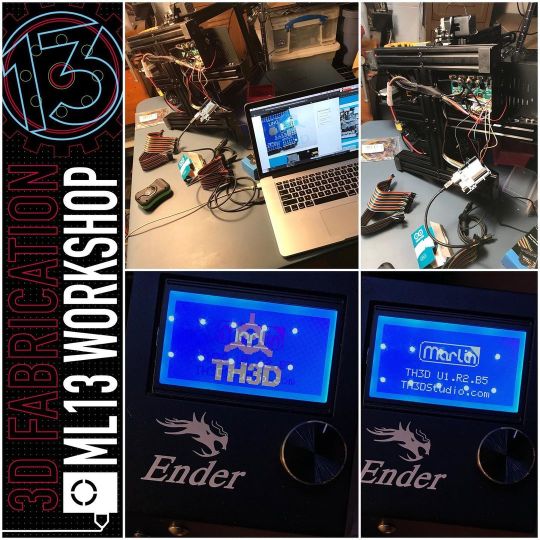
#ml13workshop 02/18/21 Last Christmas Santa brought me some sweet upgrades for my Ender 3 Pro. I got the upgraded glass bed, a Capricorn Bowden tube, and the BL Touch sensor to self-level the bed. This may sound dull, but for a guy like me, it is all very cool. Last weekend was the first opportunity I had to do the upgrade for the BL Touch. Before I could do that I had to flash the firmware and install a bootloader onto the board. I had watched several YouTube videos that went about this in different ways. In the first video, I watched they recommended using a USB microcontroller programmer downloader and ordered one, and I couldn't get the computer to see it. I then mucked around in Terminal trying to get it to work and then guesses that maybe I had a bad part. I ordered a replacement controller and discovered that the controller was fine, but discovered it was an issue with the drivers, then I spent the next two days trying to get the drivers to run on my computer. I then found a workaround for the driver issue. This involved removing the bottom panel off the bottom of the electronics box and connecting Dupont leads from my Arduino Uno to the Ender 3 Motherboard. Then uploading the TH3D Marlin software from my laptop using Arduino IDE (Integrated Development Environment). It was only after all this I discovered I had forgotten about the directions that came with the kit, which included a small piece of hardware that would have let me do all this through the Micro SD port. This once again proves that the hard way of doing things can be the best teacher. I can be stubborn and blindly power-thru until I figure things out. I am finding I have a growing appreciation that it is much easier to have someone over your shoulder to tell you that there is a better way. #3dprinting #fabrication #maker @thingiverse #thingiverse #ender3 #ender3creality #creality #cad #design #th3d #ArduinoIDE #TH3DMarlin #TH3D #Marlin https://www.instagram.com/p/CLdaJ-bjb5S/?igshid=1ce5e7gqcj3al
#ml13workshop#3dprinting#fabrication#maker#thingiverse#ender3#ender3creality#creality#cad#design#th3d#arduinoide#th3dmarlin#marlin
0 notes
Photo
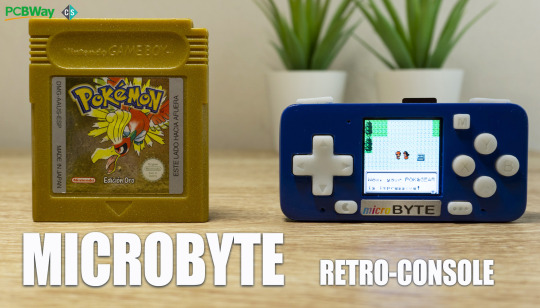


MicroByte
#CrowdSupply What is MicroByte?MicroByte is a hand-held, open-source retro-console, which can execute games from NES, GameBoy, GameBoy Color, Game Gear, and Sega Master System. It owns a powerful battery life of up to 6/7 hours with a colorful, high pixel density 1.3" IPS screen.MicroByte is controlled by an ESP32-WROVER E microcontroller module. And it is fully compatible with Arduino IDE.It maybe the tiniest hand-held console you have ever seen -- The entire console measures just 78 x 17 x 40 mm (3.07 x 0.67 x 1.57 inches). It seems a great choice to bring it when you are going out.
-
-Learn more: http://bit.ly/3c8pyrB -
0 notes
Photo
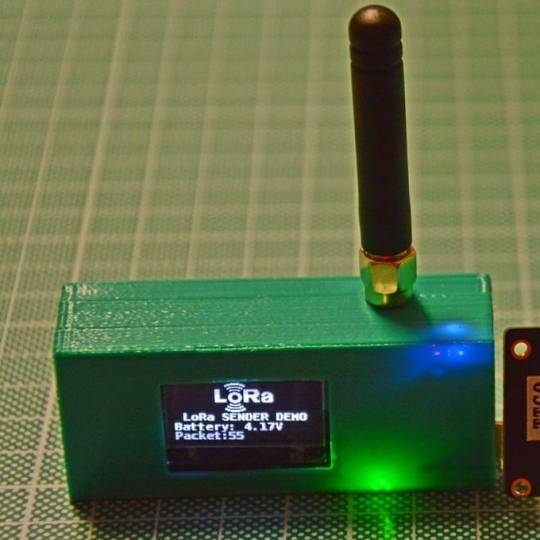
The second part of the article about the @ttgo_by_lilygo #TTGO #LORA32 is arrived! In this article there is a *complete* working example. #sourcecode is about a point-to-point #lora communication but with some extra features added letting anyone use the full capabilities of this board: both transmitter and receiver do a log file on the #sdcard If attached and the #battery voltage is monitored. I've explained all the issues about the usage of the two user-available SPI peripherals and about the battery/USB/external power usage. Thanks to #digitspace for giving me those board to experiment with. Read the full article in the bio. You must had read the previous article in order to understand perfectly: it's linked in the article you can reach from the bio. . . . . . . . . . . . . #wireless #esp32 #esp8266 #espressif #wifi #lorawan #lpwan #sigfox #loraalliance #semtech #arduinoide #smarthome #iot #automation #homeautomation #3dprinting #domotica #embeddedsystems #maker #coding #programmer https://www.instagram.com/p/CC-p2nZqPC9/?igshid=zoffk7v5mdmc
#ttgo#lora32#sourcecode#lora#sdcard#battery#digitspace#wireless#esp32#esp8266#espressif#wifi#lorawan#lpwan#sigfox#loraalliance#semtech#arduinoide#smarthome#iot#automation#homeautomation#3dprinting#domotica#embeddedsystems#maker#coding#programmer
0 notes
Photo

An ultrasonic sensor is an electronic device that measures the distance of a target object by emitting ultrasonic sound waves, and converts the reflected sound into an electrical signal. Ultrasonic waves travel faster than the speed of audible sound Follow guys for more stuff on Electronics @electronics_curiosities @electronucs_curiosities Be curious have fun 🙋Happy Learning Like 👍 Share 📩comment Want to suggest ideas or next posts feel free to comment below 👇👇👇👇👇👇👇👇👇👇👇📩 #electronics_curiosities #arduinouno #arduinofun #nodemcu #arduinoide #electronicspoint #electronics #engineer #engineeringmemes #engineering #electrical #electronicengineering #diyelectronics #digital_electronics #electroniclovers #sensor #semiconductor #analogelectronics #ultrasonic #raspberrypi #iot #techhouselovers #computers #microcontroller #processor #miniproject #electronicproject #mechatronics #circuitdesign #newtechnologies (at Sensors) https://www.instagram.com/p/CC2olxGhXCV/?igshid=1dz5eonhpwy4r
#electronics_curiosities#arduinouno#arduinofun#nodemcu#arduinoide#electronicspoint#electronics#engineer#engineeringmemes#engineering#electrical#electronicengineering#diyelectronics#digital_electronics#electroniclovers#sensor#semiconductor#analogelectronics#ultrasonic#raspberrypi#iot#techhouselovers#computers#microcontroller#processor#miniproject#electronicproject#mechatronics#circuitdesign#newtechnologies
0 notes
Text
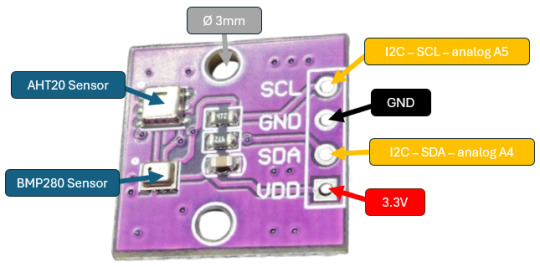
Kompakte Sensor-Platine mit AHT20 und BMP280: Vielseitig und platzsparend
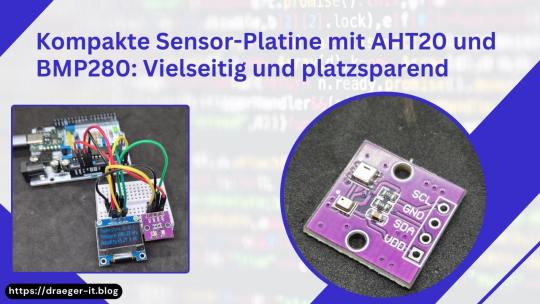
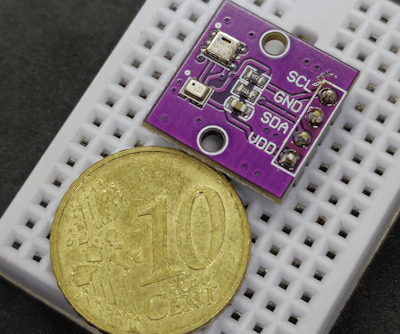
Komplexe Messaufgaben erfordern oft mehrere Sensoren – doch das geht auch einfacher. Diese kleine Platine vereint den AHT20 und den BMP280 Sensor und bietet dir die Möglichkeit, Temperatur, Luftfeuchtigkeit und Druck effizient auf kleinstem Raum zu erfassen. Dank der kompakten Bauweise, die kaum größer als ein 10-Cent-Stück ist, eignet sich die Platine ideal für Anwendungen mit begrenztem Platzangebot, wie IoT-Geräte, Wetterstationen oder tragbare Elektronik. https://youtu.be/HEVn_T0Cv6Q Die Kommunikation über den I²C-Bus macht die Integration in bestehende Projekte kinderleicht und minimiert den Verkabelungsaufwand. Trotz der geringen Größe überzeugen die Sensoren mit einer hohen Messgenauigkeit und Zuverlässigkeit, wodurch diese Lösung nicht nur platzsparend, sondern auch leistungsstark ist.

Den BMP280 und weitere Luftdrucksensoren habe ich dir im Beitrag Genauigkeitstest bei der PTB: Luftdrucksensoren BMP180, BMP280 und BME680 einem Test unterzogen und dir einen ausführlichen Bericht veröffentlicht.
Technische Daten der Sensoren AHT20 & BMP280
Nachfolgend die technischen Daten der beiden Sensoren: Technische DatenAHT20BMP280Versorgungsspannung2.0 - 5.5V DC1.71 - 3.6VSchnittstelleI²CI²CMessbereichTemperatur: -40 bis +85 °C Feuchtigkeit: 0 - 100 %Temperatur: -40 bis +85 °C Luftdruck: 300 - 1100 hPaGenauigkeitTemperatur: ±0.3 °C Feuchtigkeit: ±2 %Temperatur: ±1 °C (typ. bei 950-1050 hPa) Luftdruck: ±0.12 hPa (±1 m) Aus der Tabelle können wir zusätzlich entnehmen, dass der AHT20 sowie auch der BMP280 die Temperatur messen, dieses können wir uns gleichzeitig zu eigen machen und prüfen, inwieweit die Sensorwerte auseinander gehen.
Bezug der Sensor-Platine mit AHT20 und BMP280
Ich habe mir diese kleine Platine (wie so oft) bei Aliexpress.com für ein paar Euro bestellt. Du bekommst diese aber auch über ebay.de für knapp 4,90 € inkl. Versandkosten*. Hinweis von mir: Die mit einem Sternchen (*) markierten Links sind Affiliate-Links. Wenn du über diese Links einkaufst, erhalte ich eine kleine Provision, die dazu beiträgt, diesen Blog zu unterstützen. Der Preis für dich bleibt dabei unverändert. Vielen Dank für deine Unterstützung!
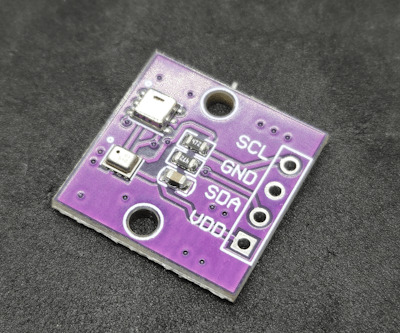
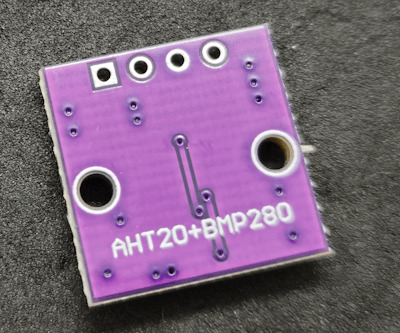
Aufbau der Sensor-Platine
Die kleine 15 mm x 15 mm Platine verfügt über vier Pins (SCL, GND, SDA & VDD) und noch zwei 3 mm Bohrungen an den Seiten.
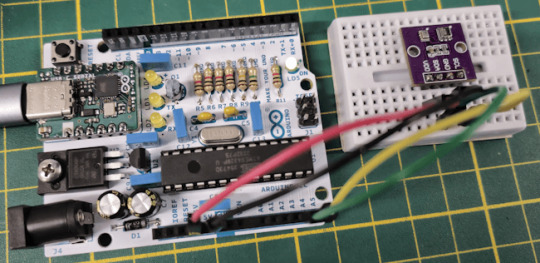
Aufbau der Schaltung am Arduino UNO R3
Schließen wir die Sensor-Platine via I2C an den Arduino UNO an, um diese später auszulesen. Da der BMP280 Sensor mit maximal 3.6V arbeitet, dürfen wir hier nur den 3.3V Pin als Stromversorgung verwenden.

Für den Aufbau der Schaltung benötigst du: - einen Arduino UNO R3* oder Arduino Nano V3* - ein passendes Datenkabel* - eine Sensor-Platine mit AHT20 & BMP280 Sensor* - vier Breadboardkabel*, 10 cm, männlich - männlich - ein 170 oder 400 Pin Breadboard*

Programmieren der Sensor-Platine in der Arduino IDE
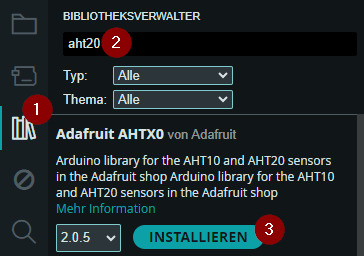
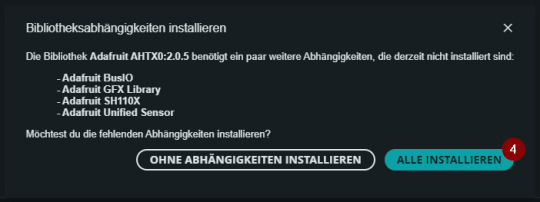
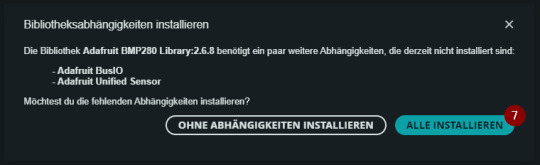
Bevor wir mit der Programmierung beginnen, installieren wir die Bibliotheken für die beiden Sensoren AHT20 & BMP280. Dazu öffnen wir den Bibliotheksverwalter (1) und suchen zunächst nach "aht20" (2) es wird dir nun eine lange Liste von kompatiblen Bibliotheken aufgelistet. Aus dieser Liste wähle ich "Adafruit AHTX0 von Adafruit" und klicke dort INSTALLIEREN (3). Diese Bibliothek hat jedoch einige Abhängigkeiten, welche zusätzlich installiert werden müssen. Daher klicken wir im neuen Dialog auf "ALLE INSTALLIEREN" (4).
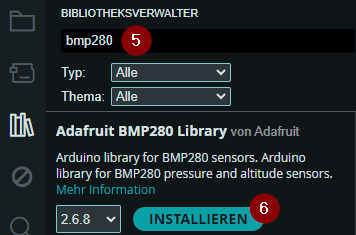
Um die Bibliothek für den BMP280 Sensor zu installieren, suchen wir zunächst nach dieser (5) und wählen auch hier die Version von Adafruit aus (6).
Im ersten Schritt möchte ich die Daten der beiden Sensoren auf der seriellen Schnittstelle ausgeben. Dazu kopiere ich mir zunächst die benötigten Code-Snippets aus den Beispielen, welche den beiden Bibliotheken beiliegen. Programm: Ausgabe der Sensordaten in tabellarischer Form auf der seriellen SchnittstelleHerunterladen Programm: exportieren der Sensordaten im CSV-FormatHerunterladen Wert |BMP280 |AHT20 ------------------------------------------------------------------------------ Temperatur |20.59 °C |20.80 °C Luftdruck |101491.25 Pa | Luftfeuchtigkeit | |50.96% rH ------------------------------------------------------------------------------ Temperatur |20.59 °C |20.79 °C Luftdruck |101489.41 Pa | Luftfeuchtigkeit | |51.44% rH Nachfolgend der Code zur tabellarischen Darstellung der Daten: // Importieren der benötigten Bibliotheken #include // für den BMP280 Sensor #include // für den AHT20 Sensor #include //Objekt instanziieren vom Typ Adafruit_BMP280 Adafruit_BMP280 bmp; //Objekt instanziieren vom Typ Adafruit_AHTX0 Adafruit_AHTX0 aht; void setup() { //beginn der seriellen Kommunikation mit 9600 baud Serial.begin(9600); //beginn der Kommunikation mit dem BMP280 Sensor bmp.begin(); //Konfigurieren des BMP280 Sensors bmp.setSampling(Adafruit_BMP280::MODE_NORMAL, Adafruit_BMP280::SAMPLING_X2, Adafruit_BMP280::SAMPLING_X16, Adafruit_BMP280::FILTER_X16, Adafruit_BMP280::STANDBY_MS_500); //beginn der Kommunikation mit dem AHT20 Sensor aht.begin(); //Ausgeben einer Tabelle Serial.println("Wert tttt|BMP280ttt|AHT20"); Serial.println("------------------------------------------------------------------------------"); } void loop() { //lesen der Daten vom AHT20 Sensor sensors_event_t humidity, temp; aht.getEvent(&humidity, &temp); Serial.print("Temperaturttt|"); Serial.print(String(bmp.readTemperature(), 2) + " °C"); Serial.print("tt|"); Serial.println(String(temp.temperature, 2) + " °C"); Serial.print("Luftdruckttt|"); Serial.print(String(bmp.readPressure(), 2) + " Pa"); Serial.println("tt|"); Serial.print("Luftfeuchtigkeittt|"); Serial.print("ttt|"); Serial.println(String(humidity.relative_humidity,2)+"% rH"); delay(5000); Serial.println("------------------------------------------------------------------------------"); }
Anzeigen der Sensorwerte auf einem OLED-Display
Die beiden Sensoren (AHT20 & BMP280) liefern jeweils die Temperatur, da ich diesen Wert lediglich einmal benötige, nutze ich diesen vom BMP280. Ansonsten zeige ich auf dem Display noch zusätzlich den Luftdruck in hPa (Hektopascal) sowie die Luftfeuchtigkeit in % an.
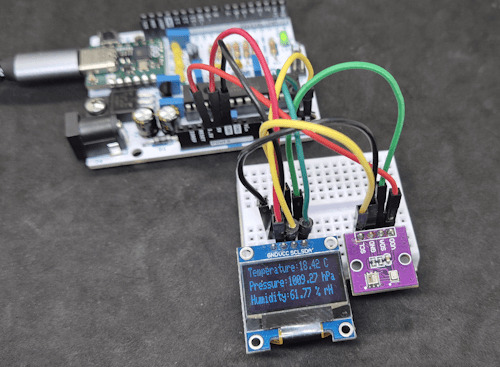
Für die Schaltung verwende ich ein 0,96" OLED-Display, welches du auf ebay.de bereits ab 2,95 € zzgl. Versandkosten beziehen kannst. Programm: anzeigen der Sensordaten auf einem OLED-DisplayHerunterladen // Importieren der benötigten Bibliotheken #include // für den BMP280 Sensor #include // für den AHT20 Sensor #include // für das OLED-Display #include #include #include // das Display wird via 0x3C am I2C Port angesteuert #define SCREEN_ADDRESS 0x3C Adafruit_SSD1306 display(128, 32, &Wire, -1); //Objekt instanziieren vom Typ Adafruit_BMP280 Adafruit_BMP280 bmp; //Objekt instanziieren vom Typ Adafruit_AHTX0 Adafruit_AHTX0 aht; void setup() { //beginn der seriellen Kommunikation mit 9600 baud Serial.begin(9600); // beginn der Kommunikation mit dem Display display.begin(SSD1306_SWITCHCAPVCC, SCREEN_ADDRESS); // setzen der Textgröße display.setTextSize(1); // setzen der Schriftfare "weiß" display.setTextColor(SSD1306_WHITE); //beginn der Kommunikation mit dem BMP280 Sensor bmp.begin(); //Konfigurieren des BMP280 Sensors bmp.setSampling(Adafruit_BMP280::MODE_NORMAL, Adafruit_BMP280::SAMPLING_X2, Adafruit_BMP280::SAMPLING_X16, Adafruit_BMP280::FILTER_X16, Adafruit_BMP280::STANDBY_MS_500); //beginn der Kommunikation mit dem AHT20 Sensor aht.begin(); } // Funktion zum schreiben einer Textzeile auf dem Display // lineIndex - der Index der Zeile // desc - Beschreibung zbsp. "Temperature" // value - der Wert zbsp. "18.56" // sign - die Einheit zbsp. "C" void drawText(int lineIndex, String desc, float value, String sign) { display.setCursor(3, lineIndex * 10); display.println(desc + String(value, 2) + sign); } void loop() { //lesen der Daten vom AHT20 Sensor sensors_event_t humidity, temp; aht.getEvent(&humidity, &temp); // leeren des Displays display.clearDisplay(); // anzeigen der Temperatur drawText(0, "Temperature:", bmp.readTemperature(), " C"); // anzeigen des Luftdrucks drawText(1, "Pressure:", bmp.readPressure()/100, " hPa"); // anzeigen der Luftfeuchtigkeit drawText(2, "Humidity:", humidity.relative_humidity, " % rH"); // absenden der Daten an das Display display.display(); // eine kleine Pause von 5 Sekunden delay(5000); } Read the full article
0 notes
Photo

Стопочка подопытных :):) Но иногда без них никак , особенно когда что-то срочно нужно . А так раз и сваял по быстрому . Самый главный подопытный Arduino DUE на процессоре ARM Cortex m3 Atmel SAM3X8E. #gennadilisai #autoservicemiscow #swapmoscow #arduino #arduinoide #arduinodue #arm #armcortexm3 #sam3x8e @arduino.cc (at Moscow, Russia) https://www.instagram.com/p/CAPIyXFBA7T/?igshid=gnztiw9vbup5
0 notes
Photo

Berlangsung sore ini pelatihan bagi para calon pengajar @coding.is.fun di studio #rumahsenirupakakzulfa di Pamulang. @infotangsel @millenniabookstore @lukisandotcom @infobsdcity #CodingisFun #coding #codingclass #arduino #scratch #mblock #ardublock #arduinoide #appinventor2 #robotics (di Pondok Petir, Sawangan, Depok) https://www.instagram.com/kakzulfa/p/Bu0qAi3AK_o/?utm_source=ig_tumblr_share&igshid=1uuzu77u2niy1
#rumahsenirupakakzulfa#codingisfun#coding#codingclass#arduino#scratch#mblock#ardublock#arduinoide#appinventor2#robotics
1 note
·
View note
Photo

ESP12E/12F programmer Making video link in bio PCBs from @jlcpcb ##esp12e #esp12f #esp8266wifi #esp8266 #espnow #arduinoide #programmer #programming #diy #diytech #electronicsprojects #espressif #techvideo https://www.instagram.com/p/CfJeZEqPH_4/?igshid=NGJjMDIxMWI=
#esp12e#esp12f#esp8266wifi#esp8266#espnow#arduinoide#programmer#programming#diy#diytech#electronicsprojects#espressif#techvideo
0 notes