#Photogrammetry Software Free
Explore tagged Tumblr posts
Visit Tumblr Blog
Explore Tumblr blogs with no restrictions, modern design and the best experience.
Last Seen Tumblr Blogs


Fun Fact
Tumblr’s website traffic is steadily declining.
Text
Photogrammetry Software Free
Point Precise uses photogrammetry and your iPhone’s device sensors to convert your scans into precise 3D point clouds.
0 notes
Text
Athletes Go for the Gold with NASA Spinoffs
NASA technology tends to find its way into the sporting world more often than you’d expect. Fitness is important to the space program because astronauts must undergo the extreme g-forces of getting into space and endure the long-term effects of weightlessness on the human body. The agency’s engineering expertise also means that items like shoes and swimsuits can be improved with NASA know-how.
As the 2024 Olympics are in full swing in Paris, here are some of the many NASA-derived technologies that have helped competitive athletes train for the games and made sure they’re properly equipped to win.

The LZR Racer reduces skin friction drag by covering more skin than traditional swimsuits. Multiple pieces of the water-resistant and extremely lightweight LZR Pulse fabric connect at ultrasonically welded seams and incorporate extremely low-profile zippers to keep viscous drag to a minimum.
Swimsuits That Don’t Drag
When the swimsuit manufacturer Speedo wanted its LZR Racer suit to have as little drag as possible, the company turned to the experts at Langley Research Center to test its materials and design. The end result was that the new suit reduced drag by 24 percent compared to the prior generation of Speedo racing suit and broke 13 world records in 2008. While the original LZR Racer is no longer used in competition due to the advantage it gave wearers, its legacy lives on in derivatives still produced to this day.
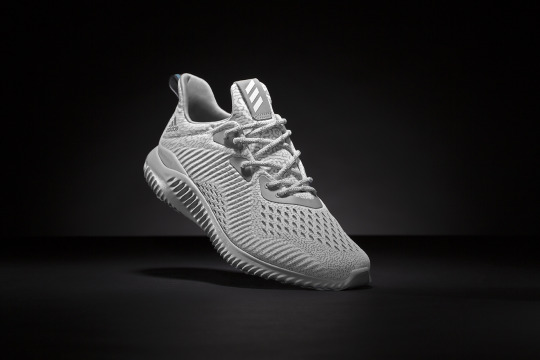
Trilion Quality Systems worked with NASA’s Glenn Research Center to adapt existing stereo photogrammetry software to work with high-speed cameras. Now the company sells the package widely, and it is used to analyze stress and strain in everything from knee implants to running shoes and more.
High-Speed Cameras for High-Speed Shoes
After space shuttle Columbia, investigators needed to see how materials reacted during recreation tests with high-speed cameras, which involved working with industry to create a system that could analyze footage filmed at 30,000 frames per second. Engineers at Adidas used this system to analyze the behavior of Olympic marathoners' feet as they hit the ground and adjusted the design of the company’s high-performance footwear based on these observations.

Martial artist Barry French holds an Impax Body Shield while former European middle-weight kickboxing champion Daryl Tyler delivers an explosive jump side kick; the force of the impact is registered precisely and shown on the display panel of the electronic box French is wearing on his belt.
One-Thousandth-of-an-Inch Punch
In the 1980s, Olympic martial artists needed a way to measure the impact of their strikes to improve training for competition. Impulse Technology reached out to Glenn Research Center to create the Impax sensor, an ultra-thin film sensor which creates a small amount of voltage when struck. The more force applied, the more voltage it generates, enabling a computerized display to show how powerful a punch or kick was.
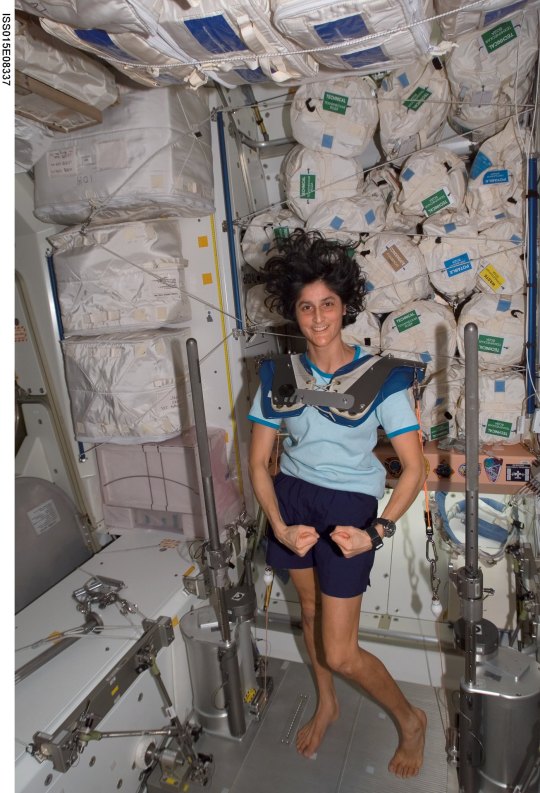
Astronaut Sunita Williams poses while using the Interim Resistive Exercise Device on the ISS. The cylinders at the base of each side house the SpiraFlex FlexPacks that inventor Paul Francis honed under NASA contracts. They would go on to power the Bowflex Revolution and other commercial exercise equipment.
Weight Training Without the Weight
Astronauts spending long periods of time in space needed a way to maintain muscle mass without the effect of gravity, but lifting free weights doesn’t work when you’re practically weightless. An exercise machine that uses elastic resistance to provide the same benefits as weightlifting went to the space station in the year 2000. That resistance technology was commercialized into the Bowflex Revolution home exercise equipment shortly afterwards.
Want to learn more about technologies made for space and used on Earth? Check out NASA Spinoff to find products and services that wouldn’t exist without space exploration.
Make sure to follow us on Tumblr for your regular dose of space!
2K notes
·
View notes
Note
Are there any primitives or operations you wished parametric CAD software had?
This is tricky, because parametric CAD is what I learned to design on so its feature set feels "natural".
I don't really think so! Most of the obvious innovations are already covered, SolidWorks can take a model back and forth between parametric and primitives modelling in its own weird way, Inventor has really great design for manufacture features, from what I've seen SolidEdge has done some clever stuff with the solver to help you design parts that are customizable as you go down the chain. Who knows what's going on in NX these days, not me. There's definitely some holes in the sense of individual packages lacking features, but almost anything you can ask has been implemented somewhere, by someone.
Good quality design for manufacture tools really do help, I remember doing sheet metal stuff in Inventor back before they cut off free Inventor access and being able to see your generated sheet and bend allowances so clearly was great, and now even OnShape has pretty solid design helpers.
A thing small shops and hobbyists would probably like is better handling of point clouds and photogrammetry for matching parts, since you're much more likely to be working with parts and projects where you didn't do all the design, I've spent many hours trying to accurately model a mating feature, but even that's like. Pretty good these days, importing 3D scans into an editor is pretty standard and the good CAD packages will even let you pick up holes and clean up point clouds directly from the scan.
I'm not that much of a mech eng, and never really was, my CAD is mostly self taught for simple tasks, real mechanical designers no doubt have better opinions on this, @literallymechanical probably has thoughts on T-splines.
37 notes
·
View notes
Text
Mastering the Art of 3D Scanning: Tips and Tricks for Optimal Results
3D scanning technology has revolutionized various industries, from e-commerce to healthcare. By capturing the physical world in digital form, 3D scanners offer unparalleled precision and detail. Whether you're a beginner or looking to refine your skills, this guide provides essential tips and tricks for mastering 3D scanning.
Understanding 3D Scanners
Before diving into tips, it's crucial to understand the types of 3D scanners available:
Laser Scanners: Use laser beams to measure the distance between the scanner and the object. They are highly accurate and ideal for detailed scans.
Structured Light Scanners: Project a pattern of light onto the object and capture the deformation of the pattern to create a 3D model. They are fast and suitable for a variety of surfaces.
Photogrammetry: Uses photographs from different angles to create a 3D model. This method is cost-effective but requires good lighting and a high-quality camera.
Contact Scanners: Physically touch the object to measure its dimensions. These are less common but very precise.
Tips and Tricks for Effective 3D Scanning
1. Choose the Right Scanner
Selecting the appropriate scanner for your needs is the first step. Consider factors like the object's size, required precision, surface texture, and budget. For instance, laser scanners are excellent for intricate details, while structured light scanners are better for larger objects.
2. Prepare the Object
Proper preparation of the object ensures a smoother scanning process:
Clean the Surface: Dust and dirt can interfere with the scan quality.
Apply Matting Spray: For shiny or reflective surfaces, use a matting spray to reduce glare and improve scan accuracy.
Stabilize the Object: Ensure the object is stable and won't move during scanning.
3. Optimal Lighting
Good lighting is crucial for photogrammetry and structured light scanners. Use diffuse lighting to minimize shadows and reflections. Avoid direct sunlight or harsh lighting, which can create unwanted glare.
4. Correct Positioning
Positioning the scanner and the object correctly is vital:
Maintain a Steady Distance: Keep a consistent distance between the scanner and the object.
Multiple Angles: Capture multiple angles to ensure all parts of the object are scanned. This is particularly important for photogrammetry.
5. Calibration and Testing
Regularly calibrate your scanner to maintain accuracy. Conduct test scans to ensure settings are optimal. Adjust the scanner's resolution and speed based on the object's complexity and desired detail level.
6. Use High-Quality Software
Post-processing software is as important as the scanner itself. Use reputable software to refine the scanned model, remove noise, and fill in any gaps. Some popular software options include:
MeshLab: Free and open-source, great for editing and processing 3D scans.
Blender: Powerful, free software with extensive features for 3D modeling.
Geomagic: Professional-grade software with advanced editing capabilities.
7. Patience and Practice
3D scanning is an art that requires patience and practice. Don’t be discouraged by initial failures. Experiment with different settings, angles, and techniques to improve your skills.
Common Challenges and Solutions
Problem: Incomplete Scans
Solution: Re-scan missing parts from different angles and merge the scans using software.
Problem: Poor Surface Detail
Solution: Increase the scanner's resolution or use a different scanning method.
Problem: Excessive Noise in the Scan
Solution: Use software tools to clean up the noise and smooth the model.
Advanced Tips
Use Turntables
For smaller objects, use a turntable to rotate the object smoothly during scanning. This ensures consistent coverage and saves time.
Leverage Markers
Place markers around the object to help the scanner track its position accurately, especially useful in large or complex scans.
Combine Scanning Methods
For comprehensive results, combine different scanning methods. For example, use a structured light scanner for the object's overall shape and a laser scanner for fine details.
Conclusion
Mastering 3D scanning involves selecting the right equipment, preparing adequately, and refining your technique through practice. By following these tips and tricks, you'll achieve high-quality 3D scans that can enhance your projects and applications. Remember, the key to success in 3D scanning lies in patience, experimentation, and continuous learning. Happy scanning!
#3DScanning#3DScanner#3DScan#3DPrinting#3DModeling#3DTechnology#LaserScanning#StructuredLight#Photogrammetry#3DDesign#DigitalScanning#ScanningTips#TechInnovation#Ecommerce#OnlineStore#EBayStore#ProductPhotography#ProductVisualization#TechTrends#CAD#IndustrialDesign#3DArt#Innovation#TechGadgets#TechNews#DigitalTransformation#TechCommunity#SmartTech#FutureTech#DigitalArt
3 notes
·
View notes
Text
The making of a fake ad for my portfolio [comprehensive breakdown]
youtube
Here's a breakdown of how I made a fake advertisement for my portfolio.
For the past month or so I've been making some fake advertisements to show potential employers. Before making this manga ad I made a fake advertisement for Vinegar Syndrome's UHD of Freeway. When making these ads I use Blender for most things, but other software is used as well.
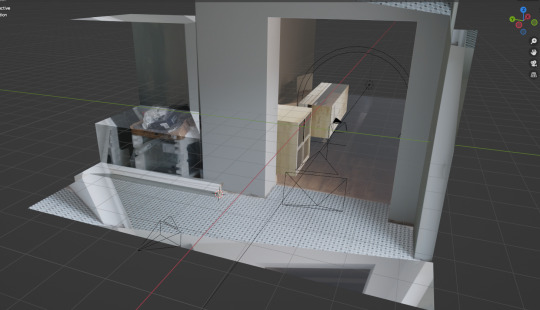
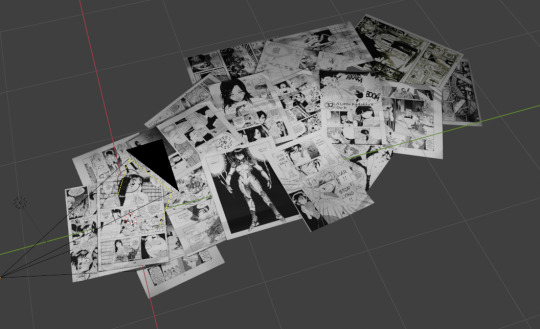
The origin of this project started with something completely unrelated; a photo projection recreation of part of my living space. The goal was to create my entire home in 3D for a short film I was conceptualizing. It's something I'll maybe revisit, but in the process I decided to use photogrammetry to create a 3D model of my bookshelf.
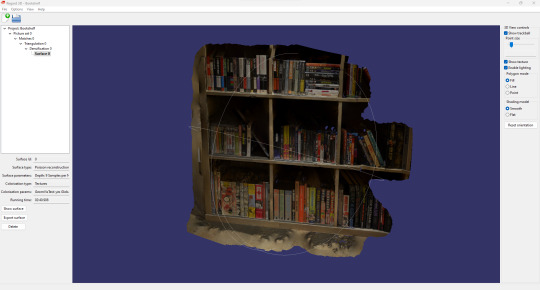
Photogrammetry is when you take a bunch of pictures of something and a piece of software, identifying common elements across multiple images, processes depth and other related things to make a 3D model. To create this model of my bookshelf I had to take 106 pictures, which wasn't much of a hassle. I used Regard3D and Meshroom to create different models using the same pictures. Surprisingly, Regard3D gave me a better end result.
The reason I say it's surprising is because Meshroom's website and operation generally seems a lot more professional and funded, while Regard3D's website won't even load for me [which might be because I'm using a VPN but I'm not going to check]. Regardless, almost any photogrammetry model is going to be riddled with weird imperfections, most commonly awkward bumps that don't exist in real life.
It's worth experimenting with both pieces of software; it may have been something about the specific set of images I used that created a less desirable end result with Meshroom. It's worth noting that the materials [basically textures but not] on the Regard3D model were broken when I put it into Blender, and I had to fix the shaders for it to render properly. Meshroom only works with Nvidia graphics cards. Both pieces of software are free. [Also, I used the Meshroom and Regard3D models in the ad. The Meshroom one is only used in the first shot.]
After making the bookshelf model I decided to make another ad. The reason the ad uses a vertical aspect ratio is because I made it after seeing a job listing looking for someone to make ads for tik tok specifically. I realized after basically finishing the demonstration ad that they were looking for an influencer and not someone who makes cool 30-second CGI things . . .
The reason the ad is about manga is because the manga books came out looking very good in the photogrammetry model, because most of the pictures focused on the manga books specifically. Also, it wouldn't have been a good idea to make two fake ads about Blu-Rays in a row.

Making the book models without the bookshelf was very simple; I took photographs of my books, measured their dimensions, and mapped the textures onto cubes in Blender. I used Sand Ripper to get the textures from my photos; Sand Ripper is a simple browser tool that allows someone to take a picture slightly out of perspective and make it "flat". Because it's a browser based tool I had to first scale down all the images in Gimp using a plugin that allowed me to bulk modify images. Because the spines of most of the books were so narrow they got very pixilated by Sand Ripper, I used the UV editor in Blender on the original pictures I took to get better spines.

Blender can basically do the perspective fixing on its own, and so you might be wondering what the point is of using an external tool like Sand Ripper at all. Basically it's just better and less confusing to use fewer images in Blender; only having two seperate materials for a book is better than six, one for each face.
For a few books I cheated and used one "page" texture for all three "page" faces. Also, some manga books have the spine on the left, and others have it on the right; it largely relates to the age of the book, but it's something that's very inconsistent either way.
Creating the shot with all of the manga pages was simple but time consuming, especially since I didn't want anything but the pages to be visible, which sometimes meant setting up an entire page just to cover up a corner in the shot. Turning on the "Import images as planes" add-on in Blender helped a lot; it's essential for any user. For whatever reason Blender's Eevee renderer has a glitch that made pages that were actually behind other pages look like they were infront, and so I used Cycle's render view for basically everything.
I used this Ian Hubert tutorial to give the pages a little bit of texture, and I did a little bit of loop cutting and knife tool stuff to add slight wrinkles to the pages. The video David F. Sandberg made talking about his "homemade" shots in Annabelle Creation was a big inspiration. I cheekily threw a page from Adam Warren's Dirty Pair comic on the bottom left, which is not a manga.
Some of the manga pages I found were a little too low res to use, and so I upscaled them using Waifu2x.

The mirror shot with the books falling took a long time to render but it was a very simple shot to put together. The pool shot was a bit more complicated. If you refer to the photo projection thing from the beginning of this breakdown you'll notice that the tiles in the pool are the tiles from my floor. Setting up most of this shot was very simple, but getting the caustics took a lot of hassle.
If you're not familiar with what caustics are, they're basically the white lights you see on the bottom of a pool, or when light passes through a glass of water. They appear in a lot of contexts but those are two of the most noticable ones.
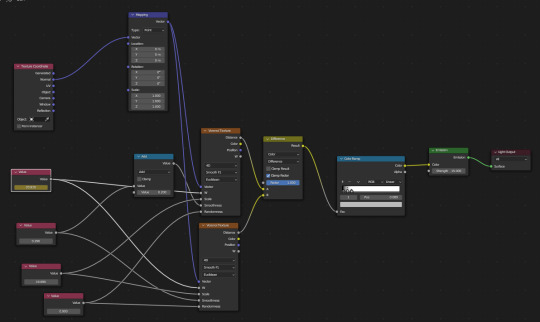
Blender added "real" caustics to their software for the first time around a year ago, but people had been making do with "fake" caustics for a long time. Even today people still use fake caustics because Blender's real caustics frequently are so underwhelming it's hard to notice when they're turned on.
In the picture above you can see the node based shader editing I had to do to get the caustics to appear. I followed this Polyfjord tutorial, but this other tutorial by Cartesian Caramel also seems good.
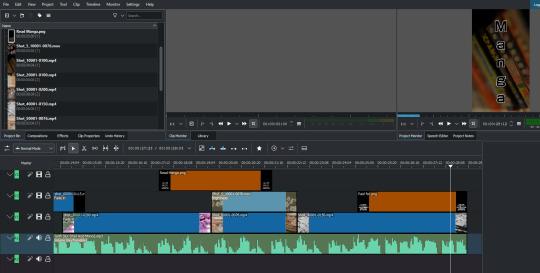
I edited the video together in Kdenlive. Kdenlive is a FOSS [free open source software] video editor that's great for making short videos like this. Relative to something like DaVinci Resolve Kdenlive is lacking in features, and it's not suitable for certain kinds of professional work yet. But I find it very fast and intuitive to use. Maybe a few years from now it will become very competitive and feature rich and Avid users will still derisively laugh at it for no justifiable reason, but unfortunately Kdenlive hasn't found its cult yet the way many other open source softwares have.
There are two video files in the ad that have alpha channels. This requires encoding the videos in Blender using Quicktime. The rest of the shots used the AV1 codec; many of the files in this video are less than a megabyte in size using Blender's "perceptually lossless" setting.
For the text in the ad I used the font Shin Go, which I guess is the Japanese equivalent to Helvetica, at least when writing stuff in the Latin alphabet. It's probably most famous to English speakers for its association with the Wii.
The piece of music used in the ad is called Goth Slut (Wet Acid Mixxx). I recorded it a few years ago using a Volca Sampler and Volca Bass. It was recorded to be a soundalike of Aphex Twin's Windowlicker (Acid Edit). I thought it sounded austere in a way that was good for a "cool" advertisement.

I hope this breakdown answered any questions you may have had. I think the real takeaway here should be that it's very easy to create something interesting without a ton of technical know-how using Blender; if you come across something you don't understand, simply pull up a tutorial on your second monitor and follow along [make sure you have a second monitor]. Make sure you have a lot of RAM as well, especially for photogrammetry, or if you plan on using your computer while rendering; since I upgraded to 32 GB I haven't even come close to having a problem.
The other takeaway should be that I did literally all of this using free software. Barely over two decades ago the thought of making an ad filled with CGI imagery for free was inconceivable, but now it's no hassle at all. The other other takeaway should be that it's normal to use a lot of different pieces of software in a project like this. I've already mentioned Regard3D, Meshroom, Waifu2x, Blender, and Kdenlive. DaVinci Resolve has a free version that's very good and feature rich. I used MediBang Paint Pro to create the text PNGs. In many other projects I use Krita, a FOSS raster graphics editing program.
A final piece of software that was indispensable was Stéphane Claudon's Blender Render Queue. As you might expect it allows you to queue up a bunch of different renders so that you don't need to babysit them. It's essential for rendering a bunch of different shots overnight, or during a day you're mostly out of the house. I think it's marginally less resource intensive than using Blender itself, which is great if you're using your computer while stuff is rendering.
Hope you enjoyed the breakdown, and I hope I didn't inspire you so much that you make your own ad instead of hiring me.
2 notes
·
View notes
Text
I’ve started 3D scanning places that are important to me. The scans let me see a full 3D map of the place again whenever I want. They’ve got all the shapes and the colors. They capture things I didn’t even notice were there until afterwards!
For places like my apartment or my childhood home, I’ll take in depth scans of each room and stitch them together into one model. But, for some places I just take a scan from my perspective without moving around at all. As long as I view the 3D model from that perspective, it’s like having a little snippet of that moment.
Sometimes I scan objects too. I have an iPhone with LiDAR (lasers that tell the phone how far away stuff is) and I use that for rooms, but you don’t need that to use photogrammetry (algorithms that figure out how an object should look in 3D just from a bunch of photos of it taken in a circle) which is way better at objects anyway.
If you’re on iOS, I like to use 3D Scanner App or Scaniverse. If you’ve got an iPhone 12 Pro/Pro Max or any newer Pro or Pro Max model, you can use LiDAR, but both of those apps support photogrammetry as well as some other methods for capturing spaces.
For Android, Polycam is probably your best bet, but be aware that most of the apps available for android do their processing in the cloud, so they usually only let you do a few scans for free. Polycam lets you get some additional free credits by jumping through hoops, but YMMV so try out some other apps as well.
If you want to stitch models together, you can export them (I’ve had a lot of success with exporting to the OBJ format, but it depends on what program you want to send it to) and import it into 3D modeling software like Fusion360 (runs on your computer, there’s a free personal edition if you make an account) or SketchUp (runs in your browser, free).


@fairycosmos / Comic by @shhhitsfine / Comic by @incendavery
145K notes
·
View notes
Text
Spherical Cameras Market [2025-2033] Size, Share, Growth, Trends, Scope
Global “Spherical Cameras Market” research report is a comprehensive analysis of the current status of the Spherical Cameras industry worldwide. The report categorizes the global Spherical Cameras market by top players/brands, region, type, and end-user. It also examines the competition landscape, market share, growth rate, future trends, market drivers, opportunities, and challenges in the global Spherical Cameras market. The report provides a professional and in-depth study of the industry to help understand its current state and future prospects. What Are The Prominent Key Player Of the Spherical Cameras Market?
Samsung Electronics
Ricoh
Nikon
360fly
Insta360
GoPro
LG Electronics
Sony
Kodak
Bublcam
Immervision
Panono
Xiaomi
Digital Domain Productions
Freedom360
Panasonic
YEOCHUN NCC
The Primary Objectives in This Report Are:
To determine the size of the total market opportunity of global and key countries
To assess the growth potential for Spherical Cameras
To forecast future growth in each product and end-use market
To assess competitive factors affecting the marketplace
This report also provides key insights about market drivers, restraints, opportunities, new product launches or approvals.
Regional Segment of Spherical Cameras Market:
Geographically, the report includes research on production, consumption, revenue, market share, and growth rate of the following regions:
United States
Europe (Germany, UK, France, Italy, Spain, Russia, Poland)
China
Japan
India
Southeast Asia (Malaysia, Singapore, Philippines, Indonesia, Thailand, Vietnam)
Latin America (Brazil, Mexico, Colombia)
Middle East and Africa (Saudi Arabia, United Arab Emirates, Turkey, Egypt, South Africa, Nigeria)
The global Spherical Cameras Market report answers the following questions:
What are the main drivers of the global Spherical Cameras market? How big will the Spherical Cameras market and growth rate in upcoming years?
What are the major market trends that affecting the growth of the global Spherical Cameras market?
Key trend factors affect market share in the world's top regions?
Who are the most important market participants and what strategies being they pursuing in the global Spherical Cameras market?
What are the market opportunities and threats to which players are exposed in the global Spherical Cameras market?
Which industry trends, drivers and challenges are driving that growth?
Browse More Details On This Report at - https://www.businessresearchinsights.com/market-reports/spherical-cameras-market-104443
Contact Us:
Business Research Insights
Phone:
US: (+1) 424 253 0807
UK: (+44) 203 239 8187
Email: [email protected]
Web: https://www.businessresearchinsights.com
Other Reports Here:
Ceiling Air Diffuser Market
Paragliders Market
Photogrammetry Software Market
Ridesharing Insurance Market
Sugar-free Cereal Market
Pneumatic Riveter Market
LTCC Ceramic Substrates Market
Vegetarian Sausage Casings Market
Vacuum Insulated Glass Market
Underwater Pelletizing Systems Market
Other Reports Here:
Micrographic Camera Market
Bagmaker System Market
Disposable Pressure Transducer Market
Office Binder Market
Overfill Prevention System Market
Wear Resistant Steel Market
Hematology Analyzers & Reagents Market
Model Based Development (MBD) Market
Inflatable Tents Market
Silane Modified Polymers (SMP) Adhesives and Sealants Market
0 notes
Text
High-Precision Mapping |Our Drone & Aerial Surveying Services
In today’s fast-paced and technology-driven world, traditional surveying methods are rapidly being replaced by advanced drone and aerial surveying solutions. Whether it’s construction planning, land development, mining operations, or agricultural monitoring, drone technology is revolutionizing the way we map, measure, and manage large-scale projects.
If you're looking for top drone and aerial surveying services in India, you're in the right place. Our expert drone service providers deliver accurate, efficient, and cost-effective mapping solutions tailored to meet the diverse needs of industries across the country.
Why Choose Drone Surveying & Mapping Services?
Drone-based surveying is not just a trend—it’s a powerful tool that offers several advantages over conventional methods:
High-Accuracy Results: Capture detailed images and data with centimeter-level accuracy using GPS-enabled drones and RTK technology.
Faster Data Collection: Complete surveys that once took weeks in just hours with aerial drones.
Reduced Manpower & Cost: Cut down on labor costs and time with automated drone flights.
Safety & Accessibility: Survey remote, hazardous, or hard-to-reach areas without risking lives.
Versatile Applications: Suitable for multiple industries—construction, mining, agriculture, oil and gas, urban planning, and more.
Our Drone Surveying Services Include:
Topographic & Contour Mapping We create precise topographic maps and contour lines for land development, construction, and urban planning projects.
Orthomosaic Mapping Generate georeferenced high-resolution maps stitched from drone-captured images, ideal for planning and analysis.
Digital Elevation Models (DEM) & Digital Surface Models (DSM) Get elevation data critical for hydrological modeling, flood risk analysis, and infrastructure design.
3D Modeling & Photogrammetry Create realistic 3D models of terrain, structures, and infrastructure with detailed visual representations.
Land Surveying & Volume Estimations Accurate volume calculations for stockpiles, cut/fill operations, and earthwork planning in mining and construction.
Asset Inspection & Monitoring Perform aerial inspections for power lines, pipelines, solar farms, wind turbines, and industrial assets without shutdowns.
Industries We Serve
We provide drone surveying and mapping services for:
Construction and Real Estate
Agriculture and Forestry
Mining and Quarrying
Oil and Gas
Infrastructure Development
Environmental Monitoring
Urban Planning and GIS Projects
Pan-India Coverage with Professional Support
Our drone service network spans across Delhi, Mumbai, Bangalore, Hyderabad, Chennai, Pune, Ahmedabad, and other major cities, ensuring timely project delivery and complete regulatory compliance with DGCA (Directorate General of Civil Aviation) guidelines.
Our licensed drone pilots and GIS specialists are trained professionals equipped with state-of-the-art drones and software to deliver exceptional results. From pre-project planning to post-processing and analysis, we offer end-to-end drone solutions that are reliable, scalable, and designed for success.
Contact Us Today Ready to take your surveying and mapping projects to new heights? Contact us now for a free consultation and discover how drone technology can optimize your operations and decision-making process.
0 notes
Text
Drone Mapping: Revolutionizing Aerial Surveying
Introduction
Drone mapping is an advanced technology that utilizes UAVs (unmanned aerial vehicles) to capture high-resolution aerial imagery and generate accurate, georeferenced maps. This innovation is transforming industries such as agriculture, construction, urban planning, and environmental monitoring by providing cost-effective and efficient mapping solutions.
How Drone Mapping Works
Drones equipped with high-resolution cameras and GPS sensors fly over designated areas, capturing overlapping images. These images are processed using photogrammetry software to create detailed 2D orthomosaic maps or 3D models. The final output provides accurate spatial data, enabling professionals to analyze terrain, infrastructure, and environmental changes.
Key Benefits
High Precision & Accuracy – Advanced GPS and imaging technologies ensure detailed, distortion-free maps.
Time & Cost Efficiency – Reduces the need for manual surveys, saving time and resources.
Enhanced Safety – Eliminates the risks associated with traditional land surveying in hazardous environments.
Real-Time Data Collection – Provides up-to-date information for better decision-making.
Versatile Applications – Supports industries such as construction, agriculture, and disaster management.
Applications of Drone Mapping
Agriculture: Monitors crop health, irrigation needs, and soil conditions for precision farming.
Construction & Infrastructure: Tracks project progress, assists in site planning, and ensures structural integrity.
Urban Planning & Land Development: Aids in zoning, smart city development, and transportation planning.
Disaster Management & Emergency Response: Provides critical mapping for search and rescue, damage assessment, and recovery planning.
Environmental Monitoring: Helps track deforestation, coastal erosion, and wildlife habitats.
Challenges & Considerations
Despite its advantages, drone mapping faces challenges such as regulatory restrictions, weather dependency, and the need for skilled operators. However, advancements in AI, automation, and data processing are helping mitigate these obstacles, making drone mapping more accessible and efficient.
Conclusion
Drone mapping is revolutionizing industries by providing fast, accurate, and cost-effective mapping solutions. As technology continues to evolve, the potential for drone mapping will expand, improving efficiency, safety, and decision-making across various sectors. With ongoing innovations, drones will remain a crucial tool for modern aerial surveying and geospatial analysis.
0 notes
Text
0 notes
Text
Photogrammetry Software Free
Point Precise uses photogrammetry and your iPhone’s device sensors to convert your scans into precise 3D point clouds.
0 notes
Text
5 Top GIS Tools - Discover the Power of GIS
As Geographic Information System (GIS) technology continues to advance, 3D GIS tools are playing an increasingly important role in the visualization and analysis of geospatial data. These tools not only allow for the display of complex spatial relationships but also provide users with a more intuitive way to understand and utilize geographic data. Below are five noteworthy 3D GIS tools, each offering unique features and applications that can greatly support you in creating virtual worlds.
1. Esri ArcGIS Pro
Overview: ArcGIS Pro, provided by Esri, is a leading GIS software that integrates 2D and 3D geospatial data management, analysis, and visualization. Within a single project, you can work with both 2D and 3D maps and scenes, enabling data analysis from multiple perspectives.
Features:
Powerful 3D analysis capabilities, including line-of-sight analysis and 3D model import.
Support for creating and sharing 3D scene layers, making it easy to display complex terrains, buildings, and urban models.
Suitable for managing large-scale geospatial data, efficiently integrating various data formats.
Use Cases: Urban planning, infrastructure management, environmental impact assessment.
2. Google Earth
Overview: Google Earth is a free geospatial information platform that allows users to explore any location on Earth in 3D. With its intuitive interface and rich satellite imagery, 3D models, and street view, users can examine the terrain and buildings in detail.
Features:
Combines satellite imagery with elevation data to provide realistic 3D views.
Offers location search, route display, and historical imagery time-lapse features.
Displays 3D buildings and terrain data, offering users deep geographic insights.
Use Cases: Tourism, education, basic geographic awareness.
3. Wings Engine
Overview: Wings Engine is a high-performance visualization platform focused on real-time 3D Geographic Information Systems (GIS). It is widely used in urban planning, environmental analysis, and infrastructure management. Wings Engine supports multiple data formats and can render complex terrains and buildings in real-time.
Features:
Supports various 3D data, allowing for the visualization of terrains, buildings, and infrastructure.
Real-time data processing and display, with dynamic scenes and time sliders to visualize data changes.
An advanced rendering engine that smoothly handles large-scale urban models and detailed terrain displays.
Use Cases: Urban planning, disaster simulation, environmental monitoring, infrastructure management.
4. CesiumJS
Overview: CesiumJS is an open-source JavaScript library designed for creating and displaying interactive 3D globes or maps in web browsers. Through WebGL technology, it enables real-time high-performance rendering of large-scale geospatial data.
Features:
Provides streaming and visualization of large-scale 3D data.
Real-time 3D rendering in web-based applications, supporting time-series and dynamic data.
Open-source and highly customizable, suitable for various types of geospatial application development.
Use Cases: Web-based geospatial applications, aerospace, urban planning.
5. Bentley ContextCapture
Overview: Bentley ContextCapture uses photogrammetry technology to convert the real world into high-precision 3D models. By processing images taken by drones or cameras, it can automatically generate large-scale and detailed models of cities, buildings, and terrains.
Features:
Automatically generates realistic 3D models from photos or point cloud data.
Creates high-precision large-scale 3D models that can integrate seamlessly with other GIS software.
Use Cases: Architectural design, city modeling, infrastructure monitoring.
Conclusion These five 3D GIS tools each offer unique advantages and applications in their respective fields. Whether you're involved in urban planning, environmental monitoring, or creating virtual worlds, these tools can provide you with powerful support. Choosing the right tool will significantly enhance the efficiency and effectiveness of your geospatial data processing and visualization. If you have any questions or need further advice, feel free to reach out.
0 notes
Text
Week 2 - Class Exercise 1

After my feedback session with my lecturer, I understood that picking a topic is much more complicated than it seemed. A lot of my topics overlap information and ideas; finding a suitable and smart way to mix these topics together was ultimately what was going to work for me.
These are the concepts which I would want to merge into one larger topic... "New Horizons in VFX and Animation" - This encapsulates the innovation in the animation and VFX industries and how professionals design systems around problem-solving and innovative new ideas in an ever-changing age of technology.
Virtual Production and Volumes
Photogrammetry and NeRF (Neural Radiance Fields) Capture and their uses
The rise of AI in the VFX and animation industry (software, methods and deep fakes) (Cascadeur)
Introductory Paragraphs:
Virtual Production and Volumes -
Virtual production and the application of volumes are rapidly changing the filmmaking and animation processes by merging real and virtual environments. This technique, known best from the series “The Mandalorian” involves the usage of enormous LED walls that enable the shooting of scenes with actors interacting live with changing backgrounds. They include the use of characters, plausible product placement, prop usage and last but not least, disregard the need for on-location shoots and require little to no post-processing while at it. The latest technologies of real-time rendering allow the film director to change the lighting and the scenery at a moment's notice, which enhances the efficiency and the speed of shooting. The concept of volumes and virtual production contributes to the modernization of filmmaking as a step toward a more flexible and combined way of visual narration.
Photogrammetry and NeRF (Neural Radiance Fields) Capture and their uses -
Photogrammetry and Neural Radiance Fields are state-of-the-art in the field of 3D scanning and reconstruction. Photogrammetry is the procedure that involves taking several photographs with the goal of creating accurate 3D models of real-life objects. NeRF is primarily a machine learning algorithm designed to reconstruct the scene with high photorealism based on a few images and with the ability to capture subtle lighting effects and textures. Such technologies are being incorporated into various professions from video games to virtual reality, offering the best realism and efficiency. Their uses are not limited to games and entertainment but are used in fields like archaeology, architecture, and even medical imaging where detailing and accurate reproduction are important. As these technologies progress, there is an indication that the reality of the physical world will eventually replaced by a virtual one.
The Rise of AI in the VFX and Animation industry -
The introduction of artificial intelligence (AI) in the VFX and animation industry is revolutionalizing the way that content is produced and consumed. There is Cascadeur for animation and deep learning algorithms for the generation of deepfakes which are making some of the complex processes easier and opening new creative opportunities. AI is also able to perform laborious processes such as rotoscoping, motion capture, and character animation and thus freeing the artists to do what they do best – telling the story. Furthermore, the ethical issues of AI especially in the case of deepfakes bring new questions to the table in the topics of realism and permission. Thus, as AI progresses, it can act as a tool to revolutionize and improve the VFX and animation industries and their work processes.
0 notes
Text
David Fattal, Co-Founder & Chief Technical Officer at Leia – Interview Series
New Post has been published on https://thedigitalinsider.com/david-fattal-co-founder-chief-technical-officer-at-leia-interview-series/
David Fattal, Co-Founder & Chief Technical Officer at Leia – Interview Series
David Fattal is the CEO and founder at Leia, the leading provider of glasses-free 3D display hardware and software solutions. He previously spent nine years at HP Labs working on various aspects of quantum computing and photonics, and specializing in the manipulation of light at the nanoscale. He holds a PhD in Physics from Stanford University and a BS in theoretical physics from Ecole Polytechnique, France.
Fattal holds over 100 granted patents and was featured on the 2013 list of 35 Innovator under 35 by the MIT technology Review. He co-authored the text-book “Single Photon Devices and Applications” and was awarded the French National Order of Merit in 2014 for developing the “Diffractive Lightfield Backlighting” concept.
As a former research scientist at HP Labs in the Quantum Science Research Team and a specialist in Nano-Photonics, can you share some key highlights from your experience?
During my time at HP Labs, I focused on the intersection of quantum computing and nano-photonics, exploring how light manipulation at the nanoscale could revolutionize communication technologies. A key highlight was Project Leia, where we developed diffractive light field backlighting technology and advanced the field of 3D displays beyond traditional methods. This work laid the foundation for the innovative display technologies we now use at Leia Inc.
What inspired the inception of Project Leia, and how did a chance observation during a fire drill at HP Labs lead to the discovery of using nano-structures for creating holographic images?
Project Leia drew inspiration from technologies used in the field of optical interconnects, which deals with replacing electrical signals with light signals inside computer chips. During a fire drill at HP Labs, I noticed the intricate patterns formed by light passing through one of our “light on a chip” prototypes. This observation led to using nano-structures to intentionally bend light similarly, ultimately enabling the creation of holographic images. This serendipitous moment sparked the development of the diffractive light-field backlighting technology central to Leia Inc.
How does Leia Inc.’s technology convert 2D experiences into immersive 3D experiences on any device?
Leia Inc.’s technology leverages advanced optics and AI to transform 2D experiences into 3D.
Our LeiaSR optical technology can upgrade any personal device screen and give it the ability to send different images to the viewer’s left and right eyes, thereby creating a high-quality 3D effect. The 3D optics can be switched off on demand, allowing standard 2D content to display at full resolution.
Our Neural Depth Technology, powering the Immersity AI platform, can convert any 2D picture or video into 3D. Users don’t need to have a 3D display to see the effects of the conversion.
The combination of screen conversion and content conversion gives us this unique ability to create immersive 3D experiences today on any familiar device, from cell phones to computer monitors.
How does the Neural Depth Engine in the Immersity AI platform contribute to generating precise depth maps for 3D content?
The Neural Depth Engine is a state-of-the-art neural network fine-tuned on millions of 3D images collected by Leia-equipped devices in the field. Thanks to this proprietary training dataset, it can create very precise depth maps from 2D images.
The better your depth maps are, the better results you get in applications like smartphone photo enhancements and 3D imaging. If you’re familiar with the background blur (bokeh) portrait mode, then you might have an unknown appreciation for depth maps.
Depth maps are also used for things like photogrammetry, creating 3D models of real-world objects from multiple photographs, and can also be used in medical imaging.
What industries could benefit the most from Leia Inc.’s 2D-to-3D conversion technology, and how?
Several industries can benefit significantly from our 2D-to-3D conversion technology. Social media creators and influencers can enhance their content by offering more engaging experiences that connect them with their community. The media and advertising industry can create more captivating advertisements that stand out from their competition. Filmmakers and game developers can provide audiences with a richer and more immersive visual experience. Additionally, the design industry, including image and video editing professionals, can use our technology to add depth and dimension to their projects, resulting in more compelling and dynamic visuals.
How does the 3D overlay technology used by Leia Inc. ensure that 2D image quality is not compromised when the 3D mode is inactive?
We designed our 3D overlay technology to be non-intrusive. When the 3D mode is inactive, the nanostructures used for 3D rendering become virtually invisible, maintaining the original 2D image quality without any degradation.
Can you describe a real-world application or project where Leia Inc.’s 3D technology has been successfully implemented?
We are powering ZTE’s first mobile 3D tablet, the Nubia Pad, released in 2023, and Acer’s first professional creator 3D laptop, released the same year.
How does Leia Inc. collaborate with companies like ACER and ZTE to integrate their 3D display technology into consumer devices?
We closely collaborate with companies like ACER and ZTE by providing our 3D hardware and software solutions, technical support, and integration services. This partnership ensures that our 3D technology is seamlessly embedded into their devices, offering consumers a unique and enhanced user experience.
How does Leia Inc. ensure user-friendly interfaces and seamless integration of their 3D technology for everyday consumers and professionals alike?
We prioritize intuitive design and user experience in our technology development. Our SDKs and software tools are easy to integrate, with extensive documentation and support for developers. Our interfaces are straightforward for consumers, ensuring seamless and user-friendly switching between 2D and 3D modes.
What future developments can we expect from Leia Inc. in the field of 3D display technology and immersive AI experiences?
Leia Inc. is continuously innovating. Future developments will focus on enhancing our AI algorithms for even more realistic 3D conversions, expanding our device compatibility, and exploring new applications in the mobile and extended reality (XR) space. We aim to make immersive 3D experiences more accessible and impactful across various industries.
Thank you for the great interview, readers who wish to learn more should visit Leia.
#2023#3d#advertisements#advertising#ai#ai platform#Algorithms#applications#Art#background#blur#book#cell#CEO#chips#collaborate#communication#Community#Companies#competition#computer#computer chips#computing#consumers#content#creators#deals#Design#developers#development
0 notes
Text
Turn Your Model into a 3D Masterpiece: Scanning Made Easy
The world of 3D printing has opened a door to endless creative possibilities. But what if you have a physical model, a cherished figurine, or a unique object you'd love to replicate or modify in the digital realm? 3D scanning technology makes this a reality. By transforming your physical model into a 3D model in scanning, you can preserve it digitally, create multiples, or even customize it for 3D printing.

Demystifying 3D Scanning
3D scanning captures the exact geometry of a physical object using various technologies. Imagine a camera that, instead of capturing a flat image, records the object's depth and dimensions, creating a digital replica. There are several 3D scanning methods, each with its strengths and limitations:
Structured Light Scanning: This method projects a pattern of light onto the object. The scanner then analyzes the distortion of the pattern to create a 3D model. It's fast, accurate for smaller objects, and readily available in handheld scanners.
Laser Scanning: This technique uses a laser beam to measure millions of points on the object's surface. It's highly accurate for complex shapes and ideal for industrial applications, but scanners tend to be expensive.
Photogrammetry: This method captures multiple photographs of the object from different angles. Specialized software then analyzes these images to create a 3D model. It's a good option for capturing large or intricate objects at a lower cost, but the quality can be dependent on the photographer's skill.
Choosing the Right Scanner for Your Model
The best scanner for your project depends on your model's size, complexity, and desired level of detail. Here's a quick guide:
For small, simple models: A handheld structured light scanner is a great choice. They're relatively affordable, easy to use, and offer good accuracy.
For larger or more complex models: Consider a professional scanning service. They often use high-end laser scanners for superior detail and can handle intricate shapes.
For capturing large objects on a budget: Photogrammetry might be a solution. However, it requires good lighting, multiple high-resolution photos, and specialized software.
The Scanning Process: What to Expect
The specific process will vary depending on the scanner, but here's a general idea:
Preparation: Ensure your model is clean and free of dust or debris. Some scanners might require placing markers on the object to aid in the scanning process.
Scanning: Depending on the scanner, you might move the scanner around the object, or the object might be placed on a rotating platform while the scanner captures data. The scanning time can range from seconds to minutes.
Post-Processing: The scanned data often requires some cleaning up. Software might be used to remove unwanted noise, fill in any gaps, and create a complete 3D model.
Bringing Your 3D Model to Life
Once you have your 3D model in scanning, the possibilities are endless:
3D Printing: This is perhaps the most exciting application. You can now use your 3D model to print a physical replica of your original model, create multiples for personal use, or even modify the model for a custom design before printing.
Digital Preservation: 3D scanning allows you to create a digital archive of your physical models. This is a great way to preserve them for future generations, especially for fragile or irreplaceable objects.
Modification and Animation: 3D editing software allows you to modify your 3D model, scaling it, adding details, or even preparing it for animation.
With 3D scanning becoming more accessible and affordable, transforming your physical models into 3D masterpieces is easier than ever. So, unleash your creativity, explore the world of 3D scanning, and bring your models to life in the digital realm!
0 notes
Text
Photogrammetry
Polycam
The technology that allows us to create 3D models of real objects from photographs of this same object. As simple as it sounds, photographs are taken of the object in a certain way and then, using free software, these photos are converted into a 3D model

By taking pictures (or videos) of the object from different perspectives and under constant lighting, the specialized software is able to find representative or characteristic points of the model that are repeated in all the photos.
Using key point extraction techniques, the software is able to infer the distance between these points through the separation between them in different photos, thus creating a cloud of characteristic points. Finally, this point cloud is converted into a mesh, which can be processed or cleaned to be printed in 3D or included in virtual representations.
1. Take images
2. Import into photogrammetry software
3. Create 3d model in photogrammetry software
Shooting Images for Photogrammetry
High quality: The quality of model is directly related to the quality of photos
Enough light to properly expose the image
Make sure the photos are as sharp as possible and have a deep depth of field (i.e. higher aperture)
Make sure photos overlap by at least 60% (The more photos the better)
When photographing move the camera between shots. Do not pivot on one point (The software needs to recognize vertical or horizontal movement between photos)
Optimizing Your Scans
Decimate, decimate, decimate. Photogrammetry software often produces models that have millions of polygons. You will need to reduce that poly count by decimating the geometry. This can be done in the native photogrammetry software or in a 3D editing tool like Blender. For a model to run smoothly on a mobile device look to decimate to 50,000 or 100,000 polys.
Textures can drain the processing power of your scene. As a general rule of thumb, keep your texture counts low and between 2 and 4k resolution. Ideally, you will want to produce 2k textures to run even more smoothly, but you can lose some definition. In most scenarios, this is totally fine. You can also resize textures after model creation by converting the .glb file into a .gltf. Lastly, in the process of decimating models, or because you could not capture the entire environment, you may be left with some holes in your texture. In these cases, the clone tool
Problem
Don't have enough storage / memory
0 notes