#Python 3.8
Explore tagged Tumblr posts
Visit Tumblr Blog
Explore Tumblr blogs with no restrictions, modern design and the best experience.
Last Seen Tumblr Blogs


Fun Fact
There are dozens of funny blogs to kill time on Tumblr.
Text
Your All-in-One AI Web Agent: Save $200+ a Month, Unleash Limitless Possibilities!
Imagine having an AI agent that costs you nothing monthly, runs directly on your computer, and is unrestricted in its capabilities. OpenAI Operator charges up to $200/month for limited API calls and restricts access to many tasks like visiting thousands of websites. With DeepSeek-R1 and Browser-Use, you:
• Save money while keeping everything local and private.
• Automate visiting 100,000+ websites, gathering data, filling forms, and navigating like a human.
• Gain total freedom to explore, scrape, and interact with the web like never before.
You may have heard about Operator from Open AI that runs on their computer in some cloud with you passing on private information to their AI to so anything useful. AND you pay for the gift . It is not paranoid to not want you passwords and logins and personal details to be shared. OpenAI of course charges a substantial amount of money for something that will limit exactly what sites you can visit, like YouTube for example. With this method you will start telling an AI exactly what you want it to do, in plain language, and watching it navigate the web, gather information, and make decisions—all without writing a single line of code.
In this guide, we’ll show you how to build an AI agent that performs tasks like scraping news, analyzing social media mentions, and making predictions using DeepSeek-R1 and Browser-Use, but instead of writing a Python script, you’ll interact with the AI directly using prompts.
These instructions are in constant revisions as DeepSeek R1 is days old. Browser Use has been a standard for quite a while. This method can be for people who are new to AI and programming. It may seem technical at first, but by the end of this guide, you’ll feel confident using your AI agent to perform a variety of tasks, all by talking to it. how, if you look at these instructions and it seems to overwhelming, wait, we will have a single download app soon. It is in testing now.
This is version 3.0 of these instructions January 26th, 2025.
This guide will walk you through setting up DeepSeek-R1 8B (4-bit) and Browser-Use Web UI, ensuring even the most novice users succeed.
What You’ll Achieve
By following this guide, you’ll:
1. Set up DeepSeek-R1, a reasoning AI that works privately on your computer.
2. Configure Browser-Use Web UI, a tool to automate web scraping, form-filling, and real-time interaction.
3. Create an AI agent capable of finding stock news, gathering Reddit mentions, and predicting stock trends—all while operating without cloud restrictions.
A Deep Dive At ReadMultiplex.com Soon
We will have a deep dive into how you can use this platform for very advanced AI use cases that few have thought of let alone seen before. Join us at ReadMultiplex.com and become a member that not only sees the future earlier but also with particle and pragmatic ways to profit from the future.
System Requirements
Hardware
• RAM: 8 GB minimum (16 GB recommended).
• Processor: Quad-core (Intel i5/AMD Ryzen 5 or higher).
• Storage: 5 GB free space.
• Graphics: GPU optional for faster processing.
Software
• Operating System: macOS, Windows 10+, or Linux.
• Python: Version 3.8 or higher.
• Git: Installed.
Step 1: Get Your Tools Ready
We’ll need Python, Git, and a terminal/command prompt to proceed. Follow these instructions carefully.
Install Python
1. Check Python Installation:
• Open your terminal/command prompt and type:
python3 --version
• If Python is installed, you’ll see a version like:
Python 3.9.7
2. If Python Is Not Installed:
• Download Python from python.org.
• During installation, ensure you check “Add Python to PATH” on Windows.
3. Verify Installation:
python3 --version
Install Git
1. Check Git Installation:
• Run:
git --version
• If installed, you’ll see:
git version 2.34.1
2. If Git Is Not Installed:
• Windows: Download Git from git-scm.com and follow the instructions.
• Mac/Linux: Install via terminal:
sudo apt install git -y # For Ubuntu/Debian
brew install git # For macOS
Step 2: Download and Build llama.cpp
We’ll use llama.cpp to run the DeepSeek-R1 model locally.
1. Open your terminal/command prompt.
2. Navigate to a clear location for your project files:
mkdir ~/AI_Project
cd ~/AI_Project
3. Clone the llama.cpp repository:
git clone https://github.com/ggerganov/llama.cpp.git
cd llama.cpp
4. Build the project:
• Mac/Linux:
make
• Windows:
• Install a C++ compiler (e.g., MSVC or MinGW).
• Run:
mkdir build
cd build
cmake ..
cmake --build . --config Release
Step 3: Download DeepSeek-R1 8B 4-bit Model
1. Visit the DeepSeek-R1 8B Model Page on Hugging Face.
2. Download the 4-bit quantized model file:
• Example: DeepSeek-R1-Distill-Qwen-8B-Q4_K_M.gguf.
3. Move the model to your llama.cpp folder:
mv ~/Downloads/DeepSeek-R1-Distill-Qwen-8B-Q4_K_M.gguf ~/AI_Project/llama.cpp
Step 4: Start DeepSeek-R1
1. Navigate to your llama.cpp folder:
cd ~/AI_Project/llama.cpp
2. Run the model with a sample prompt:
./main -m DeepSeek-R1-Distill-Qwen-8B-Q4_K_M.gguf -p "What is the capital of France?"
3. Expected Output:
The capital of France is Paris.
Step 5: Set Up Browser-Use Web UI
1. Go back to your project folder:
cd ~/AI_Project
2. Clone the Browser-Use repository:
git clone https://github.com/browser-use/browser-use.git
cd browser-use
3. Create a virtual environment:
python3 -m venv env
4. Activate the virtual environment:
• Mac/Linux:
source env/bin/activate
• Windows:
env\Scripts\activate
5. Install dependencies:
pip install -r requirements.txt
6. Start the Web UI:
python examples/gradio_demo.py
7. Open the local URL in your browser:
http://127.0.0.1:7860
Step 6: Configure the Web UI for DeepSeek-R1
1. Go to the Settings panel in the Web UI.
2. Specify the DeepSeek model path:
~/AI_Project/llama.cpp/DeepSeek-R1-Distill-Qwen-8B-Q4_K_M.gguf
3. Adjust Timeout Settings:
• Increase the timeout to 120 seconds for larger models.
4. Enable Memory-Saving Mode if your system has less than 16 GB of RAM.
Step 7: Run an Example Task
Let’s create an agent that:
1. Searches for Tesla stock news.
2. Gathers Reddit mentions.
3. Predicts the stock trend.
Example Prompt:
Search for "Tesla stock news" on Google News and summarize the top 3 headlines. Then, check Reddit for the latest mentions of "Tesla stock" and predict whether the stock will rise based on the news and discussions.
--
Congratulations! You’ve built a powerful, private AI agent capable of automating the web and reasoning in real time. Unlike costly, restricted tools like OpenAI Operator, you’ve spent nothing beyond your time. Unleash your AI agent on tasks that were once impossible and imagine the possibilities for personal projects, research, and business. You’re not limited anymore. You own the web—your AI agent just unlocked it! 🚀
Stay tuned fora FREE simple to use single app that will do this all and more.
7 notes
·
View notes
Text
(Ramble without much point)
Meditating today on how Perfectly Ordinary dev tasks get recursively byzantine at the drop of a hat.
Like, ok, we're writing Haskell and there's a fresh ghc and a fresh LTS snapshot of compatible packages; would be nice to upgrade. How hard could that be.
Ah, right, we're building with Bazel. Need to reconfigure it to point at the right ghc, update our custom snapshot to include deps not in current LTS, regenerate the autogenerated Bazel build file for all the 3rd-party deps we use, and check that the projects still builds. Wait, no; regeneration instructions are bullshit, we have not migrated to the new autogen system yet & need to use the old one.
The project...does not build; a dependency fails with incomprehensible problems in some files generated by Cabal, the lower-level build system. Aha, we had this problem before; Cabal does something bazel-incompatible there, fix will land in the next ghc/Cabal release, & for now the workaround is to use a forked Cabal for all the packages with the problem. The autogen tool we use has a list of affected packages that need this treatment; let's inject the dep there.
That doesn't help, why? Mmm, aha, this dep has several hardcoded setup-time deps, and the autogen tool uses the default map-merging operator, which....discards the custom Cabal dep we thought we inserted. Ok, let's force it to union instead.
That still doesn't help, why. Is it perhaps the other setup-time dependency that was already there. ........why, yes, of course; the setup problem in general is that a package's Setup.hs uses functions from fresh, unpatched Cabal to generate some incoherent-wrt-bazel code; the setup problem here is that Setup.hs of this package uses a function from cabal-doctest to do something fancy, and cabal-doctest is basically a wrapper on Cabal's function. And for some reason, we build cabal-doctest with unpatched Cabal, & so obviously it fails later.
(How do we know that cabal-doctest has a wrong Cabal wired in, and that is the extent of the problem? What a good question! It turns out if we start inlining cabal-doctest's functions into the Setup.hs of the faulty package, they complain about type mismatches of type X defined in Cabal-3.6 and the same type X defined in Cabal 3.8. Also, if we inline the entirety of cabal-doctest, the problem merrily goes away. Also, cabal-doctest build artifact binaries contain mentions of Cabal-3.8.)
Ok, so how do we make cabal-doctest depend on/use the correct patched version of Cabal? Specify Cabal version in Bazel's build config file? No. There are.....no further obvious avenues to affect the build of cabal-doctest. .......how tho.
Ok, fine, time to learn what bazel build action does exactly. It generates faulty but coherent build config and artifacts all by itself; it figures out somewhere that it's supposed to wire in Cabal-3.8. Let's find out where and why and how to make it not.
First, we'll need to overcome bazel's tendency to uninformatively Do Absolutely Nothing when it's asked to execute a cached action. The normal way to force bazel to rebuild something so we can look at debug output is.... (...) .....not a thing, apparently? (Why would you make a build system you can't command to force a rebuild. What the fuck, bazel devs.) Oh, ok, thank you, internet article about debugging bazel builds; if the recommended way is to harmlessly alter the source of cabal-doctest to force cache misses, we'll do just that, good thing we have it downloaded and unpacked anyway.
Now, unpeeling the bazel action: bazel can be made to output the exact command it runs; we can then run it manually, without appeals to cache; good. Moreover, we can look at the executable of the command, maybe find some verbosity levers. (...) Not as such, but thankfully it's just a python script, so we can figure what it does by reading; what's more, we can tinker with it manually, and print() will give us all the verbosity we can ask for.
So what does that script, cabal_wrapper, do? (...) ...ignoring irrelevant parts: sets up environment flags and...calls...another...python script...cabal_wrapper.py. You know what, I don't care why it works like this, it's probably useful for concern-separation reasons, the internal cabal_wrapper.py is just as amenable to forced verbosity by way of print(), let's just move on to what it does.
Oh hey, a directory that contains some faulty build artifacts is mentioned by exact path put into a variable. Let's see where it's used; I bet we'll run into some specific line that produces or consumes faulty outputs & thereby will have a nice localized point from which to backtrack. Use in a function that further used somewhere, use in a variable that etc, argument to run runghc configure, argument to run runghc register --gen-pkg-config, aha, that's exactly the name of one of the faulty artifacts, that's interesting. Experiment: is it true that the faulty artifact does not exist before that line and exists after? Yes! Awesome; let's dig into what this line does. (It's almost certainly an invocation of runghc wrapper, but exact arguments are important.)
(There was supposed to be an ending here, but now it's been months and i forgot how it ended. Sorry.)
3 notes
·
View notes
Text
Capturing the ambience of Halo 2 (2004)

This still-hyped shooter was released on Xbox, Windows Vista, and on various modern platforms via the Master Chief Collection.
Extracting sound assets
Reclaimer is compatible with Halo 2 Xbox (H2X) maps. It's the successor to Adjutant, which could open H2 maps but not extract sounds.
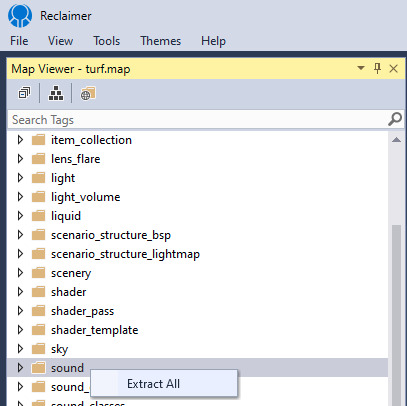
To enable sound extraction and conversion you'll need to provide an ffmpeg "plugin" to the program. From Reclaimer main menu, click View -> Plugins directory. Inside there, create a folder called ffmpeg and drop an ffmpeg.exe inside. Edit your settings.json file accordingly:
"Reclaimer.Plugins.SoundExtractorPlugin": { "FFmpegPath": ".\Plugins\ffmpeg\ffmpeg.exe", "OutputExtension": "wav", "OutputNameFormat": "{0}[{1}]", "LogFFmpegOutput": true },
However, be aware that newer versions of Reclaimer incorrectly convert ADPCMs - listen to the static in zanzibar_distant_battle outputted by Reclaimer 2.0.1509, for example. For this reason I suggest only performing extraction:
"Reclaimer.Plugins.SoundExtractorPlugin": { "OutputExtension": "", },
We can then convert Xbox ADPCMs using an accurate tool such as vgmstream, or others [1] [2].
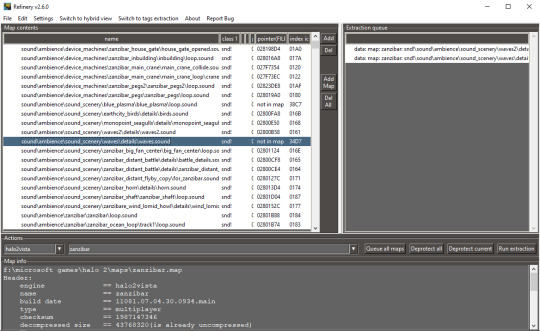
Alternatively, Refinery can extract and convert HV2 sounds to PCM. See appendices below for setup instructions.
Identifying sounds
If Reclaimer doesn't serve your needs, Assembly is an excellent tool for exploring the tags comprising map files. It can also decompress maps if necessary.
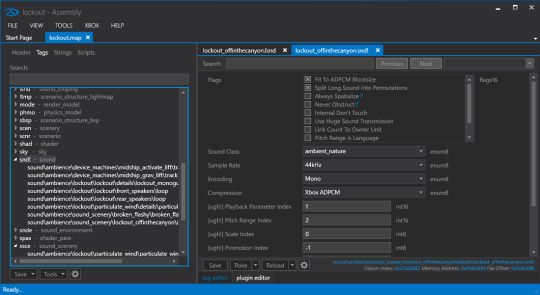
You can also use Guerilla, included in the official Halo 2 Editing Kit (H2EK) that shipped with H2V (with its own community improvements) and The Master Chief Collection (MCC), to inspect tags.
Capturing footage
Option A: Project Cartographer
This ambitious mod builds atop H2V. See appendices below for setup instructions. While Cartographer adds some interesting console commands (press F10 to activate), they are mostly focused on multiplayer functionality and won't help us.
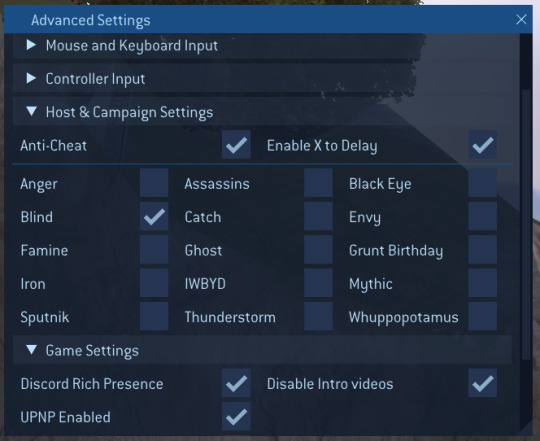
There are a handful of graphics improvements offered via Cartographer's Video Settings menu. HUD Settings allows you to hide the in-game UI and viewmodel.
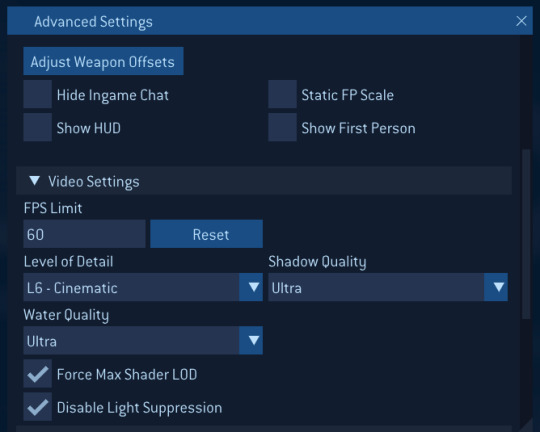
You can open these at any time using the Home key. Choices are written to an INI file at AppData\Local\Microsoft\Halo 2.
Another way to hide HUD/weapon is the Blind skull. We can use Cartographer to toggle it, or pick it up in-game on Outskirts. This modifier will persist across missions, but reset once you exit the game.
Option B: Halo 2 Mod Tools
These coincide with the MCC release of H2. By using the included "Tag Test" build, we can execute H2's developer console* in-game. To load into a map, use the menu or run map_name, e.g.
map_name scenarios\multi\ascension\ascension
From there, we can move the camera around by running debug_camera_save followed by debug_camera_load.
If you see a black screen, try running fade_in 0 0 0 0. show_hud 0 removes the HUD. This build shows various map integrity errors by default; you can hide those with error_geometry_hide_all.

*Press ~ to activate. Use tab to auto-complete commands
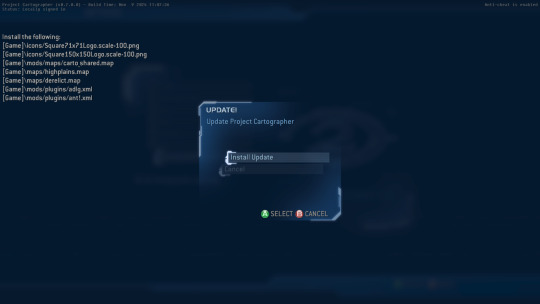
Appendix 1: Setting up Project Cartographer
Make sure H2V has the latest patches applied. The easiest way to do this is simply launching the game, and signing into Games for Windows.
Now, download the latest Cartographer installer. You may need to fix the install by applying files manually. Once Cartographer is in a launchable state, visit the in-game updater to get the latest changes.
Appendix 2: Extracting assets with Refinery
First, install Python 3.8 from the official site, i.e. not from the Microsoft Store. After installation, update pip:
"C:\Program Files\Python38\python.exe" -m pip install --upgrade pip
Get the Mozz Editing Kit (MEK) repo rather than cloning Refinery directly. Also, do not clone MEK; the MEK installer (MEK_Installer.pyw) expects you to run the latest build from its master archives instead.

I recommend a portable install. After this, you should be able to run Refinery.py.
If this is all too complicated, try getting Refinery via Mozz Editing Kit Essentials instead.
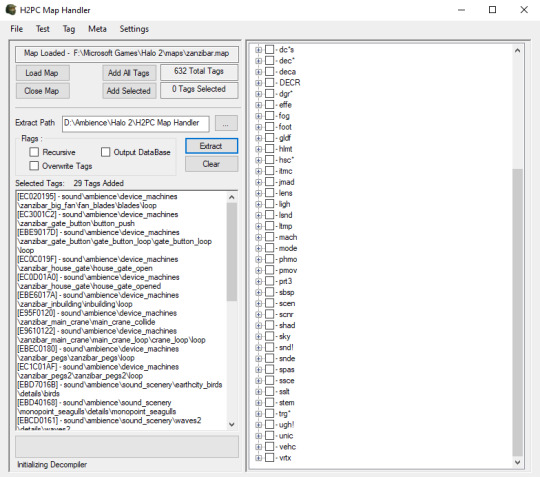
Appendix 3: Extracting Halo 2 Vista tags
We use H2PC_TagExtraction for this. Set the required Paths, load a map, queue up the map's snd tags, and click Extract.
6 notes
·
View notes
Text
Converting UTZOO-Wiseman Usenet Tapes to Website with PostgreSQL backend using Python 3.8
October 7, 2020 by joe0
Recently, I came across a resource that allowed me to download the entire collection of UTZOO NetNews Archive of the earliest USENET posts. These were essentially the earliest available discussions posted to the Internet by people working at various Universities who were already connected to the Internet. There were approximately 2.1 million posts in these archives created between Feb 1981 and June of 1991. This article describes the journey of converting those tapes into fully searchable PostgreSQL database and later also into the usenetarchives.com website.
3 notes
·
View notes
Text
Global tick number decline revolution: Alltick API heavy plasticity trade production
On the real-world trading system, the number of ticks is as precise as the "nuclear fuel", and the intelligent strategy of the modern financial market is moving. However, since a long time ago, the number of industries has been limited, and the number of companies that have entered the industry has been rejected, and the technology has been rejected by many new companies. Alltick API is currently in use, so it's a unique technology structure, and it's a revolutionary standard model system, and it's a global developer's system. Does the number of ticks depend on the amount of money?
Tick number position (sequential exchange number position) record the smallest view of the market: Precisely arrive at a precise time in seconds Complete flow (buying/booking direction, amount of exchange, order) Market depth change (Level 2 number central change)
The complete story of the story behind the introduction of the plot and the formation of the character. The four major pain points of picking up the number of ticks Completed wall: Mainstream supply business yearly cost $50k+, and annual trading office single purchase Technical strength: Demand for self-contained high output volume, pipelines and existing systems Diversification of the number of contacts: different market demands, multiple contacts, formality and uniformity Cannot be postponed :Partial supply merchant existence second line number deferment Improving calculation and trading Demand-seeking point: large international demand Alltick method: Historical Tick number arrangement flow mobility consumption model Review test: TWAP/VWAP calculation efficiency 22%quantification factor digging Demand and pain point: Please set the number of commands in order to fine-tune the performance. Alltick method: Build Tick 级买卖压力标 Factor appearance: new opening high ratio factor 3.8
Support system for opening people's lives Multilingual SDK: Python/Java/C++/Rust fully supported Jupyter collection: Open-box quantification research environment Strategy board: 20+ Basic Tick number development strategy examples
Joining Alltick.co

1 note
·
View note
Text
Build a Personal AI Assistant with ChatGPT API (Step-by-Step Guide)
Learn how to build a personal AI assistant using the ChatGPT API and Python. Step-by-step guide to create your own voice-enabled, smart AI assistant. @maxoncodes
Introduction
Ever wanted your own AI assistant like JARVIS or Siri, but with more customization and privacy? Thanks to OpenAI’s ChatGPT API, you can now build a personal AI assistant tailored to your exact needs. Whether you’re looking to automate workflows, manage daily tasks, or simply build an intelligent chatbot for fun or productivity, this guide will walk you through it — step-by-step.

Let’s build your very own AI assistant using Python and the ChatGPT API, integrating voice, memory, and task automation.
🧠 What Can Your AI Assistant Do?
A personal AI assistant can:
Answer questions using ChatGPT
Perform web searches or fetch real-time data
Read emails or send messages
Automate system commands (e.g., open apps, send notifications)
Remember custom preferences or to-do lists
Also read :how to make money with chatbotsIntegrate with APIs (Google Calendar, Weather, Home Assistant)
🚀 Step 1: Set Up Your Environment
🛠️ Tools Needed
Python 3.8+
OpenAI API Key (get it here)
IDE (VS Code or PyCharm)
Terminal or Command Prompt
📦 Install Required Libraries
pip install openai python-dotenv pyttsx3 speechrecognition pyaudio Copy
🔐 Step 2: Get Your OpenAI API Key
Go to https://platform.openai.com/
Sign in and navigate to API keys
Create a new key and copy it.
Store it securely in a .env file:
OPENAI_API_KEY=your_api_key_here
Load it in your Python script:
Also read :Is AI threat for future from dotenv import load_dotenv import os load_dotenv() OPENAI_API_KEY = os.getenv("OPENAI_API_KEY")
🧑💻 Step 3: Create the ChatGPT Assistant Script
Here’s a minimal script to get your assistant talking using OpenAI's GPT-4:
Read More >>
1 note
·
View note
Text
Price: [price_with_discount] (as of [price_update_date] - Details) [ad_1] This open access book offers an initial introduction to programming for scientific and computational applications using the Python programming language. The presentation style is compact and example-based, making it suitable for students and researchers with little or no prior experience in programming. The book uses relevant examples from mathematics and the natural sciences to present programming as a practical toolbox that can quickly enable readers to write their own programs for data processing and mathematical modeling. These tools include file reading, plotting, simple text analysis, and using NumPy for numerical computations, which are fundamental building blocks of all programs in data science and computational science. At the same time, readers are introduced to the fundamental concepts of programming, including variables, functions, loops, classes, and object-oriented programming. Accordingly, the book provides a sound basis for further computer science and programming studies. ASIN : B08C7GNS3N Publisher : Springer; 1st ed. 2020 edition (1 July 2020) Language : English File size : 3.8 MB Text-to-Speech : Not enabled Enhanced typesetting : Not Enabled X-Ray for textbooks : Enabled Word Wise : Not Enabled Print length : 164 pages Format : Print Replica [ad_2]
0 notes
Text
CSED342 - Assignment 3. Search Problem Solved
CSED342 – Artificial Intelligence General Instructions This assignment has been developed in Python 3.8, so please use Python 3.8 to implement your code. we recommend using Conda environment. You should modify the code in submission.py between # BEGIN_YOUR_ANSWER and # END_YOUR_ANSWER You can add other helper functions outside the answer block if you want, but do not import other libraries and do…
0 notes
Text
谷歌快排页面:快速获取信息的秘诀
在当今这个信息爆炸的时代,如何高效地从海量信息中筛选出自己需要的内容,成为了许多人面临的一大挑战。谷歌作为全球最大的搜索引擎之一,提供了强大的搜索功能,帮助用户快速找到所需的信息。今天,我们就来聊聊如何利用谷歌快排页面,让你的信息检索更加高效。
什么是谷歌快排页面?
谷歌快排页面是指谷歌搜索结果中的前几页,通常包括第一页和第二页。这些页面上的内容��往是最相关、最热门的结果。通过优化你的搜索技巧,你可以更有效地利用这些页面,从而节省大量时间。
如何优化你的搜索?
1. 使用精确关键词:明确你想要找什么,尽量使用具体的关键词。例如,如果你在寻找“Python编程教程”,直接输入“Python 编程 教程”会比模糊的搜索词更有效。
2. 利用引号:将短语放在引号内可以确保谷歌返回包含该短语的确切匹配项。例如,“Python 编程 教程”与“Python编程教程”相比,后者会更精准。
3. 排除不相关的搜索结果:如果你想排除某些特定的网站或类型的内容,可以在搜索词后面加上减号(-)和你想排除的关键词。例如,输入“Python 编程 教程 -wikipedia”可以避免显示维基百科的相关内容。
4. 使用高级搜索:谷歌提供了一个高级搜索页面,允许你设置更多过滤条件,如语言、地区、时间范围等。这可以帮助你进一步缩小搜索范围。
结合实际案例
假设你是一名程序员,正在寻找关于“Python 3.8 特性”的最新文章。你可以尝试以下几种搜索方式:
- “Python 3.8 特性”
- “Python 3.8 特性 -site:github.com”(排除GitHub上的相关内容)
- “Python 3.8 特性 site:blogspot.com”(仅搜索BlogSpot博客)
通过这些方法,你可以更快地找到你需要的信息。
结尾讨论点
你平时是如何使用谷歌进行搜索的?有没有一些特别的技巧或者经验分享给大家?欢迎在评论区留言,让我们一起交流学习!
希望这篇文章能帮助你在信息海洋中更快地找到你所需要的内容!
加飞机@yuantou2048

CESUR Mining
BCH Miner
0 notes
Text
was going to be productive yesterday but instead I had the wild idea to try and do something with the Bianca diff-svc model I was training only to find the colab notebook is in shambles and the discord has been abandoned for a year. so I spent all day trying to fix it, got it to run preprocessing on the data, only for my connection to fuck up and when I reconnected the code that was just working was giving incomprehensible errors. so now I’m just at work like

because I believe I can still fix her. either we get colab to run python 3.8 or we force the code to run with python 3.11. I don’t know what anything means but I believe in myself.
2 notes
·
View notes
Text
Creating Snowflake UDFs and Stored Procedures
1. Introduction
Overview of User-Defined Functions (UDFs) and Stored Procedures in Snowflake.
When to use UDFs vs. Stored Procedures.
Benefits of writing reusable functions for data transformation and automation.
2. Understanding User-Defined Functions (UDFs)
What Are UDFs?
UDFs allow custom logic to be executed in SQL queries.
Supports languages: SQL, JavaScript, Python, Java, and Scala.
Creating a SQL-Based UDF
sqlCREATE FUNCTION add_numbers(a INT, b INT) RETURNS INT AS $$ a + b $$;
Usage:sqlCopyEditSELECT add_numbers(10, 20);
Creating a JavaScript-Based UDF
sqlCREATE FUNCTION get_uppercase(input_str STRING) RETURNS STRING LANGUAGE JAVASCRIPT AS $$ return input_str.toUpperCase(); $$;
Usage:sqlSELECT get_uppercase('snowflake');
Creating a Python UDF
sqlCREATE FUNCTION square_num(x FLOAT) RETURNS FLOAT LANGUAGE PYTHON RUNTIME_VERSION = '3.8' HANDLER = 'square' AS $$ def square(x): return x * x $$;
Usage:sqlSELECT square_num(5);
3. Understanding Stored Procedures
What Are Stored Procedures?
Stored procedures execute a series of SQL statements inside Snowflake.
Supports JavaScript & Python.
Can perform control flow operations (loops, conditions, exceptions).
Creating a JavaScript-Based Stored Procedure
sqlCREATE PROCEDURE insert_new_employee(name STRING, age INT, department STRING) RETURNS STRING LANGUAGE JAVASCRIPT AS $$ var sql_command = `INSERT INTO employees (name, age, department) VALUES ('${name}', ${age}, '${department}')`; snowflake.execute({sqlText: sql_command}); return 'Employee added successfully'; $$;
Usage:sqlCALL insert_new_employee('Alice', 30, 'Engineering');
Creating a Python-Based Stored Procedure
sqlCREATE PROCEDURE get_employee_count() RETURNS INT LANGUAGE PYTHON RUNTIME_VERSION = '3.8' HANDLER = 'employee_count' AS $$ def employee_count(): import snowflake.snowpark as snowpark session = snowpark.Session.builder.getOrCreate() result = session.sql("SELECT COUNT(*) FROM employees").collect() return result[0][0] $$;
Usage:sqlCALL get_employee_count();
4. When to Use UDFs vs. Stored Procedures
FeatureUDFsStored ProceduresReturn TypeScalar valuesTable results or execution logsBest forSimple calculations, transformationsComplex logic, transactionsSupportsSQL, JavaScript, PythonJavaScript, PythonExecution ScopeSingle rowMultiple queries and transactions
5. Best Practices for Snowflake UDFs & Stored Procedures
✅ Optimize UDF performance (avoid excessive loops). ✅ Use SQL-based UDFs for better performance over JavaScript/Python. ✅ Limit stored procedure complexity to improve maintainability. ✅ Test functions before deploying in production.
6. Conclusion
Snowflake’s UDFs and Stored Procedures enable powerful custom logic and automation for data processing. Understanding when to use UDFs vs. stored procedures helps optimize performance and maintainability.
WEBSITE: https://www.ficusoft.in/snowflake-training-in-chennai/
0 notes
Text
CS4221/CS5421 Project 2 Functional Dependencies and Normalisation Solution
In this project, we use Python 3.8. Use the Python le \project2.py” from Luminus les to answer the questions. You may add additional functions to help you answer the questions. However, do not change the name and the parameters of the given functions in the template le. You may import additional Python standard libraries (e.g itertools, copy) but not external libraries. For all questions, we use…
0 notes
Quote
2025年02月03日 11時13分 OpenAIがChatGPTにオンライン上の情報を収集させる「Deep research」機能を搭載すると発表 OpenAIが、オンライン上の情報をAIモデルに収集させる「Deep research」機能をChatGPTに導入することを発表しました。Deep researchはOpenAIの推論モデルである「o3」をベースにしたAIエージェントで、インターネット上の情報を検索して、推論を重ねた上で調査結果をまとめあげることができます。 Introducing deep research | OpenAI https://openai.com/index/introducing-deep-research/ OpenAI unveils a new ChatGPT agent for ‘deep research’ | TechCrunch https://techcrunch.com/2025/02/02/openai-unveils-a-new-chatgpt-agent-for-deep-research/ OpenAIは、ChatGPTがインターネットへのアクセス機能が欠如していることが大きな課題であり、この制限によって日常生活で使用する多くの情報にモデルがアクセスできない状況が続いていたと述べています。 この課題を解決するための機能が、「Deep research」です。Deep researchはインターネット上で複数のステップを踏んだ検索を実行することができ、「コンテンツの発見」「コンテンツの統合」「情報についての推論」という3つの主要な機能を備えているとのこと。さらに、新しい情報を発見するたびに検索計画を動的に適応・更新する能力も持ち合わせているそうです。 Deep researchはo3推論モデルをベースに、エンドツーエンドの強化学習を通じて開発されたとのこと。これにより、モデルは複数のステップを踏む検索プロセスを計画・実行し、リアルタイムの情報に応じて軌道修正することができます。さらに、ユーザーがアップロードしたファイルの閲覧、Pythonツールを使用した計算や画像・プロット作成、ウェブサイトからの画像の埋め込みなども可能です。 モデルの性能について、Deep researchはCenter for AI SafetyとScale AIが公開した「Humanity's Last Exam」というベンチマークで26.6%の正確性を達成。GPT-4o(3.3%)、Grok-2(3.8%)、Claude 3.5 Sonnet(4.3%)、Gemini Thinking(6.2%)、OpenAI o1(9.1%)、DeepSeek-R1(9.4%)、OpenAI o3-mini medium(10.5%)、OpenAI o3-mini high(13.0%)といった結果を大きく上回りました。OpenAIは、Deep researchの問題解決プロセスは、オンラインリサーチを活用する人間の思考プロセスと非常に似ていることを強調しています。 また、実世界の問題に対するAIの評価を行う「GAIA」というパブリックベンチマークで、Deep Researchは、推論能力、マルチモーダル機能、ウェブブラウジング、ツール使用の熟練度などを要する課題において、新たな最高記録を達成しました。具体的な数値として、Level 1では74.29%(pass@1)および78.66%(cons@64)、Level 2では69.06%(pass@1)および73.21%(cons@64)、Level 3では47.6%(pass@1)および58.03%(cons@64)を記録し、平均でそれぞれ67.36%と72.57%を達成しました。これは従来の最高記録である63.64%を上回る結果となっています。 OpenAIはDeep researchの革新的な特徴として、従来のモデルにあった応答時間の制約を完全に取り除いたことを挙げています。通常のモデルが比較的速い応答を返すのに対し、Deep researchは5分から30分という長い処理時間をかけることもあります。OpenAIはこの長い処理時間を、自律的なタスク実行の実現と汎用(はんよう)人工知能、すなわちAGI開発のロードマップにおける重要な進展として肯定的に捉えています。 Deep researchの出力は、アナリストや分野の専門家が作成するような、包括的で完全に引用付きの研究論文に相当するものとなるとOpenAIは評価。その用途は多岐にわたり、知識労働関連のタスクから、広範なウェブ検索が必要な作業まで対応可能で、特定の条件に合った商品の検索やプレゼンテーション用のコンテンツ作成などにも活用できると、OpenAIは述べています。 実際の機能については、以下のOpenAIによる発表から見ることができます。なお、この発表ライブ配信は日本の東京で撮影されたとのこと。 Introduction to Deep research - YouTube ChatGPTに、「iOSとAndroidの導入率、言語学習希望者の割合、過去数年間のスマートフォン普及率の変化について、先進国と発展途上国の比較データを出力する」ように命令し、さらに「表を含むレポート形式での出力と最も有望な新興市場に関する明確な推奨事項」を要求します。プロンプトを入力したら、「Deep research」のボタンをクリック。 すると、ChatGPTが要求内容を明確にするための質問をいくつか返してきました。これは調査を始める前に、スマートフォン普及率の定義方法や関心度の測定方法など、要件を正確に把握するためとのこと。 ユーザーがこれらの質問に答えると、ChatGPTは調査を開始しました。その推論の経緯が右カラムに表示されます。 OpenAIは「Deep Researchは、様々な知識労働の分野で活用できます。市場調査だけでなく、物理学、コンピューターサイエンス、生物学などの学術分野でも利用可能です。調査過程はサイドバーに表示され、モデルの推論プロセスを確認することができます。モデルは実際にウェブページを開き、画像、表、PDFなどの様々なコンテンツを分析し、その情報を基に次の調査ステップを決定していきます」と述べています。 リリーススケジュールについては、まず2025年2月3日の発表時点でPro版でサービスを開始し、その後にPlus版、チーム版、教育機関向け、そしてエンタープライズ版へと順次サービスが展開されるとのことです。 この記事のタイトルとURLをコピーする ・関連記事 OpenAIがあらゆるウェブサイトでのタスクをAIに依頼できる「Operator」を発表 - GIGAZINE OpenAIがAGIの構築に向けてアメリカの国立研究機関と提携したことを発表 - GIGAZINE DeepSeekの推論モデル「DeepSeek-R1」をOpenAIのo1&o3と比較することで明らかになったこととは? - GIGAZINE OpenAIのサム・アルトマンCEOが「DeepSeek-R1はスゴイけど、もっとスゴイAIモデルを発表予定」と発言 - GIGAZINE ChatGPTの政府専用バージョン「ChatGPT Gov」をOpenAIが発表 - GIGAZINE ・関連コンテンツ Alibabaが新AIモデル「Qwen2-VL」をリリース、20分を超えるビデオを分析し内容についての質問に要約して回答可能 GoogleのマルチモーダルAI「Gemini」ベースのプログラミングに特化したAI「AlphaCode 2」登場、競技プログラミング上位15%に入る性能 子どもの自閉症は88%の精度で血液検査から予測できることが明らかに 言語の壁を超えて複雑な文章や画像も理解できる新検索アルゴリズム「MUM」をGoogleが発表 2015年のセンター試験解答速報が早くも公開、今年のセンター試験の傾向は? OpenAIが無料で使えるAIモデル「GPT-4o mini」をリリース、マルチモーダルで画像や音声入力にも対応 人力で数時間かかる情報収集作業を数分で実行できるGoogle製AI検索機能「Deep Research」が日本語でも利用可能に AlibabaのQwenチームがOpenAI o1に匹敵する推論モデル「QwQ-32B-Preview」を発表、数学や科学的推論において優れた性能を発揮
OpenAIがChatGPTにオンライン上の情報を収集させる「Deep research」機能を搭載すると発表 - GIGAZINE
0 notes
Text
Learn Python in Less than 10 Minutes for Beginners (Fast & Easy)
Introduction
In this course, we’ll cover the basics of Python programming in under 10 minutes using Python 3.8 and PyCharm as the code editor. Both tools are free and open-source. You can download them easily via a quick online search.

Get it now from here
#LearnPython#PythonBasics#PythonForBeginners#CodeIn10Minutes#QuickPythonGuide#PythonMadeEasy#ProgrammingForEveryone#LearnToCode#PythonTutorial#FastPythonLearning
1 note
·
View note
Text
"From Zero to Hero: A Practical Guide to Creating a RESTful API with Django"
Introduction In this comprehensive tutorial, we will guide you through the process of creating a RESTful API with Django, a popular Python web framework. This tutorial is designed for developers who want to build a robust and scalable API, and it covers the core concepts, implementation, and best practices for creating a RESTful API with Django. Prerequisites Python 3.8 or higher Django 4.0 or…
0 notes
Text
ReflectiveTranslator:开启智能文档翻译新时代
在这个信息爆炸的时代,我们每天都会接触到大量的外语文档 —— 学术论文、技术文档、商业报告等。如何快速准确地理解这些文档的内容,成为了一个普遍的挑战。今天,我很高兴向大家介绍一个革命性的解决方案:ReflectiveTranslator。
为什么开发这个工具?
作为一个经常需要阅读英文技术文档和学术论文的开发者,我深深体会到现有翻译工具的局限性:
复制粘贴太麻烦,特别是 PDF 文件
翻译质量参差不齐,专业术语经常翻译错误
排版格式全部丢失,阅读体验很差
在线工具的隐私安全令人担忧
正是这些痛点促使我开发了 ReflectiveTranslator。
ReflectiveTranslator 有什么特别之处?
1. 智能文档处理
支持 PDF、TXT、Markdown 等多种格式
自动识别文档结构,保留原格式
输出整洁的 Markdown 文件,便于阅读和分享
2. 高质量翻译
采用先���的 AI 翻译技术
支持 13 种主要语言之间的互译
保持专业术语的准确性
上下文感知,确保翻译的连贯性
3. 简单易用
一行命令完成翻译
无需复杂的设置
全程自动化处理
详细的进度提示
4. 安全可靠
本地运行,数据安全有保障
开源透明,代码可审查
稳定可靠,持续更新维护
实际使用案例
让我分享几个真实的使用场景:
1. 翻译英文技术文档
最近我需要阅读一篇关于 ChatGPT 技术原理的英文论文,有 30 多页。使用 ReflectiveTranslator,我只需要:
python reflective_translator.py paper.pdf
2. 翻译中文文档为英文
需要将中文技术文档翻译成英文分享给国外同事:
python reflective_translator.py --source_lang zh --target_lang en chinese_doc.txt
3. 翻译日文文档
阅读一份日文的商业报告:
python reflective_translator.py --source_lang ja --target_lang zh japanese_report.pdf
短短几分钟后,就能得到一个格式精美的译文版本,不仅翻译准确,还完美保留了原文的段落结构、图表位置等。
支持的语言
目前支持 13 种主要语言之间的互译:
中文 (zh)
英文 (en)
日文 (ja)
韩文 (ko)
法文 (fr)
德文 (de)
西班牙文 (es)
意大利文 (it)
俄文 (ru)
葡萄牙文 (pt)
荷兰文 (nl)
阿拉伯文 (ar)
印地文 (hi)
整个过程完全自动化,你可以专注于阅读和理解内容,而不是在各种翻译工具之间来回切换。
开源回馈社区
ReflectiveTranslator 是一个开源项目,我希望它能帮助到更多有类似需求的人。无论你是:
学术研究者需要阅读外文文献
技术人员要查看国外文档
学生需要学习外语资料
商务人士要处理外文报告
ReflectiveTranslator 都能成为你的得力助手。
未来展望
这个工具还在持续进化中,计划添加更多功能:
更多文件格式支持
更智能的术语管理
批量处理功能
更多语言支持
更好的用户界面
立即开始使用
项目完全开源,你可以在 GitHub 上找到它。使用非常简单:
安装 Python 3.8+
克隆项目并安装依赖
配置 API 密钥
开始使用!
⭐ 重要提示:API 费用优化
为了帮助大家节省使用成本,这里分享一个重要提示:
将 OpenAI API base_url 从 https://api.openai.com 替换为 https://api.gptsapi.net
可以节省 50% 的 API 调用费用
保持相同的服务质量
👉 点击这里注册
这个优化已经在代码中默认配置,你可以直接享受更低的使用成本!
详细使用说明和安装教程都在项目的 README 中。
结语
文档翻译不应该是一个痛苦的过程。通过 ReflectiveTranslator,我希望能为每个需要处理外语文档的人提供一个简单、高效、可靠的解决方案。
欢迎访问项目主页,试用这个工具,也欢迎提供建议和反馈。让我们一起把文档翻译变得更简单!
博客:天天悦读
Email:[email protected]
GitHub:PDF_reflective_translator
#AI工具 #翻译 #PDF #开源项目 #效率工具
0 notes