#QR Code on My Cash App Card
Explore tagged Tumblr posts
Visit Tumblr Blog
Explore Tumblr blogs with no restrictions, modern design and the best experience.
Last Seen Tumblr Blogs


Fun Fact
Tumblr is available in 18 languages.
Text
Where Is the QR Code on My Cash App Card?
The Cash App Card has gained popularity in recent years due to its convenience and ease of use. With the rise in technological advancements, users often wonder where is the QR code on my Cash App Card is located. This article aims to address this query and provide relevant information to assist Cash App users.
To begin with, it is important to understand the purpose of the QR code on a Cash App Card. The QR code, also known as a Quick Response code, is a square-shaped barcode that contains information linked to the user's Cash App account. It is a vital component allowing users to make payments and access their funds swiftly. Therefore, locating the QR code is essential for users to fully utilize the functionalities of the Cash App Card.
Moving on to the physical appearance of the Cash App Card, the QR code is located on the backside of the card. It is usually found towards the bottom right corner, easily identifiable due to its distinct pattern of black squares on a white background. The placement of the QR code ensures that it remains protected from everyday wear and tear, minimizing the risk of damage to the barcode.
Furthermore, it is worth mentioning that the QR code on the Cash App Card serves multiple purposes. By scanning the QR code, users can quickly add funds to their Cash App account by linking it to their bank or debit card. Additionally, the QR code enables users to transfer money to other Cash App users effortlessly. Simply scanning the recipient's QR code on their Cash App card or using the Cash App's in-app QR code scanner can facilitate the transfer of funds instantly.
In addition to the physical card, the QR code is also accessible through the Cash App mobile application. Users can launch the app and navigate to the Card section, where they will find a digital representation of their Cash App Card. Tapping on the digital card will reveal the QR code, which users can then choose to enlarge for scanning purposes.
In conclusion, where the QR code on a Cash App Card is an essential feature that enables users to harness the full potential of their Cash App account. By understanding the physical location of the QR code and its various functions, users can make seamless transactions, add funds, and transfer money hassle-free. Whether it is through the physical card or the digital representation in the Cash App mobile application, users can easily locate and utilize the QR code to enjoy the convenience and benefits of the Cash App Card.
0 notes
Text
public transit going app-only for its payment system is something that cannot ever sit pleasantly for me
#:)#my local buses stopped taking cash and technically they do card payments but last time i did that they overcharged me#on the morality scale tap in/tap out systems are even worse than in app qr codes#in all cases it is wrong and evil. you should still be able to feed buses coins to get to where you need to go <3
10 notes
·
View notes
Note
Do you have any tips or advice for running an artists booth at a convention? I'm thinking about doing it eventually and been wanting to hear from people who have done it before :^)
yeah!!! lemme rattle off a few things off the top a my head also, pardon me 4 using amazon dot ca links for products that i mention. its just easy to find references that way (and often u can look up the brand and find their non-amazon store etc etc)
this got super long so im putting it under a cut!!
• join an artist alley group!! i'm in this artist alley discord and it is a fantastic place to get info about cons, table display ideas, manufacturer recommendations, etc. there are more than just this group out there and i think there are bigger ones but i personally really like this one ^u^ i make a ton of use of the display resources and manu recommendation channels!
• if you can afford it, be choosy about the events you apply to. there are a lot of cons out there that are fantastic, and a lot that aren't worth the trouble, and i don't necessarily mean small vs big cons. some of my fav events are smaller artist alleys local to me, and most of the artists i know avoid informa (fanexpo) like the plague. check out what other artists have to say about past events and keep an eye out for red flags: personally i find cons with really out of date/poorly advertised social medias and websites that have mismatched info are a warning sign of a mismanaged and not well attended event. • you don't need a lot of fancy display stuff to start, those sorts of things you can build up over time. im a fan of getting a ton of my display stuff from the dollar store >:)
when you're ready and need the space to display a good amount of art the main thing you wanna pick up is definitely something that gives your table some verticality, whether that's a pvc pipe style setup, pegboards, or modular cube shelving (we all used to use these big heavy grid ones until the plastic sheet covered ones came out and now we all use those. theyre cuter and lighter and fit better on a table and come in more colours yayay. im sure some people still like the grid ones since they fit gridwall accessories tho) there are lots of other ways to display stuff but these r what i am most familiar with. definitely helps to look at youtube and pinterest and discord groups for display ideas!!
another thing you will want to start is a tablecloth. not every con has their tables already covered! there are those plastic picnic ones at dollar stores, and you can thrift bedsheets/fabric too.
• depending on the type of display and art you do you'll need some way to attach signs/prints/charms/etc to your display. i just moved from blu-tack to magnets but i used to use sewing clips (back when i used the grid cubes) and before then masking tape. all of them are okay and cool! except blu-tack. don't make the same mistakes as me it adds like 40 whole minutes to teardown and it leaves gross oil on the prints after some time. evil
• if you don't have business cards you can make a sign with a qr code that links to you/your shop! there are lots of qr code makers online that u can even customize with images and colours and stuff. there will be people that wanna know how to find you again after a con!
• these days a lot of people don't bring cash to conventions and it's pretty vital to bring some sort of card reader or other digital payment method. most of us use square - they recently made it so that the phone app can accept tap! so you don't need to jump for the expensive physical readers. i've also got a paypal dot me qr code and my etransfer email (i think this is a canadian thing) on a lil sign on the table so people have lots of payment options. usually over 50% of my con income comes from non-cash sales!
• make sure to bring change!! we've forgotten in the past and done okay but it's always handy to be able to make change for people. you'll want a secure place to put cash as well, whether it's a locked moneybox that you keep out of sight or a place on your person (friend of mine uses a fanny pack!) you never wanna leave your table completely unattended but especially when it comes to the moneybox. if it's a multi day con this is an item you mustn't leave at your table overnight.
• keep count of your sales and expenses properly so that you can see how much you made at the end of the con. i really like spreadsheets but you can even just note it down in a book. here's a little example of one con for me:
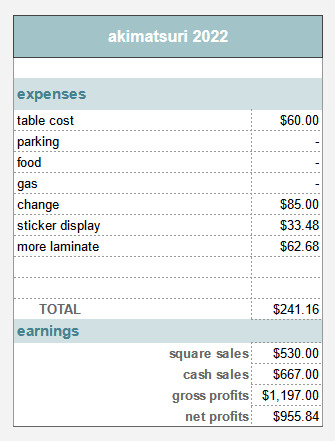
• you'll want to make a checklist of stock and display stuff to bring, but don't forget to make a list of minor stuff like phone chargers and scissors and tape and glue and pens and paper. multiple types of tape and paper if possible. they don't feel super important until you're stuck because you forgot to make a price sign and have to get by with a sharpie and a napkin. don't let that be you!! dollar store sticky note pads are super useful for this type of thing.
• plan out your prices and do as much prep (counting, sign making, display planning, packing/sorting) as you can beforehand so that the event doesn't feel too stressful. make sure your merchandise is stored in an easily accessible way for you behind the table so you aren't scrambling or rummaging too much when people are asking for stuff!
• similarly, whatever you can leave out for people to just pick/grab themselves, the more of it you're likely to sell. things like stickers and charms are good for this - people like to touch stuff! and it makes it so you don't need to go fishing for items for people as frequently. generally i don't do this with more expensive items just to be safe.
• if you sell prints, people are gonna ask for sleeves to keep them safe, especially at outdoor events. sometimes people ask for sleeves/bags even if they dont buy anything. they're a good idea to have on hand and you can find em for pretty cheap online and for a bit more expensive at dollar stores (i use OPP bags. if you dont wanna use plastic you can always get paper bags/envelopes/glassine bags instead)
• a cushion for the chair is a good idea. lots of conventions have really uncomfy chairs. some folks even bring camping chairs instead!
• pack snacks/lunch/water/drinks/have lunch plans. if you have a table buddy that is able to run out for food that's always nice. you might be sitting but it uses a lot of energy to interface all day!! you'll be exhausted and hungry and it's gonna be important to get enough fuel for your brain to function properly. i genuinely would recommend juice/soda/coffee/energy dink alongside water and food if you wanna live, especially if its a multi day con. get good sleep on days between!
• if you're excited to do trades with other artists during the con, the general etiquette is to wait until later in the day/near the end when the crowds are winding down! it's always okay to ask if someone's doing trades, and don't be upset or press them if they aren't interested or have certain stuff they don't want to trade.
• speaking of con etiquette, depending on the type of vert you are (intro/extro) and or how much customer service experience you have, interfacing can be nervewracking. my general rule is that if they stop to look, i say Hello and let them browse. if they seem interested in my table i try and do some small talk. stuff like How are you/How's the event been for ya/compliments on their outfit/cosplay/merch they have on like pins etc are good! kids and old folks love this. as tiring as it is to do some of my favourite parts of cons is talking to nice people that like my art!! all the folks that say nice things about my work are what keep me drawing ;w; i keep my sketchbook with me to jot down/doodle nice and funny encounters just cus it makes me happy to look back on XD
• when it's teardown time try to put stuff away as neatly as you can. you might be tired and just wanna toss all your stuff into whatever it is you brought it in but i promise future you (especially next-con you) will be so thankful that you put all your price signs into one baggie etc etc.
• speaking of bringing and putting away merch - you'll need a way to get it all from your home/car to your table and back. lots of people use dollies and other types of utility cart (i can guarantee there are a bunch of those grandma grocery ones at your local thrift store!!) - i personally use a big luggage bag and a collapsible wagon, but back in the day we used to CARRY bin after bin of stuff from the car and back in multiple trips which i would NOT reccomend lol. not every convention hall is easily accessible or close to parking so not having to lift stuff if you can avoid it is gonna be vital.
75 notes
·
View notes
Text
The Workbench Entry 09/09/2024: Honey, I'm home!

Hello, birdies! I have returned from exhibiting at Ottawa Comiccon and boy... what a rush it was.
It was even better than I imagined. The people are so friendly, it's now more family oriented so I saw a lot of adorable families cosplaying together, I had really good neighbors, I ran into an old friend who came in person to my booth to support me and I learned some valuable lessons that I will share with all of you.
Have 1,000 copies of your card/bookmark which you will give out for free and make sure it has a QR code.
If you are a webcomic author, your best selling product will be sketch cards for $2 each and it's ok to sell fanart too.
Have sketches ready for display and selling, and take note of which character sells the most and have spares ready.
Offer specials such as three sketch cards for the price of $5.
The thing you're trying to sell the most is yourself so be social and friendly by saying hi to people and offering your free card/bookmark and sketches.
Have the Paypal app on your cellphone.
Have your QR code on display.
Accept Paypal AND cash, and be ready to receive a lot of coins in cash.
And that's what I learned. Time to get back to the usual. Also, if anyone is interested, I have lowered the prices of my commissions since they're all digital and after what I experienced at Comiccon, I now accept fanart commissions. It's only wrong if I plagiarize or claim character that aren't mine. I am also selling physical copies of the prints I have leftover.
Go to my Ko-fi page here to commission me, shop from me, support me or even become a member.
Shout out to my editor @headdypidgeon4180 and @tntmtheshow (missed you guys a lot).
It's good to be back. - MK_Wizard
Be sure to check out my projects:
#webcomic#webcomics#support comics#comic#comics#canadian comics#art share#writers lift#graphic novel#psychoborg#cyborg#astra#sorceress#wizard#magic#action#fantasy#romance#drama#war#chosen one#champion#hero#empire#comic writer#tapas comics#webtoon canvas
6 notes
·
View notes
Note
Hi there!!! I think your art is super cool, and I love how you've drawn inspiration from fairytales, and how flexible you are with style ♡ I've been making art for a while but always just for myself, and I signed up for my very first craft fair! I was wondering how you got started selling your art. What were you nervous about? What do you wish you'd known? What did you diy that would have been worth buying, or vice versa?
Congrats on your first show!!! I wish you perfect weather, good booth assistance, and tons of wonderful people attending who buy tons of your work.
I started with an Etsy shop back in the day when Etsy was still decent, then did a few comic cons and shows and eventually timidly opened up commissions. I took it super slow! I was very shy and insecure lol
Tips:
Have a printed QR code for your insta and stuff, most people don’t take business cards anymore and just want to scan a code or take a photo. So have a sort of flyer with all your info that people can snap.
Recycled grocery bags make great bags and save you a buck, tell people you’re recycling lol
If you do any outdoor shows, have everything in plastic. Plastic tubs, plastic sleeves for art, be ready for wind and rain!!! You can get plastic sleeves for prints on Amazon for cheap.
Get a spare battery thingy so you can charge your phone if you’ve got no power connection, for indoor or outdoor shows, and just for life.
People like Venmo, cash app, most have cards, few have cash. You’ll only need like $100 in change.
When people compliment you, just say thanks! I appreciate it! Ask them where they’re from if you feel awkward. Don’t tell them your art is bad and they’re wrong lmao. Smile a lot and STAY STANDING and engage with people, it’ll help sales a ton. It sucks but if you sit nobody feels comfortable interacting with you. Then no sales. Maybe get a rubber mat to stand on. Wear comfy shoes.
Outdoor shows: Dog leash screws hold your tent down 100%. Overnight, taken EVERYTHING down, even if there’s day 2. Your tent will blow over/collapse if you leave anything behind, it’s just the law. Most tents that aren’t a fortune can’t withstand the weather and will collapse!!! So just take it all down.
Don’t sell yourself short! Calculate how long a thing took you and how much the materials were and pay yourself AT LEAST $10 an hour, if not $20. Have faith that you’re worth it.
Track all your sales and set aside 20% for taxes! Chances are you won’t have to pay them for a year or two because you won’t make much, but it’s good to start the habit. Track every cent for materials, food and gas for shows, supplies, product costs etc. those are writeoffs! If you spent more on your art business than you earned, no need to pay taxes.
www. iprintfromhome. com offers great print options and pricing!
Always always always make stuff that’s just for you. Art that the internet and the audiences never see. Not everything you make has to be show worthy.
It’s a big challenge to do this and I definitely am still learning the ropes! I wish I had all the secrets, if you find them let me know. Remember to have fun and make what you love and what inspires you. Also remember it’s a tough world out there for artists right now, so go easy on yourself if you feel like you’re not “getting it”. It’ll take time and work.
You don’t have to monetize your hobbies, but if you enjoy it and you want to, then go kick ass!!!
And again, I wish you good luck and good fortune!!! 🌟
10 notes
·
View notes
Text
How to Create a UPI Account Instantly: Step-by-Step Guide for Beginners
In today’s digital world, transferring money has become faster and easier, thanks to UPI. Whether you want to send money to a friend, pay bills, or shop online, all you need is a UPI account. If you're new to digital banking, don’t worry. This guide will walk you through everything you need to know to get started.
What is a UPI Account?
A UPI account lets you send and receive money directly from your bank using a mobile app. UPI stands for Unified Payments Interface, which is a simple and secure way to do bank transfers anytime. You don’t need to remember account numbers or IFSC codes—just use your UPI number, also known as your Virtual Payment Address (VPA), like yourname@bankname.
It’s fast, easy to use, and completely free.
Why You Should Use UPI
Having a UPI account comes with many benefits:
You can do UPI transfer instantly—24/7, even on holidays.
You don’t need cash or cards to make payments.
It connects with all major banks.
You can make secure UPI payments with PIN protection.
Everything happens through a trusted UPI net banking app on your phone.
What You Need to Set Up a UPI Account
Before you start, keep these things ready:
A smartphone with internet
A mobile number linked to your bank account
A valid debit card
A trusted mobile banking app or a UPI net banking app
Step-by-Step Guide to Create My UPI Account
Step 1: Download a UPI App
Choose a trusted UPI net banking app from the Play Store or App Store. Look for apps from well-known banks or verified providers.
Step 2: Verify Your Mobile Number
Open the app and allow it to read your SMS. The app will automatically verify your mobile number that’s linked with your bank.
Step 3: Link Your Bank Account
Once your number is verified, the app will show a list of banks. Select your bank, and your account will be linked automatically.
Step 4: Set Your UPI PIN
To keep your account safe, set a secure UPI PIN using your debit card details. This PIN will be required for all transactions.
Step 5: Get Your UPI Number
After the setup, you’ll receive your UPI number or VPA. It usually looks like yourname@upi or mobilenumber@bankname. This is what you’ll share to receive money.
How to Use Your UPI Account
Once your UPI account is ready, you can:
Send or receive money instantly
Scan QR codes to pay shops and vendors
Pay electricity, water, and mobile bills
Recharge your phone or DTH
Check account balances and transaction history
All payments happen securely with your UPI PIN, so your money stays safe.
Tips to Keep Your UPI Account Secure
Using UPI is safe, but here are some simple tips to protect your money:
Never share your UPI PIN with anyone
Always use official and trusted apps
Use app lock, fingerprint, or face ID
Don’t click on unknown payment links
If you see anything unusual, contact your bank or app support immediately
UPI Account Setup Summary
Step
What You Need to Do
Download App
Use a trusted UPI net banking app
Verify Number
Link your mobile number to your bank
Link Bank Account
Choose and connect your bank
Set UPI PIN
Use your debit card to create a PIN
Get UPI Number
Start using your VPA for payments
Conclusion
Setting up a UPI account is quick and simple. It saves time, offers instant transfers, and keeps your money secure. Whether you're paying bills, shopping, or sending money to family, UPI makes it all super easy. If you haven’t created your UPI yet, now is the perfect time to do it and enjoy smart, secure digital banking.
#mobilebanking app upi#upi mobile banking app#new bank account upi limit#upi transfer#secure upi#my upi#secure upi payment#upi net banking app#upi number#new upi payment app#app upi mobile banking#bank upi#upi mobile banking#mobile banking upi#upi khata
0 notes
Text
Does Walmart Take Apple Pay? Payment Options Explained

When it comes to paying for your purchases, many shoppers look for convenient and secure options. Apple Pay is one of the most popular mobile payment methods, but does Walmart accept it? The short answer is no, Walmart does not take Apple Pay. Instead, Walmart has its own system called Walmart Pay. Let’s explore why Walmart made this choice and what payment options are available for its customers.
Does Walmart Accept Apple Pay?
No, Walmart does not accept Apple Pay. Instead, Walmart promotes its own mobile payment solution, Walmart Pay. This service is part of the Walmart app and offers a secure, contactless way to pay at the store. Walmart Pay links directly to your debit or credit card, making the checkout process faster and easier.
Some customers have embraced Walmart Pay. For example, Jane, a frequent Walmart shopper, shared her experience. “At first, I missed using Apple Pay,” she said. “But once I got the hang of Walmart Pay, I found it simple and quick.” However, not everyone feels the same. Many Apple Pay users are disappointed and find the lack of compatibility frustrating.
Using Walmart Pay is straightforward. You first download the Walmart app and set up an account. Add your payment details to the app, and when you’re ready to pay, scan the QR code at the checkout counter. The app completes the transaction seamlessly. While it’s not Apple Pay, it serves as an effective alternative.
Why Doesn’t Walmart Use Apple Pay?
Walmart’s decision to skip Apple Pay boils down to strategy. By promoting Walmart Pay, the company avoids paying fees associated with Apple Pay transactions. These savings benefit Walmart’s bottom line. It also helps Walmart maintain control over customer data and payment processes.
Walmart Pay also encourages customer loyalty. The app connects shoppers to Walmart’s other services, such as online ordering and exclusive deals. This integration makes the app a one-stop solution for many Walmart shoppers. Still, the lack of Apple Pay limits choices for those who rely on it.
John, a tech-savvy customer, explained his experience. “I love Apple Pay for its simplicity,” he said. “At Walmart, I had to adjust. Walmart Pay works well, but it’s not my first choice.” Stories like John’s highlight how Walmart’s decision affects shoppers.
What Are Walmart’s Payment Options?
Although Walmart doesn’t accept Apple Pay, it provides plenty of alternatives. You can pay with credit or debit cards, cash, or gift cards. Walmart Pay is ideal for those who prefer a mobile payment option. Additionally, Walmart accepts PayPal for online purchases, though it’s not available in stores.
Maria, a traveler, shared her story. “I tried using Apple Pay at Walmart and was surprised it didn’t work,” she said. “Luckily, I had my debit card with me. It was inconvenient, but I managed.” Experiences like Maria’s are common among first-time Walmart shoppers.
For those unfamiliar with Walmart Pay, the transition may take time. However, the app simplifies shopping for frequent customers. While Apple Pay remains unavailable, Walmart continues to offer a variety of payment methods to meet its customers’ needs.
Discover MapBizUSA: Your Comprehensive Source for USA Contact Information
For in-depth access to extensive USA contact details, explore the MapBizUSA directory. Offering a wide array of listings, this resource ensures you can find specific contacts across various industries and regions within the United States. Whether you're searching for business contacts, customer service numbers, or professional connections, MapBizUSA is a dependable platform to streamline your search.
Utilize its user-friendly interface and vast database to access the most relevant and current contact information tailored to your needs. Efficiently uncover detailed American business contact information with the MapBizUSA directory today.
0 notes
Text
How do I activate a cash app card, automatically or manually?
The QR technique is perhaps the most widely used because it is automated and doesn't require a cash card. It is a simple process that takes only a moment to complete and will instantly a cash app card activation.

What you need to do is as follows:-
Visit the "Cash App" mobile app.
Select the cash card icon. It may be found in the left-hand corner of the Cash App's home screen.
There will be a drop-down menu. Next, select "Activate Cash Card."
The Cash App will request authorization to use your phone's camera. You must provide consent since doing so is necessary to scan the QR code.
There is another option which is The methods to activate the cash app card are as follows:
The Cash App to "Launch"
Navigate to and choose the "Cash App Tab"
Next, choose "Cash Card Support" to proceed.
Press the "Report Your Cash Card" button.
Select "Card Stolen/Compromised" or "Card Missing" from the list of alternatives.
Finally, adhere to the instructions on the screen to obtain your new Cash App Card.
How to Activate My Cash App Card without QR Code?
Cash App is a convenient platform that allows users to send and receive money easily. One of the key features of the Cash App is the Cash Card, which is a physical debit card that can be used for in-person purchases and ATM withdrawals. Typically, activating a Cash App card requires scanning a QR code. However, if you don't have access to a QR code, there are alternative methods to activate your Cash App Card. In this essay, we will explore five simple steps to activate your Cash App Card without using a QR code.
The first step in activating your Cash App Card without a QR code is to open the Cash App on your mobile device. Once you have done that, go to the "Account" tab and then select the "Cash Card" option. This will take you to a new screen where you will see an option to activate your card.
Next, you will be prompted to provide your card details. Enter the sixteen-digit card number, followed by the CVV code and the expiration date. It is important to ensure that you have entered the correct information to activate the cash app card successfully.
After entering your card details, you will be asked to provide some personal information for verification purposes. This may include your full name, date of birth, and the last four digits of your Social Security number. Make sure to provide accurate information to avoid any issues in the verification process.
Once you have entered the necessary information, review all the details you have provided and click on the "Activate Cash Card" button. This will initiate the activation process, and you will be notified once your card has been successfully activated. You can then begin using your Cash App Card for transactions and withdrawals.
In conclusion, even if you don't have a QR code, you can easily activate your Cash App Card by following these simple steps. Remember to open the Cash App, select the "Account" tab, and then go to the "Cash Card" option. From there, enter your card number, CVV code, and expiration date. Provide the necessary personal information for verification, review all the details, and click on the "Activate Cash Card" button. This process will allow you to activate your Cash App Card without the need for a QR code, ensuring that you can enjoy all the benefits and convenience that the Cash App has to offer.
0 notes
Text
How to Activate a Cash App Card: A Complete Guide
Activating a Cash App card is simple and quick, allowing you to access your Cash App funds seamlessly for purchases, payments, and cash withdrawals. If you’re wondering how to activate a Cash App card or looking for steps to activate it with ease, this guide covers everything you need to know. Whether it’s a new card, a replacement, or you’re activating it online, here are the steps and tips to get your Cash App card activated.
Steps to Activate a Cash App Card
When you receive your Cash App card, activating it should be your first step. Follow these steps to ensure you set it up correctly and securely.
Step 1: Open Cash App
To activate your Cash App card, start by opening the Cash App on your mobile device. Ensure you are logged into your account to access the card settings and activation options.
Step 2: Go to the Card Activation Section
On the Cash App home screen, locate the card icon at the bottom of the screen. Tap on it to access the Cash App card settings. Here, you’ll find the option to activate your card, either with a QR code or through manual entry.
Step 3: Activate Your Cash App Card Using QR Code
When you choose the option to activate a Cash App card, you’ll see an option to scan a QR code. Hold your phone camera over the QR code on your Cash App card, and let the app scan it. Once scanned, Cash App will recognize and activate your card automatically.
Step 4: Activate Your Cash App Card Manually
If you’re unable to scan the QR code, you can activate your Cash App card manually. Select the manual option, then enter your card details, including the CVV number and expiration date printed on the card. After entering this information, Cash App will confirm your card activation.
Step 5: Start Using Your Activated Cash App Card
Once activated, your Cash App card is ready to use. You can make purchases at any location that accepts Visa, use it to withdraw cash from ATMs, or link it to mobile wallets like Apple Pay and Google Pay for contactless transactions.
How to Activate a Replacement Cash App Card
If you’ve received a replacement Cash App card, the process to activate it is nearly identical. Simply log in to your Cash App account, go to the card settings, and select “activate.” You can then either scan the QR code on your replacement card or manually enter its details. Once the activation is confirmed, your replacement Cash App card is ready to use.
Tips for a Smooth Cash App Card Activation
Update Your Cash App: Make sure you’re using the latest version of the Cash App to access all available features for card activation.
Check Internet Connectivity: Activating your card requires an internet connection. Ensure you’re connected to Wi-Fi or a stable mobile network to avoid disruptions.
Secure Your Account: Use a strong PIN and enable notifications for enhanced security. This will help you monitor transactions and prevent unauthorized access to your Cash App funds.
Common Issues During Cash App Card Activation
While activate CashApp card is usually straightforward, you may encounter some issues. Here are common problems and solutions:
QR Code Not Scanning: Make sure your camera is clean and has adequate lighting. If it still doesn’t work, use the manual activation option.
Incorrect Card Details: Double-check that you’re entering the correct CVV and expiration date. Even small errors can prevent activation.
Account Not Verified: If you haven’t verified your identity on Cash App, you might face difficulties activating your card. Go to account settings to complete the verification process.
FAQs
Q1: How do you activate a Cash App card without a QR code? A: If you don’t have the QR code, you can activate your Cash App card manually. Open Cash App, navigate to the card settings, and select the manual activation option. Enter the CVV and expiration date to activate the card.
Q2: Can I activate my Cash App card online? A: Yes, you can activate your Cash App card online through the Cash App mobile app. There’s no need for a computer; simply follow the steps within the app to complete activation.
Q3: What should I do if I’m unable to activate my Cash App card? A: If you face difficulties, check your internet connection, ensure you’re using the latest app version, and confirm your account is verified. If problems persist, contact Cash App support for assistance.
Q4: How long does it take to activate a Cash App card? A: Activation is usually instant and should only take a few minutes if all information is entered correctly.
Q5: Is my Cash App card ready to use after activation? A: Yes, once activated, your Cash App card is immediately ready for purchases, ATM withdrawals, and linking to mobile wallets.
Activating your Cash App card is essential for accessing the full benefits of your Cash App account. With this guide, you can quickly activate your card and start enjoying convenient and secure payments right away.
1 note
·
View note
Video
When I was visiting San Francisco, I needed to ride the Cal-train, and in order to do so, I had to download 2 apps, change my security settings, inout mu credit card information, and scan a qr code - all just to get on a train. Before, id be able to walk up to a window, tell them where I was going, and give them cash. It took almost 30 minutes and 3 other people for me to be able to pay for a ticket because they wanted contactless, humanless payment.
Its okay they could call me on a rotary faster than i could explain to them I’m old enough to know what a rotary phone is
17K notes
·
View notes
Text
Cash App: How to activate a cash app card without QR Code?
The Cash App card is a debit card that allows you to make purchases or withdraw cash from ATMs using the funds in your Cash App account. But how to activate the Cash App card? You can either scan the QR code included with the card or follow the prompts in the Cash App to enter the card's activation code and other information. Using the QR code, launch the Cash App, go to Cash Card, Tap on the Cash Card > Activate Cash Card > when prompted for camera permissions, tap OK > then scan the QR code to get started.
If you don’t have the QR code, launch the Cash App, go to Cash Card, Tap on the Cash Card > Activate Cash Card > Use CVV > Enter your card's CVV and expiration date. Once that’s done, your card will be ready for use.
You may be interested in getting a Cash App card or Cash Card if you have a Cash App account. A Cash Card is a Cash App debit card that allows you to make purchases or withdraw cash from ATMs using your Cash App balance. In other words, it offers an alternative to cashing out your balance into a bank account. In this article, you’ll find a step-by-step guide on how to activate the Cash App card.
How To Activate Cash App Card?
To activate the Cash App card, the debit card offered by Cash App, the popular P2P payments platform owned by Block, Inc., you need to have the card on hand. That means that you must first order it and have it in your possession. The following section explains how to order your Cash Card for the first time.
How To Order A Cash App Card?
To order a Cash App card, you will need to follow these steps:
Make sure you have the latest version of the Cash App.
Open the Cash App and tap the ���My Cash” tab located at the bottom of the screen.
Scroll down and tap on the “Cash Card” tab.
Tap on the “Order” button.
Follow the prompts to complete your order. This may include entering your shipping address, choosing a design for your card, and customizing the name on the card.
Please note that the Cash Card is currently only available to U.S. residents, and there may be fees associated with ordering the card. It typically takes 7-10 business days for the card to arrive.
Activating Your Cash App Card With The QR Code
Once you receive your Cash Card, you can activate it by following these steps:
Open Cash App on your phone or tablet and tap the “My Cash” tab at the bottom of the screen.
Scroll down and tap on the “Cash Card” tab.
Tap on the “Activate Cash App Card” button.
When prompted, use your phone's camera to scan the QR code on the back of your Cash App card.
A “Cash Card Activated” message will appear on your screen; press “Continue” to finish.
Activating Your Cash App Card Without the QR Code
If you can’t scan your card’s QR code (e.g., your phone’s camera is damaged or broken), you can still activate your new card by following these steps:
Open Cash App and tap the “My Cash” tab located at the bottom of the screen.
Scroll down and tap on the “Cash Card” tab.
Tap on the “Activate Cash Card” button.
Press “Use CVV Instead.”
Enter your card CVV code, a 3-digit code on the back of your card.
Once you enter the CVV code, click “Continue,” and your card will automatically activate.
Once you activate your card, you can immediately start making purchases or withdraw cash from ATMs. You can also load funds to your Cash Card.
If you encounter any issues or error messages during the activation process. You can try troubleshooting them by checking your internet connection, ensuring you have the latest version of the Cash App, or contacting Cash App customer support.
Cash Card Activation FAQs:-
Are there any Cash Card fees?
There may be fees associated with using the Cash App card, such as ATM or foreign transaction fees. You can view a full list of fees by tapping on the “Fees” tab in the Cash App.
Are there any Cash Card limits?
Yes, there are limits on how much you can spend or withdraw using the Cash App card. You can view your current limits by tapping on the “Limits” tab in the Cash App. You may be able to increase your limits by verifying your identity or adding a bank account to your Cash App account.
What do I do if my Cash Card is lost or stolen?
If your Cash Card is lost or stolen, you should immediately suspend the card to prevent unauthorized charges. To suspend your card, tap on the “Cash Card” tab in the Cash App and select “Suspend Card.” You can also order a replacement card by following the “Ordering a Cash App Card” steps above.
0 notes
Text
What are the Cash App Card, and How Do You Activate It?
How to Activate Your Cash App Card?
Cash App is a convenient platform for sending money, paying bills, and even investing in stocks and Bitcoin. But there is another feature many users love—the Cash App Card. This Visa debit card links directly to your Cash App balance, making it easy to make purchases or withdraw cash from ATMs. Before you start using it, though, you will need to activate it. Here is everything you need to know about how to activate Cash App card.
To activate your Cash App Card, simply open the Cash App on your smartphone, tap the card icon, and either scan the QR code on your card or enter the card details manually. Once activated, your card will appear under the “Card” tab in the app, and you are good to go. If you encounter any issues, Cash App’s customer support can help, or you can check their blog for tips.
What are the Cash App Card, and How Do You Activate It?
Cash App, developed by Square, has become one of the most popular mobile payment services in the U.S. It lets you easily transfer money to other users from your smartphone. One standout feature is the Cash App Card—a customizable Visa debit card that connects directly to your Cash App balance.
With the Cash Card, you can use your Cash App funds at any retailer that accepts Visa, both online and in-store. Before using it, though, you will need to activate it.
You can activate Cash App Card in two ways:
Activating with a QR Code
Activating Without a QR Code
How to Activate Your Cash App Card with a QR Code?
When you receive your Cash App Card, it will have a QR code printed on it. This code is unique to your account, making activation quick and easy.
Steps to Cash App activate card Using a QR Code:
Open Cash App on your device and log in.
Tap the Cash Card icon at the bottom of the screen.
Select “Activate Cash Card.”
Allow Cash App to access your camera.
Hold your phone’s camera over the QR code on your Cash Card. The app will automatically scan the code, and your card will be activated. That is it! Your Cash App Card is ready to use for purchases or ATM withdrawals.
How to Activate Your Cash App Card Without a QR Code?
If you do not have the QR code or it is damaged, you can activate your Cash App Card manually using the card’s details.
Steps to Cash App card activate Without a QR Code:
Open Cash App and log in.
Tap the Cash Card icon.
Choose “Activate Cash Card.”
When prompted to scan the QR code, select “Use CVV Instead.”
Enter the CVV code and expiration date from your Cash Card, then confirm.
This manual method works just as well as using the QR code, and your card will be ready to use immediately.
What are the Common Issues When Activating Your Cash App Card?
Sometimes, issues may pop up when trying to activate your Cash App Card. Here are some quick solutions:
QR Code Will not Scan: Try moving to a well-lit area and clean your phone’s camera lens.
Incorrect Details: Double-check that you entered the correct CVV and expiration date.
Outdated App: Make sure your Cash App is updated, as older versions may have bugs.
If your internet connection is spotty, try moving to a stronger network or switching to Wi-Fi.
How to Use Your Cash App Card After Activation?
Once activated, you can start using your Cash App Card right away! Here is what you can do:
Use your Cash Card anywhere Visa is accepted, online or in-store.
You can withdraw cash, though Cash App charges a $2 fee unless you have direct deposits of at least $300 each month.
Some stores offer cash back with your Cash App Card, just like with a regular debit card.
Cash App keeps a detailed record of your transactions, making it easy to monitor your spending and budget.
FAQ
Can I use my Cash App Card before it arrives?
No, you will need to wait until your physical Cash App Card arrives in the mail to activate and use it.
How do I activate my Cash App Card?
To activate your card, open Cash App, go to the Cash Card section, and select “Activate Cash Card.” You can scan the QR code or enter the card details manually.
Can I activate my Cash App Card without a QR code?
Yes, simply choose “Use CVV Instead” when prompted to scan the QR code and enter your card’s CVV and expiration date.
How long does it take to activate my Cash App Card?
The Cash App card activation process is instant. Once you complete the steps, your card is ready to use.
Why isn’t my Cash App Card activating?
If you are having trouble, check your QR code, make sure your card information is correct, update your app, and ensure you have a stable internet connection.
0 notes
Text
QR Codes: The Future of Payment Processing for Businesses
If you own a business, chances are you've heard of QR codes. QR stands for "Quick Response," and these codes can be used for a variety of purposes, including making payments. QR code payments are fast, convenient, and secure, and they're quickly becoming the preferred method of payment for businesses and consumers alike. Here's everything you need to know about QR code payments and why you should start accepting them for your business.
What are QR Code Payments
QR code payments are a type of contactless payment that uses a QR code to transmit payment information. To make a QR code payment, customers simply scan the code with their smartphone and the payment is processed immediately. QR code payments are fast, convenient, and secure, making them the ideal solution for businesses that want to streamline their payment processing.
Are QR Code Payments Safe For Accepting Business Payments?
When looking to accept business payments, QR code payments are just as safe as traditional methods like credit cards or debit cards. In fact, they may even be safer since there's no need to exchange sensitive information like credit card numbers or expiry dates. When you use a QR code to process payments, all of the necessary information is encrypted and transmitted securely between the customer's smartphone and the payment processor.
Why Should My Business Start Accepting QR Code Payments?
There are many reasons why you should think about starting to accept QR code payments for your business payments. First, they're incredibly convenient for both businesses and customers. Customers can make QR code payments without ever having to take out their wallet or enter their personal information, which makes checkouts quick and easy. For businesses, QR code payments eliminate the need for cash register systems and expensive point-of-sale devices. All you need is a smartphone and an internet connection, and you're ready to start processing payments!
Another benefit of QR code payments is that they're extremely versatile. You can use them to accept in-person payments at brick-and-mortar stores, or you can use them to accept online payments on your website or mobile app. You can even use them to send invoices or set up recurring billings! The possibilities are endless.
Finally, QR code payments offer a great way to promote your brand. You can add your logo or brand colours to your QR code, making it instantly recognizable to your customers. You can also include a URL or promotional message so customers can learn more about your products or services after scanning your code.
For More Info: mobile POS system
0 notes
Text
8 Videos About USA International data plan That'll Make You Cry
youtube
There are different methods to purchase an U.S.A. SIM Card of an eSIM for U.S.A., which is the current technology innovation in travel SIM industry. Before we enter into the methods of purchasing an USA SIM Card or an USA eSIM, let us look at how much beneficial can it be in conserving you cash on your worldwide roaming bill in U.S.A.
The alternative to buying a USA SIM or eSIM is to take an International Roaming Plan for USA from your telecom service provider. If you are a postpaid consumer, you can avail of this facility. Depending upon the terms of International roaming, your telecom provider may ask you for a deposit or might trigger global roaming without the requirement to pay any deposit. They may, however, put an upper limit on use or invest, depending on your creditworthiness with your telecom business and their own policies connected to International wandering strategies.
While this is a terrific choice in regards to convenience, as you do not need to go through the hassle of purchasing a separate American SIM Card or an eSIM for USA, and also you get to retain your mobile number throughout the journey, it can be an expensive affair. If you company is looking after your mobile costs on your service trip to USA, this is an excellent option to go for as you are not paying the roaming bill in USA out of your pocket and for this reason the savings are not entering into your pocket either.

If your company is not covering your International roaming costs in USA or you are traveling to USA for leisure or individual reasons and have to take care of your mobile bill yourself, it makes best sense to buy a USA SIM Card or a USA eSIM. If your mobile phone is eSIM compatible (most Apple, Samsung & Google phones are), USA eSIM will be a better choice for you. It is much easier to purchase, install and utilize and extremely cost effective in terms of data charges. Leading eSIM Rocket mobile connectivity companies such Rocket offer unbelievable alternatives for USA eSIMs through their site and Mobile APPs.
The USA eSIM will be sent out to you by means of e-mail in a matter of minutes as a QR Code with simple USA Travel eSIM instructions to install it on your cellphone, tablet or laptop computer. Open 'settings' on your phone and set your eSIM for information usage when you land in USA and you'll be connected to the regional telecom operator for all your information requirements.

However, if your cellphone is not eSIM compatible, you might select to buy a routine plastic SIM Card for USA which requires to be set up manually into your phone and will offer you with cost effective information strolling plan and a local mobile number in USA. In regards to rates, they are a little more pricey than an eSIM for the same destination, with an included advantage of a local mobile number with totally free inbound calls and in many http://query.nytimes.com/search/sitesearch/?action=click&contentCollection®ion=TopBar&WT.nav=searchWidget&module=SearchSubmit&pgtype=Homepage#/USA eSIMs cases, couple of minutes of outgoing calls too.
Setting up a physical SIM can be slightly troublesome though. They work with all kinds of cellular phones, unlike eSIMs, which work with choose 200 plus models just. A list of eSIM suitable phones is readily available here
Where can you purchase them?
If your phone is eSIM suitable, get an eSIM for USA online from here. This is without a doubt the most convenient and fastest way to obtain Internet connectivity in USA at an unbelievable cost.
If your phone is not eSIM suitable and you should opt for a physical SIM card for USA eSIM Plans US, you can either buy it online-- supplied your area is serviced by the seller for delivery. If you are unable to find an online seller who provides to your area, then another option for you is to buy a SIM Card for USA at the airport.
I have always purchased my travel eSIM for USA online from Rocket, an extremely trusted brand in the field of International Roaming solutions. Visit their website here OR download their APP from here. They service every country you can consider and are extremely responsive if you deal with any issues or require assistance throughout or publish your purchase. They have a clever chatbot on their platform which takes care of most of your queries. If you do require to interact with a human agent, that choice is readily available in all languages.
Their costs are competitive and the platform is incredibly easy to use. All it takes is a couple of minutes and a few clicks, and you'll have your eSIM for USA installed on your mobile, tablet or laptop computer-- so regarding supply you with uninterrupted high quality internet connectivity in USA at a portion of the expense of a big telecom company's data wandering plans.
0 notes
Text
"Activate Cash App Card: A Step-by-Step Guide to Unlock Your Financial Power"
In today's fast-paced digital world, financial transactions have become more convenient than ever. Cash App, a popular mobile payment service, has revolutionized the way we handle money. With its Cash App Card, users can access their funds anytime and anywhere with ease. In this article, we will explore the simple process of Activate Cash App Card, unleashing the power of seamless transactions and financial freedom.
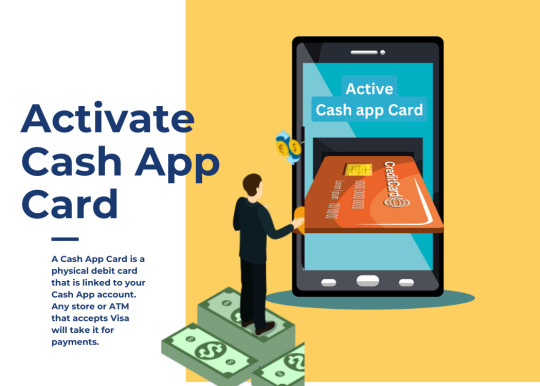
What is a Cash App Card?
A Cash App Card is a physical debit card that is linked to your Cash App account. Any store or ATM that accepts Visa will take it for payments. The card also comes with a number of benefits, such as no fees for ATM withdrawals and cash-back rewards.
Read Also :- disable cash app card
How To activate your Cash Card using the QR code:
Select the Cash Card tab on your Cash App home screen.
Select Activate Cash Card.
Select OK when your Cash App asks for permission to use your camera.
Then Scan the QR code.
What's the number to activate a Cash App card?
To activate your Cash App card, you can call the Cash App customer support number at +1(855)-538-1736. Once you have called the number, follow the prompts to navigate to the Card Activation menu option. Enter your Cash App card number or your linked phone number and follow the instructions provided by the automated system to activate your card.
Some other ways to activate your Cash App card:
You can activate your card through the Cash App app by scanning the QR code on the back of your card.
You can activate your card by entering the card details manually into the Cash App app.
If you have any trouble activating your Cash App card, you can contact Cash App support through the app or by calling the customer support number.
How to Activate Cash App Card
There are two ways to activate your Cash App Card:
Option 1: QR Code Activation
a. Open the Cash App on your smartphone and log in to your account.
b. Tap on the Cash Card icon at the bottom of the screen.
c. Select "Activate Cash Card."
d. When prompted, allow the app to access your smartphone's camera.
e. Center your smartphone's camera over the QR code located on your Cash App Card.
f. Once the QR code is scanned successfully, your Cash App Card will be activated.
Option 2: Manual Activation
a. Open the Cash App on your smartphone and log in to your account.
b. Tap on the "Activate Cash Card" option.
c. Instead of scanning the QR code, click on the "Missing QR code" option.
d. Now, enter the CVV number and expiration date found on your Cash App Card.
e. Your Cash App Card will be successfully activated.
How to activate my Cash App card without the app?
You can activate your Cash App card without the app by visiting the Cash App website on your computer or laptop. Once you're logged in to your account,
go to your profile and click on "Cash Card."
Then, click on "Activate Cash Card"
and enter your CVV and expiration date.
Once you've done that, your card will be activated and you can start using it.
How can verify my Cash App Cash Card?
Want to use your Cash App Cash Card to make purchases online and in stores? Or maybe you want to withdraw cash from an ATM? Well, you'll need to verify your card first.
To do this, open the Cash App app and tap on the "Card" tab. Then, tap "Verify Card" and follow the instructions. You'll need to provide your full name, date of birth, and the last 4 digits of your Social Security number (SSN). You may also be asked to take a selfie and a photo of your government-issued ID.
The verification process can take up to 48 hours, but it's usually pretty quick. Once your identity has been verified, you'll be able to start using your Cash App Card right away.
Conclusion
Activate your Cash App Card is a quick and easy process. Once your card is activated, you can start using it right away to make purchases and withdraw cash. By following the tips in this article, you can use your Cash App Card safely and responsibly.
#Cash App Cash Card#Activate your Cash App Card#cash app support number#Activate Cash Card.#disable cash app card#cash app suuport
0 notes
Text
Can I Activate My Cash App Card Before It Arrives?
Are you eagerly waiting for your Cash App card to arrive so you can start enjoying all the benefits it offers? Well, what if we told you that there's a way to activate your Cash App card before it arrives? Yes, you read that right! In this blog post, we'll show you how to activate your Cash App card without having the physical card in hand. We'll also address some common issues users face when trying to activate their cards and provide helpful insights. So let's dive in and find out how you can get started with using your Cash App card right away!

How to activate a Cash App card without a card?
If you're eager to start using your Cash App card before it arrives, there's good news - you can actually activate it without the physical card in hand. Here are the steps to follow:
Open the Cash App: Start by opening the Cash App on your smartphone. If you don't have it yet, simply download it from your app store and create an account.
Access Your Account Settings: Once you're logged into the app, find and tap on the profile icon or account settings option, usually represented by a small person-shaped icon.
Look for Card Activation: Within your account settings menu, look for an option related to activating your Cash App card. It might be labeled as "Activate Card" or something similar.
Scan QR Code or Enter Details: When prompted, select whether you want to scan the QR code on your physical card (if available) or enter its details manually.
Follow Verification Process: After providing the necessary information about your card, follow any additional verification steps required by Cash App to authenticate and activate your new card successfully.
By following these simple steps within the Cash App itself, you can easily activate your cash app card before it even arrives at your doorstep! Now let's address some common issues that users often encounter during this process.
Why I am unable to activate my Cash App card?
There can be several reasons why you might be unable to activate your Cash App card. One possible reason could be that the card has not arrived yet. It is important to note that you cannot activate a physical card before it is delivered to you. So, if you are trying to activate your card before it arrives, unfortunately, it won't work.
Another reason could be that there may be some issue with your Cash App account itself. Make sure that you have a verified and active account on Cash App. If your account is not fully set up or if there are any pending verification processes, this could prevent you from activating your card.
Additionally, ensure that the details entered during the activation process are correct. Double-check the information such as name, address, and phone number associated with your Cash App account matches exactly what was provided when ordering the card.
If none of these issues apply to you and you are still facing difficulties in activating your Cash App card, it would be best to reach out to their customer support for assistance. They will be able to guide you through any specific issues or provide further instructions on how to resolve the problem efficiently.
Conclusion:
It is not possible to activated your Cash App card before it arrives. The activation process requires you to physically have the card in hand. However, you can prepare for the activation by downloading and installing the Cash App on your mobile device and signing up for an account.
Once your Cash App card arrives in the mail, follow the steps provided by Cash App to activate it. This typically involves linking the card to your account and verifying your identity.
If you are experiencing issues with activating your Cash App card, make sure that you are following all of the instructions correctly and that there are no errors or typos in entering your information. If problems persist, reach out to Cash App customer support for assistance.
0 notes