#RPC Firewall
Explore tagged Tumblr posts
Visit Tumblr Blog
Explore Tumblr blogs with no restrictions, modern design and the best experience.
Last Seen Tumblr Blogs


Fun Fact
Tumblr was acquired by Yahoo for $1.1B in 2013.
Text
How to Secure Your WordPress Login Page from Hackers
[et_pb_section fb_built=”1″ _builder_version=”4.27.4″ _module_preset=”default” global_colors_info=”{}”][et_pb_row _builder_version=”4.27.4″ _module_preset=”default” global_colors_info=”{}”][et_pb_column type=”4_4″ _builder_version=”4.27.4″ _module_preset=”default” global_colors_info=”{}”][et_pb_text _builder_version=”4.27.4″ _module_preset=”default” hover_enabled=”0″ global_colors_info=”{}”…
#brute force attack#brute force attack prevention#cyber-security#cybersecurity#cybersecurity best practices#disable xml-rpc#firewall for wordpress#malware protection#protect wordpress website#secure wordpress hosting#secure wordpress login#secure wp-config file#security#site hacking prevention#SSL encryption#two-factor authentication#web application firewall#web development#Website Builders#Wordpress#wordpress brute force protection#wordpress hosting security#wordpress password security#wordpress security#wordpress security best practices#wordpress security plugins#wordpress security tips
0 notes
Text
Security Advisory [Insecurely configured geth can make funds remotely accessible]
Insecurely configured Ethereum clients with no firewall and unlocked accounts can lead to funds being accessed remotely by attackers. Affected configurations: Issue reported for Geth, though all implementations incl. C++ and Python can in principle display this behavior if used insecurely; only for nodes which leave the JSON-RPC port open to an attacker (this precludes most nodes on internal…
0 notes
Note
hi, discord-free anon here. My original quandary was less to do about plots and more to do with not being able to even join w/o discord attached. I am fine to fend for myself plot wise tho I appreciate all of your concern (: i hear all your feedback and your points aren't invalid, just not relevant to me. my mind is unchanged and I will keep looking for discord optional sites, as I have now discovered some that exist thanks to rpc positivitea and the much less vitriolic crowd over there // in what world are you where you can't use discord? i'm able to access discord from behind the great firewall of china. where are you that can't use discord or a free/cheap VPN to fix it?
~
0 notes
Text
How to Add Security through WordPress
WordPress itself provides several built-in security features, and you can further enhance security by utilizing various plugins and best wordpress hosting india. Here's how you can add security to your WordPress site:
Step 1: Update WordPress Core, Themes, and Plugins: - Keep your WordPress installation, themes, and plugins up to date to patch any known security vulnerabilities. Step 2: Use Secure Hosting: - Choose a reputable hosting provider that offers security features like firewalls, malware scanning, and regular backups. Step 3: Strong Admin Passwords: - Use strong, unique passwords for your WordPress admin accounts and encourage all users to do the same. Step 4: Limit Login Attempts: Install a plugin to limit the number of login attempts from a single IP address to protect against brute force attacks. Step 5: Two-Factor Authentication (2FA): - Implement 2FA for WordPress logins using plugins like Google Authenticator or Duo Two-Factor Authentication. Step 6: Secure wp-config.php: - Protect your wp-config.php file by moving it to a higher-level directory or adding code to your .htaccess file to restrict access. Step 7: Disable Directory Listing: - Prevent directory listing by adding Options -Indexes to your .htaccess file to hide directory contents. Step 8: Disable XML-RPC: - If you're not using XML-RPC functionality, disable it to prevent potential exploitation by attackers.

Step 9: Limit File Permissions: - Set appropriate file permissions for your WordPress files and directories to restrict unauthorized access. Step 10: WordPress Security Headers: - Implement security headers like Content Security Policy (CSP), X-Frame-Options, X-XSS-Protection, and others to enhance browser security. Step 11: WordPress Security Plugins: - Install reputable security plugins like Word fence, Sucuri Security, or themes Security to monitor and protect your site from various threats. Step 12: Regular Backups: - Set up regular backups of your WordPress site, including files and the database, and store them securely offsite. Step 13: WordPress Salts and Keys: - Update your WordPress salts and keys regularly to enhance encryption and protect against brute force attacks. Step 14: Disable File Editing: - Prevent file editing within the WordPress dashboard by adding define ('DISALLOW_FILE_EDIT', true); to your wp-config.php file. Step 15: Security Headers: - Add security headers to your site's HTTP responses to protect against various types of attacks. You can do this manually or by using a security plugin. Step 16: Monitor File Changes: - Install a plugin or set up alerts to monitor and notify you of any unauthorized changes to your WordPress files and cheap wordpress hosting india. Note: By implementing these security measures, you can significantly improve the security of your WordPress site and protect it from various threats. Additionally, staying informed about security best practices and regularly auditing your site's security can help you stay one step ahead of potential attackers.
0 notes
Text
Ankr has announced a significant partnership with XDC Network, a Layer 1 blockchain platform for trade finance and asset tokenization. The partnership will enable Ankr to offer its Remote Procedure Calls (RPC) service to XDC Network, enhancing its performance, security and scalability. RPC is a protocol that allows applications to communicate with each other across different networks. Ankr’s RPC service provides a reliable and cost-effective way for developers and users to access various blockchain networks, such as Ethereum, Binance Smart Chain, Polygon and Solana. Ankr’s RPC service also supports Web3 applications, such as wallets, exchanges and decentralized applications (DApps), that require fast and seamless interaction with blockchain data. By integrating Ankr’s RPC service, XDC Network will be able to leverage Ankr’s global network of nodes and servers, which are distributed across more than 40 data centers in 15 regions. This will ensure that XDC Network can handle high volumes of transactions and queries while maintaining low latency and availability. Moreover, Ankr’s RPC service will provide XDC Network with enhanced security features like encryption, authentication, and firewall protection. XDC Network is a hybrid blockchain platform that combines the best features of public and private blockchains. It is designed to facilitate trade finance and asset tokenization by enabling enterprises and governments to create smart contracts and issue digital assets on a secure and compliant platform. XDC Network supports interoperability with other blockchain networks, such as Corda and Hyperledger Fabric. The partnership between Ankr and XDC Network will benefit both parties and the broader blockchain community. Ankr will be able to expand its user base and network reach, while XDC Network will be able to improve its user experience and network performance. The partnership will also foster more innovation and collaboration in the blockchain space, especially in trade finance and asset tokenization. Ryan Fang, co-founder and COO of Ankr, said: “We are delighted to team up with XDC Network to launch our RPC integration. XDC Network is one of the industry’s most innovative and promising blockchain platforms, with a strong focus on trade finance and asset tokenization. We are confident our RPC service will enhance their network capabilities and support their growth ambitions.”
0 notes
Text
Security Considerations in Ethereum Node Deployment Services: Protecting Your Nodes and Data
Ethereum node deployment services offer a convenient way to set up and manage Ethereum nodes for various purposes, including running decentralized applications (DApps) and participating in the Ethereum network. While these services simplify the deployment process, it's crucial to prioritize security to safeguard your nodes and sensitive data. In this guide, we'll explore the key security considerations when using Ethereum node deployment services and provide tips to protect your nodes and data effectively.
Understanding the Risks
Before delving into security measures, it's essential to understand the potential risks associated with Ethereum node deployment services:
Data Privacy: Ethereum nodes may contain sensitive data, such as private keys or transaction details. Unauthorized access to this data can lead to security breaches or financial losses.
Service Reliability: Depending on a third-party service means relying on their infrastructure. Service outages or vulnerabilities could impact the availability of your Ethereum node.
Attack Surface: Running a publicly accessible Ethereum node can increase the risk of attacks, including Distributed Denial of Service (DDoS) attacks or targeted exploits against known vulnerabilities.
Security Best Practices
To mitigate these risks, consider the following security best practices when using Ethereum node deployment services:
1. Choose Reputable Services
Select well-established and reputable Ethereum node deployment services with a track record of security and reliability. Read reviews, check user testimonials, and research the service's history before entrusting them with your node deployment.
2. Data Encryption
Ensure that all data transmitted between your DApp and the Ethereum node is encrypted using secure protocols such as HTTPS. This prevents eavesdropping and data interception by malicious actors.

3. Access Controls
Implement strict access controls to limit who can interact with your Ethereum node. Use firewall rules and IP whitelists to allow only trusted entities to access your node's RPC (Remote Procedure Call) interface or other services.
4. Regular Updates
Stay up to date with the latest security updates and patches for both your Ethereum client software and the underlying server infrastructure. Vulnerabilities can emerge over time, and timely updates are essential to address them.
5. API Security
If your Ethereum node deployment service offers an API for interaction, secure it with API keys or tokens. Limit the permissions of these keys to prevent unauthorized access to sensitive functions or data.
6. Monitoring and Alerting
Implement comprehensive monitoring and alerting systems to track the health and performance of your Ethereum nodes. Set up alerts for unusual activity or resource consumption that may indicate a security breach.
7. Backup and Redundancy
Regularly back up critical data, including your Ethereum node's state and configuration. Implement redundancy by deploying backup nodes to ensure continuity in case of node failures.
8. Use Hardware Wallets
Consider using hardware wallets to store private keys for Ethereum accounts that interact with your node. Hardware wallets provide an additional layer of security by isolating the keys from potential online threats.
9. Test for Vulnerabilities
Perform regular security assessments, including penetration testing and vulnerability scanning, to identify and remediate potential weaknesses in your node deployment.
10. Stay Informed
Keep yourself informed about the latest security threats and best practices in the Ethereum and blockchain space. Subscribe to security newsletters and forums to stay updated on emerging risks.
Audit and Compliance
If your DApp handles user data or involves financial transactions, consider conducting a security audit by a reputable third-party firm. This audit can help identify vulnerabilities and ensure compliance with relevant regulations, providing assurance to both you and your users.
Conclusion
Security is paramount when using Ethereum node deployment services. By following these security considerations and best practices, you can protect your Ethereum nodes and sensitive data from potential threats. Remember that security is an ongoing process, and regular monitoring and updates are crucial to maintaining a strong defense against evolving threats in the Ethereum ecosystem.
1 note
·
View note
Text
Wie man Ninja Firewall WP Edition richtig einstellt

Im Bereich der Websicherheit ist die optimale Konfiguration und Einrichtung von Firewallsystemen entscheidend für den Schutz digitaler Daten. Dieser Artikel beschäftigt sich mit den Feinheiten der effektiven Einrichtung der Ninja Firewall WP Edition. Schritt für Schritt wird der Benutzer durch die Aktivierung der Web Application Firewall und die Aktivierung des Schutzes für die wp-login.php Datei geführt. Es werden auch Tipps zur Fehlerbehebung für mögliche Probleme gegeben, die während der Einrichtung auftreten können, um einen reibungslosen Implementierungsprozess zu gewährleisten. Darüber hinaus werden zusätzliche Funktionen und Möglichkeiten dieser Edition erkundet, wobei die Fähigkeit zur Erkennung und Verhinderung von Brute-Force-Angriffen, zur Überwachung von unbefugtem Zugriff oder Änderungen an PHP-Dateien und zur Bereitstellung von Ereignisbenachrichtigungen für kritische Sicherheitsupdates hervorgehoben wird. Die Anforderungen, der Installationsprozess, die FAQs, die Bewertungen und die Verfügbarkeit des Changelogs werden ebenfalls detailliert beschrieben. Dieser Artikel zielt darauf ab, den Lesern ein umfassendes Wissen über die Konfiguration verschiedener Aspekte zu vermitteln, wie z.B. das Anpassen von Sicherheitsregeln, die Konfiguration von Ereignisbenachrichtigungen, das Aktualisieren von NinjaFirewall (Pro Edition), Best Practices für die Nutzung der NinjaFirewall WP Edition unter Berücksichtigung aller Einschränkungen oder Alternativen, die mit der Verwendung der .htninja-Datei verbunden sind.
Aktivieren der vollständigen WAF
Um die volle Web Application Firewall (WAF) in Ninja Firewall zu aktivieren, sollten Benutzer die spezifische Aktivierungsmethode ihres Hosting Panels befolgen und sicherstellen, dass sie vorher ein Backup ihrer WordPress Seite machen. Benutzer mit einem benutzerdefinierten Kontrollpanel müssen die bereitgestellten Zeilen manuell in die .htaccess-Datei einfügen. Benutzer von C-Panel-Hosting hingegen sollten die Datei .user.ini im Home-Verzeichnis bearbeiten. Nach der Aktivierung der vollständigen WAF können die Benutzer die grundlegenden Firewall-Einstellungen vornehmen. Dazu gehört die Einrichtung des Login-Schutzes, indem Sie unter Firewall-Optionen auf die Registerkarte Login-Schutz gehen und den Schutz für wp-login.php aktivieren. Außerdem sollten Benutzer eine separate ID und ein Passwort für die Firewall-Seite festlegen und den Schutz für XML-RPC aktivieren. Ein weiterer wichtiger Aspekt ist die Konfiguration des XML-RPC-Schutzes, der sicherstellt, dass Brute-Force-Angriffe verhindert werden. Durch die Aktivierung des Brute-Force-Angriffsschutzes können Benutzer ihre Website vor mehreren fehlgeschlagenen Anmeldeversuchen schützen. Darüber hinaus ist es wichtig, die Firewall-Protokolle regelmäßig zu überwachen, da sie wertvolle Erkenntnisse über potenzielle Sicherheitsbedrohungen oder verdächtige Aktivitäten liefern.
Aktivieren des Wp-Login.Php-Schutzes
Um den Schutz für wp-login.php zu aktivieren, müssen Sie unter den Firewall-Optionen zur Registerkarte Login-Schutz navigieren. Auf dieser Registerkarte können Benutzer den Schutz für wp-login.php aktivieren und eine separate ID und ein Passwort für die Firewall-Seite festlegen. Es wird auch empfohlen, den Schutz für XML-RPC zu aktivieren. Um die Leistung der Firewall zu optimieren, ist es wichtig, die IP-Blockierung zu konfigurieren. Dies kann durch Hinzufügen bestimmter IP-Adressen oder IP-Bereiche zur Whitelist oder Blacklist in der .htninja-Datei erfolgen. Benutzer von NinjaFirewall (Pro+ Edition) haben Zugriff auf zusätzliche Funktionen wie z.B. die Verwaltung von IP Whitelists oder Blacklists über die Menüoption Zugriffskontrolle IP Zugriffskontrolle. Um Probleme mit dem Login-Schutz zu beheben, sollten Benutzer überprüfen, ob sie während der Aktivierung Fehler erhalten und gegebenenfalls die Seite aktualisieren. Wenn die Probleme weiterhin bestehen, wird empfohlen, den Hosting-Provider zu kontaktieren, um weitere Unterstützung zu erhalten. Das Umbenennen des Ninja Firewall Plugin-Ordners kann ebenfalls helfen, Probleme mit vergessenen Anmeldedaten zu lösen. Um die Effektivität von NinjaFirewall (WP Edition) zu maximieren, ist es wichtig, die Anpassung der Sicherheitsregeln zu verstehen. Benutzer können Servervariablen in der .htninja Datei ändern, spezifische Anfragen basierend auf variablen Bedingungen hinzufügen oder blockieren und spezielle Rückgabewerte wie ALLOW oder BLOCK für Whitelisting oder Blacklisting von IPs verwenden.

Fehlersuche bei der vollständigen WAF-Aktivierung
Wenn während des Aktivierungsprozesses der vollständigen Web Application Firewall (WAF) ein Fehler auftritt, ist es ratsam, die Seite zu aktualisieren und gegebenenfalls den Hosting-Provider um weitere Unterstützung zu bitten. Die Fehlersuche bei der Aktivierung der vollständigen WAF umfasst mehrere Schritte: - Überprüfen Sie, ob auf der Aktivierungsseite Fehlermeldungen oder Benachrichtigungen angezeigt werden. - Überprüfen Sie, ob alle erforderlichen Serveranforderungen erfüllt sind, z. B. die Kompatibilität der PHP-Version und der erforderlichen Erweiterungen. - Vergewissern Sie sich, dass es keine Konflikte mit anderen Plugins oder Themes gibt, die auf der WordPress-Website installiert sind. - Wenn das Problem weiterhin besteht, versuchen Sie, andere Sicherheits-Plugins vorübergehend zu deaktivieren, um etwaige Konflikte zu ermitteln. Wenn eine Fehlerbehebung des wp-login.php-Schutzes erforderlich ist, führen Sie die folgenden Schritte aus: - Überprüfen Sie, ob der wp-login.php-Schutz auf der Registerkarte Login-Schutz unter Firewall-Optionen aktiviert ist. - Überprüfen Sie, ob eine separate ID und ein Passwort für die Firewall-Seite festgelegt wurden. - Stellen Sie sicher, dass der Schutz für XML-RPC ebenfalls aktiviert ist. - Wenn beim Zugriff auf die WordPress-Anmeldeseite keine Anmeldedaten abgefragt werden, überprüfen Sie diese Einstellungen noch einmal. Zusätzlich zur Fehlerbehebung bei Problemen mit der Aktivierung und dem Login-Schutz sind die Konfiguration der grundlegenden Firewall-Einstellungen und die Aktivierung des Schutzes vor Brute-Force-Angriffen wichtige Schritte für eine effektive Einrichtung der Ninja Firewall WP Edition.
Fehlersuche beim Wp-Login.Php Schutz
Die Fehlerbehebung des wp-login.php Schutzes umfasst mehrere Schritte, um das ordnungsgemäße Funktionieren der Sicherheitsmaßnahmen zu gewährleisten. Zunächst ist es wichtig zu prüfen, ob der Schutz für wp-login.php aktiviert ist. Dazu können Sie unter den Firewall-Optionen auf die Registerkarte Login-Schutz zugreifen und überprüfen, ob der Schutz aktiviert ist. Als nächstes ist es wichtig, die eingestellte ID und das Passwort für die Firewall-Seite zu überprüfen. Damit wird sichergestellt, dass nur autorisierte Personen Zugriff auf die Verwaltung und Konfiguration der Firewall-Einstellungen haben. Darüber hinaus sollte der XML-RPC-Schutz aktiviert werden, um potenzielle Brute-Force-Angriffe über dieses Protokoll zu verhindern. Dies kann ebenfalls in den Firewall-Optionen vorgenommen werden. Darüber hinaus ist es wichtig zu bestätigen, dass beim Zugriff auf die WordPress-Anmeldeseite die Eingabe von Anmeldedaten erforderlich ist. Dadurch wird sichergestellt, dass unbefugte Benutzer keinen Zugang zu sensiblen Informationen erhalten oder bösartige Aktivitäten durchführen können. Um die Anmeldeinformationen wirksam zu schützen, ist die Verwaltung der Firewall-Protokolle von entscheidender Bedeutung. Durch regelmäßiges Überprüfen und Analysieren der Firewall-Protokolle können verdächtige Aktivitäten oder potenzielle Sicherheitsverletzungen erkannt und umgehend behoben werden. Schliesslich spielt die Optimierung der NinjaFirewall Leistung eine wichtige Rolle bei der Aufrechterhaltung eines effektiven Sicherheitssystems. Die regelmäßige Aktualisierung und Konfiguration der NinjaFirewall-Einstellungen gewährleistet eine optimale Leistung gegen potentielle Bedrohungen bei gleichzeitiger Minimierung falsch positiver und negativer Ergebnisse.
Zusätzliche Informationen
Der Schutz von xmlrpc.php ist entscheidend für die Sicherheit einer WordPress Webseite. Ein weit verbreiteter Irrglaube über xmlrpc.php ist die Annahme, dass es nicht wichtig ist, diese Datei zu schützen oder zu deaktivieren. Allerdings kann xmlrpc.php von Angreifern ausgenutzt werden, um Brute-Force-Angriffe und andere bösartige Aktivitäten durchzuführen. Die Vorteile einer Firewall wie Ninja Firewall liegen in der erhöhten Sicherheit und dem Schutz vor verschiedenen Arten von Angriffen wie SQL Injection, Cross-Site Scripting (XSS) und Remote Code Execution. Vergleicht man Ninja Firewall mit anderen Sicherheitsplugins, so bietet Ninja Firewall fortschrittliche Funktionen und eine leistungsstarke Filter-Engine, die von Hackern verwendete Umgehungstechniken erkennen kann. Um die Leistung der Firewall zu optimieren, wird empfohlen, den vollständigen Schutz der Web Application Firewall (WAF) zu aktivieren und den Schutz der wp-login.php in den Firewall-Optionen zu aktivieren. Zu den Tipps zur Fehlerbehebung bei der vollständigen WAF-Aktivierung gehören die Aktualisierung, wenn bei der Aktivierung Fehler auftreten, oder die Kontaktaufnahme mit dem Hosting-Provider zur Unterstützung. Für den wp-login.php Schutz kann das Umbenennen des Ninja Firewall Plugin Ordners helfen, Fehler bei fehlenden Dateien zu beheben. Um die Sicherheit einer Webseite zu gewährleisten, ist es wichtig, die verschiedenen Angriffsarten zu verstehen und zu wissen, wie Ninja Firewall vor ihnen schützen kann. Mit seiner Fähigkeit, Brute-Force-Versuche zu erkennen, den Zugriff auf PHP-Dateien zu überwachen und unbefugten Zugriff zu verhindern, bietet Ninja Firewall umfassenden Schutz für WordPress-Websites.
Beschreibung und Funktionen
Die Beschreibung und Funktionen von NinjaFirewall (WP Edition) umfassen eine eigenständige Firewall, die erweiterte Sicherheitsmaßnahmen bietet, die auf WordPress-Ebene normalerweise nicht verfügbar sind. Dieses Plugin benötigt PHP 7.1, MySQLi Erweiterung und ist kompatibel mit Unix-ähnlichen Betriebssystemen wie Linux und BSD. NinjaFirewall kann jede HTTP/HTTPS-Anfrage, die an ein PHP-Skript gesendet wird, abfangen, scannen, säubern oder zurückweisen, bevor sie WordPress erreicht. NinjaFirewall schützt alle Skripte innerhalb der Blog-Installationsverzeichnisse, einschließlich der Nicht-WordPress-Skripte. Eines der Hauptmerkmale von NinjaFirewall ist die leistungsstarke Filter-Engine, die Daten aus eingehenden HTTP-Anfragen normalisieren und transformieren kann. Es erkennt Techniken zur Umgehung der Web Application Firewall und Verschleierungstaktiken, die von Hackern verwendet werden. Das Plugin unterstützt und dekodiert auch eine große Anzahl von Kodierungen. NinjaFirewall bietet einen umfassenden Schutz gegen Brute-Force-Angriffe auf wp-admin, indem es verteilte Angriffe von tausenden von verschiedenen IPs erkennt und behandelt. NinjaFirewall kann auch unbefugten Zugriff auf PHP-Dateien verhindern, indem es Administratoren in Echtzeit über jeden Zugriff auf kürzlich geänderte oder erstellte PHP-Dateien informiert. In Bezug auf die Anmeldesicherheit ermöglicht NinjaFirewall die Konfiguration von Anmeldewarnungen für Ereignisse wie Administratoranmeldungen und Änderungen von Administratorkonten. Es bietet auch Schutz für Plugin- und Themen-Uploads und stellt sicher, dass nur autorisierte Dateien hochgeladen werden. Um die Leistung der Firewall zu optimieren, können Benutzer verschiedene Einstellungen im Optionsmenü des Plugins konfigurieren. Darüber hinaus können Probleme mit blockierten IPs durch die Überprüfung von Serverprotokollen oder die Unterstützung durch den Hosting-Provider behoben werden. Insgesamt ist NinjaFirewall (WP Edition) ein sehr leistungsfähiges Sicherheitsplugin für WordPress, das fortschrittliche Funktionen zum Schutz vor verschiedenen Bedrohungen bietet, mit denen Webseitenbetreiber konfrontiert werden.
Anforderungen und Installation
Die Installation des NinjaFirewall Plugins erfordert das Hochladen des ninjafirewall Ordners in das /wp-content/plugins/ Verzeichnis und die Aktivierung über das Plugins Menü in WordPress. Nach der Installation können Benutzer die Firewall-Einstellungen konfigurieren, IP-Whitelisting verwalten, Probleme bei der Aktivierung beheben, Sicherheitsregeln anpassen und NinjaFirewall aktualisieren. Um Firewall-Einstellungen zu konfigurieren: - Rufen Sie das NinjaFirewall Menü in WordPress auf. - Navigieren Sie zu der Seite Firewall-Richtlinien. - Passen Sie die Sicherheitsregeln an Ihre Bedürfnisse an. - Aktivieren oder deaktivieren Sie verschiedene Funktionen wie den Brute-Force-Schutz und die Beschränkung des Dateiuploads. So verwalten Sie die IP-Whitelist: - Gehen Sie zum Menüpunkt IP Zugriffskontrolle in NinjaFirewall (Pro+ Edition). - Setzen Sie bestimmte IP-Adressen oder Bereiche auf die Whitelist, indem Sie sie zur .htninja-Datei hinzufügen oder die Schnittstelle des Plugins nutzen. - Blacklisting von IPs, die für den Zugriff auf Ihre Website gesperrt werden sollen. Fehlerbehebung bei Aktivierungsproblemen: - Wenn bei der Aktivierung ein Fehler auftritt, aktualisieren Sie die Seite und versuchen Sie es erneut. - Wenden Sie sich bei Bedarf an Ihren Hosting-Provider, um weitere Unterstützung zu erhalten. - Benennen Sie den Ninja Firewall Plugin-Ordner um, wenn Sie die Anmeldedaten vergessen haben, und aktivieren Sie ihn nach der Umbenennung erneut. So passen Sie die Sicherheitsregeln an: - Navigieren Sie zur Seite Firewall Policies in NinjaFirewall. - Ändern Sie bestehende Regeln oder erstellen Sie eigene Regeln basierend auf spezifischen Anforderungen. - Überprüfen und aktualisieren Sie die Sicherheitsregeln regelmäßig, wenn neue Bedrohungen auftauchen. Um NinjaFirewall zu aktualisieren: - Prüfen Sie regelmäßig auf Updates im WordPress Dashboard im Bereich 'Plugins'. - Wenn ein Update verfügbar ist, klicken Sie auf 'Jetzt aktualisieren'. - Vergewissern Sie sich vor der Aktualisierung, dass das Plugin mit der aktuellen Version von WordPress kompatibel ist. - Testen Sie die Funktionalität der Website nach der Aktualisierung der Plugins
FAQ und Bewertungen
Die Sektion FAQ und Bewertungen bietet wertvolle Informationen über häufige Probleme bei der Fehlerbehebung, Erfahrungsberichte von Nutzern und häufig gestellte Fragen zu NinjaFirewall. Dieser Abschnitt zielt darauf ab, alle Bedenken oder Unsicherheiten zu beseitigen, die Nutzer bei der Verwendung des Plugins haben könnten. Benutzer können Antworten auf verschiedene Fragen über die Einzigartigkeit und Leistungsfähigkeit von NinjaFirewall, seine Kompatibilität mit Nginx und Windows, sowie seine Auswirkungen auf die Geschwindigkeit der Website finden. Diese FAQs helfen den Nutzern, ein besseres Verständnis für die Fähigkeiten des Plugins zu erlangen und fundierte Entscheidungen bezüglich seiner Implementierung zu treffen. Außerdem enthält der Abschnitt positive Bewertungen von Nutzern, die ihre Zufriedenheit mit NinjaFirewall zum Ausdruck bringen. Diese Erfahrungsberichte unterstreichen die Effektivität des Plugins beim Schutz von Webseiten vor Malware, Viren und unautorisiertem Zugriff. Durch die Darstellung realer Erfahrungen zufriedener Kunden tragen diese Bewertungen dazu bei, Vertrauen in die Zuverlässigkeit und Leistung von NinjaFirewall zu schaffen. Zusätzlich kann dieser Abschnitt Vergleiche mit anderen auf dem Markt erhältlichen Sicherheitsplugins enthalten. Solche Vergleiche können Nutzern helfen, die Funktionen von NinjaFirewall im Vergleich zu alternativen Lösungen zu bewerten, so dass sie eine fundierte Entscheidung basierend auf ihren spezifischen Anforderungen treffen können.

Changelog und Meta
Im Changelog und Meta Abschnitt finden Benutzer detaillierte Informationen über Updates, Fehlerbehebungen und Kompatibilität der verschiedenen Versionen des NinjaFirewall Plugins. Dieser Abschnitt bietet wertvolle Einblicke in die Entwicklung des Plugins und ermöglicht es Benutzern, über alle Änderungen informiert zu bleiben, die ihre Sicherheitseinrichtung betreffen könnten. Einige wichtige Aspekte, die in diesem Abschnitt behandelt werden, sind: - Anpassen der Sicherheitsregeln: Der Abschnitt Changelog und Meta bietet Informationen darüber, wie Benutzer die Sicherheitsregeln innerhalb des Plugins anpassen können. Dies ermöglicht es ihnen, die Firewall-Einstellungen an ihre spezifischen Bedürfnisse und Vorlieben anzupassen. - Aktivieren des Schutzes vor Brute-Force-Angriffen: Benutzer können lernen, wie man den Schutz vor Brute-Force-Angriffen durch das NinjaFirewall-Plugin aktiviert. Diese Funktion schützt vor böswilligen Anmeldeversuchen, indem der Zugriff nach mehreren fehlgeschlagenen Anmeldeversuchen beschränkt wird. - Einrichten des Anmeldeschutzes: Der Abschnitt Changelog und Meta bietet eine Anleitung zum Einrichten des Login-Schutzes für wp-login.php, einem wichtigen Schritt zur Sicherung von WordPress-Websites. Benutzer können diese Anweisungen befolgen, um den Schutz ihrer Website vor unbefugtem Zugriff zu verbessern. - IP Whitelisting und Blacklisting verwalten: Das NinjaFirewall Plugin ermöglicht es Benutzern, IP Whitelisting und Blacklisting effektiv zu verwalten. Durch die Konfiguration dieser Einstellungen können Benutzer den Zugriff auf bestimmte IP-Adressen oder Bereiche kontrollieren und so die Sicherheitsmaßnahmen erhöhen. - Konfigurieren von Ereignisbenachrichtigungen: Benutzer haben die Möglichkeit, Ereignisbenachrichtigungen innerhalb von NinjaFirewall zu konfigurieren. Diese Funktion benachrichtigt Administratoren über wichtige Ereignisse wie z.B. Administratoranmeldungen, Änderungen von Konten, Plugin/Theme Uploads, WordPress Updates und anstehende Sicherheitsupdates für Plugins/Themes. Wenn diese Benachrichtigungen aktiviert sind, können Administratoren potenzielle Sicherheitsprobleme sofort angehen. Read the full article
0 notes
Link
0 notes
Text
Essential WordPress Security Tips to Protect Your Website
[et_pb_section fb_built=”1″ _builder_version=”4.27.4″ _module_preset=”default” global_colors_info=”{}”][et_pb_row _builder_version=”4.27.4″ _module_preset=”default” global_colors_info=”{}”][et_pb_column type=”4_4″ _builder_version=”4.27.4″ _module_preset=”default” global_colors_info=”{}”][et_pb_text _builder_version=”4.27.4″ _module_preset=”default” hover_enabled=”0″ global_colors_info=”{}”…
#brute force attack prevention#disable xml-rpc#firewall for wordpress#limit login attempts#malware protection#protect wordpress website#secure wordpress hosting#secure wp-config file#SSL encryption#two-factor authentication#wordpress backup plugins#wordpress security#wordpress security best practices#wordpress security plugins#wordpress security tips
0 notes
Text
PORTFOLIO IN EMPOWERMENT TECHNOLOGY
CHAPTER 1 LESSON 1: INFORMATION AND COMMUNICATIONS TECHNOLOGY - Is a branch of engineering that involves the conception, design, manufacture, and operation of robots. This field overlaps with electronics, computer science, artificial intelligence, mehcatronics, nanotechonology and bioengineering. CONTENT STANDARD
- The learners demonstrate an understanding of ICT in the context of global communication for specific professional track.
Performance Standards
- The learners shall be able to: at the end of the 2-week period independently compose an insightful reflection paper on the nature of ICT in the context of their lives, society, and professional tracks (Arts, Tech Vocational, Sports and Academic)
Most essential learning competencies
The learners should be able to:
1. Compare and contrast the nuances of varied online platforms, sites, and content to best achieve specific class objectives or address situational challenges.
2. Apply online safety, security, ethics, and etiquette standards and practice in the use of ICTs as it would relate to their professional tracks. 3. Use the internet as a tool for credible research and information gathering to best achieve specific class objectives or address situational.

1.1 INFORMATION AND COMMUNICATION TECHNOLOGY

- ICT is the technology required for information processing, in particular, the use of the electronic computers, communication devices and software applications to convert, store, protect, process, transmit and retrieve information from anywhere, anytime.
- Information refers to the knowledge obtained from reading, investigation, study or research. The tools to transmit information are the telephone, television and radio. Information is knowledge and helps us to fulfill our daily tasks. - Communication is an act of transmitting messages. It is a process whereby information was exchanged between individuals using symbols, signs or verbal interactions. Communication is important in order to gain knowledge. Technology is the use of scientific knowledge, experience and resources to create processes products that fulfill human needs. Technology is vital in communication.
- ICT nowadays has also widened the horizon in developing new tools or emerging technologies. Mobile devices can communicate through wireless fidelity (Wifi), Bluetooth, third generation 3g & 4g, data services and dial up services and virtual private networks. EMERGING TECHNOLOGIES

- Artificial Intelligence (AI) - is the ability of a digital computer or computer controlled robot to perform tasks commonly associated with intelligent beings. The term is frequently applied to the project of developing systems endowed with the intellectual processes characteristics of humans, such as the ability to reason, discover meaning, generalize or learn from past experience. ROBOTICS

- Is a branch of engineering that involves the conception, design, manufacture, and operation of robots. This field overlaps with electronics, computer science, artificial intelligence, mehcatronics, nanotechonology and bioengineering. BIOMETRICS

- Are a way to measure a person’s physical characteristics to verify their identity. These can include physiological traits, such as fingerprints and eyes, or behavioral characteristics, such as the unique way you’d complete a security-authentication puzzle. QUANTUM CRYPTOGRAPHY

- Also called quantum encryption, applies principles of quantum mechanics to encrypt messages in a way that it is never read by anyone outside of the intended recipient. COMPUTER ASSISTED TRANSLATION

- Involves the use of software programs to translate both verbal and written texts. Also known as machine-assisted or machine aided translation. 3D IMAGING AND HOLOGRAPHY

- Is defined as a 3D projection that exists freely in space and is visible to everyone without the need for 3D glasses. VIRTUAL REALITY

- Refers to the computer generated simulation in which a person can interact within an artificial 3D environment using special electronic devices that can be similar to or completely different from the real world. ONLINE SAFETY

- Is the knowledge of maximizing the user’s personal safety and security and risk to private information, and self-protection from computer crime in general. 1. Know the scams - Learn about different kinds of scams and what you can do to avoid them.

2. Think before you click - Think twice, thrice and zillion time before click any link or buttons.

3. Safety Peruse - These sites may have an Address that’s very similar to a legitimate site, but the page can have misspelling, Bad Grammar, or low resolution Images.

4. Shop Safety - Don’t shop on a site unless it has “https” and a padlock icon on the left or right in the URL.

5. Kick-butt passwords - Use an Extremely uncrackable password One like “9&4thkel965#”.
6. Protect your info’s - Keep your guard up, Back up all your data on your computer, smartphone and tablet, theft or a cash.

7. Watch your Wi-Fi Connectivity - Protect your network by changing your router’s setting and making sure that you have the connection password protected.

8. Install a Firewall - A firewall is a grate line of defense against cyber attracts.
9. Keep up to date - The best security updates automatically to protect your computer. - Use the manufacturer’s latest security patches to make regular updates and make that you have the software set to do routine scam.

10. Use your Noggin - Use your common sense while surfing the web.

COMMON ISSUES AND CRIMES IN THE INTERNET - CYBERBULLYING - HACKING - IDENTITY THEFT - PLAGIARISM - COPYRIGHT ISSUES CYBERBULLYING - Is a form of bullying or harassment using electronic means. Cyberbullying and Cyber Harassment are also known as online bullying. - Cyberbullying is when someone, typically teens, bully or harass others on the internet, particularly on social media sites. Harmful bullying behavior can include posting rumors, threats, sexual remarks, a victims’ personal information, or pejorative labels. THE ANTI-BULLYING ACT OF 2013 ( RA 10627 )
(Sec. 2, RA 10627) These acts are collectively “called cyber bullying” when committed online. (Sec. 2-D, RA 10627) This covers social bullying aiming to belittle another individual or group or gender-based bullying that humiliates another on the basis of perceived or actual sexual orientation and gender identity. (Sec. 3, B-1 RA 10627. Implementing Rules). THE REVISED PENAL CODE AND THE CYBERCRIME PREVENTION ACT. - One who publicly or maliciously imputes to another a crime, vice, defect, real or imaginary, or any act, omission, condition, status or circumstance tending to cause the dishonor, discredit or contempt of a natural or juridical person, or blacken the memory of one who is dead may be liable for libel under this Code. (Art, 353, RPC) These acts are more severely punished when done online in addition to the civil action for damages which may be brought by the offended party. (Sec. 4(c-4), RA 10175) Cyberlibel holds liable only the original author of the post (Sec. 5(3), Implementing Rules of RA 10175) Likers or shares of a post cannot be held liable under this law. - Slander may also be applicable to one who, in heat of anger, utters statements that are highly defamatory in character. (Art 358, RPC) Intriguing Against Honour may also find applicability when the principal purpose is to blemish the honour or reputation of a person. Hence, a blind ite is not as actionable as a named-post in social media. HACKING

- Hacking generally refers to unauthorized intrusion into a computer or a network. The person engaged in hacking activities is known as a hacker. This hacker may alter system or security features to accomplish a goal that differs from the original purpose of the system. - Hacking can also refer to non-malicious activities, usually involving unusual or improvised alterations to equipment or processes.
IDENTITY THEFT

- Also known as identity fraud, is a crime in which an imposter obtains key pieces of personally identifiable information, such as Social Security or driver's license numbers, in order to impersonate someone else. TYPES AND EXAMPLES OF IDENTITY THEFT 1. True-name identity theft means the thief uses personal information to open new accounts. The thief might open a new credit card account, establish cellular phone service or open a new checking account in order to obtain blank checks. 2. Account-takeover identity theft means the imposter uses personal information to gain access to the person's existing accounts. PLAGIARISM

- Is an act of fraud. It involves both stealing someone else's work and lying about it afterward. The following are considered plagiarism - turning in someone else's work as your own - copying words or ideas from someone else without giving credit - failing to put a quotation in quotation marks - giving incorrect information about the source of a quotation - changing words but copying the sentence structure of a source without giving credit - copying so many words or ideas from a source that it makes up the majority of your work, whether you give credit or not (see our section on "fair use" rules) Republic Act No. 8293 [An Act Prescribing the Intellectual Property Code and Establishing the Intellectual Property Office, Providing for Its Powers and Functions, and for Other Purposes]otherwise known as the Intellectual Property Code of the Philippines. Intellectual property rights under the I. P. Code: The intellectual property rights under the Intellectual Property Code are as follows: 1. Copyright and related rights; 2. Trademarks and service marks; 3. Geographic indications; 4. Industrial designs; 5. Patents; 6. Layout designs [topographies] of integrated circuits; and 7. Protection of undisclosed information. The scheme of penalties for infringement has also been changed. From the previous fine of Php200 to Php2,000 and/or imprisonment of 1 year, the current range of penalties are as follows: - For first offenders - fine of PhP50,000 to PhP150,000 and/or imprisonment of 1 to 3 years - For second offenders - fine of PhP150,000 to PhP500,000 and/or imprisonment of 3 to 6 years - For third and subsequent offenders - fine of PhP500,000 to PhP1.5 Million and/or imprisonment of 6 to 9 years. - In case of insolvency, the offender shall furthermore suffer subsidiary imprisonment. NETIQUETTE - Is a combination of the word net and etiquette.It focuses on the acceptable behavior of a person while using the internet resource. - It focuses on the acceptable behavior of a person while using the internet resource. The Core Rules of Netiquette Rule 1. Remember the human. - Never forget that the person reading your mail or posting is, indeed, a person, with feelings that can be hurt. - Corollary 1 to Rule #1: It's not nice to hurt other people's feelings. - Corollary 2: Never mail or post anything you wouldn't say to your reader's face. - Corollary 3: Notify your readers when flaming. Rule 2. Adhere to the same standards of behavior online that you follow in real life. Corollary 1: Be Ethical Corollary Corollary 2: Breaking the law is bad Netiquette. Rule 3. Know where you are in cyberspace. Corollary 1: Netiquette varies from domain to domain. Corollary 2: Lurk before you leap. Rule 4. Respect other people's time and bandwidth. Corollary 1: It's OK to think that what you're doing at the moment is the most important thing in the universe, but don't expect anyone else to agree with you Corollary 2: Post messages to the appropriate discussion group.Corollary 3: Try not to ask stupid questions on discussion groups Corollary 4: Read the FAQ (Frequently Asked Questions) document Corollary 5: When appropriate, use private email instead of posting to the group Corollary 6: Don't post subscribe, unsubscribe, or FAQ requests Corollary 7: Don't waste expert readers' time by posting basic information Corollary 8: If you disagree with the premise of a discussion group, don't waste the time and bandwidth of the members by telling them how stupid they are.Just stay away Corollary 9: Conserve bandwidth when you retrieve information from a host or server. Rule 5. Make yourself look good online. Corollary 1: Check grammar and spelling before you post Corollary 2: Know what you're talking about and make sense Corollary 3: Don't post flame-bait Rule 6. Share expert knowledge. Corollary 1: Offer answers and help to people who ask questions on discussion groups Corollary 2: If you've received email answers to a posted question, summarize them and post the summary to the discussion group. Rule 7. Help keep flame wars under control. Corollary 1: Don't respond to flame-bait Corollary 2: Don't post spelling or grammar flames Corollary 3: If you've posted flame-bait or perpetuated a flame war, apologize Rule 8. Respect other people's privacy. - Don't read other people's private email. Rule 9. Don't abuse your power. - The more power you have, the more important it is that you use it well Rule 10. Be forgiving of other people's mistakes. CONTEXTUALIZED ONLINE SEARCH AND RESEARCH SKILLS

- Online search is the process of interactively searching for and retrieving requested information via a computer from databases that are online. Interactive searches became possible in the 1980s with the advent of faster databases and smart terminals. Advantages and Disadvantages Advantages: - Ability to obtain a large sample, which increases statistical power - Data is automatically coded so no data entry errors - Reduced cost of conducting research Disadvantages: Online is not totally secure and theft is one of the numerous danger it poses, researchers personal information is at risk of being access by rogue persons. - Some of the materials on the internet have not been evaluated by experts or thoroughly screened - Lack of accreditation and low quality
RESEARCH SKILLS “Research” sometimes just means finding out information about a topic.You can certainly develop advanced information retrieval skills in Working with Sources. However, in specific understandings of “research” carry a lot of weight. The classic definition is that “research” leads to an original contribution to knowledge in a particular field of inquiry by defining an important question or problem and then answering or solving it in a systematic way. - So you will need to read on to develop a relevant understanding of what research means in your subject. - Research skills can be anything from looking at competitors and seeing what they do well to producing a written report on how your department could work better. Doing research in the world of work is all about stepping back from your day-to-day work and looking at ways you can improve. Important aspects of research: - Research design covers the key issues in developing a successful research project. - Research methods takes you to resources on essential techniques for carrying out convincing research. - Working with data will provide resources on the use of statistics and other numerical skills in research. Improving Your Research Skills Online 1. Know your sources. Make sure to find the most reliable information which can be found in multiple sources or, better, to have the original source. 2. Use your web browser properly. Know the capabilities of your preferred browser to help make your search faster and easier. 3. Organize your bookmarks. It is to organize the links you have marked. 4. Learn to use advanced search engines. Practice using advanced search techniques which are available in Google. 5. Follow the web. Follow the web information in the web. Just make sure to read and be critical in every link you click. SIX STRATEGIES THAT CAN HELP ONLINE STUDENTS PRODUCE STRONGER RESEARCH. 1. Contact a librarian before getting stuck sifting through piles of online information. 2. Consider that when in doubt, it's wiser to over-cite sources than risk plagiarism. 3. Use Google and other reliable resources at the beginning of a research process, not the end. 4. Don't think that the Web is your only source of information. 5. Understand the professor's expectations for citation format. 6. Understand why professors still assign research projects. Some examples of research skills that you may have include: 1. Report writing. 2. Analyzing lots of information from different sources. 3. Finding information off the internet. 4. Critical thinking. CHAPTER 2 APPLIED PRODUCTIVITY TOOLS Productivity Tools - It is a tools that can be a freeware or shareware. Freeware - is copyrighted, which can be used for free and for an unlimited time. Shareware - is a commercial software that is copyrighted, which can be copied for trial but needs to be purchased for continued use. Advanced Techniques Using Microsoft Word Microsoft Office Word

- One of the software of Microsoft Office 2013 suite. - Offers a set of tools that is compared to its previous versions. - Along with its new features are advanced techniques including hyperlinks, macros and mail merge. Hyperlink
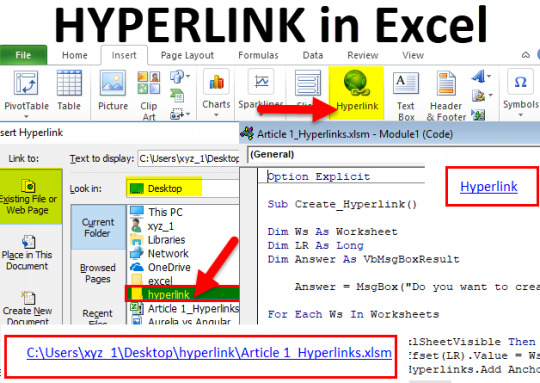
- A link that will direct you to another page or part of the same document. Creating a Hyperlink to an Existing Document - Suppose you are to link a part of your document to an existing document. - Click your mouse on the location in the document where you want to insert the hyperlink. - On the Insert Tab, click the Hyperlink button on the Links group. - On the Insert Hyperlink dialog box, click Existing File or Web Page and then select the File name where the source file is located and then hyperlink will be created on your document. - Press Ctrl+ click on the Hyperlink to open the linked file. Mail Merge
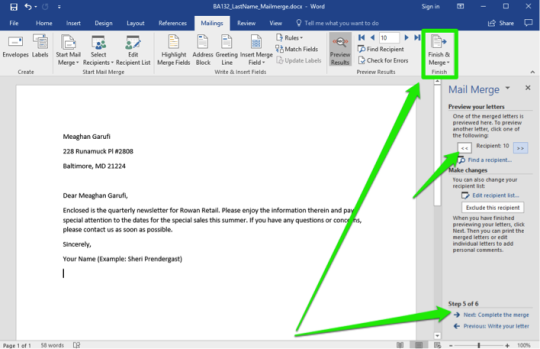
- Is a useful tool that allows you to quickly produce and send information, newsletter, resumes, or brochures to many people. Creating a Mail Merge 1. Open the word document that you want to Mail Merge. 2. On the Ribbon, click the Mailings tab, go to the Start Mail Merge group and click Start Mail Merge and select Step by Step Mail Merge Wizard. 3. The task pane will show the Mail Merge steps 1 to 6. PowerPoint

- It allows you to create slide show presentations wherein you can format the texts and images, adding also animations and other multimedia components interactively. Excel

- One of the applications created by Microsoft, used to simulate a paper worksheet.
- It is composed of cells that are represented in rows and columns design to perform basic arithmetic operations. - Widely used in accounting and financial applications, as well as statistics and engineering calculations. The following are the common Excel Functions: = SUM – Calculates the sum of the values of a range of cells = AVERAGE – Calculates the arithmetic mean of a range of cells = MAX - Gives the maximum value in a range of cells = MIN - Gives the minimum value in a range of cells = COUNT - Counts the number of cells in a range of cells BENIFITS OF ONLINE SOFTWARE Convenience - The applications should be intuitive and easy to use to ensure everyone can use them without spending a lot of time learning how. Scalability - The applications should be able to be used in all areas of your business and also work effectively no matter how much demand there is to use them or how much your business grows. Safety - All the applications should be safe to use with all existing systems and should have the ability to fully integrate with all other software and not inhibit the workers ability to do their job. Sustainability - All consumer-based software should be flexible and adaptable to have the ability to last for up to 10 years, but they must be able to expand functionally with other developments in software and operating systems. PRINCIPLES OF GRAPHICS AND DESIGN BALANCE UNITY MOVEMENT REPITITION PROXIMITY CONTRAST WHITESPACE BALANCE

- Describes the placement of elements of equal weight on the page. MOVEMENT

- Describes the flow of elements on the page.
1 note
·
View note
Note
funniest thing that’s happened to you in the RPC?
munday story time
it was weird at the time but the source of my “don’t tell me to answer asks or threads within a certain time frame” rule comes from when a blog followed me and their rules said “if you don’t answer the asks i send you within 4 hours of my sending them i’ll unfollow you” and “i’ll unfollow if it takes you more than two days to answer our thread” with the justification that they’d had too many people drop threads on them without warning and they wanted to avoid that happening. looking back on it now i find it so fucking funny that someone has rules like that-- they even had actual writing partners, people who actually tried following these rules. i didn’t follow them back because of those rules but i get a kick out of imagining my little high school self trying to hack through the social media firewall that was on the wifi so i could answer this entitled person’s asks within the four hour deadline if i had followed them back.
you also asked:
What is the strangest thing that has ever happened to you involving rp?
nothing really strange has ever happened? d’ablo is an unknown character and this blog doesn’t get a lot of attention, so i don’t get any weird anons or strange partners or encounter weird people like more popular bloggers do. i’ve had some strange plots but they weren’t even that strange so much as they went in unexpected directions.
Is there a fandom you really loved but no longer rp in? If so, why?
nope. i’ve only ever rped in the co/vt fandom and i think i’ll keep it like that. i’m slightly intimidated by larger fandoms but i also tend not to get into larger fandoms-- i’m not a big fan of marvel, and while i do have a har/ry po/t/ter verse i don’t want to write an oc or a canon muse in that fandom. so generally, i only stay within small fandoms, and i’ve only rped in the co/vt fandom, and i’ve always felt really welcome here.
Have you ever been jealous of people shipping with someone YOU wanted to ship with?
nah. people can ship with whoever they want, and they don’t have to ship with me. who has the energy to be jealous over something like tumblr rp?
Best thing that’s happened to you involving rp?
my friends!!!! i’m so so happy to have met so many wonderful people through rp and to be able to share our characters with each other and to be met with enthusiasm!!!!
2 notes
·
View notes
Text
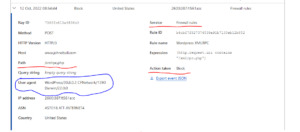
[Media] RPC Firewall
RPC Firewall Check out our RPC Firewall blog post or our BlackHat talk to gain better understanding of RPC, RPC attacks and the solution: the RPC Firewall. RPC is the underlying mechanism which is used for numerous lateral movement techniques, reconnaissance, relay attacks, or simply to exploit vulnerable RPC services. DCSync attack? over RPC. Remote DCOM? over RPC. WMIC? over RPC. SharpHound? over RPC. PetitPotam? over RPC. PsExec? over RPC. ZeroLogon? over RPC... well, you get the idea :) https://github.com/zeronetworks/rpcfirewall

1 note
·
View note
Text
The Network File System (NFS) is a well-proven, widely-supported and standardized network protocol used to share files between separate computer systems. The Network Information Service (NIS) is commonly used to provide centralized user management in the network. When NFS is combined with NIS, you’re able to have file and directory permissions for access control in the network. The default configuration of NFS is to completely trust the network and any machine connected to a trusted network is able to access any files that the server makes available. In Proxmox Virtualization Environment you can use local directories or locally mounted shares for storage. A directory is a file level storage that can be used to store content type like containers, virtual disk images, ISO images, templates, or backup files. In this post we discuss how you can configure NFS share on Proxmox VE for ISO images. The same process applies for any other storage purpose like storage of virtual disk images and templates. In Proxmox VE, storage configurations are located in the file /etc/pve/storage.cfg. You can list contents in /var/lib/vz/ directory: $ ls /var/lib/vz/ dump images template Within templates directory we can see iso and cache sub-directories. $ ls /var/lib/vz/template/ cache iso The table below shows a predefined directory layout to store different content types into different sub-directories Content type Subdir VM images images// ISO images template/iso/ Container templates template/cache/ Backup files dump/ Snippets snippets/ Configure NFS server Share Login to the server that will act as NFS server and configure export for ISO contents. If you’re using a ready solution with NFS feature, you can skip this steps. Install NFS server package on your Linux system. ### RHEL Based systems ### sudo yum -y install nfs-utils sudo systemctl enable --now rpcbind nfs-server sudo firewall-cmd --add-service=nfs --permanent sudo firewall-cmd --reload #If use NFSv3 allow the following sudo firewall-cmd --add-service=nfs3,mountd,rpc-bind --permanent sudo firewall-cmd --reload ### Debian Based systems ### sudo apt -y install nfs-kernel-server Let’s now configure NFS export by editing the file below $ sudo vim /etc/exports /nfs/isos *(rw,no_root_squash,no_subtree_check) In the example we’re setting /nfs/isos as NFS share for ISO images on Proxmox VE. Confirm it works after the changes by re-exporting shares: $ sudo exportfs -rrv exporting *:/nfs/isos Mount NFS ISO share on Proxmox VE server Install NFS utility packages in your Debian / Ubuntu system. sudo apt -y install nfs-common Our NFS server setup is: NFS Server IP address: 172.20.30.3 ISO Export path on NFS Server: /nfs/isos Ensure you don’t have any data inside isos directory: ls /var/lib/vz/template/iso/ On Proxmox VE, which acts as NFS client, execute the following to display RPC information of the remote NFS server. $ rpcinfo -p 172.20.30.3 program vers proto port service 100000 4 tcp 111 portmapper 100000 3 tcp 111 portmapper 100000 2 tcp 111 portmapper 100000 4 udp 111 portmapper 100000 3 udp 111 portmapper 100000 2 udp 111 portmapper 100005 1 udp 20048 mountd 100005 1 tcp 20048 mountd 100005 2 udp 20048 mountd 100005 2 tcp 20048 mountd 100024 1 udp 46068 status 100024 1 tcp 43599 status 100005 3 udp 20048 mountd 100005 3 tcp 20048 mountd 100003 3 tcp 2049 nfs 100003 4 tcp 2049 nfs 100227 3 tcp 2049 100003 3 udp 2049 nfs 100227 3 udp 2049 100021 1 udp 44453 nlockmgr 100021 3 udp 44453 nlockmgr 100021 4 udp 44453 nlockmgr 100021 1 tcp 35393 nlockmgr 100021 3 tcp 35393 nlockmgr 100021 4 tcp 35393 nlockmgr
Run the showmount to display all active folder exports in an NFS server: $ showmount -e 172.20.30.3 Export list for 172.20.30.3: /nfs/isos * Option 1: Configure mount using Proxmox pvesm (Recommended) pvesm is a powerful Proxmox VE Storage Manager command line tool. Use the tool to scan for NFS shares in the server we just configured. $ sudo pvesm scan nfs 172.20.30.3 /nfs/isos * We’re going to run commands shared below to configure NFS Storage for ISO images on our Proxmox environment. sudo pvesm add nfs NFS-iso --server 172.20.30.3 --path /var/lib/vz/template/iso/ --export /nfs/isos --content iso Where: 172.20.30.3 is the IP address of NFS server /nfs/isos is the path to the iso folder on NFS server (NFS export path) /var/lib/vz/template/iso/ path on Proxmox server where NFS share is mounted Listing contents of /etc/pve/storage.cfg after command execution. $ cat /etc/pve/storage.cfg dir: local path /var/lib/vz content iso,vztmpl,backup lvmthin: local-lvm thinpool data vgname pve content rootdir,images nfs: NFS-iso export /nfs/isos path /var/lib/vz/template/iso/ server 172.20.30.3 content iso We can confirm new lines were added to the file. With the df command you can check if mounting was successful. $ df -hT /var/lib/vz/template/iso Filesystem Type Size Used Avail Use% Mounted on 172.20.30.3:/nfs/isos nfs4 400G 39G 341G 11% /var/lib/vz/template/iso Option 2: Configure mount using /etc/fstab You can also use mount command for runtime testing if Proxmox server can access NFS server and exported directory. sudo mount -t nfs 172.20.30.3:/nfs/isos /var/lib/vz/template/iso/ To persist the configurations use /etc/fstab file. $ sudo vim /etc/fstab # Add NFS ISO share mount 172.20.30.3:/nfs/isos /var/lib/vz/template/iso nfs defaults 0 0 Unmount before testing: sudo umount /var/lib/vz/template/iso Validate mounting can be done successfully sudo mount /var/lib/vz/template/iso Check with the df command: $ df -hT /var/lib/vz/template/iso/ Filesystem Type Size Used Avail Use% Mounted on 172.20.30.3:/nfs/isos nfs4 400G 20G 360G 6% /var/lib/vz/template/iso Login to Proxmox Web dashboard and check the status of your mount We can see a list of images available on NFS share. From here VM installation with the ISOs can begin.
0 notes
Text
Doubletake move

#Doubletake move install#
#Doubletake move verification#
#Doubletake move software#
Click on the Manage License button located on the top menu bar followed by the "+" button to add a new license as shown below. A sample screenshot is shown below:Īt this point, servers will be discovered and displayed on the Manage Servers screen with an "Idle" state as depicted below: In the Add Servers wizard, enter the corresponding information for both, source and target servers and click OK. From the Double-Take console, Click the Add Servers button as highlighted below.
#Doubletake move software#
Once the Double-Take software has been installed, launch the Double-Take Console. See the User's guide for additional requirements. This requires WMI (which uses RPC) to be open as well as SMB (server message block) which uses 135-139 and port 445. NOTE: It is possible to push-install the server components from the console instead of manually performing all of the steps described in #4 above. Click Next on the Security Groups Information.For this demonstration, defaults will work. Select Server Components Only and click Next.Launch the Double-Take installation wizard and perform the following steps:
#Doubletake move install#
Click the Install button the begin the software installation.Ĭopy the Double-Take installation package to both, source and target servers.
Leave the defaults for the Firewall configuration and click Next.
Select Client Components Only (aka Console) and click Next.
Read the License Activation information and click Next.
Accept the License Agreement and click Next.
Click Yes, check for an updated version (Recommended).
Select Double-Take Availability (due to the trial license).
Install the Double-Take Console on your Management Server. Make a note of your ProfitBricks server IP addresses. One will be used for the console and the second machine as the target. There are also two freshly installed Windows Server 2012R2 machines (ProfitBricks image). In this scenario, a SOPHOS UTM is being used to provide site-to-site connectivity to a third-party site.
Internet access for license activation.īelow is a snapshot of the ProfitBricks environment.
Network connectivity among the three machines mentioned above.
A Third-Machine running Windows in order run the Double-Take Console (Command and Control).
Identical number of drives with sufficient space.
CPUs and RAM can be adjusted to meet your needs.
Intel to AMD (or vice versa) is supported.
A Target machine running at ProfitBricks matching the base Operating System of the Source.
#Doubletake move verification#
Optional - A running application for verification purposes after the migration.
A Source machine running Windows Server 2003SP2 - 2012 R2.
The main difference is that Double-Take Move is meant for server migrations (only source server is licensed) versus Double-Take Availability which is meant for Disaster Recovery (source and target need to be licensed). For the purposes of this demonstration, a Double-Take Availability trial license will be used as both products have the same underlying engine.
Double-Take Move software and license.
0 notes
Text
Experimenting with Cloudflare XML-RPC protections
Experimenting with Cloudflare XML-RPC protections
Looking for a way to further protect XML-RPC without letting it flap in the wind or fully disabling it. Up to now, everything that I’ve found online has been “suck it up” or “completely block it”. Got into Cloudflare this morning and fully blocked XML-RPC then tried to access my site using the WordPress app. Snagged some helpful data in the Cloudflare firewall logs then created a quick and dirty…
View On WordPress
0 notes
Text
Ejabberd change admin password

#Ejabberd change admin password how to
#Ejabberd change admin password Patch
#Ejabberd change admin password windows 10
#Ejabberd change admin password software
#Ejabberd change admin password password
#Ejabberd change admin password windows 10
(Exception from HRESULT: 0x800706BA)It's typically installed in your cluster in the namespace gke-connect It also generates for a logon attempt after which the account was locked out Veeam Rpc Connection Failed Windows 10 Error: Failed to connect to guest agent Upon opening Veeam Agent, you can perceive the user-friendly interface Upon opening Veeam Agent, you can perceive the. (Exception from HRESULT: 0x800706BA) Error: The RPC server is unavailable. Veeam Guest Agent is not started Failed to inventory guest system: Veeam Guest Agent is not started Failed to prepare guest for hot backup. If you received the errors when remotely force a gpupdate, you should check and open up below items on the firewall: Remote Scheduled Tasks Management (RPC) Remote Scheduled Tasks Management (RPC-EPMAP) Windows Management Instrumentation (WMI-In) Best Regards, Alvin Wang Error: Access is denied has permitted a connection Disable your firewall.
#Ejabberd change admin password password
UTF8): Check the version of the EntireX Broker and the RPC server in use Solution: Check if the login name and password are entered correctly Scanning of the Windows workstation failed due to one of the following reasons: The login name and password provided for scanning is invalid in the workstation In my case the destination server had the.
Veeam Rpc Connection Failed Windows 10 0 harddrive As you are getting a RPC error, I'm not sure that SNAPI is the answer to your problem Windows Event Log Analysis Splunk App Build a great reporting interface using Splunk, one of the leaders in the Security Information and Event Management (SIEM) field, linking the collected Windows events to.
Possible Cause - The following could be one of the causes: TCP/IP port and/or Hostname may be wrong Since Veeam Backup and Replication 9 Error: Failed to connect to guest agent Some errors are historic and have the most common root cause If a login fails, or they weren't set, a connection as the 'GUEST' account with a blank password is.
Otherwise use these commands: sudo ejabberdctl start. ejabberd 16.02.26 is running in that node. If ejabberd is running than a message will display like: The node is started with status: started. You can check the ejabberd running status by following command: sudo ejabberdctl status.
#Ejabberd change admin password software
Disconnect and reconnect any jabber clients to see it in effect.X2 In Veeam software at section backup infrastructure i rescanned all servers and i also set my credentials again Failed to upload disk Possible Cause - The following could be one of the causes: TCP/IP port and/or Hostname may be wrong "Error: Failed to call RPC function 'StartAgent': Timed out requesting agent port for client sessions A. Note that you must specify the username as when you log in. Log into :5280/admin/ with the admin user you set up previously.Perhaps this syntax generates a different internal representation than what we really want, but if we log into the web interface and resubmit a form without changing the contents, it works. Sudo ejabberdctl srg-create Online Online "Online users" Online The shared roster group can be created on the command line, but doesn't work unless you log into the web interface and resubmit the form. Watch out, /etc/ejabberd/ejabberd.cfg must be owned by the user/group ejjaberd/ejabberd. %% tls, ,Įxplanations for these changes are on Ejabberd Configuration.Īpply it to /etc/ejabberd.cfg and restart ejabberd with:
#Ejabberd change admin password Patch
This is a patch to apply the required configuration to /etc/ejabberd.cfg for Sugar. I'll use in the examples below.Įnter a username and password for an admin user who will have access through the web interface. If this didn't happen automatically when you installed ejabberd, run the configuration wizard:Įnter the fully qualified domain name at which ejabberd will be visible. Replace " " in the examples with the appropriate hostname.Ģ. To run ejabberd as a public server, you will need to run it on a public server where you have root privileges - like a Xen hosted virtual server. These instructions have been tested with intrepid - morgs 14:07, 24 October 2008 (UTC)
#Ejabberd change admin password how to
How to install a package from backports.
Ubuntu 8.04 hardy has a backport of the intrepid package (untested but should work).
The following distros have deb packages including the shared roster patches for Sugar collaboration using OLPC release 8.2 or earlier, or Sugar 0.82 or earlier:
0 notes