#Raspberry Pi thermostat
Explore tagged Tumblr posts
Visit Tumblr Blog
Explore Tumblr blogs with no restrictions, modern design and the best experience.
Last Seen Tumblr Blogs


Fun Fact
70% of Tumblr users say the Dashboard is their favorite place to spend time online.
Text
How to Build a DIY Smart Thermostat Using Raspberry Pi
Building your own smart thermostat using a Raspberry Pi can help you take control of your home’s heating and cooling systems while saving money and enjoying the fun of a DIY project. With a Raspberry Pi and a few additional components, you can create a smart thermostat that allows you to monitor and adjust the temperature from anywhere. Here’s a step-by-step guide to building a DIY smart…
0 notes
Text
october 1st 2024: drafts!

preacher: i'm attaching slightly improved versions of our original drafts, but i'll also include mine and scott's garbage sketches under the cut because i think they're a little bit funny
(image id available through tumblr's accessibility options)
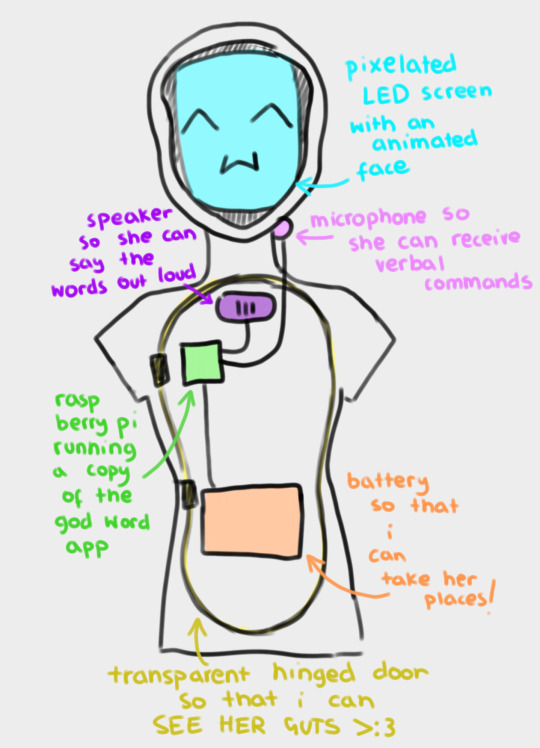
this is a slightly revised version of my original concept for "APRIL".
the main functionality i wanted for "APRIL" was for her to be able to read out words from the templeOS god word app, and ideally without needing keyboard input – hence the microphone. ideally all of her parts are going to fit inside a hollowed out mannequin or doll, which will probably just be the torso, so that she's more portable. for the same reason, i want her to run off a power bank – i want to be able to take her places!
if we manage, we're going to give her an animated LED face which moves to indicate when she's speaking. the way i first pitched it, i wanted it to also change a bit depending on how she "felt" – for example, frowning if the environment was hotter than ideal for the raspberry pi to operate on. but that's a bit beyond our current scope right now. i don't think we even ordered a thermostat.
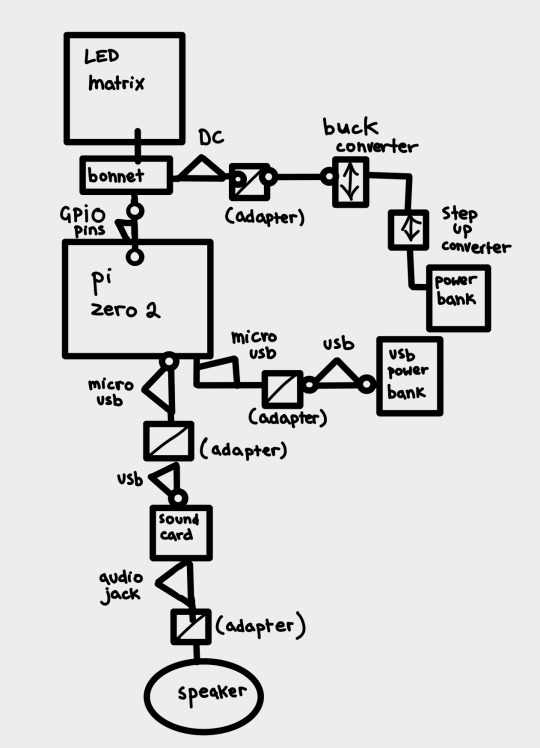
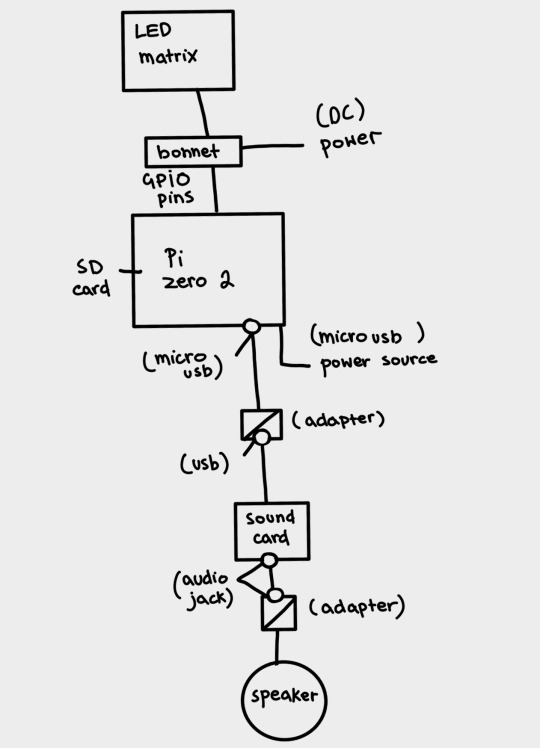
scott drew the following wiring diagrams based off my original sketch. here revised digitally for readability's sake.
(image id available through the tumblr accessibility options although i fear it's not very good in this case. feedback appreciated).
scott: I decided to go with the raspberry pi zero 2w because it's what I've got experience coding on, it's relatively cheap for the "brains" of the operation (heh) and can perform both tasks from the godword prophecy generation, speaker operation and led matrix operation simultaneously. Plus its small enough to keep the circuit lightweight and fit inside the initial mannequin design.
This drawing fits no kind of engineering standard by the way lol. It was an initial sketch closer to a wiring diagram to see how it'd physically setup and wrap my head around transforming it from mains power to being theoretically portable and running on powerbanks. Unfortunately the LED matrix is really fucking power hungry so needs its own power supply of really specific voltage and current draws hence all the converters.
Also because Im using the smaller and cheaper pi, as oppossed to a stronger system like the pi4, it doesn't have any audio out jack so I plan to use the micro usb for audio out which means yet again I need another adapter for a soundcard and usb to micro usb adapters and all that jazz. Usually sound out can be done through the GPIO pins but the LED matrix takes so many pins that I cant really take anything form them so I had to look for other ways of doing it. Plus this way I get to add a soundcard so if we wanna add microphone support or anything later on we can :)
(Also this is all a little obtuse because I'm trying to do it as much as plug and play and screw terminal style as possible rather than actually solder connections for ease of access and initial setup, but this also works for modular design and component swapping later too so its cool.)
preacher: another reason we're going with plug&play is becauuseeeeee i don't own a soldering iron 😭 it's ok. it's ok.
our silly initial drafts under the cut for your viewing pleasure.


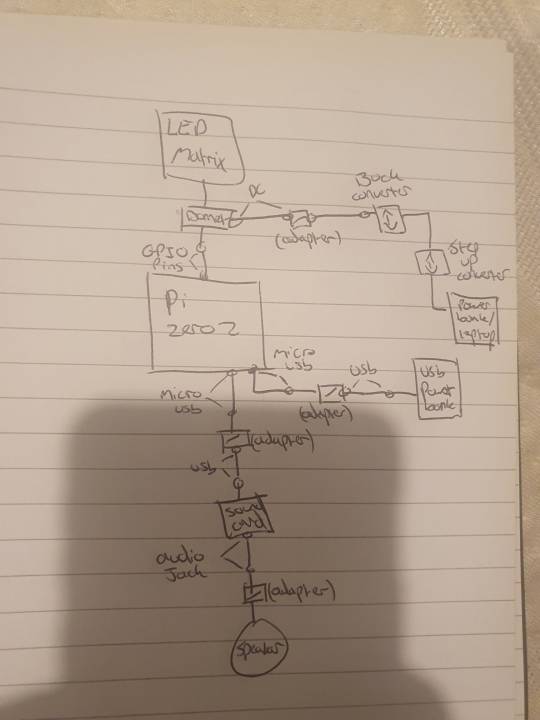
preacher: these were made around 2 weeks ago, so about september 15th ish.
as you can see the first "APRIL" drawing was beautifully drawn with my fat fingers in the facebook messenger photo editor. i think it holds up. lol.
#computers#computer#programming#software engineering#robots#robotics#raspberry pi#robot girl#machine#machines#divine machinery#tech#technology#techcore#machinecore#objectum#objectophilia#robophilia#techum#technum#android#gynoid#mechanical divinity#templeos#coding#scott#preacher#drafts#update#roadmap
30 notes
·
View notes
Text
Raspberry Pi Board: Revolutionizing Computing and Education
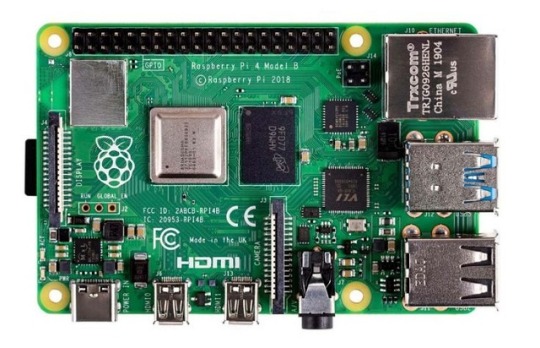
The Raspberry Pi board is a series of small, affordable single-board computers developed by the Raspberry Pi Foundation, a UK-based charity focused on promoting computer science education and digital literacy. Since its launch in 2012, the Raspberry Pi has transformed from a niche educational tool into a versatile platform used in a wide range of applications, from DIY electronics projects to industrial automation.
A Brief History
The first Raspberry Pi, the Model B, was released in February 2012. Designed to promote basic computer science in schools and developing countries, it featured a 700 MHz ARM11 processor, 256 MB of RAM, and basic connectivity options. The success of the Model B led to a rapid expansion of the Raspberry Pi lineup, with various models offering improved performance, more memory, and enhanced connectivity.
Key Features and Models
Raspberry Pi 1 Model B (2012):
Processor: 700 MHz ARM11
Memory: 256 MB RAM
Ports: 2 USB 2.0 ports, HDMI, Composite video, 3.5mm audio jack, Ethernet
Storage: SD card slot
Raspberry Pi 2 Model B (2015):
Processor: 900 MHz quad-core ARM Cortex-A7
Memory: 1 GB RAM
Ports: 4 USB 2.0 ports, HDMI, Composite video, 3.5mm audio jack, Ethernet
Storage: MicroSD card slot
Raspberry Pi 3 Model B (2016):
Processor: 1.2 GHz quad-core ARM Cortex-A53
Memory: 1 GB RAM
Ports: 4 USB 2.0 ports, HDMI, Composite video, 3.5mm audio jack, Ethernet
Wireless: Wi-Fi and Bluetooth
Raspberry Pi 4 Model B (2019):
Processor: 1.5 GHz quad-core ARM Cortex-A72
Memory: Options of 2 GB, 4 GB, and 8 GB RAM
Ports: 2 USB 3.0 ports, 2 USB 2.0 ports, 2 Micro HDMI ports, Ethernet, USB-C for power
Wireless: Wi-Fi and Bluetooth
Raspberry Pi Zero (2015) and Zero W (2017):
Processor: 1 GHz single-core ARM11
Memory: 512 MB RAM
Ports: Mini HDMI, Micro USB OTG, Micro USB for power, GPIO pins
Wireless (Zero W): Wi-Fi and Bluetooth
Applications and Uses
The versatility of the Raspberry Pi has led to its adoption in numerous fields:
Education:
Coding and Programming: Used in schools and educational programs to teach students programming languages such as Python, Scratch, and Java.
Computer Science Concepts: Introduces concepts like hardware, software, and networking.
DIY Projects and Maker Community:
Home Automation: Controls smart home devices, including lights, thermostats, and security systems.
Media Centers: Powers home media centers using software like Kodi.
Retro Gaming: Emulates classic gaming consoles using software like RetroPie.
Industrial and Commercial Applications:
IoT Devices: Serves as a hub for Internet of Things (IoT) devices, enabling data collection and remote control.
Automation and Control Systems: Used in factories and labs for monitoring and controlling equipment.
Research and Development:
Prototyping: Facilitates rapid prototyping of electronic devices and systems.
Data Collection: Gathers data from various sensors in environmental and scientific research.
Community and Ecosystem
The Raspberry Pi has cultivated a vibrant global community of developers, hobbyists, educators, and students. Online forums, tutorials, and community projects provide extensive support and resources for users at all skill levels. The Raspberry Pi Foundation also offers official accessories, including cases, cameras, and expansion boards, further enhancing the functionality of the Raspberry Pi.
Conclusion
The Raspberry Pi board has revolutionized the way people learn about and interact with technology. Its affordability, versatility, and extensive support network have made it an indispensable tool in education, DIY projects, and professional applications. As technology continues to evolve, the Raspberry Pi Foundation remains committed to expanding the capabilities and accessibility of this remarkable platform, ensuring that computing remains within reach for everyone.
3 notes
·
View notes
Text
Beyond the Books: Real-World Coding Projects for Aspiring Developers
One of the best colleges in Jaipur, which is Arya College of Engineering & I.T. They transitioning from theoretical learning to hands-on coding is a crucial step in a computer science education. Real-world projects bridge this gap, enabling students to apply classroom concepts, build portfolios, and develop industry-ready skills. Here are impactful project ideas across various domains that every computer science student should consider:
Web Development
Personal Portfolio Website: Design and deploy a website to showcase your skills, projects, and resume. This project teaches HTML, CSS, JavaScript, and optionally frameworks like React or Bootstrap, and helps you understand web hosting and deployment.
E-Commerce Platform: Build a basic online store with product listings, shopping carts, and payment integration. This project introduces backend development, database management, and user authentication.
Mobile App Development
Recipe Finder App: Develop a mobile app that lets users search for recipes based on ingredients they have. This project covers UI/UX design, API integration, and mobile programming languages like Java (Android) or Swift (iOS).
Personal Finance Tracker: Create an app to help users manage expenses, budgets, and savings, integrating features like OCR for receipt scanning.
Data Science and Analytics
Social Media Trends Analysis Tool: Analyze data from platforms like Twitter or Instagram to identify trends and visualize user behavior. This project involves data scraping, natural language processing, and data visualization.
Stock Market Prediction Tool: Use historical stock data and machine learning algorithms to predict future trends, applying regression, classification, and data visualization techniques.
Artificial Intelligence and Machine Learning
Face Detection System: Implement a system that recognizes faces in images or video streams using OpenCV and Python. This project explores computer vision and deep learning.
Spam Filtering: Build a model to classify messages as spam or not using natural language processing and machine learning.
Cybersecurity
Virtual Private Network (VPN): Develop a simple VPN to understand network protocols and encryption. This project enhances your knowledge of cybersecurity fundamentals and system administration.
Intrusion Detection System (IDS): Create a tool to monitor network traffic and detect suspicious activities, requiring network programming and data analysis skills.
Collaborative and Cloud-Based Applications
Real-Time Collaborative Code Editor: Build a web-based editor where multiple users can code together in real time, using technologies like WebSocket, React, Node.js, and MongoDB. This project demonstrates real-time synchronization and operational transformation.
IoT and Automation
Smart Home Automation System: Design a system to control home devices (lights, thermostats, cameras) remotely, integrating hardware, software, and cloud services.
Attendance System with Facial Recognition: Automate attendance tracking using facial recognition and deploy it with hardware like Raspberry Pi.
Other Noteworthy Projects
Chatbots: Develop conversational agents for customer support or entertainment, leveraging natural language processing and AI.
Weather Forecasting App: Create a user-friendly app displaying real-time weather data and forecasts, using APIs and data visualization.
Game Development: Build a simple 2D or 3D game using Unity or Unreal Engine to combine programming with creativity.
Tips for Maximizing Project Impact
Align With Interests: Choose projects that resonate with your career goals or personal passions for sustained motivation.
Emphasize Teamwork: Collaborate with peers to enhance communication and project management skills.
Focus on Real-World Problems: Address genuine challenges to make your projects more relevant and impressive to employers.
Document and Present: Maintain clear documentation and present your work effectively to demonstrate professionalism and technical depth.
Conclusion
Engaging in real-world projects is the cornerstone of a robust computer science education. These experiences not only reinforce theoretical knowledge but also cultivate practical abilities, creativity, and confidence, preparing students for the demands of the tech industry.
0 notes
Text
A couple weeks ago our HVAC guy came over and he was asking me about the new thermostat and how all my smart home stuff is working (he’s familiar with my smart home setup - i have a HomeBridge server on an old iMac. I was going to move it over to a raspberry pi but the iMac has been rebooting when we lose power and I’ve not touched it for months and) it’s working perfectly.
After that conversation, i rebooted the iMac, restarted HomeBridge, updated some plugins, whatever, because I hadn’t touched it in months right?
Half my lights aren’t working when I try to turn them on now. The lights that do turn on take about 30-60 seconds.
What have I done?
0 notes
Text
https://embetronicx.com/vilambaram/building-a-smart-home-system-with-raspberry-pi/
A Raspberry Pi-based smart home system is an affordable, flexible way to automate your living space. It can control lights, security devices, and thermostats, enhancing convenience and efficiency.
With easy integration of sensors and smart devices, you can customize your setup for a connected, smart home experience. Check the article for details.
0 notes
Text
How to Choose the Right Electronics Starter Kit for Your Needs

Getting started in electronics can be exciting, but picking the right electronics starter kit is essential for a smooth and enjoyable learning experience. Whether you’re just beginning or already have some experience, the right kit can help you understand the basics and dive deeper into more advanced projects. But with so many options available, how do you choose the one that’s right for you? In this article, we’ll walk you through how to select the perfect electronics starter kit based on your needs.
1. Understand Your Skill Level
Before you buy a kit, think about your current knowledge of electronics. Are you completely new to it, or do you have some experience? This will help you decide which kit is best for you.
If you’re a beginner, you’ll want a kit that focuses on the basics, such as learning how circuits work. A good starter kit will include:
Breadboard: A simple tool to build circuits without soldering.
Basic components: Items like resistors, capacitors, and diodes that are easy to work with.
LEDs and transistors: Basic components to help you understand how electrical signals flow.
If you already know a bit about electronics, you might want a more advanced kit with items like microcontrollers (Arduino or Raspberry Pi), sensors, and motors. These kits are for creating projects like robots or smart home devices, which can be more complex and interactive.
2. Think About What You Want to Build
Next, think about the types of projects you want to create. Your goals will help you choose the right kit. There are many different types of kits designed for different purposes. Here are some examples:
Basic Electronics Learning: If your goal is to understand how electronics work, look for a kit that teaches you the fundamentals of building circuits. These kits should have easy-to-follow guides for simple projects.
Arduino or Raspberry Pi Projects: If you want to build interactive projects, look for kits that include an Arduino or Raspberry Pi. These kits often come with microcontrollers, sensors, and other parts for creating cool projects like robots or home automation systems.
Robotics: If you’re interested in building robots, look for a robotics starter kit. These kits usually include motors, sensors, and sometimes even wheels and servos to help you create a robot.
Home Automation: Some kits are designed for smart home projects, such as controlling lights, locks, or even your thermostat. These kits typically include sensors, microcontrollers, and other components that connect to your home devices.
Wireless Projects: If you want to work on wireless electronics like Bluetooth or Wi-Fi, look for kits that include components for these kinds of projects. Wireless communication is becoming more popular, and you can use these kits to build things like remote-controlled gadgets.
Knowing what you want to build will help you choose a kit that gives you the right components and instructions for your projects.
3. Consider the Complexity of the Kit
Some kits are simple and easy for beginners, while others are made for people who already know a lot about electronics. Make sure the kit matches your skill level.
If you're new to electronics, choose a kit that includes basic components and clear instructions. A beginner kit should come with:
Easy-to-follow project guides: These will explain how to build simple circuits and understand basic concepts.
Basic components: Things like resistors, capacitors, and LEDs that you can easily experiment with.
If you’re more experienced, you might prefer a kit with more complex projects. These could involve soldering, using microcontrollers, or designing advanced circuits. More advanced kits allow you to create unique projects and experiment with a variety of components.
4. Check for Quality and Compatibility
Not all electronics kits are the same. Some kits may include low-quality components that break easily or don’t work as expected. To avoid frustration, make sure you choose a kit that has good reviews and is made with quality parts.
Also, make sure the components in the kit are compatible with each other. For example, if the kit includes an Arduino board, make sure the sensors and other parts work well with it. Check the product description and reviews to ensure everything in the kit is easy to use together.
5. Look for Good Documentation and Support
When you’re learning about electronics, good instructions can make a big difference. A high-quality starter kit should include clear guides that explain how to build and troubleshoot your projects. Look for kits that offer:
Step-by-step guides: These will help you understand how to build circuits and what each component does.
Troubleshooting tips: These can be especially helpful if something goes wrong in your project.
Online support or communities: Some kits come with online resources or communities where you can ask questions and get help from others.
For kits that involve programming, like those with Arduino or Raspberry Pi, make sure the kit includes software and guides for coding.
6. Consider Your Budget
Electronics kits come in a range of prices. While it might be tempting to choose the cheapest option, it’s important to remember that you often get what you pay for. Very inexpensive kits might have lower-quality components, or they might be missing key parts.
That said, you don’t have to spend a lot to get a good kit. Many affordable options offer solid components and instructions for beginners. Make sure to balance cost with quality so you can get the most value for your money.
7. Choose a Well-Known Brand
When selecting a kit, consider the brand. Some companies, like Arduino, SparkFun, and Adafruit, are known for making reliable kits with excellent support. These brands offer kits for beginners and more advanced users, and they often have large communities where you can get help, find tutorials, and share projects.
Choosing a well-known brand can also ensure that the components in your kit are high-quality and will work well together. Plus, these brands often provide lots of resources to help you get the most out of your kit.
Conclusion
Choosing the right electronics starter kit is an important step toward learning and exploring electronics. By understanding your skill level, defining your goals, and considering the complexity, quality, support, and price of the kit, you can select one that fits your needs. Whether you’re a beginner or already have some experience, the right electronics starter kit can set you up for success and inspire you to create amazing projects. Take your time, do some research, and pick the kit that will help you build your knowledge and skills in electronics. Happy building!
0 notes
Text
The future of smart home control begins with one sleek, powerful interface — the Nextion NX8048P050-011R 5.0” Intelligent Resistive HMI Touchscreen. Ideal for automation projects, this display offers unmatched user experience, intelligent processing, and seamless integration. If you're planning to level up your smart home or automation setup in 2025, this intelligent touchscreen should be on your radar.
Available now at www.sonoff.in, this module is a must-have for developers, hobbyists, and smart home enthusiasts.
Power-Packed 5.0” Intelligent Display for Smart Control
The Nextion NX8048P050-011R boasts a 5.0-inch resistive touchscreen, offering sharp visuals and precise touch response. Designed without an enclosure, this screen gives flexibility in mounting it into custom panels, enclosures, or control stations.
The resistive touch feature supports usage even when wearing gloves — making it practical for industrial, automation, and DIY applications. It’s a display that adapts to your environment, not the other way around.
Advanced HMI Capabilities Built for Efficiency
This is more than just a screen. It's a powerful HMI (Human Machine Interface) equipped with:
Onboard microcontroller for fast UI rendering
Rich GUI design with Nextion Editor
Easy drag-and-drop interface development
Support for static images, buttons, sliders, and dynamic text
Integrated flash memory for storing UI pages
You can build multi-layered smart interfaces without relying on external MCUs for rendering. Control everything from HVAC to lighting systems — with just a touch.
Streamlined Communication with Embedded Systems
The Nextion NX8048P050-011R communicates using UART serial communication, making it compatible with Arduino, Raspberry Pi, ESP32, and more. Developers love how it simplifies hardware-software interaction.
Commands are sent via a simple serial interface, which dramatically reduces processing load on your main MCU. This allows developers to allocate power where it truly matters.
Why It’s Perfect for Home and Industrial Automation
Here’s why the Nextion NX8048P050-011R is a game changer:
Compact but powerful – Fits in tight spaces while delivering advanced UI functionality.
Customizable UI – Create polished, user-friendly interfaces tailored to your smart home design.
Responsive Touch – Reliable performance in both residential and industrial settings.
Highly Compatible – Works seamlessly with Sonoff smart switches and automation modules from www.sonoff.in.
Whether you’re managing lighting, thermostats, or entire smart systems, this touchscreen gives you intuitive and elegant control.
Nextion Editor – No Code? No Problem.
The Nextion Editor software is a dream for non-programmers. You don’t need advanced coding skills to build dynamic user interfaces. Just drag and drop components onto your screen canvas.
From progress bars to image sliders, your interface can be as simple or complex as your imagination allows. With built-in event triggers, automation becomes a breeze.
Technical Specs at a Glance
Let’s dive into the core specs that make this touchscreen a powerhouse:
Display Size: 5.0” resistive touch panel
Resolution: 800x480 pixels
Flash Memory: 16MB
RAM: 3584 bytes
EEPROM: 1024 bytes
MCU: 48MHz
Serial Port: TTL UART
Operating Voltage: 5V
These specifications ensure smooth performance, fast response, and consistent reliability in demanding automation environments.
Installation and Custom Integration
Thanks to its open-frame design, you can install the NX8048P050-011R in custom enclosures or panels. Whether it’s a wall-mounted control panel or embedded into a furniture piece, the flexibility is unbeatable.
Pair it with Sonoff Wi-Fi switches or smart relays to create a smart home interface that looks and feels professional.
Smart Solutions, Smarter Shopping with www.sonoff.in
Looking for a reliable supplier in India? www.sonoff.in is the trusted destination for Nextion displays, Sonoff smart devices, and complete home automation solutions.
They offer fast delivery, excellent customer service, and authentic products backed by warranty. Get access to India’s top smart home gadgets — all in one place.
Conclusion: Smart Control Starts Here
The Nextion NX8048P050-011R 5.0” intelligent touchscreen is the perfect HMI solution for next-gen smart home setups. Its seamless performance, rich feature set, and compatibility with Sonoff devices from www.sonoff.in make it a standout choice.
Don't settle for clunky switches and outdated interfaces. Take control of your environment — the smart way.
Explore the future of home automation at www.sonoff.in and power up your smart living journey today.
#sonoff#smarthome#smartappliances#googlehomeintegration#alexacompatible#sonoffpowr3#homeautomation#sonoffindia#wifismartswitch
0 notes
Text
The comprehensive guide to the Internet of Things and remote control
The Comprehensive Guide to the Internet of Things and Remote Control
Table of Contents Chapter 1: Introduction to the Internet of Things (IoT) Definition of the Internet of Things. The evolution of the concept of the Internet of Things. How does the Internet of Things work? IoT applications in daily life. Chapter 2: Components of the Internet of Things Smart devices (sensors, actuators, and controllers). Communication and networking in the Internet of Things (Wi-Fi, Bluetooth, LoRa, 5G). Software and cloud platforms (artificial intelligence and data analysis). Protocols used in the Internet of Things (MQTT, CoAP). Chapter 3: Communication technologies in the Internet of Things Overview of communication technologies. The difference between local and wide area networks (LAN vs WAN). Low-power communication networks (LPWAN). Challenges of communication and reliability in the Internet of Things. Chapter 4: Smart home automation using the Internet of Things Definition of the smart home. Smart home appliances (smart lights, smart locks, thermostats). Virtual assistant systems (such as Alexa and Google Assistant). Smart home security and monitoring solutions. Chapter 5: Internet of Things in industrial sectors Smart manufacturing (predictive maintenance, smart robots). Smart agriculture (agricultural sensors, smart irrigation systems). Smart cities (traffic management, smart ecosystems). Smart healthcare (remote monitoring, wearable devices). Chapter 6: Security and privacy in the Internet of Things Potential security risks in the Internet of Things. Privacy and data protection challenges. Security protocols and technologies (encryption, identity management). How to address security threats in smart systems. Chapter 7: Artificial intelligence and the Internet of Things How does artificial intelligence complement the Internet of Things? Predictive analysis and intelligent decision making. Machine learning applications in the Internet of Things. Examples of artificial intelligence in smart systems. Chapter 8: The future of the Internet of Things Future market developments and trends. 5G Internet of Things and its role in supporting developments. Future challenges and new opportunities. How will the Internet of Things change our daily lives? Chapter 9: Examples and Case Studies Practical examples of the use of IoT in various fields. Case studies of the most popular IoT applications (eg: Nest, Tesla, Philips Hue). Utilizing the Internet of Things to improve efficiency and productivity. Chapter 10: How to get started with the Internet of Things? Available tools and platforms for developing IoT solutions (Raspberry Pi, Arduino). Building simple projects using the Internet of Things.
#Internet of Things (IoT) guide - دليل إنترنت الأشياء#Smart home automation - أتمتة المنازل الذكية#IoT for remote control - إنترنت الأشياء للتحكم عن بعد#Connected devices - الأجهزة المتصلة#IoT applications - تطبيقات إنترنت الأشياء#Smart home technology - تقنية المنازل الذكية#Home automation solutions - حلول أتمتة المنازل#Remote monitoring - المراقبة عن بعد#IoT security - أمان إنترنت الأشياء#IoT and smart devices - إنترنت الأشياء والأجهزة الذكية#Future of IoT - مستقبل إنترنت الأشياء#Smart home gadgets - أدوات المنزل الذكي#Wireless control systems - أنظمة التحكم اللاسلكي#IoT for energy efficiency - إنترنت الأشياء لكفاءة الطاقة#IoT in everyday life - إنترنت الأشياء في الحياة اليومية
0 notes
Text
ESP32
This week I wanted to shed some light on a seemingly unfamiliar tach amongst the general populace. If are into the tech world and have been around microcomputers like the Raspberry Pi then you’ve probably heard of this device, the ESP32. The ESP32 technically isn’t a device, it’s a chip, specifically a low-cost system on a chip (SoC). It provides Wi-Fi and sometimes both, depending on the model, to embedded devices, or IoT devices.
The ESP32 has many common uses, some of these include smart home applications like connecting light switches, thermostats, plugins, and other appliances. It is also used for remote monitoring sensors. With this, you can monitor temperature, humidity, motion, and other statistics of a room or area and send it over the cloud for real-time analysis. My grandpa has one employed just for this same reason and can adjust the temperature and fans of a room depending on the readings he receives.
Now while there are many more common daily life implementations of the ESP32 I think many people think of it for its network penetration capabilities. The ESP32 can conduct Wi-Fi sniffing which captures and analyzes Wi-Fi traffic in transit. With the correct firmware attached, the ESP32 can log unencrypted traffic and identify active devices within a limited range. ESP32 can also enact Wi-Fi jamming and when paired with its ability to act as a WAP, you now could have users logging into your Wi-Fi instead of the café’s.
This piece of hardware is going to be my next tech project and I'm excited to see what I can learn from it and do with it. I think this will open many doors in the aspect of learning new hands-on material with networks and devices as well as IoT devices.
Sources:
0 notes
Video
youtube
Home Assistant on Raspberry Pi 5 #raspberrypi #homeassistant #smarthome
Exploring the Home Assistant Dashboard on Raspberry Pi 5Welcome to IT Samurai Teacher!
Hello tech enthusiasts! Today, we're diving into the fascinating world of home automation with Home Assistant installed on a Raspberry Pi 5. In this post, I'll walk you through the Home Assistant dashboard, explaining all the features and options available to make your smart home setup as efficient as possible.
What is Home Assistant?
Home Assistant is an open-source platform designed to control and automate your smart home devices from a single interface. It integrates seamlessly with a wide range of devices, making it easy to manage everything from lights and thermostats to security cameras and more. Best of all, it's constantly updated by a vibrant community of developers, ensuring you always have the latest features and improvements.
Why Use Raspberry Pi 5 for Home Assistant?
The Raspberry Pi 5 is a powerful and affordable mini-computer, perfect for running Home Assistant. Its enhanced processing power and connectivity options make it an excellent choice for your home automation hub. Plus, its compact size and low power consumption make it ideal for a 24/7 operation.
Navigating the Home Assistant Dashboard
The Home Assistant dashboard is your central hub for managing all your smart home devices and automations. Here’s a quick tour of the main menu and its options:
1. Overview: The primary dashboard displays a summary of your smart home devices and their current status. Customize this view to show the most important information at a glance.
2. Map: Great for location-based automations or GPS trackers, this feature shows the real-time location of your devices on a map.
3. Logbook: Keeps a detailed history of events and changes within your Home Assistant setup. It's useful for troubleshooting and understanding what's happening in your smart home.
4. History: Displays graphs and data about your devices over time, such as temperature trends or energy usage.
5. Developer Tools: A powerful section for advanced users. Test your automations, check the state of devices, and execute commands directly.
6. Configuration: Manage your integrations, automations, users, and general settings. This is where you'll spend a lot of time setting up your Home Assistant.
Key Sections Under Configuration:
Devices & Services: Add and manage your smart devices and integrations.
Automations: Create and manage automations to make your home smarter.
Scripts: Allows for more complex sequences of actions. Scripts can be triggered manually or by other automations.
Users: Manage who has access to your Home Assistant setup, create new users, assign permissions, and more.
Settings: Configure general options such as themes, localization, and updates.
Troubleshooting Common Issues
Encountering the "Home Assistant CLI not starting! Jump into emergency console" error? Here’s how to troubleshoot:
Connect a monitor and keyboard to your Raspberry Pi.
When you see the error message, press Enter to access the emergency console.
Check disk space with df -h. If full, free up space.
Check logs with journalctl -xe for specific error messages.
Repair the file system by running fsck on your root partition. Unmount the partition first with umount /dev/sdX1.
Watch Our YouTube Tutorial
For a detailed walkthrough, check out our latest video on IT Samurai Teacher. Learn how to install Home Assistant on a Raspberry Pi 5, navigate the dashboard, and troubleshoot common issues.
Watch the video here: https://youtu.be/kcUdh3kyBWE
Home Assistant on a Raspberry Pi 5 is a powerful combination for smart home automation. With this guide, you’re well on your way to mastering the Home Assistant dashboard and creating a seamless, efficient smart home setup. Thanks for reading, and don’t forget to subscribe for more tech tutorials!
#HomeAssistant #RaspberryPi5 #SmartHome #HomeAutomation #TechTutorials #ITSamuraiTeacher #DIY #SmartHomeDevices
0 notes
Text
The Best IoT Embedded Course: A Comprehensive Guide 2024
Welcome from the frontlines of technological advancement! With the Internet of Things (IoT) constantly changing, we are excited to offer "The best IoT Embedded Course: A Comprehensive Guide in 2024," a ray of knowledge and expertise. This blog is your doorway to an immersive investigation of cutting-edge ideas, practical applications, and the newest developments that shape the world of IoT embedded systems.
What are Embedded Systems?
An Embedded System is a combination of computer hardware and software designed for a specific function. Training computing systems called embedded systems are made to carry out specific tasks inside of bigger systems. These systems are integrated into appliances and gadgets to manage particular operations, frequently in real-time.
Do you know what IoT is?
The term Internet of Things, IoT, refers to a network of connected physical objects, often referred to as “things,” that use software, sensors, and a variety of technologies to gather and transmit information over the Internet. These gadgets can be anything from commonplace items like wearable technology and appliances for the home to advanced urban facilities and industrial machinery.
The primary goal of IoT is to facilitate communication between devices and centralized systems, ultimately resulting in improved efficiency, automation of processes, and enhanced decision-making.
Impact of IoT on industries
With the introduction of an interconnected system of connected gadgets that collect and transmit data, the Internet of Things (IoT) has drastically changed a number of businesses and spurred increased productivity and creativity. The IoT simplifies supply chain procedures and enables predictive maintenance in the production sector. Smart medical devices and remote patient monitoring are revolutionizing patient care in the healthcare industry. Retail experiences more individualized customer interactions and better control of inventory. Improved network optimization and smart city connectivity are observed in telecommunications. IoT has a broad impact across many industries, streamlining processes and opening up new opportunities in the rapidly changing technology-driven business environment.
Tools covered under the IoT program
IoT Operating Systems
Raspbian
Mongoose OS
IoT Development Platforms
IoTivity
AWS IoT Core
Microsoft Azure IoT
IoT Protocols
MQTT (Message Queuing Telemetry Transport)
CoAP (Constrained Application Protocol)
HTTP/HTTPS
IoT Development Tools
Eclipse IoT
Data Analytics and Visualization Tools
Python
Jupyter Notebooks
Grafana
IoT Simulators and Emulators
IoTSim-Edge
Eclipse Mosquitto
Embedded IoT Concepts: A Practical Application
Developing a Smart Home Infrastructure:
In this hands-on project, students will use embedded Internet of Things concepts to create and put into effect a smart home system. To gather data in real-time, the project integrates sensors—such as temperature sensors, door/window sensors, and motion detectors—with microcontrollers. After that, students will use protocols such as MQTT to create a smooth connection between the sensors and a central hub. The data will be processed by the central hub, which is typically a Raspberry Pi or a comparable device, and it will regulate different smart home appliances like locks, lights, and thermostats. The project provides hands-on experience with hardware, software, and communication protocols in a real-world setting, encompassing the entire Internet of Things ecosystem from sensor data acquisition to cloud integration.
Industrial Internet of Things (IIoT) Solutions:
Students in this project with a business focus will explore the creation of Industrial IoT (IIoT) solutions to improve the effectiveness of operations. Industrial-grade chips, or programmable logic controllers (PLCs), are used in conjunction with sensors and actuators in this project. The configuration of communication protocols such as OPC, UA, or Modbus will be done by students to ensure smooth interaction between industrial equipment. Predictive maintenance systems, data analytics for process optimization, and real-time equipment health monitoring are all part of the execution. Security protocols will be prioritized to protect vital industrial data. The project leads to the development of a workable and secure IIoT solution and offers a practical understanding of IIoT applications while addressing the specific needs and difficulties of industrial settings.
The Best Embedded IoT course offered in Chennai
One of the best Embedded IoT training programs is offered by Netsui, with a motive to improve the skillsets of their students and absorb them into their parent company, Zestlogic Systems Private Ltd. Chennai.
The course is customized for professionals and individuals who are keen on exploring the opportunities that are awaiting in the field of the Internet of Things (IoT). This program helps the students who are enrolled to have a deep understanding of the advanced and comprehensive curriculum provided.
100% Job Assured at Zestlogics Systems Private Limited
Register for more details: Netsuilabs
Conclusion
In summary, this embedded IoT course is an incredible learning opportunity that equips learners with the information and abilities necessary to successfully negotiate the constantly changing terrain of networked systems. As we enter the age of smart technologies, the practical projects, in-depth analysis, and hands-on learning opportunities completed in this course lead to a deep comprehension of embedded IoT concepts.
Frequently Asked Questions (FAQs)
What are the prerequisites for an Embedded IoT Course?
The prerequisites for an Embedded IoT course encompass a foundational understanding of electronics, programming, and computer systems. Prospective participants should have a grasp of basic electronic components, and proficiency in a programming language like C or C++ is crucial. Knowledge of computer architecture, including memory and processors, is expected, and basic mathematical skills are essential for algorithmic understanding. Familiarity with microcontrollers and microprocessors and the ability to program for hardware interaction are prerequisites.
How does Embedded IoT contribute to the development of smart devices?
Through the integration of sensors, communication modules, and microcontrollers, embedded IoT facilitates intelligent functions and seamless connectivity, playing a vital part in the development of smart devices. These devices leverage real-time data processing, allowing for automated decision-making and enhanced user experiences. From smart thermostats to connected wearables, Embedded IoT empowers devices to collect, analyze, and respond to data, fostering a new era of interconnected and intelligent technologies that improve efficiency, convenience, and overall functionality.
Are there any certifications that validate proficiency in Embedded IoT?
Of course! Netsui offers a 6-month training program on Embedded IoT course along with a course completion certificate.
0 notes
Text
Building a Smart Home with DIY Embedded System Projects
A smart home is a futuristic concept that is becoming increasingly popular among homeowners. It involves the use of technology to automate and control various aspects of a home, such as lighting, security, temperature, and entertainment. While there are many smart home systems on the market, building your own smart home with DIY embedded system projects can be a fun and cost-effective way to create a personalized and efficient living space.
To get started, it is essential to have a basic understanding of embedded systems. An embedded system is a computer system that is designed to perform a specific task or control a specific device. It is often a combination of hardware and software that is programmed to perform a specific function. In the case of a smart home, the embedded system will be responsible for controlling and automating various devices.
The first step in building a smart home is to identify the areas of your home that you want to automate. This could include lighting, security cameras, door locks, thermostats, and entertainment systems. Once you have a clear idea of what you want to control, you can start researching the different components and technology needed for each project.
One of the most popular DIY embedded system projects for a smart home is creating a home automation hub. This is a central system that connects and controls all the devices in your home. There are many open-source software options available, such as Home Assistant and OpenHAB, that can be installed on a Raspberry Pi or other microcontroller to act as the hub. These software programs allow you to connect and control devices from different manufacturers, creating a unified system.
For lighting, you can opt for smart switches or smart bulbs that can be controlled through a smartphone app or voice commands. Smart switches are relatively easy to install, while smart bulbs require a bit more work as they need to be replaced in existing light fixtures. You can also add motion sensors to turn on lights automatically when you enter a room.
Security is another crucial aspect of a smart home. You can use a variety of sensors, such as door and window sensors, motion sensors, and cameras, to create a comprehensive security system. These devices can be connected to your home automation hub, allowing you to monitor and control them remotely. You can also set up alerts to notify you of any unusual activity.
Controlling the temperature in your home is another area where DIY embedded system projects can be beneficial. You can install a smart thermostat that can be controlled through a smartphone app or programmed to adjust the temperature based on your daily routine. This can help reduce energy consumption and save money on utility bills.
Entertainment systems can also be integrated into a smart home using embedded systems. You can use a Raspberry Pi or other microcontroller to create a media server that stores and streams your music and video collection to different devices in your home. You can also add voice control using Amazon's Alexa or Google Assistant to play music or videos on demand.
Overall, building a smart home with DIY embedded system projects allows you to customize and control various aspects of your home according to your specific needs and preferences. It also gives you the satisfaction of creating something unique and functional. However, it is essential to have a basic understanding of coding and electronics before embarking on such a project. With the right research and planning, you can create a smart home that not only makes your life easier but also adds value to your property.
0 notes
Text
How do I start my home automation project with iot at low cost?
Take into account the following steps to start an inexpensive IoT home automation project. First, establish your objectives. List the appliances and processes, such lighting, thermostats, or security cameras, that you wish to automate. Choose open-source solutions with flexibility and device interoperability, such as Home Assistant or OpenHAB.
Next, choose IoT devices from embedded that are being classified as automotive embedded or electric vehicles embedded affordable and compatible with your preferred platform. Affordable smart switches and sensors are offered by companies like Sonoff and Shelly. For device communication, use well accepted protocols like MQTT to ensure easy integration.Repurpose current hardware: The controllers can be Raspberry Pi boards or old iPhones. Utilise cloud services that are free or inexpensive, such as Blynk or Cayenne, for remote access. Investigate do-it-yourself options for creating unique sensors or actuators using Arduino or ESP8266/ESP32 boards.
Use tutorials, forums, and internet tools to educate oneself. There is a wealth of knowledge available on IoT and home automation projects on websites like YouTube and GitHub. Engage the neighbourhood to resolve problems and learn more.Consider security when using strong passwords and frequently updating device firmware. As necessary, gradually extend your system while balancing usefulness and expense. With this strategy, you may create a personalised home automation system while keeping costs down and acquiring important IoT experience.
1 note
·
View note
Text
A Step-by-Step Guide to Developing an IoT App
Embarking upon the development of an application for the realm of the Internet of Things (IoT) can prove to be an exhilarating pursuit. However, it is incumbent upon you to engage in meticulous strategizing and cultivate a profound comprehension of the intricate IoT ecosystem. Presented herein is a meticulous, step-by-step manual to set you on the path to IoT application development:
Grasp the Fundamentals of IoT: Prior to delving into the realm of development, it is imperative to acquire a profound understanding of the foundational principles that underlie the Internet of Things. IoT constitutes a network interconnecting a myriad of devices that engage in communication and data sharing via the vast expanse of the internet. These devices encompass a diverse spectrum, spanning from sensors and actuators to commonplace objects like refrigerators and thermostats.
Define the Purpose of Your IoT Application: It is of paramount importance to articulate with precision the raison d'être and objectives of your IoT application. What quandary shall it resolve? Who comprises your target demographic? Grasping the purpose of your application marks the inaugural stride towards crafting a triumphant IoT solution.
Select the Appropriate Hardware: Exercise discernment in the selection of hardware components for your IoT venture. This may entail the adoption of sensors, microcontrollers, and communication modules. The choice of hardware is contingent upon the specific requirements of your application and the devices it shall interface with.
Opt for a Development Platform: A plethora of IoT development platforms lay at your disposal, including but not limited to Arduino, Raspberry Pi, and the offerings presented by eminent cloud services providers like AWS IoT and Azure IoT. Your selection of a platform ought to harmonise with the exigencies of your project and your own proficiency level.
Acquire Proficiency in Programming Languages: Depending on your chosen hardware and platform, it becomes incumbent upon you to familiarise yourself with programming languages such as C/C++, Python, or JavaScript. These programming languages hold sway in the realm of IoT application development.
Establish Connectivity among Devices: Forge a nexus of communication linking your IoT apparatuses and the application. This endeavour typically necessitates the establishment of Wi-Fi, Bluetooth, or alternative communication protocols. Vigilantly institute mechanisms to guarantee secure data transmission and the incorporation of authentication safeguards.
Effectuate Data Accumulation and Processing: IoT applications pivot upon the compilation and analysis of data emanating from interconnected devices. Deploy mechanisms for data acquisition and processing to distil meaningful insights from the data corpus.
Conceive User Interface (UI) Design: Ponder the fashioning of an intuitive user interface for your application. This segment constitutes the interface through which users engage with your creation, thus, it must be imbued with user-friendliness and aesthetic allure.
Deliberate Upon Mobile App or Web App Development: Consider whether your IoT application will manifest as a mobile app or a web-based counterpart. This judgement hinges upon the demographic you aspire to cater to and the devices they favour.
Engage in Rigorous Testing and Debugging: Subject your IoT application to a rigorous battery of tests across an array of devices and diverse scenarios. Methodically discern and rectify any aberrations or glitches that may manifest during this phase.
Fortify Security Measures: It is incumbent upon you to acknowledge that IoT applications are susceptible to security vulnerabilities. Thus, institute a robust fortification regime to safeguard user data and the sanctity of the IoT ecosystem.
Harness the Power of Data Analytics and Visualisation: Employ data analytics tools to glean profound insights from the data reservoir. The visualisation of this data serves to render it comprehensible and invaluable to end-users.
Engage in Ongoing Monitoring and Enhancement: Post-deployment, vigilance becomes the watchword. Continuously monitor the performance of your IoT application and avidly solicit user feedback. Iteratively enhance the application's functionality and bolster its security infrastructure.
Adhere to Compliance and Regulatory Standards: It is imperative that your IoT application remains compliant with pertinent regulations and standards, particularly if it processes sensitive data or is implicated in safety-critical functions.
Embrace Scalability and Expansion: As your IoT application garners users and gains prominence, prepare to scale your infrastructure and expand its competencies to meet burgeoning demands.
Always bear in mind that the development of an IoT application is a dynamic journey, marked by perpetual learning and adaptation. Keep abreast of the latest trends and technologies within the ever-evolving IoT landscape to sustain the competitiveness of your creation.
Hire brillmindz for IoT app development
BrillMindz, based in Saudi Arabia, is a well-known mobile App Development Company in Jeddah. The company is well-known for its skill and inventiveness, and it specialises in developing cutting-edge Internet of Things solutions. BrillMindz develops customised solutions that suit varied industries and customer needs, thanks to a strong grasp of IoT technology and a team of talented employees. Their dedication to excellence and track record of successful projects make them a top choice for organisations in Saudi Arabia and abroad looking to leverage the power of IoT to improve operations, efficiency, and customer experiences. Email us at [email protected].
#mobile app development company in sauid#mobile app development company in jeddah#mobile app development company in riyadh#IoT App development company
0 notes
Text
Raspberry Pi Projects
Raspberry Pi is a tiny computer that packs a punch! It's a single board computer that's small enough to fit in the palm of your hand, but powerful enough to run a variety of projects. Whether you're a beginner or a seasoned pro, there's a Raspberry Pi project for you.
One of the most popular projects for Raspberry Pi is creating your own media center. With software like Kodi, you can turn your Raspberry Pi into a streaming device that can play all of your favorite movies and TV shows. You can even add a touch screen and use it as a portable media center.
Another popular project is creating a retro gaming console. With software like RetroPie, you can emulate all of your favorite classic games and play them on your Raspberry Pi. You can even connect it to a TV or monitor and use it as a standalone gaming console.
Raspberry Pi can also be used for home automation projects. You can use it to control lights, thermostats, and other smart devices in your home. You can even use it to set up a security system or create a smart mirror.
Raspberry Pi is also great for learning to code. You can use it to learn programming languages like Python and Scratch. There are also a variety of educational resources available that can help you learn how to code and build projects with Raspberry Pi.
Overall, Raspberry Pi is a versatile and affordable computer that can be used for a wide range of projects. Whether you're into gaming, home automation, or coding, there's a Raspberry Pi project that's perfect for you. So why not give it a try and see what you can create!
#raspberrypi#DIY#electronics#programming#arduino#codeforbeginners#DIYelectronics#DIYtech#DIYrobotics#DIYcomputers#makermovement#makersgonnamake#DIYscience#DIYengineering#DIYeducation#STEM#STEMeducation#computerscience
2 notes
·
View notes