#SC12
Explore tagged Tumblr posts
Visit Tumblr Blog
Explore Tumblr blogs with no restrictions, modern design and the best experience.
Last Seen Tumblr Blogs


Fun Fact
Tumblr was attacked by a cross-site scripting worm deployed by the Internet troll group GNAA on Dec 3, 2012.
Text
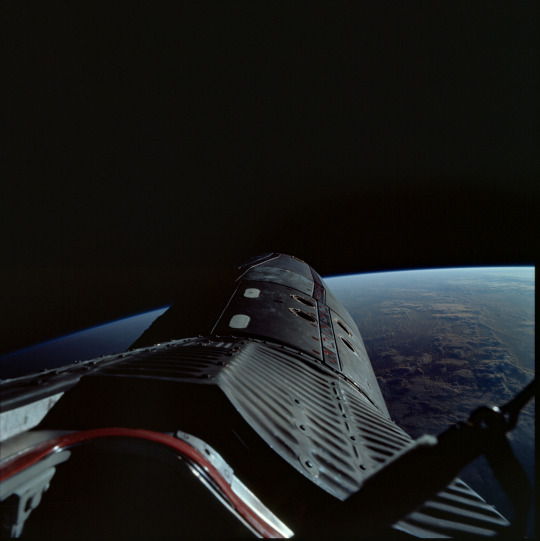


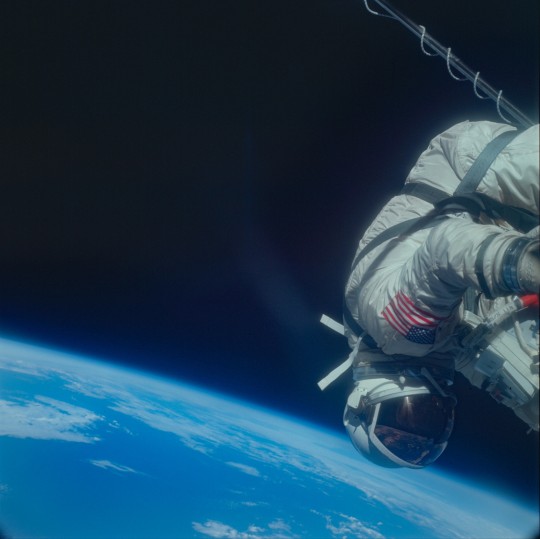
Astronaut Edwin Eugene Aldrin Jr on an EVA during the Gemini XII Mission.
Date: November 12, 1966.
NARA: 5807071, 5807147, 5807065, 5807019, 5806996, 5806978
#GT-12#GT-XII#Gemini 12#Gemini XII#SC12#NASA#Gemini Program#Project Gemini#Gemini#Space#Earth#November#1966#my post
252 notes
·
View notes
Text
Scotsman SC12-2838-24 Controller | PartsFe UK
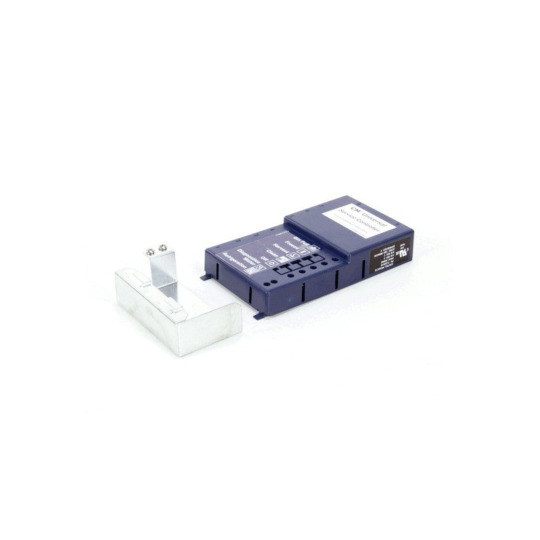
The Scotsman SC12-2838-24 Controller is a high-performance component designed for use in Scotsman ice machines. This reliable controller helps regulate and manage the machine's functions, ensuring smooth and efficient operation. Made from durable materials, it is built to withstand the demands of commercial environments. The SC12-2838-24 controller is essential for maintaining the proper functioning of your Scotsman ice machine, providing precise control over ice production, temperature regulation, and other critical processes, thereby extending the lifespan of the equipment and improving performance.
To keep your restaurant running smoothly, it's crucial to invest in Scotsman Controller that ensure long-lasting performance.
0 notes
Text
Scotsman SC12-3060-22 230V Harvest Assist Kit | CateringSparesOnline

We stock a massive inventory of commercial catering equipment parts, from industry-leading manufacturers. Whether your ice machine needs a new evaporator coil, your convection oven requires a fresh heating element, or your grill is missing a grate, CateringSparesOnline has the exact replacement part you need to get things humming again. Order Scotsman SC12-3060-22 230V Harvest Assist Kit today! Shop Restaurant Equipment Parts & Accessories at Catering Spares Online, available at the best prices.
#restaurantequipmentparts#cateringequipmentparts#cateringpartsuk#cateringsparesonline#cateringparts#SC12-3060-22
0 notes
Text
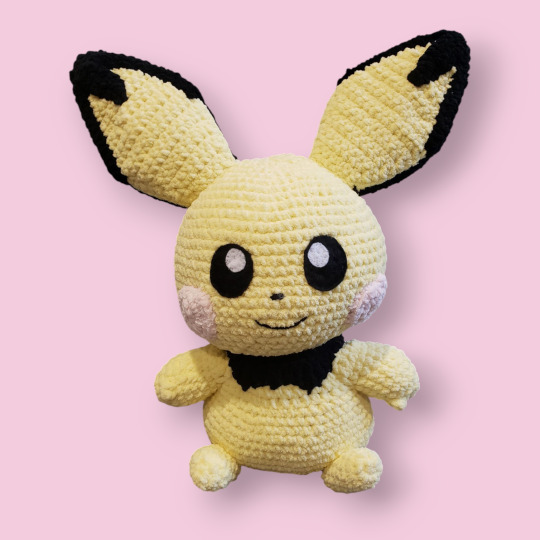


Briefly coming back from my hiatus to make an XXL Pichu ⚡
Pattern is below the cut ⬇️
Notes: Pattern was made using Bernat Blanket yarn. You may need to adjust the pattern if you use yarn of a different weight.
Popcorn stitches in this pattern are made using 5 single crochets.
Head
In light yellow
1. Mr8 (8)
2. Inc x8 (16)
3. [Sc, inc] x8 (24)
4. [Sc6, [sc, inc] x3] x2 (30)
5. [Sc6, [sc2, inc] x3] x2 (36)
6. [Sc6, [sc3, inc] x3] x2 (42)
7. [Sc6, inc] x6 (48)
8. [Sc7, inc] x6 (54)
9. [Sc8, inc] x6 (60)
10. [Sc9, inc] x6 (66)
11. [Sc10, inc] x6 (72)
12-21. Sc around (72)
22. [Sc10, dec] x6 (66)
23. [Sc9, dec] x6 (60)
24. [Sc8, dec] x6 (54)
25. [Sc7, dec] x6 (48)
26. [Sc6, dec] x6 (42)
27. [Sc5, dec] x6 (36)
28. [Sc4, dec] x6 (30)
FO. Stuff and do not close.
Body
In light yellow
1. Ch17, starting in 2nd stitch in chain, sc15, sc3 in next stitch, turn to stitch in other side of chain, sc15, sc3 in next stitch (36)
2. [Sc5, inc] x6 (42)
3. [Sc6, inc] x6 (48)
4. [Sc7, inc] x6 (54)
5. [Sc8, inc] x6 (60)
6. [Sc9, inc] x6 (66)
7. Sc around (66)
8. Sc around (66)
9. [Sc9, dec] x6 (60)
10. Sc around (60)
11. [Sc8, dec] x6 (54)
12. [Sc7, dec] x6 (48)
13. Sc around (48)
14. [Sc6, dec] x6 (42)
15. Sc around (42)
16. Sc around (42)
17. [Sc5, dec] x6 (36)
18. Sc around (36)
19. Sc around (36)
20. [Sc4, dec] x6 (30)
21. Sc around (30)
FO. Stuff, optionally placing a weighted pouch in the bottom. Do not close.
Neck detail
In black
1. Ch37 (37)
2. Turn, starting in 2nd stitch in chain, sc36 (36)
3. Ch and turn, sc, hdc, dc, tr*, dc, hdc, sc2, hdc, dc*, hdc, sc2, hdc, dc, tr*, dc, hdc, dc*, hdc, dc, tr*, dc, hdc, sc2, hdc, dc*, hdc, sc2, hdc, dc, tr*, dc, hdc (36) The * are the points of the spikes. You may want to put stitch markers here to make sure to they get sewn in a way to be visibly pointy when sewn to the body.
FO.
Left Arm
In light yellow.
1. Mr8 (8)
2. [Sc, inc] x4 (12)
3. [Sc2, inc] x4 (16)
4. Sc7, Popcorn stitch, sc8 (16)
5-9. Sc around (16)
If necessary, sc to get your hook across from the popcorn stitch from earlier. We will now start crocheting in rows.
10. Ch and turn, sc9 (9)
11. Ch and turn, dec, sc5, dec (7)
FO. Stuff well in the hand but lightly at the top. Do not close.
Right Arm
In light yellow.
1. Mr8 (8)
2. [Sc, inc] x4 (12)
3. [Sc2, inc] x4 (16)
4. Popcorn stitch, sc15 (16)
5-9. Sc around (16)
If needed, sc to get your hook over the popcorn stitch from earlier. We will now start crocheting in rows.
10. Ch and turn, sc9 (9)
11. Ch and turn, dec, sc5, dec (7)
FO. Stuff well in the hand but lightly at the top. Do not close.
Foot
In light yellow. Make 2.
1. Mr6 (6)
2. Inc x6 (12)
3-9. Sc around (12)
10. Dec x6 (6)
FO. Lightly stuff and close.
Ears Fronts and Backs
Make 2 in black for the backs and 2 in light yellow for the fronts. Ch and turn at the end of each row.
1. Ch2, turn and sc2 in 2nd stitch in chain (2)
2. Sc, inc (3)
3. Sc2, inc (4)
4. Sc3, inc (5)
5. Sc4, inc (6)
6. Sc5, inc (7)
7. Sc6, inc (8)
8. Sc7, inc (9)
9. Sc8, inc (10)
10. Sc9, inc (11)
11. Sc10, inc (12)
12. Sc11, inc (13)
13. Sc12, inc (14)
14. Sc across (14)
15. Sc12, dec (13)
16. Sc11, dec (12)
17. Sc10, dec (11)
18. Sc9, dec (10)
19. Sc8, dec (9)
20. Sc7, dec (8)
21. Sc6, dec (7)
22. Sc5, dec (6)
23. Sc4, dec (5)
Sc border around piece and FO.
Front Ear Border
In black. Make 4. Ch and turn at the end of each row.
1. Ch15, turn and sc in 2nd stitch in chain, sc13 (14)
2. Sc13, slst (14)
FO.
Front Ear Spike Detail
In black. Make 2. Ch and turn at the end of each row.
1. Ch 4, starting in 2nd stitch in chain, sc3 (3)
2. Sc across (3)
3. Dec, sc (2)
4. Sc across (2)
5. Dec (1)
6. Sc (1)
FO.
Back of Ear Spikes Detail
In light yellow. Make 2. Ch and turn at the end of each row.
1. Ch6, starting in 2nd stitch in chain, sc5 (5)
2. Hdc, dc, ch2, slst, ch2, dc, hdc
Tail
In black.
1. Ch10, starting in 2nd stitch in chain, sc8, inc, turn to stitch in other side of chain, sc8, inc (20)
2-5. Sc around (20)
6. Sc3, skip 14, sc3 (6)
7-12. Sc around (6)
FO. Leave a long tail. Whip stitch the skipped stitches from round 6 together to close the tail.
Cheeks
In light pink. Make 2.
1. Mr8 (8)
2. Inc x8 (16)
3. [Sc, inc] x8 (24)
FO.
20 notes
·
View notes
Text
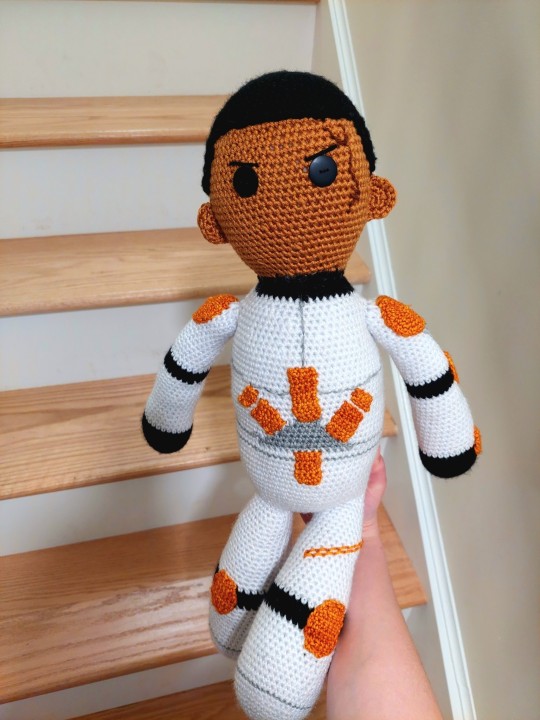
Hello! This was asked for by @kananarchiste and I've finally gotten around to writing it up-- my pattern for my crochet doll of Commander Cody-- and I'm giving it away for free! (If anyone does make this, please tag me-- I'd love to see it!!)
Commander Cody crochet doll pattern
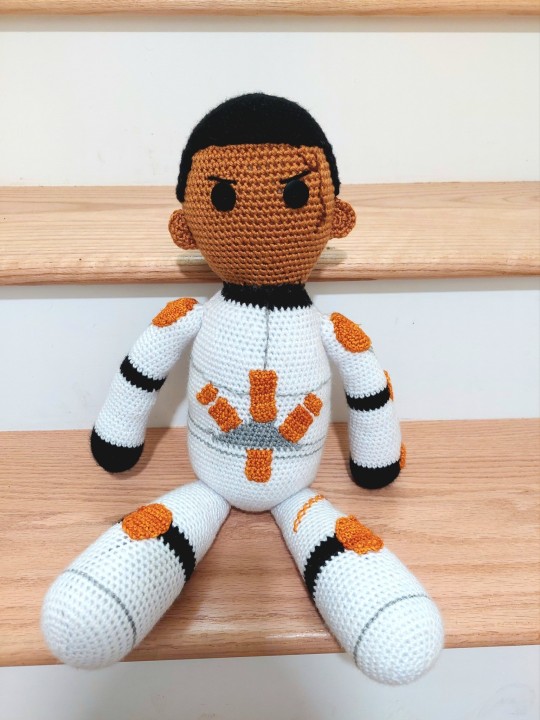
I've never written up a proper pattern before, so I apologize for any confusing bits or mistakes in advance. If you get stuck on something or if something is unclear, please shoot me an ask or DM and I'll do my best to help out.
Additional Pictures:


Yarn Weight: 4
Hook: 4 mm
Colors:
White
Yarn in Jango’s skin tone (I used Lion Brand Yarn’s Skein Tones yarn in adobe)
Black
Dark brown (for scar; contrasts with skin tone)
212th gold/orange (this can be hard to find. I got mine at a local independent store)
Grey
Extra materials:
Buttons and thread OR safety eyes (I used buttons because I like the look of them better)
Stitch markers
Yarn needle
Abbreviations Key:
Ch – chain
Dec – decrease
FO – fasten off
Inc – increase
Rep from * – repeat from *
Sc – single crochet
Sc2tog – single crochet two stitches together
Ss – slip stitch
St – stitch
Additional Notes:
All parts save for some embellishments are worked in the round. It is recommended that the crocheter mark each round for clarity.
Entire doll is worked in single US crochet.
Magic circle is NOT used.
I��m not sure what the gauge is, but mine is quite tight. Use a smaller hook if you feel as though your gauge is too loose.
BODY AND HAIR
Head– in adobe
1. Chain 2. Into the first st, sc 6 and mark with a stitch marker. (6) 2. Sc2 into each sc around. Mark. (12) 3-6. Increase by 6 each round to 48. (48) 7. Sc around. (48) 8. Inc by 6 (54) 9. Sc around. (54) 10. Inc by 6. (60) 11-12. Sc around. (60) 13. Inc by 6. (66) 14-15. Sc around. (66) 16. Inc by 6. (72) 17-18. Sc around. (72) 19. Dec by 6. (66) 20-21. Sc around. (66) 22-34. Dec by 6 in same pattern as increases. FO after crocheting 12 at row 34. Stuff firmly.
Body– in white, grey, black
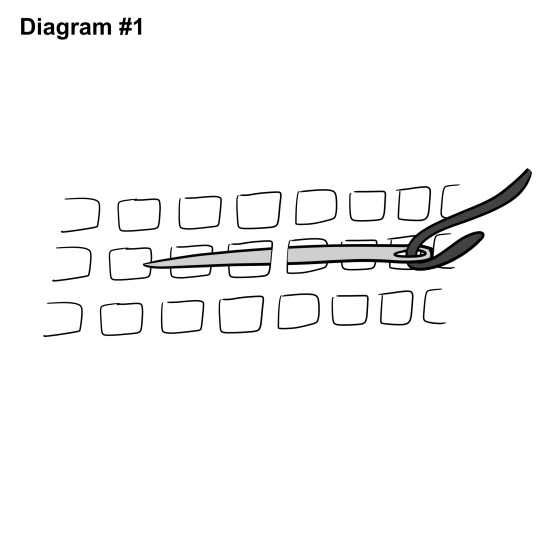
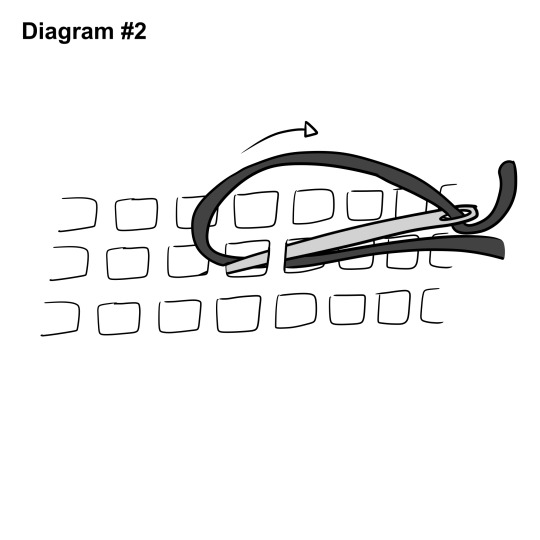
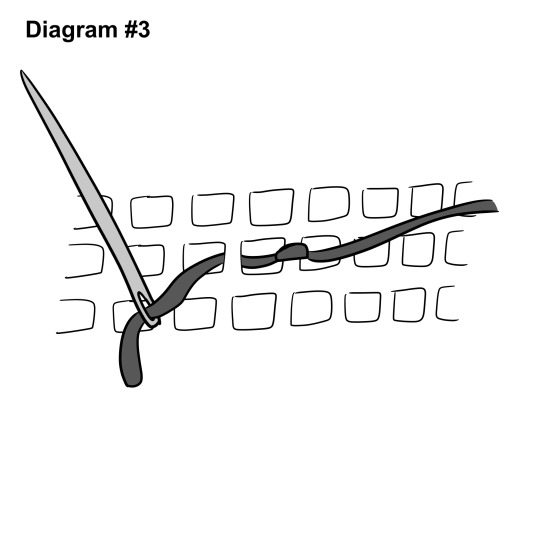
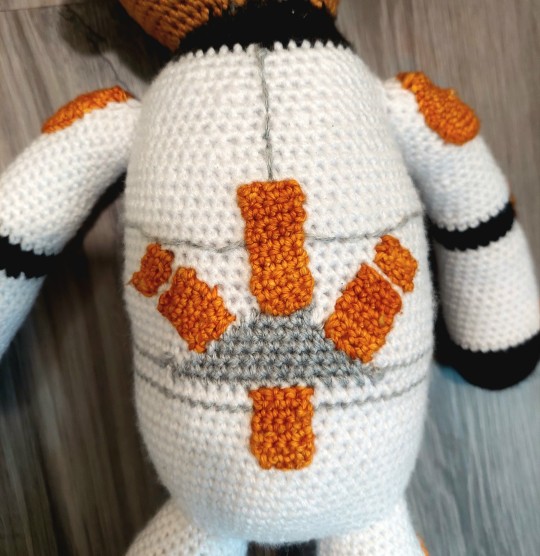
1. In white, ch2 and sc6 into second st from the hook. Mark. 2-12. Inc by 6 each round to 72. (72) 13-23. Sc around. (72) 24. Sc29 and FO. Ss in with grey and sc14. FO. Ss in with white and finish round. (72) 25. Sc30 and FO. Ss in with grey and sc12. FO. Ss in with white and finish round. (72) 26. Sc31 and FO. Ss in with grey and sc10. FO. Ss in with white and finish round. (72) 27. Sc32 and FO. Ss in with grey and sc8. FO. Ss in with white and finish round. (72) 28. Sc33 and FO. Ss in with grey and sc6. FO. Ss in with white and finish round. (72) 29. Sc34 and FO. Ss in with grey and sc4. FO. Ss in with white and finish round. (72). 30-41. Sc around in white. (72) 42. Dec by 6. (66) 43. Sc around. (66) 44. Dec by 6. (60) 45. Sc around. (60). 46. Dec by 6. (54) 47. Sc around. (54) 48. Dec by 6. (48) 49. Sc around and FO. (48) 50. In black, ss in and dec by 6. (42) 51. Dec by 6. (36) 52. Dec by 6. (30) 53. Dec by 6. (24) At this point, stuff the body firmly. 54. Dec by 6. (18) 55. Dec by 6. (12) 56. Sc around and FO, leaving a long tail, enough to sew the head on. (12) Using grey yarn and a yarn needle, stitch a trooper’s upper chest plate shape (from beginning of black area to about round 45, 5 rows above the grey shape). Center it above the grey shape. Also stitch a belt shape below the shape, shifting to a row below in the middle of the back. For chest plate pattern, see diagram #4. For how to stitch a pattern in, see diagrams #1-3.
Arms– in white, black (make 2)
1. In black, ch2 and sc6 in second ch from hook. Mark. (6) 2. Sc2 in each st around. (12) 3. Inc by 6. (18) 4. Inc by 6. (24) 5. Inc by 6. (30) 6-9. Sc around. (30) 10. Dec by 2. (28) 11. Sc3 and FO. Ss in white and finish the round. (28) 12-14. Sc around. (28) 15. Dec by 2. (26) 16-19. Sc around. (26) 20. Dec by 2. (24) 21-24. Sc around. (24) 25. Dec by 1 and sc3. FO. Ss in black and dec by 1, finishing the round. (22) 26-27. Sc around. (22) 28. Sc3 and FO. Ss in white and finish the round. (22) 29. Sc around. (22) 30. Dec by 2. (20) 31-34. Sc around. (20) 35. Dec by 2. (18) 36-39. Sc around. (18) 40. Dec by 2. (16) 41-44. Sc around. (16) At this point, stuff the arm. 45. Sc2tog around. FO, leaving a long tail. (8)
Legs– in white, black (make 2)
1. In white, ch2 and sc6 into the second ch from hook. Mark. (6) 2-7. Inc by 6 to 42. (42) 8-13. Sc around. (42) 14. Dec by 2. (40) 15-16. Sc around. (40) 17. Dec by 2. (38) 18-19. Sc around. (38) 20. Dec by 2. (36) 21. Sc around. (36) 22. Sc3 and FO. Ss in black and finish round. (36) 23. Dec by 2. (34) 24-25. Sc around. (34) 26. Dec by 1, sc2 and FO. Ss in white, sc10, and dec by 1. Finish round. (32) 27-28. Sc around. (32) 29. Dec by 2. (30) 30-31. Sc around. (30) 32. Dec by 2. (28) 33-34. Sc around. (28) 35. Dec by 2. (26) 36-37. Sc around. (26) 38. Dec by 2. (24) 39-40. Sc around. (24) 41. Dec by 2. (22) 42-43. Sc around. (22) 44. Dec by 2. (20) 45-46. Sc around and FO, leaving a long tail. (20) Stuff firmly. Using the yarn needle and grey yarn, stitch in a grey line about 10-11 rows above the starting circle. This is meant to delineate feet.
Hair– in black
1. In black, ch2 and sc6 into the second ch from hook. Mark. (6) 2-9. Inc by 6 to 54. (54) 10. Sc around. (54) 11. Inc by 6. (60) 12. Sc around. (60) 13. Inc by 6. (66) 14. Sc around. (66) 15. Inc by 6. FO. (66) Turn the dome inside out, so the backs of the stitches are facing out. Ss into the last st made. 16. Working right back along the last row, (sc48 and ch1)*, turn. (48) 17-23. Rep from *, turning each time. FO. (48) 24. Ss in at 7 sc in from the end of the last row and sc to the same on the other side, turn. (36) 25-26. Sc36, turn. (36) 27. Dec by 2 across row, turn. (34) 28-29. Sc across, turn. (34) 30. Dec by 2 across row, turn. (32) 31-32. Sc across, turn. (32) 33. Dec by 6 across row, turn. (26) 34. Sc across, turn. (26) 35. Dec by 6 across row, turn. (20) 36. Sc across and FO. (20) Turn right-side-out again. At this point, attach all limbs and the head to the body with the tails from the body and limbs. Don’t attach the hair until the ears are done. Attach with the seams from white-black transitions on limbs facing up and out for the legs and to the back for the arms. These will be covered with armor embellishments.
EMBELLISHMENTS
Pauldrons– in 212th gold/orange (make 2)
1. In 212th gold/orange, ch2 and sc6 into the second ch from hook. Mark. (6) 2-5. Inc by 6 to 30 and FO, leaving a long tail. (30) Attach to the tops of the arms in the shoulder area. Tuck in ends.
Leg pads– in 212th gold/orange (make 2)
1. In 212th gold/orange, ch3 + 1 for turning. Turn. (3) 2. Inc by 1, sc1, inc by 1, turn. (5) 3. Sc across, turn. (5) 4. Inc by 1, sc3, inc by 1, turn. (7) 5-7. Sc across and turn. (7) 8. Dec by 1, sc3, dec by 1, turn. (5) 9. Sc across and turn. (5) 10. Dec by 1, sc1, dec by 1, FO, leaving a long tail. (3) Attach to the legs where the black meets white and vice-versa. Tuck in ends.
Handguards– in 212th gold/orange (make 2)
1. In 212th gold/orange, ch5 + 1 for turning. Turn. (5) 2. Sc across, turn. (5) 3. Inc by 1, sc3, inc by 1, turn. (7) 4. Sc across and turn. (7) 5. Sc across and FO, leaving a long tail. (7) Attach over the backs of the hands where black meets white. Tuck in ends.
Back panel– in 212th gold/orange (make 1)
1. In 212th gold/orange, sc10 + 1 to turn. Turn. (10) 2. Inc by 1, sc8, inc by 1, turn. (12) 3. Inc by 1, sc10, inc by 1, turn. (14) 4-8. Sc across and turn. (14) 9. Dec by 1, sc10, dec by 1, turn. (12) 10. Dec by 1, sc8, dec by 1, turn. FO, leaving a long tail. (10) Attach to the back where the belt stitching jumps a row. Tuck in ends.
Elbow pads– in 212th gold/orange (make 2)
1. In 212th gold/orange, sc2 + 1 for turning. Turn. (2) 2. Inc by 1, inc by 1, turn. (4) 3. Sc across and turn. (4) 4. Inc by 1, sc2, inc by 1, turn. (6) 5. Sc across and turn. (6) 6. Dec by 1, sc2, dec by 1, turn. (4) 7. Sc across and turn. (4) 8. Dec by 1, dec by 1 and FO, leaving a long tail. (2) Attach to the backs of the elbows where white meets black and vice-versa. Tuck in ends.
Ears– in adobe (make 2) – You want to make a half-circle
1. In adobe, ch2 and sc6 into the second ch from hook. Mark. (6) 2. Sc2 into the first 3 st of the round to make 6 st and ch1 to turn. Turn. (6) 3. (Inc by 1 + 1 sc) 3 times and FO, leaving a long tail. (9) Using the yarn needle, sew each ear onto either side of the lower half of the head, leaving room for the hair to go on. At this point, attach the hair. Using the yarn needle and grey yarn, stitch in grey stripes on Cody’s arms.
SUNBURST
Central ray– in 212th gold/orange (make 1)
1. Sc4 + 1 for tuning. (4) 2-10. Sc across, turn. FO, leaving a long tail. (4) Attach to the top of the grey shape on the chest, pointing up. Tuck in ends.
Side and bottom rays– in 212th gold/orange (make 3)
1. Sc4 + 1 for tuning. (4) 2-7. Sc across, turn. FO, leaving a long tail. (4) Attach to the sides and bottom of the grey shape. Tuck in ends.
Ray tops, for side rays– in 212th gold/orange (make 2)
1. Sc4 + 1 for tuning. (4) 2-3. Sc across, turn. FO, leaving a long tail. (4) Attach to the tops of the side rays, leaving a small white space between the top of the rays and the ray tops. Tuck in ends.
FACE
Eyes
Buttons: using a sewing needle, attach the buttons to the yarn stitches so that they form eyes.
Safety Eyes: if using safety eyes, attach as normal in the desired position.
Eyebrows
Using the yarn needle with black yarn, form the eyebrows. Cut the yarn and tie the ends together. Pull the yarn so that the knot in on the inside of the crochet and not facing out.
Scar
Using the yarn needle with dark brown yarn, stitch Cody’s scar in.
DIAGRAMS/PICTURES
#star wars#commander cody#marshal commander cody#cc 2224#star wars the clone wars#the clone wars#swtcw#tcw#crochet#amigurumi#crochet doll#crochet pattern#beans art#considering making smaller trooper dolls but im likely to sell those patterns#this one is free though :)
71 notes
·
View notes
Text
if you are squid you do not see this. my scope management is Fine.
Delphinium crochet pattern.
trumpet bit:
magic ring
rnd 1: sc6
sc-sc in sc3
sc3 sc-sc inc sc3
sc4 sc-sc inc sc 3
sc3 sc-sc inc sc6
sc
sc 2 sc-sc inc sc8
sc 3 sc-sc inc sc8
sc rnd
sc4 sc-sc inc sc8
sc rnd
sc3 sc-sc inc sc10
sc2 sc-sc inc sc12
sc3 sc-sc inc sc12
sc rnd
sc4 sc-sc inc sc12
sc3 sc-sc inc sc14
sc2 sc-sc inc sc16
sc3 sc-sc inc SC 16
petals
row 1, SC2 along trumpet, ch18,sk1, sl1, sc1, hdc, DC, dc-dc Inc, tc3, qc 4, qi4, qi-qc-tc-dc, Sl in base of chain.
row2, sl16 up middle bit.
row 3 sc1,hdc, dc-dc Inc, tc3, qc4, qi4, qi-qc-tc-dc Sl in base chain.
sc2 along trumpet.
repeat 5x
clit petal thing
Ch8
sk1, sl1,sc1,DC, tc-tcx2, tc-tc-dc-tc-tc, tc-tcx2 DC, SC, SL ch4, sl1
labia petal thing.
ch9, sk3, sl1, ch1, tc-tcinc, qc-qc, qi-qi, qi-qi-qi-qi-qi, sl3, (mirrored), ch9, sk3, sl1, ch1, tc-tc inc, qc-qc, qi-qi-qi-qi-qi.
hot glue clit and labia around trumpet opening.
#i unfortunately do not know what the parts of a flower are <3#ill rb with pics once ive made one in a color my camera doesn't hate.#irl its a nice white flower. my phone make it look like a wadded up tissue paper
24 notes
·
View notes
Note
holy cow how'd you make so many tiny dunmeshi plushies?? they're awesome btw! but what adjustments did you make to the tiny chilchuck pattern to make it look like izutsumi?
I worked like a lil assembly line SOBS. It was fun and i ended up needing to make MORE during the convention, but I honestly. have no idea how i powered through it.
As for Izutsumi!! I still plan on releasing the patterns but for now i hope!! this messy explanation will do
Obligatory link to the chilchuck pattern just in case
One difference I'll note is when i started making tons of them, i ended up deciding to adjust the first foot over a stitch so theres that slight difference between the below pattern n the one linked above
Color Key Black, Ivory, Brown, Red
R1: Mr 6 R2: Inc 6 R3: (Sc,inc)x6 R4-6: Sc5, Sc8 Sc5 R7: HDC 18 R8: (Sc, Dec) x6 R9: FLO// Sc3 BBL Sc4 BBL Sc3 R10: Sc12 R11: Sc4 BBL Sc3 BBL Sc3 R12: Dec6
For her pieces I did them mainly via inserting the hook between stitches and crocheting them onto the main body, rather than making pieces to sew on-
Hair: Insert hook at the edge of the top hairline and pull through a loop. CH5, Sc, Hdc, dc, trb, and SLST into the middle of the hairline. Ch4 Sc Hdc Dc, Slst into a stitch or two before the hairline ends, CH5, Sc, Hdc, dc, trb. and then slst past the end of the face. I would then glue/sew the ends down so they would stay flat on her face.
Ears: Where the hair meets skin on row 4, Insert hook and pull through a loop. Ch 4, Sc Hdc, Dc, and slst into the middle-ish of the top of the head. Do the same for the other side.
Tail: Middle of row 10 or 11, Insert hook and pull through a loop. Ch5, HDC 4 down the chai Insert into the same place as before and slst.
When i actually release the patterns, I'll have pictures and such, but for now hopefully this is,, somewhat?? easy enough to follow? Im a very visual person so like OTL its easier to show rather than tell so idk how easy this is to read.
4 notes
·
View notes
Text
Fleur

Fleur is a stylish and practical hanging basket, it can be used as an odds and ends organiser, or as shown pop a cute faux succulent pot in it for an on trend decorator piece.
Requirements:
75m of 12 ply yarn or you can double strand an 8ply yarn (sample shown is Moda Vera Egerton Twist)
5mm hook
Darning needle
Stitch marker
Abbreviations: (US terms)
Ch: chain
Sc: single crochet
Hdc: half double crochet
Dc: double crochet
Skp: skip
Anything between *…* is repeated to the end of the round.
Anything between {…} is worked into the same stitch.
Pattern:
Ch4, sl st the first ch to the last ch to create a ring.
Round 1: Working into the ring, sc6, place a marker in the first st. You will remove and replace this marker at the start of each round. (6)
Round 2: {sc2} in each st (12)
Round 3: *sc1, {sc2} in the next st* x6 (18)
Round 4: *sc2, {sc2} in the next st* x6 (24)
Round 5: *sc3, {sc2} in the next st* x6 (30)
Round 6: *sc4, {sc2} in the next st* x6 (36)
Round 7: *sc5, {sc2} in the next st* x6 (42)
Round 8: *sc6, {sc2} in the next st* x6 (48)
Round 9: *sc7, {sc2} in the next st* x6 (54)
Rounds 10-14 sc54 (54)
Rounds 15-16 Hdc4, sc14, hdc4, sc32 (54)
Round 17: Hdc4, dc14, hdc36 (54)
Round 18: dc30, {dc1 and skp1} x 9, dc7 (46)
Round 19: Hdc4, sc6, ch10, skp2, sc6, hdc28 (54 including chains made)
Round 20: Sc10, sc12 around the ch10 , sc34 (56)
Round 21: Sc56
Finish off and weave your ends in with a darning needle.
10 notes
·
View notes
Text

made alien mittens : pattern is for left hand and not 100% accurate. had to slightly alter for right hand and has resulted in little fingers being bigger so currently solving that
alien mittens
- [ ] ch11
- [ ] 10 sc rib for 28 st not inc chain
- [ ] connect, turn inside out
- [ ] 28sc around top row
- [ ] 28sc for one more row (28)
- [ ] 11sc, inc in 12, 13sc, inc, 2sc (30)
- [ ] inc in prev 2 inc st (34)
- [ ] sc all around (34)
- [ ] “”
- [ ] “”
- [ ] inc in 2 st in line with previous inc (38)
- [ ] sc all around (38)
- [ ] “”
- [ ] “”
- [ ] “”
- [ ] “”
- [ ] “”
- [ ] “”
AFTER THUMB
- [ ] sc12, sk10, sc16
- [ ] sc all around (28)
- [ ] “”
- [ ] “”
- [ ] sc 25, inc in next 2 ST, sc1
- [ ] sc 30
- [ ] “”
- [ ] “”
- [ ] “”
LITTLE FINGERS
- [ ] sc5, sk14, sc11
- [ ] sc all around
- [ ] “”
- [ ] “”
- [ ] “”
- [ ] “”
- [ ] “”
- [ ] “”
- [ ] “”
- [ ] “”
- [ ] “”
- [ ] “”
- [ ] dec in each st (7)
INDEX FONGER
- [ ] sc in each stitch inc the ones that the other fingers are in
- [ ] sc all around
- [ ] “”
- [ ] “”
- [ ] “”
- [ ] “”
- [ ] “”
- [ ] “”
- [ ] “”
- [ ] “”
- [ ] “”
- [ ] “”
- [ ] “”
- [ ] dec in every st
THUMB
- [ ] sc in each stitch inc ones the hand st were in
- [ ] sc in every stitch
- [ ] “”
- [ ] “”
- [ ] “”
- [ ] “”
- [ ] “”
- [ ] “”
- [ ] “”
- [ ] “”
- [ ] “”
- [ ] dec in every st
THUMB
- [ ] sc in every st inc the end ones with. stitch already in
- [ ] sc in every around
- [ ] “”
- [ ] “”
- [ ] “”
- [ ] “”
- [ ] “”
- [ ] “”
- [ ] “”
- [ ] “”
- [ ] “”
- [ ] dec in every st
0 notes
Text

【 東京国際映画祭にて出演作品ワールドプレミア 】
出演作品『くまをまつ』 (滝野 弘仁監督)
東京国際映画祭 Nippon Cinema Now部門にて 招待上映です!
①10/29(火)17:25〜(監督Q&Aあり) ②11/2(土)13:30〜(監督・キャストによる舞台挨拶あり)
上映会場はTOHOシネマズ 日比谷 sc12です。
メインの出演ではないのですが 滝野さんに呼んでいただき 2年連続2度目の東京国際映画祭での 出演作品上映となり、うれしいです。
主演・平野鈴さんと共演、とても貴重な体験でした。役や作品に対する考え方や向き合い方などをお聞きする機会もあり、こういう方がやはり選ばれるべく主演に選ばれるのだなと。
内田周作さんはまだ観れていない作品も含めてだいたい僕が観たかったり憧れる作品に多数出演されていて、共演シーンはなかったのでお会いすることはなかったのですが、同じ作品に僕も出演できたことはうれしかったです。
竹内啓さんは同郷の石川県出身。最近はシネモンドさんで上映された『にびさびの巣』でも素晴らしい演技、そしてたくさんのお客さまが来場されていたのが記憶に新しく、とても今、注目されている俳優だと思います。 僕が行ったことある寿司屋に内田さんと行っていたり、今回もレッドカーペットの楽しそうな写真を送ってくれました。
撮影の米倉伸さんは最近だと『ナミビアの砂漠』などの撮影もされていますが、僕の出演作品『repeat in the room』を観てくれていたそうで、少しそんなお話もできて楽しかったです。
衣裳の小宮山芽以さんはいくつかの作品でお世話になっております。映画だけではなく、いろいろなジャンルの衣裳、スタイリングのお仕事をされています。 今回もこの作品でたくさんの衣裳を担ってらっしゃいます。
松野泉さんは最近だと『悪は存在しない』などの録音をされていますが、ご自身で監督や音楽活動もされていて、この作品の音楽も松野さんです。 福井映画祭代表の酒井さんと交流があり、そんな話も撮影の合間にお話できたことがうれしかったです。
助監督には登り山智志さん。 『ちかくて、とおい』という僕の出演作品の監督でもあります。こういったかたちでの再会ってもちろんうれしくて、おかげさまで、俳優活動を続けていてよかったと思える機会も多くなってきました。
そして滝野さん。滝野さんは基本あまり連絡がなく、クールな印象ですが、今回、石川県小松市での撮影で、石川県で活動する僕にオファーのお声かけをくださったのはびっくりしました。僕はメインの出演ではないのですが、みんなに平等に接していましたし、撮影や編集の経過なども教えてくださいました。 あらためておめでとうございます、滝野さん。 これから各地で上映決まるとうれしいです。
ーーーーーーーーーーーー
素晴らしいキャスト、スタッフのみなさま全員のご紹介は割愛しますが、滝野監督の素晴らしき才能の今を作品として放つ最高のタイミングとして東京国際映画祭でワールドプレミア。
ぜひ、みなさま、ご来場、ご高覧いただきましたら幸いです。
東京国際映画祭ホームページや僕も随時予約リンクをSNSに貼ったりいたします。 お近くのみなさま、ぜひ!
ーーーーーーーーーーーー
『くまをまつ』 監督・脚本:滝野弘仁 出演:平野鈴、渋谷いる太、中村映里子、大場みなみ、松浦りょう、内田周作、竹内啓、森葉南、星能豊ほか
撮影:米倉伸 照明:小川大介 録音:松野泉 衣裳:小宮山芽以 ヘアメイク:河本花葉 編集:冨永圭祐 監督補:渡辺直樹 助監督:登り山智志 制作担当:佛木雅彦 音楽:松野泉 協力プロデューサー:鈴木徳至、加藤綾佳、床井祐二朗
0 notes
Text

My latest release is now available, a 3 track EP follow-up to Topia.
Available from Bandcamp here: https://sc12.bandcamp.com/album/ology
and all major streaming services.
0 notes
Text


"The Gemini spaceflight program concludes as the Gemini-12 spacecraft, with astronaut James A. Lovell Jr., command pilot, and Edwin E. Aldrin Jr., pilot, aboard, nears touchdown in the Atlantic Ocean 2.5 nautical miles from the prime recovery ship, USS WASP. Gemini-12 splashed down at 2:21 p.m. (EST), Nov. 11, 1966, to conclude the four-day mission in space."
Date: November 15, 1966
NASA ID: S66-59986, KSC-66C-9516, S66-59936
#GT-12#GT-XII#Gemini 12#Gemini XII#SC12#NASA#Gemini Program#Project Gemini#splash down#recovery#November#1966#Atlantic Ocean#USS Wasp (CV-18)#USS Wasp#Essex Class#Aircraft Carrier#ship#United States Navy#US Navy#Navy#USN#my post
75 notes
·
View notes
Text
Seleção Caminhos SC12
A Selecção Caminhos é dedicada a toda a cinematografia nacional de produção e co-produção profissional, consagrando nesta secção todos os géneros cinematográficos. Nesta sessão serão exibidos os filmes: Recém-Nascido (Sofia Ferreira, Dinis Leal Machado) Presépio (Vasco Vasconcelos) Ponto Final (Miguel Lopez Beraza) A sessão decorrerá no TAGV no dia 14 Nov, Terça, às 19:00.

View On WordPress
0 notes
Photo

It’s my birthday. And, I want to drive this.
#Lamborghini#Lamborghini Squadra Corse#doors up#fatto in Italia#bella macchina#sc12#Essenza SC12#Verde
20 notes
·
View notes
Text
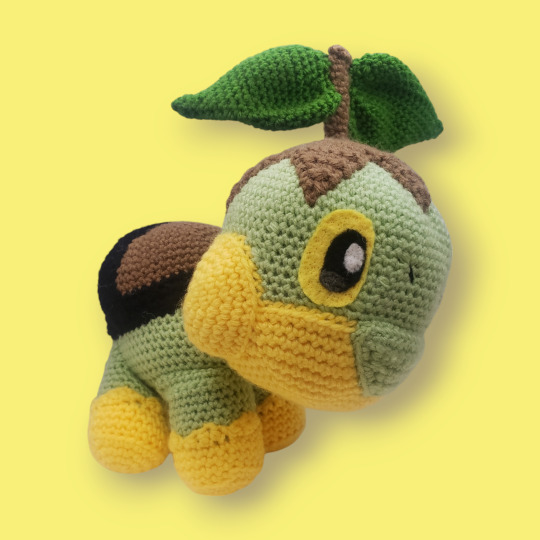
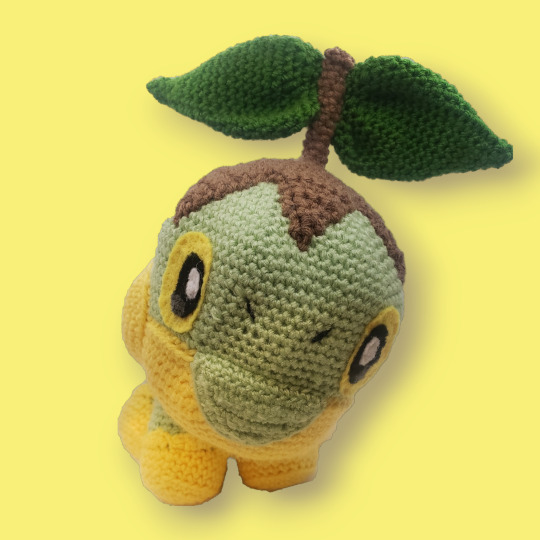

Turtwig 🌱
Pattern below the cut ⬇️
Head (in light green):
1. Mr6 (6)
2. Inc x6 (12)
3. [Sc, inc] x6 (18)
4. [Sc2, inc] x6 (24)
5. [Sc3, inc] x6 (30)
6. [Sc4, inc] x6 (36)
7. [Sc5, inc] x6 (42)
8. [Sc6, inc] x6 (48)
9. [Sc7, inc] x6 (54)
10. [Sc8, inc] x6 (60)
11. [Sc9, inc] x6 (66)
12. [Sc10, inc] x6 (72)
13. [Sc11, inc] x6 (78)
14-16. Sc around (78)
17. [Sc11, dec] x6 (72)
18-19. Sc around (72)
20. [Sc10, dec] x6 (66)
21-22. Sc around (66)
23. [Sc9, dec] x6 (60)
24-25. Sc around (60)
26. [Sc8, dec] x6 (54)
27-28. Sc around (54)
29. [Sc7, dec] x6 (48)
30. Sc around (48)
31. [Sc6, dec] x6 (42)
32. [Sc5, dec] x6 (36)
33. [Sc4, dec] x6 (30)
34. [Sc3, dec] x6 (24)
35. [Sc2, dec] x6 (18)
36. [Sc, dec] x6 (12)
37. Dec x6 (6)
Chin (in yellow):
1. Mr6 (6)
2. Inc x6 (12)
3. [Sc, inc] x6 (18)
4. [Sc2, inc] x6 (24)
5. [Sc3, inc] x6 (30)
6. [Sc4, inc] x6 (36)
7. [Sc5, inc] x6 (42)
8. [Sc6, inc] x6 (48)
9. [Sc7, inc] x6 (54)
10-13. Sc around (54)
Cheeks (in yellow):
1. Mr6 (6)
2. Inc x6 (12)
3. [Sc, inc] (18)
4. [Sc2, inc] (24)
5. [Sc3, inc] (30)
6-7. Sc around (30)
Body (in light green):
1. Ch10, sc8 down chain, sc3 in next ch, sc8 on other side of chain, sc3 in next chain (22)
2. [Sc8, inc x3] x2 (28)
3. [Sc8, [sc, inc] x3] x2 (34)
4. [Sc8, [sc2, inc] x3] x2 (40)
5. [Sc8, [sc3, inc] x3] x2 (46)
6. [Sc8, [sc4, inc] x3] x2 (52)
7. [Sc8, [sc5, inc] x3] x2 (58)
8. [Sc8, [sc6, inc] x3] x2 (64)
9-16. Sc around (64)
17. [Sc8, [sc6, dec] x3] x2 (58)
18. [Sc8, [sc5, dec] x3] x2 (52)
19. [Sc8, [sc4, dec] x3] x2 (46)
20. [Sc8, [sc3, dec] x3] x2 (40)
21. [Sc8, [sc2, dec] x3] x2 (34)
22. [Sc8, [sc, dec] x3] x2 (28)
23. [Sc8, dec x3] x2 (22)
Front lip (in light green):
Ch and turn at the end of each row
1. Ch13, turn, sc12 down the chain (12)
2. Dec, sc8, dec (10)
3. Dec, sc6, dec (8)
4. Dec, sc4, dec (6)
5. Dec, sc2, dec (4)
6. Dec x2 (2)
7. Dec (1)
8. Sc around piece
Shell:
1. (Starting in brown) Mr6 (6)
2. Inc x6 (12)
3. [Sc, inc] x6 (18)
4. [Sc2, inc] x6 (24)
5. [Sc3, inc] x6 (30)
6. [Sc4, inc] x6 (36)
7. [Sc5, inc] x6 (42)
8. [Sc6, inc] x6 (48)
9. [Sc7, inc] x6 (54)
10-12. Sc around (54)
13-15. (Change to black) sc around (54)
Shell stripe (in black):
Ch and turn at the end of each row
1. Ch33, sc in 2nd stitch from hook, sc31 (32)
2-3. Sc32 (32)
Legs:
1. (Starting in yellow) Mr6 (6)
2. Inc x6 (12)
3. [Sc, inc] x6 (18)
4. [Sc2, inc] x6 (24)
5. BLO sc around (24)
6-7. Sc around (24)
8. (Switch to light green) BLO sc around (24)
9-14. Sc around (24)
15. Sc12, ch and turn (12)
16. Sc10, dec, ch and turn (11)
17. Sc9, dec, ch and turn (10)
18. Sc8, dec (9)
FO and leave tail for sewing.
Attach to front loops of row 8 in yellow
1. Sc, [hdc, dc, hdc, slst] x5, hdc, dc, hdc, slst in same stitch as attachment point
FO and leave a tail for sewing. Sew this piece down flat on the leg to create the zigzag pattern.
Tail (in light green):
1. Mr4 (4)
2. [Sc, inc] x2 (6)
3. [Sc, inc] x3 (9)
4. [Sc2, inc] x3 (12)
5. [Sc3, inc] x3 (15)
6. [Sc4, inc] x3 (18)
Stem (in brown):
1. Mr4 (4)
2-13. Sc4 (4)
14. Sc3, inc (5)
15. Sc around (5)
16. Sc4, inc (6)
17. Inc x6 (12)
18. [Sc, inc] x6 (18)
19. [Sc2, inc] x6 (24)
20. [Sc3, inc] x6 (30)
21. [Sc4, inc] x6 (36)
22. [Sc5, inc] x6 (42)
23*. Sc7, ch and turn (7)
24. Dec, sc5, ch and turn (6)
25. Dec, sc4, ch and turn (5)
26. Dec, sc3, ch and turn (4)
27. Dec, sc2, ch and turn (3)
28. Dec, sc, ch and turn (2)
29. Dec (1)
FO. We will now create the remaining points of the head cap. Insert your hook into a stitch adjacent to the triangle you just completed, in round 22. Crochet the next triangle starting at row 23, marked with a '*' above. Create a total of 6 triangles. Leave a long tail for sewing on at least one of the tops of the triangles.
Leaves (in green):
1. Mr4 (4)
2. Sc3, inc (5)
3. Sc4, inc (6)
4. [Sc2, inc] x2 (8)
5. [Sc3, inc] x2 (10)
6. [Sc4, inc] x2 (12)
7. [Sc5, inc] x2 (14)
8. [Sc6, inc] x2 (16)
9. [Sc7, inc] x2 (18)
10. [Sc8, inc] x2 (20)
11. [Sc9, inc] x2 (22)
12. [Sc10, inc] x2 (24)
13. [Sc11, inc] x2 (26)
14. [Sc12, inc] x2 (28)
15. [Sc13, inc] x2 (30)
16-17. Sc around (30)
18. [Sc3, dec] x6 (24)
19. [Sc2, dec] x6 (18)
20. [Sc, dec] x6 (12)
37 notes
·
View notes
Text

First of the Mingos is done so I can put the written instructions up now. I'm probably going to change the edging to be something else later so it's just the center element+ 1 mingo. The written instructions are more accurate than the chart bc I made changes on the fly, trust them B4 trusting the chart. But also know my phone kept trying to spell check the stitch numbers so like. Good luck. (wish me luck too, I need to make 7 more of these fuckers)
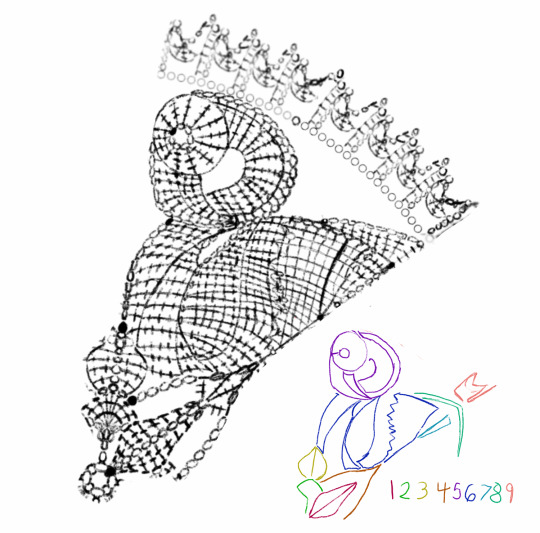
note: this is a mess, sorry, also "vc" stands for quintuple crochet and "qc" for quadruple.
color 1: ch 8 in a ring
Color 2: ch 10, sk1, st3, hdc2, dc2, hdc1, sc1, cross, sc1, hdc1, dc2, hdc2, sc2, st2 ch1, bring yarn down back of petal, sk1. Repeat 4x
color2: ch5, slip1, sk3, dc6 in 1st, dc2 connect to next petal, sc12 back across and down to base, repeat 4x
ch6, dc1, ch1, tc1, ch2, sk1 sl1, tc1, ch1, dc1 ch5, sl2, ch7, sk1 sl1, hdc1, dc2, hdc1, sl2 cross, sl2, hdc1, dc2, hdc1, sl2, ch1, repeat 4x
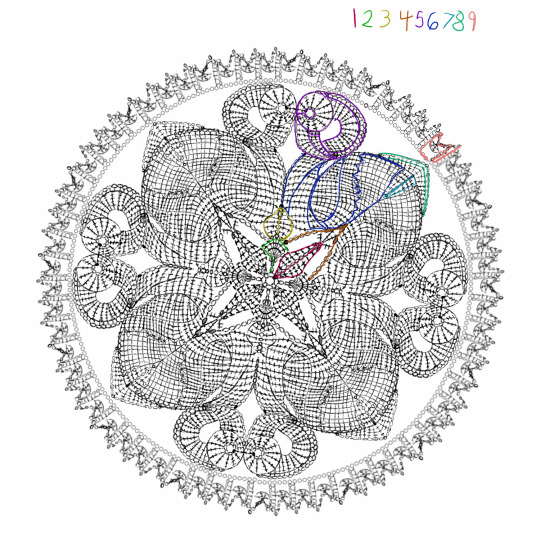
mingo x8, 4 facing left, 4 facing right
color 3: 7 in a circle, ch2, dc1 in base, dc2 in next st, tc2 in next 2, qc2 in next, tc2 in next, dc2 in last,
color 2: ch 14 in last st, sl2, sc2, hdc2, dc7, connect to face 2stchs below base of chain
color 1: starting at base of beak, ch2 dc2, next 2 together, dc1, hdc next two together, a next two together x2, sc n2tog, sl4
starting at tip of beak,ch21 sl1 to the head, turn, sl1 to head, sc back, sl4 along beak, qc3, qc 2tog x5, tc 2tog, dc 2tog, hdc 2tog, sc1
start at beak, ch 12 7st from tip, sl1 into top of element 3, sl1 on3, turn, hdc3, dc2, tc5, qc4
sl3, turn, sl1, sc1 in base, hdc1, dc2 tog twice, tc4, qc2, tc2, tc1 connect to e4, sl3, qc1, tc1, dc1, hdc1, sc1,sl1
color4, start 4sts below tip of beak, chain5, chain 1 into the stitch right at the Mingos beak, slip 1 on the neck, turn, hdc2, dc3, tc2, qc1, vc2, 2vc3, qc2, tc1, dc1, sl1 in e4, turn, sc1, hdc1, dc3, (dc1, qc1)8
color 2, start at top of back, chain 5 (qc1, vc1)6, qc1,tc2, dc2, hdc1,sc1, turn sl3, sc4, dc2tog tc2tog, qc2tog2, vc2tog,
color1: at top of wing, ch3, dc2tog2, dc1, hdc, sc, sl
color3: starting in top of wing, ch2, dc2, hdc3, sc1, sl1, turn, sl2, sc3, hdc2, ch3, tc3 accross last hdc, dc3 across, hdc3, sc3,sl2
put an edge on it, block, iron, and starch it. mingo :)

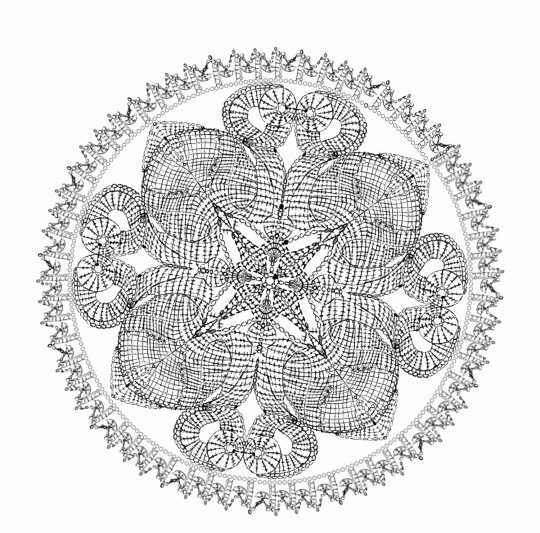
instead of working on anything I should be i made a mingo doily pattern. bc Mingos are amigos.
19 notes
·
View notes