#SCREEN SEPARABLE CONNECTOR
Explore tagged Tumblr posts
Visit Tumblr Blog
Explore Tumblr blogs with no restrictions, modern design and the best experience.
Last Seen Tumblr Blogs


Fun Fact
Tumblr was created by web developers David Karp and Marco Arment.
Text
DIFFERENCES BETWEEN 12/20(24)KV 630A SCREEN SEPARABLE CONNECTOR AND SCREENED SEPARABLE CONNECTOR
The distinction between a 12/20(24)kV 630A screen separable connector and a screened separable connector lies in their specific designs and functionalities, both of which are critical components in medium voltage power distribution systems.
A 12/20(24)kV 630A screen separable connector refers to a connector designed for use with cables of voltage ratings 12kV and 20kV, with potential suitability for voltages up to 24kV. This type of connector is specifically equipped to provide a secure and screened connection between cables, ensuring efficient power transmission while effectively containing the electric field within the connector. It often incorporates features such as silicone rubber insulation and shielding to prevent electrical interference and enhance safety in medium voltage applications.
On the other hand, a screened separable connector is a broader term encompassing connectors designed with a focus on electromagnetic compatibility (EMC) and electrical shielding. These connectors are equipped with shielding layers or screens that minimize electromagnetic interference and reduce the risk of signal disruptions or noise propagation. Screened separable connectors are particularly valuable in environments where sensitive equipment or systems may be affected by electromagnetic emissions from power cables.
The choice between these connectors depends on the specific needs of the power distribution system. A 12/20(24)kV 630A screen separable connector is ideal when the primary concern is maintaining the integrity of the cable connection itself, ensuring efficient power transfer while containing electric fields. On the other hand, a screened separable connector is advantageous when electromagnetic compatibility is paramount, as it helps mitigate electromagnetic interference that could impact adjacent systems or equipment.

0 notes
Text
The Essential Synergy of Touch-Proof Screened Separable Connectors, Shear Bolt Lugs, and Shear Bolt Connectors
In the complex and demanding landscape of electrical installations, particularly in medium-voltage and high-voltage systems, safety and reliability are paramount. From substations and switchgear to industrial plants and renewable energy installations, the seamless flow of electricity hinges on robust and dependable connections. Touch-Proof Screened Separable Connectors, Shear Bolt Lugs, and Shear Bolt Connectors are essential technologies that contribute significantly to the safety, reliability, and longevity of electrical systems. Each serves a distinct purpose, yet they work in synergy to fortify electrical infrastructure against electrical hazards, mechanical stresses, and environmental factors.
Touch-Proof Screened Separable Connectors: Prioritizing Safety and Reliability
In high-voltage environments, the risk of accidental contact with energized components is a significant concern. Touch-Proof Screened Separable Connectors are designed to mitigate this risk, providing a safe and reliable interface between cables and electrical equipment.
These connectors offer:
Touch-Proof Design: An insulated outer layer prevents accidental contact with live parts, even when disconnected.
Screened Construction: A Faraday cage effect minimizes partial discharges and ensures reliable performance.
Separable Design: Easy disconnection and reconnection for simplified maintenance and testing.
High-Quality Insulation: Excellent electrical insulation and environmental resistance.
Reliable Performance: Dependable operation under demanding conditions.
Enhanced Safety: Significantly reduced risk of electrical shock.
These connectors are crucial in switchgear, transformers, and cable joints, where safety and reliability are paramount. They enable safe and efficient operation of high-voltage systems.
Shear Bolt Lugs: Ensuring Consistent and Reliable Cable Terminations
When it comes to terminating cables to electrical equipment, consistency and reliability are essential. Shear Bolt Lug provide a mechanical connection that eliminates the need for specialized compression tools and ensures a secure and consistent connection.
These lugs offer:
Consistent Connection: Shear bolts break off at a predetermined torque, ensuring uniform pressure.
Elimination of Compression Tools: Simplified installation and reduced costs.
Versatility: Compatibility with a wide range of cable sizes and types.
Reduced Installation Time: Simplified installation process.
Improved Reliability: Minimized risk of loose connections and electrical faults.
Applications: Substations, switchgear, control panels, and other critical equipment.
The shear bolt mechanism ensures that the correct amount of force is applied to the cable conductor, creating a reliable and long-lasting termination.
Shear Bolt Connectors: Versatile Solutions for Cable Jointing and Splicing
For reliable cable jointing and splicing, Shear Bolt Connectors provide a versatile and efficient solution. These connectors offer a mechanical connection that is both robust and easy to install.
These connectors offer:
Reliable Mechanical Connection: Strong and dependable connection between cables.
Wide Range of Applications: Compatibility with various cable sizes and materials.
Simplified Installation: No specialized tools required.
Consistent Performance: Minimized risk of loose connections and electrical faults.
Versatility: Suitable for indoor and outdoor applications.
Applications: Underground cable jointing, overhead line splicing, and other cable connections.
Similar to shear bolt lugs, these connectors utilize shear bolts that break off at a predetermined torque, ensuring a consistent and reliable joint.
The Integrated System: Building a Foundation of Safety and Reliability
Touch-Proof Screened Separable Connectors, Shear Bolt Lugs, and Shear Bolt Connectors work in conjunction to provide a comprehensive approach to ensuring the safety and reliability of electrical systems. Touch-proof connectors minimize the risk of electrical shock, while shear bolt lugs and connectors ensure consistent and reliable cable connections.
By implementing these technologies, electrical engineers and technicians can:
Enhance safety for personnel and equipment.
Minimize the risk of electrical faults and equipment failures.
Simplify installation and maintenance.
Extend the lifespan of electrical infrastructure.
Ensure the continuous and efficient delivery of power.
The integration of these products provides a robust and dependable electrical system, maximizing safety and ensuring long term reliability.
0 notes
Note
Hello I recently downloaded "Otis camera tools" for DAI and I was wondering if u could assist me with it, for some reason when I try to use the "IGCS CONNECTOR" dof doesn't activate properly, I click to render the picture but it shakes around on the screen and doesn't do anything ^^' I've never used mods like this so idk what I'm doing sorry if this isn't what u usually help with
Hi anon,
IGCSDOF doesn't work like a traditional DoF shader. It takes a little getting used to.
I'm guessing you've read the guide on Frans' website about IGCSDOF? So you should understand the basics from there. Make sure you have the companion IGCSDOF.fx shader activated in your load order. You want it to be at the bottom of your load order. The only thing below it should be film grain.
Basically what happens is:
choose whether you want fast or classic mode (if you're using TAA/DLAA/DLSS/FSR you'll want to use classic mode) and choose the number of frames to wait (for classic you'll probably want 4-5 to be safe, for fast you'll likely want 2 but you may need to experiment to see which produces the sharpest in-focus results)
decide what you want to be in focus, and turn on the magnifying box and position it over that part of the image
move the focus slider until the double images overlay each other perfectly and sharply in the area you want to be in focus
move the intensity slider (above the focus slider) until the part of the image you want to be blurred has its double images a distance away from each other - the further apart they are the more blurred it will be (this is the hardest part to get used to, but you'll quickly learn what you need to aim for)
readjust the focus slider if it became slightly misaligned when you adjusted the intensity
make any adjustments to quality and bokeh shapes (if you're making a test render to check the bokeh/blur intensity, set the quality to low at first so it renders quickly, and then change it to higher once you're happy)
start the rendering and wait for it to finish
take your shot
end the session
Depending on the mode (fast or classic) and quality you chose, the number of frames you wait, and the fps of your game, the rendering part can take anywhere from a few seconds to several long minutes. That's completely normal.
While it's rendering, it takes hundreds of separate temporary shots from different angles. This is why it looks like it's moving around on the screen. It then blends all those shots together into one final one, and that's when you take your picture.
It is complicated and confusing the first few times you do it, but once you've practiced a bit it'll become a quick and easy process. The hardest part is being patient while waiting for the render to complete. I've waited over 20 minutes before. It's totally worth it.
12 notes
·
View notes
Text
CST826 touchscreen support for 2.1" Round TFT Display
Our cute 2.1" round 480x480 TFT display has a CST826 capacitive touchscreen overlay - different than the other screens that all have Focaltech FT6336U or similar. Thanks to MakerMelissa we now have support in both Arduino and CircuitPython! We also got a version of our 4" 720x720 display with capacitive touch. Unfortunately this one doesn't have the same 'integrated' style where the CTP pads go through the 40-pin connector, bot rather they're on a separate 6-pin 0.5mm pitch tail. Still, it's worth the effort, so we'll make a lil breakout for the touch connector so you can plug it into the QT port.
9 notes
·
View notes
Text
Anatomy of a Microscope
I. Scope —
Perceptor’s scope has many different functions aside from the simple functionality of magnification. It functions as an Electron Microscope, laser imaging, and thermal imaging. His scope is directly connected to his nerve and optical net, functioning, essentially, as a third eye. He is able to disconnect it via connectors attached to his sensory net, however the process is arduous and requires nerve suppressants.
His scope is incredibly sensitive, similar to how an eyelid is, and is a No Touch Zone, no matter who you are.

II. Stabilizers —
The stabilizers on his forearms originally functioned as stabilizers for his scope. However after his near death experience he modified them so they could stabilize his entire arms. Functionally, his alt mode is useless for anyone else to use because of this. (Something he much prefers.)
Now, however, he completely removed their external component and they're stored entirely under his armor for internal manual control.
III. Tactile Sensors —
Perceptor has highly specialized tactile sensors in his fingers, meant for deconstructing the composition of any object on an atomic level. This was useful for when he was a metallurgist. Aside from his fingers, his crest is similarly sensitive. He can detect atmospheric changes, meant to circumvent any changes that might tamper with his scans due the atmosphere he’s in (or without.)
IV. Specialized Needles
—
The tips of Perceptor’s fingers can fold back revealing needles that also function as clippers. These were personal modifications he made when he acted as something of a medic for the Wreckers. He's kept these, and still uses them for particularly small specimens, though not as often.
V. Universal Emulator —
Perceptor has a universal emulator: what this means is that he has the unique ability of interfacing with any technology and acting as the admin of said tech. Hacking is very easy for him because of this, but he doesn't give it much use outside of situations that call for it. If removed his consciousness is transferred to it while his body remains dormant. As long as he isn't separated from his body for long he'll stay alive. After a certain point he’ll deteriorate and his body will slip into an irreversible coma. It acts as something of a secondary brain module, which is why he's able to consume so much information at once.
His emulator is located next to his fuel tank in his torso, think where the spleen would be in a human.
VI. Data Cables —
Modern microscopes, especially electron microscopes can connect to screens, and the data is often transferred to databases so other scientists can parse the information. I think it'd make sense that he'd have data cables. Before the war, microscopes were often paired up with computers because of this. There is often symbiotic relationships between microscopes and computers.
Like all Microscopes, Perceptor has data cables of his own. They're located under his backplates. He doesn't tend to use them much, however, as they have a strange interaction with his Universal Emulator.
Since his Emulator basically functions as a self preservation mechanic, when he hooks up to something with his cables an EMP is set off in. He has to go through a Process to sidestep the natural reaction and he doesn't like bothering with it. It wouldn't be that way if not for the early experiments Airies did when he was like Just Born, so it's more a result of The Horrors than his emulator.
Simultaneously, he cannot help but act as a sort of... trojan malware with them, uploading much of his own subroutines into whatever system he's connected to. This one is a direct result of his emulator.

VII. Weight Distribution System —
In order to counteract the weight of his scope and all that goes with it, he's got a complex system of weights and pullies throughout his body that, when in root mode, make his left side heavier (since his scope is on the right side) so he stays balanced, and when he transforms those weights even out.
#【 meta. 】 — ❝ the flesh is your reference for knowing the soul. ❞#【 ❝ i will never stop complaining and that is a promise ❞ 】 ✕ ooc.#Talked this through with Tau :]#We <3 specbio#Had to update these...#anyways
5 notes
·
View notes
Text
Hey everyone, it's time for another game update!
But first I just wanted to say a big thanks to all of you for playing the game and sharing your creations. It's great to see so many new players joining the community, it really helps motivate me to keep trying to make the game better!
OK, on to the update.
Soap Box Challenge
See how fast you can get down the hill under gravity alone, no motors allowed. This new scenario gives you an idea of the kind of "mini games" possible with Lua scripting, but it still barely scratches the surface really, hopefully we can push the boundaries of this more in the future. Anyway, check it out and let me know what you think.
New Parts
Continuous servo motors, more crown, rack, & worm gear sizes, more "hole & plate" connectors, and round ended beams.
Part Behaviours
Separate servo forward & reverse angles, flip pulley belts, link displays to multiple parts, etc.
Here's a quick look at some of these changes:
youtube
Release notes:-
New Soap Box Challenge scenario.
New parts:-
Small and medium continuous servo motors.
24T and 40T Hi & Lo crown gears.
x3 rack gear.
x1 worm gear.
More "1-Hole Plate" and "2-Hole Plate" resizable connectors.
Rounded and half rounded resizable beams.
Part behaviour improvements:-
Servo motor part behaviour now has separately tweakable forward and reverse angles.
Servo and stepper motor part behaviours now have an "angular speed" data channel.
Pulley part behaviour now has an option to flip belt routing.
Displays can now be linked to multiple other parts.
Motor, battery, and rotor parts can now attach to each other, and to other parts in a more consistent way.
Changed plate on "plate axle" connector part to be circular.
Tweaked material strength of all wheels.
Added buttons to UI screens to open containing folder in Windows Explorer.
Added player "free flight movement mode" setting to allow for moving horizontally rather than along the view direction.
Added settings to the controls options screen for disabling each of the manipulators.
Improved crosshair.
Added Hungarian translations to currently localised strings, thanks to BlueGoldFlag.
Bug fixes.
Upgraded to Unity 2021.3.33.
2 notes
·
View notes
Text
Top Web Developers in Dubai | Custom Website Solutions Near You

Today, a website is not any longer just an accessory in the digital landscape. It is that primary part of an online presence and usually the first point of contact for potential customers. Whether you're starting a new business, growing an existing one, or revamping a brand, let the top web developers in Dubai help you set apart from the competition.
Dubai is an innovative and fast-paced country in digital growth, and it boasts a fantastic eclectic blend of technology talent and creative agencies. So if you really need scalable, strategically-built custom website solutions, you should understand what makes a web development partner exceptional — and how to find one near you.
Why Custom Websites Are Important While ready-made templates can get a business online quickly and efficiently, custom websites tend to be effective as they are built in conjunction with business goals, technical needs, and brand identity.
Benefits of custom web development: Tailored to Your Business Goals: Each and every feature is designed to support your sales funnel or service model or e-commerce strategy.
Custom Branding: The unique design will ensure that your business does not look like thousands of others using the same website blueprints.
SEO Ready: Built-in on-site optimization structure gives your site the best chance of ranking highly within search engines.
Mobile & User Friendly: Designed with the audience in mind—across all screen sizes and devices.
Scale Built: Your site can grow according to your business growth and without having to come up with it from scratch.
Characteristics of Some Best Web Developers in Dubai There are many out there, but finding the right web developer among them is what you need. A few things that make the top of the web developers in Dubai are as follows:
Solid Work Portfolio Previous projects were a good indication. A good developer or agency must possess several examples showing a technical range, quality design, and ease of use.
Client-Centered Approach Coding is not the only thing great developers do; they listen to your business needs, ask the right questions, and provide their recommendations based on their past experience.
Custom Development Skills It's the ability to create "from scratch," not just tweak templates that separates the professionals from those who "dabble" in development.
Mobile Responsive With over 60% of all web traffic originating from mobile devices, ensuring that your site runs flawlessly on phones and tablets is critical.
SEO Integrated Search engine optimization is not only about using keywords; it is also including clean codes, fast loading times, and optimized structure; that all starts at the level of development.
What Services Do Best Web Developers Offer In Dubai? An association with one of the best web design companies in Dubai would therefore imply that one is entitled to a whole range of services beyond mere design.
Front and Back-end Development
Connectors and Integrations (Shopify, WooCommerce, Magento)
CMS Development (WordPress, Drupal, Joomla)
Responsive Designs for Mobile Devices
Performance Boost
UX/UI Design
Integration frameworks and CRMs
POST-Launch Support and Maintenance
Corporate websites or e-commerce blogs, or anything in between, these are the services that allow your platform to act in the way you envision it.
Bringing Together Websites and Apps in Today's Environment Your digital strategy today should not just end with a website. More and more businesses are linking both the web and mobile to facilitate their users with a seamless experience. If you are going to build both, it makes perfect sense to partner with someone who understands how they connect.
The result is working with a team that is also a mobile app development company in UAE. Having one company do your app and website creates consistency in design, performance, and user experience—and it very often saves both time and costs.
The Real Business Benefit To Consider Honestly. What does a professionally developed website do for your business?
Establish Trust Immediately: A clean, modern-looking website gives customers confidence in your company and professionalism.
Lead Generation: All kinds of contact forms, booking systems, chatbots, and the like.
Search Visibility: Customized-built sites can easily be optimized for maximum visibility on search forms.
Brand Loyalty: An attractive website makes sure that people keep coming back.
Operational Efficiency: Saves time and minimizes errors by integrating with CRM, emailing tools, and automation.
Why Work with a Trustworthy Partner-Risians Technology If it is a full-service agency for end-to-end web development and digital solutions in Dubai that you seek, then Risians Technology is among the names that stand out. Proven experience in developing scalable and high-performance websites for businesses across verticals allows us to mix creativity with cutting-edge technology to set our clients on a steady path toward online platforms.
Our custom solutions include everything from SEO-optimized coding, and responsive layout, all the way to seamless mobile integration because we envision our solutions for far-reaching growth. Whether it is a modern corporate website, a highly functional e-commerce platform, or a fully integrated ecosystem of web and mobile applications, we have the skills to transform your idea into a genuine project.
A Few Pointers on Finding Custom Web Development in Your Area Even though you might be at the beginning, it is easy to kick-start your pursuit. Here are a few pointers to get you started:
Smart Google Searching: Use search queries such as "top Web Developers in Dubai" or "best Web Design Company in Dubai" to land some established names.
Business Listing Websites: Explore platforms like Clutch, GoodFirms, and Sortlist, where you can compare reviews, portfolios, and prices.
Ask for Referrals: This saves time when you get first-hand referrals from fellow business owners.
Free Consultation: Most reputable agencies will offer a free consultation. Use this time to ask questions that will allow you to gauge your level of comfort with the agency.
Final Thoughts In Dubai's highly competitive market, a website is not merely a digital storefront; it is your 24/7 sales engine, the representative of your brand, and the center for customer service. Partnering with the top-of-the-line web developers in Dubai ensures your website will be a visual treat that is also designed for speed, usability, and results.
From custom design to back-end development and app integration, there are very few things as smart to invest in off Dubai's leading web design companies. If your digital strategy is inclusive of applications, striking a partnership with a mobile app development company in UAE allows you to afford yourself an unbroken experience through every device embraced by your audience.
No matter the size of your business or the complexity of your project, expert web developers will help you design digital solutions that look great, work efficient, and grow along with your business.
Ready to Build a Website That Works for You? Let us help you bring your ideas to practical use as powerful digital experiences. Corporate websites, e-commerce platforms, custom web, and mobile solutions-we're here, and it's going to happen.
Contact us today and book a free consult to understand what we can do to elevate your online existence with custom-built web solutions geared to succeed in the UAE market.
#webdevelopment#webdesign#digitalmarketing#customwebsites#uiuxdesign#htmlcoding#responsivewebdesign#dubai#uaebusiness#developerslife#topwebdevelopers#mobileappdevelopment#webdesigncompany#ecommercewebdesign#seoagency#businessgrowth#webdevelopersdubai#webdesignindubai#startupuae
0 notes
Text
iPhone Screen Not Responding After Drop? Fix Guide

Accidentally dropped your iPhone and now the screen isn’t responding? You’re not alone. One sudden impact can leave your iPhone display unresponsive, glitchy, or completely black. Whether it’s a minor crack or no visible damage at all, a fall can affect internal components, leading to frustrating touch issues. Fortunately, not all hope is lost. With the right guidance, you can figure out what’s causing the issue and how to fix it — either yourself or with professional help. This guide walks you through the latest solutions to get your iPhone screen working again after a drop.
Why Your iPhone Screen Becomes Unresponsive After a Drop
Even when the screen looks fine externally, internal damage can affect the digitizer — the part that controls touch sensitivity. Sometimes, the fall disconnects internal components or slightly shifts the screen from its housing. Other times, the impact damages the LCD or OLED panel. Temperature changes, moisture exposure, and weakened adhesives can also worsen post-drop conditions, causing delayed failures.
The First Things You Should Check Right Away
When your screen becomes unresponsive, begin by inspecting the iPhone closely. Check for cracks along the edges, signs of separation between the screen and the frame, and any discoloration or flickering. These subtle signs often point to damage beyond the glass. If the iPhone turns on but doesn’t register touch, the digitizer is likely damaged. If the screen is black but the phone still vibrates or rings, you’re probably dealing with display failure.
Force Restart Might Bring It Back Temporarily
A force restart is a simple but effective step you should try first. It helps clear temporary glitches that may cause the screen to stop responding. Depending on your iPhone model, the restart sequence may vary, but it typically involves pressing the volume and side buttons in a specific order. While it won’t fix hardware damage, this can sometimes restore limited functionality long enough to back up your data or finish important tasks.
Try Connecting to a Computer for Clues
If your screen is completely black or frozen, connect the iPhone to a Mac or PC using a Lightning cable. If iTunes or Finder recognizes the device, that confirms it’s still functioning internally. You might even be able to initiate a backup or access important files. If the phone isn’t recognized, the drop may have damaged not just the display, but deeper internal components such as the logic board or power circuits.
External Damage Isn’t Always Visible
One of the trickiest parts of post-drop iPhone issues is that not all damage is obvious. Micro-fractures in the display, invisible separation between the screen and the motherboard, or pressure damage can all lead to a non-responsive screen. Even tiny dents on the frame can affect how the screen sits and functions. Just because there’s no crack doesn’t mean your phone escaped unharmed.
DIY Repair Options You Might Consider
If you’re confident with tech, you might consider a DIY screen replacement. This involves ordering a high-quality replacement screen, opening the device using precision tools, and swapping the damaged part. However, this can void any warranty and risks damaging other delicate components if done improperly. Still, it’s a lower-cost option for those comfortable with electronics repair and willing to follow step-by-step tutorials.
Why a Professional Diagnosis Is Worth It
A technician can open your iPhone and run a full diagnostic to determine whether the issue lies with the screen, the connectors, or something deeper like the motherboard. A proper inspection saves time and money by identifying the exact cause, which DIY attempts often overlook. In many cases, simply reconnecting or replacing a flex cable inside the phone resolves the issue — no full screen replacement needed.
Avoid Cheap Screen Replacements That Cause More Issues
Not all replacement screens are created equal. Low-quality parts may look the same but lack touch sensitivity, color accuracy, and durability. Worse, they can interfere with Face ID or True Tone features. Always choose premium-grade parts if you're replacing the screen. If you're using an iPhone Repair service in North Miami, confirm they use genuine or OEM-quality components backed by a warranty.
Back Up Your iPhone While You Still Can
If your screen intermittently works or is still responsive in some areas, use this window to back up your data. Sync to iCloud, transfer important photos, and update your settings. If repairs require a reset or replacement of the logic board, you risk losing everything. Having a fresh backup ensures peace of mind before moving forward with a fix.
When It’s Time to Replace Instead of Repair
Sometimes, the cost of replacing the screen — especially for newer models — approaches the price of a refurbished or slightly older iPhone. If additional damage like frame bending or internal water exposure is discovered, replacing the device might be the smarter financial move. Always compare repair costs with the current resale value of your iPhone before deciding.
Protect Your Phone After It’s Fixed
After getting your iPhone repaired, invest in a high-quality case and tempered glass screen protector. These small investments can prevent future screen failures. Also, avoid using your phone in extreme conditions like excessive heat or cold, which can compromise the new screen adhesive and cause premature failures after a repair.
Trusted Technicians Can Make All the Difference
Experience matters when it comes to iPhone screen repairs. A trained technician knows how to avoid static discharge, secure internal connectors, and test your phone for additional unseen damage. Whether it's reseating a flex cable or recalibrating the display, professionals have the tools and know-how that DIY kits don’t provide.
If your iPhone has a cracked screen, doesn’t hold a charge, or won’t turn on, we can help. At our Mobile Xpert North Miami center, we offer fast, professional repairs for every iPhone model — from iPhone 6 to iPhone 15 Pro. Our certified technicians use top-tier parts to return your device to like-new condition with reliable results.
We handle everything from shattered displays and battery issues to charging port damage, liquid exposure, and software glitches. Every repair includes a diagnostic check, gentle care, and warranty coverage. Visit our North Miami location or book a pickup today to get your iPhone restored quickly and affordably.
#iPhoneScreenRepair#iPhoneTouchscreenNotWorking#DroppediPhoneFix#UnresponsiveiPhoneScreen#iPhoneRepairTips#FixiPhoneAfterDrop#CrackediPhoneScreen#iPhoneTroubleshooting#iPhoneRepairServiceInNorthMiami#iPhoneDisplayIssue
1 note
·
View note
Text
Digitizer fixed! This is a Kindle Fire 8, gen. 10.

Infodump 👇

I found out that with these touch screens, the lcd gives the image and the digitizer is the glass that goes on top that controls the touchscreen capabilities. In this case, the cracks were on the top digitizer part, but the lcd screen was still working. After covering the cracked glass with tape, I used the heat gun to soften the adhesive around the edge of the device holding those two layers together. Most of the work in this type of repair is in separating the two parts without damaging the lcd underneath and creating a huge mess of glass, but I found that ifixit has tutorials for almost everything, and it gave me some good tips, like checking to make sure the magnets on the casing did not accidentally migrate to the digitizer frame, and really highlighting where the ribbon connector to the digitizer was, as well as including pictures of how to disconnect stuff from the motherboard. I already had some tools, and the replacement screen ($20) came with tools as well, but I needed add some 3m double sided foam tape ($7) to attach the new digitizer to the lcd screen.

I destroyed a cricut mat with the heat gun, so I will likely add a silicone work mat and some new picks next time I order a repair part from ifixit, but as far as entertaining me for a couple hours this was great enrichment! For reference, a new screen (digitizer and LCD) is about $50 for this model. A new kindle replacement? This kodel runs at $100. I would much rather repair than throw away. Electronic waste is a terrible thing.

1 note
·
View note
Photo

Dell E1709Wc LCD Monitor 17 Inch VGA EXCELLENT PRODUCTIVITY AT GREAT VALUE Help maximize your display investment with the excellent quality and reliability of Dell™ E1709W in a brand new ID. Offering a 1440 x 900 widescreen resolution, the wide viewable image size of the E1709W will help you enhance efficiency and productivity by enabling the running and display of multiple programs in one single wide screen without the hassle of incessant scrolling. Apart from offering 64% more content area as compared to the Dell E157FP1, Dell E1709W also renders you a fast refresh rate and a wide viewing angle. Dell E1709W helps lower operational cost and environmental impact by reducing up to 66%2 energy consumption as compared to traditional CRTs. Its slim design also helps you reduce desktop clutter and helps maximize your desk space. Boasting an intelligent blend of functionality and usability, the lean design of this sleek and stylish display goes extremely well with most desktops and will fit perfectly into most office environments. Intuitive and user-friendly features such as wall-mounting capabilities (wall-mount equipment sold separately) and panel tilt with support of 4 forward and 21 backward presents an added edge of versatility that will help give you the optimum visual experience you need to be at your best. Cleverly bundled with convenient built-in features, this chic display is the ideal solution for you as you seek an upgrade from the 15” standard flat panels or traditional CRT monitors. Get the maximum value you deserve. See More, Do More with Dell. OUTSTANDING FRONT-OF-SCREEN PERFORMANCE AND EASY CONNECTIVITY 1440 x 900 resolution provides spacious content area to help reduce scrolling up/down or left/right. 600:1 (typical) contrast ratio enables vivid color detail and great color accuracy. 8ms (typical) response time allows display of crisp images in fast motion video such as gaming or video editing. 250cd/m2 (typical) brightness renders outstanding performance while viewing motion video. Video Graphics Array (VGA) connectivity helps ensure compatibility with most computing systems. DESIGNED FOR COMFORT AND CONVENIENCE Slim black bezel fits into most office environments and desktops. Easy panel detachment from stand with wall-mounting capabilities (VESA standard 100mm, wall-mount sold separately). Panel tilt support (forward and back) designed to enable maximum comfort. DETAILED SPECIFICATIONS Dell™ E1709W 17-inch Widescreen Flat Panel Monitor Simplify IT at DELL.COM/ DISPLAY Viewable Image Size: 17” wide Preset Display Area: 367.2 mm (horizontal), 229.5 mm (vertical) 14.5” (horizontal), 9.04” (vertical) Optimal Preset Resolution: 1440 x 900 at 60Hz Pixel Pitch: 0.255 mm Brightness (Typical): 250 cd/m² Color Gamut (Typical): 65%3 Dynamic Contrast Ratio (Typical): 600:1 Viewing Angle (Typical): 150 (vertical), 160 (horizontal) Response Time (Typical): 8ms Panel Surface: Anti-glare CONNECTIVITY Available Connectors: VGA (Analog) DESIGN FEATURES Tilt: Yes VESA Mounting Support: Yes (100mm) Security: Kensington security port POWER Power Rating: 100 to 240VAC / 50Hz or 60Hz + 3Hz / 1.6A (Max.) Power Consumption: 25W (maximum) Power Saving Mode:
0 notes
Text
How Do HDMI Cables Transform Your Viewing and Listening Experience?

In today’s hyper-connected digital world, HDMI cables play a crucial role in simplifying and enhancing how we experience audio and video. Whether you're setting up a home cinema, streaming your favourite shows, or connecting a console to your monitor, the humble HDMI cable is the bridge that powers the experience. But what makes HDMI cables so important, and how do they compare with other connection types like RCA cables, optical cables, and AV cables?
This blog explores the hidden power behind HDMI cables, their variations, and why they’re the go-to standard for modern multimedia applications.
What Exactly Are HDMI Cables?
HDMI stands for High-Definition Multimedia Interface. It is a digital cable standard that transmits both video and audio signals through a single interface. This reduces clutter, improves quality, and eliminates the need for multiple separate cables. With advancements in display and sound technologies, HDMI has kept pace by supporting ultra-high resolutions and immersive sound formats.
HDMI cables transmit uncompressed digital video and audio signals
They support resolutions up to 10K depending on the version
Newer models include features like HDR, dynamic refresh rates, and enhanced audio return
They simplify installations by replacing multiple analog connections
Unlike older analog systems, HDMI ensures consistency in output quality from source to display, making it ideal for high-definition and 4K content.
How Do HDMI Cables Compare to RCA, Optical, and AV Cables?
It’s useful to understand what HDMI replaced. Traditional setups once relied on several analog cables, each serving a separate function. Let’s examine how HDMI compares to older alternatives.
RCA cables use separate connectors for video and stereo audio, and the quality suffers over longer distances
Optical cables offer high-quality digital audio transmission using light signals, but they don’t carry video and have limited bandwidth for modern formats
AV cables, usually composed of three connectors (composite video and two audio), are limited in resolution and not suitable for HD content
HDMI combines the functionality of all three, offering a streamlined and high-performance solution. It carries both high-resolution video and multi-channel digital audio, making it suitable for everything from 4K gaming to high-fidelity movie playback.
Which Types of HDMI Cables Are Available?
Not all HDMI cables are created equal. They vary based on their supported features, resolutions, and applications. Choosing the right one ensures you get the best experience without compatibility issues.
Standard HDMI cables support up to 1080i resolution and are suitable for basic HD devices
High-Speed HDMI cables can handle 1080p and 4K at 30Hz, along with 3D and deep color features
Premium High-Speed HDMI cables are certified to support 4K at 60Hz, HDR, and wide color gamuts
Ultra High-Speed HDMI cables are built for 8K, 10K, and features like variable refresh rate and eARC
Always check the specifications of your source and display devices to ensure you match the cable version with your setup needs.
Where Are HDMI Cables Used the Most?
HDMI cables are now found in almost every setting where audiovisual content is involved. Their compatibility and versatility make them indispensable across consumer and professional environments.
Home theaters rely on HDMI to connect televisions, projectors, and streaming boxes to audio receivers
Gaming consoles like PlayStation and Xbox utilize HDMI for 4K gameplay with minimal lag
Laptops and desktops use HDMI to extend displays or mirror content during presentations
Professional AV setups use HDMI for event screens, digital signage, and studio monitors
Streaming devices like Apple TV and Firestick need HDMI to deliver high-definition content to your TV
Their broad application range means you’re likely using HDMI without even realizing it—whether at home, work, or in public spaces.
What Features Should You Look for in an HDMI Cable?
Buying an HDMI cable might seem straightforward, but different setups require different features. Here are factors to consider before choosing one.
Cable version compatibility with your devices’ HDMI ports
Supported resolution and refresh rate (e.g., 4K at 60Hz or 8K at 120Hz)
Support for HDR, Dolby Vision, and other advanced video formats
Audio return channel (ARC or eARC) support for streamlined audio routing
Cable length and build quality for durable and long-distance installations
For home setups with gaming consoles or 4K TVs, opting for at least a premium high-speed cable ensures performance and future-proofing.
What Are the Real-World Advantages of HDMI?
The benefits of HDMI are more than just technical—they translate into real improvements in usability, efficiency, and experience.
One-cable convenience that reduces clutter and simplifies wiring
Superior picture quality with resolutions up to 10K for future-ready displays
Enhanced audio support including Dolby Atmos and DTS:X via eARC
Inter-device control using HDMI-CEC, allowing a single remote to operate multiple connected devices
Compatibility with a wide range of electronics, from soundbars to streaming sticks
These advantages make HDMI the most user-friendly and powerful multimedia cable on the market today.
Are HDMI Cables Evolving with Technology?
Absolutely. HDMI technology has evolved dramatically since its introduction. Today’s HDMI 2.1 standard supports features that cater to modern entertainment demands.
Dynamic HDR delivers scene-by-scene brightness and color adjustments
Variable refresh rates eliminate screen tearing during gaming
Quick media switching (QMS) reduces delays when changing video content
Enhanced Audio Return Channel (eARC) supports high-bitrate sound formats for immersive listening
This constant innovation ensures that HDMI stays relevant as new audio and video standards emerge.
When Might HDMI Not Be the Best Option?
Despite its wide adoption, HDMI is not always the ideal solution. Some setups might still require older formats depending on equipment limitations.
Analog devices without HDMI ports may only support RCA or AV connections
Optical cables might be preferred when audio needs to be routed through long distances without video
Specialized broadcasting or industrial environments may use SDI or other digital formats
Still, for most modern use cases, HDMI remains the superior choice.
Conclusion
HDMI cables have become the backbone of digital connectivity for audio and video. They offer unmatched clarity, convenience, and compatibility, outpacing older technologies like RCA cables, optical cables, and AV cables. As devices continue to advance, HDMI evolves alongside them, offering support for increasingly complex and high-quality formats.
Whether you're building a home theater, gaming setup, or professional workstation, HDMI cables ensure you experience every pixel and every sound with precision. Their role in modern digital infrastructure is not only foundational—it’s transformative.
0 notes
Text
What Is a Spudger? The Must-Have Tool for Tech Repairs
If you've ever attempted to open a smartphone, tablet, or laptop, you know how challenging it can be to separate tightly sealed components without causing damage. Enter the spudger—a simple yet indispensable tool for anyone involved in electronics repair.
🔧 What Is a Spudger?
A spudger is a slim, flat tool designed to pry open electronic devices safely. Typically made from plastic, nylon, or metal, spudgers feature a wedge-shaped end for opening casings and a pointed or hooked end for manipulating small components. Their non-conductive materials make them ideal for working around sensitive electronics without risking short circuits.
📱 Uses in Mobile and Laptop Repairs
In the realm of mobile and laptop repairs, spudgers are invaluable for tasks such as:
Opening device casings without scratching or damaging surfaces.
Disconnecting connectors and ribbon cables.
Removing or replacing batteries, screens, and other components.
Accessing internal parts for diagnostics or upgrades.
Their precision and gentle touch make spudgers essential for modern devices, where components are compact and delicate.
🧰 Types of Spudgers
Spudgers come in various shapes and materials to suit different repair needs:
Plastic Spudgers: Ideal for delicate tasks; they minimize the risk of scratching sensitive components.
Nylon Spudgers: Stronger than plastic and non-conductive, suitable for a wide range of electronic repairs.
Metal Spudgers: Durable and effective for stubborn components but should be used cautiously to avoid damaging delicate parts.
Wooden Spudgers: Traditionally used in electronics for their non-conductive properties; also popular in other crafts.
Some spudgers are double-ended, offering both a flat and a pointed tip for versatility.
🛒 Choosing the Right Spudger
When selecting a spudger, consider the specific repair tasks you'll be undertaking:
For general electronics repair: A nylon spudger offers a good balance of strength and safety.
For delicate devices: Opt for a plastic spudger to minimize potential damage.
For heavy-duty tasks: A metal spudger provides the necessary durability but requires careful handling.
Many technicians prefer to have a set of spudgers to accommodate various repair scenarios.
Incorporating a spudger into your toolkit can significantly ease the process of repairing and maintaining electronic devices. Its design caters to the intricacies of modern gadgets, ensuring that you can perform repairs efficiently and safely.
1 note
·
View note
Text
How to replace macbook Air A3113 Broken lcd screen? Watch this video for macbook Air 2024 M3 broken lcd screen repair. or Call 078394111 or visit 937 victoria street Hamilton New Zealand for macbook A3113 screen replacement.
A General guide how to replace macbook air 2024 lcd screen.
Replacing the LCD screen on a MacBook (model A3113 or similar) requires precision and care. Below is a general guide to help you through the process. Note that the exact steps may vary slightly depending on the specific MacBook model, so it's a good idea to consult a repair guide or video specific to your device (e.g., from iFixit).
Tools You’ll Need:
P5 Pentalobe screwdriver (for MacBook case screws)
T3 Torx screwdriver (for display screws)
Phillips #000 screwdriver
Spudger or plastic opening tool
Tweezers
Suction handle (optional, for lifting the screen)
Replacement LCD screen (compatible with your MacBook model)
Anti-static wrist strap (recommended)
Steps to Replace the LCD Screen:
1. Power Down and Prepare
Shut down your MacBook completely.
Unplug all cables and peripherals.
Ground yourself using an anti-static wrist strap to avoid damaging internal components.
2. Remove the Bottom Case
Use the P5 Pentalobe screwdriver to remove the screws on the bottom case.
Carefully lift the bottom case off and set it aside.
3. Disconnect the Battery
Locate the battery connector on the logic board.
Use a spudger or plastic tool to gently disconnect the battery connector. This prevents accidental power flow during the repair.
4. Remove the Display Assembly
Locate the display cables near the hinge area.
Carefully disconnect the display cables (video cable, camera cable, and antenna cables if applicable) using a spudger.
Use the T3 Torx screwdriver to remove the screws securing the display hinges to the top case.
Gently lift the display assembly away from the MacBook.
5. Remove the LCD Screen from the Display Assembly
Lay the display assembly face down on a clean, soft surface.
Use the T3 Torx screwdriver to remove the screws around the edges of the display bezel.
Carefully separate the bezel from the LCD screen using a spudger or plastic tool.
Disconnect any cables connecting the LCD to the display assembly (e.g., backlight cable).
Remove the screws securing the LCD to the display housing and carefully lift the LCD out.
6. Install the New LCD Screen
Place the new LCD screen into the display housing.
Reconnect any cables (e.g., backlight cable) and secure the LCD with screws.
Reattach the bezel and secure it with screws.
7. Reattach the Display Assembly
Carefully align the display assembly with the MacBook’s top case.
Secure the hinges with the T3 Torx screws.
Reconnect the display cables (video cable, camera cable, etc.).
8. Reconnect the Battery and Reassemble
Reconnect the battery connector to the logic board.
Place the bottom case back on and secure it with the P5 Pentalobe screws.
9. Test the New Screen
Power on your MacBook to ensure the new LCD screen works properly.
Check for display quality, touchpad functionality, and any other issues.
Tips:
Take photos or notes during disassembly to help with reassembly.
Be gentle when handling cables and connectors to avoid damage.
If you’re unsure about any step, consult a professional or refer to a detailed repair guide.
If you’re not comfortable performing this repair yourself, consider taking your MacBook to AppleFix Hamilton New Zealand www.applefix.co.nz or send your device follow instructions here https://applefix.co.nz/send-your-device/
0 notes
Text
Separating the second stage fuel tank into it's own file Pt1:
I opened up the full rocket model file and saved it as a new file while I remember to. Just like I did with the previous models. I named the new file "Fuel tank 3".

Here, I selected the rest of the meshes I didn't need and pressed 'Delete' to delete them.

From there, I applied the 'Smooth by Angle' modifier like I did with the other models.

Next, I clicked onto the 'Shading' window and changed the 'Shader Type' from 'Object' to 'World'.

Like the I did with shading settings of the files of the previous models that I used from the full rocket file, I added a 'Light Path', 'Mix Shader', and a second 'Background' box to connect together. I did this so I could change the background colour without effecting the model visually.

I copied and pasted the same hexadecimal colour code that I keep using for the background in the files of my other models. The code is '#0086FFFF'.

When I switched back to the 'Layout' window. I jumped straight into 'Edit Mode' to give the top and bottom of the mesh a face. I pressed 'Alt' + 'LMB' to select all the vertices on the top of the mesh. I then pressed 'F' to fill the gap with a face.
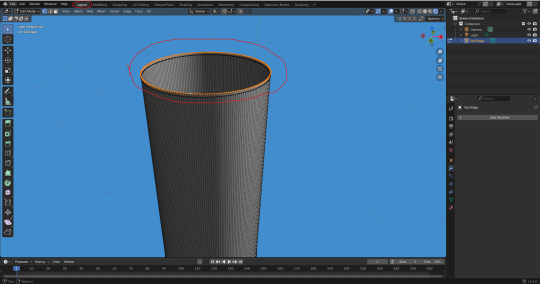
I did the same at the bottom of the mesh.

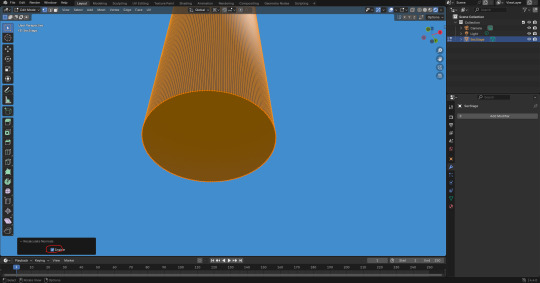
However, there was an issue. The face at the bottom was black, which suggests a lighting problem. I looked it up on Google to see what was specifically the problem.

I tried to recalculate the normals of the mesh. I entered 'Edit Mode', and pressed 'A' to select the whole mesh. I then pressed 'Ctrl' + 'N'. The problem was that when I pressed 'Ctrl' + 'N', It came up with the option to create a new file. That obviously wasn't what I wanted.

I looked up how to recalculate the normals more specifically on Google. According to this result, I need to press 'Shift' + 'N', not 'Ctrl' + 'N'.

I tried again by pressing 'Shift' + 'N'. It didn't do anything. One thing it did do, is show a box at the bottom left of the screen with a tick box. The tick box allows you to recalculate the inside.
I did that and it still didn't do anything. I then tried doing it manually. I clicked on 'Mesh', 'Normals', 'Recalculate Outside'.

It still didn't work. so I tried clicking on 'Recalculate Inside'.

That still didn't fix a thing. However, I just realised that I have embarrassingly mistaken a faulty face with the colour of the texture. The texture is black where it separates from the first stage.
Now that that is sorted. I was ready to move onto adding an image into blender and combining it with the mesh. However, my computer black screened. Thankfully it came back on but blender's tab was pitch white. I lost progress. Now that I'm back in college, I tried to retry those steps as this is where I last saved.

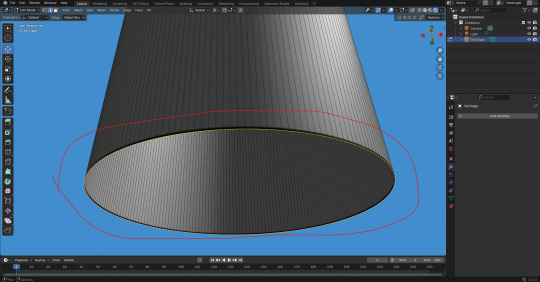
Here, I added the faces back. It looks like the lighting on the mesh is a bit off.

I decided to press 'RMB' and then 'LMB' on 'Shade Auto Smooth'.

This actually worked well. I then realized that my previous models would look better if I kept making sure that I used 'Shade Auto Smooth' whenever make a big change to the model. For example, adding faces or joining meshes. I then applied the 'Smooth by Angle' modifier.

Next, I wanted to add the 'PNG' for the connector faces on the model. I made in photoshop yesterday. I did this by clicking on 'Add', 'Image', and 'Reference'.

Here, I selected the 'PNG' file that I wanted to use as a reference image object.

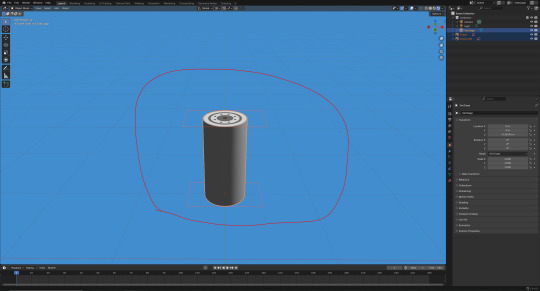
At this point, I had transformed the image to these transformations seen in the screenshot below. This is so that it looks apart of the model.

Next, I duplicated this object and placed it underneath the face model. I did that by pressing 'Ctrl' + 'C' and then 'Ctrl' + 'V'. From there, I transformed it's position on the 'Z' axis (circled below).

Here, I selected the two images and the mesh and tried to join them together by pressing 'Ctrl' + 'J'.
At this point, I remembered that I couldn't join them together unless the images were converted to a 'Mesh Plane'.

I then pressed 'RMB' and then 'LMB' on 'Convert to Mesh Plane'.

Last time I did this, I didn't change the settings. This still worked fine so I did the same here.
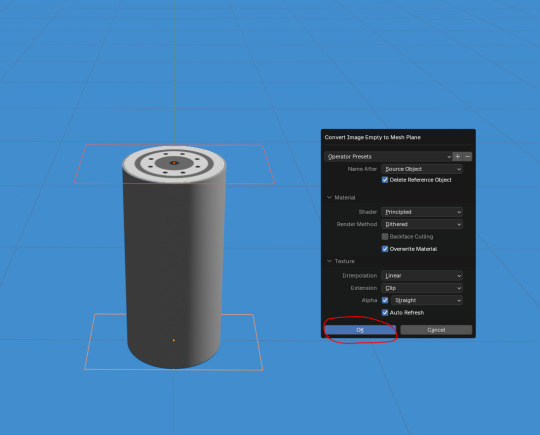
Here, I attempted to join them together again by pressing 'Ctrl' + 'J'.

Although it worked, I realized that the images were too far apart from the mesh. As a result, I undid this.

Next, I set the position of the image on the top to '1.354m' on the 'Z' axis.

0 notes
Text
The Best Ways to Protect Fragile Equipment During Relocation
Relocating fragile equipment, whether it’s industrial machinery, laboratory instruments, or delicate electronic systems, requires careful planning and execution. Mishandling during transport can result in costly damages, downtime, and even safety hazards. That’s why businesses trust professionals like Eagle Equipment Moving & Rigging, a leading heavy equipment moving company, to ensure secure and efficient transportation.

In this guide, we’ll explore the best ways to protect fragile equipment during relocation, covering essential preparation steps, packing techniques, transportation considerations, and unloading best practices.
Understanding the Risks of Moving Fragile Equipment
Fragile equipment is particularly susceptible to:
Vibrations and shocks that can damage internal components.
Temperature fluctuations and humidity that can lead to malfunctions.
Improper handling that results in cracks, dents, or misalignment.
Unsecured loads that shift during transport, causing structural damage.
To avoid these risks, businesses should follow a strategic approach when moving delicate machinery and equipment.
Step-by-Step Guide to Protecting Fragile Equipment
1. Conduct a Pre-Move Assessment
Before relocating any fragile equipment, perform a thorough assessment to determine:
Equipment size and weight to choose the right transportation method.
Specific vulnerabilities such as sensitive wiring, glass panels, or precision parts.
Disassembly requirements to ensure safer handling.
Environmental factors like humidity control needs or shock sensitivity.
A professional rigging company near me will conduct a detailed evaluation and create a customized moving plan to safeguard fragile machinery.
2. Use the Right Packing Materials
Proper packing is crucial to prevent damage. Some of the best packing materials include:
Shock-absorbing foam padding to reduce vibrations.
Anti-static wraps for electronic equipment.
Heavy-duty crates and custom containers for maximum protection.
Moisture barriers and desiccants to prevent condensation damage.
Palletizing and securing equipment with straps to prevent shifting.
Using high-quality materials ensures equipment remains intact throughout the relocation process.
3. Disassemble When Necessary
Some fragile equipment can be transported more safely if it is partially or fully disassembled. This includes:
Removing detachable parts such as control panels, screens, and fragile attachments.
Labeling and storing screws, bolts, and connectors to simplify reassembly.
Packaging delicate components separately for added protection.
Professional movers from Eagle Equipment Moving & Rigging can safely disassemble and reassemble machinery to minimize the risk of damage.
4. Choose the Right Transportation Method
Selecting the correct transport vehicle and method is key to ensuring a smooth relocation. Options include:
Air-ride suspension trucks to reduce shocks and vibrations.
Climate-controlled trailers for temperature-sensitive equipment.
Flatbed trailers with custom enclosures for oversized delicate machinery.
Lowboy trailers for heavy yet fragile equipment that requires extra stability.
A trusted heavy equipment moving company will determine the best transportation option based on the type and sensitivity of the equipment.
5. Secure Equipment Properly for Transport
Ensuring the load is stable and secure prevents shifting and damage. Best practices include:
Using heavy-duty ratchet straps and braces to immobilize the load.
Placing cushioning materials between stacked equipment to avoid contact damage.
Ensuring proper weight distribution to prevent tilting or tipping.
Applying tilt and shock indicators to monitor handling conditions.
6. Monitor Environmental Conditions
Many fragile machines are sensitive to temperature, humidity, and dust. To mitigate these risks:
Use dehumidifiers or silica gel packs to control moisture inside packaging.
Cover electronics with anti-static shielding to prevent electrostatic discharge.
Transport in climate-controlled trucks if extreme temperatures could cause damage.
Minimize exposure to outdoor elements during loading and unloading.
A rigging company near me with experience in delicate equipment moving will have the tools and knowledge to maintain optimal transport conditions.
7. Hire Trained Professionals for Loading and Unloading
The most critical phase of relocation is the handling of fragile equipment during loading and unloading. Experienced movers follow best practices such as:
Using forklifts and cranes with precision control to lift delicate loads.
Operating at slow, controlled speeds to avoid sudden jolts.
Implementing team-based lifting to evenly distribute weight and minimize strain.
Following detailed unloading procedures to prevent impacts or mishandling.
By working with professionals from Eagle Equipment Moving & Rigging, businesses can ensure their equipment is handled with expert care.
8. Conduct a Post-Move Inspection and Testing
After relocation, inspect and test equipment before putting it back into operation. Steps include:
Checking for visible signs of damage such as cracks, loose connections, or misalignment.
Reassembling and calibrating machinery as per manufacturer guidelines.
Running diagnostic tests to verify proper function before full use.
Documenting any irregularities for further assessment.
Why Hire a Professional Heavy Equipment Moving Company?
Choosing a reliable heavy equipment moving company is the best way to ensure a successful relocation. Key benefits of hiring experts include:
Specialized experience in handling fragile and sensitive equipment.
Access to high-quality packaging and rigging solutions.
Compliance with safety regulations to avoid costly penalties.
Efficient and timely execution to minimize downtime.
Full insurance coverage for added peace of mind.
If you’re searching for equipment hauling near me, partnering with Eagle Equipment Moving & Rigging ensures your fragile equipment is relocated with the highest level of care and precision.
Conclusion
Protecting fragile equipment during relocation requires careful planning, expert handling, and the right transportation strategies. Businesses can prevent damage and minimize risks by following best practices such as using specialized packing materials, securing loads properly, and hiring professionals for transport and unloading.
With Eagle Equipment Moving & Rigging, companies can rely on experienced professionals who understand the complexities of moving delicate machinery. Whether you need a trusted rigging company near me, a heavy equipment moving company, or equipment hauling near me, choosing the right experts will ensure a smooth and damage-free relocation process.
Eagle Equipment Moving & Rigging 69 Pavilions Dr Suite 1, Manchester, CT 06042, United States 1-860-750-9594 https://eaglerigging.com/heavyequipmentmoving-manchesterct/
0 notes
Text
The Essential Roles of Screened Connectors, GIS Bushings, and Digital Clamp Meters in High-Voltage Environments
In the complex and demanding realm of high-voltage electrical systems, particularly within the compact and reliable Gas-Insulated Switchgear (GIS) installations, safety and reliability are paramount. From substations in urban areas to critical industrial facilities, the seamless flow of electricity hinges on robust and dependable components and monitoring. Screened Connectors, GIS Bushings, and Digital Clamp Meters are essential technologies and tools that contribute significantly to the safety, reliability, and longevity of GIS systems. Each serves a distinct purpose, yet they work in synergy to fortify GIS infrastructure against electrical hazards, environmental stresses, and ensure continuous, accurate monitoring.
Screened Connectors: Ensuring Safe and Reliable Cable Connections in GIS
In the confined spaces of GIS enclosures, the risk of accidental contact with energized components is a significant concern. Screened Connectors are specifically designed to mitigate this risk, providing a safe and reliable interface between high-voltage cables and GIS equipment.
These connectors offer:
Touch-Proof Design: An insulated outer layer prevents accidental contact with live parts, even during disconnection.
Screened Construction: A Faraday cage effect minimizes partial discharges and ensures reliable performance under high-voltage conditions.
Separable Design: Easy disconnection and reconnection for simplified maintenance and testing within GIS.
High-Quality Insulation: Excellent electrical insulation and environmental resistance, crucial for GIS environments.
Reliable Performance: Dependable operation under demanding conditions, including the specific gas environment of GIS.
Enhanced Safety: Significantly reduced risk of electrical shock, vital in tight GIS installations.
These connectors are crucial in GIS substations and switchgear, where safety and reliability are paramount. They enable safe and efficient operation of these critical systems.
GIS Bushings: Maintaining the Integrity of Gas Insulation
GIS Bushings are essential components that provide a reliable and safe interface between the internal gas-insulated environment of the GIS equipment and the external environment. They are designed to withstand high voltage and ensure the integrity of the gas insulation, which is the core of GIS technology.
These bushings offer:
High-Voltage Insulation: Prevents electrical breakdown between the internal and external environments.
Gas Tightness: Maintains the gas tightness of the GIS enclosure, preventing leakage of insulating gas (typically SF6).
Mechanical Strength: Withstands mechanical stresses, such as vibration and thermal expansion, within the GIS enclosure.
Environmental Resistance: Designed to withstand environmental stresses, ensuring long-term reliability in GIS applications.
Various Types: Epoxy resin and porcelain bushings to suit different GIS applications.
Applications: Switchgear, transformers, and circuit breakers within GIS systems.
GIS Bushing are critical components that ensure the reliable and safe operation of GIS systems, maintaining the vital gas insulation.
Digital Clamp Meters: Essential Tools for Monitoring and Diagnostics in GIS
Digital Clamp Meters are indispensable tools for monitoring and diagnosing electrical systems, including GIS installations. They provide a non-invasive method for measuring current, voltage, and other electrical parameters, which is crucial for maintaining the sealed environment of GIS.
These meters offer:
Non-Invasive Measurement: Allows for current measurement without breaking the circuit, maintaining GIS integrity.
Accurate Measurement: Provides precise readings for monitoring GIS system performance.
Safety: Designed with safety features to prevent electrical shock, vital in high-voltage GIS environments.
Versatility: Measures a wide range of electrical parameters, aiding in GIS diagnostics.
Data Logging: Records and analyzes electrical parameters over time for preventative maintenance in GIS.
Diagnostics: Helps identify electrical faults and troubleshoot problems in GIS systems.
Preventative Maintenance: Enables early detection of potential issues, minimizing downtime in GIS.
Digital Clamp Meters are essential for ensuring the safe and reliable operation of GIS systems, enabling technicians to monitor system performance and diagnose faults without compromising the GIS enclosure.
The Integrated System: Ensuring GIS Reliability and Safety Through Synergy
Screened Connectors, GIS Bushings, and Digital Clamp Meters work in conjunction to provide a comprehensive approach to ensuring the reliability and safety of GIS systems. Screened connectors ensure safe cable connections, GIS bushings maintain the integrity of gas insulation, and digital clamp meter enable precise monitoring and diagnostics.
By implementing these technologies and tools, electrical engineers and technicians can:
Enhance safety for personnel working with GIS.
Minimize the risk of electrical faults and equipment failures within GIS.
Simplify maintenance and diagnostics of GIS systems.
Extend the lifespan of GIS installations.
Ensure the continuous and efficient delivery of power from GIS substations.
The integration of these products and tools provides a robust and dependable GIS system, maximizing safety and ensuring long-term reliability in high-voltage environments.
0 notes