#ShaderGraph
Explore tagged Tumblr posts
Visit Tumblr Blog
Explore Tumblr blogs with no restrictions, modern design and the best experience.
Last Seen Tumblr Blogs


Fun Fact
Mobile Tumblr US users spend an average of 4.04 minutes per session on the app.
Text

I really like chunky clouds.
#gamedev#pixels#redpanda#sky#shadergraph#unity#poppysanctum#spectrafoundry#jackbloom#cute#stupid cute#toocute#farts
15 notes
·
View notes
Text
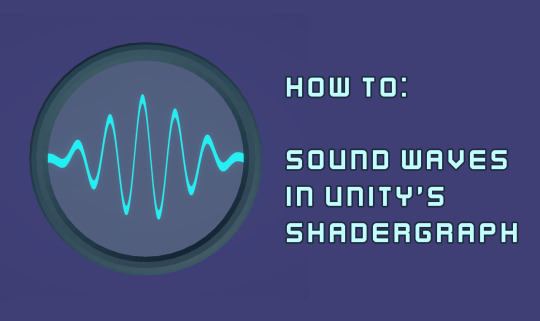
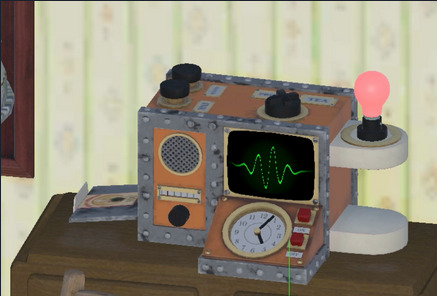
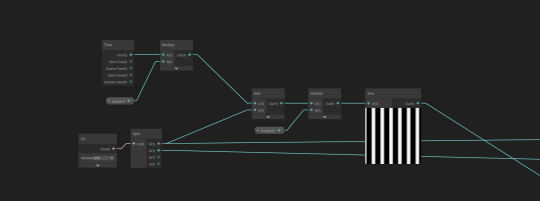
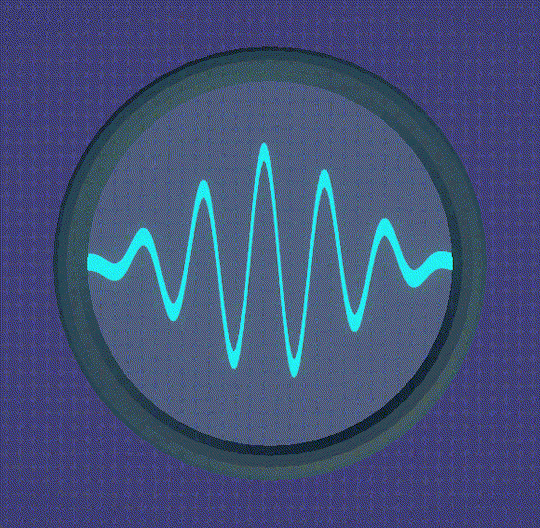
It's been a good while since I've posted anything, and I've wanted to post some little effects from projects I have been working on, so this is the first one! This is a little shader to create a sound wave in Unity, I used a similar one when I was working on the Wallace and Gromit project, The Big Fix up, a couple of years ago, as one of the characters talked to the player through radios, and we needed a visual representation of that!
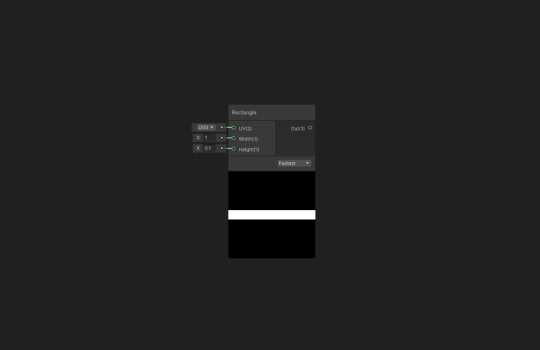
Start off by adding a rectangle node, make sure it's thing and centred in the middle of the image.
Add a UV node. Put the X straight into the X of a Vector 2 node. Create some stripes by multiplying the X axis (x10) and running it through a sine wave. Then multiply it by the height (0.2) then add this to the Y axis, and put it in the Y of the vector 2.
This gives us a sine wave.
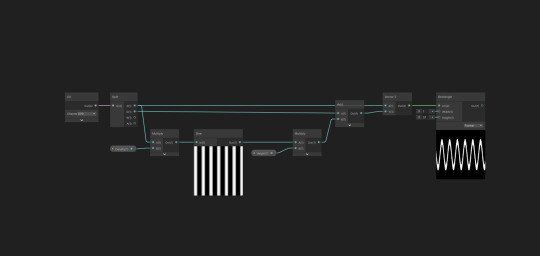
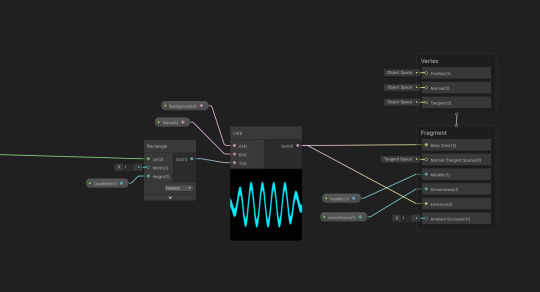
Now grab another UV node, use the smoothstep node to fade this on each edge and multiply these together. Multiply this with the height node, and stick a saturate in there somewhere, to keep the value under one.
The result of this should be plugged into where the height was previously.
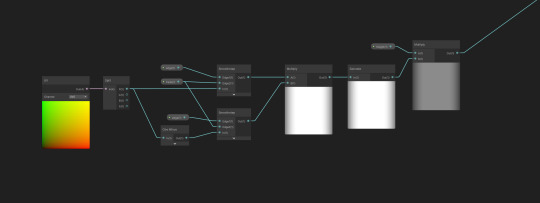
To animate the wave you can add a time node, and multiply it by speed (0.2), then add this to the X axis right at the start, before it's multiplied by the density.
Then you can use a lerp node to add colour, and hook the result into the BaseColor and Emission
And you're done! You can animate the values with an animation or timeline, change colours, add more effects, anything you like!
1 note
·
View note
Text

Learned how to write some vertex animating shaders today!!! I still don't know how to write c# scripts to control the shaders but :/ progress is progress !!
#pls congradulate me i did not learn anything other than pure misery in my one singular javascript course in college#i wish matt was still here so he could explain how to write up a simple script to control shaders#looping or playing it a defined number of times or setting up triggers and states#i could probably ask the new programmer tbh cause our main one is wayyy too busy#i am feeling a lot more comfortable with shadergraph and visual scripting stuff which is cool!!#i am pretty aware that a lot of places use peoprietary engines though so idk if knowledge of shadergraph is enough to get me by#if i wanted to lean into 'tech art' i think u gotta be an actual programmer for that#waugh
6 notes
·
View notes
Note
how much do you have to understand coding before getting into playing with unity shaders to get the effects you do on your potions, job stones, the hololive waiting screen, etc? nothing so complicated as programming wave physics. (and do you have any recommendations for what to learn to get up to that base level?)
so luckily most programs these days have a node-based approach to shaders, meaning you technically dont even need to learn how to code them at all!!
shaders are essentially just giving every pixel of your model a set of instructions based on the properties of that pixel. "the more the normal at this pixel is facing the light, the brighter i want it to be" you now have a basic lit shader. "the more the normal at this pixel ISNT facing the camera, the brighter i want it to be" you now have basic rim lighting
most of the resources i have are for coding shaders just cause thats how i got started (nodebased shaders werent as widespread when i first started learning!!) but i do have a few
minionsart has some really excellent intro tutorials as always
brackeys has a good intro vid
unity themselves have a decent amount of videos going into it
and for more generalized tutorials (not necessarily shadergraph) i have a list here
109 notes
·
View notes
Text
Untitled Card Project #1
My obsession with TCG Pocket has let me into thinking that making the Pack Openning mechanics is a good idea, today i got the Pack models textures (i did the models some days ago) and the shadergraph to make the holographic effect for the packs, but it needs some more work tho, and also i aligned all the packs in the circle like in the game and im planning to make it so you can scroll it. To make it clear, Im just making the pack opening part of the app, im not making a whole card game with this, its just so i can feel the happy gambling chemicals and maybe make some silly cards, and also i can maybe reuse this system one day for collectables for another project or smth, idk. Soon ill post more of my old projects, since it appears im not going anywhere this summer, gotta have more free time that i know what to do with.
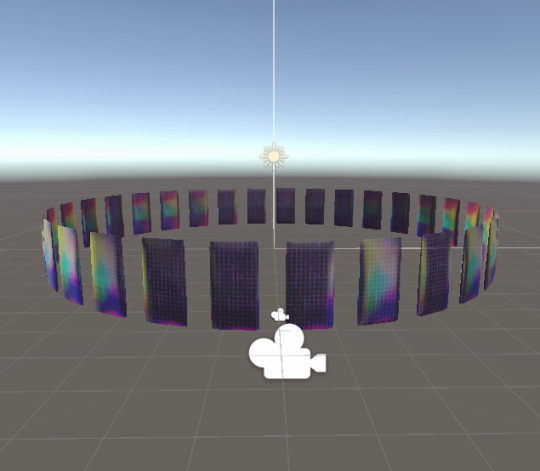
4 notes
·
View notes
Note
Having some trouble progressing with shaders, I feel there's a lack of reference material (tutorials etc). Could you guide me to some materials that you used to progress in this field?
Yes, of course ! I don't know your degree of familiarity with shaders, or what platform you're writing them on, so these resources are going to be very Unity-centric, since that what I'm familiar with ! But a shader is a shader, no matter where you create it, so it should not be complicated to adapt these resources to your needs. I personally started with Gabriel Aguiar Prod's Shadergraph tutorials. He doesn't go in depth into the how and whys of shaders, but it's a good starting point to get a feel of how it works.
For learning how to write shaders, both Xibanya and Cyanilux are very good resources : Xibanya's Shaders for people who don't know ho to shader focuses on writing shaders for Unity's Built In Render Pipeline; and Cyanilux has a very detailed article on writing shader code for the Universal Render Pipeline, and a more general intro to the shader pipeline that goes into how shaders work in general. The book of shaders is not attached to any particular engine and provides interactive examples of the concepts they present.
When it comes to tutorials, I really like the work of Ronja's tutorials, Harry Alisavakis, Minions Art, Roystan and Alan Zucconi. Also, Simon Schreibt makes a lot of game effects breakdown and has a series of posts explaining render pipelines from an artist's perspective.
I also want to mention Catlike Coding, Inigo Quilez and Acerola who are on the more technical side of things. Reddit and the Unity forums can also be really useful if you're stuck. Oh, and don't hesitate to dive into Unity's shadergraph documentation when you need a specific function (remap, gradient, blend mode...) : each node comes with a code snippet and it's a lifesaver.
For the maths, I unfortunately don't have a lot of resources. You can go without for a while, but eventually you'll have to know some vector maths and matrices, either for more complicated effects or if you want a better understanding of what's going on in your shaders. The book 3D Math Primer for Graphics and Game Development by Fletcher Dunn and Ian Parberry has really helped me link abstract maths concepts to what happens on my screen. I also got Mathematics fo 3D Game Programming and Computer Graphics (third edition) by Eric Lengyel (it has a skeleton on the cover, how cool is that) but I haven't gotten through it yet.
I probably forgot a few blogs or youtube channels, but these are the ones I always come back to ! I hope these will be useful to you, have fun creating shaders !
#ask#not art#how many times did i write shaders in this post#also i am very much still learning so maybe some more advanced resources eluded me because i couldn't understand them yet
7 notes
·
View notes
Text
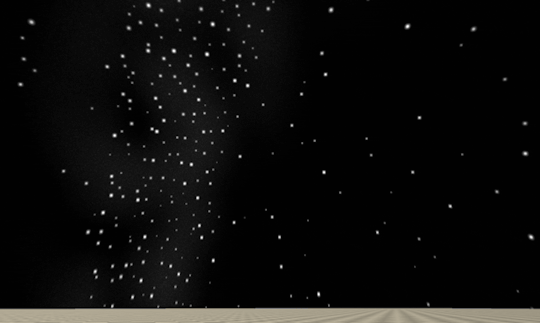
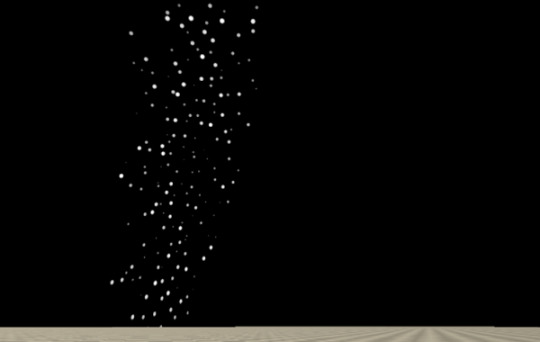
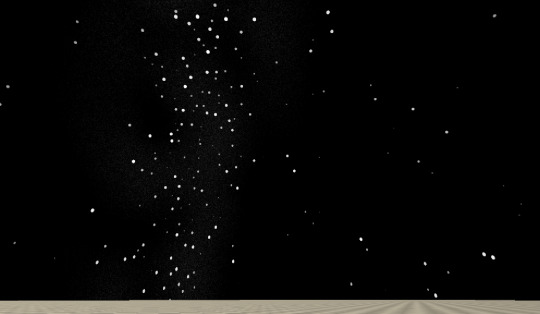
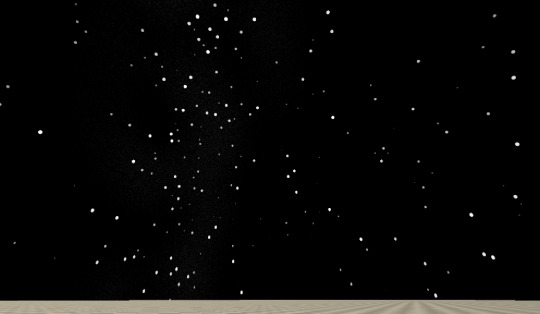
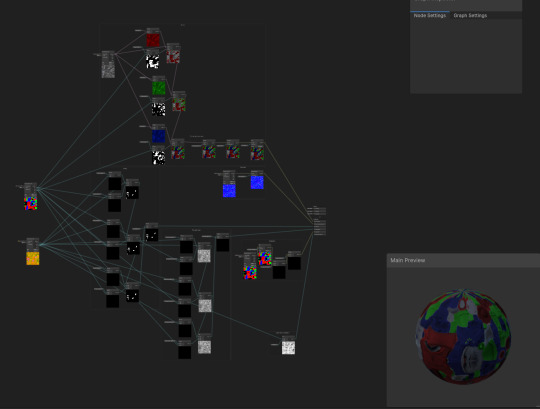
Procedural Skyboxes 2 - Stars
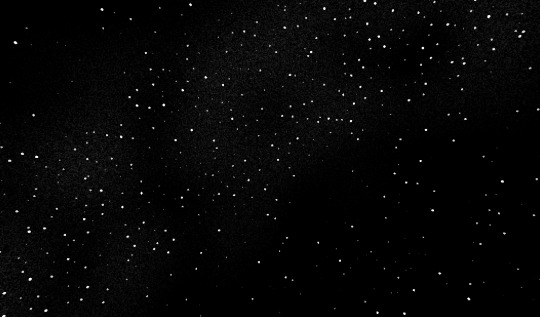


This time I need to credit a second excellent tutorial, this time by Tim Coster. My end result looks very different from this, but the underlying principles were essential.
Process and discussion below the cut.
Mk0 - Voronoi
My first attempt at stars was based off the same tutorial I referenced in the previous post, using Voronoi noise to space the stars. Two inputs control star density and star size.
This might work fine for the use case in the tutorial, but in trying to adapt it for mine I immediately encountered some major issues.
the very even spacing feels kinda unnatural, especially with fewer, larger stars
there’s a seam in the sky (probably wouldn’t be visible with smaller stars)
heavy distortion around the sky zenith

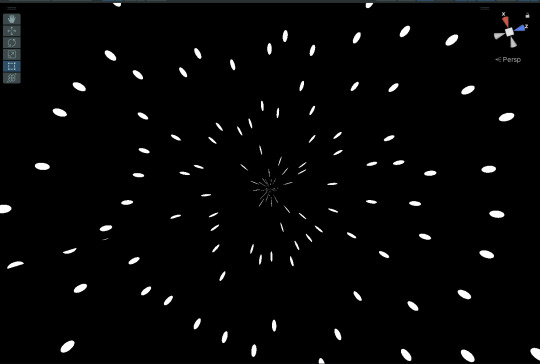
Kinda looks like you're going to hyperspace every time you look up.
The seam and distortion issues are a result of the UVs (the coordinates that determine how the shader wraps around the sky). I solved this by moving to a kinda parachute-shaped UV as outlined in this incredibly helpful post on the Unity forums.
The unnaturally even distribution is a consequence of using Voronoi noise as a base. An entirely new approach was called for, which is where the Coster tutorial comes in.
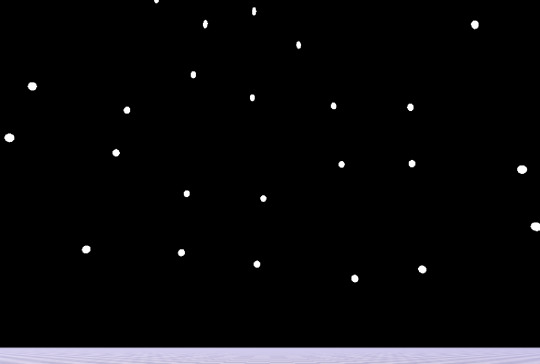
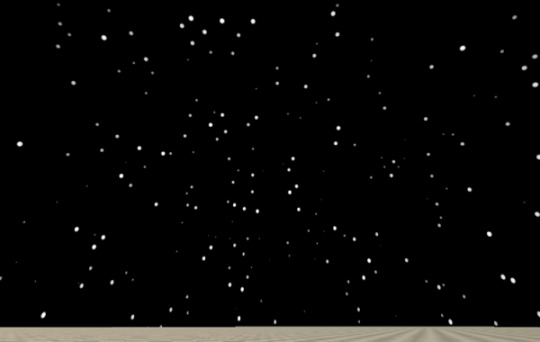
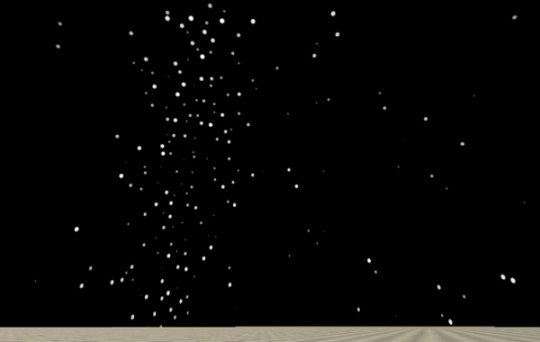
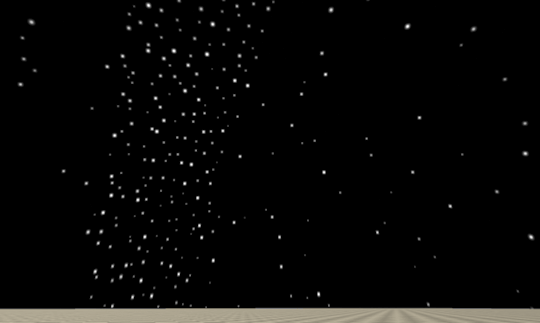
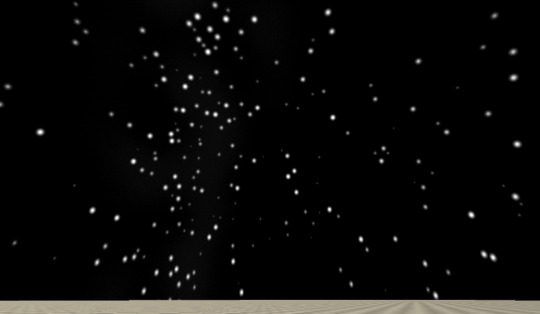
Mk1 - Tiling with displacement
I skipped the addition of the spiky light flares (not the aesthetic I’m going for) and worked through the tutorial as far as the section on size variation.
The Mk1 shader is a much better fit for the feel I’m looking for, and also looks good when you stare directly up into the sky, not just at the horizons. It also has a lot more controls. Star size remains, and gains an extra control for how much variation in size.


Density now has two controls: one which controls the density of the “tiling” (it’s not a repeating texture, because each tile is randomised, but there is tiling) and one which randomly omits a certain proportion of stars, making the distribution more gappy.

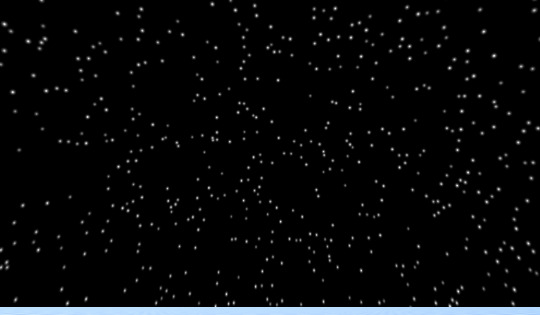


There’s also a control for how randomly the stars are spaced. I probably won’t want to move this much from a value of about 0.8 (1 produces a little more tight bunching than I like), but it’s there.
Last but not least, there is a setting for the hardness of the stars. This is going to be important later for modelling the effects of different amounts of atmosphere on the visible starfield.
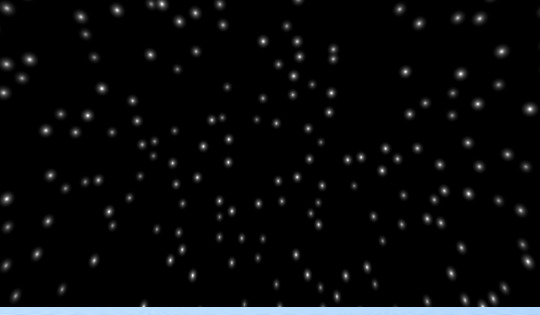

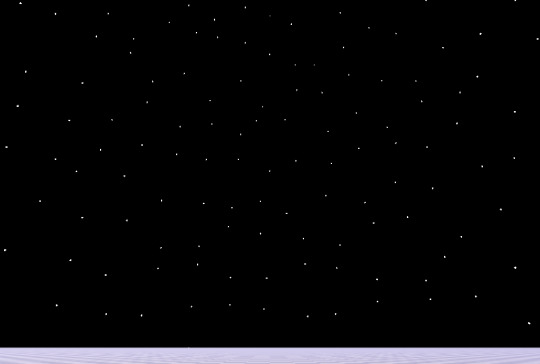
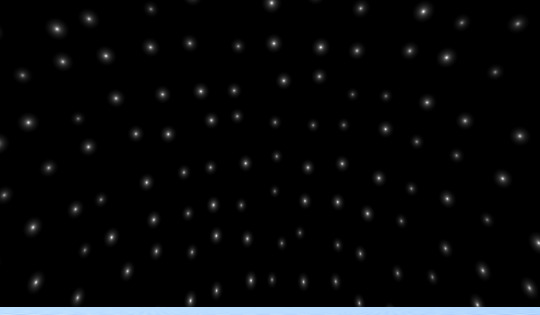
Mk2 - Galaxy Band
In the Mk1 shader, star distribution is even in all directions. The next thing I wanted to add was a band of denser stars across the sky to represent the bulk of the galaxy - as we see the Milky Way as a band across the sky from Earth.
Up to this point I had been using the purely-Shadergraph approach from the tutorial – which involves a very clunky grid of nine nearly-identical subnodes to perform an operation that is much more neatly executed by a for loop in code.
When I started trying to vary star density across the sky, this clunky 9-way graph was no longer adequate. Maybe I could have made it work with the right transformation of inputs, but it reached the point where it made more sense to bite the bullet and learn how to include the HLSL code from the tutorial and edit it to suit.
Once I managed that, feeding in variable density across the sky got a lot easier.
A new control variable, BandIntensity, controls how dramatically stars are grouped into the galactic band.
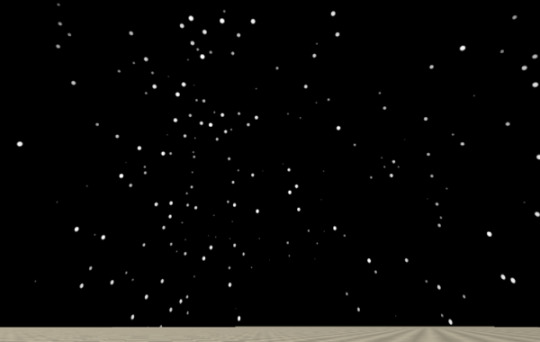
It was also at this point that I added twinkle, with controls for rate and magnitude. Eventually twinkle and hardness will be tied together, because they’re both functions of amount of atmosphere, but for now they’re separate controls.
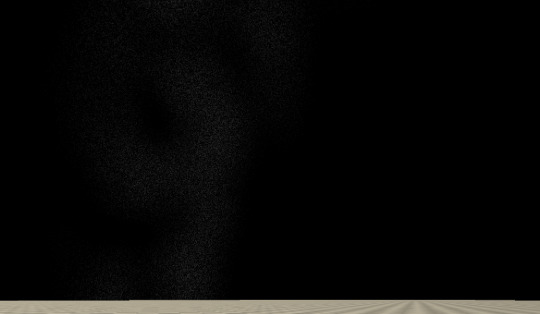
Next I added a band of faint texture behind the stars.
At low hardness, it’s just a soft stripe of Unity’s Gradient Noise. At high hardness, to make it seem “sharper” and more like a dense field of points instead of a smudge, the gradient noise is multiplied by some Simple Noise.

The end result – a pretty good looking, flexible starfield.
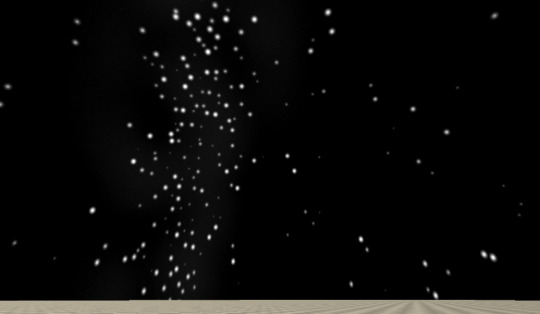
Next up, combining it with the atmosphere shader from pt1.
2 notes
·
View notes
Text
youtube
If you are interested in getting a VRChat avatar like this,
please visit my Commission page down below!
👇👇👇
[ https://vgen.co/UberTheMeh ]
👆👆👆
I made a VRChat avatar with a custom shader that changes sprite based on the camera angle!
It was made with Unity's ShaderGraph, which I am planning to share it publically soon.
I have yet to test it with a quest build, which im not sure will work fine with custom shaders.
#myart#my art#vrchat#vrchat avatar#vrchat model#2D art#2d animation#unity#unity shaders#unity shader graph#comissions#commissions#Youtube
13 notes
·
View notes
Text
Ladies, gentlemen and people who prefer to go by anything else, I present to you, what is quite possibly my finest work of shader code yet! I, thejinxedartist, also known as Folly, have added shadows to the fog!
OK, OK, enough with the fancy talk. But yes, I have spent quite a while re-writing the fog shader from scratch in its own shader, rather than as a custom function in shadergraph. I was planning to anyway as auto-generated code from node-based editors is generally not the fastest, but I also had no way to access lighting information where I needed it in order to add shadows. If anyone was wondering, in the raymarching loop, before I accumulate the fog density, I check if the point in space is in shadow using mainLight.shadowAttenuation.
Anyway, now that this whole thing is over, I can get back to- oh wait! The ambient sky light isn't working properly you say? Well, I can't just leave it unfinished, can I! Just leave me a few weeks and I'll have it done! (This is a joke, It'll only take 6 days ;)
[UPDATE]
So I forgot that I was rendering this at 512 samples for the screenshots and I was wondering why my my fps had dropped from ~250 to ~150 and so I spent a while adding every optimisation I could, and then I realized "Oh wait, why am I rendering this with 512 samples" so now its back to 64 samples and is running even faster.
3 notes
·
View notes
Note
hi. I wanted to ask what type of dither shader you were using for the game and if you could nudge me in the right direction. It is stunningly beautiful. Thanks
Hey thanks! To be honest, I have no idea what I'm doing haha.
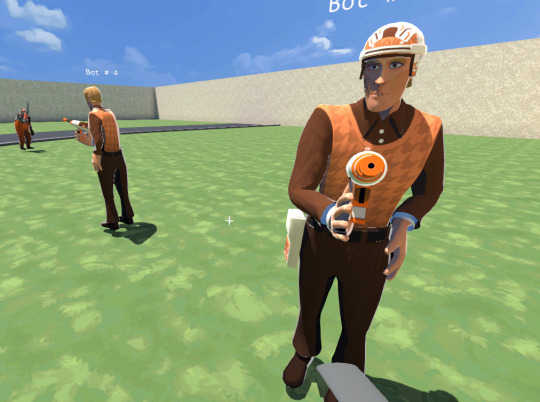
Attached is a screenshot of my dither shader for most objects. It's a mess.
Uh I'd say look into toon shaders and just start messing with them in shadergraph with the dither node.
I went through a lot of trial and error.


3 notes
·
View notes
Text
Ported my Material System to Unity
I have no plans on Switching to Unity. I'm just considering the possibility of porting my Unreal Asset Packs to the Unity Asset Store.
Cuase who doesn't want more income? Its been 3 years since I last used Unity. So my material system in Unreal has gotten more complicated since then.
Click on read more if you wanna get my thoughts.
This is what my Material System in Unreal Looks like.
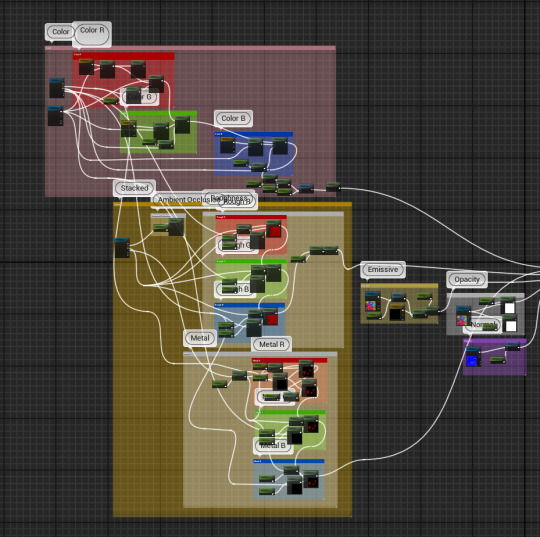
This isn't the Maximum Power version. Max Power isn't ready for production. Its extremely demanding.
But basically you can pick 3 different colors and for each color you can pick metalness and Roughness levels.
I'm not planning on making any game projects in Unity. I never have been, since its so Unity. But heres my material system in Unity.
Right now, It has all the same features as the Unreal Version MINUS the Opacity settings. If I do end up porting Assets to the Unity store, I'll be porting assets that aren't dependent on Transparency. Although any models that use Glass will obviously be required to have some use of it. As you can see in the video above, it works well. I need export a different version of the textures though, cause the Smoothness texture is a little rough atm, however, since its controlled by parameters I guess its not too big a deal. Since i can just drag it under. I'm a little rusty on Unity, but so far, its been coming back to me little by little. Shadergraph is very similar to Unreal's Material Graph so it's been easy getting back in it.
Anyway, thats about it. I've been really busy with life and work and some personal things. So I haven't been updating much here. But I'm hoping to post more here in the future. Since Tumblr still feels like a ghost town. It feels like a nice place to post random rants like this and let it fade into the ether.

1 note
·
View note
Text
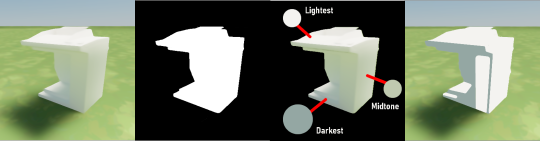
Ok so, explanation on how I'm gonna theoretically do cel shading (I know general shader stuff but I'm entering into an area that if I take the wrong step here its gonna be like 2fps)
So, my game is completely pathtraced besides certain objects being cel shaded. Due to this, there's no default lighting values I can clip the shading to and have it look natural. I need something that can dynamically decide what is gonna be the light and shaded parts of an object every frame.
First is to render the object in the path tracer without any textures.
Next is to, per object, render out a mask of just the mesh.
Third is to then use the mask on the original rendered image, and figure out the average color to use as the seperator between the light and dark spots (This can be additionally adjusted before being sent to the shader)
Lastly is to push this final color to the cel shader. The shader will then check the pathtraced pixels again and determine whether its lighter or darker than the final color, allowing it to be dynamically cel shaded.
Theres still a few additional things to implement. One is additionally checking for the average color value in the bright and dark areas after determining the midtone so that the light and dark areas can be tinted correctly. This doesn't technically need to be done in the same frame, nor does the average color need to be exactly checked every frame- as this won't change too often. Due to noise in the pathtracer, its also best that these checked values be Lerped over time.
So this is just my notes to take before my brain explodes. I have no clue if this is gonna tank performance on implementation. If this is gonna be on like 100 objects then I'm gonna have to downsample textures, schedule each object for checks on different frames, ect. I also gotta completely rewrite my ShaderGraph Min-Max shader in standard hlsl with these additional parameters. Whew its gonna be a lot.
Fun fact, this dynamic cel shading was stupidly easy to do for Min-Max. I'd just sample the nearest reflection probe at its lowest LOD to get the average midtone.
5 notes
·
View notes
Text

made my very first ever shader in shadergraph :-)
#be proud of me#i've been trying to figure out how to understand any variation of programming for years now lol#i think shadergraph/nodes are as close as i can get#visual scripting makes a lot more sense#and shadergraph does too now!! i get what the difference between a float and a vector is now.... woah...#basically i needed to make a glow/rim shader that could also have alpha and normal maps and basecolor slotted in#perhaps i may someday *actually* be able to qualify as a technical artist..... hm....#a job that is actually in demand very very unlike 'generalist 3d artist'#personal stuff#honestly it's been embarrassing how like. befuddled any kind of programming/scripting has made me all these years.#i have a similar relationship to it as i have with any kind of theoretical math or physics
5 notes
·
View notes
Text
Devlog 6: V-FX:ing this mess
Hello world! I have spent a week or so doing loads of Unity ShaderGraph, and made some cool effects. One is a grass surface that grows as the song in-game progresses. The other is a simple full-screen post-processing image shader that turns the screen strictly black and white, without any grascale in between. It works wonders for so called impact frames, exemplified here by a short 5 frame sequence from Arcane
(Full sequence here)
I am really hyped about using this for the explosion VFX that really should grab the player's attention, such as when parts of the sequencer are destroyed, which obviously is a huge blow to someone whose main weapon is the sequencer-plant combination, and something they need to do something about as quicklly as possible.
Oh, yeah, and I also implemented a state machine for the enemies (finally...) and sequencer destruction. Now to make a loss condition, scripted enemy spawns instead of random time intervals and the aforementioned explosion VFX. Hoping my teammates can get the textures and sprites for those done first so I don't have to whip out paint for some programmer art™.
0 notes
Text
I started playing Last Epoch recently and was charmed by the graphics. Vfx in game are awesome, and there is so many of those.
This inspired me to do something similar, test myself, finally try myself in the fantasy art style and craft a couple of fanarts. Of course, I could not pass by the first mini boss and his fire spells ( on video below )
youtube
Yeap, i've created new character just to record this xD
I've already recorded lots of references for other effects.
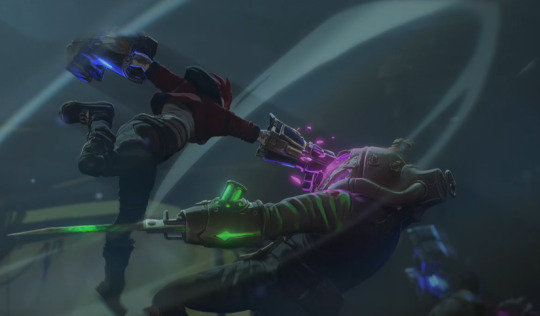
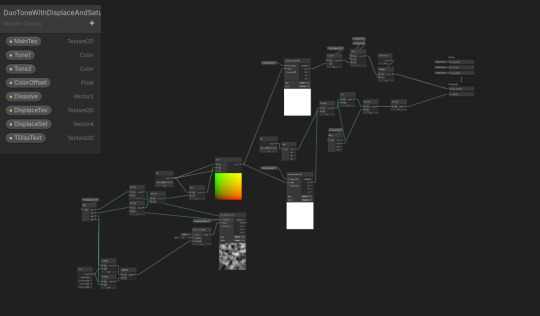
By the way, Embergen turned out to be very useful in creating fire sprites. You can achieve the necessary detail level in just an hour or two, and as a bonus there is an infinite number of variations. For this vfx didn't want to create whole effect with flipbook sequences, so used 4 flame spites, animated by displace texture.
I've quickly made shaders in shadergraph, nothing special here, dissolve and displace.

0 notes
Text
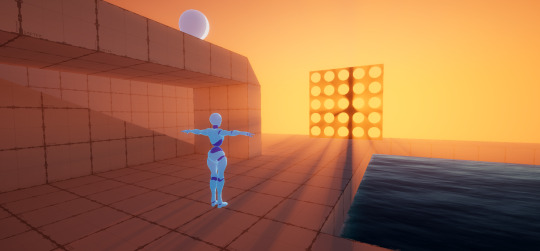
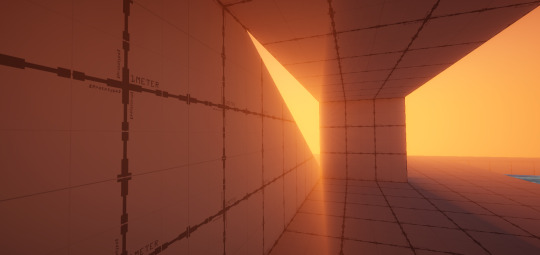
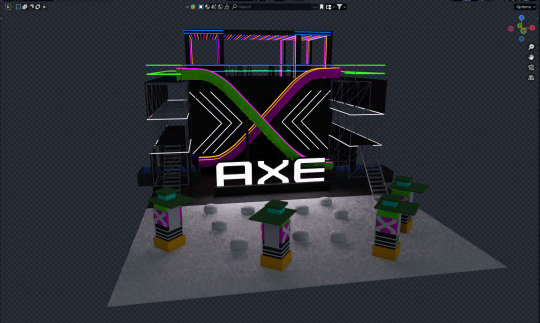
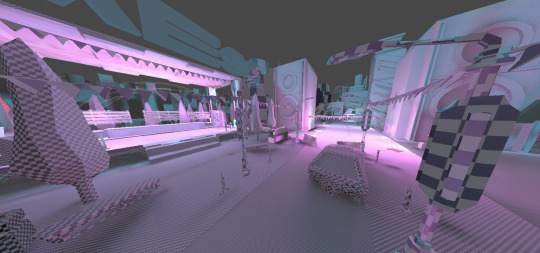
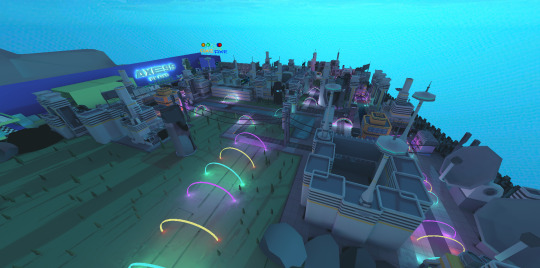
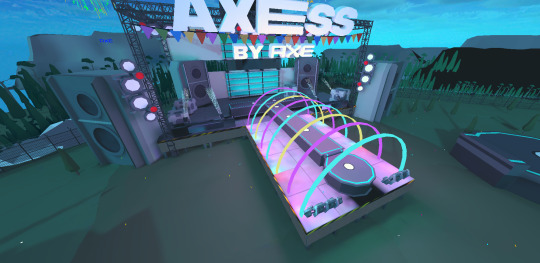
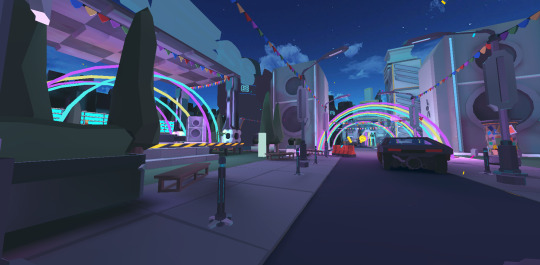
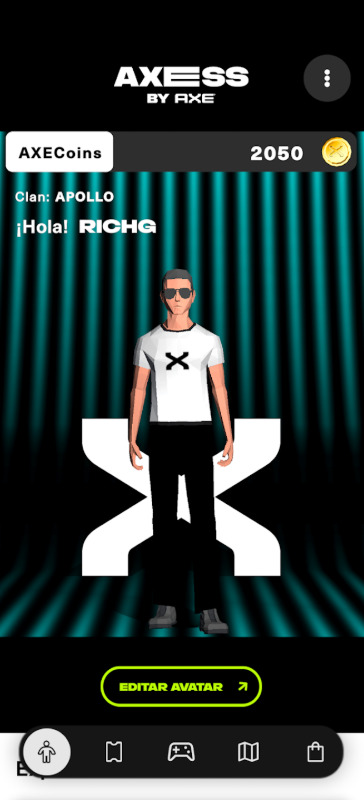
Axess By AXE:

AXESS by AXE is an app from AXE México that allows users to access events, win experiences, and play games
My Contributions
Level Design: Designed the entire game flow from start to finish, ensuring a cohesive and engaging player journey.


Game Design: Developed gameplay mechanics focusing on exploration and interaction to enhance player immersion.
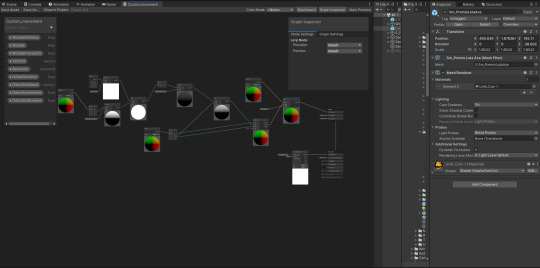
VFX: Created, implemented, and fine-tuned VFX with shadergraph


Modeling: Designed and modeled almost all game assets, including characters, environments, and props.
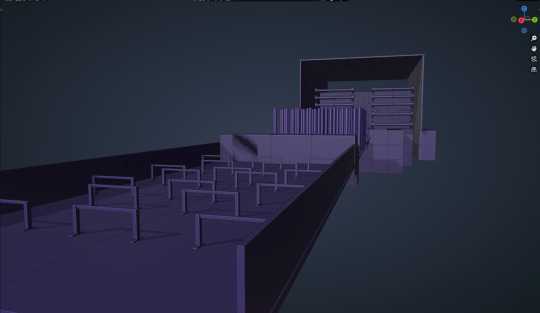


Texturing: Crafted textures for every asset, ensuring visual consistency and style.
Lighting: For mobile-optimized lighting, I used Bakery, implemented it, created shaders, and set up global illumination without using point lights.


Technologies and Tools
Engine: Unity
Modelling: Blender
Texturing: Substance painter
post: Photoshop
Baking: Bakery
Challenges and Key Learnings
The real challenge of this project was taking charge of the foundation so that programmers and designers could work effectively. My task involved designing the functionality of the environment, mini-game levels, asset importation, in-game optimization, lighting with Bakery, and some VFX.
Gameplay Previews


Try It Out
The demo is available for download on Itch.io. Experience it here:
Feedback Welcome
I’d love to hear your thoughts! Whether it’s about the mechanics, art, or level design, your feedback is invaluable. Feel free to comment on this post or send me a direct message. Thank you for playing! 🎮
1 note
·
View note