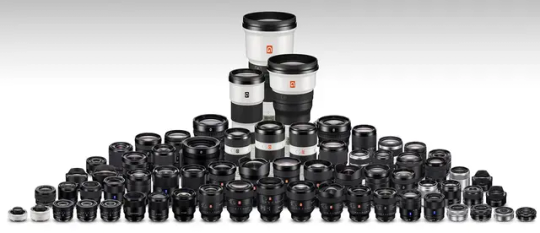
#Sony E-mount lenses
Text
ProAV TV Shows Off Samyang V-AF Autofocus Cinema Prime Lenses
ProAV TV Shows Off Samyang V-AF Autofocus Cinema Prime Lenses

View On WordPress
#autofocus cinema prime lenses#cinema prime lenses#Fujifilm X-H2#Fujifilm X-H2S#Fujifilm X-T5#Fujinon HK Premier Series#Fujinon MKX 18-55mm T2.9#Fujinon MKX 50-135mm T2.9#Fujinon Premista Series#Fujinon XF 18-120mm f/4.0 LM PZ WR#Fujinon XK Cabrio Series#Fujinon XK Series#Fujinon ZK Cabrio Series#ProAV#ProAV TV#Rokinon#Samyang#Samyang Cine AF 75mm T1.9 FE Sony E-Mount Lens#Sony E-mount lenses#Xeen
0 notes
Text
Need a Telephoto Lens? These Are Great Ones!
I mean, this is one of the reasons why you get an interchangeable lens camera anyway, right?
Why did you buy a camera? If you’re new to photography, it’s probably because you wanted better pictures than what your phone gives you. Lots of folks do it because they want a telephoto lens that lets them zoom in on a scene. This is far better than using the digital zoom or other lenses on your smartphone. And so if you’re buying your first lens, we’ve got a few fantastic options to recommend.…

View On WordPress
#fujifilm#fujifilm x mount#lenses#nikon z mount#sony#sony e mount#tamron#Tamron 50-400mm#Tamron 70-180mm#tamron 70-300mm#Tamron Lenses#telephoto lens
1 note
·
View note
Note
Hi Froggy,
I hope you've been well! I wanted to reach out and first say that you inspired me many years ago to rescue a corgi! She was a grump, I think she may have taken her name (Elphaba) too literally. She recently crossed the rainbow bridge, but she was such fun and a joy. I hope our pups are playing together, somewhere peaceful.
I have a question unrelated to stumpy Corgis. I'm a veteran birth doula and an aspiring birth photographer! I've been trying to research cameras, lenses, and all sorts of technical stuff. I'm leaving towards purchasing the new Nikon ZF, because of the purported low-light capabilities.
Lenses are throwing me completely.
Do you have any guidance or resources to help a newbie like myself? Not really looking for an in-depth answer (I know how complicated things can get), but maybe a general push in the right direction?
If you don't want or can't answer, no hard feelings! I enjoy just seeing your posts on my dash and I hope the rest of your year is amazing and calm!-Steph
(continued...)
My budget is pretty flexible, since I am an independent contractor the expense would be tallied towards my taxes. But that being said, maybe $1-3k? I know it's important to invest more into lenses!
Usually, I am in a hospital, and lighting is extremely variable. I would be shooting mostly in low-light before baby is born. During delivery and after there is usually a spotlight or fluorescent lighting. The low lighting is exactly why I was looking at the new ZF, but if you have suggestions on that too I'm happy to hear them!
It's very cramped when the baby is born, most medical and support staff are clustered around the laboring person.
Warning! A lot of birth photos will have baby crowning or blood. It's a messy business, so I don't want to trigger you if you're sensitive to those sorts of images.
I will not be able to be directly next to the laboring parent, more than likely I'll be a few feet away, possibly behind the parents or standing on a stool.
After the baby is born, I'll be able to get closer to both parents and baby!
Here's a portfolio that is close to what I would like to provide (once again TW for blood and crowning):
https://www.sarahginderphotography.com/birth-photography-north-new-jersey
I cannot thank you enough for any help or advice, this whole endeavor is like learning a new language!
----------------------------
Note from Future Froggie...
I went way overboard on this response, as usual. I have decided I'm going to break it up into 3 parts.
First, an encyclopedia of lens terminology.
Second, a camera and lens buying guide.
Third, practical advice for shooting in cramped rooms with tricky lighting conditions.
While this will be geared towards the original ask, I think this could be helpful to a lot of people. So, let's learn about lenses!
--------------------------
Lenses throw everybody, just because there are so many options. It can be overwhelming to look at a picture like this and wonder what will suit you best.
It's a lot of pressure too, because lenses are more important than the camera in a lot of ways. Interchangeable lenses are probably the biggest advantage big cameras have over smartphones these days.
But I think I can help get you up to speed.
The following terms are photospeak you might hear in camera and lens reviews and if you aren't familiar with them, it can make it difficult to figure out what camera and lens to purchase.
I tried to put these in an order that makes sense, but some terms relate to other terms and you may have to read the list twice to make sure you understand how everything mushes together.
Froggie's Encyclopedia of Lens Terms
Lens Mount
Every camera has a specific lens mount. Sony calls theirs the E Mount. Nikon has the F Mount (older) and the Z Mount (mirrorless). So you need to make sure the lens you are looking at is compatible with the mount on your camera.
Mirrorless cameras all upgraded to a mount with a "short flange distance." Going without a mirror allows the lenses to be closer to the sensor.
Long story short...
Short flange distance = easier lens design = sharper/lighter lenses.
However, if you want to use older DSLR lenses, there are adapters for Nikon and Canon that allow you to do that.
Aperture
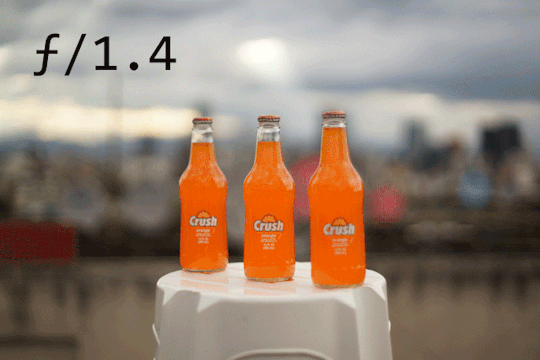
"Aperture" is an opening at the front of the lens. It gets bigger to let in more light or smaller to restrict light.
Wider apertures have a shallower depth of field, causing blurry foregrounds and backgrounds outside the plane of focus. Smaller apertures expand the focus area to keep more stuff from being blurry, but they let in much less light and are difficult to use in dark environments.
Aperture can be a creative decision or it can be a technical decision or it can be a mix of both. If you need a blurry background, use a wider aperture. If you need everything in focus, use a smaller aperture. If you need more light in a dark scene, open it up.
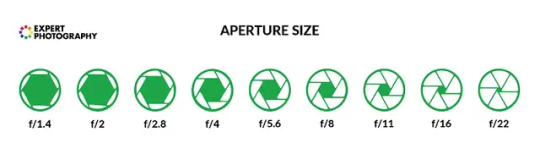
F-stop
"F-stop" is a number representing how big the aperture is. A lower number is a bigger hole. Higher number is a smaller hole. It is helpful to memorize f-stops as they are not easily divisible. Cameras generally allow third stops, half stops, and full stops.
These are all a "full stop" apart.
Stop Down/Open Up
When someone says to "stop down" a lens, they are telling you to make the aperture smaller or use a higher f-stop number.
If they say to "open up" they are saying to make the hole bigger or lower the f-stop number.
Depth of Field (DoF)
Depth of field refers to how much of the photo is in focus. Things in front of the plane of focus will get blurrier and blurrier and things behind the plane of focus will get blurrier and blurrier. A shallow depth of field means only a tiny sliver of your image will be in focus. A deep depth of field means almost everything will be in focus.
The wider the aperture, the shallower the depth of field.
The smaller the aperture, the deeper the depth of field.
Focal Plane or Plane of Focus
The focal plane is the sharpest point within the depth of field. You can imagine an imaginary section of 3D space where things within the depth of field are sharp and things outside are blurry. The farther away from the focal plane, the blurrier they will get. But the focal plane is not always dead center of the depth of field.
Typically, at close distances, things will be sharp half in front of where you focused and half behind where you focused. As things get farther away, that changes to more 1/3 in front and 2/3 behind. The ratio changes even more at greater distances, but the 50-50 and 1/3-2/3 ratios are typically what photographers try to remember.

Shallow Depth of Field
The focal plane is something you need to be very aware of at close distances with a wide aperture—as the depth of field can end up as a tiny sliver.
Let's say you are only a few feet away from a baby and you have the aperture set at f/1.2. You focus on the nearest baby eye, and then you notice its ears and nose are out of focus.
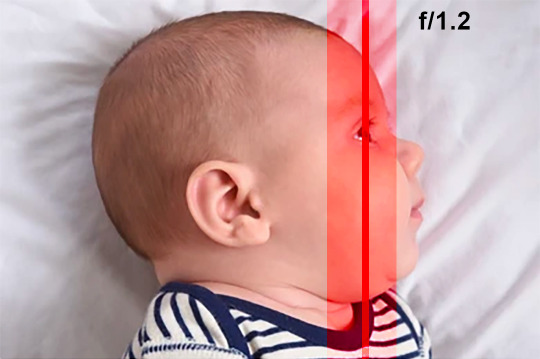
The plane of focus and shallow depth of field are causing this issue. This might be a worthy compromise if you are in a dark room and your ISO is very high and you are worried about too much noise.
However, if you can use a flash or some kind of lighting, you can stop down your lens and increase that depth of field around the focal plane.

Bokeh
Bokeh is the quality of the blurriness. Some people are more obsessed with how good the blurry parts of the photo are more so than the in focus parts. Bokeh is typically judged by "bokeh balls" which are just out-of-focus lights in the background. While I like attractive bokeh balls as much as the next photographer, I will admit this is one of the sillier aspects of photography.

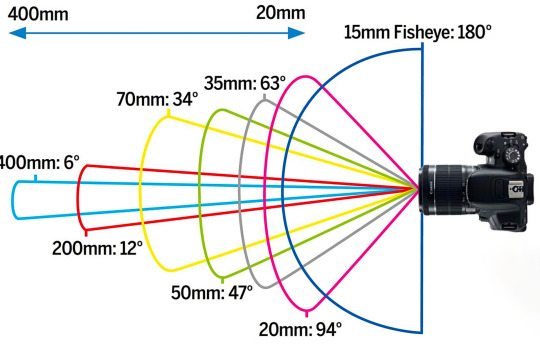
Field of View (FoV)/Angle of View
This is how much stuff you can fit in frame at a given distance. Wide angle lenses can fit more stuff in at a shorter distance and telephoto lenses can fill the frame with stuff that is farther away. The focal length of the lens determines the field of view. The focal length is designated by millimeters and the field of view by degrees.
Focal Length
Technically, this is "the distance between the lens's optical center and the camera's sensor."
In simpler terms, this is how you determine the field of view of a given lens.
A short focal length, like 10mm, will have a wider field of view. You have to be very close to your subject to fill the frame with them.
And a longer focal length, like 500mm, will allow you to fill the frame with your subject from farther distances.
Typically all lenses are designated by their focal length. If someone says, "Hand me the 50" they mean a 50mm lens.
35mm Equivalent
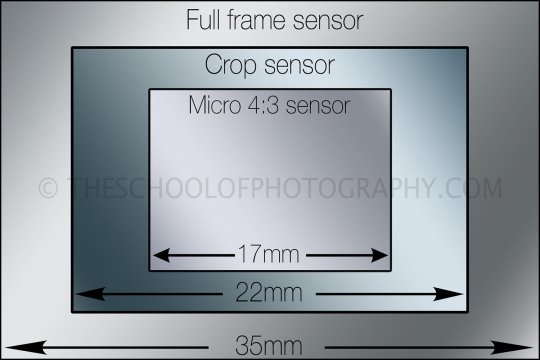
Not every camera has the same sized sensor. So when we talk about lenses, we need a reference to help us understand how a given lens will behave. A 50mm f/2.8 lens does not have the same field of view or depth of field when placed on different sensors. So, we need a standard for comparison.
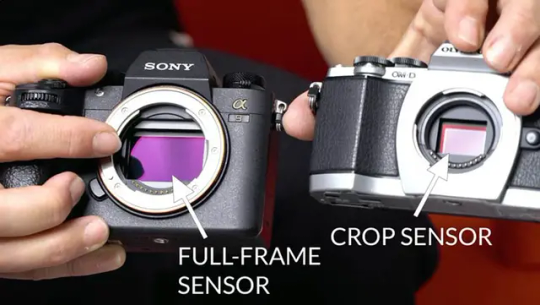
The standard that is used is the "full frame" sensor which is roughly the same size as a 35mm piece of film.
Anything smaller is considered a "cropped sensor."
Those cropped sensor cameras have a "crop factor"—a simple multiplier that helps you understand how lenses compare. And when you use this multiplier it tells you the "35mm equivalent."
Confused yet? Yeah, sorry, it would be easier if camera manufacturers chose metrics that didn't change depending on the sensor, but this allows them to make their cameras and lenses seem more impressive in the marketing.
There are two main cropped sensors for ILCs. (Interchangeable lens cameras.) APS-C and Micro Four Thirds. They have a "crop factor" of 1.5x and 2x respectively. The Micro 4/3 sensor is half the size of Full Frame, therefore it has a 2x crop factor. And when you apply this crop factor to the aperture and focal length you can determine how a lens will behave.
For example, a 50mm f/2.8 lens on a micro 4/3 sensor would behave the same as a 100mm f/5.6 lens on a full frame—as 100mm is 2x 50mm and f/5.6 is 2 stops above f/2.8.
As you can see, the Micro 4/3 lens is not going to do as well in low light. The iPhone boasts an aperture of f/1.8 on its main lens, but when you figure out the 35mm equivalent, it's more like an f/8 lens.
I went to all the effort to explain this because it demonstrates that larger sensors allow you to work in cramped spaces with less light. If you want to use a 50mm in a hospital room, you probably can on a full frame. But on a Micro 4/3 you might need to be out in the hall because your lens is acting like it is 100mm. So the Zf would be a good choice in this regard.
Camera Shake
This is the bad kind of blurry. Humans are not tripods, so when you are handholding a lens, you need to make sure your shutter speed is fast enough to freeze the action of your image. Camera shake is very easy to control on wide angle lenses and very difficult to manage with telephoto lenses.
Reciprocal Rule
The reciprocal rule states that in order to get sharp photos without blurry camera shake, you must set your shutter speed to 1 over twice the focal length of your lens. So if you have a 100mm lens, you need to set your shutter speed at 1/200 to be safe.
This rule breaks down at a shutter speed of 1/50 if there is anything moving in your image. So if a dog is running or a car is driving by, it will have a motion trail, but at least it won't be due to your shaky hands.
Image Stabilization
This is a feature some lenses have that helps reduce camera shake. Image stabilization can counteract shaky hands and let you get sharp photos with a much slower shutter speed. Newer cameras have sensor stabilization which does the same thing. And if you pair up a stabilized sensor with a stabilized lens, it is almost as effective as using a tripod.
Stabilization is measured in stops. You might hear a lens has 4 stops of stabilization. That means you can handhold the lens and not get camera shake with a shutter speed 4 stops below the reciprocal rule. So for that 100mm lens, that 1/200 becomes roughly 1/12. And if your sensor has 4 stops, you could handhold a shot for nearly a second without any shake.
However, at shutter speeds that slow, if anything in the frame is moving, they will probably have motion blur. But for still life scenes, or maybe a sleeping baby, this can be very handy if you don't have a tripod with you.
If being able to handhold at lower shutter speeds seems important, then you might want to seek out a lens with stabilization and pair it to a camera with sensor stabilization for maximum stable-osity.
Lens Compression
Lens compression is kind of a myth, but I think we still call it compression because it is easier to explain to beginners than optical physics. The lens doesn't really compress anything, it's actually a matter of distance and the aforementioned physics. But I'm going to go with the easy explanation for now.
Lens compression is a phenomenon seen with different focal lengths. If you take a photo with a 500mm lens, the background will seem to compress with the foreground. Thus objects in the background will seem much larger in size.

This also happens with faces.
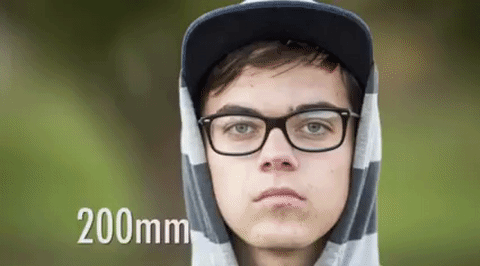
Wider lenses exaggerate distance. At 10mm, the lens would only be a few inches away from someone's face.
From the lens's point of view, the ears are several times farther away from the lens than the tip of the nose. So the lens is like, "Your ears are really far away! And far away things are really small, right?" So the lens gives us a big nose and small ears and makes us look a bit alien.
But at 100mm, the lens will be several yards away.

From this perspective, the lens feels like your ears and your nose are nearly the same distance away. And the lens is now like, "Things that are the same distance away do not get bigger or smaller." The lens seems to compress or flatten the face, causing a more flattering appearance in the image.
Minimum focus distance
This is sometimes called the working distance. This is how close you can get to your subject while maintaining focus. If you get too close, your camera will just hunt and freak out perpetually until you back up and it can lock on again. This isn't always advertised prominently for lenses, so you need to make sure the lens will be able to focus in the space you plan to use it.
Extension Tubes
Sometimes called "macro extension tubes." These are spacers you put between your camera and lens to decrease the minimum focus distance. In some cases you can even turn a normal lens into a macro lens. These tubes are able to stack and the more you put on, the more into the macro realm you can go. They come in smart and dumb versions. The dumb ones require you to manual focus whereas the smart ones can still use the autofocus system. I highly recommend the smart ones, as they are not too much more expensive.
Lens Imperfections
There are a few imperfections that can plague all lenses and their quality is sometimes judged by how well they mitigate those imperfections. Here are some of those attributes.
Lens Distortion
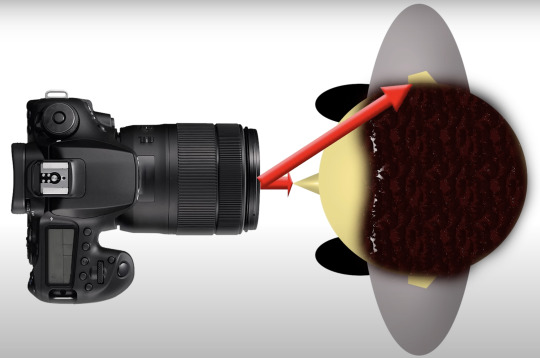
As lenses get wider, they allow a larger field of view by accepting light rays that are coming from the side of your lens. Let's look at this image again.
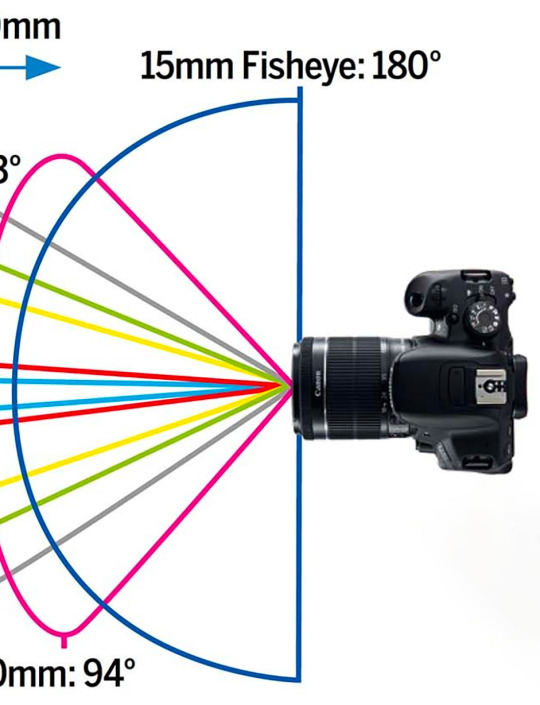
Your lens then has to correct those rays and send them to a square, flat sensor. If you look at the 180 degree fisheye, that entire arc has to be flattened and made square. And as good as optical engineering has become, the wider the lens, the harder it is to keep the image from distorting.
This is typically called "barrel distortion." Minor distortion can actually be corrected in editing software. Every lens has correction algorithms. Though sometimes it is best to embrace the distortion, like on a fisheye lens. Make the distortion a feature and not a bug.
Chromatic Aberration
This is the fancy name for color fringing. This is a defect in the lens that cause false colors to contaminate certain objects in a photo. Typically this happens around dark skinny things against a bright background, such as tree branches.

Modern lenses have nearly eliminated this, except for the super cheap models, but if you do end up with fringing, this can be easily corrected in Lightroom or Photoshop. And many lenses even have that correction built in and all you have to do is check a box.
Sharpness
You might not think of sharpness as an optical flaw, but no lens is perfectly sharp. And the quest to make a perfectly sharp lens involves engineering those optical flaws to a minimum.
A "sharp lens" is one with incredible fidelity. Even zoomed in beyond 100%, sharp lenses will show great detail. If you can't get close to the subject and need to crop your photo later, having a sharp lens can make up for the loss in resolution—as you can upscale without much loss in quality. If you plan to make large high quality prints, a sharp lens will help more than tons of megapixels.
That said, if you truly want to get the most out of a high megapixel camera, a sharp lens comes in handy here too. A smartphone may boast in the marketing as having 200 megapixels, but it has a tiny plastic lens. So even though it technically has 200 megapixels on the sensor, the lens will give it the equivalent of maybe 8-10 megapixels worth of detail. People forget, the lens has a resolution as well, and if the lens cannot resolve 200 megapixels, you aren't going to get a 200 megapixel image.
A sharp lens will allow for more detail than higher megapixels. In some cases you need to double or triple the number of pixels to see an increase in detail. Whereas you can put a super sharp lens on a 12 megapixel camera and blow any smartphone out of the water.
And if you put a sharp lens on a 50 megapixel camera, you can almost see into skin pores.
So... sharp = more detail. And more detail gives you greater cropping power for when you can't get close to babies.
Now, I am obligated to say that some photo nerds chase sharpness as if it is some holy grail. They need the sharpest lens so all of their pixels are perfect at 100% zoom even though no one ever looks at an image that close. There are amazing photos that have been blurry. There are amazing photos taken with 50 year old vintage glass. Sharpness is just another tool. If you need to crop. If you need to upscale. If you need to print large... it is a great help. But nearly every lens made for a modern mirrorless camera is "sharp" to some degree.
So, if you need extra sharpness for certain situations, do your research and find a lens that is sharp as can be. But sharpness should be like 8th on the list of priorities.
Soft Lens
A "soft" lens is how a non-sharp lens is referred to. Most modern optics for mirrorless cameras have some degree of sharposity.
Sharpitude.
Sharp...ness.
So you don't need to worry too much about getting a detrimentally soft lens unless you go super duper budget. This is why I usually recommend people skip the "kit lens" unless they absolutely can't afford anything better.
Though sometimes people purposely get vintage lenses because they don't like sharpness and prefer the "character" of older lenses. The imperfections can achieve a different artistic goal. Though this can also be achieved through lens filters... or Vaseline.
I'm looking at you, Barbara Walters.

Sharpness at the Corners
When I read that in my head just now I said it the same way I do "Panic! at the Disco."
Engineers will prioritize sharpness at the center of the lens since that is where most of the interesting stuff tends to be. But also, the light rays at the center tend to be the most parallel as they head to the sensor, so they don't need as much correction. The rays coming from the sides have to be bent and manipulated to correct for distortion, so keeping things sharp at the corners can be a challenge.
Now, knowing that, and knowing how the aperture works, you can infer that when you stop down your lens and make the hole smaller, all of the light rays are constricted to a smaller area. This makes them easier for your lens to deal with, so if a lens has problems with corner sharpness, you can usually stop down to improve this. So if a lens is soft at the corners at f/1.8, you might be able to go to f/2 or f/4 to get better results.
Vignetting
Vignetting is a circular area of darkness at the perimeter of your photo. This is another side effect caused by the same things as soft corners. When correcting those non-parallel light rays, it causes them to travel an ever so slightly farther distance getting to your sensor. And the inverse square law tells us that light becomes dimmer as it travels longer distances.
This is very easy to correct. Usually your camera has a setting to correct vignetting if you are outputting JPEG files. And if you are shooting RAW photos, your editing software should have a check box to fix the vignetting—usually the same one that fixes chromatic aberration. This is usually called "lens correction" in most menus.
Also, same as with corner sharpness, stopping down your lens will usually fix this optically rather than with software algorithms.
Contrast
Contrast is probably the most important attribute to determine lens quality. Good contrast can make a soft lens look good. But lens contrast is not always consistent. It can get better or worse depending on the lighting in your scene.
The best way to test the contrast of a lens is to take a picture of something that is backlit. A person with the sun behind them is a great indicator. If they have no light on them, the person should fall into inky darkness. But if a lens has poor contrast, they will seem like a faded gray.
Focus Breathing
Focus breathing is a phenomenon where your focal length changes depending on how far away your subject is. It's usually not a big deal and most people don't even notice it, but if you ever do video, it can cause a few headaches. Some people can get annoyed because they feel they aren't getting the advertised focal length on the lens they bought. Like, if you get a 300mm lens and it only goes to 250mm for things super far away, that can be annoying.
This video explains it in detail.
youtube
Lens Types
Prime Lens
A "prime lens" has a fixed focal length and cannot be zoomed. Typically prime lenses are "faster" (wider max aperture) and sharper. Weirdly they can be very inexpensive or the most expensive. They can be extremely lightweight or weigh a ton. And if you want the sharpest lens possible or the fastest lens possible or both, it will be expensive and heavy.
Having at least one fast prime is usually recommended for any professional photographer.
Zoom Lens
A "zoom lens" allows you to zoom. Obviously. But there are few that go below an aperture of f/2.8, so less light gathering and you sacrifice a bit of sharpness. However, if you don't know how much space you will have to work with, the flexibility of a zoom can be invaluable.
Be warned, while a cheap prime lens can still take fairly good photos, cheap zooms are usually pretty terrible. There are plenty of reasonably priced zoom lenses to choose from, but if the price seems too good to be true, I would trust that intinct.
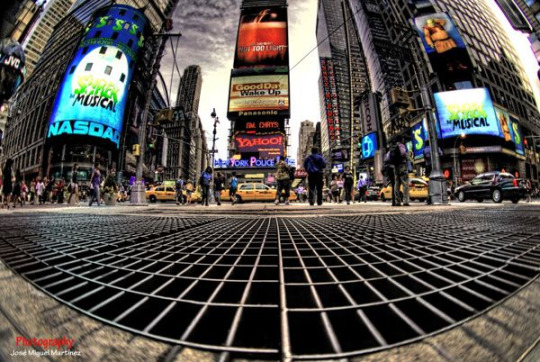
Wide Angle Lens
A "wide angle lens" is any focal length below 35mm. Wider focal lengths allow you to get more stuff in the photo at shorter distances. A theme you might notice with photography is that every benefit has a compromise or consequence to go with it. Wide angle lenses are wonderful if you are in a cramped space. They also make it easy to keep everything in focus. But as you go wider, distances become exaggerated and barrel distortion becomes more pronounced and harder to correct.
Things that are close to the lens seem huge and things farther away seem tiny. One trick to remember is things in the center of the frame will be less affected by distortion. Something to take into account when taking those smartphone selfies.
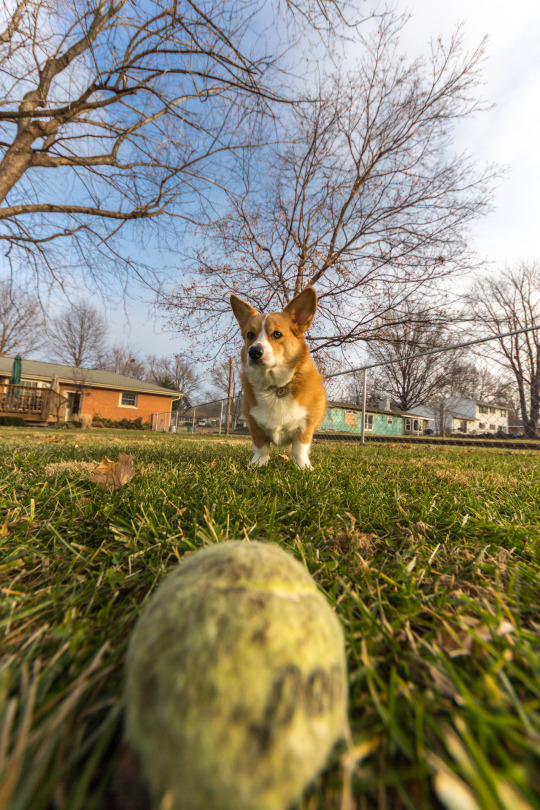
If you look, the ball looks huge in frame because it was only a few inches from the lens. Otis was literally smaller in frame than the ball despite only being about 2 feet away. However, he doesn't look all stretchy like the ball because he is centered.
Standard Lens
A "standard" or "normal lens" represents about the same field of view as the human eye. Generally around 40mm to 55mm on a full frame camera (there is some debate on this, but close enough). This is right about where you can take pictures of faces without the unflattering side effects of wide angle.
Telephoto Lens
A "telephoto lens" allows you to stand farther away and still fill the frame with your subject. Usually lenses 200mm and above are considered telephoto. These are often heavy and expensive.
Specialty Lenses
Ultrawide
This is just an extremely wide angle lens. At this point, you just except the massive amounts of distortion and embrace it. These lenses are extremely fun.
Medium Telephoto
These are sometimes called "portrait" lenses as well. They are a little more tele than standard and not quite tele enough for long distance photography. Usually in the 70-200mm range. This is the focal range that allows you to still be close to your subject but you are far enough away to get extra flattering lens compression on faces.
Superzoom Lens
A "superzoom" has an extremely large focal range. It can go from very wide to very telephoto. These are usually not wonderful lenses, although they have improved on mirrorless cameras in recent years. There are a few that could even be used professionally now. But most are just a huge mediocre compromise for vacation pix.
The cheap ones aren't fast, they aren't sharp, and every time you zoom people think your camera is having an erection.
If you are traveling and you have no idea what you might be photographing and carrying around a bunch of lenses is impractical, these have utility. But the larger the focal range, the more mediocre they get. Typically if the zoom range exceeds ~150mm you will start noticing that mediocrity. So a 70-200mm can be fantastic. But an 18-300mm will be very mid.
Macro
A macro lens is any lens that has 1x or more magnification. 1x magnification is a designation that relates the sensor size to how much of the subject fills the frame of your image. For 1x, that ratio should be 1:1.
So if you imagine a quarter lying on top of an image sensor, that's how big the quarter should be in your photo. 2x magnification would be like if a quarter doubled in size and you laid it on top of the image sensor. And so on.
Beware of lenses claiming to be macro and really only having a short working distance. 0.5x is not macro, but is sometimes advertised as so.
Tilt Shift Lens
This is a very niche lens. Most people know of it from the photos that make everyone look like they are in a miniature land.
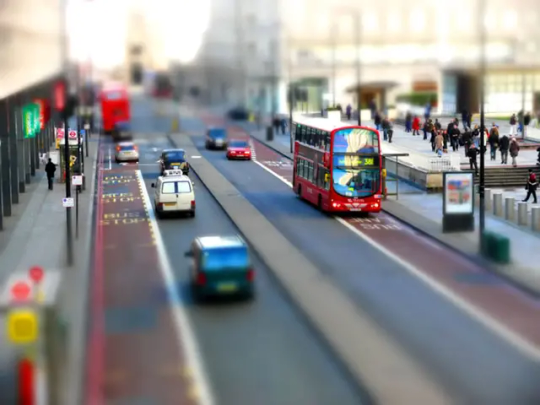
For every other lens, the focal plane is perpendicular. If you move the camera at an angle, the focal plane will match that movement. So what the tilt shift lens allows you to do is angle the focal plane so your depth of field goes in bonkers directions.
Product photographers love this because you can take a photo of an array of products from a 45 degree angle and keep everything in focus.
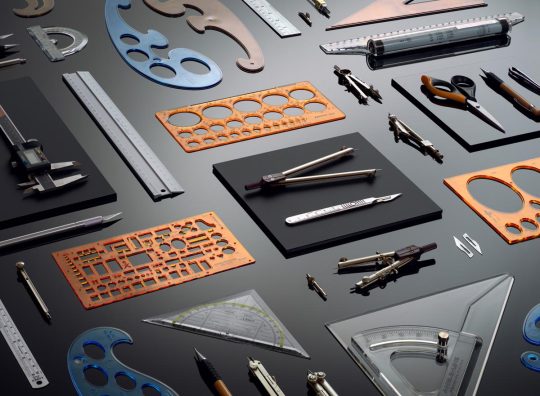
This image would be impossible to maintain complete focus of all the objects without a tilt shift lens.

In this example, without tilting the lens, the tip of the multitool is out of focus.

And now you can see the camera hasn't moved, but the lens is at a steeper angle. And you'll also notice the entire tool is in focus.
But wait, there's more! Did you forget about the shifting? Architectual photographers can use the shift function of the lens to correct perspective distortion and keep buildings looking straight.

Will this lens help in the photographing of infants?
Probably not.
But I bet you thought it was cool and are glad I included it.
Recommended Essential Lenses
I didn't know what to call this section. These are just the collection of lenses most photographers will try to acquire as they build out their kit.
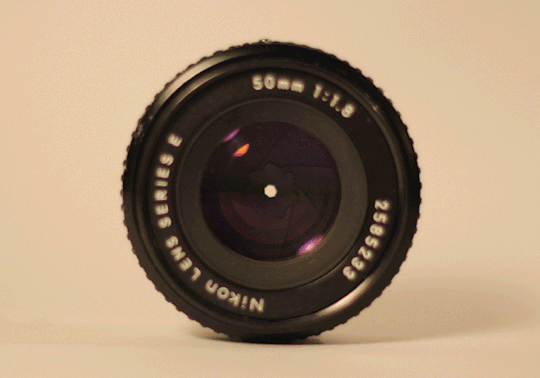
Nifty Fifty
This is probably the first lens everyone should buy. Almost every brand has their own version. It is an inexpensive 50mm lens with a sub f/2 aperture. Canon's Nifty Fifty or "Plastic Fantastic" is probably the most famous example. It is only $125 and has an f/1.8 aperture.
This lens may not be the sharpest and it might have a lot of plastic-y, cheap feeling parts, but it is a wonderful way to get started with photography. You can use the wide aperture to experiment with bokeh and shallow depth of field. And the 50mm focal length is probably one of the most versatile. Not too wide, so people look normal, and not too tele, so you aren't a mile away from your subjects.
The Holy Trinity
The "Holy Trinity" is meant to describe the 3 lenses that can handle nearly every photographic task while maintaining professional quality results. Typically these lenses are all f/2.8 and are high quality zoom lenses. The 16-35mm, the 24-70mm, and the 70-200mm.
Most photographers can accomplish just about any task with these lenses in their bag.
Froggie's Holy Hexagon
That said, if I had an unlimited budget I would actually have 6 lenses to cover everything. Beyond the Holy Trinity, I would get a fast prime, an ultrawide, and a macro lens.
A fast prime can see in the dark and has more background blur. The nifty fifty would work great for this.
An ultrawide is one of the most fun lenses you will ever use, even if it distorts everything to a crazy degree and isn't useful very often. It is great for breaking you out of photographic ruts and can really get the creative juices flowing.
And a macro lens is not just useful for making tiny things big. It also allows you to focus at any distance. Sometimes you just need to get a tad bit closer than your other lenses will allow. Macro lenses are also pretty great portrait lenses and can serve multiple functions.
And if anyone is interested in sports or wildlife photos, a nice telephoto lens might be a seventh lens to consider.
I think that is the end of part 1.
I hope this was helpful. And I look forward to posting part 2 soon.
89 notes
·
View notes
Text
I’ve been asked to explain my kit and my workflow by @savage-daughter-of-nikitie.
I use either a Canon 80D, Canon 5D Mk IV or a Sony A7Riv with a sigma MC-11 mount converter. I also have a Canon 300D and a Canon 70D from both of which I have removed the internal infrared filter, so that I can shoot in the Infrared.
I have a number of tripods and LED light panels which I sometimes use, but for most general things I prefer to use natural light with perhaps a small reflector.
Lens-wise, my aviation photography is done using either a Sigma 60-600mm f/4.5-6.3 OS DG Sports or a Canon 100-400mm f/4.5-5.6L MkI.
For other general photography such as landscapes and when I do portraits, (which I don’t post here). I have a range of lenses but my favourites are:
* Canon EF 24-70mm f/2.8l USM
* Canon 50mm f/1.8
* Lensbaby Velvet 56mm f/1.6
* Canon EF-S 10-22mm f/3.5-4.5 (this won’t fit on the Sony / MC-11 combo)
For macro photography I generally use either a Sigma 105mm f/2.8 EX DG OS HSM macro or, very occasionally, a Canon MP-E 65mm 1-5x Macro with a lot of light and a macro rail.
I occasionally use a Newer variable ND e.g to slow flowing water and I have various intervalometers, and all of the Pluto Trigger and Dripper kit for water droplets or complex triggering.
I also use my phone camera more and more and then achieve effects in Lightroom, Photoshop or Topaz AI
My workflow varies depending upon the type of photography. By way of an example, for the flower studies my workflow is:
1. Photos were taken on a variety of kit, mainly my phone.
2. Import into Lightroom
3. Square crop the flower and rotate to get the best light/symmetry/arrangement.
4. Use Lightroom’s Subject Mask to initially mask the flower and refine using brush addition/subtraction
5. Duplicate and invert the mask to effectively mask the background
6. Set exposure, contrast, highlights, shadows, whites, blacks and saturation to zero. This removes the background allowing the flower to stand alone but gives me the option to recover the background should I wish to later.
7. At this point any issues with masking become very noticeable so I will often refine both flower and background masks once more.
8. Return to the flower mask and set the exposure, contrast, white balance, response curves, saturation and sharpness as required, to make the flower pop.
9. I often apply radial masks to even the exposure or highlight the inner or outer sections at this point.
10. Use the heal tools to remove pollen specs, imperfections or other issues. Lightroom’s content aware AI healing is extremely good these days.
11. I then catalogue, add metadata, and export to a number of private and public storage and distribution services.
I have two projects I want to start as we move into winter, life permitting.
Firstly, I want to try to do some star trails. Near where I live there is a park on an escarpment running east west, with a couple of stone crosses that can be photographed from the south with the Polaris (the North Star, which is the centre or rotation in the night sky) just above the top of one of them.
I also want to play more with my 70D and do some more IR photography. This makes warmer parts of the scene brighter and cooler darker and can lead to some eerie effects. I have a long standing desire to visit a certain chateau in France and photograph it in IR.
This is probably way more than you were asking for and I’m not sure is this is what you wanted to know, but I hope it helps.
12 notes
·
View notes
Text
Top 5 Cameras for Wedding Photography: Advantages and Disadvantages
1. Canon EOS R5
Advantages:
1. High Resolution: The 45MP sensor delivers incredibly detailed images, perfect for large prints and cropping without losing quality.
2. Advanced Autofocus: Canon's Dual Pixel CMOS AF II provides fast and accurate autofocus, even in challenging lighting conditions, ensuring you capture every critical moment.
3. 8K Video: The ability to shoot in 8K resolution allows for high-quality video production and the ability to extract high-resolution stills.
4. In-Body Image Stabilisation (IBIS): The 5-axis IBIS helps in reducing camera shake, enabling sharp images even at slower shutter speeds.
5. Versatile Lens Options: The RF mount offers a wide range of high-quality lenses tailored for professional use.
Disadvantages:
1. Overheating Issues: Extended video recording, especially in 8K, can cause overheating, which might limit shooting time.
2. High Cost: The advanced features come at a premium price, which might be a significant investment for some photographers.
3. Large File Sizes: The high-resolution images and 8K videos result in large file sizes, requiring significant storage capacity and powerful editing hardware.
2. Nikon Z7 II
Advantages:
1. Excellent Image Quality: The 45.7MP sensor provides superb dynamic range and detail, crucial for wedding photography.
2. Improved Autofocus: Enhanced AF performance with eye-detection ensures sharp focus on subjects, even in low light.
3. Dual Card Slots: Supports CFexpress/XQD and SD cards, offering flexibility and redundancy, important for wedding shoots.
4. Robust Build: Weather-sealed body ensures reliability in various environmental conditions.
5. User-Friendly Interface: Intuitive controls and a high-resolution electronic viewfinder enhance the shooting experience.
Disadvantages:
1. Limited Native Lenses: Although growing, the Z-mount lens lineup is still not as extensive as some competitors.
2. Battery Life: While improved, the battery life could be better for long wedding shoots.
3. Video Capabilities: While solid, the 4K video specs are not as advanced as some competing models.
3. Sony A7R IV
Advantages:
1. High Resolution: The 61MP sensor offers extraordinary detail and resolution, ideal for large prints and extensive cropping.
2. Real-Time Tracking and Eye AF: Sony's autofocus system is among the best, ensuring precise focus on subjects' eyes, even in motion.
3. Dynamic Range: Exceptional dynamic range captures fine details in both highlights and shadows.
4. Versatile Lens Ecosystem: E-mount system provides access to a vast array of lenses from Sony and third-party manufacturers.
5. Compact and Lightweight: Despite its high specs, the A7R IV remains relatively compact and lightweight, beneficial for long shoots.
Disadvantages:
1. File Management: The massive 61MP files can be cumbersome to manage, requiring substantial storage and processing power.
2. Complex Menu System: The extensive features lead to a complex menu system that can be overwhelming for new users.
3. Battery Life: Intensive use, especially with high-resolution images, can drain the battery quickly.
4. Fujifilm X-T4
Advantages:
1. Colour Science: Renowned for its colour reproduction and film simulations, delivering beautiful, vibrant images straight out of the camera.
2. IBIS: In-body stabilisation ensures sharp images, even in challenging conditions.
3. Video Features: Capable of 4K/60p video recording, providing high-quality video performance alongside stills.
4. Build Quality: Robust, weather-sealed body ensures durability and reliability.
5. Compact and Lightweight: The APS-C sensor allows for a more compact and lighter camera body, making it easier to handle during long events.
Disadvantages:
1. APS-C Sensor: While excellent, it doesn’t match the full-frame sensors in terms of depth of field and low-light performance.
2. Battery Life: Although improved, the battery life still falls short compared to some full-frame counterparts.
3. Limited Lens Selection: While Fujifilm offers a range of high-quality lenses, the selection is more limited compared to full-frame systems.
5. Canon EOS 5D Mark IV
Advantages:
1. Proven Reliability: The 5D series has a long-standing reputation for durability and performance, trusted by professionals worldwide.
2. Image Quality: The 30.4MP full-frame sensor delivers excellent image quality with good dynamic range and colour accuracy.
3. Versatile: Suitable for both stills and video, with 4K video capability and robust performance in various shooting conditions.
4. Lens Compatibility: Access to a wide range of EF lenses, providing flexibility and options for different shooting styles.
5. Ergonomics: Comfortable and intuitive to use, with a well-thought-out control layout.
Disadvantages:
1. Weight and Size: Being a DSLR, it is bulkier and heavier compared to mirrorless options.
2. Single CF Card Slot: Unlike newer models with dual card slots, the single CF card slot could be a drawback for some photographers.
3. Outdated Tech: While still a strong performer, some of its features and specs are behind the latest mirrorless offerings.
Each of these cameras offers unique strengths that can enhance your wedding photography. The choice ultimately depends on your specific needs, budget, and shooting style. Investing in any of these top cameras will provide you with the tools to capture beautiful, timeless wedding photos that your clients will cherish forever.
Choosing the Sony for wedding photography has been one of my best decisions. Here's why I love using this camera and why it works perfectly for my needs:
Reasons I Choose the Sony A7R IV for Wedding Photography
1. High Resolution
- 61MP Sensor: The Sony A7R IV’s 61-megapixel full-frame sensor provides unmatched detail and resolution. This is particularly beneficial for wedding photography, where capturing intricate details like the lace on a wedding dress or textures in floral arrangements is crucial. The high resolution also allows me to crop images significantly without losing quality, which is useful for creating different compositions from a single shot.
2. Exceptional Autofocus
- Real-Time Tracking and Eye AF: Sony’s advanced autofocus system ensures sharp focus on my subjects, which is crucial for candid moments and fast-moving scenes typical at weddings. The real-time tracking and eye autofocus (Eye AF) work seamlessly, keeping the bride and groom in sharp focus even when they are moving or in low light conditions. This reliability allows me to concentrate more on composition and creativity.
3. Dynamic Range
- Wide Dynamic Range: The A7R IV’s sensor offers excellent dynamic range, capturing details in both highlights and shadows. This is particularly important in wedding photography, where lighting conditions can vary greatly throughout the day. Whether I’m shooting in harsh midday sun or dimly lit receptions, the A7R IV helps me retain detail and colour accuracy.
4. Versatile Lens Ecosystem
- E-Mount Lens Compatibility: The A7R IV is part of Sony's E-mount system, giving me access to a vast range of lenses from Sony and third-party manufacturers. This versatility allows me to choose the perfect lenses for different aspects of wedding photography, whether I need a fast prime lens for portraits, a wide-angle lens for group shots, or a telephoto lens for candid moments from a distance.
5. Compact and Lightweight Design
- Portability: Despite its high specs, the A7R IV is relatively compact and lightweight compared to many DSLR counterparts. This makes it easier to carry and handle during long wedding shoots, reducing fatigue and allowing me to move more freely to capture the best angles and moments.
6. Professional Video Capabilities
- 4K Video Recording: The A7R IV offers high-quality 4K video recording, making it suitable for capturing cinematic wedding videos alongside stills. The ability to shoot high-resolution videos provides flexibility and enhances my offerings to clients who may want both photo and video services.
7. Excellent Low Light Performance
- ISO Sensitivity: With a broad ISO range, the A7R IV performs well in low-light situations, common in wedding receptions and evening events. This capability ensures that I can capture clear, noise-free images even in dimly lit environments, allowing me to focus on capturing the ambiance and mood of the event.
Conclusion
Choosing the Sony A7R IV for wedding photography has been a game-changer for me. Its exceptional image quality, reliable autofocus, and versatile lens options make it a perfect fit for capturing the special moments of a wedding day. The camera’s ability to handle diverse lighting conditions and its compact design make it a powerful tool in my kit. While the large file sizes and battery life are considerations, the benefits far outweigh these drawbacks, making the Sony a top choice for my professional wedding photography needs.
0 notes
Text
Tamron 50-300mm F4.5-6.3: Excelent Versatility and Performance
The Tamron 50-300mm F4.5-6.3 Di III VC VXD lens is a game-changer for photographers seeking a versatile and high-quality zoom lens. Its unique focal range and compact design set it apart from other lenses in the market.
Comprehensive Review
Tamron has launched a groundbreaking 6x telephoto zoom lens, the 50-300mm F4.5-6.3 Di III VC VXD (Model A069), for Sony E-mount full-frame mirrorless…

View On WordPress
0 notes
Text
Revival of Vintage Lenses: The Latest Trend, Digital Photography
**Revival of Vintage Lenses: The Latest Trend in Digital Photography**
Welcome back to my digital photography blog! Today, we're diving into one of the most intriguing trends reshaping the photography landscape: the revival of vintage lenses. This trend blends the old with the new, offering photographers unique creative opportunities and distinctive visual styles. Let's explore why vintage lenses are making a comeback and how you can incorporate them into your photography toolkit.
### The Allure of Vintage Lenses
#### Unique Optical Characteristics
One of the primary reasons photographers are drawn to vintage lenses is their unique optical qualities. Unlike modern lenses, which are designed to minimize flaws and produce clinically sharp images, vintage lenses often have imperfections that add character to photos. These can include:
- **Soft Focus:** Many vintage lenses produce a softer image, particularly at wider apertures. This can give portraits a dreamy, ethereal quality.
- **Swirly Bokeh:** Certain vintage lenses, like the Helios 44-2, are famous for their distinctive bokeh patterns, which can add an artistic touch to backgrounds.
- **Chromatic Aberration:** While generally considered a flaw, chromatic aberration (color fringing) can sometimes enhance the aesthetic of an image, giving it a unique look that modern lenses typically avoid.
#### Build Quality and Aesthetic
Vintage lenses are often built with metal bodies and manual focus rings, providing a tactile shooting experience that many photographers find satisfying. The craftsmanship of these lenses is typically robust, and their classic design adds a nostalgic aesthetic to your camera setup.
### Adapting Vintage Lenses to Modern Cameras
#### Lens Mount Adapters
To use vintage lenses on modern digital cameras, you'll need a lens mount adapter. These adapters are readily available for most camera and lens combinations. Here’s how to choose the right adapter:
- **Compatibility:** Ensure the adapter matches both your lens mount and camera mount. Popular mounts include M42, Canon FD, and Nikon F for lenses, and Sony E, Canon EF, and Micro Four Thirds for cameras.
- **Quality:** Invest in a good-quality adapter to ensure a secure fit and to avoid light leaks. Brands like Fotodiox and Metabones are known for their reliable adapters.
Manual Focus and Exposure
Most vintage lenses are manual focus, which can be a learning curve for those used to autofocus. However, this can also be an advantage, as it encourages more deliberate and thoughtful composition. Many modern cameras have focus peaking and magnification features to assist with manual focusing.
Additionally, vintage lenses often lack electronic contacts, meaning you’ll need to adjust exposure settings manually. This includes setting the aperture on the lens and adjusting shutter speed and ISO on your camera.
Creative Benefits of Using Vintage Lenses
Enhanced Storytelling
The unique characteristics of vintage lenses can enhance storytelling by imparting a distinctive mood or atmosphere to your images. For instance, the soft focus and warm colour rendition of a vintage lens can evoke nostalgia or romance, making it perfect for portraiture and lifestyle photography.
Experimentation and Learning
Using vintage lenses can reinvigorate your creative process. The need to manually focus and set exposure slows down the shooting process, encouraging more thoughtful composition and a deeper understanding of photographic principles.
Cost-Effective Quality
Many high-quality vintage lenses are available at a fraction of the cost of modern equivalents. This allows photographers to expand their lens collection and experiment with different focal lengths and styles without breaking the bank.
Popular Vintage Lenses to Explore
- **Helios 44-2 58mm f/2:** Known for its swirly bokeh and sharp central focus, this Soviet-era lens is a favorite among portrait photographers.
- **Canon FD 50mm f/1.4:** This lens offers excellent sharpness and beautiful background blur, making it ideal for portraits and low-light photography.
- **Minolta Rokkor 58mm f/1.2:** Renowned for its build quality and pleasing bokeh, this lens is a great choice for those looking to experiment with shallow depth of field.
Conclusion
The revival of vintage lenses in digital photography is more than just a trend; it's a movement that celebrates the artistry and craftsmanship of past generations. By integrating these classic lenses into your modern workflow, you can achieve unique optical effects, enrich your creative process, and produce images with a distinctive charm that sets your work apart.
So, dig out that old lens from your attic or visit a second-hand camera store, grab an adapter, and start exploring the endless
creative possibilities that vintage lenses offer. Happy shooting!
#disabled artist#photographers on tumblr#art#digital art#landscape#artists on tumblr#my art#original art#photographer#adobe photoshop#art blog#blog#vintage#vintage photography#vintage lenses#informative#information#interesting#social#past#cameras#lightroom#nikonphotography#photography
0 notes
Text
Lensbaby Trio - Triple the Fun!
At the PhotoFair in Newark, CA last month, I bought this Lensbaby Trio from long time exhibitor, Ernie Fenn. He gave me a sweetheart deal on it. They run about $200-$250 retail. This is a nicely made mostly metal lens set. Yes it is a set of lenses. There are three 28mm f/3.5 lenses mounted in a turret. Lensbaby offers these in a variety of mounts including Sony E, Canon EOS-M, 4/3, and a few…

View On WordPress
0 notes
Text
Viltrox 20mm f/2.8 Review (Nikon z-mount)
Background
Ever since hearing that Viltrox was making an inexpensive wide angle prime for Sony e-mount, I waited to see if when they would release it on Z-mount.
A few months later, they did. I pre-ordered one directly from Viltrox and in short time it made the trip from China to my front door.
Having used other Viltrox lenses in the past, I kind of had an idea of what to expect. Will this…

View On WordPress
0 notes
Text
Beyond Boundaries: Sony A6400

Background Information
Sony launched the Sony a6400 camera, specifically for vloggers, as part of their Alpha series in 2019. However, in the three years since its release, the camera's position in Sony's lineup has changed. It is now considered a versatile option, suitable for both photography and videography enthusiasts. The Sony a6400 comes packed with features that make it ideal for hobbyists, semi-professionals, and online creators. It is a compact and robust camera that can handle a wide range of photo and video tasks, particularly for those who seek advanced features in a smaller size.
Features
The Sony a6400 camera boasts a 24.2-megapixel APS-C Exmor CMOS sensor, an advanced autofocus mechanism with 425 phase-detection and 425 contrast-detection points, and 4K video recording at 30 frames per second. The camera is lightweight and compact, with a tilting touchscreen and an electronic viewfinder built-in. It performs exceptionally well in low-light conditions, thanks to its high ISO performance and continuous shooting speed of up to 11 frames per second.
Review
It is a mirrorless camera known for its advanced features, compact design, and impressive imaging capabilities. It's a popular choice among content creators and photography enthusiasts due to its autofocus system, ability to record 4K video, and portability. However, it's important to note that this camera lacks in-body image stabilization and weather sealing. These limitations should be considered for specific photography or videography needs. It's also advisable to stay up-to-date with the latest models or updates as technology continues to evolve.
"Is the Sony a6400 the Perfect Camera for You?"
If you need a camera with advanced capabilities, consider the Sony a6400. It comes with features like Real-time Eye Autofocus, Tracking Autofocus, a 24.2-megapixel APS-C sensor, and the ability to shoot 4K videos at 30fps. The camera is compact and lightweight, making it convenient for shooting on the move. It also offers versatile modes and customization options. The tiltable touchscreen LCD improves usability, and it works with Sony's E-mount lenses, providing creative flexibility.
Conclusion
The camera's versatility makes it suitable for a wide range of photography and videography needs, whether you're a hobbyist, semi-professional, or online creator. Plus, its lightweight and portable design make it convenient for shooting on the go. So if you're looking for a camera that delivers exceptional performance in a smaller size, the Sony a6400 is definitely a great choice!
0 notes
Text
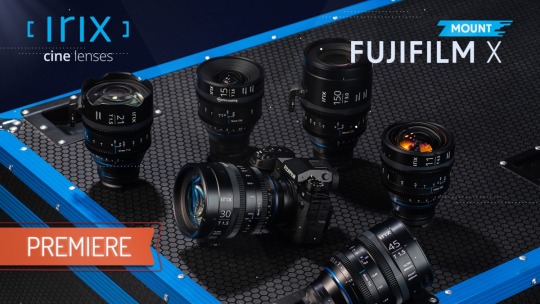
Irix Lens: Irix release[s] a new [Fujifilm X] mount for all [Irix] cine lenses – Commentary
View On WordPress
#@IrixUSA#Arri PL mount#Canon EF mount#Canon RF mount#Fujifilm X-Mount#Irix#Irix cinema lenses#Irix Lens#Irix Lens USA#Leica L mount#M43-mount#MFT-mount#Micro Four Thirds mount#Nikon Z-Mount#Press Releases#Sony E-Mount
0 notes
Text
Approved for Video and Photos: Sony 28-135mm F4 G PZ OSS Review
What happens when you use a video lens for photos?
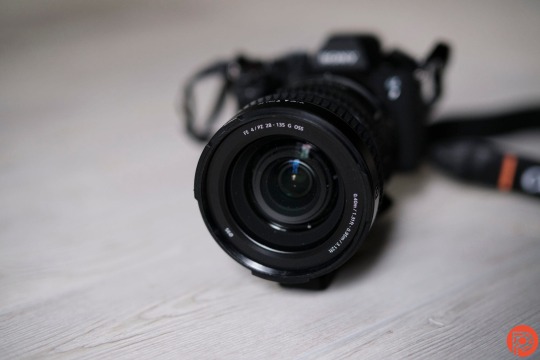
View On WordPress
#cinema lens#lens#lenses#Photography#sony#sony e mount#telephoto zoom lens#video#wide-angle zoom lens#Zoom Lens
0 notes
Text
How is the Sony ZV-E10 for vlogging?
Looking to take your vlogging to next level? The Sony ZV-E10 interchangeable lens mirrorless camera may be the content creators seeking professional- video and versatility.
With large 24.2 sensor and powerful BIONZ processor, the ZV-E10 delivers stunning 4K footage for ultra-sharp videos. The E-mount system provides the flexibility to experiment with different lenses to suit your creative vision.

Optim features the flip-out vari-angle LCD, Background Defocus button, and Product Showcase Setting make it easy to produce engaging, visually-appealing vlogs. Switch between c effects, shift focus between yourself products and monitor shoots with ease.
However, the extensive controls and settings can have a learning curve. Investing in a portable, stable tripod helps maximize results. Overall, the ZV-E10 offers an excellent blend performance, creative control, and ergonomicslogging ready to take their channel to the next level with professional-grade mirrorless video.
Click for details
0 notes
Text
Photography and videography have always been a passion/hobby of mine! Growing up, my cousins and I always liked to pretend to be Youtubers and act as if we had our own channel. One day in middle school, I decided that I wanted to purchase a camera. I wanted to experiment with photography to try to capture life’s moments.
I purchased a Canon Rebel T6i bundle off Amazon, and it had all the starter pack items for beginners. This camera was in my budget despite all the additional items it came with. After getting my camera, it became a fun activity for my friends and I to go out and explore around our hometown to take pictures.
I didn’t have anyone that was as passionate about photography, so I had to do most of my learning on my own. I would research what each setting was used for and how and when to use it. I wanted to know more than just pointing and shooting. As I started to gain more experience with the camera world, I researched the different types of cameras. Different camera brands offered different specialties- quality, shutter speed, sensors, etc.
Some of the top brands for cameras include:
Canon cameras are the most well-known, and I would say that it is one of the most user friendly for beginners. They also have many affordable options for those that are just starting out. It’s a good reliable brand for both videography and photography.
Nikon is another growing and trustworthy camera brand that is known for their accurate exposure. The accuracy is due to advanced spot-metering modes that read the light at the focal point.
Lastly, Sony cameras have some of the best mirrorless camera systems in the market. Sony hasn’t been around as long as its competitors, but the quality of camera still competes. They are also the world’s largest supplier for image sensors; therefore, you may end up buying a different camera brand with a Sony sensor.
Everyone has their own preference of cameras based on the amenities and accessibility they contain. Since there is constant competition in this market, the top choice for brands changes every year. It can be Sony one year, Nikon the next, and eventually Canon.
If you are looking for what camera to invest in, try to do as much research on what you need for the type of photography you are trying to achieve. I highly recommend visiting your local camera store and asking their opinions on camera bodies. This also allows you to look at the physical camera types before purchasing.
The Sony cameras are the best in the market. Although Sony cameras are on the pricier side of the market, it is worth it. The autofocus system is the best in the market, with amazing tracking capabilities. The cameras take sharp-quality photos that, even in low light, it is a clear image. The more appealing aspect is that Sony cameras have an E mount. This allows a variety of lenses to be used, especially lenses that are manufactured by third parties. From a videography perspective, Sony cameras offer in-camera image stabilization and advanced autofocus. It is an amazing camera to own if you are willing to break the bank for a high-quality camera.
1 note
·
View note
Text
Food Photography: Tips and Tricks to Capture Stunning Restaurant Dishes

One of the things I love about food photography is that we have to choose the best camera to get that perfect shot. It makes a lot of confusion for people when they are deciding which camera to buy for food photography. If you are considering buying a new camera system, you must go wrong with any of the brands. The newer camera systems have so many great features. Just pick your budget, then make your better choices from there to get a better one.
I’m a little different from a lot of photographers, in that I feel the right camera for you is what you can afford, and has the features you need for food photography – not necessarily a specific brand.Some photographers insist on one brand being superior to all the others for photographing all disciplines, and I don’t agree with that.
As I am a fan of food photography, I am currently testing several of the newer systems before I upgrade what I am currently using as a 35mm camera. I’m heavily looking into getting a mirrorless system.As food photography, many times we are actually doing macro photography because we have to get very close to our food and show fine details of the food.
This has its own set of equipment with the lenses we use. Sony came out with its 90mm macro lens E-mount in 2015, so they were ahead of the game for us food shooters.With macro photography, focus is absolutely critical. If you miss the mark of your focus in your shot, our cameras must be extremely accurate with the auto focus.
As I’m looking for better camera systems, I understand that macro focus is a challenge for some systems for food photography. Most of the newer mirrorless cameras have ways of zooming into your focus on food products .When you take the picture to enlarge an area in the image that you are focusing on to make sure it’s sharp. This is very helpful.
The “focus zoom” is a great new feature with a lot of cameras, and with the Sony, it was extremely accurate. Wherever I put my single focus point, Sony nailed it every time. The Sony 90mm macro lens is extremely sharp as well.There are a lot of menu options for the focus on this camera, so you must do some testing for your situation to set up the camera’s focusing menu for what will work for you.So, with all that being said, for traditional food photography where you are only using 1 frame.
Photography backdrops are the backbone of our photos. I can’t emphasize how important they are! They can literally make or break our images.
When I first started out food photography, I didn’t have a lot of money and tried to make my own backgrounds. But soon I realized that spending money for quality backgrounds for food photos was one of the most important things I could do for my food story .I used to be really scared of using brightly coloured photography backgrounds. Now, it’s one of my favorite composition techniques.If you have a limited budget, however, you’ll want to try and make your collection go as far as possible. Therefore, I recommend sticking to neutrals.
A time for your food photos at a time – instead of a multi shot, focus stack, this system will work really well for you. I was very happy with how the system worked for a single food image.For more advanced commercial work and food photography, where everything has to be in focus, you’ll just need to use a third party device and software to do focus stacking. Better cameras are essential for improving your photographs with the best focus and clarity on your image. It’s really that simple!
Importantly it’s not about ‘experimenting’ or ‘trying things out’ until you get what you’re looking for. There’s a method you can use to help you get that amazing shot every time—so you’re not taking 300 photos when you could take 10. Dynamic symmetry is a game changer for food photography.My Composition Essentials course will teach you everything you need to know to master composition and create your signature style—but for now, let’s dive into the basics of dynamic symmetry.Exploring the visual impact of cropping is an amazing way to improve your image.
Don’t chase the clients for pay before work ,most of them pay earlier—but you must need to set expectations with them before the shoot.When you start freelancing, you might want to take on every job that comes your way. Consider, though, that clients who don’t pay and make things harder for you generally aren’t worth the extra hassle. If budget is an issue from the outset, think about whether the job is worth the time and effort you might need to spend just to get paid.
Setting expectations from the beginning lets your clients know that you’re professional and expect them to act the same way. The way of indirectly lightly lighting your food will make beautiful soft light that emulates natural open shade light from your window makes our food photography more beautiful.
So, there you have it. A super easy way to backlight your tasty food items.
1 note
·
View note
Text
Review: Rokinon 12mm F2.0 NCS CS Ultra Wide Angle Lens Sony E-Mount Lens
For years I used Prime Lenses and preferred them over telephoto lenses. Eventually, I decided in 2019 that it was time to lighten my gear before an international flight and purchased a Sony SELP18105G E PZ 18-105mm F4 G OSS lens. This lens has been my go-to lens since then. But, it’s just ok for […] http://dlvr.it/Sp91g2
1 note
·
View note
Last Seen Blogs

incomingmsg
Sorry

yurionficrecs
fic recs!!!

itsdefinitlysage
TotallyNotSage

wwuqueercon
WWU Queer Con

grandcoffeecollectorsblog-blog
Untitled