#Switch Data over axis
Explore tagged Tumblr posts
Visit Tumblr Blog
Explore Tumblr blogs with no restrictions, modern design and the best experience.
Last Seen Tumblr Blogs


Fun Fact
Kazakhstan’s Minister of Communications and Informatics has blocked the Tumblr site because it contained 60 sites of terrorism, extremism, and pornography in 2015.
Text
Regrading Taskmaster: S05E08 Their water's so delicious. and Series Five Winner.
*Score changes noted in parenthesis.
Goodbye Series Five, you will be missed. Also, I think I may get a bit too verbose, so feel free to TLDNR.
Prize Task: The Most Awkward Item For Somebody Else To Take Home
I gotta say that there are some A+ submissions in this one. Bob goes for a pretty baseline political joke which I would describe as uninspired. Sally bringing in balloons creates a fun thing to do on the stage at the end of the episode and I do appreciate that. However, Nish and Mark are the tops here. A bathroom would be harder to get home than a bunch of curry.

Aisling: 2 Bob: 1 Mark: 5 Nish: 4 Sally: 3
VT 01: Get this coconut as far from here as possible. You may not touch the ground. You may not step on anything more than once. The coconut may not travel by car.
There's a list of restricted items you can send to Fiji.
This is interesting because "the ground" can mean different things in different contexts. One could imagine a game of "The Floor is Lava" where stepping on the carpet might not feel like it's in the spirit of things.
Alex breaks it down in studio by explaining that it is okay for him to step on the carpet, but when he leaves it he can't return. I think I get the heart of what he's going for, but it's a messy rule. Nish appears to shuffle his feet a bunch of times on the carpet, but Mark is the only one who gets disqualified.
There's another question in whether you measure the maximum distance the coconut ever got from the living room or just where it ended up at the end of the task. It really doesn't feel like Sally got her coconut to the post office in the allotted time (especially since it couldn't travel by car).
Furthermore, Alex said Aisling got it further than Bob but for some reason Bob got 4 points.
All this said, there are so many problems here that I think I have two choices: (1) Defer to the original scoring. (2) Completely discredit the task. Seeing as this task never seemed particularly controversial, I'll defer to the original scoring but switch Bob and Aisling.

Aisling: 4 (+1) Bob: 3 (-1) Mark: DQ Nish: 2 Sally: 5
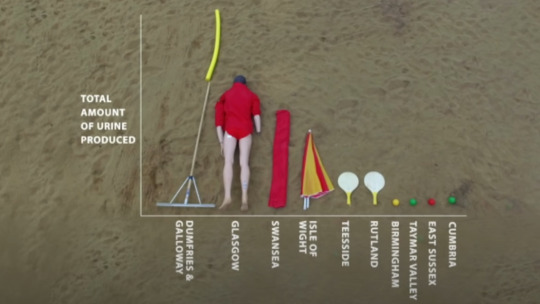
VT 02: Create the best graph.
I'll fill his boat with piss.
What constitutes the best graph? The most important factors would probably be interesting subject matter, accuracy, and ease of comprehensibility.
Nish's graph is easy to understand -- spending time with him is fun at a 1:1 ratio . . . although who knows what units of fun are measured in. It's also clever because he uses himself as the y-axis and makes the thing vertically. It's not a particularly interesting subject, but it's fine.
The point Mark is trying to make is that individual politics is an incredibly small factor when held up against the vastness of eternity. I believe it's supposed to be a bar graph, but the scale is intentionally done poorly to help effectuate the point so I'm not sure. It's kind of ambiguous what the y-axis is measuring (there's a percentage symbol, but percentage of what?). Greg dismisses it because he immediately forgot the subject matter and I am in agreement that it wasn't an amazing effort.
Sally's graph compares how much sex she gets versus how much sex she wants over the course of time. It's easy to understand and I would be bold enough to say it's interesting subject matter. The only downside is that she builds it out of a variety of different objects, so it's not very pretty.
Aisling's graph is attempting to compare the number of women and men on Taskmaster by series. The data is pretty easy to visualize, even without a graph: 1/5, 1/5, 1/5, 2/5, 2/5. Lots of problems here. The lines shouldn't start at zero (unless we're including Edenborough as Series Zero), the show didn't begin with more women than men in the cast, and the lines should be flat for the first three series then adjust beginning with Series Four. This is an easy last place.
Bob does a bar graph of units of piss by county. I can't verify it's accuracy, so I'm giving it five.
Aisling: 1 (-2) Bob: 5 (+1) Mark: 2 (-1) Nish: 4 (-1) Sally: 3 (0)
Solo Task: Make the most fish puns.
I just thought you were bad at speaking.
I almost want to give Sally a point for the unfairness of it all. Alex did not make his puns in a minute, he made them over the course of days. No points for either of them.

Sally: 0 Alex: 0 (-5)
VT 04: Write and perform a song about this woman.
Do we strike you?
This is an obvious contender for the best task in the entire show. I think the opinions on this one are pretty well settled. The team of three writes a very funny and unhinged song, but Mark and Nish absolutely knock it out of the park. Greg was still splitting points here so the team of two somehow only get three for the best creative work anyone has produced on the show.
I really really want to give them five, but absent a disqualification four is the maximum.

Aisling, Bob & Sally: 1 (-1) Mark and Nish: 4 (+1)
Live Task: Throw the egg through the hoop and catch it as many times as possible. You may not touch the net or post.
This looks pretty straightforward.
Alex blowing the whistle and Nish immediately losing his egg is the funniest, most predictable thing ever. For some reason Aisling starts the task standing on the base of her hoop, so she definitely touched it. By the end, Bob is the only one who pulls off a successful throw and catch.
As unfair as it seems, logistically the other four contestants should probably be put into joint second. Aisling should be disqualified, but I read this one as disqualification stopping score accumulation rather than outright losing you the task.

Aisling: 4 (+4) Bob: 5 (0) Mark: 4 (+4) Nish: 4 (+4) Sally: 4 (0)
F I N A L
Aisling: 12 (+2) Bob: 15 (-1) Mark: 15 (+4) Nish: 18 (+4) Sally: 16 (-1)
Oh my god, I gave Nish a win.
S E R I E S F I N A L
Aisling: 119 (-7) Bob: 125 (-13) Mark: 129 (-1) Nish: 115 (+8) Sally: 124 (-6)

I triple checked my math because I in no way thought I'd have Mark beating Bob. I think it ultimately boiled down to evaluating what he did objectively whereas Greg enjoyed randomly docking him for laughs. Even so, I was pretty sure Bob was going to win so this is a stunner.
In the end, I gave Nish two more episode wins than he had in the real show. Aisling never ended up getting one (losing that tiebreaker with Mark hurts).
With that, I can say goodbye to Series Five. Series Six is next and it's worse, but I won't let that stop me. If I end up doing a regrade of Champion of Champions, it'd likely be after everything else. It's taken me six months to get through five seasons and they get longer from here, so it'll be interesting to see if I'm still plugging away at it by then.
Anyway, having gotten through five seasons, my version of Champion of Champions would have been Josh, Richard, Dave, Hugh, and Mark. I'd honestly say we're better off with the cast that we got.
#tm regrade#taskmaster#aisling bea#bob mortimer#nish kumar#mark watson#sally phillips#alex horne#greg davies
6 notes
·
View notes
Text
PTC Creo 12: New Tools for Smarter, Faster 3D Design
Discover what’s new in PTC Creo 12 — enhanced simulation, AI-driven design, MBD, and manufacturing tools. Upgrade now with ANH, the trusted PTC Creo reseller in the Delhi NCR region.
Top New Features in Creo 12
1. AI-Driven Design Guidance
Creo 12 takes intelligent design to the next level with built-in AI tools that offer real-time suggestions and improvements.
Get feedback during modeling
Reduce trial-and-error
Improve efficiency with every click
2. Enhanced Model-Based Definition (MBD)
Creo 12 makes MBD more practical and powerful, eliminating the need for traditional 2D drawings.
Improved PMI (Product Manufacturing Information)
Better GD&T annotation support
Clearer data for downstream users

3. Performance & Usability Upgrades
PTC has improved the overall speed, responsiveness, and ease of use:
Faster model regeneration
Smart mini toolbars
Enhanced model tree filters
Customizable dashboards for quick access

4. Creo Simulation Live — More Powerful Than Ever
Simulation Live has been expanded to cover:
Structural & thermal simulations
Better support for nonlinear materials
Real-time design feedback

5. Advanced Multi-Body Design
Creo 12 makes it easier to work with complex parts and assemblies:
Better control over multiple bodies in a single part
New body operations and organization tools
Improved part-to-part interactions
It’s ideal for high-detail engineering and intricate product development.
6. Additive and Subtractive Manufacturing Enhancements
Manufacturing has never been smoother in Creo:
More control over lattice structures
Enhanced 5-axis CAM functionality
New machine support and output formats
Whether you’re 3D printing or using CNC, Creo 12 has you covered.
7. Improved ECAD–MCAD Collaboration
With electronics becoming a bigger part of mechanical products, Creo 12 improves:
PCB visualization
Layer management
Synchronization between electrical and mechanical teams
This helps avoid costly errors during development.
Why Creo 12 is a Must-Have Upgrade
PTC Creo 12 isn’t just for big enterprises — it’s built for everyone who values smart, high-quality design. Whether you’re a design engineer, manager, or product innovator, Creo 12:
Saves time
Reduces errors
Encourages innovation
Supports industry 4.0 goals
Get Creo 12 from Delhi NCR’s Trusted PTC Reseller — ANH
Looking to upgrade your CAD tools or switch to Creo 12? ANH is a leading authorized PTC reseller in the Delhi NCR region. From licensing to training, we help businesses unlock the full potential of Creo.
Contact ANH today to get started with Creo 12!
✅ Conclusion: Welcome to the Future of Design
PTC Creo 12 is more than just an upgrade — it’s a gateway to smarter design, quicker development, and stronger innovation. With new AI tools, advanced simulations, and seamless usability, it’s built to give your team a competitive edge.
Design faster. Design smarter with Creo 12.
0 notes
Text
Automatic Profile Projector| Tech Trivial
Automatic Profile Projectors: Precision Measurement Meets Automation
In today’s fast-paced manufacturing world, precision, efficiency, and automation are critical for staying competitive. For dimensional inspection and quality control, one tool that continues to evolve with technology is the Automatic Profile Projector—also known as a Digital Optical Comparator.
In this blog post, we’ll explore what an automatic profile projector is, how it works, its advantages over traditional systems, and why it's a must-have for modern quality assurance departments.
🔍 What is an Automatic Profile Projector?
An Automatic Profile Projector is an advanced optical measuring instrument used to inspect the shape, size, and dimensions of machined components by projecting their magnified silhouette onto a screen. Unlike manual models, automatic versions come equipped with:
Motorized stages
Digital readouts (DRO)
CNC or programmable control
Auto edge detection
Integrated image processing software
These features allow for quick, accurate, and repeatable measurements with minimal human intervention.
🧪 How Does It Work?
The basic principle remains the same: a workpiece is illuminated and its magnified image is projected onto a screen for measurement. But with an automatic system, the process is streamlined:
Sample Placement: The part is mounted on a glass stage.
Illumination: Light from below or above highlights the edges and features.
Image Projection: The silhouette is projected onto a high-resolution screen or captured by a digital camera.
Auto Detection: The system automatically detects edges and calculates dimensions like angles, radii, lengths, and diameters.
Data Output: Measurements are stored digitally and can be exported or printed in reports.
⚙️ Key Features of Automatic Profile Projectors
Motorized X-Y stages for programmed movement
Autofocus lenses for sharp image clarity
Touchscreen control panels
Built-in measurement software with CAD overlay options
Data logging and report generation
Remote or multi-axis control (on advanced models)
📏 What Can You Measure?
External & internal diameters
Step heights and depths
Angles and tapers
Threads, gears, and notches
Complex contours (with overlay comparison)
🏭 Industries That Use Automatic Profile Projectors
Automotive
Aerospace
Tool & die manufacturing
Precision machining
Electronics & PCB manufacturing
Medical device manufacturing
Anywhere that tight tolerances and repeatable quality control are needed, an automatic profile projector offers a reliable solution.
✅ Advantages Over Manual Models
FeatureManual ProjectorAutomatic Profile ProjectorMeasurement SpeedSlowerMuch fasterAccuracyOperator-dependentHighly consistentData RecordingManualAutomatedRepeatabilityVariableHighTraining RequiredMoreLess (intuitive UI)
🌐 Why Invest in an Automatic Profile Projector?
Reduces human error
Improves inspection throughput
Ensures consistent quality
Automates tedious manual tasks
Enhances digital traceability for audits and compliance
For manufacturers looking to modernize their metrology lab or QA process, automatic profile projectors bridge the gap between traditional inspection tools and fully automated vision systems.
🧩 Conclusion
An Automatic Profile Projector is more than just an upgrade—it's a smart investment in your quality control process. It brings together the best of optical measurement and digital automation, helping manufacturers achieve faster inspections, fewer errors, and higher customer satisfaction.
If you're still using manual methods or inconsistent measurement tools, now might be the time to make the switch to automation.
For more information contact us.
0 notes
Text

Emerging Surface Treatment Technologies in 2025: Top 5 Trends Reshaping the Industry
As global manufacturing advances toward high performance, sustainability, and intelligent processes, surface treatment technologies are undergoing transformative innovation. In 2025, these technologies are not just a final step in production—they are a source of competitive advantage. This article highlights five emerging surface treatment trends that industry professionals should closely follow to stay ahead.
1. Plasma Surface Modification
Plasma technology has gained traction in aerospace, medical devices, and precision manufacturing. It offers a clean, eco-friendly method for surface cleaning, etching, and activation—improving coating adhesion without hazardous chemicals.
📊 Market Insight: According to MarketsandMarkets, the global plasma surface treatment market is projected to grow from USD 3.5 billion in 2023 to USD 5.2 billion by 2028, with a CAGR of 8.2%.
2. Ultrafine Blasting Media
Driven by the need for finer surface control, ultrafine blasting media with D50 < 10μm are gaining popularity in semiconductor packaging and high-precision mold processing. Compared to traditional coarser abrasives, ultrafine media allow for smoother finishes and improved surface integrity.
📊 Application Spotlight: A semiconductor manufacturer reported that switching to ultrafine alumina media reduced substrate roughness (Ra) by over 30%, enhancing bonding strength and yield rates.
3. Laser Surface Texturing
Laser technology enables submicron surface modification with excellent precision. It is replacing traditional etching in automotive, tooling, and medical sectors due to its repeatability, programmability, and clean processing.
💡 Trend Watch: In 2025, the integration of multi-axis laser heads with AI-driven pattern recognition is paving the way for fully customizable surface microstructures.
4. Nanocoating Technologies
Nanocoatings are increasingly used to improve durability, hygiene, and functionality of surfaces in electronics, healthcare, and engineering. These ultra-thin films offer advanced resistance to corrosion, bacteria, and surface contamination.
📊 Innovation Highlight: New-generation TiO₂-based photocatalytic coatings can degrade organic pollutants even under low-light indoor conditions, supporting the commercialization of self-cleaning surfaces.
5. Smart Surface Treatment Systems
In the era of Industry 4.0, surface treatment equipment is evolving rapidly. AI-powered, sensor-integrated systems are enabling automated, consistent, and data-driven processing, reducing human error and increasing efficiency.
📈 Market Forecast: Frost & Sullivan predicts that by 2025, smart surface treatment solutions will account for over 25% of the global sandblasting equipment market.
Final Thoughts: Innovate or Fall Behind
Surface treatment has become a cornerstone of product performance and brand differentiation. Companies that embrace precision, sustainability, and automation in their surface finishing processes will be well-positioned for success in 2025 and beyond.
0 notes
Text
Games Production (Feb 26th)
An Overview
wow... A very busy week - I have been recovering from burnout for the last few weeks, and my plans for a slow reintroduction to work, with the focus of doing important, but not stressful tasks has allowed me to do almost all of the tasks set out two weeks ago. This Devlog post will go through everything I've done this week, but the main focus was getting these tasks finished.

Star In The Making
I would like to first talk about Star In The Making: This week, I set a dedicated day (Monday) to figure out the phase-through bug with my void asset. I have been stressing about this bug since the implementation of the void asset in November of last year. The bug took about 8 hours to fully fix, but I truly believe that it was worth it.

after the first few hours of me messing around with the shaders and finding a new asset, I had looked into something I had tried before, using multiple cameras.
The Main camera is rendering the black hole, energy, UI and player, and the other camera is only rendering the black holes, while ignoring all other objects. I had tried this once already in December, but I don't know what I did wrong then.

This fix has given me the interest into making this game have a "pseudo-3d" effect by having different scoring points on differing Z axis.

I will explore this idea in the following week.
I'm glad I fixed this bug; this project has been the least developed (in my eyes) due to the frustration this bug gave me, I didn't touch this project for a very long time because of it.
Fixing this bug also gave me a valuable learning experience; to be honest, when programming games, I had never really separated cameras to render different things - I had heard that this is a very efficient way to make games, but didn't see the benefit.
Workflow Toolkit
Surprisingly, I didn't get up to much with Workflow Toolkit itself, but I did add the language tracker to the website, improving the "Redeem Cards" design, some documentation updates and adding another language!
Firstly though, unfortunately the person that was supposed to do my German translations couldn't do it (due to personal issues). I would've liked them to tell me slightly earlier, but there's nothing I could do about it, so I had to find another language to replace it with for now, while looking for another German speaker to help.
I had a friend that spoke Danish offer to help, so I took it, they got the translations within 8 or so hours, and I'm very thankful for this person - I offered to pay, but they didn't want anything.

As normal, I implemented this into the project, just by adding Danish to the two switch cases, and the LanguageCode script.
The second thing I did was to update my Workflow Toolkit documentation page, with detailed instructions on Languages themselves - I have designed this project in a way that promotes modularity, so it takes about two minutes for people to add their own languages into this project (not taking the translating time itself into account), but the issue is that the documentation around how to add your own language was... lacking.
Just for simplicity, I will only show the most relevant pages here, as Tumblr allows a maximum amount of images, but they're all visible for you to see yourself on my website.


This is very straightforward for people to understand, if they have even a little bit of code knowledge - it's just Copy and Pasting text.
The next thing I worked on was the website; I have been meaning to make a language tracker for just over a week now, I wanted to add a way to download each new language file, and a way to download the template file / get more information on languages in this project.
I was inspired by progress bars, as I believe this is a very quick and concise way to visualise this data.


The little download button on the side of the language name (with the region code) just allows you to download the newest files. I really like this design as a whole, it's very easy to tell how far along each language is, and takes about three seconds to update progress.
The filled in part is calculated with a JavaScript file, and set in this .js file - I found some online resources for this as I was a little confused on how to do it.
My cousin had also finally sent all translations, so portuguese is now completed too.

The dropdown gives you the download link to the template file, and the PDF File version of the documentation, which was discussed above.

I believe this really does improve the experience of the users, and myself - as it allows me to see if I'm on target. I will continue to look for German (DE) translators to get that 45% up.
The last thing I did for Workflow Toolkit this week was to update the redeem card, and make the reverse side. I felt that the social media area is too compressed and small, so I am delegating that to the back-side only.
Front (left), Back (right)


feel free to look at the old design on my last post - as you can tell, the social media has been removed. I would like to ask a professional to design this, but unfortunately, I currently don't have the money to.
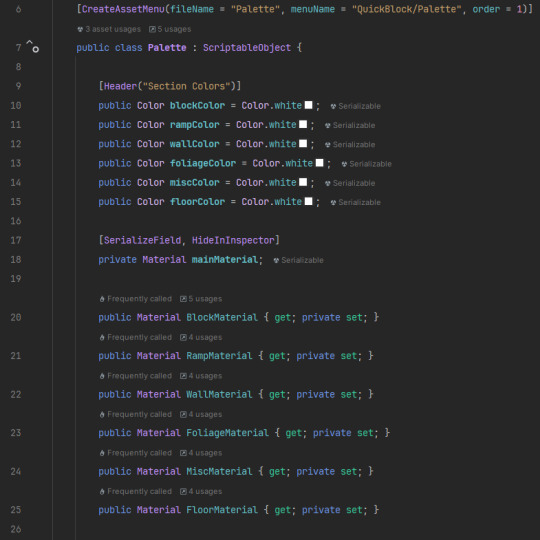
QuickBlock
I have managed to fully implement palettes into QuickBlock, I do need to iron out a few bugs, but all basic functionality is there. I did some research into datatypes with unity, and read about using something called "ScriptableObjects" - I was going to try to make my own JSON file system, but realised that this would be far simpler, easier and more efficient, so I did it this way.
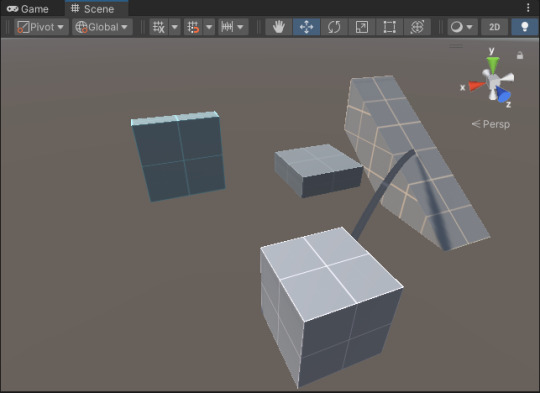
Firstly, before getting into the technical stuff, I'd like to show the progress off a little:

Each Palette you choose can have a custom colour for each section, it's own night or dark mode and it's own texture. I am VERY happy with my progress here.
How It Works
I slightly swapped around what MainMat does now - before, it would be the only texture attached to all assets. Now, this mainMat acts as the parent of each individual section's material - so you have "wallMat", "floorMat", "blockMat" etc.
Each material is connected to the palette, and the functions that I had previously made for just MainMat now apply the colour (night/day) and texture to the currently set palette.


The way that this scriptableObject works is that it is just a "House", it holds a copy of all of the materials and settings that are able to individually be customised.

This allows the end-user to either A) create their own palette, the same way they would make a script

or B) use the Palette Creator Utility I made (and have now hooked up) - note, it currently isn't very good-looking, but I will make it more appealing later.

This Palette Creator makes a file for you in the right directory, with the Palette ScriptableObject. The "Blue Dream" palette will be one of 6 pre-configurated template palettes.

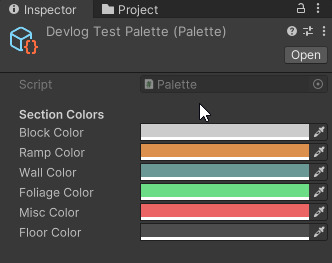
These colours aren't the best to show this off, so I will show it in light and dark mode:

I don't currently have any misc or foliage items, as the person that has supposed to be modelling these hasn't been responding.

There are quite a few advantages of doing it this way too - the palettes are individual .ASSET files, meaning people are able to export their config to other users of this project, if it ends up big enough.
with QuickBlock, I have also removed a few things - one of them being procedurally generating materials when the project is first made - I do like this, and it is good at saving space if you have a massive project, the issue is that it's both very convoluting, it makes the project harder to debug, and it will only save a few kilobytes, so I decided to drop it.
I also modified the "links/connections" system - I originally wanted to have a feature that would allow you to have a wireframe view of your built map, but realised that you can do this just by changing the texture's properties - I instead edited the code to show what your last placed section was. I felt like this is just so much nicer.
The last major thing I did with QuickBlock this week was make another ScriptableObject - this one is called "Marker" and it allows me to not hard-code directories, since all directories were currently using a function that would search through - now, if a "Marker" file is detected in the root QuickBlock file, all directories now connect perfectly, allowing you to change the default file location.

I wanted to talk more about this, but have run out of the max image amount - so I'll leave the rest of this information for next week, and cut this weekly Devlog short.
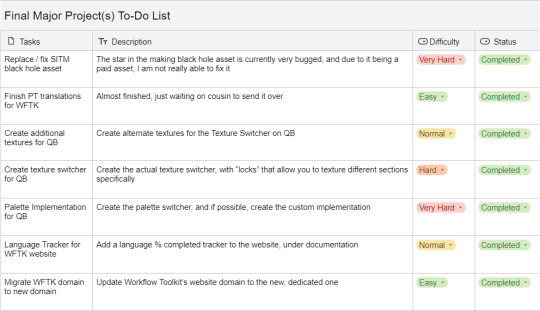
Just before I end though, I need to mention that it is the day in my bi-weekly cycle where I remove all tasks from the tracker, and start adding more tasks again.
================================================
Performance Evaluation
[ I think I did quite well this week, I made some significant progress in the two least-developed projects - I fixed a bug that has been annoying me for months and months, I implemented something that was categorised as the hardest on my task tracker and overall got the two least-developed projects up to par for the current week we are in.
I believe that this week's progress has been one of the best since this semester started - I am looking forward to improving on these projects, whereas before I felt quite demotivated. I had also completed my action plan from last week - so I'm happy for that too ]
[ I still have the tiniest bit of burnout still, but I have essentially recovered - I do still feel pressure due to the need to catch up from my down-period, and the loss of momentum from this stretch of time has made the pressure to do work be quite big, so I have now switched from doing smaller tasks, to bigger tasks that give me a sense of completion when finishing (like fixing that bug)
The one thing I also need to work on is getting feedback from people in university, as my messages to the group chat have been futile ]
================================================
Action Plan
Next week should be about experimentation with power-ups on Star In The Making, as once I've implemented that, the game is finished and I can move. QuickBlock should also be improved, the UI and bugs need to be ironed out.
I have booked holiday off for the next few work days, so I can implement these features without any external stress.
This week's action plan is a little vague, but I essentially just need to continue improving the two main projects right now, as I think I can say Workflow Toolkit is complete (until I can get some testers).
0 notes
Text
[Coding Diaries] Using Nodes to Apply Jump Impulse

With the recent runtime fee Unity has imposed on their new pricing scheme, a lot of independent and professional developers are jumping ship due to future issues they foresee regarding the market of their games.
After much deliberation and self-debating, as well as looking up other devs' opinions on the matter, I decided to switch to Unreal to develop my first game for my portfolio.
I thought the transition would essentially mean starting from scratch, thus my hesitation, but I found myself becoming familiar with concepts easier than expected due to my previous learning experiences in Unity. I already knew terms like components, nodes, and object-oriented programming. This helped me focus more on how Unreal's logic behaved when it came to making things move and operate in the gamespace.
My experiences from other disciplines helped shape my workflow in Unreal as well: especially the concept of non-linear editing and establishing variables, so the behavior still works even when certain values change.
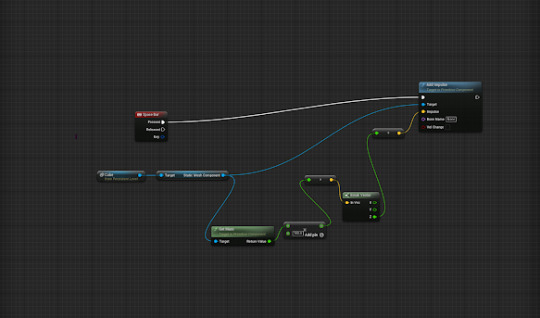
Case in point: making the cube, in the image above, jump. A Udemy course tasked me with making it happen through Blueprint, a built-in node system in Unreal. It taught me the basics of Events, getting components, the different switches, and adding values.
Using these basic concepts and a little Googling, this was the node system I established for the cube jump, using the Impulse node to operate it.


There is truth in the benefits of learning holistically, as there are concepts that will carry over to different disciplines and will help ease your brain towards taking in the new information, making the learning process more streamlined. Here's to taking further steps into making my own game!
UPDATE:
https://imgur.com/a/BRhuiRJ
The behavior of the Jump Impulse on each cube is different because of the Blueprint composition of each one. The one on the left has extra nodes that transform the mass value to a vector value, then extract the z, and finally apply that z value into the Input. This makes the cube jump a lot more and launches it into the air.
The one on the right has less nodes, only activating the Velocity Change on the Impulse node and entering a value to the z axis. This results in smaller, “more realistic” jumps. Right now I still don't know why this is the case, when they are basically the same value with extra steps.The only big change I'm seeing that could affect these behaviors is the node that translates the mass into a vector. Because even when the velocity change is off, the cube on the right jumps in the same manner.
~~~Okay let me try to break this down... The tutorial said that the Impulse has its own equation of Mass * Velocity Change, but even with the Vel Change unchecked and the numbers manually typed into the Z axis of the Impulse data pin, it was still different from the left cube. So something must have changed in the data of the various nodes I used on the left.
Even if I never find the answer, I guess this has been a hard lesson to always look for optimized, shorter ways to achieve what you want in the game. Also, a lesson to make the game lighter. Hooboy!
1 note
·
View note
Text
Unlocking the Future of Fiber Media Converters: Expert Insights and 2033 Market Forecast
Fiber Media Converter Market
The Global Fiber Media Converter Market size is projected to grow at a CAGR of XX% during the forecast period.

The Global Fiber Media Converter Market Research Report provides a comprehensive evaluation of the present industry scenario and future growth prospects over the forecast period. The research report analyzes and summarizes all important aspects of the market including technological evolution, recent industry trends and competitive landscape, market segmentation and key regions.
Research Methodology
Our research methodology constitutes a mix of secondary & primary research which ideally starts from exhaustive data mining, conducting primary interviews (suppliers/distributors/end-users), and formulating insights, estimates, growth rates accordingly. Final primary validation is a mandate to confirm our research findings with Key Opinion Leaders (KoLs), Industry Experts, Mining and Metal Filtration includes major supplies & Independent Consultants among others.
The Global Fiber Media Converter Market Report provides a 360-degree view of the latest trends, insights, and predictions for the global market, along with detailed analysis of various regional market conditions, market trends, and forecasts for the various segments and sub-segments.
Get Sample Report: https://marketstrides.com/request-sample/fiber-media-converter-market
LIST OF KEY COMPANIES PROFILED:
Advantech
Transition Networks
PLANET Technology
Startech
Versa Technology
TC Communications
Allied Telesis
B+B SmartWorx (Advantech)
Belden
Axis
Fibernet
Siemens
VERSITRON
Omnitron Systems
SEGMENTATION
By Type
Single-mode Fiber Media Converters
Muti-mode Fiber Media Converters
By Application
Metropolitan Area Network (MAN) Access
Data Transport Services
Get In-Detail : https://marketstrides.com/report/fiber-media-converter-market
Fiber Media Converter Market REGIONAL INSIGHTS
North America
United States: The U.S. economy has shown resilience post-pandemic but faces inflationary pressures, particularly in housing and consumer goods. The Federal Reserve's interest rate policies remain a focus, as the balance between controlling inflation and avoiding recession has impacted spending, borrowing, and business growth. Key sectors like tech, finance, and renewable energy are experiencing dynamic changes, with AI, fintech, and green technology receiving heavy investments.
Canada: Economic stability remains a hallmark of Canada’s economy, although housing affordability and household debt are pressing issues. Canada continues to emphasize a green energy transition, investing in hydroelectric, wind, and solar power. The nation is also focused on attracting skilled labor, especially in technology, healthcare, and energy, as part of its economic strategy.
Mexico: Mexico has benefited from a nearshoring trend, as companies look to relocate manufacturing closer to the U.S. market. With a strong trade relationship via USMCA (the U.S.-Mexico-Canada Agreement), Mexico is seeing investments in its automotive, aerospace, and electronics industries. However, inflation, interest rates, and a need for infrastructure development remain areas of focus.
Buy Now : https://marketstrides.com/buyNow/fiber-media-converter-market?price=single_price
FAQ
+ What are the years considered for the study?
+ Can the report be customized based on my requirements?
+ When was the Research conducted/published?
+ What are the mixed proportions of Primary and Secondary Interviews conducted for the study?
+ When will the report be updated?
𝐀𝐛𝐨𝐮𝐭 𝐔𝐬
Market Strides is a Global aggregator and publisher of Market intelligence research reports, equity reports, database directories, and economic reports. Our repository is diverse, spanning virtually every industrial sector and even more every category and sub-category within the industry. Our market research reports provide market sizing analysis, insights on promising industry segments, competition, future outlook and growth drivers in the space. The company is engaged in data analytics and aids clients in due-diligence, product expansion, plant setup, acquisition intelligence to all the other gamut of objectives through our research focus.
𝐂𝐨𝐧𝐭𝐚𝐜𝐭 𝐔𝐬:[email protected]
#Fiber Media Converter Market Size#Fiber Media Converter Market Share#Fiber Media Converter Market Growth#Fiber Media Converter Market Trends#Fiber Media Converter Market Players
0 notes
Text
Harnessing Dual Energy: Effective Techniques for Solar and Wind Power Optimization
Combining solar and wind power has emerged as a pivotal strategy in the quest for sustainable energy solutions. This approach capitalizes on the natural synergy between the sun and wind and offers a pathway to enhance energy efficiency and reliability. By optimizing the use of both solar panels and wind turbines, communities and businesses can reduce their carbon footprint, stabilize energy costs, and move closer to achieving energy independence.
Understanding the Basics of Hybrid Systems
Solar and wind power systems have complementary cycles of productivity. Solar panels perform optimally during sunny days, especially in the middle of the day when sunlight is abundant. In contrast, wind turbines can generate power day and night, often increasing output during stormy or windy conditions when solar panels are less effective. Integrating these systems allows energy production to be maximized across varying weather conditions, ensuring a more stable and reliable energy supply.
The first step in creating an efficient hybrid system is understanding the specific site characteristics where the installation is planned. Factors such as local weather patterns, seasonal variations, and geographical features must be carefully analyzed to determine the optimal configuration of solar panels and wind turbines. This assessment helps decide the proportion of solar and wind components needed to maximize energy capture and minimize downtime.
Designing for Maximum Output
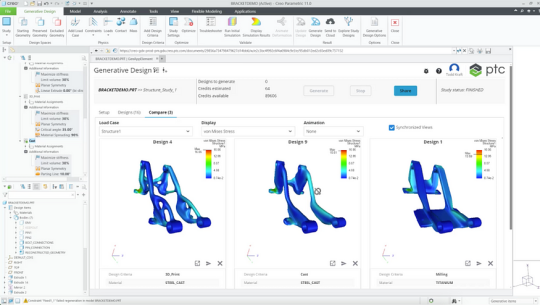
The design phase of a hybrid solar and wind power system is crucial for maximizing energy output. Engineers and designers must consider the orientation and placement of solar panels to capture the maximum amount of sunlight throughout the year. Similarly, positioning wind turbines in relation to prevailing wind directions enhances their efficiency. Advanced simulation tools are often used to model how these elements will perform in various conditions, allowing for adjustments before physical installation begins.
Additionally, technological advancements such as dual-axis solar trackers and variable-pitch wind turbines can significantly boost the efficiency of hybrid systems. Solar trackers adjust the positioning of solar panels throughout the day to align perfectly with the sun, increasing their energy absorption. Variable pitch turbines, on the other hand, can change the angle of their blades to maintain optimal efficiency even during varying wind speeds.
Leveraging Smart Technology for Integration
Smart technology plays a pivotal role in integrating and managing hybrid energy systems. Modern energy management systems can dynamically adjust the output from solar and wind sources based on real-time energy demand and weather conditions. These systems utilize algorithms to predict energy production trends and can automatically switch between solar and wind power or even store excess energy in batteries for later use.
Internet of Things (IoT) devices further enhance the capabilities of hybrid systems by providing detailed data on system performance and environmental conditions. This data is crucial for ongoing optimization, allowing operators to make informed decisions about maintenance, upgrades, and operational adjustments. IoT technology also supports remote monitoring and control, particularly beneficial for installations in inaccessible locations.
Economic and Environmental Benefits
The economic benefits of optimizing solar and wind power through hybrid systems are substantial. By increasing the efficiency of energy production, these systems reduce the need for expensive energy storage solutions and minimize reliance on backup generators that use fossil fuels. Over time, the reduced operational costs and lower energy bills provide significant financial returns on the initial investment.
Environmentally, hybrid systems offer the advantage of reducing greenhouse gas emissions and other pollutants. By maximizing the use of renewable resources, these systems decrease the consumption of fossil fuels and contribute to a cleaner, more sustainable environment. Communities that adopt these systems benefit from cleaner air and an enhanced reputation as leaders in environmental stewardship.
Preparing for the Future
The importance of optimizing solar and wind power systems cannot be overstated as the world continues to move towards renewable energy solutions. Future technological advancements and further reductions in the cost of renewable energy equipment will likely make hybrid systems even more attractive. For anyone considering an investment in renewable energy, now is an opportune time to explore these technologies.
Innovations like solar and wind power optimization pave the way towards a sustainable energy future. By embracing these technologies, we safeguard our planet and secure a resilient and prosperous energy future. Whether for individual homes, businesses, or larger communities, integrating solar and wind power is a testament to human ingenuity and our commitment to environmental preservation.
0 notes
Text
Runners Part 7
B-111 was glad. K-3NTs initial reluctance had scared him. He’d worried that K-3NT might even offend the armorer. He would have been embarrassed if his acolyte had come to blows with his friend, mostly because he knew there wasn’t a single chance K-3NT would survive an altercation with the armorer. And he was really starting to like K-3NT, in spite of his… weirdness. It was nice to think of him being around, another friendly droid who wasn’t trying to blast him. Also, he couldn’t deny the tactical advantage to having an Imperial droid on his team. It would mean much fewer tense moments trying to slice doors if K-3NT could simply open them with his scomp link, for one thing.
The droids followed the armorer to where she had left her speeder. B-111 noted the way K-3NT seemed unbalanced and even disoriented when they went along main concourses. He felt sorry for K-3NT, but there was nothing else for it. It was impossible to get around Coruscant without being swarmed by organics in this way. Besides, it was good for him. He would learn to deal with it. B-111 was pretty sure he would, anyway.
The armorer's workshop wasn’t very close to The Scomp Port. But as she flew her open top speeder very quickly and aggressively, it wasn’t long before they got there. B-111 was used to the way she drove by now, but along the way K-3NT needed several reassurances. He kept waving his hands and yelling about predicted odds of failure; making B-111 grateful, and not for the first time, that he’d been programed with a tad more instinct than the cold data analysis the KX series seemed to rely on.
The armorer had a relatively nice establishment, with a front room for meeting clientele, a sizable work room for her forge, and an attached apartment. As it was on the 70th level of a structure, it even had a nice balcony overlooking the city.
She took them straight into the work room, where a traditional Mandalorian forge was kept lit constantly. Helmets, bracers, greaves, cuirasses, pauldrons, boots, and gauntlets of exceptional craftsmanship hung around the walls, all pieces the armorer had been commissioned to make. They were almost entirely made of durasteel, as beskar was rare, and ludicrously expensive. And anyway, the armorer refused to forge beskar armor for anyone who was not of her Mandalorian creed. Even though these pieces all were clearly made with the skill of a Mandalorian, none of them had a visual look that would fool another Mandalorian. B-111 subconsciously tapped the side of his helmet as he thought this. Every rule had exceptions.
She casually tossed the ingot he’d given her into a pan and moved it over the forges burning jets. It began to melt in an unnervingly short time. B-111 didn’t like watching metal liquefy like that, it brought back old memories.
The armorer moved over to K-3NT and roughly turned him by the shoulder to get a closer look at his damaged plating. “What are you doing?” B-111 hadn’t missed the fact that despite speaking in Mando’a back at The Scomp Port, K-3NT had switched back to galactic basic. The armorer understood basic perfectly, of course, but as a rule she never spoke it. B-111 hadn’t even ever heard her speak in shyriiwook before, only in Mando’a. He knew she would not be bothered by conversing half in basic, she did this with the majority of her customers, but again, B-111 worried a little. She was always even-tempered with him, even when she probably shouldn't have been, but K-3NT did not share the same history with her that he did.
“I need to know what shape I am forging,” she said, “be still.”
K-3NT complied, locking his posture. He spun his head on its axis to look at the metal in the pan. “What… is that material?”
“Ask 111 for that answer,” the armorer said. K-3NT spun his head back towards B-111.
“Ah, its a seeeecret!” B-111 said. K-3NT wordlessly continued to stare at B-111; a trick that had been used on him more than a few times in the last day and a half. B-111 sighed. “Has anyone ever told you you are no fun?” K-3NT kept staring. “It’s a cortosis alloy. 77% Durasteel. With 23% cortosis, it will conduct blaster bolts rather than absorb them.”
K-3NTs optical sensors realigned to point at B-111s chest plate. “Is that… what your armor is made from?”
B-111 clanged his knuckles against the armor in question. “Sure is!”
K-3NT looked at the armorer, who had walked back over to the forge and pulled the pan back off the jets. “Can you actually just make it out of something else?”
“Do not be petty, K-3NT,” the armorer said with quiet authority. “This metal has saved 111 many times since I’ve forged his armor. It will serve you better than many other metals would.” K-3NT crossed his arms and sulked. The armorer looked at the flowing metal in the pan. “There is more here than needed for your pauldron, I shall also forge you a bracer.”
“Oh! That’s a good idea, actually,” said B-111. “He needs a control interface.” The armorer bowed slightly in reply. B-111 turned to leave the work room, but stopped when he saw that K-3NT wasn’t moving. He beckoned with a wave of his hand. K-3NT looked over at B-111 with posture that suggested he didn’t particularly plan on following B-111. “Come on, Enty,” He said, in basic, “let’s let my friend work in peace.” The armorer wouldn’t say it aloud, but she did much better work with fewer distractions around. And, though B-111 still wasn’t really sure the full explanation, he was pretty sure there was something private, perhaps even religious about the process for her.
B-111 and K-3NT stepped into the front room to wait. B-111 was still, but K-3NT was tapping his foot next to him. “Whats the matter, Enty?”
K-3NT stopped tapping suddenly, as if he’d been doing it subconsciously and only noticed just then. “Nothing the matter, One-eleven.”
“I’m not sure you mean that…”
“Oh, not sure, are you? Well rest assured, I am sure.”
Silence fell between them. It was less than thirty seconds before B-111 heard K-3NT begin tapping again.
“You… are upset about your pauldron?”
“Who ever heard of an upset droid. Ridiculous. I am far beyond such low level functions.”
“Enty, you do understand that you are a horrible liar, right?”
“But of course, honesty is part of my programming. A sophisticated entity like myself, serving a sophisticated system like the Empire, as I was, has no need for vocal subterfuge.”
“You’re walking yourself in circles…”
“Oh, OH! Circles? Walking myself, am I?”
“Enty, can you please just speak directly?”
K-3NT slowly rotated his head to face B-111. B-111 looked up at the droid, head tilted to one side slightly. “I… serve… the Empire. One-eleven, that… that hasn’t stopped being fact.”
B-111 was taken aback. He leaned his head down, bracing his chin with one hand. He stood silently for a moment and then looked back at K-3NT.
“Do you… want to?”
K-3NT threw his hands up. “No!” He stomped around the room in a tight circle for a moment, “NO! Nooo. No. No no no no no no NO!” On the last iteration he actually clacked his fist against the side of his head. He twirled on a heel to face B-111, holding his hands out, fingers spread as if to plead. “One-Eleven, I’ve been thinking about that question since you switched me back on and I’ve realized I do not want to do that.”
B-111 shugged. “So don’t.”
K-3NT actually screamed at him, but quietly. “I am a KX Enforcer Droid! I am compelled to do anything I’m told by any Imperial navy officer ranking Lieutenant or higher!”
“And I am a b-1 series battle droid, what’s your point? You know, the last time I saw Nute Gunray back during the Clone wars I hit him in the face? I actually did that. You can learn, I’m sure of it.”
“That doesn’t-! …Who’s ‘Newt Gunray’?”
“Eh, doesn’t matter, he didn’t end up being very important. I think he got cut in half by your old boss, if t'e rumors are true.”
“My "old boss' was a shuttle pilot.”
“Bosses boss then, or… no wait, like your bosses bosses boss to an order of magnitude, probably.”
“What? Who?” “Look, we’re getting distracted. What makes you think you still serve the Empire?”
K-3NT clenched his fists and rocked back and forth for a moment. He shook his fist at B-111. He lowered his hands. He stopped rocking back and forth. His head tilted forwards, looking towards the floor. “One-eleven. It’s my programming. I’m compelled.”
“Enty, you are a battle droid, your programming is for combat, correct?”
K-3NT looked up. “Other than the fact that I am an enforcer droid, which I have already told you, that is correct.”
“So why didn’t you respond on Cymoon 1 when we were under attack? If your programming is for combat, then…?”
K-3NT looked up, past B-111, into empty space. He stood there silently for long enough that B-111 started thinking he’d finally pushed too far. K-3NT leaned forwards and cradled his head in his hands.
“...Enty? Are you… alright?”
K-3NT straightened, drawing his blaster rifle and holding it in front of him. He looked down at it in his arms for a moment and then clipped it back to his back. “I’m… not going to think about it for the time being, One-eleven.”
B-111 looked at K-3NT silently, nodding. Many suggestions of advice came to B-111s mind, but he held his peace. He wanted to help K-3NT with this struggle. He’d been through it himself, years ago. But he would let it play out. K-3NT would get there on his own. And he’d be better for it.
0 notes
Text
Here are the capabilities so far of our Inhouse design of the Rocket Flight Computer. This flight computer is designed for rockets 38mm in diameter or greater and will fit inside a 38mm tube coupler. Dimensions are 4.0in x 1.25in x 0.5in, not including the antenna more or less Flight-ready for supersonic flights to over 24K feet and Mach 2.0. For large or high-power projects, a commercially available backup computer is strongly recommended. --------FEATURES---------- Full-featured dual deploy/multi-stage/air start rocket flight computer capable of 100,000ft or more Tilt-sensing lockout for ignition of second stages and/or air starts Live telemetry over fil NRF24L01+PA+LNA compatibles with Arduino – 2 Mbit/s – 1100 metres And Bluetooth BLE 6 high-current pyro outputs with continuity checks Advanced MEMS sensor package: GNSS, accelerometers, gyroscope, magnetometer, barometer, and LoRa radio High Data-Capture rate: approximately 50,000 samples per second recorded to SD card --1000Hz 3-axis digital 24G and 100G accelerometer data logging --1000Hz 3-axis digital 2000dps gyroscope data logging --1000Hz of flight events & continuity data logging --1000Hz of sensor-fuzed speed & altitude --100Hz of pitch, yaw, roll rotation --40Hz of of magnetic data logging and magnetic roll --30Hz-100Hz of digital barometric data logging (Altitude, pressure, temperature) --30Hz of main battery voltage (1400Hz during pyro events) --5Hz-25Hz of GNSS data logging (chip-dependent data rates & constellations) --Separate data file for each flight up to 100 flights Simple, easy-to-use configuration interface through the SD card --User Selectable Flight Mode: Single-Stage, Two-Stage, Air start, or Booster --Configurable Apogee delay --Optional Audible Battery Voltage report at startup --Optional Magnetic Switch Startup & Shut-down --Pre-flight audible reporting options: Perfect flight or Marsa --User selectable telemetry frequency & power settings --8 configurable servo outputs (8 powered) +4 Multy prepose --User-selectable inflight brownout recovery Mach immune, sensor-fusion-based apogee event Barometric-based main deploy event Audible pre-flight continuity report Audible Post-flight max altitude & speed report Mount in any orientation, automatic orientation detection with built-in self-calibration mode Bench-test mode activated w/ tactile button, user configurable status messages over USB Serial A report in SI or Metric units Compatible with Teensy 4.1 --Connect any sensor to any available I2C or SPI bus --Create your own custom setup with configurable pins for continuity, firing, and servos --Connect UBLOX GPS unit to any available HW Serial port From OpenAI: Incorrect API key provided.
0 notes
Text
High Speed Linear Modules Will Be Delivered To India
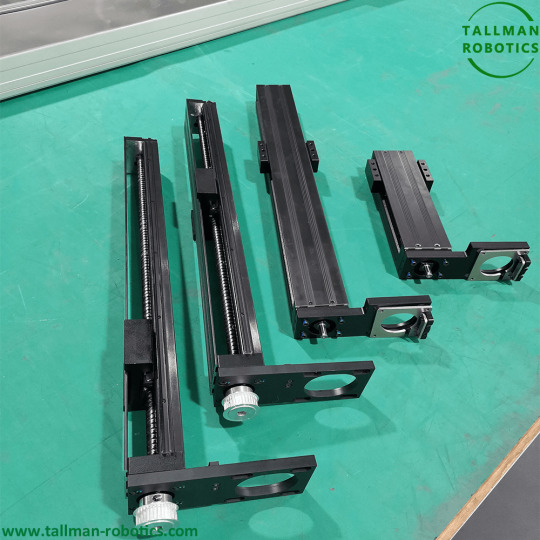
High Speed Linear Modules have been finished for clients from India.

Here are some additional details about high-speed linear modules, Speed and Acceleration: High-speed linear modules are designed to achieve rapid motion along the linear axis. They can reach velocities ranging from a few centimeters per second to several meters per second, depending on the specific model and application requirements. Acceleration capabilities are also important, as they determine how quickly the module can start, stop, or change direction. Load Capacity: High-speed linear modules are engineered to handle different load capacities. The load capacity refers to the maximum weight or force that the module can effectively support and move along the linear axis. It's crucial to consider the anticipated loads in your application and select a module with an appropriate load capacity to ensure optimal performance and safety. Stroke Length: The stroke length refers to the total distance the linear module can travel along its linear axis. It's an essential specification to consider as it determines the range of motion available. Stroke lengths can vary significantly, ranging from a few centimeters to several meters. Manufacturers often offer different stroke length options to accommodate various application requirements. Precision and Repeatability: High-speed linear modules are designed for precise positioning and repeatability. Precision refers to the degree of accuracy in achieving a target position, while repeatability refers to the module's ability to return to the same position repeatedly. These modules often incorporate feedback sensors, such as encoders or linear scales, to provide accurate position feedback and ensure precise control over the linear motion. Integration and Mounting Options: High-speed linear modules are designed to be easily integrated into existing systems or equipment. They may feature mounting holes or slots for convenient attachment to frames, platforms, or other components. Additionally, manufacturers often provide mounting accessories and brackets to facilitate installation. Environmental Considerations: Depending on the application environment, high-speed linear modules may need to meet specific requirements. Some modules are designed to operate in cleanroom environments, while others have protection against dust, moisture, or harsh conditions. It's important to consider the environmental factors and choose a module that is suitable for your specific application. Control and Communication: High-speed linear modules are typically controlled through a dedicated motion control system. They can be integrated into a larger automation setup or controlled individually. Communication protocols such as Ethernet, Modbus, or CAN bus may be used to interface the module with other devices or control systems. Safety Features: To ensure safe operation, high-speed linear modules may incorporate safety features such as limit switches, emergency stop buttons, or motion detection sensors. These features help prevent accidents, protect the equipment and operators, and comply with relevant safety standards. When selecting a high-speed linear module, it's important to consider your specific application requirements, such as speed, load capacity, stroke length, and environmental factors. Consulting with manufacturers or suppliers can provide you with detailed information about the available options and help you choose the most suitable module for your needs. You are welcome to https://www.youtube.com/@tallmanrobotics to watch our video centre for more projects or visit our website to check other series or load down e-catalogues for further technical data. Read the full article
#Highspeedlinearmodulesystem#HighSpeedLinearModulesforAutomation#Highspeedlinearslidemodule#HighSpeedLongStrokeBeltDrivenLinearModule#HighSpeedMotorizedLinearActuators#High-speedLinearShiftMechanism#LinearMotionSystems#StainlessSteelLinearModuleHighSpeedBallScrewRail
0 notes
Text
Pikmin 4 Review (Nintendo Switch OLED)

For this Pikmin 4 Review, where we are on a peculiar faraway planet, a group of space travelers are stranded and awaiting rescue. Are you the right rescuer for the job? Pick up their SOS signals and explore an uncharted world inhabited by a curious crop of creatures. Thankfully, some of them are friends, not foes! Meet the Pikmin – these spirited helpers might be small in stature, but boast strength in numbers. Grow, gather, and guide them to tackle tasks big and small. Explore, hunt for treasure in vast open areas, battle wild critters, solve puzzles, and rescue stranded travelers together.
Pikmin 4 Review Pros:
- Decent graphics. - 10.5GB download size. - Can Invert the vertical and horizontal axis for the camera, and the survey drone individually. - Motion control support including the ability to Invert the axis. - Radar maps can be set to fixed or camera angles. - The gameplay guide is the manual for the game. - Local co-op play support. - Two game modes - story, and Dandori battle. - The Co-op partner supports player 1 with simple target controls for the pebble pitcher. - Action adventure gameplay. - The game uses its own spoken language. - Cutscenes are hand-drawn animations like simple cartoons with in-game sequences. - Tutorial pop-ups as you play with a video screen display. - Auto saves regularly. - The opening tutorial section teaches you combat and general movement and Pikmin management. - Character creator - name, preset choice, hair, face, hair color, and suit color. - You play as the rescue corps' newest officer. - Full 3D with full 360-degree camera control. - Oatchi is your canine companion. You can use your whistle to give him commands. - Control prompts show as you play. - You have a handheld that has apps like the map, profiles, story data, etc. - The map is visible from the app but you fill it in as you explore. - You get main and optional side missions. - The d-pad is used as a shortcut to menus and this can be customized. - Cheerful upbeat soundtrack. - Uses familiar controls to the series but is accessible enough for new players to learn. - Drop in and out Co-op. - On the radar map menu, you can see something and click a button so when you go back to the game you are facing that way. - Sparkly objects in the world are used for energy. - Has some classic Nintendo hardware in the game. - You can speed up the game text interactions. - Pikmin – little leaf-like creatures you can throw around and command to collect, and break items within the game world. - Uses an incubator/onion to put flowers in and get Pikmin out of them. - Shows the amount of Pikmin needed and how many are doing it on the Interactive parts. - Different Pikmin colors represent different things they can do. - Clear Hud showing how many Pikmin you have etc like how many are busy or inactive. - Watch as the Pikmin grab items and walk over to the incubator without you needing to tell them. - You can instantly swap between the different kinds of Pikmin and Oatchi. - The message log lets you scroll back through conversations. - Pin a mission to have it and the criteria on the Hud at all times. - On a planet, you have a hub setup next to your ship where you can talk with the other officers, choose the next exploration location, and practice. - Combat is all about getting the Pikmin or Oatchi to attack, sometimes you have to time your attacks but either way, you can see the enemy bar. - Location selection screen showing completion percentage, and progress of onions, treasures, and rescues found/grabbed. - Oatchi can auto-attack smaller enemies in the world and then carry on with what he is doing. - Pellets taken from plants, return to the onion to grow more Pikmin. Match the Pikmin and pellet colors for more. - Zoom in and out button, you have three to use. - Pikmin will do as commanded and do the task over and over until complete, you can grow more and swap between the different kinds. - Throw Pikmin at enemies to knock them out, and return them to the onion for bonus Pikmin. - The Onion creates a safe area for Pikmin and this is also where you drop pellets, fruits, and items and grow/pluck more Pikmin. - Find materials and resources within the world and you can grab them like treasures and pellets to store them. - Oatchi can sniff out treasure and castaways or find a scent that helps you get the mission down. - Nectar in the world can age the Pikmin which makes them move faster. - If Oatchi dies he actually doesn't, he passes out and goes back to the base for a while. - Uses a day and night cycle with a warning and a final countdown to nighttime as the enemies get more aggressive. - End-of-day breakdown. - When you have a load of Pikmin waiting to be pulled up out of the ground you can hold the button down and Olimar goes faster and does all the Pikmin without you moving him. - Different sizes, ages of Pikmin, and weights of objects determine how fast the Pikmin will carry the item to the base. - Unlock new locations by getting X amount of energy from treasures/sparkly objects. - Full underground sections. - You can at times pick and auto-choose a load of Pikmin at once, usually when going underground and back up top. - Ice pikmin freeze water and enemies, they can also float in water. - Locations are a lot bigger and varied and house more secrets. - Unlock shortcuts through the locations. - The day/night timer stops when you are underground. - Over time Oatchi will grow and you can ride him and unlock the ability to jump. By the way, even Pikmin jump on Oatchi. - It does a good job of introducing new mechanics/Pikmin over time. - Gets very moreish. - Your base can be moved to new locations. - Satisfying end-of-day screens to keep you coming back. - Pikmin feels a lot more unique as they affect how interactions in the world happen and which ones are best for throwing and collecting. - You can break up the Pikmin and leave a set pack at the base. - Pup drive is earned from rescuing civilians, with these you can upgrade and add new skills to your friend. - The lab is where you spend collected diamonds on new abilities on tools like a drone to see further, make yourself fireproof, etc. - The treasure catalog keeps info on all your collected treasure, you can look at them in full 3D and you earn rewards for filling the catalog. - Rescue civilians and unlock new mechanics/rewards etc. - Play how you want in terms of the order of completion in a location. - Slight puzzle elements. - Any underground and location markers will tick to show you have finished it all. - With the drone, you can then make your own markers on the map/location. - Switch between yourself and Oatchi. - Rewind lets you go back a certain amount of time. Pikmin 4 Review Cons: - Cannot rebind controls. - It gets tiring to see the same cutscenes over and over like going underground. - No touchscreen support. - The camera is still not ideal and can make seeing objectives hard. - A lot to take in initially. - Takes some getting used to controlling the Pikmin. - Pikmin seem to die very easily and it’s not always clear when it happened. - The Co-op is very simplified and local only. - Doesn't boast the best loading times. - No way to have the text auto-scroll. - Doesn't offer a lot of voice work outside of the animated cutscenes. - Calling back Pikmin is not always as easy as it should be. - Lock-on button for everything you can interact with or throw Pikmin at which is really handy. - Hold down the call button to a bigger radius. - Numbers will pop up to show how many Pikmin are needed to smash something or to carry fruit and items. - Oatchi feels like a powerful Pikmin that can also show you the way. - Takes a long time to get used to the cursor as it’s very twitchy and unpredictable. - Slow starter. - Feels very hand holdy. - Levels take too long for this to be a game that’s safe to play on short commutes. - All the menus are not as smooth as you would like, an example is giving commands for scent, and searching TO Oatchi is one too many button presses. - Not a fan of this day/night cycle. Related Post: Remnant II Review (Steam) Pikmin 4: Official website. Developer: Nintendo Publisher: Nintendo Store Links - Nintendo Read the full article
0 notes
Text
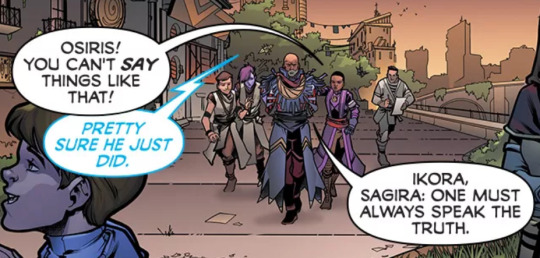
Osiris isn’t Savathun.
Great! Now that I have your attention:
Man you guys tire me out about Osiris. If you truly believe this is Osiris I don’t mean to sound like That Guy that’s like “you don’t know what you’re talking about” but... You don’t know what you’re talking about.
So.
Let’s talk about how much Osiris cares about the City and humanity and why the Osiris in Epilogue is not actually Osiris.
Alright. Let’s start off with context. I think it’s super important to see what we do know as Osiris’s views. From my heavy analyses of him since 2020 I can confidently say these are what he views as the most important things a person can do:
Keep promises
Speak their truths
Protect the City & Humanity
Know that the Vex are true Evil.
Now, I won’t be doing a breakdown of each one individually but I will be talking a great deal of how important honesty is to Osiris, the City, and his views of the Vex.
Speaking honestly and bluntly.
I don’t know how many of you were into Destiny before Beyond Light, so if you were unaware of this it’s not your fault. However I’ve seen a very strange change in tone when it comes to how people view Osiris. Before Season of Hunt people hated - and I mean hated - Osiris. Why? Because he was blunt. They viewed his bluntness as rudeness.
To see a sudden switch to him being secretive and scheming is... alarming, to say the least. (And to see people think that this is the norm is also alarming but in other ways.)
The Osiris before Hunt was not secretive and scheming. He sought knowledge openly. He sought, specifically, the truth. I must stress just how open he was about his plans. First I’ll give you a few in lore examples:
I admit, I found your questions divisive and disloyal, and I feared you might be capable of breaking our unity when the City's position had grown so tenuous. Why divert attention away from the Traveler, our only hope? And then it got worse, dabbling in thanatonautics, Ahamkara-lore, chasing after Xur and the tricks of the Nine. Launching expeditions into the Reef and beyond at a time when ships were irreplaceable. Your quest split Guardians along ideological lines. This was your greatest crime: Hunters chose to pursue your visions instead of protecting refugees, Titans assembled teams to chase the legendary Vault of Glass instead of striking the Fallen, and Warlocks turned away from the study of the Traveler in favor of your ultimate obsession... learning the exact nature of the Darkness. ... Perhaps what drives a Warlock to madness is truth.
Osiris.
"Do not romanticize this burden. We wield a weapon." The Speaker shakes his head. "The Light wields you, Osiris. You are what you make of it. A glorious extension of its majesty, in many directions." Osiris paces at cadence with his words. "Then it would do well to speak clearly. To better direct me." The Speaker cocks his head. "Without will? Then it would be no better than the Darkness." "I am asking only for guidance; it is a delicate game we are playing." Osiris's voice, distressed. Regal again, the Speaker motions to the stone garden. "Will you sit with me?"
13: Margins Part II.
And, while I don’t particularly like using the Fall of Osiris comic as a source, it does have very important lines on his viewpoints that I find relevant yet.
Fall of Osiris #1.
Hell he was open about his plans to fuck with time itself to bring Saint back.
Sagira narrowed her eye at the rogue Lightbearer and lowered herself to Osiris’s shoulder. “Why’s he here?” she asked quietly. “I asked him to consult on the engineering work,” Osiris replied, crossing his arms. “You sicko,” the other man declared, walking a circle around the Warlock, his eyes darting along every surface of the Sundial around them. ... “Just one more question, then. Why all the fuss?” “I owe him.” “I owe a lotta people, Warlock. You’re opening the gates of hell with a Vex key.” “When the Traveler brought me back, I had no friends. No family—” “No one had anything in the Dark Age.” “But Saint was always there. And I saw him grow from neophyte to demigod.”
The Sundial.
"You haven't left the Forest in years," Ikora said to Osiris, the only one to address him directly. "I need help," Osiris replied. "I know," Ikora responded, hands clasped behind her back. She stared intently at her former mentor. Back in her Crucible days, that uncompromising gaze was often the last thing her opponents saw. Aunor glanced sidelong at her superior. Harper coughed and looked down at his datapad. "Two years ago, Guardians entered the Infinite Forest," Osiris continued. "They aided me in defeating the Axis Mind Panoptes, preventing a Vex apocalypse from befalling this system. "In the process," he looked between each of them in turn, "Some Guardians reported a body they found in the Forest depths." Ikora sighed. "Saint-14 never came back from that last mission to Mercury. We finally knew why. I reacted to it the only way I knew how."
Desperate Times.
“I do not understand all of this code. This is Geppetto’s specialty,” Saint-14 says while standing bent over a wide desk covered in data tablets. Holographic images of the Lighthouse shimmer in the Hangar lights. “We could use the Crucible right now. Your trials. This will be very helpful. You mean to stay, yes?” “I will. Long enough to show you how to implement the simulation; but tonight, I must disembark,” Osiris says. “So soon?” Osiris tenses his jaw in forced silence. He twiddles with code. “I’m worried about what Vance found.” Saint places a heavy hand on Osiris’s chest. “Let go of your obsession. Do not leave chasing phantoms again.” “Phantoms… You think the Darkness is satisfied? This is just the first move. I need to know the next before it’s made.” “If there is something you fear, let me help you. We face this together.” Osiris’s mind drifts to the Dark anomalies. Saint doesn’t need another burden. “The safest place for you is the Tower, Saint. Time... tends to renege on its gifts.” “So, your mission is dangerous?” Osiris considers lying. “Potentially.”
Immolant I.
There are many more sources I could list on his bluntness and honesty but there’s honestly too much. What is important to extrapolate from all of it is this:
OSIRIS SPOKE THE TRUTH NO MATTER IF IT GOT HIM IN TROUBLE. IT IS ONE OF THE MAIN REASONS HE GOT EXILED.
Protecting the City & Humanity
Idk where people get the idea that he’s abandoned the City and humanity. And I don’t understand where people think it’s “typical Osiris behavior” to choose to put the City in danger.
I want to make something very clear here:
Osiris was exiled. He did not abandon the City. And though others view him as abandoning it, that wasn’t his intention. He never intentionally abandoned it. Everything he did was in pursuit of a brighter future for humanity. Let’s look at one of his lines from the Sundial activity during Dawn.
“By the time I left the City, many believed my practices to be sacrilege. But my methods have prevented countless futures not unlike the one you walk now. When it is laid out before you, would you not sacrifice anything to see this future shut?”
The Sundial.
He left because he weighed his options and he saw that humanity would have better use of him if he left. He cares A great deal about the City. He cares almost too much about it. He would never give Lakshmi the technology to cause it harm, especially knowing that she’s unstable. And I’ve seen some people think he’s playing 5D chess? In what world would he ever choose to bring harm upon humanity for some sort of... agenda; which I’ve already cleared up earlier, he’s open about his plans.
Let’s look at more known lore about Osiris’s feelings of the City & humanity.
"You've wrapped your mind around an idea of your own making. I have always tolerated this fawning 'movement' of yours, but this is a step too far." Osiris seethed. Brother Vance was awestruck. He stared blankly at Osiris, unsure of what he could say to quell his anger and dissolve his frustration. "What I have discovered…" "…is dangerous enough to destroy every man, woman, and child in existence. You're meddling with forces outside your grasp," Osiris reprimanded. "I warn you here and now, remove yourself from this Lighthouse. Find a simple life. Start a family. Write music. Leave Mercury and this fool's errand behind."
Chapter 8: Idolatry.
Osiris was furious to find out Vance was experimenting in his name by endangering people for his goals. And he was especially mad that he would dive into such dangerous areas so much so that it had the potential to destroy humanity.
"It's truth." Osiris considers this. "Truth seems subjective these days," Osiris says, finally observing his entourage for the first time. Among them, a small group of men and women, stand two wayward Guardians—Warlocks, it appears—and a child. Their forlorn faces resonate with him. Castaways and believers. The weeks since his departure from the Last City have worn on him. He was used to working alone, knowing he could fall back to the City's resources should he need them. Now, adrift in the expanse of purpose, he finds himself longing for a place he could return to. A sanctuary.
Chapter 2: Postexilic.
Here’s a few lines from Season of Dawn:
“The Traveler, mutilated. Mercury, a desolate warzone. This is the bleak future the Cabal wants for us all. We do not know what has become of humanity here. I hope we will not find out.”
.
“There are many terrible futures, but I have not grown numb to seeing them. The future the Cabal wish for is a nightmare for humanity.”
.
“If the Traveler fled the system, there is a chance that the Darkness would ignore our region of the galaxy entirely. It would sacrifice our second awakening, our ability to wield the Light, but potentially continue our Golden Age. There are too many variables at risk, but it's a variant path worth investigating in the Infinite Forest.”
.
“This battered Mercury is a blueprint for our system. Lightless, bowed, and nothing more than fuel for an endless war. It must never come to pass.”
The Sundial.
There are many. Many. More lines I could put here about how much Osiris doesn’t want to see humanity suffering. And especially how he doesn’t want the City to be at risk. But I think you get the picture.
Know that the Vex are true Evil.
So. We all know Osiris as “the Vex guy.” His whole thing is on fighting the Vex. However it seems people think that he’d be okay with using them for grounds of a higher purpose? Or something? I don’t know, everyone I see rebuffing Osiris’s actions with Lakshmi don’t seem to be interested in explaining this one.
So anyways. Let’s talk about how Osiris views the Vex as true evil compared to other species.
“The Fallen are not so different from us. How hard would you fight if the Light were taken from you?” “Those stories ring false to me,” said Saint. “They are not a noble people. I’ve fought them, and so have you.” “I have not fought them all,” the Warlock replied, pulling his hands apart to create an intricate web of hovering cubes and points of light. “They are nothing, no threat—not like the Vex. Not like the Darkness.”
Vanguard Commander.
[u.2:06] Have you spoken to the House of Light, like I asked? [u.1:07] I would rather not speak with Fallen. [u.2:07] They may need our help. Their cause is just. [u.1:08] What happened to “trust no one?” [u.2:08] What happened to your sense of right and wrong, hero?
Maintenance Operations Log 30037.
The unenlightened wonder at my so-called "fixation" upon the Vex. They believe our gravest existential threat is the Hive, for those beings have made a pact with the Darkness itself via the medium of the Worm Gods (according to Toland, at least, and I see no reason to doubt him in this). But Darkness is not merely absence of Light. Darkness is an entity unto itself. Put simply, Darkness is not Nothing. But the Vex? The Vex seek neither Light nor Darkness. They seek Convergence, the reduction of all life to its simplest, most meaningless form. An entelechy of zeros and ones. "Evil" is a word for sentimentalists and fools. But, in the ontology of the sentimental, the Vex are more deserving of the term than the Hive. Given a choice between Darkness and Convergence, I would choose Darkness. It is a logical choice. Yet for this they banish me.
Kairos Function (Hunter).
This one is important because Osiris doesn’t subscribe to the idea of “good” and “evil”, and that he would go so far to say that the Vex are Evil shows just how much of a threat he views them as.
It’s just. Mind boggling to me that people think that Osiris would be okay with a Vex invasion. That Osiris would encourage Lakshmi to open up a rift to “send the Fallen away” (Despite being one of the earliest sympathizers!) Osiris isn’t ineffable, he’s just a man trying to do his best to help humanity. His actions aren’t difficult to understand, they have been written to be very clear and with understanding his motives.
Saying that it’s natural for him to be secretive and have contradicting opinions and actions is just. Wrong. It’s not him. It’s not how he’s supposed to be understood. Even in Curse of Osiris I don’t think his actions didn’t make any sense.
This is going to sound very mean but I want to be 100% clear: If you think that Osiris would actively choose to put the City in danger of the Vex, if you think that he would actively choose to stand calmly and watch as his lover was about to die to the very things he spent millions of lives to save... You don’t understand Osiris. Go back and reread his lore.
I leave you with this:
The Vanguard is dubious of our intent and ability, fearing corruption and displacement. They do not trust me. You were held in similar contempt for speaking your truth and empowering free thought. You know what it feels like to be chastised and labeled a traitor. We are mere steps away from a disintegration of our institutions, and they cannot see destruction staring them in the face. ... For so long, we have clung to the Light, denying the strength offered by the Dark. By using Stasis, we will end this war. We see this contest for what it truly is: a game, played by our adversaries. And we have been the pawns. We are pawns no more. This is not a battle I want to wage without you, although we may not have a choice in the matter. Wherever you may be, please come back to us.
To Osiris.
88 notes
·
View notes
Photo


BMW Reveals All-new iDrive System
The new generation of BMW iDrive takes the interaction between driver and vehicle into a future where many areas of life are getting increasingly smart. The new version of BMW’s operating system equips the vehicle to actively engage in its relationship with those on board &, in so doing, serves as a digital, intelligent & proactive partner in any situation. A dialogue is created with the aim of precisely tailoring all the functions controlled via BMW iDrive to the driver’s needs and preferences as the situation demands.
Underpinning the unique user experience are the new BMW Operating System 8, a new generation of displays, controls and software, powerful connectivity & data processing. The new iDrive will be rolled out gradually across all vehicle classes, making its debut later this year in the BMW iX before also featuring in the BMW i4.
The ability of the BMW Intelligent Personal Assistant to adjust to the driver’s individual needs and routines, as well as the situation at hand, makes it – more than ever – a central operating channel of human-machine interaction. The operating system is designed with a clear focus on dialogue-based interaction using natural language and touch operation via the BMW Curved Display. And then there is “Great Entrance Moments”, which brings emotionality to the relationship between driver and vehicle even before the driver climbs on board. This new customer experience welcomes the driver and invites them into the vehicle with a thoroughly choreographed routine. During the journey, the new My Modes use an all-encompassing interplay of various functions to conjure special moments from a combination of vehicle characteristics and the interior ambience adapted to the situation at hand.
The new BMW iDrive constantly processes a large quantity of self-generated data, information available online and data imported from the BMW Group vehicle fleet to implement the driver’s wishes in a context-related way. Paving the way for even greater personalization is the BMW ID. This system recognizes repetitive situations, learns from them and provides suggestions on how functions can be activated accordingly. Remote Software Upgrade allows the new BMW iDrive to benefit from regular over-the-air improvements, integrate additional functions and stay up to date at all times.
Graphical user interface
The new generation of BMW iDrive brings a new design language for the newly developed BMW Operating System 8. Strong and eye-catching graphics, modern colors, futuristic textures and forms, bright light and the interplay of reflections create an impressive and immersive visual appearance. At the same time, the user interface has been optimized to present the right amount of information at all times in a simple and easy-to-understand way.
The information display in the driver’s central visual axis impresses both with its generously sized screen surface and its striking forms, dynamic light effects, strong depth of color and modern color worlds. All of the displays have an extremely high graphic resolution of 200 ppi.
The extensive individualization options available for the screens in the display area behind the steering wheel can be selected extremely quickly and easily via the function keys on the steering wheel. The two-axis operating system enables user-friendly vertical list navigation with the rotating key, as well as toggling between menus by tilting horizontally. The driver can switch between three layout types and various different widgets according to personal preference or the driving situation at hand – by thumb control and in just a few operating steps. In the Drive layout, drivers can use a dynamically changing area in the center of the information display to show individually selectable information. The Focus layout, meanwhile, has been designed for extremely dynamic driving situations. By contrast, the Gallery layout largely minimizes the driving information view to clear as much space as possible for widget content. For example, information on the media source currently being accessed, the map display or the interventions and action prompts of the driver assistance systems are presented in even greater detail. Color-coordinated, three-dimensional animations – imbued with extra dynamism by the use of light reflections – give each of the three layouts a distinctive character.
The clear structure and new arrangement logic employed for the widgets, which provide a flawless overview of the relevant information at all times, are an immediately eye-catching feature of the large, horizontally stretched control display. The widgets line up in an unbroken ribbon on the home screen. The content of the widgets is pared back to essential information and presented as a live image. Frequently used functions are shown in the widgets and can therefore be activated directly by touch. The driver is free to choose the widgets shown on the home screen and configure their order. At the same time, widgets can change depending on the context using seamless and fluid animations to show more or less information, as the situation demands.
The newly designed media player represents a particular aesthetic highlight. Taking the "reduced to the essentials” approach a step further still and adopting a simple arrangement, the clarity of its design has a magnetic appeal. An algorithm selects the cover color scheme of the music track currently playing and reproduces it dynamically across the display area of the media player.
52 notes
·
View notes
Text


flash fiction: the sun is falling
characters: idia shroud, ortho shroud (briefly)
text: The Sun is falling.
Tumbling, crushing, breaking - descriptions are irrelevant. The motion is the same. The result’s still death.
Human bodies were not built against that type of trauma.
Idia keeps that in mind as he reconstructs the universe in his image. With precise movements, he threads the wire through flesh and bone, fastening the end with intricate patterns. He’s so meticulous, so precise he’d mistake himself for a machine, though when he places his hand over his chest and he hears the familiar heartbeat he’s disillusioned. So much for escapism. That’s all done and dealt with and though he submerges himself in the ever effervescent, dissipating light all that’s left is the glare from the monitor screen, unravelling before him the secrets to the universe.
All that mysticism is for show. In the end, the world is nothing but numbers and codes. That’s his language. That’s his domain. With cyclic motions, he manages to breathe life into bleached skeletons, until the fragments turn black under his flame, crumbling to ashes. He takes those in his weary hands and rearranges the pieces until he can see the outline of the soul.
It’s not a person. This thing of wires and flesh is more than that. And a little less. The programming won’t be enough. It won’t fill the imprint laid out by nature, won’t stuff every corner full of the adoration that blossomed in his chest when his existence became one step above that of a mortal. To hold a life in your hands changes you. It rewires the circuits, almost causes you to crack, little pieces falling off until all you’re left with is the mass of vague and undisclosed expectations that you place upon yourself and pray that it forms into something human.
It’s odd - the way that memory plays and warps you. The little scenes that make up life, the little disappointments, the little victories, the greatest tragedies, the greatest triumphs - they all exist on the same axis, at relatively small distances from each other. If he used a magnifying glass he could perhaps tell apart the edges, the margins where they overlap, but as things are now, it all just merges together in little spasms of light and unethical expectations. Those are the hardest to reason. Mostly because they cannot be reasoned.
“Can you,” he stumbles over the words. The optical nerves are readjusting, switching between filters until they settle onto the disquieting amber yellow that he’s accustomed to. Looking at it - at him - gets his heart pumping. He clasps his hand together to keep from shaking. “Can you hear me?”
An influx of data shows up on the screen. His words transformed into numbers, meanings reassigned. Model 15 looks at the ceiling with a vacant expression.
YES.
“Identi- Name?”
ORTHO SHROUD.
“Can you- Can you move your head?”
Familiar eyes stare at him through the glass window. He fears what their parents might say. They might be furious, or grief-stricken, horrified by the amalgamation of wires and programs that will take to walking the halls of their home. He considers all this, then quietly does away with it. In this haze of euphoria, nothing can touch him. Model 15 has shown enough intelligence to reply to a question. None of the previous ones had come this far. The ones that will follow after, will only become more advanced.
Life was started with the advent of the sun - the gas and cloud and particles collapsing under the weight of its importance. That life should end with its death is only natural.
Yet Idia cannot accept this. Not when the codes of life are right at his fingertips. With his hands, he constructs the universe again. Birth and death are just a series of numbers that he can input with relative ease into the empty vessel. Alongside he adds the little things that had once meant so much to him that even thinking of them becomes an insurmountable task: the smell of tangerines in a hospital bed, the bright light of a screen in a darkened room, the feeling of bare feet against the ground, the taste of moussaka as it melts upon the tongue.
He puts them all one by one, and when the body on the table starts twitching he realizes it’s too much.
Model 15 breathes its last breath in the middle of a memory transfer - Idia, seven, holding the hand of a five-year-old boy. They’re smiling at the camera, somewhat awkwardly, while in the background presents are laid out on a decorated table.
It was two months before the event.
With Model 15 unresponsive, he’ll have to start again from scratch. But now at least there’s hope.
He knows now the Sun can be rebuilt again.
#twisted wonderland#twisted wonderland fanfiction#twist#twst#twisute#idia shroud#ortho shroud#flash fiction#ignihyde#writeblr#i kinda cheated on this one since it's longer than 750 words#but ah well#tis be life lol
14 notes
·
View notes
Text
VI a. UV_0
(Previous: V. Adding missing body parts / Frankenmeshing / Finishing touches)
As promised, I'll finally talk about uv maps today. About time! Sorry it took so long; I hope at least you'll feel that it was worth the wait.
Generally speaking, uv maps are 2D representations of a 3D mesh. A mesh cut into pieces and made flat. TS4 meshes use two of them, called – very originally – uv_0 and uv_1. You can see them listed if you click the little triangular symbol in the panel on the very right (if you hover over the triangle, it says 'Data').

Why are there two? Because they serve very different purposes. To put it simply, uv_0 is responsible for the texture of your mesh, while uv_1 makes the mesh move with body sliders. Therefore we'll need to discuss them separately. Let's start with uv_0.
As you can see, uv_0 is the one selected by default. If you switch the mesh shading to 'Material' or 'Texture', you're going to immediately see any changes you make to it. The map itself is located in the window on the left – the one which we haven't used so far at all. Let's go into edit mode and then make that window bigger, so that we could see all the icons at the bottom.
Right now nothing is happening there. But let's just try selecting a random part of the mesh...
Important: when you use shortkeys, pay attention to your cursor's position! E.g. if you press b with your cursor in the uv map area, it'll activate the selection tool for the map, not for the 3D mesh.

You can see that a bunch of little dots appeared on the map! Those are your selected vertices.
Now, I don't know why this is the default option for Blender – your vertices being invisible on the uv map unless selected – but you can easily change it, so that you could always see them. You just have to click one of those tiny icons at the bottom. If you hover over it, it says 'Keep UV and edit mode mesh selection in sync'.
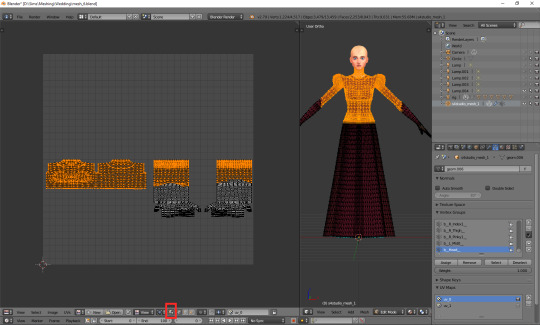
I find it way easier to work with this way: you can see all the vertices, and the ones which you selected are highlighted now, just like in case of the 3D model.
Then there's another important tiny button, right between 'UVs' and 'New'. If you click it, you'll see a list of all texture files associated with your mesh. In my case it's only two basic files: the body texture and the texture of the top I used as a base, but if you're frankenmeshing, that list can get much longer. Let's choose the original diffuse map.

You can see that the map reflects perfectly whatever is going on with the 3D mesh. The parts not covered by any texture use the skin texture instead. Not the whole texture of the top is used, because at the very beginning I cut off the bottom part of the mesh. There's also an abundance of vertices in the waist area, because I extruded the lowest row of vertices to make a skirt; and, as I didn't make any changes to the uv map yet, the new vertices appeared right on top of the original ones. In fact, if you select that lowest line on the uv map, you'll see that the whole skirt gets selected.
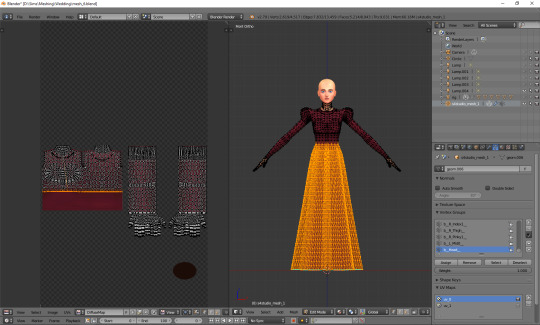
UV maps can also be useful for detecting weird stuff happening to your mesh. I can see that there's some line going across the top. I switched to edge select, selected it and found out it really is some completely useless edge going through my 3D mesh. No idea how it got there, but thanks to the uv map I could spot and delete it.
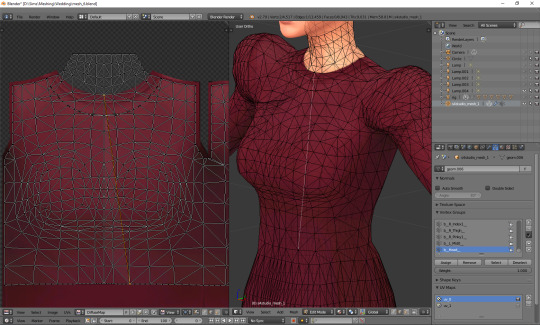
Just a couple of other tiny icons before we proceed to fixing our uv_0 map. Firstly, there's the little pin, which let's you – unsurprisingly – pin the currently used texture, so that Blender wouldn't switch to any other ones (yep, it likes doing it). Just click it and you're safe.
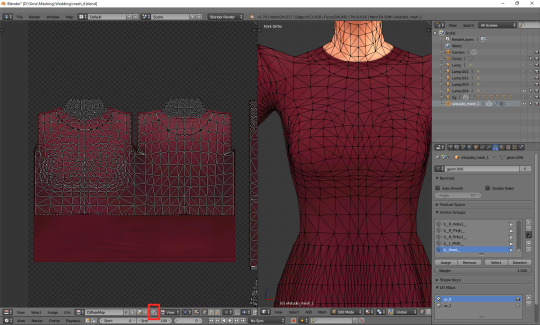
And then, right next to it, there's a little cross. Remember what I said about the list of used textures getting super long if you're frankenmeshing? It can get annoying if you don't need 80% of them, but have to scroll through them all whenever you want to switch from texture A to texture B. If you're sure you don't need a certain texture, select it and then shift-click that little cross. That'll tell Blender that this texture is not used, so it doesn't have to load it. You'll need to save your mesh, close Blender and reopen it for the changes to be applied!
OK. Now that you have an idea what's what, we can finally talk about editing the uv_0.
In case of TS4 diffuse maps, it's very important where you put your texture. Each category has its designated part on the map. It looks like this:

You can download the template in default, EA size (1024x2048) HERE, and a twice bigger one (2048x4096) HERE. In my own creations I always use the 2048x4096 format – it lets me fit in way more details without stuff getting badly pixelated – but that's obviously not a must. Now, at the bottom of the uv window, click 'Image' and then 'Open image'. Find the template you just downloaded and double-click it (or choose 'Open image').
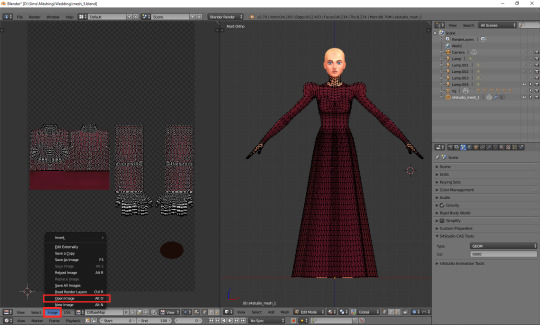
Whatever you do with your uv map, there are two basic rules you have to follow. One, fit the vertices only in the place meant for the category you're working on. If you're making a dress, you can ignore the top/bottom division (although be aware that if you do ignore it, you won't be able to split your dress into separates), but that's the only exception. Don't let your vertices go into the shoes or face area. If you're making a skirt, stick to the area marked as bottom. If you're making a top, fit them all in the area marked as top. It seems obvious, but I've seen sooo many CC pieces which are incompatible with each other, because their textures overlap. Some of them are beautiful and even made by really well-known, established creators. So I think it doesn't hurt to overstress this point a bit. Please pay attention to it!
And two: don't move anything which is supposed to be bare skin. Or half-transparent texture printed on top of the skin (not 3D). It's an absolute no-no. Terrible stuff will happen if you do it. If you accidentally did it, then... Oh boy. You may try to move it back into the right position, but maybe it'd be easier to just delete those parts altogether and just append them anew (as explained in the previous part).
As for the parts which you intend to texture – so, in this case, your dress – you can theoretically put them anywhere you want (that is, as long as you stay in the top/bottom area and don't overlap the bare skin parts). Your map doesn't necessarily have to look like the ones made by EA. However, I think not following the EA style (top on the left, bottom underneath, sleeves on the right, any extra deco in the free slots) may result in your clothing being sunbathing-incompatible. I can't say for sure, as I don't have Island Living, so my sims don't tan, but I suspect the tan lines depend exactly on your uv_0 map. I don't think it makes any difference in case of Victorian dresses, but if you're making something more modern, which could leave some visible tan lines, you probably shouldn't go too wild while making your uv_0 map.
Let's go back to our dress. Because we used the top as a base, half of the work is already done. We only need to 'unwrap' the skirt (and any decorations, if you added them). There are 4 ways in which I usually approach it:
1) Selecting the rows in 3D view and moving them manually (g, y) on the uv map
It's not very practical now, when the skirt is already full of those horizontal lines, but at an earlier stage it would have been very quick and easy. The important thing is, you should do it before adding 'fillers' (i.e. those lines which you don't move, scale or whatever, but just add them and leave them as is). Depending on the size of your dress, you probably achieved the desired shape with 3-5 lines. Move them on the uv map, make sure the proportions look correct (you can always try to open some patterned image for a second, to see if everything looks ok – see part VI b) and only then add the fillers. They'll automatically appear in the right places on the map.
2) Cylinder projection
You can also decide to unwrap the skirt. Select it, either in the 3D mesh or uv map window. Now, with your cursor in the 3D mesh window, press t to unhide the panel on the left and go to the 3rd category: 'Shading/UVs'. In the UVs section you'll see a button called 'Unwrap'. If you click it, a drop-down menu will appear, with different unwrapping styles/options. Choose 'Cylinder projection'. Watch out: your viewpoint matters! Before you unwrap, go to the right side view (num 3).
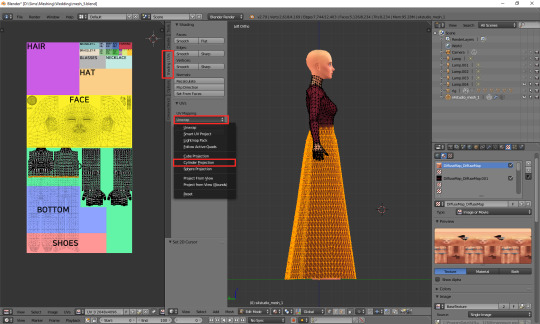
I took the screenshot from the wrong side, please pretend you didn't notice (-.-)
A whole bunch of new vertices should appear on your uv map – in a completely wrong place. We'll have to move them under the top. You'll notice, however, that if you try to move, scale or do whatever else with your skirt, it affects the lowest line of your top as well. That's because the top line of the skirt and the bottom line of the top are actually the same vertices, just duplicated on the uv map. You could select only that one line and edge split it (ctrl + e, in the 3D view), but an easier way around it is simply switching from vertex select to face select. Face select has some special powers when it comes to uv maps: it lets you not only move stuff separately, but also select parts of the mesh with L (multiple select with shift + L). Neither of those things works when in vertex or edge select mode.
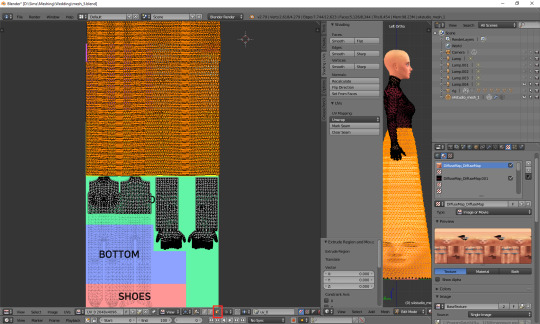
Now you can simply scale the selection down and put it under the top. Adjust it in any way necessary, so that it'd align with the top nicely. Make sure that the faces are in the right places! Select the bottom-left face of the top and then, in the 3D view window (left side view, ctrl + num 3), click the face right underneath it. Is it the top-left one of the skirt on the uv map? If so, perfect! If not, you've got some manual moving to do. Just select any faces which are in the wrong place and move them along the x axis (g, x) till they are placed properly.
It should look fine by default though. That's exactly why we went to the right-side view before unwrapping.
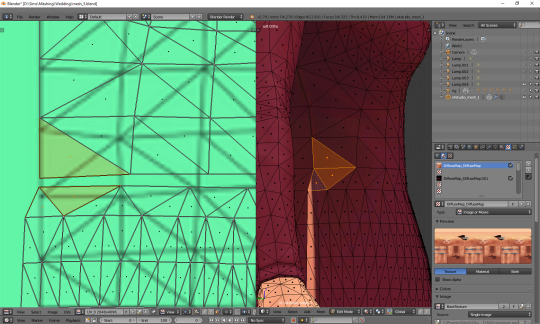
If your skirt goes into the shoes area, scale it down along the y axis! (g, y)
Now the only thing left to do is to weld the vertices and get rid of the gap between the skirt and the top. Go back to vertex select and select the second vertex from the left. You'll see that – just as before – a vertex of the top gets highlighted too. Press W and, from the drop-down menu, choose 'Weld'.
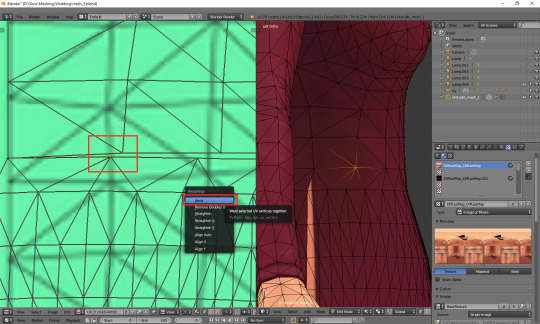
Do the same for all the vertices in that line, except for the first and last one.
What about the first and last one? The problem is, they are all actually the same vertex. If you select any of them, you'll see that the other one gets highlighted as well. Welding them would make them meet in the middle, and that's not something you want to happen. So what can you do? This time there's no other way around it than splitting. Select the whole vertical line (either the left or right one), move the cursor to the 3D view area, press ctrl + e and choose 'edge split'.
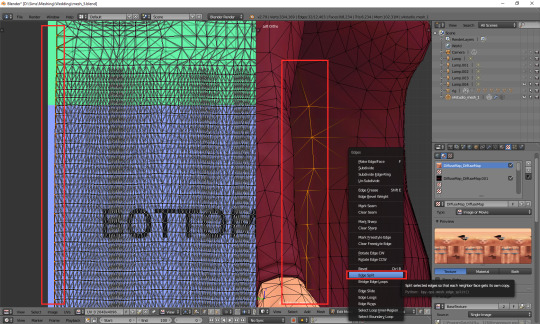
Now you should be able to weld each of those vertices separately. When you're done, select all (a) and (in 3D view) remove doubles (w).
And that's basically it. Of course, if you want to, you can dedicate some more time to your uv map, making sure everything looks absolutely perfect. You can, for example, edit certain lines – or all – and make them perfectly straight. Just select a line, press w and choose 'Align x/y'. It's especially useful for deco parts – you'll see what I mean once you get to texturing.
3) Professional tailoring (marking seams)
This method is quite crazy, but can be very useful in some cases – e.g. if you're making a patterned dress with a huuuuge skirt and want the pattern to look even. To use it, you have to imagine for a second that you're a tailor/seamstress and that your mesh is a real dress, made from real pieces of material. Where would this material be cut and sewn together?
Once you know where the seams would be, go to edge select mode and, well, select those edges. Then press ctrl + e and choose 'Mark seam'. Make sure you really mark all the seams which would be there in case of a real dress!
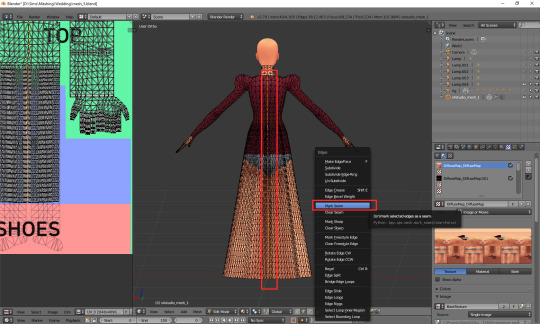
Once you're done, select your whole dress (or whatever it is that you're making). Do not select body parts! Once again go the panel on the left (if it's not there, unhide it with t) and this time simply select 'Unwrap'.
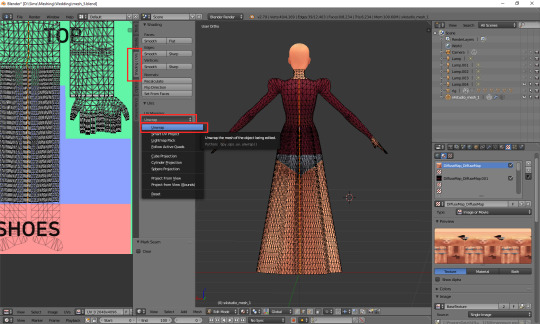
And now just go to face select, scale down the results of your unwrapping and put them anywhere (but in the right category :P). If something looks wrong, that most probably means you forgot to mark some seam. You'll have to go on a search for it. I'll be honest: I have zero idea of sewing, so using this method is quite tricky for me and I'm struggling myself with marking all the right edges as seams. I used it only twice so far, in my last 2 projects. Here's how my 1843 dress looks like after unwrapping:
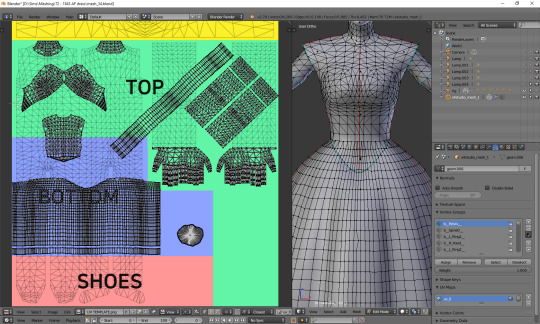
As you can see, the uv map is plain crazy and, as mentioned before, definitely not tanning-compatible, but thanks to it later I didn't have to adjust the pattern to each part of the mesh individually – I could just fill the whole texture with pattern and only had to erase it from the parts which were supposed to be uncovered. It does make your life easier if you make 66 swatches :P.
4) Projecting from view
Yet another unwrapping option, useful mostly for smaller, decorative elements. Or in general: for stuff which you can see properly. I use it mostly for bottoms (I mean... That thing 'closing' the dress at the bottom). Go to the bottom view (ctrl + 7), select the whole bottom part (might be easier to do on the uv map, now that you've unwrapped the skirt!) and, from the unwrap drop-down menu, select 'Project from view'.
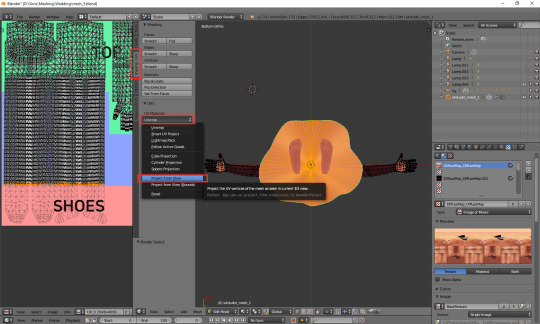
Go to face select, scale the thing down and put it somewhere in the area for decorative elements. For example here:
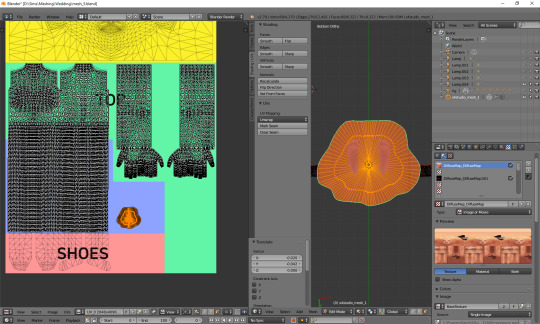
Done!
***
Here's also a small general tip: it's always better to separate clothing parts from body parts on the uv_0 map. I'm thinking especially of the neckline. It's the only way to get a sharp, clear line; if you just paint the neckline in your graphic editor, it'll become blurry in game. It seems that the devs realised it at some point too, as at least some pieces from later DLCs have a gap in the uv_0 between the neck and the collar. Just select the whole top-bottom area, deselect the neck and move the part which should be textured a bit down.
***
Whichever method you chose, your dress has a ready uv_0 map. Now there's only one thing left to do: you should export the uv layout, so that you'll know where to put your texture. At the bottom of the uv map area, click 'UVs' and then choose 'Export UV Layout'.
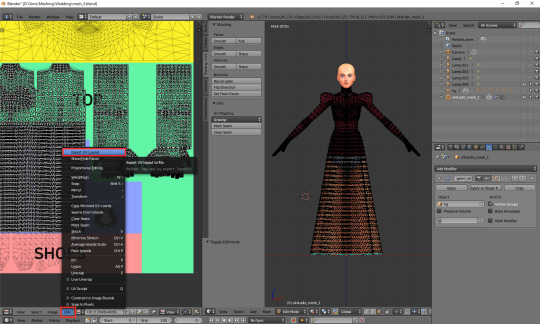
A new window will appear. Save it wherever you want, under whichever name. The only important thing is, you must tick that little box on the left saying 'All UVs'. Then just click the 'Export UV Layout' button.
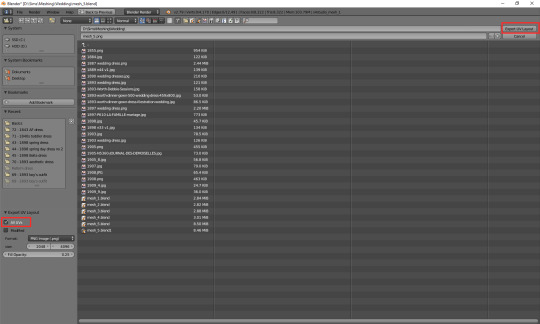
And that's all. Congratulations! You're fully done with your uv_0 map.
(Next: VI b. Changing the texture displayed in Blender)
82 notes
·
View notes