#TWRP and Rooting
Explore tagged Tumblr posts
Visit Tumblr Blog
Explore Tumblr blogs with no restrictions, modern design and the best experience.
Last Seen Tumblr Blogs


Fun Fact
Celebrities use Tumblr as well.
Text
got tagged not once but Twice! by @frostytherobot in the same post, so here's 10 songs I liiikee in no particular order or for any particular reason 1. A Human's Touch by TWRP 2. No Problems by Ginger Root 3. Want To Be Free by Sea Power 4. Mysteries of Love by Julee Cruise 5. Cognac by Monster Rally 6. What Makes A Good Man by The Heavy 7. Ladyflash by The Go! Team 8. Necessary Evil by Nikki Yanofsky 9. Rivers in the Desert from Persona5 10. Act Like You Know by Fat Larry's Band
and here's 10 people who should do it too! why not : @anarcho-transsexualism @staypuff @siddex @attaboy-art @ganachee @125fm @1ore @hopefulharddrive @agricultcher @watchthosewristrockets
7 notes
·
View notes
Note
whats the status of like. using linux on a phone. it feels like there are two parallel universes, one that kde lives in where people use linux on phones, and one where if you google linux phones you discover theyre almost usable but they can barely make phone calls or send texts and they only run on like 4 models of phone
don't have much experience with linux on phone so anyone please correct me if i'm wrong but
one of the problems with phones is that every vendor and manufacturer adds their own proprietary driver blob to it and these have to be extracted and integrated into the kernel in order for the hardware to function.
as companies don't like to share their magic of "how does plastic slab make light", reverse engineering all your hardware is quite a difficult task. Sometimes there just isn't a driver for the camera of a phone model yet because no one was able to make it work.
So naturally, this takes a lot of time and tech is evolving fast so by the time a phone is completely compatible, next generations are already out and your new model obsolete.
Also important to note: most of this work is made by volunteers, people with a love for programming who put a lot of their own time into these things, most of them after their daytime jobs as a hobby.
Of course, there are companies and associations out there who build linux phones for a living. But the consumer hardware providers, like Pinephone, Fairphone and others out there aren't as big and don't have this much of a lobby behind them so they can't get their prices cheap. Also the manufacturers are actively working against our right to repair so we need more activism.
To make the phones still affordable (and because of said above driver issues) they have to use older hardware, sometimes even used phones from other manufacturers that they have to fix up, so you can't really expect a modern experience. At least you can revive some older phones. As everything Linux.
Then there's the software providers who many of are non-profits. KDE has Plasma Mobile, Canonical works on Ubuntu Touch, Debian has the Mobian Project and among some others there's also the Arch Linux ARM Project.
That's right baby, ARM. We're not talking about your fancy PC or ThinkPad with their sometimes even up to 64-bit processors. No no no, this is the future, fucking chrome jellyfishes and everything.
This is the stuff Apple just started building their fancy line of over-priced and over-engineered Fisher-Price laptop-desktops on and Microsoft started (Windows 10X), discontinued and beat into the smush of ChatGPT Nano Bing Open AI chips in all your new surface hp dell asus laptops.
What I was trying to say is, that program support even for the market dominating monopoles out there is still limited and.... (from my own experience from the workplace) buggy. Which, in these times of enshittification is a bad news. And the good projects you gotta emulate afterwards anyways so yay extra steps!
Speaking of extra steps: In order to turn their phone into a true freedom phone, users need to free themselves off their phones warranty, lose their shackles of not gaining root access, installing a custom recovery onto their phone (like TWRP for example), and also have more technical know-how as the typical user, which doesn't quite sounds commercial-ready to me.
So is there no hope at all?
Fret not, my friend!
If we can't put the Linux into the phone, why don't we put the phone around the Linux? You know... Like a container?
Thanks to EU regulations-
(US consumers, please buy the European versions of your phones! They are sometimes a bit more expensive, but used models of the same generation or one below usually still have warranty, are around the same price as over there in Freedom Valley, and (another side tangent incoming - because of better European consumer protection laws) sometimes have other advantages, such as faster charging and data transfer (USB-C vs lightning ports) or less bloated systems)
- it is made easier now to virtualize Linux on your phone.
You can download a terminal emulator, create a headless Linux VM and get A VNC client running. This comes with a performance limit though, as a app with standard user permissions is containerized inside of Android itself so it can't use the whole hardware.
If you have root access on your phone, you can assign more RAM and CPU to your VM.
Also things like SDL just released a new version so emulation is getting better.
And didn't you hear the news? You can run other things inside a VM on an iPhone now! Yup, and I got Debian with Xfce running on my Xiaomi phone. Didn't do much with it tho. Also Windows XP and playing Sims 1 on mobile. Was fun, but battery draining. Maybe something more for tablets for now.
Things will get interesting now that Google officially is a monopoly. It funds a lot of that stuff.
I really want a Steam Deck.
Steam phones would be cool.
#asks#linux#linuxposting#kde plasma#kde#:3#kde desktop environment#arch linux#windows#microsoft#mobile phones#linux mobile#ubuntu#debian#arch#steam#gabe newell#my lord and savior
17 notes
·
View notes
Text
Okay so I’ve been vibing to this song for a while cuz it’s so ahlasajslajks (and it reminds me of a techno abba song or smth) but I once again poied too close to the sun and now I’m thinking of a pov animatic of The Machine conveying her feelings to Finch (who can’t hear her) about being confused and upset with how he changed his tune and decided to erase her memories and then give her away to people who don’t connect with her and how she’s all lonely (until Root finds her obvi, but it’s about the angsttttt)
#I’m in my sad machine hours guys#the images in my head are all 😭😭😭😭#it’s cages and being just out of reach and longing and parents and children and seeming fine on the outside but being devastated inside#like Jesus Christ if I was an actual artist y’all wouldn’t hear from me for a good month until I finished making smth to this#I love her so much and this song just randomly tapped me back into that side of me idk#also I totally thought this band had called themselves ‘TWeRP’#and I only found out just recently that it’s actually an acronym for ‘TupperWare Remix Party’#💀💀💀#but also the beat is such a crossover between abba’s ‘lay all your love on me’ and ‘SOS’#the vibessss are immaculate#person of interest#poi#the machine#🎶song sings🎶#Spotify
3 notes
·
View notes
Text
Unlock the World Redmi 5A: Detailed instructions for Unlock, Root, TWRP and more!
## unlock the World Redmi 5A: Detailed instructions for unlock, root, TWRP and more! Is your Redmi 5A phone limited? You want to experience advanced features and customize the system as you like? This article will be the key to help you unlock the entire potential of the Redmi 5A, from unlocking bootloader, rooting machine, installing TWRP Recovery to Advanced Flash, Write and BYPASS tips. We…
0 notes
Text
Mastering ADB Fastboot Commands: Why Every Android User Should Know Them

Introduction
For Android enthusiasts, developers, and power users, ADB (Android Debug Bridge) and Fastboot commands are indispensable tools. These command-line utilities allow users to interact with their Android devices beyond the standard user interface. The importance of ADB Fastboot commands lies in their ability to execute advanced tasks like debugging, unlocking the bootloader, flashing firmware, and performing system modifications without requiring full Android access.
Understanding these commands can significantly enhance Android performance, whether for customization, debugging, or troubleshooting. In this guide, we will explore the importance of ADB Fastboot commands, their role in device management, and how they relate to modern Android app development.
What Are ADB and Fastboot Commands?
Before diving into their importance, let’s understand what ADB and Fastboot are:
ADB (Android Debug Bridge): A versatile command-line tool that allows users to communicate with an Android device via a computer. It is mainly used for debugging, installing apps, and transferring files.
Fastboot: A protocol that enables interaction with the Android bootloader. It is crucial for flashing firmware, unlocking bootloaders, and modifying system partitions.
By utilizing these commands, users and developers can take full control of an Android device, unlocking a world of customization and debugging possibilities.
The Role of ADB Fastboot Commands in Android App Development
One of the primary applications of these commands is in Android app development. Developers use ADB to test applications in real-time, debug issues, and push APK files directly to a device. Fastboot, on the other hand, allows developers to modify boot images and test different system configurations.
Key Benefits for Android App Developers:
Quickly install and uninstall apps for testing.
Capture real-time logs to debug application performance.
Modify system settings without accessing the phone’s UI.
Perform compatibility tests on different Android versions.
For any developer looking to enhance their Android app development workflow, mastering ADB Fastboot commands is essential.
Why ADB Fastboot Commands Are Crucial for Android Users
Many Android users prefer customization over stock functionality. Whether you want to root your device, install a custom ROM, or recover data, the importance of ADB Fastboot commands cannot be overstated.
Common Uses of ADB and Fastboot Commands:
Unlocking Bootloaders: Required for installing custom ROMs.
Flashing Custom Recoveries: Install TWRP or other recoveries.
Sideloading Apps & Updates: Install APKs directly from a computer.
Removing Bloatware: Uninstall pre-installed apps.
Performing System-Level Tweaks: Modify system properties for better performance.
By using ADB Fastboot commands efficiently, users can transform an ordinary Android device into a fully customized powerhouse.
Hybrid App Development Services and ADB Fastboot Commands
With the rise of hybrid app development services, ADB commands play a vital role in testing and optimizing cross-platform applications. Hybrid apps run on multiple operating systems, and debugging them across different devices becomes easier with ADB.
How ADB Helps Hybrid Developers:
Enables remote debugging of hybrid applications.
Provides performance monitoring for multi-platform compatibility.
Facilitates UI testing and responsiveness checks across devices.
Speeds up the testing process by eliminating manual installations.
Given the increasing demand for hybrid app development services, developers must leverage ADB for efficient testing and deployment.
Why the Best Android App Development Company Uses ADB Fastboot Commands
Top software development companies rely on ADB Fastboot commands to deliver high-quality applications. The best Android app development company incorporates these tools into their workflows to ensure their apps are bug-free, secure, and optimized for various devices.
Why Do Companies Rely on ADB?
Automated Testing: ADB simplifies automation scripts for app testing.
Device Compatibility: Ensures smooth performance across different Android devices.
Data Analysis: Provides real-time device logs for performance improvement.
System Optimization: Assists in removing unnecessary system apps and processes.
If you’re looking for the best Android app development company, ensure they utilize ADB Fastboot commands in their development and testing phases.
Mobile App Development and System Optimization Using ADB Fastboot Commands
The influence of ADB Fastboot commands extends beyond developers—it plays a crucial role in overall mobile app development. Whether a user needs to optimize performance, install a new ROM, or debug an issue, these commands provide the flexibility needed to manage devices effectively.
Impact on Mobile App Development:
Enhances device security by identifying vulnerabilities.
Facilitates seamless application testing on various screen sizes.
Helps in modifying system permissions for better resource management.
Improves battery life by detecting background processes draining power.
By integrating ADB Fastboot commands into mobile app development, both users and developers can maintain better control over their Android devices.
How to Use ADB Fastboot Commands Safely
While these commands provide immense power, they should be used responsibly. Incorrect commands can lead to data loss or even bricking your device.
Best Practices for Safe Usage:
Backup Your Data: Always keep a full backup before making system modifications.
Enable Developer Options: Allow USB debugging and OEM unlocking before using ADB or Fastboot.
Use Verified Commands: Double-check commands to avoid unintended system changes.
Keep Drivers Updated: Ensure your computer has the latest ADB and Fastboot drivers installed.
Follow Documentation: Read Android’s official documentation for a better understanding.
Following these safety guidelines ensures that you maximize the importance of ADB Fastboot commands without risking your device.
Conclusion
The importance of ADB Fastboot commands in the Android ecosystem is undeniable. Whether for Android app development, system customization, or troubleshooting, these commands offer unmatched control over Android devices. They empower developers, enthusiasts, and even businesses involved in hybrid app development services and mobile app development.
By mastering these commands, users can unlock new possibilities, enhance device performance, and explore limitless customization. If you’re serious about Android, understanding ADB Fastboot commands is a must. Start using them today and take full control of your Android experience!
0 notes
Text
طريقة عمل Root لجميع هواتف شاومي باستخدام أدوات Magisk و TWRP
الدليل الشامل لعمل Root لجميع هواتف شاومي باستخدام أدوات Magisk و TWRP 📱🔧 هل ترغب في تخصيص جهازك شاومي بشكل كامل؟ إذا كنت من محبي التح... https://www.soft-mohtarif.com/2025/02/root-xiaomi.html
0 notes
Text
Hướng dẫn chi tiết cách root máy Xiaomi một cách an toàn và hiệu quả.
Root máy Xiaomi mang lại nhiều lợi ích như tùy biến cao hơn, tăng cường hiệu suất và khả năng cài đặt các ứng dụng không có trên cửa hàng chính thức.
Để root máy, bạn cần thực hiện một số bước cơ bản.
Đầu tiên, hãy mở khóa bootloader bằng cách truy cập vào trang web của Xiaomi và làm theo hướng dẫn.
Sau đó, tải về và cài đặt phần mềm TWRP (Team Win Recovery Project) để thay thế recovery gốc.
Cuối cùng, sử dụng ứng dụng Magisk để cài đặt quyền root.
Lưu ý rằng việc root có thể làm mất bảo hành và có nguy cơ gây hỏng hóc thiết bị.
Hãy chắc chắn sao lưu dữ liệu quan trọng trước khi thực hiện!
0 notes
Text
Rooting an Android device (commonly referred to as "jailbreaking" on iPhones) is essentially gaining full control over the operating system, including system files, settings, and functions that are otherwise restricted by default. You're right that Android is based on the Linux kernel, but it’s highly customized by Google and device manufacturers, so it’s not the same as a typical Linux distribution you'd find on a desktop. Here's a step-by-step guide on how to root an Android and get shell access, but first, a couple of notes:
Important considerations:
Rooting voids warranties: Rooting will void your device warranty, and it may even brick (render unusable) the device if not done properly.
Security risks: Once rooted, your device becomes more vulnerable to malware and hacking if precautions aren't taken.
Backup data: Rooting could erase all data on your device, so it’s important to back everything up beforehand.
Steps to Root Your Android and Access the Shell
1. Check the Bootloader Status:
The bootloader is what controls what software runs when the device is powered on. Most Android devices have a locked bootloader by default.
Some manufacturers provide a way to unlock the bootloader officially (Google, OnePlus), while others do not (Samsung in the U.S.). Check if your phone has an official way to unlock it. You might need to enable developer options on your device.
Go to Settings → About phone and tap Build number seven times. This unlocks Developer options.
Go to Settings → Developer options and enable OEM unlocking and USB debugging.
2. Unlock the Bootloader:
With OEM unlocking enabled, you can now unlock the bootloader using your computer:
Connect your phone to your computer.
Install ADB and Fastboot on your computer (these tools are part of the Android SDK).
Open a terminal on your PC and run:bashCopy codeadb devices adb reboot bootloader fastboot oem unlock
Your device will prompt you with a confirmation. Use the volume buttons to navigate and the power button to confirm.
Note: Unlocking the bootloader will likely erase all data on your device.
3. Find a Suitable Rooting Method:
Rooting methods depend on your device’s manufacturer and version of Android.
Here are some popular options:
Magisk (most recommended): It allows you to gain root access without modifying the system partition. It also passes Google's SafetyNet checks, which means you can still use apps like Google Pay and Netflix. You'll need a custom recovery to flash Magisk.
SuperSU: An older method that directly modifies system files. It's less safe and can break OTA updates and certain apps.
Flashing Magisk (if you go with Magisk):
Download the Magisk zip file to your phone from Magisk GitHub.
Boot into your custom recovery (like TWRP) using ADB:bashCopy codeadb reboot recovery
In TWRP, go to the Install section and flash the Magisk ZIP file.
Reboot your phone.
4. Install a Terminal Emulator:
Once rooted, you can install a terminal emulator from the Google Play Store (e.g., Termux or Terminal Emulator for Android).
These apps give you direct shell access on the device. Since Android is Linux-based, many typical Linux commands will work out of the box (e.g., ls, cd, cat, etc.).
5. Access the Shell via ADB:
You can also connect to your Android's shell from your computer using ADB:
Open a terminal on your computer:bashCopy codeadb shell
This will give you a shell directly on the device. If you’ve rooted the phone, you can also get root access within the shell:bashCopy codesu
This will elevate your privileges to superuser (root).
Are All Androids Just Linux?
In essence, yes, Android is based on Linux, but it is heavily modified and optimized for mobile devices. Here’s how they compare:
Kernel: Android runs on the Linux kernel, which handles hardware communication, process management, and memory management. But the rest of the operating system is built differently from traditional desktop Linux.
Userland: Android does not use the GNU C Library (glibc) or GNU core utilities by default, which are standard on Linux distributions like Ubuntu. Instead, Android uses Bionic, a lightweight C library designed for mobile use.
File Structure: While Android’s filesystem is similar to Linux’s (you'll see directories like /system, /data, /proc), it is organized differently to support mobile devices and the Android app structure.
Security: Android uses additional security measures like SELinux and a permission-based app model that separates apps from each other and restricts access to system components.
Next Steps for Using Your Android as a "Gizmo"
Once rooted and you have shell access, there are countless projects you could try, such as:
Turning your Android into a Raspberry Pi-like development platform for IoT.
Using it as a network monitoring tool or personal server (with apps like Kali Nethunter).
Repurposing it as a dedicated media player or smart home controller.
If you’re looking to customize and expand the functionality even more, consider looking into custom ROMs (like LineageOS) or building Linux distros specifically for Android devices, like PostmarketOS.
0 notes
Text
How to Root Huawei Nova 7i with Magisk without TWRP
Today's tutorial is focused on teaching you the process to root Nova 7i, specifically the Huawei Nova 7i, using Magisk patched boot.img. Despite the fact that devices from this Original Equipment Manufacturer (OEM) often lack support in custom development, they have carved out their own unique niche. Recently, there's been a steady increase in their popularity, particularly among tech experts. Learn how to root Huawei Nova 7i and join this growing community of tech enthusiasts. Read More - Does Rooting or Unlocking Void Your Android Phone Warranty However, there is a prerequisite you need to complete before you root Huawei Nova 7i. That is an unlocked bootloader. Once you have that you can try various types of mods, which can flash custom recoveries like TWRP or custom ROMs such as LineageOS. Moreover, you can gain administrator privileges! Read More - 30 Amazing Things You Can Do After Rooting Your Android Why are we waiting? Let's get into business.
Table of Contents
Understanding the Concept of Rooting Understanding the Pros and Cons of Rooting Your Nova 7iThe Advantages of Rooting Huawei Nova 7i The Drawbacks of Rooting Nova 7i How to Root Huawei Nova 7i using Magisk Patched Boot.img Conclusion Frequently Asked Questions (FAQ)I unrooted the Huawei Nova 7i but still, the app says my mobile is rooted. Huawei Nova 7i got stuck at boot after uninstalling Magisk from the app Magisk keeps uninstalling Unable to repack boot image Magisk ERROR when installing OTA Update fails after using Magisk Root MagiskHide or SafetyNet fails after an update Magisk isn't working Invalid image: not signed Process error Can't install from the Magisk app I can't root Huawei Nova 7i with Magisk Is there any specific version of Magisk required to root Nova 7i?
Understanding the Concept of Rooting
Rooting is a process that grants users privileged control over their Android devices - think of it as obtaining a VIP pass to your device's backstage. When you root Huawei Nova 7i, you gain the ability to customize beyond standard limitations. Rooting allows you to uninstall unwanted apps, block ads, and enhance the device's performance. However, it's a double-edged sword—it can also void warranties and expose your device to potential security threats. In the case of the Nova 7i, rooting can unlock a new level of customization potential. But remember, with great power comes great responsibility. Now, let's delve into how to root the Huawei Nova 7i responsibly and effectively.
Understanding the Pros and Cons of Rooting Your Nova 7i

In the realm of smartphone customization, one term frequently surfaces - to root or not to root? Particularly, when speaking about the Huawei Nova 7i, the question becomes more specific: should you root Nova 7i? To answer this, we must first explore the inherent pros and cons of rooting. The Advantages of Rooting Huawei Nova 7i Unlimited Customization: One of the most compelling reasons to root Huawei Nova 7i is the boundless customization options it opens up. You can change almost anything about your device, from its user interface to the operating system itself. Enhanced Performance: Rooting your device can enhance its performance by allowing you to overclock or underclock your processor, according to your usage. Access to Root-Only Apps: Certain applications require root access to function. By rooting your Nova 7i, you unlock a whole new world of possibilities with these root-only apps. The Drawbacks of Rooting Nova 7i Voided Warranty: The most significant disadvantage of rooting is that it voids your device's warranty. Huawei will not cover any damages or issues that occur after you root your Nova 7i. Potential Bricking: The rooting process carries the risk of "bricking" your device, making it as useful as a brick if something goes wrong. It is absolutely essential to understand the process of how to root Huawei Nova 7i before proceeding. Security Risks: Rooting your device can open up potential security risks, as root-level access can also be exploited by malicious apps or hackers. Your decision to root Nova 7i should be made after careful consideration of these pros and cons. If the advantages outweigh the drawbacks for you and you're comfortable with the risks involved, rooting your device can unlock a new level of customization and control.
How to Root Huawei Nova 7i using Magisk Patched Boot.img
To simplify the instructions I have listed them under separate sections. The only thing you have to do is to follow the exact steps without skipping a single one. And please keep in mind that won't take responsibility if anything happens to your phone and its data. Read More - The First 10 Things to Do After Rooting Your Device Step 1 : Install Android SDK

Firstly you need to install the Android SDK Platform Tools on your PC. As some of you are already aware this is the recommended official ADB and Fastboot binary given by Google. Just download it and extract it to any convenient location on your PC. Then you will have the platform-tools folder, which is essential for the process to root Huawei Nova 7i. Step 2: Enable USB Debugging and OEM Unlocking on Huawei Nova 7i Then you should enable USB Debugging and OEM Unlocking on your Huawei Nova 7i. By unlocking OEM, you will be able to make your phone discoverable by the PC in ADB mode. And then allowing you to boot your device to Fastboot Mode. Here's how you can do that. : Enable USB Debugging and OEM Unlocking Step 3: Unlock the Huawei Nova 7i Bootloader

As the third step, you need to unlock the bootloader of the phone. Don't ever forget that unlocking will wipe all the device data. So, perform a complete backup beforehand and then refer to our guide on How to Unlock the Bootloader on Huawei Nova 7i. Unlock the Bootloader on Huawei nova 7i Step 4: Extract Boot.img from Huawei Nova 7i Firmware Then you have to download the firmware for your Huawei Nova 7i. You have to download the same version that is currently installed on your device. After downloading, extract the file to a suitable location on your PC. Now go to the extracted Firmware folder and see whether you can see the boot.img file. Just transfer this file to your phone and follow me.

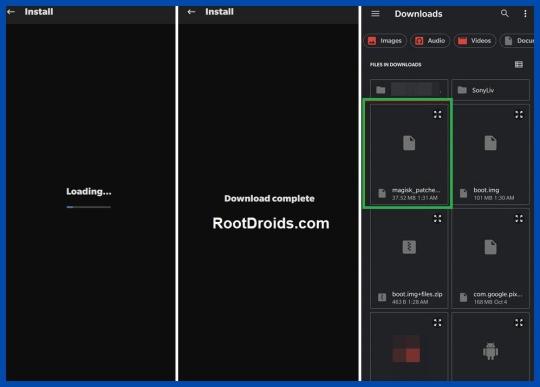
Still Can't find boot.img or Don't know how to find it? How to Extract Boot.img from Huawei nova 7i Step 5 : Patch Stock Boot.img via Magisk - Firstly install the Magisk app on your phone. Read More: Everything about Magisk - And confirm whether the boot.img has been transferred to the device. - Now tap on the Install button. (see below image) - In the Options menu, enable both the Preserve Force Encryption and Recovery Mode options. - Then tap Next. - You will be navigated to the Method selection screen. Now choose Select and Patch a file.

- As the next step, browse to the extracted boot.img file and select it. - Tap on the Let's Go button and Magisk will now load the boot.img file and start patching. - You will see a message saying Download Complete once the patching is done. - Then the patched boot image file will be saved as magisk_patched.img in Internal Storage > Downloads. - You can rename the file by deleting the random numbers at the end of the name. So the file will be named as magisk_patched.img. - Finally, transfer the file to the internal storage of your device for future use.
Step 6 : Boot to Fastboot Mode on Huawei Nova 7i - Enable USB Debugging and connect your device to the PC using a USB cable. - Now go to the platform-tools folder, type CMD in the address bar and press Enter. or Search CMD and open it. after that, navigate to the platform-tools folder - That will launch the Command Prompt.

- Then type the following command in the CMD window to boot your device to Fast boot mode. adb reboot bootloader To verify the connection, type in the below command. You should get the device ID followed by the Fastboot keyword. if you get a reply from the command prompt, it means, the connection has been successfully established. fastboot devices Disable DM Verity: Only if you have a problem with performing step 7. Step 7 Flash Magisk Patched Boot.img and Root Huawei nova 7i - First transfer the magisk_patched.img file to the platform-tools folder. - Then type the following command in the CMD window to flash the Magisk Patched file. fastboot flash boot magisk_patched.img - Finally, enter the following command to reboot your device to the OEM. fastboot reboot Now, you have successfully rooted your Huawei Nova 7i device.
Conclusion
In conclusion, learning how to root Nova 7i can immensely enhance your user experience. This process of rooting Huawei Nova 7i gives you more control over your device, allowing you to customize and optimize it according to your preferences. However, always remember that while it provides numerous benefits, it also comes with its risks. Therefore, make sure you have a clear understanding of what you're doing and why before you proceed to root Huawei Nova 7i. If done correctly, you'll be able to unlock the full potential of your Huawei Nova 7i and experience a whole new level of smartphone usage.
Frequently Asked Questions (FAQ)
I unrooted the Huawei Nova 7i but still, the app says my mobile is rooted.
Q: I completely unrooted my mobile a few days back. But still, many apps say that the device is rooted. Thereafter I rooted my device using Magisk HIDE. Please help me! A: If your bootloader is unlocked, they will report your device as a rooted device. According to your description, Magisk Hide alone has failed to do the job. I suggest you try the "Repackage Magisk Manager" option in the Magisk Manager settings. It worked for me. Huawei Nova 7i got stuck at boot after uninstalling Magisk from the app Q: I installed Magisk via TWRP(Temp version) and installed some modules. Thereafter, I decided to uninstall Magisk using the Magisk Manager APK. Then the phone rebooted and stuck into the phone logo with the red danger logo. I tried flashing Magisk again via Temp TWRP, but now a few apps keep crashing. I tried uninstalling and reinstalling them. But couldn't fix it. Can you help me? A: If your phone is stuck in the boot loop or apps still crashing, then you have to wipe the Dalvik cache again. If you still need to unroot for whatever reason you can try this: - Update Magisk first and then click uninstall from Magisk Manager. - manually flash uninstaller.zip from TWRP. - flash the uninstaller as a module as stated in this post. - Finally, if it's still no use, then you can factory reset the device to remove the root. Magisk keeps uninstalling
Q: During the past 4 days I had to re-install Magisk 16.3 at least 4 times a day. Because it keeps uninstalling itself. I have previously experienced this issue with Magisk, but it has gotten worse instead of being solved. A: After uninstalling, you can try flashing the stock boot image from your ROM/firmware package/factory image. Unable to repack boot image Q: I tried to install MAGISK v16.O using MAGISK installer. But there is a message saying, Installation failed with (! Unable to repack boot image! Failed! ! Installation failed). What can I do to get rid of this? A: Just try uninstalling v15.3 first and then install v16.0 clean. Magisk ERROR when installing Q: I got this error when installing Magisk using TWRP. What am I supposed to do now? Updater process ended with ERROR:1 Error installing zip file '/sdcard/MagiskManager/Magisk-v13.3.zip' A: I advise you to use the magisk_uninstaller.zip first. From what I saw in your log, your boot. img is already patched by something else. Therefore, you need to install Magisk on your stock boot.img. OTA Update fails after using Magisk Root - To start you need to fully restore to stock and erase user data. (basically, the same as starting with a brand new phone). - Then, flash Magisk (I used the image provided on the thread about Magisk) fastboot flash boot magisk_patched.img. - Boot to Android. - Next, install Magisk Manager. - Verify root works. - Now, reboot to bootloader, and flash the default boot.img: fastboot flash boot boot.img. - Next, reboot to Android. - Finally, apply the OTA update. MagiskHide or SafetyNet fails after an update If MagiskHide or SafetyNet starts failing after an update to either Magisk, the app, or both you can fix it by toggling MagiskHide off and on (also see ”Test MagiskHide”). Magisk isn't working If you can boot up, but Magisk isn't working as expected (not detecting the Magisk installation, loss of root, etc), there are a few troubleshooting steps you can try. - First, Reboot. Sometimes this helps Magisk to mount everything as it should. - Try removing any installed modules. So that you can see if it's a faulty module causing issues. - If that seems to fix it, just install the modules one at a time to find which one causes issues. - If nothing else works, try starting from the very beginning with a new installation. - check here: "Asking for help/reporting bugs". Invalid image: not signed If you see a message in the install log, indicating "Invalid image: not signed", that means your boot image is not signed. Don't panic! It’s perfectly normal and nothing to worry about. Process error A "process error" when installing Magisk is usually caused when the app doesn't have storage permission. So you can fix it by clearing app data. Can't install from the Magisk app When attempting to install/update either the app or Magisk in the Magisk app v8+, some users experience that nothing happens. Usually, this is caused by having a custom hosts file, or similar, that is blocking the CDN used by the Magisk app (JSDelivr). The solution is to whitelist that particular URL. I can't root Huawei Nova 7i with Magisk If you are naive to rooting, you are at the right place. How about the people who are experienced in rooting? We are here to provide you a root solution to every feature you were wishing for. Please go to the top of the website and try the step-by-step guide again. Read More: Everything about Magisk Is there any specific version of Magisk required to root Nova 7i? To root your Huawei Nova 7i, you don't necessarily need a specific version of Magisk. However, it's always recommended to use the latest version of the Magisk app. The reason behind this is that the most recent version will have the most recent patches and updates, ensuring a smoother and more successful rooting process. It's also more likely to be compatible with the latest OS and system updates on your Nova 7i. Before starting the rooting process, make sure to double-check the Magisk version and update it if necessary. Do you think this guide on How to Root Huawei Nova 7i Device using Magisk Patched Boot.img is helpful? If so, please share this article on Facebook, LinkedIn, etc. And we warmly welcome your queries, comments, and suggestions. Feel free to contact us. You can join our community and open a help Topic under Android. It's Read the full article
0 notes
Text
youtube

Intro
Handphone spare part,Accessories&Repair specialist apple-ipad ipod iphone blackberry samsung nokia

03-2697 8868
-Wap In Teleshop G88 Pertama Complex,Jalan Tuanku Abdul Rahman,50100 Kl Operating Hour: 10.30am - 7.00pm Office No : 03-26975868 Whatsapp : 0122369916


0 notes
Text


Lord Phobos stimboard
x x x / x x x / x x x
#not having one for each member was starting to bother me so here is one for phobos#I'll try to have one for meouch done soon but its getting kind of late#we will see how it goes /lh#tried to show phobos' noble roots in this#he is a lord yea? /hj /rt#lord phobos#twrp#lord phobos stimboard#suavestims
31 notes
·
View notes
Text
Potential unlock: TWRP 3.2.1 and root for Huawei P9 Lite (VNS-L21)
## Potential unlock: TWRP 3.2.1 and root for Huawei P9 Lite (VNS-L21) You own the Huawei P9 Lite (VNS-L21) and want to discover its potential capabilities? You want to customize the system, set custom ROM, or simply have access to root to manage equipment more effectively? This article will guide you step by step installing TWRP 3.2.1 – a strong recovery tool – and root your Huawei P9 Lite. I.…
0 notes
Text
if this post gets 5 likes i will sexualize that old man (draw vicar max shirtless)
#cro zone#decided to give up on rooting my tablet for now#ill just wait til the twrp version gets released
2 notes
·
View notes
Text
Learn step by step how to install twrp Recovery on Redmi Note 8 Pro. And a brief guide to Root Redmi note 8 pro device.
1 note
·
View note
Text
How to use twrp app without root

#How to use twrp app without root install#
#How to use twrp app without root drivers#
#How to use twrp app without root update#
#How to use twrp app without root android#
#How to use twrp app without root series#
#How to use twrp app without root android#
Albeit not present upon its Android theme for any variation, you may attempt to toggle the fonts without that much trouble. There are several reasons why you would want to alter the fonts: readability, marketing of the business, distinctive look, etc. From both the look or sound, through convenience and strength, anyone can adjust the interface landscape.
#How to use twrp app without root install#
Root and Install TWRP Recovery on Galaxy Tab 3 7.Among the most flexible smartphone ecosystems you’ll probably have is Android. Just to verify that your tab has proper root access, verify it with the Root Checker app from the Google Play Store: If it is present, your device has been rooted successfully. When your Galaxy Tab 3 7.0 boots up, open the app drawer and look for the SuperUser app there. Finally, its time to reboot your device by selecting Reboot> System option.Then slide the confirmation slider button to flash SuperSU on your Galaxy Tab 3.Tap the Install button, navigate to UPDATE-SuperSU.zip file and select it.Now boot your Tab 3 into Recovery Mode: press and hold the Volume Up + Home + Power buttons together till the screen turns up you see the Samsung logo, and then release the Power button but keep the Volume and Home buttons pressed until you see the TWRP menu.Now turn off your tab by pressing and holding the Power button.When the installation is finished, you will see PASS! message on Odin.Then click the Start button to start TWRP installation.click the AP button and add T210.TWRP.2.8.0.0.tar.md5 to the field.Now uncheck Auto Reboot option on Odin.You’ll see “Added!!” on the Odin message box.Use the original cable provided by Samsung to avoid errors. Now connect your tab to your computer via USB cable.When the warning screen with yellow exclamation sign appears, press the Volume Up key to enter the Download Mode. Turn off your tab and boot it into the Download mode by pressing the Volume Down + Home + Power buttons at the same time for 2-3 seconds.Copy UPDATE-SuperSU.zip file to your device.Install TWRP & Root Galaxy Tab 3 7.0 SM-T210 / T210R Backup your apps and data as a precaution.Enable USB debugging on your Galaxy Tab 3 (see instructions here).
#How to use twrp app without root drivers#
Install Samsung USB Drivers on your computer if you do not have it already.
Download the latest SuperSU zip and copy the file to your device: UPDATE-SuperSU.zip.
Download Odin 3.09 and unzip the downloaded file: Odin_v3.09.zip.
Download the TWRP image file (it’s same for SM-T210 and SM-T210R both): T210.TWRP.3.0.5.
However, if you a new to such things, do not miss any of the preparatory steps described below: Well, there is nothing new in here are most things are the same as you do while using Odin. Getting Preparedīefore we proceed to gain root on the Galaxy Tab 3 7.0 SM-T210 and SM-T210R, there are a few things to be taken care of. We have successfully tested the method for rooting and installing TWRP recovery on the Galaxy Tab 3 7.0 SM-T210 and SM-T210R both (thanks to Javez and Polaris Star for testing!) However, before you make your mind to follow or tutorial, you must know that rooting your device will void its warranty and put it at risk. And thus we can now not only root Galaxy Tab 3 7.0 SM-T210 and SM-T210R but also install TWRP recovery to enjoy custom ROMs and mods. The unavailability of a KitKat compatible custom recovery made it impossible to flash the latest SuperSU to gain root access on the device running Android 4.4.2.įortunately, we now have an unofficial build of TWRP Recovery that is compatible with the new KitKat bootloader. Since the old root method that worked on Android 4.2.2 Jelly Bean firmware stopped working on Android 4.4.2, the users of the Galaxy Tab 3 7.0 SM-T210 and SM-T210R were forced to wait for a working root method. Whether you have updated your Tab via OTA or manually through Odin, you must have lost root access on your device.Īs you know, if you have got used to enjoying the privilege of owning a rooted Android device once, it really feels bad to go a single day without root access.
#How to use twrp app without root update#
If you have not yet received the the new Android 4.4.2 update notification yet, you can update your device manually by following our step-by-step tutorial. The KitKat update for the Galaxy Tab 3 7.0 SM-T210 and SM-T210R brings a plethora of new features and enhancements for better performance. The device was released with Android 4.2.2 Jelly Bean out of the box and it has been just less than a month when Samsung started to roll out the long-awaited Android 4.4.2 KitKat update. This mid-sized tablet sports a 7″ display (600 x 1024 px), Dual-core 1.2 GHz CPU, 1GB RAM, 3.15MP primary and 1.3MP secondary camera, and a powerful 4000mAh battery.
#How to use twrp app without root series#
The Galaxy Tab 3 7.0 belongs to the third generation of Samsung’s tablet series in 7-inch category.
0 notes