#Toon boom vs adobe animate
Text
Toon boom vs adobe animate
#Toon boom vs adobe animate full#
#Toon boom vs adobe animate software#
#Toon boom vs adobe animate professional#
#Toon boom vs adobe animate tv#
#Toon boom vs adobe animate free#
#Toon boom vs adobe animate software#
Some animation software does not have drawing tools, and that is completely fine if you're working with assets from a third party.īut if you have to make your own assets, you're going to need drawing tools, and you'll need lots of them! If you're inexperienced with animation or need a hasty animation process, this is definitely something to look out for.
#Toon boom vs adobe animate free#
Templates make it easier for you to get started animating with pre-created characters, backgrounds, and assets free to use. If you're not an experienced animator, preloaded templates can be a gift sent from god. We have listed a few features that you should consider in your animation software, depending on your needs! Preloaded templates You should look out for the specific features that tend to your needs. Features to look out for in animation software?Įvery animation software is different, and no animation software can be considered the all-in-one perfect software. Once you get the hang of it, you have a fast animation process.
#Toon boom vs adobe animate professional#
Purpose: Great for creating professional 2D animations with 3D features. Skill level: Intermediate / Professionals
Fast animations (once you get the hang of it).
Gizmo Face Key editing tool for facial features.
360 Head creator for easy angle shifting.
Purpose: Synfig Studio is great for creating professional-grade animations, especially for making cutout animations.
Advanced layering system with over 50 layers.
Purpose: Procreate is the best animation software you will find on an iPad, and it is great for beginners and professionals alike. Skill level: Beginner / Intermediate / Professionals Purpose: CelAction2D is great for professional animators, and its Studio version has nice production workflow features. Price: $409 one-time-fee Animator edition / $745 one-time-fee for Professional edition / $895 per year for Studio edition.
Export both animations and still images.
Real-time animation preview in the software.
Advanced syncing technology for multiple scenes.
Whether it's short films, feature films, or videos. Purpose: The software is great for professionally made animations.
Not as many tools and features as competitors.
#Toon boom vs adobe animate tv#
Used for TV shows like The Simpsons and Rick and Morty. You can easily implement 3D elements to your 2D characters if needed. Purpose: It's great for animated 2D tv-shows and all types of 2D animations. Price: $25/month to $115/month, depending on the version.
Integration with other graphical software like Photoshop.
Advanced palettes, vector & bitmap drawing, and painting tools.
Implement 3D animations to 2D elements.
It has a great keymapping feature that makes it easy to make any type of 3D animation. Purpose: Cinema4D is great for beginners and professionals alike as it offers a large array of tools and features.
Powerslider with great keyframing feature.
It's also a good software for aspiring animators because it's free. Purpose: Blender is great for any professional animation project.
Amazing brush selection for creating realistic animations.
People use it to create assets for films, tv-shows, and games. Purpose: Autodesk Maya, or just Maya, is a great animation software for creating 3D animations.
With Bifrost, you can create incredibly realistic environments.
XGen grooming feature allows you to create layers of fur and hair.
There are plenty of features to make animations for teaching purposes. Purpose: Powtoon is great to use for both marketers and educators alike. Price: Free plan with limited features / Paid plan $19/month
Large projects can become a slow process.
Advanced control of the animation and customization of characters.
With free-to-use assets, it is great for small freelance or marketing projects. Purpose: VistaCreate is easy to get into.
#Toon boom vs adobe animate full#
Price: Free Version with some of the features / Paid version with full features for $10/month.
Good for many marketing formats (social media, presentations, and so on).
Purpose: The Adobe Animate is great for animating 2D, but it is mainly used by beginners or hobbyists.
Asset coding and design all in one software.
Vector brushes that are great for creating 2D vector graphics.
Adobe Animate virtual camera makes it easier to make great camera movements.
This will give you an idea of structuring a frame and story. If you're new to the world of visual creative projects and storytelling, consider reading our article on the basics of filmmaking. In this way, it should be easier for you to decide on what animation software fits your needs! We have gathered the 12 best animation software on the market and their strengths and weaknesses. Have you considered starting your animation journey but just found it too hard to find the best animation software for you? Then look no further!
0 notes
Note
Do you mind if I ask what program you're using for your animations? It's very clean! Asking as an unprofessional animator whos constantly having their ear to the ground about animation programs. :)
I don't mind at all! I mostly use Clip Studio Paint Ex to animate. Sometimes, I'll jump to Toon Boom Harmony if I'm doing a group or collaborative projects.
"Shard vs Metal" is being animated in Adobe Animate because that where I started it years ago.
CSP my favorite, TBH is great but sometimes more involving, and Animate is fine but... Adobe 😅
10 notes
·
View notes
Text
The Evolution of Lines: Traditional vs. Vector Animation

In the captivating world of animation, lines are more than mere strokes on paper—they breathe life into characters, convey emotions, and shape entire universes. As technology advances, so does the way we create these lines. In this exploration of 2D animation, we’ll compare the traditional hand-drawn approach with the modern vector-based technique. Join us as we trace the evolution of lines in animation.
1. Traditional Animation: Pencil, Paper, and Magic
1.1 The Birth of Classic Animation
Traditional animation, also known as cel animation, has a rich history. It emerged in the early 20th century, with pioneers like Walt Disney and Ub Iwerks leading the way. Animators painstakingly drew each frame by hand, creating fluid motion through a sequence of images. The iconic Disney princesses and Looney Tunes characters owe their existence to this method.
1.2 The Art of Inbetweening
Inbetweening, or “tweening,” bridges the gap between keyframes. Animators add intermediate frames to ensure smooth transitions. Imagine Mickey Mouse’s arm extending to grab a falling apple—each in-between frame contributes to the illusion of movement.
2. Vector Animation: Precision and Flexibility
2.1 Enter the Digital Age
Vector animation revolutionized the industry. Instead of paper, animators work with digital tools like Adobe Animate (formerly Flash). Here’s why vector animation shines:
Scalability: Vector graphics use mathematical equations, allowing them to scale infinitely without losing quality. Whether it’s a tiny icon or a billboard-sized character, vectors adapt seamlessly.
Efficiency: No need to redraw every frame. Animators manipulate symbols and paths, saving time and effort.
Interactivity: Vector animations power web graphics, interactive apps, and explainer videos. Think of those delightful loading animations or animated icons on your favorite website.
2.2 Rigging and Bones
In vector animation, characters are rigged—think of it as creating a digital puppet. Bones (not spooky ones!) define joints and movement ranges. Animators pose the character by adjusting these virtual bones. It’s like stop-motion animation, but in the digital realm.
3. The Aesthetics: Handcrafted vs. Clean Lines
3.1 Traditional Charm
Traditional animation exudes warmth. The imperfections—the slight wobble of a line, the texture of paper—are endearing. Remember the scratchy lines in old-school Disney films? They’re part of the magic.
3.2 The Sleek Vector Look
Vector animation boasts precision. Lines are crisp, colors pop, and gradients blend seamlessly. It’s the aesthetic of modern cartoons, from “Adventure Time” to “Rick and Morty.”
4. Choosing Your Path: Learning 2D Animation
4.1 Traditional Courses
If you’re drawn to the romance of pencil-on-paper animation, explore traditional courses. Institutions like CalArts and the National Film and Television School offer hands-on programs that honor the classics.
4.2 Embracing Technology
For those intrigued by vectors and digital tools, consider courses on Adobe Animate or Toon Boom Harmony. Master the art of rigging, keyframing, and creating captivating vector animations.
Conclusion
As frames dance to the beat, soundtracks weave the invisible threads that connect animation to our hearts. Next time you watch your favorite 2D film, pay attention to the music—it’s the secret ingredient that makes the magic come alive.
Enroll in our 2D Animation course in Pune and embark on a creative journey into the world of animated storytelling
0 notes
Text
Animation Software Overview: Bringing Your Visions to Life
Imagine breathing life into a sketch, or crafting a world so believable you can practically step into it. That's the magic of animation software, a powerful toolbox for creating everything from whimsical cartoons to mind-blowing special effects.
Whether you're a seasoned animator or a curious beginner, this guide will delve into the exciting world of animation software. We'll explore different animation styles, popular programs, and the key features that'll help you turn your ideas into moving masterpieces.
The Animation Playground: 2D vs 3D
Animation software comes in two main flavors: 2D and 3D. Think of 2D animation as the classic hand-drawn style, where characters and backgrounds come alive frame by frame. Think Disney classics or those awesome explainer videos you see online.
3D animation, on the other hand, lets you create stunning, realistic imagery. This is the realm of blockbuster movies, video games, and those jaw-dropping product demos. Here, you build 3D models and manipulate them in virtual worlds.
Choosing Your Weapon: Popular Animation Software
The software you choose depends on your animation style and budget. Here are some heavy hitters to consider:
2D Animation:
Adobe Animate (formerly Flash): An industry standard, Animate lets you create vector graphics and traditional-looking animations. Great for beginners and pros alike.
Toon Boom Harmony: Beloved for its intuitive interface and powerful tools for character animation, Harmony is a favorite among professional 2D animators.
3D Animation:
Blender: The king of open-source 3D animation, Blender boasts a massive feature set for modeling, rigging, and animation. It has a steeper learning curve, but the rewards are vast (and free!).
Autodesk Maya: A professional-grade software used in major studios, Maya offers unparalleled control over 3D characters, environments, and effects.
Beyond the Basics: Essential Features
Animation software goes way beyond just drawing pictures. Here are some key features you'll encounter:
Timeline & Keyframing: Imagine a filmstrip where you set key poses for your characters or objects at specific points. The software fills in the gaps, creating smooth animation.
Rigging: This is the magic that brings 3D models to life. Rigging involves creating a digital skeleton that allows you to pose and animate your characters.
Special Effects: From fire and explosions to smoke and weather, animation software lets you add all the glitz and glam to your animations.
Getting Started with Animation Software
The world of animation is vast and exciting, but don't be intimidated! Here are some tips to kickstart your journey:
Free Trials: Most software offers free trials, so you can experiment and see what works for you.
Tutorials & Online Resources: There's a wealth of free tutorials and online courses available to teach you the basics and advanced techniques.
Start Small: Don't try to create a Pixar movie right away. Begin with simple animations to get a feel for the software and build your skills gradually.
Animation software is more than just a program; it's a gateway to express your creativity and bring your visions to life. So, dive in, experiment, and get ready to be amazed by what you can create!
1 note
·
View note
Text
Best Animation Campus in Sonipat.
https://picklesanimation.in/sonipat/
Here's a comprehensive course outline for an Animation course offered by Pickles Animation, branded as the "Best Animation Campus." This course is designed to cover the fundamental principles, technical skills, and creative techniques needed for both 2D and 3D animation, catering to beginners and advanced learners.
Course Outline for Best Animation Campus
Module 1: Introduction to Animation
Overview of Animation
History and evolution of animation
Different types of animation (2D, 3D, stop-motion, etc.)
The role of an animator in various industries
Basic Principles of Animation
Understanding the 12 principles of animation (squash and stretch, anticipation, timing, etc.)
Keyframing and in-betweens
Understanding animation timing and spacing
Module 2: Drawing and Design Fundamentals
Basic Drawing Skills
Drawing shapes and forms
Anatomy and figure drawing
Character design principles
Digital Drawing Tools
Introduction to digital drawing tablets
Using software like Adobe Photoshop and Illustrator
Creating and managing layers
Module 3: 2D Animation Techniques
Traditional Animation Techniques
Understanding keyframes and in-betweens
Timing charts and exposure sheets
Flipbook animation basics
Digital 2D Animation Software
Introduction to Adobe Animate
Using Toon Boom Harmony
Exploring other animation software (e.g., TVPaint, Moho)
Animating in Software
Creating keyframes and tweens
Working with symbols and libraries
Using onion skinning and other animation aids
Module 4: 3D Animation Techniques
Introduction to 3D Animation
Understanding 3D space and coordinates
Basic navigation and tools in 3D software (e.g., Autodesk Maya, Blender)
Creating simple 3D objects
Modeling Techniques
Polygonal modeling
NURBS and subdivision surfaces
Character and environment modeling
Rigging and Skinning
Basics of rigging and skeletal structures
Creating bones and joints
Binding characters to rigs (skinning)
3D Animation Workflow
Keyframing in 3D
Using the graph editor
Principles of 3D character animation (walk cycles, run cycles)
Module 5: Texturing, Lighting, and Rendering
Texturing and Shading
Creating and applying textures
UV mapping and unwrapping
Understanding materials and shaders
Lighting Techniques
Types of lights and their uses
Setting up and adjusting lights
Creating mood and atmosphere with lighting
Rendering
Basics of rendering engines (e.g., Arnold, V-Ray)
Render settings and optimization
Rendering for animation (batch rendering, render layers)
Module 6: Advanced Animation Techniques
Character Animation
Acting and posing in animation
Expressions and lip-syncing
Animating complex scenes and interactions
Motion Capture and Integration
Introduction to motion capture technology
Integrating motion capture data into animation
Refining and polishing motion capture animations
Special Effects Animation
Animating natural elements (water, fire, smoke)
Adding effects and secondary actions
Physics-based animation (ragdoll, particle systems)
Module 7: Storytelling and Production
Storyboarding and Animatics
Creating a storyboard from a script
Visual storytelling techniques
Planning shots and sequences
Creating an animatic from storyboards
Layout and Background Design
Designing backgrounds and environments
Perspective drawing and camera angles
Integrating characters with backgrounds
Sound Design and Editing
Basics of sound recording and editing
Adding voiceovers and sound effects
Synchronizing sound with animation
Module 8: Portfolio Development and Career Preparation
Building a Strong Animation Portfolio
Selecting and showcasing your best work
Creating demo reels and case studies
Designing an online portfolio
Industry Insights and Career Paths
Understanding different roles in animation
Freelancing vs. working in a studio
Networking and professional development
Business Skills for Animators
Pricing your work and creating contracts
Managing client relationships
Continuing education and professional development
Additional Features
Guest Lectures and Workshops: Sessions by industry experts on various topics.
Hands-On Projects: Real-world projects to apply learned skills.
Feedback and Critique Sessions: Regular feedback from instructors and peers.
Field Trips and Studio Visits: Visits to animation studios and industry events.
Online Resources and Community: Access to tutorials, forums, and networking opportunities.
This course structure ensures that students gain a solid foundation in both 2D and 3D animation, practical experience with essential tools and techniques, and preparation for a successful career in the animation industry.

0 notes
Text
From flash to hand-drawn
Through the years, American animated TV shows were switched from hand-drawn traditional animation to flash animation such as The Fairly Oddparents & Johnny Test. However, some cartoons were switched from flash to hand-drawn such as Star vs. the Forces of Evil & Dawn of the Croods. With the success of the Animaniacs revival on Hulu, the upcoming 9th season of Teen Titans Go! will probably switch from flash to hand-drawn & be animated overseas at Snipple Animation in the Philippines & in South Korean animation studios such as Digital eMation & Rough Draft Korea. Also, the 2D animation software should switch from Adobe Animate to Toon Boom Harmony. For me, I prefer rough animation on paper with pencil rather than clean-up animation on paper with pencil or ink before being scanned into the computer.
0 notes
Text
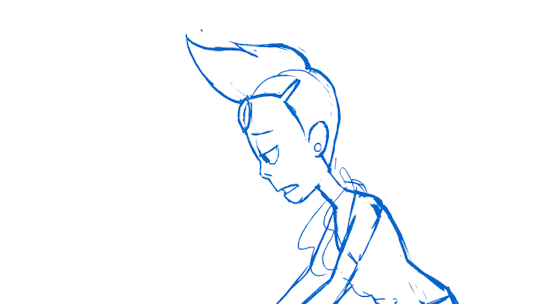
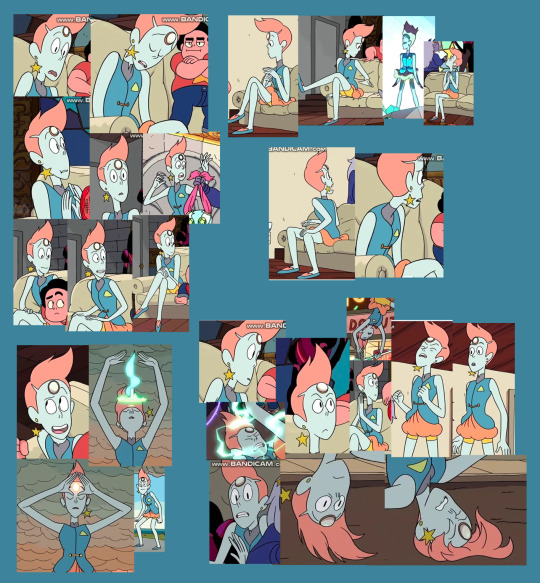
“It’s Over Isn’t It” Reanimation progress
Honestly one of my favourite parts about animating is posting the WIPs online. Here’s the step-by-step of how I went about doing my reanimation for the end section of “It’s Over Isn’t It” from the Steven Universe episode Mr. Greg.
1) Idea and Prep
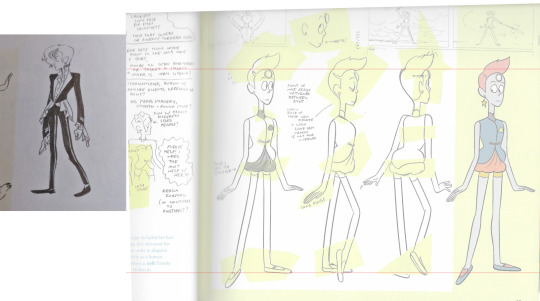
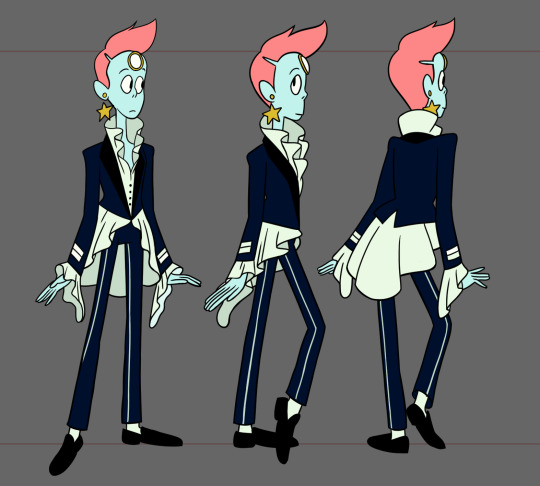
I was flicking through Steven Universe: Art & Origins. I think at the time I must’ve been between jobs or bored or something, because it came into my head to do a bit of animation based on the pilot style SU. I’ve always been quite fond of the pilot style, especially Pearl’s David Bowie / LaRoux look. The little tux design by Hellen Jo was quite snazzy as well, so I decided to have a go at doing a segment of “It’s Over Isn’t It”, using these designs.
I traced the turnaround from the book in Clip Studio Paint and approximated Jo’s design to it. At first I had the colour turnaround, but did the low-colour turnaround with the heads to give me a better idea of where the lines are and proportions of the body. I also get a clip of “It’s Over Isn’t It” and trim it down to the section I want to do.
This is a long one so strap in.
2) Sketch Pass
I’ll be using gifs that show the first 100-130 frames of the animation, because the full segment is 22 seconds long.
Very very loose animation of what I’m going to be doing with this segment, done in Adobe Animate. I have a video of the real segment in the corner of the stage and audio in the timeline, and closely reference them for layout and acting.
I’ve decided I want to go really nuts with the animation. Lots of angles on her face, smooth movement, secondary animation / follow-through on her various clothing elements. Technically her earring’s supposed to be on the other side but I want to animate that flailing around dangit, so I change it so it faces the camera.
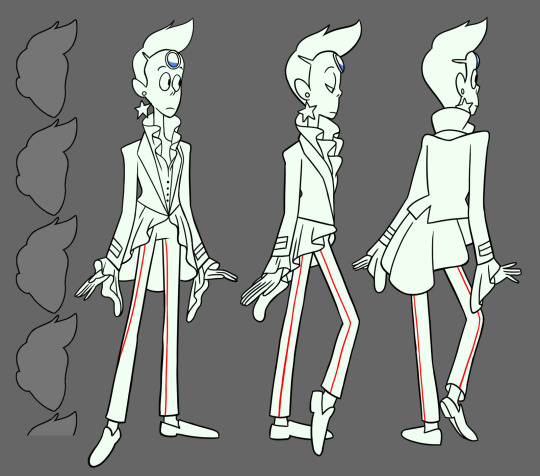
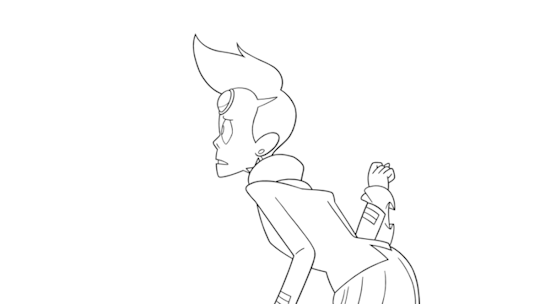
3) Rough Pass

I tidy up the rough I did somewhat. It’s still very rough, but Pearl is better proportioned and the motion is more complete. I get a better idea of how she moves by focusing on drawing keys (the most important drawings) and breakdowns (drawings that help you figure out the motion a little bit, without full animation). I have Pearl, her suit, ruffles and earring on separate layers so I can turn things on and off or lower their opacity as needed.
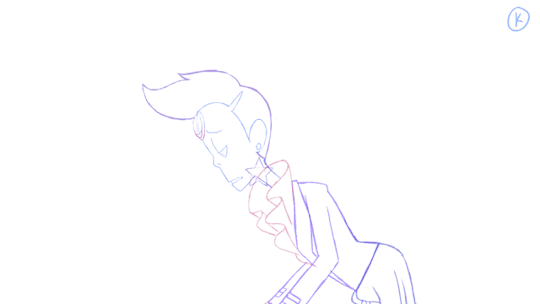
4) Tiedowns
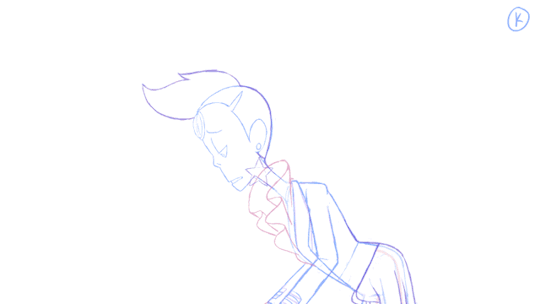
At some point between the rough and tie-down phase I realized that I’d been animating at 30fps instead of 25fps like I’d meant to, so I had to end up shifting all the roughs I’d been doing. Bad news: having to wrestle with getting the timings I’d so carefully planned out in the rough to still look good. Good news: I have to animate and clean up 5 fewer frames per second, so that’s 110 fewer drawings to worry about. Yussssss. For reference, the above clip has now gone from 132 frames to 107.
During the tiedown phase, I go over the roughs and more carefully try to match the proportions in the turnaround. I keep a flattened version of the first frame of animation to use as reference thoughout to prevent morphing. Sometimes when you’re animating, things will get bigger or small as you re-draw them, so it’s good to have a base drawing to refer back to and make the sizes stay consistent.
At this point I’m way more aware of reasons behind the big design change for Pearl between the pilot and the show. She’s so dang skinny and tall with that extra poof of hair up top that she’s really annoying to frame up. If you want to keep all of her in the frame, there’s going to be tons of empty space.
I also find that my turnaround isn’t enough reference for Pearl’s awkwardly-shaped head. I snap me a bunch of screenshots of pearl’s head from different angles and collate them into a big sheet.
5) Inbetweening
Inbetweening, aka filling out all the gaps in the timeline between the keys and breakdowns. If you’ve done your keys and BD’s well, inbetweening can be a pretty straight-forward.
But I’ve got like a million bits of secondary animation to content with, which means this still takes a significant amount of time. The hair and ruffles have to move a little later than the rest of the body, and some parts of the ruffles have to move at a different rate from the rest. I’m trying to animate like there’s wind since Pearl’s on top of a tall building. I keep animating until it feels good enough.
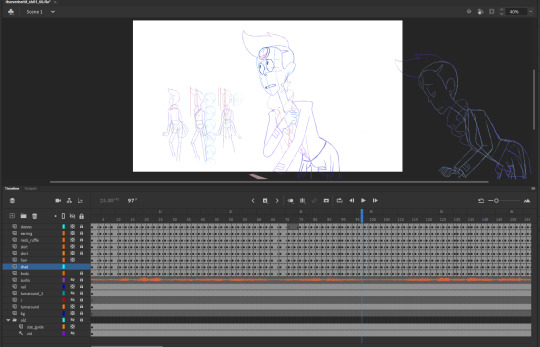
This is what my timeline and stage look like in Animate by this point. The animation is mostly on 2s, with some 1s, 3s and 4s thrown in when needed.
6) Cleanup and Colour
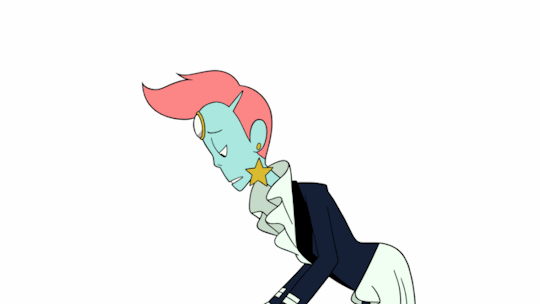
I did the cleanup in Toon Boom Harmony. As a program, I like it was more than Animate, even though it isn’t without it’s flaws. But it’s also really dang expensive. Fortunately, by this point I’d been working on the upcoming Deadendia series for Netflix. What with the pandemic, we were working from home and the studio gave me a license for Toon Boom. So I exported my frames from Animate, put ‘em in TB and started cleaning up.
I’ve found that cleanup is something that’s often offloaded to new or less experienced artists at studios because blah it’s just tracing the rough animation. But you’ve got good cleanup and bad cleanup, and a good cleanup artist will compensate for flaws in volume and have a good, clear and natural line.
I’m not terribly fond of doing cleanup myself. I feel I tend to end up rushing, which leads to sloppy work. I tried really hard to keep up a standard here.
7) Comping
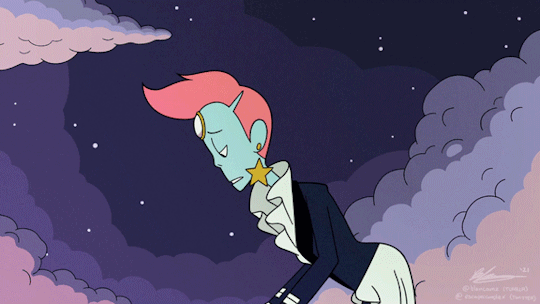
a.k.a. Compositing, the final layering of the various elements before exporting a film. Another stage I don’t quite care for because of its nuances. Also drawing backgrounds.
I admit that I’m not very good at drawing backgrounds or environments. I tried to do the one for the second shot of this animation, since it was acutally really important. In shots 1 and 3, you don’t really see the ground or even the railing that Pearl is leaning on, but 2 is a wide shot. My first attempts at it were unfortunate. Fortunately my husband @joe-sparrow is both good at backgrounds and good at imitating the style and colour palette of the show. He volunteered to do the BGs and I accepted. See mine vs. his:
So yeah, get me some nice backgrounds, put the animation on top, then fiddle with a couple of elements in the comp to give things a little bit more depth. During this stage, errors that had happened during the animation progress that I hoped would just go away became annoyingly obvious, so there was a fair bit of going back to fix them.
So that’s how I done made this animation. I started April 2018 and posted in on January 1st 2021, so that’s over 1.5 years it took me to do these 22 seconds of animation. However, I wasn’t working on it continuously through that time. Sometimes I’d be working on it every day, other times I’d not touch it for weeks or months at a time. It really depended on how busy or whatever I was at the time. I think if I’d been working on it non-stop, it still would’ve taken me at least like 2-3 months to finish it.
If you made it to the end of this post, I hope you found all this information interesting.
Happy drawing.
It’s over, isn’t it.
158 notes
·
View notes
Note
Hello...QWQ may I ask what program do you use for animating??
Hi, pal! For complex animations I use Toon Boom (Buddy vs Chara) and Adobe After Effects for composing (Dancetale). Sometimes I use TVpaint as well (Ruby and Sapphire falling from the skies) and Paint Tool SAI and Adobe Photoshop (Sans)Did it help?
31 notes
·
View notes
Note
opinion on toon boom vs adobe animate/flash ?
Never used animate/flash, sorry!
25 notes
·
View notes
Text
Reflective Post - Learning: Adobe After Effects
After finalizing my narative and storyboard the next step was to start the animation process, but I being a Visual Communication Designer did not know much about the animating softwares. Previously I used Adobe Photoshop to create simple animations with the frame-by-frame animation technique but it was not possible to achieve the flowy movement of kites through frame-by-frame animation technique.
Most of my classfellows use Toon Boom and After Effect to create their animations so I thought I should give these softwares a try and learn how to use them. I had an easy excess to the adobe softwares so I decided to learn after effects.
I watched a couple of youtube tutorial to learn how to animate in Adobe After Effects. After watching two to three videos I came across a course on Domestika called Fundamentals of Animation in After Effects A course by Michael Tierney, Motion Designer. I signed up for this course and started the learning process. This course seemed to be a good one as it covered all the basics of animation that I needed to get started.


These videos helped me to understand the user interface, learn about the most common effects, and how to make a simple animation. I have not completed the course yet but l’ve pretty much understood and learnt the basic purpose and functions of this software.
I have planned to use Adobe After Effects to create the animation for my ‘Red vs Blue’ project. I think It will be easier for me to animate the kites in After Effects and achieve the right kite flying movements/poses. I hope it goes in the right direction.
Reflection
I think that any learning experience comes with time and effort. Leaning a new software is not an easy task, you have to learn all the tools and techniques to be able to work on it. It requires a certain time to have a strong command on the software and become a pro at it.
After Effects timelines are incredibly deep and complex as compared to other creative apps but having solid skills of Photoshop, Illustrator, and Premiere helped me understand the software a lot and made the learning easier for me.
I chose to learn the software from a course instead of the youtube tutorials because the course was very well designed, it had different units and after watching each tutorial we were asked to do certain exercises/tasks to complete the unit so when I did the tasks, It automatically helped me learn new skills. And with every exercise the skills and learning improved. I could not complete all the exercises as I had to start working on the animation but I tried to experiement as much as I could to be able to start working on the project.
I would say its fun to learn new softwares. We can learn in small bits and implement it, by doing that the excitement of learning something new goes up. When we see we are actually creating something, the hunger for learning more increases.
Domestika, 2021. Fundamentals of Animation in After Effects | A course by Michael Tierney. Available [online] at: https://www.domestika.org/en [Accessed: 7th Oct 2021]
0 notes
Text
2D animation tools
I wanted to use flash to make my interactive animation, but after meeting with the teacher, I changed my production tools. There is a long-term competition between toon boom and adobe. Adobe's previous animation tool was flash. However, due to many restrictions on animation production progress, many users turned to toon boom. In hard drawing style animation, two popular animation tools are cartoon prosperity and harmony and tvpaint animation. Flash is no longer favored by artists. By 2015, Adobe will stop using flash and release animate CC, an animator friendly software.
As Adobe released, animate CC is very friendly to vector art brushes. Adobe animate: usually, it creates vector animation, and because of this specific style, it is targeted at different customer groups.
Now Adobe After effects is also a good animation software. In contrast, Adobe Animate is more suitable for making what you think is a traditional "cartoon". It provides the function of hand-painted frame by frame animation, as well as the limited animation that can change each part of the character, and the puppet animation that can put out the character device without redrawing
This is related to my practice. Compare these software and choose the most suitable one for me to make my project.
https://www.bloopanimation.com/zh/animate-cc-vs-after-effects/
0 notes
Text
Toon Boom Harmony vs Flash (Adobe Animate): Which One Should You Use?
Toon Boom Harmony vs Flash (Adobe Animate): Which One Should You Use?

If you’re one of the many people looking to get into 2D animation, or are considering updating your workflow, you might be wondering: What’s the best software to use? The most common debate in the 2D realm is Toon Boom vs. Flash.
In this article we’ll look at two of the biggest contenders. Toon Boom Harmony and Adobe Animate CC (the modern incarnation of Flash).
Background
First let’s…
View On WordPress
0 notes
Text
Create An Amazing 2d Animated Explainer Video
Create An Amazing 2d Animated Explainer Video
d66daecc41f29bc12c177b006b17d985e752a673
I will create an amazing 2d animated explainer video
explainer video & whiteboard animation services whiteboard & animated explainers faqs what makes an explainer video engaging first engaging explainer videos are short and succinct they to the point quickly usually within 60 to 90 seconds animation studio 2d animation production & traditional powerhouse…
View On WordPress
0 notes
Text
2D Animation Course in Sonipat.
Here's a comprehensive course outline for a 2D Animation course offered by Pickles Animation. This course is designed to cover the fundamental principles, software skills, and creative techniques needed for 2D animation, catering to both beginners and advanced learners.
Course Outline for 2D Animation
Module 1: Introduction to 2D Animation
Overview of 2D Animation
History and evolution of 2D animation
Key principles of animation (e.g., squash and stretch, timing, anticipation)
Understanding the animation workflow
Animation Basics
Types of 2D animation (traditional, digital, cut-out)
Frame rate and timing in animation
Introduction to storyboarding
Module 2: Drawing and Design Fundamentals
Basic Drawing Skills
Drawing shapes and forms
Anatomy and figure drawing
Character design principles
Digital Drawing Tools
Introduction to digital drawing tablets
Using software like Adobe Photoshop, Illustrator, and Clip Studio Paint
Creating and managing layers
Module 3: Animation Techniques and Software
Traditional Animation Techniques
Understanding keyframes and in-betweens
Timing charts and exposure sheets
Flipbook animation basics
Digital Animation Software
Introduction to Adobe Animate
Using Toon Boom Harmony
Exploring other animation software (e.g., TVPaint, Moho)
Animating in Software
Creating keyframes and tweens
Working with symbols and libraries
Using onion skinning and other animation aids
Module 4: Advanced Animation Principles
Character Animation
Walking cycles and movement
Expressions and lip-syncing
Acting and posing in animation
Special Effects Animation
Animating natural elements (water, fire, smoke)
Adding effects and secondary actions
Combining effects with character animation
Module 5: Storytelling and Production
Storyboarding
Creating a storyboard from a script
Visual storytelling techniques
Planning shots and sequences
Layout and Background Design
Designing backgrounds and environments
Perspective drawing and camera angles
Integrating characters with backgrounds
Animatics
Creating an animatic from storyboards
Timing and pacing in animatics
Refining the animatic for production
Module 6: Sound and Post-Production
Sound Design for Animation
Basics of sound recording and editing
Adding voiceovers and sound effects
Synchronizing sound with animation
Post-Production Techniques
Compositing in After Effects or similar software
Adding final touches and effects
Exporting and rendering the final animation
Module 7: Portfolio Development and Career Preparation
Building a Strong Animation Portfolio
Selecting and showcasing your best work
Creating demo reels and case studies
Designing an online portfolio
Industry Insights and Career Paths
Understanding different roles in animation
Freelancing vs. working in a studio
Networking and professional development
Additional Features
Guest Lectures and Workshops: Sessions by industry experts on various topics.
Hands-On Projects: Real-world projects to apply learned skills.
Feedback and Critique Sessions: Regular feedback from instructors and peers.
Online Resources and Community: Access to tutorials, forums, and networking opportunities.
This course structure ensures that students gain a solid foundation in 2D animation, practical experience with essential tools and techniques, and preparation for a successful career in the animation industry.

0 notes
Link
أيهم يجب عليك استخدامه؟ (Toon Boom vs Flash (Adobe Animate
إذا كنت من بين العديد من الأشخاص الذين يتطلعون إلى انتاج رسوم متحركة ثنائية الأبعاد أو يفكرون في تحديث طريقة عملهم ، فقد تتساءل: ما أفضل برنامج لاستخدامه؟ الجدل الأكثر شيوعا في عالم 2D هو تون بوم مقابل فلاش.
في هذه المقالة سنلقي نظرة على اثنين من أكبر المتنافسين. Toon Boom Harmony و Adobe Animate CC (الاسم الحديث للفلاش).
دعونا أولا الحصول على خلفية صغيرة في كل من هذه البرامج.
Adobe Animate CC ، (المعروف سابقًا باسم Flash) ، هو برنامج للرسوم المتحركة المتجهه والذي جعل سهولة استخدامه والتفاعلية وأحجام الملفات الصغيرة منه معيارًا للرسوم المتحركة عبر الإنترنت لسنوات عديدة. كما تم استخدامه لصنع رسوم متحركة للتلفزيون أيضًا ، على الرغم من أن Adobe لم تقدم تطويرا كبيرا في البرنامج . مما ترك الاستوديوهات تعتمد على المكونات الإضافية أو بناء أدوات مخصصة لجعل البرنامج أكثر ملاءمة للإنتاج.
ولكن في السنوات الأخيرة ، منذ إعادة تسمية العلامة التجارية باسم Adobe Animate بدلاً من Flash ، أضافت Adobe بعض التحسينات التي تشتد الحاجة إليها والتي يبدو أنها تشير إلى أنها قد تحاول دعم الرسوم المتحركة الطويلة في المستقبل.
عروض كبيرة تبحث باستخدام Adobe Animate (فلاش)
إجمالي جزيرة الدراما
موتور سيتي
My Little Pony: الصداقة هي ماجيك
من ناحية أخرى ، استهدفت Toon Boom سوق الرسوم المتحركة الاحترافية ، وعروضها الحالية ، Toon Boom Harmony ، تعتبر معيار الصناعة للرسوم المتحركة ثنائية الأبعاد . ومع ذلك ، فإن صعوبة البرنامج و خاصة في البداية لا يجعله الخيار الأفضل للمبتدئين والهواة.
قطع كبيرة القيام به مع تون بوم الانسجام
ستار ضد قوى الشر
ستيلا وسام
ثلاثية من بيلفيل
تجدر الإشارة أيضًا إلى وجود إصدار حالي واحد فقط من Adobe Animate ، لكن Toon Boom Harmony يأتي في 3 مستويات مختلفة ، وهي Harmony Essentials ، و Harmony Advanced ، و Harmony Premium ، لكل منها سعر أعلى. هذا يجعل الأمر صعبًا قليلاً مقارنة Animate and Harmony إلى حد ما ، ولكن في النهاية انت تريد الاختيار استنادًا إلى الميزات التي تحتاج إليها.
تون بوم مقابل فلاش: كيف أختار؟
ما نوع الرسوم المتحركة التي تريدها؟
السؤال الكبير الأول الذي يجب عليك طرحه على نفسك هو نوع الرسوم المتحركة التي ترغب في صنعها؟
إذا كنت ترغب في جعل عناصر الرسوم المتحركة لمواقع الويب أو الرسوم المتحركة التي لديها التفاعل��ة. يعد Animate أفضل أداة لنشر محتوى متحرك لرسوم HTML5 Canvas و WebGL و SVG . يمكنك أيضًا النشر كملف فيلم لتحميله إلى مواقع مثل YouTube و Vimeo.
إذا كنت تبحث عن عمل رسوم متحركة طويلة للسينما أو التلفزيون أو الويب ، فقد لا يكون فلاش هو الوسيلة الافضل . سوف تحتاج بالتأكيد إلى التفكير في تون بوم .
سرعة التعلم
ربما تكون الرسوم المتحركة أكثر وضوحًا للتعلم والفهم ، خاصة إذا كنت مستخدمًا بالفعل في Adobe Creative Suite من البرامج. لا يزال برنامج فلاش هو الاسهل في التعلم مقارنة مع تون بوم الذي يعتبر صعبا نوعا ما
ادوات الرسم
الاساس الاول لبرامج الرسوم المتحركة ثنائية الأبعاد هو أدوات الرسم. يقدم كل من Animate و Toon Boom أدوات رسم رائعة. أظن أن أدوات الرسم المتجه التي تقدمها Animate ربما تكون أسهل في الاستخدام ، لكن تون بوم هي أكثر ميزة ، وربما ستبدو أفضل على المدى الطويل.
يوفر تون بوم أيضًا أدوات الرسم والتصوير النقطية كذلك. لا تتوفر هذه الإصدارات إلا في الإصدارات الأكثر تكلفة من Harmony ، ولكنها تستحق ذلك إذا كنت رسامًا رقميًا وترغب في أن تتمتع الرسوم المتحركة بشكل اكثر واقعية .
أيضا ، ��ذا كنت من منتجي الرسوم المتحركة التقليدية ، التي تعتمد على الورق ، فإن Harmony لديه أدوات رائعة لمسح وتنظيف الرسومات الورقية . لذا إذا كان هذا هو هدفك فانت تستخدم البرنامج الصحيح.
أدوات العظام
يحتوي كل من Animate and Harmony على أدوات لتركيب الشخصية مع العظام لإنشاء شخصيات متحركة بسهولة. قد تكون عملية تركيب Animate أسهل قليلاً ، لكن Harmony's أكثر تقدماً
التركيب
الوئام لديه أدوات تركيب قوية . عندما تستخدم الاستوديوهات Animate ، يتعين عليهم بشكل عام تصدير الرسوم المتحركة النظيفة واستخدام برنامج آخر مثل After Effects لدمجها في الخلفية وإضافة مؤثرات مرئية مثل الإضاءة.
ومع وجود هارموني هناك الكثير من التأثيرات المضمنة ، ويقدم هارموني بريميوم الراقية تأثيرات أكثر تطوراً ونظام تركيب عقدي متطور لتطبيقها .
يحتوي Harmony أيضًا على كاميرا ثلاثية الأبعاد حتى يمكنك إعداد بيئات متعددة المستويات المشاهد باستخدام الكاميرا الافتراضية. أضاف تحديث Adobe لعام 2017 إلى Animate كاميرا افتراضية مدمجة ، ولكن لا تزال هناك مرحلة ثلاثية الأبعاد.
سعر البرنامج
أخيرا دعونا ننظر إلى ما سيكلف في الواقع للحصول على البرنامج.
الطريقة الوحيدة لشراء Animate هي من خلال الاشتراك في Adobe Creative Cloud . يبدأ السعر من 19.99 دولارًا في الشهر إذا اشتريت اشتراكًا سنويًا أو 29.99 دولارًا شهريًا. إذا كان لديك بالفعل اشتراك Creative Cloud لجميع تطبيقات Adobe ، يتم تضمين Animate CC ويمكنك تنزيله والبدء في استخدامه وقتما تشاء.
TOON BOOM HARMONY Essentials Advanced Premium Annual Subscription $15 $38 $73 Monthly Subscription $23 $58 $109 Perpetual License $375 $975 $1,975
0 notes
Text
2D Animation Course in Delhi.

https://picklesanimation.in/best-2d-animation-institute-in-delhi/
Course Title: 2D Animation Fundamentals for picklesanimation
Course Overview: This course is designed to provide participants with a comprehensive understanding of 2D animation techniques and principles, tailored specifically to the style and requirements of picklesanimation. Through a combination of theoretical lessons and practical exercises, students will learn the fundamentals of character animation, storytelling, and creating compelling visuals for animation projects.
Course Duration: 12 Weeks (2 hours per session, twice a week)
Week 1-2: Introduction to 2D Animation
Overview of picklesanimation's animation style and aesthetic
History and evolution of 2D animation
Introduction to animation software (Adobe Animate, Toon Boom Harmony, etc.)
Understanding the animation workspace and tools
Basic principles of animation: squash and stretch, timing, and easing
Week 3-4: Character Design and Development
Fundamentals of character design for animation
Anatomy and proportion in character design
Creating expressive and appealing character designs
Developing character personalities and traits
Designing characters in line with picklesanimation's style
Week 5-6: Storyboarding and Narrative Structure
Introduction to storyboarding techniques
Understanding story structure and narrative pacing
Creating storyboards for animation sequences
Visual storytelling techniques and shot composition
Incorporating humor and emotion into storytelling
Week 7-8: Animation Principles: Part 1
Keyframe animation vs. frame-by-frame animation
Understanding the principles of anticipation and follow-through
Creating believable character movement and gestures
Introduction to walk cycles and other character animations
Timing and spacing in animation
Week 9-10: Animation Principles: Part 2
Advanced animation techniques: overlapping action, secondary motion, and arcs
Lip-sync animation techniques for dialogue scenes
Incorporating special effects and environmental animation
Experimenting with different animation styles and approaches
Critique and feedback sessions on animation exercises
Week 11-12: Putting It All Together
Integrating characters, backgrounds, and effects into animation scenes
Refining and polishing animation sequences
Introduction to sound design and audio editing for animation
Exporting and optimizing animations for various platforms
Final project: Creating a short animated scene in picklesanimation's style
Assessment:
Continuous assessment through animation exercises and projects
Final animation project presentation and critique
Participation in class discussions and activities
Resources:
Recommended readings, online tutorials, and animation resources
Access to animation software and tools
Guest lectures from industry professionals in animation
Prerequisites:
Basic drawing skills
Familiarity with animation software (preferred but not mandatory)
Outcome: By the end of this course, participants will have gained a solid foundation in 2D animation principles and techniques, specifically tailored to the style and requirements of picklesanimation. They will be able to create compelling animated characters and scenes, effectively convey stories through animation, and contribute to animation projects at picklesanimation with confidence and skill.
0 notes
Last Seen Blogs

nur59
nur

haugr
why am i like this

opinion247
Untitled
pompkinsoups
Boop Beep I Eat Your Sheep

marinrose
Untitled