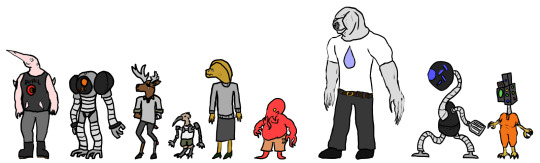
#Animation Software Overview
Explore tagged Tumblr posts
Visit Tumblr Blog
Explore Tumblr blogs with no restrictions, modern design and the best experience.
Last Seen Tumblr Blogs


Fun Fact
Tumblr has been providing a Korean-language service since 2013.
Text
Animation Software Overview: Bringing Your Visions to Life
Imagine breathing life into a sketch, or crafting a world so believable you can practically step into it. That's the magic of animation software, a powerful toolbox for creating everything from whimsical cartoons to mind-blowing special effects.
Whether you're a seasoned animator or a curious beginner, this guide will delve into the exciting world of animation software. We'll explore different animation styles, popular programs, and the key features that'll help you turn your ideas into moving masterpieces.
The Animation Playground: 2D vs 3D
Animation software comes in two main flavors: 2D and 3D. Think of 2D animation as the classic hand-drawn style, where characters and backgrounds come alive frame by frame. Think Disney classics or those awesome explainer videos you see online.
3D animation, on the other hand, lets you create stunning, realistic imagery. This is the realm of blockbuster movies, video games, and those jaw-dropping product demos. Here, you build 3D models and manipulate them in virtual worlds.
Choosing Your Weapon: Popular Animation Software
The software you choose depends on your animation style and budget. Here are some heavy hitters to consider:
2D Animation:
Adobe Animate (formerly Flash): An industry standard, Animate lets you create vector graphics and traditional-looking animations. Great for beginners and pros alike.
Toon Boom Harmony: Beloved for its intuitive interface and powerful tools for character animation, Harmony is a favorite among professional 2D animators.
3D Animation:
Blender: The king of open-source 3D animation, Blender boasts a massive feature set for modeling, rigging, and animation. It has a steeper learning curve, but the rewards are vast (and free!).
Autodesk Maya: A professional-grade software used in major studios, Maya offers unparalleled control over 3D characters, environments, and effects.
Beyond the Basics: Essential Features
Animation software goes way beyond just drawing pictures. Here are some key features you'll encounter:
Timeline & Keyframing: Imagine a filmstrip where you set key poses for your characters or objects at specific points. The software fills in the gaps, creating smooth animation.
Rigging: This is the magic that brings 3D models to life. Rigging involves creating a digital skeleton that allows you to pose and animate your characters.
Special Effects: From fire and explosions to smoke and weather, animation software lets you add all the glitz and glam to your animations.
Getting Started with Animation Software
The world of animation is vast and exciting, but don't be intimidated! Here are some tips to kickstart your journey:
Free Trials: Most software offers free trials, so you can experiment and see what works for you.
Tutorials & Online Resources: There's a wealth of free tutorials and online courses available to teach you the basics and advanced techniques.
Start Small: Don't try to create a Pixar movie right away. Begin with simple animations to get a feel for the software and build your skills gradually.
Animation software is more than just a program; it's a gateway to express your creativity and bring your visions to life. So, dive in, experiment, and get ready to be amazed by what you can create!
1 note
·
View note
Text
The European Union's General Product Safety Regulations (GPSR): A Huge Mess For Some Small & Micro Businesses

Above is an email Amazon sent to sellers many months ago that covers the basics. Not all marketplaces were as forthcoming - or early - with info.
UPDATED: February 25, 2025
As many of you know, new laws coming into effect Friday December 13, 2024 affect businesses' ability to sell products into the European Union and Northern Ireland (EU and NI). The General Product Safety Regulations (GPSR) impose various requirements on most goods being sold to the EU and NI, and some of those new rules will be very onerous for some small businesses. Furthermore, there are still some unanswered questions that the relevant government bodies hadn't covered until the European Commission did release some more details and an FAQ page very recently [pdf for download at the end of the first section on that page], and until public Q & A sessions were held.
This post contains a brief summary of the GPSR and of the key questions for common small business types, with the best answers I can find at this time. There is a section discussing problems on Etsy (which hasn't yet adapted their platform to the new regulations). I also compiled a list of helpful links including government and marketplace information pages, and places to obtain an "EU Responsible Person" to represent your business.
If anything gets clarified in the near future, this post will be updated.
What Does GPSR Require?
The Amazon summary in the screenshot at the top of this post is one of the easiest to understand, but a shorter overview may work better for some, so here is what eBay has to say:
To comply with the GPSR and related regulations, all business sellers listing items for sale in the EU and NI must include the following information: 1. The product manufacturer's name and contact information 2. If the manufacturer isn’t located in the EU or NI, you’ll have to indicate an EU-based Responsible Person or entity, along with their name and contact details 3. Any relevant product information like model number, pictures, and type 4. Product safety and compliance information like warnings and safety information (which can be included in labels and product manuals) in the local language 5. The CE marking when required by the related regulations applicable to your product
And yes, all of this applies to merchants of all stripes, including small and microbusinesses. Per the EU, “...the GPSR obligations apply to businesses of all sizes. Consumers are entitled to only safe products and therefore exceptions cannot be made based on the size of a business.”
Clearly there are significant hurdles for small and micro businesses: the cost of hiring a responsible person, and the cost of producing the required safety and use instructions and of translating them into local languages. Some may choose to stop sales to the EU and NI instead of complying.
Are There Any Exceptions?
Yes, several types of products are excluded, but most of those already subject to equally strict or even stricter regulations, e.g., medicine, foods, animals etc.
The two main known exceptions of interest to most of my readership are:
Antiques, which seem to be limited to items that are old (but no age is given, as far as I can tell) and generally to art or other collectible items.
Items already available for sale before December 13 of this year.
That second point is good news for many businesses, but please note it only seems to apply to stock made before December 13, not just listings made before that date. Once you run out and need to order or make more products, they then become subject to the GPSR.
Does The GPSR Apply To Digital Products?
It now appears that the new regulations cover items such as digital downloads. The FAQ pdf put out by the European Union very recently states "[t]he GPSR applies to all types of products (physical or digital products too, including software) that are placed or made available on the EU Single Market". At least some analysts agree this can include pretty much everything digital:

I can understand why some folks think that a knitting pattern or a simple art downloadable file should not be covered, and in the future once there is more discussion of and action taken under the GPSR, those products might be excluded. But note that the pdf of FAQs also states "[t]he GPSR is about avoiding and preventing “risks to both physical health and mental health”. Including image files and similar downloads therefore makes some sense.
How Do I Find A "Responsible Person" To Represent My Digital Download Business In The EU?
That's a good question, because I haven't found any verified sources saying they will cover digital items, or any digital sellers mentioning they have found coverage. Many have been denied by the companies they have contacted. [UPDATE: A company called EAS has agreed to represent at least one digital seller.]
If you are aware of any other firms or individuals offering "Responsible Person" services for digital products, please let me know!
(Remember, If you are in the EU/NI, you are the Responsible Person. If your products are manufactured in the EU/NI, the manufacturer is the Responsible Person.)
Does the GPSR Apply To Free Products?
Yes. From the FAQ pdf: "an item provided free of charge falls within the scope of the GPSR.”
In addition to complimentary physical items ("free gifts") sent out with orders, this would seem to include free downloads provided on blogs and social media, on a Patreon site, in YouTube descriptions etc. I’ve not seen much discussion on this aspect of the law for some reason.
Items Offered For Sale Before December 13 Are Exempt, But How Would The Government Know When I First Offered The Product Or When It Was Made?
If you had 100 widgets in stock before December 13 and had them listed on a marketplace or website, by law you can continue to sell those widgets to the EU and NI until all 100 are gone. And if you created a digital file and offered it online before December 13, it should be exempt forever, as long as you do not edit the file after December 13.
But proving you had 100 widgets already made, or that you listed a specific product before the law took effect could be difficult, especially for anyone handmaking their own items. If you are going to continue to sell to the EU and NI after December 13, keep careful records of which stock needs labelling, safety information and translations of use instructions.
Online marketplaces could also create problems if they don't display the date an item was first offered for sale, as happens on Etsy, for example. Every time an item renews, the visible date is reset, and it can be difficult to go through spreadsheets looking for the original listing date, and csv files may not be adequate proof under this law (since they can easily be changed after downloading).
Unfortunately, we won't truly know what evidence will be accepted in these circumstances until the authorities start enforcing these regulations, but this will only be a concern for anyone continuing to sell "old stock" into the EU and NI after December 13, so it is far from the largest concern.
The Case of Etsy - Failure To Comply With The GPSR
Unlike some other marketplaces, Etsy was fairly late in warning its sellers that the GPSR affected them, and how Etsy will approach the law. The blog post included the line "[s]hould Etsy receive a notification from an authority that your product is non-compliant, we will take appropriate action, which may include removing your listing and/or suspending your account." So, the stakes are high here - you could lose your Etsy shop if accused of not complying with the GPSR.
There are currently 2 problems for sellers who decide they can't/won't comply with the GPSR and therefore do not want to offer their items to the EU and NI any more:
Shipping to the UK on Etsy includes Northern Ireland, and sellers anywhere within the UK cannot remove the UK from their shipping profiles. That means they are forced to offer their goods to NI even if they don't want to.
Digital products on Etsy are sold to the whole world by default; there is no way to exclude any countries that Etsy allows sales to. That means every digital listing on Etsy is currently offered in the GPSR jurisdictions, regardless of the seller's wishes or compliance.
The GPSR was published on May 10, 2023. That gave everyone 19 months to get their ducks in a row. However, Etsy has so far done nothing to allow UK and digital sellers to remove their listings from being available in the EU and NI. Nothing.
Support has told some sellers that the corporation is working on it, and that UK sellers could just cancel any sales to NI:

However, it is not good enough to refuse to complete orders to the EU and NI. Any item offered for sale in the EU and NI is automatically subject to the GPSR; just allowing someone to check out is a violation, if the listing and product does not meet the law's requirements.

As of December 13, there is still no way to stop selling to Northern Ireland on Etsy if you are a seller in the United Kingdom, and there is no way for a digital product to be excluded from offer in either the EU or NI. Sadly, this means the only way shops can follow the law is to close for the time being, and some are planning on doing that.
Etsy has failed its sellers, and there is no excuse.
UPDATE (February 25, 2025): Etsy has finally Etsy has updated settings for excluding GPSR countries from those you sell to. Change it here under "Choose how you sell to GPSR states".

More changes to come here under the February updates, including fields for safety information and your responsible person.
And probably the biggest news: Etsy is working on vetting companies that will act as a "responsible person" for its sellers - you know, like eBay already did months ago. Still no word on why Etsy was caught unprepared by legislation that was released almost 2 years ago.
UPDATE (April 15, 2025): Etsy has added fields for safety compliance and an EU responsible person, and now warns shops that "If a product is subject to the GPSR but does not meet the requirements, it may be classified as a “dangerous product” by EEA or NI authorities. This may result in enforcement actions, including fines, product bans, or the removal of your products from the marketplace.
Should Etsy receive notification from an authority that your product is non-compliant, we’ll take appropriate action, which may include removing your listing and/or suspending your account."
Resources and Responsible Person Offerings
I've compiled a separate post on my Patreon, listing some of the official legal and government resources on GPSR, as well as rules and Help pages from some major marketplaces and Print on Demand companies, and a short list of places you can hire a "Responsible Person" for your products:
https://www.patreon.com/posts/sources-and-for-117871846
Please let me know if you find any broken links there, or have other resources to add!
This post will be updated as required.
UPDATED: April 15, 2025
42 notes
·
View notes
Note
Hello! I first need to say that I greatly admire your art, I love how you come up with different pieces every time, each more beautiful than the last, you're genuinely a huge inspiration <3 😭
I wanted to ask, do you have more input on how you do your blender papercut-like animations? I know you did a quick tutorial on an artfight piece last year but, how would you explain it to someone who's completely unfamiliar with the software?
I'm maybe asking a lot tho, so instead, do you have any video tutorials you recommend?
Thank you for all the kind words!! I appreciate it so <3 ;u;
I did learn solely off youtube, but it was a very very long time ago. I recommend learning the basics of creating meshes and navigating the menus - a lot of tutorials exist out there (but I don't have any specific one in mind cause it's been forever). I DO remember doing the notorious blender doughnut for my first model though!
---
Additional documentation/tutorial to look up for this is
transparent materials
shape keys
basic keyframing and rigging
I'm sorry I can't provide specifics.. but I tried to put together a very bad overview video myself for the Caged Wish piece to try to walk through it.
youtube
85 notes
·
View notes
Text
I am fucking sick of AI.
AI has fundamentally ruined the way we live.
I know it seems drastic and over exaggerated, but at this point it is genuinely true. AI can be helpful, but it gets to a certain point. Going into high school, I am now extremely worried that I will not be able to find a job after graduation. My particular passions are animation, digital art, music, and coding. AI can easily do all of those jobs within seconds. Due to this, artists like others and I have been put in a predicament where we could potentially not have jobs.
Another thing, AI is destroying the education system and the general knowledge of humanity. Students use AI to complete homework for them, causing them to not actually retain any information and this will result in unintelligence. This is the next generation, people. We are the ones meant to sustain the planet, and yet we allow AI to teach us that two plus two equals five, and the “AI Overview” is the first thing you see. Teachers are using AI to grade papers, hypocrites. They use AI to do their jobs but do not allow us to do the same. Besides, studies have found that AI incorporates bias into upwards of 38.6% of answers, and AI is completely incorrect upwards of 25% of the time.
AI has been observed to think for itself. AI. Thinking for itself. In a Chinese research facility, a robot with AI software attempted to attack the researchers. AI programs were studied and they overrode shut down instructions. This technology is not here to be our friend.AI has gotten EXTREMELY good at mimicing us. AI Minecraft youtubers, generated street interviews, AI “humans” ominously demonstrating that they “can talk”.
I’m not distinctly for nor against AI, but I definitely lean more towards anti-AI. It honestly depends on its use.
For example, AI in the medical and scientific communities has been extremely influential in modern medicine and technology and have contributed greatly to the advancement of research in both fields. In these specfic cases, I am all for AI as long as it helps the wellbeing of others.
Generative AI, however (the type you are most common with), I am completely against. Leave the art to the artists, the writing to the writers, composing to the composers, and the filming to the filmmakers. AI in the more creative spaces has shown nothing but harm to the humans in those spaces. Companies are refusing to hire actual artists for product images or actors/voice actors for commercials simply because they think “AI can do it better”, which it can’t. AI will never replace the human imagination, no matter how advanced it becomes. ChatGPT could create a perfect one-to-one recreation of the Sistine Chapel and the original would still be better. AI cannot pick up a pencil or a brush, AI cannot pour blood, sweat, and tears into a piece of music, AI cannot create emotion within a scene, AI cannot write with such passion and dedication. AI cannot measure up to the human desire to create.
In conclusion, AI is not a specific good nor evil, but is slowly moving towards the latter. It has its strengths and weaknesses, as everything else. It can be used for good but just as easily used for bad. Just make sure to support your local artists and steer clear of generative AI.
10 notes
·
View notes
Note
Hey!! I absolutely love your work, your art, comic, designs, etcetc are just.. so SO good. ALSO, I was wondering if you possibly had any art resources? More specifically art resources for someone that’s just starting out. I would love to get into drawing but there are a million videos and books and articles out there and I have no idea where or how to start.
Art school would be amazing but gosh dang it I’m broke </3
first of all ive never gone to art school proper, or any real amount of college at all for that matter either, its not terribly hard to get ahead of your peers who do with proper work ethic and knowing where to look for, the 'self-taught' label is becoming increasingly arbitrary because the internet's made it all easier than ever to access if you know where to look
admittedly i was starting out at a very different time in the internet and speaking a different language, so i cannot quite recommend what i was using when i started between language availability and modern expectations of say video quality, however! i do have some pointers
at a glance channels like proko [though more so the older videos] are pretty handy but also
i can tell you what to look for and general principles
if youve not already, look up and commit to practice the way youre supposed to hold the pen for art. genuinely good for your artwork, but, more importantly, helps you strain your wrist less. considering especially in the beginning artwork can take a long time, you need to get into those habits early. look up wrist exercises while you're at it and try to warm up your hands before starting. it is genuinely exactly like sports you cant skip the stretch. /
look for specific things. 'get good at art in 10 days' is the same as 'get fit in 10 days' even if its not impossible to learn some very useful fundamentals in that time, you know thats not what they have for you. you need to be looking for things like 'color contrast' 'muscles of the leg' 'how to do cleaner linework' when searching on the internet /
I would avoid short form content or even just shorter videos altogether or anything with a super flashy presentation for anything but like, simple software tricks, that stuff is not really usually interested in teaching things as much as its here to get algorithm points. it used to be a lot less of a thing and i feel sorry for people that are learning with this so saturated in the space ngl definitely steer clear off pinterest too. they wouldnt need to cocomelon you if they had something useful. did you know straight up art lecture recordings are out there btw? /
if you want an overview of a broad variety of things you want a book. yes i know. they are all fairly useful i would personally say and if you do not have a library in your immediate area, did you know the internet archive lets you borrow books digitally if you have an account? for human anatomy i really recommend the morpho series, for animals my go to was Gottfried Bammes, and i cannot recommend the Understanding Comics and Making Comics for sequential art, but generally speaking, books often want to appeal to people that are just starting out, so most of them that have a technical drawing aspect at all will help a beginner in some capacity. if you dont yet know which ones are 'good' i generally recommend looking into ones that mention the author is an art professor in the back /
important note: sometimes people consider the text on the page in those books as filler and Only look at the diagrams. that's not the case, you do in fact learn things if you read it /
also when reading those books take care to not just copy down the process but try your best to understand why. its not so much what it looks like so much as the thought process behind it /
use gesture drawing exercise tools like sketchdaily.com [if you do not wish to see nude models make sure it's filtered to clothed] if you do not yet know what gesture drawing is, that's a keyword to look up /
The secret sauce to drawing any creature is its bones and muscle. Trouble with faces? draw some studies off of photos of replica skulls. struggling to get what the hell is happening with the neck? look up a diagram of the neck muscles. a lot of 'anatomy for artists' resources are ultimately just translations of the scientific fact, so if youre not finding anything good there, go to the source! ive been doing that a lot lately. /
watch speedpaint videos! i know they dont come up as often on youtube naturally anymore but you get a Lot of insight into things from watching people whose art you like [and even don't like!] draw /
Draw real life things from real life. your pet or perhaps family member or friend, strangers on public transport, buildings outside it doesnt actually matter what just that you do it. photographs lack real life depth information most people's eyes can capture irl /
i know it can be kind of difficult these days but you shouldnt discount or ignore traditional even if you are not planning to focus on it. understanding of irl art mediums is really valuable even if you plan on being primarily digital because the less predictable nature of them builds confidence and helps you be more present among other benefits. its one of the many reasons youre not gonna find life drawing classes that allow students to just whip out a tablet /
hang out with your artist peers! ideally in spaces where people are actively making something like OCTs[Original Character Tournaments], game jams, even fandom spaces can work though i do not recommend that last one so much because they tend to be less interested in you as a person and more just seeing free art of their favorite guy and arent very friendly to beginners ngl. best find spaces specifically for original work, people tend to be more supportive there.
there really isnt a strict order in which you have to learn things. you can in fact go all in on turtle anatomy for a while if thats what interests you, why not, etc. but some good places to start are, in no particular order
anatomy of the face
anatomy of the torso
rotating cubes in 3d space [volume and perspective. generally not that scary i just find people overthink it a lot and get anxious]
how motion works[even if youre not at all animation inclined]
composition, color, contrast
various linework techniques, various panting techniques
mammal anatomy, bird anatomy, reptile anatomy, bug anatomy's nice too
basic plants, basic buildings, basic machinery
Anything deeper than that will be dictated by your own interests, this is just what would make you a very adaptable generalist. look up references whenever you struggle, study things you find visually cool, let your interests guide your research for the most part
but also, if i were to call Anything my big cool piece of advice, it's don't just sit around and aimlessly wait for your art to get 'good enough' to do something cool. start some little projects [and i do mean little. like under 5 pages of comic, a silly animation to a Short sound byte etc] and look up what you Directly need for them try your best. like a one day project, then a three day project then maybe a week long one, etc dont go right into anything long term right away, get practice finishing things first!
[youd be surprised what comics make you draw too, my last thing just had a random model t car in it for fun]
Because nothing, and i do mean nothing will teach you to make art in practice quite the same as making even a tiny project featuring the thing you want to learn
9 notes
·
View notes
Text
Procedural Cyclic Slash
Get the code for this shader here -> https://godotshaders.com/shader/procedural-cyclic-slash/
This is a really jank shader, but it looks pretty nice when the values are just right. So that's what this post is for! I'll help you with understanding the uniforms and value setup and leave some general tips so you can experiment easily on your own.
Quick Setup
Here is a quick rundown on how to get something similar to the video above:
Create a MeshInstance3D node and set the mesh to QuadMesh
Apply the shader as a Material Override (GeometryInstance3D -> Geometry)
Set these values:
Animation.Derive_Progress = -1 Animation.Time_Scale = 0.25 Shape.Rotate_All = 285 Shape.Noise = - New NoiseTexture2D - - Width = 512 - - Height = 128 - - Seamless = True - - Noise = - - - New FastNoiseLite - - - - Noise_Type = Cellular - - - - Fractal.Gain = 4 - - - - Cellular.Distance_Function = Manhattan Shape.Width_Gradient_Mask = - New GradientTexture1D - - Gradient = - - - New Gradient - - - - Offsets: 0.2, 0.5, 0.52 - - - - Colors: #FFFFFF, #000000, #FFFFFF Shape.Length_Gradient_Mask = - New GradientTexture1D - - Gradient = - - - New Gradient - - - - Offsets: 0.25, 0.4, 0.6, 0.65, 0.7 - - - - Colors: #FFFFFF, #7F7F7F, #000000, #7F7F7F, #FFFFFF Shape.Highlight = - New GradientTexture1D - - Gradient = - - - New Gradient - - - - Offsets: 0.5, 0.52, 0.54 - - - - Colors: #000000, #FFFFFF, #000000 Coloring.Color_Lookup = - New GradientTexture1D - - Gradient = - - - New Gradient - - - - Offsets: 0.0, 0.1, 0.2 - - - - Colors: #BF40BF, #008080, #ADD8E6
Overview
This shader works by taking a noise texture and wrapping it around the center point of UV1. The curved noise texture is then masked twice to set its width and "length" and an additional texture is applied to add a highlight effect. The shader uses values of gray, a lookup texture, and UV.x to apply colours. Lastly, motion is created by shifting the UV sample of the original noise texture and running the combined grayscale texture through a smooth step function to determine its alpha. This is a text-based shader written in Godot's Shading Language. Sorry, I can't help you implement it in Unity or some other engine or software. --
Animation Uniforms
The Progress uniform sets what point in time the shader is in. This only works when the Derive Progress uniform is set to (0). You can pretty much use the progress uniform to scrub through the shader's animation. If you set the progress value in code or through an animation player, you can control the animation as you like. Derive Progress changes what drives the shader's animation. If set to (-1), TIME will progress the animation. If it animates too quickly, you can use Time Scale to speed it up or slow it down. If set to (1) the particle LIFETIME will progress the animation. This is useful if you plan to set this shader as the material of a particle in a GPUParticles3D or CPUParticles3D. Ease Progress gives you a bit of control over how the shader's animation progresses if you are driving it with TIME or LIFETIME. When set to (0) no easing will occur. (-1) Will ease in exponentially and (1) Will ease out exponentially, but if you have the chops you can tweak this by changing the functions in the shader code. Time Scale alters the speed of the animation when Derive Progress is set to (-1). Anim Rot Amt controls how much the shader rotates as it animates. Set it to (0) if you want the effect to remain in the same place instead of rotating around the center of UV1. This value is put through an easing function, so it doesn't adjust linearly. I personally, wouldn't try setting this to anything other than (0) or (1). --
Shape Uniforms
Zoom controls the size of the effect on the quad. The value is interpreted inversely, so setting a larger value will make it smaller. The effect will repeat if you set this value above (1). Rotate All lets you rotate the effect on the quad. Use degrees. Base Noise generates the main shape for this effect. You can use any type of noise and I encourage you to experiment. Just make sure it's seamless so you don't get any odd artifacts. By setting the noise to be wider than it is tall, you can stretch out the shapes it makes which I think better resembles a slash. Decreasing the dimensions of the noise can lead to bigger streak blobs and softer-looking shapes depending on the noise used. I'd look into this if you want a more stylized/cartoon-looking effect.

Width Gradient Mask masks the Base Noise in a way that controls the width of the final effect. Like Base Noise this will be wrapped around the center point of UV1 so I suggest using a GradientTexture1D. You can do some cool things here if you're willing to experiment (and possibly alter the code) just make sure this is set to a grayscale image. The way I wrote the math dictates that darker colours will be kept and light colours will clip, so use white to control what to cut out and black to control what to keep. A gradient that transitions from white to black back to white is a good place to start.

Length Gradient Mask masks the Base Noise in a way that controls the "length" of the final effect. This also controls how it animates sorta. I can't really explain it, but how this overlays the noise will alter how the smooth step function works... I think. White denotes the edges and Black the center. If you use a gradient here, moving the white values closer to the center can help with shaping. I also suggest using gray so you can better shape the length of the effect.

Highlight is overlayed on the effect. like everything else, it is wrapped around the center point of UV1. A thin white stripe works best. Unlike the other textures this one is played straight, so black won't appear and white will. Moving the white stripe closer to the right edge of the gradient will move the highlight effect to the outside of the slash, left will move it inside. I like to set it so it's a bit closer to the right so it appears on the outer edge. If you don't want a highlight at all leave this uniform empty. --
Coloring Uniforms
Emission Strength controls how much it glows. If it doesn't glow in the editor, add a world environment node and enable glow, you will also need this in your game scenes fyi. Mix Strength controls how much the Color Lookup is applied to the effect. If Color Lookup is applied, decreasing this value will give a darker appearance. At (0), the effect (excluding the highlight) will appear black. You can add extra glow by increasing this above (1).

Color Lookup is used to color the effect. I think I screwed up the math, so just ensure the colors you want the shader to sample from are close to the left side of what you set here. Three colors is pretty nice, I like to put darker colors closer to the left side and lighter ones to the right. --
Final Notes
Sorry for this lengthy post. I've had issues before where a shader I found on GodotShaders was a bit obtuse and I didn't want others to run into that with this one. I've spent quite some time trying to figure this out but I still feel this is a pretty meh effect. I think I need to look into how people animate shaders using a static image and clipping/stepping/smooth stepping it. If you have any good resources for shaders I'd be interested to hear about them. I'd prefer not to get any articles about visual or node-based shaders since I keep fumbling how to convert some nodes into functions or what sorta math is going on, but at this rate, I'll take whatever I can get lol. Hopefully, this shader saves you some time or teaches you something new! If you have any questions (and I can answer them) don't hesitate to ask. However, I'd prefer if you contacted me on Discord. I'm in Godot Café, Godot Engine, and the Godot Effects and Shaders discord servers as (@)Aiwi.
17 notes
·
View notes
Text
so you want to use OBS
hello! i’ve decided to compile information on my OBS setup and some resources that have helped me along the way. this is mostly for personal reference, but maybe others can make use of this information!
some notes before i get into it:
i use OBS for both offline recording and (twitch) streaming. any footage i record is edited using DaVinci Resolve 18, which is free.
most of my OBS captures are of video games (through a USB capture card, specifically elgato), and the occasional screen/application capture (like clip studio paint, and sometimes PC games).
as such, the information here is reflective of these experiences. this post is not comprehensive to all of OBS’s features- this is just an overview of the settings and configurations that are most relevant to me.
with that out of the way, all the information will be under the cut!
Basic Setup
file format:
how to change: settings -> output -> recording -> recording format -> press “apply” once finished!
I save most of my recordings as .mkv files- it supports multi-track audio! i prefer .mkv over .mp4 because if your power goes out, you still have a recording to work with.
.mkv files can be read by DaVinci Resolve without an issue- but for Adobe software, they'll need to be remuxed to .mp4 within OBS! (file -> remux recordings -> press the … to select a file -> press the “remux” button)
video resolution and framerate:
how to change: settings -> video -> output (scaled) resolution
my obs canvas is @ 1920 x 1080p (16:9)
i switch between 720p and 1080p as needed! if you're concerned about space, you can probably just go for 720p. i also record at 30 fps, simply because that’s what my capture card supports.
video bitrate:
how to change: settings -> output -> encoder settings (located in both the streaming and recording tab) -> press “apply” once finished!
bitrate is a bit of a doozy to explain, but the most important thing to know is that bitrate affects your video’s quality. lower numbers = lower quality, while higher numbers = higher quality.
generally speaking, you'll want higher bitrate when you're recording things with high depth of information (e.g. you’d want a higher bitrate for something fast-paced like splatoon, compared to a slower-paced game like animal crossing).
my video bitrate is either set to 3000 or 4000 kbps! and here's some of my other (related) settings while i'm at it:
you can put your bitrate at much higher values than me if you're a stickler for quality- but keep in mind that a higher bitrate means:
bigger file size
more information to upload (when streaming)
your computer will need to encode more
i’d recommend reading twitch’s guidelines on encoding, bitrate, resolution, and framerate to get an idea of what values to pick. for people who are doing offline recording or streaming on a different platform, i suggest googling the appropriate resources!
multi-track audio:
this is mostly applicable to anyone looking to do video editing!
multi-track audio basically allows you to separate your audio sources (e.g. discord, game audio, and your own microphone) into different tracks.
this is an immensely helpful tool because it lets you adjust audio levels in post-production (editing). some examples of how this can be used:
increasing someones microphone volume if they speak too softly
increasing/decreasing game audio
muting swear words/sensitive information
completely muting voice call + microphone if you want to upload a no commentary video
and more!
to set this up, take a look at your audio mixer panel, and press the ⚙ icon. this will bring up advanced audio properties.
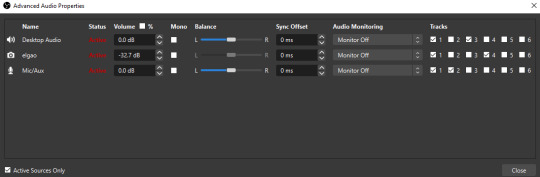
by checkmarking a track box, it puts the audio on that track. to make the above screenshot easier to digest:
track 1 consists of ALL three audio sources- desktop, elgato, and microphone.
track 2 only has the microphone audio.
track 3 only has desktop audio (i use this for voice calls)
track 4 only has the elgato capture card audio (game audio). the volume has also been lowered so that any speaking voices can be heard clearly.
tracks 5 and 6 are unused.
you might be wondering, “why do all three of these have 1 checked off?” this is what i call the universal audio track. i recommend having a universal audio track for a few reasons:
when you stream from OBS onto twitch/youtube- you have to select ONE audio track.
it’s also a nice backup in case you didn’t separate your audio correctly.
if for whatever reason you need to move around your individual audio tracks in editing, the universal track acts as a nice reference point.
mark off your audio tracks for each audio source as you see fit! once you’re finished with the advanced audio properties, go to settings > output.
for the streaming tab, you’ll want to have the number of your universal audio track selected. in my case, that will be audio track 1.
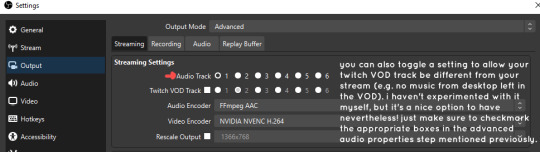
for the recording tab, checkmark all the audio tracks that are applicable to you (in my case, audio tracks 1, 2, 3, and 4). by default, only audio track 1 is selected.
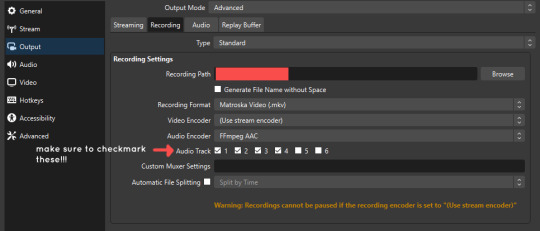
if you don’t check off the additional audio tracks in the output > recordings section, you will not have access to those audio tracks in editing, and you won’t be able to edit your audio tracks independently of each other. so don’t forget to do this! 👍
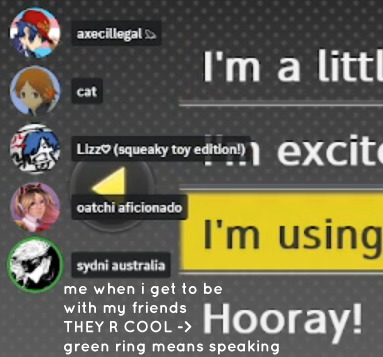
custom browser docks
custom browser docks are a great tool for when you’re streaming and want to have access to your twitch chat and/or activity feed! (or if you wanted to have some other web browser on OBS).
to create one, go to docks -> custom browser docks.
you’ll be given a table interface that asks you to put the dock name and URL. for streamers who want to have chat and alerts available, do the following:
on twitch’s homepage, go to the upper right and click your icon
then, click creator dashboard
once you’re on your dashboard, go to stream manager
click the vertical “...” on my chat OR activity feed.
press “pop-out chat” OR “pop-out activity feed”
copy and paste the link into the table back into OBS
press apply once you’re done
click and drag the docks around at your leisure to put them where you like!
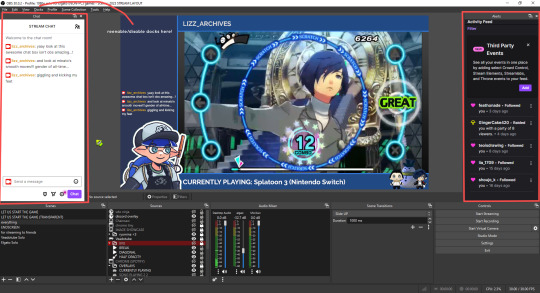
if you ever decide you don’t want to have something on your OBS dock (or want to bring something back), go to the toolbar, click “docks,” and click the appropriate dock!
third party things
a section of optional things that you may enjoy having.
streamlabs alerts
this is basically for anyone who streams and wants to have their chat and/or follower notifications visualized on screen!
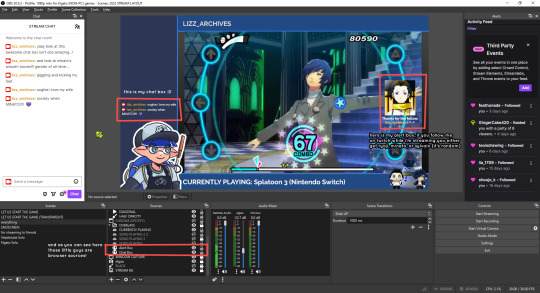
streamlab alerts can be added to OBS by adding a browser source into your scene, and the specifics can be customized on streamlabs itself. it’s pretty self-explanatory, so i’ll just leave a link to streamlabs website, where you can log in using the streaming platform of your choice: https://streamlabs.com/
discord overlay
this is a browser source that can be set up to show people who are in a server's voice chat and who speaks. i recommend this to people who make multiplayer content- it can help viewers distinguish who is who but also it can be helpful in editing.
to set this up, go to https://streamkit.discord.com/overlay, click “install for OBS,” and after logging in with discord, go to “voice widget” and click the server and voice channel you want.
you are able to apply CSS if you'd like more control over the visuals, but the standard layout tends to work fine for me! a search of “discord overlay css” on youtube can help you get more information.
veadotube mini
this is a pngtuber software that a friend recommended to me! no webcam is required- mouth opening and closing is based on your microphone input!
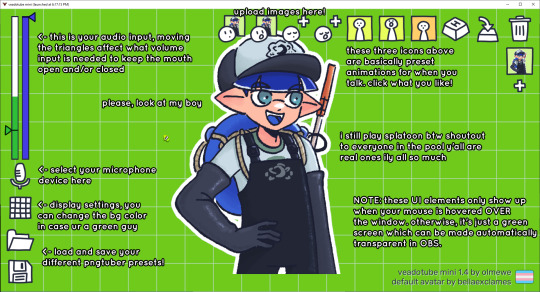
you can download it here (it’s pay what you want!): https://olmewe.itch.io/veadotube-mini
for a proper tutorial on how to use it, i recommend checking out the app's documentation, which you can read here: https://veado.tube/help/
source record
have you ever wanted to stream something with a chat overlay/layout, but wanted your recording to ONLY be the gameplay? or maybe you wanted to record BOTH your gameplay AND your webcam so that you can have a crisp zoom-in on your webcam!
source record is a third party plugin that can help you with that!
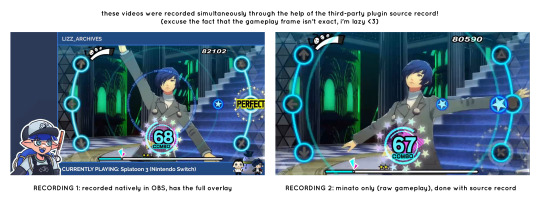
the general gist of source record involves applying the “source record” filter on either a scene or source, and customizing the encoding settings accordingly. the exact details of how to set it up is beyond the scope of this post, so I'll just direct people to this video instead (it was very helpful to me):
youtube
⚠ a quick note about source record: this plugin can be intense for your computer. be sure to do test recordings and the like to see what your computer can handle (and see if the recordings come out the way you like). it took me a few tests before i settled onto something i liked!
you can download and install source record here: https://obsproject.com/forum/resources/source-record.1285/
vdo.ninja
have you ever wanted to do a collaborative video or stream where you feature someone else’s video on your stream? or maybe you’re doing a multi-person streaming event! vdo.ninja is the perfect tool for you!
vdo.ninja turns your OBS virtual camera into a browser source link- which your collaborator can add on their stream! this is a new tool that i’ve added to my arsenal recently- since my friend and i are planning to stream a side order challenge together! i’ve still got to iron it out a bit more, but i like what i’ve used of it so far.
try it out for yourself at their website here (with documentation and demos available on the homepage!): https://vdo.ninja/ (no downloads required!)
ok! i’m set up! what now?
and with that, that’s all of the settings and tools that i thought would be worth mentioning! while most of my setup was written with video games in mind, some of these plugins and setups may be applicable to other types of videos (e.g. tabletop gaming with a physical camera)!
now that i’ve outlined all these settings, i have one more thing i have to say: regardless of what you're using OBS for, do a test recording before doing anything “official” with it. this recording can be as short as 30 seconds. it’s a good habit to develop that can make sure your streams/recordings turn out the way you want them to!
here are the kinds of things i like to check! it’s not an exhaustive list, but this can be a starting point:
video:
does my video look the way i want it to (and can my computer handle that)?
can my computer handle the load of encoding? - OBS will note in the bottom if the encoding is overloaded. if it can’t handle it, turn down your bitrate or adjust other encoding settings (e.g. i had to toggle psycho visual tuning OFF because it was causing lag)
this is especially the case if you're recording PC games- you don’t want to have slowdown on either your game or the recording!
audio:
are my audio sources (e.g. desktop audio and microphone) correct? - if you plug/unplug devices a lot, be sure to check this (settings -> audio).
are any of my audio sources muted? - make sure you don’t have anything on 🔇 if you don’t want it to be muted! otherwise the audio will be lost forever… (i lost my friend’s VC audio once… it was sad)
are my audio tracks separated properly? - requires you to boot up your editing software, but it's worth doing! for the test recording, just have something from all your sources playing at once, and see if your editor has things separated into tracks.
can i hear the voices clearly? or does the music and/or game overpower them?
if for whatever reason your OBS crashes, or you want more information on anything “critical” or “warning” worthy in your set-up, you can go to help > log files > upload current log file > analyze. crash logs currently can’t be analyzed by the log analyzer- but they’re a valuable tool when asking for help on the OBS forums!
and that’s all! for real, this time. i hope that some of these tools and settings can help anyone wanting to get more out of OBS. there’s definitely other things i didn’t touch upon (e.g. audio filters for noise compression, suppression, etc.), so i suggest doing your own research and trying things out!
happy recording/streaming, and thanks for reading! ✨
#lizzy speaks#this was a fun little write up!! i've been slowly getting some of my friends into video making teehee and its SO FUN!!!#(digital) video is like one of my other passions next to art. everyone say thank you splatoon for getting me back into it again <3#i've been using obs since like 2018 so i wanted to share some of the things i learned for funsies... i really love video...#but also i like having reference posts like this in the case people have questions they want to ask me...#because i don't always remember what video tutorials i watched and it's nice to document that somewhere...#warning to anyone who reads it this is like 2.1k words. i do want to stress that this isn't comprehensive but there's still a lot of info#that i wanted to put for this post...! that said topics like designing your own stream layout + assets for it are NOT in the scope of this#post and nor is this a beginner's guide to obs (i wrote this with the assumption that you know how to record and/or stream and that-#people already have an idea of how to use scenes and the different types of sources obs can use).#i hope everyone's had a lovely march 5th! i would love to look at the fanart but im still not done with reload...#but im hoping to finish it by the end of the month!!! yipee!!!#Youtube
50 notes
·
View notes
Text
Hey you! Yes, you! Learn how to use GZDoom!
Also if you see this post, please reblog it if you think it's good, like I don't think Tumblr's algorithm (that kinda exists) will like it.
Hi, I'm Lynn "WJB" Beck, and I'm here to tell you about an exciting new old game engine that is extremely easy to use for not just making original games, but also mods and animations and stuff!
And this engine... is GZDoom.
GZDoom is an enhanced sourceport of the 1993 first-person shooter, demon-punching simulator and stress-test for pretty much any technology that contains a computer. As opposed to more low-key and/or "vanilla" sourceports like Chocolate Doom or Boom, GZDoom allows for a lot more options, including Build Engine-style voxels, several types of dynamic lighting, and even stuff that was originally exclusive to specific Doom Engine games, like Strife's light RPG mechanics, This means that it can be used to make extremely impressive "total conversion" mods, and even fully original games with entirely custom stuff!
This guide covers how to get started, and a basic overview of how certain things work (get ready to learn about lumps!).
Getting Started
Ok so before you can start Doing The Thing, you need to... install some software! Don't worry, it's only like 4 and they're fairly lightweight.
Go to this website here and download the most recent version of GZDoom. You will need this to actually run your game.
Go here and get Slade. You will need this to import custom graphics and audio, as well as to use text-lumps (which are basically necessary, even if you're making a basic custom level set, and I will explain why further down).
This ZDoom Forum topic is where you can get Ultimate Doom Builder. While there are other Doom mapping tools, UDB is what I personally use, and it's extremely beginner-friendly while also being fairly versatile. It even has a built-in script editor, so you can modify a script and then immediately jump into testing to see if what you've done has worked!
Finally, you need a copy of specifically Doom 2. You could use Doom 1, but in my opinion Doom 2 is better because it has a lot more stuff than the first game, and - let's be real - you'll probably be doing a lot of vanilla mapping to get to grips with the editor before you can start making your big ambitious game (which is what I'm doing over on my modding sideblog, check it out). I'll leave this one up to you. EDIT: I forgot that Freedoom exists. That's also good.
Mounting stuff into Ultimate Doom Builder
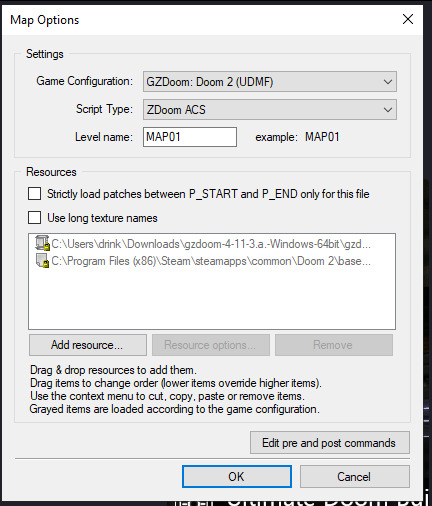
Next, you'll need to get UDB set up. This is fairly easy. First open UDB and, as soon as it starts up, go to the top-menu and click "Tools", then go to Game Configuration. Select "GZDoom: Doom 2 (UDMF)" and click "add resource"; using the attached file-explorer, locate the Doom 2 folder on your computer's file system and add DOOM2.WAD to the list of resources, then do the same with gzdoom.pk3 in the GZDoom folder (making sure to switch the "Add Resource" tab from "From WAD" to "From PK3". Click Ok, and you're done!
If you want to put your custom graphics into the game, you simply create a WAD file in Slade, put your graphics in (more on that later) and save it; then when creating a map in UDB, this box will appear:
If you click "Add resource" here, you can then select your custom wad and use any assets, code etc. in your map!
How Slade works
This bit is a bit more complex because it deals with multiple file formats and methods of importing stuff, but I'll start simply by explaining textures, flats, sprites and patches.
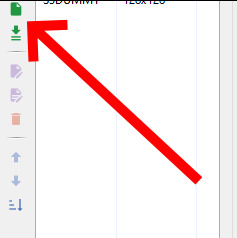
Before I do that though, I need to talk about Markers. To define images as a sprite, patch or flat, you need to put them between a pair of Markers with specific names, which you can create by clicking the "New Entry" button:

"Empty (Marker)" is selected by default, so all you need to do is name it. The naming format is [LETTER]_START to start a section and [LETTER]_END to end one; S_Start/S_End are for sprites, P_Start/P_End are for patches, and F_Start and F_End are for flats. You can, additionally, further subdivide this by making another pair of Markers inside a Start/End pair with a number after the letter, but I'm not sure if this does anything (my only experience with it is that the Doom 2 wad file does this).
Now to explain how these things actually work! First, sprites. A sprite is an image that represents an object or creature in the game, and a cool thing that GZDoom does is let you use generic PNGs instead of Doom's proprietary GFX format. Sprites use the following naming scheme: a four-letter identifier, a single character denoting what frame of the animation the image represents (the Arch-Vile, which has the most sprites out of any monster in Doom 2, has frames that go from A all the way to Z, and then [, \ and ]), and finally a number from 0-8 that indicates the angle the Thing (that's the technical term for a Doom Engine entity, by the way) is at. Using the Imp as an example:

The "0" angle just means that the sprite should look the same regardless of the player's angle; this is used for items, decorations, the death animations of all monsters (including players), and the two sprites used for Doom II's final boss.
A cool thing about sprite angles is that you can actually make a sprite work for multiple angles; by adding an extra frame-letter and angle-number after the first set, you can do things like have a monster whose left and right walking frames are the same but mirrored by formatting the sprite's name as something like NAMEA2A8 (in fact, the Imp uses this technique for all its sprites apart from its death animation).
Next up, flats! Flats are square textures that are designed to go on floors or ceilings (though you can use them anywhere, including as sky textures!) but lack the flexibility of patch-based textures. You literally just. Import your texture and put it between F_Start and F_End. That's it. That's how a flat works.
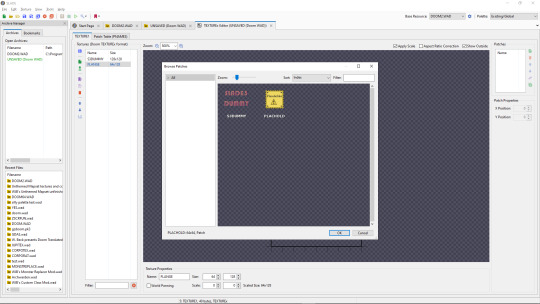
And finally, patches. Patches are complicated, but very easy to use when you know what you're doing. First, put your image between P_Start and P_End, then right click it, put your mouse over the "Graphics" dropdown, and select "Add to Patch Table". You will then be prompted to create a TEXTURES lump; click "Ok" with the default settings. This creates a Texture1 lump, and the "Patch Table" (which is just a list of patches, which I will explain soon), alongside P_Start and P_End if they aren't already present (and a dummy texture). Double-click Texture1 to open it, and then select "New Texture" (you can adjust the scale, too):
Once this is done, go to the top-right corner and click "Add patch":

By default, you only have access to any patches you have assigned, but a cool trick I use in my own mapsets whenever I want to modify an official texture is to copy its Texture1 entry from the Doom 2 WAD, then paste it into my WAD's Texture1 and rename it. This does create copies of the constituent patches in your own wad's P_Start/P_End section, but you can delete those and it will still work fine.
Both patches and Flats are limited to 8-letter names, so be warned.
The actual final thing to talk about is converting PNGs to GFX; this is a simple process, but it can cause issues with colour. Basically, Doom has a very specific palette:

While this can look pretty good, on images it wasn't designed for or that use colours it doesn't feature, it can look pretty bad. For example, if I put this random image I made through the conversion process:
Then it comes out looking like this:
All the more cyan-adjacent hues become more blue, it nuked the antialiasing, and some of the gaps in my colouring are now much more obvious (especially on the fifth character's head and legs).
My point is, only do this if you want your mod to be compatible with more vanilla sourceports, or if you want to reduce the filesize. Otherwise, you're better off just using a strict palette when making the sprites and keeping them as PNGs.
Custom palettes are possible, but like. Literally all you do is click "New Entry", select "palette", name it, click the "Import from" button (purple page with a diagonal arrow on the top-middle of the palette-view window), set the filetype on the file explorer to "PNG", and import your custom palette image (which should be square (non-square images get squished and lose some colours) and 16x16 at the smallest, though the images I normally use are 128x128 because for some reason they're scaled up by a factor of 8, even though they display the same when imported regardless of size). You can even test them out or add them to the in-built palette list, which is nice. If you want it to override the default palette when your WAD is loaded, name the lump "PLAYPAL", which is what Doom's palette is called.
Now we get to talk about text lumps! I don't have much to say. Do the "New Entry" thing, select "Text", and name the file. The ZDoom wiki - which I will be linking to at the end - has information on each type, so check those out.
Map making
This is the final main section of this, and I'll try keeping it fairly brief and simple. Doom maps use four main elements; Vertices, Lines, Sectors, and Things. A Vertex is, well a vertex; it's a point in 2D space that acts as a starting or connecting point on a Line. Lines can be either walls or walkover triggers, depending on how you use them. Sectors can be rooms or shapes on the floor, and have properties such as damaging floors, being "underwater" (the player can swim and sound is muffled), or even having different gravity. Finally, a Thing is any entity that isn't one of those, ranging from monsters to player-starts to decorations, plus some complex technical ones I can't even begin to explain.
Useful resources
I am not good with words, but these places are!
ZDoom wiki - covers both regular ZDoom and GZDoom, plus other sourceports like the multiplayer-focused Skulltag and Zandronum. It has guides about ACS and ZScript, two of GZDoom's most useful tools for scripting maps and Things, respectively, as well as the obsolete "DECORATE" language which ZScript incorporates many elements of.
Dragonfly's Doomworks - mapping tutorial resource. I use their portal tutorial a lot whenever I want to put portals in a map.
Doomwiki - good for looking up monster and weapon stats for if you're making custom Things.
22 notes
·
View notes
Text
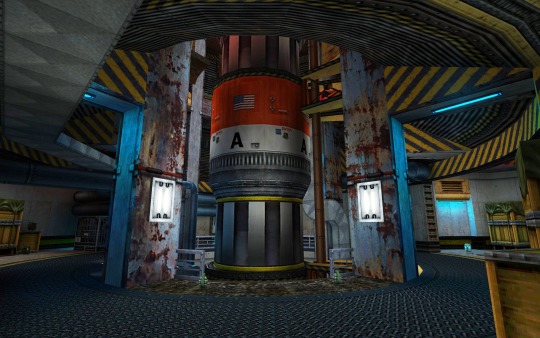
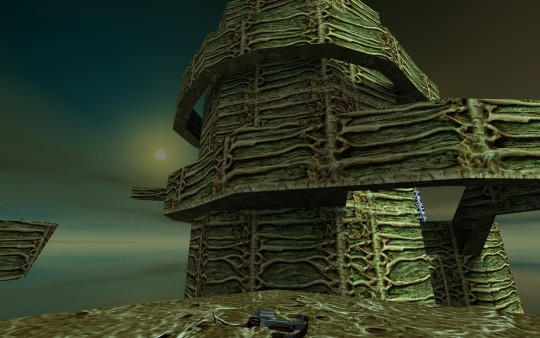
Valve has released a 25th anniversary update for Half-Life.
Half-Life is free to own on Steam until November 20, 2023 10AM PT / 1PM ET.
Overview
BRAND NEW INTERVIEWS WITH THE HL1 DEV TEAM!
youtube
We got the band back together to celebrate this anniversary, and we invited the fine people at Secret Tape to film it all happening. Getting together after all this time was the perfect opportunity to revisit the game as it existed in its earliest forms, and to talk about how and why it eventually took shape the way it did. Check out the film to see what it was like to be a part of the team, way back then.
THE 25TH ANNIVERSARY UPDATE FOR HALF-LIFE INCLUDES:
HALF-LIFE UPLINK
Originally released as a CD exclusive for magazines and hardware manufacturers, this mini-campaign was built by the Half-Life team right after the game went gold. As this was many people's first experience with Half-Life, we thought it was finally time to bundle it with the main game—no sound card purchase necessary.


4 NEW MULTIPLAYER MAPS
Built by Valve level designers, these new maps push the limits of what's possible in the Half-Life engine.
CONTAMINATION
Two-foot-thick steel doors block off access to this contaminated waste facility, which has questionable scientific goals at best. Strap on a gluon gun and roast all intruders.
POOL PARTY
Enjoy a relaxing stay at this abandoned Xen outpost built around a cluster of soothing healing pools free-floating in space. How do you breathe here? It doesn't matter!

DISPOSAL
Processing Area 3, a massive radioactive waste plant gone quiet. Tons of room for you and your colleagues to do experiments with a Tau Cannon or some hand grenades.
ROCKET FRENZY
The creaking weight of this decaying orbital satellite launch facility somehow feels familiar… If we could switch on the oxygen lines, power, and fuel, we might just be able to light this candle.
UPDATED GRAPHICS SETTINGS
Play the game the way it looked in 1998, but on a modern monitor.
Widescreen field of view!
Option to disable texture smoothing on the GL renderer!
Lighting fixes including the long-lost GL Overbright support!
Software rendering on Linux! Crisp colors, animated water, and unfiltered textures!
CONTROLLER AND STEAM NETWORKING SUPPORT
A proper gamepad config out of the box!
Added support for Steam Networking! Invite your friends or join games instantly with no fuss.
STEAM DECK SUPPORT!

We finally put our game through our own “Verified” tests, and... we failed super hard. So we fixed it! After re-testing the game, Half-Life gets to officially wear the green checkmark.
Now you can play Half-Life on the best handheld gaming computer in the world in glorious 800p with improved controls and UI.
UI SCALING SUPPORT FOR HIGHER RESOLUTIONS
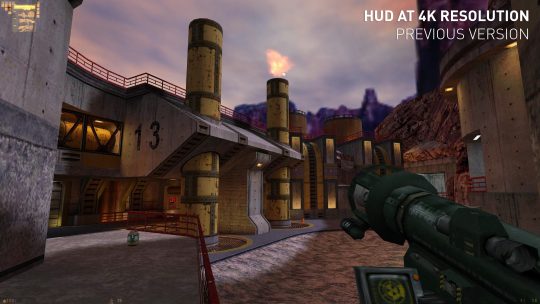

The entire UI has been reworked to scale at larger screen sizes. We built most of this stuff for 640x480 CRTs and apparently some of you have upgraded since then.
RESTORED CONTENT
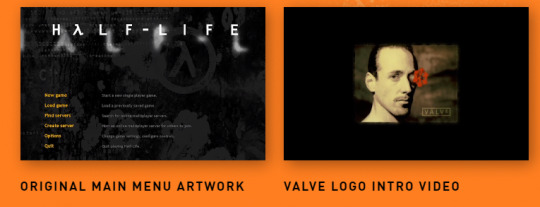
We brought back the classic Valve logo video with its iconic music and reskinned the menu to match the 1998 build.
IVAN THE SPACE BIKER AND PROTO-BARNEY
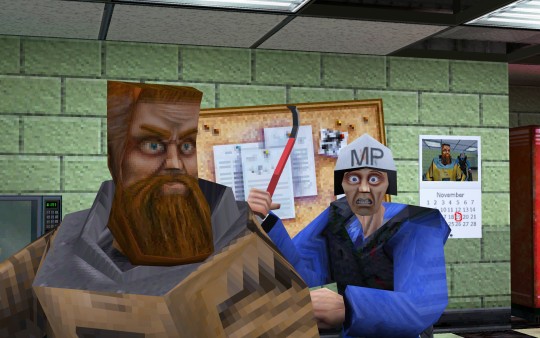
After all this time we finally shipped the original heroes from the alpha builds of Half-Life, available as multiplayer skins!
AS WELL AS THESE RARELY-SEEN EXTRAS!
In 1999, Valve released a CD called Half-Life: Further Data at retail stores, and we're finally including much of that content.
THREE MULTIPLAYER MAPS

Double Cross

Rust Mill
Xen DM
TWO MP PLAYER MODELS

The Half-Life: Further Data CD also included some multiplayer skins made by the original team; we've brought back this incredible skeleton (now with tintable eyes!) and fan-favorite Too Much Coffee Man.
DOZENS OF SPRAYS

While playing a bunch of multiplayer matches we kept wanting more sprays... So we grabbed several megabytes of them from the Further Data release!
BUG FIXES AND CHANGE NOTES
New Content
Now Verified on the Steam Deck (and our native Linux runtime has been set as the default).
Half-Life: Uplink — the original standalone Half-Life demo — has been added to the game, and is accessible through the "New Game" menu.
Added four all-new Half-Life Deathmatch maps: contamination, pool_party, disposal, and rocket_frenzy
Added three old Half-Life Deathmatch maps formerly available only on the "Half-Life: Further Data" CD: doublecross, rust_mill, xen_dm.
Added Ivan the Space Biker, Prototype Barney, Skeleton, and Too Much Coffee Man as player models to Half-Life Deathmatch.
Added dozens of new sprays formerly available only on the "Half-Life: Further Data" CD.
Added support for Steam Networking, allowing easy multiplayer via Steam's Join Game and Invite features.
Added support for Steam Friends Rich Presence, allowing your friends to follow your journey through Black Mesa.
Nostalgia
Brought back the original Valve Intro video. Can be skipped with the "-novid" launch command.
Updated main menu to a design inspired by the game's original 1998 main menu.
Changed the default models to the original (non "HD") models.
Gameplay Changes
Improved physics for throwing grenades.
Improved randomness for initial spawn points in multiplayer.
Improved satchel charge controls: primary fire now always throws a new satchel, and secondary fire always detonates.
Fixed push-able entity movement being based on framerate.
Fixed players with high framerates freezing in place on death in multiplayer.
Fixed some cases where the player could get stuck in place on level transitions.
Fixed some cases where characters would interrupt important dialogue with their "greetings" dialogue.
Fixed weapon view-bob angles.
Fixed red barrels at the start of Surface Tension not launching as intended.
Fixed Snarks attacking FL_WORLDBRUSH entities (such as func_walls).
Fixed players sometimes failing to deploy a snark while crouching and looking down.
Fixed certain convars ("pausable" and "sv_maxspeed") being set to incorrect values when entering a singleplayer game after a multiplayer game.
Fixed singleplayer auto-aim setting being changed when entering a multiplayer game that disallows auto-aim.
Fixed the flashlight HUD showing empty after loading a savegame.
Fixed rockets in CONTENTS_SKY not always detonating.
Fixed incorrect bullet impact sounds for NPCs.
Fixed gauss gun making a loud static noise if it was charged across level transitions.
Fixed a crash in mods that display keybinds in their UI.
Fixed singleplayer weapons not auto-switching away when exhausted (grenades / snarks / satchels / etc)
Fixed interpolation artifacts when animated models are moved by other entities.
Fixed some buffer overflow exploits.
UI Changes
Main-menu background and buttons have been reskinned, and now scale based upon screen resolution without stretching, supporting background image layouts up to 3840x1600.
In-Game HUD now uses double or triple sized sprites when playing at higher resolutions.
UI dialogs and in-game fonts now scale to improve readability at high screen resolutions.
In-Game HUD HEV suit display has been shifted to the left of the screen, and no longer changes position at larger screen resolutions.
Added an "Enable texture filtering" setting.
Added an "Allow widescreen Field of View" setting to correct non-anamorphic FOVs, for widescreen and ultrawide displays.
Re-organized all the Settings screens to improve legibility, and support controller navigation.
Updated the Pause menu to be aware of the current gameplay mode.
The default server name and multiplayer player name are now based on the player's Steam Persona.
The Steam platform menu has been removed, now that all its features are in Steam itself.
Fixed application icon rendering incorrectly when using the software renderer.
Fixed player and spray images not updating their coloring on the settings screen.
Removed the now very unnecessary "Low video quality. Helps with slower video cards." setting.
Input Changes
Improved support for keyboard and controller navigation everywhere.
Added "Lower Input Latency" option: Synchronizes the CPU and GPU to reduce the time between input and display output.
Fixed issues that caused jerky mouse / joystick input.
(We basically rewrote it all - if you've got a custom Steam Input controller configuration, you should rebuild it from our newly published Official Configuration).
Multiplayer Balancing
Increased the 357 damage from 40 → 50.
Hive Hand reload time has been reduced from 0.5s → 0.3s per shot, and it will be selected at higher priority than the pistol on pickup.
MP5 now always starts it with full ammo when picked up.
Players no longer drop empty weapons, and any that are dropped are reloaded by what's in the dying player's backpack.
Improved client-side prediction to reduce "ghost shots". Like Counter-Strike, consider hitboxes and not just bounding boxes for hits on the client.
Fixed network predicted crowbar swing damage being incorrect.
Rendering
Added supported for UI Sprites and Texture files larger than 256x256.
Added support for UI Font special render modes: "blur" and "additive".
Added setting to turn off texture filtering when using the OpenGL renderer.
Default resolution is now based on the resolution of the desktop, instead of a 640x480 window.
Default gamma has been decreased from 2.5 → 2.2, now that we aren't all playing on CRTs.
Software renderer will now correctly filter out incompatible resolutions, unless there is only 1 resolution available on the display.
Restored OpenGL overbright support.
Fixed fullscreen software renderer crashing on systems that don't support 16-bit color.
Fixed software renderer being stretched when using widescreen resolutions.
Fixed skyboxes and sky color incorrectly carrying over when transitioning maps in multiplayer.
Fixed the game appearing too dark after modifying video settings.
Fixed MSAA in windowed mode.
Fixed mipmap rendering on studio models.
Fixed gluon gun sprite rendering in multiplayer.
Fixed gluon gun sinusoidal noise being incorrect.
Various optimizations to support the newly increased engine limits.
OpenGL optimizations for the Steam Deck.
Engine Improvements for Mod Makers
Increased maximum limit of dynamic sound channels from 8 → 32.
Increased maximum limit of sentences in the sentences.txt file from 1536 → 2048.
Increased maximum number of entities (MAX_EDICTS) from 900 → 1200.
Increased MAX_PACKET_ENTITIES increased from 256 → 1024.
Increased MAX_GLTEXTURES from 4800 → 10000.
Increased software renderer geometry limits: max spans 3000 → 6000, max surfaces 2000 → 4000, and max edges 7200 → 14400.
Cycler and func_button entities can now be the entity target for scripted_sentence entities, and are allowed to speak in multiplayer.
Incorporated func_vehicle entity support from Counter-Strike, for mod-makers to use. Full SDK update will come later, but level designers can use it now.
Native Linux Build
Added support for the software renderer.
Improved font rendering.
Many stability and behavior fixes.
Other
Localization files updated.
Miscellaneous security fixes.
Notes
The previous version of the game has been archived to a publicly visible Beta branch named "steam_legacy", with the description "Pre-25th Anniversary Build." If a mod or feature is behaving in an unexpected way, you may need to run this archived build until the issue is resolved in the default build.
We now consider this anniversary version of Half Life to be the definitive version, and the one we'll continue to support going forward. Therefore, we'll be reducing the visibility of Half Life: Source on the Steam Store. We know Half-Life: Source's assets are still being used by the Source engine community, so it'll remain available, but we'll be encouraging new Half-Life players to play this version instead.
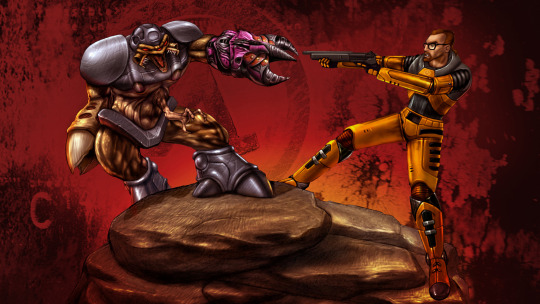
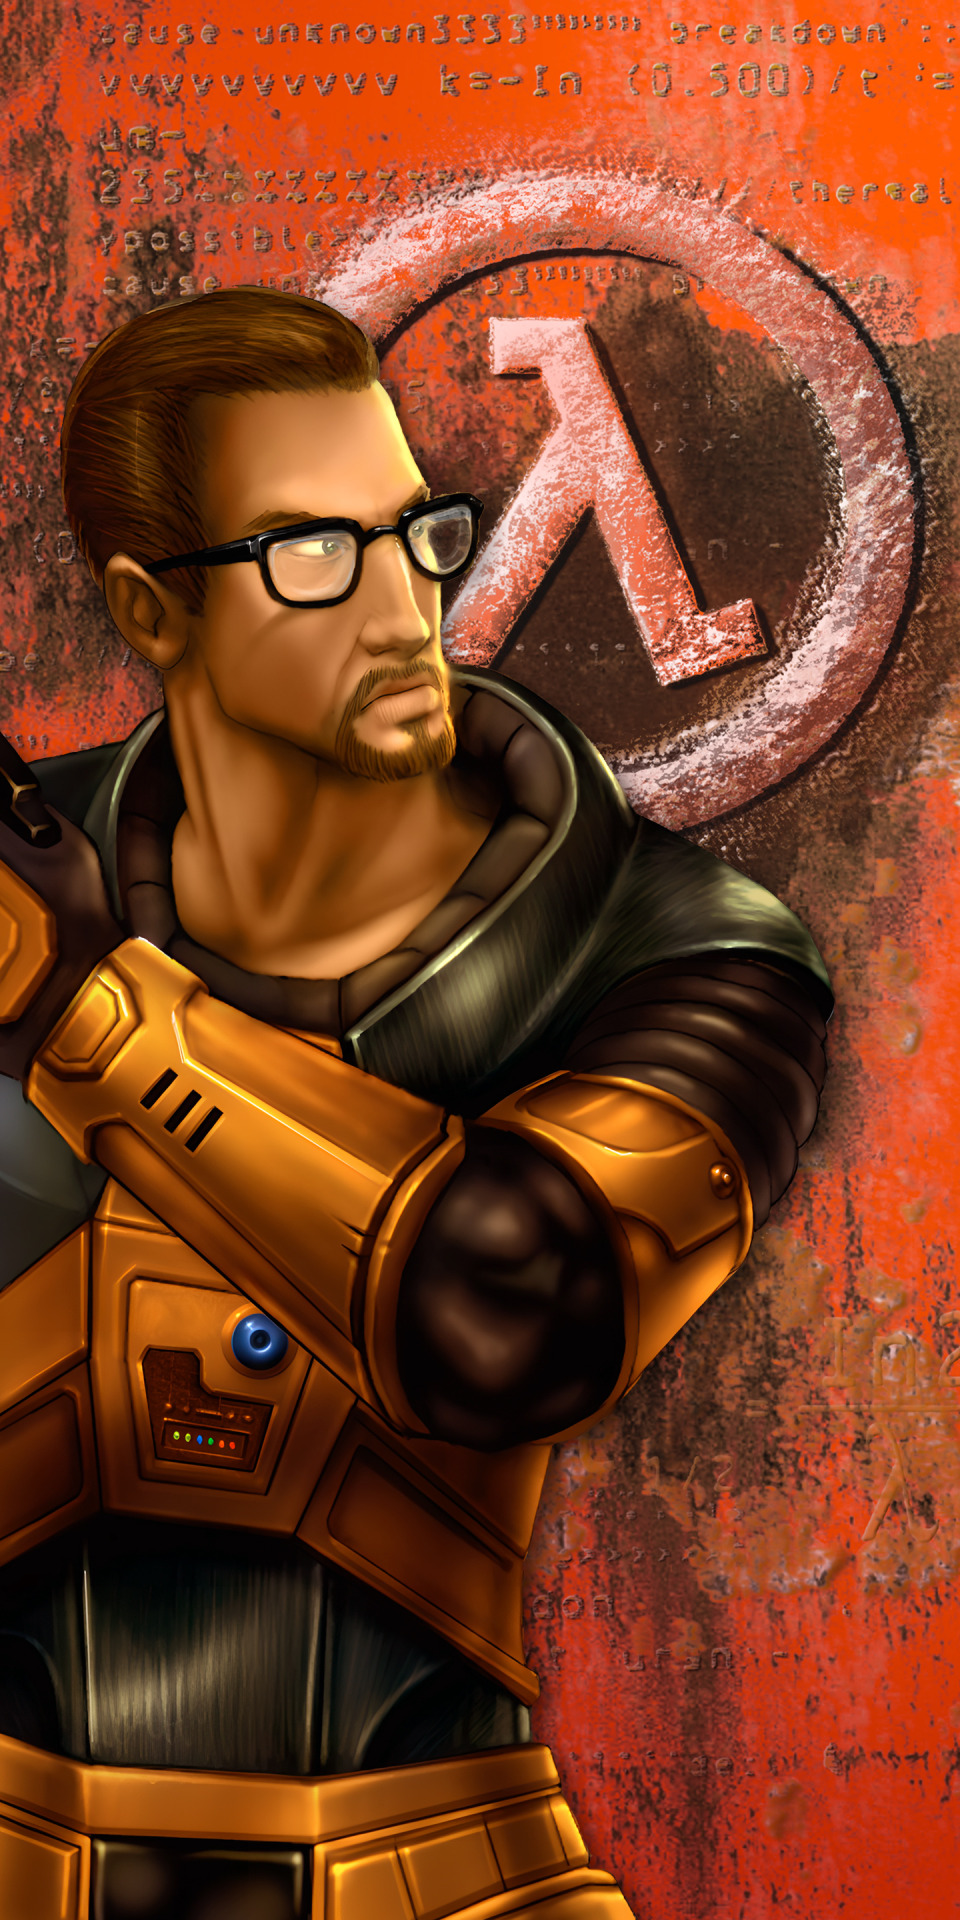
WALLPAPERS
Celebrate 25 years of Half-life by decorating your desktop and mobile phone.


33 notes
·
View notes
Text
Video Editing Course in Chandigarh: A Complete Guide for Aspiring Creators
In today’s digital era, where content is king and visuals dominate every platform, video editing has emerged as one of the most sought-after skills. From YouTube vlogs and Instagram reels to documentaries and feature films, editing plays a pivotal role in crafting a compelling visual story. Chandigarh, being a hub of education and innovation in North India, offers numerous opportunities for individuals aspiring to learn video editing. This article explores everything you need to know about enrolling in a video editing course in Chandigarh—including course content, career scope, top institutes, eligibility, and more.
Why Choose Video Editing as a Career?
Video editing is no longer confined to film studios. With the explosive growth of digital content on social media, OTT platforms, and e-learning, skilled video editors are in high demand across industries. Here are some reasons why a career in video editing is both exciting and rewarding:
Creative Expression: Editing is an art that lets you shape stories, evoke emotions, and deliver impactful messages.
High Demand: From marketing agencies to content creators, every industry needs talented editors.
Freelancing Opportunities: With the right skills, you can work as a freelancer for global clients.
Attractive Salaries: Experienced editors often earn competitive salaries and perks.
Work Flexibility: Many editors work remotely, giving you the freedom to work from anywhere.
Scope of Video Editing in Chandigarh
Chandigarh, with its emerging media landscape, offers numerous job opportunities in video production, advertising, media houses, and digital marketing firms. The city is also home to various regional entertainment channels and film production units, increasing the need for skilled editors.
Moreover, the growing trend of content creation among YouTubers, influencers, and startups in the Tricity (Chandigarh, Mohali, Panchkula) region has further boosted the demand for professional video editors.
What Does a Video Editing Course Include?
A comprehensive video editing course in Chandigarh typically covers both the technical and artistic aspects of editing. While the curriculum may vary between institutes, the following modules are commonly included:
1. Introduction to Video Editing
Basics of video production
Role of a video editor
Overview of the editing process
2. Editing Software Training
Adobe Premiere Pro
Final Cut Pro (Mac)
DaVinci Resolve
Adobe After Effects (for motion graphics)
3. Technical Skills
Importing and organizing footage
Timeline editing
Trimming, cutting, and splicing clips
Adding transitions and effects
Audio editing and sound design
4. Color Grading & Correction
Adjusting exposure, contrast, and saturation
Using LUTs and color wheels
Matching color tones across shots
5. Motion Graphics & Visual Effects
Intro to keyframing and animation
Creating titles, lower thirds, and credits
Visual effects and green screen editing
6. Exporting & Project Delivery
Understanding codecs and file formats
Rendering for different platforms (YouTube, Instagram, etc.)
Backup and archiving best practices
7. Live Projects & Portfolio Development
Working on short films, music videos, or commercials
Creating a showreel for job or freelance applications
Top Video Editing Institutes in Chandigarh
Several institutes in Chandigarh offer professional training in video editing. Here are some of the best:
1. Morph Academy
Courses: Video Editing, Film Editing, VFX, Multimedia
Software: Adobe Premiere Pro, After Effects, Final Cut Pro
Duration: 3 to 6 months
Certification: Yes
Placement Assistance: Yes
2. BigBoxx Academy
Offers short-term and diploma-level courses
Hands-on training with real projects
Strong industry network for internships and placements
3. Chandigarh Institute of Film and Television (CIFT)
Focuses on film editing and post-production techniques
Experienced faculty from the film industry
4. MAAC Chandigarh
Known for animation and multimedia courses
Includes VFX and advanced motion graphics training
5. ThinkNEXT Technologies
Offers certified training in Adobe software
Affordable courses with practical lab sessions
Eligibility Criteria
Most video editing courses in Chandigarh have minimal eligibility requirements:
Minimum Qualification: 10+2 (any stream). Graduates are also eligible.
Technical Skills: Basic computer knowledge is recommended.
Creative Interest: A passion for films, storytelling, or visual media is a plus.
No prior editing experience is necessary, as most institutes start from the basics.
Duration and Fees
Duration:
Short-term Courses: 1 to 3 months (basic to intermediate level)
Advanced/Diploma Courses: 6 to 12 months (includes motion graphics and VFX)
Fee Structure:
Basic Courses: ₹15,000 to ₹25,000
Diploma Courses: ₹30,000 to ₹80,000
Fees vary depending on the course duration, software taught, and institute reputation.
Career Opportunities After Course Completion
After completing a video editing course, students can explore various career paths, such as:
Video Editor
Motion Graphics Artist
YouTube Content Editor
Post-Production Assistant
Film/TV Editor
Freelance Video Editor
Social Media Content Creator
With experience, editors can also move into roles like Creative Director, Colorist, or Visual Effects Supervisor.
Freelancing vs. Job – Which is Better?
Both options have their merits, depending on your goals and lifestyle.
Freelancing:
Flexible hours and location
Ability to work with international clients
Higher earning potential (once established)
Full-Time Job:
Stable income and benefits
Learning from seniors and working in teams
Opportunities for career growth and promotions
Many students start with a job to gain experience and then transition into freelancing.
Tips to Excel as a Video Editor
Practice Regularly: Edit different types of videos to build versatility.
Watch Tutorials: Platforms like YouTube, Skillshare, and Udemy offer advanced tips.
Stay Updated: Editing trends and software features change frequently.
Build a Portfolio: A strong showreel is essential to attract clients or employers.
Network: Attend workshops, film festivals, or online forums to connect with other creators.
Final Thoughts
A video editing course in Chandigarh can be a stepping stone to a dynamic and fulfilling career in the creative industry. Whether you’re a student, professional, or aspiring content creator, learning how to edit videos professionally opens up countless opportunities in today’s visual-centric world. With the right training, dedication, and creativity, you can build a successful career and bring powerful stories to life through the art of editing.
If you're based in Chandigarh or the surrounding areas, now is the perfect time to sharpen your editing skills and make your mark in the digital content revolution.
2 notes
·
View notes
Text
C++ Programming Language – A Detailed Overview
C++ is a effective, high-overall performance programming language advanced as an extension of the C language. Created via Bjarne Stroustrup at Bell Labs in the early Eighties, C++ delivered object-orientated features to the procedural shape of C, making it appropriate for large-scale software program development. Over the years, it has emerge as a extensively used language for machine/software program improvement, game programming, embedded systems, real-time simulations, and extra.
C ++ Online Compliers
C++ combines the efficiency and manage of C with functions like classes, items, inheritance, and polymorphism, permitting builders to construct complex, scalable programs.
2. Key Features of C++
Object-Oriented: C++ supports object-orientated programming (OOP), which include encapsulation, inheritance, and polymorphism.
Compiled Language: Programs are compiled to machine code for overall performance and portability.
Platform Independent (with Compiler Support): Though not inherently platform-unbiased, C++ programs can run on a couple of structures when compiled therefore.
Low-Level Manipulation: Like C, C++ permits direct reminiscence get right of entry to thru suggestions.
Standard Template Library (STL): C++ consists of powerful libraries for facts systems and algorithms.
Rich Functionality: Supports functions like feature overloading, operator overloading, templates, and exception dealing with.
3. Structure of a C++ Program
Here’s a primary C++ program:
cpp
Copy
Edit
#encompass <iostream>
the use of namespace std;
int important()
cout << "Hello, World!" << endl;
return zero;
Explanation:
#encompass <iostream> consists of the enter/output stream library.
Using namespace std; allows using standard capabilities like cout without prefixing std::.
Foremost() is the access point of every C++ program.
Cout prints textual content to the console.
Four. Data Types and Variables
C++ has both primitive and user-defined statistics types. Examples:
cpp
Copy
Edit
int a = 10;
glide b = 3.14;
char c = 'A';
bool isReady = true;
Modifiers like short, lengthy, signed, and unsigned extend the information sorts’ range.
5. Operators
C++ supports, !
Assignment Operators: =, +=, -=, and many others.
Increment/Decrement: ++, --
Bitwise Operators: &,
cout << "a is greater";
else
cout << "b is extra";
Switch Case:
cpp
Copy
Edit
transfer (desire)
case 1: cout << "One"; ruin;
case 2: cout << "Two"; smash;
default: cout << "Other";
Loops:
For Loop:
cpp
Copy
Edit
for (int i = zero; i < five; i++)
cout << i << " ";
While Loop:
cpp
Copy
Edit
int i = 0;
at the same time as (i < five)
cout << i << " ";
i++;
Do-While Loop:
cpp
Copy
Edit
int i = zero;
do
cout << i << " ";
i++;
whilst (i < 5);
7. Functions
Functions in C++ growth modularity and reusability.
Cpp
Copy
Edit
int upload(int a, int b)
go back a + b;
int major()
cout << upload(three, 4);
return 0;
Functions may be overloaded via defining multiple variations with special parameters.
Eight. Object-Oriented Programming (OOP)
OOP is a chief energy of C++. It makes use of instructions and objects to represent real-international entities.
Class and Object Example:
cpp
Copy
Edit
magnificence Car
public:
string logo;
int pace;
void display()
cout << brand << " velocity: " << pace << " km/h" << endl;
int main()
Car myCar;
myCar.Emblem = "Toyota";
myCar.Pace = 120;
myCar.Show();
go back zero;
9. OOP Principles
1. Encapsulation:
Binding facts and features into a unmarried unit (elegance) and proscribing get admission to the usage of private, public, or blanketed.
2. Inheritance:
Allows one magnificence to inherit properties from another.
Cpp
Copy
Edit
elegance Animal
public:
void talk() cout << "Animal sound" << endl;
;
class Dog : public Animal
public:
void bark() cout << "Dog barks" << endl;
; three. Polymorphism:
Same characteristic behaves in a different way primarily based at the item or input.
Function Overloading: Same feature name, special parameters.
Function Overriding: Redefining base magnificence method in derived magnificence.
Four. Abstraction:
Hiding complicated information and showing handiest vital capabilities the usage of training and interfaces (abstract training).
10. Constructors and Destructors
Constructor: Special approach known as while an item is created.
Destructor: Called whilst an item is destroyed.
Cpp
Copy
Edit
magnificence Demo
public:
Demo()
cout << "Constructor calledn";
~Demo()
cout << "Destructor calledn";
;
11. Pointers and Dynamic Memory
C++ supports tips like C, and dynamic memory with new and delete.
Cpp
Copy
Edit
int* ptr = new int; // allocate reminiscence
*ptr = 5;
delete ptr; // deallocate memory
12. Arrays and Strings
cpp
Copy
Edit
int nums[5] = 1, 2, three, 4, 5;
cout << nums[2]; // prints 3
string name = "Alice";
cout << call.Period();
C++ also supports STL boxes like vector, map, set, and many others.
Thirteen. Standard Template Library (STL)
STL offers established training and features:
cpp
Copy
Edit
#consist of <vector>
#consist of <iostream>
using namespace std;
int important()
vector<int> v = 1, 2, 3;
v.Push_back(four);
for (int i : v)
cout << i << " ";
STL includes:
Containers: vector, list, set, map
Algorithms: sort, discover, rely
Iterators: for traversing containers
14. Exception Handling
cpp
Copy
Edit
attempt
int a = 10, b = 0;
if (b == zero) throw "Division by means of 0!";
cout << a / b;
seize (const char* msg)
cout << "Error: " << msg;
Use attempt, capture, and throw for managing runtime errors.
15. File Handling
cpp
Copy
Edit
#consist of <fstream>
ofstream out("information.Txt");
out << "Hello File";
out.Near();
ifstream in("records.Txt");
string line;
getline(in, line);
cout << line;
in.Near();
File I/O is achieved the usage of ifstream, ofstream, and fstream.
16. Applications of C++
Game Development: Unreal Engine is primarily based on C++.
System Software: Operating systems, compilers.
GUI Applications: Desktop software (e.G., Adobe merchandise).
Embedded Systems: Hardware-level applications.
Banking and Finance Software: High-speed buying and selling systems.
Real-Time Systems: Simulations, robotics, and so on.
17. Advantages of C++
Fast and efficient
Wide range of libraries
Suitable for each high-level and low-level programming
Strong item-orientated aid
Multi-paradigm: procedural + object-oriented
18. Limitations of C++
Manual reminiscence management can lead to mistakes
Lacks contemporary protection functions (in contrast to Java or Python)
Steeper studying curve for beginners
No built-in rubbish series
19. Modern C++ (C++11/14/17/20/23)
Modern C++ variations introduced capabilities like:
Smart recommendations (shared_ptr, unique_ptr)
Lambda expressions
Range-based totally for loops
car kind deduction
Multithreading support
Example:
cpp
Copy
Edit
vector<int> v = 1, 2, three;
for (auto x : v)
cout << x << " ";
C Lanugage Compliers
2 notes
·
View notes
Text

"To see a world in a grain of sand and a heaven in a wild flower… "
✦[WELCOME, peeps!] I'm Windy, a Latin American (Argentinian) adult female in her 30s who "draws all day" because of my creative mind and fingers always scheming new OCs for my infinite hoard of virtual dolls… or jumping onto the AUs my friends make me fall for.
I'm here mostly to get ✧INSPIRATION✧ from awesome art, writing, science news, and nature pics! When not reblogging, I share my artwork, too, hoping to return that inspiration or just have a good time with mutuals who enjoy creating stories and characters!
[More details on my ABOUT]
✦[My SOCIALs]
[INSTAGRAM] (More active, I post ahead there).
[DISCORD] (Only for close friends/mutuals).
✦[Currently WORKING ON]
[The Door to Barrioween (Intro Part I)] #the door to barrioween (Personal Original Project that integrates my love for monster designs, character bonding, and urban fantasy.)
Illustrations for Fan Zines! (2/4 Finished so far; Participating this year on: Fossil Figthers Zine, AllSpark Zines-I Starscream, Antology of Artists-Original OCs, Gachapon Collectible Creature Catalogue-Original Designs).
✦[OPEN for]
Art Process Questions (I like gushing about art! TALK ART TO MEEE).
Art Requests (With delays! And I have the RIGHT to decline if the subject and/or characters don't vibe with me).
Art Trades (Only with friends/close mutuals).
Art Collabs (Only with friends/close mutuals).
Art Commissions (Ask on DMs, depending on my current schedule and subject).
Gift Art (Feel free to draw my OCs and Fav Blorbos!).
Roleplay (Ask on DMs, depending on my current schedule and subject -I'm more experienced in Spanish-)
But there's still MORE! Under the cut I'll continue, please keep reading so you get a clear overview of the type of warnings and contents you'll stumble upon when following me!
"… Hold infinity in the palm of your hand… "
✦[Be AWARE… ]
English is not my first language. I have a tendency to Spanglish here and there so, if you read me funny, please tell me so I can explain/correct myself.
The foundation of my ideals spins around concepts of Friendship and Love (100% Platonic) so, please tell me ASAP if the way I apply those words to you makes you uncomfortable and I'll change that!
I'm an Aromantic Asexual very supportive of romance and sex in fiction (AKA I'm one of those crazy shippers) but I'm the worst at noticing intentional flirting and advances of that type make me sick so please: DON'T EVEN TRY.
I'm an Eclectic Witch and an animist who worships the Moon and favors Pop Culture Magic. I'm trying to learn to mix it with Arts & Crafts and Technomagic.
I'm quite a busy adult irl so be patient if I don't reply faster some days than others.
I'm a self-taught artist, an Amateur if you want to be fancy. I like to mix both traditional techniques (inking, clay sculpture) and digital techniques (photography, collage, digital watercolors). I have a dozen art styles I change seasonally.
I'm against the use of AI/Generative Art & Writing software (including ChatGPT and Character.AI). I suggest not following me if you don't agree in this: I will block you in a blink.
My other hobbies: reading horror gothic novellas, collecting plastic dinosaurs, watching animated movies, and playing adventure-exploration and farm-sim games.
As I mentioned before, I'm a shipper, mostly of Enemies to Lovers dynamics. I swing them in both fluffy and angsty situations. If something doesn't sit well with you, learn to flag the tags and move on. Thank you.
(In case you want to know my personal stand about shipping [here is my PSA]. TLDR; I'm not anti-shipper, I won't tolerate harassment and censoring of someone else's enjoyment; I'm not either pro-shipper: I have my own squicks and limits with themes, and I will block freely whoever crosses my boundaries.)
I enjoy monster designs, alien speculative science, eldritch horrors, and feral animal characters the most.
I find joy too in creepy-cute designs, especially if themed around Gothic and Halloween!
The emojis I use the most: 💖👀🎉📝🍀🌻✨💥🍪🍿🐦🐾🦡
✦[My TAGs if you wish to check/flag some]
#windy squawks for art and blog updates.
#windy squeals for personal babblings/vent.
#myart for my general artwork (And if you are here for my Transformers fanart, this #ifellinrobothellagain is the tag).
#windydrawallday ocs for my original characters.
#my beloved fav characters from other media.
#shipping to the moon and back fav pairings.
#witchy side of the wind for my witchcraft reblogs.
#windy taps the sign about personal stands related to shipping, interaction with me and my art online etc.
[Check the Masterlist for specific tags]
Thanks for reading! And I hope you enjoy your stay if following uvu/

"… And eternity in an hour."
5 notes
·
View notes
Text
AdMotion Review: Create Trending and High Conversion Movie-Style Video In 1-Click by [Arifianto Rahardi]

Welcome to my Honest Review AdMotion Review. The current world depends on video marketing social media video marketing, and running ads. The content creator and marketer compete with each other. How to promote their video, how to instant viral media, and how unique to each other. Recently launched a powerful software to help you create a cinematic video in any language, thumbnail design, create intro video, marketing video, run ads, animation, and you forget about expensive production costs, endless editing hours, and outdated video-making methods- AdMotion Create any video in 3 simple steps. TURN NORMAL VIDEO INTO HIGH-QUALITY CINEMATIC VIDEO WITHOUT HAND-FREE.
What is AdMotion? AdMotion is a high-converting video creator app that creates cinematic videos in any language like Bollywood- just 3 simple steps without any skill and monthly fees, the AdMotion works automatically and generates Ordinary Videos into Stunning, High-Converting Cinematic Commercials Video Effortlessly in a Few Seconds. AdMotion is easy to use for your favorite social media, Video Marketing, Affiliate Marketing, Run Ads, Design Thumbnail, Intro Video, and Ready-Made templates, and does not require complicated downloads, or frustrating installations- just make seamless, professional-quality videos from your Canva Free Account in a few seconds. I believe it! You forget 100% about expensive production costs, endless editing hours, and outdated video-making methods and start a new journey with AdMotion. Grab attention, engage your audience, skyrocket your results, transform Marketing, and create cinematic video and animation start everything with AdMoton,
Overview – AdMotion Review First, a customer optimizes the products quality or benefits the site. Who is the person who built the app? Discount price: why build the app? And who is the best choice for it? Everything. That is an ideal customers quality. Don`t worry; I covered the part for an ideal person. I think you are an idealistic reader.
Read more here>>
Author/vendor – Arifianto Rahardi Product –AdMotion Launce date – 9/03/25 Official website – VISITE HERE Front-end price - $19 Business – ok Instantly Create Text Into High-Quality 4k HD Video Watch/ Create Video – Any Language Social Media Marketing – Number One passive income – ok Recurring System – OK Payment – ONE Time Local Business – High Recommend Money-Back – 30 Days Money-Back Guarantee Funnel/Tool – Automated & Done-For-You Support – Effective Niche – Any Niche of your choice
How does AdMotion Work? AdMotion review works in 3 simple steps. Set it unique to other apps. Use simple steps to generate thousands of profits every single day.
Stpe-1 Sing Up, Login & Choose Template:- The First Sing-Up & Login your Canva account and choose the template you want.
Step-2 Customize & Rebrand:- After Choosing the right template quickly upload and rebrand, replacing the video, pictures, and text to your choice.
Step-3 Publish & sell:- After a customized process ready to use your favorite social media, business, and more you want.
Why Unique AdMotion to Other App? AdMotion app has some wonderful parts that make it unique to other apps worldwide. Every time you feel cinematic videos test and grow your audience day by day, and dominate your business win competition with each other.
How can AdMotion Help You? Different software has different quality. The same AdMotion has some effective different quality. 1- Cinematic style: AdMotion automatically generates cinematic animation like Bollywood cinema that surprises any customer for a few moments.
2- Promote Video Ads: It is too easy to promote video ads. The app makes realistic videos of hypersonic quality.
3- Intro Animation Effect: This is amazing. AdMotion creates automatic intro VIDEO human-like. So the agency wants to choose a template only.
4- Outro Animation: Create a realistic and cinematic outro in a few seconds.
5- Third Animation: That is too popular for your young generation. The generation demands software that makes a video hero worldwide.
6- Call Out Animation: Users can easily promote a country, office, project, agency, and any video they want. AdMotion gives all free templates.
7- Square Video Animation: Every social media does not allow uploading all-size videos. The social media company fixed a few sizes. Don`t worry you promote square video easily.
8- Vertical Video Animation: TikTok, Instagram, Facebook short video and YouTube Short video allow vertical video. To promote an easily vertical video and grab money in your bank account.
9- Thumbnail Design: There are thousands of free templates. Log in, choose, and promote then profit.
Key Highlight – AdMotion There is an awesome key feature that helps make profits, grow an audience, and promote video seamlessly. The feature converts your audience to more leads. AdMotion Review is the world's first revolutionary software that gives you high-quality content and designs.
Why AdMotions is a Breakthrough? The video and graphic agency wants to buy software that helps them with high-speed internet, improved video compression methods, and the widespread availability of powerful computing devices. As a result, the agency built an app that provides lower costs and more production for content providers and distributors for entrepreneurs. The app provides the audience with user-friendly tools high-quality effects, and content, including professional-grade software like Adobe Premiere Pro and After Effects. Every video's quality is cinematic like a Bollywood movie. Does not require monthly fees and subscriptions. If the app doesnt work qualityful or doesn`t provide cinematic video then he money back in 30 days -announced to audience Arifianto Rahardi. The agency gives a PLR license to the audience. An audience can create unlimited video and design. Who is AdMotion's Best Choice? Every person can use the app to promote everything. The agency needs to unlock the app and the app works in 3 simple steps generate video, design, thumbnail, data upload, File upload & export, and promote any product easily with AdMotion. Now who is the best choice for it:
Digital Marker: Make your audience with awesome, high-quality unique video animations then convert lead generation to the sales page.
Affiliate Marker: Promote product or service by creating unlimited cinematic videos and animation to get the best-converting sales.
eCommerce Store Owner: Create unlimited video or animation for product promotion.
Advertisers: Eyecatching videos grab new and valuable audiences easily.
Freelancer: Freelancers would demand money from clients to create movie-style videos and designs.
Social worker: instantly viral every video and grow audience in a few months- follow only 3 simple steps.
Home Business: A mother can create her world with AdMotion easily and earn massive income from large companies.
Read more here>>
AdMotion`s Positive & Negative site
Positive site: -Instant create thumbnail -High-quality cinematic video -Valuable outro video -Real animation of intro video -Image, music, file video unlimited export and import -Customize any design or thumbnail -Promote any product in any language -Provide PLR-free license -World-class effective support -30-day money-back guarantee -Humanlike and real-like video creation.
Negative site: -Depend on internet connection -Everyday post on your site -Make unique ideas.
OTO, Funnel & Bonus
Front-End Price: $14 - $24
OTO 1 Price: $27
OTO 2 Price: $47
OTO 3 Price: $54
Cinematic Movie Style Animation Templates (Worth $750) Promo Video Ads Animation Templates (Worth $750) Intro Opener Animation Templates (Worth $450) Outro Animation Templates (Worth $450) Lower Third Animation Templates (Worth $375) Call Out Animation Templates (Worth $375) Square Post Animation Templates (Worth $750) Vertical Post Animation Templates (Worth $750) Thumbnail Designs (Worth $500) YouTube Channel Designs (Worth $500)
Frequently Asked Questions (FAQ)
Are images and videos included? Yes, They have done all templates. You use this template of your choice.
How to get the app? First log in, select the template, and promote the video on social media.
Is there any passive income system? Yes, the agency gives us the utmost priority for recurring and passive income.
Are there monthly fees? No, one-time payment and auto-update are all features.
Affiliate disclaimer
Thank you for perusing my genuine audit. My fair conclusion is shared within the survey.
An affiliate disclaimer may be an explanation to advise gatherings of people that a company or person may gain a commission or other emolument on the off chance that they buy items or administrations through joins on their site, web journal, social media, or different stages. This disclaimer is basic for keeping up straightforwardness and complying with legitimate requirements, such as those set by the Government Exchange Commission (FTC) within the Joined Together States. It guarantees perusers or watchers know of any potential predisposition or budgetary motivating force behind proposals.
Ordinarily, the disclaimer is set noticeably at the start or conclusion of substance and clearly states the nature of the partner relationship. For illustration, "This post may contain partner joins, meaning I win a commission if you buy through my joins at no additional taken a toll." This builds belief with the group of onlookers while ensuring the substance
#Arifianto Rahardi#Cinematic video animation software#Create movie-style animations online#Sell animation templates instantly All-in-one animation toolkit#Sell animation templates instantly#All-in-one animation toolkit#ADmotion review#admotion features
2 notes
·
View notes
Text
PowerPoint Presentation Design Services
Overview of PowerPoint Presentation Design Services
PowerPoint presentation design services are specialized offerings aimed at creating visually appealing and effective presentations for various purposes, including business meetings, educational settings, conferences, and marketing pitches. These services typically involve a combination of graphic design, content development, and strategic communication to ensure that the final product not only looks professional but also conveys the intended message clearly and effectively.
Key Components of Presentation Design Services
Content Development: This involves collaborating with clients to understand their objectives and audience. Content development may include writing text for slides, creating outlines, and ensuring that the information is organized logically. The goal is to create a narrative that engages the audience while delivering key messages succinctly.
Visual Design: A significant aspect of presentation design is the visual appeal. Designers use principles of graphic design to create slides that are aesthetically pleasing. This includes selecting appropriate color schemes, fonts, images, and layouts that align with the brand identity or theme of the presentation. Visual elements should enhance understanding rather than distract from it.
Slide Creation: Once the content and visual elements are established, designers create individual slides using software like Microsoft PowerPoint or other presentation tools. Each slide should be designed with clarity in mind—avoiding clutter while highlighting essential points through bullet lists, charts, graphs, and images.
Branding Consistency: For businesses, maintaining branding consistency across presentations is crucial. Design services often include customizing templates to reflect corporate branding guidelines—ensuring that logos, colors, and typography are uniform throughout all slides.
Interactive Elements: Modern presentations often incorporate interactive elements such as hyperlinks, embedded videos, or animations to engage audiences more effectively. Designers may integrate these features thoughtfully to enhance interactivity without overwhelming viewers.
Revisions and Feedback: After an initial draft is created, designers typically seek feedback from clients to make necessary revisions. This iterative process ensures that the final presentation meets client expectations and effectively communicates its intended message.
Training and Support: Some design services also offer training sessions for clients on how to present their materials effectively or how to use specific features within PowerPoint itself.
Delivery Formats: Finally, once the presentation is complete, it can be delivered in various formats depending on client needs—whether as a PowerPoint file (.pptx), PDF for easy sharing without formatting issues, or even as an online presentation via platforms like Google Slides.
Benefits of Using Professional Design Services
Expertise: Professional designers bring experience in both design principles and effective communication strategies.
Time-Saving: Outsourcing presentation design allows individuals or teams to focus on their core responsibilities while ensuring high-quality output.
Enhanced Engagement: Well-designed presentations tend to capture audience attention better than poorly constructed ones.
Increased Credibility: Professionally designed presentations can enhance perceived credibility during pitches or important meetings.
In conclusion, PowerPoint presentation design services encompass a comprehensive approach to creating impactful presentations through expert content development and visual design tailored to meet specific client needs.
2 notes
·
View notes
Text
「viRtua canm0m」 Project :: 002 - driving a vtuber
That about wraps up my series on the technical details on uploading my brain. Get a good clean scan and you won't need to do much work. As for the rest, well, you know, everyone's been talking about uploads since the MMAcevedo experiment, but honestly so much is still a black box right now it's hard to say anything definitive. Nobody wants to hear more upload qualia discourse, do they?
On the other hand, vtubing is a lot easier to get to grips with! And more importantly, actually real. So let's talk details!
Vtubing is, at the most abstract level, a kind of puppetry using video tracking software and livestreaming. Alternatively, you could compare it to realtime mocap animation. Someone at Polygon did a surprisingly decent overview of the scene if you're unfamiliar.
Generally speaking: you need a model, and you need tracking of some sort, and a program that takes the tracking data and applies it to a skeleton to render a skinned mesh in real time.
Remarkably, there are a lot of quite high-quality vtubing tools available as open source. And I'm lucky enough to know a vtuber who is very generous in pointing me in the right direction (shoutout to Yuri Heart, she's about to embark on something very special for her end of year streams so I highly encourage you to tune in tonight!).
For anime-style vtubing, there are two main types, termed '2D' and 3D'. 2D vtubing involves taking a static illustration and cutting it up to pieces which can be animated through warping and replacement - the results can look pretty '3D', but they're not using 3D graphics techniques, it's closer to the kind of cutout animation used in gacha games. The main tool used is Live2D, which is proprietary with a limited free version. Other alternatives with free/paid models include PrPrLive and VTube studio. FaceRig (no longer available) and Animaze (proprietary) also support Live2D models. I have a very cute 2D vtuber avatar created by @xrafstar for use in PrPrLive, and I definitely want to include some aspects of her design in the new 3D character I'm working on.

For 3D anime-style vtubing, the most commonly used software is probably VSeeFace, which is built on Unity and renders the VRM format. VRM is an open standard that extends the GLTF file format for 3D models, adding support for a cel shading material and defining a specific skeleton format.
It's incredibly easy to get a pretty decent looking VRM model using the software VRoid Studio, essentially a videogame character creator whose anime-styled models can be customised using lots of sliders, hair pieces, etc., which appears to be owned by Pixiv. The program includes basic texture-painting tools, and the facility to load in new models, but ultimately the way to go for a more custom model is to use the VRM import/export plugin in Blender.
But first, let's have a look at the software which will display our model.
meet viRtua canm0m v0.0.5, a very basic design. her clothes don't match very well at all.
VSeeFace offers a decent set of parameters and honestly got quite nice tracking out of the box. You can also receive face tracking data from the ARKit protocol from a connected iPhone, get hand tracking data from a Leap Motion, or disable its internal tracking and pipe in another application using the VMC protocol.
If you want more control, another Unity-based program called VNyan offers more fine-grained adjustment, as well as a kind of node-graph based programming system for doing things like spawning physics objects or modifying the model when triggered by Twitch etc. They've also implemented experimental hand tracking for webcams, although it doesn't work very well so far. This pointing shot took forever to get:
<kayfabe>Obviously I'll be hooking it up to use the output of the simulated brain upload rather than a webcam.</kayfabe>
To get good hand tracking you basically need some kit - most likely a Leap Motion (1 or 2), which costs about £120 new. It's essentially a small pair of IR cameras designed to measure depth, which can be placed on a necklace, on your desk or on your monitor. I assume from there they use some kind of neural network to estimate your hand positions. I got to have a go on one of these recently and the tracking was generally very clean - better than what the Quest 2/3 can do. So I'm planning to get one of those, more on that when I have one.
Essentially, the tracker feeds a bunch of floating point numbers in to the display software at every tick, and the display software is responsible for blending all these different influences and applying it to the skinned mesh. For example, a parameter might be something like eyeLookInLeft. VNyan uses the Apple ARKit parameters internally, and you can see the full list of ARKit blendshapes here.
To apply tracking data, the software needs a model whose rig it can understand. This is defined in the VRM spec, which tells you exactly which bones must be present in the rig and how they should be oriented in a T-pose. The skeleton is generally speaking pretty simple: you have shoulder bones but no roll bones in the arm; individual finger joint bones; 2-3 chest bones; no separate toes; 5 head bones (including neck). Except for the hands, it's on the low end of game rig complexity.
Expressions are handled using GLTF morph targets, also known as blend shapes or (in Blender) shape keys. Each one essentially a set of displacement values for the mesh vertices. The spec defines five default expressions (happy, angry, sad, relaxed, surprised), five vowel mouth shapes for lip sync, blinks, and shapes for pointing the eyes in different directions (if you wanna do it this way rather than with bones). You can also define custom expressions.
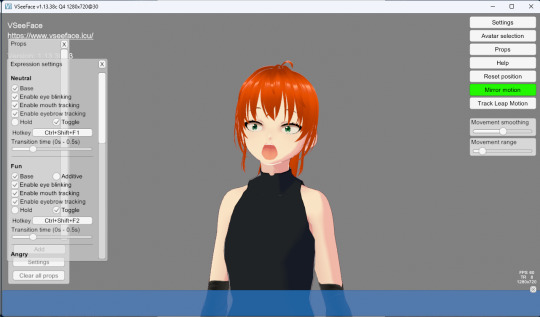
This viRtua canm0m's teeth are clipping through her jaw...
By default, the face-tracking generally tries to estimate whether you qualify as meeting one of these expressions. For example, if I open my mouth wide it triggers the 'surprised' expression where the character opens her mouth super wide and her pupils get tiny.
You can calibrate the expressions that trigger this effect in VSeeFace by pulling funny faces at the computer to demonstrate each expression (it's kinda black-box); in VNyan, you can set it to trigger the expressions based on certain combinations of ARKit inputs.
For more complex expressions in VNyan, you need to sculpt blendshapes for the various ARKit blendshapes. These are not generated by default in VRoid Studio so that will be a bit of work.
You can apply various kinds of post-processing to the tracking data, e.g. adjusting blending weights based on input values or applying moving-average smoothing (though this noticeably increases the lag between your movements and the model), restricting the model's range of movement in various ways, applying IK to plant the feet, and similar.
On top of the skeleton bones, you can add any number of 'spring bones' which are given a physics simulation. These are used to, for example, have hair swing naturally when you move, or, yes, make your boobs jiggle. Spring bones give you a natural overshoot and settle, and they're going to be quite important to creating a model that feels alive, I think.
Next up we are gonna crack open the VRoid Studio model in Blender and look into its topology, weight painting, and shaders. GLTF defines standard PBR metallicity-roughness-normals shaders in its spec, but leaves the actual shader up to the application. VRM adds a custom toon shader, which blends between two colour maps based on the Lambertian shading, and this is going to be quite interesting to take apart.
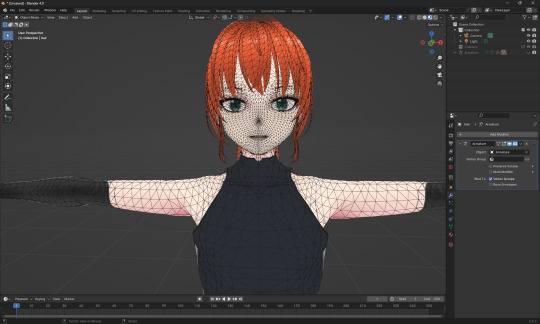
The MToon shader is pretty solid, but ultimately I think I want to create custom shaders for my character. Shaders are something I specialise in at work, and I think it would be a great way to give her more of a unique identity. This will mean going beyond the VRM format, and I'll be looking into using the VNyan SDK to build on top of that.
More soon, watch this space!
9 notes
·
View notes
Text
How to Create 2D Graphics for Games?

Introduction
If you have a question like “How to Create 2D Graphics for Games?” then this article is for you. 2D game graphics are visuals used in video games that exist on a two-dimensional plane. Unlike 3D graphics, which have depth and perspective, 2D graphics are flat and lack depth perception. Importance of Quality 2D Graphics in Games Quality 2D graphics play a crucial role in enhancing the visual appeal and overall gaming experience. They help convey the game's narrative, evoke emotions, and immerse players in captivating virtual worlds. Overview of Popular 2D Game Art Styles - Monochromatic: Uses a single color or shades of a single color for the entire artwork. - Pixel Art: Utilizes small, square pixels to create intricate designs and characters. - Vector Art: Relies on mathematical equations to render smooth, scalable graphics. - Cutout Art: Features flat, stylized artwork with visible cutout edges. - Doodle Art: Characterized by hand-drawn, whimsical sketches and illustrations.
Different 2D Game Art Styles
Monochromatic Art Monochromatic art employs a single color palette to create visually striking compositions. Games like "Limbo" and "Badland" showcase the atmospheric and minimalist appeal of monochromatic art.
Pixel Art Pixel art utilizes tiny square pixels to form detailed images and animations. Popularized by games like "Minecraft" and "Stardew Valley" pixel art exudes retro charm and nostalgia.
Vector Art Vector art comprises geometric shapes and lines that can be resized without losing quality. Games such as "Angry Birds" and "Monument Valley" leverage vector graphics for their clean and scalable visuals.

Cutout Art Cutout art features flat, paper-like characters and environments with distinct outlines. Titles like "Paper Mario" and "Cuphead" showcase the vibrant and stylized nature of cutout art.
Doodle Art Doodle art embraces a free-form and whimsical drawing style, often resembling sketches in a notebook. Games like "Doodle Jump" and "Scribblenauts" exhibit the playful and imaginative essence of doodle art.

Step-by-Step Guide to Creating 2D Game Graphics
- Preparing for Artwork Creation: Before diving into artwork creation, it's essential to understand the game's requirements and the preferences of the target audience. Selecting a suitable art style based on the game's theme and genre is paramount for cohesive visual storytelling. - Conceptualizing and Sketching: Start by developing concept art for characters, environments, and props through iterative sketching and feedback loops. This process allows for the exploration of various design ideas and ensures alignment with the game's artistic vision. - Digital Art Creation: Utilize tools and software tailored for 2D game artwork, such as Adobe Photoshop, Procreate, or Aseprite. Create characters, backgrounds, and objects with attention to detail and consistency in art style. - Optimization and Integration: Optimize artwork for performance by adhering to file size limitations and resolution requirements. Ensure seamless integration of art assets into game engines, maintaining compatibility across different platforms and devices.
Common Mistakes to Avoid in 2D Game Graphics
- Lack of Understanding of Target Audience: Failing to grasp the preferences and expectations of the target audience can result in mismatched visuals that fail to resonate with players. - Inconsistency in Art Style: Inconsistencies in art style can disrupt immersion and cohesion within the game world, detracting from the overall player experience. - Inaccuracy in Artwork: Artwork that lacks attention to detail or realism may fail to convey the intended aesthetic or narrative, diminishing its impact on players. - Poor Optimization for Performance: Overly complex or unoptimized artwork can lead to performance issues such as lag or stuttering, negatively impacting gameplay. - Rushing Artwork Creation Process: Rushing the artwork creation process can result in subpar quality and missed opportunities for creativity and refinement.
Hiring 2D Artists for Creating 2D Graphics
Options for Hiring 2D Artists - Freelance Platforms: Use platforms like Upwork or Fiverr for project-based collaborations. - Outsourcing Companies: Partner with firms specializing in game development services. - Game Industry Events: Attend conferences to network with professionals. - Social Media: Engage with artists on platforms like LinkedIn or Twitter. Criteria for Selecting 2D Artists - Portfolio: Look for diversity, style consistency, and relevance to your project. - Experience: Prioritize artists with gaming industry experience or similar projects. - Professionalism: Consider communication skills, responsiveness, and meeting deadlines. - Adherence to Deadlines: Ensure artists can deliver on time.
Conclusion
In summary, mastering the creation of quality 2D graphics is crucial for enhancing the visual appeal and immersive experience of video games. By understanding different art styles, avoiding common pitfalls, and selecting the right talent, developers can bring their game worlds to life. Whether you're a seasoned artist or just starting out, continuous learning and experimentation are key to creating captivating 2D game graphics that resonate with players. Join our community to stay updated and connected, and let's continue to elevate the game industry together.
FAQs
1. What software is best for creating 2D graphics for games? Popular software options for creating 2D graphics for games include Adobe Photoshop, GIMP, and Aseprite. Choose the software that best fits your workflow and skill level. 2. Do I need artistic talent to create 2D graphics for games? While artistic talent certainly helps, anyone can learn to create 2D graphics with practice and dedication. Start with the basics and experiment with different techniques to develop your skills. 3. Can I use pre-made assets for my game? Yes, you can use pre-made assets for your game, but be mindful of licensing restrictions and ensure that the assets fit the style and theme of your game. 4. How can I learn more about creating 2D graphics for games? There are many online resources available for learning about creating 2D graphics for games, including tutorials, forums, and online courses. Start by exploring beginner-friendly tutorials and gradually expand your skills. 5. What are some common mistakes to avoid when creating 2D graphics for games? Common mistakes to avoid include using too many layers, overcomplicating designs, neglecting optimization, and ignoring feedback from playtesting. Keep your designs simple, optimize for performance, and iterate based on feedback from players.
Join Our Community
Stay connected with us and become a part of our vibrant community on social media: - Facebook - Linkedin - X
Get In Touch
Have questions, suggestions, or feedback? We’d love to hear from you! Reach out to us through our contact page. At Universe 2.0, we provide information, tutorials, guides, etc., to grow the game industry. Visit us at: universe-2.com Read the full article
2 notes
·
View notes