#UserManagement
Explore tagged Tumblr posts
Visit Tumblr Blog
Explore Tumblr blogs with no restrictions, modern design and the best experience.
Last Seen Tumblr Blogs


Fun Fact
Hackers stole 65M passwords from Tumblr in 2013.
Text
How To Add Users in Ubuntu 24.04 LTS
Adding users is a fundamental responsibility of system administrators, crucial for maintaining secure access and efficient resource allocation. Regular users need accounts for their daily operations, and administrators require robust ways to manage these accounts seamlessly. Effective user addition ensures that each user has the appropriate access and permissions for their role.
How To Add Users in Ubuntu 24.04 LTS
Ubuntu 24.04 LTS offers diverse methods for adding users, accommodating various preferences and needs. Whether you prefer the precision of terminal commands, the convenience of a graphical interface, or the efficiency of automation scripts, this guide covers it all. In this comprehensive guide, we will explore multiple methods for adding users in Ubuntu 24.04 LTS, including:
Using the Command Line: Employing powerful commands like adduser and useradd for detailed and controlled user creation.
Using the Graphical User Interface (GUI): Managing user accounts through Ubuntu’s intuitive settings interface.
Adding Users Temporarily: Creating users with expiration dates for specific tasks.
Automating User Creation with Scripts: Streamlining bulk user creation with custom scripts.
Each method is detailed with step-by-step instructions to ensure you can add users effectively and effortlessly, enhancing your Ubuntu experience.
Method 1: Adding a User Using the Command Line
This method is ideal for administrators who prefer using terminal commands.
Using adduser
An easy-to-use, high-level command for adding users is the adduser. It provides a guided process to set up a new user, including setting a password and additional user information.
Step 1: Open the Terminal
To access the terminal, simultaneously depress the Ctrl, Alt, and T keys. Alternatively, search for "Terminal" in your application menu.
Step 2: Add a New User
Execute the following command:
sudo adduser newuser

Substitute newuser with your desired username.
The password must be entered when prompted.
Take Note:
Make sure the password satisfies the following requirements:
Minimum of 8 characters.
Includes both upper and lower case letters.
Contains at least one number.
Includes special characters (e.g., !, @, #, $, etc.).

Enter the password and press Enter.
Type the password one more time and hit Enter to confirm it.
Some details will be asked while adding a new user like full name, room number, work phone, and home phone.

Any field can be skipped by pressing Enter.
After entering the information, you will see a summary of the details.

Confirm the details by typing Y and pressing Enter.
Step 3: Verify User Creation
Execute the below given command to check the new user's addition:
getent passwd newuser
If the command is successful in creating the user, the user's details will be shown like this:

Using useradd
A low-level utility for creating new users is the useradd command. It requires more specific options but offers greater control over the user creation process.
Step 1: Open the Terminal
The terminal can be opened by simultaneously holding down the Ctrl, Alt, and T keys.
Step 2: Add a New User
Run the following command, and substitute new_username with the username you prefer:
sudo useradd -m new_username
Making sure the user's home directory is created is ensured by the -m option.
Step 3: Set Password for the User
The new user can be assigned a password by using:
sudo passwd new_username

Type the password one more time and hit Enter to confirm it.
Step 4: Verify User Creation
Execute the below given command to check the new user's addition:
getent passwd new_username
If the command is successful in creating the user, the user's details will be shown.

Additional Steps (Optional)
Adding the User to a Specific Group
Use the below given command to add a new user to a certain group:
sudo usermod -aG groupname newuser
Replace groupname with the desired group (e.g., sudo, admin, docker).
Execute the below given command to check the new user's addition:
groups new_username
This command will list all the groups that the user belongs to, including the new group.

Method 2: Adding a User Using GUI (Graphical User Interface)
For those who prefer a graphical interface, Ubuntu provides an easy way to manage users through its settings. Here's a step-by-step guide to adding a new user using the GUI.
Step 1: Open Settings
To access the terminal:
Search for "Settings" in your application menu.

Step 2: Access Users Section
In the Settings window, go to the search bar at the top and type "Users."

As an alternative, move to the sidebar's bottom and select "System."

Click on "Users" from the options available in the System settings.
Step 3: Unlock User Management
Select the "Unlock" button by moving to the upper right corner.

Enter your administrative password and click "Authenticate."
Step 4: Add New User
Click the "Add User" button.
Input the required data, including your username and name.
You can choose to keep the toggle button inactive by default to designate the new user as a "Standard" user.
Then insert password.
Step 5: Confirm and Apply
Click "Add" to create the user.
Now the new user will appear in the user list.
Take Note
User Management:
Once the user is created, click on the username in the Users section to manage its settings.
Method 3: Adding a User Temporarily
For certain tasks, you might need to add a user that expires after a specified period. This method outlines how to create a user with an expiration date using the command line.
Step 1: Open the Terminal
The terminal can be opened by simultaneously holding down the Ctrl, Alt, and T keys.
Step 2: Add a User with an Expiry Date
Execute the following command:
sudo useradd -m -e YYYY-MM-DD temporaryuser
Replace YYYY-MM-DD with the desired expiration date and temporaryuser with your desired username.
Step 3: Set Password for the User
The new user can be assigned a password by using:
sudo passwd temporaryuser
Enter the password, when prompted.
Type the password and press Enter.
Type the password one more time and hit Enter to confirm it.
Step 4: Verify User
To verify that a temporary user has been created successfully, use the below given command:
sudo chage -l temporaryUser
Substitute the temporaryuser with the username you want to verify.
Method 4: Automating User Creation with Scripts
The method outlined here demonstrates automating user creation with scripts, particularly useful for bulk user creation tasks.
Step 1: Open the Terminal
The terminal can be opened by simultaneously holding down the Ctrl, Alt, and T keys.
Step 2: Create a Script
Any text editor will work for writing the script. Using nano, for instance:
nano add_users.sh
Step 3: Add Script Content
Add the following content to the script. Modify the usernames and other details as needed.
#!/bin/bash
sudo adduser user1 --gecos "First Last,RoomNumber,WorkPhone,HomePhone" --disabled-password
echo "user1:password1" | sudo chpasswd
sudo adduser user2 --gecos "First Last,RoomNumber,WorkPhone,HomePhone" --disabled-password
echo "user2:password2" | sudo chpasswd
Replace user1, user2, etc., with the desired usernames.
Modify the --gecos option to provide additional information about the user (optional).
Replace the password with the desired password.
Adjust the script content as needed, adding more users or customizing user details.
Save and close the file.
Step 4: Make the Script Executable
To enable the script to run, use the chmod command.
chmod +x add_users.sh

Step 5: Run the Script
Run the script to create the users.
./add_users.sh

Conclusion:
User management in Ubuntu 24.04 LTS is a critical task for system administrators, providing security, efficient resource allocation, and smooth system operation. With various methods available, from command-line interfaces to graphical user interfaces and automation scripts, Ubuntu 24.04 LTS ensures that adding users can be tailored to different needs and preferences. By following the comprehensive steps outlined in this guide, you can effectively manage regular users.
2 notes
·
View notes
Link
Are you dreaming of launching your own membership website but feeling overwhelmed by the technicalities? Brilliant Directories might just be the solution you’re looking for. This powerful platform empowers users to effortlessly create and manage professional membership sites, regardless of technical skill level. In my latest blog post, I dive deep into the features of Brilliant Directories that set it apart from the competition. From customizable membership tiers to streamlined member management, you have all the tools needed to foster an engaging online community. Discover how to enhance user experience while maximizing revenue with smart membership plans. Whether you're an aspiring entrepreneur or an established business owner, Brilliant Directories offers the perfect blend of functionality and simplicity. Don’t let the intricacies of web design hold you back. Take the leap and bring your vision to life! Ready to transform your online presence? Explore the full blog for insights and tips on utilizing Brilliant Directories to build the membership site of your dreams: https://jomiruddin.com/brilliant-directories-reviews-build-professional-membership-websites/ #BrilliantDirectories #MembershipWebsite #OnlineBusiness #CommunityBuilding #Entrepreneurship #DigitalMarketing #WebDesign
#membershipwebsites#directorysoftware#websitecustomization#BrilliantDirectories#membershipsitefeatures#usermanagement#custommembershipsites#contentmanagement#increasemembershiprevenue#digitalmarketplace
0 notes
Text

Profile Press: Elevate Your Online Presence Now!
#ProfilePress#MembershipManagement#WordPressPlugin#UserManagement#ContentAccess#BloggingTools#OnlineBusiness#SubscriptionServices#DigitalMarketing#WebsiteOptimization
0 notes
Text
The Future of Hospital Software: How MediBest Supports User Management and IT Innovation
In today’s rapidly evolving healthcare landscape, the demand for sophisticated software solutions is more critical than ever. Hospitals face increasing pressures to improve patient care, streamline operations, and adopt new technologies to remain competitive. MediBest, a forward-thinking hospital software company, has emerged as a leader in this field by developing a hospital management system that addresses both the current and future needs of healthcare management. Through cutting-edge technology, robust user management, cross-platform accessibility, and telemedicine integration, MediBest’s hospital management software is setting a new standard for how hospitals can optimize IT innovation to deliver better patient outcomes and operational efficiency.
In this article, we’ll delve into MediBest’s role as a pioneer in healthcare IT, exploring how it meets the challenges of modern healthcare, enhances user management, and sets the stage for a connected, efficient future.
The Growing Demand for IT Innovation in Healthcare
As the healthcare industry transitions towards more data-driven, patient-centered care models, the need for advanced IT solutions has become paramount. Hospitals require software that can keep up with the demands of digital transformation while enabling seamless communication between departments, improving patient outcomes, and ensuring operational efficiency. Additionally, IT innovation is crucial for handling the growing volume of patient data, meeting compliance standards, and protecting sensitive health information.
Digital Transformation in Hospitals Digital transformation is reshaping how hospitals operate. By automating routine tasks, improving data accessibility, and optimizing workflows, hospitals can become more efficient and patient-focused. However, managing this transformation requires a comprehensive, scalable software system that can handle the complex needs of a hospital environment. MediBest addresses this need with its advanced hospital management system, which integrates multiple functionalities under a single platform and supports high levels of customization to fit each hospital’s specific requirements.
Enhanced Patient Care Through IT IT innovation has a direct impact on patient care, enabling faster diagnosis, better treatment planning, and improved patient-provider communication. With MediBest’s integrated hospital management system, healthcare providers can easily access patient information, communicate seamlessly with other departments, and streamline workflows. This level of coordination ensures that patients receive timely and accurate care, ultimately improving health outcomes and patient satisfaction.
Meeting Compliance and Security Standards In the healthcare industry, maintaining regulatory compliance and data security is critical. MediBest’s hospital management software incorporates the latest security protocols to protect patient data and ensure compliance with industry regulations. Through robust user management and access controls, the system ensures that sensitive data remains secure while allowing authorized users to access the information they need.
MediBest’s Role in Advanced User Management
User management is a vital aspect of any hospital management system, given the large number of users who require varying levels of access to patient and hospital data. MediBest’s software offers advanced user management features that simplify access and reduce dependency on manual processes. Key features include single sign-on (SSO), multi-user support, and self-service capabilities, each of which contributes to a more streamlined and secure user experience.
Single Sign-On (SSO) for Simplified Access Single sign-on is a valuable feature in complex healthcare environments where users need access to multiple systems. MediBest’s SSO feature allows users to log in once and access all authorized modules without having to enter their credentials multiple times. This streamlines workflows, saves time, and reduces the risk of password fatigue, enhancing both user convenience and system security. With SSO, healthcare providers can quickly access patient data, communicate with colleagues, and access the tools they need to deliver high-quality care.
Multi-User Setup for Enhanced Collaboration Hospitals are collaborative environments where multiple users often need access to the same data simultaneously. MediBest’s hospital management system supports a multi-user setup, allowing numerous healthcare providers, administrators, and support staff to work within the system concurrently. This feature ensures that everyone has real-time access to the latest information, facilitating collaboration and improving the overall quality of care. Additionally, MediBest’s system can accommodate between 100 and 200 users at a time, making it scalable for hospitals of various sizes.
Self-Service Capabilities for Reduced Manual Dependency One of the challenges hospitals face is the heavy reliance on manual processes, which can be time-consuming and prone to errors. MediBest’s hospital management system incorporates self-service principles, allowing users to access and manage information independently. Whether it’s accessing patient records, updating schedules, or generating reports, the self-service capabilities enable users to complete tasks without unnecessary dependencies, ultimately saving time and improving efficiency across the hospital.
Browser-Based and Cross-Platform Accessibility
Accessibility is another key component of an effective hospital management system. MediBest’s software is browser-based, meaning it can be accessed on any platform—whether it’s Microsoft, Linux, or Apple—without requiring local installation. This cross-platform functionality is especially beneficial in today’s healthcare environment, where hospital staff may need to access the system from various devices and locations.
No Local Installation Required A browser-based system reduces the burden on IT departments by eliminating the need for local installations. Users can access MediBest’s hospital management system from any internet-enabled device, whether they’re in the hospital, working remotely, or consulting from another facility. This flexibility makes it easier for healthcare providers to access patient data, collaborate with colleagues, and stay connected to the hospital’s resources at all times.
Scalability for Large and Mid-Sized Hospitals MediBest’s system is designed to be scalable, accommodating the needs of both large and mid-sized hospitals. With the ability to support a high number of concurrent users, the system can grow with the hospital’s needs, ensuring it remains functional and reliable as the hospital expands. This scalability is particularly important in healthcare, where patient volumes and operational demands can fluctuate.
Cross-Platform Compatibility for Greater Flexibility By supporting multiple operating systems, MediBest ensures that hospitals are not limited by platform-specific constraints. This cross-platform compatibility allows hospitals to make use of their existing hardware and software infrastructure, reducing the costs associated with IT upgrades and enabling a smoother transition to digital management.
Mobility, Web Integration, and Telemedicine
In the age of digital health, mobile access and telemedicine capabilities are becoming essential features of hospital management systems. MediBest has recognized this trend and developed its software to support mobile applications and web integration, providing healthcare providers with more flexibility in how they deliver care.
Mobile Applications for On-the-Go Access MediBest’s mobile applications allow doctors and patients to stay connected, regardless of their location. Doctors can review patient records, check lab results, and communicate with patients directly from their mobile devices. This level of access is invaluable in fast-paced hospital environments, where healthcare providers may need to make quick decisions based on the latest data.
For patients, mobile access offers convenience and transparency. They can use the app to view their medical records, receive appointment reminders, and communicate with their healthcare providers, improving engagement and satisfaction.
Web Integration for External Access MediBest’s hospital management system is web-integrated, meaning that authorized users outside the hospital’s network can securely access the system. This is particularly useful for doctors who need to consult remotely, administrative staff who work from different locations, or specialists collaborating on patient care from outside facilities. Web integration ensures that all authorized personnel can access necessary information, making healthcare more efficient and flexible.
Telemedicine Integration for Remote Patient Care Telemedicine has become a critical tool for delivering healthcare services to patients who may not have easy access to medical facilities. MediBest’s hospital management system includes telemedicine features that enable doctors to conduct virtual consultations, monitor patients remotely, and provide care to patients in remote areas. By incorporating telemedicine into its platform, MediBest is helping hospitals expand their reach and reduce healthcare costs, making high-quality care more accessible to all.
Conclusion: MediBest as the Future of Healthcare IT
As hospitals face increasing pressures to innovate and adopt digital solutions, MediBest stands out as a pioneer in hospital management software. With a focus on user management, cross-platform accessibility, and telemedicine integration, MediBest’s hospital management system is uniquely equipped to meet the challenges of modern healthcare. By providing a fully integrated, scalable solution, MediBest supports hospitals in their digital transformation journey, enabling them to deliver better patient care, improve operational efficiency, and stay competitive in a fast-evolving industry.
MediBest’s forward-thinking approach to healthcare IT positions it as a leader in hospital management software, preparing healthcare facilities for a future where technology and patient care are seamlessly connected. Through continuous innovation and a commitment to quality, MediBest is setting a new standard for how hospitals can leverage IT to create more efficient, patient-centered care environments.
0 notes
Text
youtube
#WordPress#Blogging#Website#CMS#SEO#Plugins#Themes#Customization#Hosting#Security#Maintenance#SpeedOptimization#MobileFriendly#Ecommerce#Multilingual#Backup#Analytics#SocialMediaIntegration#UserManagement#Forms#Widgets#Shortcodes#Gutenberg#RESTAPI#Multisite#Performance#Accessibility#GDPRCompliance#SSL#CDN
0 notes
Text


If you need advanced and modern features with the latest design admin dashboard for e-commerce website Administration, Advanced Settings, Categories, Customer Activity, Dashboard, Data Visualization, Management Panel, Multi-Vendor, Online Stores, and Product Management you can try Remos – eCommerce Admin Dashboard NextJS Template.
View more details and demo
#webdesign#webdevelopment#customizable#nextjs#seo#techbe#wordpresstheme#technology#responsivedesign#woocommerce#eCommerceDashboard#ReactJSAdmin#NextJSTemplate#AdminDashboard#SalesAnalytics#OrderTracking#UserManagement#ProductManagement#InventoryControl#DataVisualization#ResponsiveDesign#ModernWebDesign#AdminInterface#BusinessDashboard#RealTimeData#PerformanceMetrics#WebDevelopment#AdminPanel#OnlineStoreManagement#CustomizableUI
0 notes
Text
In recent years, the use of cloud-based applications has drastically increased. Any company with 40–50 employees will be using at least 15–20 cloud applications, and in a large enterprise, the number of applications is even higher. This page highlights the problems faced by IT teams and the solution.
1 note
·
View note
Text

From corporate conferences to music festivals, Event Nerve manages your events from start to end. Plan, execute, and analyse with our Event Management Suite.
0 notes
Text

User Management System Software
Discover the ultimate user management system software for seamless control over user access, permissions, and authentication. With intuitive interfaces and robust security features, our user management solution ensures efficient user administration, role-based access control, and centralized user authentication across your organization. Streamline user management processes, enhance security, and improve user experience with our customizable and scalable user management system software.
0 notes
Text
BuddyDev makes managing BuddyPress accounts easy!
Are you tired and weary of deactivating or reactivating BuddyPress accounts? There's nowhere else to look! It only takes a few clicks to manage user accounts with BuddyDev's robust solution. This plugin makes the process easy and quick, whether you need to temporarily deactivate or reactivate an account!
Principal Advantages:
One-click functionality to activate/deactivate
Effortless user management for community sites
Easy and quick interface for all administrators
Ideal for webmasters who wish to have more control over what their users do within BuddyPress communities!
Get BuddyDev right now from WP Super Box, which is the best place to get GPL plugins and themes!
#BuddyPress #WordPressCommunity #WPPlugins #UserManagement #GPLThemes
2 notes
·
View notes
Text
Using Asp.net Identity in our eShop ASP.NET Core MVC (Part 7)
In this tutorial, I’ll show you how to implement ASP.NET Identity in an ASP.NET MVC application, step by step. 🔍 What You’ll Learn in This Tutorial Introduction ASP.NET Identity Overview Real-World Analogy for Identity Core Components of ASP.NET Identity Role of ApplicationUser Class Inheriting IdentityUser Role of UserManager in ASP.NET Identity Role of SignInManager in ASP.NET…
0 notes
Text
A demo web app from an experienced developer. Highlights: somplicty (routing - cond, minimal middleware, no component framework), 1st class DB queries.
0 notes
Text
Securing Virtual Private Servers (VPS)
https://supedium.com/cyber-security-tips/securing-virtual-private-servers-vps/ #dataencryption #incidentresponse #networkprotection #serverhardening #usermanagement #VPSsecurity Securing Virtual Private Servers (VPS) https://supedium.com/cyber-security-tips/securing-virtual-private-servers-vps/
0 notes
Text
How All In One Restaurant Management Software Can Help Your Business Grow In A Much Better Way!
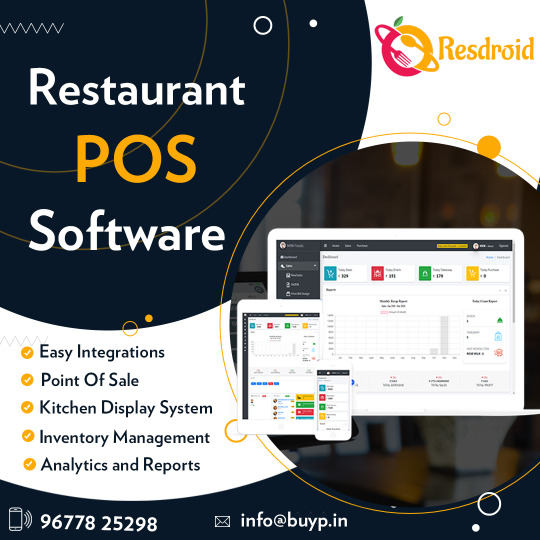
Expand your restaurant with our POS software. We Offer All In One Restaurant Management Software! A restaurant owner has to go through an endless number of tasks in a day just to make sure that the restaurant is running smoothly and providing good services to their customers in order to make a profit from their business. A restaurant with a point of sale integrated software will empower your business, boost sales, and increase revenues.
Resdroid is smart and reliable and can be used by all through its cloud technology. Expand your Restaurant easily with our POS software. Manage stocks, schedule staff, increase table turnaround time, get intelligence reports, and much more… Improve your speed of service and transform the customer experience. Get a Resdroid App! All you need is a browser!
Resdroid is accessible on any device that runs a browser – from traditional POS systems and desktops to laptops, tablets, and even smartphones! Say goodbye to expensive proprietary hardware.
Get a Special Features:
👉Great For Business Owners
👉 Purchase Management
👉 Stock Management & Inventory
👉 Powerful Inventory Reporting
👉 Start your 30 days free trial now!
To know more details of about our services visit our website page: https://resdroid.com
#restaurantmanagement#restaurantpos#restaurantpossystem#restaurantpossoftware#possoftware#possoftwaresustem#purchasemanagement#salesmanagement#stockmanagement#inventorymanagement#tablemanagement#smartreportsystem#usermanagement#integratedsoftware#integratedsoftwaresolution#bestpossoftware#restaurantsoftware
2 notes
·
View notes
Text
Remos - eCommerce Admin Dashboard React NextJS Template

🚀 Introducing Remos – the ultimate React NextJS template for eCommerce admin dashboards! Perfect for managing your online store with efficiency and style.
✨ Key Features:
Fully Responsive & Mobile-Friendly
Next.js & React Integration
Tailwind CSS for Styling
Advanced Analytics & Reporting
Product Management System
Order Tracking & Management
User Management & Roles
Customizable Dashboard Widgets
Dark Mode & Light Mode Support
SEO Optimized
Multi-Language Support
Secure Authentication
Regular Updates & Dedicated Support
🌟 Why Choose Remos?
Remos is designed to streamline your eCommerce operations, providing a powerful and intuitive admin dashboard. Whether you’re managing products, orders, or users, Remos offers the tools you need to succeed.
🔗 Get Remos today and take control of your eCommerce business!
#eCommerce#AdminDashboard#React#NextJS#TailwindCSS#ResponsiveDesign#SEO#ProductManagement#OrderTracking#UserManagement#webdesign#techbe#technology#webdevelopment
0 notes
Photo
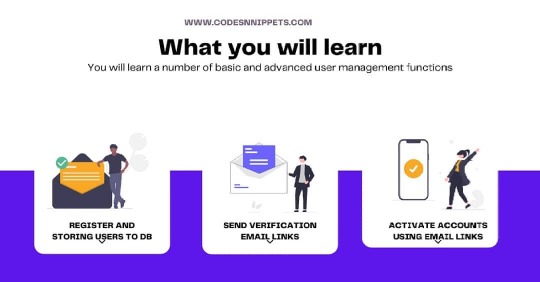
Learn how to design a User management system with Python and flask. It begins with deciding what parameters you need to store for your user model. But at the heart of it all is security. Securely storing user passwords by encryption and sending emails for verification covers half of Security requirements. Check out the latest posts at www.codesnnippets.com and download the project code files for free. #usermanagement #passwordhashing #emailverification #userauthentication #pythonframework #pythonprogramming #webdevelooment #tailwindcss #flask #flasklogin #flaskbcrypt #flasksqlalchemy #flaskmail #mysql #mysqldb #databasemanagement (at Lilongwe, Malawi) https://www.instagram.com/p/CRniy5sD6Pa/?utm_medium=tumblr
#usermanagement#passwordhashing#emailverification#userauthentication#pythonframework#pythonprogramming#webdevelooment#tailwindcss#flask#flasklogin#flaskbcrypt#flasksqlalchemy#flaskmail#mysql#mysqldb#databasemanagement
0 notes