#UserMode
Explore tagged Tumblr posts
Visit Tumblr Blog
Explore Tumblr blogs with no restrictions, modern design and the best experience.
Last Seen Tumblr Blogs


Fun Fact
Tumblr’s website traffic is steadily declining.
Text
I found a command on my raspberry pi's bash that can change the name of a user with complete disregard to any effects that may occur as a result ^w^
[email protected]:~ $ loginctl terminate-user pi; usermod -l snail pi; usermod -d /home/snail -m snail; groupmod -n snail pi
(I chose purple because i thought it would be easiest to distinguish from the rest of the text)
Idk if there is anything else i can add to this command to make it function better, but it worked for me with minimal issue (probably) :3c
Probably should not have done this, and i did not think it through, but it seems to have worked ^w^
#lake's posts#i have very little experience in this field so i probably messed something up#i'm just not sure what :3
8 notes
·
View notes
Note
$ usermod -a -G grey-face-paint wheel
im not giving a homestuck sudo privs arenyou nuts?
9 notes
·
View notes
Text
How To Add Users in Ubuntu 24.04 LTS
Adding users is a fundamental responsibility of system administrators, crucial for maintaining secure access and efficient resource allocation. Regular users need accounts for their daily operations, and administrators require robust ways to manage these accounts seamlessly. Effective user addition ensures that each user has the appropriate access and permissions for their role.
How To Add Users in Ubuntu 24.04 LTS
Ubuntu 24.04 LTS offers diverse methods for adding users, accommodating various preferences and needs. Whether you prefer the precision of terminal commands, the convenience of a graphical interface, or the efficiency of automation scripts, this guide covers it all. In this comprehensive guide, we will explore multiple methods for adding users in Ubuntu 24.04 LTS, including:
Using the Command Line: Employing powerful commands like adduser and useradd for detailed and controlled user creation.
Using the Graphical User Interface (GUI): Managing user accounts through Ubuntu’s intuitive settings interface.
Adding Users Temporarily: Creating users with expiration dates for specific tasks.
Automating User Creation with Scripts: Streamlining bulk user creation with custom scripts.
Each method is detailed with step-by-step instructions to ensure you can add users effectively and effortlessly, enhancing your Ubuntu experience.
Method 1: Adding a User Using the Command Line
This method is ideal for administrators who prefer using terminal commands.
Using adduser
An easy-to-use, high-level command for adding users is the adduser. It provides a guided process to set up a new user, including setting a password and additional user information.
Step 1: Open the Terminal
To access the terminal, simultaneously depress the Ctrl, Alt, and T keys. Alternatively, search for "Terminal" in your application menu.
Step 2: Add a New User
Execute the following command:
sudo adduser newuser

Substitute newuser with your desired username.
The password must be entered when prompted.
Take Note:
Make sure the password satisfies the following requirements:
Minimum of 8 characters.
Includes both upper and lower case letters.
Contains at least one number.
Includes special characters (e.g., !, @, #, $, etc.).

Enter the password and press Enter.
Type the password one more time and hit Enter to confirm it.
Some details will be asked while adding a new user like full name, room number, work phone, and home phone.

Any field can be skipped by pressing Enter.
After entering the information, you will see a summary of the details.

Confirm the details by typing Y and pressing Enter.
Step 3: Verify User Creation
Execute the below given command to check the new user's addition:
getent passwd newuser
If the command is successful in creating the user, the user's details will be shown like this:

Using useradd
A low-level utility for creating new users is the useradd command. It requires more specific options but offers greater control over the user creation process.
Step 1: Open the Terminal
The terminal can be opened by simultaneously holding down the Ctrl, Alt, and T keys.
Step 2: Add a New User
Run the following command, and substitute new_username with the username you prefer:
sudo useradd -m new_username
Making sure the user's home directory is created is ensured by the -m option.
Step 3: Set Password for the User
The new user can be assigned a password by using:
sudo passwd new_username

Type the password one more time and hit Enter to confirm it.
Step 4: Verify User Creation
Execute the below given command to check the new user's addition:
getent passwd new_username
If the command is successful in creating the user, the user's details will be shown.

Additional Steps (Optional)
Adding the User to a Specific Group
Use the below given command to add a new user to a certain group:
sudo usermod -aG groupname newuser
Replace groupname with the desired group (e.g., sudo, admin, docker).
Execute the below given command to check the new user's addition:
groups new_username
This command will list all the groups that the user belongs to, including the new group.

Method 2: Adding a User Using GUI (Graphical User Interface)
For those who prefer a graphical interface, Ubuntu provides an easy way to manage users through its settings. Here's a step-by-step guide to adding a new user using the GUI.
Step 1: Open Settings
To access the terminal:
Search for "Settings" in your application menu.

Step 2: Access Users Section
In the Settings window, go to the search bar at the top and type "Users."

As an alternative, move to the sidebar's bottom and select "System."

Click on "Users" from the options available in the System settings.
Step 3: Unlock User Management
Select the "Unlock" button by moving to the upper right corner.

Enter your administrative password and click "Authenticate."
Step 4: Add New User
Click the "Add User" button.
Input the required data, including your username and name.
You can choose to keep the toggle button inactive by default to designate the new user as a "Standard" user.
Then insert password.
Step 5: Confirm and Apply
Click "Add" to create the user.
Now the new user will appear in the user list.
Take Note
User Management:
Once the user is created, click on the username in the Users section to manage its settings.
Method 3: Adding a User Temporarily
For certain tasks, you might need to add a user that expires after a specified period. This method outlines how to create a user with an expiration date using the command line.
Step 1: Open the Terminal
The terminal can be opened by simultaneously holding down the Ctrl, Alt, and T keys.
Step 2: Add a User with an Expiry Date
Execute the following command:
sudo useradd -m -e YYYY-MM-DD temporaryuser
Replace YYYY-MM-DD with the desired expiration date and temporaryuser with your desired username.
Step 3: Set Password for the User
The new user can be assigned a password by using:
sudo passwd temporaryuser
Enter the password, when prompted.
Type the password and press Enter.
Type the password one more time and hit Enter to confirm it.
Step 4: Verify User
To verify that a temporary user has been created successfully, use the below given command:
sudo chage -l temporaryUser
Substitute the temporaryuser with the username you want to verify.
Method 4: Automating User Creation with Scripts
The method outlined here demonstrates automating user creation with scripts, particularly useful for bulk user creation tasks.
Step 1: Open the Terminal
The terminal can be opened by simultaneously holding down the Ctrl, Alt, and T keys.
Step 2: Create a Script
Any text editor will work for writing the script. Using nano, for instance:
nano add_users.sh
Step 3: Add Script Content
Add the following content to the script. Modify the usernames and other details as needed.
#!/bin/bash
sudo adduser user1 --gecos "First Last,RoomNumber,WorkPhone,HomePhone" --disabled-password
echo "user1:password1" | sudo chpasswd
sudo adduser user2 --gecos "First Last,RoomNumber,WorkPhone,HomePhone" --disabled-password
echo "user2:password2" | sudo chpasswd
Replace user1, user2, etc., with the desired usernames.
Modify the --gecos option to provide additional information about the user (optional).
Replace the password with the desired password.
Adjust the script content as needed, adding more users or customizing user details.
Save and close the file.
Step 4: Make the Script Executable
To enable the script to run, use the chmod command.
chmod +x add_users.sh

Step 5: Run the Script
Run the script to create the users.
./add_users.sh

Conclusion:
User management in Ubuntu 24.04 LTS is a critical task for system administrators, providing security, efficient resource allocation, and smooth system operation. With various methods available, from command-line interfaces to graphical user interfaces and automation scripts, Ubuntu 24.04 LTS ensures that adding users can be tailored to different needs and preferences. By following the comprehensive steps outlined in this guide, you can effectively manage regular users.
2 notes
·
View notes
Text
I love that Intel and AMD still have to keeping dragging the x87 instruction set forwards in this day and age. If anyone proposed it today they'd be laughed out of the city. Having to treat your own processor like a foreign stack-machine accelerator only capable of interacting via DMA is insane. It made sense, yes, when the 8087 was a foreign stack-machine accelerator only capable of interacting via DMA, but since the i486DX in 1989 this has been obsolete. But processors still have to support it!
Even the most modern x64 processors, with the highest core counts and IPCs, are configured on startup to perform a shadow-play with themselves. They have to lie to you, have to pretend that the ST(x) and Rxx registers can't see each-other, that the integer ALU and the floating-point ALU aren't side-by-side on the same chip, that it's still 1978, still a world where BCD is important, still a world before IEEE 754.
Sure, processors still start in real mode, but that hasn't been relevant to user programs in decades. User code doesn't get to touch real mode.
But x87? The x87 instruction set lasted through the i386. It made it to the introduction of protected mode, of privilege rings, of usermode. And so, forever codified in the System V Application Binary Interface, AMD64 Architecture Processor Supplement, every program must begin in x87 mode. Likewise for Windows.
The OS can't save you from history here. You have to choose. It's on you to enter MMX mode, or to use SSE2+ instructions. You can live in the present, if you decide to. But x87 is still there. Still in the background. Still doing its own stupid thing. You can never be sure exactly which extensions you can rely on being present. Except x87. You can always rely on your computer's ability to lie to itself about its abilities.
x87 will outlive us all. Ass-backward forever.
#my thoughts#x86#x87#programming#computers#really a microcosm of x86 in general#down with cisc#/affectionate
9 notes
·
View notes
Text
Fox...? -Short Genuinely don't remember where I got this audio, it's been sitting in my usermod for like 2 years.
13 notes
·
View notes
Text

SYSTEM ADMIN INTERVIEW QUESTIONS 24-25
Table of Content
Introduction
File Permissions
User and Group Management:
Cron Jobs
System Performance Monitoring
Package Management (Red Hat)
Conclusion
Introduction
The IT field is vast, and Linux is an important player, especially in cloud computing. This blog is written under the guidance of industry experts to help all tech and non-tech background individuals secure interviews for roles in the IT domain related to Red Hat Linux.
File Permissions
Briefly explain how Linux file permissions work, and how you would change the permissions of a file using chmod. In Linux, each file and directory has three types of permissions: read (r), write (w), and execute (x) for three categories of users: owner, group, and others. Example: You will use chmod 744 filename, where the digits represent the permission in octal (7 = rwx, 4 = r–, etc.) to give full permission to the owner and read-only permission to groups and others.
What is the purpose of the umask command? How is it helpful to control default file permissions?umask sets the default permissions for newly created files and directories by subtracting from the full permissions (777 for directories and 666 for files). Example: If you set the umask to 022, new files will have permissions of 644 (rw-r–r–), and directories will have 755 (rwxr-xr-x).
User and Group Management:
Name the command that adds a new user in Linux and the command responsible for adding a user to a group. The Linux useradd command creates a new user, while the usermod command adds a user to a specific group. Example: Create a user called Jenny by sudo useradd jenny and add him to the developer’s group by sudo usermod—aG developers jenny, where the—aG option adds users to more groups without removing them from other groups.
How do you view the groups that a user belongs to in Linux?
The group command in Linux helps to identify the group a user belongs to and is followed by the username. Example: To check user John’s group: groups john
Cron Jobs
What do you mean by cron jobs, and how is it scheduled to run a script every day at 2 AM?
A cron job is defined in a crontab file. Cron is a Linux utility to schedule tasks to run automatically at specified times. Example: To schedule a script ( /home/user/backup.sh ) to run daily at 2 AM: 0 2 * * * /home/user/backup.sh Where 0 means the minimum hour is 2, every day, every month, every day of the week.
How would you prevent cron job emails from being sent every time the job runs?
By default, cron sends an email with the output of the job. You can prevent this by redirecting the output to /dev/null. Example: To run a script daily at 2 AM and discard its output: 0 2 * * * /home/user/backup.sh > /dev/null 2>&1
System Performance Monitoring
How can you monitor system performance in Linux? Name some tools with their uses.
Some of the tools to monitor the performance are: Top: Live view of system processes and usage of resource htop: More user-friendly when compared to the top with an interactive interface. vmstat: Displays information about processes, memory, paging, block IO, and CPU usage. iostat: Showcases Central Processing Unit (CPU) and I/O statistics for devices and partitions. Example: You can use the top command ( top ) to identify processes consuming too much CPU or memory.
In Linux, how would you check the usage of disk space?
The df command checks disk space usage, and Du is responsible for checking the size of the directory/file. Example: To check overall disk space usage: df -h The -h option depicts the size in a human-readable format like GB, MB, etc.
Package Management (Red Hat)
How do you install, update, or remove packages in Red Hat-based Linux distributions by yum command?
In Red Hat and CentOS systems, the yum package manager is used to install, update, or remove software. Install a package: sudo yum install httpd This installs the Apache web server. Update a package: sudo yum update httpd Remove a package:sudo yum remove httpd
By which command will you check the installation of a package on a Red Hat system?
The yum list installed command is required to check whether the package is installed. Example: To check if httpd (Apache) is installed: yum list installed httpd
Conclusion
The questions are designed by our experienced corporate faculty which will help you to prepare well for various positions that require Linux such as System Admin.
Contact for Course Details – 8447712333
2 notes
·
View notes
Text
one of my biggest fantasies is to write a ROP chain and exploit a vulnerability in usermode software, allowing for privilege escalation and eventually kernel process overrides... hhhhh the things i would do.....
9 notes
·
View notes
Note
Can I be on your sudoers list?
👉👈
y-you would like...admin access, to me ? 😳😳
root@synthia # usermod -aG wheel Elizabeth
pls be gentle 👉🏻👈🏻🥺
12 notes
·
View notes
Text
Install Davinci Resolve in any Linux distro
New Post has been published on https://tuts.kandz.me/install-davinci-resolve-in-any-linux-distro/
Install Davinci Resolve in any Linux distro

youtube
on host sudo usermod -a -G render,video $LOGNAME install distrobox and podman sudo zypper in podman distrobox or sudo apt install -y podman distrobox or sudo dnf install -y podman distrobox or sudo pacman -S -y podman distrobox reboot go url to download https://www.blackmagicdesign.com/no/p... create a Fedora 40 container and enter it distrobox create distrobox create --name fedora40 --image registry.fedoraproject.org/fedora:40 distrobox enter fedora40 install dependencies sudo dnf install fuse fuse-devel alsa-lib \ apr apr-util dbus-libs fontconfig freetype \ libglvnd libglvnd-egl libglvnd-glx \ libglvnd-opengl libICE librsvg2 libSM \ libX11 libXcursor libXext libXfixes libXi \ libXinerama libxkbcommon libxkbcommon-x11 \ libXrandr libXrender libXtst libXxf86vm \ mesa-libGLU mtdev pulseaudio-libs xcb-util \ xcb-util-image xcb-util-keysyms \ xcb-util-renderutil xcb-util-wm \ mesa-libOpenCL rocm-opencl libxcrypt-compat \ alsa-plugins-pulseaudio unzip it. Change the name with the version you have downloaded, and the location you have downloaded it. cd ~/Downloads unzip DaVinci_Resolve_Studio_19.1.3_Linux run the DaVinci Resolve installer. Change the name with the version you have downloaded chmod +x DaVinci_Resolve_Studio_19.1.3_Linux.run sudo ./DaVinci_Resolve_Studio_19.1.3_Linux.run --appimage-extract sudo SKIP_PACKAGE_CHECK=1 ./squashfs-root/AppRun apply workaround for outdated libraries sudo mkdir /opt/resolve/libs/disabled sudo mv /opt/resolve/libs/libglib* /opt/resolve/libs/disabled sudo mv /opt/resolve/libs/libgio* /opt/resolve/libs/disabled sudo mv /opt/resolve/libs/libgmodule* /opt/resolve/libs/disabled run DaVinci Resolve /opt/resolve/bin/resolve export desktop files distrobox-export --app resolve In case more problems cd /opt/resolve/libs sudo mkdir disabled sudo mv libglib* disabled sudo mv libgio* disabled sudo mv libgmodule* disabled
0 notes
Text
Postal SMTP install and setup on a virtual server

Postal is a full suite for mail delivery with robust features suited for running a bulk email sending SMTP server. Postal is open source and free. Some of its features are: - UI for maintaining different aspects of your mail server - Runs on containers, hence allows for up and down horizontal scaling - Email security features such as spam and antivirus - IP pools to help you maintain a good sending reputation by sending via multiple IPs - Multitenant support - multiple users, domains and organizations - Monitoring queue for outgoing and incoming mail - Built in DNS setup and monitoring to ensure mail domains are set up correctly List of full postal features
Possible cloud providers to use with Postal
You can use Postal with any VPS or Linux server providers of your choice, however here are some we recommend: Vultr Cloud (Get free $300 credit) - In case your SMTP port is blocked, you can contact Vultr support, and they will open it for you after providing a personal identification method. DigitalOcean (Get free $200 Credit) - You will also need to contact DigitalOcean support for SMTP port to be open for you. Hetzner ( Get free €20) - SMTP port is open for most accounts, if yours isn't, contact the Hetzner support and request for it to be unblocked for you Contabo (Cheapest VPS) - Contabo doesn't block SMTP ports. In case you are unable to send mail, contact support. Interserver
Postal Minimum requirements
- At least 4GB of RAM - At least 2 CPU cores - At least 25GB disk space - You can use docker or any Container runtime app. Ensure Docker Compose plugin is also installed. - Port 25 outbound should be open (A lot of cloud providers block it)
Postal Installation
Should be installed on its own server, meaning, no other items should be running on the server. A fresh server install is recommended. Broad overview of the installation procedure - Install Docker and the other needed apps - Configuration of postal and add DNS entries - Start Postal - Make your first user - Login to the web interface to create virtual mail servers Step by step install Postal Step 1 : Install docker and additional system utilities In this guide, I will use Debian 12 . Feel free to follow along with Ubuntu. The OS to be used does not matter, provided you can install docker or any docker alternative for running container images. Commands for installing Docker on Debian 12 (Read the comments to understand what each command does): #Uninstall any previously installed conflicting software . If you have none of them installed it's ok for pkg in docker.io docker-doc docker-compose podman-docker containerd runc; do sudo apt-get remove $pkg; done #Add Docker's official GPG key: sudo apt-get update sudo apt-get install ca-certificates curl -y sudo install -m 0755 -d /etc/apt/keyrings sudo curl -fsSL https://download.docker.com/linux/debian/gpg -o /etc/apt/keyrings/docker.asc sudo chmod a+r /etc/apt/keyrings/docker.asc #Add the Docker repository to Apt sources: echo "deb https://download.docker.com/linux/debian $(. /etc/os-release && echo "$VERSION_CODENAME") stable" | sudo tee /etc/apt/sources.list.d/docker.list > /dev/null sudo apt-get update #Install the docker packages sudo apt-get install docker-ce docker-ce-cli containerd.io docker-buildx-plugin docker-compose-plugin -y #You can verify that the installation is successful by running the hello-world image sudo docker run hello-world Add the current user to the docker group so that you don't have to use sudo when not logged in as the root user. ##Add your current user to the docker group. sudo usermod -aG docker $USER #Reboot the server sudo reboot Finally test if you can run docker without sudo ##Test that you don't need sudo to run docker docker run hello-world Step 2 : Get the postal installation helper repository The Postal installation helper has all the docker compose files and the important bootstrapping tools needed for generating configuration files. Install various needed tools #Install additional system utlities apt install git vim htop curl jq -y Then clone the helper repository. sudo git clone https://github.com/postalserver/install /opt/postal/install sudo ln -s /opt/postal/install/bin/postal /usr/bin/postal Step 3 : Install MariaDB database Here is a sample MariaDB container from the postal docs. But you can use the docker compose file below it. docker run -d --name postal-mariadb -p 127.0.0.1:3306:3306 --restart always -e MARIADB_DATABASE=postal -e MARIADB_ROOT_PASSWORD=postal mariadb Here is a tested mariadb compose file to run a secure MariaDB 11.4 container. You can change the version to any image you prefer. vi docker-compose.yaml services: mariadb: image: mariadb:11.4 container_name: postal-mariadb restart: unless-stopped environment: MYSQL_ROOT_PASSWORD: ${DB_ROOT_PASSWORD} volumes: - mariadb_data:/var/lib/mysql network_mode: host # Set to use the host's network mode security_opt: - no-new-privileges:true read_only: true tmpfs: - /tmp - /run/mysqld healthcheck: test: interval: 30s timeout: 10s retries: 5 volumes: mariadb_data: You need to create an environment file with the Database password . To simplify things, postal will use the root user to access the Database.env file example is below. Place it in the same location as the compose file. DB_ROOT_PASSWORD=ExtremelyStrongPasswordHere Run docker compose up -d and ensure the database is healthy. Step 4 : Bootstrap the domain for your Postal web interface & Database configs First add DNS records for your postal domain. The most significant records at this stage are the A and/or AAAA records. This is the domain where you'll be accessing the postal UI and for simplicity will also act as the SMTP server. If using Cloudflare, turn off the Cloudflare proxy. sudo postal bootstrap postal.yourdomain.com The above will generate three files in /opt/postal/config. - postal.yml is the main postal configuration file - signing.key is the private key used to sign various things in Postal - Caddyfile is the configuration for the Caddy web server Open /opt/postal/config/postal.yml and add all the values for DB and other settings. Go through the file and see what else you can edit. At the very least, enter the correct DB details for postal message_db and main_db. Step 5 : Initialize the Postal database and create an admin user postal initialize postal make-user If everything goes well with postal initialize, then celebrate. This is the part where you may face some issues due to DB connection failures. Step 6 : Start running postal # run postal postal start #checking postal status postal status # If you make any config changes in future you can restart postal like so # postal restart Step 7 : Proxy for web traffic To handle web traffic and ensure TLS termination you can use any proxy server of your choice, nginx, traefik , caddy etc. Based on Postal documentation, the following will start up caddy. You can use the compose file below it. Caddy is easy to use and does a lot for you out of the box. Ensure your A records are pointing to your server before running Caddy. docker run -d --name postal-caddy --restart always --network host -v /opt/postal/config/Caddyfile:/etc/caddy/Caddyfile -v /opt/postal/caddy-data:/data caddy Here is a compose file you can use instead of the above docker run command. Name it something like caddy-compose.yaml services: postal-caddy: image: caddy container_name: postal-caddy restart: always network_mode: host volumes: - /opt/postal/config/Caddyfile:/etc/caddy/Caddyfile - /opt/postal/caddy-data:/data You can run it by doing docker compose -f caddy-compose.yaml up -d Now it's time to go to the browser and login. Use the domain, bootstrapped earlier. Add an organization, create server and add a domain. This is done via the UI and it is very straight forward. For every domain you add, ensure to add the DNS records you are provided.
Enable IP Pools
One of the reasons why Postal is great for bulk email sending, is because it allows for sending emails using multiple IPs in a round-robin fashion. Pre-requisites - Ensure the IPs you want to add as part of the pool, are already added to your VPS/server. Every cloud provider has a documentation for adding additional IPs, make sure you follow their guide to add all the IPs to the network. When you run ip a , you should see the IP addresses you intend to use in the pool. Enabling IP pools in the Postal config First step is to enable IP pools settings in the postal configuration, then restart postal. Add the following configuration in the postal.yaml (/opt/postal/config/postal.yml) file to enable pools. If the section postal: , exists, then just add use_ip_pools: true under it. postal: use_ip_pools: true Then restart postal. postal stop && postal start The next step is to go to the postal interface on your browser. A new IP pools link is now visible at the top right corner of your postal dashboard. You can use the IP pools link to add a pool, then assign IP addresses in the pools. A pool could be something like marketing, transactions, billing, general etc. Once the pools are created and IPs assigned to them, you can attach a pool to an organization. This organization can now use the provided IP addresses to send emails. Open up an organization and assign a pool to it. Organizations → choose IPs → choose pools . You can then assign the IP pool to servers from the server's Settings page. You can also use the IP pool to configure IP rules for the organization or server. At any point, if you are lost, look at the Postal documentation. Read the full article
0 notes
Text
Chimera-Linux with btrfs
Chimera Linux is a rather new from the ground up Linux Distribution built with LLVM, MUSL, BSDUtils and dinitit comes with GNOME and KDE Plasma. It, however doesn't come with a installer so here's how to install the KDE flavour with btrfs root and home directories plus a swap partition for use in Linux KVM with UEFI.
Step 1. Get a Chimera live image from https://repo.chimera-linux.org/live/latest/
I use the chimera-linux-x86_64-LIVE-XXXXXXXX-plasma.iso image with KDE Plasma 6 and the following steps assume you do the same.
Step 2. Boot the live image
Step 3. Prepare the target disk with KDE Partition Manager
/dev/vda /dev/vda1, vfat, EFI System, 500 MB /dev/vda2, btrfs, Root FS, subvols @ & @home , rest of the disk /dev/vda3, swap, SWAP FS, 2x RAM Size
Step 4. Open Konsole and do the following
doas -s mkdir -p /media/root mount -t btrfs /dev/vda2 /media/root chmod 755 /media/root btrfs subvolume create /media/root/@ btrfs subvolume create /media/root/@home btrfs subvolume set-default /media/root/@ umount /media/root mount -t btrfs -o compress=zstd:5,ssd,noatime,subvol=/@ /dev/vda2 /media/root mkdir -p /media/root/home mount -t btrfs -o compress=zstd:5,ssd,noatime,subvol=/@home /dev/vda2 /media/root/home mkdir -p /media/root/boot/efi mount -t vfat /dev/sda1 /media/root/boot/efi
let's bootstrap our new chimera system
chimera-bootstrap -l /media/root exit
time to chroot into our vergin system
doas chimera-chroot /media/root
time to bring everything up to date
apk update apk upgrade --available
if something is iffy
apk fix
we want our swap to show up in the fstab
swapon /dev/vda3
Let's build a fstab
genfstab / >> /etc/fstab
install the latest LTS Kernel
apk add linux-lts
install the latest released kernel
apk add linux-stable update-initramfs -c -k all
time for EFI GRUB
apk add grub-x86_64-efi grub-install -v --efi-directory=/boot/efi update-grub
install KDE, Firefox, Thunderbird
apk add plasma-desktop flatpak smartmontools ufw firefox thunderbird qemu-guest-agent-dinit spice-vdagent-dinit
Set root password
passwd root
create main user
useradd myuser passwd myuser
add user to relevant groups
usermod -a -G wheel,kvm,plugdev myuser
Set hostname
echo chimera > /etc/hostname
set timezone
ln -sf /usr/share/zoneinfo/Europe/Berlin /etc/localtime
Configure some services
syslog-ng
dinitctl enable -o syslog-ng
sshd
dinitctl enable -o sshd
KDE Login Manager
dinitctl enable -o sddm
only needed when in KVM VM
dinitctl enable -o spice-vdagentd dinitctl enable -o qemu-ag
network time client
dinitctl enable -o chrony
network manager defaults to dhcp client on first ethernet interface
dinitctl enable -o networkmanager
optional: enable firewall if installed
dinitctl enable -o ufw
see the firewall status
ufw status
configure flatpak
flatpak remote-add --if-not-exists flathub https://dl.flathub.org/repo/flathub.flatpakrepo
just to be sure
update-initramfs -c -k all update-grub
exit from chroot
exit
umount drive
doas umount /media/root/boot/efi doas umount /media/root/home doas umount /media/root
Step 5. Reboot the System
1 note
·
View note
Text
Ollama×Open WebUI:CPUオンリーのLinuxサーバーで最も簡単にLlama3.2をセットアップする手順
Ollamaのインストール Ollamaは高性能なオープンソースLLMを、プライバシーを確保しながらローカル環境で実行できる優れたツールです。 インストール手順を詳しく解説します。 基本インストール curl -fsSL <https://ollama.com/install.sh> | sh このコマンドでOllamaの最新バージョンがシステムに直接インストールされます。 シェルスクリプトを使用することで、依存関係の解決から初期設定まで自動的に実行されます。 システムサービスの設定 sudo useradd -r -s /bin/false -U -m -d /usr/share/ollama ollama sudo usermod -a -G ollama…
0 notes
Text
Hướng dẫn cài đặt Docker trên Ubuntu 22.04 chi tiết

Trong bài viết này, chúng ta sẽ cùng tìm hiểu cách cài đặt Docker trên Ubuntu 22.04, một công cụ mạnh mẽ và linh hoạt trong việc quản lý container. Docker giúp việc triển khai ứng dụng trở nên nhanh chóng, tiện lợi và tối ưu hóa tài nguyên. Nếu bạn đang sử dụng Ubuntu 22.04 và muốn thiết lập môi trường Docker để phát triển hoặc triển khai ứng dụng, hãy theo dõi hướng dẫn chi tiết dưới đây.
Giới thiệu về Docker CE
Docker CE (Community Edition) là một phiên bản mã nguồn mở của Docker, được thiết kế để dành cho cộng đồng người dùng và nhà phát triển. Đây là phiên bản Docker phổ biến nhất, phù hợp cho các dự án cá nhân hoặc các môi trường sản xuất quy mô nhỏ và trung bình.
Các tính năng chính:
Mã nguồn mở: Docker CE là một dự án mã nguồn mở, cung cấp quyền truy cập vào mã nguồn của Docker, cho phép cộng đồng đóng góp, kiểm tra và cải thiện phần mềm.
Đa nền tảng: Docker CE hỗ trợ nhiều hệ ��iều hành, bao gồm Linux, Windows và macOS, giúp đảm bảo tính linh hoạt khi triển khai ứng dụng trên các môi trường khác nhau.
Containerization: Docker CE cho phép tạo ra các container độc lập, chứa đầy đủ môi trường cần thiết để chạy một ứng dụng, giúp tránh các xung đột về môi trường hoặc phụ thuộc khi triển khai.
Quản lý hình ảnh: Docker CE cung cấp khả năng tạo và quản lý các hình ảnh Docker. Mỗi hình ảnh là một bản sao của một ứng dụng cụ thể, bao gồm tất cả các phụ thuộc của nó.
Docker Hub: Docker CE tích hợp với Docker Hub, bạn có thể tải lên, chia sẻ và truy cập hàng ngàn hình ảnh từ cộng đồng.
Docker Compose: Docker CE đi kèm với Docker Compose, một công cụ cho phép định nghĩa và quản lý nhiều container như một dịch vụ duy nhất, giúp dễ dàng triển khai các ứng dụng phức tạp.
Orchestration: Hỗ trợ các tính năng quản lý và điều phối container, như Docker Swarm để quản lý nhiều container trên nhiều host.
Các bước cài đặt Docker trên Ubuntu 22.04
Mặc định gói cài đặt đã có sẵn trong repo của ubuntu, nhưng đó không phải là bản mới nhất. Dưới đây là cách để bạn tải Docker phiên bản mới nhất
Bước 1: Cập nhật hệ thống
sudo apt update
Bước 2: Cài đặt các gói phụ thuộc
sudo apt install apt-transport-https ca-certificates curl software-properties-common
Bước 3: Thêm khóa GPG cho kho lưu trữ Docker
curl -fsSL https://download.Docker.com/linux/ubuntu/gpg | sudo gpg --dearmor -o /usr/share/keyrings/Docker-archive-keyring.gpg
Bước 4: Thêm kho lưu trữ Docker vào nguồn APT
echo "deb [arch=$(dpkg --print-architecture) signed-by=/usr/share/keyrings/Docker-archive-keyring.gpg] https://download.Docker.com/linux/ubuntu $(lsb_release -cs) stable" | sudo tee /etc/apt/sources.list.d/Docker.list > /dev/null
Bước 5: Cập nhật lại danh sách gói
sudo apt update
Bước 6: Kiểm tra kho lưu trữ Docker
apt-cache policy docker-ce
Bước 7: Cài đặt Docker phiên bản mới nhất
sudo apt install docker-ce
Bước 8 (Nếu cần): Nếu bạn muốn user mà bạn đăng nhập sử dụng Docker chứ không chỉ mỗi tài khoản root
sudo usermod -aG docker ${USER}
Kiểm tra sau khi cài đặt Docker trên Ubuntu 22.04
Sau khi cài đặt Docker CE xong ta cũng cần kiểm tra xem Docker đã chạy chưa và đang dùng version bao nhiêu
sudo systemctl status docker
sudo docker version
Tổng kết
Docker CE tích hợp Docker Compose, Dockerfile, và nhiều công cụ khác để cung cấp một giải pháp toàn diện cho việc quản lý container. Với Docker CE, bạn có thể dễ dàng tạo, triển khai, và quản lý các ứng dụng container hóa, đồng thời tận dụng sự hỗ trợ mạnh mẽ từ cộng đồng. Điều này giúp cho Docker CE trở thành lựa chọn hàng đầu cho các nhà phát triển, nhóm phát triển nhỏ, và cả những người mới bắt đầu tìm hiểu về công nghệ container.
Nguồn: https://suncloud.vn/cai-dat-docker-tren-ubuntu
0 notes
Text
Utilizing llama.cpp, LLMs can be executed on Intel GPUs

The open-source project known as llama.cpp is a lightweight LLM framework that is gaining greater and greater popularity. Given its performance and customisability, developers, scholars, and fans have formed a strong community around the project. Since its launch, GitHub has over 600 contributors, 52,000 stars, 1,500 releases, and 7,400 forks. More hardware, including Intel GPUs seen in server and consumer products, is now supported by llama.cpp as a result of recent code merges. Hardware support for GPUs from other vendors and CPUs (x86 and ARM) is now combined with Intel’s GPUs.
Georgi Gerganov designed the first implementation. The project is mostly instructional in nature and acts as the primary testing ground for new features being developed for the machine learning tensor library known as ggml library. Intel is making AI more accessible to a wider range of customers by enabling inference on a greater number of devices with its latest releases. Because Llama.cpp is built in C and has a number of other appealing qualities, it is quick.
16-bit float compatibility
Support for integer quantisation (four-, five-, eight-, etc.)
Absence of reliance on outside parties
There are no runtime memory allocations.
Intel GPU SYCL Backend
GGM offers a number of backends to accommodate and adjust for various hardware. Since oneAPI supports GPUs from multiple vendors, Intel decided to construct the SYCL backend using their direct programming language, SYCL, and high-performance BLAS library, oneMKL. A programming model called SYCL is designed to increase hardware accelerator productivity. It is an embedded, single-source language with a domain focus that is built entirely on C++17.
All Intel GPUs can be used with the SYCL backend. Intel has confirmed with:
Flex Series and Data Centre GPU Max from Intel
Discrete GPU Intel Arc
Intel Arc GPU integrated with the Intel Core Ultra CPU
In Intel Core CPUs from Generations 11 through 13: iGPU
Millions of consumer devices can now conduct inference on Llama since llama.cpp now supports Intel GPUs. The SYCL backend performs noticeably better on Intel GPUs than the OpenCL (CLBlast) backend. Additionally, it supports an increasing number of devices, including CPUs and future processors with AI accelerators. For information on using the SYCL backend, please refer to the llama.cpp tutorial.
Utilise the SYCL Backend to Run LLM on an Intel GPU
For SYCL, llama.cpp contains a comprehensive manual. Any Intel GPU that supports SYCL and oneAPI can run it. GPUs from the Flex Series and Intel Data Centre GPU Max can be used by server and cloud users. On their Intel Arc GPU or iGPU on Intel Core CPUs, client users can test it out. The 11th generation Core and later iGPUs have been tested by Intel. While it functions, the older iGPU performs poorly.
The memory is the only restriction. Shared memory on the host is used by the iGPU. Its own memory is used by the dGPU. For llama2-7b-Q4 models, Intel advise utilising an iGPU with 80+ EUs (11th Gen Core and above) and shared memory that is greater than 4.5 GB (total host memory is 16 GB and higher, and half memory could be assigned to iGPU).
Put in place the Intel GPU driver
There is support for Windows (WLS2) and Linux. Intel suggests Ubuntu 22.04 for Linux, and this version was utilised for testing and development.
Linux:sudo usermod -aG render username sudo usermod -aG video username sudo apt install clinfo sudo clinfo -l
Output (example):Platform #0: Intel(R) OpenCL Graphics -- Device #0: Intel(R) Arc(TM) A770 Graphics
orPlatform #0: Intel(R) OpenCL HD Graphics -- Device #0: Intel(R) Iris(R) Xe Graphics \[0x9a49\]
Set the oneAPI Runtime to ON
Install the Intel oneAPI Base Toolkit first in order to obtain oneMKL and the SYCL compiler. Turn on the oneAPI runtime next:
First, install the Intel oneAPI Base Toolkit to get the SYCL compiler and oneMKL. Next, enable the oneAPI runtime:
Linux: source /opt/intel/oneapi/setvars.sh
Windows: “C:\Program Files (x86)\Intel\oneAPI\setvars.bat\” intel64
Run sycl-ls to confirm that there are one or more Level Zero devices. Please confirm that at least one GPU is present, like [ext_oneapi_level_zero:gpu:0].
Build by one-click:
Linux: ./examples/sycl/build.sh
Windows: examples\sycl\win-build-sycl.bat
Note, the scripts above include the command to enable the oneAPI runtime.
Run an Example by One-Click
Download llama-2–7b.Q4_0.gguf and save to the models folder:
Linux: ./examples/sycl/run-llama2.sh
Windows: examples\sycl\win-run-llama2.bat
Note that the scripts above include the command to enable the oneAPI runtime. If the ID of your Level Zero GPU is not 0, please change the device ID in the script. To list the device ID:
Linux: ./build/bin/ls-sycl-device or ./build/bin/main
Windows: build\bin\ls-sycl-device.exe or build\bin\main.exe
Synopsis
All Intel GPUs are available to LLM developers and users via the SYCL backend included in llama.cpp. Kindly verify whether the Intel laptop, your gaming PC, or your cloud virtual machine have an iGPU, an Intel Arc GPU, or an Intel Data Centre GPU Max and Flex Series GPU. If so, llama.cpp’s wonderful LLM features on Intel GPUs are yours to enjoy. To add new features and optimise SYCL for Intel GPUs, Intel want developers to experiment and contribute to the backend. The oneAPI programming approach is a useful project to learn for cross-platform development.
Read more on Govindhtech.com
#intel#oneapi#onemkl#inteloneapi#llms#llamacpp#llama#intelgpu#govindhtech#cpu#sycl#news#technews#technology#technologynews#technoloy#ai#technologytrends
0 notes
Text
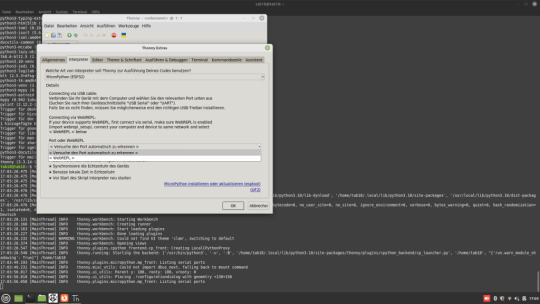
Fehlerfreie Installation von Thonny auf Linux: Schritt-für-Schritt-Anleitung

In diesem Beitrag möchte ich dir zeigen, wie du eine fehlerfreie Installation von Thonny auf einem Linux System durchführst. Dazu zeige ich dir dieses in eine Schritt-für-Schritt-Anleitung und wenn es besonders schnell gehen muss, dann biete ich dir das Shellscript an, welches diese Schritte automatisiert ausführt.

Fehlerfreie Installation von Thonny auf Linux: Schritt-für-Schritt-Anleitung Hintergrund: Zur Vorbereitung auf meinen MicroPython-Kurs im Jugendfreizeitzentrum Schöningen habe ich einige Laptops mit Linux Mint erhalten. Auf diesen Systemen musste ich zunächst ein Update durchführen, bevor ich Thonny installieren konnte. Dabei sind mir einige Fallstricke aufgefallen, die ich hier gerne inklusive der Lösungen vorstellen möchte. Im Beitrag Thonny IDE auf Linux einrichten für den Raspberry Pi Pico W habe ich dir bereits gezeigt wie du Thonny installierst, jedoch verlief dort die Installation sauber durch ohne irgendwelche Fehler. Für die nachfolgenden Schritte benötigst du root Rechte bzw. das Passwort für den Benutzer!
Schritt 1 - Aktualisieren des Linux Systems
Bevor wir Thonny installieren, aktualisieren wir das System. Damit stellen wir sicher das alle benötigten Pakete aktuell sind. sudo apt-get update sudo apt-get upgrade
Schritt 2 - Installieren vom Python Paketmanager pip
Damit wir die Python Pakete später installieren können, müssen wir pip installieren. (Ggf. wird dieses bei Thonny auch installiert, weil dort Python3 mit installiert wird.) sudo apt install pip
Schritt 3 - Installieren von Thonny
Das Tool Thonny kannst du im Anschluss mit dem nachfolgenden Befehl installieren. sudo apt install thonny Auf einem System musste ich das Modul tkinter manuell mit nachfolgendem Befehl installieren. sudo apt-get install python3-tk
Schritt 4 - Benutzer der Gruppe dialout hinzufügen
Damit der aktuelle Benutzer auf den seriellen Port zugreifen kann, muss dieser der Gruppe dialout hinzugefügt werden.
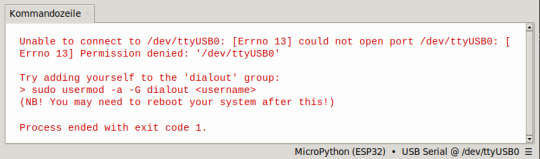
sudo usermod -a -G dialout $USER Im Anschluss muss der Rechner neu gestartet werden, erst damit werden diese Berechtigungen final gesetzt. Mit dem Befehl groups kann man sich die zugewiesenen Gruppen zum Benutzer anzeigen lassen. groups $USER

Schritt 5 - Entfernen von BRLTTY
In meinem Fall wurde kein Port in Thonny aufgeführt und ich musste zusätzlich noch das Dienstprogramm BRLTTY entfernen.
sudo apt remove brltty

BRLTTY ist ein Dienstprogramm im Hintergrund, das es blinden Personen ermöglicht, über eine Braillezeile auf die Textkonsole von Linux/Unix zuzugreifen. Es steuert die Braillezeile und bietet umfassende Funktionen zur Bildschirmüberprüfung.
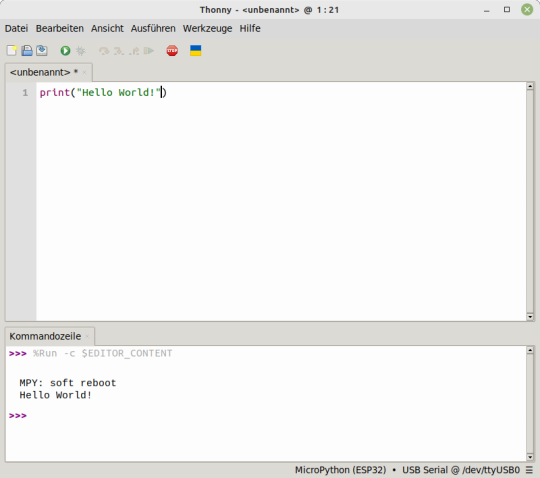
Schritt 7 - Testen der Installation
Wenn alle Schritte ausgeführt wurden, dann müssen wir noch kurz die Installation testen. Dazu stellen wir eine Verbindung her und geben im Editor ein kleines Script ein, welches "Hello World!" ausgibt. print("Hello World!") Wenn die grüne Playtaste aus der Toolbar betätigt wird, dann wird das kleine Programm ausgeführt und es sollte der Text "Hello World!" auf der Kommandozeile angezeigt werden.
Thonny fehlerfreie installation mit Shellyscript
Nachfolgend nun das kleine Shellyscript zum automatischen Installieren von Thonny. Shellscript zum automatischen installieren von ThonnyHerunterladen Die SH-Datei musst du auf der Konsole jedoch ausführbar machen, dazu gibst du nachfolgenden Befehl im Terminal ein: chmod +x install_thonny.sh Im Anschluss kannst du dieses Script dann mit dem nachfolgenden Befehl starten: ./install_thonny.sh Hier nun das kleine Shellscript zum automatischen Installieren von Thonny: #!/bin/bash sudo apt-get update sudo apt-get upgrade sudo apt install pip sudo apt install thonny sudo usermod -a -G dialout $USER sudo apt remove brltty groups $USER sleep 6 sudo reboot Read the full article
0 notes
Video
youtube
How to Create a New User and Grant Sudo Privileges to it in Linux Debian
In this video we will create a user for our Linux system and then grant it the sudo privilege. The commands we will use in this tutorial go following.
# Create a new user sudo adduser USERNAME
Note: Replace USERNAME with the username of your choice and after pressing enter, give it the user password.
# Make user sudoer usermod -aG sudo USERNAME
# Method 2 of making a user sudoer visudo # Add the following line to the end of file: USERNAME ALL=(ALL:ALL) ALL Ctrl+X Y
# Log into the user account su - USERNAME
# Test privileges whoami sudo whoami
# Logout from an account logout
All Open Source!
Arashtad provides high quality tutorials, eBooks, articles and documents, design and development services, over 400 free online tools, frameworks, CMS, WordPress plugins, Joomla extensions, and other products.
More Courses ▶ https://tuts.arashtad.com/
Business Inquiries ▶ https://arashtad.com/business-inquiries/ Affiliate Programs ▶ https://arashtad.com/affiliate-programs/
eBooks ▶ https://press.arashtad.com/ Our Products ▶ https://market.arashtad.com/ Our Services ▶ https://arashtad.com/services/ Our Portfolio ▶ https://demo.arashtad.com/ Free Online Tools ▶ https://tools.arashtad.com/ Our Blog ▶ https://blog.arashtad.com/ Documents ▶ https://doc.arashtad.com/ Licensing ▶ https://arashtad.com/licensing/ About us ▶ https://arashtad.com/about/
Join Arashtad Network ▶ https://i.arashtad.com/
Our Social Profiles ▶ https://arashtad.com/arashtad-social-media-profiles/ Vimeo ▶ https://vimeo.com/arashtad Udemy ▶ https://www.udemy.com/user/arashtad GitHub ▶ https://github.com/arashtad Linkedin ▶ https://www.linkedin.com/company/arashtad Twitter ▶ https://twitter.com/arashtad
0 notes