#Uuid generator js
Explore tagged Tumblr posts
Visit Tumblr Blog
Explore Tumblr blogs with no restrictions, modern design and the best experience.
Last Seen Tumblr Blogs


Fun Fact
Tumblr is available in 18 languages.
Text
Free Multi Tool website that can simplify your work
Free Multi Tool website that can simplify your work
Website Purpose
howtosolver.com is your digital Swiss Army knife! It’s a one-stop shop packed with free, convenient tools to handle a huge variety of everyday tasks. From website troubleshooting to image editing, text manipulation to password generation — this clever site will save you time and hassle.
Here’s a breakdown of what you can do:
Web Development and Analysis
Website Status Checker: Having trouble loading a site? This tool tells you instantly if it’s up, down, or somewhere in between.
User Agent Finder, IP Address Locator: Delve into the technical details of your browsing experience.
HTTP Headers Parser: Analyze the hidden data that websites exchange with your browser.
SSL Checker: Ensure websites are protected with the right security certificates.
Redirect Checker: See exactly where web addresses lead you, ideal for tracking complex links.
Coding and Encryption
UUID Generator: Create unique identifiers, useful for coding projects.
Text Conversion Tools: Swap between text, binary, Base64 — essential for developers.
Encoding/Decoding: Work with URL formatting, ROT13, Unicode…all your translation needs in one place.
Hash Generators (MD5, SHA, Bcrypt): Add robust security layers to data.
HTML/CSS/JS Minifiers and Obfuscator: Make your code more streamlined and harder to reverse-engineer.
Images and Visuals
QR Code Generator and Reader: Create and scan these handy codes — perfect for sharing links or info.
YouTube Thumbnail Downloader: Grab high-quality stills from your favorite videos.
Image Format Converters (JPG, PNG, WEBP): Make sure your pictures are compatible with anything.
Image Compressor and Resizer: Optimize images for websites or sharing.
Text Tools
Word Counter, Lorem Ipsum Generator: Whether you’re writing or testing, these handle your word-related needs.
Text Modification: Separate lines, remove duplicates, extract URLs/emails, and tons more.
Case Converter, Palindrome Checker: Play with words, fix formatting, or just have some language fun!
Security and Privacy
Password Generator and Strength Checker: Build uncrackable passwords and test your existing ones.
Credit Card Validator: Double-check the authenticity of card numbers.
Privacy Policy and Terms of Service Generators: Get basic legal protection for your website with ease.
Miscellaneous Awesomeness
Random Number Generator: Because sometimes you just need a truly random number.
Color Converters (RGB, Hex, more): Perfect for design tweaks and color matching.
Timestamp Converter: Work with time across different formats.
Calculators: Memory/storage conversions, even a BMI calculator!
Why Use howtosolver.com?
Completely Free: All these tools without a single subscription or hidden fee.
Fast and Easy: No downloads, no complicated setups — just get the job done.
Constantly Expanding: New tools pop up all the time!
Forget juggling a dozen browser tabs and mysterious downloads. Think of howtosolver.com as that weird, but weirdly brilliant friend who always has the perfect gadget or weird software to solve any problem. You might not need a QR code reader or Base64 decoder every day, but trust me — the day you DO, you’ll be so glad this site exists. Go on, explore, get a little nerdy…you might just surprise yourself with how handy all this stuff really is!
#software engineering#rpg maker#programming#machine learning#coding#islamic#unity#linux#artificial intelligence#python
0 notes
Text
Free Multi Tool website that can simplify your work

Website Purpose
howtosolver.com is your digital Swiss Army knife! It’s a one-stop shop packed with free, convenient tools to handle a huge variety of everyday tasks. From website troubleshooting to image editing, text manipulation to password generation — this clever site will save you time and hassle.
Here’s a breakdown of what you can do:
Web Development and Analysis
Website Status Checker: Having trouble loading a site? This tool tells you instantly if it’s up, down, or somewhere in between.
User Agent Finder, IP Address Locator: Delve into the technical details of your browsing experience.
HTTP Headers Parser: Analyze the hidden data that websites exchange with your browser.
SSL Checker: Ensure websites are protected with the right security certificates.
Redirect Checker: See exactly where web addresses lead you, ideal for tracking complex links.
Coding and Encryption
UUID Generator: Create unique identifiers, useful for coding projects.
Text Conversion Tools: Swap between text, binary, Base64 — essential for developers.
Encoding/Decoding: Work with URL formatting, ROT13, Unicode…all your translation needs in one place.
Hash Generators (MD5, SHA, Bcrypt): Add robust security layers to data.
HTML/CSS/JS Minifiers and Obfuscator: Make your code more streamlined and harder to reverse-engineer.
Images and Visuals
QR Code Generator and Reader: Create and scan these handy codes — perfect for sharing links or info.
YouTube Thumbnail Downloader: Grab high-quality stills from your favorite videos.
Image Format Converters (JPG, PNG, WEBP): Make sure your pictures are compatible with anything.
Image Compressor and Resizer: Optimize images for websites or sharing.
Text Tools
Word Counter, Lorem Ipsum Generator: Whether you’re writing or testing, these handle your word-related needs.
Text Modification: Separate lines, remove duplicates, extract URLs/emails, and tons more.
Case Converter, Palindrome Checker: Play with words, fix formatting, or just have some language fun!
Security and Privacy
Password Generator and Strength Checker: Build uncrackable passwords and test your existing ones.
Credit Card Validator: Double-check the authenticity of card numbers.
Privacy Policy and Terms of Service Generators: Get basic legal protection for your website with ease.
Miscellaneous Awesomeness
Random Number Generator: Because sometimes you just need a truly random number.
Color Converters (RGB, Hex, more): Perfect for design tweaks and color matching.
Timestamp Converter: Work with time across different formats.
Calculators: Memory/storage conversions, even a BMI calculator!
Why Use howtosolver.com?
Completely Free: All these tools without a single subscription or hidden fee.
Fast and Easy: No downloads, no complicated setups — just get the job done.
Constantly Expanding: New tools pop up all the time!
Forget juggling a dozen browser tabs and mysterious downloads. Think of howtosolver.com as that weird, but weirdly brilliant friend who always has the perfect gadget or weird software to solve any problem. You might not need a QR code reader or Base64 decoder every day, but trust me — the day you DO, you’ll be so glad this site exists. Go on, explore, get a little nerdy…you might just surprise yourself with how handy all this stuff really is!
#artificial intelligence#linux#unity#software engineering#python#programming#rpg maker#machine learning#coding#islamic
1 note
·
View note
Text
Uuid generator js

#Uuid generator js how to
#Uuid generator js generator
#Uuid generator js software
#Uuid generator js code
Var uuid = 'xxxxxxxx-xxxx-4xxx-yxxx-xxxxxxxxxxxx'. Write a JavaScript function to create a UUID For human-readable display, many systems use a canonical format using hexadecimal text with inserted hyphen characters. The meaning of each bit is defined by any of several variants.
#Uuid generator js software
Write a JavaScript function to create a UUID identifier.Īccording to Wikipedia - A universally unique identifier (UUID) is an identifier standard used in software construction. Caching random data is not always desirable, so as an additional option, the Node.js implementation of crypto.JavaScript Math: Exercise-23 with Solution In contrast, crypto.randomUUID() has a mean execution time of only 350 nanoseconds per UUID, with a minimum of 220 and a maximum of 663551. Running on my benchmark server locally, the uuid module has a mean execution time of about 1030 nanoseconds per UUID, with a minimum of 640 and a maximum of 870399. The h1 histogram shows the results for the uuid module. These are the only fixed values in a random UUID - all other bits in the sequence are randomly generated.Ĭopy to Clipboard import ) The reserved field identifies the variant which is encoded into the clock-seq-and-reserved field in the eighth byte in the UUID. As described in RFC 4122, the version is “in the most significant 4 bits of the timestamp (bits 4 through 7 of the time_high_and_version field)”, which - if it’s not clear - are the four most significant bits of the sixth byte in the UUID. The version and reserved fields in the UUID identify the layout and type. Of particular note in this structure are the “version” and “reserved” bits (the time-high-and-version and clock-seq-and-reserved fields in the structure definition above). They actually have a structure as defined by RFC 4122:Ĭopy to Clipboard UUID = time-low "-" time-mid "-"
#Uuid generator js how to
UUIDs aren’t simply a sequence of hex-encoded digits. unique string id js create unique id in node js js uuid library uuid generieren js how to use uuid in nodejs generate a unique id for each element javascript generate unique id for elements in javascript how to give a unique id to the object created javascript uuid example javascript uuid nodejs tutorial uuid node js tutorial why uuid is use in. It’s also worth knowing that uuid module maintainers helped us to review the new API that landed in Node.js core). (It’s important to note that the uuid module is not going anywhere.
The web platform is working to standardise on a crypto.randomUUID() API that is common across environments.
Implementing random UUID generation directly in Node.js is significantly faster.
Generate RFC-compliant UUIDs in JavaScript.
#Uuid generator js generator
Philosophically, functionality that is found everywhere really ought to be part of the standard library of the platform. A tiny (130 bytes), secure, URL-friendly, unique string ID generator for JavaScript Built-In uuid.
It’s a fair question, with three specific answers: So if uuid is ubiquitous, why add uuid generation to Node.js itself? It can generate version 1, 3, 4 and 5 UUIDs. The JavaScript library we recommend for generating UUIDs is called (unsurprisingly), uuid. I’ve never seen a production Node.js application that does not have uuid in its dependency tree, and I consider it to be among the most important dependencies in the ecosystem. Although the JavaScript language itself does not have built-in support for generating a UUID or GUID, there are plenty of quality 3rd party, open-source libraries that you can use.
#Uuid generator js code
Historically in Node.js, if you’ve wanted to generate UUIDs, the go-to module on npm has always been the appropriately named uuid module, a small and useful piece of code that is downloaded over 50 million times per week. The irony is that, with the complex definitions and variations that do exist, the random UUID (so-called “version 4 UUIDs”) is by far the most popular and widely used. They don’t realise there’s actually an IETF RFC detailing the construction and format of multiple variations of UUID - all of which share a common serialisation and structure with significant variations on exactly how the bytes are derived. Most developers look at them and assume they’re nothing more than a random sequence of hex-encoded bytes. Universally Unique Identifiers (UUIDs) are surprisingly complex little structures. We introduced you to Node.js’s new Web Cryptography API implementation and the new support for the HKDF key derivation scheme previously, and in this post, we discuss two powerful new capabilities for generating random UUIDs and random prime numbers: Generating random UUIDs Much has been happening in the Node.js crypto subsystem lately. Node.js offers powerful new capabilities for generating random UUIDs and random prime numbers.
0 notes
Text
My dudes... I don't know if I'm the last one to learn this, but I come bearing good news! Google's Apps Script is amazing and makes Spreadsheets & Slides so much more powerful!
Tumblr is hardly the best platform to talk about code on but this was a game changer! As a minor helper on @renegadepublishing's yearly exchange, my scripts let me keep up with the growing quantity of entries and while I only figured it out at the end of this year's labors, it will be so very, very, very helpful for next year's.
Will tuck further ravings under the cut but the short of it is that it (A) let me programmatically pull deets from AO3 to enrich final report and (B) let me programmatically fill the results slide show with data.

Coherently flowing prose often fail me when shifting to a technical discussion, so to break down the work:
this was all in JavaScript. I obviously love Kotlin more these days, but it felt painless/rather accessible being in JS
the primary 'key' passed around for the entries (when participents submitted updates and final entries) tended to just be the fic URL (plus gifter/giftee names) - a good UUID but carries no meta info
almost (tho not all) of the entries were hosted on AO3 which made programatic scraping possible
we definitely needed the author & fic name... which required visiting the page. And once you're on the page, why not grab more details? In the end we wound up scraping: title, author, last update, word count, fandom, rating. And while there's more one could collect, we lacked the space to visually display it along with the results. Remember-- the point is the typesetting!
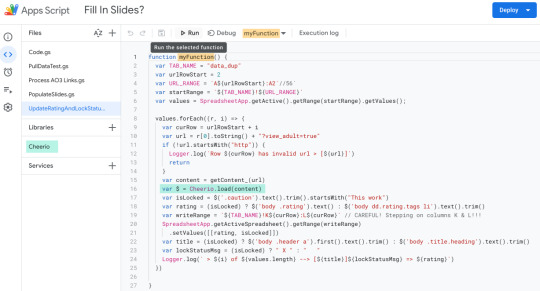
Apps Script let you make URL requests [getContent]
I used the Cheerio library to process the page's contents and let me comb through it using jQuery. Link goes to GitHub page, which has the Script ID you'll need to import it in the Libraries section.
I found the Google Sheets APIs easy enough to read/work with -- just lots of arrays, really. Also, the quotas that you get seem generous to me (for a free product)
AO3 specific note : had to append "?view_adult=true" to the URLs if I wanted to bypass that check screen, but I also had to handle locked fic, which keep you at a reduced info lock screen. Be sure to test E rated & locked fic when drafting your script (Incognito Window is your friend)
Here is the Gist of the pictured script-- it was a 'round 2' edit where I went back and pulled Rating & Locked status : [LINK]
The above refers mostly to the Sheets side of things. The other most magical feature was the population of Slides w/ sheet data!

Notes as follows:
images are my current weakness-- had to go in later and adjust/layout/upload images manually. SUPER LAME. Next time I'm going to dig into pulling images from the drive...
I was able to embed links programmatically into the slides but it was VERY HACKY code. The generation of the PDF links was still a manual task, and while I imagine I could script that, sounds hairy (I want to avoid all things Auth)
The {{name_pattern}} was/is only a stylistic choice. Doing a find & replace on something so distinct is safest tho.
I did not use Alt Text on my things but I think going forward, it would be how I'd ID/address the non-string replacement actions (finding the right shape to anchor a URL link on was finicky the way I did it)
Here is my (very messy!) script for populating the slides: [LINK]
For next time:
using a script to pull tags/fandoms/pairings will make the gifter/giftee pairing process sooooo much smoother (so far it's been very manual!! Bless @aetherseer's tenacity!)
I need to figure out image imports/population of the slides... ignoring any aspect ratio/size issues
27 notes
·
View notes
Link
0 notes
Text
Tiny Random UUID Generator In Vanilla JavaScript - giuuid
Tiny Random UUID Generator In Vanilla JavaScript – giuuid
UUID (Universally Unique Identifier) is a 128-bit number used to identify information without any ambiguity. It is more suitable to use UUID than other kinds of mutable unique IDs because it guarantees uniqueness. This post will introduce a super tiny and easy-to-use JS library to generate random UUID, which can be used in browsers and node.js. Let’s get started. How to use it: 1. Install &…

View On WordPress
0 notes
Text
Full Stack Development with Next.js and Supabase – The Complete Guide
Supabase is an open source Firebase alternative that lets you create a real-time backend in less than two minutes.
Supabase has continued to gain hype and adoption with developers in my network over the past few months. And a lot of the people I've talked to about it prefer the fact that it leverages a SQL-style database, and they like that it's open source, too.
When you create a project Supabase automatically gives you a Postgres SQL database, user authentication, and API. From there you can easily implement additional features like realtime subscriptions and file storage.
In this guide, you will learn how to build a full stack app that implements the core features that most apps require – like routing, a database, API, authentication, authorization, realtime data, and fine grained access control. We'll be using a modern stack including React, Next.js, and TailwindCSS.
I've tried to distill everything I've learned while myself getting up to speed with Supabase in as short of a guide as possible so you too can begin building full stack apps with the framework.
The app that we will be building is a multi-user blogging app that incorporates all of the types of features you see in many modern apps. This will take us beyond basic CRUD by enabling things like file storage as well as authorization and fine grained access control.
You can find the code for the app we will be building here.
By learning how to incorporate all of these features together you should be able to take what you learn here and build out your own ideas. Understanding the basic building blocks themselves allows you to then take this knowledge with you in the future to put it to use in any way you see fit.
Supabase Overview
How to Build Full Stack Apps
I'm fascinated by full stack Serverless frameworks because of the amount of power and agility they give to developers looking to build complete applications.
Supabase brings to the table the important combination of powerful back end services and easy to use client-side libraries and SDKs for an end to end solution.
This combination lets you not only build out the individual features and services necessary on the back end, but easily integrate them together on the front end by leveraging client libraries maintained by the same team.
Because Supabase is open source, you have the option to self-host or deploy your backend as a managed service. And as you can see, this will be easy for us to do on a free tier that does not require a credit card to get started with.
Why Use Supabase?
I've led the Front End Web and Mobile Developer Advocacy team at AWS, and written a book on building these types of apps. So I've had quite a bit of experience building in this space.
And I think that Supabase brings to the table some really powerful features that immediately stood out to me when I started to build with it.
Data access patterns
One of the biggest limitations of some of the tools and frameworks I've used in the past is the lack of querying capabilities. What I like a lot about Supabase is that, since it's built on top of Postgres, it enables an extremely rich set of performant querying capabilities out of the box without having to write any additional back end code.
The client-side SDKs provide easy to use filters and modifiers to enable an almost infinite combination of data access patterns.
Because the database is SQL, relational data is easy to configure and query, and the client libraries take it into account as a first class citizen.
Permissions
When you get past "hello world" many types of frameworks and services fall over very quickly. This is because most real-world use cases extend far beyond the basic CRUD functionality you often see made available by these tools.
The problem with some frameworks and managed services is that the abstractions they create are not extensible enough to enable easy to modify configurations or custom business logic. These restrictions often make it difficult to take into account the many one-off use cases that come up with building an app in the real-world.
In addition to enabling a wide array of data access patterns, Supabase makes it easy to configure authorization and fine grained access controls. This is because it is simply Postgres, enabling you implement whatever row-level security policies you would like directly from the built-in SQL editor (something we will cover here).
UI components
In addition to the client-side libraries maintained by the same team building the other Supabase tooling, they also maintain a UI component library (beta) that allows you to get up and running with various UI elements.
The most powerful is Auth which integrates with your Supabase project to quickly spin up a user authentication flow (which I'll be using in this tutorial).
Multiple authentication providers
Supabase enables all of the following types of authentication mechanisms:
Username & password
Magic email link
Google
Facebook
Apple
GitHub
Twitter
Azure
GitLab
Bitbucket
Open Source
One of the biggest things it has going for it is that it is completely open source (yes the back end too). This means that you can choose either the Serverless hosted approach or to host it yourself.
That means that if you wanted to, you could run Supabase with Docker and host your app on AWS, GCP, or Azure. This would eliminate the vendor lock-in issue you may run into with Supabase alternatives.
How to Get Started with Supabase
Project setup
To get started, let's first create the Next.js app.
npx create-next-app next-supabase
Next, change into the directory and install the dependencies we'll be needing for the app using either NPM or Yarn:
npm install @supabase/supabase-js @supabase/ui react-simplemde-editor easymde react-markdown uuid npm install tailwindcss@latest @tailwindcss/typography postcss@latest autoprefixer@latest
Next, create the necessary Tailwind configuration files:
npx tailwindcss init -p
Now update tailwind.config.js to add the Tailwind typography plugin to the array of plugins. We'll be using this plugin to style the markdown for our blog:
plugins: [ require('@tailwindcss/typography') ]
Finally, replace the styles in styles/globals.css with the following:
@tailwind base; @tailwind components; @tailwind utilities;
Supabase project initialization
Now that the project is created locally, let's create the Supabase project.
To do so, head over to Supabase.io and click on Start Your Project. Authenticate with GitHub and then create a new project under the organization that is provided to you in your account.

Give the project a Name and Password and click Create new project.
It will take approximately 2 minutes for your project to be created.
How to create a database table in Supabase
Once you've created your project, let's go ahead and create the table for our app along with all of the permissions we'll need. To do so, click on the SQL link in the left hand menu.

In this view, click on Query-1 under Open queries and paste in the following SQL query and click RUN:
CREATE TABLE posts ( id bigint generated by default as identity primary key, user_id uuid references auth.users not null, user_email text, title text, content text, inserted_at timestamp with time zone default timezone('utc'::text, now()) not null ); alter table posts enable row level security; create policy "Individuals can create posts." on posts for insert with check (auth.uid() = user_id); create policy "Individuals can update their own posts." on posts for update using (auth.uid() = user_id); create policy "Individuals can delete their own posts." on posts for delete using (auth.uid() = user_id); create policy "Posts are public." on posts for select using (true);
This will create the posts table that we'll be using for the app. It also enabled some row level permissions:
All users can query for posts
Only signed in users can create posts, and their user ID must match the user ID passed into the arguments
Only the owner of the post can update or delete it
Now, if we click on the Table editor link, we should see our new table created with the proper schema.

That's it! Our back end is ready to go now and we can start building out the UI. Username + password authentication is already enabled by default, so all we need to do now is wire everything up on the front end.
Next.js Supabase configuration
Now that the project has been created, we need a way for our Next.js app to know about the back end services we just created for it.
The best way for us to configure this is using environment variables. Next.js allows environment variables to be set by creating a file called .env.local in the root of the project and storing them there.
In order to expose a variable to the browser you have to prefix the variable with NEXT_PUBLIC_.
Create a file called .env.local at the root of the project, and add the following configuration:
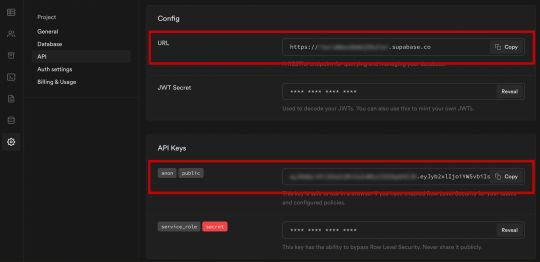
NEXT_PUBLIC_SUPABASE_URL=https://app-id.supabase.co NEXT_PUBLIC_SUPABASE_ANON_KEY=your-public-api-key
You can find the values of your API URL and API Key in the Supabase dashboard settings:
Next, create a file called api.js in the root of the project and add the following code:
// api.js import { createClient } from '@supabase/supabase-js' export const supabase = createClient( process.env.NEXT_PUBLIC_SUPABASE_URL, process.env.NEXT_PUBLIC_SUPABASE_ANON_KEY )
Now we will be able to import the supabase instance and use it anywhere in our app.
Here's an overview of what it looks like to interact with the API using the Supabase JavaScript client.
Querying for data:
import { supabase } from '../path/to/api' const { data, error } = await supabase .from('posts') .select()
Creating new items in the database:
const { data, error } = await supabase .from('posts') .insert([ { title: "Hello World", content: "My first post", user_id: "some-user-id", user_email: "[email protected]" } ])
As I mentioned earlier, the filters and modifiers make it really easy to implement various data access patterns and selection sets of your data.
Authentication – signing up:
const { user, session, error } = await supabase.auth.signUp({ email: '[email protected]', password: 'example-password', })
Authentication – signing in:
const { user, session, error } = await supabase.auth.signIn({ email: '[email protected]', password: 'example-password', })
In our case we won't be writing the main authentication logic by hand, we'll be using the Auth component from Supabase UI.
How to Build the App
Now let's start building out the UI!
To get started, let's first update the app to implement some basic navigation and layout styling.
We will also configure some logic to check if the user is signed in, and show a link for creating new posts if they are.
Finally we'll implement a listener for any auth events. And when a new auth event occurs, we'll check to make sure there is currently a signed in user in order to show or hide the Create Post link.
Open _app.js and add the following code:
// pages/_app.js import Link from 'next/link' import { useState, useEffect } from 'react' import { supabase } from '../api' import '../styles/globals.css' function MyApp({ Component, pageProps }) { const [user, setUser] = useState(null); useEffect(() => { const { data: authListener } = supabase.auth.onAuthStateChange( async () => checkUser() ) checkUser() return () => { authListener?.unsubscribe() }; }, []) async function checkUser() { const user = supabase.auth.user() setUser(user) } return ( <div> <nav className="p-6 border-b border-gray-300"> <Link href="/"> <span className="mr-6 cursor-pointer">Home</span> </Link> { user && ( <Link href="/create-post"> <span className="mr-6 cursor-pointer">Create Post</span> </Link> ) } <Link href="/profile"> <span className="mr-6 cursor-pointer">Profile</span> </Link> </nav> <div className="py-8 px-16"> <Component {...pageProps} /> </div> </div> ) } export default MyApp
How to make a user profile page
Next, let's create the profile page. In the pages directory, create a new file named profile.js and add the following code:
// pages/profile.js import { Auth, Typography, Button } from "@supabase/ui"; const { Text } = Typography import { supabase } from '../api' function Profile(props) { const { user } = Auth.useUser(); if (user) return ( <> <Text>Signed in: {user.email}</Text> <Button block onClick={() => props.supabaseClient.auth.signOut()}> Sign out </Button> </> ); return props.children } export default function AuthProfile() { return ( <Auth.UserContextProvider supabaseClient={supabase}> <Profile supabaseClient={supabase}> <Auth supabaseClient={supabase} /> </Profile> </Auth.UserContextProvider> ) }
The profile page uses the Auth component from the Supabase UI library. This component will render a "sign up" and "sign in" form for unauthenticated users, and a basic user profile with a "sign out" button for authenticated users. It will also enable a magic sign in link.
How to create new posts
Next, let's create the create-post page. In the pages directory, create a page named create-post.js with the following code:
// pages/create-post.js import { useState } from 'react' import { v4 as uuid } from 'uuid' import { useRouter } from 'next/router' import dynamic from 'next/dynamic' import "easymde/dist/easymde.min.css" import { supabase } from '../api' const SimpleMDE = dynamic(() => import('react-simplemde-editor'), { ssr: false }) const initialState = { title: '', content: '' } function CreatePost() { const [post, setPost] = useState(initialState) const { title, content } = post const router = useRouter() function onChange(e) { setPost(() => ({ ...post, [e.target.name]: e.target.value })) } async function createNewPost() { if (!title || !content) return const user = supabase.auth.user() const id = uuid() post.id = id const { data } = await supabase .from('posts') .insert([ { title, content, user_id: user.id, user_email: user.email } ]) .single() router.push(`/posts/${data.id}`) } return ( <div> <h1 className="text-3xl font-semibold tracking-wide mt-6">Create new post</h1> <input onChange={onChange} name="title" placeholder="Title" value={post.title} className="border-b pb-2 text-lg my-4 focus:outline-none w-full font-light text-gray-500 placeholder-gray-500 y-2" /> <SimpleMDE value={post.content} onChange={value => setPost({ ...post, content: value })} /> <button type="button" className="mb-4 bg-green-600 text-white font-semibold px-8 py-2 rounded-lg" onClick={createNewPost} >Create Post</button> </div> ) } export default CreatePost
This component renders a Markdown editor, allowing users to create new posts.
The createNewPost function will use the supabase instance to create new posts using the local form state.
You may notice that we are not passing in any headers. This is because if a user is signed in, the Supabase client libraries automatically include the access token in the headers for a signed in user.
How to view a single post
We need to configure a page to view a single post.
This page uses getStaticPaths to dynamically create pages at build time based on the posts coming back from the API.
We also use the fallback flag to enable fallback routes for dynamic SSG page generation.
We use getStaticProps to enable the Post data to be fetched and then passed into the page as props at build time.
Create a new folder in the pages directory called posts and a file called [id].js within that folder. In pages/posts/[id].js, add the following code:
// pages/posts/[id].js import { useRouter } from 'next/router' import ReactMarkdown from 'react-markdown' import { supabase } from '../../api' export default function Post({ post }) { const router = useRouter() if (router.isFallback) { return <div>Loading...</div> } return ( <div> <h1 className="text-5xl mt-4 font-semibold tracking-wide">{post.title}</h1> <p className="text-sm font-light my-4">by {post.user_email}</p> <div className="mt-8"> <ReactMarkdown className='prose' children={post.content} /> </div> </div> ) } export async function getStaticPaths() { const { data, error } = await supabase .from('posts') .select('id') const paths = data.map(post => ({ params: { id: JSON.stringify(post.id) }})) return { paths, fallback: true } } export async function getStaticProps ({ params }) { const { id } = params const { data } = await supabase .from('posts') .select() .filter('id', 'eq', id) .single() return { props: { post: data } } }
How to query for and render the list of posts
Next, let's update index.js to fetch and render a list of posts:
// pages/index.js import { useState, useEffect } from 'react' import Link from 'next/link' import { supabase } from '../api' export default function Home() { const [posts, setPosts] = useState([]) const [loading, setLoading] = useState(true) useEffect(() => { fetchPosts() }, []) async function fetchPosts() { const { data, error } = await supabase .from('posts') .select() setPosts(data) setLoading(false) } if (loading) return <p className="text-2xl">Loading ...</p> if (!posts.length) return <p className="text-2xl">No posts.</p> return ( <div> <h1 className="text-3xl font-semibold tracking-wide mt-6 mb-2">Posts</h1> { posts.map(post => ( <Link key={post.id} href={`/posts/${post.id}`}> <div className="cursor-pointer border-b border-gray-300 mt-8 pb-4"> <h2 className="text-xl font-semibold">{post.title}</h2> <p className="text-gray-500 mt-2">Author: {post.user_email}</p> </div> </Link>) ) } </div> ) }
Let's test it out
We now have all of the pieces of our app ready to go, so let's try it out.
To run the local server, run the dev command from your terminal:
npm run dev
When the app loads, you should see the following screen:

To sign up, click on Profile and create a new account. You should receive an email link to confirm your account after signing up.
You can also create a new account by using the magic link.
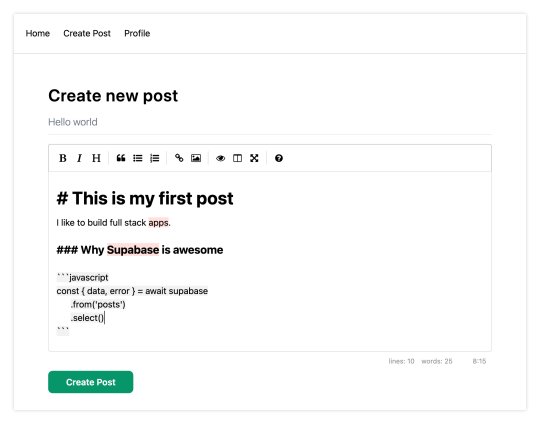
Once you're signed in, you should be able to create new posts:
Navigating back to the home page, you should be able to see a list of the posts that you've created and be able to click on a link to the post to view it:

How to Edit Posts
Now that we have the app up and running, let's learn how to edit posts. To get started with this, let's create a new view that will fetch only the posts that the signed in user has created.
To do so, create a new file named my-posts.js in the root of the project with the following code:
// pages/my-posts.js import { useState, useEffect } from 'react' import Link from 'next/link' import { supabase } from '../api' export default function MyPosts() { const [posts, setPosts] = useState([]) useEffect(() => { fetchPosts() }, []) async function fetchPosts() { const user = supabase.auth.user() const { data } = await supabase .from('posts') .select('*') .filter('user_id', 'eq', user.id) setPosts(data) } async function deletePost(id) { await supabase .from('posts') .delete() .match({ id }) fetchPosts() } return ( <div> <h1 className="text-3xl font-semibold tracking-wide mt-6 mb-2">My Posts</h1> { posts.map((post, index) => ( <div key={index} className="border-b border-gray-300 mt-8 pb-4"> <h2 className="text-xl font-semibold">{post.title}</h2> <p className="text-gray-500 mt-2 mb-2">Author: {post.user_email}</p> <Link href={`/edit-post/${post.id}`}><a className="text-sm mr-4 text-blue-500">Edit Post</a></Link> <Link href={`/posts/${post.id}`}><a className="text-sm mr-4 text-blue-500">View Post</a></Link> <button className="text-sm mr-4 text-red-500" onClick={() => deletePost(post.id)} >Delete Post</button> </div> )) } </div> ) }
In the query for the posts, we use the user id to select only the posts created by the signed in user.
Next, create a new folder named edit-post in the pages directory. Then, create a file named [id].js in this folder.
In this file, we'll be accessing the id of the post from a route parameter. When the component loads, we will then use the post id from the route to fetch the post data and make it available for editing.
In this file, add the following code:
// pages/edit-post/[id].js import { useEffect, useState } from 'react' import { useRouter } from 'next/router' import dynamic from 'next/dynamic' import "easymde/dist/easymde.min.css" import { supabase } from '../../api' const SimpleMDE = dynamic(() => import('react-simplemde-editor'), { ssr: false }) function EditPost() { const [post, setPost] = useState(null) const router = useRouter() const { id } = router.query useEffect(() => { fetchPost() async function fetchPost() { if (!id) return const { data } = await supabase .from('posts') .select() .filter('id', 'eq', id) .single() setPost(data) } }, [id]) if (!post) return null function onChange(e) { setPost(() => ({ ...post, [e.target.name]: e.target.value })) } const { title, content } = post async function updateCurrentPost() { if (!title || !content) return await supabase .from('posts') .update([ { title, content } ]) router.push('/my-posts') } return ( <div> <h1 className="text-3xl font-semibold tracking-wide mt-6 mb-2">Edit post</h1> <input onChange={onChange} name="title" placeholder="Title" value={post.title} className="border-b pb-2 text-lg my-4 focus:outline-none w-full font-light text-gray-500 placeholder-gray-500 y-2" /> <SimpleMDE value={post.content} onChange={value => setPost({ ...post, content: value })} /> <button className="mb-4 bg-blue-600 text-white font-semibold px-8 py-2 rounded-lg" onClick={updateCurrentPost}>Update Post</button> </div> ) } export default EditPost
Now, add a new link to our navigation located in pages/_app.js:
// pages/_app.js { user && ( <Link href="/my-posts"> <span className="mr-6 cursor-pointer">My Posts</span> </Link> ) }
When running the app, you should be able to view your own posts, edit them, and delete them from the updated UI.
How to enable real-time updates
Now that we have the app running it's trivial to add real-time updates.
By default, Realtime is disabled on your database. Let's turn on Realtime for the posts table.
To do so, open the app dashboard and click on Databases -> Replication -> 0 Tables (under Source). Toggle on Realtime functionality for the posts table. Here is a video walkthrough of how you can do this for clarity.
Next, open src/index.js and update the useEffect hook with the following code:
useEffect(() => { fetchPosts() const mySubscription = supabase .from('posts') .on('*', () => fetchPosts()) .subscribe() return () => supabase.removeSubscription(mySubscription) }, [])
Now, we will be subscribed to realtime changes in the posts table.
The code for the app is located here.
Next Steps
By now you should have a good understanding of how to build full stack apps with Supabase and Next.js.
If you'd like to learn more about building full stack apps with Supabase, I'd check out the following resources.
If you read this far, tweet to the author to show them you care.
0 notes
Photo
What are closures? / Hapi is back / Human friendly natural language date picking
#497 — July 17, 2020
Unsubscribe | Read on the Web
JavaScript Weekly
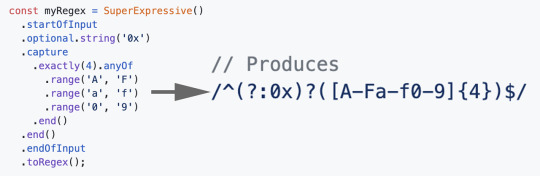
Super Expressive: Build Regexes in (Almost) Natural Language — A library for building regular expressions (something many developers have a problem with in their native format) using an ‘almost natural language’ approach. It’s not for me but the code examples look interesting.
Francis Stokes
📊 Billboard.js 2.0: D3.js-Powered Charts Library — Billboard.js is a chart library built on top of d3.js that supports a wide variety of chart types in all modern browsers. 2.0 is a rewrite into TypeScript plus a lot of refactoring and performance improvements.
Jae Sung Park
Get a Free T-Shirt. It Doesn’t Cost Anything to Get Started — FusionAuth provides authentication, authorization, and user management for any app: deploy anywhere, integrate with anything, in minutes. Download and Install today and we'll send you a free t-shirt.
FusionAuth sponsor
Apollo Client 3.0 Released: The Full Featured GraphQL Client — Apollo Client is commonly associated with React but it can also be used with Angular or on its own. GitHub repo.
Ben Newman (Apollo)
⚡️ Quick bytes:
So the Hapi project was originally going to come to an 'end', but now it's not. It's back!
If watching a developer ▶️ fly through 6 code katas in 11 minutes sounds entertaining to you, enjoy! He explains what he's doing too so you might learn something.
You can now start up a new Codepen by visiting pen.new.
🎧 UI Therapy is a new podcast with an interesting episode on Snowpack and Pika featuring an interview with their lead creator.
There seems to be some concern over a number of people leaving Google or the Angular team?
Adobe Flash passes off into the sunset later this year, and Ars Technica have taken a look back at its story. A nice bit of nostalgia.
💻 Jobs
JavaScript Developer at X-Team (Remote) — Join the most energizing community for developers and work on projects for Riot Games, FOX, Sony, Coinbase, and more.
X-Team
Find a Job Through Vettery — Use Vettery to connect with growing tech teams at startups and Fortune 500 companies.
Vettery
📚 Tutorials, Opinions and Stories
What The Fork is a Closure? — A sanitized fork of a new project from React’s Dan Abramov that sets out to explain what different development concepts mean, and he has started with closures.
Dan Abramov
How To Create a GitHub Profile README — Did you know you can now create a document that’s shown on your main GitHub profile page? It’s not JavaScript specific but I imagine a lot of you would find this neat to do!
Monica Powell
How to Build Forms With React the Easy Way — Building forms with React can be frustrating. TJ VanToll suggests one way to tackle this challenge with ease. Read more.
Progress KendoReact sponsor
A Simple Explanation of Event Delegation — A useful pattern when listening for events on multiple elements using just one event handler.
Dmitri Pavlutin
Generating UUIDs at Scale on the Web — Can you trust every browser to generate globally unique identifiers at scale? Apparently yes. This sounds boring but the technicalities are more interesting than you’d initially think!
Matthieu Wipliez
Building SVG Components in React — When building responsive web apps it makes nothing but sense to use SVG as opposed to more traditional image formats. SVG stores an XML-based description of the image which can be progammatically manipulated similar to HTML. It’s tailor made to be incorporated into components.
Maciek Sakrejda
CSS Transitions in Vue.js and Nuxt.js — For when you want a little visual pizazz when data changes or is added/removed.
Timi Omoyeni
Building Strong Distributed Teams, One Pixel at a Time — Learn how eng. managers can improve teams based on three key “C” pillars: connection, communication, and collaboration.
CircleCI sponsor
Type Safe JavaScript with JSDoc — If TypeScript just isn’t your cup of tea but you see the value in types, what can you do? Remy reminds us of a popular post from 2018 with a JSDoc-based approach.
Remy Sharp
How You Might Not Need Vuex with Vue 3
Gábor Soós
🔧 Code & Tools
React Native 0.63 Released — The latest version of React Native ships with LogBox, a totally new way to monitor errors and warnings raised in development.
Mike Grabowski
Inclusive Dates: A Human-Friendly Date Picker — You can try it here. The user can type natural language phrases like “Next Friday” or “in 30 days” and the picker will move to the correct date(!)
Tommy Feldt
Hukum: Display GitHub Action Progress in the Terminal — If you’re using GitHub’s Actions CI/CD feature and want to keep a real-time eye on it, this will help. Built in Node.
abskmj
wait-on: A CLI and Node Library to Wait for Ports, Files, Sockets, etc. — For when you need to wait until files, ports, sockets, and similar resources become available (or the opposite).
Jeff Barczewski
currency.js 2.0: A Library for Handling Currencies — Built to work around floating point issues, currency.js provides a variety of useful methods and formatters for working with monetary values.
Jason Wilson
xmlbuilder2: An XML Builder Library — Convert JS objects into XML, parse and serialize XML documents, or create XML documents using chained function calls. Aimed at Node but can be used in the browser too.
Ozgur Ozcitak
Help Shape the Future of Video, Fill Out the 2020/21 Video Dev Survey
Bitmovin Inc. sponsor
vue-flux: A Responsive Image Slider with 20 Cool Transitions — See the transitions in action on the demo page. Mobile-friendly, usable via arrow keys, and includes an optional parallax component.
oscar deulos
dequal: A Tiny (305B) Utility for Check for Deep Equality
Luke Edwards
Jaxcore Bumblebee: A JavaScript Voice Application Framework — For building ‘conversational voice assistants’ (so think Alexa, Cortana, Siri, etc.)
Jaxcore Software Inc
🎨 Creative Corner
WebGazer.js: Webcam Eye Tracking in the Browser — I’m going to file this under “fun, but..” The examples are certainly neat and moderately accurate for me. A fun demo and a neat piece of work but with limited use cases, IMHO.
Brown HCI Group
by via JavaScript Weekly https://ift.tt/3fzD32h
0 notes
Text
The Anatomy of a Tablist Component in Vanilla JavaScript Versus React
If you follow the undercurrent of the JavaScript community, there seems to be a divide as of late. It goes back over a decade. Really, this sort of strife has always been. Perhaps it is human nature.
Whenever a popular framework gains traction, you inevitably see people comparing it to rivals. I suppose that is to be expected. Everyone has a particular favorite.
Lately, the framework everyone loves (to hate?) is React. You often see it pitted against others in head-to-head blog posts and feature comparison matrices of enterprise whitepapers. Yet a few years ago, it seemed like jQuery would forever be king of the hill.
Frameworks come and go. To me, what is more interesting is when React — or any JS framework for that matter — gets pitted against the programming language itself. Because of course, under the hood, it is all built atop JS.
The two are not inherently at odds. I would even go so far as to say that if you do not have a good handle on JS fundamentals, you probably are not going to reap the full benefits of using React. It can still be helpful, similar to using a jQuery plugin without understanding its internals. But I feel like React presupposes more JS familiarity.
HTML is equally important. There exists a fair bit of FUD around how React affects accessibility. I think this narrative is inaccurate. In fact, the ESLint JSX a11y plugin will warn of possible accessibility violations in the console.

ESLint warnings about empty <a> tags
Recently, an annual study of the top 1 million sites was released. It shows that for sites using JS frameworks, there is an increased likelihood of accessibility problems. This is correlation, not causation.
This does not necessarily mean that the frameworks caused these errors, but it does indicate that home pages with these frameworks had more errors than on average.
In a manner of speaking, React’s magic incantations work regardless of whether you recognize the words. Ultimately, you are still responsible for the outcome.
Philosophical musings aside, I am a firm believer in choosing the best tool for the job. Sometimes, that means building a single page app with a Jamstack approach. Or maybe a particular project is better suited to offloading HTML rendering to the server, where it has historically been handled.
Either way, there inevitably comes the need for JS to augment the user experience. At Reaktiv Studios, to that end I have been attempting to keep most of our React components in sync with our “flat HTML” approach. I have been writing commonly used functionality in vanilla JS as well. This keeps our options open, so that our clients are free to choose. It also allows us to reuse the same CSS.
If I may, I would like to share how I built our <Tabs> and <Accordion> React components. I will also demonstrate how I wrote the same functionality without using a framework.
Hopefully, this lesson will feel like we are making a layered cake. Let us first start with the base markup, then cover the vanilla JS, and finish with how it works in React.
Table of contents
Flat HTML examples
Vanilla JavaScript examples
React examples
Conclusion
For reference, you can tinker with our live examples:
Live demo of Accordion
Live demo of Tabs

Reaktiv Studios UI components
Flat HTML examples
Since we need JavaScript to make interactive widgets either way, I figured the easiest approach — from a server side implementation standpoint — would be to require only the bare minimum HTML. The rest can be augmented with JS.
The following are examples of markup for tabs and accordion components, showing a before/after comparison of how JS affects the DOM.
I have added id="TABS_ID" and id="ACCORDION_ID" for demonstrative purposes. This is to make it more obvious what is happening. But the JS that I will be explaining automatically generates unique IDs if nothing is supplied in the HTML. It would work fine either way, with or without an id specified.
Tabs (without ARIA)
<div class="tabs" id="TABS_ID"> <ul class="tabs__list"> <li class="tabs__item"> Tab 1 </li> <!-- .tabs__item --> <li class="tabs__item"> Tab 2 </li> <!-- .tabs__item --> <li class="tabs__item" disabled> Tab 3 (disabled) </li> <!-- .tabs__item --> </ul> <!-- .tabs__list --> <div class="tabs__panel"> <p> Tab 1 content </p> </div> <!-- .tabs__panel --> <div class="tabs__panel"> <p> Tab 2 content </p> </div> <!-- .tabs__panel --> <div class="tabs__panel"> <p> NOTE: This tab is disabled. </p> </div> <!-- .tabs__panel --> </div> <!-- .tabs -->
Tabs (with ARIA)
<div class="tabs" id="TABS_ID"> <ul class="tabs__list" role="tablist"> <li aria-controls="tabpanel_TABS_ID_0" aria-selected="false" class="tabs__item" id="tab_TABS_ID_0" role="tab" tabindex="0" > Tab 1 </li> <!-- .tabs__item --> <li aria-controls="tabpanel_TABS_ID_1" aria-selected="true" class="tabs__item" id="tab_TABS_ID_1" role="tab" tabindex="0" > Tab 2 </li> <!-- .tabs__item --> <li aria-controls="tabpanel_TABS_ID_2" aria-disabled="true" aria-selected="false" class="tabs__item" disabled id="tab_TABS_ID_2" role="tab" > Tab 3 (disabled) </li> <!-- .tabs__item --> </ul> <!-- .tabs__list --> <div aria-hidden="true" aria-labelledby="tab_TABS_ID_0" class="tabs__panel" id="tabpanel_TABS_ID_0" role="tabpanel" > <p> Tab 1 content </p> </div> <!-- .tabs__panel --> <div aria-hidden="false" aria-labelledby="tab_TABS_ID_1" class="tabs__panel" id="tabpanel_TABS_ID_1" role="tabpanel" > <p> Tab 2 content </p> </div> <!-- .tabs__panel --> <div aria-hidden="true" aria-labelledby="tab_TABS_ID_2" class="tabs__panel" id="tabpanel_TABS_ID_2" role="tabpanel" > <p> NOTE: This tab is disabled. </p> </div> <!-- .tabs__panel --> </div> <!-- .tabs -->
Accordion (without ARIA)
<div class="accordion" id="ACCORDION_ID"> <div class="accordion__item"> Tab 1 </div> <!-- .accordion__item --> <div class="accordion__panel"> <p> Tab 1 content </p> </div> <!-- .accordion__panel --> <div class="accordion__item"> Tab 2 </div> <!-- .accordion__item --> <div class="accordion__panel"> <p> Tab 2 content </p> </div> <!-- .accordion__panel --> <div class="accordion__item" disabled> Tab 3 (disabled) </div> <!-- .accordion__item --> <div class="accordion__panel"> <p> NOTE: This tab is disabled. </p> </div> <!-- .accordion__panel --> </div> <!-- .accordion -->
Accordion (with ARIA)
<div aria-multiselectable="true" class="accordion" id="ACCORDION_ID" role="tablist" > <div aria-controls="tabpanel_ACCORDION_ID_0" aria-selected="true" class="accordion__item" id="tab_ACCORDION_ID_0" role="tab" tabindex="0" > <i aria-hidden="true" class="accordion__item__icon"></i> Tab 1 </div> <!-- .accordion__item --> <div aria-hidden="false" aria-labelledby="tab_ACCORDION_ID_0" class="accordion__panel" id="tabpanel_ACCORDION_ID_0" role="tabpanel" > <p> Tab 1 content </p> </div> <!-- .accordion__panel --> <div aria-controls="tabpanel_ACCORDION_ID_1" aria-selected="false" class="accordion__item" id="tab_ACCORDION_ID_1" role="tab" tabindex="0" > <i aria-hidden="true" class="accordion__item__icon"></i> Tab 2 </div> <!-- .accordion__item --> <div aria-hidden="true" aria-labelledby="tab_ACCORDION_ID_1" class="accordion__panel" id="tabpanel_ACCORDION_ID_1" role="tabpanel" > <p> Tab 2 content </p> </div> <!-- .accordion__panel --> <div aria-controls="tabpanel_ACCORDION_ID_2" aria-disabled="true" aria-selected="false" class="accordion__item" disabled id="tab_ACCORDION_ID_2" role="tab" > <i aria-hidden="true" class="accordion__item__icon"></i> Tab 3 (disabled) </div> <!-- .accordion__item --> <div aria-hidden="true" aria-labelledby="tab_ACCORDION_ID_2" class="accordion__panel" id="tabpanel_ACCORDION_ID_2" role="tabpanel" > <p> NOTE: This tab is disabled. </p> </div> <!-- .accordion__panel --> </div> <!-- .accordion -->
Vanilla JavaScript examples
Okay. Now that we have seen the aforementioned HTML examples, let us walk through how we get from before to after.
First, I want to cover a few helper functions. These will make more sense in a bit. I figure it is best to get them documented first, so we can stay focused on the rest of the code once we dive in further.
File: getDomFallback.js
This function provides common DOM properties and methods as no-op, rather than having to make lots of typeof foo.getAttribute checks and whatnot. We could forego those types of confirmations altogether.
Since live HTML changes can be a potentially volatile environment, I always feel a bit safer making sure my JS is not bombing out and taking the rest of the page with it. Here is what that function looks like. It simply returns an object with the DOM equivalents of falsy results.
/* Helper to mock DOM methods, for when an element might not exist. */ const getDomFallback = () => { return { // Props. children: [], className: '', classList: { contains: () => false, }, id: '', innerHTML: '', name: '', nextSibling: null, previousSibling: null, outerHTML: '', tagName: '', textContent: '', // Methods. appendChild: () => Object.create(null), cloneNode: () => Object.create(null), closest: () => null, createElement: () => Object.create(null), getAttribute: () => null, hasAttribute: () => false, insertAdjacentElement: () => Object.create(null), insertBefore: () => Object.create(null), querySelector: () => null, querySelectorAll: () => [], removeAttribute: () => undefined, removeChild: () => Object.create(null), replaceChild: () => Object.create(null), setAttribute: () => undefined, }; }; // Export. export { getDomFallback };
File: unique.js
This function is a poor man’s UUID equivalent.
It generates a unique string that can be used to associate DOM elements with one another. It is handy, because then the author of an HTML page does not have to ensure that every tabs and accordion component have unique IDs. In the previous HTML examples, this is where TABS_ID and ACCORDION_ID would typically contain the randomly generated numeric strings instead.
// ========== // Constants. // ========== const BEFORE = '0.'; const AFTER = ''; // ================== // Get unique string. // ================== const unique = () => { // Get prefix. let prefix = Math.random(); prefix = String(prefix); prefix = prefix.replace(BEFORE, AFTER); // Get suffix. let suffix = Math.random(); suffix = String(suffix); suffix = suffix.replace(BEFORE, AFTER); // Expose string. return `${prefix}_${suffix}`; }; // Export. export { unique };
On larger JavaScript projects, I would typically use npm install uuid. But since we are keeping this simple and do not require cryptographic parity, concatenating two lightly edited Math.random() numbers will suffice for our string uniqueness needs.
File: tablist.js
This file does the bulk of the work. What is cool about it, if I do say so myself, is that there are enough similarities between a tabs component and an accordion that we can handle both with the same *.js file. Go ahead and scroll through the entirety, and then we will break down what each function does individually.
// Helpers. import { getDomFallback } from './getDomFallback'; import { unique } from './unique'; // ========== // Constants. // ========== // Boolean strings. const TRUE = 'true'; const FALSE = 'false'; // ARIA strings. const ARIA_CONTROLS = 'aria-controls'; const ARIA_DISABLED = 'aria-disabled'; const ARIA_LABELLEDBY = 'aria-labelledby'; const ARIA_HIDDEN = 'aria-hidden'; const ARIA_MULTISELECTABLE = 'aria-multiselectable'; const ARIA_SELECTED = 'aria-selected'; // Attribute strings. const DISABLED = 'disabled'; const ID = 'id'; const ROLE = 'role'; const TABLIST = 'tablist'; const TABINDEX = 'tabindex'; // Event strings. const CLICK = 'click'; const KEYDOWN = 'keydown'; // Key strings. const ENTER = 'enter'; const FUNCTION = 'function'; // Tag strings. const LI = 'li'; // Selector strings. const ACCORDION_ITEM_ICON = 'accordion__item__icon'; const ACCORDION_ITEM_ICON_SELECTOR = `.${ACCORDION_ITEM_ICON}`; const TAB = 'tab'; const TAB_SELECTOR = `[${ROLE}=${TAB}]`; const TABPANEL = 'tabpanel'; const TABPANEL_SELECTOR = `[${ROLE}=${TABPANEL}]`; const ACCORDION = 'accordion'; const TABLIST_CLASS_SELECTOR = '.accordion, .tabs'; const TAB_CLASS_SELECTOR = '.accordion__item, .tabs__item'; const TABPANEL_CLASS_SELECTOR = '.accordion__panel, .tabs__panel'; // =========== // Get tab ID. // =========== const getTabId = (id = '', index = 0) => { return `tab_${id}_${index}`; }; // ============= // Get panel ID. // ============= const getPanelId = (id = '', index = 0) => { return `tabpanel_${id}_${index}`; }; // ============== // Click handler. // ============== const globalClick = (event = {}) => { // Get target. const { key = '', target = getDomFallback() } = event; // Get parent. const { parentNode = getDomFallback(), tagName = '' } = target; // Set later. let wrapper = getDomFallback(); /* ===== NOTE: ===== We test for this, because the method does not exist on `document.documentElement`. */ if (typeof target.closest === FUNCTION) { // Get wrapper. wrapper = target.closest(TABLIST_CLASS_SELECTOR) || getDomFallback(); } // Is `<li>`? const isListItem = tagName.toLowerCase() === LI; // Is multi? const isMulti = wrapper.getAttribute(ARIA_MULTISELECTABLE) === TRUE; // Valid key? const isValidKey = !key || key.toLowerCase() === ENTER; // Valid target? const isValidTarget = !target.hasAttribute(DISABLED) && target.getAttribute(ROLE) === TAB && parentNode.getAttribute(ROLE) === TABLIST; // Valid event? const isValidEvent = isValidKey && isValidTarget; // Continue? if (isValidEvent) { // Get panel. const panelId = target.getAttribute(ARIA_CONTROLS); const panel = wrapper.querySelector(`#${panelId}`) || getDomFallback(); // Get booleans. let boolPanel = panel.getAttribute(ARIA_HIDDEN) !== TRUE; let boolTab = target.getAttribute(ARIA_SELECTED) !== TRUE; // List item? if (isListItem) { boolPanel = FALSE; boolTab = TRUE; } // [aria-multiselectable="false"] if (!isMulti) { // Get tabs & panels. const childTabs = wrapper.querySelectorAll(TAB_SELECTOR); const childPanels = wrapper.querySelectorAll(TABPANEL_SELECTOR); // Loop through tabs. childTabs.forEach((tab = getDomFallback()) => { tab.setAttribute(ARIA_SELECTED, FALSE); }); // Loop through panels. childPanels.forEach((panel = getDomFallback()) => { panel.setAttribute(ARIA_HIDDEN, TRUE); }); } // Set individual tab. target.setAttribute(ARIA_SELECTED, boolTab); // Set individual panel. panel.setAttribute(ARIA_HIDDEN, boolPanel); } }; // ==================== // Add ARIA attributes. // ==================== const addAriaAttributes = () => { // Get elements. const allWrappers = document.querySelectorAll(TABLIST_CLASS_SELECTOR); // Loop through. allWrappers.forEach((wrapper = getDomFallback()) => { // Get attributes. const { id = '', classList } = wrapper; const parentId = id || unique(); // Is accordion? const isAccordion = classList.contains(ACCORDION); // Get tabs & panels. const childTabs = wrapper.querySelectorAll(TAB_CLASS_SELECTOR); const childPanels = wrapper.querySelectorAll(TABPANEL_CLASS_SELECTOR); // Add ID? if (!wrapper.getAttribute(ID)) { wrapper.setAttribute(ID, parentId); } // Add multi? if (isAccordion && wrapper.getAttribute(ARIA_MULTISELECTABLE) !== FALSE) { wrapper.setAttribute(ARIA_MULTISELECTABLE, TRUE); } // =========================== // Loop through tabs & panels. // =========================== for (let index = 0; index < childTabs.length; index++) { // Get elements. const tab = childTabs[index] || getDomFallback(); const panel = childPanels[index] || getDomFallback(); // Get IDs. const tabId = getTabId(parentId, index); const panelId = getPanelId(parentId, index); // =================== // Add tab attributes. // =================== // Tab: add icon? if (isAccordion) { // Get icon. let icon = tab.querySelector(ACCORDION_ITEM_ICON_SELECTOR); // Create icon? if (!icon) { icon = document.createElement(I); icon.className = ACCORDION_ITEM_ICON; tab.insertAdjacentElement(AFTER_BEGIN, icon); } // [aria-hidden="true"] icon.setAttribute(ARIA_HIDDEN, TRUE); } // Tab: add id? if (!tab.getAttribute(ID)) { tab.setAttribute(ID, tabId); } // Tab: add controls? if (!tab.getAttribute(ARIA_CONTROLS)) { tab.setAttribute(ARIA_CONTROLS, panelId); } // Tab: add selected? if (!tab.getAttribute(ARIA_SELECTED)) { const bool = !isAccordion && index === 0; tab.setAttribute(ARIA_SELECTED, bool); } // Tab: add role? if (tab.getAttribute(ROLE) !== TAB) { tab.setAttribute(ROLE, TAB); } // Tab: add tabindex? if (tab.hasAttribute(DISABLED)) { tab.removeAttribute(TABINDEX); tab.setAttribute(ARIA_DISABLED, TRUE); } else { tab.setAttribute(TABINDEX, 0); } // Tab: first item? if (index === 0) { // Get parent. const { parentNode = getDomFallback() } = tab; /* We do this here, instead of outside the loop. The top level item isn't always the `tablist`. The accordion UI only has `<dl>`, whereas the tabs UI has both `<div>` and `<ul>`. */ if (parentNode.getAttribute(ROLE) !== TABLIST) { parentNode.setAttribute(ROLE, TABLIST); } } // ===================== // Add panel attributes. // ===================== // Panel: add ID? if (!panel.getAttribute(ID)) { panel.setAttribute(ID, panelId); } // Panel: add hidden? if (!panel.getAttribute(ARIA_HIDDEN)) { const bool = isAccordion || index !== 0; panel.setAttribute(ARIA_HIDDEN, bool); } // Panel: add labelled? if (!panel.getAttribute(ARIA_LABELLEDBY)) { panel.setAttribute(ARIA_LABELLEDBY, tabId); } // Panel: add role? if (panel.getAttribute(ROLE) !== TABPANEL) { panel.setAttribute(ROLE, TABPANEL); } } }); }; // ===================== // Remove global events. // ===================== const unbind = () => { document.removeEventListener(CLICK, globalClick); document.removeEventListener(KEYDOWN, globalClick); }; // ================== // Add global events. // ================== const init = () => { // Add attributes. addAriaAttributes(); // Prevent doubles. unbind(); document.addEventListener(CLICK, globalClick); document.addEventListener(KEYDOWN, globalClick); }; // ============== // Bundle object. // ============== const tablist = { init, unbind, }; // ======= // Export. // ======= export { tablist };
Function: getTabId and getPanelId
These two functions are used to create individually unique IDs for elements in a loop, based on an existing (or generated) parent ID. This is helpful to ensure matching values for attributes like aria-controls="…" and aria-labelledby="…". Think of those as the accessibility equivalents of <label for="…">, telling the browser which elements are related to one another.
const getTabId = (id = '', index = 0) => { return `tab_${id}_${index}`; };
const getPanelId = (id = '', index = 0) => { return `tabpanel_${id}_${index}`; };
Function: globalClick
This is a click handler that is applied at the document level. That means we are not having to manually add click handlers to a number of elements. Instead, we use event bubbling to listen for clicks further down in the document, and allow them to propagate up to the top. Conveniently, this is also how we can handle keyboard events such as the Enter key being pressed. Both are necessary to have an accessible UI.
In the first part of the function, we destructure key and target from the incoming event. Next, we destructure the parentNode and tagName from the target.
Then, we attempt to get the wrapper element. This would be the one with either class="tabs" or class="accordion". Because we might actually be clicking on the ancestor element highest in the DOM tree — which exists but possibly does not have the *.closest(…) method — we do a typeof check. If that function exists, we attempt to get the element. Even still, we might come up without a match. So we have one more getDomFallback to be safe.
// Get target. const { key = '', target = getDomFallback() } = event; // Get parent. const { parentNode = getDomFallback(), tagName = '' } = target; // Set later. let wrapper = getDomFallback(); /* ===== NOTE: ===== We test for this, because the method does not exist on `document.documentElement`. */ if (typeof target.closest === FUNCTION) { // Get wrapper. wrapper = target.closest(TABLIST_CLASS_SELECTOR) || getDomFallback(); }
Then, we store whether or not the tag that was clicked is a <li>. Likewise, we store a boolean about whether the wrapper element has aria-multiselectable="true". I will get back to that. We need this info later on.
We also interrogate the event a bit, to determine if it was triggered by the user pressing a key. If so, then we are only interested if that key was Enter. We also determine if the click happened on a relevant target. Remember, we are using event bubbling so really the user could have clicked anything.
We want to make sure it:
Is not disabled
Has role="tab"
Has a parent element with role="tablist"
Then we bundle up our event and target booleans into one, as isValidEvent.
// Is `<li>`? const isListItem = tagName.toLowerCase() === LI; // Is multi? const isMulti = wrapper.getAttribute(ARIA_MULTISELECTABLE) === TRUE; // Valid key? const isValidKey = !key || key.toLowerCase() === ENTER; // Valid target? const isValidTarget = !target.hasAttribute(DISABLED) && target.getAttribute(ROLE) === TAB && parentNode.getAttribute(ROLE) === TABLIST; // Valid event? const isValidEvent = isValidKey && isValidTarget;
Assuming the event is indeed valid, we make it past our next if check. Now, we are concerned with getting the role="tabpanel" element with an id that matches our tab’s aria-controls="…".
Once we have got it, we check whether the panel is hidden, and if the tab is selected. Basically, we first presuppose that we are dealing with an accordion and flip the booleans to their opposites.
This is also where our earlier isListItem boolean comes into play. If the user is clicking an <li> then we know we are dealing with tabs, not an accordion. In which case, we want to flag our panel as being visible (via aria-hiddden="false") and our tab as being selected (via aria-selected="true").
Also, we want to ensure that either the wrapper has aria-multiselectable="false" or is completely missing aria-multiselectable. If that is the case, then we loop through all neighboring role="tab" and all role="tabpanel" elements and set them to their inactive states. Finally, we arrive at setting the previously determined booleans for the individual tab and panel pairing.
// Continue? if (isValidEvent) { // Get panel. const panelId = target.getAttribute(ARIA_CONTROLS); const panel = wrapper.querySelector(`#${panelId}`) || getDomFallback(); // Get booleans. let boolPanel = panel.getAttribute(ARIA_HIDDEN) !== TRUE; let boolTab = target.getAttribute(ARIA_SELECTED) !== TRUE; // List item? if (isListItem) { boolPanel = FALSE; boolTab = TRUE; } // [aria-multiselectable="false"] if (!isMulti) { // Get tabs & panels. const childTabs = wrapper.querySelectorAll(TAB_SELECTOR); const childPanels = wrapper.querySelectorAll(TABPANEL_SELECTOR); // Loop through tabs. childTabs.forEach((tab = getDomFallback()) => { tab.setAttribute(ARIA_SELECTED, FALSE); }); // Loop through panels. childPanels.forEach((panel = getDomFallback()) => { panel.setAttribute(ARIA_HIDDEN, TRUE); }); } // Set individual tab. target.setAttribute(ARIA_SELECTED, boolTab); // Set individual panel. panel.setAttribute(ARIA_HIDDEN, boolPanel); }
Function: addAriaAttributes
The astute reader might be thinking:
You said earlier that we start with the most bare possible markup, yet the globalClick function was looking for attributes that would not be there. Why would you lie!?
Or perhaps not, for the astute reader would have also noticed the function named addAriaAttributes. Indeed, this function does exactly what it says on the tin. It breathes life into the base DOM structure, by adding all the requisite aria-* and role attributes.
This not only makes the UI inherently more accessible to assistive technologies, but it also ensures the functionality actually works. I prefer to build vanilla JS things this way, rather than pivoting on class="…" for interactivity, because it forces me to think about the entirety of the user experience, beyond what I can see visually.
First off, we get all elements on the page that have class="tabs" and/or class="accordion". Then we check if we have something to work with. If not, then we would exit our function here. Assuming we do have a list, we loop through each of the wrapping elements and pass them into the scope of our function as wrapper.
// Get elements. const allWrappers = document.querySelectorAll(TABLIST_CLASS_SELECTOR); // Loop through. allWrappers.forEach((wrapper = getDomFallback()) => { /* NOTE: Cut, for brevity. */ });
Inside the scope of our looping function, we destructure id and classList from wrapper. If there is no ID, then we generate one via unique(). We set a boolean flag, to identify if we are working with an accordion. This is used later.
We also get decendants of wrapper that are tabs and panels, via their class name selectors.
Tabs:
class="tabs__item" or
class="accordion__item"
Panels:
class="tabs__panel" or
class="accordion__panel"
We then set the wrapper’s id if it does not already have one.
If we are dealing with an accordion that lacks aria-multiselectable="false", we set its flag to true. Reason being, if developers are reaching for an accordion UI paradigm — and also have tabs available to them, which are inherently mutually exclusive — then the safer assumption is that the accordion should support expanding and collapsing of several panels.
// Get attributes. const { id = '', classList } = wrapper; const parentId = id || unique(); // Is accordion? const isAccordion = classList.contains(ACCORDION); // Get tabs & panels. const childTabs = wrapper.querySelectorAll(TAB_CLASS_SELECTOR); const childPanels = wrapper.querySelectorAll(TABPANEL_CLASS_SELECTOR); // Add ID? if (!wrapper.getAttribute(ID)) { wrapper.setAttribute(ID, parentId); } // Add multi? if (isAccordion && wrapper.getAttribute(ARIA_MULTISELECTABLE) !== FALSE) { wrapper.setAttribute(ARIA_MULTISELECTABLE, TRUE); }
Next, we loop through tabs. Wherein, we also handle our panels.
You may be wondering why this is an old school for loop, instead of a more modern *.forEach. The reason is that we want to loop through two NodeList instances: tabs and panels. Assuming they each map 1-to-1 we know they both have the same *.length. This allows us to have one loop instead of two.
Let us peer inside of the loop. First, we get unique IDs for each tab and panel. These would look like one of the two following scenarios. These are used later on, to associate tabs with panels and vice versa.
tab_WRAPPER_ID_0 or tab_GENERATED_STRING_0
tabpanel_WRAPPER_ID_0 or tabpanel_GENERATED_STRING_0
for (let index = 0; index < childTabs.length; index++) { // Get elements. const tab = childTabs[index] || getDomFallback(); const panel = childPanels[index] || getDomFallback(); // Get IDs. const tabId = getTabId(parentId, index); const panelId = getPanelId(parentId, index); /* NOTE: Cut, for brevity. */ }
As we loop through, we first ensure that an expand/collapse icon exists. We create it if necessary, and set it to aria-hidden="true" since it is purely decorative.
Next, we check on attributes for the current tab. If an id="…" does not exist on the tab, we add it. Likewise, if aria-controls="…" does not exist we add that as well, pointing to our newly created panelId.
You will notice there is a little pivot here, checking if we do not have aria-selected and then further determining if we are not in the context of an accordion and if the index is 0. In that case, we want to make our first tab look selected. The reason is that though an accordion can be fully collapsed, tabbed content cannot. There is always at least one panel visible.
Then we ensure that role="tab" exists.
It is worth noting we do some extra work, based on whether the tab is disabled. If so, we remove tabindex so that the tab cannot receive :focus. If the tab is not disabled, we add tabindex="0" so that it can receive :focus.
We also set aria-disabled="true", if need be. You might be wondering if that is redundant. But it is necessary to inform assistive technologies that the tab is not interactive. Since our tab is either a <div> or <li>, it technically cannot be disabled like an <input>. Our styles pivot on [disabled], so we get that for free. Plus, it is less cognitive overhead (as a developer creating HTML) to only worry about one attribute.

Fun Fact: It is also worth noting the use of hasAttribute(…) to detect disabled, instead of getAttribute(…). This is because the mere presence of disabled will cause form elements to be disabled.
If the HTML is compiled, via tools such as Parcel…
Markup like this: <tag disabled>
Is changed to this: <tag disabled="">
In which case, getting the attribute is still a falsy string.
In the days of XHTML, that would have been disabled="disabled". But really, it was only ever the existence of the attribute that mattered. Not its value. That is why we simply test if the element has the disabled attribute.
Lastly, we check if we are on the first iteration of our loop where index is 0. If so, we go up one level to the parentNode. If that element does not have role="tablist", then we add it.
We do this via parentNode instead of wrapper because in the context of tabs (not accordion) there is a <ul>element around the tab <li> that needs role="tablist". In the case of an accordion, it would be the outermost <div> ancestor. This code accounts for both.
// Tab: add icon? if (isAccordion) { // Get icon. let icon = tab.querySelector(ACCORDION_ITEM_ICON_SELECTOR); // Create icon? if (!icon) { icon = document.createElement(I); icon.className = ACCORDION_ITEM_ICON; tab.insertAdjacentElement(AFTER_BEGIN, icon); } // [aria-hidden="true"] icon.setAttribute(ARIA_HIDDEN, TRUE); } // Tab: add id? if (!tab.getAttribute(ID)) { tab.setAttribute(ID, tabId); } // Tab: add controls? if (!tab.getAttribute(ARIA_CONTROLS)) { tab.setAttribute(ARIA_CONTROLS, panelId); } // Tab: add selected? if (!tab.getAttribute(ARIA_SELECTED)) { const bool = !isAccordion && index === 0; tab.setAttribute(ARIA_SELECTED, bool); } // Tab: add role? if (tab.getAttribute(ROLE) !== TAB) { tab.setAttribute(ROLE, TAB); } // Tab: add tabindex? if (tab.hasAttribute(DISABLED)) { tab.removeAttribute(TABINDEX); tab.setAttribute(ARIA_DISABLED, TRUE); } else { tab.setAttribute(TABINDEX, 0); } // Tab: first item? if (index === 0) { // Get parent. const { parentNode = getDomFallback() } = tab; /* We do this here, instead of outside the loop. The top level item isn't always the `tablist`. The accordion UI only has `<dl>`, whereas the tabs UI has both `<div>` and `<ul>`. */ if (parentNode.getAttribute(ROLE) !== TABLIST) { parentNode.setAttribute(ROLE, TABLIST); } }
Continuing within the earlier for loop, we add attributes for each panel. We add an id if needed. We also set aria-hidden to either true or false depending on the context of being an accordion (or not).
Likewise, we ensure that our panel points back to its tab trigger via aria-labelledby="…", and that role="tabpanel" has been set.
// Panel: add ID? if (!panel.getAttribute(ID)) { panel.setAttribute(ID, panelId); } // Panel: add hidden? if (!panel.getAttribute(ARIA_HIDDEN)) { const bool = isAccordion || index !== 0; panel.setAttribute(ARIA_HIDDEN, bool); } // Panel: add labelled? if (!panel.getAttribute(ARIA_LABELLEDBY)) { panel.setAttribute(ARIA_LABELLEDBY, tabId); } // Panel: add role? if (panel.getAttribute(ROLE) !== TABPANEL) { panel.setAttribute(ROLE, TABPANEL); }
At the very end of the file, we have a few setup and teardown functions. As a way to play nicely with other JS that might be in the page, we provide an unbind function that removes our global event listeners. It can be called by itself, via tablist.unbind() but is mostly there so that we can unbind() before (re-)binding. That way we prevent doubling up.
Inside our init function, we call addAriaAttributes() which modifies the DOM to be accessible. We then call unbind() and then add our event listeners to the document.
Finally, we bundle both methods into a parent object and export it under the name tablist. That way, when dropping it into a flat HTML page, we can call tablist.init() when we are ready to apply our functionality.
// ===================== // Remove global events. // ===================== const unbind = () => { document.removeEventListener(CLICK, globalClick); document.removeEventListener(KEYDOWN, globalClick); }; // ================== // Add global events. // ================== const init = () => { // Add attributes. addAriaAttributes(); // Prevent doubles. unbind(); document.addEventListener(CLICK, globalClick); document.addEventListener(KEYDOWN, globalClick); }; // ============== // Bundle object. // ============== const tablist = { init, unbind, }; // ======= // Export. // ======= export { tablist };
React examples
There is a scene in Batman Begins where Lucius Fox (played by Morgan Freeman) explains to a recovering Bruce Wayne (Christian Bale) the scientific steps he took to save his life after being poisoned.
Lucius Fox: “I analyzed your blood, isolating the receptor compounds and the protein-based catalyst.”
Bruce Wayne: “Am I meant to understand any of that?”
Lucius Fox: “Not at all, I just wanted you to know how hard it was. Bottom line, I synthesized an antidote.”

“How do I configure Webpack?”
↑ When working with a framework, I think in those terms.
Now that we know “hard” it is — not really, but humor me — to do raw DOM manipulation and event binding, we can better appreciate the existence of an antidote. React abstracts a lot of that complexity away, and handles it for us automatically.
File: Tabs.js
Now that we are diving into React examples, we will start with the <Tabs> component.
// ============= // Used like so… // ============= <Tabs> <div label="Tab 1"> <p> Tab 1 content </p> </div> <div label="Tab 2"> <p> Tab 2 content </p> </div> </Tabs>
Here is the content from our Tabs.js file. Note that in React parlance, it is standard practice to name the file with the same capitalization as its export default component.
We start out with the same getTabId and getPanelId functions as in our vanilla JS approach, because we still need to make sure to accessibly map tabs to components. Take a look at the entirey of the code, and then we will continue to break it down.
import React, { useState } from 'react'; import PropTypes from 'prop-types'; import { v4 as uuid } from 'uuid'; import cx from 'classnames'; // UI. import Render from './Render'; // =========== // Get tab ID. // =========== const getTabId = (id = '', index = 0) => { return `tab_${id}_${index}`; }; // ============= // Get panel ID. // ============= const getPanelId = (id = '', index = 0) => { return `tabpanel_${id}_${index}`; }; // ========== // Is active? // ========== const getIsActive = ({ activeIndex = null, index = null, list = [] }) => { // Index matches? const isMatch = index === parseFloat(activeIndex); // Is first item? const isFirst = index === 0; // Only first item exists? const onlyFirstItem = list.length === 1; // Item doesn't exist? const badActiveItem = !list[activeIndex]; // Flag as active? const isActive = isMatch || onlyFirstItem || (isFirst && badActiveItem); // Expose boolean. return !!isActive; }; getIsActive.propTypes = { activeIndex: PropTypes.number, index: PropTypes.number, list: PropTypes.array, }; // ================ // Get `<ul>` list. // ================ const getTabsList = ({ activeIndex = null, id = '', list = [], setActiveIndex = () => {} }) => { // Build new list. const newList = list.map((item = {}, index) => { // ========= // Get data. // ========= const { props: itemProps = {} } = item; const { disabled = null, label = '' } = itemProps; const idPanel = getPanelId(id, index); const idTab = getTabId(id, index); const isActive = getIsActive({ activeIndex, index, list }); // ======= // Events. // ======= const handleClick = (event = {}) => { const { key = '' } = event; if (!disabled) { // Early exit. if (key && key.toLowerCase() !== 'enter') { return; } setActiveIndex(index); } }; // ============ // Add to list. // ============ return ( <li aria-controls={idPanel} aria-disabled={disabled} aria-selected={isActive} className="tabs__item" disabled={disabled} id={idTab} key={idTab} role="tab" tabIndex={disabled ? null : 0} // Events. onClick={handleClick} onKeyDown={handleClick} > {label || `${index + 1}`} </li> ); }); // ========== // Expose UI. // ========== return ( <Render if={newList.length}> <ul className="tabs__list" role="tablist"> {newList} </ul> </Render> ); }; getTabsList.propTypes = { activeIndex: PropTypes.number, id: PropTypes.string, list: PropTypes.array, setActiveIndex: PropTypes.func, }; // ================= // Get `<div>` list. // ================= const getPanelsList = ({ activeIndex = null, id = '', list = [] }) => { // Build new list. const newList = list.map((item = {}, index) => { // ========= // Get data. // ========= const { props: itemProps = {} } = item; const { children = '', className = null, style = null } = itemProps; const idPanel = getPanelId(id, index); const idTab = getTabId(id, index); const isActive = getIsActive({ activeIndex, index, list }); // ============= // Get children. // ============= let content = children || item; if (typeof content === 'string') { content = <p>{content}</p>; } // ================= // Build class list. // ================= const classList = cx({ tabs__panel: true, [String(className)]: className, }); // ========== // Expose UI. // ========== return ( <div aria-hidden={!isActive} aria-labelledby={idTab} className={classList} id={idPanel} key={idPanel} role="tabpanel" style={style} > {content} </div> ); }); // ========== // Expose UI. // ========== return newList; }; getPanelsList.propTypes = { activeIndex: PropTypes.number, id: PropTypes.string, list: PropTypes.array, }; // ========== // Component. // ========== const Tabs = ({ children = '', className = null, selected = 0, style = null, id: propsId = uuid(), }) => { // =============== // Internal state. // =============== const [id] = useState(propsId); const [activeIndex, setActiveIndex] = useState(selected); // ================= // Build class list. // ================= const classList = cx({ tabs: true, [String(className)]: className, }); // =============== // Build UI lists. // =============== const list = Array.isArray(children) ? children : [children]; const tabsList = getTabsList({ activeIndex, id, list, setActiveIndex, }); const panelsList = getPanelsList({ activeIndex, id, list, }); // ========== // Expose UI. // ========== return ( <Render if={list[0]}> <div className={classList} id={id} style={style}> {tabsList} {panelsList} </div> </Render> ); }; Tabs.propTypes = { children: PropTypes.node, className: PropTypes.string, id: PropTypes.string, selected: PropTypes.number, style: PropTypes.object, }; export default Tabs;
Function: getIsActive
Due to a <Tabs> component always having something active and visible, this function contains some logic to determine whether an index of a given tab should be the lucky winner. Essentially, in sentence form the logic goes like this.
This current tab is active if:
Its index matches the activeIndex, or
The tabs UI has only one tab, or
It is the first tab, and the activeIndex tab does not exist.
const getIsActive = ({ activeIndex = null, index = null, list = [] }) => { // Index matches? const isMatch = index === parseFloat(activeIndex); // Is first item? const isFirst = index === 0; // Only first item exists? const onlyFirstItem = list.length === 1; // Item doesn't exist? const badActiveItem = !list[activeIndex]; // Flag as active? const isActive = isMatch || onlyFirstItem || (isFirst && badActiveItem); // Expose boolean. return !!isActive; };
Function: getTabsList
This function generates the clickable <li role="tabs"> UI, and returns it wrapped in a parent <ul role="tablist">. It assigns all the relevant aria-* and role attributes, and handles binding the onClickand onKeyDown events. When an event is triggered, setActiveIndex is called. This updates the component’s internal state.
It is noteworthy how the content of the <li> is derived. That is passed in as <div label="…"> children of the parent <Tabs> component. Though this is not a real concept in flat HTML, it is a handy way to think about the relationship of the content. The children of that <div> become the the innards of our role="tabpanel" later.
const getTabsList = ({ activeIndex = null, id = '', list = [], setActiveIndex = () => {} }) => { // Build new list. const newList = list.map((item = {}, index) => { // ========= // Get data. // ========= const { props: itemProps = {} } = item; const { disabled = null, label = '' } = itemProps; const idPanel = getPanelId(id, index); const idTab = getTabId(id, index); const isActive = getIsActive({ activeIndex, index, list }); // ======= // Events. // ======= const handleClick = (event = {}) => { const { key = '' } = event; if (!disabled) { // Early exit. if (key && key.toLowerCase() !== 'enter') { return; } setActiveIndex(index); } }; // ============ // Add to list. // ============ return ( <li aria-controls={idPanel} aria-disabled={disabled} aria-selected={isActive} className="tabs__item" disabled={disabled} id={idTab} key={idTab} role="tab" tabIndex={disabled ? null : 0} // Events. onClick={handleClick} onKeyDown={handleClick} > {label || `${index + 1}`} </li> ); }); // ========== // Expose UI. // ========== return ( <Render if={newList.length}> <ul className="tabs__list" role="tablist"> {newList} </ul> </Render> ); };
Function: getPanelsList
This function parses the incoming children of the top level component and extracts the content. It also makes use of getIsActive to determine whether (or not) to apply aria-hidden="true". As one might expect by now, it adds all the other relevant aria-* and role attributes too. It also applies any extra className or style that was passed in.
It also is “smart” enough to wrap any string content — anything lacking a wrapping tag already — in <p> tags for consistency.
const getPanelsList = ({ activeIndex = null, id = '', list = [] }) => { // Build new list. const newList = list.map((item = {}, index) => { // ========= // Get data. // ========= const { props: itemProps = {} } = item; const { children = '', className = null, style = null } = itemProps; const idPanel = getPanelId(id, index); const idTab = getTabId(id, index); const isActive = getIsActive({ activeIndex, index, list }); // ============= // Get children. // ============= let content = children || item; if (typeof content === 'string') { content = <p>{content}</p>; } // ================= // Build class list. // ================= const classList = cx({ tabs__panel: true, [String(className)]: className, }); // ========== // Expose UI. // ========== return ( <div aria-hidden={!isActive} aria-labelledby={idTab} className={classList} id={idPanel} key={idPanel} role="tabpanel" style={style} > {content} </div> ); }); // ========== // Expose UI. // ========== return newList; };
Function: Tabs
This is the main component. It sets an internal state for an id, to essentially cache any generated uuid() so that it does not change during the lifecycle of the component. React is finicky about its key attributes (in the previous loops) changing dynamically, so this ensures they remain static once set.
We also employ useState to track the currently selected tab, and pass down a setActiveIndex function to each <li> to monitor when they are clicked. After that, it is pretty straightfowrard. We call getTabsList and getPanelsList to build our UI, and then wrap it all up in <div role="tablist">.
It accepts any wrapper level className or style, in case anyone wants further tweaks during implementation. Providing other developers (as consumers) this flexibility means that the likelihood of needing to make further edits to the core component is lower. Lately, I have been doing this as a “best practice” for all components I create.
const Tabs = ({ children = '', className = null, selected = 0, style = null, id: propsId = uuid(), }) => { // =============== // Internal state. // =============== const [id] = useState(propsId); const [activeIndex, setActiveIndex] = useState(selected); // ================= // Build class list. // ================= const classList = cx({ tabs: true, [String(className)]: className, }); // =============== // Build UI lists. // =============== const list = Array.isArray(children) ? children : [children]; const tabsList = getTabsList({ activeIndex, id, list, setActiveIndex, }); const panelsList = getPanelsList({ activeIndex, id, list, }); // ========== // Expose UI. // ========== return ( <Render if={list[0]}> <div className={classList} id={id} style={style}> {tabsList} {panelsList} </div> </Render> ); };
If you are curious about the <Render> function, you can read more about that in this example.
File: Accordion.js
// ============= // Used like so… // ============= <Accordion> <div label="Tab 1"> <p> Tab 1 content </p> </div> <div label="Tab 2"> <p> Tab 2 content </p> </div> </Accordion>
As you may have deduced — due to the vanilla JS example handling both tabs and accordion — this file has quite a few similarities to how Tabs.js works.
Rather than belabor the point, I will simply provide the file’s contents for completeness and then speak about the specific areas in which the logic differs. So, take a gander at the contents and I will explain what makes <Accordion> quirky.
import React, { useState } from 'react'; import PropTypes from 'prop-types'; import { v4 as uuid } from 'uuid'; import cx from 'classnames'; // UI. import Render from './Render'; // =========== // Get tab ID. // =========== const getTabId = (id = '', index = 0) => { return `tab_${id}_${index}`; }; // ============= // Get panel ID. // ============= const getPanelId = (id = '', index = 0) => { return `tabpanel_${id}_${index}`; }; // ============================== // Get `tab` and `tabpanel` list. // ============================== const getTabsAndPanelsList = ({ activeItems = {}, id = '', isMulti = true, list = [], setActiveItems = () => {}, }) => { // Build new list. const newList = []; // Loop through. list.forEach((item = {}, index) => { // ========= // Get data. // ========= const { props: itemProps = {} } = item; const { children = '', className = null, disabled = null, label = '', style = null, } = itemProps; const idPanel = getPanelId(id, index); const idTab = getTabId(id, index); const isActive = !!activeItems[index]; // ======= // Events. // ======= const handleClick = (event = {}) => { const { key = '' } = event; if (!disabled) { // Early exit. if (key && key.toLowerCase() !== 'enter') { return; } // Keep active items? const state = isMulti ? activeItems : null; // Update active item. const newState = { ...state, [index]: !activeItems[index], }; // Set active item. setActiveItems(newState); } }; // ============= // Get children. // ============= let content = children || item; if (typeof content === 'string') { content = <p>{content}</p>; } // ================= // Build class list. // ================= const classList = cx({ accordion__panel: true, [String(className)]: className, }); // ======== // Add tab. // ======== newList.push( <div aria-controls={idPanel} aria-disabled={disabled} aria-selected={isActive} className="accordion__item" disabled={disabled} id={idTab} key={idTab} role="tab" tabIndex={disabled ? null : 0} // Events. onClick={handleClick} onKeyDown={handleClick} > <i aria-hidden="true" className="accordion__item__icon" /> {label || `${index + 1}`} </div> ); // ========== // Add panel. // ========== newList.push( <div aria-hidden={!isActive} aria-labelledby={idTab} className={classList} id={idPanel} key={idPanel} role="tabpanel" style={style} > {content} </div> ); }); // ========== // Expose UI. // ========== return newList; }; getTabsAndPanelsList.propTypes = { activeItems: PropTypes.object, id: PropTypes.string, isMulti: PropTypes.bool, list: PropTypes.array, setActiveItems: PropTypes.func, }; // ========== // Component. // ========== const Accordion = ({ children = '', className = null, isMulti = true, selected = {}, style = null, id: propsId = uuid(), }) => { // =============== // Internal state. // =============== const [id] = useState(propsId); const [activeItems, setActiveItems] = useState(selected); // ================= // Build class list. // ================= const classList = cx({ accordion: true, [String(className)]: className, }); // =============== // Build UI lists. // =============== const list = Array.isArray(children) ? children : [children]; const tabsAndPanelsList = getTabsAndPanelsList({ activeItems, id, isMulti, list, setActiveItems, }); // ========== // Expose UI. // ========== return ( <Render if={list[0]}> <div aria-multiselectable={isMulti} className={classList} id={id} role="tablist" style={style} > {tabsAndPanelsList} </div> </Render> ); }; Accordion.propTypes = { children: PropTypes.node, className: PropTypes.string, id: PropTypes.string, isMulti: PropTypes.bool, selected: PropTypes.object, style: PropTypes.object, }; export default Accordion;
Function: handleClick
While most of our <Accordion> logic is similar to <Tabs>, it differs in how it stores the currently active tab.
Since <Tabs> are always mutually exclusive, we only really need a single numeric index. Easy peasy.
However, because an <Accordion> can have concurrently visible panels — or be used in a mutually exclusive manner — we need to represent that to useState in a way that could handle both.
If you were beginning to think…
“I would store that in an object.”
…then congrats. You are right!
This function does a quick check to see if isMulti has been set to true. If so, we use the spread syntax to apply the existing activeItems to our newState object. We then set the current index to its boolean opposite.
const handleClick = (event = {}) => { const { key = '' } = event; if (!disabled) { // Early exit. if (key && key.toLowerCase() !== 'enter') { return; } // Keep active items? const state = isMulti ? activeItems : null; // Update active item. const newState = { ...state, [index]: !activeItems[index], }; // Set active item. setActiveItems(newState); } };
For reference, here is how our activeItems object looks if only the first accordion panel is active and a user clicks the second. Both indexes would be set to true. This allows for viewing two expanded role="tabpanel" simultaneously.
/* Internal representation of `activeItems` state. */ { 0: true, 1: true, }
Whereas if we were not operating in isMulti mode — when the wrapper has aria-multiselectable="false" — then activeItems would only ever contain one key/value pair.
Because rather than spreading the current activeItems, we would be spreading null. That effectively wipes the slate clean, before recording the currently active tab.
/* Internal representation of `activeItems` state. */ { 1: true, }
Conclusion
Still here? Awesome.
Hopefully you found this article informative, and maybe even learned a bit more about accessibility and JS(X) along the way. For review, let us look one more time at our flat HTML example and and the React usage of our <Tabs>component. Here is a comparison of the markup we would write in a vanilla JS approach, versus the JSX it takes to generate the same thing.
I am not saying that one is better than the other, but you can see how React makes it possible to distill things down into a mental model. Working directly in HTML, you always have to be aware of every tag.
HTML
<div class="tabs"> <ul class="tabs__list"> <li class="tabs__item"> Tab 1 </li> <li class="tabs__item"> Tab 2 </li> </ul> <div class="tabs__panel"> <p> Tab 1 content </p> </div> <div class="tabs__panel"> <p> Tab 2 content </p> </div> </div>
JSX
<Tabs> <div label="Tab 1"> Tab 1 content </div> <div label="Tab 2"> Tab 2 content </div> </Tabs>
↑ One of these probably looks preferrable, depending on your point of view.
Writing code closer to the metal means more direct control, but also more tedium. Using a framework like React means you get more functionality “for free,” but also it can be a black box.
That is, unless you understand the underlying nuances already. Then you can fluidly operate in either realm. Because you can see The Matrix for what it really is: Just JavaScript

. Not a bad place to be, no matter where you find yourself.
The post The Anatomy of a Tablist Component in Vanilla JavaScript Versus React appeared first on CSS-Tricks.
source https://css-tricks.com/the-anatomy-of-a-tablist-component-in-vanilla-javascript-versus-react/
from WordPress https://ift.tt/3c7Dj6X via IFTTT
0 notes
Text
Of course, there is a general knowledge about the use of alcohol in the culinary world. It always gives a little something above the average. Wonderful red wine stews, flambéing with spirits or basting with white wine or beer. Poultry especially tastes stunning with a good lager. It makes the meat very tender and yummy – Smooth Beer Turkey Bits served with My very dear potato salad.
Total Time: 45 minutes + few hours to chill the turkey marinade
jQuery.getScript( "//s3.amazonaws.com/downloads.mailchimp.com/js/signup-forms/popup/embed.js", function( data, textStatus, jqxhr ) { require(["mojo/signup-forms/Loader"], function(L) { L.start({"baseUrl":"mc.us10.list-manage.com","uuid":"7aeba6c48256d8408435f1f81","lid":"3e0c23c2aa"}) }); } );
[amazon_link asins=’B008UQ5A2E’ template=’ProductAd’ store=’nonstopstra0c-20′ marketplace=’US’ link_id=’2f0116c1-cdd8-11e7-bafc-cf81cff08cc4′]
[amazon_link asins=’B00EXLOVU2′ template=’ProductAd’ store=’nonstopstra0c-20′ marketplace=’US’ link_id=’5e38092b-cdd8-11e7-9c8a-eb20b8c5125c’]
[amazon_link asins=’B007S9ULGY’ template=’ProductAd’ store=’nonstopstra0c-20′ marketplace=’US’ link_id=’89987737-cdd8-11e7-b39c-f956dd842b0c’]
Shopping List
The Turkey: 300g of good quality Turkey breasts, cleaned and chopped in chunks 2 splashes of olive oil 1 splash of Worcestershire Sauce Splash of juice from lemon 2 tablespoons of Heinz Ketchup 1 teaspoon of sea salt Pinch of satureja, chili flakes, Provencal Herbs, black pepper 1 teaspoon of good honey and Dijon Mustard
1 cup of good quality lager for basting
Potato Salad: 5 medium potatoes, washed 1 large onion, peeled and finely chopped 2 knobs of lard 3 large pickles, finely chopped 2 splashes of pickled sweet-and-sour juice (mixture of vinegar and icing sugar) Sea salt and pepper
<p>function nofocus() <p>{ <p>document.convert.InUnit.focus() <p>} <p>var gValue = 1 var kgValue = 1000 var ounceValue = 28.3495 var lbValue = 453.592 var tValue = 907184 <p>function toCM() <p>{ <p>var i = document.convert.unit.selectedIndex var thisUnit = document.convert.unit.options[i].value <p>if (thisUnit == "G") <p> { <p>document.convert.g.value = document.convert.InUnit.value <p> } <p>else if(thisUnit == "KG") <p> { <p>document.convert.g.value = document.convert.InUnit.value * kgValue <p> } <p>else if(thisUnit == "OUNCE" ) <p> { <p>document.convert.g.value = document.convert.InUnit.value * ounceValue <p> } <p>else if(thisUnit == "LB" ) <p> { <p>document.convert.g.value = document.convert.InUnit.value * lbValue <p> } <p>else if(thisUnit == "T" ) <p> { <p>document.convert.g.value = document.convert.InUnit.value * tValue <p> } <p>toAll() <p>} <p>function toAll() <p>{ <p>var m = document.convert.g.value <p>document.convert.kg.value = m / kgValue document.convert.ounce.value = m / ounceValue document.convert.lb.value = m / lbValue document.convert.t.value = m / tValue <p>} //-->
Weight Converter
Unit Number GramKilogramOuncePoundU.S. Ton Gram: Kilogram: Ounce: Pound: U.S. Ton:
Instructions
The Beer Turkey Bits
First marinate the meat. The more time you have, the better. Ideally a few hours ahead.
In a medium metal bowl place the oil, Worcestershire Sauce, lemon, ketchup, all the herbs and spices (salt, satureja, chili, Provencal herbs, black pepper) and mustard. Mix with a balloon whisk and taste.
Turkey in. Gently stir with a spoon. Cover with a lid and let it work in a cold place.
The Potato Salad
Put the potatoes in a large deep pan and season well with sea salt. Cover with cold water and the lid. Bring it to boil and cook until soft on medium heat.
Take the potatoes out of the pot and let them cool down for a bit.
Presentation
Peel the potatoes and grate them into a large serving bowl. I like to use a simple egg grater.
Melt the lard in a medium frying pan and add the onion on high heat. Sauté until it gets golden and crispy, for about 1 minute.
Next, pour the hot onion over the potatoes and mix. Yummy already now.
Season with salt and pepper and stir in pickles. A splash of pickle juice and taste. It shouldn’t be too dry, nor too juicy. Add few more juice if necessary.
If you don’t have sweet-and-sour pickles, pour in a splash of vinegar into a glass. Reduce with a bit of cold water and start adding icing sugar with a small spoon. Taste and work it into perfection. Pour the mixture into the salad and enjoy.
While the salad is resting, finish the meat. Place it all into a pan you used for the lard and the onion.
Roast the Beer Turkey Bits on high heat until they get beautifully golden all over.
Then, baste it with the lager and reduce the heat.
Lower the heat to low and let it simmer for about 5 more minutes. Easy dinner done.
Makes 2 serves.
(adsbygoogle = window.adsbygoogle || []).push({});
#mc_embed_signup{background:#fff0; clear:left; font:14px Helvetica,Arial,sans-serif; } /* Add your own MailChimp form style overrides in your site stylesheet or in this style block. We recommend moving this block and the preceding CSS link to the HEAD of your HTML file. */
Get inspired. Sign up and receive favourites collected PLUS unique recipes.
* indicates required
Email Address *
First Name *
Smooth Beer Turkey Bits
Of course, there is a general knowledge about the use of alcohol in the culinary world. It always gives a little something above the average.
0 notes
Text
Implementing a simple Smart Contract for Asset Tracking [blockcentric #6]
Our article series “blockcentric” discusses blockchain-related technology, projects, organization and business concerns. It contains knowledge and findings from our work, but also news from the area.We are looking forward to your feedback on the column and exciting discussions about your use cases.
In previous posts we gave an overview of the challenges of supply chains, an overview of a blockchain-enabled supply chain platform, as well as a ��hardware implementation for production integration. Now we would like to give some examples for implementing smart contracts that allow asset tracking in the blockchain.
A simplified asset tracking case
In our simplified case we would like to track assets throughout the supply chain. In reality, the data structures for the assets might be more complicated, but we will focus on a few aspects only: name, description and manufacturer. It should be guaranteed that there is only a single instance of an asset at any time which leads to a uniqueness requirement of the ID. We would like to keep track of origin and history of the asset. The key actions that should be supported are the creation of new assets as well as transfers of assets. Furthermore, there should be a possibility to check whether a person is actually in the possession of the asset ownership certificate or not.
The implementation environment
As an easy starting point to implement smart contracts, we use the Ethereum blockchain. The key feature of Ethereum is the ability to execute programs on the nodes of the blockchain. It can be seen as an application platform that runs contracts as unstoppable programs on the blockchain. Ethereum has its own virtual machine (Ethereum virtual machine) that executes programs on all nodes the same way. The programming language that defines these programs is called Solidity, which is a object contract-oriented, high-level language for implementing smart contracts. Solidity supports inheritance, libraries, complex types and reads quite similarly to object-oriented programming languages, such as C++, Python or JavaScript.
Once you have implemented your smart contract functionality, you are ready to either test the contract locally, by deploying it to a test blockchain such as truffle-ganache or to an Ethereum test network such as the Rinkeby test network. Both options will be covered by follow-up articles. The interaction with the contract is done by using either command-line tools such as geth or via web frameworks such as web3.js. To manage your wallets in your browser, you would need a wallet store such as Metamask that connects to either your local or a public test chain as well as the Ethereum network.
Structure of the smart contract
Let’s have a look a the basic structure of a smart contract written in Solidity.
pragma solidity ^0.4.2; import "assets.sol"; contract AssetTracker { string id; function setId(string serial) public { id = serial; } function getId() public constant returns (string) { return id; } }
The contract file opens with a section on the applicable Solidity language version. Pragmas are known from compilers such as gcc. They give the compiler additional information on how to process the given code. This given pragma tells the compiler to use the ‘^’ highest available language version above ‘0.4.2’.
Furthermore, you are able to import code from other files at the global scope level by using the well-known ‘import’ statement, just as in most other languages.
In this example we have added some public getter and setter functions that can be used both as an internal and as an external function. Beyond this, there is the possibility to create events along the way that can be used to log processes or states. We will make use of the events in order to keep track of supply chain events such as goods receipt or asset creation.
A brief excursion to types and costs
The static types that are available, such as string, int, bool …, will come with the typical unary and binary operators. You can find a full list of types here. You shouldn’t be lazy about learning and using the types properly, because this will have impact on the running cost oft your transactions. The transaction effort, described in the unit gas, will depend on the operations executed and the data stored. This effort is priced by you. If you pay more for the execution of your code, your transaction will be preferred by the network, hence executed sooner.
If you want to drill down into the economics of transactions, you should have a look at ‘Calculating Cost in Ethereum Contracts‘ and ‘Ethgasstation‘ to get a feeling about the associated costs with your smart contract. The details of gas cost for opcodes, e.g. the formerly used SSTORE opcode, can be found in the Ethereum yellow paper. Another way to have a look at the cost is to use the online Solidity compiler that allows you to have a look at the Ethereum Virtual machine code generated from your contract. It estimates the gas price and reveals the inner workings of how the different data types are handled on the stack.
Tracking data structure
The following struct describes our simplified asset.
struct Asset { string name; string description; string manufacturer; bool initialized; }
We use members such as describing properties such as name, description and process control variables such as initialized and manufacturer. They are used to check whether this asset was already manufactured and who the manufacturer is.
In order to store the assets, we create two mappings that will allow us to store asset properties as well as the relation between assets and wallets based on asset uuids.
mapping(string => Asset) private assetStore;
is used later on to store assets under their respective uuid:
assetStore[uuid] = Asset(name, description, true, manufacturer);
For the wallet store, we use the following mapping:
mapping(address =>; mapping(string =>; bool)) private walletStore;
is used later on to make the assignment of an asset to a wallet
walletStore[msg.sender][uuid] = true;
Declaring the events
For different real-world events in the supply chain, such as asset creation or asset transfer, we define counterparts in the smart contract.
event AssetCreate(address account, string uuid, string manufacturer); event RejectCreate(address account, string uuid, string message); event AssetTransfer(address from, address to, string uuid); event RejectTransfer(address from, address to, string uuid, string message);
Declaring the functions
The first function that we would need is the create asset function. It takes all information needed to specify the asset and checks if the asset already exists. In this case we trigger a formerly declared event – RejectCreate(). If we have a new asset at hand, we store the data in the asset store and create the relation between the message sender’s wallet and the asset uuid.
function createAsset(string name, string description, string uuid, string manufacturer) { if(assetStore[uuid].initialized) { RejectCreate(msg.sender, uuid, "Asset with this UUID already exists."); return; } assetStore[uuid] = Asset(name, description, true, manufacturer); walletStore[msg.sender][uuid] = true; AssetCreate(msg.sender, uuid, manufacturer); }
In order to transfer the asset, we create a function that takes the address of the target wallet along with the asset id. We check two pre-conditions: The asset is actually existing and the transaction initiator is actually in possession of the asset.
function transferAsset(address to, string uuid) { if(!assetStore[uuid].initialized) { RejectTransfer(msg.sender, to, uuid, "No asset with this UUID exists"); return; } if(!walletStore[msg.sender][uuid]) { RejectTransfer(msg.sender, to, uuid, "Sender does not own this asset."); return; } walletStore[msg.sender][uuid] = false; walletStore[to][uuid] = true; AssetTransfer(msg.sender, to, uuid); }
We would also like to have access to the asset properties by just giving the uuid. Since it is currently not possible to return structs in Solidity, we return a list of strings.
function getAssetByUUID(string uuid) constant returns (string, string, string) { return (assetStore[uuid].name, assetStore[uuid].description, assetStore[uuid].manufacturer); }
Furthermore, we would like to have a simple way to prove the ownership of an asset without the need to fiddle around the transaction log. So we create a helper function isOwnerOf().
function isOwnerOf(address owner, string uuid) constant returns (bool) { if(walletStore[owner][uuid]) { return true; } return false; }
Once the contract is deployed, we can interface with the smart contract by using web3.js. The following example is an excerpt for creating a new asset.
export const createAssetInContract = async (assetData, publicKey) =>; { console.log('Creating asset...'); const atContract = await AssetTracker.deployed(); const asset = atContract.createAsset( assetData.name, assetData.description, assetData.assetId, assetData.manufacturer, { from: publicKey }, ); return asset; };
This simple example shows a basic asset tracking functionality in the blockchain. There are many ways to improve the design and the functionality, such as on-chain uuid generation. If you want to discuss tracking solutions in the blockchain, feel free to start a discussion.
If you are interested in this topic, please let us know. We would like to hear your comments and amendments. Feel free to drop me a few lines: [email protected] and follow me on Twitter: https://twitter.com/kherings
Previously published blockcentric posts
The post Implementing a simple Smart Contract for Asset Tracking [blockcentric #6] appeared first on codecentric AG Blog.
Implementing a simple Smart Contract for Asset Tracking [blockcentric #6] published first on http://ift.tt/2fA8nUr
0 notes
Text
The Anatomy of a Tablist Component in Vanilla JavaScript Versus React
If you follow the undercurrent of the JavaScript community, there seems to be a divide as of late. It goes back over a decade. Really, this sort of strife has always been. Perhaps it is human nature.
Whenever a popular framework gains traction, you inevitably see people comparing it to rivals. I suppose that is to be expected. Everyone has a particular favorite.
Lately, the framework everyone loves (to hate?) is React. You often see it pitted against others in head-to-head blog posts and feature comparison matrices of enterprise whitepapers. Yet a few years ago, it seemed like jQuery would forever be king of the hill.
Frameworks come and go. To me, what is more interesting is when React — or any JS framework for that matter — gets pitted against the programming language itself. Because of course, under the hood, it is all built atop JS.
The two are not inherently at odds. I would even go so far as to say that if you do not have a good handle on JS fundamentals, you probably are not going to reap the full benefits of using React. It can still be helpful, similar to using a jQuery plugin without understanding its internals. But I feel like React presupposes more JS familiarity.
HTML is equally important. There exists a fair bit of FUD around how React affects accessibility. I think this narrative is inaccurate. In fact, the ESLint JSX a11y plugin will warn of possible accessibility violations in the console.

ESLint warnings about empty <a> tags
Recently, an annual study of the top 1 million sites was released. It shows that for sites using JS frameworks, there is an increased likelihood of accessibility problems. This is correlation, not causation.
This does not necessarily mean that the frameworks caused these errors, but it does indicate that home pages with these frameworks had more errors than on average.
In a manner of speaking, React’s magic incantations work regardless of whether you recognize the words. Ultimately, you are still responsible for the outcome.
Philosophical musings aside, I am a firm believer in choosing the best tool for the job. Sometimes, that means building a single page app with a Jamstack approach. Or maybe a particular project is better suited to offloading HTML rendering to the server, where it has historically been handled.
Either way, there inevitably comes the need for JS to augment the user experience. At Reaktiv Studios, to that end I have been attempting to keep most of our React components in sync with our “flat HTML” approach. I have been writing commonly used functionality in vanilla JS as well. This keeps our options open, so that our clients are free to choose. It also allows us to reuse the same CSS.
If I may, I would like to share how I built our <Tabs> and <Accordion> React components. I will also demonstrate how I wrote the same functionality without using a framework.
Hopefully, this lesson will feel like we are making a layered cake. Let us first start with the base markup, then cover the vanilla JS, and finish with how it works in React.
Table of contents
Flat HTML examples
Vanilla JavaScript examples
React examples
Conclusion
For reference, you can tinker with our live examples:
Live demo of Accordion
Live demo of Tabs

Reaktiv Studios UI components
Flat HTML examples
Since we need JavaScript to make interactive widgets either way, I figured the easiest approach — from a server side implementation standpoint — would be to require only the bare minimum HTML. The rest can be augmented with JS.
The following are examples of markup for tabs and accordion components, showing a before/after comparison of how JS affects the DOM.
I have added id="TABS_ID" and id="ACCORDION_ID" for demonstrative purposes. This is to make it more obvious what is happening. But the JS that I will be explaining automatically generates unique IDs if nothing is supplied in the HTML. It would work fine either way, with or without an id specified.
Tabs (without ARIA)
<div class="tabs" id="TABS_ID"> <ul class="tabs__list"> <li class="tabs__item"> Tab 1 </li> <!-- .tabs__item --> <li class="tabs__item"> Tab 2 </li> <!-- .tabs__item --> <li class="tabs__item" disabled> Tab 3 (disabled) </li> <!-- .tabs__item --> </ul> <!-- .tabs__list --> <div class="tabs__panel"> <p> Tab 1 content </p> </div> <!-- .tabs__panel --> <div class="tabs__panel"> <p> Tab 2 content </p> </div> <!-- .tabs__panel --> <div class="tabs__panel"> <p> NOTE: This tab is disabled. </p> </div> <!-- .tabs__panel --> </div> <!-- .tabs -->
Tabs (with ARIA)
<div class="tabs" id="TABS_ID"> <ul class="tabs__list" role="tablist"> <li aria-controls="tabpanel_TABS_ID_0" aria-selected="false" class="tabs__item" id="tab_TABS_ID_0" role="tab" tabindex="0" > Tab 1 </li> <!-- .tabs__item --> <li aria-controls="tabpanel_TABS_ID_1" aria-selected="true" class="tabs__item" id="tab_TABS_ID_1" role="tab" tabindex="0" > Tab 2 </li> <!-- .tabs__item --> <li aria-controls="tabpanel_TABS_ID_2" aria-disabled="true" aria-selected="false" class="tabs__item" disabled id="tab_TABS_ID_2" role="tab" > Tab 3 (disabled) </li> <!-- .tabs__item --> </ul> <!-- .tabs__list --> <div aria-hidden="true" aria-labelledby="tab_TABS_ID_0" class="tabs__panel" id="tabpanel_TABS_ID_0" role="tabpanel" > <p> Tab 1 content </p> </div> <!-- .tabs__panel --> <div aria-hidden="false" aria-labelledby="tab_TABS_ID_1" class="tabs__panel" id="tabpanel_TABS_ID_1" role="tabpanel" > <p> Tab 2 content </p> </div> <!-- .tabs__panel --> <div aria-hidden="true" aria-labelledby="tab_TABS_ID_2" class="tabs__panel" id="tabpanel_TABS_ID_2" role="tabpanel" > <p> NOTE: This tab is disabled. </p> </div> <!-- .tabs__panel --> </div> <!-- .tabs -->
Accordion (without ARIA)
<div class="accordion" id="ACCORDION_ID"> <div class="accordion__item"> Tab 1 </div> <!-- .accordion__item --> <div class="accordion__panel"> <p> Tab 1 content </p> </div> <!-- .accordion__panel --> <div class="accordion__item"> Tab 2 </div> <!-- .accordion__item --> <div class="accordion__panel"> <p> Tab 2 content </p> </div> <!-- .accordion__panel --> <div class="accordion__item" disabled> Tab 3 (disabled) </div> <!-- .accordion__item --> <div class="accordion__panel"> <p> NOTE: This tab is disabled. </p> </div> <!-- .accordion__panel --> </div> <!-- .accordion -->
Accordion (with ARIA)
<div aria-multiselectable="true" class="accordion" id="ACCORDION_ID" role="tablist" > <div aria-controls="tabpanel_ACCORDION_ID_0" aria-selected="true" class="accordion__item" id="tab_ACCORDION_ID_0" role="tab" tabindex="0" > <i aria-hidden="true" class="accordion__item__icon"></i> Tab 1 </div> <!-- .accordion__item --> <div aria-hidden="false" aria-labelledby="tab_ACCORDION_ID_0" class="accordion__panel" id="tabpanel_ACCORDION_ID_0" role="tabpanel" > <p> Tab 1 content </p> </div> <!-- .accordion__panel --> <div aria-controls="tabpanel_ACCORDION_ID_1" aria-selected="false" class="accordion__item" id="tab_ACCORDION_ID_1" role="tab" tabindex="0" > <i aria-hidden="true" class="accordion__item__icon"></i> Tab 2 </div> <!-- .accordion__item --> <div aria-hidden="true" aria-labelledby="tab_ACCORDION_ID_1" class="accordion__panel" id="tabpanel_ACCORDION_ID_1" role="tabpanel" > <p> Tab 2 content </p> </div> <!-- .accordion__panel --> <div aria-controls="tabpanel_ACCORDION_ID_2" aria-disabled="true" aria-selected="false" class="accordion__item" disabled id="tab_ACCORDION_ID_2" role="tab" > <i aria-hidden="true" class="accordion__item__icon"></i> Tab 3 (disabled) </div> <!-- .accordion__item --> <div aria-hidden="true" aria-labelledby="tab_ACCORDION_ID_2" class="accordion__panel" id="tabpanel_ACCORDION_ID_2" role="tabpanel" > <p> NOTE: This tab is disabled. </p> </div> <!-- .accordion__panel --> </div> <!-- .accordion -->
Vanilla JavaScript examples
Okay. Now that we have seen the aforementioned HTML examples, let us walk through how we get from before to after.
First, I want to cover a few helper functions. These will make more sense in a bit. I figure it is best to get them documented first, so we can stay focused on the rest of the code once we dive in further.
File: getDomFallback.js
This function provides common DOM properties and methods as no-op, rather than having to make lots of typeof foo.getAttribute checks and whatnot. We could forego those types of confirmations altogether.
Since live HTML changes can be a potentially volatile environment, I always feel a bit safer making sure my JS is not bombing out and taking the rest of the page with it. Here is what that function looks like. It simply returns an object with the DOM equivalents of falsy results.
/* Helper to mock DOM methods, for when an element might not exist. */ const getDomFallback = () => { return { // Props. children: [], className: '', classList: { contains: () => false, }, id: '', innerHTML: '', name: '', nextSibling: null, previousSibling: null, outerHTML: '', tagName: '', textContent: '', // Methods. appendChild: () => Object.create(null), cloneNode: () => Object.create(null), closest: () => null, createElement: () => Object.create(null), getAttribute: () => null, hasAttribute: () => false, insertAdjacentElement: () => Object.create(null), insertBefore: () => Object.create(null), querySelector: () => null, querySelectorAll: () => [], removeAttribute: () => undefined, removeChild: () => Object.create(null), replaceChild: () => Object.create(null), setAttribute: () => undefined, }; }; // Export. export { getDomFallback };
File: unique.js
This function is a poor man’s UUID equivalent.
It generates a unique string that can be used to associate DOM elements with one another. It is handy, because then the author of an HTML page does not have to ensure that every tabs and accordion component have unique IDs. In the previous HTML examples, this is where TABS_ID and ACCORDION_ID would typically contain the randomly generated numeric strings instead.
// ========== // Constants. // ========== const BEFORE = '0.'; const AFTER = ''; // ================== // Get unique string. // ================== const unique = () => { // Get prefix. let prefix = Math.random(); prefix = String(prefix); prefix = prefix.replace(BEFORE, AFTER); // Get suffix. let suffix = Math.random(); suffix = String(suffix); suffix = suffix.replace(BEFORE, AFTER); // Expose string. return `${prefix}_${suffix}`; }; // Export. export { unique };
On larger JavaScript projects, I would typically use npm install uuid. But since we are keeping this simple and do not require cryptographic parity, concatenating two lightly edited Math.random() numbers will suffice for our string uniqueness needs.
File: tablist.js
This file does the bulk of the work. What is cool about it, if I do say so myself, is that there are enough similarities between a tabs component and an accordion that we can handle both with the same *.js file. Go ahead and scroll through the entirety, and then we will break down what each function does individually.
// Helpers. import { getDomFallback } from './getDomFallback'; import { unique } from './unique'; // ========== // Constants. // ========== // Boolean strings. const TRUE = 'true'; const FALSE = 'false'; // ARIA strings. const ARIA_CONTROLS = 'aria-controls'; const ARIA_DISABLED = 'aria-disabled'; const ARIA_LABELLEDBY = 'aria-labelledby'; const ARIA_HIDDEN = 'aria-hidden'; const ARIA_MULTISELECTABLE = 'aria-multiselectable'; const ARIA_SELECTED = 'aria-selected'; // Attribute strings. const DISABLED = 'disabled'; const ID = 'id'; const ROLE = 'role'; const TABLIST = 'tablist'; const TABINDEX = 'tabindex'; // Event strings. const CLICK = 'click'; const KEYDOWN = 'keydown'; // Key strings. const ENTER = 'enter'; const FUNCTION = 'function'; // Tag strings. const LI = 'li'; // Selector strings. const ACCORDION_ITEM_ICON = 'accordion__item__icon'; const ACCORDION_ITEM_ICON_SELECTOR = `.${ACCORDION_ITEM_ICON}`; const TAB = 'tab'; const TAB_SELECTOR = `[${ROLE}=${TAB}]`; const TABPANEL = 'tabpanel'; const TABPANEL_SELECTOR = `[${ROLE}=${TABPANEL}]`; const ACCORDION = 'accordion'; const TABLIST_CLASS_SELECTOR = '.accordion, .tabs'; const TAB_CLASS_SELECTOR = '.accordion__item, .tabs__item'; const TABPANEL_CLASS_SELECTOR = '.accordion__panel, .tabs__panel'; // =========== // Get tab ID. // =========== const getTabId = (id = '', index = 0) => { return `tab_${id}_${index}`; }; // ============= // Get panel ID. // ============= const getPanelId = (id = '', index = 0) => { return `tabpanel_${id}_${index}`; }; // ============== // Click handler. // ============== const globalClick = (event = {}) => { // Get target. const { key = '', target = getDomFallback() } = event; // Get parent. const { parentNode = getDomFallback(), tagName = '' } = target; // Set later. let wrapper = getDomFallback(); /* ===== NOTE: ===== We test for this, because the method does not exist on `document.documentElement`. */ if (typeof target.closest === FUNCTION) { // Get wrapper. wrapper = target.closest(TABLIST_CLASS_SELECTOR) || getDomFallback(); } // Is `<li>`? const isListItem = tagName.toLowerCase() === LI; // Is multi? const isMulti = wrapper.getAttribute(ARIA_MULTISELECTABLE) === TRUE; // Valid key? const isValidKey = !key || key.toLowerCase() === ENTER; // Valid target? const isValidTarget = !target.hasAttribute(DISABLED) && target.getAttribute(ROLE) === TAB && parentNode.getAttribute(ROLE) === TABLIST; // Valid event? const isValidEvent = isValidKey && isValidTarget; // Continue? if (isValidEvent) { // Get panel. const panelId = target.getAttribute(ARIA_CONTROLS); const panel = wrapper.querySelector(`#${panelId}`) || getDomFallback(); // Get booleans. let boolPanel = panel.getAttribute(ARIA_HIDDEN) !== TRUE; let boolTab = target.getAttribute(ARIA_SELECTED) !== TRUE; // List item? if (isListItem) { boolPanel = FALSE; boolTab = TRUE; } // [aria-multiselectable="false"] if (!isMulti) { // Get tabs & panels. const childTabs = wrapper.querySelectorAll(TAB_SELECTOR); const childPanels = wrapper.querySelectorAll(TABPANEL_SELECTOR); // Loop through tabs. childTabs.forEach((tab = getDomFallback()) => { tab.setAttribute(ARIA_SELECTED, FALSE); }); // Loop through panels. childPanels.forEach((panel = getDomFallback()) => { panel.setAttribute(ARIA_HIDDEN, TRUE); }); } // Set individual tab. target.setAttribute(ARIA_SELECTED, boolTab); // Set individual panel. panel.setAttribute(ARIA_HIDDEN, boolPanel); } }; // ==================== // Add ARIA attributes. // ==================== const addAriaAttributes = () => { // Get elements. const allWrappers = document.querySelectorAll(TABLIST_CLASS_SELECTOR); // Loop through. allWrappers.forEach((wrapper = getDomFallback()) => { // Get attributes. const { id = '', classList } = wrapper; const parentId = id || unique(); // Is accordion? const isAccordion = classList.contains(ACCORDION); // Get tabs & panels. const childTabs = wrapper.querySelectorAll(TAB_CLASS_SELECTOR); const childPanels = wrapper.querySelectorAll(TABPANEL_CLASS_SELECTOR); // Add ID? if (!wrapper.getAttribute(ID)) { wrapper.setAttribute(ID, parentId); } // Add multi? if (isAccordion && wrapper.getAttribute(ARIA_MULTISELECTABLE) !== FALSE) { wrapper.setAttribute(ARIA_MULTISELECTABLE, TRUE); } // =========================== // Loop through tabs & panels. // =========================== for (let index = 0; index < childTabs.length; index++) { // Get elements. const tab = childTabs[index] || getDomFallback(); const panel = childPanels[index] || getDomFallback(); // Get IDs. const tabId = getTabId(parentId, index); const panelId = getPanelId(parentId, index); // =================== // Add tab attributes. // =================== // Tab: add icon? if (isAccordion) { // Get icon. let icon = tab.querySelector(ACCORDION_ITEM_ICON_SELECTOR); // Create icon? if (!icon) { icon = document.createElement(I); icon.className = ACCORDION_ITEM_ICON; tab.insertAdjacentElement(AFTER_BEGIN, icon); } // [aria-hidden="true"] icon.setAttribute(ARIA_HIDDEN, TRUE); } // Tab: add id? if (!tab.getAttribute(ID)) { tab.setAttribute(ID, tabId); } // Tab: add controls? if (!tab.getAttribute(ARIA_CONTROLS)) { tab.setAttribute(ARIA_CONTROLS, panelId); } // Tab: add selected? if (!tab.getAttribute(ARIA_SELECTED)) { const bool = !isAccordion && index === 0; tab.setAttribute(ARIA_SELECTED, bool); } // Tab: add role? if (tab.getAttribute(ROLE) !== TAB) { tab.setAttribute(ROLE, TAB); } // Tab: add tabindex? if (tab.hasAttribute(DISABLED)) { tab.removeAttribute(TABINDEX); tab.setAttribute(ARIA_DISABLED, TRUE); } else { tab.setAttribute(TABINDEX, 0); } // Tab: first item? if (index === 0) { // Get parent. const { parentNode = getDomFallback() } = tab; /* We do this here, instead of outside the loop. The top level item isn't always the `tablist`. The accordion UI only has `<dl>`, whereas the tabs UI has both `<div>` and `<ul>`. */ if (parentNode.getAttribute(ROLE) !== TABLIST) { parentNode.setAttribute(ROLE, TABLIST); } } // ===================== // Add panel attributes. // ===================== // Panel: add ID? if (!panel.getAttribute(ID)) { panel.setAttribute(ID, panelId); } // Panel: add hidden? if (!panel.getAttribute(ARIA_HIDDEN)) { const bool = isAccordion || index !== 0; panel.setAttribute(ARIA_HIDDEN, bool); } // Panel: add labelled? if (!panel.getAttribute(ARIA_LABELLEDBY)) { panel.setAttribute(ARIA_LABELLEDBY, tabId); } // Panel: add role? if (panel.getAttribute(ROLE) !== TABPANEL) { panel.setAttribute(ROLE, TABPANEL); } } }); }; // ===================== // Remove global events. // ===================== const unbind = () => { document.removeEventListener(CLICK, globalClick); document.removeEventListener(KEYDOWN, globalClick); }; // ================== // Add global events. // ================== const init = () => { // Add attributes. addAriaAttributes(); // Prevent doubles. unbind(); document.addEventListener(CLICK, globalClick); document.addEventListener(KEYDOWN, globalClick); }; // ============== // Bundle object. // ============== const tablist = { init, unbind, }; // ======= // Export. // ======= export { tablist };
Function: getTabId and getPanelId
These two functions are used to create individually unique IDs for elements in a loop, based on an existing (or generated) parent ID. This is helpful to ensure matching values for attributes like aria-controls="…" and aria-labelledby="…". Think of those as the accessibility equivalents of <label for="…">, telling the browser which elements are related to one another.
const getTabId = (id = '', index = 0) => { return `tab_${id}_${index}`; };
const getPanelId = (id = '', index = 0) => { return `tabpanel_${id}_${index}`; };
Function: globalClick
This is a click handler that is applied at the document level. That means we are not having to manually add click handlers to a number of elements. Instead, we use event bubbling to listen for clicks further down in the document, and allow them to propagate up to the top. Conveniently, this is also how we can handle keyboard events such as the Enter key being pressed. Both are necessary to have an accessible UI.
In the first part of the function, we destructure key and target from the incoming event. Next, we destructure the parentNode and tagName from the target.
Then, we attempt to get the wrapper element. This would be the one with either class="tabs" or class="accordion". Because we might actually be clicking on the ancestor element highest in the DOM tree — which exists but possibly does not have the *.closest(…) method — we do a typeof check. If that function exists, we attempt to get the element. Even still, we might come up without a match. So we have one more getDomFallback to be safe.
// Get target. const { key = '', target = getDomFallback() } = event; // Get parent. const { parentNode = getDomFallback(), tagName = '' } = target; // Set later. let wrapper = getDomFallback(); /* ===== NOTE: ===== We test for this, because the method does not exist on `document.documentElement`. */ if (typeof target.closest === FUNCTION) { // Get wrapper. wrapper = target.closest(TABLIST_CLASS_SELECTOR) || getDomFallback(); }
Then, we store whether or not the tag that was clicked is a <li>. Likewise, we store a boolean about whether the wrapper element has aria-multiselectable="true". I will get back to that. We need this info later on.
We also interrogate the event a bit, to determine if it was triggered by the user pressing a key. If so, then we are only interested if that key was Enter. We also determine if the click happened on a relevant target. Remember, we are using event bubbling so really the user could have clicked anything.
We want to make sure it:
Is not disabled
Has role="tab"
Has a parent element with role="tablist"
Then we bundle up our event and target booleans into one, as isValidEvent.
// Is `<li>`? const isListItem = tagName.toLowerCase() === LI; // Is multi? const isMulti = wrapper.getAttribute(ARIA_MULTISELECTABLE) === TRUE; // Valid key? const isValidKey = !key || key.toLowerCase() === ENTER; // Valid target? const isValidTarget = !target.hasAttribute(DISABLED) && target.getAttribute(ROLE) === TAB && parentNode.getAttribute(ROLE) === TABLIST; // Valid event? const isValidEvent = isValidKey && isValidTarget;
Assuming the event is indeed valid, we make it past our next if check. Now, we are concerned with getting the role="tabpanel" element with an id that matches our tab’s aria-controls="…".
Once we have got it, we check whether the panel is hidden, and if the tab is selected. Basically, we first presuppose that we are dealing with an accordion and flip the booleans to their opposites.
This is also where our earlier isListItem boolean comes into play. If the user is clicking an <li> then we know we are dealing with tabs, not an accordion. In which case, we want to flag our panel as being visible (via aria-hiddden="false") and our tab as being selected (via aria-selected="true").
Also, we want to ensure that either the wrapper has aria-multiselectable="false" or is completely missing aria-multiselectable. If that is the case, then we loop through all neighboring role="tab" and all role="tabpanel" elements and set them to their inactive states. Finally, we arrive at setting the previously determined booleans for the individual tab and panel pairing.
// Continue? if (isValidEvent) { // Get panel. const panelId = target.getAttribute(ARIA_CONTROLS); const panel = wrapper.querySelector(`#${panelId}`) || getDomFallback(); // Get booleans. let boolPanel = panel.getAttribute(ARIA_HIDDEN) !== TRUE; let boolTab = target.getAttribute(ARIA_SELECTED) !== TRUE; // List item? if (isListItem) { boolPanel = FALSE; boolTab = TRUE; } // [aria-multiselectable="false"] if (!isMulti) { // Get tabs & panels. const childTabs = wrapper.querySelectorAll(TAB_SELECTOR); const childPanels = wrapper.querySelectorAll(TABPANEL_SELECTOR); // Loop through tabs. childTabs.forEach((tab = getDomFallback()) => { tab.setAttribute(ARIA_SELECTED, FALSE); }); // Loop through panels. childPanels.forEach((panel = getDomFallback()) => { panel.setAttribute(ARIA_HIDDEN, TRUE); }); } // Set individual tab. target.setAttribute(ARIA_SELECTED, boolTab); // Set individual panel. panel.setAttribute(ARIA_HIDDEN, boolPanel); }
Function: addAriaAttributes
The astute reader might be thinking:
You said earlier that we start with the most bare possible markup, yet the globalClick function was looking for attributes that would not be there. Why would you lie!?
Or perhaps not, for the astute reader would have also noticed the function named addAriaAttributes. Indeed, this function does exactly what it says on the tin. It breathes life into the base DOM structure, by adding all the requisite aria-* and role attributes.
This not only makes the UI inherently more accessible to assistive technologies, but it also ensures the functionality actually works. I prefer to build vanilla JS things this way, rather than pivoting on class="…" for interactivity, because it forces me to think about the entirety of the user experience, beyond what I can see visually.
First off, we get all elements on the page that have class="tabs" and/or class="accordion". Then we check if we have something to work with. If not, then we would exit our function here. Assuming we do have a list, we loop through each of the wrapping elements and pass them into the scope of our function as wrapper.
// Get elements. const allWrappers = document.querySelectorAll(TABLIST_CLASS_SELECTOR); // Loop through. allWrappers.forEach((wrapper = getDomFallback()) => { /* NOTE: Cut, for brevity. */ });
Inside the scope of our looping function, we destructure id and classList from wrapper. If there is no ID, then we generate one via unique(). We set a boolean flag, to identify if we are working with an accordion. This is used later.
We also get decendants of wrapper that are tabs and panels, via their class name selectors.
Tabs:
class="tabs__item" or
class="accordion__item"
Panels:
class="tabs__panel" or
class="accordion__panel"
We then set the wrapper’s id if it does not already have one.
If we are dealing with an accordion that lacks aria-multiselectable="false", we set its flag to true. Reason being, if developers are reaching for an accordion UI paradigm — and also have tabs available to them, which are inherently mutually exclusive — then the safer assumption is that the accordion should support expanding and collapsing of several panels.
// Get attributes. const { id = '', classList } = wrapper; const parentId = id || unique(); // Is accordion? const isAccordion = classList.contains(ACCORDION); // Get tabs & panels. const childTabs = wrapper.querySelectorAll(TAB_CLASS_SELECTOR); const childPanels = wrapper.querySelectorAll(TABPANEL_CLASS_SELECTOR); // Add ID? if (!wrapper.getAttribute(ID)) { wrapper.setAttribute(ID, parentId); } // Add multi? if (isAccordion && wrapper.getAttribute(ARIA_MULTISELECTABLE) !== FALSE) { wrapper.setAttribute(ARIA_MULTISELECTABLE, TRUE); }
Next, we loop through tabs. Wherein, we also handle our panels.
You may be wondering why this is an old school for loop, instead of a more modern *.forEach. The reason is that we want to loop through two NodeList instances: tabs and panels. Assuming they each map 1-to-1 we know they both have the same *.length. This allows us to have one loop instead of two.
Let us peer inside of the loop. First, we get unique IDs for each tab and panel. These would look like one of the two following scenarios. These are used later on, to associate tabs with panels and vice versa.
tab_WRAPPER_ID_0 or tab_GENERATED_STRING_0
tabpanel_WRAPPER_ID_0 or tabpanel_GENERATED_STRING_0
for (let index = 0; index < childTabs.length; index++) { // Get elements. const tab = childTabs[index] || getDomFallback(); const panel = childPanels[index] || getDomFallback(); // Get IDs. const tabId = getTabId(parentId, index); const panelId = getPanelId(parentId, index); /* NOTE: Cut, for brevity. */ }
As we loop through, we first ensure that an expand/collapse icon exists. We create it if necessary, and set it to aria-hidden="true" since it is purely decorative.
Next, we check on attributes for the current tab. If an id="…" does not exist on the tab, we add it. Likewise, if aria-controls="…" does not exist we add that as well, pointing to our newly created panelId.
You will notice there is a little pivot here, checking if we do not have aria-selected and then further determining if we are not in the context of an accordion and if the index is 0. In that case, we want to make our first tab look selected. The reason is that though an accordion can be fully collapsed, tabbed content cannot. There is always at least one panel visible.
Then we ensure that role="tab" exists.
It is worth noting we do some extra work, based on whether the tab is disabled. If so, we remove tabindex so that the tab cannot receive :focus. If the tab is not disabled, we add tabindex="0" so that it can receive :focus.
We also set aria-disabled="true", if need be. You might be wondering if that is redundant. But it is necessary to inform assistive technologies that the tab is not interactive. Since our tab is either a <div> or <li>, it technically cannot be disabled like an <input>. Our styles pivot on [disabled], so we get that for free. Plus, it is less cognitive overhead (as a developer creating HTML) to only worry about one attribute.
ℹ️ Fun Fact: It is also worth noting the use of hasAttribute(…) to detect disabled, instead of getAttribute(…). This is because the mere presence of disabled will cause form elements to be disabled.
If the HTML is compiled, via tools such as Parcel…
Markup like this: <tag disabled>
Is changed to this: <tag disabled="">
In which case, getting the attribute is still a falsy string.
In the days of XHTML, that would have been disabled="disabled". But really, it was only ever the existence of the attribute that mattered. Not its value. That is why we simply test if the element has the disabled attribute.
Lastly, we check if we are on the first iteration of our loop where index is 0. If so, we go up one level to the parentNode. If that element does not have role="tablist", then we add it.
We do this via parentNode instead of wrapper because in the context of tabs (not accordion) there is a <ul>element around the tab <li> that needs role="tablist". In the case of an accordion, it would be the outermost <div> ancestor. This code accounts for both.
// Tab: add icon? if (isAccordion) { // Get icon. let icon = tab.querySelector(ACCORDION_ITEM_ICON_SELECTOR); // Create icon? if (!icon) { icon = document.createElement(I); icon.className = ACCORDION_ITEM_ICON; tab.insertAdjacentElement(AFTER_BEGIN, icon); } // [aria-hidden="true"] icon.setAttribute(ARIA_HIDDEN, TRUE); } // Tab: add id? if (!tab.getAttribute(ID)) { tab.setAttribute(ID, tabId); } // Tab: add controls? if (!tab.getAttribute(ARIA_CONTROLS)) { tab.setAttribute(ARIA_CONTROLS, panelId); } // Tab: add selected? if (!tab.getAttribute(ARIA_SELECTED)) { const bool = !isAccordion && index === 0; tab.setAttribute(ARIA_SELECTED, bool); } // Tab: add role? if (tab.getAttribute(ROLE) !== TAB) { tab.setAttribute(ROLE, TAB); } // Tab: add tabindex? if (tab.hasAttribute(DISABLED)) { tab.removeAttribute(TABINDEX); tab.setAttribute(ARIA_DISABLED, TRUE); } else { tab.setAttribute(TABINDEX, 0); } // Tab: first item? if (index === 0) { // Get parent. const { parentNode = getDomFallback() } = tab; /* We do this here, instead of outside the loop. The top level item isn't always the `tablist`. The accordion UI only has `<dl>`, whereas the tabs UI has both `<div>` and `<ul>`. */ if (parentNode.getAttribute(ROLE) !== TABLIST) { parentNode.setAttribute(ROLE, TABLIST); } }
Continuing within the earlier for loop, we add attributes for each panel. We add an id if needed. We also set aria-hidden to either true or false depending on the context of being an accordion (or not).
Likewise, we ensure that our panel points back to its tab trigger via aria-labelledby="…", and that role="tabpanel" has been set.
// Panel: add ID? if (!panel.getAttribute(ID)) { panel.setAttribute(ID, panelId); } // Panel: add hidden? if (!panel.getAttribute(ARIA_HIDDEN)) { const bool = isAccordion || index !== 0; panel.setAttribute(ARIA_HIDDEN, bool); } // Panel: add labelled? if (!panel.getAttribute(ARIA_LABELLEDBY)) { panel.setAttribute(ARIA_LABELLEDBY, tabId); } // Panel: add role? if (panel.getAttribute(ROLE) !== TABPANEL) { panel.setAttribute(ROLE, TABPANEL); }
At the very end of the file, we have a few setup and teardown functions. As a way to play nicely with other JS that might be in the page, we provide an unbind function that removes our global event listeners. It can be called by itself, via tablist.unbind() but is mostly there so that we can unbind() before (re-)binding. That way we prevent doubling up.
Inside our init function, we call addAriaAttributes() which modifies the DOM to be accessible. We then call unbind() and then add our event listeners to the document.
Finally, we bundle both methods into a parent object and export it under the name tablist. That way, when dropping it into a flat HTML page, we can call tablist.init() when we are ready to apply our functionality.
// ===================== // Remove global events. // ===================== const unbind = () => { document.removeEventListener(CLICK, globalClick); document.removeEventListener(KEYDOWN, globalClick); }; // ================== // Add global events. // ================== const init = () => { // Add attributes. addAriaAttributes(); // Prevent doubles. unbind(); document.addEventListener(CLICK, globalClick); document.addEventListener(KEYDOWN, globalClick); }; // ============== // Bundle object. // ============== const tablist = { init, unbind, }; // ======= // Export. // ======= export { tablist };
React examples
There is a scene in Batman Begins where Lucius Fox (played by Morgan Freeman) explains to a recovering Bruce Wayne (Christian Bale) the scientific steps he took to save his life after being poisoned.
Lucius Fox: “I analyzed your blood, isolating the receptor compounds and the protein-based catalyst.”
Bruce Wayne: “Am I meant to understand any of that?”
Lucius Fox: “Not at all, I just wanted you to know how hard it was. Bottom line, I synthesized an antidote.”

“How do I configure Webpack?”
↑ When working with a framework, I think in those terms.
Now that we know “hard” it is — not really, but humor me — to do raw DOM manipulation and event binding, we can better appreciate the existence of an antidote. React abstracts a lot of that complexity away, and handles it for us automatically.
File: Tabs.js
Now that we are diving into React examples, we will start with the <Tabs> component.
// ============= // Used like so… // ============= <Tabs> <div label="Tab 1"> <p> Tab 1 content </p> </div> <div label="Tab 2"> <p> Tab 2 content </p> </div> </Tabs>
Here is the content from our Tabs.js file. Note that in React parlance, it is standard practice to name the file with the same capitalization as its export default component.
We start out with the same getTabId and getPanelId functions as in our vanilla JS approach, because we still need to make sure to accessibly map tabs to components. Take a look at the entirey of the code, and then we will continue to break it down.
import React, { useState } from 'react'; import PropTypes from 'prop-types'; import { v4 as uuid } from 'uuid'; import cx from 'classnames'; // UI. import Render from './Render'; // =========== // Get tab ID. // =========== const getTabId = (id = '', index = 0) => { return `tab_${id}_${index}`; }; // ============= // Get panel ID. // ============= const getPanelId = (id = '', index = 0) => { return `tabpanel_${id}_${index}`; }; // ========== // Is active? // ========== const getIsActive = ({ activeIndex = null, index = null, list = [] }) => { // Index matches? const isMatch = index === parseFloat(activeIndex); // Is first item? const isFirst = index === 0; // Only first item exists? const onlyFirstItem = list.length === 1; // Item doesn't exist? const badActiveItem = !list[activeIndex]; // Flag as active? const isActive = isMatch || onlyFirstItem || (isFirst && badActiveItem); // Expose boolean. return !!isActive; }; getIsActive.propTypes = { activeIndex: PropTypes.number, index: PropTypes.number, list: PropTypes.array, }; // ================ // Get `<ul>` list. // ================ const getTabsList = ({ activeIndex = null, id = '', list = [], setActiveIndex = () => {} }) => { // Build new list. const newList = list.map((item = {}, index) => { // ========= // Get data. // ========= const { props: itemProps = {} } = item; const { disabled = null, label = '' } = itemProps; const idPanel = getPanelId(id, index); const idTab = getTabId(id, index); const isActive = getIsActive({ activeIndex, index, list }); // ======= // Events. // ======= const handleClick = (event = {}) => { const { key = '' } = event; if (!disabled) { // Early exit. if (key && key.toLowerCase() !== 'enter') { return; } setActiveIndex(index); } }; // ============ // Add to list. // ============ return ( <li aria-controls={idPanel} aria-disabled={disabled} aria-selected={isActive} className="tabs__item" disabled={disabled} id={idTab} key={idTab} role="tab" tabIndex={disabled ? null : 0} // Events. onClick={handleClick} onKeyDown={handleClick} > {label || `${index + 1}`} </li> ); }); // ========== // Expose UI. // ========== return ( <Render if={newList.length}> <ul className="tabs__list" role="tablist"> {newList} </ul> </Render> ); }; getTabsList.propTypes = { activeIndex: PropTypes.number, id: PropTypes.string, list: PropTypes.array, setActiveIndex: PropTypes.func, }; // ================= // Get `<div>` list. // ================= const getPanelsList = ({ activeIndex = null, id = '', list = [] }) => { // Build new list. const newList = list.map((item = {}, index) => { // ========= // Get data. // ========= const { props: itemProps = {} } = item; const { children = '', className = null, style = null } = itemProps; const idPanel = getPanelId(id, index); const idTab = getTabId(id, index); const isActive = getIsActive({ activeIndex, index, list }); // ============= // Get children. // ============= let content = children || item; if (typeof content === 'string') { content = <p>{content}</p>; } // ================= // Build class list. // ================= const classList = cx({ tabs__panel: true, [String(className)]: className, }); // ========== // Expose UI. // ========== return ( <div aria-hidden={!isActive} aria-labelledby={idTab} className={classList} id={idPanel} key={idPanel} role="tabpanel" style={style} > {content} </div> ); }); // ========== // Expose UI. // ========== return newList; }; getPanelsList.propTypes = { activeIndex: PropTypes.number, id: PropTypes.string, list: PropTypes.array, }; // ========== // Component. // ========== const Tabs = ({ children = '', className = null, selected = 0, style = null, id: propsId = uuid(), }) => { // =============== // Internal state. // =============== const [id] = useState(propsId); const [activeIndex, setActiveIndex] = useState(selected); // ================= // Build class list. // ================= const classList = cx({ tabs: true, [String(className)]: className, }); // =============== // Build UI lists. // =============== const list = Array.isArray(children) ? children : [children]; const tabsList = getTabsList({ activeIndex, id, list, setActiveIndex, }); const panelsList = getPanelsList({ activeIndex, id, list, }); // ========== // Expose UI. // ========== return ( <Render if={list[0]}> <div className={classList} id={id} style={style}> {tabsList} {panelsList} </div> </Render> ); }; Tabs.propTypes = { children: PropTypes.node, className: PropTypes.string, id: PropTypes.string, selected: PropTypes.number, style: PropTypes.object, }; export default Tabs;
Function: getIsActive
Due to a <Tabs> component always having something active and visible, this function contains some logic to determine whether an index of a given tab should be the lucky winner. Essentially, in sentence form the logic goes like this.
This current tab is active if:
Its index matches the activeIndex, or
The tabs UI has only one tab, or
It is the first tab, and the activeIndex tab does not exist.
const getIsActive = ({ activeIndex = null, index = null, list = [] }) => { // Index matches? const isMatch = index === parseFloat(activeIndex); // Is first item? const isFirst = index === 0; // Only first item exists? const onlyFirstItem = list.length === 1; // Item doesn't exist? const badActiveItem = !list[activeIndex]; // Flag as active? const isActive = isMatch || onlyFirstItem || (isFirst && badActiveItem); // Expose boolean. return !!isActive; };
Function: getTabsList
This function generates the clickable <li role="tabs"> UI, and returns it wrapped in a parent <ul role="tablist">. It assigns all the relevant aria-* and role attributes, and handles binding the onClickand onKeyDown events. When an event is triggered, setActiveIndex is called. This updates the component’s internal state.
It is noteworthy how the content of the <li> is derived. That is passed in as <div label="…"> children of the parent <Tabs> component. Though this is not a real concept in flat HTML, it is a handy way to think about the relationship of the content. The children of that <div> become the the innards of our role="tabpanel" later.
const getTabsList = ({ activeIndex = null, id = '', list = [], setActiveIndex = () => {} }) => { // Build new list. const newList = list.map((item = {}, index) => { // ========= // Get data. // ========= const { props: itemProps = {} } = item; const { disabled = null, label = '' } = itemProps; const idPanel = getPanelId(id, index); const idTab = getTabId(id, index); const isActive = getIsActive({ activeIndex, index, list }); // ======= // Events. // ======= const handleClick = (event = {}) => { const { key = '' } = event; if (!disabled) { // Early exit. if (key && key.toLowerCase() !== 'enter') { return; } setActiveIndex(index); } }; // ============ // Add to list. // ============ return ( <li aria-controls={idPanel} aria-disabled={disabled} aria-selected={isActive} className="tabs__item" disabled={disabled} id={idTab} key={idTab} role="tab" tabIndex={disabled ? null : 0} // Events. onClick={handleClick} onKeyDown={handleClick} > {label || `${index + 1}`} </li> ); }); // ========== // Expose UI. // ========== return ( <Render if={newList.length}> <ul className="tabs__list" role="tablist"> {newList} </ul> </Render> ); };
Function: getPanelsList
This function parses the incoming children of the top level component and extracts the content. It also makes use of getIsActive to determine whether (or not) to apply aria-hidden="true". As one might expect by now, it adds all the other relevant aria-* and role attributes too. It also applies any extra className or style that was passed in.
It also is “smart” enough to wrap any string content — anything lacking a wrapping tag already — in <p> tags for consistency.
const getPanelsList = ({ activeIndex = null, id = '', list = [] }) => { // Build new list. const newList = list.map((item = {}, index) => { // ========= // Get data. // ========= const { props: itemProps = {} } = item; const { children = '', className = null, style = null } = itemProps; const idPanel = getPanelId(id, index); const idTab = getTabId(id, index); const isActive = getIsActive({ activeIndex, index, list }); // ============= // Get children. // ============= let content = children || item; if (typeof content === 'string') { content = <p>{content}</p>; } // ================= // Build class list. // ================= const classList = cx({ tabs__panel: true, [String(className)]: className, }); // ========== // Expose UI. // ========== return ( <div aria-hidden={!isActive} aria-labelledby={idTab} className={classList} id={idPanel} key={idPanel} role="tabpanel" style={style} > {content} </div> ); }); // ========== // Expose UI. // ========== return newList; };
Function: Tabs
This is the main component. It sets an internal state for an id, to essentially cache any generated uuid() so that it does not change during the lifecycle of the component. React is finicky about its key attributes (in the previous loops) changing dynamically, so this ensures they remain static once set.
We also employ useState to track the currently selected tab, and pass down a setActiveIndex function to each <li> to monitor when they are clicked. After that, it is pretty straightfowrard. We call getTabsList and getPanelsList to build our UI, and then wrap it all up in <div role="tablist">.
It accepts any wrapper level className or style, in case anyone wants further tweaks during implementation. Providing other developers (as consumers) this flexibility means that the likelihood of needing to make further edits to the core component is lower. Lately, I have been doing this as a “best practice” for all components I create.
const Tabs = ({ children = '', className = null, selected = 0, style = null, id: propsId = uuid(), }) => { // =============== // Internal state. // =============== const [id] = useState(propsId); const [activeIndex, setActiveIndex] = useState(selected); // ================= // Build class list. // ================= const classList = cx({ tabs: true, [String(className)]: className, }); // =============== // Build UI lists. // =============== const list = Array.isArray(children) ? children : [children]; const tabsList = getTabsList({ activeIndex, id, list, setActiveIndex, }); const panelsList = getPanelsList({ activeIndex, id, list, }); // ========== // Expose UI. // ========== return ( <Render if={list[0]}> <div className={classList} id={id} style={style}> {tabsList} {panelsList} </div> </Render> ); };
If you are curious about the <Render> function, you can read more about that in this example.
File: Accordion.js
// ============= // Used like so… // ============= <Accordion> <div label="Tab 1"> <p> Tab 1 content </p> </div> <div label="Tab 2"> <p> Tab 2 content </p> </div> </Accordion>
As you may have deduced — due to the vanilla JS example handling both tabs and accordion — this file has quite a few similarities to how Tabs.js works.
Rather than belabor the point, I will simply provide the file’s contents for completeness and then speak about the specific areas in which the logic differs. So, take a gander at the contents and I will explain what makes <Accordion> quirky.
import React, { useState } from 'react'; import PropTypes from 'prop-types'; import { v4 as uuid } from 'uuid'; import cx from 'classnames'; // UI. import Render from './Render'; // =========== // Get tab ID. // =========== const getTabId = (id = '', index = 0) => { return `tab_${id}_${index}`; }; // ============= // Get panel ID. // ============= const getPanelId = (id = '', index = 0) => { return `tabpanel_${id}_${index}`; }; // ============================== // Get `tab` and `tabpanel` list. // ============================== const getTabsAndPanelsList = ({ activeItems = {}, id = '', isMulti = true, list = [], setActiveItems = () => {}, }) => { // Build new list. const newList = []; // Loop through. list.forEach((item = {}, index) => { // ========= // Get data. // ========= const { props: itemProps = {} } = item; const { children = '', className = null, disabled = null, label = '', style = null, } = itemProps; const idPanel = getPanelId(id, index); const idTab = getTabId(id, index); const isActive = !!activeItems[index]; // ======= // Events. // ======= const handleClick = (event = {}) => { const { key = '' } = event; if (!disabled) { // Early exit. if (key && key.toLowerCase() !== 'enter') { return; } // Keep active items? const state = isMulti ? activeItems : null; // Update active item. const newState = { ...state, [index]: !activeItems[index], }; // Set active item. setActiveItems(newState); } }; // ============= // Get children. // ============= let content = children || item; if (typeof content === 'string') { content = <p>{content}</p>; } // ================= // Build class list. // ================= const classList = cx({ accordion__panel: true, [String(className)]: className, }); // ======== // Add tab. // ======== newList.push( <div aria-controls={idPanel} aria-disabled={disabled} aria-selected={isActive} className="accordion__item" disabled={disabled} id={idTab} key={idTab} role="tab" tabIndex={disabled ? null : 0} // Events. onClick={handleClick} onKeyDown={handleClick} > <i aria-hidden="true" className="accordion__item__icon" /> {label || `${index + 1}`} </div> ); // ========== // Add panel. // ========== newList.push( <div aria-hidden={!isActive} aria-labelledby={idTab} className={classList} id={idPanel} key={idPanel} role="tabpanel" style={style} > {content} </div> ); }); // ========== // Expose UI. // ========== return newList; }; getTabsAndPanelsList.propTypes = { activeItems: PropTypes.object, id: PropTypes.string, isMulti: PropTypes.bool, list: PropTypes.array, setActiveItems: PropTypes.func, }; // ========== // Component. // ========== const Accordion = ({ children = '', className = null, isMulti = true, selected = {}, style = null, id: propsId = uuid(), }) => { // =============== // Internal state. // =============== const [id] = useState(propsId); const [activeItems, setActiveItems] = useState(selected); // ================= // Build class list. // ================= const classList = cx({ accordion: true, [String(className)]: className, }); // =============== // Build UI lists. // =============== const list = Array.isArray(children) ? children : [children]; const tabsAndPanelsList = getTabsAndPanelsList({ activeItems, id, isMulti, list, setActiveItems, }); // ========== // Expose UI. // ========== return ( <Render if={list[0]}> <div aria-multiselectable={isMulti} className={classList} id={id} role="tablist" style={style} > {tabsAndPanelsList} </div> </Render> ); }; Accordion.propTypes = { children: PropTypes.node, className: PropTypes.string, id: PropTypes.string, isMulti: PropTypes.bool, selected: PropTypes.object, style: PropTypes.object, }; export default Accordion;
Function: handleClick
While most of our <Accordion> logic is similar to <Tabs>, it differs in how it stores the currently active tab.
Since <Tabs> are always mutually exclusive, we only really need a single numeric index. Easy peasy.
However, because an <Accordion> can have concurrently visible panels — or be used in a mutually exclusive manner — we need to represent that to useState in a way that could handle both.
If you were beginning to think…
“I would store that in an object.”
…then congrats. You are right!
This function does a quick check to see if isMulti has been set to true. If so, we use the spread syntax to apply the existing activeItems to our newState object. We then set the current index to its boolean opposite.
const handleClick = (event = {}) => { const { key = '' } = event; if (!disabled) { // Early exit. if (key && key.toLowerCase() !== 'enter') { return; } // Keep active items? const state = isMulti ? activeItems : null; // Update active item. const newState = { ...state, [index]: !activeItems[index], }; // Set active item. setActiveItems(newState); } };
For reference, here is how our activeItems object looks if only the first accordion panel is active and a user clicks the second. Both indexes would be set to true. This allows for viewing two expanded role="tabpanel" simultaneously.
/* Internal representation of `activeItems` state. */ { 0: true, 1: true, }
Whereas if we were not operating in isMulti mode — when the wrapper has aria-multiselectable="false" — then activeItems would only ever contain one key/value pair.
Because rather than spreading the current activeItems, we would be spreading null. That effectively wipes the slate clean, before recording the currently active tab.
/* Internal representation of `activeItems` state. */ { 1: true, }
Conclusion
Still here? Awesome.
Hopefully you found this article informative, and maybe even learned a bit more about accessibility and JS(X) along the way. For review, let us look one more time at our flat HTML example and and the React usage of our <Tabs>component. Here is a comparison of the markup we would write in a vanilla JS approach, versus the JSX it takes to generate the same thing.
I am not saying that one is better than the other, but you can see how React makes it possible to distill things down into a mental model. Working directly in HTML, you always have to be aware of every tag.
HTML
<div class="tabs"> <ul class="tabs__list"> <li class="tabs__item"> Tab 1 </li> <li class="tabs__item"> Tab 2 </li> </ul> <div class="tabs__panel"> <p> Tab 1 content </p> </div> <div class="tabs__panel"> <p> Tab 2 content </p> </div> </div>
JSX
<Tabs> <div label="Tab 1"> Tab 1 content </div> <div label="Tab 2"> Tab 2 content </div> </Tabs>
↑ One of these probably looks preferrable, depending on your point of view.
Writing code closer to the metal means more direct control, but also more tedium. Using a framework like React means you get more functionality “for free,” but also it can be a black box.
That is, unless you understand the underlying nuances already. Then you can fluidly operate in either realm. Because you can see The Matrix for what it really is: Just JavaScript™. Not a bad place to be, no matter where you find yourself.
The post The Anatomy of a Tablist Component in Vanilla JavaScript Versus React appeared first on CSS-Tricks.
The Anatomy of a Tablist Component in Vanilla JavaScript Versus React published first on https://deskbysnafu.tumblr.com/
0 notes
Photo

Babel 7.8 released with built-in ES2020 support
#471 — January 17, 2020
Read on the Web
JavaScript Weekly
Babel 7.8.0 Released — The popular JavaScript transpiler now supports ECMAScript 2020 features by default with no plugins needed for nullish coalescing (??), optional chaining (?.) and dynamic import(). Work is also underway on Babel 8 with two upcoming issues outlined in this post too.
Nicolò Ribaudo
Goodbye, Clean Code — Much as Donald Knuth warned us away from premature optimization, here React expert Dan Abramov tells us to beware of premature refactoring and de-duplication. A well put and interesting argument you might appreciate here.
Dan Abramov
Faster CI/CD for All Your Software Projects Using Buildkite — See how Shopify scaled from 300 to 1500 engineers while keeping their build times under 5 minutes.
Buildkite sponsor
Native Web Components Come to Microsoft Edge — As featured in our Frontend Focus newsletter earlier this week, Microsoft’s Chromium-based version of Edge is now out and this also means “all major evergreen browsers now support Web Components natively.”
Polymer Project
What to Pay JavaScript Developers in 2020? — I think this is one of those “how long is a piece of string?” type questions but nonetheless Eric Elliott has brought together a variety of interesting stats.
Eric Elliott
The ECMAScript Archives — A collection of documents spanning from 1996 to 2015 relating to the activities of Ecma TC39 as the standards behind JavaScript were crafted over the years. Useful? Not really. Interesting? Depends how much of a geek you are, but the “issues list” in the first TC39 meeting’s minutes is kinda fun. “Why reserve Java keywords?”.. quite!
ECMA
Announcing TypeScript 3.8 Beta — Type-Only imports and export, top-level await and ECMAScript Private Fields all.. await you :-) TypeScript has a way of dropping a final release just after we publish, so watch this space!
Daniel Rosenwasser (Microsoft)
💻 Jobs
Senior Frontend-Focused Engineer in Munich — Do you love working with React, TypeScript, GraphQL, and working in a user-centred team? Then you're in for a treat 🍪 Let's protect some businesses together. 🙌
Finanzchef24
Find a Job Through Vettery — Vettery is completely free for job seekers. Make a profile, name your salary, and connect with hiring managers from top employers.
Vettery
📘 Articles & Tutorials
A Class-Based enum Pattern for JavaScript — Always a pleasure to see Dr. Axel writing. This time he looks at a way to implement enums (as available in other languages) in pure JavaScript before showing off enumify, a library he’s created for the task.
Dr. Axel Rauschmayer
How to Build a D3 and Cube.js Powered Data Dashboard — Cube.js provides the analytics framework, D3 provides the visualizations.
Artyom Keydunov
The Fastest Way to Get Great Bug Reports from Non-Technical Folk Get less “the link is broken”, get great bug reports (with screenshot and browser data) from non-tech clients with BugHerd.
BugHerd sponsor
A Good VSCode Linting and Formatting Setup for TypeScript Projects — There’s a GitHub repo with the actual configs and rules.
Andréas Hanss
Letting Tools Make Choices — We used to link to tutorials by Jack quite often back in the day so it’s great to see him blogging again. Now, Jack is thinking about the process of working out which tools to use, why, and letting tools carry the ‘burden’ of choices you’d otherwise have to make yourself.
Jack Franklin
Working with Raw WebGPU — An overview on how to write a WebGPU application, where WebGPU is an under development W3C spec on bringing modern 3D graphics and compute capabilities to the Web (and JavaScript).
Alain Galvan
Understanding npm Filesystem Takeover Vulnerabilities — Last month, a security vulnerability affecting all JS package managers (npm, yarn and pnpm) was disclosed which allows malicious actors to use various arbitrary file overwrite tactics. Here’s what that means and why it matters.
Liran Tal
Building a Virtualized List From Scratch — Understanding a powerful tool for improving UI render performance.
Mark Jordan
6 Useful Decorators to Use in Angular Projects
Chidume Nnamdi
▶ How to Improve Error Handling in Your Node.js Apps
Heroku sponsorpodcast
How to Support IE 11 with Angular — Might be relevant if you’re targeting enterprise users.
Colum Ferry
Is TypeScript Worth It? — “I would like the jury to know that I am, for the most part, a TypeScript fan but I do have some nagging doubts that I would like to discuss in this post..”
Paul Cowan
🔧 Code & Tools
Next.js 9.2 Released — The popular React-meets-server framework gains improved code splitting, CSS modularity, and new ‘catch-all’ dynamic routes.
Neutkens, Haddad, Kasper and Alvarez
uuid: Generate RFC-Compliant UUIDs in JavaScript — Seems very complete and covers UUID v1, v3, v4 and v5. Includes support for namespaces too.
UUID
Villus: A Tiny and Fast GraphQL Client for Vue 3 — An interesting writeup of how the creator approached the problem, too. Vue 3.0.0 alpha 2 is also out, BTW.
Abdelrahman Awad
FeathersJS/Hooks: Async Middleware for JavaScript and TypeScript — Koa-style middleware for any async functions for creating composable and reusable workflows and adding functionality without having to change a function or class’s original code.
Feathers
react-email-editor — A drag-n-drop component that makes it easy to add a solid email editor to your React apps. Designs are saved in JSON & can be exported as HTML.
Unlayer on GitHub sponsor
Styled-Components 5.0: Faster CSS Styling for React Components — Styled Components is a popular way to bring CSS and JavaScript together for styling components and 5.0.0 officially dropped this week :-)
Evan Jacobs
Spectacle: A React and JSX-Based Presentation Library — Got a presentation coming up? Build your decks with JSX! The best way to get a feel for what it can do is via this live slide deck.
Formidable
❓ The Coding Sans Software Development Survey
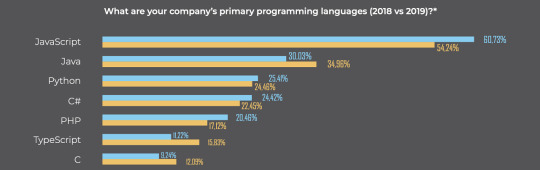
Each year we help out (for free – this isn't a sponsored thing) Coding Sans by linking to their State of Software Development survey. The latest one is out now, and if you're able to fill it out, that would be awesome :-) They release the results each time, so if you're intrigued what sort of things it covers and uncovers, this PDF of the 2019 results may be of interest.
You can take the 2020 survey here — thanks!
by via JavaScript Weekly https://ift.tt/38ipPTC
0 notes
Text
Build Simple Authentication in Express in 15 Minutes
Building web pages with user authentication can be a huge pain. You typically need to set up some sort of database to manage users even if you're not using the database for anything else. You would then need to store their password hashes, and you almost need a degree on internet security to know the safest ways to do that.
What if I told you it didn't have to be so complicated? Using Okta and Express, I'll show you how to really quickly set up a website that has secure user authentication, without the need for a separate database. Everything you need you could deploy anywhere that you can run Node.
Creating a new app in Express doesn't take a lot of code. You'll need to set up your project structure and install some dependencies, which you can do with just a few commands:
mkdir new-project cd new-project npm init -y npm install [email protected] [email protected] npm install --save-dev [email protected] [email protected]
Edit the "scripts" section of your package.json to look like this:
"scripts": { "start": "nodemon .", "test": "standard" },
Now create a new file index.js :
index.js
const express = require('express') const path = require('path') const app = express() app.set('views', path.join(__dirname, 'views')) app.set('view engine', 'hbs') app.use(express.urlencoded({ extended: true })) app.use('/static', express.static('public')) // @TODO add auth middleware // @TODO add registration page // @TODO add logout route app.use('/', require('./routes/index')) const port = process.env.PORT || 3000 app.listen(port, () => console.log(`App listening on port ${port}`))
Make a few new folders as well:
mkdir -p public/images routes views
Put a fun greeting image in `public/images/greeting.jpg` that you will use to greet users.
Express allows for a templating engine. You already set up Handlebars (hbs) above, so now you can create a couple of views. One will be the HTML skeleton that contains the basic markup, and the other will be your homepage (the index view).
views/layout.hbs
<!doctype html> <html lang="en"> <head> <!-- Required meta tags --> <meta charset="utf-8"> <meta name="viewport" content="width=device-width, initial-scale=1, shrink-to-fit=no"> <!-- Bootstrap CSS --> <link rel="stylesheet" href="https://stackpath.bootstrapcdn.com/bootstrap/4.1.3/css/bootstrap.min.css" integrity="sha384-MCw98/SFnGE8fJT3GXwEOngsV7Zt27NXFoaoApmYm81iuXoPkFOJwJ8ERdknLPMO" crossorigin="anonymous"> <title>Simple Auth in 15 Minutes</title> </head> <body> <nav class="navbar navbar-expand-lg navbar-dark bg-dark"> <div class="container"> <a class="navbar-brand" href="/">Navbar</a> <button class="navbar-toggler" type="button" data-toggle="collapse" data-target="#navbarNavAltMarkup" aria-controls="navbarNavAltMarkup" aria-expanded="false" aria-label="Toggle navigation"> <span class="navbar-toggler-icon"></span> </button> <div class="collapse navbar-collapse" id="navbarNavAltMarkup"> <div class="navbar-nav"> </div> </div> </div> </nav> <main class="container pt-4">}</main> <!-- Optional JavaScript --> <!-- jQuery first, then Popper.js, then Bootstrap JS --> <script src="https://code.jquery.com/jquery-3.3.1.slim.min.js" integrity="sha384-q8i/X+965DzO0rT7abK41JStQIAqVgRVzpbzo5smXKp4YfRvH+8abtTE1Pi6jizo" crossorigin="anonymous"></script> <script src="https://cdnjs.cloudflare.com/ajax/libs/popper.js/1.14.3/umd/popper.min.js" integrity="sha384-ZMP7rVo3mIykV+2+9J3UJ46jBk0WLaUAdn689aCwoqbBJiSnjAK/l8WvCWPIPm49" crossorigin="anonymous"></script> <script src="https://stackpath.bootstrapcdn.com/bootstrap/4.1.3/js/bootstrap.min.js" integrity="sha384-ChfqqxuZUCnJSK3+MXmPNIyE6ZbWh2IMqE241rYiqJxyMiZ6OW/JmZQ5stwEULTy" crossorigin="anonymous"></script> </body> </html>
This layout will get rendered for each view, with the specific view replacing the } tag.
Now you can create the indexview. This will just display the image you put in public/images/greeting.jpg :
views/index.hbs
<div class="d-flex justify-content-center"> <img class="rounded img-fluid" src="/static/images/greeting.jpg" /> </div>
To tell the homepage to use that file when rendering, you'll also need to create a router. You already required routes/index.jsin the index.js file of your app, so now you just need to create that file:
routes/index.js
const express = require('express') const router = express.Router() router.get('/', (req, res) => { res.render('index') }) module.exports = router
The call to res.render('index') tells Express to use the render the index.hbs view and respond with the results back to the client. You can also pass in some context, but it's not needed here just yet.
Now you can run your server with the following command (as you make changes, the server will reload and you'll just need to refresh the page):
npm start
Go to http://localhost:3000 to see your greeting.
You now have a simple web server with a homepage and a lovely greeting image. The next step I promised to show you is to add secure user authentication. This is where Okta comes in to play. Okta is a cloud service that allows developers to create, edit, and securely store user accounts and user account data, and connect them with one or multiple applications. Our API enables you to:
If you don't already have one, sign up for a forever-free developer account.
You're going to need to save some information to use in the app. Create a new file named .env in the root of your application. In it, enter your organization URL.
HOST_URL=http://localhost:3000 OKTA_ORG_URL=https://{yourOktaOrgUrl}
You will also need a random string to use as an App Secret for sessions. You can generate this with the following command:
npm install -g uuid-cli echo "APP_SECRET=`uuid`" >> .env
Next, log in to your Okta developer console, navigate to Applications, then click Add Application. Select Web, then click Next.
The page you come to after creating an application has some more information you need to save to your .env file. Copy in the client ID and client secret.
OKTA_CLIENT_ID={yourClientId} OKTA_CLIENT_SECRET={yourClientSecret}
At the time of this writing, the default application creation page does not allow you to add a Logout redirect URI, but you can add one after creating the application. After creating the application, click Edit, then next to Logout redirect URIs click Add URI. Add a logout redirect URI of http://localhost:3000 and click Save.
The last piece of information you need from Okta is an API token. In your developer console, navigate to API -> Tokens, then click on Create Token. You can have many tokens, so just give this one a name that reminds you what it's for, like "15 Minute Auth". You'll be given a token that you can only see right now. If you lose the token, you'll have to create another one. Add this to .env also.
OKTA_TOKEN={yourOktaAPIToken}
Add Auth Middleware to Your Express App
Okta provides some middleware that will give you information about whether the user is registered or not. It also gives you a login page by default at /login . Add the following dependencies:
In your index.js page, replace the // @TODO add auth middleware comment with the following code:
app.use(require('express-session')({ secret: process.env.APP_SECRET, resave: true, saveUninitialized: false })) const { ExpressOIDC } = require('@okta/oidc-middleware') const oidc = new ExpressOIDC({ issuer: `${process.env.OKTA_ORG_URL}/oauth2/default`, client_id: process.env.OKTA_CLIENT_ID, client_secret: process.env.OKTA_CLIENT_SECRET, redirect_uri: `${process.env.HOST_URL}/authorization-code/callback`, scope: 'openid profile' }) app.use(oidc.router)
Also, make sure to add the following to the very top of index.js . This needs to be there before any other code in order to load your environment variables, so it should be the very first line of the file:
require('dotenv').config()
Create a Registration Page
You should now be able to login by going to /login . This will redirect you to your Okta developer page, and after you sign in you'll be redirected back to the homepage.
For people who aren't registered yet, they'll need a registration page. At the time of this writing, Okta doesn't provide a registration page out of the box, but you can build one pretty quickly. Create a new view for your route:
views/register.hbs
<form method="post"> {{#each fields}} <div class="form-group"> <label>{{this.label}}</label> <input required name="" type="" class="form-control is-invalid" value="" /> <div class="invalid-feedback">{{this.error}}</div> </div> {{/each}} <button type="submit" class="btn btn-primary">Register</button> </form>
You'll also need a new route:
routes/register.js
const okta = require('@okta/okta-sdk-nodejs') const express = require('express') const router = express.Router() const client = new okta.Client({ orgUrl: process.env.OKTA_ORG_URL, token: process.env.OKTA_TOKEN }) // Take the user to the homepage if they're already logged in router.use('/', (req, res, next) => { if (req.userContext) { return res.redirect('/') } next() }) const fields = [ { name: 'firstName', label: 'First Name' }, { name: 'lastName', label: 'Last Name' }, { name: 'email', label: 'Email', type: 'email' }, { name: 'password', label: 'Password', type: 'password' } ] router.get('/', (req, res) => { res.render('register', { fields }) }) router.post('/', async (req, res) => { const { body } = req try { await client.createUser({ profile: { firstName: body.firstName, lastName: body.lastName, email: body.email, login: body.email }, credentials: { password: { value: body.password } } }) res.redirect('/') } catch ({ errorCauses }) { const errors = {} errorCauses.forEach(({ errorSummary }) => { const [, field, error] = /^(.+?): (.+)$/.exec(errorSummary) errors[field] = error }) res.render('register', { errors, fields: fields.map(field => ({ ...field, error: errors[field.name], value: body[field.name] })) }) } }) module.exports = router
To tie this all together, in your root index.js file, make sure to replace the // @TODO add registration page comment with the following:
app.use('/register', require('./routes/register'))
You can now have users register. If they run into an error, it will be displayed with the field that caused the error.
Add a Logout Route
At the time of this writing, Okta's middleware doesn't provide a default /logout route. Luckily, adding one is fairly simple. In your index.js file, replace the // @TODO add logout route comment with:
app.get('/logout', (req, res) => { if (req.userContext) { const idToken = req.userContext.tokens.id_token const to = encodeURI(process.env.HOST_URL) const params = id_token_hint=${idToken}&post_logout_redirect_uri=${to} req.logout() res.redirect(${process.env.OKTA_ORG_URL}/oauth2/default/v1/logout?${params}) } else { res.redirect('/') } })
If you're logged in, this will invalidate the token and delete the user's session. It will then redirect you back to the homepage. If you're not logged in, it just takes you back to the homepage.
Add Links to the New Routes in Your Express App
To more easily expose these routes to the user, you can add some buttons. You'll need to expose the user context to the view to know if a user is logged in or not so you know which buttons to display, and potentially greet the user.
In routes/index.js replace the res.render('index') line with the following:
routes/index.js
const { userContext } = req res.render('index', { userContext })
While you're at it, you can also prevent the user from seeing your greeting unless they're logged in. Change your views/index.hbs file to the following:
views/index.hbs
{{#if userContext}} <h1 class="text-center">Hi {{userContext.userinfo.given_name}}!</h1> <div class="d-flex justify-content-center"> <img class="rounded img-fluid" src="/static/images/greeting.jpg" /> </div> {{else}} <h1 class="text-center">Please log in</h1> {{/if}}
Now to add the buttons. In views/layout.hbs, replace the comment with the following:
views/layout.hbs
<a class="nav-item nav-link" href="/logout">Log out</a> <a class="nav-item nav-link" href="/login">Log in</a> <a class="nav-item nav-link" href="/register">Register</a>
Check out the final product to make sure it works
That's it! In just a few minutes, you went from an empty folder to a secure website with user registration and login. You didn't even have to set up a database! If you want to see the final code sample for reference, you can find it on GitHub.
If you'd like to learn more about Node and Express check out some of these other posts on the Okta developer blog:
If you have any questions about this post, please add a comment below. For more awesome content, follow @oktadev on Twitter, like us on Facebook, or subscribe to our YouTube channel.
via Scotch.io https://ift.tt/2AqUzm1
0 notes
Text
A beautiful smell of home. Buchteln, Buchty or sweet sugar rolls. Nicely risen yeast dough, served with Applemus, vanilla sauce or pears. In the countries I come from they are traditionally filled with a mixture from poppy, plum marmalade or quark with raisins. I like them generously sprinkled with icing sugar. Just like that, the fresher, the tastier – Sugar Buchteln.
The secret of the best taste is well-kneaded and risen dough and the lard. Of course, you can substitute the lard with a good butter, however, the taste is different. The lard gives the extra, the juiciness, the crispiness.
The rule of baking is to preheat the oven well, thereafter, reduce the temperature, so they get beautifully shocked inside and baked into perfection. Trust me!
#gallery-0-10 { margin: auto; } #gallery-0-10 .gallery-item { float: left; margin-top: 10px; text-align: center; width: 100%; } #gallery-0-10 img { border: 2px solid #cfcfcf; } #gallery-0-10 .gallery-caption { margin-left: 0; } /* see gallery_shortcode() in wp-includes/media.php */
I normally eat this kind of bread for breakfast. However, I just couldn’t resist and eat them straight away from the oven. The smell reminds me my childhood when my grandmother used to make them upon our request, which means very often. Let them cool down a bit and tear apart. So yummy!
Sugar Buchteln are suitable for kids 2 plus, because of a possible egg white intolerance. They make wonderful breakfast or an afternoon snack with milk.
Total Time: 1 hour 15 minutes + 1,5 hour of rising the dough
jQuery.getScript( "//s3.amazonaws.com/downloads.mailchimp.com/js/signup-forms/popup/embed.js", function( data, textStatus, jqxhr ) { require(["mojo/signup-forms/Loader"], function(L) { L.start({"baseUrl":"mc.us10.list-manage.com","uuid":"7aeba6c48256d8408435f1f81","lid":"3e0c23c2aa"}) }); } );
[amazon_link asins=’B00MGTEM2U’ template=’ProductAd’ store=’nonstopstra0c-20′ marketplace=’US’ link_id=’9f9357fb-c911-11e7-88d2-fb4b00f9dd42′]
[amazon_link asins=’B01JQYE5IS’ template=’ProductAd’ store=’nonstopstra0c-20′ marketplace=’US’ link_id=’ddbf2cf4-c911-11e7-8a67-8311d4929f34′]
[amazon_link asins=’B071Z9L298′ template=’ProductAd’ store=’nonstopstra0c-20′ marketplace=’US’ link_id=’fc21a66e-c911-11e7-bf99-f7d5a2e4d704′]
Shopping List
20g of fresh yeast 1 cup of lukewarm milk 1 teaspoon + 120g of raw sugar 400g of universal flour, sifted 1 teaspoon of lemon zest A pinch of sea salt 50 g butter, melted 1 whole egg + 1 egg yolk 3 knobs of lard/butter
<p>function nofocus() <p>{ <p>document.convert.InUnit.focus() <p>} <p>var gValue = 1 var kgValue = 1000 var ounceValue = 28.3495 var lbValue = 453.592 var tValue = 907184 <p>function toCM() <p>{ <p>var i = document.convert.unit.selectedIndex var thisUnit = document.convert.unit.options[i].value <p>if (thisUnit == "G") <p> { <p>document.convert.g.value = document.convert.InUnit.value <p> } <p>else if(thisUnit == "KG") <p> { <p>document.convert.g.value = document.convert.InUnit.value * kgValue <p> } <p>else if(thisUnit == "OUNCE" ) <p> { <p>document.convert.g.value = document.convert.InUnit.value * ounceValue <p> } <p>else if(thisUnit == "LB" ) <p> { <p>document.convert.g.value = document.convert.InUnit.value * lbValue <p> } <p>else if(thisUnit == "T" ) <p> { <p>document.convert.g.value = document.convert.InUnit.value * tValue <p> } <p>toAll() <p>} <p>function toAll() <p>{ <p>var m = document.convert.g.value <p>document.convert.kg.value = m / kgValue document.convert.ounce.value = m / ounceValue document.convert.lb.value = m / lbValue document.convert.t.value = m / tValue <p>} //-->
Weight Converter
Unit Number GramKilogramOuncePoundU.S. Ton Gram: Kilogram: Ounce: Pound: U.S. Ton:
Instructions
First, activate the yeast. In a coffee mug pour lukewarm milk. Sprinkle with yeast and 1 teaspoon of sugar. Mix. Sprinkle with some flour and let it rise in a warm place for about 15 minutes until it gets bubbly.
Meanwhile, in a large and wide mixing bowl place sugar, flour, lemon zest, salt, butter and eggs.
Next, make a well in the middle and add the yeast with little bit of milk.
Start kneading the dough with a wooden spatula and add milk accordingly. Beat the air out of the dough and knead it into a smooth, elastic and sticky texture, for about 5 minutes.
#gallery-0-11 { margin: auto; } #gallery-0-11 .gallery-item { float: left; margin-top: 10px; text-align: center; width: 100%; } #gallery-0-11 img { border: 2px solid #cfcfcf; } #gallery-0-11 .gallery-caption { margin-left: 0; } /* see gallery_shortcode() in wp-includes/media.php */
Sprinkle with some flour and cover with a clean cloth. Let it double its size for about 1,5 hour in a warm place. Knead twice in between.
Preheat the oven to 180 degrees.
Prepare your working board and mold the dough. Sieve with the flour and roll out with hands into a long snake, thick around 5 cm. If the dough gets too long, you can divide it into 2 parts. Cut every 2 cm and start rolling balls. Use a bit of flour and create a small ball. Mold the balls into greased baking tray. I made 15 balls for the tray of 35×25 cm (14×10 inch). Place them nicely next to each other. Cover with the cloth and let them rise in a warm place for 10 more minutes.
#gallery-0-12 { margin: auto; } #gallery-0-12 .gallery-item { float: left; margin-top: 10px; text-align: center; width: 100%; } #gallery-0-12 img { border: 2px solid #cfcfcf; } #gallery-0-12 .gallery-caption { margin-left: 0; } /* see gallery_shortcode() in wp-includes/media.php */
Melt the lard and brush them generously over the tops and sides of Buchteln. Bake in the oven for about 40 minutes until they are golden on the top and baked through in the middle.
Once they are ready, brush them again with lard and let them cool down on a rack. Sprinkle with icing sugar and serve with homemade marmalades or Apfelmus. Enjoy with a cup of hot chocolate or coffee.
Makes 15 medium Buchteln.
1
2
3
4
5
6
(adsbygoogle = window.adsbygoogle || []).push({});
#mc_embed_signup{background:#fff0; clear:left; font:14px Helvetica,Arial,sans-serif; } /* Add your own MailChimp form style overrides in your site stylesheet or in this style block. We recommend moving this block and the preceding CSS link to the HEAD of your HTML file. */
Get inspired. Sign up and receive favourites collected PLUS unique recipes.
* indicates required
Email Address *
First Name *
Sugar Buchteln
A beautiful smell of home. Buchteln, Buchty or sweet sugar rolls. Nicely risen yeast dough, served with…
0 notes