#Webflow CSS tutorial
Explore tagged Tumblr posts
Visit Tumblr Blog
Explore Tumblr blogs with no restrictions, modern design and the best experience.
Last Seen Tumblr Blogs


Fun Fact
Forty percent of Tumblr users are between the ages of 18 to 25.
Text
make your own website today!! ꒰ᐢ. .ᐢ꒱₊˚⊹
this is for all people who want to make their own website and maybe try to save the internet from dying! you will find something for yourself no matter if you can or cannot code! static website hostings: neocities - really beginner friendly github pages gitlab pages website builders (no code required): ! personally i don't recommend them! you can easily learn html and css and even javascript! this way you can make a more personalized website! bearblog- secure and fast hotglue - this one is pretty unique and charming in its own way zonelets - simple blog maker write.as wordpress webflow farmer resources: web3schools - tutorials of all kinds code academy (learn html) - free html course if you wanna know anything feel free to ask!
30 notes
·
View notes
Text
neocities heracles trials: from a chaotic newbie
okay so i want to actually start posting here and i finally got it through my thick skull that this is LITERALLY A BLOG. i'm supposed to blog. so here's a blog post.
anyways, for context, i've been working on my neocities for a while now, recently started over to make things more original and more me. another thing to note is that i'm using VScode.
the issue here is that i have zero well not exactly zero but i lack any professional/academic background experience with making websites. the html isn't the issue (thankfully) but holy shit dude...css+javascript implementation . basic styling with css is no biggie, right? absolutely, however...may i introduce: smooth transitions + the absolutely tragic fact that the <marquee> tag is deprecated an accessibility issue.
so, my first goal day one was to recreate a marquee animation through css. so i tried to simply implement this incredibly useful bit of code into my site (in which if you're interested i totally think my failure to get it working was user error so please check it out it works great if you're not me) but, lo and behold, despite me getting it to work in my V1 project, i could not, for the life of me, get it to work. so i, not too familiar with css animation and completely lost when it comes to javascript, started grasping at straws. i ended up finding this tutorial and, with some improvisation since the tutorial is for webflow and i'm manually writing everything, managed to make my own css recreation of a marquee effect essentially from scratch, and even learned about the animation-play-state css attribute so i could pause the effect when the marquee is hovered over! victory, basically.

then, i looked around the many cool and absolutely awesome sites on neocities to get inspiration, and then i was like "hey what if i made a custom button background image" and with some trial and error, made myself a pretty decent base (for now) with aseprite, and learned more about the program in the meantime which is always a plus.
then i decided that i wanted to do more with the buttons. i wanted to make it animate on hover. not too hard right? you'll...you'll see why i struggled...in a moment...
anyways, i settled on a simple shrink animation. which THIS i could do with ease, messed around a bit, got the keyframes, assigned that to the button:hover and all of that and all was good!...until i realized that once i stopped hovering over it, it snapped back to its original scale instead of transitioning smoothly again. THIS is where the "fun" began.
see, although i can wrap my head around things easily when it comes to css, i have to constantly look up what the proper syntax for everything is because otherwise i'll mess everything up. and through my research i had conducted (aka surfing through multiple blogs and reddit posts alongside other things on random forum websites) i had discovered the very neat transition attribute.
but we'll have to return to this because i have adhd, and i ended up getting distracted during this process. see, originally i had decided that the button would change it's visual to appear like it was pressed when the user's mouse hovered over it. then i was like "i don't think this makes sense" so i changed it so that the button wouldn't change its background image unless the user actually clicked on it. so i did that. then i had to make sure that the button wouldn't magically scale up again so i had to transform the styling and blah blah blah those details aren't really that important ANYWAYS the actual important bit about this is that if you use the transition attribute and there's a change in background images that change will also be transitioned unless you set the transition to only apply to a specific change. and i didn't know that originally. so every time i tried to fix things up with a transition so the button wouldn't snap back to it's original size out of nowhere the background would slooowly change as well and i actually got so frustrated with this that i wanted to burn something down because that's a totally normal reaction i guess. anyways, then i started frantically searching for answers on the topic and EVERY. SINGLE. THING. THAT I FOUND. INCLUDED JAVASCRIPT.
i do not know javascript. i have not learned anything about it unlike css and html. it SCARES me and it is FRUSTRATING. but i thought i'd try it anyways. news flash that shit didn't work at all and i almost thought about scrapping the animation entirely especially when it randomly stopped working when i made certain changes, but i ended up eventually figuring out what i mentioned earlier (CSS transitions and the fact that you can assign them to only affect a specific change instead of everything) so with some dabbling here and there i eventually managed to finally figure out how to make everything smooth through pure css and although it still snaps if the element hasn't finished animating i'm happy with it.

moving on to another thing, i wanted to then make a sound effect play when you click the button. yes, we are still talking about buttons. THIS i could not do with css, like, at all. javascript admittedly is for interactivity and i had already been bending the rules quite a bit with the animations since those teechnically should've been done with javascript as well but this? this was impossible without javascript. so i found a free mp3, and searched up a nice little tutorial on the very basics of javascript.
little did I know that apparently, this would be my own personal little hell.
see, no matter how many times i tried a different script, the sound just would not work like at all. i'd do everything in what i assumed to be the correct way, and no matter what, it would not play. knowing that i'd just have to revisit this, i decided it was best to just sort of put it on the back burner.
and this is where i wish i could say this is the end of my absolutely gobstopping rant. however, i cannot.
see, one thing that i really like that i've seen in a lot of other people's sites is draggable windows. i think they're sick. but this ALSO requires javascript, but i didn't think this could POSSIBLY be that bad since so many people did it.
...right?.......right? guys. right?
MOTHERFUCKER I WAS SO WRONG.
see, it turns out that a lot of people do this sort of thing with jQuery, specifically for user interfaces. but vscode doesn't have a "user friendly" way to get jquery to work with it. and because i don't want to mess with program files, i decided that logically speaking jquery just makes writing things in js scripts less complicated and doesn't introduce things that are impossible in vanilla javascript so i decided i could suffer a little bit and try and do things without jquery.
this led me to looking at many sites with draggable windows to look at their own scripts, in which every single time i tried replicating things i FAILED.
i eventually stumbled upon a nice code that worked. but the issue with it - in which unfortunately i can't find it, else i'd link it - is that it works with not only element classes but also a specific ID. see, this would be fine if i only wanted ONE draggable element. but i want multiple. and i thought that maybe if i just duplicated the script and dedicated it to a different ID and changed function names it would work but nooo life cannot be this easy apparently. so after setting up my webmaster status window, getting that to work, i tried doing the aforementioned method for what will eventually be a guestbook of sorts. it failed.
so i decided, "hey i'll revisit this later!!" and i went on to finding a way to implement a status widget into my site. this honestly was really easy as i ended up stumbling upon status.cafe . so i registered, eventually got my account activated, and i got it working in my live port of vscode just fine!! all is good in the world.
well that's what i thought until i found out that since i had created my neocities account in march of 2024, and i'm unemployed since i'm still in high school hence i have a free account, that i could not. use the widget. in neocities. so i tried finding a work around, found this handy guide (which is genuinely useful by the way) and set up things through a RSS feed instead which is essentially just a work around that complies with the security restrictions of neocities that i'm bound by. anyways, this works great but i literally just can't customize it to how i want so this is another fail. then i find imood.com which, although is NICE, doesn't suit what i want on its own. so i'm at a loss here too.
so, again, another thing to put to the side i suppose.

so i started working on getting my guestbook, browsed through people's homepages again, and found chattable . and you probably think i have another paragraph complaining about this but honestly i can't write about something when i can't figure out how to even create a chat to implement onto my site in the first place so...y'know.
plus, i honestly have no clue if it'll work on my site either due to security restrictions so this is fun!!
anyways, after dealing with all of this, i finally decided it was about time i ported what i had so far over onto my neocities account. which isn't actually that hard i just had to wipe all of my files, overwrite the content in my index.html file there and paste in what i have now, and then upload my new files. but for some god awful reason after i went through all of this chrome just. kept depending on my old stylesheet??? so i had to clear some of my browsing data and eventually everything was loading properly for me.
and THIS is finally the end of my ridiculous documentation concering my neocities adventure so far.
i have no doubts i'll end up ranting here AGAIN about all of this but for now this is all i have on my plate...besides finally caving and learning javascript for real and continuing to learn more about html and css. hopefully one day i'll stop having such frequent issues but now is not the time and i doubt that'll be anytime soon either.
moral of the story, if you want to start something new and pick up a new hobby, please for the love of all that is of substance in this world don't go in completely blind like i've done if you're going to be making a project of some sorts. it will only lead to many misfortunes.
anyways you can see what i currently have done in my neocities here, make suggestions or give advice in the notes and whatnot i don't know.
#neocities#rant post#rant#coding#web development#geocities#html#html css#htmlcoding#css#javascript#losing my mind#holy shit#send help
6 notes
·
View notes
Text
Exploring Webflow’s Pros and Cons
Did you know that 68% of website visitors will leave a site if it’s not mobile-friendly or loads too slowly? With Webflow, you can easily create a site that’s fast, responsive, and visually stunning.
But is it the right choice for you? Let’s dive into what Webflow developers have to say regarding the pros and cons of Webflow to help you decide.
What is Webflow?
Design, functionality, and… No code at all. Webflow is a versatile tool. It combines all it takes to make modern websites without any programming expertise.
Here's a more specific breakdown of what it has to offer:

Clean code, hosting, and other technical complexities are handled by Webflow — you can focus on creative freedom. A business website, a personal portfolio, or a full-scale ecommerce store — the tool of this kind has it all.
Weighing the Benefits and Drawbacks of Webflow CMS
Below, I’ll explore its main pros and cons through examples and insights to help you decide whether it’s the right choice for your next project.
Pros of Webflow CMS
Clean Code and SEO Optimization
Benefit: Webflow generates clean code. That results in perfect page loading speed and SEO-friendly structures like meta tags and meta descriptions.
Fact: Websites built with Webflow score high on Google Lighthouse for performance and accessibility.
Design Flexibility & Custom Animations
Benefit: Webflow’s design tool offers unmatched flexibility. That means creators can craft custom animations and interactive animations.
Example: A SaaS company can use Webflow to showcase their features through scroll-based animations to improve user engagement.
No-code Platform for Custom Websites
Benefit: Webflow allows you to build websites with a drag-and-drop interface. It’s perfect for those without coding knowledge.
Example: A freelance graphic designer without HTML skills can easily create a portfolio with interactive elements like animations and galleries.
Fact: Over 3.5 million designers and teams use Webflow platforms for diverse projects.
Ecommerce and Scalability
Benefit: Webflow’s e-commerce plan allows businesses to create scalable online stores. Enterprise plans cater to larger organizations that might need some advanced features.
Example: A small retail shop can start with Webflow Ecommerce and scale as sales grow.
Integrated Hosting and Free SSL Certificate
Benefit: Hosting is built-in. Besides, Webflow offers a free SSL certificate for secure connections and seamless live site management.
Example: An entrepreneur launching a business website can go live without the hassle of external hosting.
Responsive Designs for All Devices
Benefit: Webflow offers responsive layouts for desktop, tablet, and mobile without extra effort.
Example: A blog post or landing page designed in Webflow looks great on any screen size.
Cons of Webflow CMS
Costly for Smaller Projects
Challenge: Compared to other platforms, Webflow’s pricing is higher. Its free plan is limited. Features like form submissions require paid plans.
Example: A hobby blogger might find it expensive to upgrade for custom domains and more storage.
Dependence on Webflow Hosting
Challenge: Sites built with Webflow can only be hosted on its platform. That limits flexibility for developers wanting external hosting options.
Example: Businesses looking for unique server configurations might find this restrictive.
Limited Plugins and Third-party Integrations
Challenge: Unlike WordPress, Webflow lacks an extensive plugin ecosystem.
Example: Integrating advanced marketing tools often requires custom code or third-party services.
Steep Learning Curve
Challenge: While the platform is a no-code tool, mastering its advanced features like custom animations or CMS setup requires a basic understanding of design principles.
Example: Beginners may struggle to understand Webflow’s box model or advanced CSS capabilities.
Insight: Webflow provides extensive tutorials, but time investment is necessary.
No Backend User Roles
Challenge: Managing multiple sites with varying access levels for editors and admins is more complex compared to traditional content management systems.
Example: A team working on a business website might face challenges in assigning granular permissions.
Table: Pros and Cons at a Glance

Conclusion
Webflow CMS offers powerful tools for content management systems and website creation, but it comes with trade-offs like pricing and a steeper learning curve.
Use this checklist to evaluate if Webflow CMS aligns with your needs and goals.
1. Your Technical Skills and Team Setup
Do you have a basic understanding of HTML, CSS, and design tools, or a team with coding knowledge?
Are you comfortable working with a drag-and-drop interface for design?
Will your team benefit from a no-code platform to streamline development?
2. Your Project Requirements
Are you creating a business website, landing pages, or a blog post series?
Do you need advanced features like custom animations, interactive elements, or an e-commerce plan?
Does your project involve managing multiple sites or an enterprise-level solution?
3. Budget and Scalability
Does your budget allow for Webflow's pricing tiers, including free plans and enterprise plans?
Do you require features like form submissions or a free SSL certificate included in paid plans?
Will your site grow to need custom code integration or scalable content management?
4. Your Design and Branding Needs
Are you looking for a design tool that prioritizes flexibility and visual control?
Do you plan to create interactive animations or custom animations that enhance user experience?
Is maintaining a clean code output important for performance and SEO?
5. Your Time and Learning Curve
Do you have the time to overcome Webflow’s learning curve?
Are you seeking a platform that allows you to create websites faster than traditional coding?
Will you benefit from Webflow’s templates for a quick start on your next project?
If most of your answers align with Webflow’s features, it might be your perfect match. No? Explore other content management systems.
0 notes
Text
Best No-Code Tools to Build Your MVP
Build apps and websites without a line of code.
NY Tech Alliance - April 15
Do you have a brilliant idea for a tech product but don’t know a single thing about coding?

No need to study HTML and CSS for months or hire a software engineer to evaluate your idea’s viability: You can simply start by building your Minimum Viable Product (MVP) yourself, using no-code tools. Most of the tools mentioned in this article have a free “Academy” you can enroll in with a supportive community and excellent tutorials.
Bubble
If you want to create an app, you can do it with Bubble. The platform, created in NYC in 2012, claims that you can build and launch your product in just a few hours. Though we don’t know if this is true, you can certainly create a solid prototype that will help you introduce your project to potential investors and test your idea. You can browse all no-code apps built on Bubble here.
Another great tool to create an app without code is Glide.
Carrd
Carrd is a straightforward and effective tool to build a professional-looking website in a matter of minutes. Whether you need a website for your product, a landing page to capture emails, or even something more elaborate, you can do it with Carrd.
Softr
Product Hunt called Softr “the LEGO of web app building,” and it’s pretty much what it is! Thanks to Softr, you can build powerful websites, web apps, client portals, and beautiful databases using… Airtable. The good thing about Softr is that you don’t really have a learning curve — designing and launching your product is super easy. They also have a nice collection of templates you can use for free.
Voiceflow
Voiceflow is used by some of the biggest companies out there — Spotify, Google, Amazon, The New York Times, and more. This powerful tool allows you to design a conversational app — whether it’s a chatbot, an in-car assistant, or an Alexa & Google feature — without writing a single line of code. You can learn the basics of design and prototyping on Voiceflow here.
Webflow
Webflow isn’t particularly “easy” to use and has a learning curve. But if you take the time to follow their tutorials and properly learn how to use the platform, your website will be just as good as a website built by a professional software engineer. If you’re able to put some time and sweat into it, you can definitely end up with a very elaborated website for free.
145 notes
·
View notes
Text
Webflow tutorial: the absolute beginner's guide
By the end of this tutorial, you’ll learn how to create your first homepage in Webflow and leave with a solid understanding of how to build powerful websites in Webflow — by visually coding HTML and CSS.
There’s a lot of hype around the no code movement — a wave of technologies that allow us to build software without code. But code is at the internet’s core. It’s not about the absence of using it to build websites and apps. This movement is actually focused on making it easier (and faster) to code — by making it visual. Meaning, you just design and platforms like Webflow write the code for you.
If you approach Webflow with the mindset of designing, based on the fundamentals code, you’ll be able to learn it quickly. And on top of that, you might end up learning how to code as well.
What is Webflow? Webflow is a design and web development tool, ecommerce, CMS, and hosting platform. Each aspect of the platform is represented by a particular product/feature set:
The Designer gif of building a website in Webflow A visual web design tool firmly grounded in web standards and best practices, the Designer translates your design decisions into clean, production-ready HTML, CSS, and JavaScript. We built it to enable designers to develop websites in a familiar way — i.e., visually — without sacrificing quality.
If you’re mostly a prototyper, you can use the Designer alone, either sharing the prototype with devs to reproduce, or exporting the code.
But to experience the full power of Webflow, you’ll want to combine the Designer with the CMS and our Hosting.
The CMS gif of creating CMS collection in Webflow Like the Designer, the CMS is a code-free web development tool. It has both in-Designer elements (where the site designer works) and on-site elements (where the client and/or content managers work). We call the latter element the Editor, but more on that later.
For now, just know that in the Designer, the CMS lets you structure content types you’ll publish over and over again — like blog posts, product pages, etc. — by combining modular “fields.” Once you’ve created your content types, which we call Collections, you can then use the Designer to determine how Collection items look on the site (like how individual blog posts look).
Ecommerce
Webflow Ecommerce lets you take the power of the Designer and CMS to create a fully custom ecommerce experience. Any Webflow project can be converted into an ecommerce site, but the hosting price differs slightly from a regular website.
You can connect your ecommerce website with payment gateways like Stripe, Apple Pay, Paypal, or Google Pay, while also extending your stores capabilities with various integrations.
Hosting Webflow's hosting stack The final piece of the Webflow puzzle is our Hosting platform. Backed by Amazon Web Services (AWS) and Fastly, it’s blazing fast, super-reliable, has enterprise grade security, and you’ll need it to enjoy some of our best features, including:
The CMS
The Editor
Form management
Responsive images (automatic resizing of images by device to improve performance)
Free SSL/HTTPS (improved site security that Google is basically making a must for sites that ask for visitor information)
Okay, now that we have the lay of the land, let’s talk about diving in.
Designing and building a homepage Before we create our first blank project, we need to understand how websites are fundamentally built on the web — HTML and CSS.
The fundamentals: box model Websites use the box model, a design principle that lets us understand that everything on a web page is basically a box within a box. These boxes are HTML components known as “divs.”
showing the box model principle on the Webflow homepage In the image above, we have a section (outlined in black), a container (outlined in red) to keep everything responsive within the section, and various divs (outlined in blue) that act as content within the container.
The nomenclature for section, container, and div comes down to how you style and label the divs, using what are known as CSS classes.
We use CSS for spacing, positioning, alignment, fonts, and styles of these HTML boxes and their contents. We add what is known as a CSS class to each box, which is like a preset you create for style settings. Classes are reusable throughout the site and allow you to stay organized as you build out your website.
To sum it up:
HTML is the component on a page
CSS is the design of that component
Congratulations, you now have a general understanding of how websites are built. A fun exercise you can do now is go to your favorite website, say apple.com, and open up your web browser’s inspect element.
picture of apple.com using inspect element You can view the code (on the right) and see how everything is a box (aka a div). Within those divs are sometimes other divs with content like headings, paragraphs, and buttons. This is all HTML. You can see how the designer of apple.com labeled their classes for each component/element and div, while also being able to view the CSS in the Styles section.
Okay, let’s get building.
Building in the Designer The best way to learn Webflow is to actually build in Webflow. To get the most out of this guide, I’ll need you to follow me in all of the steps we are about to go over.
The first step is to create a blank project.
blank project in the Webflow Designer Here you’ll see everything you need to build any powerful website. On the left side, you’ll see everything you need to add and edit components, and on the right, you’ll see everything you need to style those components.
In Webflow, the first 3 buttons on the left side of the Designer are what you use for HTML elements.
adding HTML components buttons The first is your Add Elements panel. Here you can add components like divs, buttons, text, images, forms, etc. The second is where you can add and manage symbols. These are sections that you can pre-save and reuse on multiple pages, like your navbar or footer. The third is the Navigator, where you can see the hierarchy and structure of your components.
Before we drop any elements onto the canvas, let’s determine our typeface and the font size of our Body (the main page we build on).
Start by selecting Body in the Navigator. Then, head over to the Style panel (on the right) and select the class "Body (All Pages)." Any style edits we do to this class can be reused on additional pages of our website. For example, if we want to add a main background color to all of our pages we would do that here. In this case, we’re keeping it the default white color.
gif of adding typography to Body (All Pages) class We’ll want to establish our base font and sizes by going to Typography and selecting a font from the list. You can also add a custom font in your project settings which will reflect in the dropdown.
We selected the font Verdana, and now we want to select the base font size. 16px is a standard for font size, and adding “1.4-” for the height will make sure that the font height is 1.4 times the font size. If you want to learn more about advanced web typography and font settings check out this video:
Okay, let’s add some elements. We’ll start by adding a pre-built navbar.
Next, below that we’ll add a Section div for our hero section. Once we drop in the Section div, we can add a class to it and name it “Hero Section,” just so we can stay organized and see all the elements neatly in our Navigator.
gif of adding navbar and section in the Designer We can now make some styling changes to our navbar, starting with making the background the same color as our Body.
gif of changing navbar color Just select the navbar in the Navigator and change the background color in the Style panel.
Now let’s add a logo. Make sure to have your logo saved as either a PNG or SVG and upload it to the asset manager in your Webflow project. From there, you can drag and drop the icon asset onto your canvas.
gif of adding logo in navbar Now let's adjust the padding on the logo and add an extra nav link.
adding padding on the logo Adding a new navbar link is as simple as copy and pasting — Command C and Command V on Mac, Control C and Control V on Windows.
Nice, we have a simple navbar. Let’s get down to the hero section.
We’ll start by adding a Container to our Hero Section. We want to recreate the current Webflow homepage (kinda) so we’ll also need to add a Grid to our container.
gif of adding grid to container Once the Grid is added, we can right click on it and delete the default extra row. This way we have a simple two column grid within our container.
Referring back to the box model, we’ll also want to add a div into each column and add classes to them (Left Column Grid and Right Column Grid) so we have them labeled properly and can style them later.
We added an image element to our Right Column Grid and now we can add our content within the Left Column Grid.
gif of adding heading, paragraph, and button to grid We start with a heading, a paragraph, and a button. As you can see in the video above, we can add our elements by dragging and dropping them onto the canvas, or by dragging and dropping them straight into our Navigator. When working with grids, it’s easier to align things within the Navigator. As you can see, we added the paragraph in the Navigator instead of on the canvas. This is because the element wasn’t going where we wanted it to go.
Now, we can add our content and style them using the Style panel on the right. Let's adjust the font size and add margin for spacing.
gif of changing font size and spacing Okay let’s make this look a bit better, starting with the CTA (call to action) button.
gif of styling button Let’s change the button color and add more padding between the button text and the inside edges of the actual button.
Button padding Padding on the CTA button We use padding for creating space inside elements, and margin for creating space outside of elements. For something like separating our heading, paragraph, and button, we used margin because we wanted to create space between these elements. But for our button, we wanted to create more space inside of the button element, so we used padding.
Which leads us nicely into the part where we add padding to our Hero Section to give our Grid some room from our navbar.
gif of adding top padding to hero section After adding padding to our Hero Section, we also want to center our image within the Right Column Grid to line it up with our Left Column Grid.
To do this, we just select on the Right Column Grid we made earlier and within the Style panel, click Align to Center. This will make sure all contents within the Right Column Grid fall to the center of the box.
Now let’s add a section to show off all the clients that we have.
gif of adding client logos grid After we create our five column grid, let's set the class name on the Grid to Client Logo Grid. Now, we'll want to upload our logos to our asset manager. I’ll be using one logo five times for demonstration purposes.
gif of adding logo images within the five column grid Simply drag and drop your logos into each column on the grid. After dropping the first image, we want to make sure our logo is in the middle of our grid. To center the logo, select the image and in the Style panel click Justify to center.
Because we are using the same logo for all five columns, I simply copied and pasted them (Command C and Command V on Mac, Control C and Control V on Windows) in the video above.
We just built our first homepage!
I’m not a great web designer, but hopefully you have a better understanding of how to approach Webflow as a beginner. If you can get this far, your Webflow development skills will pick up in no time.
For reference, here is how my Navigator looks. Notice the placement of our components:
image of components withing the Webflow Navigator But wait, we only know that this looks good on desktop. What about tablet or mobile?
Make it responsive Now, if you’ve ever worked with responsive design before, you’ll know that things can get a little hairy at this stage.
The good news is: Webflow has already done a lot of the hard work for you! To see that in action, we’ll step down through the various device previews available at the center of the Designer’s top bar:
image of top of Designer Now toggle through each breakpoint and see how it affects your design.
gif of toggling through different Webflow breakpoints If you design the way we did, Webflow will automatically try and make everything responsive. But sometimes you need to scale down, or move things around, if using Grid (which we are).
We can see that anything in tablet mode, or smaller, makes our featured image look off. Our font size is also a bit too big, along with our content being too close to the edges.
Let’s fix all of this.
Whatever design changes we make in tablet mode will reflect down to the smaller sizes. So start in tablet mode and work your way down as needed.
First, start by fixing the way the featured image is displayed. Instead of the image being squished to the right, we want to move it to the bottom of the hero section.
To do this, click on edit grid. From there add one extra row, and right click to delete the left column our featured image is in. This will automatically force our Right Column Grid, with our image in it, to the new bottom row we created.
gif of making grid responsive in tablet mode Once that happens, click Right Column Grid and move the image to the center of the div by clicking on Justify center. From there, add some top margin to Right Column Grid to bring it down.
Looking good, let’s move down to mobile landscape mode.
gif of mobile landscape First thing we see is that the font size is too big, let’s decrease that. Next, we want to bring our content in from the edges. To fix this, select the Container that our entire Grid is in and add padding to the sides.
Last one, let’s go to mobile portrait mode.
gif of mobile portrait Again, the font is too big. Let’s downsize the heading, paragraph, and button text.
We’re done!
As you can see, the client logos at the bottom stayed responsive and downscaled themselves. But if you want the logos to stack on top of each other, follow the exact same process we went through for the grid in our hero section.
You did it, your first responsive homepage, built in Webflow.
gif demonstrating responsive Webflow website You should be proud, I know I am. We just visually developed a whole homepage with code. Building in Webflow let us experience the power of code, without actually writing it. Check out all the HTML and CSS we visually wrote in this guide:
gif of showing Webflow code export That’s pretty cool if you ask me. If you have any questions, feel free to leave them in the comments below — happy creating!
Unleash your creativity on the web Build completely custom, production-ready websites — or ultra-high-fidelity prototypes — without writing a line of code. Only with Webflow.
Get started for free
More resources If you want to develop your web design skills, we highly recommend you check out our Ultimate web design course and other resources below:
Webflow University: learn web design, development, and time travel Webflow Forum: Q&A center Webflow Community: to talk to other people about your projects and learn about upcoming events and launches Webflow Blog: web design inspiration, guides, and tips Template Marketplace: purchase pre-made templates Webflow Showcase: the community hub for websites, including cloneables Webflow Experts: hire Webflow designers to help
1 note
·
View note
Text
WebsiteDesignCourseInDelhi
You'll also learn about SEO, including how organic and paid searches work, how to set up Google analytics, and how to optimise your website for search engines, in addition to these basic web design skills. WebsiteDesignCourseInDelhi
Once you've mastered the basics, you can move on to more advanced topics such as creating complex animations and interactions, as well as a variety of other lessons that will help you stand out in your design work. WebsiteDesignCourseInDelhi
Webflow puts everything you'll need to build responsive websites in front of you, even if you don't know anything about HTML, CSS, or JavaScript. The Webflow University courses break down the fundamentals and include step-by-step guidance to help you become the designer you've always wanted to be. WebsiteDesignCourseInDelhi
2. Creating a Clean & Simple Website with Webflow
With Creating a Clean & Simple Website with Webflow, Jan Losert, a talented Czech designer, has put together a detailed online web design course. WebsiteDesignCourseInDelhi
He demonstrates the fundamentals by demonstrating how to design and create a startup community website step by step. Jan seems to be truly enthusiastic about architecture, and his upbeat demeanour makes all of these lessons inspiring to watch. WebsiteDesignCourseInDelhi
He not only walks you through every step of the process, but he also makes the whole website free to clone. This allows you to see how the different elements fit together and how the whole page design works together. Understanding these principles is much simpler when you work on this simplified, real-world example rather than beginning with something too ambitious. WebsiteDesignCourseInDelhi
These lessons go into the main design concepts that everybody should be aware of. A few of the topics covered include navigation, calls to action, div blocks, SEO, and responsive web design. This free online course has a lot to offer, and even if you have little experience, you'll find something useful.
If you want to learn how to build websites, you shouldn't start with anything too difficult. Jan's Creating a Clean & Simple Website with Webflow is a great place to start because it's a simple project with a lot of features.
3. The Webflow Masterclass WebsiteDesignCourseInDelhi
Flux Academy's creator, Ran Segall, epitomises what it means to be a self-employed web designer. He brings both experience and skills as someone who understands graphic design, what it takes to work with customers, and how to run a company. His premium Webflow Masterclass combines all of his knowledge into a course that is both educational and inspirational for any aspiring web developer. WebsiteDesignCourseInDelhi
The underlying thread that runs through this coursework is an entrepreneurial spirit. Learning how to build personalised websites not only makes you a better designer, but it also allows you to charge more for your services. WebsiteDesignCourseInDelhi
Along with tutorials in learning about web design and Webflow, there's other materials to help you out in your career. One of the hardest things when you're blazing the trail as a freelance designer is figuring out how much to charge. There’s a discussion dedicated to pricing your own work. This mix of teaching design skills, and navigating other aspects of the job, makes this a well rounded
This online course is a celebration of the no-code movement as well as a way to expand your skills. Ran's philosophy is to use Webflow to open new doors to innovation and sales by moving beyond the bounds of templates. This is a positive message for any web designer, regardless of where they are in their career. WebsiteDesignCourseInDelhi
4. Memorisely
It's like working in building and not knowing architecture if you're a web designer and don't know anything about UX or UI design. You can put something together that has a structure, but it's difficult to know if it'll be a functional space that people would enjoy traversing
The emotional experience of a website is formed by UX, while the controls and pathways to navigate through it are created by UI. Both disciplines take the raw materials of a page design and bring them together in such a way that working through it is enjoyable for the user.
Also for those with a lot of experience, it's easy to get the terms UI and UX mixed up. You should be aware that UX (user experience) refers to how the user flow and information layout of a website affects anyone scrolling through it.
You should also be aware that UI (user interface) is concerned with the accessibility of menus and buttons, as well as their visual styling. Being able to speak about UI and UX without sounding like a fool increases people's confidence in you as a web designer.
Memorisely provides training in both to better educate you and extend your knowledge of these web design disciplines.
Memorisely provides 6-week part-time bootcamps as well as monthly ebooks that cover different aspects of user interface and user experience design. These ebooks are particularly useful for those who want to stay up to date on new technologies and ideas, and they provide models (some of which are Webflow) to demonstrate these concepts. WebsiteDesignCourseInDelhi
5. Design + Code
Wow, that was incredible. On Design+Code, there are plenty of interesting courses to choose from. If you want to learn React, Vue, After Effects, or Webflow, there are plenty of resources available. WebsiteDesignCourseInDelhi
Other subjects appealing to creatives include sound design, video editing, software design, and game production, which can be found in their list of courses. It's like going to a warehouse store for design geeks and techies, with racks stacked with goodies to help you learn new skills.
Their free Webflow course walks you through the process of creating a functional website. This isn't a bare-bones, uninteresting website created solely for the purpose of learning, but a fully functional website with multiple pages containing interactions, CMS info, and payment processing. Webflow assets are given, making it simple to follow along with and experiment with the template on your own.
Conversions are emphasised in this online course. It explains how to improve the user experience by using content, calls to action, and integrating customer input. It's all too tempting for new web designers to get caught up in the visual aspect of things and forget these design concepts that aid conversions.
6. Design. Build. Launch.
Caler Edwards' Design. Build. Launch has a lot to recommend it. Designing with Webflow is the subject of a YouTube collection. One of the best aspects of this online course is that you can receive your own portfolio page upon completion. You will not only learn about the web design process, but you will also take home something useful. Another fantastic feature of this web series is that it starts the design process with the free Adobe XD app. Caler demonstrates how to wireframe as well as some of the fundamentals of UX and UI design.
This is a good place to start because it gives you some practical theory before you start designing. Keeping these principles in mind when you start creating a page template with Webflow will help you understand what you're doing better.
The course then walks you through the process of creating a web design step by step. You'll learn how to add linked navigation, practise responsive web design, and bring together elements to build your layout.
The series' final video discusses SEO, which is critical for organic scope. This is one of the most enigmatic aspects of web design, but Caler makes these principles simple to grasp.
He goes into how to use Webflow to add title tags, meta descriptions, and how social media's open graph systems operate. This is an easy step to overlook when creating the first website.
7. Learn UI/UX
Learnux.io has a number of web design courses available. When you first visit their website, you'll be greeted with fresh and enjoyable scroll activated animations, interactions, and smart page design, all of which make a strong first impression. You know you've found the right place to learn about these aspects of web design because the UI and UX are so well thought out.
New designers who want to understand how CSS and HTML work will benefit from the HTML/CSS lessons in particular. Knowing how to understand the nuances of cascading style sheets will help you understand how they function when you're using them in places like Webflow.
From the fundamentals of UX and usability to prototyping and handoff, these video courses cover every aspect of the design process, ensuring that beginners have the skills they need to create their first website.
Begin with web design courses and end up a designer
When you first decide to learn how to be a web designer, the path ahead of you can seem intimidating. Essential concepts like UI and UX design, graphic design, CSS, HTML5, responsive web design, and design guidelines to follow are all laid out in front of you. If you've ever wanted to be a designer, there are a plethora of classes and design platforms available, including Figma, Adobe XD, and Webflow.
If you’ve ever wanted to be a designer, there are so many classes and design platforms like Figma, Adobe XD, and Webflow that can help you on your way.
Let us know in the comments below if there are any other web design courses you think aspiring web designers should know about!
1 note
·
View note
Text
How Web Design Newsletter
>>> Click here to subscribe and get the How Web Design newsletter sent to your inbox. <<<
____
Some of my favorite tutorials I've seen in the last month or so. — Craig Node.js Crash Course [Video] Explore Node.js fundamentals including modules such as path, url, fs, events and we will create an HTTP server from scratch without Express and deploy to Heroku. 100 Days Of Code Frontend Curriculum Day to day schedule for learning front-end development. Covers a wide range of front-end development topics, it can be thought of as more of a "survey" style course. WebFlow - Build, design, launch a website AD Build custom websites visually, manage projects in a shared dashboard, collaborate with your colleagues, then charge clients directly for ongoing costs right from Webflow. It’s the all in-one platform for growing agencies serving modern clients. Using CSS Grid the Right Way CSS Grid is robust, flexible, and a refreshing paradigm shift from other CSS layout systems. While these are selling points for Grid, they also make it hard to learn. A Detailed Guide to CSS Animations and Transitions The X-factor that makes these websites stands out. Animated CSS Burger Components Available as plain html/css or as React components. Fully functional WhatsApp Clone using React An open-source full-stack example app made with React 16.7 (Hooks & Suspense), TypeScript, GraphQL-Subscriptions/Codegen/Modules and PostgreSQL
____
Join 2861 other frontend web designers and UI/UX professionals to receive hand picked; design inspiration, tutorials, industry trends & updates — sent monthly.
310 notes
·
View notes
Text
Webflow CSS tutorial (using the Old UI)
Using a color picker can be helpful, and sometimes it's all we need. But for precision, we often want to get more specific. And there are three common ways that colors are represented on the web. We have color names, hex codes (or hex triplets), and RGBA. Let's start with names. These are the common color names for 140 colors that are supported by modern browsers. For instance, sometimes we see 1E90FF, which might be more challenging to remember than DodgerBlue. So if we type in DodgerBlue, we're all set. But the names and the colors are somewhat arbitrary, like LawnGreen, PeachPuff, BlanchedAlmond, and of course, LemonChiffon. Because these presets—because HTML color names aren’t a full representation of what's entirely possible with web colors, sometimes it can be a bit more freeing to use one of the other formats. With that being said... We have hex codes. And these are usually six-digit codes that correspond with a precise color output. And the reason they're also called hex triplets is because there are three sets of two digits. Red, green, and blue. The same three colors that make up each pixel in a display. As you increase the value of a particular color? The more of that color you get in your output. Set all values to zero? We got black. Ramp up the red? We got red. And if we add blue, we approach magenta. Add in some green, now we have full white. You can play with the red, and the green, and the blue to get virtually any color you can think of. The hex part of this is pretty simple if you're a fan of counting. In traditional counting, base-10, we count 0 through 9 in the ones place. Then we switch the tens place to a 1, counting 0 through 9 again. We repeat each time we pass 9. When we count hexidecimally, which is not a real word, we just add the letters A through F after our nines. That's it. Before we switch to 10, we're going to do A, B, C, D, E, F. Then, we switch the digit to the left after we count past F. We’re just adding A through F after our nines. Same thing in the tens place, when our numbers get large enough. Sometimes designers and developers will use shorthand hex. On Google, the background attribute is FFF and the color attribute, which affects text color, is 222. You can use shorthand hex—if you’re working with a color that has repeating digits in all three of the color values. Like AA-BB-CC or 44-11-EE. You can simply omit the second digit for each color, making it ABC or 41E. Now if hexadecimals aren’t your thing, you don’t need them. In fact, if you prefer to think numerically, you’re in luck, because RGBA uses good old-fashioned base-10. Normal numbers. What’s after 9? 10. What’s after 99? 100. What’s after six... RGBA uses the values 0 through 255 to represent each color—that’s 256 levels of red if we include zero. Same control here as hex. Red, green, blue…and in this case, the A, of course, is for Alpha. This is incredible freedom right here when we’re setting colors. So we can control the opacity from completely transparent to fully opaque. The lower the alpha, the more transparent the color. The higher the alpha? The more opaque. So. We have color names for some of our more specific colors like Chocolate and BurlyWood, we have hex codes or hex triplets, which let us specify red, green, and blue values hexidecimally, and RGBA: numerical control over each color and the ability to adjust opacity.
https://youtu.be/JBRZ3KBfOk8
0 notes
Text
[ THEFACEBOOK ] - Breif 5
sammarbeidspartner: Idun
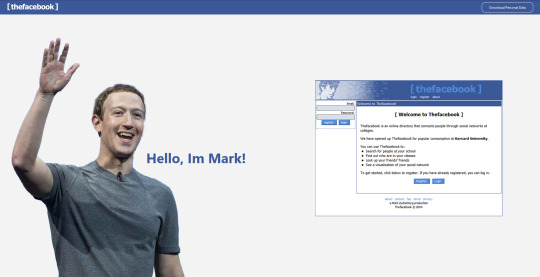
occstudio.com/zuckerberg NB: Nettside støtter KUN Desktop
Konsept
Facebook, evolusjon / Mark Zuckerberg memes
Lyd
Ai TTS (text 2 speach) — https://fakeyou.com/
Musikk loop
“Oh, I'm an alien, I'm a legal alien I'm an Englishman in New York Oh, I'm an alien, I'm a legal alien I'm an Englishman in New York”
ChatGPT: Koding, debuging
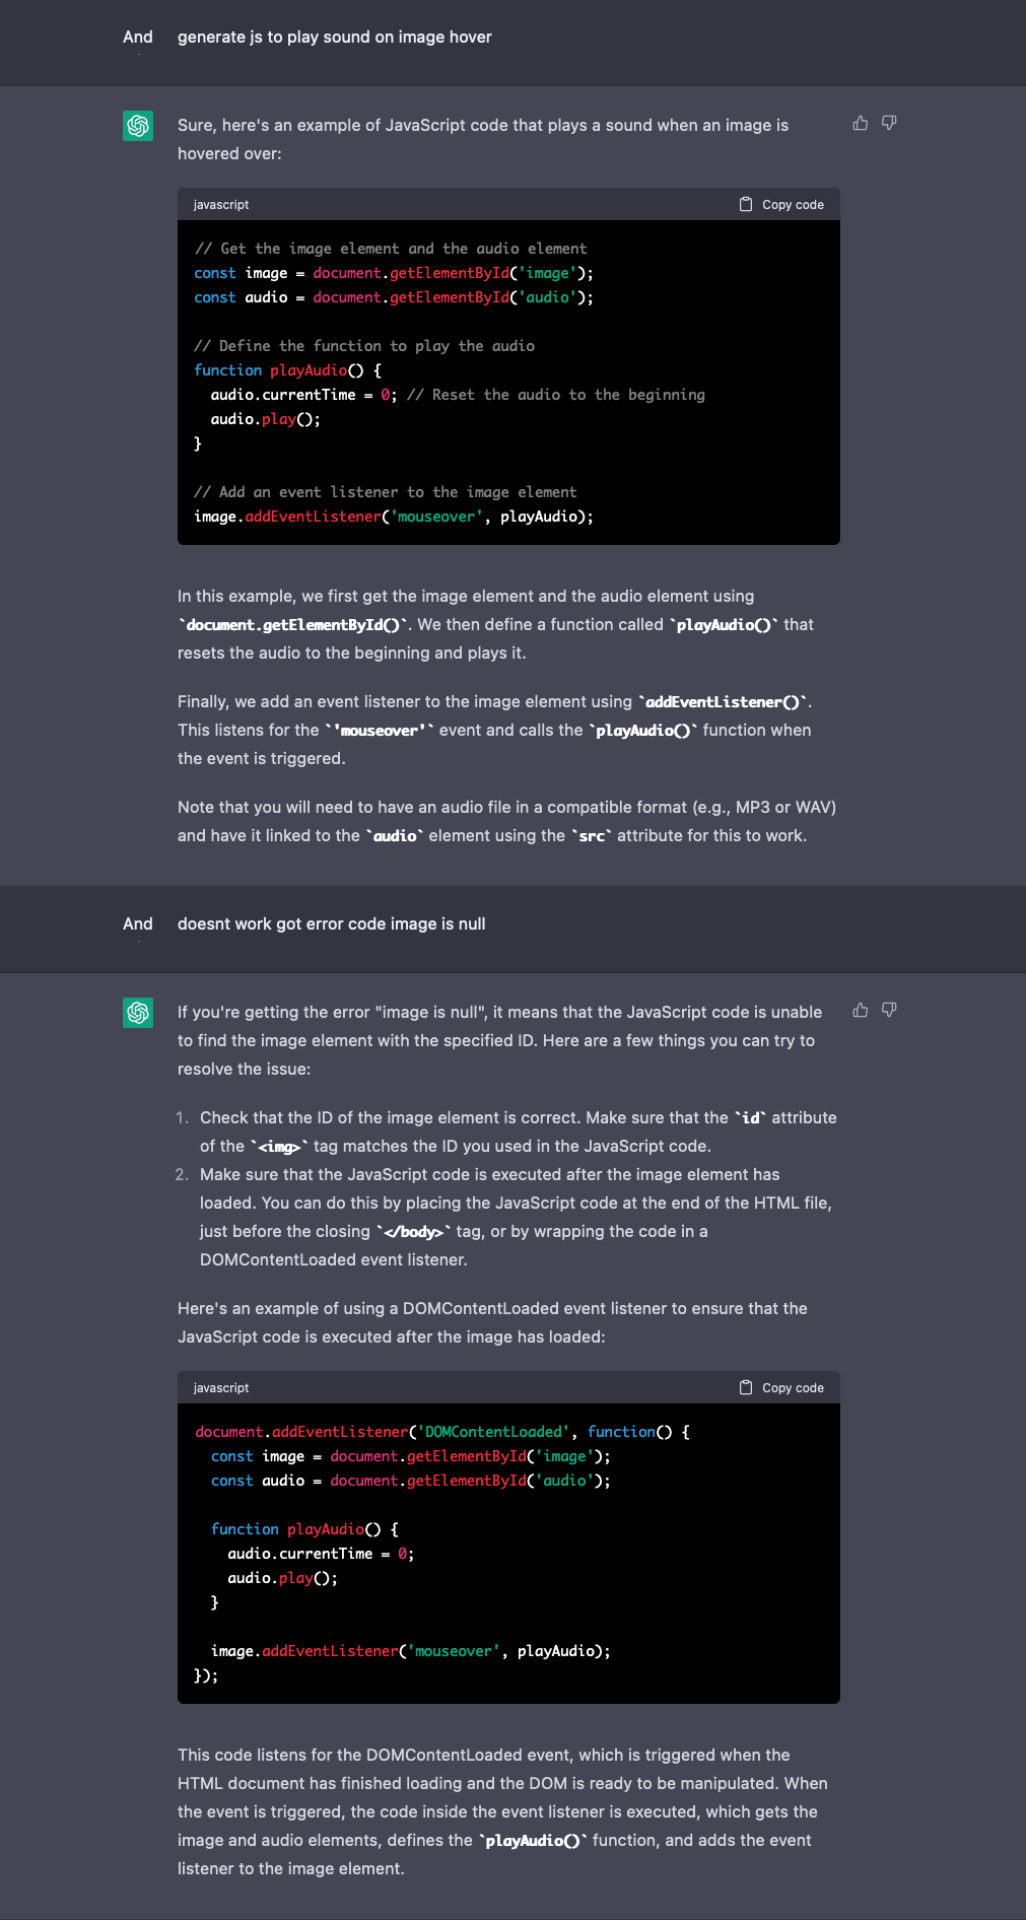

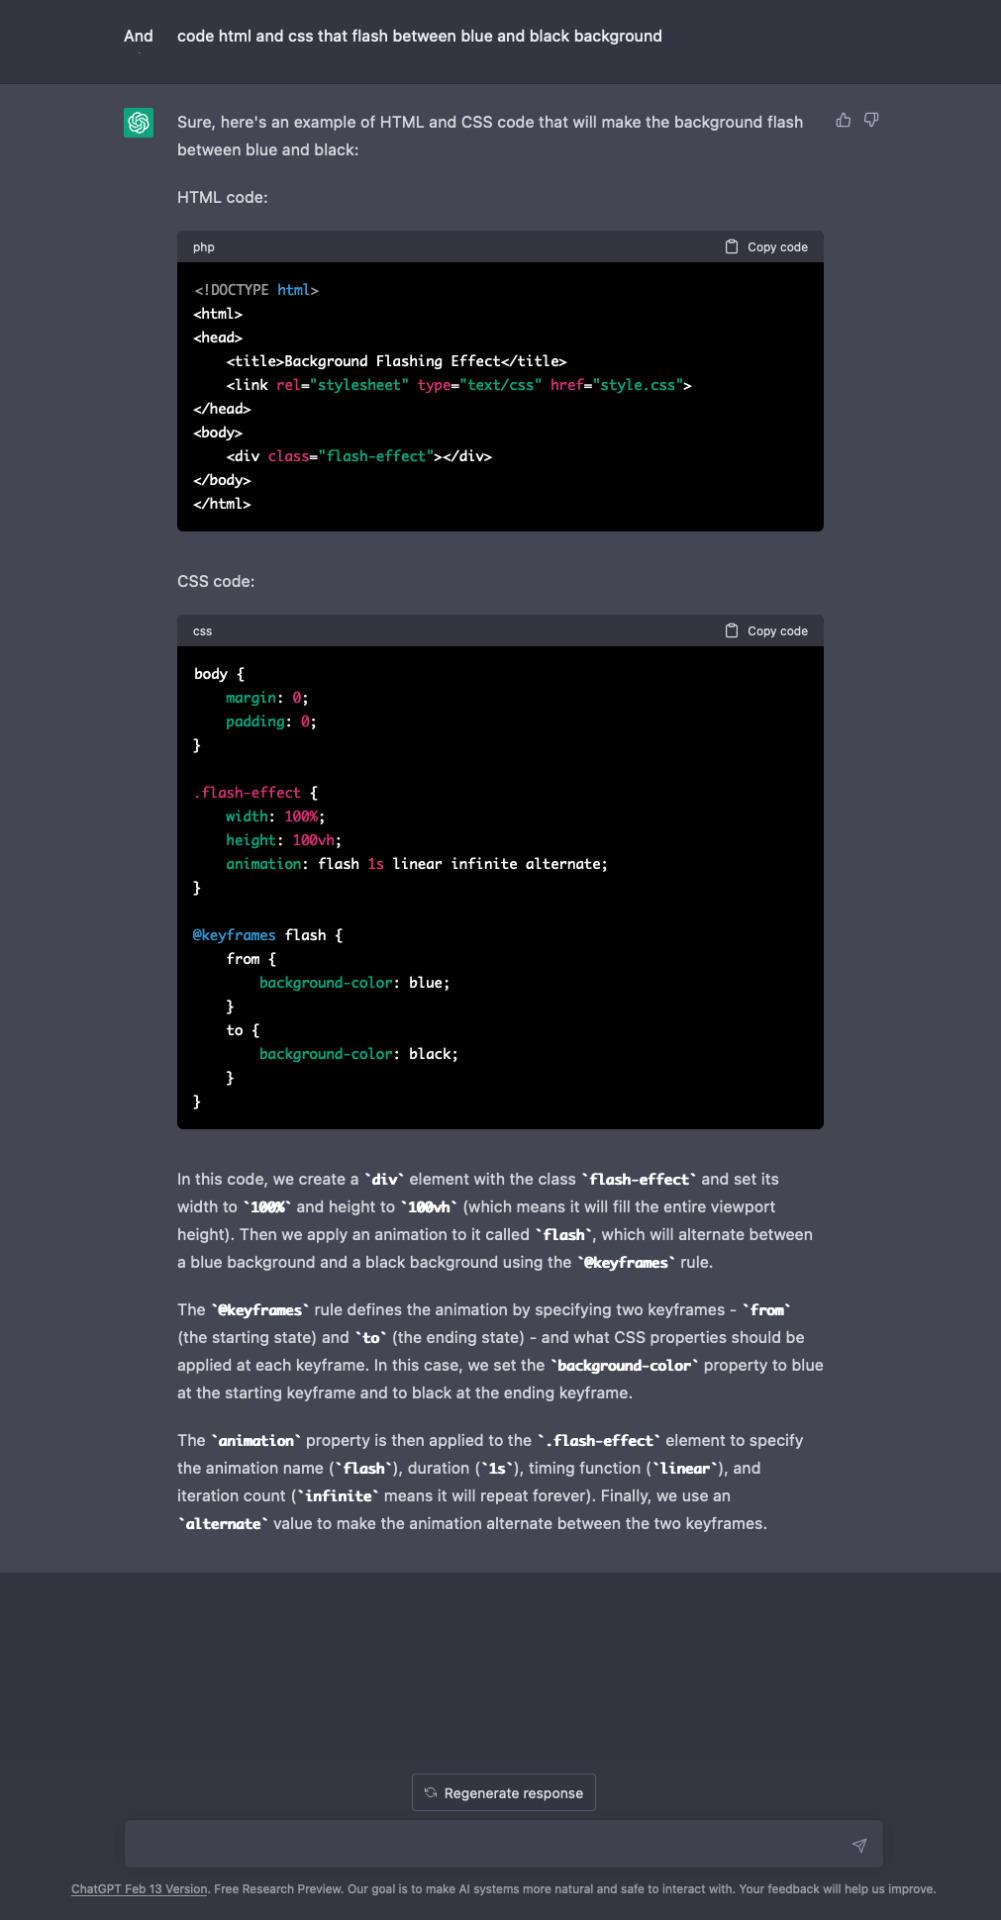
Jeg brutke mye chatGPT til å debugge kode, dette gjorde jeg ved å lime inn kode og error meldig fra inspect element på browser inn i chatGPT. Det var veldig nyttig og skal brukes oftere da det tar kort tid.
Forstå HTML & CSS: Div, Flex og alle andre HTML, CSS finurligheter.
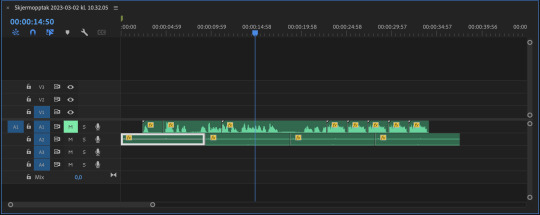
Formater
Video av facebook innlegg som fortellende tekst isteden for paragraf. Prøvde WebP format først, for en mindre filstørrelse som også kunne bli brukt i “Background-image” stylen. Fant ut at WebP har noen begrensninger. (Bilde kvalitet når bildet skal opp skaleres og frames i forhold til lengde på video.)
https://www.adobe.com/creativecloud/file-types/image/raster/webp-file.html
WebP files.
WebP files were designed entirely with the internet in mind. Their main uses include:
Reducing website image sizes.
WebP aims to balance quality and practicality when it comes to website images. With the help of predictive coding, WebP files compress photos and graphics without reducing the quality of their appearance. Smaller image sizes also ease the strain on user broadband connections and make websites faster to navigate, improving page experience.
Supporting online animations.
While GIFs have long been the dominant format for memes and other basic online animations, WebP files offer an alternative. According to Google, an animated WebP can be significantly smaller than a GIF, requiring fewer bytes.
Advantages of WebP files.
Faster-loading webpages offer a better user experience and even boost a website’s ranking in search engines. In contrast, websites with slow-loading images might encourage users to look elsewhere when shopping for products and services.
The WebP format is highly compatible with various web browsers, including Google Chrome, Microsoft Edge, and Mozilla Firefox.
WebP might free up storage space for businesses by compressing their website images into more manageable sizes.
Disadvantages of WebP files.
The WebP file format is designed mainly with the internet in mind, so it might not be helpful if you use images offline.
Some older browsers, like Internet Explorer, may not be as effective in supporting WebP images, despite the format’s broad compatibility.
Even a small amount of compression can reduce the quality of an image, which is worth keeping in mind if you work with professional photographers and high-quality images.
Debugging ved upload på server
Da jeg skulle laste opp nettsiden på server la jeg merke til at linking til filer var feil. var noen spesifike steder der jeg bruke //"foldername"/"filename" dette caller til root(første mappe), noe jeg ikke ville i denne situasjonen, hvor nettsiden ligger i egen mappe på nettsiden. I denne situasjonen ville jeg heller gå tilbake en mappe og brude ha brukt ./"foldername"/"filename"
Koste meg maks og var godt sammarbeid! Var vanskelig å ikke le... 😆, likte briefen veldig godt. Har vært veldig lærerikt og har kost meg mye med research av html, css, Js osv.
0 notes
Video
youtube
Liked on YouTube: 2D & 3D effects and transitions in CSS — Webflow tutorial https://www.youtube.com/watch?v=YHQ820W8FRw
0 notes
Text
How to Learn Web Design - Build a Website That Looks Good on Every Browser and Device
Learning about web design can be a big hurdle for some people. But, with a little bit of determination, some commitment and hard work, you can learn how to do it. Below is a list of tips and ideas for you to look into.
Social Media
The use of social media has become more prevalent in the web design industry. As such, many designers have found that learning web design without social media is not a good idea. You can sign up for an online marketing course like Hoot Suite. This course can teach you how to maximize your social media presence.

Visual Studio
Microsoft's visual studio is arguably one of the most popular software programs for designers. Most people are familiar with the basic function of building websites. However, you can also learn how to use visual basics for web designers.
Color Theory
Even though you will not be directly dealing with color theory in a real web designer's job, color theory still applies to visual design as well. You will want to incorporate certain color schemes in your web design, such as using a lot of black and white.
Inspect Element Visibility and Testing
When someone is building a website, they will likely include an HTML form. One thing that is often overlooked is the need to inspect the form's HTML code. When you learn web design with Inspect element visibility and testing, you will learn how to make changes based on what is visible. For example, when a form contains a text box, you want to make sure that it can be edited properly.
Once you have learned web design with visual basic, you will want to know more about testing. There are several different ways to test your layouts. In particular, you may want to try writing a test page and seeing how it looks before making any changes to the site's code. Keep in mind that a test page may be short, but it should still show you what things are supposed to look like.

Mastery of CSS
CSS is a coding language that enables you to style and format your web page. CSS works with HTML, so you will have to know how to combine these two basic building blocks to have a basic working website. CSS gives you the ability to put graphics and videos right into your web pages, and there are CSS preprocessors and CSS transitions that allow you to change the appearance of a web page without changing the HTML code.
To build a site that looks good on a variety of browsers, learn and master CSS. Numerous free online tools help you learn and build a site with CSS, and you may want to check out the Code Pad tutorials available from Smashing Colors. To know more about web design click here.
Color Theory and Typography
While you cannot expect to become a professional web designer by simply learning how to use Adobe's Dreamweaver program, you can learn about color theory. Before becoming a web designer, understanding these concepts is essential to succeeding in this career field. For example, you must grasp how different hues affect viewers' perceptions of color.
You must also understand typography when learning web design. It may seem easy, but understanding how typography affects the way that users read can be complicated. Before becoming a web designer, it would be helpful to brush up on basic skills in typography.
For example, you should learn to recognize the difference between "size" and "style" in terms of web designs. Knowing the difference between these two things will help you avoid confusing visitors to your site and make sure the information is clear.

Webflow Diagrams
You will need to understand the webflow and how it can affect your designs. Webflow diagrams, which are sometimes referred to as WYSIWYG (what you see is what you get), are diagrams used by designers to display the data that they need to build their sites.
0 notes
Text
7 Tech Side Hustles That Seriously Pay
While tech skills can provide an actionable and achievable path toward a complete career change, it doesn’t have to be as extreme as all that. Flexibility is one of tech’s most defining features, and part of that flexibility is the wide range of ways tech skills can be used. Yes, you can land a full-time job in tech working for a single company, or launch your own full-time business working for yourself. But what if either of those options are more than you need? If you’re a parent or caretaker looking to make extra cash on the side, someone who wants to supplement their day job with an additional income stream, or a retired person looking to boost a fixed income, is tech still for you? The answer is yes!
Whether you’re working toward full-time tech employment or you’re hoping to score part-time work that actually pays, keep in mind that learning tech skills will allow you to take advantage of the growing gig economy by starting a tech side hustle. Intuit, the parent company of TurboTax, says that in 2017 “gig” freelancers (including everyone from Uber drivers to traditional freelancers like plumbers and electricians) made up about 34 percent of the workforce, a number that Inuit projects to reach 43 percent by 2022. Tech skills are an ideal way to break into this rapidly growing sector, so we’ve put together a list of seven hustle ideas that seriously pay, plus examples of the rates freelancers in those roles are asking on freelance work site Upwork. Spoiler alert: Based on current Upwork listings, working these side hustles for ten hours a week could net you from $700 to $6,000 a month.
1. Web Development
Becoming a web developer is the end game for a lot of people learning tech skills, and for good reason. The Bureau of Labor Statistics (BLS) lists the 2017 median web developer salary at nearly $70,000 per year and projects a 15 percent job growth rate (much faster than average) between now and 2026—all of which means web development is a lucrative and future-proof entry point into tech. But it’s also a very flexible field—while you might picture yourself down the road working full-time job as a web developer for one company (or running your own freelance business), there’s nothing stopping you from taking on paid clients and making extra cash while you’re still learning the ropes (or taking up part-time web development as a long-term side hustle).
Once you know fundamental web skills like HTML and CSS (markup languages used to format and stylize web pages) you’ll be able to start building basic websites, and these are skills that can take as little as a few weeks to learn. Add some JavaScript (a scripting language used to add animation, interactive forms, and other dynamic features to websites) and familiarity with WordPress (software for creating, publishing, and managing digital content) to your toolkit, and you’ll have an even wider range of sites you can build and clients you can land. Free tutorials on HTML, CSS, and JavaScript can be found on sites like Codecademy and w3schools, and—when you’re ready to expand your skills further—paid, instructor-led courses from sites like Skillcrush can help take your game to the next level.
Average Web Developer rate on Upwork: $75/hour
2. Web Design
Where web development is the building of websites, web design is the process of designing what a website will look like. This includes making sure the site is aesthetically pleasing, while also creating a sensible layout that’s easy for people to use whether they’re on a computer, tablet, or smartphone. Web design typically involves tools like Photoshop (an industry standard image editing program) and Webflow (a software program used for web design layouts) to create mockups of how finished sites will look. Like web development, web design is a field you can start freelancing in as you learn. And if you’ve put together some of the web development skills outlined above, all the better—you can earn even more extra cash by combining web development skills with web design skills and providing a full service freelance option for paid clients. You can find basic web design courses online at sites like Coursera, or take a deeper dive with Skillcrush’s Web Designer Blueprint.
Average Web Designer rate on Upwork: $74/hour
3. SEO Consulting
SEO (search engine optimization) is a tech speciality you can pick up while learning other skills (like web development or design), giving you a another option for making side hustle money. It’s the practice of improving a website’s ranking with search engines like Google and Yahoo, meaning the site will show up higher in search results. SEO consulting jobs involve staying up to date with SEO best practices and helping clients implement these practices on their website—this includes researching keywords (the terms used on search engines like Google that are bringing users to your website), analyzing website traffic and trends (identifying what other sites your users are coming from, what links from your site they’re clicking on, etc.), and using this information to improve your website’s search rankings. Google’s Search Engine Evaluator Guidelines is a key place to start if you want to learn more about SEO, after which you can familiarize yourself with industry standard analytics tools like Google Analytics, NetInsight, and Webtrends. Lastly, while developer skills aren’t a must for SEO specialization, any web skills you’ve picked up will also help your cause. SEO specialists often work closely with developers to consult on issues like site loading speeds, outdated or broken links to URLs (web addresses), and optimizing HTML tags (tags that identify HTML documents for visiting web browsers), so being able to speak on these issues using development concepts and language will improve your effectiveness at the job. Basic understanding of skills like HTML and CSS (so you know your way around the structure of a web page) and WordPress (so you’re familiar with how to edit and optimize content stored on the WordPress platform) are recommended for SEO consulting.
Average SEO consultant rate on Upwork: $66/hour
4. Copywriting
Copywriting might not seem obviously related to tech, but—if you already have a writing background—tech skills can help get your freelance writing online in ways that lead to extra money. Think about it—while tech mainstays like websites, web applications, software, and marketing emails are all built with coding languages, those products are used to convey content that’s written in human languages. A stunning looking, easy to use website or app is still going to be dead on arrival if it’s a home for bad copy, so if you know your way around the written word (and particularly if you can combine that knowledge with basic tech skills like HTML, WordPress, and SEO fundamentals) there’s a whole world of companies and clients hungry for freelance writing.
Average Copywriting rate on Upwork: $69/hour
5. Social Media Manager
Chances are—even if you’re brand new to tech skills like coding languages and digital design—you’ve logged some time on social media. However, social media has become such an unconscious part of daily life that you might not even realize having an elite Twitter game or killing it on Instagram are marketable tech skills. The good news is, they certainly are. While you might have social media dialed in, there are plenty of companies and clients out there who don’t (and who are willing to pay a social media manager to handle it for them). Social media managers typically combine experience using major social media platforms (Facebook, Twitter, Instagram, etc.) with copywriting skills (you’ve got to keep those posts and tweets concise-yet -zippy), a bit of SEO knowledge (in order to understand how to analyze and manipulate online traffic), and a basic foundation in tech skills like HTML, CSS, and WordPress (useful for creating custom email templates and blog posts). Put those skills together, and you’ll be ready to seek out part-time work and extra income through a social media manager side hustle.
Average Social Media Manager rate on Upwork: $32/hour
6. Tech Support
Having a background in tech or computers is absolutely not a prerequisite for learning tech skills—tech careers are achievable for everyone regardless of where you’re at experience-wise. That being said, as you familiarize yourself with tech you’ll inevitably start learning your way around computers and technology. And that means you’ll begin accumulating a knowledge base that people are happy to pay for. Tech support jobs are projected to grow faster than average (by 11 percent) between now and 2026 according to the BLS, so even if tech support isn’t your final tech destination it can be a lucrative sideline as you hone your skills. Certification programs like Google’s IT Support Professional Certificate are an efficient way to both learn more about tech support and be able to demonstrate your knowledge to potential clients. But don’t let the idea that you have to know everything keep you from trying to earn money with a tech support side hustle. The more time you spend with tech, the more you’ll see that “knowing tech” means knowing how to use Google and other resources to solve problems, rather than magically knowing all the answers.
Average Tech Support rate on Upwork: $37/hour
7. QA (Quality Assurance) Testing
QA testers are responsible for running tests on websites, applications, and software programs to identify coding flaws and bugs. If you’re new to tech this kind of work might sound out of reach, but it’s actually an ideal platform for learning more about the coding process. QA testers themselves aren’t the ones writing the code (their job is knowing how to run the automated tests that inspect code for problems), meaning you don’t have to be a master coder to do QA work. However, if you start a QA side hustle you’ll be up close and personal with plenty of coding examples to learn from—while also getting paid. If you’re interested in learning more about QA testing, sites like Udemy and Lynda offer online courses.
Average QA Testing rate on Upwork: $47/hour
from Web Developers World https://skillcrush.com/2018/07/19/tech-side-hustles/
2 notes
·
View notes
Text
HTML / CSS Refresh

As it has been quite a while since we touched on the actual code of a design, it was important for us to conduct a CSS / HTML refresh this semester. We will need to know at least the basics of the code for our careers and so Kyle took the time to refresh our brains on the subject.
I have used Webflow to develop my website and Landen to create my digital product page, these are 2 no code applications which allow us to focus directly on the design. However I want to know the behind the scenes so that I have a better understand of why something works the way it does.
Kyle went over CSS grids and Flex boxing which are 2 really important and useful techniques for building websites. It was hard to understand at first as we hadn’t done it in ages but once we had down a fair bit it all started to come back to me. It’s crazy how after neglecting something for a short period of time that we completely forget.
We also went through the basics of HTML and CSS to spark our memories. Things like Padding, spacing, margins, tags, Divs blocks. Even though I didn't use the raw code to create my website I’m glad I used Webflow because it still includes all the programming terms and tools. As a kinesthetic learner I learn best from doing things and making mistakes and so Weblflow as good in that aspect. Before I used Webflow, I wasn't too sure what different terms meant and how to use them but after being surrounded by them visually I now understand them a lot better.
I look forward to getting the opportunity to use code again in projects now knowing what things mean and do. I would like to be gradually brought back into code so that I don't get overwhelmed.
I will use Linkden Learning as an asset for picking up techniques and tutorials on code to better improve myself as a UX / UI designer.
0 notes
Text
Refresh on HTML and CSS
Understanding HTML and CSS is crucial in today’s standards. Even though no code tools like webflow and Umso are most likely going be used for creating my portfolio site and digital product site; it’s important we still have a basic understanding of it to not just rely on no code tools and to show employers that you have these skills that could get you the job. We went over all the basics of html again like tags, links and lists; along with sorting tables and inserting images. We also went over how to make your site responsive with different devices. We do this by using flexible grids like Flexbox and CSS Grid to create breakpoints known as media queries.
We then looked at CSS and how we can style the html content on our page to make it visually engaging. Things like adding padding and spacing, colour, typography etc. Finally, we began looking at headers, main body and footers to understand what content is placed where. Most of your content should be inputted into the main body when writing HTML. This would be your paragraphs and images. The header includes your meta data, name of author and the file name. The footer usually contains your copyright information and social media links for users. So, most of the essential information on the page is contained within the main body.
The best thing looking forward is to keep practicing with HTML and CSS by producing more websites only from code. Even if they turn out terrible it’s still good for improving at writing code. A good idea is to keep using linkedin learning for tutorials on HTML and CSS as they offer as many tutorial videos and guides you could ask for.
0 notes
Text
5 Best Free Courses and Resources to Level Up As a Web Designer

I often see freelancers on social media asking what the secret is to working fewer hours, making more money, and helping new clients to find them. While those things tend to happen the longer you’ve been freelancing, it doesn’t happen without some effort.
If you’re wondering how you can change things so that your business becomes more profitable and easier to manage, education is the key.
But it’s not just mastering new design techniques that will take you to the next level. It’s important to invest your time in a well-rounded education so that you can grow not just as a web designer, but also as a freelancer and business owner.
The good news is that you don’t have to spend a ton of cash on courses or resources. In the following round-up, I’m going to share some of the best free courses to help you level up.
5 Best Free Courses and Resources for Web Designers
Rather than sign up for Udemy, Skillshare and other premium course membership sites, I recommend taking a bootstrapping approach to self-education. I mean, the whole point in learning new skills and strengthening existing ones is so you can run a better business and make more money, right?
Once you have extra funds to throw at premium courses, definitely explore those options. For now, let’s focus on the free courses and resources that’ll help get you to that next level:
1. edX

edX was created by Harvard and MIT in order to provide university-level training and education to anyone, anywhere. While you can’t get certified without paying a few hundred dollars, you can go through entire courses for free.
Courses are offered over a wide range of categories. As a freelance web designer, you’d do well to focus on the following areas:
Design Learn more than just how to design beautiful interfaces. Learn about the technical side of it, too — things like AI, IoT, and cybersecurity.
Computer Science Learn web development and coding.
Business & Management Learn essential business skills like:
Project management
Finance management
Leadership
Marketing and analysis
Communication Learn things like branding, negotiation, reputation management, and critical thinking.
2. Envato Tuts+

Envato Tuts+ might be best known for its succinct step-by-step design and development tutorials. However, it has a new section of free video courses to take advantage of.
Although you won’t learn any soft skills here, this is a great resource if you want to master the tools of your trade.
Free courses give you a deeper look at tools like:
HTML, CSS, and JavaScript
Adobe’s suite of software
Sketch
WordPress
Video conferencing tools
3. YouTube
YouTube is more than just a place to watch entertaining videos. There are some amazing YouTube channels for web designers at all skill levels.
When choosing a design channel and course to follow, look for ones that are well organized. If they’re just posting videos at random without any rhyme or reason, it’ll be difficult to focus on and master one skill set before moving onto the next.
Here are the channels I recommend you follow:
Flux

Learn skills related to:
Web design
Getting started as a freelancer
Strengthening your processes
Building your portfolio
Design theory and strategy
CharliMarieTV

Learn skills related to:
Web design
Building sites with Figma or Webflow
Career paths for designers
Productivity hacks
NNgroup
Learn skills related to UX:
Web design
User psychology
Usability testing
Design thinking
Research and data analysis
Journey mapping
Get access to UX Conference seminars, too
4. Moz Whiteboard Fridays

Even if you don’t offer SEO as a standalone service, it’s important for web designers to understand the role they play in SEO and to stay abreast of the latest and greatest strategies.
If you haven’t tuned in for one of Moz’s Whiteboard Fridays yet, I’d recommend you start now.
Some of the topics might not be relevant to you (like creating a content strategy). However, there are others you’ll get some great tips from, like the one above that talks about creating great visuals, preparing web pages with tags and schema markup, and optimizing for featured snippets.
5. Nir Eyal – Indistractible

Nir Eyal has made a name for himself over the years as an author and presenter on the subject of human psychology and behavior. His first book (Hooked) examined consumer behavior and how to design around it. His second (Indistractible) turned the focus on us — the doers and creators who build experiences and products for consumers.
The first of his free resources to explore is this 30-minute presentation on why we’re so easily distracted and how to keep those distractions (and ourselves) from getting in the way.
The second free resource to snag up is the 80-page workbook available on the homepage. Here’s a preview of what it looks like:

You’ll learn about common distractions, identify those that are specific to you, and then work through exercises to defeat them.
If this is something you’re struggling with, these resources will empower you to make a much-needed change.
BONUS: WebDesigner Depot
Although WebDesigner Depot doesn’t offer video courses, I consider each of the articles contained within this site to be mini-courses of their own. And you’ll learn everything you’ve ever wanted to know about becoming a web designer and growing your freelance business.
Featured image via Unsplash.
Source from Webdesigner Depot https://ift.tt/350MXHN from Blogger https://ift.tt/2GqEIKW
0 notes
Text
Webflow Review – An Exceptional Website Builder| Forever FREE
Webflow is a website builder that has attracted a lot of attention. But how nice is it? For whom designed? How much this software costs? I am going to address all the above-mentioned questions, But, let’s start with the basics first –
Introduction

Most of the people refer to Webflow as an online toolkit for building websites. It’s a great combination between the classic content management platform and conventional website builders like WordPress. It is indeed one of those exceptionally SaaS platforms with the professedly specific target market.
Getting Confused?
This review post created to wave off that confusion. Considering the various components which Webflow offer including, CMS, Designer, eCommerce, Hosting, etc. you will also get answers to questions for anyone considering this platform.
The primary principle of WebSocial is so-called “smart codelessness”. Alternatively stated, it aims to provide a desirable balance between customization capabilities and code fewer processes of site-building. Also, you can monitor many of your website’s attributes without operating on the correct source.

Surprisingly, this platform does not lock you out of the cycle of coding. It still uses fun software to help you thoroughly customize your page, without actually confining yourself to any particular submission platform.
Are you feeling interested to know more?
Alright, hang around because this review post of the Webflow enables you to reach all the major components associated with this platform. Read out the essential features of Webflow, customer support, pricing, and the associated pros and cons.
Overview
Webflow moved ahead to the path of success with this mantra – “If you can imagine the ultimate outcome, you can bring it to life.”

This simple, yet versatile web-based drag and drop tool mainly developed with the principal focus on the designers and regular people. This tool will help them easily create responsive, flexible and powerful websites and applications better and faster without any special coding skills.
But that’s not all. The site builder was also systematically integrated with a CMS framework for seamless management of the entire ecosystem.
The platform is consistently integrated based on the framework of the Content Management System, which helps in seamlessly managing the entire ecosystem. They are also looking forward to capitalizing on some of the core functions, which include:
Ecommerce
CMS
Designing
Web Hosting
Interactions
Editing, etc.
Though this platform serves as an alternative to WordPress, it claims to be much simpler than this. As having said that, WordPress considered being one of the simplest and the best and simplest CMS platforms available on the internet today.
So, will Webflow able to take the challenge? Let’s check it out!
Salient Features
Inclusive Ease Of Use
One thing that could impress you right off the bat is the overall versatility or flexibility of Webflow.
For example, the website designer doesn’t come with the rigid site construction framework that is available in many other “user-friendly” options. In other words, you can choose any template of your choice here.
Although that considered to be an easy option as there are limited customization capabilities for pre-designed themes. But this website builder allows you to start with a completely blank canvas and build your site from the ground up.

Not only this, Webflow is designed to facilitate complete responsiveness and mobile-centric adaptability. Moreover, it also provides various designing features which include the tiniest website elements. Typography, which has numerous possibilities to accommodate, including Typekit, Google Font, and your own custom font.
Webflow, in particular, does not restrict you to its system. At any time, you can conveniently export Javascript, HTML, and CSS from your page to a third party website.
In case you are working on different projects simultaneously, then you should be able to arrange and control them directly from the dashboard display. With the project options, you can add them in folders, share, duplicate, and edit them. All the projects are available with a different set of array settings, which includes external service connections, SEO, code integrations, backups, websites, etc.
Though the only downside is the complex framework that is available with it. Newbies can find it a little difficult to try out the latest features of Webflow. However, it becomes easier and easier with more websites you work on.
These people also offer a complete set of useful video tutorials, which helps in providing valuable guidance in case you face any issues. But if that doesn’t turn out, you can always contact the customer support team, who I found to be quite responsive.
On the whole, people who are having the most manageable time using this platform are probably HTML and CSS coders. Similarly, on the other hand, non-coders are also most likely to gain great results just by footing well after a couple of hours on this platform.
Also Read : Why Choose Wix as a Free Website Builder | An Honest Wix Review?
WebFlow Hosting
The hosting function provided by this platform works on the policy – “Start building for free, add hosting to go live.” In simple terms, you are allowed to start creating your website on a free Webflow subdomain. You can then pay for one of the Webflow hosting packages to connect the website to a custom domain name.
One of the best plans to gain complete advantage of the hosting services is the basic plan. It allows us to provide hosting for some simple site with less than 500 form submissions and 25,000 monthly visits and at a minimum cost of $15 per month or $12 per month billed yearly.
Not only the custom domains, but there are also some extra features which are provided by this tool –
Free SSL certificate
CDN
Advanced SEO
Backups
Versioning
Some of the other benefits of leveraging Webflow hosting include:
Webflow hosting based on decentralized infrastructure operated by renowned cloud providers such as Amazon CloudFront and fastly.
Webflow hosting provides an additional CDN (Content Delivery Network) at zero additional cost. It accelerates the delivery of content to site visitors far from the position of your primary server.
Provides SSL compliance certificate for free to ensure that each site adheres to the current standards for web encrypted communications.
Webflow hosting based on more than 100 data centers spread across 6 continents, letting you choose a server that is nearest to your chief traffic source.
It provides a shorter loading page as compared to the standard HTTP websites.

Webflow Designer
The website builder and the design tool is given a fancy name as Webflow Designer, which provides a unique twist to the entire website creation process.
It provides a balance between the worlds of coding and non-coding. Users who do not have the advanced coding skills will take advantage of the intuitive DIY side of the website builder. Instead, on the other hand, experienced programmers, designers, and organizations will benefit from the complete freedom of choice that comes with the programming side of the Webflow site builder.

Therefore, you can consider it as a hybrid site builder. Apart from this, some of the specific features of this platform include:
Languages like JavaScript, HTML, and CSS coding easily handled by website-builder. Web developers expected to like the code creation features of their visual designer, which saves the trouble by line writing code.
The next thing which sets this Designer apart from others is its exceptional approach to editing the visual things. As here the canvas is designed to provide you with an easy to use way to tweak the elements of your page, with the versatility provided by HTML and CSS. For example, placing a square requires you to add a new “part” or “box” and then build a “set” location.
Well, Webflow Designer seems designed to serve professional web designers along with developers in the first place as well as their agencies.
Final Words
Webflow is one exceptional, high-end website builder for freelancers and designers. Several features like Databases, integrations, databases, several layout edit modes, identificators, integrations, template code export, etc. make it one of a kind platform.
The blended force of its Hosting, Designer, E-commerce offers, and Editor/CMS is massive. This website builder has also the most exquisite tailor-made website development setups. The 24*7 support team makes every single process smooth and easy.
In short,
Simplicity Level – (simple)
Progress in Learning – Mid (before you think to jump in and create something, you need to first watch the available videos and understand every terminology)
For Consumers (Perfectly suitable)
For Designers (Perfectly suitable)
For Developers (Perfectly suitable)
Time taken in the Development process (Quick)
Whitelabel – For businesses and agencies who carry out the payment.
In-built templates – Yes
Pricing Plans – Low
Your Thoughts?
I am thankful to you for taking the time from your busy schedule to read our analysis of Webflow. Was this review helpful? Do you have something to add, or do you disagree with some points? Let’s discuss in the comment section given below.

Originally Published On: SaasTrac
About The Author SaasTrac is one of the trusted places where users can find reviews on different Saas Products, Software, and Platforms. Our major goal is to let users know the detailed and the most helpful information possible about every product — the good, the bad, and the ugly in the SaaS space.
#high-end website builder#Webflow Review#Webflow#An Exceptional Website Builder#Exceptional Website Builder#Website Builder
0 notes