#WebflowExperts
Explore tagged Tumblr posts
Visit Tumblr Blog
Explore Tumblr blogs with no restrictions, modern design and the best experience.
Last Seen Tumblr Blogs


Fun Fact
In Q3 of 2020, 31% of US users access the Tumblr app daily.
Text
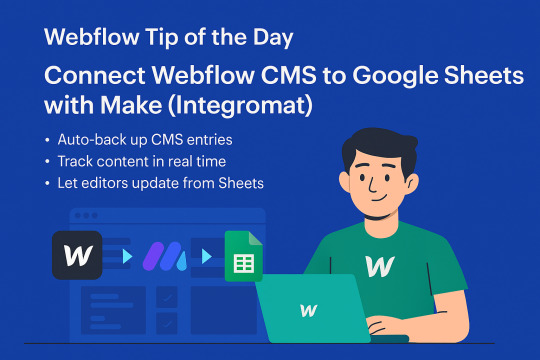
Webflow Tip of the Day
Connect Webflow CMS to Google Sheets with Make (Integromat)
Want to automate your content workflow? Use Make (formerly Integromat) to connect Webflow CMS to Google Sheets.
This allows you to:
Auto-backup CMS entries to a spreadsheet
Track blog posts, products, or team updates in real time
Enable content editors to update content from Google Sheets
How to Do It:
Create a scenario in Make.com
Add Webflow and Google Sheets as modules
Authenticate your Webflow API and select your CMS Collection
Choose actions like “Watch Records” in Google Sheets and “Create Item” in Webflow
Schedule it or run on form submission
Bonus Use Case:
Reverse the flow, update a CMS item when a Google Sheet row is edited.
No-code automation saves hours of manual entry and empowers your non-technical clients, too!
📌 Connect With Me:
🌐 Portfolio: https://webflowwork.com/
🎯 Upwork: https://bit.ly/4iu6AKd
🎯 Fiverr: https://bit.ly/3EzQxNd
#WebflowTips #NoCode #WebflowCMS #Automation #Make #Integromat #GoogleSheets #WebflowDeveloper #ClientWork #Productivity
#webflow#freelancewebdeveloper#web design#web development#webflowdesign#webflowlandingpage#webflowexperts#website#nocode#ui ux design
0 notes
Text
Effective Vue.js Debugging: The Ultimate Guide for Developers

Mastering debugging in Vue.js is an essential skill for every developer. This ultimate guide offers a deep dive into the most effective debugging practices for Vue.js applications. You’ll discover tools and techniques that will make the debugging process less stressful and more efficient. Learn how to track down errors using console logs, manage application state, and apply real-time debugging tools like Vue Devtools.
#HireWebflowDeveloper#WebflowDeveloper#HireWebflowDevelopers#WebflowDevelopers#WebflowExperts#HireWebflowDesigner#WebflowDevelopersForHire#WebflowDeveloperForHire#WebflowFreelancer#ExpertWebflow
0 notes
Text

Migrating from WordPress to Webflow: Tips and Tricks for Success
Unlock valuable insights and strategies for successfully migrating from WordPress to Webflow. This guide offers best practices, highlights potential challenges, and provides tips to help you achieve a seamless transition and enhance your website's performance."
#MigratingfromWordPresstoWebflow#Wordpresstowebflow#Websitemigration#Webflowexpert#webflowfreelancer
0 notes
Text

🗳️ Make your campaign stand out.
The Politician TNC Webflow CMS Template helps political candidates and organizations build sleek, professional websites that connect with voters.
✨ Clean design 📱 Mobile-responsive ⚙️ CMS-powered & customizable
🎯 Go live in minutes: https://tncflow.com/template/politician-tnc
#PoliticalWebsite #Election2025 #WebflowTemplate #Candidate2025 #CMSWebsite #DigitalCampaign #WebDesignDaily #CampaignReady #UXDesign #WebflowExperts
#design#web development#webflow#business#web design#home & lifestyle#template#aesthetic#education#beauty#politics#american politics#political website
0 notes
Link
Do you know which is the best platform out of Webflow vs WordPress?🤔
The comparison of Webflow vs WordPress is about their scalability, features, and pros and cons. 😎✅
This will help you determine which platform is most suitable for you.👇
https://wpblazer.com/comparison/webflow-vs-wordpress/?utm_source=bookmark&utm_medium=social&utm_campaign=tof_cd_webflowvswp
2 notes
·
View notes
Photo
Let us build that creative website for you #creative #creditrepairwebsite #cryptocurrency #creativity #landingpage #salesfunnelexpert #contentmarketing #content #contactme #figmaplugins #webdesignagency #graphicsdesignagency #webflowexpert #uiuxdesignexpert https://www.instagram.com/p/Cj63NMvIfC0/?igshid=NGJjMDIxMWI=
#creative#creditrepairwebsite#cryptocurrency#creativity#landingpage#salesfunnelexpert#contentmarketing#content#contactme#figmaplugins#webdesignagency#graphicsdesignagency#webflowexpert#uiuxdesignexpert
0 notes
Photo

🚀Guía de introducción a Webflow para principiantes 2021💙⠀ ☑️¿Quién no ha querido diseñar su propia web sin tener que programar? Gracias a plataformas como WordPress, creadores de páginas y servicios de creación de sitios web como Wix y Weebly, esto ha sido posible por un tiempo. En este tutorial de Webflow, conocerás una posibilidad más.⠀ ⠀ Las webs hechas con las opciones anteriores pueden ser un poco repetitivas. Por lo general, puedes verlos desde lejos. Webflow es una herramienta en línea que promete acabar con eso.⠀ 👉Nuevo post en mi blog, link en mi bio.⠀ 📣 #webdesign #uiux #uxdesign #ux #designtools #uidesign #dribbble #userexperience #webdesigner #websitedesign #appdesign #interface #uidesigner #webflowexpert #webdevelopment #graphicdesigner #graphicdesign #dailywebdesign #appdesigner #uiuxdesign #userinterface #uxprocess #webdesigninspiration #websitedesigner #wix #uxdesignmastery #websitedesigning #webdeveloper #uxresearch #uxinspiration https://www.instagram.com/p/CVNAIp3AR7Z/?utm_medium=tumblr
#webdesign#uiux#uxdesign#ux#designtools#uidesign#dribbble#userexperience#webdesigner#websitedesign#appdesign#interface#uidesigner#webflowexpert#webdevelopment#graphicdesigner#graphicdesign#dailywebdesign#appdesigner#uiuxdesign#userinterface#uxprocess#webdesigninspiration#websitedesigner#wix#uxdesignmastery#websitedesigning#webdeveloper#uxresearch#uxinspiration
0 notes
Text
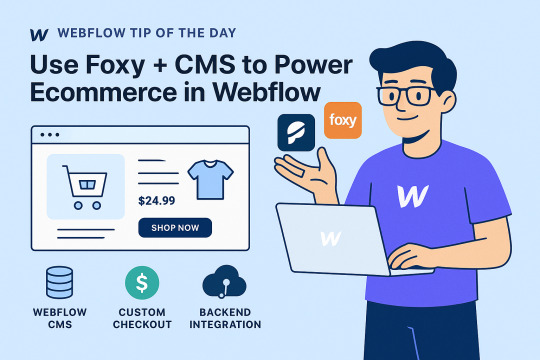
Webflow Tip of the Day
Use Foxy + CMS to Power E-commerce in Webflow Without Limiting Design
If you're building an ecommerce experience in Webflow but don’t want to be restricted by Webflow’s native ecommerce limitations, Foxy is the perfect integration to supercharge your setup using Webflow CMS!
Why Use Foxy for E-commerce in Webflow?
Webflow’s native ecommerce is powerful, but it lacks flexibility for custom checkout flows, subscriptions, digital downloads, complex pricing, or multi-currency.
Foxy lets you use Webflow CMS to manage your products visually and still enjoy powerful cart & checkout features.
How It Works:
Create a CMS Collection for your products (name, price, description, image, etc.)
Use a custom attribute to connect each product to Foxy, using:
data-fc-product="name:Product Name; price:24.99; code:SKU001;"
Embed a Foxy add-to-cart button inside each Collection Item using a <form> element or link block.
Customize the cart, checkout, and confirmation pages from Foxy’s backend.
Optional: Store customer data in platforms like Zapier, Airtable, or even Supabase for deeper backend integration.
Use Cases Perfect for Foxy:
Selling digital downloads (PDFs, courses, music)
Offering subscriptions or memberships
Donation forms
Product variants (sizes, colors, bundles)
Global shipping with dynamic rates
Pro Developer Tips:
Use Webflow CMS filters + Foxy logic to build dynamic product catalogs.
Combine with JavaScript to trigger dynamic pricing updates or variant displays.
Use Foxy webhooks or integrations to connect with external CRMs, email systems, or analytics platforms.
Result:
Fully custom design freedom with Webflow
Powerful and scalable e-commerce backend
Seamless checkout experience with secure payment gateways
🔗 Need inspiration or help with setup?
Check out my e-commerce builds:
🌐 Portfolio: webflowwork.com
🎯 Upwork: bit.ly/4iu6AKd
🎯 Fiverr: bit.ly/3EzQxNd
#webflow#freelancewebdeveloper#web design#webflowdesign#web development#webflowexperts#webflowlandingpage#website#nocode#ui ux design#fiverr gigs#fiverr#upwork#freelance#freelancing#webflowexpert#web developers#website development#foxy#cms development
0 notes
Text

Webflow Tip of the Day Use :focus-visible for Better Accessibility When styling interactive elements like buttons or links, avoid removing the outline completely. Instead, use the :focus-visible pseudo-class to only show outlines when it's keyboard-focused, not mouse clicks. Why this matters: Improves keyboard navigation without affecting mouse users. Keeps your site WCAG-compliant and accessible for users relying on keyboard/tab navigation. How to apply: button:focus-visible { outline: 2px solid hashtag hashtag#0070f3; outline-offset: 4px; } You can add this as custom code in Webflow or style it via custom attributes with minimal JS if needed. Bonus: Combine it with skip links or anchor links for full keyboard-friendly navigation. Result: Better experience for visually impaired users No annoying outlines on mouse clicks Clean, accessible UX across devices I’m ready to bring your vision to life! 🌐 Webflow Portfolio: www.webflowwork.com 🎯 Upwork: bit.ly/4iu6AKd 🎯 Fiverr: bit.ly/3EzQxNd #WebflowExpert #FiverrGig #FigmaToWebflow #WebflowDeveloper #WebDesign #WordPressDeveloper #APIIntegration #FreelanceDeveloper #WebflowWebsite #ResponsiveDesign #SEOFriendly #WebsiteDesigner #FiverrPro #HireFreelancer #FreelanceWebDeveloper
#webflow#freelancewebdeveloper#web design#web development#webflowdesign#webflowexperts#webflowlandingpage#website#nocode#ui ux design
0 notes
Text
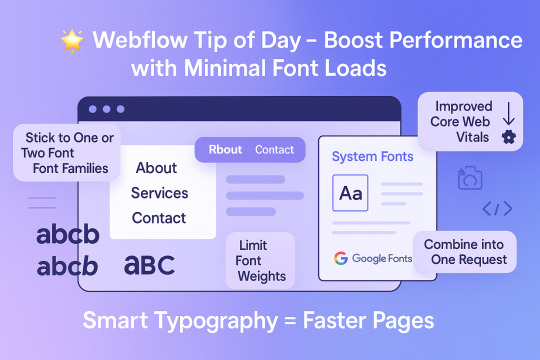
Webflow Tip of the Day
Boost Performance with Minimal Font Loads
Did you know that loading multiple font families and weights can slow down your site?
Smart Typography = Faster Pages
Here’s how to optimize your typography without compromising design:
1. Stick to One or Two Font Families
Too many fonts = heavier load. Choose a strong primary font and, if needed, one secondary.
2. Limit Font Weights
Instead of loading 100, 300, 400, 500, 600, 700 – stick to what you actually use. For most websites, 400 (regular) and 700 (bold) are enough.
3. Use System Fonts Where Appropriate
System fonts like Arial, Helvetica, or Roboto load instantly – no extra fetch needed.
4. Combine Google Fonts into One Request
When using Google Fonts, bundle them smartly using Webflow’s font settings or manual embed.
Why It Matters:
Faster load times
Improved Core Web Vitals
Better mobile performance
SEO gains with cleaner code


#webflow#freelancewebdeveloper#web design#web development#webflowdesign#webflowlandingpage#webflowexperts#website#nocode#ui ux design
0 notes
Text
Webflow Tip of the Day Use Auto Height on Sliders for Dynamic Content
When using Webflow Sliders for blog previews, testimonials, or case studies, you might face layout shifts or empty space issues if slides have different content heights.
Here’s how to solve it smartly:
Problem: Slides with different content lengths cause awkward gaps or clipped content.
Solution: Use Auto Height for Slider Wrappers to make your sliders adjust smoothly!
How to Apply:
1. Select the `Slider` element in Webflow. 2. Make sure the `Slide` wrapper uses `Auto` height (not fixed or min-height). 3. Set each `Slide` content to `Fit Content` using proper padding & margins. 4. Add smooth transitions (optional) for elegant height changes.
Why This Works:
* Prevents layout jumping when switching between slides * Makes sliders responsive to dynamic CMS content * Improves user experience on all devices * Reduces empty space in designs
Pro Tip: If you're using CMS content in your sliders, always test on mobile and tablet views, content height can vary dramatically!
Boost your Webflow game every day!
Portfolio:https://lnkd.in/dt5pF9MW 🎯 Upwork: https://bit.ly/4iu6AKd 🎯 Fiverr: https://bit.ly/3EzQxNd

#webflowdesign#webflowexperts#webflow#freelancewebdeveloper#nocode#website#webflowlandingpage#web development#ui ux design#web design#fiverr seller#fiverr gigs#fiverr tutorial#fiverr top rated seller#upwork#freelance#fiverr review#commission#freelancing
0 notes
Text
webflow tip of the year
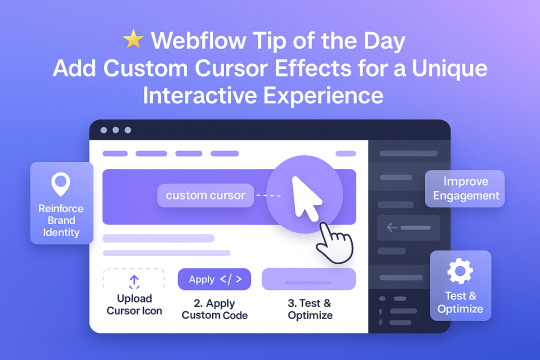
Webflow Tip of the Day Add Custom Cursor Effects for a Unique Interactive Experience
Want to make your site stand out and feel more interactive without heavy JavaScript?
🎯 Use Custom Cursors to Enhance UX & Visual Identity
Why Use Custom Cursors? Custom cursors can guide user interaction and reinforce your brand personality. Subtle changes (like hover animations or icon-based cursors) elevate the experience.
How to Implement in Webflow:
1. Upload a Cursor Icon Go to your assets → Upload a `.png` or `.svg` icon for your custom cursor.
2. Apply It via Custom Code Use this code in Page Settings or Embed:
css body { cursor: url('your-cursor-url.png'), auto; }
3. Change Cursor on Hover (Optional) Target buttons or links with different cursors using:
css a:hover { cursor: url('hover-icon.png'), pointer; }
Pro Tips:
* Keep file size small for performance * Test across browsers * Use contrasting icons so they remain visible on all backgrounds
Result:
* Better user interaction * Unique, memorable brand experience * Improved engagement without extra plugins
Portfolio:-https://lnkd.in/dt5pF9MW 🎯 Upwork:- https://bit.ly/4iu6AKd 🎯 Fiverr:- https://bit.ly/3EzQxNd
#WebflowTips #WebflowDesign #WebflowDeveloper #UXDesign #CustomCursor #WebflowMagic #NoCode #WebDesign #WebflowExperts #CreativeUX
#webflow#freelancewebdeveloper#webflowdesign#webflowlandingpage#webflowexperts#web development#website#nocode#web design#ui ux design
0 notes
Text

🌟 Webflow Tip of the Day – Use Webflow’s Audit Panel to Catch SEO & Accessibility Issues
Before you hit publish, make sure your site is polished not just visually — but also technically! Webflow’s Audit Panel is an underrated tool that helps you catch issues that might hurt SEO, accessibility, and performance.
🔍 What is the Audit Panel? It’s a built-in feature in Webflow Designer that flags:
Missing alt text for images
Unlinked pages
Heading structure issues (like skipping H2 to H4)
Empty link blocks
Pages missing meta titles or descriptions
✅ How to Use It:
Go to Designer → Click the Audit icon (⚠️) in the lower-left corner
Select a page and run the audit
Webflow will list issues and link directly to the problematic elements
Fix them right away inside the Designer
💡 Why This Matters:
🚀 Boosts SEO and crawlability
♿ Improves accessibility for all users
🔧 Catches issues before clients or users do
✅ Helps maintain professional, production-ready builds
⚡ Pro Tip: Make a habit of auditing every major page before publishing — especially the homepage and key landing pages.
🔗 My Portfolio & Services: 🌐 Portfolio: www.webflowwork.com 🎯 Upwork: bit.ly/4iu6AKd 🎯 Fiverr: bit.ly/3EzQxNd
#webflow#freelancewebdeveloper#web design#web development#webflowdesign#webflowexperts#webflowlandingpage#website#nocode#ui ux design#fiverr gigs#fiverr#fiverr top rated seller#fiverr seller#fiverr review#fiverr tutorial#upwork#freelance#freelancing
0 notes
Text
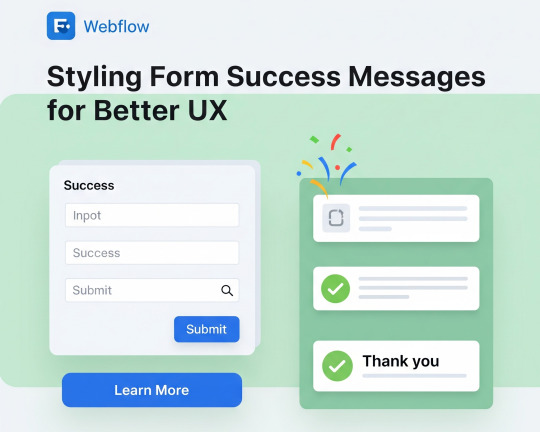
🌟 Webflow Tip of the Day
Style Form Success Messages for Better UX
Don’t let your user’s form submission success go unnoticed! A well-designed success message reassures the user, increases trust, and keeps your branding consistent even after the form is submitted.
Why It Matters:
Confirms form submission clearly
Reinforces brand voice and tone
Opens doors for further engagement (CTAs!)
How to Style It:
Select your Form Block in Webflow.
Go to the Success Message block (inside the form wrapper).
Add styles: background color, icons, animations, and friendly thank-you text.
Optional: Add a CTA like “Return to Home” or “Book a Call.”
Pro Tip:
Use subtle animations or checkmark icons to enhance feedback. Also, don’t forget to check how it looks on mobile!
🔗 My Portfolio & Services:
🌐 Portfolio: www.webflowwork.com
🎯 Upwork: https://bit.ly/4iu6AKd
🎯 Fiverr: https://bit.ly/3EzQxNd
#webflow#freelancewebdeveloper#web design#web development#webflowdesign#webflowexperts#webflowlandingpage#website#nocode#ui ux design
0 notes
Text

Webflow Tip of the Day
Use “Current” State Styling for Active Navigation Links
Make your site navigation smarter and visually intuitive by styling the Current state of nav links. It helps users instantly know where they are on your website, improving clarity and trust.
What is the “Current” State?
Webflow automatically applies a Current state to navigation links that point to the page or section the user is viewing.
How to Use It:
Add a nav link to a specific page or section.
Visit that target page in Webflow Designer.
Select the link – it will show a Current tag.
Style it with bold, underline, or a color change to highlight it.
Why It Matters:
Boosts navigation clarity
Improves user experience
Makes your site look polished
Reduces bounce rate by guiding users better
Pro Tip:
Don’t forget to style the Current state in your mobile nav menu as well. This adds extra clarity for mobile users!
📌 Connect With Me
🌐 Portfolio: www.webflowwork.com
🎯 Upwork: https://bit.ly/4iu6AKd
🎯 Fiverr: https://bit.ly/3EzQxNd
#webflow#freelancewebdeveloper#web design#web development#webflowdesign#webflowexperts#webflowlandingpage#website#nocode#ui ux design#fiverr#watership down fiver#upwork
0 notes
Text

🌟 Webflow Tip of the Day – Create Global Styles with Custom Tags for Consistency
Tired of repeating styles across headings, paragraphs, or links? Use Webflow’s tag-based styling to apply global styles that automatically affect every instance.
🔧 How to Do It:
Select an element, like a Heading or Paragraph.
Instead of adding a class, click into the tag (e.g., All H1 Headings, All Paragraphs).
Apply your preferred font, size, color, spacing, etc.
All elements using that tag will now inherit these styles unless overridden by a class.
🧠 Why Use It:
Maintain consistency across your project
Avoid repetitive styling
Easily update styles globally
Keep your style guide clean and scalable
🔥 Pro Tips:
Combine tag styles with utility classes for advanced layout control.
Use this for All Links, All Buttons, or even All Blockquotes.
📌 Connect With Me 🌐 Webflow Portfolio: www.webflowwork.com 🎯 Upwork: https://bit.ly/4iu6AKd 🎯 Fiverr: https://bit.ly/3EzQxNd
#Webflow #WebflowTips #WebDesign #NoCode #UIUX #GlobalStyles #WebflowExpert #StyleGuide #ResponsiveDesign #WebflowCommunity
#webflow#freelancewebdeveloper#web design#web development#webflowdesign#webflowlandingpage#webflowexperts#website#nocode#ui ux design
0 notes