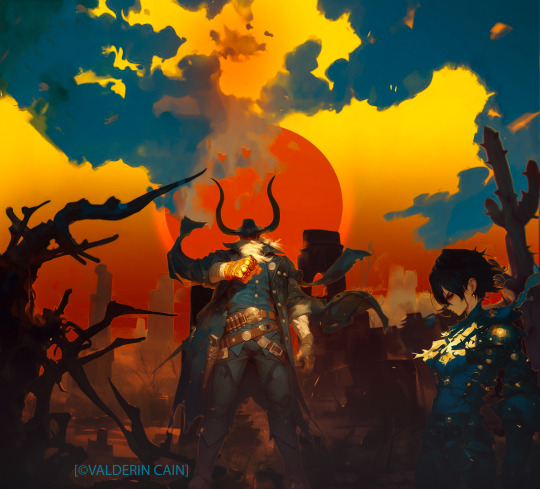
#adobe photoshop 6
Photo
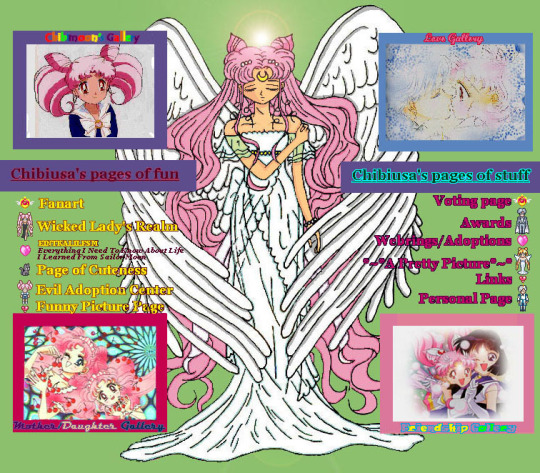
I gave it all of 24 hours.
And you know what? No one is gonna see it, and that’s fine. It is! I am a nobody here, *crickets* just like all of my other art pages, anywhere else. Posting this as if it will shame me in the slightest is like saying my first f word at a live concert. Aint no one paying attention.
Therefore- out of clear cathartic nonsense in the disguise of attention seeking (HELLOOOO hahaha j/k nobody look) or perhaps both- here it is.
Child of the Crystal World, everyone. the very large image that was the main page of my website all of 20 years ago. If you were on the internet back then, all of that nonsense makes a bit of sense. (If not, i really cant help you, sorry, i’m not gonna explain it) I had Photoshop 6 and a mouse. I was amazing.
I might just see how many of these I can post before I start apologizing.
#no#not really#adobe photoshop 6#drawing with a mouse#its as bad as it sounds#child of the crystal world#that lens flare tho#i am making that a tag damnit#chibimoon#chibimoon fanart#chibiusa#princess lady serenity#sailor moon#sailor moon serenity#man yells at cloud#my art#myart
6 notes
·
View notes
Text
More Pokémon
More BH6
In the ongoing saga of Obake and Tadashi get Isekai’ed…so yeah you can’t jump in Pokémon games which is a grievous oversight that should have been fixed two generations ago but saying that it’s not that hard to cheese your way up a cliff even before you get the pogo-deer. With that in mind, Tadashi can jump and climb and he’s forever excited at new Pokémon.
Also dangit Game Freak look at the reception PLA got and learn from it maybe five new Pokémon got introduced but thanks to how the capture system works in that game it’s interesting and people get invested.
Find it on Eclipse here, as always please be kind and reblog, not repost, thank you! :D
Pokémon © Game Freak; Nintendo
Big Hero 6 © 2014 Disney
Done in Adobe Photoshop.
#bh6#bh6 month#pokemon#big hero 6#big hero six#pokemon legends arceus#big hero 6 the series#big hero six the series#adobe photoshop#tadashi#buneary#obake and tadashi get isekai'ed
34 notes
·
View notes
Text
Me: idk what to do for this graphic design assignment due tomorrow I’m so fucked
Rui kamishiro from the hit mobile game project sekai:

#second time this has happened. thank you law evading rock mv for getting me thru the mental block 🫡#do I like the result? no not really. did it take me 6 hours? yes.#fighting Adobe illustrator & getting my ass beat is a tried and true method for success.#mine#i have so much beef with that fucking program it’s so unintuitive it’s like they did everything they could to piss me off specifically#you can learn photoshop if you know art programs you can learn premier with a bit of hard work#you learn illustrator through tears YouTube shorts and help boards#putting the perspective grids function on my suicide note with a post script abt gradient texts#and envelop distortions
3 notes
·
View notes
Photo

first post after .....5 years i think on here.. this is a jolyne i did in photoshop (:
#jolyne#jjba jolyne#jolyne joestar#jolyne kujo#kujo#jjba#jojo#jojos bizzare adventure#jojo part 6#part 6#photoshop#adobe#jojo fanart#art#fanart#jjba fanart#drawing
114 notes
·
View notes
Text
Dasher - Issue 6 - front covers
In the story of issue 6, dasher will go down to the sewers of Blackpool to face of against a terrifying creature that threatens the lives of not just the residents of Blackpool, but the entire world too.
Currently, I have made 3 different versions of the front cover based of the story line of issue 6. Right now, I've focusing on which of the 3 is best suited for it.


Once I make my choice, my next task will be to upload it onto the last page of issue 5 to tease issue 6 to the readers for when they finish the current issue.
#dasher#adobe photoshop#photoshop#comics#issue 6#design#designs#2023#frontcovers#front cover#Goodinmaginations#superhero genre#superhero#the beast below#artwork#cgoodin#version 1#version 2#version 3
2 notes
·
View notes
Text
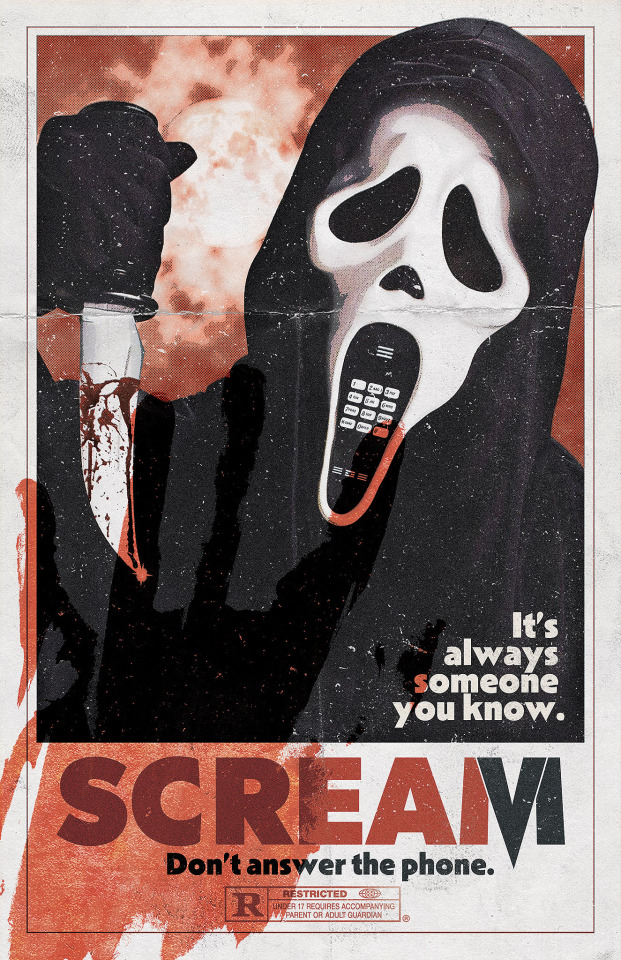
A new scream trailer dropped as I was making this a couple days ago😱 I changed the logo to match the sixth installment
#scream#horror#blood#ghostface#fan edit#graphic design#adobe#photoshop#scream franchise#horror edit#jenna ortega#scream queens#scream 6#film#trailer#new movie
11 notes
·
View notes
Text
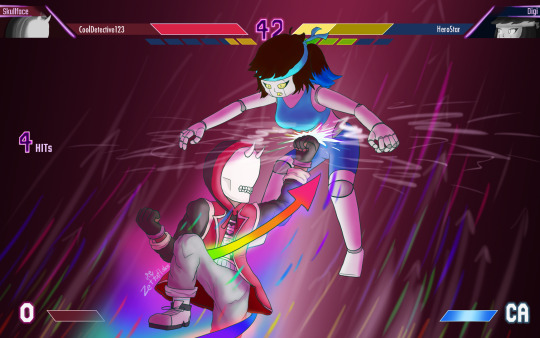
Revenge against CoolDetective123!
Skullface's Level 3 Super is the superpowered variant of his iconic Rising Spectrum Fist, sending opponents flying into the sky in a stream of bright colors. Once your super gauge is filled, this is the perfect combo ender to unleash the most painful world of hurt on your opponent.
Skullface here demonstrates the attack in live footage, matching with Digi to resemble his purpose in fighting against a tyrannical government of robots. Digi, being a former war robot however, is not one to go down so easily. Skullface will have to carefully calculate his next move upon Digi's wakeup state.
#digital art#character art#photoshop art#digital artist#original character#artists on tumblr#adobe photoshop#art fight 2023#art fight werewolves#art fight#fighting games#street fighter 6#street fighter#fanart#video game fanart#super art#super move#superpowers
2 notes
·
View notes
Text
[DESOLATION MATRIMONY]
[FIST OF MARS]
"IN THE RUINS OF TRAIL AND SACRIFICE"

[ THER IS NO MESSAGE HERE, JUST A PICTURE.]
#illustration#midjourney#digitalart#light#tumblr#digital art#artwork#niji 6#ai art#ai artwork#sunset#adobe photoshop#my edit#orginal art#sunet#ruins#clouds and sky#sun
1 note
·
View note
Photo
Reposted from @raileybaceprints Excited to have been asked by @umphreysmcgee to create a piece for their two night stint in Montana tonight and tomorrow! Even more excited that they were cool with me expanding the mushroomverse lore with this new piece!! Their only art direction for me was “we want one of your gnarly characters over a Montana mountain range”, and boy - did I have fun running with that. Those unfamiliar with the mushroomverse - it’s a post human world where it’s inhabitants live among leftover tech and magic alike, where massive giants and gods roam freely, each of which giving just a little more insight into the new society that’s grown from the fumble of ours. This is print #6 in the series, and the second of which to feature a new one of these gods - with the last focusing on a roaming ronin, and this one featuring a peaceful, spiritual deity with long flowing robes. More long flowing robes, please! As always - thanks a million to @sep_lab and @vahalla for bringing my work to life!! The band has some with them, and I’ll have reg and foil AP’s up for grabs next week. These will ship right AFTER the move, but will be the first thing on the docket once I get everything unpacked. Until then - thank you as always for being here!! . #art #artwork #artistsoninstagram #digitalart #digitalpainting #adobe #adobephotoshop #adobeps #photoshop #screenprinting #gigposter #umphreysmcgee #um #surrealism #god #deity #sunset #montana #hifructose #hifructosemag #juxtapoz #juxtapozmag #goldenhour #illustration #illustratorsoninstagram #micamade #raileybaceprints (at Bozeman, Montana) https://www.instagram.com/p/CiSry47uJKR/?igshid=NGJjMDIxMWI=
#6#art#artwork#artistsoninstagram#digitalart#digitalpainting#adobe#adobephotoshop#adobeps#photoshop#screenprinting#gigposter#umphreysmcgee#um#surrealism#god#deity#sunset#montana#hifructose#hifructosemag#juxtapoz#juxtapozmag#goldenhour#illustration#illustratorsoninstagram#micamade#raileybaceprints
0 notes
Photo

Potential Graphic Print #6 . . . . #picame #illustrationhowl #brwnpaperbag #illustrateddoris #ballpitmag #socfeature #illustrationartists #graphicdesign #illustrations #thedesigntip #creative #art #nft #adobe #procreate #photoshop #instagram #university #drawing #typography #print #etsy #logo #graphicdesigner #graphic #creative #marketing #digitalart #poster #instaart (at Lincoln, Lincolnshire) https://www.instagram.com/p/Cfe91YIMcnN/?igshid=NGJjMDIxMWI=
#6#picame#illustrationhowl#brwnpaperbag#illustrateddoris#ballpitmag#socfeature#illustrationartists#graphicdesign#illustrations#thedesigntip#creative#art#nft#adobe#procreate#photoshop#instagram#university#drawing#typography#print#etsy#logo#graphicdesigner#graphic#marketing#digitalart#poster#instaart
0 notes
Text

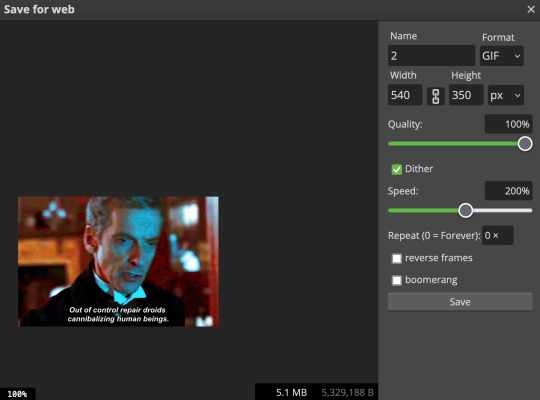
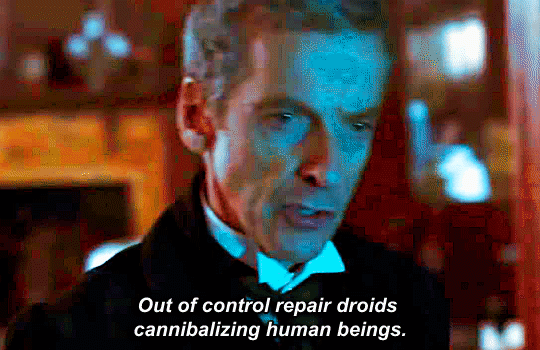
The silent art of gif making
The gif above has 32 layers plus 6 that aren't shown because this is part of a larger edit. I wanted to share it to give everyone a glimpse of the art of gif making and how long it usually takes for me to make something like this. This one took me about an hour and a half but only because I couldn't get the shade of blue right.
I use Adobe Photoshop 2021 and my computer doesn't have a large memory space (I don't know what to call it) so usually most of psds get deleted because I'm too lazy to get a hard drive. It doesn't really bother me that much because I like the art so when it's done, it's done. Off to somewhere else it goes.
Here are the layers:

Everything is neat and organized in folders because I like it that way. I prefer to edit it in timeline but others edit each frame. There's a layer not shown (Layer 4 is not visible) and it's the vector art. Here it is:

Now it is visible. I don't plan to make this a tutorial, but if you're interested I'd love to share a few tricks about it. I'm pretty new to the colors in gifmaking but the rest is simple to understand. Here, I just want to show how much work it takes to make it.

I opened Group 2 and here's the base gif. I already sharpened and sized it correctly but that's about it. Let's open the base coloring next.

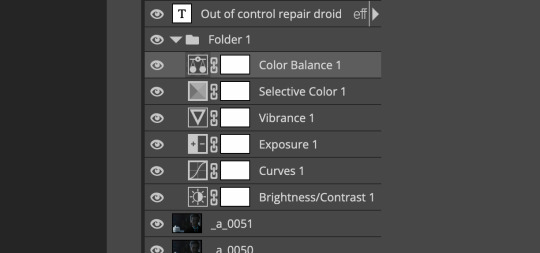
Yay! Now it looks pretty! The edits are in Portuguese but it doesn't matter. There's a silent art of adding layers depending on how you want the gif to look but you get used to it. The order matters and you can add multiple layers of the same thing (for eg. multiple layers of levels or curves or exposure).

This was pretty much my first experiment with coloring so I don't know what I'm doing (this happens a lot with any art form but gifmaking exceeds in DIYing your way to the finished product) but I didn't want to mess up his hair, that's why the blue color is like that. Blue is easy to work with because there's little on the skin (different from red and yellow but that's color theory). I painted the layers like that and put it on screen, now let's correct how the rest looks.

I was stuck trying to get the right teal shade of blue so yes, those are 10 layers of selective color mostly on cyan blue. We fixed his hair (yay!) we could've probably fixed the blue on his neck too but I was lazy. This is close to what I wanted so let's roll with that.

BUT I wanted his freckles to show, so let's edit a little bit more. Now his hair is more vibrant and his skin has red tones, which accentuates the blues and his eyes (exactly what I wanted!). That lost Layer 2 was me trying to fix some shadows in the background but in the end, it didn't make such a difference.

This was part of an edit, so let's add the graphics and also edit them so they're the right shade of blue and the correct size. A few gradient maps and a dozen font tests later, it appears to be done! Here it is:

Please reblog gifsets on tumblr. We gifmakers really enjoy doing what we do (otherwise we wouldn't be here) but it takes so long, you wouldn't imagine. Tumblr is the main website used for gif making and honestly, we have nowhere to go but share our art here. This was only to show how long it takes but if you're new and want to get into the art of gif making, there are a lot of really cool resource blogs in here. And my ask box is always open! Sending gifmakers all my love.
#gif making#gif tutorial#resources#completeresources#y'know what that post yesterday got me into this#i love creativity so i send all my love to gifmakers#this is HARD#my tutorials#tutorials
367 notes
·
View notes
Text
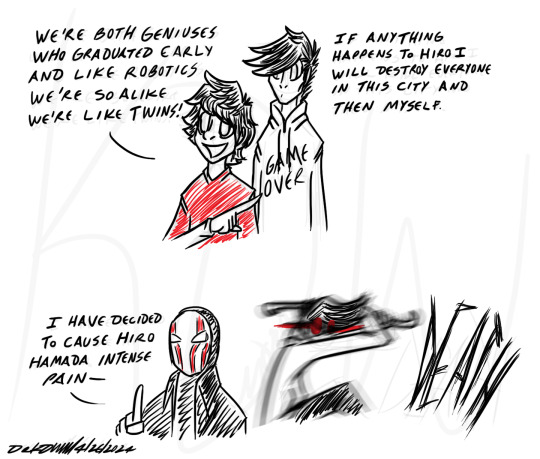
Okay I promise I'll do a more serious piece tomorrow but I had to get the memes out of my system first
Anywho if you haven't read Other Worlds Than These yet by @lesbian-honey-lemon get over there I am forever a sucker for Obake fics and this month I have been Spoiled. <3
Anyway in the fic Hiro is thrilled to death because Beck is like him but Taller in his eyes and according to Beck Hiro must be Protected At All Costs. Granted in the fic he didn't take a crowbar to Yokai's head but the vibe was still there. XD
Big Hero 6 © 2014 Disney
Done in Adobe Photoshop.
#bh6#big hero 6#big hero six#big hero 6 the series#big hero six the series#fanart of fanfiction#that fanfic being Other Worlds Than These#hiro#young obake AKA beck aken#adobe photoshop#beck has absolutely terrible self-esteem but get him going on hiro WOO#reading their opinions of each other has been a trip#hiro: beck is so cool he's just like me it's so nice having someone with the same vibes and likes and smarts and stuff#beck: hiro is my better in every way I must make sure he survives at all cost because if anything happens to him I WILL destroy this city
23 notes
·
View notes
Text
they say write what you know and what i know is academic stress and yearbook pain. so anyways it's a yearbook club au!!!!
YEARBOOK CLUB MEMBERS:
supervising teachers: gertrude and leitner. they become uncontactable like a week into the project (do they die? do they resign? tim has a running theory that they eloped.)
elias: head of yearbook club. dips unexpectedly in the middle of the entire thing (something about an optical surgery) and forces jon to take over. his dad paid for the adobe subscription they’re using
rosie: treasurer, she’s very efficient, they’ve probably exchanged like 3 emails in total and she’s gotten everything funded. knows well enough to stay out of the dumpster fire that is yearbook production otherwise
jon: de facto head of yearbook club. thinks it should have gone to sasha instead. hes a bit incompetent but plans like it’s doomsday the next week so they are always in a wealth of excel sheets. writer, editor
tim: joined partly because he wanted an excuse to get out of football fixtures. also because he is 1 out of jons 3 friends including his ex and jon asked him. he has a tiktok. marketing, editor
sasha: joined partly to impress gertrude (she’s looking for her to write her letter of recommendation as head girl in sixth form). also because she is 1 out of jons 3 friends including his ex and jon asked her. she still uses livejournal. designer, writer
gerry: sixth form, occasionally helps out with networking at gertrude’s behest. tim is a bit starstruck over him. he saves their asses many, many times
melanie and georgie: got unofficially roped in as photographers. why you ask? manuela dominguez may have the cutting edge cameras but she is simply too scary to approach. melanie has a youtube channel that all the girls and tim are apparently subscribed to.
martin: there is not one single picture of him. apparently he didn’t turn up for photo day, neither was he involved in any school events. even the people who have shared half-remembered facts about him seem to forget about him when questioned a second time. where did he go?
PLOT:
it’s the month before the yearbook is due to be sent in for production, and the team have discovered numerous issues with the draft: pictures of random people keep getting swapped over like they’ve been photoshopped, some pages are illegible and distorted unless they are physically written out in hand and scanned, one paragraph is a leitner. and nobody can find martin blackwood so they can get his picture in the yearbook. what will they do.
SIDE CHARACTERS:
annabelle cane: current head girl
mikaele salesa: somehow knows literally everyone, involved in the funding of yearbook production
mike crew: uneasy alliance with gerry in their pursuit of jurgen leitner
oliver banks: had a mental breakdown sometime during his gcses but hes fine now
david from research: nobody says it to his face but he has genuinely the most atrocious clothing choice in the entire school apart from michael shelley, and even then michael shelley makes work
grifter’s bone: the band of the school, except no one actually knows anyone who’s part of it. their shows are legendarily terrible. manuela says ambulances were phoned.
daisy and basira: prefects, currently invested in making sure yearbook club remains LEGAL and not STALKING ANY STAFF OR STUDENTS, JON
jmag: principal. boo. what a creep
julia montauk: apparently her dad went to jail. but who is she living with now? i don’t know, manuela told me. how does manuela know? julia told her in a sleepover during year 6. and she’s telling other people? wow. that’s messed up. is that old guy her grandpa? why does he carry a rifle around
jared hopworth: prejudiced gymbro, but importantly, NOT a homophobe.
the admiral: what else needs to be said
FAMOUS ALUMNI:
agnes montague (campus celebrity from literally decades ago) (her relationship with jack barnabas is mythicised)
jude perry (allegedly caused some fire-related, agnes-related events)
edwin burroughs (allegedly commited atrocities during one year’s christmas dinner)
jane prentiss (left for uni a year ago, allegedly brought many live organisms onto campus) (keeps talking about this guy called jordan)
eric delano (he did WHAT to his eyes)
MISCELLANEOUS POINTS:
daedalus crew is astronomy club
breekon and hope are the manufacturers for much of the schools equipment and stationery
jon keeps finding notes from gertrude stashed in random places about yearbook difficulties its like a fun cool treasure hunt
they cant figure out where a computer they were initially using for yearbook club is from. it says ‘ushanka’ on the bottom of the display and the keys are slightly crusty
what the hell are the drama students actually up to
259 notes
·
View notes
Text
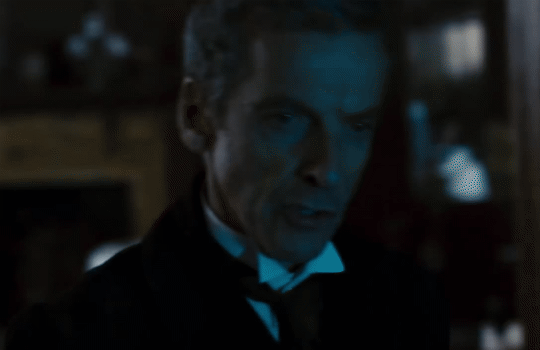
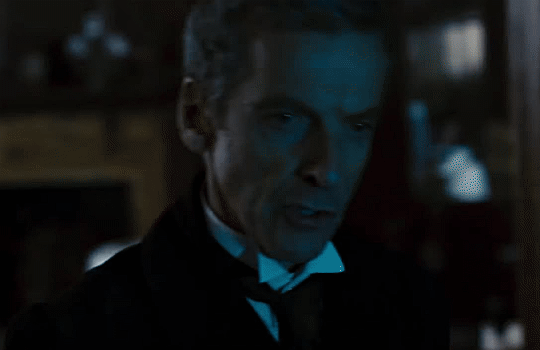
photopea gif tutorial!
i recently started learning the craft of gifmaking with the free software photopea. when i first started, i had to piece together several different tutorials as well as extrapolate from some photoshop tutorials because-- no one uses photopea.
but they should! it's free! it can run in your browser! it can do most everything photoshop can do and you don't have to deal with adobe or torrenting. so i'm making a tutorial of my photopea gifmaking process because that's what i needed a couple months ago, and i hope it can be of use to some others. let's go!
1: PREPARING
source the scene you want to gif. it's best to download your video when you can, but screen recording can work in a pinch. this is the video downloader software i use.
once the source video is downloaded, i like to pick out the specific moments i'm going to gif and save them as their own files-- this makes future steps easier. an individual gif shouldn't be more than 4ish seconds, so limit your selections to about that. name your files in a way that makes sense to you:

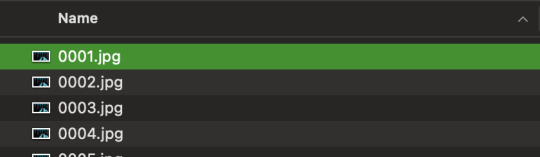
2: CONVERTING TO .JPG
i like to convert my video clips to .jpg format. it is possible to load video clips directly into photopea, but unless it is a very short <30fps clip, it is likely to freeze or crash in my experience. i use this website as it downloads a higher framerate (~25fps) than others i've used.
convert your video files and download the .zip folder containing your frames. make sure to unzip them and name them something helpful if you need to.
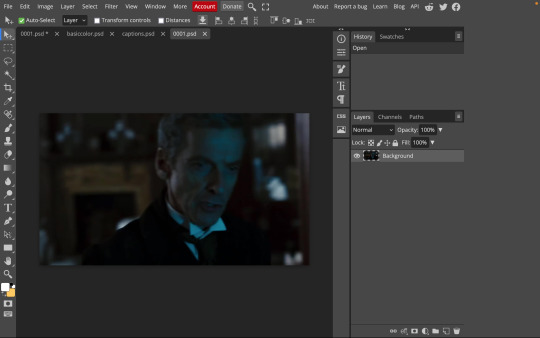
3: OPENING YOUR FRAMES IN PHOTOPEA
photopea looks like this when you open it:

select "open from computer" and select only the first frame of your first gif:
your environment should look like this (ignore the other projects i have open, you should just have 0001.psd or similar):
go to file> open and place, and select ALL of the rest of the frames from your first clip:
they'll load in one by one, and your environment should look like this:
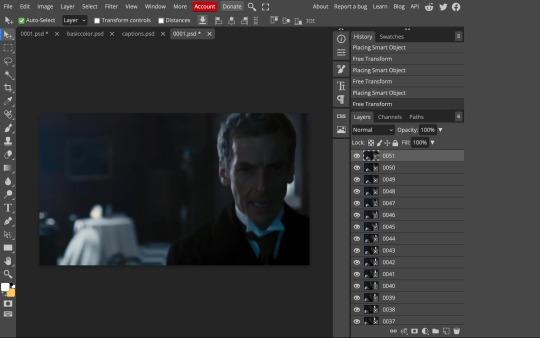
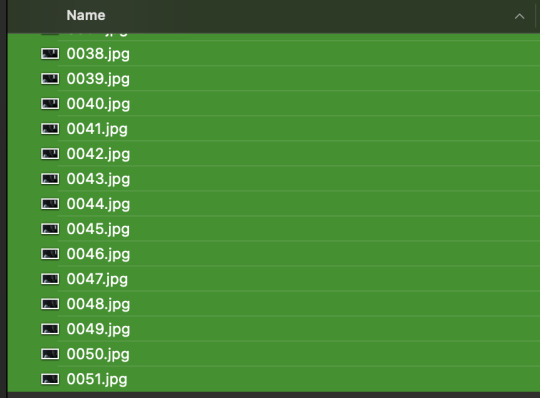
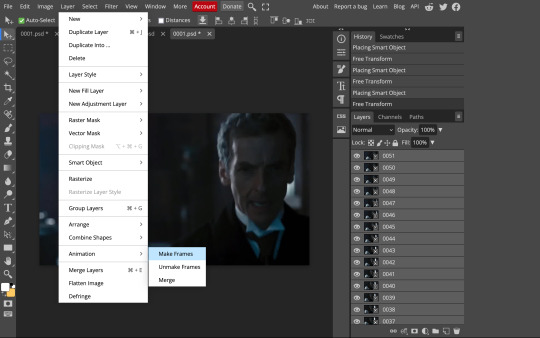
notice how all the frames have a little square in the corner? that means they are smart objects, and we need them to not be for our purposes. select all of your frames, right click, and choose rasterize:

in order to make the series of jpgs move as a gif upon download, select all of your frames and go to layer> animation> make frames:
all your layer names should now start with _a_. you can really do this at any point in the process so it's not a big deal if you forget at the beginning.
finally, you want to limit the frames in individual gifs to around 50 or less. if you find you have more, delete some frames off of the beginning or end by right clicking and selecting delete.
4: CROPPING AND RESIZING
select the crop tool on the left hand panel:

at the top bar, select fixed size:

gifs on tumblr are limited to 540px wide for single column gifs, 268px for two columns, and 178px for three columns. the height is up to you; i like to use 350px height with the 540px width.
enter your values into the W and H fields and do not press enter yet. drag the cropped area to where you want it to be-- try to line up the top and bottom edges so as not to lose too much of your image. once you're satisfied with the selection, press enter. your gif is now cropped and resized to tumblr standards.
5: SHARPENING
(if you are working with low-qual video, check out this tutorial by @hellboys before sharpening. basically filter> filter gallery > grain, select soft and play with the settings. then proceed!)
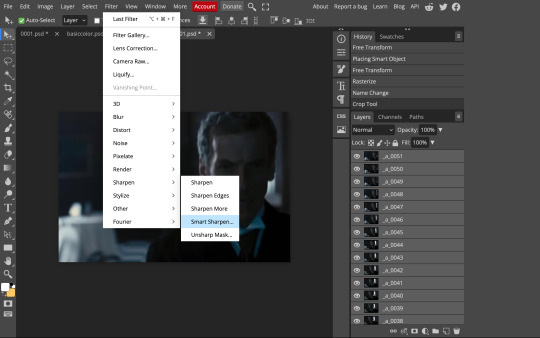
still making sure all of your layers are selected, navigate to filter> sharpen > smart sharpen:
you should see this dialog box:
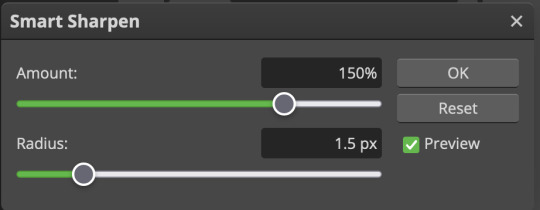
these are the settings i like to use, but you can play around to see what you like. here's the before and after of my sharpening settings:
the difference will be more noticeable once we complete the next step-- brightening and coloring.
6: BRIGHTENING & COLORING
navigate to layer > new adjustment layer:
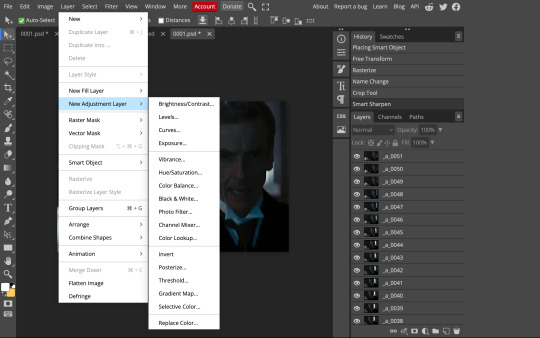
at any time, you can edit your adjustment layers by clicking this button in the right hand panel:

for each edit you make to your gif, you will add a new adjustment layer. always make sure they're at the top of your layer stack. i like to start with adjusting the brightness and exposure, which are both pretty straightforward.
additionally ,you can select a curves adjustment layer, choose the RGB channel, and drag the curve just slightly upwards to further brighten your gif, like so:
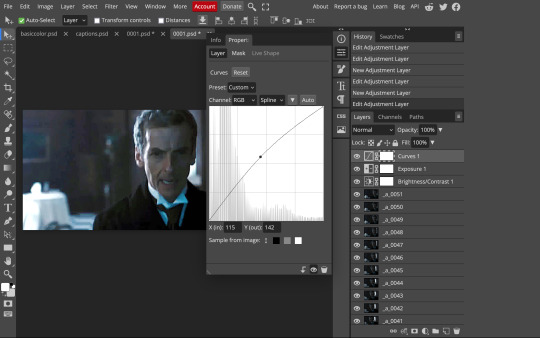
here's a before and after:
now for coloring-- i mostly use the saturation/vibrance, curves, color balance, and selective color adjustment layers. just play around with all of these until you find a style you like. i like my gifs to look really bright and colorful, so i push the saturation and try to draw out warmer tones in the color balance:
7: CAPTIONS
the font i like to use for captions is arial bold italic. you can download it (or any font of your choosing) from pretty much any free font website. if you choose to download a font not in photopea, go to file> open and select your font; it will now show up in the list of fonts.
navigate to the text button in the left hand panel:

and type in the captions for your gif. i make the font size 20 for 540px gifs.
next, while only your text layer is selected, navigate to layer> layer style > blending options:
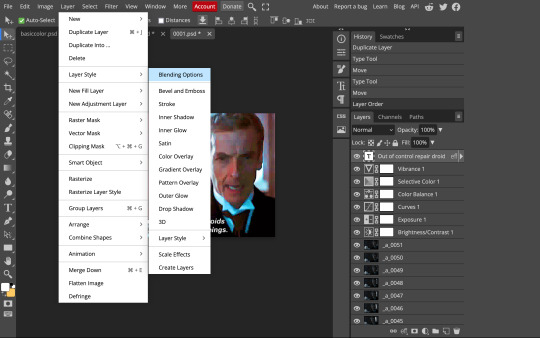
click on drop shadow, and play around with the settings until you get something you like. here's mine:

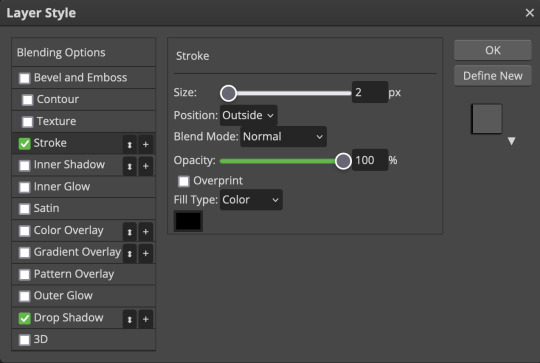
next, click on stroke and do the same thing:
when you're done, make sure your text is your top-most layer.
8: EXPORTING
you're done! head to file> export as> GIF. you'll be prompted with a dialog that looks like this, with your gif playing (you can also do these steps without saving if you want a preview of your gif during editing):
the only thing you should need to adjust is speed. this is the main difference between photopea and photoshop. the only way to specifically adjust the delay in photopea is to manually enter "_05" (or whatever amount of delay) at the end of every layer name. if you're like me you'll agree that is simply too much and settle for the speed slider.
i don't really know what logic governs the speed slider. it doesn't seem to be consistent across gifs, so play with it until it looks right. i've had it on 200% lately which seems insane but looks visually normal.
once the speed is adjusted, hit save and you're done! here's a final before and after of all the work:
BONUS: SAVING .PSD PRESETS
did you think manually creating and editing all those adjustment layers was a lot of work? here's how to streamline it for next time.
at the very bottom of your screen, below your layers, select the icon that looks like a folder (third from the right).
it will create another layer called folder 1. drag your adjustment layers into this folder, making sure they stay in the same order. your layers should look like this when you're done:
ONLY ONCE YOU HAVE SAVED YOUR GIF, delete all other layers that are not in the folder. then select file> save as PSD. save it somewhere convenient.
next time you're making gifs, after you've cropped and sharpened your frames, select file > open and choose your .psd file. it will open as another project. select the layer that says folder 1, and drag it to whatever project you're working on at the top bar. voila! your adjustment layers are applied to your new gif!
i still like to play with the settings, as coloring and brightness needs will differ from gif to gif.
thanks for reading! here's the gifset i made while making this tutorial :-)
#milk post#gif tutorial#doctor who#photopea#i can't tell if i went too detailed or not enough lol. tag me if you use this i want to see ppl's gifs!!
212 notes
·
View notes
Text
Front room - Layout
I have been working on the layout for one of the rooms in Lucas' house. In issue 6, I plan for there to be a scene where Lucas, Ben and Matthew are recovering after meeting the villain. I wanted to plan the layout of the from room so I can get a good idea as to how it will look in the comic.
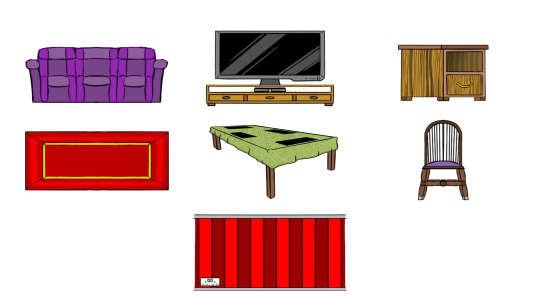
Before I got started on creating the viewpoints of the room, I wanted to list down the furniture so I can make sure I wouldn't forget to include them into the layout. This included the furniture that would be shown in the background of the viewpoints. I had drawn a sort of chart that would give me an idea as to what the furniture would look like in the viewpoints.


I have drawn 3 viewpoints to get a good view of the room layout. As you can see, I made sure that everything is in place exactly as where it is shown on the layout map. The layout map is what I have used to plan where each piece of furniture will be located in the room.
#dasher#adobe photoshop#photoshop#goodinmaginations#comic series#superhero genre#design#artwork#cgoodin#front room#living room#viewpoints#issue 6#furniture#decoration#2023#Lucas Wilson#home#layout
1 note
·
View note
Text
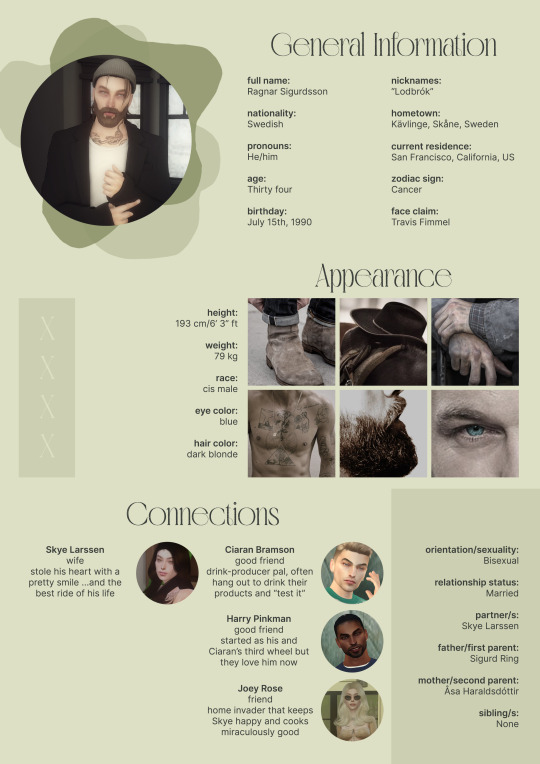
So uhm... I did a thing...
✨Character Info Template✨
Been meaning to do this a long time ago (and actually started it but never finished it, lol) as a way to share some more information about my ocs without needing to use a custom page theme, but mostly because I haven't found any page theme that looks exactly as I want and allows this much customization.
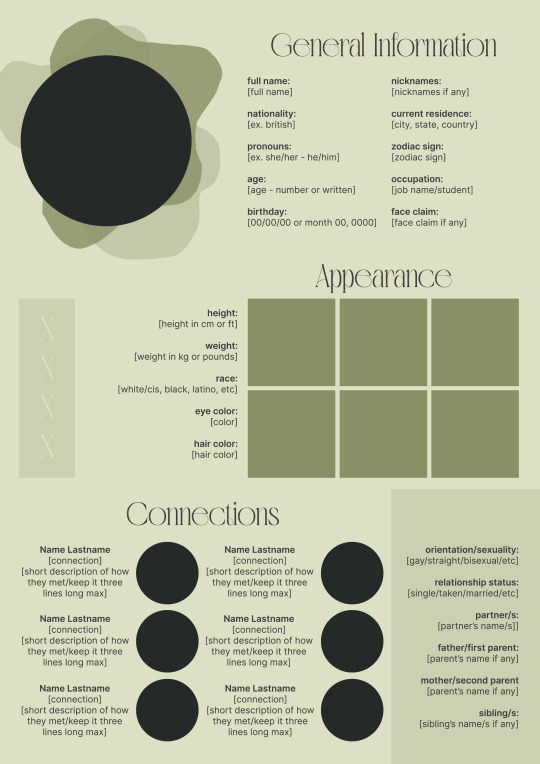
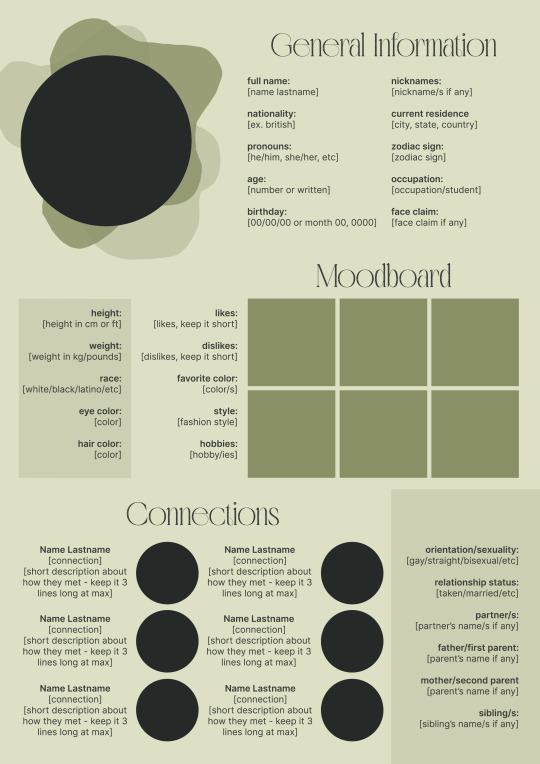
There are two versions and both are almost exactly the same; but the example shown in the left has an 'appearance' section which is small and has few quick facts regarding the oc's appearance; while the example on the right has a 'moodboard' section instead which allows you to add more info about your oc.
You can change every section/title to fit your needs like I did in the examples below; I personally removed some categories as well and got rid of some connections as this oc doesn't have that many close friends/partners to fill the original template. However, I also included an extra separated 'connections' section in the download in case you want to add more people and more information.
I recommend you stick to square-shaped pictures so it's easier to fit them to each section. Also if and when you edit the information or section titles, please select only one line at a time to replace it so you don't lose the text format. (Titles shouldn't change because that's a single format/font within the same text box, but should it change you can always hit ctrl+z hehe) When you're done, I strongly recommend you save this as a .png instead of .jpg so it's the best possible quality!
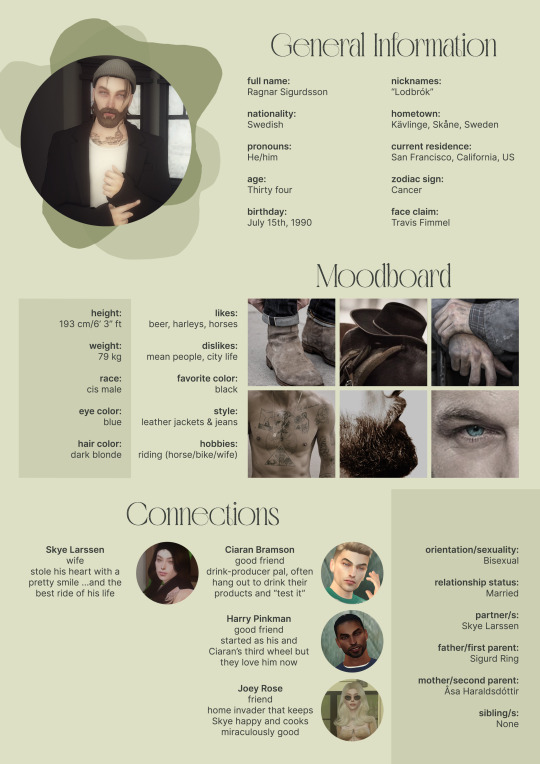
Last but not least, this is a .psd file. So you'll need either Photoshop (I did this with Photoshop Portable, but it supports newer versions of PS and it *should* support older versions too) or Photopea to open and edit this file.
Credits: Adobe Photoshop, Inter font, Golften Vintage font
>DOWNLOAD< (patreon but free :p)
(note: I'm posting this with my gaming blog because I think my fellow gamers might be interested in this, but please consider giving credits to me if you use this template by tagging @synindoodles instead of this blog)
More info on how to use and edit this template below the cut!
Layers:
>Each layer is properly named and categorized. The general layers such as the background, the icon shape and background shapes are under the groups.
>If you don't want to see/don't need one of the connections' pictures and information, I recommend you find which one it is (1, 2, 3, 4, 5 or 6) and click on the eye symbol next to the layer to hide it so that way if you ever need it, it won't be truly gone.
>To edit a text section, simply find the layer (such as General Information>Left Column) and double click on the 'T' symbol next to the layer. That way it will open edit mode and allow you to edit the text, just don't hit delete or enter while everything is selected or you'll erase it :p
>Main text sections aren't separated, they're blocks of text. I recommend you don't remove the amount (for example, if you downloaded the version with the 'appearance' section, which has 5 sections of information, don't remove the fifth line.) Either leave it empty or replace it with another data, otherwise it will look weird. The 'general information' section might look good even if you remove a few lines, just don't get rid of the whole block of text.
Pictures:
>To add a new picture, simply paste it over this document and move it using the Move Tool.
>To frame it (so it becomes a circle or fits over the shape you want), make sure the picture layer is over the layer you want, then while holding alt click between the two layers. [For example, if you want to add a new main oc picture: 1) paste the pic you want, 2) move it with the Move Tool so it's covering the big circle, 3) once you've fully covered the shape (if it isn't you can resize it by right clicking on it then on 'free transform', sometimes you might need to hold shift to proportionally resize it) make sure the newly pasted pic layer is over the layer named "picture goes here", 4) hold the alt key and hover your mouse cursor over the line between your pic layer and the circle layer until you see an arrow going down symbol, once you see it click it and tah dah! your picture should now have the same shape as the circle! - you can further move it if it doesn't fit the way you want with the Move Tool (;
Others:
>You can change every color, font and section to your liking, just don't change the general layout of the template.
>To hide/show the guides (those bright blue lines all over the document), click ctrl+,
>'Inter' is a free font and you can get it in the link above (linked with the credits), Golften Vintage is not, but you can get the demo version >here< (just scroll down and click the blue download button under license). I will not tell you how to install fonts as it might be different for everyone (for me it's C:/Windows/Fonts and I just drop the zipped files (except the .txt one) there), but google is your friend.
>I can't think of anything else that needs to be said here, but if you have any other question feel free to send me an ask or dm and I'll help you out!
>Last but not least, a like is appreciated if you plan to use this plus consider tagging @synindoodles if you use it <3
#psd template#template#characters page#muses page#muse page#muse template#character template#character page template#oc page#oc page template#synindoodles#rp resources#rp template#roleplay resources#roleplay template#writers resources#writing resources#writing template#writers template
66 notes
·
View notes
Last Seen Blogs
askadietitianltd-blog
Online CPD for a dietitian
sifabul
Şifa Bul

coding-central
Untitled

rannymaas-blog
Обнаружение себя, исследование

messy-mind
Lia