#and also breaking down fabrication projects into materials and parts
Text
i applied for a job that i'm like slightly underqualified for in formal education, but overqualified in terms of experience and actual knowledge base and i have to wait until end of feb to even know where this is going
#bat rambles#the struggle of being a self-taught fabricator who did it professionally but never under guidance#i just am really really good at research and applying what i learn to creative projects#and also breaking down fabrication projects into materials and parts
4 notes
·
View notes
Text

Miscommunication Part 3
Izuku x Fem Reader
Summary: After telling Mina about your new found relationship with Izuku, things become heated. You noticed this when Uraraka and Mina become team captains for a training exercise and they pick you last. Mina also starts giving you snarky comments about your appearance and your relationship. You tell Izuku about the confrontation you had with Mina in the locker room which upsets him. During dinner, Mina tries to make you insecure and Izuku snaps at her. After the big blow up, a certain somebody knocks on your door.
Word Count: 2k+
<3<3<3<3<3<3<3<3<3<3<3
Part 4 Now Posted!
You didn’t know how to respond to Mina’s message. Izuku noticed you were taking a while to get water and approached you, ensuring you were okay. You showed him the text and explained the situation. He advised that you give a truthful and straightforward answer; you guys didn’t hook up but were starting to go out. She didn’t text you back which you thought was weird because usually, Mina had quite a bit to say over text messages. You didn’t think much of it because she was probably reporting back to Uraraka. After you guys were done working out, you went by a local market and picked up a few snacks for your dorm. It was Sunday so everyone was tucked away in their rooms, rushing to finish the stack of homework they ignored all weekend. You still had some work left but were happy that most of your work was done. It allowed you to rest for tomorrow, Mondays usually were really intense when it came to training and school work. You know Izuku told you a simple answer and left to leave it at that but it was weird that she didn’t text back. You sent a message asking if everything was okay but didn’t hear back.
The next morning, you felt very optimistic about the day ahead. This was the first day you had class since you and Izuku had made things official. You ironed your uniform and spent a little more time getting ready than usual. On your way to class, you were feeling extremely confident and prepared. All your homework was done, your hair looked great and you were well-rested. Once you got to your desk, you noticed that none of the girls were looking at you. Usually, they would sit at your desk and talk briefly until Aizawa entered the room. You started to feel a pit in your stomach form. You reassured yourself that it was just your anxiety projecting. The girls may have seemed jaded after you told Mina about your newfound romance. Izuku walked into the class and gave you a kiss on the cheek, breaking you out of your thoughts. After greeting each other Aizawa came in and handed out the assignment for the day. It was just a packet about stabilizing a victim in a high-risk area. The class reviewed the material together before suiting and doing hands-on training.
You had just gotten your new costume that Midnight helped you design. It was a dark purple leather body suit that had rhinestones that looked like stars; you wanted it to look like the night sky. Aoyama was the first one to compliment you. This made you extremely happy because you admired his style. When the training started, Aizawa instructed that the class would be split into two teams: Heroes and Injured Civilians. The civilian is lying down in a fabricated high-risk area. The hero would then stabilize and carry the civilian to safety. The team captains were Mina and Uraraka. It was then that you realized your gut feeling was right. You were picked last Mina which made you feel some type of way but you didn’t let it show. Izuku being who he is, volunteered first and conveniently Uraraka’s hand shot up to be his partner. You physically had to bite your tongue in order not to say anything. Behind you, a couple of the girls were snickering which was really driving you crazy. Izuku looked back at you and started the exercise. It did bother you but at the same time, you were a pretty secure girl. It’s not like he’s going to fall in love with her because he trained with her in class. It was just irritating that she was trying to make a statement, it just seemed super petty.
“God they’re so cute,” you heard a voice squeak from behind you.
“I know when they are going to get together,” someone else responded.
You then moved on to basic attack training. This time Aizawa was in charge of making the pairs which made you let out a sigh of relief. You were paired with Kirishima, and part of you felt smug because you knew him and Mina had a thing. At the same time, you didn’t want any type of problem and obviously didn’t feel the need to be shady. You were throwing attack after attack and it was apparent he wasn’t budging. He wasn’t even breaking a sweat while you were fighting as hard as you could when you reached your limit and excused yourself for a water break. He complimented you on how far you’ve come and you thanked him. The next exercise was two teams against each other, essentially playing capture the flag against each other. Mina started hailing down attacks on you, yes she would let up here and there but damn. It was starting to feel really personal, you were dodging and were proud to say none of her acid got on you. You were sweating and breathing heavily as you pulled your hair into a bun. The class was then dismissed for the rest of the day and all the students made their way to locker rooms. As you were changing you could hear Mina talking about your new suit.
“Oh, you don’t like how it looks? I figured you were trying to get my attention because why would you be talking about me when I’m 4 feet away,” you said pulling your hoodie over your head.
“I was just pointing out that your costume seemed to change right after you got with Deku. I wonder if there’s a correlation,” she said, packing her bag up.
“You knew I was getting my costume redesigned with Midnight because I’m planning on being her sidekick when I get my permit. So no need to wonder, save that energy for your training,” you said.
“I just think it’s convenient for you and Deku-” she started when you interrupted.
“Oh my- do you want to date him? Do you stalk him? I just don’t know why you have such an obsession with us. If you don’t want to be with him then don’t talk to me about it Mina. If a certain somebody has an issue then surely they’ll come tell me about it right? Okay then,” you said, turning your head to Uraraka who made eye contact with you for a second before looking away. Throwing your backpack over your shoulder you walk through the doors. Izuku was waiting for you outside the boy’s locker room, he could tell in your face that you were upset.
“What’s wrong? Are you hungry?” he asked, offering you the other half of his sandwich that he was about to eat.
“Just unnecessary drama that Mina is trying to pull me into,” you huffed while taking a bite.
“About us?” he asked, nodding your head in agreement.
“What about though did like- Uraraka say something?” he asked.
“No I think Mina is trying to like- I don’t know, confront me for Uraraka because she doesn’t want to,” you sighed.
“That’s weird, why doesn’t Uraraka just talk to you or me even?” he asked.
“What’s what I told her before I left? I don’t want to talk about this anymore, it’s just too much to handle right now,” you said.
You walked back to the dorm talking to each other about different homework assignments. Also considering different plans for the upcoming weekend. Once you were in your bedroom you immediately turned on the shower. Today was not only physically straining but mentally as well. You were already feeling a little homesick and now you feel super uncomfortable. That sick feeling in your stomach when you know people are talking about you. You stepped in and felt gross when you could taste the sweat on your upper lip. You went to turn up the hot water and realized it was as hot as it was going to get. Turning your body, you looked up at the ceiling and let the water run down on you. Dissociating here and there while thinking about various things. After getting out and doing your skincare routine, you hear your phone go off from your bed. It was Izuku letting you know that everyone was gathering in the kitchen for dinner. You brush your hair, throw on some comfortable clothes and make your way out there. Everyone was already in a line with their plate, waiting to get their serving. You stood in line with Izuku leaning against him as time went on.
Everyone was sitting around, either on the sofa or sitting on the ground next to the coffee table. Izuku was sitting on the couch and you were sitting on the floor between his legs. He playfully rested his plate on top of your head for a second which made everyone laugh. You noticed Mina giving you dirty looks but ignored it, you didn’t want to make a scene. Mina however was feeling quite confrontational. Everyone was talking among themselves but she spoke just above the general volume of chatter.
“So Y/N where did you head off too after the dinner we had on Saturday? I stopped by your room but nobody was there,” Mina said, pretending to be clueless. You knew she was referring to the night that everyone thought you and Izuku hooked up. You were about to respond but he beat you to it.
“Mina why do you keep asking Y/N about me. Don’t play dumb about it because you texted her and asked about what happened that night. So it’s pretty clear you;re only asking her to be petty,” he said, setting his plate down. Everyone was now starring, Mina’s face was bright red, the same as yours.
“I just- you lead Uraraka on. You know she doesn’t have the courage to tell you, especially after you hurt her-” Mina started.
“You can’t be seriously accusing me of purposely hurting Uraraka by getting with Y/N. I’m not with her for the same reason I didn’t know she liked me, she won’t communicate. Even now you’re trying to have a problem with my relationship on her behalf. It’s weird, now you’re giving Y/N a hard time because we're together? Oh but you wanna be a hero right?” he asked rhetorically, his voice raising.
“Alright just chill out guys,” Kirishima said.
“I’m completely chill, it’s not like I'm saying anything that isn’t true,” Izuku said.
Everyone was feeling awkward now, especially because Izuku never got mad at other students.
“You’re telling me not to speak for Uraraka but you’re speaking for Y/N right now!” Mina said standing up and taking a step or two towards the both of you.
“Um.. I told you in the locker room that if Uraraka had an issue she would have come to me about it. You texted ME and asked if we hooked up, I thought you were asking as a friend not to spread my information around. Seriously, what is your problem?” you asked while standing up and taking a step towards Mina.
You were now arguing at each other, nobody being able to understand what was being said. Pointing fingers at each other, getting louder and slowly getting closer. Izuku was now in between you and Mina, that’s when Kirishima got in front of Izuku. Once they started arguing, Bakugo got in between them pushing them apart. Both boys stormed off and the entire class disbanded. This was horrible, the one fear you had was that dating him was going to cause drama. Izuku starts pacing in the hallway so you lead him to your dorm. He was bright red and breathing hard, he sat on your bed and you joined them.
“I’m so sorry that all this drama is happening,” you said.
“It’s not your fault. Mina has always been over dramatic. She shouldn’t be rude to you on Uraraka’s behalf,” he reassured you.
“I know but I still feel bad especially because you ended up getting into it with Kirishima,” you sighed.
“It’s really not that serious. Kiri is a cool guy, I'm sure he won’t be bothered,” he said.
“Hopefully now there won’t be a problem, now that everything's out in the open,” you said.
“Yeah, it’s not like you started it,” he said.
“Thank you for defending me, I made me feel really secure,” you said.
“Well of course, You’re my girlfriend,” he said, giving you a peck on the lips, you giggled and moved a piece of hair out of his eye. You got a knock on the door and when you answered, Uraraka was standing playing with her hands.
“Can I talk to you?” she asked you to step out of the room, leaving Izuku inside.
<3
Tag List:
@lets-all-hope-for-the-best
@aymasakusa
@izumi-sakura
@angelaut0matec
@tess-sweirdstuff
^ Thank you for reading! I really appreciated the feedback you've given. You guys are the coolest! ^
#fanfic writing#izuku x y/n#izuku x reader#izuku midoriya#deku x y/n#fluff fanfiction#deku midoriya#my hero acedamia fanfic#my hero academia#boku no hero acedamia#my hero fanfic#boku no hero#izuku x fem!reader
110 notes
·
View notes
Text

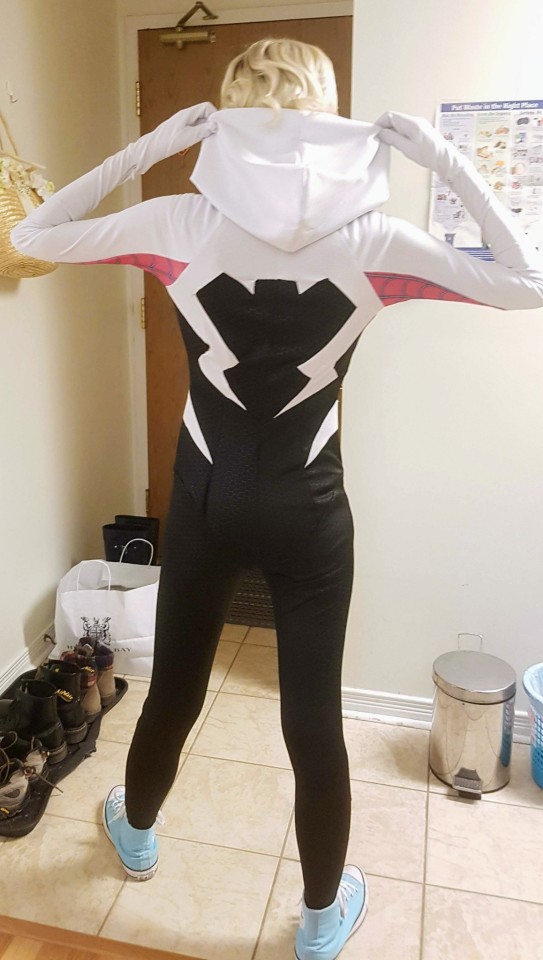
This is a Spider-Gwen jumpsuit I made!
Happy Halloween! I made this bodysuit and I'm super happy with it!
I'm gonna break down step by step what i did but I'm NOT a professional cosplayer or seamstress or fashion designer or anything. This is just to document what I've done in case it could help somebody else!
Materials used:
Scuba hex white (2 yards, available at Joann or Cosplay Fabrics International)
Scuba hex black (2 yards, same as previous links)
Web pattern on Spoonflower (make sure to order it printed on spandex!)
Three zippers (one for the bodysuit, two for the arms)
7mm snap buttons for the collar
Wig from @ardawigscanada so I don't actually have to style it as I am lazy and bad at wig styling
Step One: PATTERNING

I used several patterns as a base:
Yaya Han's Ultimate Bodysuit Pattern for the general design (McCall's M7217)
The Yaya Han pattern with a baseball jersey shirt for the arm sleeves (McCall's M7554)
McCall's M7486 for the hood (or you can trace a hood from a sweater of your choice)
Step Two: DRAFTING
First I tested out the bodysuit pattern solely on its own on some cheap stretchy fabric just to make sure it fits. I find that their smallest size fits me well as I am definitely a very stringy person. But the bodysuit was a bit short so i needed to extend the torso parts.
Then I trace out new patterns and draw the Spider-Gwen design on top of them, and cut.
BUT WAIT THERE'S MORE!!!
I wasn't sure if that would fit me either so I made ANOTHER mockup of the pattern I drafted out of scrap fabric (basically the web pattern I ordered but in the wrong size because I am dumb and I don't check things). Turns out this was a GOOD IDEA because this came out too loose! The fabrics I got were veeeery expensive so I'd rather be safe than sorry!
Step Three: COMMENCE SEWING! (AND HAIR PULLING)
After making the adjustments to my paper patterns, I held my breath and started on the bodysuit proper. Hoping that I don't fuck everything up.
I started with the easy stuff, which were the front panels:
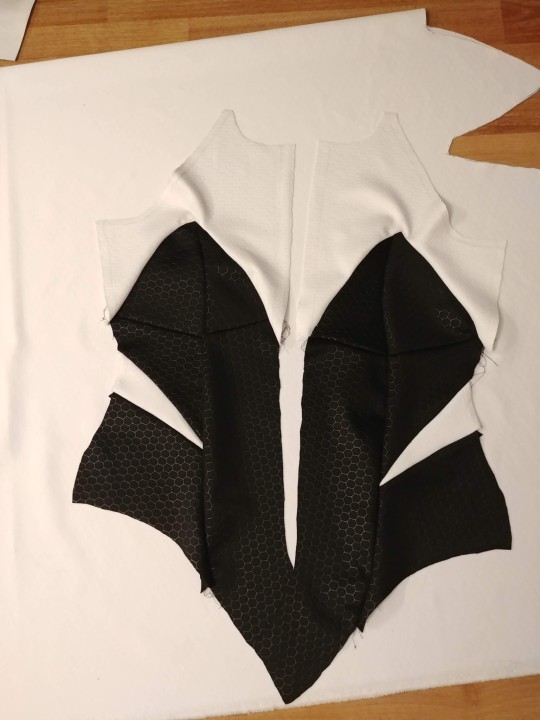
So far so good! I didn't use any special types of stitches, just regular straight stitch. I read that other cosplayers may use zigzag stitches for stretchy fabric but I have very little sewing experience and I do NOT trust my sewing machine at all. Just do what you're comfortable with and you'll be fine!
And important note! Make sure you stretch your fabric slightly while sewing! It's supposed to be a stretchy suit after all!
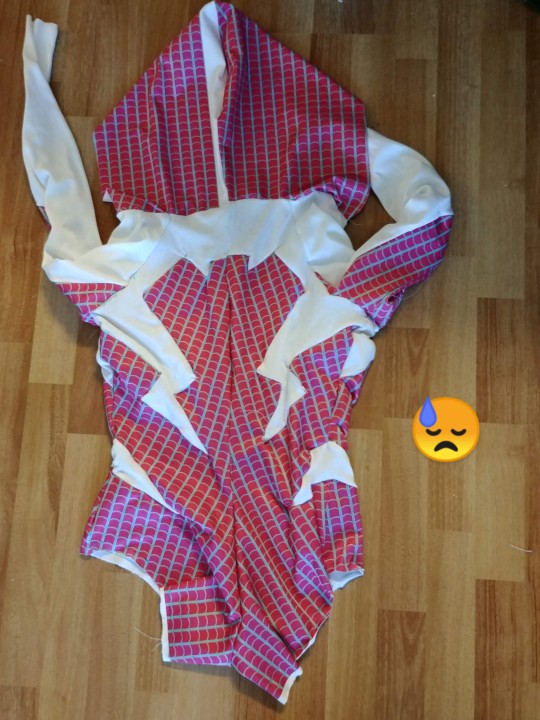
Back panels were a pain, but I got it done... there was a lot of thread pulling and hair pulling and questioning my life choices involved.

then I sewed the sides together! The white and black parts don't align perfectly but you can't really tell in this picture 😅
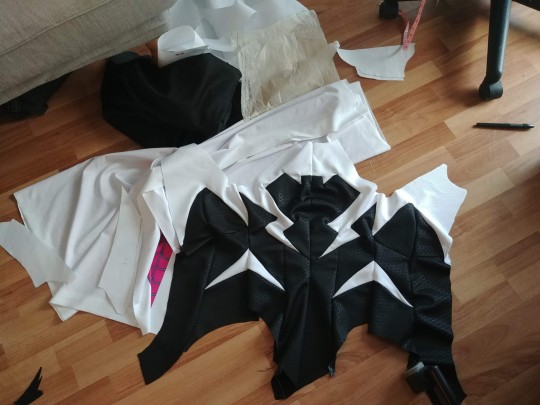
After that, I sewed the web parts onto the sleeves and the sleeves to the shoulders. That part went surprisingly smoothly so I'm just going to move on. Sorry for the lack of images but there's a photo limit on this website.
Step 3.1 Gloves!!!
Okay so I got a separate pattern for the gloves and also left them to basically the last minute to finish as they're so goddamn difficult!
This tutorial helped me out so much!!!
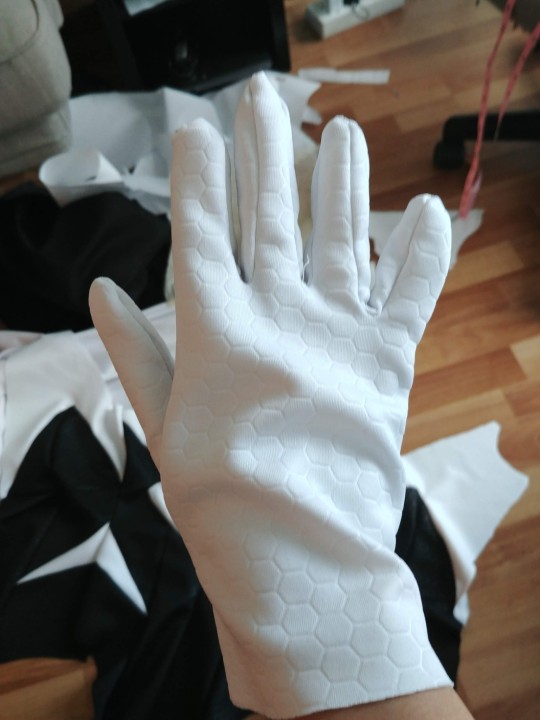

As you can see in these pictures, my first attempt came out a bit too loose. But it was an easy fix. I just had to take in the thumb and the pinky and it fit reasonably well on my hand.
And I also installed zippers on the seams of my sleeves so I can easily remove my gloves while still keeping them attached to the jumpsuit. This is why this project needed three zippers.

Step 3.2 Collar
And finally, the collar. This almost made me gave up on the entire project.
Right after I sewed the hood on, I was well on my way to finishing, or so I thought!
Because I was combining two different patterns with two different types of collars, I needed to figure out how to make them fit together. there were many MANY failed attempts.
Eventually what I did was I cut out two curved trapezoid shaped things out of the white scuba fabric, sewed that to the top of where the hood connects to the bodysuit, and then sewed the collar on top of that. This made sure that the fabric actually conforms to my neck area.
I placed down a t-shirt to trace the curvy trapezoids, and also make sure you measure your neck area appropriately!
CLOSING THOUGHTS
So yeah that's basically what I did. I admit I was too lazy to dye my flats in order to make her ballet flats but I'm sure that's easy compared to this mess! Anyway my Converses worked in a pinch.
Thank you for reading! Good luck and Happy Halloween!
#spider gwen#spider gwen cosplay#into the spider verse#spiderverse#itsv#cosplay#cosplay tutorial#sewing#sewing tutorial#stuff i made
112 notes
·
View notes
Text
Almost a year to the day after first asking @its-sixxers if I could print out and bind Half Light (after figuring out how one actually does that), I've finally finished it!!!
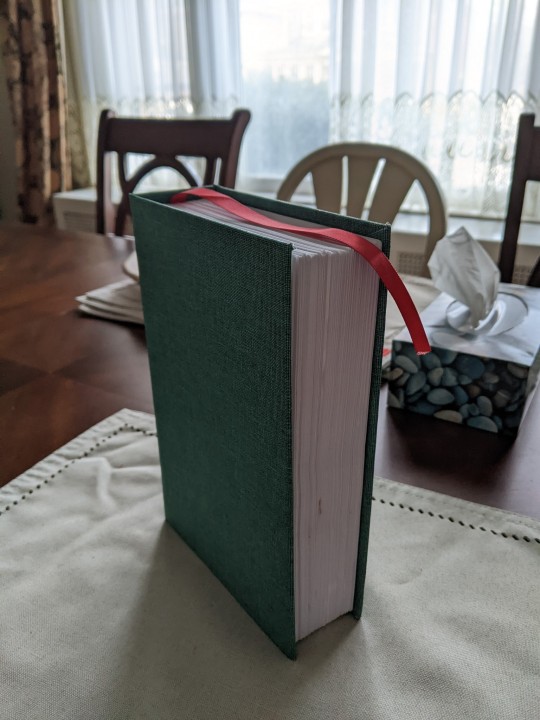

She's 825 pages long, has some of the early pages warped from glue, and blood (?) staining the text block, and I am so excited to fall in love with Nines and Mary all over again. Thanks for letting me do this, it's been a really rewarding project and I got a new hobby out of it!!!
Please go read Half Light and everything else Six has written, she is immensely talented. Mary is my favourite character in Bloodlines bar none and reading her story endeared me to VTMB when the game itself did not. Six's Fallout works are also masterpieces, and I haven't checked out her newer stuff with Elder Scrolls but I fully intend to because even if I've never touched a Skyrim game in my life, I know I'm going to adore it too!
More info about the process under the cut.
SeaLemon was an invaluable resource starting out here because I barely know how to sew and I had no idea how to approach the actual construction of a book. I'm gonna plug her right off the bat because she's very beginner-friendly if anyone else wants to learn.
But before all of that I had to format everything in Word! Chapter by chapter I copied the text over from the downloadable PDF from AO3 and would scan through the fic to ensure the formatting was correct (italicization, bolding, paragraph breaks, etc). I'd do this for about an hour at a time over the course of a couple months, until I decided to do the rest of it all at once after one March night at 10PM where I decided to learn how to bind it all, because fuck it, why not. (Answer: I was freaked out about my upcoming departmental talk and this seemed like a good distraction).

Printing all of it just on regular printer paper (don't know if I'd do that again in the future, but it's what I had on hand) it ended up being 52 signatures, or collections of 16 pages (4 pieces of paper) folded in half. Pierced holes in all of those using an awl and an old phonebook to hold the pages open, and then used my old embroidery thread to sew them together. This part took me maybe two days because I was just so damn pumped about it lmao. I also don't have any kind of bookpress to weight down the pages, so I had made due with old textbooks and MCAT prep material.

It stayed this way for LITERAL MONTHS as I gathered all the other supplies - chipboard and brushes from my local craft store, PVA glue online, and by far the hardest part was fabric. I've since learned that you can make your own fabric using book cloth and basically anything you want (if I had known this book would have been coated in red silk I swear) but for now I just wanted to be sure it was something designed for this purpose, as the woman at Fabric Land assured me it needed something specialized. So binder's buckram! Took a while to find something local and the color selection was pretty limited, I was hoping for a dark red or a dark blue but the green was the best they had in stock. Took even longer to get here. And by that point I had enough going on that it fell by the wayside until uh.... last week.
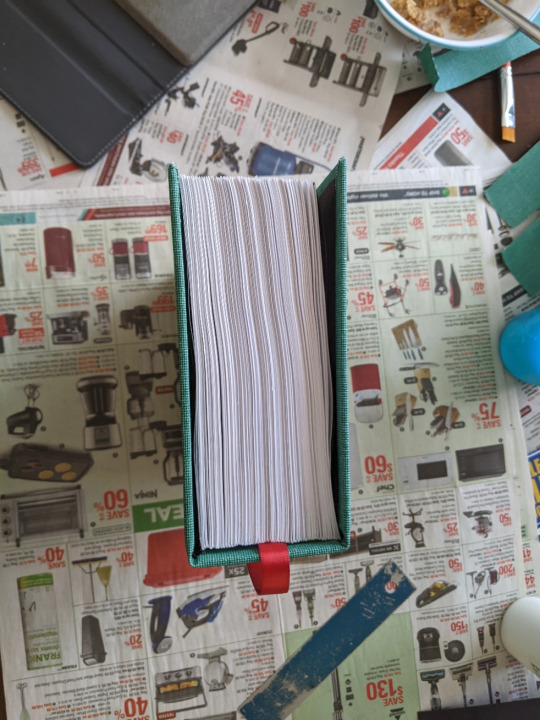
I glued the spine, again realizing that maybe I should've just made my own bookpress but powering through with textbooks to hold things in place, and let that sit for a couple days to fully dry. Ideally it would be flat, but beggars cannot be choosers. Gave her a lil ribbon too.

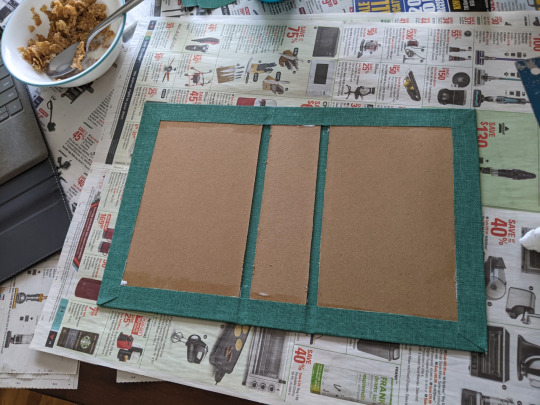
Not pictured because I forgot, the final text block with black construction paper glued to it to form the inside cover (would probably use something thicker/crisper in the future, something more like cardstock perhaps?). But then it came to putting the cover together! And that was just cutting chipboard to fit and gluing it correctly onto the fabric, leaving gaps around the spine.
Let that dry, and then I glued the text block in and let everything sit for just over 24h, again with makeshift weights to prevent the fabric warping (it's the second book from the bottom).

And then tada! Finished book! (This one's from before it was pressed but it looks the same now)
All in all extremely cool to hold in my hands and I look forward to the next fic that makes me this insane. If I get permission to do The Sun Is Now Fading I might take a crack at that and make a little set! Follow your dreams and one day you too will be able to take notes in the margins of your favourite Vampire the Masquerade fic.
#vtmb#vampire the masquerade#its-sixxers#bookbinding#mine#cant wait to read this on my flight and pray that no one asks me what it is lest i have to respond with#..... uh are you familiar with the 1991 TTRPG world of darkness and its subsequent media#em.chats
44 notes
·
View notes
Text
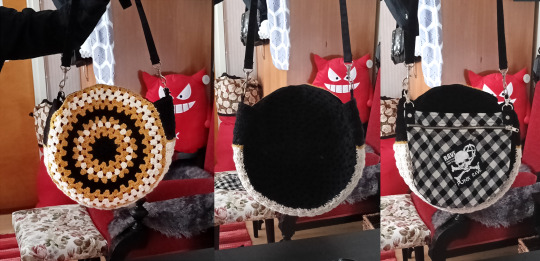
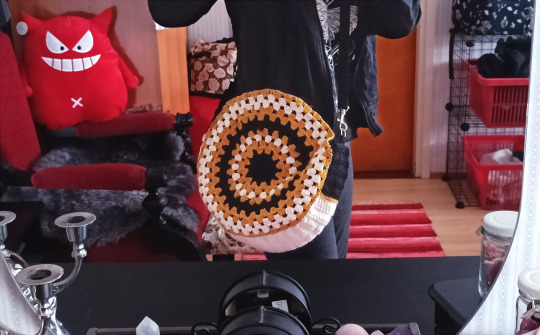
A relatively quick and quite experimental crochet project to kiiinda start the year off; a crochet bag from scrap yarns! (And other scrap materials now that I think about it)
So I had some yarn left over from my blanket of darkness (I can't believe the rounds that post is making, what on earth), one untouched ball of black yarn and then three balls of yarn I had used misc amounts of. I knew right away there wouldn't be much yarn there for any big project, I did kinda considder just making myself a simple scarf but right now I'm actually in the middle of knitting four scarves to give out to family on Christmas* so between the reality that I probably wouldn't wear a striped scarf in these particular colors and me having enough scarf projects to do anyways... yeah, the idea wasn't particularly appealing
*(GOTTA GET STARTED EARLY, also it's the misc yarn I bought when our yarn shop was shutting down, the stuff I have no idea what to do with. Currently on Scarf 2, I'll probably share photos when all four are done. Eventually. Knitting is slow. So slow I had to do a crochet project between the first two scarfs because I was losing my marbles.)
Now I have Instagram so I can post art there once every six months, I'd hardly considder myself like an Insta user, but sometimes it is kind of nice to browse the things Insta reccomends because there are some lovely things posted on there. A while back, this post of these crochet bags got reccomended to me and they have been haunting me ever since. Like look at them, they're really pretty. And yeah, when I was wondering what I could do with these scrap yarns in particular... The idea of trying to make a bag seemed really fun
And specifically, making a crochet bag with a lining on it, so it'd be like, actually kind of usable. I've never made a bag, not a crochet one nor a sewn one, and I didn't want to up any tutorials or help on how to make a lined crochet bag either, I wanted to just wing it and figure it out by myself (for better or worse) (mostly worse)
So I started the project by just making the actual crochet part of it

This whole thing involved a lot of math, trial and error to figure out the Max Size of the bag I could make (also I wanted to a round bag for some god forsaken reason) with the yarn I had. I didn't have too much of this specific yarn, and I didn't want to buy any more, just use what I already had.
At the time I thought it'd be a good idea to make the "backside" of the bag a plain black, since not only the largest amount of yarn I had was black, but also because it'd be the "inside facing side" that you'd theoretically never see if I wore the bag. In hindsight I regret that decision but we'll get back to that later
I did try out a few different color layouts, tested how many stripes of what colors I could do with the yarn I had (again, math), for some reason this was the one I liked the most though (don't ask me what the numbers mean I can't remember anymore) (something about the stitches/rounds), though I did add one more round since I had just enough yarn for it

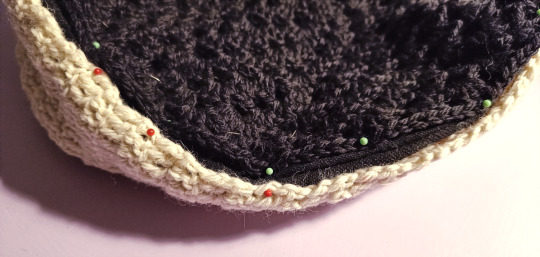
But, here is how my pieces turned out. At this point, I had no yellow yarn left and only a Very Very Small Amount of white and black, not enough to do any more rounds or make the bag or the bottom piece bigger/longer, but just enough for some sewing later on
But, with the pieces completed, it was time for me to do the lining

I've had this black fabric for years now, I got it for some project that I never actually did so it had been just sitting around, collecting dust for years, so I'm glad I finally got around to using it.
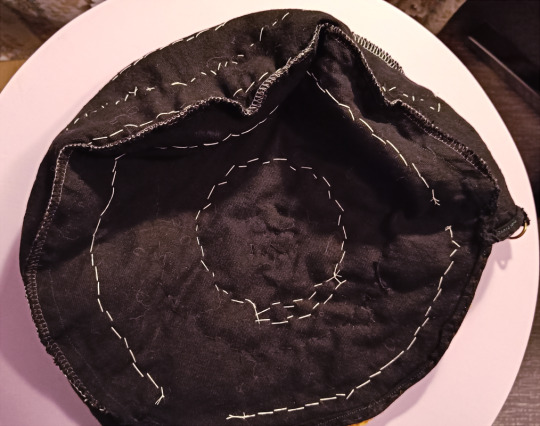
I laid it down, put the crochet pieces on top, traced them and cut 'em ✂️✨ Followed by sewing them together, a process I did not bother to take photos of because it wasn't particularly interesting.
((Also I had to take a massive break at one point because I realized I really actually needed my mom's serger but that thing was covered in decades worth of tobacco, dust and grime so it needed to be cleaned bad. There was no way in hell I was putting my fabric pieces on that filthy thing. (Also I've never used a serger before so I had to look up tutorials how to use it jdfhjkdfg)))
Once I had put the lining together I washed it (just to get any excess dust and cat hair off it) and ironed it ✨
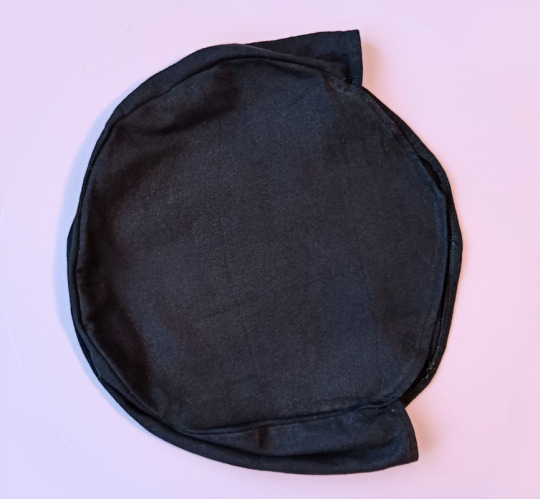
It looks like an absolute mess, lmao, you can tell I don't do sewing (it almost looks like a tulip... And man, a tulip shaped bag could be super cute...)
But it's fine, because this lining's getting covered in crochet pieces >:)c So ain't nobody gonna see the wonky sewing once it's done! (Also to be fair, big part of the reason it looks horrendous here is because the fabric itself was like, quite floppy. Like there's nothing to hold it up and keep its structure and shape at this point)
Now, one important thing needs to be addressed here. Although at the time I thought this was the best way for me to make the bag, in hindsight I know I should've done the opposite.
I thought it'd be easier for me to first sew the fabric together and then sew the crochet pieces on top, mainly because I believed it'd be harder for me to try to do sewing if the fabric pieces also had the crochet pieces attached to them. Like they'd add bulk to the fabric and increase the risk of me sewing over the crochet and somehow damaging the crochet and/or my sewing machine (or something, I dunno).
And while in theory that might be true, I now know that I would've gotten a much nicer, cleaner looking bag if I had sewed the crochet pieces onto this fabric first, because then I would've been able to add an extra inner lining. You'll see why that would've been prettier a bit later
I just want to point this out because while the way I made the bag works just fine for me, it's not the ideal way to do it, it's not the smartest nor the prettiest way to do it, and I can't reccomend it to anyone. Just wanted to give out this disclaimer, do as I say, not as I do lmao
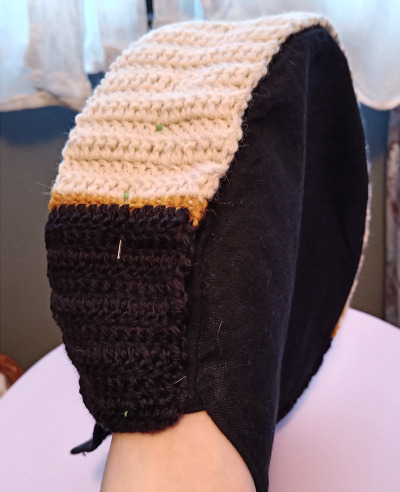
Anyway, with the lining done, I started working on attaching the crochet onto the fabric with the bottom piece, first pinning it down and then hand sewing it onto the fabric.
Then I did the side pieces. I was careful to start from the middle of each crochet piece, slowly moving outwards to the edges as I was attaching the pieces, leaving the edges unsewn for now...
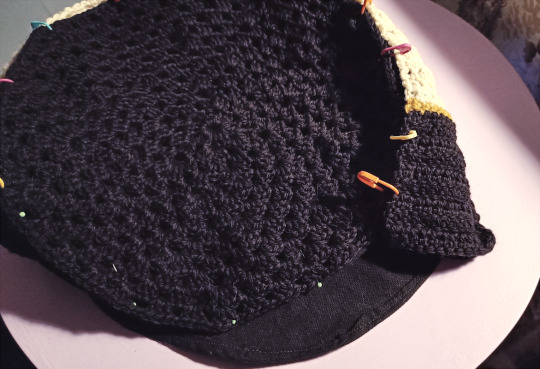
...because next, I wanted to sew the crochet pieces together. The crochet had more stretch to it, so I figured first sewing them together and then attaching the edges of the crochet to the lining would result in a cleaner look.
Sadly I didn't have much/any yarn left to so I couldn't crochet the crochet pieces together, somekinda slipstitch would've looked much cleaner and prettier, but with the little yarn I had left I didn't want to risk running out in the middle and having to unravel it or something.

So yeah, not particularly pretty, but it worked. And with that done, it was time for me to add a strap to the bag, before I'd go finish sewing the crochet pieces onto the fabric! You'll see why I did this now!

So I had some random ass, thin, black yarn leftover from... something, so I figured I could use some of that up and I did! I made tiny crochet straps and slipped small metal rings (from my mom's hoard) on them, and sewed them onto the bag
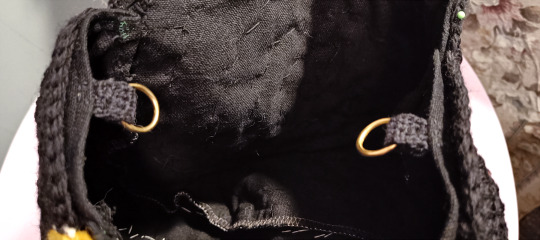
Specifically sewed them onto the fabric, didn't want them to be visible on top of the crochet lining (which is why the edges around the bag's opening were still unsewn at this point)
And in the spirit of using things I already had, I have these two straps from one of my old goth pants (though they're actually shorts now). And they just happened to be like, the perfect lenght for an over-the-shoulder bag

No the metals don't match but beggars can't be choosers and it's fiiiiiiine. What matters is that I got a free bag strap without having to make one >:)c
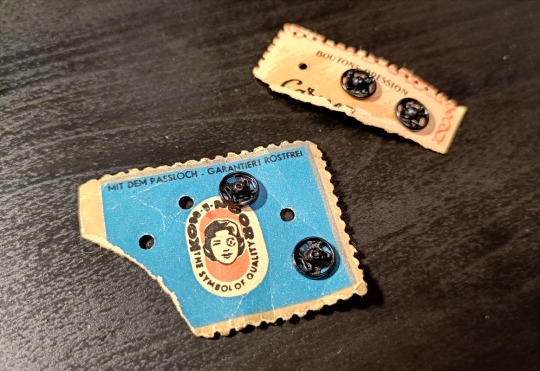
One last thing I did was add some buttons to the bag to hold it closed. I wasn't originally going to add anything but when I tried the bag on, I realized it was just a little too floppy on the opening. I didn't want to try to figure out how to add a zipper or anything, so I grabbed these ancient buttons (from my mom's hoard) and sewed three of them onto the bag, so it holds its shape better
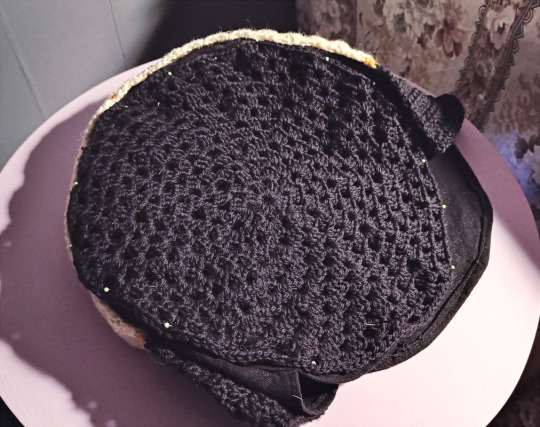
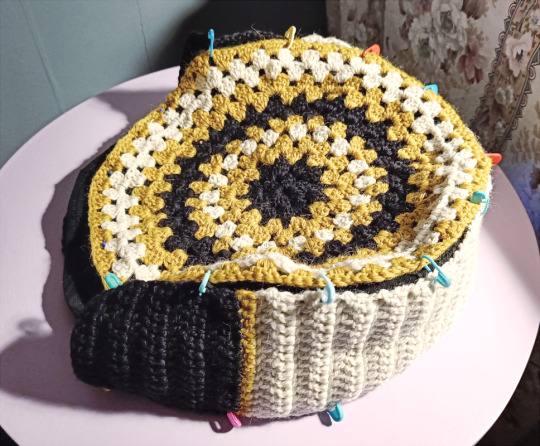
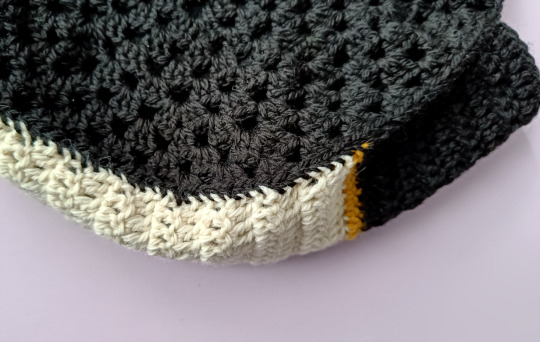
Finished sewing crochet pieces onto the fabric and finished up the very very outer edges as well, and the bag was pretty much done!
Indeed. The inside looks like ass. Although it's mainly just the white yarn that I used, since I didn't want the sewing to be too obvious on the outside I tried to match the thread I used for the sewing to the part of the crochet I was attaching.
If I had an inner lining, the inside would look much nicer since all of this would be hidden underneath it, but at this point there was no way in hell I was going to rip these pieces apart just to add a lining, nah, it's fine, it's good enough for me and good enough for my first bag. But yeah, if you want to make a bag, learn from my mistake here
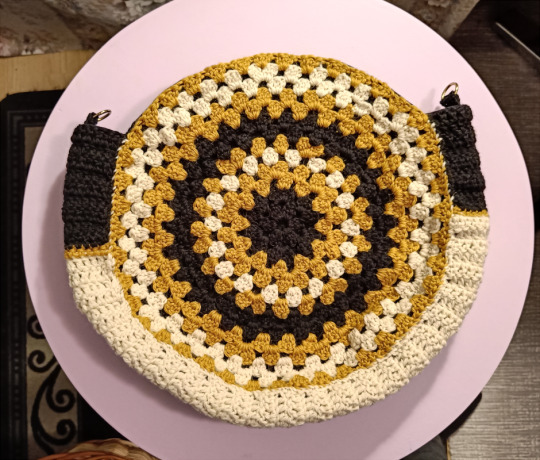

But, with all that done, the bag was done!
And yeah, here you can see why I regret doing the colors the way I did. More specifically, I regret making the bottom white. Like, I thought it would look cool and interesting, and I thought it'd be a waste of the white yarn to use it on "the backside" (the side noone would ever see), and I didn't have enough yarn to make the bag symmetrical on both sides (at least not without severely down playing the part of the yellow yarn in the design).
But in the end, because the bag doesn't hold its shape SUPER WELL, it makes the bottom piece more visible than I expected it to be. Like sewing on the crochet parts did add some structure to it, but it doesn't hold the tin cookie jar shape the way I had hoped it would. So the bottom is much more prominent because of that, and because the bottom part has like, some interest to it with the contrasting colors and whatever, it draws in the eye even more. Like, I really should've just made the bottom piece pure black and used whatever leftover yarns I had to make the backside of the bag.
But, it is what it is. I've made my mistake and now I get to learn from them!
In anycase, here is the bag, despite looking like an absolute mess and not turning out the way I had hoped it would, it still turned out pretty cute.
SHEER COINCIDENCE, I realized that I had this ancient little extra pocket thing (possibly from the same old goth pants as the strap, though I'm not sure, I can't remember) which just HAPPENED to be the exact same size/width as the bag. Like, I did not plan for that at all, but it's the perfect size, so I can straight up just keep the pocket on this bag and use it as an extra, separate compartment if I need one. Lmao, what are the odds
Also the strap from my old pants really is like the perfect lenght for this bag (/me, since I'm short, and it's not adjustable or anything)
Weirdest thing about this project is that it hasn't made me want to make more crochet bags, but it did make me want to learn to do embroidery so I could make custom embroidered bags jkdfhjahgfdg
(Disclaimer, the yarn part of the bag is 100% wool, I don't want to have to deal with washing it, and I don't want to get it dirty, so realistically, I am never going to wear this bag outside dfjghsdjfgh)
#Mine#Yarncraft Diary#Yarnblr#Crochetblr#Yarncraft#I shall now disappear into the void as I go into Knitting Jail
13 notes
·
View notes
Photo
May or may not have forgotten what I posted here myself months ago so the last post had a few repeats. oops.
Well I know for sure this one won’t because I stopped posting when I started the second semester, which is what this post is about.
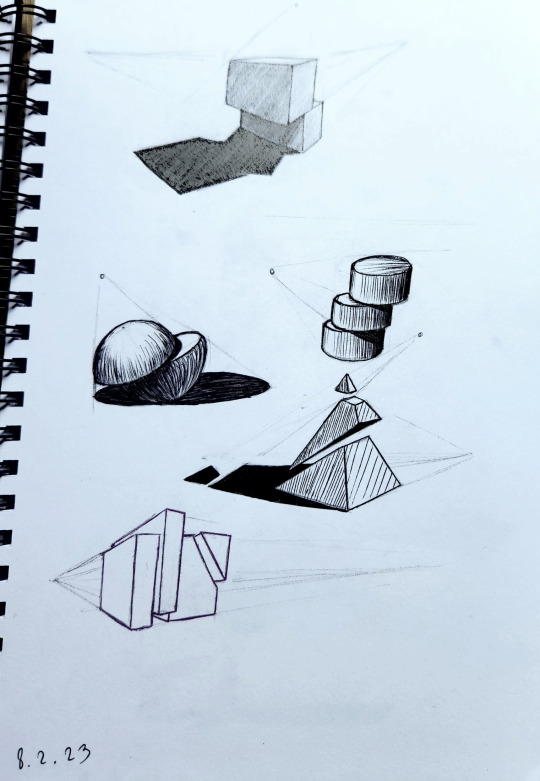
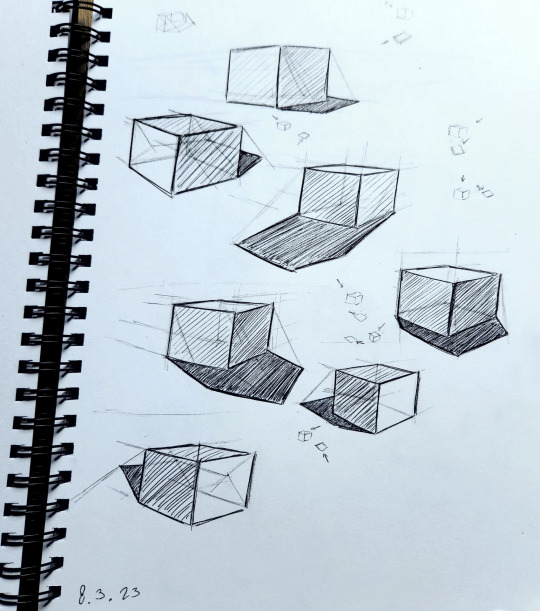
So the drawing above is the start of working with more complex shapes, using the ones we learned from last semester. This is also where things got interesting, since I could see the potential for architectural drawings.

There are a lot, and I mean A LOT of drawings like these in my sketchbook, I’m gonna show you only the ones I find interesting.
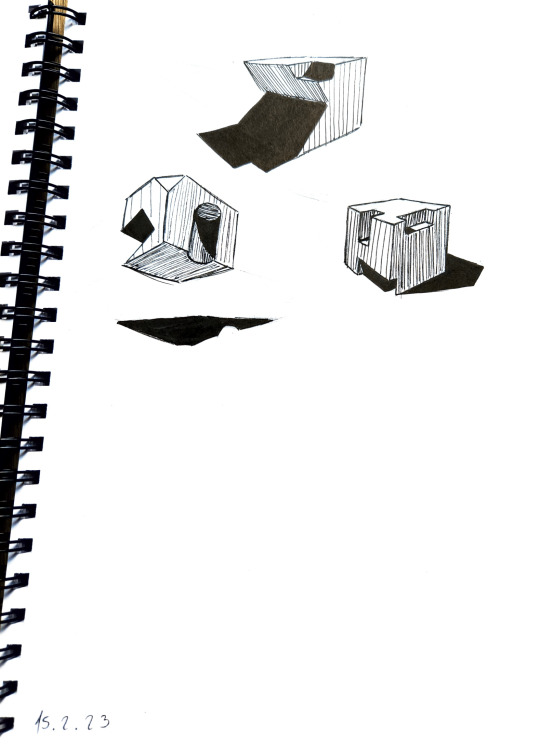
After that we went back a bit for cast shadows, which I have decided are my new mortal enemy in art. A long time ago it was rendering hair, but that’s nothing compared to this.

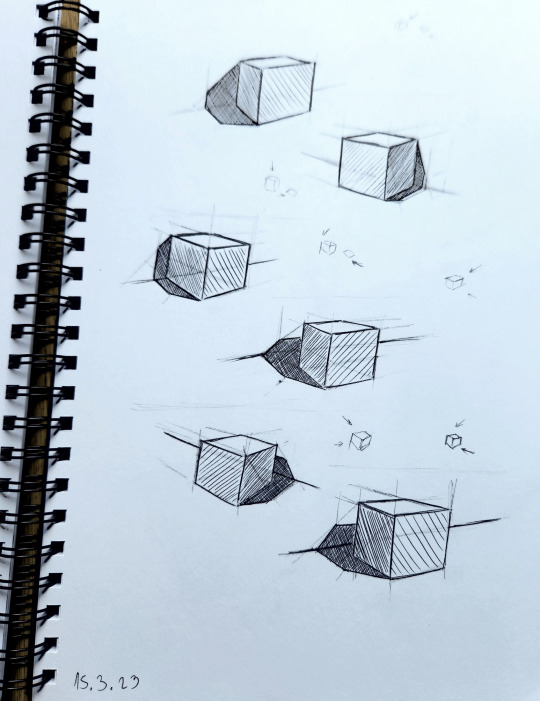
The amount of calculations you need to do for this and the different formulas for each shape make me wanna rip my hair off. And that’s before getting into more complex shapes.
They're not 100% correct but my teacher said the majority of people won’t notice anything wrong so I shouldn’t worry about it. I won’t until I need it for a personal project, then I’ll get very annoyed again.
After that nightmare I got rewarded with finally using colors to render for the first time!!! I love rendering with colors so I was very excited haha

The copper (right middle sphere) is my absolute favorite, and my teacher really liked it as well.
We also had a small lecture on arrows and ribbons/fabric and we got to render them with colors as well.

For all the colored drawings I used a combination of alcohol markers and colored pencils. The markers melted and blended the pencils and I could use this to mix colors I didn't have. For example, I didn’t have a red marker at all.
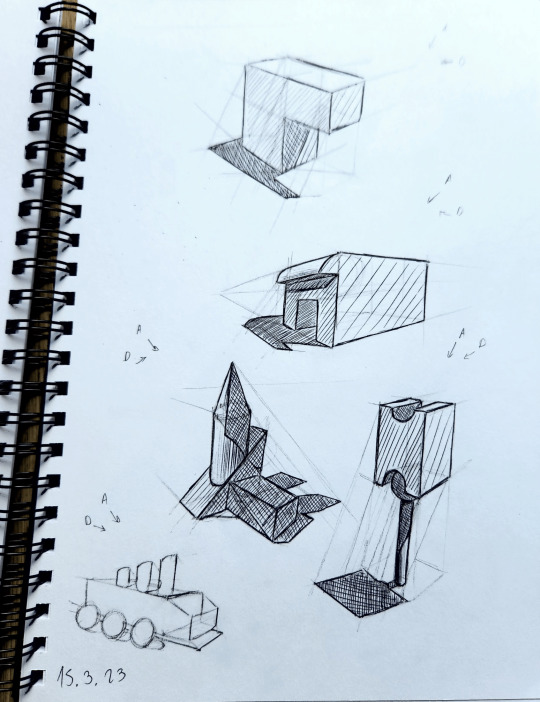
After that we had a fun exercise where we needed to either study an object or design our own. The purpose was to use the previous lessons about shapes in perspective, and the rendering of different materials.
I went with a gun design, but not just any gun-this one is technically 3 guns, a pistol and an SMG that you can connect and form an assault rifle. So I designed each gun separately (somehow I managed to turn this exercise to designing 3 objects instead of one, leave it to me to make it harder on myself lmao), and thought about how they connect, making sure the chambers kinda align and stuff like that.
I don’t wanna brag but I got the highest grade in the class for this assignment. Mostly because I’m the only one that actually rendered the different materials (or tried to), but also because my teacher liked the idea and thought it was interesting, and something people would actually buy if it was real.

It’s not the best but I literally didn’t have a grey marker so I was pretty limited. I chose a stained-glass theme for some reason, I didn’t want to make it a normal looking gun. The scan made it a bit more contrast-y than it is irl.
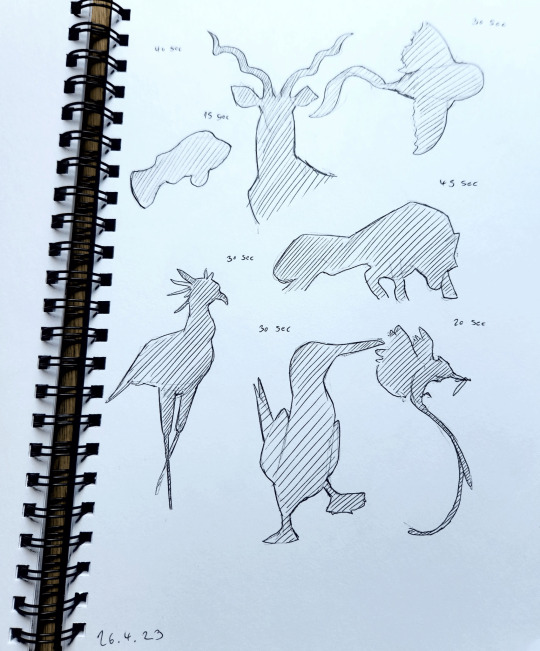
After a huge break we came back and had one lesson of silhouettes, something I kinda knew but never went out and made studies of. The challenging part of this was the time limit, at the start we had a minute, but it went down to 30 seconds. We were allowed to go overtime but it wasn't considered good.


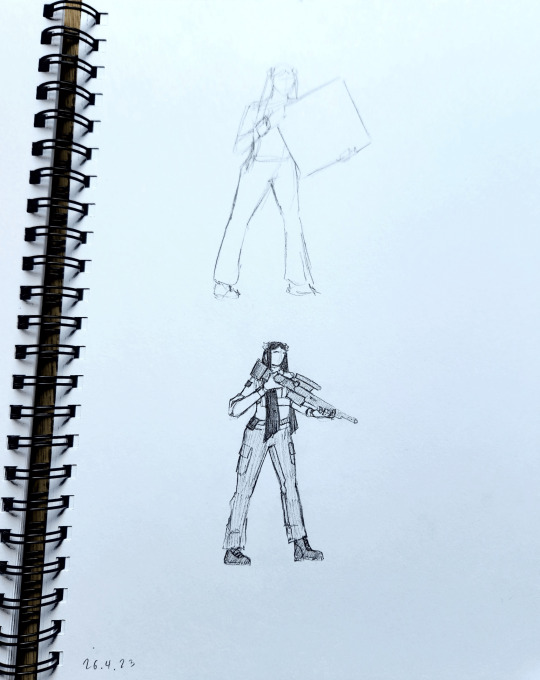
On the same lesson, we also had life drawing, using each other as models. We had to get the pose down in one minute, and then take that as a reference for a more detailed drawing. I chose to completely change the context at that point lol


The next lesson was about isometric perspective. I don’t think I’ve actually talked about this here, but I got scammed by a guy who asked me to make him a city island in isometric perspective, then when it came time to pay, he “took a vacation” for two weeks. Came back to tell me he’s definitely gonna pay me. Proceeded to disappear.
Anyways I haven’t done isometric from that moment until this lesson, where we were given a prompt word and had to draw an environment following it.
I used only colored pencils for this one because I forgot to bring my markers, but it was a nice restriction to only use 12 colors and try to combine them to make the rest.
I really enjoyed this one since I got the freedom to make something cool.

(the prompts are top-to-bottom forest, COVID-19, underwater and space)
my teacher walked up to my desk to see what I’m doing while I worked on the space one, and he said “you are crazy” every time he passed by. He showed everyone’s work around, and a lot of people liked mine :)
The space one is based on a black hole btw, but if it was an eldritch horror.
The last lesson was a time for the teacher to review everyone’s work one by one, so most of the time we were waiting for our turn. He put up a pic of an old camera if any of us wanted to draw it, but I used it as a reference for a building because it reminded me of art deco architecture. After finishing that, I had an idea for a shrine kind of place, inspired by a spot I built for a friend’s minecraft server that we didn’t end up using. And I topped it off with Lykena and Eivrun sketches (that for Eivrun might turn into a full painting when it’s her turn)

The entire year my teacher was occasionally asking me if I’m not getting bored, because we were going through a lot of basics I was obviously proficient at already, but I always found something new to learn, no matter how small, even on topics I practiced a lot before. So I’d say this workshop was very useful for me. And besides, it’s always good to get critiques from a professional, and from people who are interested in art.
#original art#Art Studies#uni work#my teacher was pretty mean but he wasnt mean to me#probably bc i never gave him trouble but also i dont think i look like the person that can take his roasts lmao#i learned a lot about perspective from this year#which is good bc it was a weakpoint for me
5 notes
·
View notes
Text
Brazil Textile Recycling Market Size, Share, Price Trends, Growth & Reports 2024-2032
The latest report by IMARC Group, titled “Brazil Textile Recycling Market: Industry Trends, Share, Size, Growth, Opportunity, and Forecast 2024-2032.,“ offers a comprehensive analysis of the industry, which comprises insights into the market. The report also includes competitor and regional analysis, and contemporary advancements in the market.
The Brazil textile recycling market size is projected to exhibit a growth rate (CAGR) of 6.48% during 2024-2032.

Brazil Textile Recycling Market Overview:
Textile recycling involves repurposing and reprocessing used clothing, fabric waste, and other textile materials. The process typically begins with the collection and sorting of textiles, followed by cleaning and shredding to break down fibers. These fibers are then spun into new yarns or used as raw materials for various industries. This form of recycling not only extends the life of fabrics but also significantly reduces environmental impact compared to traditional textile production.
The key properties of recycled textiles include sustainability, versatility, and the potential for creative reuse in diverse applications, ranging from clothing to industrial products. One of the main advantages of textile recycling is its contribution to reducing landfill waste and conserving natural resources like water and energy used in conventional textile manufacturing.
Request to Get the Sample Report: https://www.imarcgroup.com/brazil-textile-recycling-market/requestsample
Brazil Textile Recycling Market Trends:
The market in Brazil is primarily driven by the increasing environmental awareness and the push for sustainable practices in the fashion industry. In line with this, government initiatives promoting eco-friendly processes and waste reduction are providing an impetus to the market.
Moreover, the growing trend of sustainable fashion among consumers is acting as a significant growth-inducing factor. In addition to this, advancements in recycling technologies enabling more efficient processing of textile waste are further propelling the market. The market is further driven by collaborations between fashion brands and recycling companies, aiming to develop sustainable products. Apart from this, the expansion of the retail sector and the increasing popularity of second-hand clothing are enhancing the visibility and accessibility of recycled textiles, thereby stimulating market dynamics.
Explore the Full Report with Charts, Table of Contents, and List of Figures: https://www.imarcgroup.com/brazil-textile-recycling-market
Brazil Textile Recycling Market Segmentation:
Product Type Insights:
Cotton Recycling
Wool Recycling
Polyester and Polyester Fiber Recycling
Nylon and Nylon Fiber Recycling
Others
Textile Waste Insights:
Pre-consumer Textile
Post-consumer Textile
Distribution Channel Insights:
Online Channel
Retail and Departmental Store
End User Insights:
Apparel
Industrial
Home Furnishings
Non-woven
Others
Regional Insights:
Southeast
South
Northeast
North
Central-West
Competitive Landscape:
The competitive landscape of the industry has also been examined along with the profiles of the key players.
Key highlights of the Report:
• Market Performance (2018-2023)
• Market Outlook (2024-2032)
• COVID-19 Impact on the Market
• Porter’s Five Forces Analysis
• Strategic Recommendations
• Historical, Current and Future Market Trends
• Market Drivers and Success Factors
• SWOT Analysis
• Structure of the Market
• Value Chain Analysis
• Comprehensive Mapping of the Competitive Landscape
Note: If you need specific information that is not currently within the scope of the report, we can provide it to you as a part of the customization.
About Us:
IMARC Group is a leading market research company that offers management strategy and market research worldwide. We partner with clients in all sectors and regions to identify their highest-value opportunities, address their most critical challenges, and transform their businesses.
IMARC’s information products include major market, scientific, economic and technological developments for business leaders in pharmaceutical, industrial, and high technology organizations. Market forecasts and industry analysis for biotechnology, advanced materials, pharmaceuticals, food and beverage, travel and tourism, nanotechnology and novel processing methods are at the top of the company’s expertise.
Contact Us:
IMARC Group
134 N 4th St. Brooklyn, NY 11249, USA
Email: [email protected]
Tel No:(D) +91 120 433 0800
United States: +1-631-791-1145 | United Kingdom: +44-753-713-2163
0 notes
Text
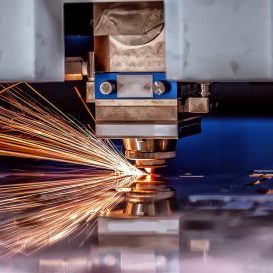
Shattering Misconceptions About Sheet Metal Laser Cutting
Any laser cutting company can tell you that manufacturing technology is evolving incredibly quickly. Because of that, people tend to think that they know exactly how sheet metal laser cutting works when they really aren't quite as up-to-date as they might think. Sometimes people have misconceptions based on ideas that used to be true but that aren't any more. Some were born out of total misunderstanding in the first place.
Regardless, eliminating a lot of the myths and misconceptions about sheet metal laser cutting is the best way to fully understand how to wield the full power of this tech-based manufacturing revolution to your advantage.
The Truth About Sheet Metal Laser Cutting: Breaking Things Down
Perhaps one of the biggest myths about sheet metal laser cutting has to do with the idea that these machines are so sophisticated that they can do just about anything. This likely has to do partially with the champions of the technology that have sung its praises far and wide over the years... coupled with the fact that "laser cutting" just sounds a lot more futuristic than it really is.
The reality of the situation is that, as is true in all other areas of manufacturing, there are types of materials that are great candidates for laser cutting and there are those that aren't. PVC, for example, actually gives off fumes that could be potentially dangerous when cut by a laser - meaning you'll want to investigate alternative options. In other situations, you may be able to work with very thin sheets of material like polycarbonate but the thicker you get, the more difficult things become.
Another common myth about sheet metal laser cutting has to do with the idea that the machines themselves are inherently dangerous. Again, a lot of this probably stems from the use of the term "laser" and the lofty ideas people tend to associate with it.
So long as you A) follow the safety protocols the same way you would with any other piece of manufacturing machinery, and B) avoid material-based issues like the PVC complication outlined above, laser cutting machines are perfectly safe. They're also very easy to operate, as a lot of the modern day machines come with software and user interfaces that are equal parts intuitive and easy-to-use.
Let Our Team Help With Your Next Big Sheet Metal Fabrication Project
At Yarder Manufacturing, we see ourselves as so much more than just another fabrication and laser cutting services company. We have over 96 years of custom sheet metal fabrication experience that we're honored for the opportunity to leverage to your advantage.
It doesn't matter how big or small your project is. How tight your tolerances are. How complicated the challenge is that you're trying to solve. We have the dedicated workforce and the robust array of services needed to make the impossible, possible - exactly as it should be.
So if you'd like to find out more information about what a sheet metal fabrication partner could do for your business, or if you just have any additional questions you'd like to go over in a bit more detail, please don't hesitate to contact Yarder Manufacturing today.
Source URL:- https://sites.google.com/view/yardermfg30/home
0 notes
Text
7 Easy Secrets To Totally You Into Double Glazing Repairs Near Me
How to Find Window Repair Near Me
It is essential to be aware of the best places to find window repairs near you in case you have broken glass, a sash that's broken or a broken motor. It's essential to locate an expert who is experienced in handling these repairs.
Replace a broken glass pane
Changing a broken glass pane on your windows can enhance the look and value of your home. It's also a great way to reduce energy costs. By replacing the old glass with newer glass that is insulated you can reduce the loss of heat and improve efficiency. The type of window and the number of panes that need to be replaced will determine the price of the project.
Before removing the glass, you must clean the inside of the frame to remove debris and soften any glazing compound. Use a wire brush to clean out any crevices. If you own a wooden frame and want to smooth it out, lightly sand it to smooth out any rough edges.
Wear gloves that are thick and safety glasses to protect yourself from cuts. To remove the glazing, you can use a utility blade.
Once you have removed the old glazing, measure the glass. It is a good idea cut a new piece glass to the correct size and then fit it into the frame. You might want to apply a small bead of caulking around the edges of the new glass before nailing it in the frame.
The cost of replacing a broken glass pane can vary based on how large the fracture is, the size of the broken glass pane, and the quality of the frame. A double-pane window replacement will cost between $200 and 600, while one pane replacement will cost between $50 and $200.
Take out a sash that has been damaged
If you're looking to repair a broken sash, or simply want to keep your old window in good condition There are a variety of options to accomplish the task. Depending on the type of window you have, you may have to contact an expert or purchase special hardware.
If you have a sash that is weighted window, you'll need to remove the top sash before you can repair it. You can either lift it off or use the weights that are attached to the frame to pull it down. You'll need to cut the cords if you wish to replace the upper shash. This will stop the glass from breaking.
If your sash is made of vinyl, then the repair isn't possible. You'll usually find the sash's weights in a scrap yard. They can be found in numerous locations across London. If you're planning to replace the entire window, it's best to contact an expert in window replacement.
If your sash is constructed out of wood, you'll have to move the sash to your window box. To do this, you'll have to employ a tool with sharp side cutters. Additionally, you'll need a friend to hold the top sash while you work.
If you're not sure of what you're doing, you can bring your window to an area glass fabrication shop. The cost of materials and labour will cost you about $400.
Repair a broken window motor

There are a few things you can do when your window motor stops working properly. It's a good idea to take your car to an expert mechanic on the road to get a complete diagnosis and repair. They will be able tell you the reason your window isn't rolling down or lift.
Common indicators are the most effective method to determine the cause of your window's issue. One of the most crucial indicators is a blown fuse. This can cause your glass's to shake or even become stuck.
The same fuse will also signal a mechanical issue. If your window doesn't move down or raise as it should then you must replace the fuse and the glass.
Power window issues were traditionally caused by defective wiring or switches. A change in the battery can help.
You may be able to fix the issue in the event that the fuse has blown by resetting the fuse box. This will allow you to start the window motor and allow it to start working again.
The window motor will likely be the first part you'll have to replace. You can purchase a brand new regulator at an auto parts store or on the internet. Depending on your vehicle's make and model it is possible to remove the door panel to access the motor.
You should be able to observe the motor once you've removed the panel. To examine the wiring as well as service ports, make use of a flashlight. You may have to clean the gasket because it could be susceptible to rust or dirt particles.
Repair a double-paned window
There are many ways to fix damaged windows no matter if you need to replace them, or if the double-paned windows you have are damaged. The greatest benefit is that it could save you money. There are many variables which affect the price of your window repair.
Double-paned windows can be the ideal way to boost insulation in your home. They can also break and create condensation within your home. They can be replaced but they are difficult to replace. If you want to repair a cracked or broken double pane, you will require your expertise and specialized tools.
To repair a double-paned glass, you must first remove the sash. The sash is the frame that holds the glass in place. After you have removed the sash, you must seal the gaps between the panes and the sash. Silicone caulking works well to close these gaps.
Next, you will need to remove old adhesive tape. This can be accomplished using a thin-bladed putty knife. You can also heat guns to soften the old adhesive. To get rid of the tape residue, you could employ a general-purpose solvent.
After you have removed the tape, you can cut it. You can also use a scraper for scraping the edges. Then, you'll require new sealing tape.
Replace the window made from rotten wood
The replacement of a wood window that is rotten can be a nightmare but there are plenty of DIY solutions to help you complete the task. However, if the rotted windows are too large for simple fixes, then replacing the whole frame could be the most effective solution.
The first step is to get rid of the decayed wood that can be done with a hammer or prybar and saw. A prybar is a great tool as it permits you to take off the decayed material in one go.
www.repairmywindowsanddoors.co.uk is to clean any cracks or holes in the wood. Then, fill the gaps with epoxy or another filler. The filler isn't an ideal solution for the long term, but it will provide the necessary protection for your wood.
After filling the gap After you have filled the gap, apply a coat of caulk and primer to finish. Paint the new frame so that it blends with the existing frame.
If your rotted wood is vast that is rotting, you may be thinking about hiring a professional carpenter complete the task. This is especially true for those with limited carpentry skills. The help of a professional will save you a lot of hassle and ensure the wood that is rotting is replaced in a way that will last.
It is possible to repair a rotten window from wood without spending a lot. The cost for replacing a damaged wood window is between $100-$800 , depending on the type and the extent of damage.
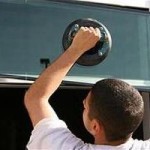
Take a look at the windshield
If you're purchasing a brand new car or upgrading your existing vehicle, it's a good idea to take a look at your windshield before you drive off the lot. It's necessary to repair it if damaged. Based on the extent of the extent of damage, you might even require it to be replaced.
Although a cracked or damaged windshield isn't the first thing that is in your mind when you think about the safest method of operating your vehicle, it's a frequent occurrence. It's easy to fix.
It is recommended to examine your windshield from every angle to determine if the windshield is repairable. If it's chipped , cracked, or damaged you'll need to repair it before you attempt to pass a safety exam.
You also want to take a look at the seals. If the seals have cracked or deteriorated, they could weaken the structural integrity of the glass.
The correct seals and adhesives can assist in stopping water from leaking into your windshield. This is especially important when it's hot and sunny outside. Also, ensure that the moulding on the windshield matches that of the body.
The main safety issue when you have a chipped or cracked windshield is that it will not allow you to see from both sides. For safe driving, you will need to be able to see the road and other vehicles.
#upvc window repairs near me#window repairs near me#window repair#window repairs#upvc window repairs
1 note
·
View note
Text
Cricut Maker 3 Set Up - The Ultimate Craft Cutting Machine

Today’s latest and must-have DIY gadget is Cricut Maker 3. It is always in the top list of the crafter’s wish lists. Also, crafters and DIYers praise this latest Cricut machine thanks to how easy it is to use and get more out of it. In addition to this, you do not require much prior experience or technical knowledge to use the machine.
However, Social media is full of videos where influencers share the endless tasks you can do with this incredible machine. Therefore, we decided to look at how the Maker 3 machine works and what it can do.
What is Cricut Maker 3?
This Maker 3 is a digital crafting machine that uses a design app (Design Space) and a variety of tools that allows you to do a fantastic craft project. This cutting machine is so smart that many things wouldn’t possibly be done with scissors alone.
Its upgraded cutting speed enables you to cut over 300 materials. Therefore, it is called the Rolls-Royce of cutting machines.
What Can a Cricut Maker Do?
The Cricut Maker 3 is the newest cutting machine model released in June 2021, which is a super choice for delivering performance at commercial grade level. Like the original Maker model, it can cut more than 300 different types of materials, including paper, wood, leather, fabric, and others. It is also compatible with the 13 tools for scoring foiling, writing, cutting, engraving, etc.
In contrast, the compatibility of Cricut Maker 3 with Smart Materials allows you to cut a long project up to the length of 12 feet without the need for a mat. Its strong motor can provide 2x fast cutting with 10x cutting force as the original Cricut Maker.
How Does the Cricut Maker 3 Work?
The Design Space app is required to control the Maker 3 machine. You can use the app on a computer or mobile device. Also, you can connect your Cricut Maker 3 machine via wireless Bluetooth technology or using a USB cable.
On Design Space, you can create your numerous designs from an image file format, such as PNG, JPG, and SVG. In addition to that, it also provides its own library of text fonts, pictures, and SVG files as part of the Cricut Access plan. What is the SVG file? The SVG stands for Scalable Vector Graphic, and this image uses code instead of pixels to form an image.
You also might have noticed the reduced quality of small images while resizing them to make them larger. This happens due to the pixels getting stretched and distorted. Whereas, when you try to resize the SVG file (image) then, you don’t see any distortion in your image. Additionally, you can break the graphic down into several layers that are quite easy to edit.
What Makes a Cricut Maker 3 Unique?
Cricut machines are famous for their top-notch cutting and drawing features, and they can easily cut vinyl, cardstock, balsa wood, fabric, leather, and paper. Here are the features of Cricut Maker 3 that makes it unique:
Adaptive Tool System
The feature of this versatile Cricut Maker 3 machine is so powerful, and it is the only machine that comes with this adaptive tool feature.
This adaptive system feature can equip different tools and blades to provide all types of cuts so that you can personalize your Cricut projects in a different manner.
Escalated Cutting Pressure
The Adaptive system means that the Maker 3 machines include a 10x cut force, meaning the applied pressure and their movement can provide precise cuts on your projects. Furthermore, it can cut over 300 materials, which include plastic, fabric, wood, leather, vinyl, and felt.
What Materials Can You Cut With Cricut Maker 3?
As mentioned earlier, Maker 3 can cut more than 300 materials, like Cardstock, Vinyl, and Paper. However, the more specialized material here includes:
Washi Sheet
Suede
Vellum
Poster
Magnetic Sheets
Glitter Duct Tape
Felt
Faux Leather
Craft Foam
Chipboard
Chalkboard Vinyl
Burlap
Balsa Wood
Aluminum Sheet
Acetate
Besides, the smart materials released by Cricut are now capable of working with the Cricut Maker 3 without using a mat, which is a game changer for DIYers and Crafters who have a larger task to do.
Earlier, it was only possible to cut the designs of the standard mat size 30.5 cm x 30.5 cm (12″ x 12″) or the long mat 30.5cm x 61cm (12″ x 24″). But now Smart Materials will enable you to cut designs that are 30.5 cm wide and up to 3.6 meters (12 feet) long.
Conclusion
In conclusion, the Cricut Maker 3 machine comes with the latest and unique features, such as an Adaptive tool system. It allows it to be equipped with a range of tools to provide all types of desired cuts on your Cricut projects. In addition, the Smart Materials for Cricut Maker 3 make it unique and don’t require any cutting mats. With this ultimate cutting machine, thrive in your crafting journey!
FAQs
Question 1: What blade comes with Cricut Maker 3?
Answer: When you buy a Maker 3, you get the Premium Fine-Point Blade aligned with housing, which can cut your most popular materials, including vinyl, iron-on (HTV), and paper. However, this Fine-Point Blade comes with Explore 3 and Maker 3, so you don’t need to purchase the housing separately. You just need a few replacement blades to have extra on hand. With jaw-dropping speed, expedite and boost your production with this smart gadget!
Question 2: What can you do with a Cricut Maker 3?
Answer: With this smart Maker 3 machine, you can perform various tasks, such as cutting hundreds of materials in less time with precision and also scoring foiling, writing, cutting, engraving, and more. In addition, the smart tool system allows you to switch out 13 different tools to perform actions on desirable materials.
Question 3: Do I need to connect to the internet to use Cricut Maker 3?
Answer: No, it’s not necessary to always connect to the internet. Cricut Design Space Software installed on your devices, such as a computer or iOS mobile device, can work without the internet. But to access some features, for example, uploading any content and syncing it to the cloud, may require you to use the internet.
0 notes
Text
15 Secretly Funny People In Double Glazing Repairs Near Me
How to Find Window Repair Near Me
It is essential to be aware of where you can find window repairs in your area in case you have broken glass, a damaged sash, or a busted motor. It is important to find an expert who has experience in the repair.
Replace a broken glass pane
You can make your home appear better and more valuable by replacing broken glass panes in your windows. It's also a simple method to cut down on energy costs. It is possible to reduce heat loss and improve energy efficiency by replacing your old glass with insulation glass. The cost of the project is contingent on the type of window you have as well as the number of panes that have to replace.
To remove any dust or hardened glazing compound clean the frame before you begin to remove the glass. To clean any crevices, you can use a wire brush. If you have a wood frame, lightly sand the frame to smooth out any rough edges.
Wear thick gloves and safety glasses to avoid cuts. You can employ a utility knife scrape away the glazing compound.
Measure the glass after you have removed the old glass. It is recommended to cut a new piece to the correct size and fit it into the frame. Before you attach the glass to the frame, it is possible to apply a bit of caulking around its edges.
The cost to replace a broken glass pane depends on the size and quality of the crack. upvc window repairs near me for replacing windows is $200 to 600 for double-pane windows replacing a single pane costs between $50 and $200.
Remove a damaged sash
If you're looking for a replacement for a broken sash, or simply want to keep your old window in good working order, there are several ways to accomplish the task. Depending on the kind of window you own, you might require a contractor, or buy special hardware.
If you have a sash with a built-in weight window, you'll have to remove the top sash prior to being able to repair it. You can either lift it off or use the weights attached to the frame to pull it down. If you're going to replace the upper sash, then you'll need to cut off the cords. This will help to keep the glass from breaking.
If your sash is made of vinyl, it's likely it's not repairable. Sashweights are often found in the scrapyard. They can be found in several locations throughout London. If you're looking to replace the entire window, it's best to contact a window replacement specialist.
If the sash you have is made out of wood, you'll have to transfer the sash to your window box. You will need a sharp cutter on the side to complete this. A friend can help you hold the top sash in place while you work.
If you're uncertain about what you're doing, you can take your window to an area glass fabrication shop. This can cost you around $400 for the materials and labor.

Repair a busted window motor
If you notice that your window motor isn't functioning well, there are a few things you should do first. For a thorough analysis and repair, it might be worthwhile taking your vehicle to a mobile mechanic. They will be able to identify the reason your window isn't rolling down or lift.
Common indicators are the most effective way to identify the source of the window problem. One of the most vital indicators is a blowing fuse. This can cause your glass to become shaky or even get stuck.
A mechanical problem can also be identified by the same fuse. It is necessary to replace both the fuse and the window if your window isn't moving or raising correctly.
Traditionally, issues with power windows have been caused by defective wiring or switches. Changing the battery will also assist.
If the fuse has blown, you might be able to resolve the issue by resetting the fuse box. This will allow you to start the window motor and get it to function again.
Most likely the window motor is the first part you will need to replace. You can purchase a brand new regulator from an auto parts store or online. Depending on the model and make of your vehicle, you might have to take the door panel off to access the motor.
After you have removed the panel, you should be able to see the window motor. You can then use a flashlight to inspect the service ports and wiring. It is possible to clean the gasket because it is susceptible to rust or dirt particles.
Repair double-paned windows
There are numerous ways to fix damaged windows, whether you need to replace them or your double-paned windows are damaged. It could also save you money. There are many variables which affect the price of your window repair.
Double-paned windows can be a great way of increasing the insulation of your home. However, they can be damaged, leading to condensation to develop inside your home. They can be replaced but they are difficult to replace. You'll need the knowledge and skills as well as use special tools to repair cracks or breaks in a two-pane.
The first step in repairing double paned windows is to remove the sash. The sash is the frame that holds the glass in position. Once you've removed the sash, you'll have to close the gaps between sash and the panes. Silicone caulking works well to fill in these gaps.
Next, you will need to remove the old adhesive tape. This can be done with the use of a sharpened, thin-bladed knife. To soften the adhesive you can use heat guns. You can also use all-purpose solvent to clean the tape residue.
After you've cleaned your old tape after which you can cut it off. To scrape the edges, you can employ a scraper. The next step is to purchase new sealing tape.
Replace windows made of decayed wood
It can be difficult to replace windows made of wood that are decaying However, there are plenty of DIY solutions you can employ. If your rotten windows are too large for simple fixes replacing the entire frame may be the best solution.
The first step is to eliminate any rotten material. This can be accomplished using a prybar, hammer and saw. A prybar is an excellent tool because it allows you to remove the decayed material in one go.
Next, clean out any gaps in the wood. Then, seal the gaps using epoxy or another filler. Although the filler will not last for long, it will protect your wood.
Once you've filled the gap, apply primer and caulk to seal it. To blend with the frame that is already in place it is recommended to paint it.
If the wood you have rotted is vast, then you might want to think about hiring a professional carpenter to do the work. This is particularly true if you have limited carpentry skills. A professional can save you time and ensure that your damaged wood lasts.
The most important thing to keep in mind is that you can fix a rotten wood window without costing you a fortune. The cost for doing thus is between $100 and $800, depending on the kind of wood you have and the extent of damage.
Check out the windshield
If you're planning to purchase a new car or upgrading your existing vehicle, it's an excellent idea to take a look at your windshield prior to you drive off the lot. It's necessary to repair it if damaged. Based on the extent of the damage, you may even require it to be replaced.
Although a cracked windshield may not be the first thing that pops into your mind when you think of the most secure method to drive your vehicle, it's an issue that's common. It's simple to fix.
The best way to know if your windshield is repairable is to look at it from every angle. If it's cracked or chipped you'll need to repair it before attempting to pass a safety exam.
Also, take a look at seals. Damaged or cracked seals could cause glass to lose its structural quality.
The correct seals and adhesives can prevent moisture from entering your windshield. This is particularly important during hot weather. You'll also need to make sure that the windshield's molding is in alignment with the body.
A cracked or chipped windshield could cause you to be blind from both sides. To safely drive, you will need to be able to see the road as well as the cars around.
#window repair near me#double glazing repairs near me#double glazing near me#window repairs near me#upvc window repairs near me
1 note
·
View note
Text
5 People You Should Meet In The Double Glazing Repairs Near Me Industry
How to Find Window Repair Near Me
It is essential to be aware of the best places to find window repair services near you in case you have a broken pane of glass, a damaged sash or a motor that has failed. It is crucial to find an expert who has experience in these repairs.
Replace a broken glass pane
Replacing a damaged glass pane in your windows can boost the look and value of your home. It's also a great option to reduce your energy costs. You can cut down on heat loss and increase efficiency by replacing your old glass with insulated glass. The cost of the project is contingent on the type of window you have as well as the amount of panes that need replaced.
Before removing the glass, you must clean the inside of the frame in order to remove debris and soften any hardened glazing compound. To clean any crevices, you can use a wire brush. To remove any rough edges of a wooden frame then lightly sand it.
Wear gloves that are thick and safety glasses to prevent cuts. To take off the glazing compound you can use a utility knife.
Measure the glass after you have removed the old glazing. It is a good idea cut a new piece glass to the right size and fit it into the frame. Before you attach the glass to the frame it is possible to apply some caulking on its edges.
The cost of replacing the glass pane that has been damaged is contingent on the size and the quality of the break. The average cost to replace the window pane is $200 to 600 for a double pane window, while a single-pane replacement costs $50 to $200.
Remove a sash that is damaged
Whether you're looking to replace damaged sash, or simply want to keep your old window in good repair, there are several ways to accomplish the task. Based on the type of window you have, you may require the help of an expert or purchase some specialty hardware.
If you have a sash with a weighted window, you'll need remove the top sash before you can repair it. You could either lift it out or use the weights attached to the frame to pull it down. If you're replacing the upper sash you'll be required to cut off the cords. This will stop the glass from breaking.
If your sash is constructed of vinyl, it's likely it's not possible to repair it. You'll usually find Sash weights at the scrap yard. They can be bought at numerous locations across London. If you are looking to replace the entire window, however you'll need to talk to an expert in window replacement.
If your sash comes with a wood frame, you will need to lower it to your window box. You'll require an edge-cutting side cutter to do this. Also, you'll need a friend hold the top sash as you do the work.
You can take your window to an area store for glass fabrication if you aren't sure. The cost of materials and labor will cost you about $400.
Repair a motorized window that is broken
If you notice that your window motor doesn't work well, there are a couple of things you must do first. It might be recommended to take your car to an on-site mechanic for a thorough diagnosis and repair. These experts can tell you why your window won’t roll down or raise.
Common indicators are the best method to determine the cause of your window issue. A fuse that has been blown is among the most important indicators. This can cause your glass become shaky or even get stuck.
A mechanical issue could also be detected by the same fuse. It is necessary to replace both the fuse and the window if the window isn't rolling down or raising correctly.
Typically, problems with power windows have been caused by defective wiring or switches. A change in the battery can assist.
If the fuse is blowing, you might be able to repair the issue by resetting the fuse box. This will allow you to run the window motor and make it work once more.
Most likely the window motor will be the first component that you will need to replace. You can purchase a new regulator from an auto parts store or on the internet. Depending on the make and model it is possible to remove the door panel to reach the motor.
You should be able to observe the motor after you have removed the panel. To examine the wiring as well as ports for service, you can make use of a flashlight. It is possible to clean the gasket that is susceptible to dirt particles or rust.
Repair a double-paned window
There are a myriad of ways to fix damaged windows, whether you need to replace them or if your double-paned windows have been damaged. The greatest benefit is that it can save you money. There are a number of factors that determine the amount you'll are required to spend to have your windows fixed.
Double paned windows are a fantastic method to boost the insulation of your home. They can also become damaged and cause condensation to develop within your home. While they can be replaced however, they are not always easy to do. If you have to fix cracks or breakages in a double pane, then you'll require your expertise and the right tools.
To fix a double-paned windows it is necessary to first remove the sash. The sash is the frame that holds the glass in its place. After removing the sash you will need to seal the gaps between the panes and sash. Silicone caulking will help fill these gaps.
Next, you will need to cut away old adhesive tape. This can be accomplished with a thin-bladed, sharpened putty knife. You can also use heat guns to soften the adhesive. You can also use all-purpose solvent to wash off the old tape residue.
After you have removed the tape, you can cut it. To scrape the edges, you can make use of an edger. Then, you'll require new sealing tape.
Replace a rotted wood window
It isn't easy to repair rotten wooden windows However, there are a variety of DIY solutions that you can make use of. If the damage is too severe for simple repairs replacing the entire frame may be a viable option.
The first step is to take away the rotted material and this can be accomplished by using a hammer, prybar and saw. A prybar can be extremely helpful because it permits you to eliminate the rotten wood in one piece.
Next, remove any cracks from the wood. Then, you can seal the gaps with epoxy or another filler. The filler isn't a long-term solution however it will provide the required protection for your wood.
After filling the gap Apply primer and caulk to seal it. To blend with the frame that is already in place, you should also paint it.
If the rotted wood covers an extensive area you may want to consider hiring a professional carpenter. This is particularly true for those who have limited carpentry abilities. A professional can save you a lot of headaches and ensure that your wood that has rotted is repaired in a manner that will last.
The most important thing to keep in mind is that you can replace damaged wood windows without spending a lot of money. The cost of doing this is between $100 and $800, depending on the kind of wood you have and the severity of the damage.
Check the condition of the windshield
It doesn't matter if purchasing a brand new car or upgrading your vehicle, it's recommended to inspect your windshield before you drive off the lot. You will need to repair it if it's been damaged. Based on the extent of the damage, you may even require to have it replaced.
Although a damaged or cracked windshield might not be the first thing that pops into your mind when you think about the safest method to drive your car, it is a common problem. It's not difficult to fix.
The best way to know whether your windshield can be repaired is to take a look at it from every angle. If it's chipped or broken it's best to repair it before attempting to pass a safety check.
Also, look at seals. Cracked or deteriorated seals can cause glass to lose its structural quality.
The right seals and adhesives can assist in stopping water from getting into your windshield. This is especially important in hot weather. Also, ensure that the moulding on the windshield is consistent with the body.
A chipped or cracked windshield can cause you be blind from both sides. You'll need to be able to see the road and the surrounding vehicles to safely drive.
1 note
·
View note
Text
17 Reasons You Shouldn't Ignore Double Glazing Repairs Near Me
How to Find Window Repair Near Me

It is important to know where to find window repairs close to you in case you have broken glass, a sash that's broken or a broken motor. It is important to find an expert who has experience in these repairs.
Replace a broken glass pane
Replacing a damaged glass pane on your windows can improve the appearance and value of your home. It's also a simple method to lower your energy bills. By replacing the old glass with more modern glass that is insulated you can reduce the loss of heat and improve energy efficiency. The type of window as well as the amount of panes required to be replaced will determine the price of the project.
Before you remove the glass, you must wash the inside of the frame to remove debris and soften any hardened glazing compound. To clean any crevices, use a wire brush. If you own a wooden frame you can lightly sand the frame to smooth out any rough edges.
Wear gloves that are thick and safety glasses to protect yourself from cuts. You can use a utility knife to scrape away the glazing compound.
Take a measurement of the glass after you have removed the old glass. It is a good idea cut a new piece glass to the proper size and fit it into the frame. It is possible to apply a tiny amount of caulking around the edges of the glass prior to nailing it into place.
The cost to replace a damaged glass pane will depend on the size as well as the quality of the crack. The average cost for replacing the window pane ranges from $200 to 600 for a double pane window replacing a single pane costs $50 to $200.
Remove a damaged sash
There are many ways to repair your window, whether you want to replace the sash that is broken or keep it in good shape. Depending on what kind of window you have, you may have to hire an expert contractor or purchase specialized hardware.
If your sash window has an upper that is weighted that is a problem, you must remove it before you can fix it. To take it down or lift it, you can either lift it, or use the weights that are connected to it. If you're going to replace the upper sash, you'll also be required to cut off the cords. This will prevent the glass from breaking.
Vinyl sashes are more difficult to repair. You can often find sashweights in the scrapyard. They can be bought at numerous locations across London. If you are looking to replace your entire window, you'll have to speak with a window replacement specialist.
If your sash has a wood frame, you'll need to lower it to your window box. You will need a sharp side cutter do this. It is also necessary to have someone else hold the top sash as you work.
If you're not sure about what you're doing, bring your window to an area glass fabrication shop. Materials and labor will run about $400.
Repair a broken window motor
There are a few things to do when your window motor ceases to work properly. It's a good idea to take your vehicle to an expert mechanic on the road for a full diagnosis and repair. The experts will be able to tell you why your window won't roll down or raise.
The best method to determine the cause of the window issue is to look for indicators that are common. One of the most significant indicators is a blowing fuse. This can cause your glass to quiver or become stuck.
A mechanical issue could also be identified by the same fuse. It is necessary to replace both the fuse and the window if your window isn't moving or raising properly.
Power window issues were traditionally caused by defective wiring or switches. It is also possible to change the battery.
You might be able fix the problem in the event that the fuse has blown by setting the fuse box. This will allow you to turn on the window motor and get it to start working again.
The window motor will most likely be the first part you'll need to replace. You can purchase a replacement regulator from an auto parts store or on the internet. Depending on the vehicle's make and model you may need to take off the door panel to reach the motor.
After removing the panel, you should be able to see the window motor. To check the wiring and ports for service, you can make use of a flashlight. You may need to clean the gasket as it could be prone to rusting or dirt particles.
Double-paned windows can be fixed
If you have to replace broken window panes or your double paned windows have been damaged, there are ways to fix them. The best part is that it could save you money. There are a variety of factors that can affect the cost of your window repair.
Double-paned windows are the ideal way to boost insulation in your home. website link can also break and cause condensation to develop in your home. While they can be replaced, they are not always easy to fix. You'll need the knowledge and skills as well as use special tools to repair a cracked or broken two-pane.
To fix a double-paned window, you must first remove the sash. The sash is the frame that holds the glass in position. After removing the sash , you will need seal the gaps between the panes and the sash. These gaps can be filled with silicone caulking.
Next, you will need to remove old adhesive tape. This can be done using a putty knife with a thin blade. You can also use heat guns to soften the adhesive. To remove the tape's residue, you can also use a general solvent.
After you've cleaned your old tape to remove it, you can remove it. To scrape the edges, you can use the scraper. After that, you'll need to apply a new sealing tape to the frame.
Replace the window made from rotten wood
Replacing a damaged or rotten wooden window can be a nightmare but there are many DIY solutions to help finish the job. However, if your rotted windows are too large to be simple repairs, then replacing the whole frame might be the best solution.
The first step is to get rid of the rotted material that can be done with a prybar or hammer and saw. A prybar is a great tool in that it allows you to take out the rotten wood in one piece.
Next, clean out any gaps in the wood. Then, use a filler such as epoxy to fill the gap. The filler isn't an ideal solution for the long term however it will provide the needed protection for your wood.
Once you've filled the gap After you have filled the gap, apply a coat of caulk and primer to seal. You should also paint the new frame to blend with the existing frame.
If the wood you have rotted is a large area that is rotting, you may think about hiring a professional carpenter take on the task. This is particularly true for those with limited carpentry abilities. A professional can help you save time and ensure that your rotted wood will last.
The most important thing to remember is that you can change the wood window that is rotten without spending a lot of money. The cost for doing thus is between $100 and $800, depending on the kind of wood you've got and the amount of the damage.
Have a look at the windshield
It doesn't matter whether you're buying a brand new car or upgrading your vehicle, it's recommended to examine your windshield prior to when you leave the lot. If it's damaged, you'll need to have it repaired. It may even be required to replace it based on the extent of damage.
Although a cracked or damaged windshield might not be the first thing that pops into your mind when you think of the most secure way for you to drive your vehicle, it's an issue that's common. It's not difficult to repair.
The best way to determine whether your windshield is repairable is to take a look at it from all angles. If it's chipped or damaged, you'll want to fix it before you attempt to pass a safety check.
It is also important to take a look at the seals. Damaged or cracked seals could cause glass to lose its structural integrity.
The correct seals and adhesives will stop water from entering your windshield. This is especially important in hot weather. Also, ensure that the moulding around the windshield is consistent with the body.
The biggest safety concern with a cracked or chipped windshield is that it won't allow you to see from both sides. You'll need to be able to be able to see the road as well as the surrounding vehicles to be able to safely drive.
1 note
·
View note
Text

✂️ Project Overview ✂️
Pattern: self-drafted from All-in-Motion Athletic Tank
Size: Small
Est. Time: 10-15 hrs.
Fabric:
Silver jersey knit w/ all-over circle sequins
Ileana metallic black textured faux leather
Metallic ruby red polyester spandex
Shiny elastic trim (black)
🧵 Summary 🧵
A few weeks ago I saw a friend of mine tweet out to our extended cosplaying friends network for assistance in creating a piece for the Beyoncé Renaissance tour. I was very intrigued, so I reached out and he told me he wanted to evoke Bey's custom Loewe bodysuit in a tank style shirt. Looking at the suit, I knew that the fabric was going to be the make-or-break for this project. So I started hunting.
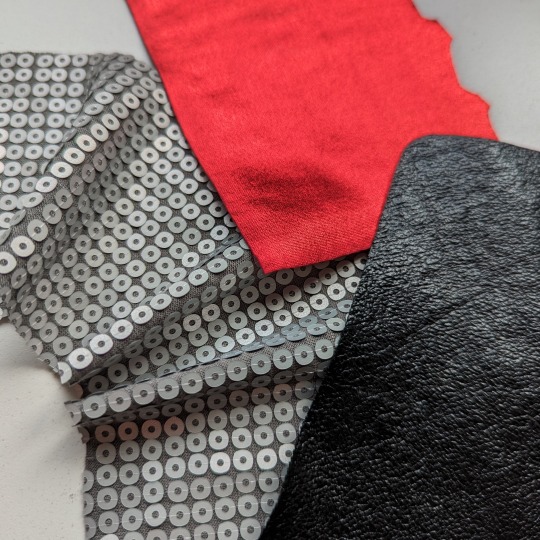
Thankfully, I found this stunning metallic sequined jersey over at Mood. It caught the light beautifully, and was extremely soft on the wrong side of the fabric making it very comfortable to wear.
Leaning into that metallic sheen, as opposed to utilizing sparkly fabrics, helped to elevate this piece and keep it from looking too costume-y.
(Also quick shoutout to Mood Fabrics for having such big swatches. I ended up being able to cut all of the nail appliques out of a single swatch, with plenty leftover.)
Once we found our fabric, the next step was finding a pattern. I had my client go purchase a stretch material tank that fit him the way he wanted, and then copied it.
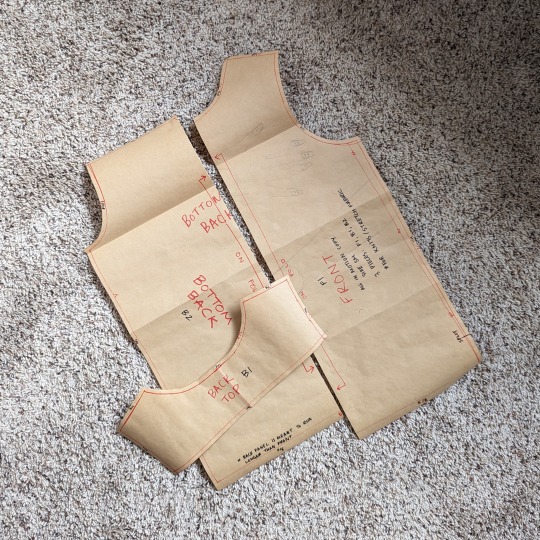

I really took my time with this since the fabric was stretchy and it really paid off. The final fit on my client was perfect and almost an exact match the tank he purchased.
This was also my first time copying an item, and despite how fiddly it was I am hoping that I can try this again with some of my wardrobe items that are starting to fall apart.
Getting the sequined jersey through my machine wasn't the most pleasant experience, but it worked okay. Serging the main seams ended up working really well, since the threads covered the sequins and kept the inside from being too scratchy.
Overall, the most challenging part was binding the edges of the neck and arm holes. I used some 1/2' wide elastic like double fold binding, sewing down one edge on the inside of the garment, and then folding it over the front to finish with a zig-zag stitch. By itself it was a lot of bulk to push through the machine, but keeping the holes (which were cut on the bias in places) from stretching was my highest priority. I only ended up with a couple of puckers in the neckline, and fearing what would happen if I unpicked things, I decided to call that a win and move on to the appliques.
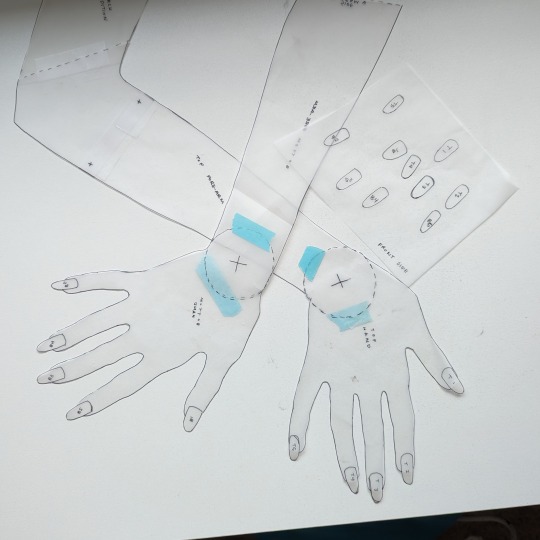

The hands were patterned off my own hands. I pinned the pattern to the tank and traced my hands to get a general idea of the placement. Then I built my patterns with joints so I could play around with them.
Once I finalized my shapes, I cut the hands out of a 1-way stretch metallic pleather (making sure that the stretch of the pleather matched the stretch of the jersey). Since all of the materials were stretchy, and the fabrics I was trying to attach were heavily sequined and pleather, I had decided from the beginning to treat the hands as appliques. I made sure when purchasing my swatches to check if the pleather and spandex for the nails didn't fray or have any issues when cut so I didn't have to worry about finishing their edges.

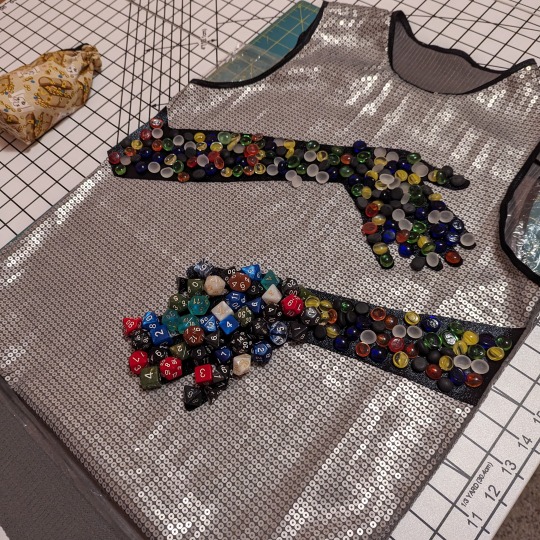
I used Tulip Applique Bond to attach the arms and nails to the tank, and it worked fantastically. Again, since I was attaching two stretchy materials I opted to use a dot pattern so that there was still lots of flexibility for the large appliques.
I really wanted to make sure that the glue bonded well, so in an attempt to find something heavy to keep on the appliques overnight I ended up using a bunch of gaming pieces and dice like pie weights.
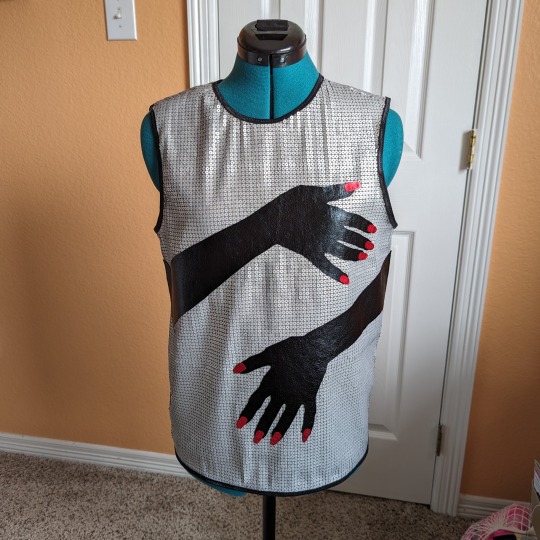
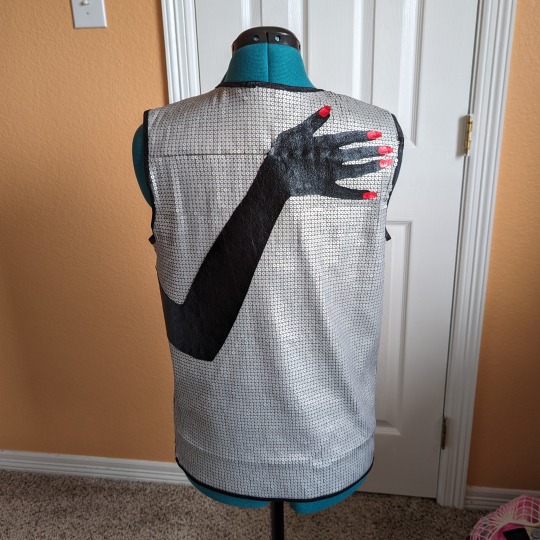
After drying for 24 hours she was finished! Overall, this project was a very fun challenge and I think I learned a lot.
I experienced a ton of firsts:
first time drafting a pattern off an existing garment
first time sewing with stretchy fabric
first time working with sequined fabric
first time working with large appliques

But most importantly, I loved building something with my client that he ended up loving.
Happy sewing ✂️🧵✂️🧵,
Mrs. Crow
#beyonce renaissance#beyonce world tour#sewing#costume#costume design#self drafted pattern#concert#beyonce#renaissance tour#sequins#virgo season#virgo#commission#loewe#custom made#mood#mood fabric#thank you mood#metallic#long nails#concert pics#concert fit#loewe inspired#client work
0 notes
Text
What You Need to Know About TPU Extrusions: Your Guide
When it comes to custom plastic extrusions, one of the most important things to keep in mind has to do with your choice of materials. Only by understanding the precise needs of your project will you be able to work your way back to the material that will check all critical boxes on your list. For many of our own customers, TPU extrusions are a solution they depend on for a number of reasons that are absolutely worth a closer look.

TPU Extrusions: Breaking Things Down
Short for "thermoplastic polyurethane," TPU is a type of material called an elastomer. It's commonly used in a wide range of different applications, including for side molding and supports in a lot of modern vehicles. It's also great for seals, belting, gaskets, and more.
This is in large part because TPU brings with it a number of benefits that make it ideal in many different conditions. It has low temperature flexibility, for example, and is both abrasion and wear resistant. These make it a particularly long-lasting option for a component that will operate under harsh conditions, like the drive belt on a car. It's also got high chemical resistance when compared to alternatives, which is why it's often used for the purposes of things like seals and gaskets.
Note that TPU extrusions are also used to help create everything from components for industrial conveyors, essential medical devices that are regularly providing life-saving care to patients, and even items in the sporting goods industry. Overall, TPU is slightly softer than some harder plastics, but that makes it more flexible as well. It's also not as soft as options like silicone or even rubber.
One of the reasons why TPU extrusions in particular have become so popular is because TPU is often compounded with other materials to expand their own natural properties. If you need to increase the strength of something in a custom way before you mass produce a component, or if you're designing an innovative new component for a car and need to worry about things like fuel or oil resistance, custom TPU extrusions can absolutely leave one less thing on your plate to worry about.
Spiratex: Your Partner in Custom Plastic Extrusion
At Spiratex, we pride ourselves on our ability to change the shape of plastics thanks to our custom plastic extrusion offerings. Whether you're in need of custom tubing, profiles, or fabrication, we have the tools and the expertise needed to get the job done. Spiratex can also run durometers from 60A all the way up to 95A, as well as 55D to 65D.
Above all else, we're true masters of complexity. Since 1955 we've maintained the stance that the harder the design is, the more we like it - meaning that there is no job too big or too difficult for us to handle. There are also no minimum order requirements.
If you'd like to find out more information about custom TPU extrusions and how they can benefit your next big project, or if you'd just like to talk about your needs pertaining to HDPE tubes, UHMW tubing, or related materials in a bit more detail, please contact the team at Spiratex today.
Source URL:- https://thescopeblog.com/what-you-need-to-know-about-tpu-extrusions-your-guide/
0 notes
Text
Custom Notebooks: The Perfect Personalized Companion
In today's digital age, where technology has become an integral part of our lives, there's something special about putting pen to paper. Custom notebooks offer a unique and personalized way to capture our thoughts, ideas, and memories. Whether you're a student, a creative professional, or simply someone who enjoys journaling, custom notebooks provide a tangible and expressive medium to express yourself. In this article, we will delve into the world of custom notebooks, exploring their versatility, benefits, and how they can be customized to suit your individual style and needs.
1. Introduction
In a world filled with digital devices, the allure of custom notebooks remains strong. There's something magical about flipping through the pages of a notebook filled with your own thoughts, dreams, and aspirations. Custom notebooks allow you to break free from the digital noise and create a personal and meaningful connection with your ideas.
2. The Allure of Custom Notebooks
Custom notebooks offer a sense of uniqueness and individuality that is often lacking in mass-produced products. They give you the opportunity to own something truly one-of-a-kind, reflecting your personality and style. Whether it's a vibrant cover design, an inspiring quote, or a personalized monogram, custom notebooks are an extension of yourself.
3. Personalization: Unleash Your Creativity
One of the biggest advantages of custom notebooks is the ability to personalize them according to your preferences. From choosing the size, paper type, and ruling, to adding custom artwork, photos, or motivational messages, the possibilities are endless. Personalization allows you to create a notebook that resonates with you on a deep level, making it a joy to use every day.
4. Durability and Quality: The Perfect Companion
Custom notebooks are not only about aesthetics; they are also built to last. With high-quality materials and sturdy bindings, these notebooks can withstand the test of time. Whether you're carrying it in your backpack, using it for sketching, or jotting down important notes, a custom notebook ensures that your precious thoughts and ideas are protected.
5. Organization and Productivity
A custom notebook can be a powerful tool for staying organized and boosting productivity. By incorporating different sections, dividers, and page layouts, you can create a structure that suits your specific needs. Whether you're using it for goal setting, project planning, or habit tracking, a well-organized custom notebook can help you stay focused and achieve your objectives.
6. Custom Notebook Cover: Reflect Your Style
The cover of a custom notebook serves as a blank canvas for self-expression. You can choose from a variety of materials, such as leather, fabric, or eco-friendly options, and add personalized designs, patterns, or colors. Whether you prefer a minimalist look or a bold and vibrant design, the custom notebook cover is an opportunity to showcase your style and make a statement.
7. Notebook Print: Expressive and Eye-Catching
Custom notebook printing takes personalization to the next level. You can have your favorite quotes, artwork, or photographs printed on the pages, creating a visually stunning and emotionally resonant notebook. Whether you want to capture a special memory, showcase your artistic skills, or simply add a touch of inspiration, notebook printing allows you to transform your notebook into a work of art.
8. Custom Notebooks for Special Occasions
Custom notebooks make excellent gifts for special occasions. Whether it's a birthday, graduation, or anniversary, a personalized notebook shows thoughtfulness and care. You can tailor the design, colors, and messages to suit the recipient's tastes and preferences, creating a truly memorable and cherished gift.
9. Custom Notebooks for Businesses and Promotional Purposes
Custom notebooks also have a place in the business world. They serve as valuable branding tools, allowing companies to showcase their logo, colors, and messages. Custom notebooks can be given to employees as a token of appreciation or used as promotional giveaways during conferences, trade shows, or other events. They leave a lasting impression and keep your brand at the forefront of people's minds.
10. Eco-Friendly Custom Notebooks
For those who prioritize sustainability, eco-friendly custom notebooks are a fantastic choice. These notebooks are made from recycled or sustainable materials, reducing their environmental impact. By opting for eco-friendly options, you can align your values with your stationery choices and contribute to a greener planet.
Conclusion
In a world filled with digital noise, custom notebooks provide a refreshing and personal way to engage with your thoughts and ideas. From personalization and durability to organization and productivity, custom notebooks offer numerous benefits. They serve as an extension of your creativity, allowing you to express yourself and leave a lasting impression. So, why wait? Embrace the world of custom notebooks and discover the joy of writing in a truly personalized way.
0 notes
Last Seen Blogs

jaletan
Jale Tan

ofskiesandmountaintops-blog
Shockwave

alunasky-blog
Alunasky

lemonbruises-blog
LemonBruises

prettyhighforawhiteguyblog
The nice & accurate prophecies of a pretty high White guy