#append text redirection
Explore tagged Tumblr posts
Visit Tumblr Blog
Explore Tumblr blogs with no restrictions, modern design and the best experience.
Last Seen Tumblr Blogs


Fun Fact
69% of Tumblr users are millennials.
Video
youtube
I just used the redirection operator twice to append text to a file, and...
0 notes
Text
How to Use ContactFormToAPI to Connect Your Static HTML Forms to Zapier
In the modern web development landscape, building fast, secure, and serverless websites is more popular than ever. Static sites are blazing fast, cost-effective, and often hosted on platforms like GitHub Pages, Netlify, or Vercel. But one lingering challenge remains: how do you handle form submissions without a traditional backend?

Enter ContactFormToAPI, a powerful no-code solution that connects static HTML forms directly to any API endpoint, including Zapier. By bridging this gap, you can easily automate workflows, capture leads, and integrate with countless apps—without spinning up a backend or writing server-side logic.
In this guide, we’ll walk through how to use ContactFormToAPI to connect your static HTML forms to Zapier, so you can trigger zaps every time someone submits a form on your website.
What You'll Need
A simple HTML website or static site (can be hosted anywhere)
A Zapier account (free or paid)
A ContactFormToAPI account (free tier available)
Step 1: Create Your HTML Form
Here’s a basic contact form you might include in your HTML site:
<form id="contactForm" method="POST" action="https://contactformtoapi.com/api/YOUR_UNIQUE_ENDPOINT">
<input type="text" name="name" placeholder="Your Name" required>
<input type="email" name="email" placeholder="Your Email" required>
<textarea name="message" placeholder="Your Message" required></textarea>
<button type="submit">Send</button>
</form>
Note: You’ll replace YOUR_UNIQUE_ENDPOINT with the actual endpoint provided by ContactFormToAPI. We'll set that up next.
Step 2: Create a Zap in Zapier
Zapier is an automation platform that connects your apps and services. Our goal here is to make a Zap that triggers when a form is submitted via ContactFormToAPI.
1. Log in to Zapier
Visit zapier.com and sign in.
2. Create a New Zap
Click the “+ Create Zap” button.
3. Set the Trigger App to "Webhooks by Zapier"
Select Webhooks by Zapier as your trigger app.
Choose Catch Hook as the trigger event.
Zapier will now generate a unique webhook URL. Copy this URL—we'll use it in the next step.
Step 3: Set Up ContactFormToAPI
Go to the Contact Form to Any API and sign in or create a free account.
1. Create a New Form Endpoint
Click “New Form” or “Create Endpoint.”
Name your form (e.g., "Zapier Contact Form").
In the Webhook URL, paste the Zapier webhook URL you copied earlier.
(Optional) Enable reCAPTCHA or set a redirect URL after submission.
Click Save to generate your unique endpoint URL.
2. Update Your HTML Form
Replace YOUR_UNIQUE_ENDPOINT in your form’s action attribute with the new endpoint URL provided by ContactFormToAPI.
Example:
<form action="https://contactformtoapi.com/api/abcd1234">
3. Test the Form Submission
Fill out and submit the form on your website.
Zapier should detect the test data, and you’ll be prompted to move to the next step in building your Zap.
Step 4: Configure the Zap Action
After Zapier catches the hook, you'll configure what happens next:
1. Choose an Action App
Select any app where you'd like the form data to go:
Gmail (send email notification)
Google Sheets (log new entries)
Slack (send a message to a channel)
Notion, Trello, Airtable, Mailchimp, etc.
2. Map the Form Fields
Zapier will show the form fields (name, email, message). Match these fields with the action app's fields.
3. Turn On Your Zap
Click Publish Zap to activate it. Your static form is now fully connected!
Real-World Use Cases
Here are some creative ways you can use ContactFormToAPI + Zapier:
Newsletter Signup: Collect emails and add them to Mailchimp.
Support Form: Create a ticket in Trello or Zendesk.
Lead Generation: Send qualified leads directly to your CRM.
Job Application Form: Upload applicant details to Google Drive and notify HR in Slack.
Survey Feedback: Append responses to a Google Sheet for analysis.
Benefits of Using ContactFormToAPI with Zapier
No backend needed: Eliminate server setup and maintenance.
No-code friendly: Ideal for marketers and designers.
Fast setup: Get working forms live in minutes.
Highly flexible: Connect with over 5,000 apps via Zapier.
Security ready: Includes spam protection and HTTPS by default.
Tips for Success
Use reCAPTCHA v2 to protect your forms from bots.
Set up redirect URLs for a smoother user experience.
Add error handling by showing fallback messages if the form fails.
Log form data to a Google Sheet as a backup.
Conclusion
Thanks to ContactFormToAPI and Zapier, static websites can now have fully functional, automated forms without a backend. Whether you're building a landing page, portfolio, or marketing site, this powerful combo enables you to collect and route form data with ease.
0 notes
Text
5 Critical Errors a Site Crawler Can Reveal for Your Site

Maintaining a website's technical health is paramount to achieving strong search engine rankings. While many businesses turn to the best SEO companies for comprehensive solutions, understanding the critical issues that plague your website is the first step toward improvement. A site crawler, one of the most valuable tools in any SEO services arsenal, can uncover hidden problems that might be hampering your site's performance. Modern crawling technologies have evolved to detect increasingly subtle technical issues that can significantly impact both user experience and search engine rankings.
Broken Internal Links: The Silent Conversion Killers
Perhaps the most damaging yet overlooked technical issue is the presence of broken internal links. These digital dead ends not only frustrate users but also waste valuable crawl budget – the number of pages search engines will crawl on your site within a given timeframe. When a site crawler identifies broken links, it is revealing more than just technical errors; it is uncovering potential revenue loss.
A broken internal link can occur when pages are removed or URLs are changed without proper redirects. For example, an ecommerce site might discontinue a product line but fail to redirect old category pages, leaving customers clicking through to "404 Not Found" errors. This creates a negative user experience and can lead to immediate abandonment, particularly on mobile devices where user patience is notably shorter.
The impact of broken links extends beyond immediate user frustration. Search engines interpret broken links as signs of poor maintenance and outdated content, which can negatively affect your site's authority. Furthermore, when internal links are broken, the natural flow of link equity throughout your site is disrupted, potentially weakening the ranking potential of your key pages.
To properly address broken links, implement a systematic approach:
Regular crawl audits to identify newly broken links.
Implementation of proper 301 redirects for permanently moved content.
Update of internal linking structures to reflect current site architecture.
Regular content audits to ensure outdated links are updated or removed.
Duplicate Content: The Search Engine Confusion Factor
The second critical error that site crawlers frequently uncover is duplicate content. While many website owners believe duplicate content only refers to copied text from other websites, internal duplication can be equally problematic. This issue often surfaces when the best SEO company audits reveal multiple URLs serving identical or nearly identical content.
Common causes include:
Parameter-based URLs generating multiple versions of the same page.
Printer-friendly versions of pages without proper canonical tags.
HTTP and HTTPS versions of pages both being accessible.
Mobile and desktop versions of pages lacking proper implementation.
Faceted navigation creating multiple paths to the same content.
Session IDs appending unique identifiers to URLs.
Regional variations of pages without proper hreflang implementation.
The impact of duplicate content extends beyond search engine confusion. It can lead to:
Diluted ranking power across multiple URLs.
Wasted crawl budget on redundant pages.
Inconsistent user experiences.
Difficulty in tracking performance metrics accurately.
Potential keyword cannibalisation issues.
To effectively manage duplicate content, implement:
Proper canonical tag usage.
Strategic use of robots.txt directives.
Consistent internal linking practices.
URL parameter handling in Google Search Console.
Structured redirect strategies for defunct pages.
Inefficient Site Architecture: The Crawl Depth Dilemma
A well-structured website should make every important page accessible within a few clicks from the homepage. When a site crawler reveals pages buried deep within your site architecture, it is highlighting a fundamental issue that can impact both user experience and search engine visibility.
Many ecommerce SEO company specialists emphasise the importance of a flat site architecture, where no important page is more than three clicks away from the homepage. When pages are buried deeper, they receive less authority from internal linking and are crawled less frequently by search engines. This is particularly critical for large e-commerce sites where product pages might be hidden beneath multiple category levels.
The implications of poor site architecture include:
Reduced crawl frequency for important pages.
Diminished page authority due to limited internal linking.
Higher bounce rates from frustrated users.
Increased server load from inefficient crawling patterns.
Reduced conversion rates due to poor user journey mapping.
Modern site architecture should consider:
User journey mapping and intent-based navigation.
Strategic internal linking for authority distribution.
Clear categorical hierarchies.
Breadcrumb navigation implementation.
Mobile-first navigation patterns.
Advanced search functionality integration.
XML Sitemap Inconsistencies: The Navigation Roadmap Gone Wrong
The fourth critical error that site crawlers often uncover relates to XML sitemap issues. Your XML sitemap serves as a roadmap for search engines, but when it contains errors, it is like providing incorrect directions to an important destination. Common sitemap problems include missing pages that should be included, outdated URLs that no longer exist, and the inclusion of non-canonical versions of pages.
Advanced sitemap considerations should include:
Dynamic sitemap generation for frequently updated content.
Priority and change frequency settings optimisation.
Multiple sitemaps for different content types.
Image and video sitemap implementation.
News sitemaps for publishing sites.
International targeting through sitemap parameters.
Effective sitemap management requires:
Regular validation and error checking.
Integration with content management systems.
Automated updating processes.
Proper compression and formatting.
Strategic prioritisation of important pages.
Resource Loading Issues: The Performance Bottleneck
The fifth critical error that site crawlers can reveal relates to resource loading issues, particularly with CSS and JavaScript files. In an era where page speed is a crucial ranking factor, understanding how your site's resources are loaded and executed is essential for optimisation.
A site crawler can identify resources that are blocking rendering, reveal oversized files that slow down page load times, and highlight render-blocking JavaScript that prevents users from seeing content quickly. These technical issues directly impact Core Web Vitals, Google's metrics for measuring user experience, and can significantly affect your search rankings.
Modern crawlers can also detect more subtle resource-related issues, such as:
Unminified code files.
Unused CSS and JavaScript.
Improperly compressed images.
Missing resource files.
Inefficient loading order of critical resources.
Excessive third-party script loading.
Poor cache implementation.
Unoptimised delivery networks.
Render-blocking resource sequences.
Mobile-specific resource loading issues.
Advanced resource optimisation strategies include:
Implementation of lazy loading for images and videos.
Critical CSS path optimisation.
Asynchronous and deferred script loading.
Modern image format adoption (WebP, AVIF).
Resource hints implementation (preload, prefetch).
Service worker implementation for offline functionality.
Progressive web app considerations.
Understanding and addressing these technical issues is crucial for maintaining a healthy website that performs well in search results and provides a superior user experience. While some issues might seem minor in isolation, their cumulative effect can significantly impact your site's performance and search engine rankings.
Remember that while automated tools can identify these issues, interpreting the results and implementing effective solutions often requires expertise. Working with experienced SEO professionals who can properly diagnose and fix these technical issues can make the difference between a site that struggles to rank and one that consistently performs well in search results.
By regularly crawling your site and addressing these critical errors, you can maintain a technical foundation that supports both user experience and search engine optimisation goals, ultimately leading to better visibility and increased organic traffic to your website. The key is to establish a regular monitoring schedule and maintain a proactive approach to technical SEO maintenance, ensuring that issues are identified and resolved before they can significantly impact your site's performance.
0 notes
Text
The Rise of SMS as an Attack Vector and How SMS Firewalls Protect Against It

The Rise of SMS as an Attack Vector As mobile phones become ubiquitous communication devices, Short Message Service (SMS) has grown to become one of the most widely used messaging platforms globally. However, the open nature of SMS has also made it an attractive attack vector for cybercriminals. SMS is an inherently insecure channel that lacks end-to-end encryption and authentication. Threat actors are exploiting these weaknesses to execute large-scale SMS phishing and smishing campaigns. According to recent reports, SMS attacks increased by 700% in 2020 alone. Millions of users receive fraudulent texts each day, putting personal and financial data at risk. With nearly universal access to SMS, organizations need robust defenses to protect mobile users from this growing threat. How SMS Firewalls Mitigate SMS-based Attacks An SMS firewall sits between an organization's internal systems and the public telephone network to filter and monitor SMS traffic in real-time. It uses a variety of techniques to identify and block malicious or unauthorized SMS messages before they ever reach end users. SMS firewalls inspect the content, context, and patterns of incoming and outgoing text messages to identify signs of suspicious activity. They can analyze messages for malicious links, detect SMS spoofing, uncover bulk messaging patterns, and match messages against known phishing and smishing campaigns. This layered filtering approach protects users from a wide range of SMS-based attacks without disrupting legitimate business communications. When suspicious messages are detected, the SMS firewalls is able to take automatic actions to mitigate threats. Common responses include blocking messages, redirecting URLs to warn pages, scrubbing attachments, and appending risk warnings. Administrators also receive alerts about detected threats so they can take follow-up actions like blacklisting senders or configuring new rules. For high-risk situations, the SMS firewall can even suspend entire inbound or outbound messaging on the fly. This level of real-time monitoring and control gives security teams the tools needed to proactively shut down SMS-borne attacks before any damage occurs. A Holistic Defense Against Emerging SMS Threats Modern SMS firewalls go beyond basic filtering to offer multilayered protections against an ever-evolving threat landscape. As attackers tweak their tactics, the latest solutions can quickly adapt defenses. Machine learning models and behavioral analytics now supplement traditional techniques, allowing SMS firewalls to more accurately detect unknown threats and anomalous activity. Deep packet inspection also examines full SMS payloads and protocols to uncover threats hidden in unusual formats, encodings or signaling messages. Get more insights on SMS Firewall
About Author:
Money Singh is a seasoned content writer with over four years of experience in the market research sector. Her expertise spans various industries, including food and beverages, biotechnology, chemical and materials, defense and aerospace, consumer goods, etc. (https://www.linkedin.com/in/money-singh-590844163)
#SMS Firewall#Text Message Security#SMS Protection#Anti-Spam#Fraud Prevention#Message Filtering#Telecom Security#SMS Gateway#Security Protocols
0 notes
Text
How To Redirect Old Domain To New Domain

Redirecting an Old Domain to a New Domain
When you change domains, it's crucial to maintain the integrity of your old URLs. This ensures anyone clicking a link to your old website gets directed to the corresponding page on your new domain. This redirection is achieved using a 301 redirect, which tells search engines the move is permanent and helps preserve SEO value. Here are several methods to redirect your old domain to your new domain:
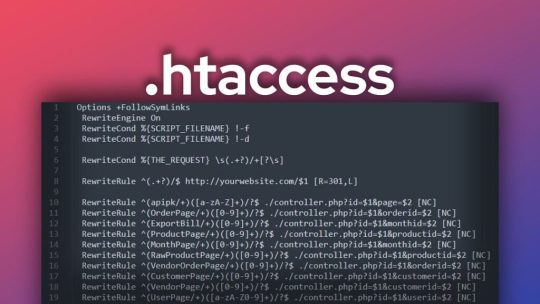
1. Using an .htaccess file: - .htaccess is a configuration file for Apache web servers. Even minor syntax errors can disrupt your content, so ensure you follow the instructions carefully. - Important: .htaccess is a hidden file. Make sure your FTP client is configured to show hidden files before proceeding. Here's a step-by-step guide: 1. Access your old domain's root directory through an FTP client. 2. Create a new text file using a text editor like Notepad and save it as `.htaccess` (ensure the filename starts with a dot). 3. Edit the contents of `.htaccess` with the following code, replacing `your-new-domain.com` with your actual new domain: ```apache RewriteEngine On RewriteBase / RewriteRule ^(.*)$ https://your-new-domain.com/$1 ``` - **Explanation:** - `RewriteEngine On` activates the rewrite engine. - `RewriteBase /` sets the base directory for the rewrite rules. - `RewriteRule ^(.*)$ https://your-new-domain.com/$1 ` defines the redirection rule: - `^(.*)$`: Matches any request URL. - `https://your-new-domain.com/$1`: The destination URL with the captured request path (`$1`) appended. - ``: Sets the redirect status code to 301 (permanent). - ``: Stops processing further rewrite rules after this one is applied. 4. Upload the `.htaccess` file back to your old domain's root directory.

2. Using PHP scripts: - You can leverage PHP scripts to redirect URLs using the header() function. This function sends an HTTP header instructing the client to redirect to a new location. Here's how to implement a PHP redirect script:- Create a new PHP file (e.g., redirect.php) using a text editor. - Add the following code to the PHP file, replacing https://your-new-domain.com/ with your new domain:```php ``` - **Explanation:** - `$newURL` stores the destination URL. - `header()` sends an HTTP header with the `Location` directive set to `$newURL` and a status code of 301 (permanent). - `exit()` terminates the script execution. - Upload the redirect.php file to your old domain's web server. - In your old website's code, link to redirect.php from the URLs you want to redirect.

3. Using DNS redirection: - Domain Name System (DNS) configurations can be used to point your domain to a new location. This method involves modifying your domain's DNS records at your domain registrar or DNS hosting provider. Here's a general process:- Log in to your domain registrar or DNS hosting provider's control panel. - Locate the DNS management section for your domain. - Create a new DNS record, typically labeled "URL Redirect" or "Forwarding." - Specify the destination URL (including http:// or https://) in the record. - Choose the redirect type (permanent or temporary). - Save the DNS record changes.Note: DNS propagation can take time (from a few minutes to several hours) for the changes to take effect globally.

4. Using cPanel (if your web hosting uses cPanel): Here's how to use cPanel's "Redirects" feature: - Access your cPanel account using your login credentials. - Navigate to the "Domains" section and locate the "Redirects" icon or option. - Within the "Redirects" section, you'll typically find options for different redirect types: - Permanent (301) Redirect: Use this for permanently moving visitors and search engines to a new URL. - Temporary (302) Redirect: Choose this for temporary redirects, like website maintenance or promotions. - Select the domain you want to redirect from the dropdown menu. - Enter the following details: - Redirects to: The full URL of the new destination page. - Source: The original URL or URL pattern you want to redirect from. - Choose whether to redirect with or without the "www" prefix (based on your preference). - (Optional) Enable wildcard redirection if you want all subdirectories within the old domain to redirect to the same path on the new domain. - Click "Add" or "Save" to apply the redirect configuration. - Test the redirect by entering the original URL in a web browser. It should automatically redirect to the specified new URL.

5. Using Cloudflare: - Cloudflare is a popular content delivery network (CDN) that also offers DNS management and redirection features. It provides free basic functionalities, including DDoS protection and SSL certificates. Here's a basic guide on using Cloudflare for redirection: Pre-requisite:- Sign up for a free Cloudflare account if you don't have one already.Steps: - Add your old domain to Cloudflare (it's a free process). - Update your domain's nameservers to point to Cloudflare's nameservers (provided during signup). This step propagates DNS changes, so allow some time for it to take effect globally. - Once your domain is active on Cloudflare, access the Cloudflare dashboard and navigate to the "Rules" section. - Create a new rule. - In the "For" field, enter your old domain name (e.g., your-old-domain.com). - Under "Settings," choose "Forwarding URL (301)" for a permanent redirect. - In the "To" field, enter your new domain name (e.g., https://your-new-domain.com/). - Click "Save" to activate the redirect rule.

Additional Considerations: - Testing: After implementing any redirection method, thoroughly test your redirects to ensure they work as expected. Use different browsers and devices to verify functionality. - SEO Impact: Using 301 redirects is generally SEO-friendly, as it signals to search engines that the content has permanently moved and helps transfer SEO value to the new domain. - Choosing the Right Method: The best method for you depends on your technical comfort level and hosting platform. If you're comfortable with editing configuration files, using .htaccess might be suitable. cPanel's "Redirects" feature offers a user-friendly interface for those using cPanel hosting. Cloudflare is a great option if you already use it for DNS management and want a convenient redirection solution. By following these methods and considerations, you can effectively redirect your old domain to your new domain, ensuring a smooth transition for your website visitors and preserving your SEO value. Read the full article
0 notes
Text
Redirect To The End ... ?
The latest broken behaviour that I’m seeing on Tumblr is that every attempt to interact with the site, instead re-directs me to the dashboard. This includes likes, reblogs and any attempt to post. The requested action isn’t registered - instead you just loop, Groundhog Day-style, back to your dashboard.
Looking closely, it appears that all in-site URLs have been modified so that they look like this:
https://www.tumblr.com/new/text?redirect_to=%2Fdashboard
I was able to type this post after copy-and-pasting the URL manually into my address bar, and manually deleting the “?redirect_to=%2Fdashboard” part. I’m not sure if this is a bug, a new Staff-speciality borked-up feature or some sort of weird shadow-ban thing - but, everything now has that “redirect to dashboard” statement appended onto the end of it.
Basically, as of today, to use Tumblr at all, I now have to manually-hack it. Yes, this is absurd. Completely absurd.
It also makes the site unusable.
So unless this magically happens to go away, it’s possible this might be the last you see of me on here. Umm, sorry, guys. Not my choice :(
Edit: false alarm, looks like this was just some weird glitch.
#LHS witters#OH TUMBLR NO#A sad way to end the last 5 years#Uh#look for me on Pilowfort#same username!
3 notes
·
View notes
Text
Pdf programs for mac

#PDF PROGRAMS FOR MAC PDF#
#PDF PROGRAMS FOR MAC SOFTWARE#
#PDF PROGRAMS FOR MAC PASSWORD#
#PDF PROGRAMS FOR MAC OFFLINE#
#PDF PROGRAMS FOR MAC PROFESSIONAL#
If you need any help, please contact, Thanks again.
#PDF PROGRAMS FOR MAC SOFTWARE#
if you like, we recommend that you try our free screen recording software - Filmage Screen.
#PDF PROGRAMS FOR MAC PDF#
Thanks, PDF Reader Pro offers free trials and special education discounts. But PDF Reader Pro seems to prioritize Mac as well, which is such a nice change! I hope to keep using this for a long long time. One of the things that I noticed about Foxit was that Mac seemed to be a second priority next to Windows, where features and help articles almost always applied only to Windows and not to Mac. And although it’s only been about a week, I think they’re right! 5 stars for this feature-rich and easy to use software, and for top-notch customer support so far (I had accidentally purchased a Windows license, and they quickly helped me resort it out). I heard about PDF Reader Pro on Reddit recently, where lots of people were saying that it was the best option for Mac. But I kept finding that it was quite annoying to use, lacking certain features, having a confusing interface for basic things, etc. I was using a Foxit PDF editing software on my Mac for the last few years, because I heard it was the best a while back. Have any feedback, comments? Please contact us directly at ・ Ever feel tired of reading large files? Try Text-to-Speech(TTS). ・Reduce PDF size to make your documents much lighter
#PDF PROGRAMS FOR MAC PASSWORD#
You can also password protect sensitive documents and authorization to edit, copy, modify or print PDFs.
・ Convert scanned PDF forms files or pictures into editable and searchable PDFs or TXT files. ・ Multiple - You can print more than one page of a PDF on a single sheet of paper ・ Poster - Poster divides large PDF page(s) into multiple smaller Pages ・ Booklet - Booklet puts your pages side by side re-sorted for booklet printing, no matter what printer you have ・ Flatten - Flatten PDF to make the contents static ・ Background - Change the background (color or image) of the PDFs to comfort your eyes after long-time reading Add a unique prefix or suffix which can be a set number, case number, firm name or date ・ Bates number - Identify and retrieve information from your legal documents. ・ Header & Footer - Label each page of your PDF document with fully customized page numbers
#PDF PROGRAMS FOR MAC PROFESSIONAL#
・ Watermark - Add fantastic watermarks to keep your documents safe and professional ・ Rotate, delete, replace, and crop pages ・ Append - Insert another file into the existing file ・ Extract - Extract the desired pages to create a new PDF ・ Merge & Split - Split documents into multiple documents or combine multiple pages into a new single, searchable PDF
Convert to PDF from images imported from Scanner and TXT files.
#PDF PROGRAMS FOR MAC OFFLINE#
Export from PDF to Microsoft Word (.docx), PowerPoint (.pptx), Excel (.xlsx), RTF, Text, HTML, Image, CSV, and more Offline.Work with static PDF forms created in Adobe Acrobat Support to align and distribute form objects Create fillable PDF Forms from interactive field objects, such as buttons, check boxes and list boxes. ・Redact PDF - Remove or black out private and sensitive information permanently with the redaction feature ・Edit PDF files including adding, deleting, moving, or modifying text. You can add header and footer rows when you create the table ・Table - A table consists of rows and columns of cells. ・Link - Add hyperlinks to redirect other destinations, and edit your links as you like ・Stamps - Customize your PDF with custom, image and dynamic stamps ・Sign - Create multiple signatures for any situations with trackpad, keyboard or images ・Continuous Annotations - Add Comments Continuously ・Classic tools - Annotate and markup PDF with highlight, underline, strikethrough, freehand, text box, anchored note, shape and etc ・ Bookmark specific pages or sections of PDFs ・ Create, Edit and Search outlines to easily navigate through the whole file ・ Presentation - Slideshow Mode to present your PDF as PPT ・ Reading modes - Multi-tab viewing, full-screen, page-fit, horizontal or vertical orientation, auto scroll, Night mode PDF Reader for Professional is your last PDF Viewer application you would ever need. Carry just your PDFs and make your presentations with them under the Presentation Mode, work becomes effortless and more productive with lighter PDFs! PDF Reader Pro offers even more - Edit text in PDFs, merge and combine multiple documents, split your PDF into several files, insert pages from another PDF, Convert PDF to Word and any other Microsoft Office® formats. Building on solid features such as Annotation, Edit, Form filling, OCR, Convert, Redact, Create, Sign, Bookmark and protect your PDF files, PDF Reader Pro allows you to maneuver through your PDF files. PDF Reader Pro is a PDF powerhouse that will fulfill all your document needs. Join the 90M users who are already working with PDF Reader Pro on their devices for Viewing, Editing, Commenting, Form Fill, Converting, Creating, OCR, and Signing PDFs
0 notes
Text
Best online pdf viewer mac

BEST ONLINE PDF VIEWER MAC PDF
BEST ONLINE PDF VIEWER MAC PRO
BEST ONLINE PDF VIEWER MAC PASSWORD
BEST ONLINE PDF VIEWER MAC OFFLINE
But I kept finding that it was quite annoying to use, lacking certain features, having a confusing interface for basic things, etc.
BEST ONLINE PDF VIEWER MAC PDF
I was using a Foxit PDF editing software on my Mac for the last few years, because I heard it was the best a while back. Have any feedback, comments? Please contact us directly at ・ Ever feel tired of reading large files? Try Text-to-Speech(TTS). ・Reduce PDF size to make your documents much lighter
BEST ONLINE PDF VIEWER MAC PASSWORD
You can also password protect sensitive documents and authorization to edit, copy, modify or print PDFs.
・ Convert scanned PDF forms files or pictures into editable and searchable PDFs or TXT files. ・ Multiple - You can print more than one page of a PDF on a single sheet of paper ・ Poster - Poster divides large PDF page(s) into multiple smaller Pages ・ Booklet - Booklet puts your pages side by side re-sorted for booklet printing, no matter what printer you have ・ Flatten - Flatten PDF to make the contents static ・ Background - Change the background (color or image) of the PDFs to comfort your eyes after long-time reading Add a unique prefix or suffix which can be a set number, case number, firm name or date ・ Bates number - Identify and retrieve information from your legal documents. ・ Header & Footer - Label each page of your PDF document with fully customized page numbers ・ Watermark - Add fantastic watermarks to keep your documents safe and professional ・ Rotate, delete, replace, and crop pages ・ Append - Insert another file into the existing file ・ Extract - Extract the desired pages to create a new PDF ・ Merge & Split - Split documents into multiple documents or combine multiple pages into a new single, searchable PDF
Convert to PDF from images imported from Scanner and TXT files.
BEST ONLINE PDF VIEWER MAC OFFLINE
Export from PDF to Microsoft Word (.docx), PowerPoint (.pptx), Excel (.xlsx), RTF, Text, HTML, Image, CSV, and more Offline.
Work with static PDF forms created in Adobe Acrobat Support to align and distribute form objects Create fillable PDF Forms from interactive field objects, such as buttons, check boxes and list boxes. ・Redact PDF - Remove or black out private and sensitive information permanently with the redaction feature ・Edit PDF files including adding, deleting, moving, or modifying text. You can add header and footer rows when you create the table ・Table - A table consists of rows and columns of cells. ・Link - Add hyperlinks to redirect other destinations, and edit your links as you like ・Stamps - Customize your PDF with custom, image and dynamic stamps ・Sign - Create multiple signatures for any situations with trackpad, keyboard or images ・Continuous Annotations - Add Comments Continuously ・Classic tools - Annotate and markup PDF with highlight, underline, strikethrough, freehand, text box, anchored note, shape and etc ・ Bookmark specific pages or sections of PDFs ・ Create, Edit and Search outlines to easily navigate through the whole file ・ Presentation - Slideshow Mode to present your PDF as PPT ・ Reading modes - Multi-tab viewing, full-screen, page-fit, horizontal or vertical orientation, auto scroll, Night mode PDF Reader for Professional is your last PDF Viewer application you would ever need. Carry just your PDFs and make your presentations with them under the Presentation Mode, work becomes effortless and more productive with lighter PDFs!
BEST ONLINE PDF VIEWER MAC PRO
PDF Reader Pro offers even more - Edit text in PDFs, merge and combine multiple documents, split your PDF into several files, insert pages from another PDF, Convert PDF to Word and any other Microsoft Office® formats. Building on solid features such as Annotation, Edit, Form filling, OCR, Convert, Redact, Create, Sign, Bookmark and protect your PDF files, PDF Reader Pro allows you to maneuver through your PDF files. PDF Reader Pro is a PDF powerhouse that will fulfill all your document needs. Join the 90M users who are already working with PDF Reader Pro on their devices for Viewing, Editing, Commenting, Form Fill, Converting, Creating, OCR, and Signing PDFs
0 notes
Text
trust me as a certified Jackass™ of all trades, learning HTML is easier than learning python, and a FUCKTON more easy than C or C++ or C# or C- or whatever other stupid idiot pointless versions of that stupid language there are. I hate you C
ANYWAY as for WebTV specific stuff, you can make dialog boxes appear by just making it open a URL however you prever (e.g. <a>, or some javascript to redirect the page) but replace the URL with "client:showalert?message=[text goes here, even spaces!]". You can also change the text on the button(s) but that's a little harder to explain, but you just append some shit at the end of the client:showalert link.
You can also add buttons to the info panel of the page, as seen here:
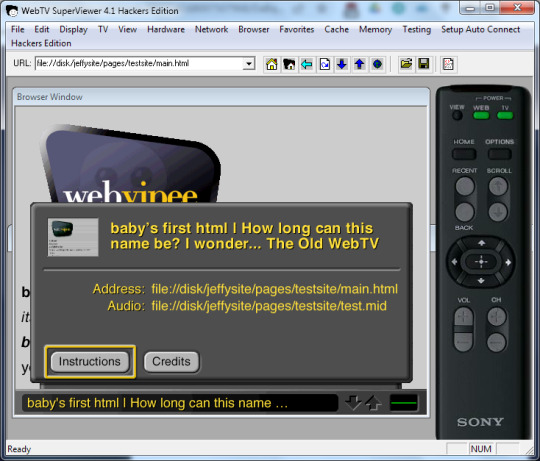
These can link to (practically) any URL you want, including client: links.

For example, "instructions" makes a reference to Parappa 1 appear :-)
To do this, it's as easy as addint the "credits" and "instructions" attributes on the <body> tag.
<body credits="kungpow.penis" instructions="doinyamam.com"> <p>This is some example code I'm writing right now just to illustrate the simplicity of adding the buttons.</p> <p>unfortunately you can't change the text on the buttons afaik...</p> </body>
I bet tumblr is probs gonna mess up the lines on that so here's a notepad screenshot (NOTE: if you DO wanna make your own HTML, use notepad++)

Additionally, the audio formats WebTV can play are actually kinda wild

5K notes
·
View notes
Text
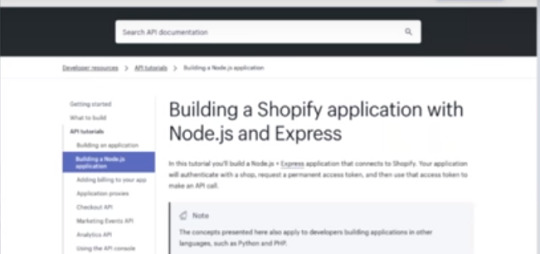
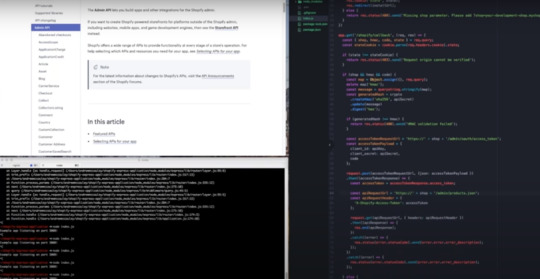
Building Your First Shopify App with Node.js and Express :)
Hey everyone we're gonna be talking about how to build your own first Shopify app using nodejs and Express and yeah you can find the tutorial that we're going through right here if you happen to lag behind or you just prefer to read a hard copy it's essentially the same thing as what's on my screen right now found at our Help Center.
So let's get started just give one a moment here sorry just one second I apologize about that I guess I forgot to book this room that I'm in and someone came to kick me out of it anyways so in this webinar like I said we're gonna be building a basic app using nodejs and Express I'll be primarily focusing on building your app as a public app that essentially means that the app can be installed on multiple shops using OAuth authentication you can also create a private app that is scoped to a single shop it's in the Apps section of the shops admin but like I said we're gonna be focusing on a public app today.
So in order to get the most out of this webinar we're gonna be there's gonna be some things that you'll want to have while these things aren't required in order to build an app these are what I'm going to be using today.
So the first is I'm going to be using Mac OS a tunneling service such as an groucho or forward HQ both of these have a free off or free trial but I'll be using n rock in this tutorial I'm going to be using nodejs as I mentioned I'm on version 8.1 1.1 and NPM I'm gonna be using version 5.1 6.0 just one moment cool so I'll give you a chance now to download and rockeo if you don't have it already.
Yeah so the first thing that we're going to be doing is signing up for our partner account some of you may already have a partner account but if you don't you can sign up here there should be a big blue join Now button so we're going to click on this all right so we're gonna ask for a little bit more information from you and just about your business and this is just for a test stop.
So I'm just gonna put that there put my email my say country and province or state or wherever you're from it might be different and then at the bottom we're gonna ask kind of why you're sitting at the partner account.
So for now if you're creating one with me today we're gonna choose custom app development but there may be other areas that you're interested in so feel free to choose multiples perfect so here we are on our partner dashboard there's this is basically where all of your information and actions will take place from a partner standpoint.

So the first thing that we're gonna do is we're gonna create the development store this is gonna be the shop that we're testing our apple on we're going to install it onto the store and view some of the data on the store once we get making our first API call if you already have a store that you use maybe a paid store or you're offering I'll feel free to use that one otherwise we'll hit create store create our store name create a password first store and then again our address and then it's safe sweet so some of you may already be familiar with the Shopify back-end.
So here it is we can pretty much ignore this for now and let's go back to our partner dashboard awesome so now that we have a partner dashboard open let's click on apps and we're gonna actually create our app we're going to be prompted for a little bit of information again so our app name I'm gonna call my own Shopify Express app and it's gonna ask you for your app URL so this is the address that your app lives at and you can't really just put a local host address here it has to be an actual absolute URL so that's where a tunneling a service comes in handy.
So if you have taken the time to download and Rock or another tunneling service then we're gonna hop in with our terminal and we're gonna change directory to the folder that we downloaded it and then we're gonna type and rock HTTP and then 3,000 which is the port we're gonna run on so if you are using a free trial one caveat is that you are gonna be given a randomly generated sub domain so you can see mine right there so anytime you close your in Rock towing service and then start it up again you're gonna be given a different subdomain.
So just make sure that if you are going to do that you're updating the URL you partner dashboard and updating the URL as it shows in your actual apps code so I'm gonna leave this open for the duration of the webinar but I'm gonna copy the address that we have here on the HTTP version and I'm gonna throw it in the app URL and I'm just gonna end it with slash Shopify.
So we have access to actually use our route URL later on if you wanted to so we're gonna create the app and that's it so now we're in our apps dashboard there's some resources on the the first page here and we can create an app listing for the app store up here which you may want to do if you want to sell your app to merchants on the app store but otherwise we'll click on app info and we'll see a bit of the information that we've already entered our app URL here.
This is the role we entered on the previous step and the URL that is shown that merchants are redirected to if they click the install button on your app store listing and we append the shop as a URL parameter to the end of this URL and then below we have the whitelisted redirection URLs so this basically is white listing the URLs that we're going to redirect the merchants to once they've actually authorized your app.
So for this one we are going to just add slash call back to what's already there and it's good practice also to add this URL without the S so it's just HTTP and you can add as many others that you may need but this should be fine for what we're using it for today.
If you scroll below there's a preferences URL which is optional that's just to add a link to preferences on the App Store you can an icon which will show up on the app store and then below is your API key and API secret so we'll take note of these as we'll be using them as environment variables later on but for now we'll save our app cost so a bit more advanced but we also have the option for extensions for example if you want your app to be embedded in the Shopify admin which is enabled by D default admin links which add links to your app within the admin pages such as like the product page orders page.
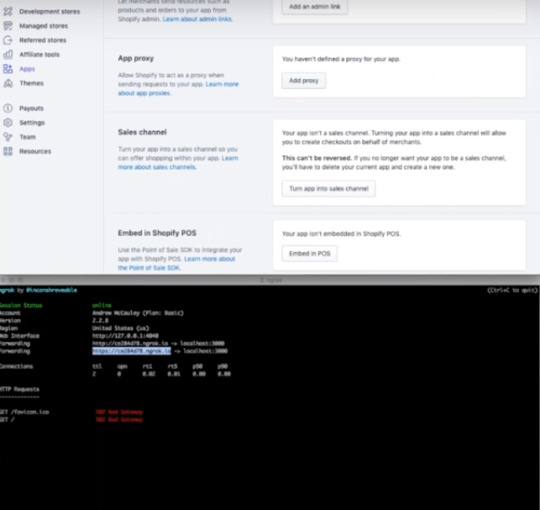
If you have an app that maybe prints orders things like that an app proxy which allows you to have a view on the storefront that allows you to put your own like apps view or if you're building a sales channel this is the option you can also embed the app in that pls we're not going to be worrying about any of that today.
We're just gonna be building a simple app austell them so let's open a new tab in our terminal and we're gonna create our app stricter so I'm going to do mcdr Shopify - Express - application and then we're gonna actually navigate to this folder and then we're gonna run NPM in it and you should just be able to select all the defaults that it offers you but you can change them if you want but for the sake of this webinar we're just gonna keep hitting Enter all the way through until we're asked if everything that we've chosen is okay and I just sighs this can see everything and so I'm going to confirm and then if we go to our text editor.
I'm using atom and we find our apps folder we'll see that our app is there with a package.json file which is great so next we're going to need to install the required packages for our application so we are going to be using a number of them gonna npm install the first one is Express this is just the node framework that we're going to be using next one is dot env this is to handle our environment variables next one is cookie which is just a basic HTTP cookie parser and serializer next is knots for generating a unique not possible you that'll be part of the security for app that we'll go over in a bit request which allows us to make HTTP calls and request promise which adds promise functionality to our requests end it with - - save which essentially just tells npm that we want to add these packages as dependencies to our packaged tour packages of JSON file and we'll hit enter awesome.
So now that our packages of JSON is filled with our dependencies and all of our packages are installed we're going to want to create an environment file to save our environment variables and to do that we'll just touch a env and of course we're going to want to put our and file in to get ignore to make sure that we're not sharing our environment variables with the world if we push them to get up.
So we're also going to type touch dot get ignore and in that get ignore file we will add dot tnp and in the dot env file we're gonna add our credentials so I'm going to put it as Shopify API oops key and we're gonna make it equal to the API key that we find in our partner dashboard so we'll just copy it there and we're gonna do the same with our secret they're gonna make it called Shopify API secret will copy the secret from our partner dashboard.
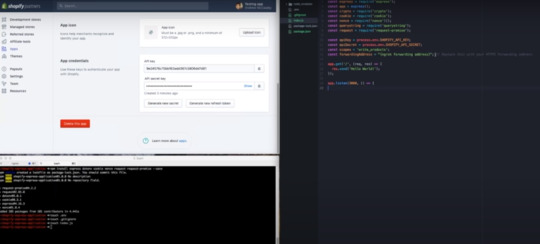
We'll paste it in there we'll hit save and we'll move on to the next step actually building our app the fun stuff so to start will actually need our index dot JSP so we will touch index touch yes which creates a file in our app folder and we are going to just build a foundation of a very simple hello world app that we can build off of so I'm going to paste some code here I'll be writing out the rest of the code but this is mainly just setting all of our packages to constants grabbing our ad I can secret from our animal file setting them to constants and then setting a few more constants that we'll need later on such as the Scopes that our app is going to request.
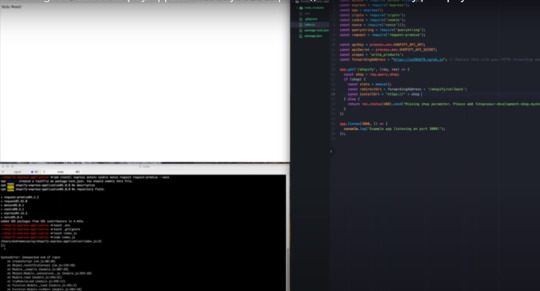
So we're requesting write products which means we'll have access to both view product data and create product data within the shop that our app is installed and then we also have our forwarding address which is simply just the it's the URL of our app so we're gonna want to replace what's in here with the URL of our app that we put in our partner dashboard there we go and all I have here is a very simple get route to our route that'll print out hello world on the screen and of course we're listening on port 30,000 so we'll save it and we'll run her out make sure everything is working so far it should be but you never know especially with live coding what did I do here.
Oh I forgot it's a little bit there go perfect so now we'll save and we'll try it again there we go and then we'll visit our app URL also got our hello world so from here we're gonna want to create our first route this row is going to be the we'll call it the install rate.
So we'll replace our hello world route with a shell type the set up so it seemed easy to follow with a get route to our app URL as we put it in our partner dashboard which is just slash Shopify and inside we're gonna set a constant which will be this job so the shop should be passed in as a query parameter and it'll be called shop and we're just if statement to make sure that we actually have the shop variable and if we don't we're going to return a four hundred response please add just saying that you'll need to add the shop as a query parameter to the address that you're visiting and again if you're clicking get to install the app from the App Store then this will already be attached to your URL so you should always have it awesome.
So if we do have this job parameter we are going to use our nonce package to set a constant called state we are going to set our redirect URI just the same as we set up in our partner dashboard so that's slash Shopify slash callback whoops and then we're going to build our install URL so there's a number of things that we'll need in our install URL.
Let me just get down the beginnings HTTP plus shop plus slash admin / pull off / authorize and then the first query parameter is going to be client underscore ID and this is going to be equal to the API key the next variable or a URL parameter sorry is going to be the scope and that's simply going to be equal to the scope that we set previously whoops the next one is going to be our state same thing the same as the state that we set previously and then lastly we're gonna set the redirect URI.
So Shopify knows where we're gonna redirect the merchants as soon as they have authorized your app to be installed on their store that's going to be equal to awesome so just a little bit more about the state or nonce this is essentially just a random string that you would set the nonce package takes care of that automatically for me that we're gonna send on the request and once we receive a call back from Shopify is going to echo that date.
So that we can compare the two if they match then great we know the request came from Shopify if they don't match then chances are someone is trying to spoof the request and we can't confirm the origin of it in which case we would go on a return an error so we're going to set that to a cookie normally you would want to encrypt it before setting it to a cookie since it will live on the client-side however for the sake of this app.
We'll just set it to state for the sake of time and then we're gonna redirect to the installing URL that we just built oh sweet all right let me just make sure I'm not missing anything looks good so let's give this a test we'll save our work we'll restart our app and we've got an error of course unexpected identifier oh I forgot a plus here all right let's try this again.
Okay so we'll go to our app slash Shopify and then we'll add our shop you just grab to the shop URL since we have that open and we'll add this as a query parameter scope is not defined oh I called it scopes whoops okay all right third time's a channel let's close out our app restart it and all right what am I doing wrong redirect to your I slash Shopify slash callback.

Okay so this essentially it's a common error that comes up if the callback isn't whitelisted but it does look like listed so let's try to find out what I'm doing wrong here oh whoops reader right you are / Shopify / a callback why is uh not wait listen did we say no is there whoops Shopify guys call it back whoops oh don't think I'd save all right everything one second folks.
Let's try this again all right shop equals why is this happen redirect your eyes missed oh whoops all right so this actually has to be redirect underscore URI so the correct you are I was whitelisted I just had the wrong query parameter key so this should work again just the joys of live programming take our app URL equals there we go so this is the authorization prompt that merchants are going to see and you'll be able to see the Scopes that we requested which is managed products and it'll show your app logo if you have one your app name it shows that this app isn't listed on the App Store but of course your app if it was listed it would not have this banner.
So if we click install we'll get a 404 error because it'll redirect to our callback URL but we don't actually have a route for it yeah see so cannot get Shopify / call that so the next step that will do is actually creating that rep alright so here goes our next row.

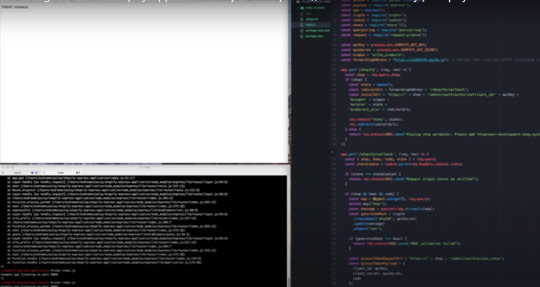
We're going to set it to the same as our whitelisted URL that we put in our turnout board all right oh you can't see my screen anymore whoops thank you hello there girl perfect okay alright so building your route whoops and to start off in this route we are going to first set a constant that is going to be the query parameters that Shopify sense to us and that'll be the shop the H Mac and the code and then in this state echoed from the one that we set previously alright and those are just great parameters.
So request three and then we're going to grab that state cookie that we set previously let's go and we're gonna verify that they actually matched and if they don't then we're gonna return a 403 message as I mentioned previously and we're gonna say that the request can't be verified if it does not equal the state from our cookie again.
If you are saving your state in a cookie make sure you encrypt it as it is on the client side and you can decrypt it once you get the request awesome so the next step we're gonna also put in some logic to make sure that we have all the necessary parameters and then we're going to start with our H max validation which is probably the part that people struggle with the most when setting up a new shop application.
So basically we need to calculate a signature using all the query parameters that we received and to validate the request that signatures should match the 8h Mac that Shopify has provided so to start doing that we are first going to map all of our query parameters to an object and the reason we're doing this is just because it'll make it easier to remove the H Mac because we don't want to sign the request including the provided H mat because then we wouldn't get our own signature that matched that H Mac so we're going to delete the map with the key H Mac all right.
So now we're gonna can we r going to make a constant called message and it's just gonna be our object but turn back into a string apply restraining the string that's gonna be awesome so now we have our message so we can actually go ahead and generate that hash we'll call it generated hash and we're gonna use notes built in crypto method and we're gonna create an H Mac it's gonna be using sha-256 encryption and our secret key used to sign.

So the idea here is that only you the app developer and Shopify know what your secret key is so you'll be able to sign any request with it to ensure its validity and keep Shopify shalvoy's merchants and your app secure and we're going to be signing the message using a text yes awesome so just like we did with the state we're gonna want to verify that what we calculated matches what shot if I gave us so if generated hash is not equal to RH Mac then we're gonna return oops I can't I ate for my life a status message and 400 error H Mac validation failed otherwise we will simply respond with oops 8200 whoops there we go 200 Datsun H Mac.
So we'll put this here for now just for testing but we'll actually replace this with making their first API call in just a moment but first we want to I forgot about this part we'll just want to make an else statement so that if we don't have the required parameters we actually specify that and I noticed another mistake that I will correct in just a second required parameters oops miss awesome and I forgot to put a closing bracket there sweet.
So hopefully we don't have any errors this time hopefully and we'll test our work I already saved it so we'll just run this again and so far so good so because the merchants in this case just us I'm already authorized the app we shouldn't get that authorized screen again if I were to change my hired scopes then the merchants would be prompted to accept the installation of the app once again because the requested scopes have changed but this should work there you go each Mac validated but that doesn't really do us any good.
So let's actually exchange for an access token and make an API call so we can just replace this line of code right here we will replace it with first the URL that we're going to be making a request to the endpoint and that endpoint is slash admin so the shop slash admin / oo / access underscore token and we're also going to need a payload there's the number of things that we're going to pass into the payload when requesting an access token the first is the client ID which is simply the API key the client secret which you guessed it is the API secret and then that code parameter that Shopify sent us in our callback URL.
Once you already have an access token you may not actually receive a code which is totally fine you would just go through the validation of the request in the same way just without the code so it's always a good idea not to rely on specific URL parameters to be there because they may not always be there you just want to calculate the signature upon all the query parameters that you have - the H Mac so there's only need for the request so let's make it whoops so we're gonna do a post request and that post request is going to be - the access token request URL with a payload a JSON payload that is equal to the payload that we set previously and once the request completes we are going to save our access token okay god access underscore token awesome and then of course we're gonna send a 200 response status 200 got send got access I'm not sure why I switch to double quotes there but oh well cool and of course we're gonna catch any errors that we may receive here like so we'll save this hope that there's no errors so far so good and we'll visit our app again.
Awesome so we got an access token let's do something with it and we can see all the parameters in the URL there including the code yeah so let's replace this useless message with an actual API call now that we have our authenticated access okay cool so we will do the same as we did when we were exchanging for an access token will create the endpoint API request whoops you are fools and we're just going to be Shopify this is an API that you can hit as long as you have an access token you don't need a specific scope for it and it just gives you information about the shop that your app is installed on so shop + / admin / ah dr. song and it doesn't need a payload.
It's just a request a get request on Shopify and I think generally you should never have a body in your get request URL parameters are better there but we do need to set the leg they're set are a single request header and that request header is the ex Shopify access token header and that essentially is the way that we can tell Shopify a we have our access token here we're authenticated it's cool now give me my dad data and we are gonna set that to our access token okay sweet and then just like we did when we were getting our access token.
We'll create the request set the endpoint that's going to be - whoops I realize anything this wrong it's going to be to API request URL and with the headers whoops API request header and on response we are going to display their sports and of course kept any errors oops that's a comma says code Oh this up a bed alright so when I was doing this earlier I did have an error that I had to fix this one.
So hopefully we have better luck this time and I can get to some questions okay if you are ah and there we go we are now receiving my shot represented in a JSON object and if we wanted to say fetch products instead we could do that fairly easily I'll just change this to products dot JSON hit save and that should be good enough whoops and there you go my shop doesn't have any products.
So we're just getting an empty an empty products object but that's it this is basically the framework that you'll be able to use to make your own app whether it be you know maybe a fulfillment service you know maybe in order printer like I mentioned we have a large number of api's you can view our reference to see all these ones on the left if you're making a carrier service to return Rome shipping rates to a store this is where creativity comes in but yeah that is it we do have some time for questions sorry about the technical difficulties we could have had more time but since we don't gonna look at some of these questions cool.
Yep so I believe we're gonna be doing the follow-up so if there's any references that we linked we'll be sending it including the recording to anyone who signed up yeah cool just looking through the questions here so just bear with me I see well now I didn't see the questions previously but I see you guys correcting some of the issues that I had before I should have looked in the chat earlier shout out the Adrian Corcoran for finding the redirect to your I issue and Sergei yeah so the example code will be available actually is already available it's at our building in Chama fire allocation with no das and Express a tutorial if you search our Help Center just search no tap this should be the top result and this is basically everything that I covered today all the code is there you can copy-paste and I believe at the end there's the full project that you can copy and paste and use as your skeleton for your app.
So someone asked can you use your own app to charge a credit card we do have a checkout API which lets you programmatically create checkouts however the ability to process payments is by request only and you can actually request that in your partner dashboard.
So if you go to the extensions tab and you turn your app into a sales channel there'll be an option here to request payment processing access we are only offering that at two sales channels intended to be marketplaces so if you did have an idea for a marketplace by all means turn your app into a sales channel request that payment processing and will basically get back to you if we have approved it switch back to the dot and someone's there we go.
So it doesn't necessarily need to be Shopify underscore API there's no secret or seam with key but whatever you do use just make sure that you use the same when you're setting it to a variable on these lines let's see if time for a couple more questions here macelli asks you have sales people who need to create a custom order and then charge it I'm sorry your best option there would be to use our draft order API so what that allows you to do is create a draft order and then actually send an invoice to the customer where they'll be able to click a link to complete the checkout this is the best option if you actually need to charge people programmatically through the API.
So I got a question about selling apps so do we have to pay any joining fees etc so right now the revenue share modelon our App Store is 8020 so basically 80% of any proceeds from your apps would be paid out with your partner account and then there's the 20% that is delegated to Shopify as fees someone asks how do you deploy this to Heroku and then I think I have time for one more so to answer that we actually have a very good video series called app in five and let me see if I can find it so the one that we have right now the one that we have right now is using Ruby on Rails but basically we create the framework of a Ruby on Rails using our Shopify Rails generator and deploy to Heroku in five minutes look out for another one in the future where we'll do the same thing with nodejs probably with Express we don't have a video on that right.

Now but you should be able to get an idea based on our rails video and then just apply it to whatever language you're working with and then that's I'll find one more question that we can we can throw in here so here's a question about using the crypto method I actually asked myself the same question when I went through this and actually crypto was made baseline in nodejs I can't remember which version but we didn't actually have to install it because it comes with node and then one last question is there a github repository for this there isn't but you can find the code on our building a node app tutorial that's on my screen right now and I'll make sure that this gets sent out in the follow-up email that we send but yeah that's not really.
If you guys have any other questions feel free to hop on our forums like I said I leave the developer support team so we try to answer as many questions from there as we can specifically the API forms and we'll leave it there thanks everyone for joining thanks for your questions but yeah thanks again for joining and the hope that we see you at a future webinar take care of the one.
0 notes
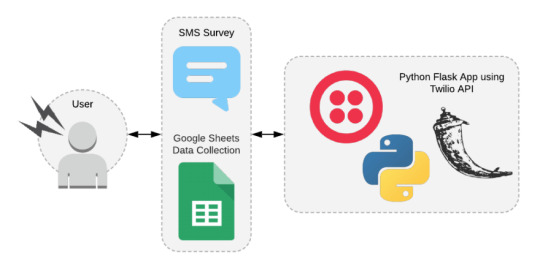
Link
Happy Wednesday evening and last day of the Twilio x Dev Hackathon! I hope you are all doing well. It has been great to spend the month of April working with Twilio and Google sheets on this project in order to capture SMS data from a survey.
For those who may not have seen the other posts in this series, you can view them above. The first post began as the initial start of the project in Tracking Migraines with SMS which is just an introductory post.
The setup of Google Sheets is discussed in Setting up Python to Connect to Google Sheets where I talked about API Errors due to scope along with path issues with PyTest.
My first experience with Flask is talked about in the post What I Learned using Flask for the First Time in which I discussed port issues, data types, casting data types, and Flask sessions. This section also details issues with getting to the next question in the survey.
The final integration of Google Sheets and Twilio is discussed in Integrating Twilio with Google Sheets. This post discusses clearing results in a list, and data import issues with Google Sheets appending single quotes at the start of numbers and dates.
With all of that said, todays post will focus on the wrap up of the Twilio x Dev Hackathon, along with a walk through and discussion of the application flow through the functions in app.py.
Quick Recap
For a quick recap on the project concept, I spend time logging migraines for the doctors office but don't remember the format she wanted, or the details she found important. This application was created as a way to request a survey for a migraine, quickly fill out the details, and log the data for later use at the doctors appointment.
Commonly Asked Questions for Migraines
Below is a list of commonly asked questions relating to migraines:
In a scale of 1-10, how would you rate your migraine?
Where is your migraine located today?
How long did your migraine last (in hours)?
What medication did you take to treat the migraine?
Has anything changed? Is anything out of the ordinary? Do you have any other notes to add?
Category - Engaging Engagements and Interesting Integrations
During this hackathon, I focused on two categories: Engaging Engagements and Interesting Integrations.
Engaging Engagements looked at developing applications that a company could implement to better engage with their customers or to manage their business. An application of this type could be utilized by doctors offices in order to collect data commonly needed during patient visits or to have patients collect their own data for use in their visits.
Interesting Integrations focused on the integration of the Twilio API with at least one other API. This application integrated Twilio with the Google Sheets API in order to log data in an easy to access format.
Filled out Twilio CodeExchange Agreement: ✔️ Agreed to the Competition's Terms: ✔️
Link to Code
To clone the code, please visit the GitHub project Migraine Tracking.
Demo Link
In the repository is also a GIF showing a brief demo of the code. There is also a README available for those who would like to run the code locally and try it out.
Application Flow
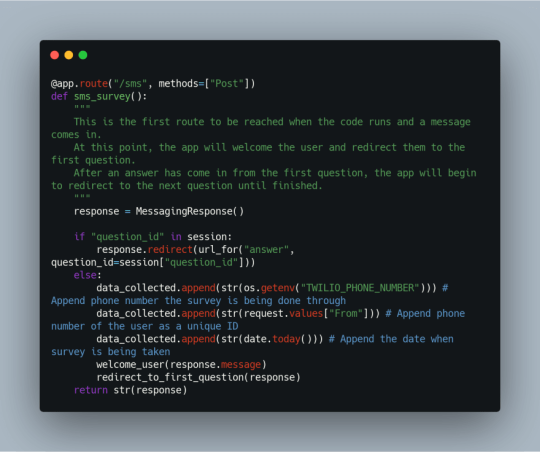
The first route that is reached when the application receives an SMS is the /sms route that calls the function sms_survey(). This function looks to see if a question ID comes in and in the session, the function will redirect to the /answer route.
Before a question ID will come in, the function will first default to collecting the Twilio number, the users number, and the date. Note: These were hidden in the demo data output in Google Sheets. These values are appended to the collected data list and then the a welcome message will be displayed to the user through the welcome_user() function. After displaying the welcome message, the user is redirected to the first question in the survey.
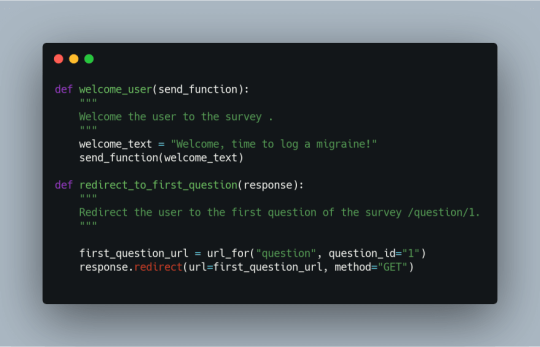
welcome_user(), seen below, will return a brief message to the user. Then the user is directed to the /question/<question_id> route.
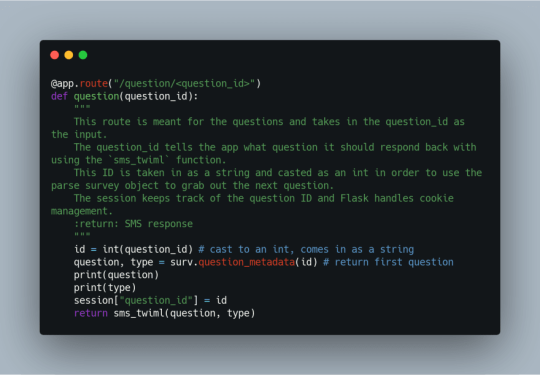
The /question/<question_id> route takes in the question ID and tells the application which question it should respond back to the user with. Using the question ID, we pass the ID into the parseJson pulls out the first question and its type. The question ID is stored into a session variable called question_id to be used as the application looks for the next question or the end of the survey. Once that has been captured, the sms_twiml() function is called with question and type.
This function responds with the message and type of data to ask the user for. The three types of data asked for in this survey are text, hours, or a numeric number from 1 to 10.

After the user has answered the question, the application will redirect to the /answer/<question_id> route. This route first iterates to the next question ID which is used to grab data collected from the parseJson object. Then, the user entered data for the previous question is extracted and appended to the data_collected list. extract_content() returns either text for text elements or numeric digits for hours and numeric answers. If data is available for the next question, the survey will continue by redirecting to the /question/<question_id> route, otherwise the survey will end and display a goodbye message through the use of the goodbye_twiml() function.
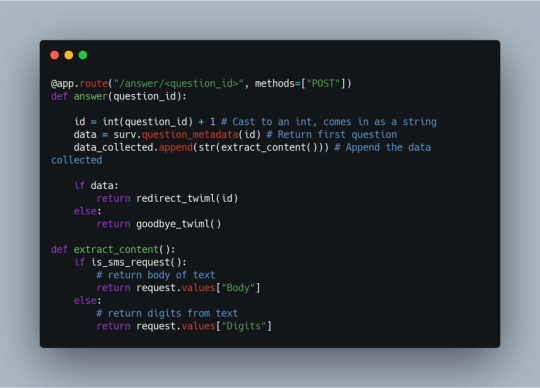
The redirect_twiml() redirects the survey to the /question/<question_id> route to allow the user to view and answer the next question, repeating the process until all questions have been answered.

The goodbye_twiml() function ends the survey, appending all the data collected into the Google Sheet using the spreadsheet object. After a goodbye message is displayed to the user, the data collected is cleared from the data_collected list and the session variable for question_id is cleared.

And that is the overall flow of the code from first question to last.
Development Stack
Thank you for following along this past month as all of the pieces have come together to log the data into the Google sheet from the SMS survey.
Thank you to all those who put together this hackathon and participated in it. Have a Happy May!
0 notes
Link
SEO Best Practices for Choosing a Domain Name for SEO?
Explore Some SEO Best Practices for Ensuring that Your Domain Name Is a Big Hit for SEO and User Experience
Domain names have been regarded as the vanguard of the online or digital experience for over two decades now. They help in providing real estate for organizations to establish their online presence, as well as, effective doorways for their prospective customers to locate them. In this context, choosing domain names for SEO have a huge impact in terms of CTR from social media to search results, including type-in traffic, to referring links, offline advertising, and brand-ability. There exists a massive treasure house of places that your specific domain name could be impacting your brand and overall online marketing.
You simply can’t ignore the importance of the domain name for SEO and your brand.
As per https://www.entrepreneur.com, the Internet is a crowded place. Statistics from WhoIsHostingThis.com, a web hosting tool, tell us that 84,000 brand new domain names seem to be registered every single day.
That implies that for startups and small business owners it is becoming more and more difficult to come up with a domain name that’s just right for your customers to remember. Besides being memorable, your domain name must safeguard your brand and trademark. For maximizing search engine-referred traffic, you must follow some SEO best practices when choosing your domain name as discussed below.
1. Focus on Making Your Domain Name Outstanding & Memorable
You must try your best to identify domain names that seem to be short, easy to type, easy to pronounce and easy to remember. This is of great significance for word-of-mouth promotion and advertising as those visitors would be required to come to your precise domain directly. Moreover, a memorable domain name is also, essential for processing fluency. You need to avoid such domain names that include numbers, figures or any other non-standard characters, are longer and use unusual spelling. Since search engines are increasingly relying on usability and accessibility as an important ranking factor, the easier and simpler a URL or domain for humans to read, the better it becomes for search engines.
2. Consider Making the Domain Name Brandable
Brandable implies that the moment you see or hear the domain name, it appears to you as a brand or sounds very much like a brand. You must keep in mind that numbers and hyphens need to be avoided as they pose a major problem. They definitely do not sound at all like a brand. They sound strange or generic.
3. Make Your Domain Name Short
Length is of great importance in terms of processing fluency. It is definitely easier to say, type, or share if the domain name contains fewer characters. If your domain name is short, it is less likely to be shortened on search results and social media sharing channels. Always remember shorter domain names are certainly better.
4. Make Your Domain Name Intuitive
A perfect domain name would be giving users a solid idea of what exactly a website would really be about. When you can understand at once what a business is all about while glancing through the domain name, you have come up with a highly intuitive one. People should be able to guess what your company does by looking at your domain name. For instance, PastaBest.com is quite obvious hence; the domain name is pretty intuitive as anybody could easily figure out what the company is all about.
5. Think about Using Broad Keywords
Keywords incorporated into a domain name could prove to be helpful in terms of cognitive fluency biases, as well as, from the perspective of search engine optimization. Google generally biases away from all these partial match domains and exact match domains, however, the anchor text obtained by you from users linking to specifically your domain could prove to be helpful.
If you could incorporate a broad keyword into your domain name that makes it pretty obvious as to what your organization is all about while retaining a domain name that is unique, catchy, and even brand-friendly, you must opt for it. However, it is a wise decision to stay away from those domain names that are regarded as keyword-targeted or keyword-rich.
In recent years, we have noticed that Google has come up with numerous algorithm updates and changes that do not give priority to sites that have keyword-rich domains but are actually of poor quality. Including a keyword in the domain name could prove to be beneficial, however, it could culminate in meticulous scrutiny and you may get a negative impact on your SERP rankings. You need to tread with caution. It is a good idea to coordinate with a partner like AtomicDesign.net that is known for understanding all about domain name negotiations and could help you in saving your financial resources and valuable time.
6. Avoid Hyphens Wherever Possible
Suppose your domain name comprises two words such as www.sitename.com, you would like to separate these two words by using a hyphen to boost readability like www.site-name.com. However, you must not forget that using hyphens are often correlated strongly with spammy behavior and diminishes domain name memorability and readability. As such, you must avoid using more than just a single hyphen. However, it is best to avoid hyphens wherever possible.
7. Move Domains Whenever Necessary
Whenever a webmaster deems it necessary to move a domain to another one, there are numerous crucial factors to keep in mind including building the redirects page wise in a way that deep content pages and sub-folders are seamlessly redirected to all the relevant or corresponding deep content pages and sub-folders on your new domain. SEOs must not redirect all pages from a particular domain to another domain’s homepage.
8. You Are Free To Append or Modify Your Domain Name
Suppose the domain name you are looking for is just not available, you could consider adding a prefix or a suffix. You could even consider using alternate TLD extensions. It is fine to be slightly creative and unique with your specific online brand.
Conclusion
Keep all the above-discussed SEO rules or best practices for creating your domain name in mind. Follow them so that you could come up with a short, crisp, brandable, intuitive, and memorable domain name for your business or organization.
0 notes
Text
What you should do to get more downloads to your app(app store optimization tips)?

1. Encourage User Reviews-
Increasing the visibility of your app is one part of improving downloads. After user found your app, you’ll need to convince
Them to download. And here reviews are most important because users normally trust to word of mouth recommendations, for eg., user reviews. Reviews not only shows the quality and importance of your app to potential downloaders, but also provide an excellent opportunity for you to engage with customers. If reviewers provide suggestions or even complaints, you can respond and show potential users how responsive you are to feedback. By doing this all the time, you’ll inspire trust and encourage more app downloads as a result.
2. Check that your app is crash- free –
If your users are facing any problems with your application, they’ll share their experience online so you can easily detect if your application is defective. After you react to their complaints, your developers should fix the problem quickly so that your app never crashes again.
However, it’s more effective to take a proactive approach—your app should undergo vigorous testing so that your developers can identify all bugs and resolve them before you make your app available to the public.
Metrics to track:
Crash rate
Retention rate
3. Motivate users to make referrals-
Referrals are another approach to exhibit quality, relevance, and trust, which will help to increase downloads. You can transform your existing users into brand ambassadors by giving them an incentive to refer your app to their friends.
For example, for a ride-sharing app, you can provide free ride credits in exchange for a referral.
Metrics to track:
Number of in-app referrals
Number of downloads
4. Pay attention to content-
Creating attractive and relevant content to promote your app can help you to engage more users. You can use online articles, videos, or infographics. For a gaming app, you can upload walkthrough videos to show off your game’s high quality visuals and gameplay to impress your audience. You can also share user-generated content to help community.
5. Engage on social media-
Social media is there to help you to show off your app. It is an effective way to extend your reach and introduce your app to new clients.
However, your intended target group will spend time on one platform over another, so analyzing the attention of your users demographics is important. Responding to your followers and encouraging them to share their thoughts exhibits that you care about your audience’s sentiments.
6. Measure, analyze and optimize-
It is important to continuously analyze how users are interacting with your app in order to ensure that they remain engaged. Are they effectively utilizing the application the manner in which it was intended to be utilized? Are there any issues that are restricting you from monetizing your app? You can use these analysis to optimize your future campaigns. Perhaps you’ve seen that many users from a specific source stop interacting with your app after a day or two. This can be because they weren’t a qualified audience, so you can decide to redirect your battle endeavors to other securing sources.
7. Put your mobile-best foot forward
App stores are only becoming more saturated, and with the industry moving toward the convergence of mobile web and mobile apps. It’s careful to consider how your brand translates across multiple channels instead of focusing on just your app experience.
8. Influencer and community outreach-
Surveys from perceived specialists carry more presentation to your application, however they additionally impart more trust in your app. By researching the right specialists you can set up a helpful organization that will construct your brand and boost application downloads.
9. App store optimization-
App store SEO is the process of optimizing mobile apps for achieving a higher rank in the app store search results. It is similar to Search engine Optimization for websites so it is also referred as App Store Optimization.
App Name and Keywords-
Use of keywords in your title can result upto 10.3% boost in the rankings. Both Google and Apple’s search algorithms scan the app name for keywords when user performs a keyword search. Both the platforms give high priorities to apps with app names that have search input.
App Name Format-
Keep the actual brand name short and sweet. You can then append this short brand name with a few keywords, typically preceded by a dash or a semicolon. App Name Format – Use the format – “Brand Name – Keywords” or “Brand Name: Keywords” For eg., Google Maps – GPS Navigation, Amazon – Shopping made easy, eBay: Buy & Sell – Find Deals.
App name length-
Apple limits the app name to a maximum of 30 characters in iOS 11 whereas, in Google Play Store App name is limited to 50 characters.
App Subtitle-
This field is available in the iOS App Store only. App subtitle appears under your app name, and is limited to 30 characters only.
App description-
Near about only 5% of the users click on read more button below the short description. So use each character to specify your product and also to grab the attention. Avoid blank lines and interrupted sentences.
App Promotional Text-
Your app’s promotional text appears at the top of the description and is limited to 170 characters. Despite the fact that the promotional text is NOT indexed in the app store search, the good news is you can change this text anytime without releasing a new version.
App Icon-
A good icon can increase your app downloads up to 560%! Keep your icon design simple and eye-catchy. Do not squeeze the small space with many items or words. You want people to remember the icon after the first impression. Likewise, guarantee that your symbol will even now look great when it is downsized to the littlest size required by App Store/Google Play. It should also look good against light and dark background.
App Screenshots-
60% of users won’t swipe your first two screenshot images. A better version of your first two screenshots can boost your conversions by 25%! Make sure each screenshot is telling a single message about your app. Show your strongest messages in the first two screenshots. The best apps use all five screenshot slots to impress their users, and you should do the same. Adding short caption texts on your screenshots can help, but make sure they are on a clean background. And try to create a positive impression in the viewers’ mind at all times.
Also there are some ways that you can use to boost your app downloads. These ways are- App store keywords, App preview video, App store ratings, App indexing, app conversion rates, App size, App pricing, App updates. Know the latest trends of mobile app development at- Best Mobile App Development Trends in 2019.
Do you want to develop an effective mobile app for your business. Then Solace is the right place. Expert at solace are well trained to develop an application that will be the face of your business. Contact us for mobile app development that helps you to boost your business to the next level.
0 notes
Text
A Guide To Enhance Your WordPress Site Performance - 2

One often spends an ample amount on building a site with appealing designs, images, videos and whatnot, to attract and retain their customer base. But yet, when a site fails to load faster, every other effort made goes in vain. And hence, the loading speed of your website deserves as much importance as other factors of website-building & maintenance. The ingenious team of AddWeb WordPress developers has jotted down a list of guidelines, specifically meant for WordPress Site Optimisation. And here we’re, as promised, with the second blog from this 2-blog series which shares this list of things that can help you optimise the performance of your WordPress Site.

1) Remove Unnecessary Plugins
Remove all the inactive,problematic and duplicate plugins from your site.
Avoid the premium plugins, because they are required to visit the 3rd party server for decrypting the code. And this process results in a drastic decline in the load time of the website.
Choose & install plugins carefully. Keeping the number of plugins less than 20 is the ideal thing to do for an optimised WordPress site.
2) Enable gzip Compression
Technically, gzip compression is something that drastically reduces the amount of data that is sent from the website server.
In simpler words, it basically compresses the size of the website page and eventually increases the loading speed of the respective web-page.
In fact, Varvy claims that compression is capable of discarding 50-70% of the unnecessary HTML & CSS files of the web-page.
The implementation of compression depends on the web-server & its setting. Below, we’ve shared a couple of resources used for the commonly-used web-servers.
In case, your web-server isn’t on the below-list, contact your hosting company to guide you through the same.
For Apache Server Add below code in .htaceess file.
<IfModule mod_deflate.c> # Compress HTML, CSS, JavaScript, Text, XML and fonts AddOutputFilterByType DEFLATE application/javascript AddOutputFilterByType DEFLATE application/rss+xml AddOutputFilterByType DEFLATE application/vnd.ms-fontobject AddOutputFilterByType DEFLATE application/x-font AddOutputFilterByType DEFLATE application/x-font-opentype AddOutputFilterByType DEFLATE application/x-font-otf AddOutputFilterByType DEFLATE application/x-font-truetype AddOutputFilterByType DEFLATE application/x-font-ttf AddOutputFilterByType DEFLATE application/x-javascript AddOutputFilterByType DEFLATE application/xhtml+xml AddOutputFilterByType DEFLATE application/xml AddOutputFilterByType DEFLATE font/opentype AddOutputFilterByType DEFLATE font/otf AddOutputFilterByType DEFLATE font/ttf AddOutputFilterByType DEFLATE image/svg+xml AddOutputFilterByType DEFLATE image/x-icon AddOutputFilterByType DEFLATE text/css AddOutputFilterByType DEFLATE text/html AddOutputFilterByType DEFLATE text/javascript AddOutputFilterByType DEFLATE text/plain AddOutputFilterByType DEFLATE text/xml # Remove browser bugs (only needed for really old browsers) BrowserMatch ^Mozilla/4 gzip-only-text/html BrowserMatch ^Mozilla/4\.0[678] no-gzip BrowserMatch \bMSIE !no-gzip !gzip-only-text/html Header append Vary User-Agent </IfModule>
For nginx Server Create a file at /etc/nginx/conf.d/gzip.conf with the following content:
gzip on; gzip_proxied any; gzip_types text/plain text/xml text/css application/x-javascript; gzip_vary on; gzip_disable "MSIE [1-6]\.(?!.*SV1)";
3) Use a Content Delivery Network (CDN)
CDN is a set of web servers distributed across various geographical locations that provide web content to end-users with regard to their location.
When you host the website on a single server, all user requests are sent to the same hardware. Due to this, the load time increases when users are physically far from the server.
With CDN, user requests are redirected to the nearest server. As a result, the content is delivered to a user quickly and a website works faster. It is expensive but an effective way for optimisation.
4) Minimize the Number of JavaScript & CSS File
JavaScript & CSS files lead to a large number of HTTP requests on the basis of every individual visitor’s access request for any file. This reduces the speed of your WordPress site. Hence, reduce the usage of JavaScript & CSS files.
Try and combine all the JavaScript & CSS files in one group, which will reduce the number of the HTTP request and eventually optimize the speed of the site-page.
There are multiple tools available in the market, which minimizes the HTML, CSS & JavaScript files with ease. Some of these tools are named, WillPeavy, Script Minifier, Grunt tools, et al.
5) Database Optimisation in CMS
Database optimisation is a proved-formula for increasing the performance of the website.
Especially, when you’re using one of those Content Management Systems(CMS) with complex plugins, database optimisation is highly required to reduce the excessive load brought-in by these complex plugins.
Every such CMS requires database optimisation in order to leave behind all the above-mentioned setbacks and gain an optimised CMS platform & website.
It’s a mandatory measure to optimise a CMS and for a WordPress-based platform, one can utilise the WP-Optimise Plugin for database optimisation.
6) Less Utilisation of Web Fonts
Web Designing is one of the most appealing & result-oriented features of every website since that is what your user is going to see and get impressed by. And Web Fonts is one of the major factors in Web Designing.
But unfortunately, the usage of more web fonts adversely affects the page rendering speed.
Web fonts are prone to adding extra HTTP requests to external resources and eventually adding up to the load of the website, which reduces the speed of the website.
Below we share a measure to overcome from excessive traffic coming from web fonts and optimise your website speed:
Use modern formats WOFF2 for modern browsers;
Include only those character sets that are used on the site;
Choose only the needed styles
7) Detect 404 Errors
It occurs several times that your web-page goes under error and comes with an instruction of ‘Page Not Found’ when tried contacting.
One comes across such an instruction when the access for the requested content is not available. To avoid & fix such an issue, one uses additional plugins. But some of such additional plugins load the website while affecting the speed of the webpage.
Hence, we advise you to run the resource through external tools for fixing the error detection issue.
Below is the suggested solution for the same:
For instance, Xenu’s Link Sleuth, Google Webmaster Tools (GWT), and 404 Redirected Plugin For WordPress.
Once the detected error is fixed, see to it if the respective page is attracting traffic or not. Because, if the page brings heavy traffic, consider redirecting the external ones to the external links and fix the link addresses for the internal ones.
8) Reduces Redirects
Redirection creates additional HTTP requests, which ultimately increases the load of the website leading to a fall in the performance speed of the same.
Hence, it is highly recommended to avoid such redirection or keep it as less as possible.
Scan your site/webpage to churn out a list of such redirection links.
‘Screaming Frog’ can be used to grasp this list of redirection links.
Once you receive the list, scrutinize each of them wisely and discard the unnecessary ones.
Concluding Words
Team AddWeb WordPress Developers, with their experience of 160+ WordPress projects, is glad to share their knowledge of optimising the speed of a WordPress site with all of you. Hope, it may prove to be helpful to you and in case of any queries or suggestions, feel free to get in touch with us. Let’s support and grow the WordPress community, together, with the contribution of all kinds.
Also, in case you wish to check the score of how well-optimised is your website; here is our blog on it. We also have a blog that speaks about a list of plugins for WordPress Site Optimisation, which might help you.
Source: AddWeb Solution
#Wordpress Development Service#WordPress Optimization#Website Performance#Customization#WordPress#Blog#Guide#letstalksolution
0 notes
Text
Using Python to recover SEO site traffic (Part two)


Automating the process of narrowing down site traffic issues with Python gives you the opportunity to help your clients recover fast. This is the second part of a three-part series. In part one, I introduced our approach to nail down the pages losing traffic. We call it the “winners vs losers” analysis. If you have a big site, reviewing individual pages losing traffic as we did on part one might not give you a good sense of what the problem is. So, in part two we will create manual page groups using regular expressions. If you stick around to read part three, I will show you how to group pages automatically using machine learning. You can find the code used in part one, two and three in this Google Colab notebook. Let’s walk over part two and learn some Python.
Incorporating redirects
As the site our analyzing moved from one platform to another, the URLs changed, and a decent number of redirects were put in place. In order to track winners and losers more accurately, we want to follow the redirects from the first set of pages. We were not really comparing apples to apples in part one. If we want to get a fully accurate look at the winners and losers, we’ll have to try to discover where the source pages are redirecting to, then repeat the comparison. 1. Python requests We’ll use the requests library which simplifies web scraping, to send an HTTP HEAD request to each URL in our Google Analytics data set, and if it returns a 3xx redirect, we’ll record the ultimate destination and re-run our winners and losers analysis with the correct, final URLs. HTTP HEAD requests speed up the process and save bandwidth as the web server only returns headers, not full HTML responses. Below are two functions we’ll use to do this. The first function takes in a single URL and returns the status code and any resulting redirect location (or None if there isn’t a redirect.) The second function takes in a list of URLs and runs the first function on each of them, saving all the results in a list. View the code on Gist. This process might take a while (depending on the number of URLs). Please note that we introduce a delay between requests because we don’t want to overload the server with our requests and potentially cause it to crash. We also only check for valid redirect status codes 301, 302, 307. It is not wise to check the full range as for example 304 means the page didn’t change. Once we have the redirects, however, we can repeat the winners and losers analysis exactly as before. 2. Using combine_first In part one we learned about different join types. We first need to do a left merge/join to append the redirect information to our original Google Analytics data frame while keeping the data for rows with no URLs in common. To make sure that we use either the original URL or the redirect URL if it exists, we use another data frame method called combine_first() to create a true_url column. For more information on exactly how this method works, see the combine_first documentation. We also extract the path from the URLs and format the dates to Python DateTime objects. View the code on Gist. 3. Computing totals before and after the switch View the code on Gist. 4. Recalculating winners vs losers View the code on Gist. 5. Sanity check View the code on Gist. This is what the output looks like.
Using regular expressions to group pages
Many websites have well-structured URLs that make their page types easy to parse. For example, a page with any one of the following paths given below is pretty clearly a paginated category page. /category/toys?page=1 /c/childrens-toys/3/ Meanwhile, a path structure like the paths given below might be a product page. /category/toys/basketball-product-1.html /category/toys/p/action-figure.html We need a way to categorize these pages based on the structure of the text contained in the URL. Luckily this type of problem (that is, examining structured text) can be tackled very easily with a “Domain Specific Language” known as Regular Expressions or “regex.” Regex expressions can be extremely complicated, or extremely simple. For example, the following regex query (written in python) would allow you to find the exact phrase “find me” in a string of text. regex = r"find me" Let’s try it out real quick. text = "If you can find me in this string of text, you win! But if you can't find me, you lose" regex = r"find me" print("Match index", "tMatch text") for match in re.finditer(regex, text): print(match.start(), "tt", match.group()) The output should be: Match index Match text 11 find me 69 find me Grouping by URL Now we make use of a slightly more advanced regex expression that contains a negative lookahead. Fully understanding the following regex expressions is left as an exercise for the reader, but suffice it to say we’re looking for “Collection” (aka “category”) pages and “Product” pages. We create a new column called “group” where we label any rows whose true_url match our regex string accordingly. Finally, we simply re-run our winners and losers’ analysis but instead of grouping by individual URLs like we did before, we group by the page type we found using regex. View the code on Gist. The output looks like this:
Plotting the results
Finally, we’ll plot the results of our regex-based analysis, to get a feel for which groups are doing better or worse. We’re going to use an open source plotting library called Plotly to do so. In our first set of charts, we’ll define 3 bar charts that will go on the same plot, corresponding to the traffic differences, data from before, and data from after our cutoff point respectively. We then tell Plotly to save an HTML file containing our interactive plot, and then we’ll display the HTML within the notebook environment. Notice that Plotly has grouped together our bar charts based on the “group” variable that we passed to all the bar charts on the x-axis, so now we can see that the “collections” group very clearly has had the biggest difference between our two time periods. View the code on Gist. We get this nice plot which you can interact within the Jupyter notebook!
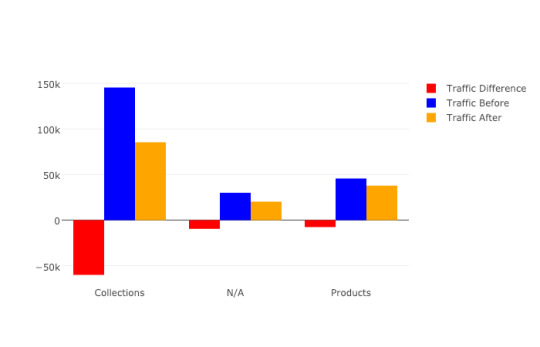
Next up we’ll plot a line graph showing the traffic over time for all of our groups. Similar to the one above, we’ll create three separate lines that will go on the same chart. This time, however, we do it dynamically with a “for loop”. After we create the line graph, we can add some annotations using the Layout parameter when creating the Plotly figure. View the code on Gist. This produces this painful to see, but valuable chart.
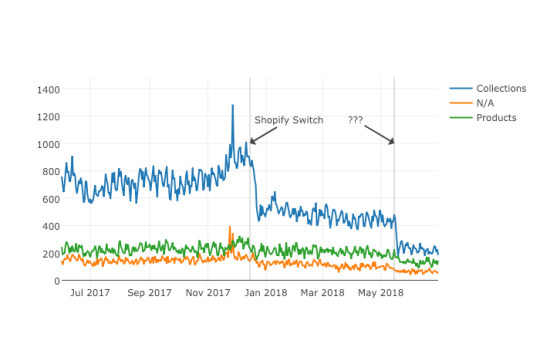
Results
From the bar chart and our line graph, we can see two separate events occurred with the “Collections” type pages which caused a loss in traffic. Unlike the uncategorized pages or the product pages, something has gone wrong with collections pages in particular. From here we can take off our programmer hats, and put on our SEO hats and go digging for the cause of this traffic loss, now that we know that it’s the “Collections” pages which were affected the most. During further work with this client, we narrowed down the issue to massive consolidation of category pages during the move. We helped them recreate them from the old site and linked them from a new HTML sitemap with all the pages, as they didn’t want these old pages in the main navigation. Manually grouping pages is a valuable technique, but a lot of work if you need to work with many brands. In part three, the final part of the series, I will discuss a clever technique to group pages automatically using machine learning. Hamlet Batista is the CEO and founder of RankSense, an agile SEO platform for online retailers and manufacturers. He can be found on Twitter @hamletbatista. The post Using Python to recover SEO site traffic (Part two) appeared first on Search Engine Watch. Read the full article
0 notes
Text
Version 257
youtube
windows
zip
exe
os x
app
tar.gz
linux
tar.gz
source
tar.gz
I had a great week. I am almost done with the new duplicate system.
dupe stuff
I have essentially finished the duplicate filter. The 'this file has a higher resolution' statements are better and the underlying database code is as efficient and productive as I can think of. I have also added some new merge option checkboxes--you can now apply 'archive' status across a processed pair or even choose to delete both files.
You can also filter which tags are merged when you say to copy or move tags between the pair. Check this out if you are interested and let me know what you think--the panel to edit this new 'tag censor' object is a little technical and I think it could do with some user-friendliness work.
And I have made a new 'system:duplicate relationships' system predicate. It finds files that have a certain number of the given kind of relationship, such as 'files that are better than at least one other file' or 'files that have alternates' or 'files that are equal to two other files'. This is not wholly useful yet, but it will be when thumbnails are dupe-aware and actionable. (Thumbnails will know their existing dupe relationships and will allow you to set new dupe relationships manually through the right-click menu.)
I believe I will have this thumbnail stuff done next week, at which point I will be done with this initial phase of the new duplicates system and I can start on the downloader engine overhaul!
some other stuff
You can now move the main gui's page tabs all the way to the left or right with their right-click menu, and you can also append or insert new pages in the same way.
The statusbar is a little more informative when it comes to db locking--it will say a bit more than 'db locked', and if you hover over it, it will report the current database job in a tooltip. If your client has been locking up from time to time, please hover over it and report to me what you now see.
full list
the duplicate filter will now maintain zoom on files with the same ratio
split the duplicate merge options into separate tag/rating controls--you may see some duplicate service entries, but these will be cleaned on your next shutdown
duplicate merge options now allow syncing 'archive' status
duplicate merge options now allow 'delete both files', which you may find use for in custom actions
created a tag censorship object to handle and action a rich tag censorship ruleset
tag duplicate merge options now have and use this tag censorship object to filter which tags are merged, with an initial value of 'let everything through'
wrote a tag censorship edit panel and tied it into the duplicate action edit panel so these new tag censorship objects can be edited
added an optimisation to the duplicate status setting code--if two files are better/worse, they are inherantly duplicates and so 'not dupe' and 'alternate' relationships apply to both equally and can be duplicated
fixed and culled and normalised the 'this has more tags' dupe filter statements to be more accurate and useful
added 'this has a larger filesize' type-statements to the dupe filter
created a 'system:duplicate relationships' predicate that can find files based on how many duplicate relationships of a particular type they have
cleaned up some misc duplicate filter code and added some tooltips to the top hover window dupe action buttons
added 'move to left/right end' to main gui page tab right-click menu
added 'new page' and 'new page here' to main gui page tab right-click menu
you can now right-click for a menu from empty tab space on the main gui
the main gui statusbar now updates more efficiently when under heavy refresh load
the main gui statusbar now shows db read/write/commit status and sets the current db job summary as its tooltip--if you experience persistent hangs, please hover over the statusbar and report what you see!
export tags to .txts checkbox will now default to 'all services on' when checked
fixed the thread watcher, which was accidentally disabling its text input early
'similar files' searches launched from the thumbnail menu will now default to 'my files' file domain rather than 'all local files'
downloader pages will now correctly sort their files on initialisation
refactored and generally cleaned up some collect and sort code
fixed some unlikely-but-possible collect/sort bugs
fixed some bad layout in the top-right hover window that was making it grow unreasonably tall when many urls were shown
on the different download import pages, the progress gauge that shows file download progress will now reset back to 0 as soon as the file download is complete
fixed a problem where video imports with unicode characters in their path were failing to mime-parse
improved the file import status update pipeline to better deal with large transactions (like skipping/deleting/retrying a thousand rows at once). all these big transactions should lag the gui far less
improved some misc import status cache code
made first step in a big size rewrite job that will size many elements according to local system font size rather than specific pixel values
hydrus servers now explicitly default to TLSv1.2--we'll see if that clears up some of the handshake timeout problems we have recently seen
cleaned up a bunch of possible pydeadobjecterrors when the new review services panel is closed
improved and rescheduled gelbooru redirect url purge
added a catch-and-recovery to hydrus network session initialisation, which may sometimes receive invalid data after a service deletion
added similar catches to tag parent/sibling initialisation, which apparently can be vulnerable to a similar invalid data problem
I think I cleaned up some more Linux ClientToScreen console errors
refactored and cleaned some frame size event responsibility
refactored and cleaned the panel and controls that display file import status
did a little more menu code cleanup
misc cleanup
misc fixes
next week
I want to finish the thumbnail dupe stuff if I can, as I would like to start the downloader engine overhaul asap. There is also some IPFS work I accidentally missed this week, and I would like to apply the new Tag Censor object to the client's regular tag censorship system.
1 note
·
View note