#applying what I've learned in my anatomy and perspective studies
Note
Do you have any advice on how to get over lack of skill? I want to do the Astarion Lestate trend but I don't think my skills are ready for it. I have references pictures of Astarion pulled up when I'm working, and even have the game launched so I can turn him if I need to (mostly for the attempts I did at his hair) but everytime I tweaked something or started over nothing looked right. I keep getting frustrated 😭
Hi anon-
Sorry this took me a while to get to, i hope you and others can still find this useful! While the basic advise to get over 'lack of skill' is PRACTICE, PRACTICE, PRACTICE! i hope this will help you knowig where to get started with that!
I'm going to put my teacher pants back on, this might be a bit long so buckle up- I'll go over a few areas:
Primitive Shapes
How to Use References
Delete your work (hear me out)
--------------------------------------
Primitive Shapes:
This is your foundation.
Everything starts with this, and while you may find it boring to think of your art in terms of cubes and spheres- i kid you not it will help elevate your work.
If/when you are stuggling to draw a complicated pose, or a specific perspective, refering back to the form in these basic shapes can really help to simplify your process and help you problem solve.
A chill/silly watch for a more in depth discussion on what i mean / how this can help - Give Pikat's 'Draw boxes (correctly) to improve your art' a watch.
They also mention this in the video but @/Uncomfortable on youtube also has some great fundermental videos.
-------------------------------------
How to use references.
Okay so references are great 10/10 very useful. But, unless you know WHAT to study from a reference, they can sometimes fall flat of their usefullness.
Anatomy studies are something a lot of us will be recommended as artists, but actually knowing what to pay attention to can boost your confidence in your work. Start with a goal, what do you want to get out of this sketch session? Do you want to get better at understanding the 3D form of a specific part of anatomy? Better at poses? Try to narrow down your learning each session to make it less overwhelming.
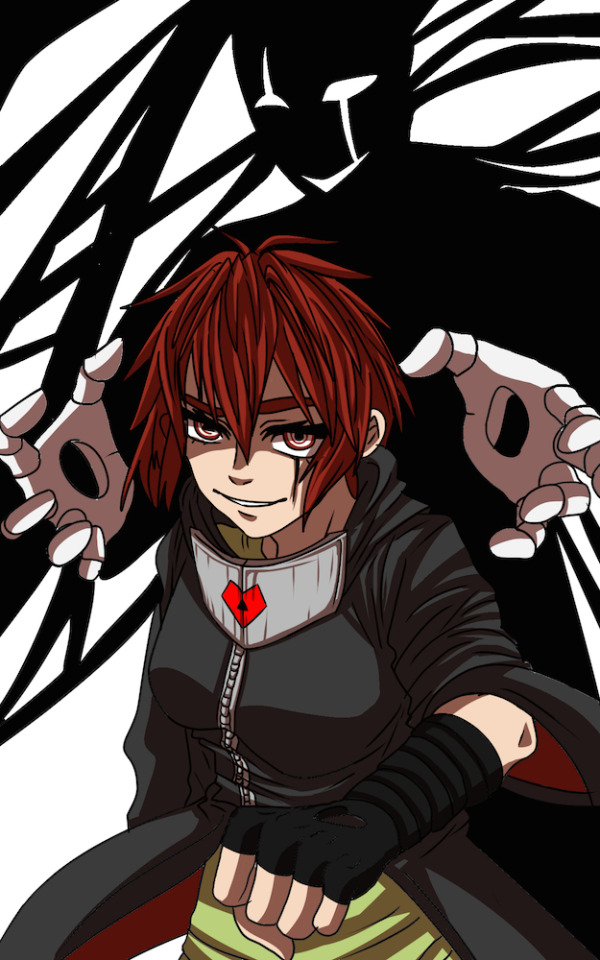
In this i'll focus on understanding the form so, lets start with a reference.
Linking back to Primitives again, start off by braking down your anatomy into forms. Sketching over the top of your references is totally fine. But make sure you are doing so critically, otherwise it may look like a flat/unnatural trace and you're not really learning from it.
Via the first sketch you can see where the primitive shapes fall on the body - think of it like a ball-jointed-doll, hips, knees, shoulders ect are ball socketed whereas arms, legs ect can be made up of tubes.
(See the first image, when sketching your tubes, sketch your contour lines too- this can help determind how clothing / hair will fall over the body, and can help you understand the 3D Form.)
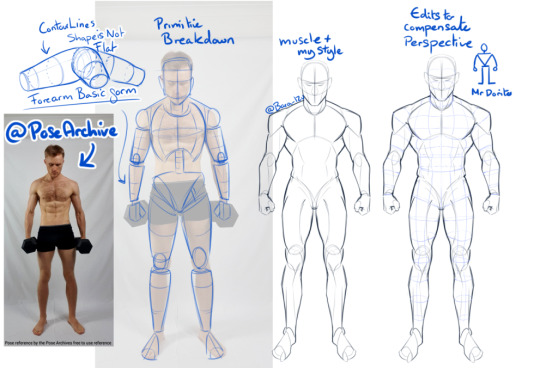
A BIG IMPORTANT SIDE NOTE - When using photo references, do be very aware that they may be distorted due to the height of the camera, or camera focal length - (you can see in my sketch i had to edit the torso and head because the reference was a little top heavy)
A few artists/books for some extra reading / reference :
- Andrew Loomis (OG for body proportions, books are a little outdated but fundermentals are still useful),
- Tenten云画画 (his stylised anatomy breakdowns are very interesting to me)
- Anatomy Essentials (I've had this book for years, it covers lots of areas, is a bit complex though, i myself should reread it again 😅
Also, if you can't find a reference for a specific pose, don't be afraid to use 3D programs!
Anatomy 360, DesignDoll, Clip Studio, Magic Poser - all nifty options~
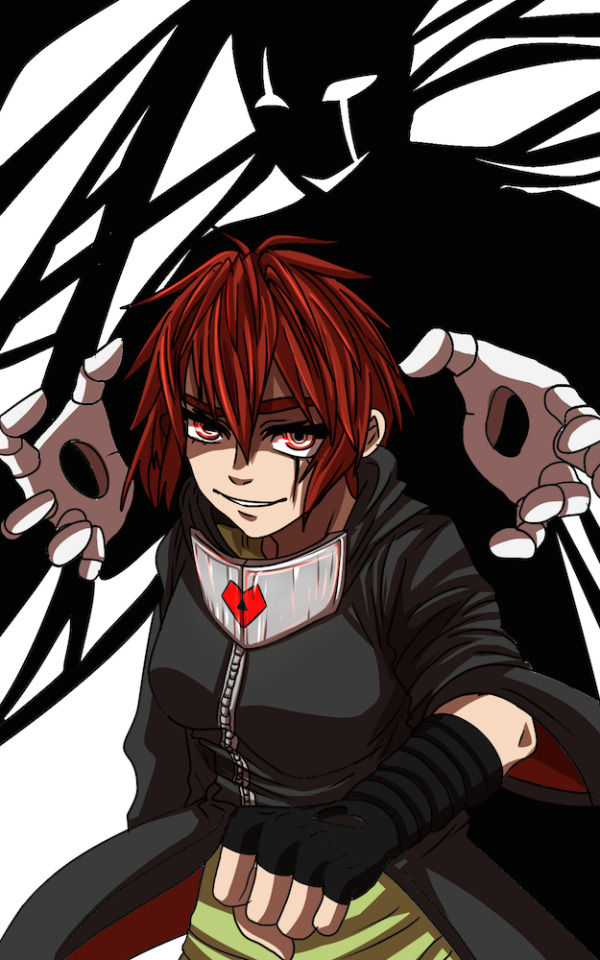
SO taking when we've learnt from the primitive forms, you can now try applying that to the Lestrat Picture. (which, granted is a complicated pose, as it also has forshortening and an odd top down perspetive of the bottom character- so don't panic if you don't get it the first time!)
-------------------------------------
Final points-
Delete your art (hear me out)
What i mean by this is, sometimes reworking the same face over and over again can bog your down. It can make it very difficult to actually see whats wrong. So, get rid of it and start again. (hide the layer/use a different piece of paper, please don't actually bin it (yet))
Next, redraw it. Use what you've learned the first time, and redraw it from scratch. (in this case, that might be just specifically the head, or the hair, or the eyes ect - you don't have to bin the whole thing, but sometimes it can really help give you a new perspective)
Once you've done this, unhide your original, compare, this may help you understand what you were doing wrong the first time. Or if there are areas of one that you like- its an opportunity to combine them as you see fit! :)
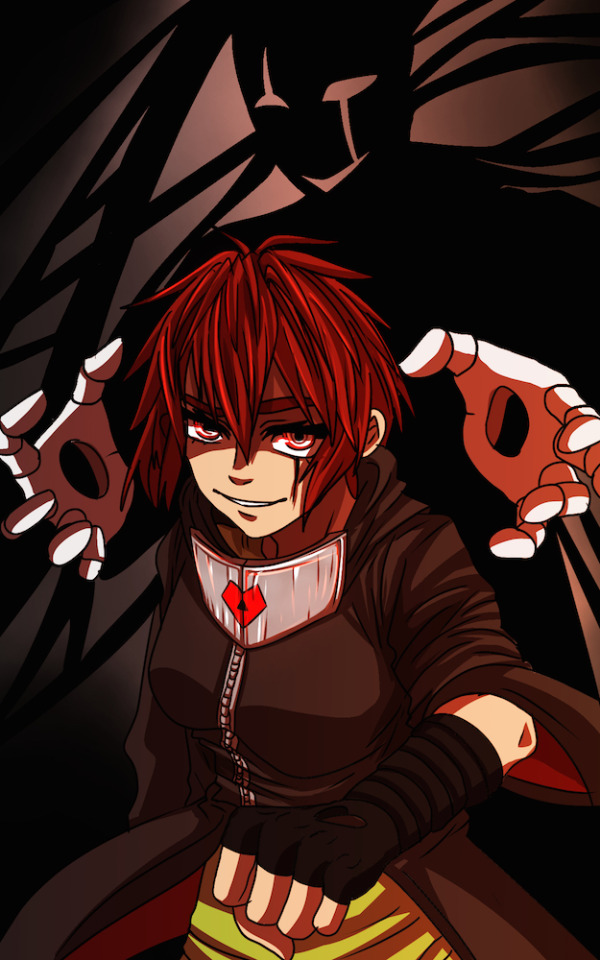
On a side note for Astarion's Hair, the lovely @mistercrowbar actually posted a breakdown yesterday! (i use p much the same method so-)
I HOPE this was of some use- do feel free to ask any questions if you've got them! i'll try to answer in a more timely manner next time 😅
92 notes
·
View notes
Note
I am sorry for bothering you, but if you don't mind, can you tell the tips for the very very begginers. I really want to start learning how to draw, but it is overwhelming and I don't no where to start and feel a little at loss
ha! One of these days I'm going to have to write something detailed and well-constructed to be able to answer these questions properly. ^^"
In any case, you're not bothering me at all and I'll try to give you a clear answer, but I apologise in advance if it's too long or if my English isn't good at times.
In short version I would just quote Lorenzo from How to think when you draw : source
My long version:
It's hard because everyone functions differently, but I'd say that first of all you need to define a goal or a project that will be your driving force so that you don't lose your motivation. It could be a personal comics project or doing fan art, it doesn't matter as long as you're enthusiastic about it.
If you have to choose between academic seriousness and fun, choose fun, because fun make you practice and practice make you progress anyway so you'll be less likely to get discouraged.
It's important to practice as regularly as possible, because your ability to draw is like a muscle that you need to maintain. If you don't practice enough, your progress will be slow, and if you don't practice for too long, you'll lose what you've learnt.
Having said that, learning fast is not an obligation - it depends on your goal.
For the technical aspects that you still need to learn between two sessions of fun, the order that seems logical to me is :
shape and volume || light and shade
anatomy
colour theory
perspective
composition
That's assuming you start by doing just characters before getting into complex backgrounds.
And bearing in mind that certain parts are connected together and can be learned simultaneously. For example, I've put perspective towards the end, assuming that you come to the backgrounds last, but it's useful for drawing characters too.
To make each of these parts easier, they need to be broken down into stages.
Shape and volume || Light and shade :
Shape and volume :
Basically, it's useful for everything else. understanding shapes allows you to decompose complex subjects so that you can reproduce them more easily. Absolutely everything around you and everything you want to draw can be decomposed in this way. It will then help you to know how to apply light and shade.
A good article here.
Light and shade : not knowing how to sum it up in a few words, I found some useful links :
[link] [link] [link]
these three articles talk about the same thing, but maybe if you look at what else their authors have in stock you'll find something different or explained in a way that suits you better.
Anatomy :
Once you know how to build a human being with tubes and rectangles, you can go into more detail about anatomy.
You can start with the head alone, practising drawing it from all angles, with different characteristics, different expressions etc, then arms, then torso, etc and then gradually moving on to the whole human body.
Study the skeleton and musculature, it sounds annoying but it really changes everything.
Even if it's possible to know how to position a character correctly without it, the result will inevitably be better with it and it'll make your task easier and drawing skeletons is great fun!
This doesn't mean that you have to learn every single piece by heart, just that you know enough to be able to place the bumps and hollows in the right places.
a good article for beginners, giving the balance needed to avoid being overwhelmed by the study of anatomy.
I suggest as an exercise : with the help of references and tutorials, draw a character 4 times in an identical posture, except that first you only do the skeleton, then the musculature, then a normal nude, and finally with clothes to familiarise yourself with the behaviour of the fabrics. (The folds and drapes are, I think, a sub-chapter of the anatomy part because clothes.)
about folds and drapery [link] [link]
Colour theory :
Basically, it's what colour you get when you mix these two together, or which colour is best for shadowing this other one, or to produce a certain mood over the whole illustration, I have to limit my palette to these colours and so on.
Again, I can't summarise this easily but it's a big important part.
Just type colour theory in google or pinterest and you'll find so many good tutorials.
Note: again I think that, colour and light / shade are connected and should be learned simultaneously.
[link] [link]
Perspective :
For this part it's easy to broke it in steps.
Start by practising with a single vanishing point to understand the principle, then two points, then three, then the fish-eye effect.
I forced myself to do the spiral staircase exercise with the perspective, it was terrible but once you've done it and understood what you've done then you're good.
Better, you can test your understanding of perspective by having fun reproducing Escher's impossible constructions. I love his work.
1 point [link][link] 2 points [link][link] 3 points [link][link] [Escher]
Composition :
It's one of the last things I learnt and I can really guarantee that there was a before and an after to it. Composition is one of the fundamental that will make you say: I'm an illustrator, in the sense that I know how to tell a story, evoke a feeling with a single drawing.
[link] [link] [link] [link]
To come back to more general things, accept that it can take time, it's OK if it's not great at first, we've all been there. Don't put pressure on yourself and don't make yourself feel guilty by comparing yourself to others.
Be curious too, look for new challenges, and always do it for fun.
Finding a community in which you can make artist friends with whom you can share projects can also be great, because you feed off each other and that helps to keep you motivated.
Don't be afraid of failure, failure is good, failure is your friend. Because once you've identified the reason why you think your drawing is a failure or not good enough, you'll remember to pay attention the next time or it'll motivate you to do more training on that point. Knowing things is good, but turning them into reflexes is better.
Here it is, I hope it helps, most of the resources I learnt with were in French so I quickly tried to find the English equivalent, I checked them quickly, but I think it's ok.
And, the links I've found are just entry points, in some cases you'll need to find other resources, like anatomy for example, but just type anatomy tuto on pinterest and see what seems easiest for you to start with.
aaand this is the end, I think.
#ask#text post#every time I have a question like that I take the outline of the previous one and add a little something to it.#After some times I might have enough to write a book x)
24 notes
·
View notes
Note
I love ur art so much!!!!🥹🫶🫶 how long have u been drawing for? and I was wondering if u have any tips(?) for drawing cuz im trying to learn how to ehe👉👈
thank you so much!! sorry for the late response
i honestly dont know how to answer how long i've been drawing for because i kinda just been doodling since i was a toddler but i started doing it more seriously when i was in 5th-6th grade and then digital art when i was around 12? it doesn't really matter when you start though
tips!!!!!!!!!! this might get long i hope i dont sound pretentious
in my opinion, art is 70% observation and 30% putting it into practice i.e. you first have to see the concepts and the breakdowns and the details before being able to use them at all. they're not going to appear by brute force or out of thin air unless you first observe that they exist and how they are used.
i have an entire archive on art tips and breakdowns that i store that cover basically everything like anatomy, color theory, composition, perspective etc. i also have an archive for art that i just enjoy looking at and want to emulate! that doesn't necessarily mean to copy verbatim someone else's style, but to pick up details in how they use colors or how they conduct lighting or how they paint a landscape. it's to pick out what makes their art so appealing and figure out how that can then be used to apply to your own art! I also just like looking at beautiful art to inspire me :)
general tips i think are really good for improvement vv
study the difference between cast shadows and form shadows. this is REALLY helpful in making your art look more 3 dimensional. for simplicity's sake, cast shadows are generally more hard while form shadows are generally more soft (depending on the form) and every object has a combination of the two. the way that you can see it most notably and then apply it is on clothing, where the clothing folds will cast a shadow while also being rounded and have a form shadow
color and light are deeply intertwined and something that you can use is cool shadows/warm light or vice versa! this doesn't ALWAYS apply, but it is a good starting point.
think of shadow not as an addition but the starting point while light is where you are adding. therefore, the shadows should be heavily influenced by the environment that they are in, i.e. a white box in an entirely red room is not going to have gray shadows, but red shadows. when the white light is shined on it then it becomes white.
use dynamic lighting to create the sense that something is real! this can be done in the way that either your shadows are rendered while your light has little detailed or that your light is rendered and your shadows have less detail
when referencing, use at least one or two "reference" lines that go across the entire picture horizontally or vertically so you are not trying to draw everything relative to each other but instead search for where something is relative to that line and you will be able to then capture the proportions in much more more comprehensive manner
i think this one might be overdone but break everything down into simple shapes!! it becomes a lot easier to understand something when it's not as visually complex and then after you have gotten down the basic shapes of a figure
use blank space as a guide (when referencing or otherwise). sometimes something isnt looking right when you have tried to redraw something and that might be because the blank spaces in between the lines of the figure and outside the figure arent actually matching up!
the heat of your drawing is determined by the dominant colors and when trying to make a color more cool or warm, you don't necessarily need to shift your hue over to that color. for example, if you have a predominantly warm color scheme with strong oranges/reds/yellows/pinks, if you wanted to have bluer shadows all you need to do is to make the color more desaturated. it will pop out as blue because your colors are mostly warm
make shadows a bit more lighter/saturated in the insides of them because light is being reflected onto it
this one might not apply to you, but it really helped my art when i stopped trying to force myself to do lineart. there are ways to improve at lineart but i prefer not to do it and to just create multiple layers of sketches and then at the very end after i've colored i create a layer on top of everything to clean up the messier bits
implement light fall-off! tbh i don't reallyyy know what this is i just see it a lot but it's basically a really saturated red-orange that you mostly see on skin where the shadows meet the light
pick what your brightest and darkest colors are going to be when you start coloring. i would normally stay away from pure white or pure black because by picking other colors as your brightest/darkest you can create mood and tone
fade out the hair at the edges of it because hair isn't really a block despite often being drawn like one. it's a large collection of strands and as it nears the edges those stands would begin to thin out in comparison to the cneter. in addition, add flyaways to your hair to make it more realistic because again, it's a collection of strands that is usually composed into blocks because that's how it looks most of the time
alright that's kinda all I got for now there's so much more i could talk about but i think this is getting long LOL... i hope that at least one of these is helpful in some way, shape, or form <3
9 notes
·
View notes
Note
how u draw good?
Ahah uh. This is such a tiring answer to receive but it's always "practice"
Practice in a sense that you'd draw a lot. Practice in a sense that you'd study other people's works a lot. Practice in the sense that you'd experiment and step out of your artistic comfort zones a lot
That's what I mean when you ought to "practice". It's one thing to be told to practice but it's another thing to understand what that actually means for you. And for me, it's the part where I experiment a lot— I've gone through, and will still go through, many art style shifts and learnings with each piece I work even just a little differently than my usual on
But that's what works for me. For others, practice can mean drawing everyday or even just studying other people's art everyday. It kinda ends up being a mixture of all the things I said but you lean into one side more when you're really getting yourself into it
Regardless, always keep in mind of the fundamentals. Which can mean many things too depending on what you'd want your art to look like at the end of the day. If you're going for a more realistic style, focus on anatomy and perspectives, if you're going for scenic artworks, focus on lighting and shadows, if you're going for cartoony pieces, focus on exaggeration and shapes. That isn't to say you'll be throwing away the other basics but the focus will be more heavy on those specific scenarios. You can also apply all of these and just mix and match until you find what works for you
#food#the thing abt art is there's no ONE single way to do things#you get to focus on whatever aspect you want to stand out in or hold back on#while also keeping in mind of the very basics#anw i wish you luck!#take what i say with a grain of salt#im self taught#i learned these all by observations and sourcing through the internet#i appreciate the ask tho!
4 notes
·
View notes
Note
Hi! I've recently started to get back into drawing, do you have any tips on how to practice drawing people and developing a style? I love your work and I want to create a similar style!
Hi anon! Sorry for the wait!I need you to listen very, very carefully.You open MS Paint and-Ok seriously though that’s a first for me holy shit (never been asked about this before) but I’ll try to give you some pointers on what I found useful for my hoomans. I don’t think it’s very universal because my brain has it’s own weird-ass mechanics, but maybe it’ll help you out a little!
The thing that I do on a daily basis and skip very rarely are gesture drawings. There’s a lot of approaches to the subject and it might get confusing but it’s important to try several ones, so you can find one that works for you best. I have 3 modes that I apply for myself while studying
30sec gestures these are real good for turning off your “detail radar” where you can focus on rhythm and forces going through the pose
1-2 min ones where you can try and add some of the form indications to your drawings
no time limit- because sometimes it’s good to slow down and look at the pose a bit longer, there are pros and cons to it because you might start overfocusing on the tiniest bumps on human bodies
Gestures are real good for your visual library and are super helpful when you’re trying to invent poses from imagination and portraying emotions. It’s important to remember that it’s not only limited to human face. I highly recommend getting familiar with books, vids, tutorials about animation because animators are MVPs when it comes to character acting, dynamism and simplification.Proportions that’s still a thing I keep working on, I find I tend to go way to hard on my instincts sometimes which ends with a loOOooOOT of fixing. So like, don’t do that don’t be me. Get yourself some body/facial proportion sheets that you can keep on a side while you draw and try to remember them and apply it but don’t get trapped in them, humans have different proportions and your model is not always a 9 head tall himbo with bricks for muscles- try and measure them. Same’s with bodytypes! Variety is a spice for an interesting character! Anatomy Studies this is where I’m still searching for a good method of learning, there are days when I sit down and I have zero clue what the hell should I learn. I usually separate these to head features and rest of the body( upper-lower), watch some vids or read some books/tutorials on their anatomical properties, then i jump to simplification to forms and try practicing their structure and placement. Recently I picked a habit of listing things that I hate to study and doing 50-100 drawings of them. Form, overlaps, perspective: Definitely haven’t mastered that, but what I can’t stress enough how much easier it is for me to draw now, when I can have some more comfort in that field. Boxes are boring but they can be your Lego and you’ll be building that sick-ass R2-D2 1:1 in no time. These bitches called hands it’s very easy for human eye to spot awkwardly drawn hands, we’ve all been there and hid them behind character’s back. They can make you cry in the middle of the night but it’s good to give them a proper studying. Emotions I find that I can forgive myself some technical imperfections, when I’m happy with emotional side of my piece. I like to be invested into characters and their stories, and empathize with them and I want people to feel the same when they see my drawings.STYLEWhich is a very subjective thing and I don’t think mine’s very consistent,but there are things that work for me when I try and get into actual analytical mode. Your taste in people: Everyone has different standards for beauty/ugliness/interesting/uncanny etc. it’s good to have some collections of photos/screenshots of characters that click/or don’t click with you or your friends (this is good when you feel stuck in your comfort zone) It works for both body types and faces.Influences: I have big ass moodboards with my fave art, that i spread into categories (like anatomy, lineweight, composition, character design, simplification yadda yadda), it’s very helpful when you’re trying to navigate what would you like your art to be. Maybe you’d like to go more realistic? Or more cartoonish? Maybe you’ll go for several approaches? Don’t be afraid to Frankenstein a little spice here and there to your main approach. You can copy/trace some features from your fave artists to understand their shape language better and try to apply their problem-solving to your own pieces.Tools: I started digital pretty late, so I have some experience in drawing with traditional tools like nibs, microns, brushpens, calligraphy brushes and my all-time favorite- mr cheap ballpoint. I took a lot of it into my digital work and I still do most of my warmups and studies on paper. Cross-training is very helpful. It’s good to take the tools one at a time, but once you get some confidence you’ll find new and very cool ways to spice your artwork up and learn from experimentation. I know it might look a bit overwhelming, because it is a lot but don’t worry! Even if you only manage 20 minutes or 1h a day it’s still a time spent learning and developing your skills!Good luck with your studying!
#Anonymous#vashplies#i am in no way an authority or anything in here#but i'm doing what i can and i hope something here is going to be useful for you!#it's really funny to reply to this after posting two terrible memes
29 notes
·
View notes
Note
Heyoo!! I was wondering how did you start to study anatomy?? Sometime ago you said that you simply had to open a biology book and start, but how do you apply that in your drawings?? (I don't know if my question makes sense ups) . I've been following you for a while now and your improvement never fails of amaze me, you are really an inspiration!!!
Hi! In my opinion, having a good grasp on anatomy comes from doing various studies, analysing and drawing the same things over and over again from different perspectives; in other words, practice! Human body is nothing but an object made up of many many (complicated!) elements and to draw it properly you have to have a grasp on those elements and know that they exist in the first place. This knowledge/grasp comes from practice/studying as mentioned above and references like photos or sculptures. You have to -know- the human body: where and how it bends, how the muscles are placed, what happens when they stretch or get squished etc. You have to know it inside out! I’m still learning myself because the anatomy in my pictures is by no means perfect haha :)
But the thing is you don’t learn these things the way you do for your chemistry test by looking at the rules/definiteions over and over again - you have to draw it!! You have to draw many trash sketches (using references of course!!! If your’e learning don’t draw from head!!!!!!), fill your sketchbooks with nothing but scribbly back muscles or arms, gesture drawings and the similar - and they aren’t supposed to be perfect or pristine or polished. You aren’t creating masterpieces, you’re studying so you can create masterpieces in the future. You gotta draw that nose 27 times and fail so later when you’re drawing the next Mona Lisa the (107th) nose looks spot on.
And god, by no means think that every page in your sketchbook is supposed to look like those cool sketchbook photos on instagram? I think that this is like the biggest misconception in the artistic community - when you’re practising your drawings aren’t supposed to look gorgeous and ready for social media. Otherwise you put unnecessary pressure on yourself like “oh no this is looking not-perfect now everyone will know that I can’t draw hands”. No!! No one will ever see it!!! You don’t have to post everything you draw!! So go wild!!!!!I hope that these 3 cents of mine help you somehow. Thank you for your kind words and have a nice day! :)
165 notes
·
View notes
Note
i'm so forgetful, I don't remember if I sent you an ask today so I apologize if this is ask #2! and I love your tangents! tbh I would also have a hard time dancing in public, I really just do it for myself. but that's super cool you used to take classes for that! its sooo hard finding people with the same interests so yeah Tumblr is a great place to express your interests. I love all those hobbies! im going to art school and a bunch of people ask me like "how do they even grade if art is subjective?" so that relates to ur last paragraph. I like all art even though I might not be good at a lot of it lol. I was into digital drawing for a long time but I dont think I have the patience for it. the song im learning is "back door" by a boy group called stray kids! i'll link the dance practice for you, the choreo is soooo fun to watch: https://www.youtube.com/watch?v=WAGlb7u9nqE - pixel 🧸
💜💜nooo it's okay i love getting asks from you!!💜💜
i find it incredibly frustrating when people don't understand that some skills and talents you want to keep just for yourself. but yas queen good for you you're doing something you love for yourself! <3
you go to art school WOW. i've heard and seen stories from the animation community on yt😬mad respect for ya boo you're definitely a girlboss😎😎😎😎😎😎
i think there's an answer to that question people ask you? i think it's okay for a person to be graded on objective assignments and tests that are meant to teach and enforce the fundamentals of drawing like anatomy and figure drawing and light studies and perspective? but if it's something like 'draw your emotions' then no that sorta thing shouldn't be graded. great idea for extra credit tho ;')
ah but i'm just doing guesswork here and basing it on my writing experience. same thing applies here imo! you get graded on stuff like vocabulary and comprehension and sentence structure. but i always hated the questions in my exams where you had to form a story based on the given prompt. i can only hope i was graded on the objective part lol we'll never know will we? XD so what is art school actually actually like? O_O
oh i love digital drawing too (why can't physical art have an undo button sigh)✨though i only use it for coloring practice and just trace out the outline :p oui you're right it is very time-consuming😭😭😭
aaand the final part! i wanted to answer this after watching the video but didn't get time until now so please excuse the late reply😅that dance looks INCREDIBLY COMPLICATED AND HARD OMG. i mean, i shouldn't be surprised they're a kpop boy group of course they have insane choreo😵😵😵but dang i'm still amazed by their stamina and synchronity!! i don't think any artist of any other nationality can execute such moves AND sing without losing their breath, the closest i've seen is beyonce at the superbowl :p
ALHAHAF AND IT'S ALMOST CHRISTMAS DAY!! so excited for your reveal tomorrow!!
0 notes
Note
I've been hesitant to ask anything here but, I've been struggling when it comes to drawing and coloring. I'm not sure how to get better. I've asked for tips many times and well just practice is all I get. Heh. I'm really trying. I'd just like some way of helping myself. Is there a way too?
Hmm. Okay, this is going to be a LOOOOOOONG POST.
I don’t know how much advise I can offer but I will tell you what helps me, and how I colour. I’ll break it down into sections. XD
Drawing
I very much recommend live drawing. Particularly for anatomy. Live drawing helps you learn the basic structures of the human body. How the skin folds, how joints bend and move, how to gain perspective. It trains your brain and makes you able to draw a lot better, a lot faster and more accurately.
With anatomical drawing: Do break it down into shapes and lines. Shapes and lines are your friends in drawing.
Like, the shape of the basic human ribcage can be described like a shape of an egg. Artists like Leonardo De Vinci broke down the anatomical forms of the human body into basic shapes.
Lines helps you gain movement into the body. They, along with shapes, are you basic frame for anatomical drawing.
Don’t be afraid of failure or mistakes. If a drawing failures or has mistakes, then it’s something you’ve learnt. You can then apply what you know now from your to a new drawing.
Drawing Style
Drawing style does very from person to person. But looking at comic artists styles can be a great source of inspiration. And maybe mix styles up.
I’d say my style is like a combination of Naruto and Deadman Wonderland.
With time, drawing style does develop and it does. Like, mine has changes so much within a year.
This one was made on the 5th of January 2016.
And then there’s this one:
This was made on the 6th of January 2017.
They may be subtle changes, but anatomically speaking, it’s a lot better than last year.
Colouring
Let’s use a visual example to explain this:
Colouring is really dependent on the style of the artist. For any tips with digital colouring, always have separate layers from your base colour and your shading.

As you can see, I love layers. I am very thankful for them. And use a lot of them.
So I always start with a layer for base colours:

Shading
For my shading style, I prefer to use cell shading, so sharp lines and blocked colours to represent tone. However, instead of using a black colour as my shading, I think about what colours would be suitable for the setting and lighting of a scene. So, say the lighting or scene was more pigment with reds and oranges, then I’d want the same colours for my shading (and highlighting).

The darkest red in the top right side is my shading colour, whilst the two on the two of the left (the lighter coloured reds) are more to be used for highlighting.
When setting my layers, I set them to “Multiply”, and turn the opacity to about 50-70%. Up to you.

I usually make two layers of shading, one for the main and primary shading:
And another for secondary:

And one other layer for highlights. For highlighting, I set the layers settings to “add” or “add (glow)”. Some programs may call it something else, like Sai calls it “luminosity”.

It may not seem much, but it definitely brightens up the eyes and the shine of the metal neck (brace?).
It just gives your character more dimension and lil’ touch of realism. Whether you decide to have soft or cell shading is up to you.
Once you’ve feel happy with it, you can always add any extra effects.
So, usually to brighten up the colours and the character, I use similar colours on a separate layer, and set that layers setting to “overlay”. Again, set that to around 50-60%. But it’s up to you.

And for effects like the magic, I use the “add (glow)” layer setting again. For colour, I use the most vibrant red on my colour pallet. So the one on the top left.


Now, something that my lovely friend Cross taught me. When I know I’ve finished everything, but want to give it a bit more “oomph”, then I make a duplicate of the completed drawing, use a “gaussain blur” and set the opacity to about 60-80%. Once that’s done, I go to edit and use a “colour balance” effect.


Giving me this result. It just gives the drawing more charisma and “badassery”.
How you shade and colour is entirely up to you. It is a practice thing, but it doesn’t hurt to experiment with other techniques.
I’m not very skilled when it comes to soft shading, with the exception of some architectural backgrounds (sometimes). But I can definitely see the appeal.
Say @kiacii for example, rather than cell shading, she uses soft shading that almost has a sharp edge. She uses SAI and the ’shade’ setting of her layer. And her drawing and colouring style is stunning. With just subtle changes in colour and layer settings, it really makes her work come to life. Which is one of the reasons I hold her so highly.
Brushes:
Brush type is really up to you and which you feel most comfortable with. Or experiment.
Traditional work:
I really can’t do traditional comics. So instead I save the comics for digital, and use traditional mediums like oil paints, acrylics, watercolours, inks etc. for traditional life painting.
One of my artist studies on Melanie Rothman’s paintings.
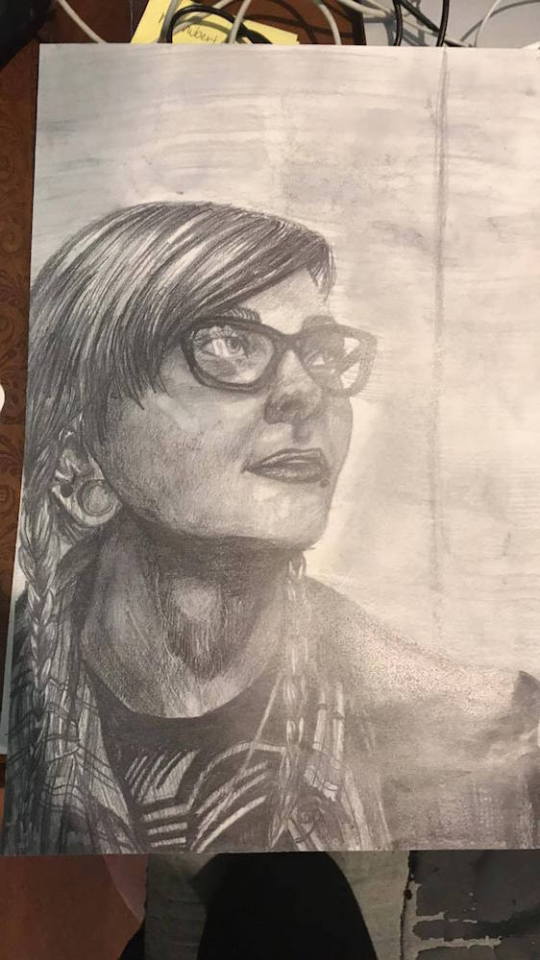
Pencil portrait of my friend from school.
It seriously takes practice and patience. But you can do it :D I hope this helps xDD
180 notes
·
View notes
Last Seen Blogs

abra-ka-dammit
the big bad booty daddy

spitblaze
Corndog Formica

tribyute-melayu
awek tudung cumtribute

lombamenulis
Info Lomba Menulis [Update]

helioleti
Veggies And Straight Talk