#arduino due
Explore tagged Tumblr posts
Visit Tumblr Blog
Explore Tumblr blogs with no restrictions, modern design and the best experience.
Last Seen Tumblr Blogs


Fun Fact
Tumblr has 411 employees.
Text

Getting Started with CAN Bus Development Using Arduino
Explore CAN Bus development with Arduino using MCP2515 and MCP2518FD controllers, the Arduino Due with dual CAN support, and protocol-specific solutions for SAE J1939 and NMEA 2000. Ideal for automotive, industrial, and marine applications.
0 notes
Text
Arduino Due AT91SAM3X8E ARM Cortex-M3 Board

The Due is a microcontroller board based on the Atmel SAM3X8E ARM Cortex-M3 CPU. The Arduino Due AT91SAM3X8E ARM Cortex-M3 Board is the first Arduino board based on a 32-bit ARM core microcontroller. Arduino Due AT91SAM3X8E ARM Cortex-M3 Board has 54 digital input / output pins (of which 12 can be used as PWM outputs), 12 analog inputs, 4 UARTs (hardware serial ports), a 84 MHz clock, an USB OTG capable connection, 2 DAC (digital to analog), 2 TWI, a power jack, an SPI header, a JTAG header, a reset button and an erase button. The Arduino Due AT91SAM3X8E ARM Cortex-M3 Board contains everything needed to support the microcontroller; simply connect it to a computer with a micro-USB cable or power it with an AC-to-DC adapter or battery to get started. The Due is compatible with all Arduino shields that work at 3.3V and are compliant with the 1.0 Arduino pinout. The SAM3X has 512KB (2 blocks of 256KB) of flash memory for storing code. The bootloader is pre-burned in a factory from Atmel and is stored in a dedicated ROM memory. The available SRAM is 96KB in two contiguous banks of 64KB and 32KB. All the available memory (Flash, RAM, and ROM) can be accessed directly as a flat addressing space. It is possible to erase the Flash memory of the SAM3X with the onboard erase button. This will remove the currently loaded sketch from the MCU. To erase, press and hold the Erase button for a few seconds while the board is powered.
Arduino Due AT91SAM3X8E ARM Cortex-M3 Board pins:
Due follows the 1.0 pinout:
TWI: SDA and SCL pins that are near to the AREF pin.
The IOREF pin which allows an attached shield with the proper configuration to adapt to the voltage provided by the board. This enables shield compatibility with a 3.3V board like the Due and AVR-based boards which operate at 5V.
An unconnected pin, reserved for future use Connections / Interfaces
Digital I / O pins :54
With PWM :12
USB :Yes
SPI :No
I²C :No
ICSP :Yes
TWI :2x
UART :4x
CAN :Yes
SAC :2x
LAN :No
Bluetooth :No
Note: Unlike other Arduino boards, the Due board runs at 3.3V. The maximum voltage that the I/O pins can tolerate is 3.3V. Providing higher voltages, like 5V to an I/O pin could damage the board.
Features:
A 32-bit core, that allows operations on 4 bytes wide data within a single CPU clock.
CPU clock at 84Mhz
96KBytes of SRAM
512KBytes of flash memory for code
A DMA controller, that can relieve the CPU from doing memory intensive tasks.
1 note
·
View note
Text
Numpad Jr
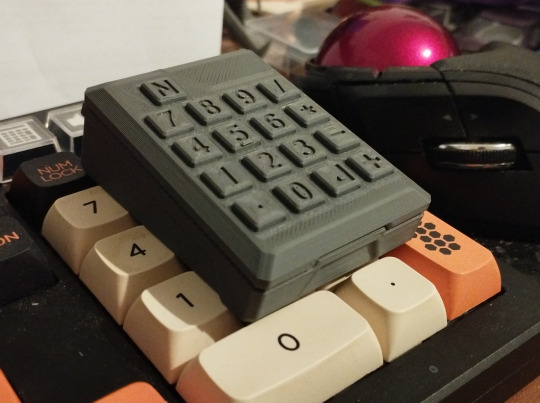
My thinkpad doesn't have a numpad and could use something more portable than the average USB ones, so… just made one! Used Kailh square mouse buttons and an Arduino Pro Micro.
Sure, tactility's compromised due to size… but look at the cute lil' thingy lol.
13 notes
·
View notes
Text
youtube
An amazing documentary on an older bit of computer technology that uses punchcards. What makes this more amazing too, is that this is a VERY old form of programming that dates back to the 1700s. Before we had these types of electric punchcard computers, Paper punchcards were used to make weaving patterns for things like dobbies when making jacquard fabric and lace patterns for big looms, automatons, and in a lot of ways works like the drum on a music box. It's a way to have mechanical programming instead of coding electronics. Electronics are smaller, load faster, and can hold much much more data, but Punch card equipment has it's own benefits as well. I'm actually old enough and fortunate enough to have handled old punch card and mag striped equipment when helping my mom in her classroom, it was a very outdated tech then. But it's not just charming, fun to use, and fairly simple to pickup, it's practical, and at least for me I can understand it better than I can with coding now due to my issues with losing my memory. Honestly it's a fascinating rabbithole to go down, because it leads you to analog technology and how simple it really is. From the fact that a speaker is just something that can vibrate a pattern like a piece of cardboard or rubber attached to a needle being cranked over a record like this:
youtube
You'd be surprised what you can do mechanically. And a solid mechanical build combined with simple electronics like an arduino if you're able to learn can make amazing things.
#mechanics#punch card computers#punch cards#old technology#amazing things#learn something new#gramophone#Youtube
5 notes
·
View notes
Text

Battery overheating notwithstanding, the DCO is working! (ignore the VCA prototype in the upper right, I realized I needed different voltage levels than the arduino 0-5V and didn't want to disassemble the VCA)

I've got a bit of fine tuning to do, so I'm not quite ready to share any sounds just yet. I'm just excited to get a (mostly) decent looking ramp out of it. The amplitude drops at higher frequencies, so there's definitely some updates needed in the DAC voltage lookup table. Also there's a really weird ripple at the very lowest frequencies that I suspect might be due to the HPF on the clock signal (that might end up being a feature though).
Also, my scope is showing signals inverted from what I expect and I'm wondering if I've just always had my probe wired up wrong.
Next step will be getting the ATtiny set up to replace the Arduino!
12 notes
·
View notes
Text
Arduino Due vs. Mega: A Comprehensive Comparison
What is Arduino Due and Mega?
The Arduino platform has revolutionized the world of DIY electronics, providing hobbyists and professionals alike with versatile and powerful microcontroller boards. Among the myriad of options, the Arduino Due and Arduino Mega stand out for their advanced features and robust performance. The Arduino Due, introduced in 2012, is the first Arduino board based on a 32-bit ARM core microcontroller, the Atmel SAM3X8E. In contrast, the Arduino Mega, built around the 8-bit ATmega2560 microcontroller, is known for its abundant I/O pins and memory. Understanding the differences between these two boards can help in selecting the right one for specific projects, enhancing both functionality and efficiency.
Processing Power and Performance
The processing capabilities of the Arduino Due and Mega are distinctly different, primarily due to their core microcontrollers. The Arduino Due, with its 32-bit ARM Cortex-M3 processor running at 84 MHz, offers significantly higher processing power compared to the Arduino Mega's 8-bit ATmega2560, which operates at 16 MHz. This difference in architecture and clock speed means that the Due can handle more complex calculations and tasks faster and more efficiently than the Mega. For projects requiring high computational power, such as real-time data processing or handling multiple sensors simultaneously, the Due is the superior choice. However, for simpler tasks, the Mega's processing power may suffice.
Memory and Storage Capabilities
Memory is another critical aspect where the Arduino Due and Mega diverge. The Arduino Due is equipped with 512 KB of flash memory for code storage and 96 KB of SRAM for data. On the other hand, the Arduino Mega has 256 KB of flash memory and 8 KB of SRAM. Additionally, the Due features a Direct Memory Access (DMA) controller, which allows for efficient memory operations, freeing up the CPU to handle other tasks. These memory enhancements make the Due more suitable for applications requiring large codebases and significant data handling, such as advanced robotics or sophisticated control systems. The Mega, with its more modest memory, is ideal for less demanding applications.
Input/Output Capabilities and Expansion
Both the Arduino Due and Mega are renowned for their extensive input/output (I/O) capabilities, yet they cater to different needs. The Mega boasts a whopping 54 digital I/O pins, 16 analog inputs, and 4 UARTs, making it ideal for projects that require multiple sensors, actuators, or communication interfaces. The Due, while offering fewer digital I/O pins at 54, includes 12 analog inputs and 4 UARTs, along with additional features like two DAC outputs for analog signal generation and enhanced PWM capabilities. These features provide the Due with superior analog output capabilities, making it suitable for applications like audio processing or advanced signal generation.
Power Consumption and Compatibility
Power consumption and compatibility are practical considerations when choosing between the Arduino Due and Mega. The Due operates at 3.3V logic levels, which makes it more power-efficient than the Mega, which uses 5V logic levels. This lower voltage operation is beneficial for battery-powered projects where energy efficiency is crucial. However, the 3.3V logic also means that the Due is not directly compatible with 5V components without level shifters. The Mega, with its 5V logic, offers broader compatibility with existing Arduino shields and components, making it a versatile choice for a wide range of projects. Understanding these power and compatibility nuances can help in making an informed decision based on the project's specific requirements.
2 notes
·
View notes
Text
What is this?
This is my brand new sideblog, my main blog is @justafoxytwink. I've been wanted to document some of my coding and other projects that I do because I've been having trouble motivating myself and I'm hoping that having a public space to talk about them will help with that. So here's a couple things I'm planning on for the next few months:
Making a simple digital clock - this is a very simple arduino project, but I've gotten a bit out of practice and want something easy to start with
customizing a model for vrchat/vtubing - I've gotten the julia winterpaw canine model and would like to recolor it to my own fursona, and I'll need to get the software to do so running on linux since I don't use windows. I'll have to try getting vtuber plus running, hopefully I can use either wine or proton to do that.
replacing the timing belt in my truck - this is a bit of an odd one out. I have this old truck that belonged to my dad that I'd like to fix up, and this is where I'll start.
general programming practice - I've had to put my cs degree on hold for the last couple years due to a lot of personal issues, so I've got some catching up and relearning to do. I'm hoping to get back to school this coming fall tho
I'll put more stuff up here as I come up with more and have updates, I'll try to post at least once a week with some kind of update.
3 notes
·
View notes
Text
Top 10 Scale Gifts for the Gadget Enthusiast
Finding the ideal present for the gadget lover in your life may be thrilling and difficult at the same time because technology is continuously changing, and gadgets are becoming an essential part of our lives. The appropriate gadget may make their world come alive, whether it's for a birthday, an anniversary, or to express gratitude. We've put together a list of Top 10 Scale Gifts for the Gadget Enthusiast to aid you in your search for the perfect present.

High-end headphones
There's nothing quite like immersing yourself in music or podcasts with a pair of high-quality headphones. For the audiophile in your life, consider options like the Bose QuietComfort 35 II or Sony WH-1000XM4. These headphones not only offer exceptional sound quality but also come with noise-canceling features, making them perfect for music lovers on the go.
Smartwatch or Fitness Tracker
Smartwatches and fitness trackers have become more than just timekeeping devices; they're personal assistants for tracking health and staying connected. Due to their abundance of health and fitness capabilities, app compatibility, and stylish designs, the Apple Watch Series 7 and Fitbit Versa 3 are both fantastic options.
Drone
Drones have taken the world by storm, offering a unique perspective and endless possibilities for creativity. DJI's Mavic Air 2 and Skydio 2 are top-notch options, equipped with high-resolution cameras, obstacle avoidance, and impressive flight capabilities. A drone is an excellent gift for both tech enthusiasts and photography lovers.
Virtual Reality (VR) Headset
Step into another world with a VR headset. Oculus Quest 2 and Valve Index provide immersive gaming experiences and access to virtual reality applications. VR headsets are perfect for those who crave a new level of entertainment and want to explore virtual realms.
High-Performance Laptop
A powerful laptop is essential for the tech enthusiast who wants power on the run. Choose laptops are notorious for their exceptional speed, stunning defenses, and portability, similar as the MacBook Pro or Dell XPS 15. These laptops work well for a variety of operations, including videotape editing and programming.
Smart Home Devices
Transforming a house into a smart home is a trend that continues to gain momentum. Smart home devices like Amazon Echo, Google Nest, and Philips Hue lights offer convenience and automation. They allow control over lights, music, security, and more with just a voice command or a tap on your smartphone.
Streaming Device
Cutting the cord has never been more accessible with streaming devices like Roku Ultra and Apple TV 4K. These devices offer access to a vast library of streaming services, including Netflix, Disney+, and Hulu, in stunning 4K quality. Streaming devices are perfect for binge-watchers and movie buffs.
High-Resolution Camera
Capture life's moments in stunning detail with a high-resolution camera. The Sony Alpha a7R IV and Canon EOS R5 are recognized for their superb image quality and adaptability. For photographers who want to capture landscapes, portraiture, or wildlife, these cameras are perfect.
Gaming Console or Accessories
Gaming is a passion for many gadget enthusiasts. Consider the latest gaming consoles like the PlayStation 5 or Xbox Series X. Enhance the gaming experience with accessories like gaming chairs, mechanical keyboards, or gaming headsets.
Tech Toolkit or DIY Electronics Kit
For those who love to tinker and build, a tech toolkit or DIY electronics kit is the perfect gift. Arduino Starter Kits and Raspberry Pi Bundles provide endless opportunities for creating gadgets, robots, and electronic projects.
Conclusion
In conclusion, it need not be difficult to select the ideal present for a gadget fanatic. With the top 10 scale gifts we've outlined, you can surprise your loved one with a thoughtful and exciting present that aligns with their passion for technology. Remember, the best gift is one that shows you know their interests and cater to their tech-savvy side.
2 notes
·
View notes
Text
ESP32-S3 Mini TV demo for Star Trek Day 🖖📺🔊
This Mini TV demo
by moononournation is perfectly themed for Star Trek day, playing the TOS and STNG intros at 480x480 12fps MJpeg and 22KHz I2S MP3 audio. We'll try Cinepak next, but this was an easy first start, and it looks and sounds great. There's a little tearing effect due to the low frame rate and the display being single, not double-buffered, but considering this is a $4 microcontroller module running Arduino, it's very impressive! This may be the first time we've seen reasonable size-and-quality video+audio playback! This was our last 'test' for the ESP32-S3 TFT Experimenter board. All functionality has been tested, and it's ready to go out for manufacture - only one blue-wire fix is needed to change the default I2C address of the GPIO expander :)
#StarTrekDay#adafruit#espressif#esp32#espfriends#ESP32S3#arduino#startrekfan#minitv#techdemo#audiovisual#innovation#diyprojects#microcontroller#videoplayback#trekkie#engineeringmagic#startrek
2 notes
·
View notes
Text
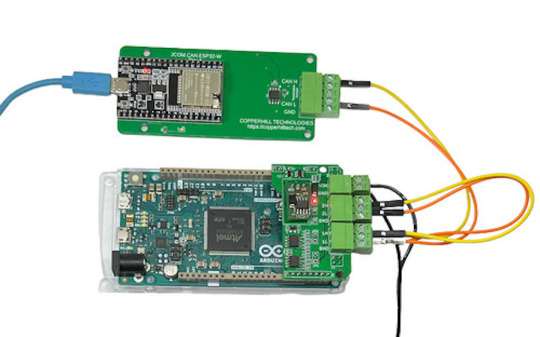
Unlocking SAE J1939 Development with the Arduino-Due-Based Programming Kit
Discover the Arduino-Due-Based SAE J1939 Programming Kit by Copperhill Technologies — a complete development platform for building, simulating, and monitoring heavy-duty vehicle networks using the J1939 protocol. Includes hardware, software, and detailed guides for ECU prototyping, diagnostics, and telematics.
#arduino due#can bus shield#sae j1939#can bus#embedded system#J1939 simulator#J1939 programming#arduino ide#J1939 protocol stack
0 notes
Text
220 Ohm Resistor: Applications, Characteristics & Design Tips
In the world of electronics, resistors are among the most fundamental and widely used components. Among them, the 220 Ohm resistor holds a special place due to its versatility and ideal resistance value for many common applications. Whether you're just getting started with electronics or designing more advanced circuits, understanding the 220 Ohm resistor’s characteristics, typical applications, and best practices can help you design more reliable and efficient systems.

Characteristics of a 220 Ohm Resistor
A resistor with a value of 220 Ohms restricts the current in a circuit according to Ohm’s Law: V = IR, where V is voltage, I is current, and R is resistance.
For example, with a 5V supply, a 220 Ohm resistor will allow approximately 22.7 mA of current to pass through. This is a suitable current level for driving many LEDs or interfacing with logic-level components.
Key specs to consider:
Resistance: 220 Ohms (±1% for metal film, ±5% for carbon film)
Power rating: Commonly 1/4W, 1/2W, or 1W, depending on the use case
Tolerance: Defines how much the actual resistance can vary from the stated value
Common Applications
1. LED Current Limiting: The most frequent use of a 220 omega resistor is as a current-limiting resistor in LED circuits. LEDs typically require 10–30 mA of current. Using a 220 Ohm resistor helps prevent overcurrent that can burn out the LED, especially when powered by 5V sources like microcontrollers.
2. Microcontroller Interfaces: When interfacing LEDs or switches with microcontrollers (e.g., Arduino, Raspberry Pi, ESP32), 220 Ohm resistors are used to control current flow and protect I/O pins from excessive current draw.
3. Pull-down or Pull-up Resistors: While 220 Ohms is lower than typical pull-up/down resistor values, in high-speed or low-resistance applications, it can be used to ensure strong logic-level signals or to reduce signal noise.
4. Audio and Signal Circuits: In audio applications, 220 Ohm resistors can be used for impedance matching, signal attenuation, or current limiting in op-amp circuits.
Design Tips
1. Always Consider Power Rating: Use the formula P = I²R to ensure your resistor can handle the power it dissipates. For a 220 Ohm resistor carrying 25 mA, the power dissipated is about 0.14W—so a 1/4W resistor would be adequate, but higher wattage may be needed for safety or prolonged use.
2. Check Tolerance Based on Application: For precise analog circuits, opt for resistors with 1% or better tolerance. For general-purpose applications like LED limiting, 5% tolerance is usually acceptable.
3. Combine for Custom Values: Need a value close to but not exactly 220 Ohms? You can combine resistors in series or parallel. For example, two 110 Ohm resistors in series give 220 Ohms.
4. Mind the Temperature Coefficient: If your circuit operates in varying temperatures, choose resistors with low temperature coefficients to maintain stable resistance.
Conclusion
The 220 Ohm resistor is a simple yet indispensable tool in electronics. Whether you're lighting up an LED or protecting your microcontroller, understanding when and how to use it can elevate your circuit design. Keep it in your toolkit—it’s a small component with big impact.
ODG SNS:
Szxlxc: https://www.szxlxc.com
YouTube: https://www.youtube.com/@Origin_Data
Facebook: https://www.facebook.com/OriginDataGlobalLimited
Twitter: https://twitter.com/Origin_IC
Tiktok: https://www.tiktok.com/@origin_data
0 notes
Text
Getting Started with Embedded Systems Programming

Embedded systems programming is the backbone of modern electronics. From smartwatches to washing machines, embedded systems power the intelligent functions of countless everyday devices. This guide will introduce you to the basics of embedded programming, key tools, and how to begin building your own embedded applications.
What is an Embedded System?
An embedded system is a computer integrated into a larger system or device, performing dedicated functions. Unlike general-purpose computers, embedded systems are designed for specific tasks, often with constraints on power, memory, and processing.
Examples of Embedded Systems:
Microcontrollers in home appliances
Sensor-based devices (e.g., temperature sensors, motion detectors)
Medical equipment
Automotive control systems
IoT (Internet of Things) gadgets
Core Components of an Embedded System
Microcontroller or Microprocessor: The brain of the embedded system (e.g., Arduino, STM32, ESP32).
Memory: RAM and ROM to store instructions and data.
Input/Output Interfaces: Connects to sensors, displays, motors, and communication modules.
Software: Custom firmware developed for specific functions, typically in C or C++.
Popular Programming Languages
C: Most widely used due to its efficiency and low-level hardware access.
C++: Used when object-oriented design is required.
Assembly: For highly optimized or time-critical routines.
MicroPython: Python for microcontrollers (e.g., ESP8266, Micro:bit).
Getting Started with Embedded Programming
Select Your Platform:
Beginners: Arduino (easy setup, wide community support)
Advanced: STM32, Raspberry Pi Pico, ESP32
Set Up Your Development Environment:
Install IDEs like Arduino IDE, PlatformIO, STM32CubeIDE
Download necessary drivers and board support packages
Write and Upload Code: Create simple programs like blinking an LED, then expand to sensors, displays, and communication modules.
Example: Blink an LED with Arduino
void setup() { pinMode(13, OUTPUT); // Set pin 13 as output } void loop() { digitalWrite(13, HIGH); // Turn LED on delay(1000); // Wait for 1 second digitalWrite(13, LOW); // Turn LED off delay(1000); // Wait for 1 second }
Tools and Debugging
Serial Monitor: For real-time debugging and logging.
Oscilloscope & Logic Analyzer: For electrical signal inspection.
In-Circuit Debuggers: Like JTAG or ST-Link for low-level debugging.
Best Practices
Write modular and readable code.
Use debouncing for physical inputs like buttons.
Handle memory carefully to avoid overflows.
Optimize power usage in battery-powered devices.
Conclusion
Embedded systems programming is both fun and powerful, offering endless possibilities for innovation in hardware and software. Whether you’re building a home automation project or diving into the world of IoT, understanding the basics of embedded programming gives you the foundation to create smart, responsive devices.
0 notes
Text
shoutout to my engineering group who had to complete a subtask for a thang due thursday and we had to make our car move but we dont have all the parts 3d printed yet so the guy stuck one motor and wheel onto a 1 ft by 1 ft plank of wood with an arduino hanging off it and then stuck a stick througj the other 2 wheels to keep them in place and had one more spin enough that it pushed the whole thing forward (almost) in a straight line. it was very comical
0 notes
Text
How to Set Up an Affordable STEM Lab in Amravati?
Setting up a STEM lab in Amravati is a game-changer for schools looking to provide hands-on, future-ready education. However, many schools hesitate due to budget constraints. The good news is that creating a STEM lab solution in Amravati doesn’t have to be expensive. With the right planning, resource allocation, and smart investments, schools can develop a cost-effective STEM lab program in Amravati that enhances student learning and aligns with modern education trends.
A well-equipped STEM lab in Amravati enables students to explore science, technology, engineering, and mathematics through interactive and practical experiences. By integrating STEM education into the curriculum, schools can foster problem-solving skills, creativity, and critical thinking among students. Moreover, a STEM lab solution in Amravati prepares young minds for future careers in technology-driven fields. The demand for STEM professionals is growing rapidly, making it crucial for schools to introduce students to these fields early on. While some institutions may worry about the costs, the reality is that an effective STEM lab can be set up within budget-friendly parameters. This guide will walk you through essential steps to establish an affordable STEM lab program in Amravati that benefits both students and educators. Book your first free consultation!
Identify Your STEM Lab Goals and Requirements
Before setting up a STEM lab solution in Amravati, schools must define their objectives. Are you focusing on robotics, coding, electronics, or engineering concepts? Understanding the curriculum needs will help in selecting the right tools and resources while keeping costs in check. Contact us now!
Start Small and Scale Gradually
A common misconception is that a STEM lab program in Amravati requires high-end equipment and a massive budget. Instead, schools can start small by integrating basic kits and tools like Arduino, Raspberry Pi, and affordable 3D printers. Over time, as interest and funding grow, more advanced equipment can be added.
Utilize Open-Source and Low-Cost Resources
One of the best ways to keep costs low is by leveraging open-source software and low-cost STEM kits. Many online platforms offer free coding programs, robotics simulations, and engineering design tools that can enhance the learning experience without additional expenses.
Seek Government and Private Funding Options
Many organizations and government initiatives support STEM education by offering grants and funding. Schools looking to set up a STEM lab in Amravati should explore options such as CSR funding from corporations, state education grants, and nonprofit partnerships to reduce financial burdens.
Optimize the Existing Infrastructure
Instead of building a new facility, schools can repurpose existing classrooms or libraries into a STEM lab solution in Amravati. This helps save costs on infrastructure while ensuring students have a dedicated space for hands-on learning.
Encourage Community and Industry Collaborations
Collaborating with local industries, universities, and STEM organizations can provide access to mentorship, guest lectures, and even shared equipment. These partnerships not only reduce setup costs but also enhance real-world exposure for students.
Invest in Multi-Purpose Equipment
To maximize budget efficiency, invest in multi-purpose STEM tools that cater to various learning activities. For example, a 3D printer can be used for engineering prototypes, biology models, and even art projects, making it a versatile addition to your STEM lab program in Amravati.
Train Teachers for Effective STEM Education
A well-equipped STEM lab is only effective if educators are trained to use it. Schools must provide professional development opportunities for teachers to ensure they can deliver engaging and interactive lessons using STEM tools. Book your first free consultation!
Involve Students in the STEM Lab Setup Process
Engaging students in the creation and development of the STEM lab in Amravati fosters a sense of ownership and creativity. Allowing students to participate in selecting tools, designing projects, and even assembling kits can make learning more immersive and cost-effective.
Monitor, Evaluate, and Upgrade Regularly
Once your STEM lab solution in Amravati is operational, it’s crucial to assess its effectiveness. Gather feedback from students and teachers, track progress, and upgrade resources periodically to ensure the lab continues to meet educational goals.
Get Started with a STEM Lab in Amravati Today!
An affordable STEM lab program in Amravati is within reach for every school. With careful planning, strategic resource allocation, and community collaboration, schools can provide students with a future-ready education without breaking the budget. Investing in a STEM lab solution in Amravati is not just about equipping a classroom with tools; it’s about transforming the way students learn and engage with real-world challenges. Schools that integrate STEM learning can ensure their students are prepared for the demands of the modern workforce, equipped with critical thinking, problem-solving, and technical skills.
Moreover, implementing a STEM lab program in Amravati can help schools meet educational guidelines, enhance student participation, and improve academic outcomes. If your school is ready to take the next step towards innovation and interactive learning, contact us today! and bring a STEM lab to your students.
0 notes
Text
Creativity 1 February Learning to code in Arduino

I do not have a lot of experience with coding unfortunately, but I needed to learn it due to the fact that I wanted to incorporate it in a few of my projects. Therefore, I watched numerous youtube videos on the topic, and wrote a few of my own codes. In the picture attached there is evidence of it. As this was not my first contact with arduino platform, it was not too hard to understand the commands once I had learned them. To reflect, coding in arduino is very intuitive, and when learned though youtube it is easy and simple to understand and incorporate into your own projects, which gives you a lot of satisfaction.
0 notes
Text
213729 Fine Arts Research & Development: Honors ⋆ WEEK 3
Monday kicked off with a brief Fourth Year-only discussion with Simon! We'll no longer have Tim or his workshop downstairs - instead we'll need to do induction courses for the 3D workshop all the way in Block 11.
Our Independent Project Outline is due shortly (which I am horrendously behind on). As Kieran pointed out, the IPO, presented as a 'quiz' on Stream, needs to first have "finish attempt" ticked, followed by "submit".
I came across a powered speaker (of dubious functionality) in the hallway, which I brought to my space. Before heading to the lecture, Eugene recommended I contact the technical personnel from the Music block for all my Arduino-based soldering needs.
From a glance over the CoCA website, I'm guessing the guy to contact is Adam Dransfield:

"CIRCUMNAVIGATIONS" Clément Verger.
Chapter 1 - Endeavor.
Studies Captain Cook's impact on landscapes through the introduction of plants.
Project began at southern Portugal in 2016. Eucalyptus trees growing near his residence.
"Human interference on landscape, what the landscape can tell us about people"
Introduced species, forest fires, lack of biodiversity. Began tracing the voyage of the Eucalyptus, leading him to Tasmania, where the first Eucalyptus was collected by Joseph Banks to aid the paper press industry for their fast growing properties.
Comparing Eucalyptus trees, such as one that was planted in the late 19th century and went on to be the tallest tree in Europe. A mark of the anthroprocene.
Ecological issue, photographing Eucalyptus in Tasmania vs Europe, where no endemic insects, birds or plants can coexist with the introduced plant.
Overlaying - over photographs - the transit of Venus, the initial 'prompt' for Cook's voyage, in reality a directive to find new lands and collect exotic plant specimens.
Verger collects samples from the locations he visits and prints them 1:1, has now accumulated close to 400 total. He'll get a large variety from Australian locations, but only one or two species from other locations.
Makes his own frames and frame design.
Prints on Portuguese newsprint, the cause for the introduction of Eucalyptus to Portugal in the first place, which now regularly suffers horrific forest firest every year.
His photographic works also respond to these fires, featuring black frames and burnt scenes.
Chapter 2 - Resolution
Cooks' voyage norfolk pine, found 1774
found exclusively in norfolk island , grew well in seaward conditions, good for buuilding ship masts, brought with them on the journey and dispersed
Response work are some bunnings-plant-section-style plant pots with norfolk pine saplings, presented beneath massive ship sails, a physical iconography of colonialising
Three phases of colonisation, exemplified by a single photo of a patch of Norfolk Island bush
Norfolk Pines, ancient seeds carried by wind or currents
Banyon trees, polynesian origin
Grass, introduced for cow pastures
Chapter 3 - Discovery
Instead of New World plants in the Old World, looked at Old World impact on new world, specifically the death of cook
Cook was killed by an iron dagger (made from his ship anchor) which he himself traded for a swordfish weapon,
Brought artists on their voyage for archival - seen through a coloniser lens - Hawaii catamaran with gourd helmets
Back in france, gourd growing tradition, plant originated in Zimbabwe, spread everywhere
Seeds from zimbabwe, seeds from tonga, used in installation, currently ongoing
Very catergorical, technical text, image comes first,
Works are more encyclopaedic in their complete, story based presentation rather than singular works receiving a spotlight
youtube
I met up with Mike for a one-on-one on Tuesday, bringing my SP-202 along for some extra reference.
Explaining my work idea, along with the growing imperative to construct my own sampler for the piece, Mike instead entertained the possibility of having Ableton - a highly 'able' music software - perform the same function.
From there, I could wire up a custom midi control for the audience to interact with, a task which would still require a bit of electrical handiwork, just significantly less so.
Make the system first (using a proxy midi), THEN build a single midi button
Feedback loop
Music without human
"Auto visualfeedback system"
Not actually ableton, it's MAX MSP
You can just have max msp, there are operators (hardware) that you can assign to it, giving it functionalities
Instead of going through a multi step recording interface
MAX MSP (Ableton) has patches, saves time, good problem solving, design
Node tree
So how do I get a Max Msp license?
$9 a month, will need internet connection
Student version
Max for live or max msp?
Will I even need an induction?
All Im making is a midi controller
Computer overheating? Have hatch in back open, computer breathability
Patches available to download:
Auto chop?
Auto sequencer?
A single midi button, streamlines audience action
"Generative drum sample"
"How to make a generative drum machine"
Like those talking hamsters
Movement further: start adding knobs and other functionality
Fahsai last year: motion camera, sound variables patched to movement
Made a 'human' that you touched to make sound.
- There's facial recognition patches too, you could remove the button and have it make sound from your face
WEDNESDAY ONE ON ONE
talked with israel about my work so far - or lack there of! had a bit of a vent about the amount of time creative practice class is taking up lately, but it was good to speak my general directive aloud.
I forked out the $28 per month subscription... with the standard plan. Indeed there was a student plan that I was eligible for, but the swindlers didn't provide any monthly option for it!

0 notes