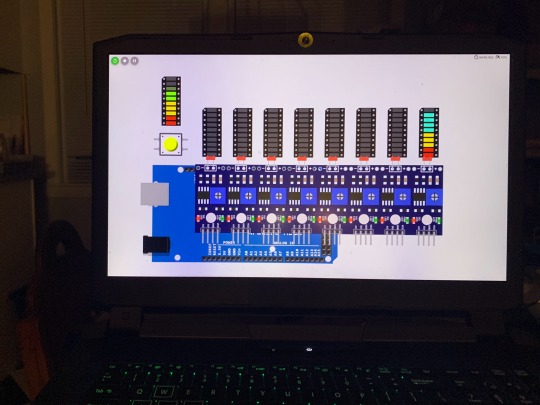
#arduino simulator online
Explore tagged Tumblr posts
Visit Tumblr Blog
Explore Tumblr blogs with no restrictions, modern design and the best experience.
Last Seen Tumblr Blogs


Fun Fact
When “GIF” was named word of the year in 2012, Oxford Dictionaries U.S.A. credited Tumblr for pushing the word.
Text
youtube
HX711 Tare Calibration Scaling - Simple basic usage Arduino UNO digital weighing scale simulate 5Kg load cells digital weighing scale hx711 hx710 datasheet programming reference on wokwi arduino uno online simulator. how to calibrate a hx711 load cell for 5kg load?
#HX711#programming#wokwi#hx710#Arduino UNO#load cells#online simulator#digital weighing scale#youtube#arduino#tutorials#how to#simulator#datasheet#Youtube
0 notes
Text
ghostie arduino chanukiah
for xanuka this year, i made a little electronic chanukiah that i want to share! i know i’m not the only person who can’t do flame-based candles for some reason or another.
this chanukiah is an online simulation that you can run in any web browser, and it is, in my grandiose and objectively correct opinion, better than any other electric chanukiah out there right now.

lots of electric chanukiot do a decent job at emulating the visual appearance of a flame-based chanukiah. the goal with this project was to emulate not only the 🕎visual appearance🕎 of a chanukiah, but also the 🔥ritual experience🔥 of lighting the candles and watching them burn.
some neat features of the ghostie arduino chanukiah:
- candle representation: each candle is represented by a stack of LED lights, and you can make the candles any color you want! if you can express it with a hex code, it’s a valid candle color. there’s also two bonus gradient patterns.
- lighting the candles: you press a button to light the shamash, then you light each candle that you want by moving a slider that lights up its light sensor.
- watching the candles burn: after a candle is lit, the top LED begins to flicker like a flame! and after that, the candle slowly and semi-randomly begins to burn down- the top LED goes dark, and the next one in the stack begins to flicker, and so on, until the light goes out at the bottom of the stack.
- clean up: all the candles will burn out on their own over the course of 30-ish minutes(plus or minus like, 20. i should really optimize the burn pattern a little, lol). after that, you can stop the simulation and reset it for the next night.
it works great on both mobile and desktop, so put it on whatever device you want. a note for mobile users: instructions for use are in the “code” tab, on the top right!
check it out at: https://wokwi.com/projects/353600148292695041
#i realize this post is several days late but OOPS and WHATEVER#please enjoy it!!!#jumblr#menorah#my art#jewish art#judaica#hanukkah#chanukiah#ghostie chanukiah 2023#arduino
18 notes
·
View notes
Text
How to Set Up an Affordable STEM Lab in Amravati?
Setting up a STEM lab in Amravati is a game-changer for schools looking to provide hands-on, future-ready education. However, many schools hesitate due to budget constraints. The good news is that creating a STEM lab solution in Amravati doesn’t have to be expensive. With the right planning, resource allocation, and smart investments, schools can develop a cost-effective STEM lab program in Amravati that enhances student learning and aligns with modern education trends.
A well-equipped STEM lab in Amravati enables students to explore science, technology, engineering, and mathematics through interactive and practical experiences. By integrating STEM education into the curriculum, schools can foster problem-solving skills, creativity, and critical thinking among students. Moreover, a STEM lab solution in Amravati prepares young minds for future careers in technology-driven fields. The demand for STEM professionals is growing rapidly, making it crucial for schools to introduce students to these fields early on. While some institutions may worry about the costs, the reality is that an effective STEM lab can be set up within budget-friendly parameters. This guide will walk you through essential steps to establish an affordable STEM lab program in Amravati that benefits both students and educators. Book your first free consultation!
Identify Your STEM Lab Goals and Requirements
Before setting up a STEM lab solution in Amravati, schools must define their objectives. Are you focusing on robotics, coding, electronics, or engineering concepts? Understanding the curriculum needs will help in selecting the right tools and resources while keeping costs in check. Contact us now!
Start Small and Scale Gradually
A common misconception is that a STEM lab program in Amravati requires high-end equipment and a massive budget. Instead, schools can start small by integrating basic kits and tools like Arduino, Raspberry Pi, and affordable 3D printers. Over time, as interest and funding grow, more advanced equipment can be added.
Utilize Open-Source and Low-Cost Resources
One of the best ways to keep costs low is by leveraging open-source software and low-cost STEM kits. Many online platforms offer free coding programs, robotics simulations, and engineering design tools that can enhance the learning experience without additional expenses.
Seek Government and Private Funding Options
Many organizations and government initiatives support STEM education by offering grants and funding. Schools looking to set up a STEM lab in Amravati should explore options such as CSR funding from corporations, state education grants, and nonprofit partnerships to reduce financial burdens.
Optimize the Existing Infrastructure
Instead of building a new facility, schools can repurpose existing classrooms or libraries into a STEM lab solution in Amravati. This helps save costs on infrastructure while ensuring students have a dedicated space for hands-on learning.
Encourage Community and Industry Collaborations
Collaborating with local industries, universities, and STEM organizations can provide access to mentorship, guest lectures, and even shared equipment. These partnerships not only reduce setup costs but also enhance real-world exposure for students.
Invest in Multi-Purpose Equipment
To maximize budget efficiency, invest in multi-purpose STEM tools that cater to various learning activities. For example, a 3D printer can be used for engineering prototypes, biology models, and even art projects, making it a versatile addition to your STEM lab program in Amravati.
Train Teachers for Effective STEM Education
A well-equipped STEM lab is only effective if educators are trained to use it. Schools must provide professional development opportunities for teachers to ensure they can deliver engaging and interactive lessons using STEM tools. Book your first free consultation!
Involve Students in the STEM Lab Setup Process
Engaging students in the creation and development of the STEM lab in Amravati fosters a sense of ownership and creativity. Allowing students to participate in selecting tools, designing projects, and even assembling kits can make learning more immersive and cost-effective.
Monitor, Evaluate, and Upgrade Regularly
Once your STEM lab solution in Amravati is operational, it’s crucial to assess its effectiveness. Gather feedback from students and teachers, track progress, and upgrade resources periodically to ensure the lab continues to meet educational goals.
Get Started with a STEM Lab in Amravati Today!
An affordable STEM lab program in Amravati is within reach for every school. With careful planning, strategic resource allocation, and community collaboration, schools can provide students with a future-ready education without breaking the budget. Investing in a STEM lab solution in Amravati is not just about equipping a classroom with tools; it’s about transforming the way students learn and engage with real-world challenges. Schools that integrate STEM learning can ensure their students are prepared for the demands of the modern workforce, equipped with critical thinking, problem-solving, and technical skills.
Moreover, implementing a STEM lab program in Amravati can help schools meet educational guidelines, enhance student participation, and improve academic outcomes. If your school is ready to take the next step towards innovation and interactive learning, contact us today! and bring a STEM lab to your students.
0 notes
Text
How to Learn Embedded Systems: A Comprehensive Guide
Embedded systems are integral to countless applications, from consumer electronics to industrial automation. Understanding how to learn embedded systems can open up a world of opportunities in various fields, including robotics, automotive, healthcare, and IoT. Here’s a structured approach to mastering embedded systems.

1. Understanding the Basics
Start with the fundamentals of embedded systems. Familiarize yourself with key concepts such as:
What are Embedded Systems?
Embedded systems are specialized computing systems that perform dedicated functions within larger mechanical or electrical systems. Unlike general-purpose computers, they are designed to execute specific tasks with high reliability.
Components of Embedded Systems:
Microcontrollers and Microprocessors: Understand the difference between the two. Microcontrollers are compact integrated circuits designed to govern a specific operation in an embedded system, while microprocessors are the central unit of a computer that performs calculations and logic operations.
Memory: Learn about different types of memory (RAM, ROM, Flash) used in embedded systems.
Input/Output Devices: Familiarize yourself with sensors, actuators, and communication interfaces (UART, SPI, I2C).
2. Choose Your Learning Resources
Select resources that match your learning style. Here are some options:
Books:
"Embedded Systems: Introduction to the MSP432 Microcontroller" by Jonathan Valvano
"Programming Embedded Systems in C and C++" by Michael Barr
Online Courses:
Platforms like Coursera, Udemy, and edX offer courses in embedded systems. Look for those that cover microcontrollers, programming, and interfacing.
YouTube Channels:
Channels like "The DIY Life" and "NPTEL" provide practical insights and tutorials on embedded systems.
3. Get Hands-On Experience
Theory is essential, but hands-on practice is crucial for mastering embedded systems. Consider the following:
Development Boards:
Start with popular development boards like Arduino, Raspberry Pi, or ESP32. These platforms are beginner-friendly and have extensive community support.
Build Projects:
Create simple projects like LED blinkers, temperature sensors, or motor controls. Gradually move to more complex projects like home automation systems or robotic applications.
Use Simulation Tools:
Familiarize yourself with simulation tools like Proteus or MATLAB/Simulink for testing your designs virtually.
4. Learn Programming Languages
Embedded systems often require programming skills. Focus on:
C/C++ Programming:
C is the most commonly used language for embedded systems due to its efficiency and control over hardware. Learn the syntax, data structures, and memory management.
Assembly Language:
Understanding assembly language can provide deeper insights into how microcontrollers operate.
5. Explore Real-Time Operating Systems (RTOS)
Many embedded systems require multitasking and real-time performance. Learning about RTOS concepts can be beneficial:
Understand the Basics:
Familiarize yourself with the concepts of task scheduling, inter-task communication, and resource management.
Hands-On with RTOS:
Try using an RTOS like FreeRTOS or Zephyr on your development board. Implement multitasking projects to get practical experience.
6. Join Online Communities
Engaging with fellow learners and professionals can enhance your learning experience:
Forums and Discussion Groups:
Platforms like Stack Overflow, Reddit, and specialized forums (e.g., Embedded Related) are great for seeking help and sharing knowledge.
Attend Workshops and Webinars:
Participate in online workshops or local meetups to learn from experts and network with peers.
7. Stay Updated with Industry Trends
The field of embedded systems is constantly evolving. Keep yourself updated with the latest trends and technologies:
Follow Industry News:
Subscribe to blogs, newsletters, and magazines related to embedded systems.
Participate in Hackathons:
Engage in hackathons or coding competitions focused on embedded systems to test your skills and learn from others.
Conclusion
Learning embedded systems requires a mix of theoretical knowledge and practical experience. By following this structured approach—starting from the basics, choosing the right resources, getting hands-on experience, and staying engaged with the community—you can build a strong foundation in embedded systems. Whether you aim to work in robotics, IoT, or automation, mastering embedded systems can significantly enhance your career prospects. Start your journey today, and embrace the exciting world of embedded systems!
0 notes
Text
MicroPython mit ESP32: Schaltungen entwerfen und testen mit Wokwi

Im heutigen Beitrag möchte ich dir gerne zeigen, wie du eine Schaltung am für den ESP32 online erstellen und simulieren kannst. Das ist besonders vom Vorteil, wenn du noch nicht soviel Erfahrung oder einfach gerade benötigten Bauteile nicht zur Hand hast. https://youtu.be/THfZxJQZW9Y Für diese Simulation verwende ich Wokwi welches ich dir bereits für den Arduino im Beitrag Arduino & Raspberry Pi – Online Simulator für Schaltungen vorgestellt habe. Hier möchte ich speziell auf die Programmierung mit MicroPython eingehen und dir ein paar Schaltungen und Kniffe zeigen.
Was benötigt man für Wokwi?
Das Onlinetool Wokwi ist kostenfrei und benötigst auch keine Anmeldung. Wenn du jedoch deine Projekte dauerhaft speichern möchtest, dann musst du dich anmelden. Ansonsten benötigst du nur einen Browser wie dem Google Chrome oder Mozilla FireFox (für diesen Beitrag verwende ich den Chrome)

Du kannst dich via Google, GitHub oder mit deiner E-Mail & dem Passwort anmelden / registrieren. Der einfachste Weg ist über das Google-Konto, jedoch möchte die Seite so einige Berechtigungen verlangt, habe ich mich für GitHub und der 2Faktor Authentifizierung entschieden.
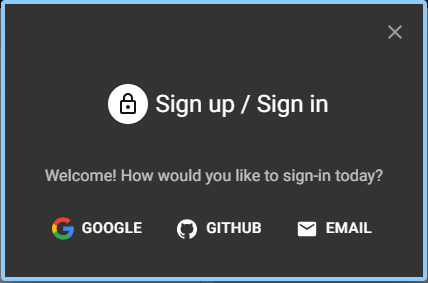
Anmeldung / Registrierung an Wokwi via Google, GitHub oder E-Mail Einen Mikrocontroller benötigst du nicht, da alles, was du machst, quasi online geschieht!
"Hello World!" auf dem ESP32 mit MicroPython in Wokwi
Starten wir mit einem kleinen Beispiel und geben den Text "Hello World!" auf der Kommandozeile aus. Dazu kannst du nachfolgenden Link verwenden https://wokwi.com/projects/401020964205534209.

Ausgabe von "Hello World!" in Wokwi mit MicroPython am ESP32 Die Ausgabe erfolgt, wenn du im Bereich "Schaltung" auf die Play-Taste drückst. Zusätzlich läuft oben rechts noch zusätzlich ein Timer, welcher die Zeit der Ausführung anzeigt. Das kleine Programm beendet sich sofort, jedoch läuft der Timer weiter, das ist zum Anfang meist verwirrend. Der Timer bezieht sich quasi auf die Ausführung der Simulation und nicht auf das Programm! # Gibt die Textzeile "Hello World!" # auf der Kommandozeile aus. print("Hello World!")
Aufbau und Simulation einer Schaltung in Wokwi für den ESP32
Du kannst, wenn du nicht aufpasst, deinen ESP32 zerstören, mit Wokwi kannst du deine Schaltung aufbauen, testen, ohne dass du ein Stück Hardware in die Hand nehmen musst. Fangen wir wieder mit einem einfachen Beispiel an und aktivieren / deaktivieren eine LED. https://wokwi.com/projects/401022295974890497
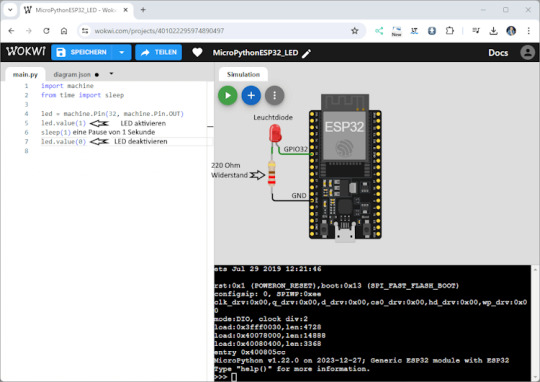
Schaltung - LED mit Vorwiderstand am ESP32 in Wokwi Den Code kennst du bestimmt schon aus dem Beitrag MicroPython mit ESP32: GPIO-Pins steuern – LEDs und Taster. # Modul zum ansteuern der GPIOs am # Mikrocontroller import machine # Modul zum einlegen einer kleinen # Pause im Code from time import sleep # LED mit dem GPIO 32 als Ausgang led = machine.Pin(32, machine.Pin.OUT) # LED aktivieren led.value(1) # einlegen einer Pause von 1 Sekunde sleep(1) # LED deaktivieren led.value(0)
Piezo Buzzer in Wokwi in MicroPython programmieren
Du kannst auch die bisher gezeigten Beispiele in Wokwi nachbauen, unter anderem die Schaltung mit dem Piezo Buzzer, dabei wird der Ton dann vom PC abgespielt. https://wokwi.com/projects/401024173753518081

Piezo Buzzer am ESP32 in einer Simulation in Wokwi # Modul zum ansteuern der GPIOs am # Mikrocontroller import machine # Modul zum einlegen einer kleinen # Pause im Code from time import sleep # Buzzer mit dem GPIO 25 als Ausgang buzzerPin = machine.Pin(25, machine.Pin.OUT) # erzeugen eines PWM Signals buzzer = machine.PWM(buzzerPin) # setzen der Duty auf 512 buzzer.duty(512) # Frequenz des Tones 1000 Hz buzzer.freq(1000) # eine Pause von 0,5 Sekunden sleep(0.5) # PWM Signal & Pin deinitialisieren # damit wird zusätzlich der Ton deaktiviert buzzer.deinit()
Ausblick
Im oben verlinkten YouTube Video zeige ich dir einige Schaltungen und erläutere dir, wie du diese Schaltungen Schritt-für-Schritt aufbaust. Im nächsten Beitrag möchte ich jedoch wieder zurück zum "echten" Mikrocontroller wechseln und die erläutern, wie du einen DHT11 Sensor mit MicroPython auslesen kannst. Read the full article
0 notes
Text
Simulate Circuits Online: Circuit Simulation Made Simple
See on Scoop.it - Education 2.0 & 3.0
It is often the case that you don't have all the components required to build a circuit that is developing in your mind. Or, perhaps the circuit you wish to develop uses dangerously high voltages and currents. In such cases, it makes sense to use a simulator to test the idea in safety. Simulators are now commonly available, with the Tinkercad Circuits platform covered here accessible in your web browser. As well as simulating circuits, it can also execute Arduino code, as we show here. Circuit simulation made simple!
Learn more / En savoir plus / Mehr erfahren:
https://www.scoop.it/t/21st-century-learning-and-teaching/?&tag=ARDUINO
https://www.scoop.it/topic/21st-century-learning-and-teaching/?&tag=Simulations
0 notes
Text
0 notes
Text
TTP224 4 Channel Digital Touch Sensor For Arduino
The TTP224 is an integrated circuit (IC) that functions as a touch pad detector, providing 4 touch keys. It is specifically designed to replace conventional direct button keys with various pad sizes. By utilizing capacitive touch technology, this IC enables electronic devices to detect when a finger is in close proximity to the surface, simulating the action of pressing a button, similar to how a physical push button operates.
0 notes
Text
#stem education#learntothink#positive mental attitude#coding for kids#coding#engineering#scratchjr#Scratchcoding#arduino#diy#technology#arduino simulator online
0 notes
Text
Free resources for learning electrical engineering and electronics
I made a list of free learning resources for electrical/electronics engineering students.
Courses
Khan Academy electrical engineering course
Class Central electrical engineering courses
Class Central electronics courses
Alison electrical engineering courses
Alison electronics courses
My MOOC electrical engineering courses
My MOOC electronics courses
Instructables electrical engineering courses and projects
Instructables electronics courses and projects
Coursera electrical engineering courses (note: not all Coursera courses are free)
Coursera electronics courses (note: not all Coursera courses are free)
FutureLearn electrical engineering courses (note: not all FutureLearn courses are free)
FutureLearn electronics courses (note: not all FutureLearn courses are free)
Skillshare electronics courses (note: not all Skillshare courses are free)
Coursesity electronics courses (note: not all Coursesity courses are free)
edX electronics courses (note: not all edX courses are free)
OpenLearn An introduction to electronics
YouTube
The Engineering Mindset
Practicing Electronics
GreatScott!
ElectroBOOM
BEEE Works
EEVBlog
SR electric
learnelectronics
Superb Tech
Electronoobs
Jeri Ellsworth
CAD CAM Tutorials
Simply Electronics
THE ELECTRONIC GUY
CAD CAM TUTORIAL
inventor KR
Technical Creative Channel
HowToMake01
Electronics repair school
CircuitBread
Websites
IEEE
Electrical Engineering Portal
Electrical Technology
Software
FreeCAD
Scilab
QElectroTech
KiCAD
LTspice
Arduino IDE
SimulIDE
Online design tools & resources
Texas Instruments Design tools and resources
Analog Devices Design Center
OKAWA Electric Design tools
RF Tools
CircuitLab
Circuit Simulator
PartSim simulator
TinkerCAD
Virtual Labs (Electrical Engineering)
Virtual Labs (Electronics & Communications)
If you know something else, that sholud be on this list, feel free to add links!
#studyblr#motivation#studying#engblr#electrical engineering#inspiration#electricity#engineering#masterlist#electrical#electronics#electrical engineer#electrical engineering student#engineering student#engineer#engineers#college student#college#university student#university#uni#stem#girl in stem#engineering girl#learning#academia#free learning#courses#engineering studyblr#learning resources
926 notes
·
View notes
Text
youtube
Arduino 2 Phase Traffic Lights Signal LEDs in Series Tinkercad Code Circuit Online Simulator
#arduino#programming#traffic light#tutorials#how to#Traffic Lights Signal#Online Simulator#2 Phase Traffic#LEDs in Series#Tinkercad#Youtube
1 note
·
View note
Text
Coding for Kids, apart from Scratch and Python
Coding and Algorithms is essentially about telling a computer what to do. Like most skills in life, programming involves:
Imagining to solve a big problem
How to break big problems into small step by step procedures and instructions
Express these steps precisely in a particular language following syntax
And learning the patience and mental agility to do the above two
So, what is really important for anyone learning programming is not the syntax of a language, but to learn the underlying algorithmic and logical thinking to solve problems. It is like learning to drive a car, the car doesn’t matter – it could be a Ford or a Toyota, what matters is: are you learning the basics of the use and control of clutch, brake, gear, steering, and acceleration or not?
So, pick your language – Basic Scratch, Advanced Scratch, Python, Java, Roblox, Unity, Minecraft, C#, C++, and many more.
Obviously, children won’t understand this easily. They are at the age of innocence and enthusiasm with a limitless energy to experience new things and do something exciting. They want to engage visually and build and see what they’re building visually with immediate gratification. They don’t want to write boring extensive classes and interfaces and make packages that are released in one small service pack of a large software after one year. Working with children is far exciting as they will challenge you to show immediate output of what they’re doing in situations and tasks that need not necessarily have an immediate output. Children want to build everything that they see around them. So, we enable them to just do that, and we cleverly embed the most important logical thinking and algorithmic thinking part in the curriculum while they build exciting and engaging stuff.
And not all kids are the same! Some children are more into specific forms of thinking and creativity and while other kids are into different other forms of thinking and creativity in using their intelligence. For example, some kids we teach are into a lot of music and some kids are into a lot of environmental thinking and some are into games and puzzles. So, we induce that respective interest into our teaching and programming exercises accordingly. But, we don’t lose sight of the most important part that we’re here to teach kids – logical thinking, problem-solving and creative-building using programming.
At UnicMinds, kids can start to learn coding from the below courses apart from Scratch and Python.
Space Programming (15 classes)
Learning to program and build games in Minecraft (30 classes)
Doodle Programming in JavaScript (15 classes)
JavaScript App development course (30 classes)
Roblox Game Development (30 classes)
JavaScript/HTML/CSS Website Development (30 classes)
Arduino Programming for Kids (using online simulator and also real breadboard and Arduino Uno)
The most important thing is to keep the child engaged in learning programming, the language doesn’t matter so much. The child should love what they’re doing and in that process they will learn the problem-solving skills necessary for overall development.
Yes, most kids might still start with Scratch and Python. But, if you are bored and want to do something exciting, while learning the problem-solving skills, logical thinking and creativity, then kids can take these courses apart from Scratch and Python. For example, it is a good choice for kids to learn Java because it is a widely used programming language in academia and industry. It is used to build a wide range of applications from desktop, mobile and web applications. It is used well to build both backend and frontend applications as it has a popular GUI and also strong support among the developer community.
Kids should first develop understanding of the basic building blocks to work around in programming such as variables, data-types, loops, logical operators, making a block of logical related statements, composing a program, using arrays, using smaller files and data structures, objects, classes and methods. The trick is to teach them this while engaging them creatively and visually. Not everybody can do that!
We often see a lot of children do courses in major institutes for one year or two years and then they never understand what is a variable. The point is: we are not here to teach syntax or a particular programming language to children. It is like learning a car, which car you learn in doesn’t matter – do you learn the basics of clutch, brake, gear, steering, and acceleration or not matters more than whether you’re learning a Ford or a Toyota! So, focus more on continuity, because that continuity drives the fundamental learning of logical thinking, problem-solving by breaking a big problem into smaller pieces of logical statements.
At UnicMinds, in teaching coding to kids, we focus a lot on providing children the building blocks of programming and logical thinking. If you’re looking for coding courses for your child, then book a free trial with us and understand our curriculum and methodology. Our curriculum is designed by industry experts and smart folks from Ivy league colleges. So, we don’t fool around, we know what we’re doing.
Hope this is useful, thank you.
0 notes
Text
What Are the Must-Have Tools for a Future-Ready STEM Lab in Agartala?

Introduction: Why Every STEM Lab in Agartala Needs the Right Tools
A STEM Lab in Agartala is more than just a classroom—it’s a hands-on innovation center where students explore robotics, coding, AI, and engineering. To make learning engaging and future-ready, schools must equip their STEM Lab in Agartala with the right tools and technologies.
In this guide, we’ll explore the must-have tools that every future-ready STEM Lab in Agartala should have.
1. Robotics Kits – Powering Hands-On Learning
A top-quality STEM Lab in Agartala must include robotics kits to teach students about automation, AI, and engineering. Some of the best robotics kits include:
LEGO Mindstorms EV3 – Ideal for beginners, offering block-based coding. Arduino & Raspberry Pi Kits – Great for advanced robotics and IoT projects. VEX Robotics Kits – Used for competitions and real-world problem-solving.
These kits help students develop logical thinking and problem-solving skills while preparing them for careers in automation and robotics.
2. 3D Printers – Bringing Creativity to Life
A STEM Lab in Agartala should have 3D printers to help students design and prototype real-world objects. Some essential options include:
Creality Ender 3 – Affordable and beginner-friendly for schools. Ultimaker 2+ – High-quality prints for advanced projects. ️ Anycubic Photon – Best for precise, resin-based 3D printing.
With 3D printing, students can turn their ideas into reality, fostering creativity and innovation.
3. Coding & AI Learning Kits – Preparing for the Future
To make a STEM Lab in Agartala future-ready, it must include coding and AI tools for teaching programming skills. Some of the best choices are:
Scratch & Blockly – Block-based coding for beginners. Python & Java Programming Platforms – Industry-standard coding languages. Google AIY & NVIDIA Jetson Nano – AI and machine learning kits for advanced learning.
These tools help students learn AI, data science, and machine learning, making them ready for future tech careers.
4. Virtual Reality (VR) & Augmented Reality (AR) – Immersive Learning
A cutting-edge STEM Lab in Agartala should include VR and AR tools to create immersive educational experiences. The best options are:
VR and AR tools make learning more engaging and interactive, helping students visualize complex concepts easily.
5. IoT & Smart Sensors – Learning About the Connected World
An IoT-enabled STEM Lab in Agartala prepares students for the future of smart technology and automation. Essential IoT tools include:
Arduino IoT Cloud – Teaches real-world IoT applications. ESP8266 & ESP32 Microcontrollers – Used for smart device projects. Smart Sensors (Temperature, Humidity, Motion) – For creating real-time monitoring systems.
With IoT tools, students can build smart home projects, automated weather stations, and AI-driven devices.
6. Electronics & Circuit Design Kits – Understanding Engineering Basics
A future-ready STEM Lab in Agartala must include electronics kits for hands-on engineering projects. The best options are:
LittleBits Electronics Kit – Easy-to-use snap circuits for beginners. Snap Circuits Pro – Teaches circuit design in a fun way. Breadboards & Multimeters – Essential for real-world electronics projects.
Electronics kits enhance problem-solving skills and prepare students for engineering careers.
7. STEM Software & Simulations – Enhancing Digital Learning
A well-equipped STEM Lab in Agartala should also have digital tools and software for coding, engineering, and simulations. Some must-have software include:
Tinkercad – Online 3D design and electronics simulation. MATLAB & Simulink – Used for data analysis and AI applications. AutoCAD & SolidWorks – Industry-grade design software.
These digital tools help students practice real-world STEM applications in a virtual environment.
Conclusion: Build a Future-Ready STEM Lab in Agartala with the Right Tools
A high-quality STEM Lab in Agartala must include robotics kits, 3D printers, AI and coding tools, IoT kits, VR devices, and circuit design tools to prepare students for technology-driven careers.
By investing in these essential tools, schools in Agartala can create an engaging, innovative, and future-ready learning environment.
Want to set up a STEM Lab in Agartala? Contact us today to Upgrade the best solutions for your school!
0 notes
Text
Smart cities big data civic hackers and the quest for a new utopia, Anthony Townsend
============================
Trade offs of smart cities: efficient but preserve opportunities for spontaneity and sociability. Secure but not surveillance chambers. Open and participatory but provide support structure for those who lack the resources to self organize. Need to be inclusive. "The death and life of great American cities" Jane Jacobs - cities have the capability of providing something for everybody when they are created by everybody.
The unintended consequences of nee technologies dwarf their intended dedign. Motorization promised to save city dwellers from factory smoke but scarred the countryside with sprawl.
Cybernetics. Rio de Janeiro city control room 2012 - remote control city. Norbert Weiner.Jay Forrester - computer models for urban planning.
RAND New York fire department simulation. Oversimplification of model to suit limitation of the computer. Portland 2011 IBM system dynamics for smarter cities. Michael Batty Centre for advanced spatial analysis. Models assumed a closed loop moving from one equilibrium to another and no effect by the external environment.
Patrick Geddes - civic participation
Ebenezer Howard solution for urbsn renewal - start over. Price of city planning is cities built for cars. Tyler Cowen no more big breakthroughs "great stagnation". Hal Varian, rapid transformation.
The history of the internet. TCP/IP favoured by academics won over X.25 backed by telecommunications companies. Cisco, IBM, Siemens planning for smart cities is to cobble together internet of things, analytics, video communications no bottom up everyday people participation. Technology giants designs are 21st century upgrade to 20th century paternalism these design fail to realize the full potential of smart cities. The bureaucrat leaves out time, patience, detail, inter-relating past and future, human purpose, citizens above mechanical requirements.
Dodgeball- crowdsourced online city guides.
Internet of things- not only a system for remote monitoring but also a platform for citizen microcontrol of the physical world. Arduino gives us the tools to structure intelligence into the human scale objects we live in. A social technology that get people talking to each other. Cheap microcontrollers Arduino boards at $25 are networked into clusters.
Foursquare- local, social, mobile software
In 2007 hackers figured how to jailbreak the iPhone. In 2008 Apple co-opted the movement by launching the App store
We can ship laptops to the world's slums but can force anyone to use them. Map Kibera demonstrates how open source tools can empower them to create knowledge relevant to the problems they face. The advent of the digital age means that gatekeepers to information can be bypassed allowing for a new parallel information system to be created by marginalized citizens. Aa fashionable crowdsourcing has become in the developed world it is regressive. Governments may withdraw services as citizen-driven alternatives expand and allow governments to free themselves from the obligation equalize services for the poor.
Apps contests on open city data was a model that could deliver innovation wth nearly zero funding. Problem with apps contests driven by government data is they rely on programmers to define problems instead of citizens or government.
Problem of parochialism in government software procurement. Every city wants to support the development of a local technology industry. Reinvent the wheel and dress it up as an innovation program. Variations of the same service, subpar apps and different one for each town.
"Connected cities" Haselmayer
Contrast to situated software
Rebound consumption or Jevons paradox: improve roads or have driverless cars, same congestion as people buy more cars. Better power efficiency, costs lower, people buy new appliances
0 notes
Text
Effizientes Prototyping: Arduino-Simulation mit TinkerCAD

In diesem Beitrag möchte ich dir TinkerCAD von Autodesk vorstellen und zeigen, wie du damit dein Prototyping am Arduino effizienter machen kannst. Mit dem bereits veröffentlichten Beitrag Arduino & Raspberry Pi – Online Simulator für Schaltungen wo ich dir Wokwi vorgestellt habe, habe ich dir bereits eine gute Lösung gezeigt, hier soll es nun um eine Alternative zu diesem gehen.

Warum sollte man eine Schaltung simulieren?
Der Vorteil einer Simulation am Computer ist, dass du alle Bauteile vorhanden hast und dir nichts kaputtgehen kann, wenn du mal etwas falsch verdrahtest. Des Weiteren bist du mit einem Tool wie TinkerCAD (oder ähnlichen) viel schneller und effizienter. Zusätzlich kannst du hier auch mal etwas ausprobieren, ohne gleich tief in die Tasche greifen zu müssen und so deine Schaltung im vorn hineinplanen.
Anmelden an TinkerCAD
Damit du TinkerCAD verwenden kannst, musst du dir zunächst ein Konto anlegen. Dieses kannst du ein bestehendes Google oder Apple Konto machen. Oder du erstellst dir mit deiner E-Mail-Adresse ein eigenes Konto.


Wenn du angemeldet bist, dann kannst du über die Schaltfläche "Erstellen" (1) aus dem Untermenü den Eintrag "Schaltkreis" (2) wählen.

Erstellen einer einfachen Arduino-Simulation mit TinkerCAD
Im ersten Schritt wählen wir einen Mikrocontroller aus, hier kannst du zwischen einem BBC micro:bit, Arduino UNO R3 und ATtiny wählen.

Dieser Beitrag soll sich zunächst um die Simulation von Schaltkreisen am Arduino handeln, daher wähle ich diesen aus und platziere diesen per Drag'n Drop auf die Arbeitsfläche. Der einfachste Schaltkreis am Arduino UNO ist wie immer eine blinkende Leuchtdiode. Eigentlich benötigt diese keine Simulation, denn, wenn du eine LED falsch in den Schaltkreis einbaust, dann leuchtet diese einfach nur nicht. Jedoch benötigst du dafür lediglich wenige Komponenten und Code, und daher ist es der ideale Einstieg. Die interne LED ist am digitalen Pin D13 angeschlossen und an diesen verbinden wir nun eine LED mit einem 220 Ohm Vorwiderstand.

Der Beispielcode, welcher bereits existiert macht, hier genau das, was wir benötigen und daher ist unser kleines Programm und die damit verbundene Simulation schon fertig.

Programmieren
Den Code erstellen wir ähnlich wie in MakeCode oder Scratch mit vorgefertigten Blöcken. Hier findest du zu jeder verfügbaren Komponente einen Codeblock und somit kannst du sehr einfach und schnell dein Programm erstellen. Nachfolgend ein kleiner Codeblock zum Drehen eines Servomotors von 1° bis 180° und zurück. (siehe obiges YouTube-Video)

Fazit zur Arduino-Simulation mit TinkerCAD
Als Fazit zu TinkerCAD als Tool zur Arduino-Simulation ziehe, ich, dass dieses für kleine Projekte gut brauchbar ist. Was ich besonders cool finde ist, dass dieses bereits mit einer Vielzahl von Komponenten bestückt ist und somit schon einige Projekte simuliert werden können. Jedoch fehlt hier eine Möglichkeit diesen Code, als INO-Datei für die Arduino IDE zu exportieren, was ich leider als deutlichen Minuspunkt werten muss. Read the full article
0 notes
Text
-WIP-Technical Specification
• 1. Document Using sensors and projectors in combination with sound to create an interactive reality "ASMR" device.
The computational part includes: 1. Programming the sensor and devices connected to it, setting up the corresponding actions. 2. Programming the background image to be dropped by the projector, using the p5.js library.
Using Java Script language and P5.js library for setting up the visual image part. And use C++ language with Arduino kits to program the sensor to control the devices.
I will use Physical Computing techniques and use the circuits to connect the sensor and devices. Also, if it is possible, I will let the sensor make differences on the projector image as well. That will depend on how much I could take control of the sensor and the relevant coding problem.
I will use some of the knowledges from Physical Computing module and follow the tutorials of class, but also will look for the tutorials on YouTube. I have already found some of the tutorials for designing the background image projecting.
The specific data set need to wait after I decided which kind of the sensor I will use in this project. The choice of sensitivity and the type of sensor affects the exact method of operation in the interaction as well as the programming direction.
• 2. Code snippet
Below is the code fragment for the projecting part I have already done. On this basis, the animation and changes will be further enhanced to create a more suitable "hypnotic" effect. At the moment it is a loop animation with color changing, simulating the scene of hypnosis.
The code can be run in the P5.js online editor.
Reference:
1. https://www.youtube.com/watch?v=ktPnruyC6cc
2. https://www.variohm.com/news-media/technical-blog-archive/types-of-sensors
Code:
0 notes