#array php key value foreach
Explore tagged Tumblr posts
Visit Tumblr Blog
Explore Tumblr blogs with no restrictions, modern design and the best experience.
Last Seen Tumblr Blogs


Fun Fact
Tumblr was the first site to host the blog for President Barack Obama in 2011.
Text
Complete PHP Tutorial: Learn PHP from Scratch in 7 Days
Are you looking to learn backend web development and build dynamic websites with real functionality? You’re in the right place. Welcome to the Complete PHP Tutorial: Learn PHP from Scratch in 7 Days — a practical, beginner-friendly guide designed to help you master the fundamentals of PHP in just one week.
PHP, or Hypertext Preprocessor, is one of the most widely used server-side scripting languages on the web. It powers everything from small blogs to large-scale websites like Facebook and WordPress. Learning PHP opens up the door to back-end development, content management systems, and full-stack programming. Whether you're a complete beginner or have some experience with HTML/CSS, this tutorial is structured to help you learn PHP step by step with real-world examples.
Why Learn PHP?
Before diving into the tutorial, let’s understand why PHP is still relevant and worth learning in 2025:
Beginner-friendly: Easy syntax and wide support.
Open-source: Free to use with strong community support.
Cross-platform: Runs on Windows, macOS, Linux, and integrates with most servers.
Database integration: Works seamlessly with MySQL and other databases.
In-demand: Still heavily used in CMS platforms like WordPress, Joomla, and Drupal.
If you want to build contact forms, login systems, e-commerce platforms, or data-driven applications, PHP is a great place to start.
Day-by-Day Breakdown: Learn PHP from Scratch in 7 Days
Day 1: Introduction to PHP & Setup
Start by setting up your environment:
Install XAMPP or MAMP to create a local server.
Create your first .php file.
Learn how to embed PHP inside HTML.
Example:
<?php echo "Hello, PHP!"; ?>
What you’ll learn:
How PHP works on the server
Running PHP in your browser
Basic syntax and echo statement
Day 2: Variables, Data Types & Constants
Dive into PHP variables and data types:
$name = "John"; $age = 25; $is_student = true;
Key concepts:
Variable declaration and naming
Data types: String, Integer, Float, Boolean, Array
Constants and predefined variables ($_SERVER, $_GET, $_POST)
Day 3: Operators, Conditions & Control Flow
Learn how to make decisions in PHP:
if ($age > 18) { echo "You are an adult."; } else { echo "You are underage."; }
Topics covered:
Arithmetic, comparison, and logical operators
If-else, switch-case
Nesting conditions and best practices
Day 4: Loops and Arrays
Understand loops to perform repetitive tasks:
$fruits = ["Apple", "Banana", "Cherry"]; foreach ($fruits as $fruit) { echo $fruit. "<br>"; }
Learn about:
for, while, do...while, and foreach loops
Arrays: indexed, associative, and multidimensional
Array functions (count(), array_push(), etc.)
Day 5: Functions & Form Handling
Start writing reusable code and learn how to process user input from forms:
function greet($name) { return "Hello, $name!"; }
Skills you gain:
Defining and calling functions
Passing parameters and returning values
Handling HTML form data with $_POST and $_GET
Form validation and basic security tips
Day 6: Working with Files & Sessions
Build applications that remember users and work with files:
session_start(); $_SESSION["username"] = "admin";
Topics included:
File handling (fopen, fwrite, fread, etc.)
Reading and writing text files
Sessions and cookies
Login system basics using session variables
Day 7: PHP & MySQL – Database Connectivity
On the final day, you’ll connect PHP to a database and build a mini CRUD app:
$conn = new mysqli("localhost", "root", "", "mydatabase");
Learn how to:
Connect PHP to a MySQL database
Create and execute SQL queries
Insert, read, update, and delete (CRUD operations)
Display database data in HTML tables
Bonus Tips for Mastering PHP
Practice by building mini-projects (login form, guest book, blog)
Read official documentation at php.net
Use tools like phpMyAdmin to manage databases visually
Try MVC frameworks like Laravel or CodeIgniter once you're confident with core PHP
What You’ll Be Able to Build After This PHP Tutorial
After following this 7-day PHP tutorial, you’ll be able to:
Create dynamic web pages
Handle form submissions
Work with databases
Manage sessions and users
Understand the logic behind content management systems (CMS)
This gives you the foundation to become a full-stack developer, or even specialize in backend development using PHP and MySQL.
Final Thoughts
Learning PHP doesn’t have to be difficult or time-consuming. With the Complete PHP Tutorial: Learn PHP from Scratch in 7 Days, you’re taking a focused, structured path toward web development success. You’ll learn all the core concepts through clear explanations and hands-on examples that prepare you for real-world projects.
Whether you’re a student, freelancer, or aspiring developer, PHP remains a powerful and valuable skill to add to your web development toolkit.
So open up your code editor, start typing your first <?php ... ?> block, and begin your journey to building dynamic, powerful web applications — one day at a time.

0 notes
Text
Associative arrays in php
PHP Training in Chandigarh,
Associative arrays in PHP are a type of array where each element is identified by a unique key, as opposed to numerical indices used in standard arrays. This allows for more meaningful and descriptive ways to organize and access data.
Here's how you can work with associative arrays in PHP:
**1. Creating Associative Arrays:
phpCopy code
$person = array( "first_name" => "John", "last_name" => "Doe", "age" => 30, "email" => "[email protected]" );
In this example, "first_name", "last_name", "age", and "email" are the keys, and "John", "Doe", 30, and "[email protected]" are the corresponding values.
2. Accessing Values:
phpCopy code
echo $person["first_name"]; // Output: John
You can access a specific value by referencing its key.
3. Modifying Values:
phpCopy code
$person["age"] = 31;
You can update the value associated with a specific key.
4. Adding New Elements:
phpCopy code
$person["city"] = "New York";
You can add new key-value pairs to the associative array.
5. Removing Elements:
phpCopy code
unset($person["email"]);
This deletes the key "email" and its associated value from the array.
6. Looping Through an Associative Array:
phpCopy code
foreach($person as $key => $value) { echo "$key: $value\n"; }
This iterates through each key-value pair in the array.
7. Checking if a Key Exists:
phpCopy code
if(isset($person["age"])) { echo "Age is set."; }
You can use isset() to check if a specific key exists in the associative array.
Associative arrays are extremely versatile and are commonly used in PHP for tasks like handling form data, representing database records, and organizing configuration settings. They provide a powerful way to structure and access data in a meaningful manner.
0 notes
Text
Mastering PHP: A Complete Guide to PHP Certification Course
In the fast-evolving world of web development, PHP remains a cornerstone technology powering millions of websites across the globe. Despite the rise of newer programming languages and frameworks, PHP holds its ground thanks to its simplicity, flexibility, and wide adoption. If you’re looking to build a strong foundation in backend development, enrolling in a PHP Certification Course is a smart step toward a rewarding career. This article explores everything you need to know about PHP, the benefits of getting certified, course content, career prospects, and tips for choosing the right program.
What is PHP?
PHP, or Hypertext Preprocessor, is a widely-used open-source server-side scripting language. Designed specifically for web development, it can be embedded within HTML and used to manage dynamic content, session tracking, databases, and even build entire e-commerce websites.
Created by Rasmus Lerdorf in 1994, PHP has undergone numerous improvements and currently powers platforms like WordPress, Joomla, and Magento. It's also integrated seamlessly with databases such as MySQL, PostgreSQL, and Oracle, making it a go-to language for developers.
Why Get PHP Certified?
A PHP Certification is more than just a document – it validates your knowledge and skills, offering tangible proof of your ability to potential employers or clients. Here's why pursuing a PHP certification course can be a game-changer:
1. Structured Learning
A certification course provides a structured learning path from basics to advanced topics. This approach ensures that you understand core concepts such as syntax, loops, and functions before moving on to complex subjects like object-oriented programming (OOP), database integration, and security.
2. Industry Recognition
A certification from a reputable institution adds value to your resume and signals to employers that you have formal training and a serious attitude toward your professional development.
3. Hands-On Experience
Most PHP certification programs include practical assignments and projects. These real-world applications strengthen your understanding and prepare you for actual development work.
4. Career Advancement
Whether you're a fresher or an experienced developer looking to upskill, a PHP certification can open doors to better job opportunities, freelance gigs, and even entrepreneurial ventures.
Who Should Take a PHP Certification Course?
A PHP certification course is ideal for:
Students in computer science or IT who want to enhance their web development skills.
Aspiring web developers looking to specialize in backend development.
Freelancers who want to offer dynamic website creation as a service.
Software professionals seeking to diversify their skill set.
Entrepreneurs or business owners who want to build or manage their websites without depending entirely on developers.
No prior programming experience is strictly necessary, though familiarity with HTML and basic coding concepts is helpful.
What Does a PHP Certification Course Cover?
While the syllabus may vary depending on the institution or online platform, most certification courses include the following key modules:
1. Introduction to PHP
History and evolution of PHP
Server vs. client-side scripting
Installing and configuring PHP
2. PHP Basics
Syntax and variables
Data types
Operators and expressions
Conditional statements (if, else, switch)
Loops (for, while, foreach)
3. Functions and Arrays
Creating and invoking functions
Built-in functions
Recursive functions
Indexed, associative, and multidimensional arrays
4. Forms and User Input
Handling GET and POST requests
Validating form data
Sanitization and security
5. Working with Databases
Introduction to MySQL
Connecting PHP to MySQL
Executing queries (SELECT, INSERT, UPDATE, DELETE)
Prepared statements and data sanitization
6. Object-Oriented Programming (OOP) in PHP
Classes and objects
Constructors and destructors
Inheritance, encapsulation, and polymorphism
7. File Handling and Session Management
Reading and writing files
Cookies and sessions
Authentication and authorization
8. Advanced Topics
MVC architecture
Using PHP with AJAX and JavaScript
Error handling and debugging
Web services and APIs
9. Capstone Project
Most courses include a final project, such as building a blog, e-commerce website, or content management system, which allows learners to apply everything they’ve learned.
Choosing the Right PHP Certification Course
With countless options available, selecting the right course can be overwhelming. Here are a few tips to guide your decision:
1. Accreditation and Recognition
Choose a course offered by a recognized institution or reputed online platform like Coursera, Udemy, LinkedIn Learning, or a local university or training center.
2. Comprehensive Curriculum
Ensure the course covers both basic and advanced concepts, as well as real-world projects.
3. Qualified Instructors
Check the background of the instructors. Look for experienced developers or educators with practical industry knowledge.
4. Hands-on Learning
The best courses offer practical coding exercises, quizzes, and projects, not just theoretical lessons.
5. Support and Community
Access to mentors, forums, and peer groups can enhance your learning experience, especially when you run into coding challenges.
Top Online Platforms Offering PHP Certification
Here are a few popular online learning platforms that offer high-quality PHP certification courses:
Udemy – Offers beginner to advanced courses with lifetime access.
Coursera – Includes PHP courses from universities like the University of Michigan.
edX – Offers structured programs, often in collaboration with institutions.
LinkedIn Learning – Ideal for professionals looking to upskill quickly.
W3Schools – Offers beginner-friendly content and an exam for certification.
Career Opportunities After PHP Certification
A PHP certification can qualify you for a wide range of roles in web development. Some of the most common job titles include:
PHP Developer
Backend Developer
Full Stack Developer
Web Developer
Software Engineer
WordPress Developer
Freelance Web Developer
According to industry data, PHP developers can earn between $50,000 to $100,000 annually, depending on location, experience, and specialization.
Additionally, PHP skills are in demand for freelance work, remote development positions, and building personal projects or startups.
Final Thoughts
The digital economy is booming, and web development remains at the core of this growth. PHP continues to play a crucial role in web applications, and having formal training in this technology can give you a significant edge in the job market.
A PHP Certification Course not only equips you with practical skills but also enhances your credibility as a developer. Whether you're just starting your tech career or seeking to advance in it, this certification can be a stepping stone to many professional opportunities.
Take the leap today—invest in learning PHP and unlock your potential in the world of web development.
#php certification course#PHP Training in Chandigarh#Python Training in Chandigarh#CCNA Training in Chandigarh
0 notes
Text
Array PHP ke string yang dipisahkan koma
Di sini Anda akan belajar, array php ke string dipisahkan koma, PHP Array ke String Conversion, PHP Array ke Comma Separated String, PHP Array Dua Dimensi ke String Konversi, PHP Implode – Array Multidimensional ke String Dipisahkan dengan Koma, PHP Implode Multidimensional Array ke Comma Separated Tali.
Tutorial ini menunjukkan, cara mengkonversi array ke string di PHP menggunakan fungsi implode…
View On WordPress
#array php key#array php key exists#array php key name#array php key order#array php key value#array php key value foreach#array php keys sort#php array key exists multidimensional#php array key search#php array_key_first
0 notes
Text
Enviar una campaña de MailChimp desde PHP
Enviar una campaña de MailChimp desde PHP aparece primero en nuestro https://jonathanmelgoza.com/blog/enviar-una-campana-de-mailchimp-desde-php/
Veremos un ejemplo sobre cómo enviar una campaña de MailChimp desde PHP para integrarlo en nuestros proyecto web de clientes o propios, te mostraremos código para obtener listas de suscriptores, obtener plantillas predefinidas y varias cosillas más relacionadas con la integración PHP con MailChimp.
Hace poco tuve la necesidad de Integrar MailChimp con PHP.
Afortunadamente MailChimp ofrece una excelente API y una aun mejor documentación por lo que no fue tan complicado conectar ambos.
Ya hemos hablado antes en este blog cómo obtener listas de MailChimp con PHP y ahora seguiremos adelante con este tema.
Lo más importante de este primer post es sin lugar a dudas la función para comunicarse con MailChimp.
Hoy veremos cómo enviar una campaña de MailChimp desde PHP para lo cual haremos varias cosas.
Antes que nada repasaremos la función para conectar a MailChimp para los que no han ido al post anterior.
Posteriormente también repasaremos el código para obtener tus listas de suscriptores en un combo.
Adicional a esto veremos también cómo:
Obtener miembros de una lista
Obtener etiquetas en la que esta un miembro
Obtener plantillas de correo predefinidas por nosotros
Crear una nueva campaña
Enviar una campaña
Antes que nada recuerda que debes de contar con una cuenta en MailChimp y obtener una API KEY para poder vincular.
Conectar con MailChimp desde PHP
function conectar_a_mailchimp( $url, $peticion, $api_key, $data = array() ) if( $peticion == 'GET' ) $url .= '?' . http_build_query($data); $mch = curl_init(); $headers = array( 'Content-Type: application/json', 'Authorization: Basic '.base64_encode( 'user:'. $api_key ) ); curl_setopt($mch, CURLOPT_URL, $url ); curl_setopt($mch, CURLOPT_HTTPHEADER, $headers); curl_setopt($mch, CURLOPT_RETURNTRANSFER, true); curl_setopt($mch, CURLOPT_CUSTOMREQUEST, $peticion); curl_setopt($mch, CURLOPT_TIMEOUT, 200); curl_setopt($mch, CURLOPT_SSL_VERIFYPEER, false); if( $peticion != 'GET' ) curl_setopt($mch, CURLOPT_POST, true); curl_setopt($mch, CURLOPT_POSTFIELDS, json_encode($data) ); return curl_exec($mch);
A partir de aquí toda referencia a la variable $API_KEY hace referencia a la clave del API requerida.
Obtener listas de suscriptores
$data = array( 'fields' => 'lists', 'count' => 5 ); $url = 'https://' . substr($API_KEY,strpos($API_KEY,'-')+1) . '.api.mailchimp.com/3.0/lists/'; $result = json_decode( conectar_a_mailchimp( $url, 'GET', $API_KEY, $data) ); if( !empty($result->lists) ) echo '<select>'; foreach( $result->lists as $list ) echo '<option value="' . $list->id . '">' . $list->name . ' (' . $list->stats->member_count . ')</option>'; echo '</select>'; elseif ( is_int( $result->status ) ) echo '<strong>' . $result->title . ':</strong> ' . $result->detail;
Obtener miembros de una lista
$data = array( 'offset' => '0', 'count' => '2000' ); $url = 'https://' . substr($API_KEY,strpos($API_KEY,'-')+1) . '.api.mailchimp.com/3.0/lists/[IDLISTA]/members/'; $result = json_decode( conectar_a_mailchimp( $url, 'GET', $API_KEY, $data) ); if( !empty($result->members) ) echo '<select>'; foreach( $result->members as $member ) echo '<option value="' . $member->id . '">' . $member->email_address . '</option>'; echo '</select>'; elseif ( is_int( $result->status ) ) echo '<strong>' . $result->title . ':</strong> ' . $result->detail;
Asegúrate de incluir el ID de tu lista, los IDs los obtuvimos con el código anterior.
Obtener etiquetas en la que esta un miembro
$data = array( 'offset' => '0', 'count' => '50' ); $url = 'https://' . substr($API_KEY,strpos($API_KEY,'-')+1) . '.api.mailchimp.com/3.0/lists/[IDLISTA]/members/[IDMIEMBRO]/'; $result = json_decode( conectar_a_mailchimp( $url, 'GET', $API_KEY, $data) ); echo '<select>'; echo '<option value="0">Seleccionar Tag</option>'; if( $result->tags_count > 0 ) for($i=0;$i<$result->tags_count;$i++) echo "<option value='" . $result->tags[$i]->id . "'>" . $result->tags[$i]->name . "</option>"; echo '</select>';
Aquí también debes de cambiar el ID de lista y el ID de miembro, ambos los obtenemos en los combos anteriores.
Obtener plantillas de correo predefinidas por nosotros
$data = array( 'offset' => '0', 'count' => '50', 'type' => 'user' ); $url = 'https://' . substr($API_KEY,strpos($API_KEY,'-')+1) . '.api.mailchimp.com/3.0/templates/'; $result = json_decode( conectar_a_mailchimp( $url, 'GET', $API_KEY, $data) ); echo '<select>'; echo '<option value="0">Seleccionar Template</option>'; if( $result->total_items > 0 ) for($i=0;$i<$result->total_items;$i++) echo "<option value='" . $result->templates[$i]->id . "'>" . $result->templates[$i]->name . "</option>"; echo '</select>';
Aquí obtenemos las plantillas de correo disponibles únicamente creadas por nosotros, para ver todas elimina ‘type’ => ‘user’.
Crear una nueva campaña
$subject = "Asunto"; $reply_to = "[email protected]"; $from_name = "Mi empresa"; $campaign_id = ""; $data = array( "recipients" => array( "list_id" => "[IDLISTA]", "segment_opts" => array( "saved_segment_id" => [IDETIQUETA] )), "type" => "regular", "settings" => array("subject_line" => $subject, "reply_to" => $reply_to, "from_name" => $from_name ) ); $url = "https://" . substr($API_KEY,strpos($API_KEY,"-")+1) . ".api.mailchimp.com/3.0/campaigns/"; $create_campaign = json_decode(conectar_a_mailchimp( $url, "POST", $API_KEY, $data )); $idCampaña = 0; if ( $create_campaign ) if ( ! empty( $create_campaign->id ) && isset( $create_campaign->status ) && "save" == $create_campaign->status ) $idCampaña = $create_campaign->id;
Sustituimos IDLISTA e IDETIQUETA para crear una campaña para una lista de suscriptores pero además para únicamente los que tengan dicho ID de Segmento, eliminar esta linea para enviar a toda la lista.
La campaña se crea como borrador pero aún no se envia.
Enviar una campaña
$data = array(); $url = "https://" . substr($API_KEY,strpos($API_KEY,"-")+1) . ".api.mailchimp.com/3.0/campaigns/".$idCampaña."/actions/send/"; $send_campaign = json_decode(conectar_a_mailchimp( $url, "POST", $API_KEY, $data )); print_r($send_campaign); if ( empty( $send_campaign ) ) echo "Se ha enviado la campaña"; elseif( isset( $send_campaign->detail ) ) $error_detail = $send_campaign->detail;
Con ayuda del IDCAMPAÑA creado en el paso anterior enviamos la campaña.
Como puedes ver enviar una campaña de MailChimp desde PHP no es complicado de hacer.
Puedes consultar más información sobre el API de MailChimp para aprender a hacer más cosas.
Espero y posteriormente seguir agregando más funcionalidades cómo agregar y eliminar suscriptores desde PHP.
Si esta información sobre cómo enviar una campaña de MailChimp desde PHP te fue de utilidad no olvides compartirla en tus redes sociales o dejarnos un comentario en la sección de abajo para aclararte cualquier duda relacionada al tema.
Hasta luego!
2 notes
·
View notes
Text
How to use Associative Arrays in PHP

Associative arrays are used to store key value pairs. For example, to store the age of different members of a family in an array, a numerically indexed array would not be the best choice. Instead, we could use the respective member’s names as the keys in our associative array, and the value would be their respective age. There are two ways to create an associative array: Example: $age = array("Anil"=>"45", "Suita"=>"39", "Ravina"=>"23"); or $age = "45"; $age = "39"; $age = "23"; /* Accessing the Associative arrays's elements directly */ echo "Anil is " . $age . " years old.";
Loop Through an Associative Array
To print all the values of an associative array, you can use a foreach loop, like this: Read the full article
1 note
·
View note
Text
Best method for exact match in array with PHP?
Best method for exact match in array with PHP?
During a job interview one asked me: “how would you search for a word inside a very long array?”. I answered just by using the foreachloop and compare the single content with the searched word. But according to him it would not fit with very big sized arrays, so his suggestion was to flip the array (changing all keys and values) and then to input the word in the key field and see if it’s found.…
View On WordPress
1 note
·
View note
Text
Laravel 9 Elasticsearch Integration From Scratch With Example

In this post, we'll talk about how to incorporate Elasticsearch from scratch using a Laravel 9 example. Full-text search engine Elasticsearch is deployed in real-time and has multitenant support. It offers a JSON document format and an HTTP web interface.
Table of Content
Step 1: Install Elasticsearch Step 2: Create Table using migration Step 3: Install Package Step 4: Add providers and aliases Step 5: Create Route Step 6: Create a Model and Controller Step 7: Create Blade Files Step 8: Run Our Laravel Application
Step 1: Install Elasticsearch
Elasticsearch will be installed in our system; if you haven't downloaded it yet, click here for instructions.
Step 2: Create Table using migration
We must now start a migration. In order to construct the student's table migration, we will use the command below. php artisan make:migration create_students_table --create=students upon successful migration. The database/migrations/create students table file needs to be modified as shown below. Once the aforementioned file has been modified, run the command below. php artisan migrate
Step 3: Install Package
Installing the elasticquent/elasticquent package will now be done. Consequently, first enter composer.json and add the line below. "elasticquent/elasticquent": "dev-master"
Step 4: Add providers and aliases
In the "config/app.php" section, we will add the providers and aliases listed below. 'providers' => , 'aliases' => We will now run the following command to create an elastic search configuration file.
Step 5: Create Route
In the "routes/web.php" file, add the following route code.
Step 6: Create a Model and Controller
The commands listed below assist in creating the controller and model. php artisan make:controller StudentController php artisan make:model Student Student.php StudentController.php
Step 7: Create Blade Files
In the "resources/views/" folder directory, we will create a student-search file and paste the code below. student-search.blade.php @extends('layouts.app') @section('content')
Laravel 7 Elasticsearch integration from scratch with example
{{ Form::open(array('method'=>'get','class'=>'')) }} Go! {{ Form::close() }} @if(!empty($students)) @foreach($students as $key => $value) {{ $value }}
{{ $value }}
{{ $value }} @endforeach @endif Create New Student @if (count($errors) > 0) Whoops! There were some problems with your input. @foreach ($errors->all() as $error) - {{ $error }} @endforeach @endif {{ Form::open(array('url' => 'StudentSearchCreate','autocomplete'=>'off')) }} First Name: {{ Form::text('first_name', null, array('placeholder' => 'First Name','class' => 'form-control')) }} Last Name: {{ Form::text('last_name', null, array('placeholder' => 'Last Name','class' => 'form-control')) }} Address: {{ Form::text('address', null, array('placeholder' => 'Address','class' => 'form-control')) }} Submit {{ Form::close() }} @endsection
Step 8: Run Our Laravel Application
The command listed below can be used to launch the server and run this example. php artisan serve Now, we'll execute our example by navigating to the URL listed below in a browser. http://127.0.0.1:8000/studentSearch Read the full article
0 notes
Text
Array manipulation in PHP
PHP Certification Course, Array manipulation in PHP involves performing various operations on arrays, such as adding or removing elements, sorting, searching, and restructuring. PHP offers a rich set of array functions to facilitate these tasks. Here are some common array manipulation techniques:
Creating Arrays: Arrays in PHP can be created using square brackets [] or the array() construct. For example:phpCopy code$numbers = [1, 2, 3, 4, 5]; $fruits = array('apple', 'banana', 'cherry');
Adding Elements: To add elements to an array, you can use the assignment operator = or the [] notation. For example:phpCopy code$numbers[] = 6; // Adds 6 to the end of the $numbers array array_push($fruits, 'date'); // Adds 'date' to the end of the $fruits array
Removing Elements: Elements can be removed using functions like unset() or array manipulation functions like array_pop() and array_shift(). For example:phpCopy codeunset($numbers[2]); // Removes the element at index 2 $removedFruit = array_shift($fruits); // Removes and returns the first element
Merging Arrays: Arrays can be combined using functions like array_merge() or the + operator. For example:phpCopy code$combinedArray = array_merge($numbers, $fruits); $mergedArray = $numbers + $fruits; // Note: Keys are preserved
Sorting Arrays: Arrays can be sorted using functions like sort(), rsort(), asort(), ksort(), etc., based on different criteria such as value or key. For example:phpCopy codesort($numbers); // Sorts the array in ascending order ksort($fruits); // Sorts the array by keys
Searching in Arrays: Functions like in_array() and array_search() can be used to search for elements in an array. For example:phpCopy code$found = in_array('banana', $fruits); // Checks if 'banana' is in the $fruits array $index = array_search('cherry', $fruits); // Returns the index of 'cherry' in $fruits
Filtering Arrays: Functions like array_filter() allow you to create a new array with elements that meet specific criteria. For example:phpCopy code$filteredNumbers = array_filter($numbers, function($num) { return $num % 2 == 0; // Filters even numbers });
Iterating Over Arrays: Looping constructs like foreach and for are commonly used to iterate through arrays and perform operations on each element.
These are just a few examples of array manipulation techniques in PHP. Understanding these functions and techniques allows developers to effectively work with and manipulate arrays in their applications.
0 notes
Text
Mastering PHP: The Ultimate Guide to PHP Online Courses
In today's fast-evolving digital era, web development continues to play a vital role in shaping online experiences. One of the most trusted and widely-used server-side scripting languages in this domain is PHP (Hypertext Preprocessor). Whether you are a beginner aiming to break into web development or a seasoned programmer looking to expand your skills, enrolling in a PHP online course is a smart and strategic move.
What is PHP?
PHP is a powerful scripting language specifically designed for web development. It is open-source, easy to learn, and integrates seamlessly with HTML, databases like MySQL, and content management systems such as WordPress. PHP runs on almost all operating systems including Linux, Windows, and macOS, making it incredibly versatile.
Since its creation in 1994 by Rasmus Lerdorf, PHP has evolved dramatically. Today, it powers over 75% of websites on the internet, including big names like Facebook, Wikipedia, and WordPress. Its simplicity and wide applicability make it a must-know language for aspiring web developers.
Why Learn PHP Online?
1. Flexibility and Convenience
One of the biggest advantages of choosing an online PHP course is the flexibility it offers. Whether you're a college student, a working professional, or a freelance developer, you can learn PHP at your own pace, anytime and anywhere.
2. Cost-Effective Learning
Online courses are typically more affordable than in-person classes. Many platforms even offer free PHP tutorials or low-cost courses that deliver high-quality content.
3. Access to Quality Resources
Most online PHP courses provide a wealth of resources, including video lectures, downloadable content, quizzes, code editors, and forums. These materials make it easier to grasp complex concepts and practice coding in real-time.
4. Certification and Career Growth
Many PHP online courses offer certificates upon completion. These certificates can enhance your resume and make you stand out in the job market. With PHP skills, you can pursue roles such as Web Developer, Full-Stack Developer, Backend Developer, or Software Engineer.
Key Topics Covered in a PHP Online Course
A comprehensive PHP course typically includes the following modules:
1. Introduction to PHP
What is PHP?
Installation and setup (XAMPP, WAMP)
Syntax and basic structure
Embedding PHP in HTML
2. PHP Variables and Data Types
Strings, integers, floats, booleans
Arrays (indexed and associative)
Constants
Type casting
3. Control Structures
Conditional statements (if, else, switch)
Looping structures (for, while, do-while, foreach)
4. Functions and Scope
Creating and calling functions
Function parameters and return values
Variable scope (local, global, static)
5. Forms and User Input
Handling GET and POST methods
Form validation
Superglobals like $_GET, $_POST, $_REQUEST, $_SERVER
6. Working with Databases
Connecting PHP with MySQL
CRUD operations (Create, Read, Update, Delete)
Using PDO and MySQLi
Prepared statements for security
7. Error Handling
Types of errors (syntax, runtime, logical)
Try-catch blocks
Custom error handlers
8. Sessions and Cookies
Creating and managing sessions
Setting and reading cookies
Session security best practices
9. File Handling in PHP
Reading and writing files
Uploading files via forms
File permissions
10. Object-Oriented Programming in PHP
Classes and objects
Constructors and destructors
Inheritance, encapsulation, polymorphism
Interfaces and traits
11. PHP and Web Security
Input validation and sanitization
Preventing SQL injection and XSS
HTTPS and secure sessions
12. Advanced PHP Topics
PHP with AJAX
REST APIs in PHP
MVC Frameworks like Laravel and CodeIgniter
Composer and dependency management
Popular Platforms Offering PHP Online Courses
Here are some of the best platforms where you can learn PHP online:
1. Udemy
Udemy offers a wide range of PHP courses for all levels. Courses like “PHP for Beginners” and “Object-Oriented PHP & MVC” are among the top-rated, featuring lifetime access and a certificate upon completion.
2. Coursera
Partnering with universities and colleges, Coursera offers structured PHP programs. You can audit most courses for free or pay to receive a certification. A good example is the Web Applications for Everybody course from the University of Michigan.
3. edX
edX features PHP-related content through universities like Harvard and MIT. Though primarily focused on computer science and web development, several PHP courses are included under broader programming paths.
4. LinkedIn Learning
LinkedIn Learning provides bite-sized PHP lessons with project-based learning. A subscription gives access to multiple courses, helpful if you're pursuing more than just PHP.
5. FreeCodeCamp and W3Schools
Both platforms are excellent for beginners who want to explore PHP basics for free. W3Schools, in particular, is well-known for its hands-on “Try It Yourself” editor.
Who Should Take a PHP Online Course?
1. Beginners in Web Development
If you're new to coding and want to start with a language that's widely used and beginner-friendly, PHP is a great option.
2. Students and Computer Science Graduates
Learning PHP alongside HTML, CSS, and JavaScript can give you a competitive edge when applying for internships or junior developer roles.
3. Freelancers and Entrepreneurs
If you're planning to build your own website or work on client projects, PHP enables you to create dynamic, database-driven websites quickly.
4. Working Professionals
Developers who want to expand their backend skills or transition into full-stack development will benefit significantly from PHP expertise.
Career Opportunities After Learning PHP
Once you complete a PHP online course, several doors open for your professional growth:
Web Developer: Design and build dynamic websites.
Backend Developer: Manage server-side logic and database interactions.
Full-Stack Developer: Handle both frontend and backend tasks.
WordPress Developer: Customize and develop plugins/themes using PHP.
Freelance Developer: Build and manage websites for clients.
According to recent job market statistics, PHP developers earn an average salary of $60,000–$90,000 annually, depending on experience, location, and industry.
Tips for Success in an Online PHP Course
Set Clear Goals: Decide whether you’re learning for a job, freelance projects, or personal growth.
Practice Regularly: The best way to learn coding is by doing it. Practice through exercises and mini-projects.
Join Online Communities: Platforms like Stack Overflow, Reddit, and GitHub can help you learn collaboratively.
Work on Real Projects: Apply what you learn by building real-world applications—this boosts your confidence and portfolio.
Keep Up With Updates: PHP continues to evolve (e.g., PHP 8.x versions), so staying updated ensures your skills remain relevant.
Conclusion
PHP remains a cornerstone of modern web development, and mastering it through an online course is an effective, convenient, and affordable way to jumpstart or advance your programming journey. With comprehensive learning resources, expert instructors, and real-world projects, PHP online courses provide everything you need to build robust, scalable, and dynamic websites.
Whether you're starting from scratch or adding PHP to your skillset, now is the perfect time to enroll and harness the power of this essential language.
#php online course#PHP Training in Chandigarh#Python Training in Chandigarh#CCNA Training in Chandigarh#MERN Stack Training in Chandigarh
0 notes
Link
The PHP foreach as loop works just on arrays and is employed to loop through each key/value pair in an array. The foreach build gives the least demanding approach to indicate the array segments. It goes on at array and objects both.
0 notes
Photo

php array chunk to insert huge data at less query in Laravel foreach (array_chunk($data, 1000) as $key => $value) { DB::table('table')->insert($value); }
0 notes
Text
Executing WP CLI commands inside WP CLI command with WP_CLI::runcommand()
In this article let’s learn about how to execute another WP CLI commands.
Note: If you read some recent articles then you can skip some below steps that are related to plugin creation.
Create Empty Plugin #Create Empty Plugin
Create a new folder wordpress-examples into plugins directory /wp-content/plugins/
Create a file wordpress-examples.php and add the below code into it.
<?php /** Plugin Name: WordPress Examples */
Note: If you want to add some additional information then you can get it from gist snippet – WordPress Complete Plugin Readme File.
Now you can see our WordPress Examples plugin exists into the plugins list.
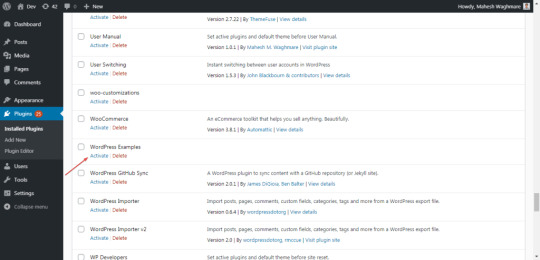
Now, Activate the WordPress Examples plugin.

Register WP CLI Command #Register WP CLI Command
Register PHP class WordPress_Examples_WP_CLI e.g.
if ( ! class_exists( 'WordPress_Examples_WP_CLI' ) && class_exists( 'WP_CLI_Command' ) ) : class WordPress_Examples_WP_CLI extends WP_CLI_Command { } endif;
Here,
We have registered a new class WordPress_Examples_WP_CLI and extend it with WP_CLI_Command.
Add Examples Command #Add Examples Command
Now let’s register the examples. E.g.
WP_CLI::add_command( 'examples', 'WordPress_Examples_WP_CLI' );
Here,
We have used the function WP_CLI::add_command() to register our examples command.
The function WP_CLI::add_command() accepts 2 parameters. The first parameter is the command name. Which is examples in our case.
And second is a callback class which is WordPress_Examples_WP_CLI.
Add execute_commands sub command #Add execute_commands sub command
public function execute_commands( $args, $assoc_args ) { WP_CLI::line( 'Hello' ); }
Here,
We have added a function execute_commands() with two parameters.
$args contain the arguments.
$assoc_args contain the associate arguments.
Testing the Command #Testing the Command
Open command prompt/terminal. Go to your WordPress setup. I have set up WordPress in D:\xampp\htdocs\dev.test
So, Execute the below commands:
cd D:\xampp\htdocs\dev.test
wp examples execute_commands
You can see the output something like below:
λ wp examples execute_commands Hello
This command just shows the string Hello.
Using WP_CLI::runcommand() #Using WP_CLI::runcommand()
Its time to execute another command in our WP CLI command with WP_CLI::runcommand().
public function execute_commands( $args, $assoc_args ) { WP_CLI::runcommand( 'cli info' ); }
Let’s execute the command wp examples execute_commands.
λ wp examples execute_commands OS: Windows NT 6.1 build 7601 (Windows 7 Ultimate Edition Service Pack 1) i586 Shell: C:\Windows\system32\cmd.exe PHP binary: D:\xampp\php\php.exe PHP version: 7.0.8 php.ini used: D:\xampp\php\php.ini WP-CLI root dir: phar://wp-cli.phar/vendor/wp-cli/wp-cli WP-CLI vendor dir: phar://wp-cli.phar/vendor WP_CLI phar path: D:\xampp\htdocs\dev.test WP-CLI packages dir: C:\Users\intel/.wp-cli/packages/ WP-CLI global config: WP-CLI project config: WP-CLI version: 2.4.0 D:\xampp\htdocs\dev.test
Here, we see the result of the WP CLI command wp cli info.
Note: When we use the function WP_CLI::runcommand() then we don’t need to pass the prefix wp. So, wp cli info should be cli info.
Experiment with Examples #Experiment with Examples
Example 1
public function execute_commands( $args, $assoc_args ) { // Execute `wp cli info` CLI command. WP_CLI::runcommand( 'cli info' ); // Execute `wp plugin list --status=active` CLI command. WP_CLI::runcommand( 'plugin list --status=active' ); }
Lets execute command wp examples execute_commands.
λ wp examples execute_commands OS: Windows NT 6.1 build 7601 (Windows 7 Ultimate Edition Service Pack 1) i586 Shell: C:\Windows\system32\cmd.exe PHP binary: D:\xampp\php\php.exe PHP version: 7.0.8 php.ini used: D:\xampp\php\php.ini WP-CLI root dir: phar://wp-cli.phar/vendor/wp-cli/wp-cli WP-CLI vendor dir: phar://wp-cli.phar/vendor WP_CLI phar path: D:\xampp\htdocs\dev.test WP-CLI packages dir: C:\Users\intel/.wp-cli/packages/ WP-CLI global config: WP-CLI project config: WP-CLI version: 2.4.0 +--------------------+--------+--------+---------+ | name | status | update | version | +--------------------+--------+--------+---------+ | wordpress-examples | active | none | | +--------------------+--------+--------+---------+
Here, we have executed two commands.
wp cli info – It displays the WP CLI information.
wp plugin list --status=active – It displays active plugins.
Example 2
public function execute_commands( $args, $assoc_args ) { WP_CLI::runcommand( 'plugin list --format=json --status=active' ); }
λ wp examples execute_commands [{"name":"wordpress-examples","status":"active","update":"none","version":""}]
Example 3
Lets, Get the result of the command in a variable to perform some operations like:
public function execute_commands( $args, $assoc_args ) { $options = array( 'return' => true, // Return 'STDOUT'; use 'all' for full object. 'parse' => 'json', // Parse captured STDOUT to JSON array. 'launch' => false, // Reuse the current process. 'exit_error' => true, // Halt script execution on error. ); $plugins = WP_CLI::runcommand( 'plugin list --format=json --status=active', $options ); foreach ($plugins as $key => $plugin) { WP_CLI::line( $plugin['name'] . ' status is ' . $plugin['status'] ); } }
λ wp examples execute_commands wordpress-examples status is active
Here, In function WP_CLI::runcommand() we have passed 2 arguments.
First is plugin list --format=json --status=active which is the WP CLI command.
And second is the $options which is the array of configuration values.
Example 4
public function execute_commands( $args, $assoc_args ) { $options = array( 'return' => true, // Return 'STDOUT'; use 'all' for full object. 'parse' => 'json', // Parse captured STDOUT to JSON array. 'launch' => false, // Reuse the current process. 'exit_error' => true, // Halt script execution on error. ); $posts = WP_CLI::runcommand( 'post list --format=json', $options ); foreach ($posts as $key => $post) { WP_CLI::line( $post['ID'] . ' | ' . $post['post_title'] ); } }
λ wp examples execute_commands 162 | Sample Post 160 | Sample Post 89 | Another Post 1 | Hello world!
Oh! Don’t forget that we learned about the class \WP_CLI\Formatter(). It displays the well-formatted data.
Let’s try to implement it in the above example.
public function execute_commands( $args, $assoc_args ) { $options = array( 'return' => true, // Return 'STDOUT'; use 'all' for full object. 'parse' => 'json', // Parse captured STDOUT to JSON array. 'launch' => false, // Reuse the current process. 'exit_error' => true, // Halt script execution on error. ); $posts = WP_CLI::runcommand( 'post list --format=json', $options ); $display_fields = array( 'ID', 'post_title', ); $formatter = new \WP_CLI\Formatter( $assoc_args, $display_fields ); $formatter->display_items( $posts ); }
Now, Execute wp examples execute_commands.
λ wp examples execute_commands +-----+--------------+ | ID | post_title | +-----+--------------+ | 162 | Sample Post | | 160 | Sample Post | | 89 | Another Post | | 1 | Hello world! | +-----+--------------+
We can see the data in the table format. To demonstrate the WP_CLI::runcommand() I have used posts example.
You can use the command wp post list to list the posts. E.g.
λ wp post list +-----+--------------+---------------+---------------------+-------------+ | ID | post_title | post_name | post_date | post_status | +-----+--------------+---------------+---------------------+-------------+ | 162 | Sample Post | sample-post-2 | 2019-11-05 02:11:16 | publish | | 160 | Sample Post | sample-post | 2019-11-05 02:10:05 | publish | | 89 | Another Post | another-post | 2019-10-15 23:32:57 | publish | | 1 | Hello world! | hello-world | 2019-10-05 08:23:44 | publish | +-----+--------------+---------------+---------------------+-------------+
Executing WP CLI commands inside WP CLI command with WP_CLI::runcommand().
Tweet
from WordPress http://bit.ly/2PpUGqE via IFTTT
0 notes
Text
Obtener listas de Mailchimp con PHP - Ejemplo de Integración
Obtener listas de Mailchimp con PHP - Ejemplo de Integración aparece primero en nuestro https://jonathanmelgoza.com/blog/obtener-listas-de-mailchimp-con-php-ejemplo-de-integracion/

¿Necesitas integrar MailChimp con PHP? En este pequeño post te mostramos cómo obtener listas de MailChimp desde PHP para crear un combo o select de listas en tu proyecto web con la ayuda del propio API MailChimp.
Actualmente estoy trabajando en un proyecto web donde necesito integrar MailChimp para el envío de Newsletter.
La verdad es que tuve la posibilidad de elegir a MailChimp y lo hice por varias razones.
Porqué es un excelente servicio con grandes características y sobre todo porqué cuenta con un API para desarrolladores lo cual hace todo más fácil.
Nosotros cómo programadores siempre estamos agradecidos de que grandes empresas se preocupen por la integración de sus herramientas con proyectos independientes.
En un próximo articulo hablaré sobre la importancia de los APIs en las herramientas de hoy en día.
Por cierto, hace poco vimos cómo implementar google recaptcha con php por si te interesa.
Hoy vamos a ver un pequeño ejemplo de integración de MailChimp con PHP pero que demuestra lo fácil que es conectarlo a nuestro proyecto web.
¿Qué necesitamos?
Antes que nada necesitamos por supuesto contar con una cuenta en MailChimp.
Una vez con una cuenta necesitamos tener una lista de audiencia con personas agregadas.
Posteriormente necesitamos obtener nuestra API KEY, la podemos obtener desde el menú Cuenta/Account -> Extras -> API Keys y damos clic en Crear Llave/Create Key.
Ahora tendremos todo lo necesario para comenzar a obtener listas de MailChimp con PHP.
Obtener listas de MailChimp con PHP
Una vez con nuestra API Key vamos a crear una función para conectar con MailChimp desde PHP:
function conectar_a_mailchimp( $url, $request, $api_key, $data = array() ) if( $request== 'GET' ) $url .= '?' . http_build_query($data); $mch = curl_init(); $headers = array( 'Content-Type: application/json', 'Authorization: Basic '.base64_encode( 'user:'. $api_key ) ); curl_setopt($mch, CURLOPT_URL, $url ); curl_setopt($mch, CURLOPT_HTTPHEADER, $headers); curl_setopt($mch, CURLOPT_RETURNTRANSFER, true); curl_setopt($mch, CURLOPT_CUSTOMREQUEST, $request); curl_setopt($mch, CURLOPT_TIMEOUT, 10); curl_setopt($mch, CURLOPT_SSL_VERIFYPEER, false); if( $request != 'GET' ) curl_setopt($mch, CURLOPT_POST, true); curl_setopt($mch, CURLOPT_POSTFIELDS, json_encode($data) ); return curl_exec($mch);
Ahora cada que necesitemos conectar con MailChimp podremos hacerlo mediante esta función.
Lo siguiente será crear la petición para obtener las listas de nuestra cuenta en MailChimp:
$API_KEY = 'tuapikey-usxx'; $data = array( 'fields' => 'lists', 'count' => 5 ); $url = 'https://' . substr($API_KEY,strpos($API_KEY,'-')+1) . '.api.mailchimp.com/3.0/lists/'; $result = json_decode( conectar_a_mailchimp( $url, 'GET', $API_KEY, $data) ); if( !empty($result->lists) ) echo '<select>'; foreach( $result->lists as $list ) echo '<option value="' . $list->id . '">' . $list->name . ' (' . $list->stats->member_count . ')</option>'; echo '</select>'; elseif ( is_int( $result->status ) ) echo '<strong>' . $result->title . ':</strong> ' . $result->detail;
Lo importante aquí sería la URL la cual es del tipo api.mailchimp.com/3.0/lists/ y la información del arreglo $data en la cual especificamos que deseamos obtener el objeto lists con máximo 5 listas.
Posteriormente hacemos uso de la función que creamos en el paso anterior al que le mandamos la URL, el tipo de conexión, nuestra API Key y el arreglo con los datos de Queries.
Al obtener el resultado lo volcamos en un combo o select para mostrar las listas disponibles con el ID como value.
Puedes ver una lista completa de cosas que podemos hacer en la página oficial del API de MailChimp.
En artículos siguientes hablaremos sobre cómo realizar otras acciones en MailChimp desde PHP cómo la creación y envío de campañas.
Espero y este pequeño post sobre cómo obtener listas de MailChimp con PHP te sea de utilidad, no olvides compartirlo en tus redes sociales o dejarnos un comentario en la sección de abajo si tienes cualquier duda al respecto de este tema.
Hasta luego!
0 notes
Link
Ever given Google rolled out present hunt features, it has turned a renowned trend in web design. There are some fun examples online such as Michael Hart’s Google Images app. The techniques are all sincerely candid where even a web developer with assuaging jQuery knowledge can collect adult programming APIs and JSON data.
For this educational, we wish to explain how we can build an identical present hunt web application. Instead of pulling images from Google we can use Instagram that has grown tremendously in usually a few brief years.
This amicable network started off as a mobile app for iOS. Users could take photos and share them with their friends, leave comments, and upload to 3rd celebration networks such as Flickr. The group was recently acquired by Facebook and had published a formula new app for an Android Market. Their userbase has grown tremendously, and now developers can build extraordinary mini-apps usually like this instasearch demo.
View Demo
Download Source
Obtaining API Credentials
Before formulating any plan files we should initial demeanour into a ideas behind Instagram’s API system. You will need a comment to entrance a developer’s portal that offers useful instructions for beginners. All we need to query a Instagram database is a “Client ID”.
In a tip toolbar click a Manage Clients link, afterwards click an immature symbol “Register a New Client”. You’ll need to give a concentration a name, brief description, and website URL. The URL and Redirect URI can be the same value in this instance usually since we don’t need to substantiate any users. Just fill in all a values and beget a new concentration detail.
You’ll see a prolonged fibre of characters named CLIENT ID. We will need this pivotal after on when building a backend script, so we’ll lapse to this section. For now we can start the construction of a jQuery present hunt application.
Default Webpage Content
The tangible HTML is unequivocally slim for a volume of functionality we’re using. Since many of the picture information is appended boldly we usually need a few smaller elements inside a page. This formula is found inside a index.html file.
!doctype html html lang="en" head meta http-equiv="Content-Type" content="text/html; charset=utf-8" titleInstagram Photo Instant Search App with jQuery/title meta name="author" content="Jake Rocheleau" integrate rel="stylesheet" type="text/css" href="style.css" book type="text/javascript" src="https://ajax.googleapis.com/ajax/libs/jquery/1.7.2/jquery.min.js"/script book type="text/javascript" src="ajax.js"/script /head body div id="w" territory id="sform" smallNote: No spaces or punctuation allowed. Searches are singular to one(1) keyword./small contention type="text" id="s" name="s" class="sfield" placeholder="Enter a hunt tag..." autocomplete="off" /section territory id="photos"/section /div /body /html
I’m regulating a latest jQuery 1.7.2 library along with dual outmost .css and .js resources. The contention hunt margin has no outdoor form coupling since we don’t wish to ever contention a form and means a page reload. we have infirm a few keystrokes inside a hunt margin so that there are some-more singular restrictions when users are typing.
We will stock all a print information inside a centre territory ID #photos. It keeps a simple HTML purify and easy to read. All a other inner HTML elements will be combined around jQuery, and also private before any new search.
Pulling from an API
I’d like to start initial by formulating an energetic PHP book and afterwards pierce into jQuery. My new record is named instasearch.php that will enclose all a critical backend hooks into an API.
?php header('Content-type: application/json'); $client = "YOURCLIENTIDHERE"; $query = $_POST['q']; $api = "https://api.instagram.com/v1/tags/".$query."/media/recent?client_id=".$client; function get_curl($url) { if(function_exists('curl_init')) { $ch = curl_init(); curl_setopt($ch, CURLOPT_URL,$url); curl_setopt($ch, CURLOPT_RETURNTRANSFER, 1); curl_setopt($ch, CURLOPT_HEADER, 0); curl_setopt($ch, CURLOPT_SSL_VERIFYHOST, 0); curl_setopt($ch, CURLOPT_SSL_VERIFYPEER, 0); $output = curl_exec($ch); relate curl_error($ch); curl_close($ch); lapse $output; } else{ lapse file_get_contents($url); } }
The initial line denotes that a piece of lapse information is formatted as JSON instead of plaintext or HTML. This is required for JavaScript functions to review information properly. Afterwards, I’ve got a few variables setup containing a concentration customer ID, user hunt value, and a final API URL. Make certain we refurbish a $client fibre value to compare your possess application.
To entrance this URL information we need to parse a record essence or use cURL functions. The tradition duty get_curl() is usually a tiny bit of formula that checks opposite a stream PHP configuration.
If we do not have cURL activated this will try to activate a underline and lift information around their possess functions library. Otherwise, we can simply use file_get_contents() that tends to be slower, though still works usually as well. Then we can indeed lift this information into a non-static like so:
$response = get_curl($api);
Organizing Returning Data
We could usually lapse this strange JSON response from Instagram with all a information installed up. But there is so many additional information and it’s unequivocally irritating to loop by everything. we cite to classify Ajax responses and lift out accurately that pieces of information we need.
First we can set up a vacant array for all images. Then inside a foreach() loop, we’ll lift out a JSON information objects one-by-one. We usually need three(3) specific values that are a $src(full-size picture URL), $thumb(thumbnail picture URL), and $url(unique print permalink).
$images = array(); if($response){ foreach(json_decode($response)-data as $item){ $src = $item-images-standard_resolution-url; $thumb = $item-images-thumbnail-url; $url = $item-link; $images[] = array( "src" = htmlspecialchars($src), "thumb" = htmlspecialchars($thumb), "url" = htmlspecialchars($url) ); } }
Those who are unknown with PHP loops might get mislaid in a process. Don’t concentration so many on these formula snippets if we don’t know a syntax. Our array of images will enclose during many 16-20 singular entries of photos pulled from many new announcement dates. Then we can outlay all this formula onto a page as a jQuery Ajax response.
print_r(str_replace('\/', '/', json_encode($images))); die();
But now that we’ve had a demeanour behind a scenes we can burst into frontend scripting. I’ve combined a record ajax.js that contains a integrate eventuality handlers tied on to a hunt field. If you’re still following adult compartment now afterwards get vehement we so tighten to completion!
jQuery Key Events
When initial opening a request ready() eventuality I’m environment adult a integrate variables. The initial dual act as approach aim selectors for a hunt margin and photos container. I’m also regulating a JavaScript timer to postponement a hunt query until 900 milliseconds after a user has finished typing.
$(document).ready(function(){ var sfield = $("#s"); var enclosure = $("#photos"); var timer;
There are usually dual categorical duty blocks we’re operative with. The primary handler is triggered by a .keydown() eventuality when focused on a hunt field. We initial check if a pivotal formula matches any of a banned key, and if so annul a pivotal event. Otherwise transparent a default timer and wait 900ms before pursuit instaSearch().
/** * keycode glossary * 32 = SPACE * 188 = COMMA * 189 = DASH * 190 = PERIOD * 191 = BACKSLASH * 13 = ENTER * 219 = LEFT BRACKET * 220 = FORWARD SLASH * 221 = RIGHT BRACKET */ $(sfield).keydown(function(e){ if(e.keyCode == '32' || e.keyCode == '188' || e.keyCode == '189' || e.keyCode == '13' || e.keyCode == '190' || e.keyCode == '219' || e.keyCode == '221' || e.keyCode == '191' || e.keyCode == '220') { e.preventDefault(); } else { clearTimeout(timer); timer = setTimeout(function() { instaSearch(); }, 900); } });
Every time we refurbish a value it’ll automatically go fetch new hunt results. There are also many of other pivotal codes we could have blocked from triggering a Ajax duty – though too many for inventory in this tutorial.
The Ajax instaSearch() Function
Inside my new tradition duty we are initial adding a “loading” category onto a hunt field. This category will refurbish a camera idol for a new loading gif image. We also wish to dull any probable information leftover within a photos section. The query non-static is pulled boldly from a stream value entered in a hunt field.
function instaSearch() { $(sfield).addClass("loading"); $(container).empty(); var q = $(sfield).val(); $.ajax({ type: 'POST', url: 'instasearch.php', data: "q="+q, success: function(data){ $(sfield).removeClass("loading"); $.each(data, function(i, item) { var ncode = 'div class="p"a rel="external" href="'+data[i].src+'" class="fullsize" target="_blank"img src="img/full-image.png" alt="fullsize"/a a rel="external" href="'+data[i].url+'" target="_blank"img src="'+data[i].thumb+'"/a/div'; $(container).append(ncode); }); }, error: function(xhr, type, exception) { $(sfield).removeClass("loading"); $(container).html("Error: " + type); } }); }
If you’re informed with a .ajax() duty afterwards all these parameters should demeanour familiar. I’m flitting a user hunt parameter “q” as a POST data. Upon success and disaster, we mislay a “loading” category and attach any response behind into a #photos wrapper.
Within a success duty, we are looping by a final JSON response to lift out particular div elements. We can accomplish this looping with a $.each() duty and targeting a response information array. Otherwise, a disaster process will directly outlay any response blunder summary from an Instagram API. And that’s unequivocally all there is to it!
View Demo
Download Source
Final Thoughts
The Instagram group has finished a smashing pursuit scaling such an extensive application. The API can be delayed during times, though response information is always scrupulously formatted and unequivocally easy to work with. we wish this educational can denote that there is a lot of energy operative off 3rd celebration applications.
Unfortunately a stream Instagram hunt queries do not concede some-more than 1 tab during a time. This is tying to a demo, though it positively doesn’t mislay any of a charm. You should check out a live instance above and download a duplicate of my source formula to play around with. Additionally, let us know your thoughts in a post contention area below.
0 notes
Text
PHP is A-OK for Templating
PHP templating often gets a bad rap for facilitating subpar code — but that doesn't have to be the case. Let’s look at how PHP projects can enforce a basic Model, View, Controller (MVC) structure without depending on a purpose-built templating engine.
But first, a very brief PHP history lesson
The history of PHP as a tool for HTML templating is full of twists and turns.
One of the first programming languages used for HTML templating was C, but it was quickly found to be tedious to use and generally ill-suited for the task.
Rasmus Lerdorf created PHP with this in mind. He wasn’t opposed to using C to handle back-end business logic but wanted a better way to generate dynamic HTML for the front end. PHP was originally designed as a templating language, but adopted more features over time and eventually became a full programming language in its own right.
PHP’s unique ability to switch between programming mode and HTML mode was found to be quite convenient, but also made it tempting for programmers to write unmaintainable code — code that mixed business logic and templating logic. A PHP file could begin with some HTML templating and then suddenly dive into an advanced SQL query without warning. This structure is confusing to read and makes reusing HTML templates difficult.
As time passed, the web development community found more and more value enforcing a strict MVC structure for PHP projects. Templating engines were created as a way to effectively separate views from their controllers.
To accomplish this task, templating engines typically have the following characteristics:
The engine is purposely underpowered for business logic. If a developer wants to perform a database query, for example, they need to make that query in the controller and then pass the result to the template. Making a query in the middle of the template’s HTML is not an option.
The engine takes care of common security risks behind the scenes. Even if a developer fails to validate user input and passes it directly into the template, the template will often escape any dangerous HTML automatically.
Templating engines are now a mainstay feature in many web technology stacks. They make for more maintainable, more secure codebases, so this comes as no surprise.
It is possible, however, to handle HTML templating with plain PHP as well. You may want to do this for a number of reasons. Maybe you are working on a legacy project and don’t want to bring in any additional dependencies, or maybe you are working on a very small project and prefer to keep things as lightweight as possible. Or maybe the decision isn’t up to you at all.
Use cases for PHP templating
One place that I often implement plain PHP templating is WordPress, which doesn’t enforce a rigid MVC structure by default. I feel that bringing in a full templating engine is a bit heavy-handed, but I still want to separate my business logic from my templates and want my views to be reusable.
Whatever your reason, using plain PHP to define your HTML templates is sometimes the preferred choice. This post explores how this can be done in a reasonably professional way. The approach represents a practical middle ground between the spaghetti-coded style that PHP templating has become notorious for and the no-logic-allowed approach available with formal templating engines.
Let’s dive into an example of how a basic templating system can be put into practice. Again, we’re using WordPress as an example, but this could be swapped to a plain PHP environment or many other environments. And you don’t need to be familiar with WordPress to follow along.
The goal is to break our views into components and create a distinct separation between the business logic and HTML templates. Specifically, we are going to create a view that displays a grid of cards. Each card is going to display the title, excerpt, and author of a recent post.
Step 1: Fetching data to render
The first step to take is fetching the data that we want to display in our view. This could involve executing a SQL query or using the ORM or helper functions of your framework/CMS to access your database indirectly. It could also involve making an HTTP request to an external API or collecting user input from a form or query string.
In this example, we’re going to use the WordPress get_posts helper function to fetch some posts to display on our homepage.
<?php // index.php $wp_posts = get_posts([ 'numberposts' => 3 ]);
We now have access to the data we want to display in the cards grid, but we need to do some additional work before we can pass it to our view.
Step 2: Preparing data for templating
The get_posts function returns an array of WP_Post objects. Each object contains the post title, excerpt, and author information that we need, but we don’t want to couple our view to the WP_Post object type because we might want to show other kinds of data on our cards somewhere else in the project.
Instead, it makes sense to proactively convert each post object to a neutral data type, like an associative array:
<?php // index.php $wp_posts = get_posts([ 'numberposts' => 3 ]); $cards = array_map(function ($wp_post) { return [ 'heading' => $wp_post->post_title, 'body' => $wp_post->post_excerpt, 'footing' => get_author_name($wp_post->post_author) ]; }, $wp_posts);
In this case, each WP_Post object is converted into an associative array by using the array_map function. Notice that the keys for each value are not title, excerpt, and author but are given more general names instead: heading, body, and footing. We do this because the cards grid component is meant to support any kind of data, not just posts. It could just as easily be used to show a grid of testimonials that have a quote and a customer’s name, for example.
With the data properly prepared, it can now be passed into our render_view function:
<?php // index.php // Data fetching and formatting same as before render_view('cards_grid', [ 'cards' => $cards ]);
Of course, the render_view function does not exist yet. Let’s define it.
Step 3: Creating a render function
// Defined in functions.php, or somewhere else that will make it globally available. // If you are worried about possible collisions within the global namespace, // you can define this function as a static method of a namespaced class function render_view($view, $data) { extract($data); require('views/' . $view . '.php'); }
This function accepts the name of the rendered view and an associative array representing any data to be displayed. The extract function takes each item in the associative array and creates a variable for it. In this example, we now have a variable named $cards that contains the items we prepared in index.php.
Since the view is executed in its own function, it gets its own scope. This is nice because it allows us to use simple variable names without fear of collisions.
The second line of our function prints the view matching the name passed. In this case, it looks for the view in views/cards_grid.php. Let’s go ahead and create that file.
Step 4: Creating templates
<?php /* views/cards_grid.php */ ?> <section> <ul> <?php foreach ($cards as $card) : ?> <li> <?php render_view('card', $card) ?> </li> <?php endforeach; ?> </ul> </section>
This template uses the $cards variable that was just extracted and renders it as an unordered list. For each card in the array, the template renders a subview: the singular card view.
Having a template for a single card is useful because it gives us the flexibility to render a single card directly or use it in another view somewhere else in the project.
Let’s define the basic card view:
<?php /* views/card.php */ ?> <div class="card"> <?php if (!empty($heading)) : ?> <h4><?= htmlspecialchars($heading) ?></h4> <?php endif; if (!empty($body)) : ?> <p><?= htmlspecialchars($body) ?></p> <?php endif; if (!empty($footing)) : ?> <span><?= htmlspecialchars($footing) ?></span> <?php endif; ?> </div>
Since the $card that was passed into the render function contained keys for a heading, body, and footing, variables of those same names are now available in the template.
In this example, we can be reasonably sure that our data is free of XSS hazards, but it’s possible that this view could be used with user input at some later time, so passing each value through htmlspecialchars is prudent. If a script tag exists in our data it will be safely escaped.
It’s also often helpful to check that each variable contains a non-empty value before rendering it. This allows for variables to be omitted without leaving empty HTML tags in our markup.
PHP templating engines are great but it is sometimes appropriate to use PHP for what it was originally designed for: generating dynamic HTML.
Templating in PHP doesn’t have to result in unmaintainable spaghetti code. With a little bit of foresight we can achieve a basic MVC system that keeps views and controllers separate from each other, and this can be done with surprisingly little code.
The post PHP is A-OK for Templating appeared first on CSS-Tricks.
PHP is A-OK for Templating published first on https://deskbysnafu.tumblr.com/
0 notes