#as a basic editing tool gimp is fine
Explore tagged Tumblr posts
Visit Tumblr Blog
Explore Tumblr blogs with no restrictions, modern design and the best experience.
Last Seen Tumblr Blogs


Fun Fact
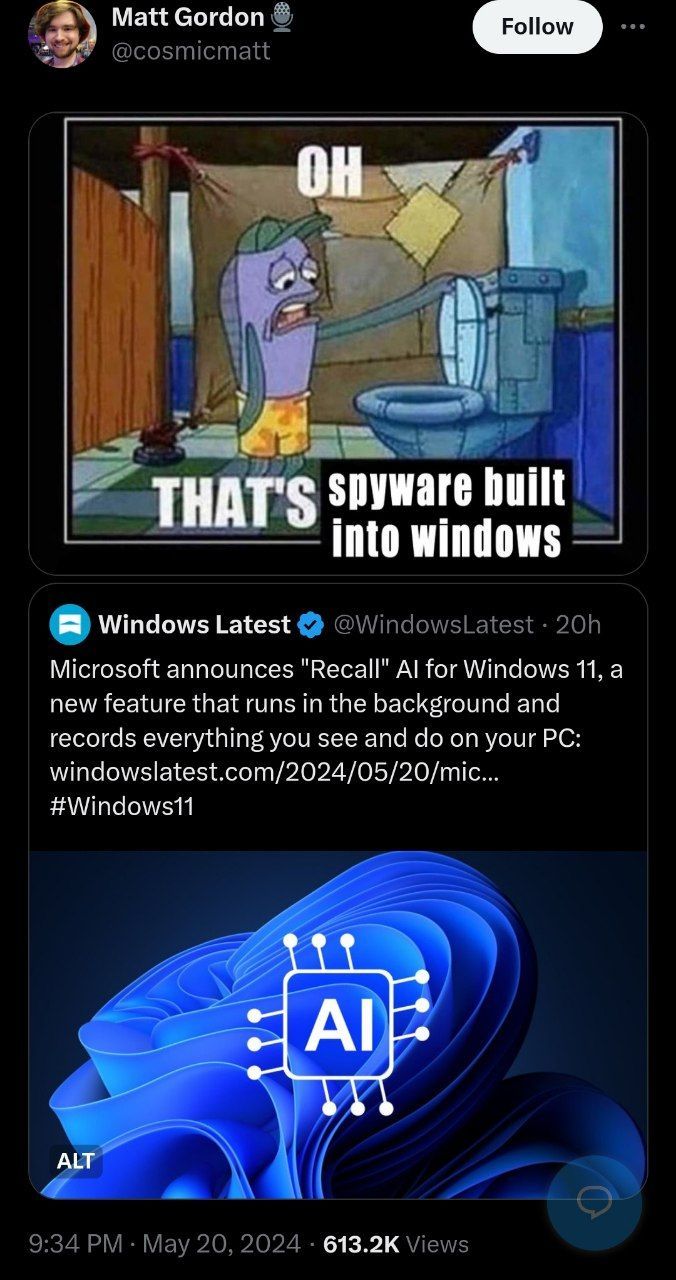
If you dial 1-866-584-6757, you can leave an audio post for your followers.
Text
everyone who's like "NEVER use gimp photoshop is always going to be the best option" you BETTER ADVOCATE FOR PIRATING IT and share download links!! don't give adobe a cent!!!!! gimp still has the advantage of being free and tbh it's Really Not That Bad depending on what you're working with 😭 tho that might just be because i'm really used to it
#i use photoshop only if i have to make gifs or more complicated graphics for stuff#as a basic editing tool gimp is fine#leo.txt
35 notes
·
View notes
Text
So ive been using linux for a good while now, and its now officially my daily driver. Windows is now permabenched in a removed hhd in a drawer unless something awful happens. (Good riddance, havent truly enjoyed windows since xp)
And from this I think that people urging others to move to linux are not doing so in the correct way.
Instead of trying to push a friendly distro and insisting it will work for everything and everyone, instead check if the hardware they are using specifically is good for linux and if so what families.
One computer will be a breeze with any distro, another could have a few quirks but be basically fine, however another of the same year and manufacturer could be an uphill battle thats straight up unusable even for someone who knows how to do the kernel edit workarounds for all but specific distros, if that.
My desktop took linux mint like a dream, 100% painless with no fucking about to make it work and even no need for an ethernet cable to get things started. My dinosaur laptop (may it rest in peace after other components died) had a few issues but also worked very well with little effort with mint. My current junk laptop is an uphill battle that will require arch AND edits to the kernel paremeters to work without being filled with screen flashing and full system freezes at random and im still gearing up the gumption to give it another few attempts to actually pull it off.
Each of these computers is a VERY different experience, and if your prospective switcher is using a computer that doesnt play well, its NOT going to work, they will get frustrated, and they will give up. They have to work with what they have.
Instead of going right to telling them to switch and that anything is good, Encourage people to search up their pc+linux compatibility if they are looking to switch to determine if its viable for a newbie who doesnt want to struggle, then offer a distro that has a live usb/dvd version if possible for them to test without install, and a big enough userbase that troubleshooting is as painless as possible.
If its a laptop, archwiki has lists of those by maker (linked in the page given) with notes on what has been tested in that family of linux.
This, I think, above all, is the most important thing when trying to get people to switch:
MAKE SURE THEIR HARDWARE IS GOOD FOR IT
Not just the pc, but the peripherals too; their mouse, their mic, their webcam, their keyboard- these things are not always supported well.
Linux can be fast, easy, and really comfortable and painless with little to no troubleshooting or tedious workarounds to get your stuff to work; but you have to be using the right hardware.
Yes, make sure you have alternative programs lined up that are actually good (stop reccing gimp when krita is a way better P$ alternative for people trying to draw digitally), and maybe consider talking about how to run wine in a newbie friendly way for things they might need for work reasons that dont work on linux normally(and accept that it might not work even with wine), but above all, make sure that its not just being phrased as 'a you problem' when it might be their system that is the issue there.
For prospective switchers that tried but gave up because of glitches or freezes or things otherwise not working: It wasnt you being bad at computers. Sometimes it just doesnt work with that hardware well and there is nothing you can do. People dont warn you about this, but its a very real issue.
If you still want to try linux, when you eventually get a new computer in the future, look for one that seems to be supported by linux well- some pcs even come with linux preinstalled for you even (dell does this with ubuntu and ubuntu has skins that looks windows esque). Asking specifically for linux compatible or linux preinstalled computers signals to developers to make more computers that work with linux, and makes it easier to get linux friendly stuff.
If not, there are windows 11 neutering tools out there in the wild that are very useful and are a plenty fine alternative to switching. You should only switch if you want to switch.
#wayward rambling#long post#linux#rebloggable#its also worth assessing for their ability and desire to debug themselves via google fu and command line instead of taking it to A Guy#but number one is checking the hardware!! You cant do shit if the hardware isnt good for it!!#this sort of went in whatever direction oh well
73 notes
·
View notes
Note
Do you have any tips/useful information for people who want to start making audio rps?
(Also love ur content sm!!! Mitch is the most lovable little guy)
Aw thank you so much! Love him too!
This is a great question, had to think about it for a bit;
If you want to dabble with making audios, feel free to start off with public scripts! I think there's subreddits like ASMR script haven (IIRC?) that has public scripts that can be filled by anyone. Just be sure to read the author's conditions carefully i.e. credit, terms of use, what can be changed etc. Right at the start I recorded a public script to try and get started, it's a great way to just jump right into making something to learn the ropes of it without also first having to write an entire script for it too. Filling public scripts is a fantastic way to start off, however I reckon writing your own stories is a major part of the fun!
You don't need an expensive mic, but audio quality is a very important factor. Do some test recordings and listen back to them (with headphones!) and see how it sounds. This is especially important for whispered scenes (DO NOT get too close to the mic or breathe on it!) or loud scenes (DO NOT peak the mic!). If your mic has a gain / input dial, play with that before recording! Just start with mono to begin with, play with stereo if your mic supports it after you become familiar with it. Aim for your recording to be no louder than -6db at the highest, if you can keep your voice roughly between like -20 and -6 that tends to sound reasonably natural.
Do your best to eliminate external sounds! If you have AC or anything like that on, turn it off. I have to shut down my main PC and record with only my editing Mac on because the PC fans are much louder and my mic is very sensitive! There'll pretty much always be background fuzz, some mics will just have some, but try to make your room as quiet as you can. Your software may have some background noise removal tools, I use filters for that (expensive so I can't recommend them), but DO NOT use the noise removal tool in Audacity! It's terrible!
Speaking of, Audacity is decent to get started with. It's good basic recording software, plus multiplatform. For a while I preferred recording on Windows with Audiodope, also very simple, plus I liked that it asks me whether I wanted to record in mono or stereo first in case I forget to switch, I currently record on Mac with ocenaudio which does the same, while Audacity won't ask, you have to go into settings. Anyway Audacity is okay to start with for editing, it's free, but from what I understand it's a "destructive" editing software in that after you make a change like adding a filter, you can't then go back in and change it other than just undoing, which I really don't like, plus changing the timing of things looks fiddly. I don't know what to recommend to move up from, I've heard good stuff about Reaper but it looks very complicated. Avoid Adobe unless you have a free subscription from somewhere else. I edit entirely in Final Cut Pro so I can't recommend that unless you're on Mac, plus it's my old work software and expensive! If you need sound effects, I use freesound.org, there are other great free resources as well, but make sure you check each individual sound effect's license before use.
Once you've edited the audio and want to turn it into a video, I've heard good stuff about Da Vinci Resolve and Kden Live, both are free! Make a video canvas of 1920 x 1080, FPS doesn't especially matter if you only have a still thumbnail, 25 or 30 is fine, and render it out as a h264 mp4 if you're not sure what to select! Good compression for internet video, good for streaming. Try to record and export your audio as wav if you have enough space, wav is uncompressed audio so it maintains full quality but they can get large.
I also make my thumbnails in-edit but you may want to use external software like Gimp to make them. Avoid getting random stuff of google especially anime boys / girls, and definitely don't ever use an artist's stuff without asking for permission + giving proper credit. Using pre-built generators like Picrew is totally fine, just be sure to credit where you got it from, but 100% avoid AI generators, obviously. Be careful with Adobe stock images, apparently there's AI slop in there too. You don't need art for audios though, they're a nice to have bonus, but many of my most viewed videos have no art at all. If you need background images, I like unsplash.com because it has a free license! Read over it yourself but basically you're able to use pretty much any image they have in your videos!
Just jump in and try making something small, never start with your magnum opus! I started with the introverted incubus character because I'm a very shy person myself, it was an easier role to get started with! If you want to start writing your own scripts too there's a lot we could talk about there as well, just try to picture the scene from the perspective of the listener, what they may be thinking or feeling at any given moment, not just the perspective of the character you're going to be playing!
This was a lot and I don't think I covered much, I hope some of it helps though!!
49 notes
·
View notes
Note
How do you get such nice shots in captura? I wanna get better at it could you share some tips? Been trying to figure it out but I admit I'm not the most knowledgeable in photography etc.
Well.... It's a bit of a complicated process and it relies very very much on personal preference. Much like with any type of art there are different styles that each individual artist will gravitate toward. I can only show you how I do things, so I'd recommend asking other Captura folks on here about their own styles to see where our processes and preferences differ.
I'll also include some extremely helpful videos at the bottom, they go extremely in depth as to best practices and technical exploits.
Alright, lets get started with the background stuff... the tools! ReShade: Shader injection, a MUST if you want to take dynamic and customized captura without using a program like Photoshop to do everything in post.
SRWE: Simple Runtime Window Editor.... the god among programs... It's an upscaler, allowing you to increase the resolution of the game beyond the bounds of your monitor. It's how I was able to get 15K panoramas at one point in time.
Any image editing software. Since I rely mainly on compositing to get the lighting I do, I need something to overlay and mesh the images with. I use GIMP cuz it's free, but even Microsoft Paint will work as soon as it add the ability to layer images.
Those are the tools... what about the tactics?
Well, I generally prefer moodier shots with the Warframe being the central focus (though, that's also the side effect of me cropping the image). Just a note! Moody doesn't mean dark, moody is the enigmatic space between dark and light where there is more dark than light... but there's still a good amount of light to be had. Occasionally you can have overexposure in a moody shot even.
Important to note, the overall exposure level of the environment, even is the scene lighting is low, will effect how brightly your Warframe can be lit. Both the Scene Light and Exposure sliders need to be fine-tuned otherwise you won't be able to light your Warframe at all.
Now, for shot composition I prefer low angles with either a cluttered but familiar/recognizable background, or a simple but abstract background. The Subject, be it a Warframe, an enemy, or an NPC, reside in the center with their feet out of shot.
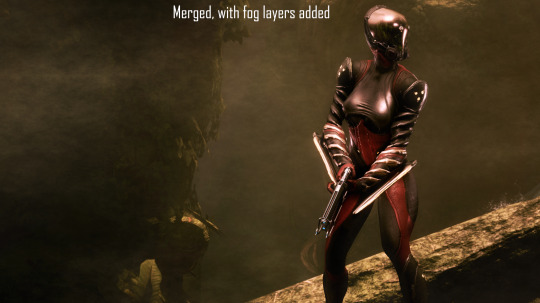
Like so:

Each of these shots also demonstrate well the way I like to pose my subjects: Symmetry and.... not... not symmetry. The official term for this is Contrapposto, which is Italian for Counterpoise. Basically, even though the Wisp is sedentary, her body is still giving off the impression of movement based on how her waist is curving and hips are tilted, forming a loose 'S' shape. There's a handful of animation sets, Khora (Urushu) Noble, Mesa Noble, and Wisp Noble are excellent for this.
Some examples:
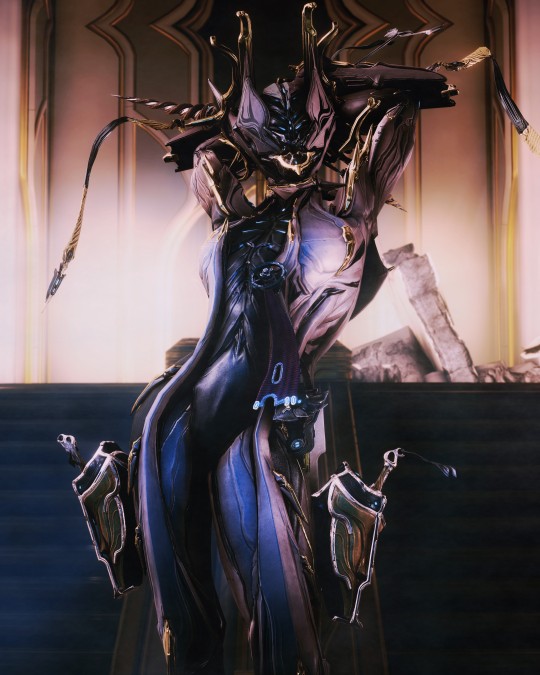
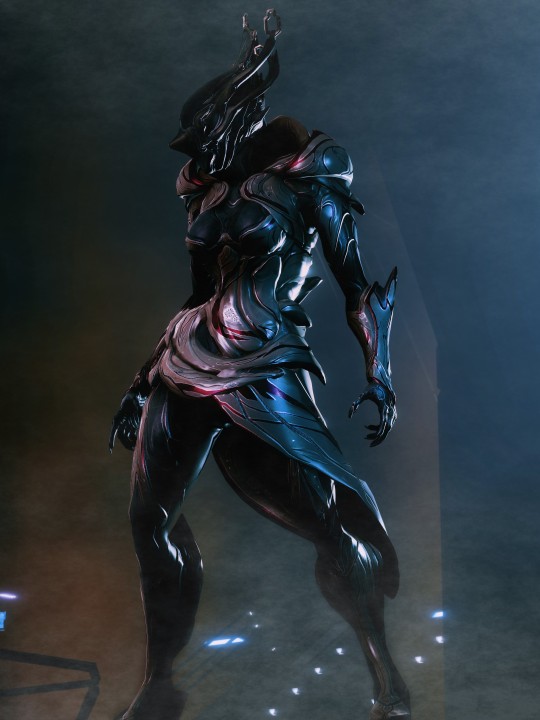
But... what about the lighting? This is where things get technical. So, the standard Captura's three-point lighting system is generally inadequate at properly lighting the entire Warframe. This is where compositing enters the picture, in a very literal sense. Each of these shots, shown above, are composites of between two and four separate images, each with different lighting angles. I actually have an example I made for an earlier explanation made already (thank goodness)

Getting the different lighting angles is really simple, just rotate the 3-way lighting without moving the camera. Then you overlay them in some photo editing software and just start going layer by layer, erasing bits of the topmost layer to reveal your desired highlights or shadows from the shot underneath.
Don't feel obligated to do this compositing process though! Sometimes the 3-way lighting works perfectly well for a shot or environment, don't feel obligated to complicate this process.
And this segues in nicely to the final part of the shot-making process, post-processing and fog layers.
Now, fog layers are important to the overall appearance and vibe of my Captura. They add texture the image that the game doesn't impart naturally, removing large swathes of solid color from the background and foreground. An added bonus is that the added texture makes the image look somewhat better (imo) when compressed, or when viewed at lower resolutions.
The same image with and without Fog


This shot contains two individual fog layers, one in the foreground, washing out the foliage, giving the general uniformity of it texture and implied depth, it also serves to cover up the manual blurring I did (poorly) around his legs. Then there's the background Fog, which is the deeper blue you see in the sky. It adds a more dynamic air to the generally dour set of greys. And, again, the fog is just something I personally like to add, even if it doesn't serve a practical purpose in a shot. No shade if someone feels the fog ruins the shot, I almost always keep a fog-free version about.
After the fog is added, blended, and blurred slightly, I will apply a few gentle blurring filters to remove any jarring or jagged pixelation from the shot, giving the Frame a somewhat smoother appearance and reducing the file-size dramatically.
That's just how I do it though, it's not a particularly popular style, but it's how I do it and how I love to do it! :3 Remember to ask around, I'm sure there's lotsa Captura Artists out there willing to explain their methods and processes.
Helpful vids! How to Captura by Vash Cowaii Hotsampling in Warframe for High Res Shots by PurpleFlurp
good luck, and happy snapping!
#warframe#captura#warframe tag#warframe captura#sorry for writing an essay... sometimes I don't know when to shut up#-_-
13 notes
·
View notes
Text
if youre not a Turbo Gamer, Linux is ready for 99% of use cases
office suite: Libreoffice has basically everything you'd need from spreadsheets and word docs to graphical files and presentations
video editing: kdenlive is fantastic if youre on anything but centos, in which case you can use DaVinci Resolve
photo editing: GIMP and Krita are amazing manipulation and painting programs respectively
browsers: Firefox tends to be the default, but you can install Chrome and even Edge if you want to use Edge for some reason. Lots of browsers are available.
Gaming: Steam, Lutris, Bottles, all great options for gaming, but Steam's Proton tool is all around fantastic. Some gaming companies think Linux users are "filthy cheaters" by default, so they wont let you play their game on Linux even tho it'd work fine. Thats really the only hiccup with Linux gaming tbh
Linux is good enough for most desktop users and its easy to install. All you need to get started is a flash drive and a willingness to learn
i doubt the option to turn off Recall will be available for ever, let alone it being local to your system only. Try Linux c:
102K notes
·
View notes
Text
Here are some beginner-friendly photo retouching tips to help improve your images without going overboard:
Start with Basic Adjustments
Use software like Adobe Lightroom, Photoshop, or free tools like GIMP or Snapseed.
Brightness/Contrast: Correct under- or over-exposed images.
White Balance: Adjust temperature (warm/cool) to reflect natural colors.
Crop & Straighten: Clean composition goes a long way.
Retouch Skin Gently
Remove Blemishes: Use a healing or spot removal tool (don't erase all texture).
Smooth Skin (Lightly): Tools like “Frequency Separation” (advanced) or simple blur brushes work. Use a low opacity for a natural look.
Avoid Over-Smoothing: Keep pores and natural texture visible!
Enhance Eyes and Teeth
Eyes: Slightly brighten and sharpen for pop (but don’t make them glow).
Teeth: Desaturate yellow tones carefully. Don't go pure white.
Adjust Color and Tone
Use Curves or Levels: Fine-tune shadows, midtones, and highlights.
Vibrance over Saturation: Keeps skin tones more natural.
Color Grading: Add subtle tints to shadows/highlights for mood.
Zoom In, Then Zoom Out
Work zoomed in to catch detail, but always zoom out to check the overall effect. It’s easy to overdo retouching without realizing it.
Keep It Natural
A good rule: if someone can tell the photo was retouched, you probably went too far.
Recommended Beginner Tools:
Lightroom (basic edits & color grading)
Photoshop (detailed retouching)
Snapseed (Mobile)—easy touch-up tool
Canva or Pixlr—beginner-friendly web tools

1 note
·
View note
Text
How To Make Background Remove In Photos
Though background removal is a part of editing, it plays a vital role. Background removal can be frustrating at times to find that the beautiful image you have captured needs a whole lot of fixing on Photoshop or any other online tool all because it was not done with an understanding of how wonderful those tools are but for taking just another photo like pretty much (though almost everyone).

Easiest Way to Background remove tips using photoshop
Do you want to say goodbye to dull one-dimensional photos? Have you wanted to create images with transparent backgrounds that are ideal for logos, web graphics and anything artistic? Well, dream no more! And this one guide will unravel all the mysteries about transparent photo editing in no time and you will become a professional.
Transparency in photos explained
In photo editing, it is the term used to indicate that you can make certain parts of an image disappear. This creates an invisible background where the subject would be, often a solid color or another image.
Ways to Create Transparent Backgrounds:
Either of these methods can be used to enable transparent backgrounds:
1. Using Photo Editing Software:
Software: Software, such as Adobe Photoshop or GIMP (for a free alternative), and even some online photo editing tools.
Workflow: They have specific functionalities such as Background Removal or Select & Mask to extract the person and erase everything else in the background.
Complex: Those same advanced utilities, while useful and not necessarily difficult to use on a basic level, can still require some user interaction in order to get the best results.
2. Remove Tools from Background of Your Online:
Ease: Many simple online tools like Photoroom or Adobe Express do the background removal for you.
How They Are User-Friendly: You just have to submit your picture and Sugandh performs the image processing part for you.
Cons: Needs manual adjustments to deal with complex background and fine details in the image.

Bonus Tip: UK Clipping Path Background Removal Services Like A Pro.→ For professional-grade, high-volume background removal needs (in batch mode as needed), use services like UK clipping path Their professionals give you a clear and on-point image, allowing you to take less editing time.
Selecting the Suitable Approach for You:
The best method will vary depending on your coding ability, the level of detail in your image and how much control you want. If you have simple edits to make, online tools are a good place to begin. This will inevitably be slower, so power users who require accuracy are generally better off with purpose-built software.
How to Make Photos Look Like an Image from a Smartphone:
Now that you know this, you are all set to create awesome almost no background transparent images. So, practice makes perfect! In lieu of that, get out your favorite editing tool and let those creative juices flow!
BONUS TIP: Take advantage of the wealth of online tutorials and resources available to teach you advanced transparent photo refining.
For any kind of professional touch UK Clipping path is here. We provide Multiple Clipping path service, ecommerce photo editing service, professional photo retouching service and many more. Want top-notch service at an affordable price? Try us for free and see the difference.
0 notes
Text
Photo Editing
Introduction to Photo Editing
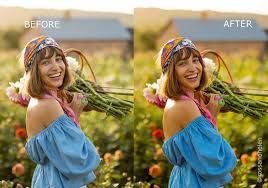
Photo editing has become an essential part of modern photography, enabling photographers and hobbyists to enhance their images and bring out the best in their shots. Whether you're a professional photographer, a social media influencer, or just someone who enjoys taking pictures, understanding the fundamentals of photo editing can dramatically improve the quality of your photos. This comprehensive guide will explore various aspects of photo editing from basic adjustments to advanced techniques, providing you with the knowledge to create stunning images.
The Importance of Photo Editing
In the digital age, capturing a great photo is only half the battle. Even the best cameras can produce images that need a little tweaking to reach their full potential. Factors like lighting, color balance, and composition often require post-processing to ensure that the image looks as vibrant and professional as possible.
Enhance Colors and Lighting: Adjust brightness, contrast, and saturation to make your photos more visually appealing.
Correct Imperfections: Remove blemishes, correct red-eye, and fix other flaws that detract from the image.
Alter Composition: Crop, straighten, and reframe images to improve their composition.
Create Artistic Effects: Apply filters, overlays, and textures to give your photos a unique, creative look.
Before diving into specific editing techniques, it's essential to understand the tools at your disposal. Various photo editing software options range from beginner-friendly apps to professional-grade programs.
Popular Photo Editing Software
Adobe Photoshop:
Overview: The industry standard for photo editing, offering a vast array of tools for everything from basic adjustments to complex image manipulation.
Key Features: Layers, masks, advanced retouching tools, and support for plugins.
Best For: Professionals and serious hobbyists who need advanced features and flexibility.
Adobe Lightroom:
Overview: A powerful tool designed for organizing and editing large collections of photos.
Key Features: Non-destructive editing, presets, and robust organizational tools.
Best For: Photographers who need to manage and process large numbers of images.
GIMP (GNU Image Manipulation Program):
Overview: A free, open-source alternative to Photoshop.
Key Features: Comprehensive tools for editing and manipulating images, supports layers and plugins.
Best For: Users who need advanced editing features without the cost.
Affinity Photo:
Overview: A budget-friendly alternative to Photoshop, offering many of the same features.
Key Features: High-end photo editing tools, RAW editing, and a user-friendly interface.
Best For: Photographers who want professional-level tools at an affordable price.
Canva:
Overview: A user-friendly online platform for basic photo editing and graphic design.
Key Features: Drag-and-drop interface, templates, and basic editing tools.
Best For: Beginners and casual users looking for quick edits and design work.
Basic Photo Editing Techniques
Once you've chosen your editing software, it's time to start enhancing your photos. Here are some basic techniques that form the foundation of photo editing.
Cropping and Straightening:
Purpose: Improve composition by removing unnecessary elements and straightening horizons.
How-To: Use the crop tool to trim the edges of your photo. Many tools also offer a grid overlay to help you straighten the image by aligning key elements with the grid lines.
Adjusting Exposure:
Purpose: Correct the overall brightness of your image.
How-To: Use the exposure slider to increase or decrease the brightness. Be careful not to overexpose (too bright) or underexpose (too dark) your image.
Contrast and Brightness:
Purpose: Enhance the difference between the light and dark areas of your photo, making it more dynamic.
How-To: Adjust the contrast slider to increase or decrease the difference between shadows and highlights. Use the brightness slider to fine-tune the overall lightness of the image.
Color Correction:
Purpose: Ensure that the colors in your photo are accurate and appealing.
How-To: Use the white balance tool to correct any color cast (e.g., too warm or too cool). Adjust saturation and vibrance to enhance colors without oversaturating them.
Sharpening:
Purpose: Enhance the clarity of your image by making edges appear more defined.
How-To: Apply the sharpening tool carefully to avoid creating a grainy or unnatural look. Focus on areas that need more definition, like eyes in a portrait or the edges of objects in landscapes.
Noise Reduction:
Purpose: Minimize graininess or “noise,” particularly in low-light photos.
How-To: Use the noise reduction slider to smooth out the grain, but be careful not to overdo it, as it can lead to a loss of detail.
Advanced Photo Editing Techniques
Once you've mastered the basics, you can explore more advanced techniques to take your photo editing to the next level.
1. Layering and Masking:
Purpose: Allows you to make non-destructive edits, combine multiple images, and apply adjustments selectively.
How-To: Use layers to separate different elements of your photo (e.g., background, subject) and apply masks to control where adjustments are applied. This technique is powerful for compositing images or making complex adjustments.
2. Dodging and Burning:
Purpose: Enhance or darken specific areas of your photo to add depth and focus.
How-To: The dodge tool lightens areas of your photo, while the burn tool darkens them. Use these tools selectively to draw attention to key parts of your image or to create a more balanced exposure.
3. Cloning and Healing:
Purpose: Remove unwanted elements or imperfections from your photo.
How-To: The clone stamp tool allows you to copy pixels from one part of your image to another, effectively “erasing” unwanted objects. The healing brush works similarly but blends the copied area with the surrounding pixels for a more natural look.
4. Advanced Color Grading:
Purpose: Apply a specific mood or aesthetic to your photo through color adjustments.
How-To: Use curves, selective color, or split toning to fine-tune the colors in your image. This technique is often used in cinematic photography to create a specific atmosphere.
5. Working with RAW Files:
Purpose: RAW files contain more data than JPEGs, giving you greater flexibility in editing.
How-To: Open RAW files in a program like Adobe Lightroom or Photoshop. From there, you can adjust exposure, white balance, and other settings with minimal loss of quality. RAW editing is essential for professional photographers who need the highest quality results.
Creative Photo Editing
Beyond enhancing and correcting photos, editing can also be used creatively to produce artistic images. This involves thinking outside the box and using various tools and techniques to transform your photos in unique ways.
1. Applying Filters and Presets:
Purpose: Quickly change the look and feel of your photo.
How-To: Many editing programs come with built-in filters and presets. These are pre-defined adjustments that can dramatically alter the appearance of your image. You can also create your own presets for a consistent style across multiple photos.
2. Adding Textures and Overlays:
Purpose: Enhance your photos with additional visual elements.
How-To: Apply textures (like grunge, paper, or fabric) as an overlay to add depth and interest to your photo. You can also use light leaks, lens flares, or bokeh effects to create a specific mood.
3. Photo Manipulation:
Purpose: Combine multiple images or elements to create a surreal or fantasy composition.
How-To: Use techniques like compositing, where you blend multiple images, or digital painting, where you paint directly onto your photo. This requires a good understanding of layers, masking, and perspective to achieve a believable result.
4. Black and White Conversion:
Purpose: Create timeless, classic images by converting color photos to black and white.
How-To: Use the black and white adjustment layer or desaturation tool to remove color from your image. You can then adjust the contrast and apply filters to enhance the tonal range and bring out details.
Tips for Effective Photo Editing
Work Non-Destructively:
Always use layers, masks, and adjustment layers to ensure that your original image remains untouched. This allows you to experiment and make changes without permanently altering your photo.
Use Shortcuts:
Familiarize yourself with keyboard shortcuts in your editing software. This will speed up your workflow and make the editing process more efficient.
Keep It Natural:
While it's tempting to push adjustments to the extreme, subtlety is often more effective. Aim to enhance your photos without making them look overly edited.
Learn from Others:
Study the work of professional photographers and editors. Tutorials, online courses, and forums are valuable resources for learning new techniques and improving your skills.
Practice Regularly:
The more you edit, the better you'll become. Experiment with different styles and techniques to develop your unique editing style.
The Future of Photo Editing
Photo editing technology is constantly evolving, driven by advancements in software and artificial intelligence (AI). Here’s a glimpse of what the future holds:
1. AI-Powered Editing:
AI is making photo editing faster and more accessible. Tools like Adobe's Sensei and Laminar AI can automatically enhance photos, suggest edits, and even retouch portraits with a single click. As AI technology advances, we can expect more intuitive and powerful editing tools.
2. Augmented Reality (AR) in Editing:
AR is starting to influence photo editing, allowing users to visualize edits in real-time or apply effects that interact with the environment. This technology could lead to new creative possibilities and more immersive editing experiences.
3. Mobile Editing:
With the increasing power of smartphones, mobile editing apps are becoming more sophisticated. Professionals and amateurs alike are turning to mobile apps like Adobe Lightroom Mobile and Snapseed for on-the-go editing. The convenience and accessibility of mobile editing will continue to grow.
4. Collaborative Editing:
As cloud-based tools become more prevalent, collaborative editing is becoming easier. Multiple users can work on the same project simultaneously, whether they are in the same room or across the globe. This is particularly useful for professional teams and creative agencies.
The Importance of Photo Editing
In the digital age, capturing a great photo is only half the battle. Even the best cameras can produce images that need some tweaking to reach their full potential, and post-processing is often required in elements such as lighting, color balance and composition to make your images look as vibrant and professional as possible.
Enhance Colors and Lighting: Adjust brightness, contrast, and saturation to make your photos more visually appealing.
Correct Imperfections: Remove blemishes, correct red-eye, and fix other flaws that detract from the image.
Alter Composition: Crop, straighten, and reframe images to improve their composition.
Create Artistic Effects: Apply filters, overlays, and textures to give your photos a unique, creative look.
Before diving into specific editing techniques, it's important to become familiar with the tools available to you. Various photo editing software options range from beginner-friendly apps to professional-grade programs.
Popular Photo Editing Software
Adobe Photoshop:
Overview: The industry standard for photo editing, offering a vast array of tools for everything from basic adjustments to complex image manipulation.
Key Features: Layers, masks, advanced retouching tools, and support for plugins.
Best For: Professionals and serious hobbyists who need advanced features and flexibility.
Adobe Lightroom:
Summary: A powerful tool for organizing and editing large photo collections.
Key Features: Non-destructive editing, presets, and robust organizational tools.
Best For: Photographers who need to manage and process large numbers of images.
GIMP (GNU Image Manipulation Program):
Overview: A free, open-source alternative to Photoshop.
Main features: Comprehensive tools for image editing and manipulation, support for layers and plugins.
Best For: Users who need advanced editing features without the cost.
Affinity Photo:
Overview: A budget-friendly alternative to Photoshop, offering many of the same features.
Key Features: High-end photo editing tools, RAW editing, and a user-friendly interface.
Best For: Photographers who want professional-level tools at an affordable price.
Canva:
Overview: A user-friendly online platform for basic photo editing and graphic design.
Key Features: Drag-and-drop interface, templates, and basic editing tools.
Best For: Beginners and casual users looking for quick edits and design work.
Once you've chosen your editing software, you're ready to start enhancing your photos. Here are some basic techniques to help you start editing your photos.
Cropping and Straightening:
Purpose: Improve composition by removing unnecessary elements and straightening horizons.
How-To: Use the crop tool to trim the edges of your photo. Many tools also offer a grid overlay to help you straighten the image by aligning key elements with the grid lines.
Adjusting Exposure:
Purpose: Correct the overall brightness of your image.
How-To: Use the exposure slider to increase or decrease the brightness. Be careful not to overexpose (too bright) or underexpose (too dark) your images.
Contrast and Brightness:
Purpose: Enhance the difference between the light and dark areas of your photo, making it more dynamic.
How-To: Adjust the contrast slider to increase or decrease the difference between shadows and highlights. Use the Brightness slider to optimize the overall brightness of your image.
Color Correction:
Purpose: Ensure that the colors in your photo are accurate and appealing.
How-To: Use the white balance tool to correct any color cast (e.g., too warm or too cool). Adjust saturation and vibrance to enhance colors without oversaturating them.
Sharpening:
Purpose: Enhance the clarity of your image by making edges appear more defined.
How-To: Apply the sharpening tool carefully to avoid creating a grainy or unnatural look. Focus on areas that need more definition, such as eyes in a portrait or the edges of objects in a landscape.
Noise Reduction:
Purpose: Minimize graininess or “noise,” particularly in low-light photos.
How to: Use the Noise Reduction slider to smooth out grain, but be careful not to overdo it as this can result in loss of detail.
Advanced Photo Editing Techniques
Once you've mastered the basics, you can explore more advanced techniques to take your photo editing to the next level.
1. Layering and Masking:
Purpose: Allows you to make non-destructive edits, combine multiple images, and apply adjustments selectively.
How-To: Use layers to separate different elements of your photo (e.g., background, subject) and apply masks to control where adjustments are applied. This technique is great for compositing images or making complex adjustments.
2. Dodging and Burning:
Purpose: Enhance or darken specific areas of your photo to add depth and focus.
How-To: The dodge tool lightens areas of your photo, while the burn tool darkens them. Use these tools selectively to draw attention to key parts of your image or to create a more balanced exposure.
3. Cloning and Healing:
Purpose: Remove unwanted elements or imperfections from your photo.
How-To: The clone stamp tool allows you to copy pixels from one part of your image to another, effectively “erasing” unwanted objects. The healing brush works similarly but blends the copied area with the surrounding pixels for a more natural look.
4. Advanced Color Grading:
Purpose: Apply a specific mood or aesthetic to your photo through color adjustments.
How-To: Use curves, selective color, or split toning to fine-tune the colors in your image. This technique is often used in film photography to create a particular atmosphere.
5. Working with RAW Files:
Purpose: RAW files contain more data than JPEGs, giving you greater flexibility in editing.
How-To: Open RAW files in a program like Adobe Lightroom or Photoshop. From there, you can adjust exposure, white balance and other settings with minimal loss of quality. RAW editing is essential for professional photographers looking for the highest quality results.
Creative Photo Editing
Beyond enhancing and correcting photos, editing can also be used creatively to produce artistic images. It's all about thinking outside the box and using different tools and techniques to transform your photos in a unique way.
1. Applying Filters and Presets:
Purpose: Quickly change the look and feel of your photo.
How-To: Many editing programs come with built-in filters and presets. These are predefined adjustments that can drastically change the look of your image. You can also create your own presets to create a consistent style across multiple photos.
2. Adding Textures and Overlays:
Purpose: Enhance your photos with additional visual elements.
How-To: Apply textures (like grunge, paper, or fabric) as an overlay to add depth and interest to your photo. You can also use light leaks, lens flares, or bokeh effects to create a specific mood.
3. Photo Manipulation:
Purpose: Combine multiple images or elements to create a surreal or fantasy composition.
How-To: Use techniques like compositing, where you blend multiple images, or digital painting, where you paint directly onto your photo. This requires a good understanding of layers, masking, and perspective to achieve a believable result.
4. Black and White Conversion:
Purpose: Create timeless, classic images by converting color photos to black and white.
How-To: Use the black and white adjustment layer or desaturation tool to remove color from your image. You can then adjust the contrast and apply filters to enhance the tonal range and bring out details.
Conclusion
Image editing is an essential skill in today's visually driven world. Whether you want to fix small mistakes or create stunning visual art, image editing tools and techniques offer endless possibilities. By understanding the basics and exploring advanced techniques, you can turn your photos into something truly stunning. Remember, image editing is both a science and an art. It requires technical knowledge, creativity and practice. With the right tools and the willingness to keep learning, you can master photo editing and realize your creative vision. Whether you're enhancing snapshots for social media or creating a professional portfolio, photo editing is key to making your images stand out in a crowded digital environment. Photo editing has become an essential part of modern photography, allowing photographers and amateurs alike to enhance their images and get the most out of them. Whether you're a professional photographer, a social media influencer, or simply someone who enjoys photography, understanding the basics of photo editing can greatly improve the quality of your photos. This comprehensive guide will explain the various aspects of photo editing, from basic adjustments to advanced techniques, giving you the knowledge to create amazing images.
#PhotoEditing#PhotoEditor#PhotoRetouching#CreativeEditing#EditMyPic#PhotoManipulation#EditingTips#PhotographyEditing#BeforeAndAfter#EditLikeAPro#EditingSoftware#Retouching#DigitalArt#CreativeRetouch#PhotoshopSkills
0 notes
Text
Life and Pictures: Entry #8
Post-Processing and Editing: Enhancing Your Photos
Post-processing is an essential part of modern photography that can transform your raw images into stunning final pieces. This entry covers the basics of popular editing software, such as Adobe Lightroom and Photoshop, and provides guidance on how to use these tools to enhance your photos. Whether you're adjusting exposure, performing color correction, retouching blemishes, or adding creative effects, post-processing can bring your images to life.
Adobe Lightroom Basics
1. Importing Photos:
Start by importing your photos into Lightroom. Use the Library module to organize and sort your images.
2. Adjusting Exposure:
Use the Basic panel to adjust exposure, contrast, highlights, shadows, whites, and blacks. This helps to balance the light and dark areas in your photo.
3. Color Correction:
Adjust the white balance to correct any color casts. Use the temperature and tint sliders to achieve the desired look.
Use the HSL (Hue, Saturation, Luminance) panel to fine-tune individual colors in your photo.
4. Cropping and Straightening:
Use the Crop tool to improve the composition. Straighten horizons and remove any unwanted edges.
5. Retouching:
Use the Spot Removal tool to remove blemishes or unwanted objects.
The Adjustment Brush allows you to make localized adjustments to specific areas of your photo.
6. Adding Creative Effects:
Use the Effects panel to add vignettes or grain for a creative touch.
Experiment with presets to quickly apply a specific look to your photos.
Adobe Photoshop Basics
1. Layers and Masks:
Use layers to make non-destructive edits. Each layer can hold different elements of your photo.
Masks allow you to apply edits to specific areas of a layer, providing precise control over your adjustments.
2. Advanced Retouching:
Use the Healing Brush and Clone Stamp tools to remove more complex blemishes or objects.
The Liquify tool can help to subtly adjust shapes and features within your image.
3. Color Correction and Grading:
Use adjustment layers like Curves, Levels, and Color Balance to fine-tune the color and tone of your image.
Create mood and atmosphere by experimenting with color grading techniques.
4. Adding Text and Graphics:
Use the Text tool to add captions or watermarks to your photos.
Incorporate shapes and graphics to create composite images or design elements.
5. Creative Effects:
Use filters and blending modes to add unique effects to your photos.
The Smudge and Blur tools can help to create motion effects or soften parts of your image.
Alternative Editing Software
If you don’t have access to Adobe software, other editing programs offer similar features. Here are some alternatives you can use:
1. GIMP (GNU Image Manipulation Program):
A free, open-source image editor with a wide range of tools for photo retouching, composition, and authoring.
2. Affinity Photo:
A cost-effective alternative to Photoshop with professional-grade tools for editing, retouching, and color correction.
3. Darktable:
A free, open-source photography workflow application and raw developer, similar to Lightroom.
4. Pixlr:
A web-based photo editor that offers a variety of tools for basic and advanced photo editing.
5. Capture One:
A professional-grade photo editing software known for its excellent color grading tools and tethered shooting capabilities.
6. Snapseed:
A mobile photo editing app with a comprehensive set of tools for enhancing photos on the go.
7. Canva:
An easy-to-use online graphic design tool that also provides photo editing features, such as filters, adjustments, and text overlay options. Canva is great for quick edits and creating social media-ready images.
Workflow Tips
Consistency: Develop a consistent editing style to create a cohesive look across your photos.
Backup: Always back up your original photos before editing. Save edited versions as separate files to preserve the originals.
Practice: The more you experiment with editing, the more proficient you will become. Don’t be afraid to try new techniques and tools.
Post-processing can significantly enhance your photography, allowing you to express your creative vision fully. By mastering these basic techniques in Lightroom and Photoshop, or their alternatives, you can elevate the quality of your images and create truly stunning photographs.
1 note
·
View note
Text
Photo Editing for Beginners: A Comprehensive Guide

Introduction
Photo editing can seem daunting for beginners, but it's an essential skill for enhancing and perfecting your images. With the right techniques and tools, you can transform ordinary photos into stunning works of art. This comprehensive guide will walk you through the basics of photo editing, providing you with the knowledge to get started on your editing journey.
Understanding Photo Editing
Photo editing involves adjusting and enhancing images to improve their appearance. This can range from simple adjustments like cropping and color correction to more complex edits like retouching and compositing. The goal is to create visually appealing images that convey your desired message or aesthetic.
Essential Photo Editing Techniques
1. Cropping and Straightening
Cropping allows you to remove unwanted elements and improve the composition of your photo. Straightening helps align the horizon or other key elements, ensuring a balanced image.
2. Adjusting Exposure
Correcting exposure ensures your photo is neither too dark nor too light. Use tools like brightness, contrast, highlights, and shadows to balance the exposure.
3. Color Correction
Color correction adjusts the colors in your photo to make them look natural and vibrant. Tools like white balance, hue/saturation, and color balance can help achieve the desired color tone.
4. Sharpening
Sharpening enhances the fine details in your photo, making it appear crisper and more defined. Use sharpening tools sparingly to avoid creating an unnatural look.
5. Noise Reduction
Noise reduction minimizes graininess, especially in photos taken at high ISO settings. Balancing noise reduction with detail preservation is key to maintaining image quality.
Choosing the Right Photo Editing Software
Adobe Photoshop: A powerful and versatile tool for both basic and advanced photo editing.
Adobe Lightroom: Excellent for managing and editing large batches of photos with ease.
GIMP: A free, open-source alternative to Photoshop with many similar features.
Canva: A beginner-friendly tool with a focus on design and simple photo edits.
Tips for Effective Photo Editing
Start with a High-Quality Image: The better the original photo, the easier it will be to edit.
Work Non-Destructively: Use layers and masks to make edits without altering the original image.
Use Presets and Filters: Presets can save time and help you achieve a consistent look.
Zoom In and Out: Regularly zoom in to work on details and zoom out to see the overall effect.
Take Your Time: Rushing can lead to mistakes. Take your time to ensure each edit enhances the photo.
Common Photo Editing Pitfalls to Avoid
Over-Editing: Less is often more. Avoid making excessive adjustments that can make the photo look unnatural.
Ignoring the Histogram: The histogram is a valuable tool for understanding the exposure and tonal range of your photo. Use it to guide your adjustments.
Neglecting Backup: Always back up your original photos before making edits to ensure you can revert to the original if needed.
Conclusion
Photo editing is a valuable skill that can greatly enhance your photography. By mastering essential techniques like cropping, exposure adjustment, color correction, sharpening, and noise reduction, you can create stunning images that captivate viewers. With the right tools and a bit of practice, you'll be well on your way to becoming a proficient photo editor.
0 notes
Text
Photo Retouching Services in Ireland

Photo retouching has become an essential aspect of both personal and professional photography. Whether you're a professional photographer aiming to deliver flawless images to your clients or an individual looking to enhance your personal photos, photo retouching services can make a world of difference. In this article, we'll dive into the world of photo retouching services in Ireland, exploring everything from the basics to the top service providers.
Understanding Photo Retouching
What is Photo Retouching?
Photo retouching involves modifying and enhancing images to improve their overall appearance. This can include correcting colors, removing blemishes, adjusting lighting, and much more. Unlike basic photo editing, which might involve simple adjustments like cropping or rotating an image, retouching is more detailed and aims to perfect the image.
Difference Between Retouching and Editing
While photo editing encompasses a wide range of adjustments, retouching is a specialized subset focusing on fine-tuning and enhancing details. Editing might be your go-to for basic fixes, but retouching is what you need for those magazine-quality images.
Why Photo Retouching Matters
Enhancing Professional Photography
For professional photographers, the quality of their work can make or break their reputation. High-quality retouching ensures that every photo delivered to clients is flawless, showcasing the photographer's skills in the best possible light.
Improving Personal Photos
Even for personal use, retouching can significantly enhance the appeal of your photos. Whether it's a family portrait or a selfie, a bit of professional retouching can turn an ordinary picture into a treasured keepsake.
Types of Photo Retouching Services
Basic Retouching
This involves minor corrections such as color adjustment, brightness and contrast enhancement, and simple blemish removal.
Advanced Retouching
Advanced retouching covers more detailed work like skin smoothing, removing complex objects, and enhancing specific features.
Restoration Services
These services are perfect for old or damaged photos. Restoration can bring back the original beauty of an old photograph, fixing tears, scratches, and fading.
Creative Retouching
For those looking to add an artistic touch to their photos, creative retouching includes techniques like adding effects, merging images, and creating composites.
Popular Photo Retouching Techniques
Skin Smoothing
This technique is used to remove blemishes, wrinkles, and other imperfections from the skin, creating a flawless look.
Color Correction
Ensuring the colors in your photo are accurate and vibrant is crucial. Color correction adjusts the hues, saturation, and brightness to achieve the perfect balance.
Object Removal
Sometimes, unwanted objects or people can ruin a photo. Object removal techniques can seamlessly eliminate these distractions.
Background Change
Changing the background of a photo can drastically alter its look and feel. This technique is often used to place subjects in more appealing or relevant settings.
Tools and Software for Photo Retouching
Adobe Photoshop
Adobe Photoshop is the industry standard for photo retouching, offering a vast array of tools and features for detailed editing.
Lightroom
Lightroom is another popular choice, especially for photographers, due to its powerful batch processing capabilities and ease of use.
GIMP
For those looking for a free alternative, GIMP offers many of the same features as Photoshop, making it a great option for budget-conscious retouchers.
Other Popular Tools
There are several other tools available, such as Capture One, Affinity Photo, and Corel PaintShop Pro, each with its unique features and strengths.
Choosing a Photo Retouching Service in Ireland
What to Look For
When selecting a retouching service, look for experienced professionals with a strong portfolio. Check for expertise in the specific type of retouching you need.
Comparing Prices and Services
Prices can vary widely, so it's essential to compare different providers. Look for transparent pricing structures and ensure you understand what services are included.
Reading Reviews and Testimonials
Customer reviews and testimonials can provide valuable insights into the quality and reliability of a retouching service.
Top Photo Retouching Services in Ireland
Local Studios
Many local photography studios offer retouching services. These can be convenient if you prefer face-to-face consultations.
Freelance Retouchers
Freelancers often provide a more personalized service and can be more flexible with pricing and deadlines.
Online Retouching Services
Online services can offer quick and convenient solutions, often with a fast turnaround time and competitive pricing.
Cost of Photo Retouching Services
Factors Influencing Cost
The cost of retouching services can depend on the complexity of the work, the experience of the retoucher, and the turnaround time.
Average Pricing in Ireland
On average, basic retouching services in Ireland can range from €20 to €50 per image, while advanced retouching might cost between €50 and €150 per image.
Tips for Budget-Friendly Retouching
To save money, consider batch processing for multiple photos or seeking out package deals from retouching services.
Benefits of Professional Photo Retouching
Quality and Precision
Professional retouchers have the skills and tools to achieve high-quality, precise results that amateur efforts can't match.
Time-Saving
Outsourcing retouching can save you significant time, allowing you to focus on other important tasks or creative projects.
Access to Advanced Techniques
Professionals have access to the latest techniques and software, ensuring your photos are retouched using cutting-edge methods.
How to Communicate Your Vision to a Retoucher
Providing Clear Instructions
Be specific about what you want to achieve. Clear instructions help the retoucher understand your vision and deliver results that meet your expectations.
Sharing Examples
Provide examples of the style or look you’re aiming for. This can help the retoucher get a better sense of your preferences.
Regular Feedback and Adjustments
Regular communication and feedback are crucial. Don’t hesitate to request adjustments if the initial results aren’t quite right.
Common Mistakes to Avoid in Photo Retouching
Over-Retouching
It’s easy to go overboard with retouching. Strive for a natural look to avoid making the photo appear artificial.
Inconsistent Style
Maintain consistency in the style of your retouching, especially when working on a series of photos.
Ignoring Natural Features
Retouching should enhance, not completely alter, the natural features of the subject. Avoid making changes that make the subject unrecognizable.
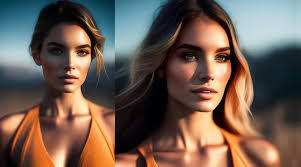
Case Studies: Before and After
Real-Life Examples
Seeing real-life examples of before and after retouching can be incredibly illuminating. It highlights the impact professional retouching can have on an image.
Analysis of Techniques Used
Analyzing the techniques used in these examples can provide insights into how different retouching methods can transform a photo.
Trends in Photo Retouching
Current Trends
Trends in photo retouching evolve constantly. Currently, natural-looking retouching and subtle enhancements are in vogue.
Future Predictions
Looking ahead, we can expect even more sophisticated AI-driven retouching tools and a continued emphasis on authenticity in photography.
Conclusion
Photo retouching is a powerful tool that can significantly enhance the quality of both professional and personal photos. Whether you’re looking to perfect a professional portfolio or create stunning personal images, understanding the different aspects of retouching and choosing the right service is crucial. Ireland offers a wealth of options, from local studios to freelance professionals and online services. By selecting the right retoucher and communicating your vision effectively, you can achieve truly remarkable results.
FAQs
What is the turnaround time for photo retouching services?
The turnaround time can vary depending on the complexity of the work and the retoucher's schedule. Typically, it ranges from a few days to a couple of weeks.
Can photo retouching make me look younger?
Yes, photo retouching can reduce the appearance of wrinkles and blemishes, giving a more youthful look.
How do I choose the right retouching style?
Consider the purpose of the photo and your personal preferences. Look at examples to decide on a style that suits your needs.
Is photo retouching ethical?
Photo retouching is ethical as long as it is done transparently and does not mislead the viewer. It’s important to use retouching to enhance rather than deceive.
Can retouching fix old and damaged photos?
Yes, photo restoration services specialize in fixing old and damaged photos, bringing them back to life with modern retouching techniques.
#editing#photoshop#reaction image#image clipping service#clippingpathservice#background remove#design#flashing images#retouching#clipping path company
0 notes
Text
How to Edit Photos like a Pro: Tips and Tricks for Stunning Images

In today's visually driven world, the importance of high-quality images cannot be overstated. Whether you're a professional photographer, a social media influencer, or a business owner, stunning images can make all the difference in how your work is perceived. At PHOTO EDITING SERVICES COMPANY, we understand the power of visual impact. Our trendsetting photo editing services, image masking, and photo retouching services ensure your images are not only beautiful but also maintain their integrity and detail. In this comprehensive guide, we'll share tips and tricks to help you edit photos like a pro, ensuring your images captivate and impress every time.
Understanding the Basics of Photo Editing
1. Choosing the Right Software
Before diving into editing, it's essential to choose the right software. Popular options include Adobe Photoshop, Lightroom, and GIMP. Each software has its strengths, with Photoshop being renowned for its versatility and precision, Lightroom for its efficient workflow, and GIMP for being a powerful free alternative.
2. Learning the Tools
Understanding the tools at your disposal is crucial. Basic tools include:
Crop Tool: For adjusting the framing and composition.
Adjustment Layers: For non-destructive editing of brightness, contrast, saturation, and more.
Healing Brush: For removing blemishes and imperfections.
Clone Stamp: For duplicating areas of an image to cover up unwanted elements.
Layer Masks: For blending different parts of an image seamlessly.
Essential Editing Techniques
3. Cropping and Straightening
Start with cropping to improve the composition. Ensure the horizon is straight, and apply the rule of thirds for a balanced image. Cropping can also help remove distractions from the edges of the frame, keeping the viewer’s focus on the main subject.
4. Adjusting Exposure and Contrast
Proper exposure is key to a good photo. Adjust the exposure to brighten or darken the image as needed. Increase contrast to make the image pop by enhancing the difference between light and dark areas. Use the histogram to guide your adjustments, ensuring you don't lose detail in shadows or highlights.
5. Color Correction
Colors can significantly affect the mood of an image. Adjust white balance to correct any color casts and ensure natural-looking colors. Use hue, saturation, and luminance adjustments to fine-tune colors. PHOTO EDITING SERVICES COMPANY specializes in color masking, which allows for precise control over specific colors in an image, enhancing its vibrancy and appeal.
6. Sharpening and Noise Reduction
Sharpening enhances the details, making the image appear crisper. However, be cautious not to over-sharpen, as this can introduce artifacts. Noise reduction is crucial for images taken in low light. Balance the noise reduction to smooth out graininess without losing too much detail.
7. Image Retouching
Retouching is an art. Use the healing brush and clone stamp tools to remove blemishes, spots, and unwanted objects. For portrait retouching, smooth skin while preserving texture, whiten teeth, and enhance eyes. Our expert retouching services at PHOTO EDITING SERVICES COMPANY ensure a natural yet polished look.
Advanced Editing Techniques
8. Using Layers and Masks
Layers and masks are fundamental for advanced editing. They allow for non-destructive edits and enable complex compositions. Use layer masks to blend multiple exposures, create composites, and apply adjustments selectively. PHOTO EDITING SERVICES COMPANY’s expertise in alpha and color masking ensures flawless edits with no detail loss.
9. Dodging and Burning
Dodging and burning are techniques used to lighten (dodge) or darken (burn) specific areas of an image. This helps in adding depth and dimension, enhancing the overall look. Use a soft brush and work on a low opacity to build up the effect gradually.
10. Frequency Separation
Frequency separation is a powerful technique for retouching portraits. It involves separating the image into high-frequency (texture) and low-frequency (color and tone) layers. This allows you to retouch skin texture and tone separately, achieving professional-level results.
11. Composite Photography
Creating composite images involves blending multiple photos to create a single, cohesive image. This can be used for adding elements, creating surreal scenes, or enhancing backgrounds. Mastery of selection tools and layer masks is crucial for seamless composites.
Enhancing Creativity
12. Adding Filters and Effects
Filters and effects can transform an ordinary photo into something extraordinary. Experiment with different filters to find the style that best fits your vision. Use effects like vignetting to draw attention to the subject or lens flare to add a sense of realism.
13. Black and White Conversion
Converting images to black and white can add a timeless quality. Focus on contrast and texture to create compelling black-and-white images. Use the black and white adjustment layer to control the conversion process, ensuring the tones are balanced.
14. Creative Masking Techniques
Masking allows for creative possibilities. Use gradient masks for smooth transitions, and experiment with texture and pattern masks to add artistic elements. PHOTO EDITING SERVICES COMPANY excels in creative masking, ensuring your images stand out with unique and innovative effects.
Workflow and Efficiency
15. Batch Processing
For large volumes of photos, batch processing can save time. Programs like Lightroom allow you to apply the same adjustments to multiple images simultaneously. This is particularly useful for maintaining a consistent look across a series of photos.
16. Using Presets
Presets are pre-configured settings that can be applied to images with a single click. They help speed up the editing process and ensure consistency. Create your own presets or use ones available online to achieve the desired look quickly.
17. Organizing Your Workflow
An organized workflow improves efficiency. Use a consistent file naming convention and folder structure. Utilize software features like catalogs in Lightroom to manage and organize your images effectively.
The Role of Professional Photo Editing Services
18. Why Choose Professional Editing?
Professional photo editing services, like those offered by PHOTO EDITING SERVICES COMPANY, bring expertise and experience that can take your images to the next level. Our 10+ years of experience, combined with advanced technical capabilities and a world-class team of Photoshop professionals, ensure that every image meets the highest standards.
19. Services Offered by PHOTO EDITING SERVICES COMPANY
Photo Masking: Precise masking for complex subjects like hair, fur, and feathers.
Portrait Retouching: Enhancing facial features while maintaining a natural look.
Image Clipping: Accurate cutouts for product photography and composites.
Digital Photo Restoration: Reviving old or damaged photos with expert restoration techniques.
Alpha Masking: Advanced masking for transparent and semi-transparent objects.
Color Masking: Enhancing or changing specific colors without affecting the rest of the image.
20. Global Reach and Expertise
PHOTO EDITING SERVICES COMPANY serves clients worldwide, including the USA, UK, Australia, Canada, Dubai, Saudi Arabia, UAE, Germany, Italy, India, Singapore, France, Finland, and Ireland. Our global reach ensures we understand diverse client needs and deliver tailored solutions that exceed expectations.
Conclusion
Editing photos like a pro requires a blend of technical skills, creativity, and an understanding of the tools at your disposal. By following the tips and techniques outlined in this guide, you can elevate your photo editing game and produce stunning images that captivate and impress. For those seeking professional results without the learning curve, PHOTO EDITING SERVICES COMPANY offers a range of expert services to meet all your photo editing needs. With our dedication to excellence and innovative approaches, we ensure every image is a masterpiece.
0 notes
Text
Make Your Image Perfect with 10 Free Background Remover Tools

In the digital age, where visuals play a crucial role in communication, having the perfect image can make all the difference. Whether you're a photographer, graphic designer, marketer, or simply someone who loves to share photos on social media, the quality of your images matters. One key aspect of enhancing your images is removing or changing the background, which can significantly impact the overall aesthetics and message of the picture. Fortunately, there are numerous free background remover tools available online that can help you achieve professional-looking results without breaking the bank. In this guide, we'll explore 10 of the best free background remover tools and how they can elevate your images to perfection.
Simplified
Simplified takes the lead as a top-tier free background remover tool due to its user-friendly interface and powerful customization capabilities. Its intuitive design ensures a seamless experience for users of all skill levels, providing a straightforward pathway to professional-looking results. With Simplified, the process of removing backgrounds becomes effortless, allowing users to refine image elements and achieve a polished look with simplicity and efficiency. The tool's robust customization options empower users to make detailed adjustments without the requirement for advanced design skills. Whether you're a novice or an experienced designer, Simplified accessible features and automation make it an ideal choice for anyone looking to enhance their images without the complexities often associated with graphic design tools.
Remove.bg:
Remove.bg is a popular and user-friendly online tool that specializes in removing backgrounds from images automatically. With its advanced AI technology, Remove.bg can accurately detect the subject in your photo and remove the background in seconds. Whether you're working with portraits, product shots, or group photos, Remove.bg delivers impressive results with just a few clicks. Best of all, it's free to use for images up to a certain resolution, making it perfect for casual users and professionals alike.
Clipping Magic:
Clipping Magic is another powerful background remover tool that offers precise control over the editing process. Its intuitive interface allows you to easily mark the foreground and background areas, and the tool will automatically remove the background while preserving the details of the subject. Clipping Magic also provides advanced editing features such as edge refinement and hair masking, ensuring clean and professional results every time. While the tool offers a paid version with additional features, the free version is still robust enough to meet the needs of most users.
Fotor:
Fotor is a comprehensive online photo editing suite that includes a background remover tool among its many features. With Fotor's background remover, you can quickly and easily remove unwanted backgrounds from your images and replace them with solid colors, gradients, or custom backgrounds. The tool also offers basic editing tools such as cropping, resizing, and color adjustments, allowing you to fine-tune your images to perfection. Whether you're editing portraits, landscapes, or product photos, Fotor provides a simple and effective solution for background removal.
GIMP:
GIMP (GNU Image Manipulation Program) is a powerful open-source image editing software that offers a wide range of features, including a robust background remover tool. While GIMP may have a steeper learning curve compared to some online tools, it provides unparalleled flexibility and control over the editing process. With GIMP, you can manually remove backgrounds, apply complex masking techniques, and fine-tune every aspect of your image to achieve professional-quality results. As an open-source software, GIMP is completely free to download and use, making it an excellent choice for budget-conscious users.
Pixlr:
Pixlr is a versatile online photo editor that offers a variety of tools for editing and enhancing your images, including a background remover tool. With Pixlr's background remover, you can quickly isolate subjects from their backgrounds and create stunning compositions with ease. The tool offers both automatic and manual selection modes, allowing you to choose the method that best suits your needs. Pixlr also provides a wide range of filters, effects, and overlays to further enhance your images, making it a favorite among photographers and designers alike.
PhotoScissors:
PhotoScissors is a simple yet powerful background remover tool that is perfect for users of all skill levels. With its intuitive interface and automatic background removal feature, PhotoScissors makes it easy to isolate subjects from their backgrounds in just a few clicks. The tool also offers advanced editing options such as edge refinement and feathering, allowing you to achieve seamless results with minimal effort. Whether you're removing backgrounds from portraits, product photos, or landscapes, PhotoScissors provides a hassle-free solution for achieving professional-quality images.
Canva:
Canva is a popular online graphic design platform that offers a range of tools for creating stunning visuals, including a background remover tool. With Canva's background remover, you can quickly remove unwanted backgrounds from your images and replace them with solid colors, patterns, or custom backgrounds. The tool also provides a variety of templates and design elements to help you create eye-catching graphics for social media, marketing materials, and more. While Canva offers a paid subscription with additional features, the free version includes everything you need to create professional-looking images.

Click Here
Adobe Photoshop Express:
Adobe Photoshop Express is a streamlined version of the industry-leading Photoshop software that offers a range of tools for editing and enhancing your images, including a background remover tool. With Photoshop Express, you can easily remove backgrounds from your photos and replace them with solid colors, gradients, or custom backgrounds. The tool also provides basic editing features such as cropping, resizing, and color adjustments, allowing you to fine-tune your images to perfection. While Photoshop Express offers a paid subscription with additional features, the free version is still a powerful tool for casual users and professionals alike.
Kapwing:
Kapwing is a web-based video and image editing platform that offers a variety of tools for creating and editing multimedia content, including a background remover tool. With Kapwing's background remover, you can quickly and easily remove backgrounds from your images and replace them with solid colors, patterns, or custom backgrounds. The tool also provides a range of editing options such as cropping, resizing, and adding text, allowing you to customize your images to suit your needs. Whether you're editing photos for social media, presentations, or personal projects, Kapwing provides a simple and effective solution for achieving professional-quality results.
Photopea:
Photopea is a powerful online image editor that offers many of the same features as Adobe Photoshop, including a robust background remover tool. With Photopea, you can easily remove backgrounds from your images and replace them with solid colors, gradients, or custom backgrounds. The tool also provides advanced editing options such as layers, masks, and filters, allowing you to fine-tune your images to perfection. While Photopea may have a steeper learning curve compared to some online tools, it provides unparalleled flexibility and control over the editing process, making it a favorite among professional photographers and designers.
Importance of Image Quality: In today's visually driven world, high-quality images are essential for grabbing attention, conveying messages effectively, and making a lasting impression. Whether it's for personal use, social media, marketing campaigns, or professional projects, the quality of your images can significantly impact their effectiveness.
Background Removal as a Key Editing Technique: Background removal is a fundamental editing technique used to isolate subjects from their surroundings, allowing for greater flexibility in design and composition. By removing distracting or irrelevant backgrounds, you can draw focus to the main subject, improve visual clarity, and enhance overall aesthetics.
Common Use Cases: Background removal is commonly used in various fields and industries. For example:
E-commerce: Product photos with clean, white backgrounds tend to perform better and increase sales.
Photography: Portrait photographers often remove backgrounds to create studio-like effects or enhance the subject's presence.
Graphic Design: Designers use background removal to create composite images, custom graphics, and visual effects for various projects.
Social Media: Influencers, brands, and individuals use background removal to create visually appealing content for platforms like Instagram, Facebook, and Pinterest.
Challenges in Background Removal: While background removal can significantly enhance images, it can also be challenging, especially when dealing with complex backgrounds, fine details, or irregular shapes. Manual background removal techniques may require time, skill, and precision, making them impractical for large volumes of images.
Role of Free Background Remover Tools: Free background remover tools provide accessible and user-friendly solutions for individuals and businesses looking to improve their images without investing in expensive software or hiring professional editors. These tools leverage advanced technologies such as artificial intelligence (AI) and machine learning to automate the background removal process, making it faster, easier, and more accurate.
Choosing the Right Tool: When selecting a free background remover tool, it's essential to consider factors such as ease of use, accuracy, editing capabilities, and compatibility with your workflow. While some tools offer basic functionalities suitable for casual users, others provide more advanced features for professional designers and photographers.
Integration with Other Editing Tools: Many free background remover tools integrate seamlessly with other image editing software, allowing users to combine background removal with additional editing techniques such as color correction, retouching, and text overlay. This integration streamlines the editing process and enables users to achieve comprehensive image enhancements with ease.
Continuous Improvement and Innovation: The landscape of free background remover tools is continually evolving, with developers regularly introducing new features, updates, and improvements to enhance usability and performance. Staying informed about the latest developments in this space can help users discover new tools and techniques to further improve their images.
1 Types of Background Removal Techniques: Free background remover tools employ various techniques to separate subjects from backgrounds. These techniques include:
Automatic Removal: Tools use AI algorithms to detect and remove backgrounds automatically, suitable for images with clear subject-background distinctions.
Manual Selection: Users manually outline the subject and background using selection tools, offering greater control over the editing process but requiring more time and effort.
Semi-Automatic Tools: These tools combine automated background removal with manual refinement options, striking a balance between speed and precision.
2 Considerations for Complex Images: While free background remover tools excel at handling simple images with well-defined subjects and backgrounds, they may struggle with complex scenes, such as those with intricate patterns, transparent elements, or overlapping objects. In such cases, additional manual editing or specialized software may be necessary to achieve desired results.
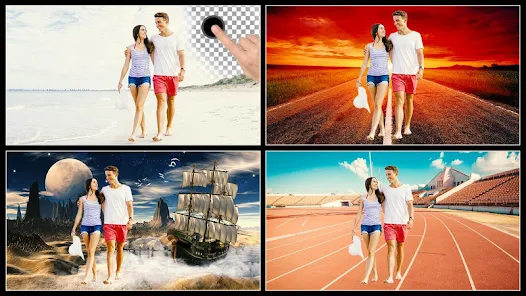
3 Image File Formats and Resolution: Free background remover tools support various image file formats, including JPEG, PNG, and TIFF. However, the resolution of the image may affect the accuracy of background removal, with higher-resolution images typically yielding better results. Users should consider the intended use and output requirements when selecting image resolution and file format.
4 Beyond Background Removal: While background removal is a valuable editing technique, free tools often offer additional features and functionalities to enhance images further. These may include:
Color Adjustments: Tools for adjusting brightness, contrast, saturation, and color balance to improve overall image quality.
Retouching Tools: Features for removing blemishes, smoothing skin, and enhancing details to achieve a polished look.
Text and Overlay Options: Tools for adding text, graphics, logos, and other overlays to customize images for specific purposes or branding requirements.
Conclusion:
Achieving the perfect image requires attention to detail and the right tools for the job. With the 10 free background remover tools outlined in this guide, you can easily remove unwanted backgrounds from your images and create stunning compositions with ease. Whether you're a professional photographer, graphic designer, or casual user, these tools offer the flexibility and functionality you need to elevate your images to perfection. So why settle for mediocre photos when you can make them perfect with the help of these free background remover tools?
0 notes
Text
Clipping World: Elevating Excellence in Clipping Path Services
In the digital age, where visual appeal is paramount, the demand for top-notch images is on the rise. Clipping World emerges as a pivotal player in the realm of image editing, offering unparalleled expertise in the art of precision through its best-in-class clipping path services. This comprehensive guide explores the nuances of Clipping World's services, shedding light on their significance, techniques, applications, and the transformative impact they have across diverse industries.

Introduction to Clipping World's Best Clipping Path Services:
Clipping World's best clipping path services involve the meticulous creation of vector paths or outlines around objects in images, delivering a level of precision that sets them apart. Tailored for graphic design, advertising, e-commerce, and other industries that prioritize visually stunning images, the primary objective is to enhance the overall aesthetic appeal and professionalism of the visuals.
Techniques in Clipping World's Clipping Path Services:
Basic Clipping Path:
Involves crafting a simple outline around uncomplicated objects.
Ideal for e-commerce product presentations requiring a clean and straightforward visual narrative.
Complex or Advanced Clipping Path:
Tailored for intricate objects with complex shapes and multiple curves.
Applied to images with detailed backgrounds or intricate product designs, demanding advanced skills and precision.
Multi-Clipping Path:
Employs multiple paths within a single image, enabling selective adjustments or modifications to different image segments.
Perfect for color correction, shadow addition, or other targeted enhancements.
Hair Masking:
Preserves fine details of hair while seamlessly removing the background.
Particularly crucial in fashion and photography industries, ensuring hair intricacies are impeccably retained.
Applications of Clipping World's Clipping Path Services:
E-commerce:
Vital for crafting visually engaging product images on e-commerce platforms.
Facilitates the presentation of products against diverse backgrounds or settings.
Advertising and Marketing:
Empowers the creation of attention-grabbing visuals for advertisements.
Utilized in designing banners, brochures, and various promotional materials.
Photography:
Widely adopted in post-processing to refine and modify images.
Essential in fashion photography, highlighting details such as clothing and hair.
Graphic Design:
Integral in designing visuals for websites, social media, and digital platforms.
Offers flexibility in incorporating images into diverse design concepts.
Tools and Software Used by Clipping World:
Adobe Photoshop:
The industry gold standard, providing an array of tools for precise clipping paths.
Leverages features like the Pen Tool, Magic Wand, and Quick Selection Tool.
GIMP (GNU Image Manipulation Program):
A cost-effective alternative to Photoshop, suitable for basic to intermediate-level image editing.
Equipped with tools for creating clipping paths and working with layers.
Outsourcing Clipping Path Services to Clipping World:
Cost-Effective Solutions:
Outsourcing to Clipping World offers competitive pricing without compromising on quality.
Ideal for businesses seeking a budget-friendly yet top-tier solution.
Focus on Core Competencies:
Enables businesses to concentrate on core competencies while entrusting image editing tasks to Clipping World's professionals.
Enhances overall efficiency and productivity.
Future Trends in Clipping World's Clipping Path Services:
Artificial Intelligence (AI) Integration:
Clipping World anticipates integrating AI to streamline and automate aspects of the clipping path process.
AI tools hold the potential to enhance accuracy and efficiency in path creation.
Virtual and Augmented Reality (VR/AR):
As VR/AR technologies advance, Clipping World foresees new applications for creating immersive and interactive visual content.
Conclusion:
In the visual-centric landscape, Clipping World stands as a beacon, redefining the standards of excellence in clipping path services. From enhancing e-commerce product visuals to crafting captivating marketing materials, the precision, and commitment to artistry by Clipping World reshape how visual content is perceived and embraced. As technology evolves, the future promises even more innovations, ensuring that the world's best clipping path services continue to lead the way in visual communication.
#photo editing sevices#Clipping path service#Clipping path services#best Clipping path service#Clipping path service provider#Clipping path service providers#Clipping path service company
0 notes
Text
How To Make Background Remove In Photos (Easy Guide) Mastering Transparency
Though background removal is a part of editing, it plays a vital role. Background remove can be frustrating at times to find that the beautiful image you have captured needs a whole lot of fixing on Photoshop or any other online tool all because it was not done with an understanding of how wonderful those tools are but for taking just another photo like pretty much (though almost everyone).

Easiest Way to Background removal tips using photoshop
Do you want to say goodbye to dull one-dimensional photos? Have you wanted to create images with transparent backgrounds that are ideal for logos, web graphics and anything artistic? Well, dream no more! And this one guide will unravel all the mysteries about transparent photo editing in no time and you will become a professional.
Transparency in photos explained
In photo editing, it is the term used to indicate that you can make certain parts of an image disappear. This creates an invisible background where the subject would be, often a solid color or another image.
Ways to Create Transparent Backgrounds:
Either of these methods can be used to enable transparent backgrounds:
1. Using Photo Editing Software:
Software: Software, such as Adobe Photoshop or GIMP (for a free alternative), and even some online photo editing tools.
Workflow: They have specific functionalities such as Background Removal or Select & Mask to extract the person and erase everything else in the background.
Complex: Those same advanced utilities, while useful and not necessarily difficult to use on a basic level, can still require some user interaction in order to get the best results.
2. Remove Tools from Background of Your Online:
Ease: Many simple online tools like Photoroom or Adobe Express do the background removal for you.
How They Are User-Friendly: You just have to submit your picture and Sugandh performs the image processing part for you.
Cons: Needs manual adjustments to deal with complex background and fine details in the image.

Bonus Tip: UK Clipping Path Background Removal Services Like A Pro.→ For professional-grade, high-volume background removal needs (in batch mode as needed), use services like UK clipping path Their professionals give you a clear and on-point image, allowing you to take less editing time.
Selecting the Suitable Approach for You:
The best method will vary depending on your coding ability, the level of detail in your image and how much control you want. If you have simple edits to make, online tools are a good place to begin. This will inevitably be slower, so power users who require accuracy are generally better off with purpose-built software.
How to Make Photos Look Like an Image from a Smartphone:
Now that you know this, you are all set to create awesome almost no background transparent images. So, practice makes perfect! In lieu of that, get out your favorite editing tool and let those creative juices flow!
BONUS TIP: Take advantage of the wealth of online tutorials and resources available to teach you advanced transparent photo refining.
For any kind of professional touch UK Clipping path is here. We provide Multiple Clipping path service, ecommerce photo editing service, professional photo retouching service and many more. Want top-notch service at an affordable price? Try us for free and see the difference.
0 notes
Text
Mastering the Art of Photo Editing: Essential Tips for Best Clipping Path Service and More 📸✨

In today's visually driven world, photo editing is a superpower that can take your images to the next level, whether you're a seasoned photographer or a social media enthusiast.
Let's explore essential tips to help you enhance your editing skills and create stunning visuals that captivate your audience.
Photo Editing Tips
Unlock the potential of your photos with expert Photo Editing Tips. Elevate your editing skills and create captivating visuals. Let me explain some points.
Starting with the Right Software
To embark on your photo editing journey, you need the right tools. Software like Adobe Photoshop, Lightroom, or the free option GIMP provides a robust platform to unleash your creativity. Familiarize yourself with your chosen software's interface and features to get started.
Understanding Basic Editing Techniques
Begin your journey by mastering fundamental editing techniques such as cropping, resizing, and adjusting brightness and contrast. These basics lay the foundation for more advanced editing methods you'll explore along the way.
Maintaining Image Quality
As you edit, always keep an eye on maintaining the overall image quality. Over-editing can lead to grainy or unnatural-looking photos. Strive for a balance that enhances your visuals without sacrificing their authenticity.
Unlocking the Power of Layers
Layers are your best friend in photo editing. They allow you to make changes non-destructively, meaning you can always revert to the original image if needed. Embrace layers for more control over your edits and to experiment fearlessly.
Getting Creative with Filters
Experiment with filters and presets to add unique styles to your photos. Filters can dramatically transform the mood and atmosphere of your images. However, use them judiciously to avoid clichéd or overly processed results.
Mastering Color Correction

Understanding color theory and correction is crucial. You can fine-tune colors to evoke specific emotions or make your subjects pop. Don't underestimate the impact of well-adjusted colors on your final image.
Enhancing Sharpness and Focus
Use sharpening tools to enhance details and make your subjects stand out. Adjust the focus to draw attention to specific areas of your image, directing the viewer's gaze where you want it to go.
Embracing Retouching Techniques
Retouching is about enhancing, not altering, reality. Remove blemishes, dust, or distractions to achieve a polished look while preserving the essence of your subject.
Exploring Advanced Techniques
As your confidence grows, delve into advanced techniques like masking, compositing, and high dynamic range (HDR) editing. These methods open up new creative possibilities and help you achieve truly stunning results.
Practice Makes Perfect
Like any skill, practice is key. Experiment with different styles, subjects, and editing techniques. Don't be afraid to make mistakes; they're valuable learning experiences that will help you grow as an editor.
Seeking Feedback and Staying Inspired
Share your edited photos with peers or online communities and seek constructive feedback. Drawing inspiration from other photographers and editors like clipping path service providers is also vital.
Follow photographers on Tumblr and Instagram, explore photography blogs, and attend workshops to stay inspired and continuously expand your skill set.
Mastering photo editing is an ongoing journey, but with dedication and a willingness to learn, you can transform ordinary photos into visual masterpieces. So, open your editing software, unleash your creativity, and start enhancing your photos today!
📸✨ #PhotoEditingTips #Photography #VisualArt #PhotoEditing #CreativeEditing #PhotographySkills #BestClippingPathService #HighEndPhotoRetouchingServices #GhostMannequinPhotoEditingServices #ClippingPathCompany #ClippingPathServices #ClippingPathServiceProvider #BestPhotoRetouchingServices #PhotoRetouchingServices #EcommercePhotoEditingServices
1 note
·
View note