#aside from workflow/sketch stages
Explore tagged Tumblr posts
Visit Tumblr Blog
Explore Tumblr blogs with no restrictions, modern design and the best experience.
Last Seen Tumblr Blogs


Fun Fact
Post activity is at the highest at 4:00 pm EDT; notes peak at 10:00 pm EDT.
Text
The Best BIM and CAD Courses to Skyrocket Your Career
The construction industry is one of the most dynamic, fast-changing sectors out there. New technologies keep emerging and reshaping it every now and then. Keeping up with the changes and adapting to them is essential to succeed in this field. The world of architecture, engineering, and construction (AEC) is no exception to this.
Computer-assisted design (CAD), BIM, 3D modeling, and other digital tools have become indispensable for AEC professionals in recent years. If you’re looking to get a job as an architect, CAD operator, or any other related profession in the near future, it’s high time you beefed up your technical skills. These are some of the best BIM courses at NIBT that will help you do just that…
What is BIM?
BIM stands for Building Information Modeling, which is a set of standards, methodologies, and software tools that enables the digital modeling of a building’s information throughout the design, construction, and operation stages. The BIM workflow integrates documentation, design, analysis, and coordination between project stakeholders. It also facilitates data sharing between them. With BIM, the risk of mistakes and misinterpretations is reduced significantly, which in turn improves the quality of projects.
As BIM is not a programming language or computer software, it can be confusing for people who are not familiar with the construction industry. It’s important to know that BIM is a workflow methodology and software, not a computer program. It’s not just one single technology. There are many technologies that go into BIM including Revit, Navisworks, BlueBeam, and more.
3D Modeling and Virtual Reality Course
This course will take you through the fundamentals of architecture and design. You’ll learn how to sketch and model your ideas, use 3D software, and create virtual reality (VR) walkthroughs for a more immersive experience. You’ll take a tour of the architectural design process, learn about the different architectural styles, and discover how architecture has shaped society. You’ll also have the opportunity to practice sketching and get feedback from the instructor.
Aside from sketching, you’ll also learn how to model ideas in 3D software that you can share with clients and colleagues. You’ll also create VR walkthroughs for a more immersive experience that clients can explore and review remotely. This course is perfect for beginners looking to enter the architectural design field. It’s a great introduction to the field and will help you take your first steps towards a career in architecture and design.
Conclusion
While sophisticated technologies keep getting integrated into AEC workflows, it’s important to remember that they are only helpful as long as they’re implemented properly. It’s crucial that all parties involved in a project understand how these tools work and how they should be used. This is where BIM and CAD courses come in. As the name suggests, these courses focus on the computer-assisted design technologies and practices that have become essential in the AEC sector.
They’ll help you understand the principles behind these tools and become proficient in using them. The best BIM and CAD courses are designed for professionals from different fields who want to learn new skills and upskill their existing knowledge. They’re also accessible to individuals who have no prior experience in technology or the AEC sector. If you’re in a similar situation, you can use these classrooms, e-learning, or virtual BIM courses at NIBT to get a leg up on the competition and gain an advantage in your career.
Visit Us: www.nibt.education
Call Us for more information: +91 73502 55855
0 notes
Text
Congratulations to Monique Castellani-Kraan for winning Best in Show at the UKCPS Keswick Exhibition 2021.
Monique has kindly share some background information on her wonderful piece Kisses in Blue.
I drew my first hyacinth macaw back in 2015, and it was wonderful being able to revisit the same subject again with “Kisses in Blue”. Parrots are honestly such a delight to draw. Their colours are bright and happy, and they have so much character. I will also always jump at the chance to get out my blue coloured pencils!
I started work on this piece back in January. After a long spate of only making miniature pet commissions over the Christmas period, which was slowly sending me into a spiral of madness, I decided to overcompensate by starting my largest drawing to date, at 40 x 50cm (16 x 20 inches approx).
As someone with a background in digital painting, I like to do all of my sketches and compositions digitally nowadays to transfer to paper. That way my expensive watercolour paper stays free of eraser marks and errant sketch lines. It saves a lot of time in the long run, and if I mess up I can very easily just print out the sketch again to start over. I don't know what I'd do without my iPad!
This drawing proved to be a little intimidating because of the size I was working at. I ended up setting it aside for a few months. You know that famous "fear of the blank canvas" we've all experienced? This one hit me hard. I got a tiny section of the eye and surrounding feathers done and then proceeded to swiftly run away, back to the safety of drawing miniatures! A few months later, I finally decided to stop hiding and to give this piece a proper go. As I got into the rhythm of it I quickly felt myself being sucked into that "zone" of intense focus - where time just slips away until it's suddenly dark outside and you've skipped a meal!
Now that I had finally got my toes wet, I was gaining confidence. Art is a bit like exercise - it takes effort and routine to get into the swing of it - but once I do, I feel like I'm flying! With every new drawing I'm reminded of just how much I adore coloured pencils and how fun the process is.
Translating the reference photo’s feathers on the left macaw’s cheek was proving to be a bit of a challenge. I could only stare for so long at the complicated mess of shadows without going cross-eyed - so I decided to treat myself to tackling the beak first instead. If ever you find yourself in a rut with a painting, look for the deepest, darkest shadows in your reference, and block those in first. You will have a much easier time once they're there. Here, the darkest shadows were the inside of the macaws' mouths, so I put my much-loved Polychromos black to work, blending with paint thinner in between each layer and tinting it with Luminance Dark Indigo to get it nice and deep. Now that the darkest shadows were blocked in, I would have a much easier time in the areas surrounding it. That shadow became my reference point for judging the values for the beak, skin and feathers nearby.
I used Daler Rowney Low Odour Thinner to blend my pencils in between layers, with a flat taklon brush. I primarily used it in the first few layers of the underpainting. The yellow skin on the beak was a tricky customer with this - my blending brushes had to be impeccably clean, or else I would end up turning it green with the blues being so close by. In addition, I didn't want the very pale yellows getting contaminated by the oranges that are in the shadows. I made sure to carefully wipe my brush off thoroughly on some paper towel before blending in small areas at a time.
Beaks are so much fun to draw! They have a lot going on, from subtle colour shifts, to chips and cracks and ridges. The texture is a treat for the eyes! Here, I started by creating a gradient of soft earthy purples, greys and creams in the underpainting. At this stage I used mostly a mix of Luminance and Polychromos pencils. For underpaintings, I like to go darker than what the final result will be - though some would say I go a little TOO dark (coloured pencil is technically a light to dark workflow because they are mostly transparent).
After blending it with OMS, and making sure it's still a little damp, I go in with my pale tones from the Derwent Lightfast, Caran d'Ache Luminance and Holbein lines. These brands are soft and have more wax than oil in them, making them very creamy and more opaque than brands like Polychromos. Because the paper is still saturated with paint thinner, the pencil melts as it makes contact with the paper, making it go on super thick, even though I'm only pressing gently. This is my dirty little secret for how I work from dark to light in all of my coloured pencil pieces. The paper you're using, of course, is paramount for this technique too. If you're not using a good paper, you're going to run out of tooth extremely quickly using this technique. This piece was drawn on Saunders Waterford Hot Pressed 300gsm- and I wholeheartedly recommend it!
However, I just want to add that if you have an area or texture you want to keep REALLY light, for example a large white crack in the beak, you should draw that in first before doing anything else. That way, when you put your underpainting over it and blend with paint thinner, the white detail you added first will show through, clear as day! (This is great for whiskers on cats and dogs for example) You can also use a ceramic cutter to do this afterwards instead, though personally I have yet to use one myself.
After finishing the beaks, it was time to face the feathers on the birds’ bodies head-on. As always, I block in my darkest shadows first and then my underpainting, giving it a good blend out with plenty of OMS. This is so that I don't get lost in a sea of repeating shapes. Without doing this, I find it's very easy for your artwork to end up all the same value with not enough contrast between the highlights and shadows. I also rough in where I want each contour feather to be on the bird’s chest with a dark blue, though I only very gently line them in with my pencil so I can still move things around if needed while I build on the textures and detail.
Once the underpainting is done I am free to start pulling out those details. I went feather-by-feather, preferring to go in with my lighter coloured pencils first, gently pulling out each feather’s barbs. After that, staying mindful of how the lighting is hitting each feather, I used my mid tone and darker pencils to work in between each barb, gradually building up shadows. I also glazed in shadows over this with a very gentle hand to give the overall shape of the feather form and depth.
It can be tempting to rush through areas like this where there is lots of uniform texture, but it’s important to stay patient and take your time. Body feathers especially can become indecipherable after a certain point, because they all overlap and merge into each other. Sometimes even though the reference photo is sharp as a tack and super clear, there is just so much going on that it wouldn't 'read' well as an artwork. So I used my reference to help me with the general structure and composition, and to inform me on how the shapes and textures should look. But I didn’t stress about getting it exact.
Once you have good knowledge of a subject, after doing study sketches and looking at lots of different references, you can be a lot freer with how you approach your final artwork. A lot of the colours, textures and feather placement in ‘Kisses in Blue’ were not there in the reference. I opted to go for a much warmer, cheerful blue. The reference I was using was also fairly flat as it was taken on an overcast day, meaning the lighting was quite diffused. I made my artwork brighter than my reference material, pushing the overall contrast between the midtones and the deepest shadows. I also found myself intermingling soft lilac hues and subtle teal with my Polychromos and Luminance pencils, almost over-exaggerating the birds’ vibrancy. I tried not to stress too much about feathers either - while getting the shape and placement of feathers right on wings can be paramount to a realistic piece, the same does not apply for contour feathers and down feathers. As long as you stick to the right shapes and sizes, paying attention to the bird’s form, you don’t need to get it looking exactly like your reference.
I try my best to bring myself out of my comfort zone with each new drawing. This piece was my biggest challenge yet – quite literally. I’m glad I pushed myself to draw larger than I am used to and I can see why a lot of coloured pencil artists like working at this size – while it is more time-consuming, you have much more room to breathe and fit details in, that would normally get lost in a smaller piece. With my choice of composition and lighting, I wanted to convey a feeling of intimacy and closeness with the birds that I don’t think I would have been able to achieve were this drawing smaller.

1 note
·
View note
Text
Responsive Workflow
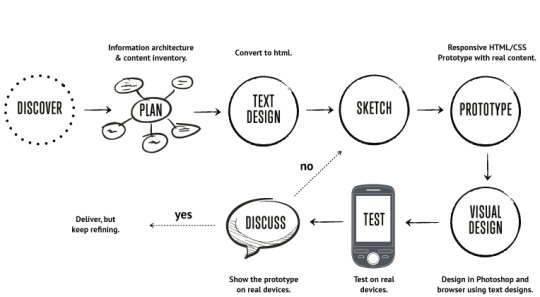
In class we discussed responsive workflow. A workflow is a sequence of steps that a designer takes in order to complete a project efficiently. It is easy to drift away from following a workflow and that is where problems might occur. If you do not follow a responsive workflow then often time can be wasted and you may not meet your clients needs.
A good responsive workflow looks like this; Start off with Discover, where you research and gather knowledge and ideas about the particular product/ target market. Make sure that you fully understand what it is you are making and who you are making it for. Carry out content audits and make notes on what other people are doing.
After that stage it is time to make a plan. Lay out everything that you have researched and organise it. Make a plan of what you are going to do and how you’re going to do it and Set aside goals. Right the content in this stage as well and have it ready for the design stage. The planning stage is basically the preparation for the steps ahead so that they can be carried out efficiently.
The text design stage is where you organise all of your content and put it into HTML, preparing it for the design stage.
Next is the sketching stage. This is where you design wireframes and lay all of your content onto the page. The layout is important in this stage as your wireframes will give you a basic overview of what your project is going to look like. Sketch where buttons, navigation, headings, paragraphs, images etc. will go thus allowing you to see your design come together.
After this comes the prototyping stage where you take the content and put it into HTML/CSS to see what it will look like.
Then there is the Visual design stage. This stage happens before and after the prototyping. You get to see the visual design of the project coming together. Colour schemes and objects will give you the feeling for what your design will look like at the end stage. Applications such as Figma and Adobe XD are great prototyping programs for this stage.
The next stage is the testing stage. This stage is vital to the project. Here you will get to see what the design will look like on physical devices. It is almost impossible to design something without testing it.
After this comes the discussion stage. Discuss with the client during all iterations. Present the actual HTML prototypes to the client and show how they work on actual devices.
If the discussion goes well and the client is happy, deliver but keep refining. If the client is unhappy with some things, go back to the sketching stage and fix it up. The process will continue until the client is satisfied completely.
0 notes
Text
11/10 ICU & Trauma: Progress Update
Problem Statement:
Breakdowns in communication between patients, care providers, and families tend to disrupt the continuity of care, and be a cause of anxiety to patients’ families. This problem can be tackled from two major points: upstream communication between nurses and doctors and downstream communication between providers and patients’ families. How might we design a streamlined system of communication between nurses, surgeons, and other providers that is able to be integrated with pre-existing infrastructure, such that downstream patient flow is optimized?
General design concept:
We are generating a prototype of a mobile and desktop application that might serve as an extension of Epic, the pre-existing electronic health record database used in Rhode Island Hospital, via utilization of FHIR. The Fast Healthcare Interoperability Resource (FHIR) has the potential to increase interoperability and health information exchange by using secure standard URLs to transfer information across systems and platforms. Given our recent pivot from patient-provider communication to nurse-physician communication, the transfer of secure information might not be as prominent as an issue given our app’s integration with Epic’s patient database.
Key features we would like to implement for our prototype include:
Syncing seamlessly from existing EHR for accurate doctor and nurse information
Providing a consolidated, unified and real-time view of patient’s care team
Allows personal physicians to add new consulting doctors to the care team
Documents, at every stage, treatment decisions, results, and medication administered
Allows creation of new user profiles (doctors, nurses, consultants, verified by EHR)
Allows creation of new patient profiles & access to patient history in case of old patient
Enables doctor-nurse communication using secure text messaging and voice calls
Onboarding tutorial for the user
Patient calendar (i.e. scheduled operations, when and where)
Medication/Procedure updates
Timeline record for each patient since being admitted
A way for nurses/physicians to confirm, rescind, or reject updates for reapproval
Delivery times for medications
Knowing when things are being canceled
Being easily updated on patient flow
User personas:
The key people we are focusing on are trauma surgeons, nurses, and their patients.
Surgeon:
Pains
Surgeons often do not know the details about every patient. They only want to know the key points about each patient.
The ED/OR is an incredibly hectic space, with many key providers aside from the surgeon (anesthetists, PAs, etc.)
Gains
They only want to know the key points about each patient.
Prefer face-to-face communication for important decisions. How can our application streamline key information to make in-person communication more effective?
Nurses:
Pains
Feel that physician-nurse communication is an extremely prevalent and overlooked issue.
Feel conflicted and stressed when physicians give different/conflicting instructions (i.e. two tests/scans scheduled at overlapping times).
Gains
Would like a way to receive timely patient care updates and clarify those updates if there is a conflict or issue.
Patients:
Pains
Lack of communication between providers causes confusion, i.e. among family members, on what medications are necessary, what scans/tests are needed, and generally what is going on with treatment plan
Gains
Streamlined communication between providers would allow for more efficient, transparent care.
Decreased stress among nurses would lead to a better quality of care.
More efficient care has the potential to decrease medical costs (fewer days in hospital)
Plan for Prototyping:
The prototyping stage will begin with narrowing in the main problem we want to tackle aka communication between staff members and other departments.
Asking questions such as:
How are users solving this problem currently? Can your target market think of another product that does something similar?
Do users understand what this product or service does?
How do users feel about the product or service?
Who is your competition?
1. They are currently using a program called Epic. Its promises predictive analytics and embedded decision support tools support clinical practice to yield better outcomes. There is also an extension to the program they are using called lifespan and they provide updates every couple of months which causes unnecessary issues. Lifespan is a health care system primarily used in rhode island. It provides resources for patients but also for doctors and nurses who need to give information to patients.
2. They understand everything about they just can't deal with the never-ending updates, slow computer systems and the inability to tend to the patients the way that they want to. The problems stem from the fact that they strictly only use desktop computers, and they can’t tend to patients as much as they want to. The computer systems are old and since they are constantly updated it wipes out all of the system setups specifically tailored for the nurses using those computers.
3. After discussing our ideas with the nurses they seem to be very interested in the idea of implementing work tablets that are specific for each staff member. They stated in our interviews that the hospital is very gadget friendly and would be willing to try out a new system. They would mainly use it to log patients symptoms, updates etc. The only thing is keeping in mind patient security. The plus about creating an application would be the fact that it can be an extension of the system that they are currently using. They can also personalize it to fit the way that they do their rounds, calendar logging, a prompt messaging system that is fast and efficient, knowing when there are cancelations, increasing patient flow, pharmacies, numbers of other units etc.
4. Our competition are brands that are stand-alone apps. We would most likely make an app that is an extension of the current system.
Prototyping Strategy:
Before delving into the workflows and sketching possible concepts, we began by assessing what we considered the biggest challenges to our app’s success, chief among which was integration into existing hospital infrastructure.
We wanted to fit our app seamlessly into existing clinical workflows and infrastructural specifications. Hence, we decided that our app must leverage what EPIC, the existing EHR system can offer, while offering its own unique value—improving communication between caregivers, thereby simplifying clinical workflows and not complicating them.
Below are two diagrams that illustrate the functionalities of our app:
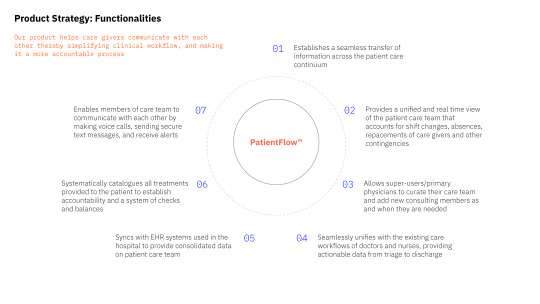

The diagrams can also be found here
Next Steps for prototyping:
Identify Specific Use Case: We will begin charting detailed user-specific workflows given a common scenario which is patients suffering from gunshot wounds.
Charting User Workflows and Engagement with App: With an understanding of the current treatment continuum (from patient arrival to discharge), we will clearly outline what our app would provide at each stage, and describe the user’s interaction with the app at every step.
Visual Prototyping: Once we have enough information on the user workflows, we will transfer that information into visual screens and sketches for testing.
0 notes
Text
9 Effective Tips To Reduce Mobile App Development Cost

These days, numerous businesses are utilizing their own mobile application to impress more clients so as to purchase their products and give them highly customized services that will improve their experience. In any case, it’s not a cheap proposition to construct a mobile application for your business. Hence, if you are in the process to enlist an Android developer to develop a mobile application for your organization, you should take a gander at these points cautiously to reduce the general expense of mobile application development. Mobile application development cost needn’t be over the top, particularly if you take specific measures to reduce unnecessary expenses. Below are the nine ways to reduce the mobile app development cost, without compromising on quality.
9 Effective Tips To Reduce Mobile App Development Cost-
1. Proper Planning of Mobile app Development Process-
This is one of the most significant tips while setting out on any endeavors and is also true when you need to enlist an Android developer to develop a mobile application for your business. A mobile app should provide the best user experience to the customer. The Mobile application development is a complicated procedure and it requires time and modifications to get finished perfectly. Each change increases the app development cost. While it’s just normal to have numerous thoughts of how to improve client interaction with the application, by conceptualizing with the team at the starting stages and weighing the upsides and downsides of different thoughts. You can pick those highlights that deliver a superior user experience for customers. In this way reducing the cost making many changes.
2. Prepare a design of the final product-
Building up a mobile application requires a great deal of code writing and it makes sense to initially attempt to make a sketch of what the application and its interface will look like and present it to the developer. This will give him an expansive thought of what you are searching for in an application and what sort of interface you need to give the client. This will help him in designing an app and its workflow as it will satisfy all your points. As you have given him an unpleasant sketch of what is expected from him, he will set aside less effort to complete the job hence reducing the expense of building up the application essentially.
3. Selection of platform for mobile app-
Read More at- https://solaceinfotech.com/blog/9-effective-tips-to-reduce-mobile-app-development-cost/
0 notes
Photo


‘On the Specialism of CG Animation
In response to our new Mystery Box brief, we are asked to pick an animation specialism to develop our final sequence. Here, I want to explore why I’ve chosen the medium of CG animation and mention a few potential career pathways this can offer me. Firstly, I want to establish my reasons for choosing Digital 3D as a response to this project.
Having never properly explored CG animation before, the specialism offers a new approach to animation: opening new doors and possibilities to not only my career as an animator but also allows me to create animated sequences in a variety of different mediums and methodologies. What little experience I have had exploring the animation workspace within Maya has been enjoyable but also interesting: it’s a challenge, but one that forces me to work outside of my comfort zone and learn an entirely new approach to the craft of animation.
There’s also an actual demand for CG animators in the industry: not only could I work on a range of projects from big-budget features to smaller studio pieces, but it is also a legitimate and viable career pathway for me to follow. There’s a demand for Digital 3D animations, in both commercial and cinematic projects that simply isn’t there for something like traditional 2D animation or even stop motion.
Whilst my initial passion for animation did center around stop motion, I’m beginning to realize it is a somewhat more niche and limited industry than Digital 3D, which is massive and totally encompassing the animation medium as a whole: appealing to everyone through such popular works as Toy Story, Kung Fu Panda, and Wall-E.
Speaking with my tutor on the subject has settled any concerns I had about leaving stop motion behind, as I was encouraged to explore CG for this brief. Ultimately, stop motion is an intuitive and simple process - it is something that I could develop on my own. With something as new and complex as computer-generated animation, however, it seems like an effective decision to learn this new process and pipeline, given the fact that I enjoyed the little animation that I have already done within Maya.
Having settled on CG animation for this project, I wanted to begin my independent research into the medium: taking a brief look at the various roles within the CG industry and potential career pathways that I could consider in the future.
Firstly, it’s important to note how universal and encompassing the medium of CG animation is. Digital 3D animation is utilised across a range of industries, from classic examples such as television and film productions, but also games, motion graphics and emerging technologies such as augmented reality. It’s a form of animation that spans many industries, and as such, is an extremely sought-after and versatile skill. Although I understand it is useful to have generalist skills, I can see the appeal and potential in beginning to specialise, even at these early stages in the course: building a targeted, specialised portfolio in a specific area of animation.
There are a variety of roles and career paths offered up by CG animation, from working independently as a freelancer or with a large group of animators on a big production studio piece. We can work in three major areas: pre-production which covers the concept art, modelling, and sculpting of the digital models; the actual production process consisting of animation and simulations and finally post-production, which includes FX and composting the final piece. As starting animators and filmmakers ourselves, we will be having to cover all of these aspects, to begin with. Giving us a set of generalist skills from sketch to screen, we can then begin to specialise in our own time.
Here, I want to briefly explore a few of these roles, and why they appeal to me.
Small - Medium Studio For beginning animators, this is the likely place we will enter the industry: working on small studio projects. This not only gives us a chance to experiment but also allows us more control and creative influence in these projects. With a big production studio, we are simply tasked with filling in a specific shot - we ultimately have no say in any major creative decisions, adding to a homogenised pie of CG animations. Whilst this is still exciting, and something that I would be more than happy to do, it’s worth noting the creative control animators working for smaller studios receive when working on projects.
The main restriction of working in such a manner would be the fact that it is a smaller studio, meaning a smaller budget. It’s natural for animators to juggle multiple jobs at a time: designing, animating texturing and rendering a project almost singlehandedly. The workload is effectively larger, but we would get more control over the work we put out.
Big Production Studio On the flip side of this is working for big-budget productions, such as Pixar or Dreamworks Animations. What would ultimately be a more commercialised and generic project means a stable workflow and living, aside from the opportunity to work on name-brand pictures with real recognition power: these are films that the public will see, unlike the small and medium-sized studios, which are less likely to receive a mainstream success. This allows us to work on beloved characters and stories that have inspired me whilst growing up - I know that, personally, I’d be more than happy than to work on a Dreamworks or Blue Sky animated feature.
Independent Freelancer One final potential career pathway for CG animators would be to make it on our own, as an independent freelancer. With this, we would source out clients or be called onto specific briefs that demand a certain style that blends particularly well with my own. It’s somewhat of a more risky business model simply because of the fact there’s no real stability with freelancing, but it allows for a more exciting career, spanning endless projects and briefs.
Honestly, all three of these pathways appeal to me. The main reason I’m choosing to explore CG animation is that, as a medium, it opens a whole new array of career paths and opportunities for me to explore as an animator. With myself being confident with stop motion already, I want to challenge myself in this upcoming project.
For a visual representation of this discussion, I’ve presented examples of CG animated work that I personally find inspiring from both small studios to large, big production pictures. These are sequences that I find visually exciting, possessing smooth movement and a clear utilisation of the basic principles of the craft. These are examples of successful CG animation, and effectively what I am aiming to produce.
Here, I’ve been able to explore my own personal reasons for working within the specialism of CG animation in response to the Mystery Box project and a few potential career pathways in the process. Next, I plan to explore the process of creating an animated sequence through analysing the methodologies used by industry professionals - looking at how the animators take a sketch and finish with a polished piece of character animation.
References
How Pixar created its most complex character yet for ‘Finding Dory’. (2016). https://www.youtube.com/watch?v=Nn0S2vmSCU0
Megamind. (2010). Tom McGrath.
Spider-Man: Into the Spider-Verse. (2018). Peter Ramsey.
3D Animation Student Showcase 2015 - Animation Mentor https://www.youtube.com/watch?v=rjbOReWvepk
Louie Zong - 3D https://www.louiezong.com/#/gallery3d/
0 notes
Text
PROTOTYPE
And then there is suddenly flooding of ideas in your mind that you want to design an app or a website of so and so project or may be your firm that provides e-service. This stage of initiation requires amount of implementation which is done then. Certain types of design or you may say demo is required which are made from earlier available information from other user. This will make your new design more easily and fast and also give you some taste that might be missing in your thoughts that will serve as a berry to your cream.
So prototype is basically a model to your website or your app that will help you give visual and functional interface enhancement and help you build your app or website more attractive and audacious according to your need to test the initial and main function of the website or a mobile application.
ADVANTAGES OF PROTOTYPE
1. Before translating to code this will test or enhance and give you the best user interface for your app or website.
2. You can make all the necessary changes over here and may help you avoid the costly changes that might occur in future. So you will be cost benefited from prototype.
3. Apart from this if you are a start up then prototype may help you win the finance of the investor’s team.
HOW TO CREATE A PROTOTYPE?
It can be anything from a paper sketch, to a clickable HTML prototype. However, typically when people talk about a prototype they are referring to an interactive prototype of some kind which allows users to navigate from page to page and use functionality such as drop down menus.
There are numerous ways to create a prototype. It can be I form of powerpoint, pdfs or even in form of word documents. Setting aside these old orthodox ways to create prototypes, in the present generation there are several other smart tools that will help you create some interactive prototype, increasing the effectiveness and attractiveness of you website or your application.
TOOLS USED TO CREATE PROTOTYPE
1. Origami https://origami.design/
Origami has helped in design and building of products like Facebook, Messenger and Instagram. Copy anything from Sketch and paste native layers into Origami Studio. Then quickly adjust, add behavior and animate any layer property without going back. Show off your designs in presentations in full screen, on a number of different devices.
2. Webflow https://webflow.com/
Webflow, Inc. is an American company, based in San Francisco,that provides software as a service for website building and hosting. Their online visual editor platform allows users to design, build, and launch websites.
3. Marvel https://marvelapp.com/
Wireframe, design and prototype fast with this intuitive design and prototyping tools. Instantly generate design specs and connect integrations that power up your workflow. From low to high-fidelity, Marvel supports you every step of the way.
4. Vectr https://vectr.com/
Vectr is a free graphics software used to create vector graphics easily and intuitively. It's a simple yet powerful web and desktop cross-platform tool to bring your designs into reality.
5. Sketch https://www.sketch.com/
Built on the best of mac OS technologies, giving you familiarity, power and performance where you need it most. Sketch’s interface automatically adapts to show you the tools you need, and gets out of the way when you need to focus.
For more such blogs visit: http://www.orainfotech.com/blog/
0 notes
Text
Final Evaluation
Introduction
This project has come to a close, and I finally have the ability to look at my finished work and discuss its condition. I am able to observe my project in all its forms, from journal and Tumblr work to my final video outcome, whilst outlining links between each and reflecting back on the entire journey. In this final evaluation, my ambition is to communicate any final thoughts that haven’t had the opportunity to be spoken about in the critical review. By doing this, I hope to form a strong finishing point to my final major project. Writing this evaluation forces me to look through everything I have done in the last eleven weeks, which will hopefully bring up unexpected discussion topics.
Step by step, weeks 1 to 11
Prior to week 1, I started making some foundations for stage 3 by carrying out an artist research exercise. I also used a holiday trip as an opportunity to collect reference imagery and reflect on the experience through written work. This preliminary basis of work allowed me to discover the head space I needed to be in early-on, making the work I produced in week 1 more effective, as I had already broken-in the context of my project. I felt empowered in week 1, because I had given myself a head start.
Unfortunately, this feeling didn’t last long; with no outcome idea to give me motivation, I soon fell into a slump. Looking back, I still admire the blind research frenzy carried out during the whole of week 1; the volume of pages I was accumulating was reassuring, and I know that there’s no such thing as too much research! This uncertain period also introduced me to the power of book research, which was thoroughly unexplored in my other projects. Initially, I didn’t trust any novels unrelated to my interests, but I soon discovered how much you can learn by independently applying ideas to your own practices.
The beginning of week 2 was a similar situation as I still had no solid idea. I found peace by simply trusting the process, focusing on idea building and seeing where research lead me. I began feeling braver and ventured into new territory such as the exploration if Adobe Fuse. I would have immediately pushed this workshop aside in the past, but I found the software rejuvenating and I was able to identify the character creation potential in this newly found programme. My open-minded attitude kept consistent after this, allowing me to read ‘Modernism in Scandinavia’ even if it was relatively unrelated to my project. Through this book, I learnt about Icelandic folklore, which helped me write my project realisation, an important milestone for my outcome idea and the most successful piece of work from week 2.
The pace quickened in week three, as I had a new and exciting idea about Icelandic mythology to be explored. I haven’t applied my interests in Scandinavia to any other projects for this course, so my research ideas were bursting at the seams. I quickly realised how much I loved the stereotypical styles depicted through Nordic landscape art, and I knew it was something to use for my outcome because of how immersed I felt for the subject. Applying knowledge to an idea made me feel self-assured; my hesitation at the possibility of my Folklore idea being childish faded as I was demonstrating factual writing alongside my fantasy design work. I reminisced on the doors that Adobe Fuse had previously opened for me, so I got to work making some very basic composition ideas in Photoshop.
To my relief, week 4 propelled faster than 3, as I assuredly created a solid storyboard draft and began linking my Amsterdam trip to this project. I was finding puzzle pieces from all kinds of sources, each coming together to help strengthen my ideas on Iceland and its ‘Landvaettir’ folklore story. The two main characters took shape, a giant and a young boy. I was surprised at the method in which these characters were generated; they seemed to just narrate the story the most effectively…a dystopian Icelandic universe where the battle between metal and nature is prevalent in the landscape. I quickly continued on with as much design work for these two new people as possible. As the pace of the project process quickened, I noticed how ‘natural’ the base ideas have been discovered; I just focus on what feels right and fix any flaws along the way. A level of understanding arose in week four, allowing me to find my core ideas and story line. I confidently worked with cinematography as well as drawn art.
Week 5 was all about ideas finally taking shape; using Fuse and Photoshop for my original ideas and turning thoughts into visual representations. I took a more in-depth look at anatomy, aided by the whiteout tasks I completed at the start of the ‘concept design’ pathway. I turned my character feature designs into a science by focusing on a single limb or characteristic through pencil drawings. Both my characters and environments came to life this week, as I also completed my first digital scene in preparation for my video outcome. This was an extremely significant part of the week as it showed how far I had come since week 1; I had finally accumulated enough self-made resources to happily create a scene including characters and architectural features. I left week 5 extremely proud from the achievements I had started to tick off my mental list. I worry slightly over the time I have left, but all I can do is work efficiently and ensure my work sticks to the key seven assessment criteria topics and to my personal main focuses.
I ruled out the possibility of rotoscoping in week 6, which felt progressive and gave me the motivation to continue my method investigation. I moved forward with this explorative mindset by carrying out some fabric research, progressing the clothing ideas for my character concepts. I was feeling energised, fuelling the completion of the second scene of my video outcome, along with its supporting process ad evaluation pages. Having competed this scene creation process twice at this point, it was becoming a routine. I stayed diligent with contextual research, adding to my sources with Amanieu Rebu, who conveyed similar interests to my own through his work. I also nurtured my informative sources by reading ‘Landscape and Nature’ by Michael Freeman, I noticed that I was becoming bolder and more experimental with my book choices, which was benefiting my written language and development influences. Week 6 initiated my ability to begin linking research and study to the formation of an outcome.
I began week 7 brainstorming exhibition and general presentation ideas. This included some gallery-space sketches, and collaging visuals for zine possibilities. These tasks hit more unique areas of the core assessment criteria such as ‘planning and production’ and prevent surprise and stress towards the end of these eleven weeks. I also demonstrated further contextual research through presenting some pages about Alexander Forssberg, who greatly inspired me to experiment with my own character turn-around in week 10. I believe that the biggest success I experienced in week 7 was the completion of my short story. I believe that it showcases the growth of my written language since the beginning of the project, which is heavily dependent on the amount of reading I have carried out. I continued with this successful trajectory for the rest of the week by completing a third illustrated scene and it's supporting journal pages.
Week 8 saw a lot of similarities to the previous seven days, which formed a lot of repetitiveness in my journal. However, I knew that the work I was producing in week 8 was important to the progression of my project, which helped me get through the workload. I finished a fourth illustrated scene and made the effort to present its process page nicely. To my surprise, I managed to also create a fifth scene, making this one of the most productive weeks of this project in my opinion. I finished the week visiting a Nucleus Arts exhibition, where I was exposed to the art of Simon Mills. This trip was a refreshing change to the repetitive work I had been conducting in week 8.
Similarly, to previous weeks, week 9 began with some contextual research on the book ‘Earth’ by Iain Stewart and John Lynch. I had noticed a considerable improvement at my efficiency with these tasks, allowing me to finish far quicker than previously. I changed up my workflow by constructing my two narrative characters using air dried clay. Carrying out this task made me feel extremely experimental, and I was confident that this example of a practical skill was drastically improving the quality of my overall project. My creative mindset carried over into the process of a sixth illustrated scene, and I believe that this is the strongest composition out of all six I digitally drew. This week, I also received an extremely unexpected email response from artist Simon Mills, who’s work I had viewed during the Easter break. I was able to elevate my project further by including an interview with Simon, which was a pleasant surprise. I made a great effort to apply his responses and tips to the drawing process of my sixth composition, which could be why the outcome was the strongest compared to the other five. I reflected on this possibility whilst developing on my exhibition ideas through wood printing research. During the last portion of the week, I created my zine using Illustrator. I successfully created an A4 draft of the product which made me feel optimistic about the inclusion of this in my project. I felt excited to present a finalised piece of work that differed from my final video. I ended the week by forming the basic atmosphere of my final video in after effects, allowing me to finish the week feeling extremely accomplished, as this was a huge checkpoint in the journey of this project.
I got back to basics in week 10, which is an important thing to remember. I had recalled a tutorial from week 2 in which the idea of context was emphasised, which is why I conducted some basic research on the origins of Landvaettir. I was shocked to discover I hadn’t yet done this in the ten weeks I had worked through so far! I followed this up with some contextual book research and watched a concept design documentary. I wanted this week to cover simple tasks, preventing me from getting too caught up in the finalising process now underway. I made good additions to my final video alongside journal work this week, which gradually reduced my stress about the task. I was growing concerned about the time I had left to complete the outcome, but I knew that the process would speed up once the basic structure of the video was down. This week saw some dramatic process to my portfolio and other general paperwork. I was able to find a good alternating approach to basic research and finalising. My ability to multitask enabled me to reach targets effectively, and I left the week feeling contempt.
The final week, week 11, was an intense compiling of all the work I had conducted during this project. I had to ensure that I was still progressing the final stages of my project whilst staying organised and prepared. I was extremely relieved to finish and export my final video successfully and begin analysing the product. This was a huge milestone that I had been tackling for a few weeks in between other tasks. I progressed with bookwork at a much slower pace, since I was no longer progressing an idea, I was perfecting content instead. I was also able to view my completed zine, which I had only held as a draft until this point. I believe that this piece of work is a great garnish to go alongside my outcome, and I was relieved to be able to incorporate my short story into an actual product. This final week felt less intense because I had used my time wisely in previous weeks. I believe that the end portion of this project was extremely successful and enabled me to end the experience positively.
Strengths, Weaknesses + the unexpected
I believe that I have more than one main strength within this project; some of the individual components that went into my final video are very strong. The main achievements that stand out to me include my sixth illustrated scene of my giant character, which I decided to present at the exhibition. This scene generates an effective atmosphere using its choice of camera positioning, deep colours and texture. In my opinion, this composition is the strongest because it is effective at developing the story visually, which was my original ambition. I am also proud of my finalized zine; I am happy to have found a way to incorporate my completed short story into its own product. I am confident that my ability to timetable my workload has a big part to play in my project, which also makes this a significant strength. The success I had with this style of organisation is evidence to how effective time management can be, and how important it is to experiment with planning techniques.
My project shared many weaknesses along with its strengths. For example, I believe that I frequently became distracted by written work and abandoned visual development. This is most obvious in my journal work, where imagery is very sparse. I think that the links between my project and my concept design pathway choice are strained because I didn’t showcase very much drawn imagery. Becoming distracted with written work ultimately reduced the quality of my journal presentation.
One of the most fundamental elements to the progression of my project was an unexpected discovery. This was the surprisingly useful resource that reading was to my project! I now understand how naïve I was to reading in past, as I have picked up on so much knowledge missed by online research only. Reading ‘Modernism in Scandinavia’ is also the sole reason I discovered the ‘Landvaettir’ folklore story originating from Iceland, which was from a book that initially didn’t relate to my project at all! I learnt my lesson and analysed a book at least once per week, leaving me with eleven books for my bibliography. My interview with Simon Mills is another example of an unexpected predicament, but It certainly improved the quality of my project overall.
Links + references to contextual research
The most influential elements of contextual research I have encountered over this project have involved Simon Mills and Simon Stalenhag. Simon Stalenhag’s style and aesthetic initiated my aims for a Nordic narrative. His art also helped provoke composition ideas, which can be seen in the metal sphere used in my first and second digitally drawn scenes. I believe that my aims wouldn’t have been as effective If not for the help of Simon Stalenhag’s art. Another huge influencer over my work has been Simon Mills. His dramatic use of yellows and purples persuaded me to explore similar techniques myself. I therefore believe that my illustrated scene successes are widely down to the help of Simon Mills, whose methods I analysed and applied to my own practices. As I progressed through the project, I learnt to be more open to inspiration from new sources. As soon as I allowed my concept designs to be influenced by Beau Lamb and saw drastically successful results, I realised the potential resided with an open-minded attitude. Beau’s influences can be seen in my concept sketches and finalised character turnaround through colour and positioning choices.
Reading has been an immense help to my project too, and I believe that my project would be extremely poor without the assistance of read material. Along with ‘Modernism in Scandinavia’ and ‘Tales from the Loop’ (important books from the beginning), I also extracted ideas from ‘Norse Gods’ by Arthur Cotterell, which allowed me to develop my ideas into something factually supported. The magazine ‘imagine FX’ included articles about outdoor creativity, which initiated my motivation to capture my own filmed footage whilst understanding how to use natural space. This was solidified by read of ‘Earth’ by Iain Steward, who’s page illustrations captivated and provoked me to uncover the extraordinary hiding in nature reserves.
Contextual research gave me masses of opportunity that I could pick from in order to make the most effective body of work. In the future, I wont be so stubborn about reading and learning, as it has certainly contributed to a huge portion of this project!
Conclusion
To my relief, I believe that I have achieved what I initially set out to accomplish, which was to create an immersive video with heavy Nordic traits. I think that the outcome will show its true effect when observed during the exhibition. However, from what I can see after completing week 11, I have created a body of work that I should be proud of. I am contempt with my project meeting the core assessment criteria. I’m also confident that I have made good use of my time, which shows in the clarity of my preparatory work and the strength of my outcome. This is also evident in my ability to recall the most significant attributes out of each week, which shows I payed attention to my progression, and understood my position within the project at all times, weather it was good or bad. Overall, this project has been a successful process, because I effectively planned my way around challenges. For example, understanding what was overambitious and choosing not to go crazy on the marketing and promotion of my outcome. As I look over my finished project, I am contempt with all the forms that it takes, from sketchpad to my journal, my Tumblr, and my outcome. Nordic and Scandinavian themes along with natural and woodland aesthetics link all bodies of work into a single product that coincides with my immersive video, allowing me to convey a clear artistic message to viewers of my work. I also believe that I have developed drastically from last year’s final project, which completes my satisfaction with this project now that it’s finished.
0 notes
Text
The Best BIM and CAD Courses to Skyrocket Your Career
The construction industry is one of the most dynamic, fast-changing sectors out there. New technologies keep emerging and reshaping it every now and then. Keeping up with the changes and adapting to them is essential to succeed in this field. The world of architecture, engineering, and construction (AEC) is no exception to this.

Computer-assisted design (CAD), BIM, 3D modeling, and other digital tools have become indispensable for AEC professionals in recent years. If you’re looking to get a job as an architect, CAD operator, or any other related profession in the near future, it’s high time you beefed up your technical skills. These are some of the best BIM and CAD courses at NIBT that will help you do just that…
What is BIM?
BIM stands for Building Information Modeling, which is a set of standards, methodologies, and software tools that enables the digital modeling of a building’s information throughout the design, construction, and operation stages. The BIM workflow integrates documentation, design, analysis, and coordination between project stakeholders. It also facilitates data sharing between them. With BIM, the risk of mistakes and misinterpretations is reduced significantly, which in turn improves the quality of projects.
As BIM is not a programming language or computer software, it can be confusing for people who are not familiar with the construction industry. It’s important to know that BIM is a workflow methodology and software, not a computer program. It’s not just one single technology. There are many technologies that go into BIM including Revit, Navisworks, BlueBeam, and more.
3D Modeling and Virtual Reality Course
This course will take you through the fundamentals of architecture and design. You’ll learn how to sketch and model your ideas, use 3D software, and create virtual reality (VR) walkthroughs for a more immersive experience. You’ll take a tour of the architectural design process, learn about the different architectural styles, and discover how architecture has shaped society. You’ll also have the opportunity to practice sketching and get feedback from the instructor.
Aside from sketching, you’ll also learn how to model ideas in 3D software that you can share with clients and colleagues. You’ll also create VR walkthroughs for a more immersive experience that clients can explore and review remotely. This course is perfect for beginners looking to enter the architectural design field. It’s a great introduction to the field and will help you take your first steps towards a career in architecture and design.
Conclusion
While sophisticated technologies keep getting integrated into AEC workflows, it’s important to remember that they are only helpful as long as they’re implemented properly. It’s crucial that all parties involved in a project understand how these tools work and how they should be used. This is where BIM and CAD courses come in. As the name suggests, these courses focus on the computer-assisted design technologies and practices that have become essential in the AEC sector.
They’ll help you understand the principles behind these tools and become proficient in using them. The best BIM and CAD courses are designed for professionals from different fields who want to learn new skills and upskill their existing knowledge. They’re also accessible to individuals who have no prior experience in technology or the AEC sector. If you’re in a similar situation, you can use these classrooms, e-learning, or virtual BIM courses at NIBT to get a leg up on the competition and gain an advantage in your career.
For more information: - +91 7350255855
Visit us: - www.nibt.education
0 notes
Text
Find Web Design with Skillshare [Reviewed]
(This branded content is brought to you by Skillshare)
Web designing is a fast-changing industry, so learning is one of the most important skills you need so as to remain relevant on the marketplace. Acquiring the essential skills can be a challenge, especially with limited free time. Luckily there are a whole lot of learning tools you may choose from.
Skillshare is one of those tools, more precisely it’s an internet educational platform which can enable you to achieve your professional learning goals. Skillshare has more than classes related to marketing, design, engineering, creative businesses, and other fields.
Skillshare normally costs you $8.25 a month, however we are able to persuade them to provide Hongkiat readers two free months with unlimited access to all of their 17,000+ classes. you can determine if it’s worth an effort I analyzed their stage.
The Teachers
Skillshare defines itself as an internet learning community but also teach a class. Anyone can teach a class, which might not seem good at first but you will discover many professionals among 28, once you look at the teachers.
Thus, persuade them in their authenticity and teachers basically have to locate their audience. They largely do that by summarizing professional experience and their qualifications on their profile page.
On the screenshot below, it is possible to observe a teacher profile webpage. It goes back to Carlye Cunniff who is a Old Experience Designer in Amazon and educates UX design skills on Skillshare as a side project–precisely the sort of specialist you might want to learn from.
Aside from the instructor’s short resume, teacher profile pages have sections for the projects, courses, and discussions of the teacher. In addition, it has social features, like hyperlinks to the instructor’s social media profiles and website, and you may also follow instructors using the big gloomy +Follow button.
The Machine
Skillshare includes a intuitive and straightforward stage. The search bar allows you to rapidly look up classes, skills, or instructors. I run the “website design” research query, and obtained 6,894 results and the following display:
The result webpage has filters which let you adjust the results for your requirements. It is possible to filter the classes based on subscription type (premium and free), freshness, class length, related skills, plus it is also possible to look up the classes held by the instructors you follow.
There is a big +Practice button near the name of this result page, which usually means you could stick to the “website design” search phrase if you would like, which will be a quite useful feature. It is possible to observe the classes which you may scan through.
The Courses
Now, let’s look at the site’s most crucial feature–the classes. For this review, I chose three classes, all associated with various parts of web design and educated by established professionals, covering the following topics:
Well-converting site layout by Dennis Field, InVisionApp’s merchandise designer
UX wireframes by the above Carlye Cunniff, ” Amazon’s senior experience designer
Typographical composition by Ellen Lupton, a curator of contemporary design at the Cooper Hewitt, Smithsonian Design Museum in New York City
Classes are broken up into videos, so they adapt to the tight schedule of a busy professional. You can add a class and notes, make and upload your class job, write a summary, and also have a look at the notes of other student, testimonials, and projects.
Website Design Essentials: Creating Advertising Homepages That Drive Results
Duration: 1h 5m
Number of movies: 9
Gear you need: Photoshop or Sketch & some free InVisionApp accounts
Final deliverable: An InVision version of a mobile program layout
Inside this class, you can follow through a program layout is created and prototypes by Dennis Field.
From the first movies, Dennis sets the aims of the job and explains that the concepts associated with homepage layout, including cues, storytelling, consumer patterns, and scannability.
You’re able to view him sketching while talking, which is a thing that is great since you can get an insight into the creative thought process he uses to achieve the project’s goals.
The layout from paper moves into PhotoShop, and it is possibly the most interesting area of the class, after the sketch is completed.
And, when the PhotoShop layout is completed, he explains how to add collaboration features to get feedback from users and team members and transforms it into a clickable prototype. A whole lot of insight and information in little more than one hour, which isn’t a bad outcome.
Wireframing for UX Design: Dice Your Big Idea
Duration: 34m
Number of movies: 7
Gear you need: Pen and newspaper
Final deliverable: A medium-fidelity wireframe
This class is a brief class into wireframing. It’s somewhat more theoretical than the class, but it will give you the essentials of layout and a good comprehension of UX wireframing.
The teacher, Carlye Cunniff shares several hands-on suggestions you can use on your own workflow, such as an idea creation exercise called “crazy eights”.
She also demonstrates how to envision, humanize, and sketch the persona out.
Carlye treats wireframes as communication tools, which looks like a fantastic strategy. She also highlights the value of producing several iterations to the same layout and demonstrates how to gradually move from low-fidelity (lo-fi) into high-fidelity (hi-fi) wireframes.
This class is also very reassuring, since Carlye claims that first thoughts are typically not the best thoughts, which means you don’t need to be concerned if you get a negative feedback apart from being information-heavy. She also discusses how to restrict your ideas to introduce your wireframe for your client, and many other helpful things.
Typography This Works: Typographic Composition and Fonts
Duration: 36m
Number of movies: 10
Gear you need: Any graphic designing applications, like Illustrator or InDesign
Final deliverable: A business card layout
This class maintained Ellen Lupton who is also a curator in the Cooper Hewitt, by its manager and is sponsored by the Maryland Institute College of Art, Smithsonian Design Museum in New York City. By attending, you can learn the craft of deciding on the typefaces for every layout and the principles of typography.
Ellen discusses the main typefaces (sans-serif, serif( slab) and introduces you to the main theories of typography, including ligature, tracking, kerning, and drop caps, and by using real-life cases.
The most noteworthy thing about this class is that she also discusses poor practices, for instance she shows a couple of cases of poor layouts, poor scaling, and other “kind crimes”.
You can learn crucial things in this class which each and every designer needs to know, like the way to orientate typographical components, the way to make a coherent internal arrangement, why it’s awful to use too many types of emphasis, the way to work with line spaces to make feel, and many more. Ellen looks over how typography has developed through the times and also gives tons of references.
From the class project using showcases and the fundamentals of Ellen explains throughout the class. She also explains how to choose and mix typefaces, use weights, and gradually add contrast and structure .
Decision
Courses are not very long, so watching them is readily manageable if you have limited time that is free. Still, they supply a great deal of knowledge and you also have the opportunity to get an inside view of practicing professionals into the job procedure. And, the more class jobs make you put your knowledge into practice simultaneously, which is also something designers tend to enjoy.
Do not forget that as a Hongkiat reader, you can now get two free months with unlimited access to each of the classes. And, if you want it you can remain part of Skillshare and continue learning for a $8.25 yearly fee.
The post <p>Find Web Design with Skillshare [Reviewed]</p> appeared first on Vista Icon Creator.
from network 8 http://vista-icon-creator.com/find-web-design-with-skillshare-reviewed/
0 notes
Text
Dude Herman reviews CINEMA 4D Studio R18
I’ll speak more about the personality object, and also some associated with R13’s other new functions later, but first we will begin with CINEMA 4D’s new rendering engine. Let us get Physical While CINEMA 4D’s old standard renderer remains available and may be invoked to provide your scenes, there can be an important new plus enhanced rendering engine on this latest version of CINEMA 4D known as the particular physical renderer. The title of this new renderer is an important hint to understanding what this does. It recreates accurate photo-realistic physical effects centered on real camera attributes such as motion obnubilate, depth of field plus lens distortion.
These bodily camera effects are managed with authentic, real-world digital camera parameters, which become obtainable once the physical renderer is selected for example f-stop, focal length, shutter swiftness, and ISO - functions you would expect in order to find on the bodily camera. Here’s the factors i like about this particular new capability: Rather compared to just dialing in irrelavent numbers to control such things as motion blur and key length, those with encounter operating real cameras within the real-world can right now draw upon and utilize their considerable knowledge inside CINEMA 4D. This means that will CINEMA 4D artists plus animators who are educated with how directors plus DPs talk can consider their comments and utilize it for this second item stage of production, producing for a more incorporated workflow. Working in the particular physical renderer, the performer will inherently know that will different combinations of shutter speed (how long the frame is exposed in order to light) and f-stop (how much light is permitted to enter the frame) affect how much movement blur is apparent within a scene and also exactly what objects are in sharpened focus or blurred out there (otherwise known as level of field). CINEMA 4D’s physical renderer enables customers to consider in conditions of a “physical digital camera, ” a concept a lot more easily understandable to the producer, director or just about anyone else included in production. Varying key lengths on the bodily camera. Motion blur can be an important factor within creating convincing looking computer animation and is also important when merging live actions and CGI. In previous versions of CINEMA 4D, before the physical renderer, there was two ways in order to achieve natural looking movement blur. The first had been to use scene movement blur (renamed Sub-Frame Movement Blur in version 13) which looks good, yet is extremely costly within terms of render period. Another option is in order to use a strategy known as vector motion blur, or even VMB, which is quick and offers decent outcomes, but less realistic. VMB is frequently used in association with Consequences and the particular ReelSmart Motion Blur connect to from RE: Vision Results. The new physical renderer, however, now offers upward accurate, motion blur within considerably less time compared to scene motion blur. Within addition, shadows cast through moving objects appear normally blurred, which was unattainable with VMB. Below can be really a simple check that I setup associated with a physical camera delivered with a shutter position of 180 degrees plus subsequently with a shutter angle of 360 levels. Notice the effect that will the different shutter sides have on the resulting motion blur. You do not have to apply Worldwide Illumination (or GI) individually to your render choices when using the bodily renderer since it’s constructed in - light will get bounced around indirectly within your scene automatically. As an aside, you may still wish to use the regular renderer unless you require it since it may be faster in specific cases. Getting into Character R13’s innovative new personality tools are very effective. As a result, I actually wouldn’t be surprised in order to get a lot a lot more character animation made upward of CINEMA 4D within the near future. The particular most crucial of these types of character animation innovations : and one can claim perhaps the most essential of all the improvements to R13 itself, may be the new character object. Typically, before one could also consider animating a personality, it had been essential to first construct the skeletal rig, bind this to your model plus carefully weight the factors from the mesh in order to the different joints within the rig. This had been no easy task, except if you’re highly skilled. The rig is really the highly complex and comprehensive construction that is composed of many hierarchies associated with joints, nulls, targets, movement and controls. Skeletal rigs often implement an sophisticated technique called inverse kinematics (or IK) that enables you to do factors like move a hands around and also have got the rest of the particular joints in the supply follow automatically. This extras you the need in order to animate each bone individually while also having the particular advantage of making the particular motion look natural. Producing a good character rig is definitely an artwork unto itself as well as a correctly designed rig should conceal its complexity from your animator. It’s no surprise, therefore, that means building the complete rig from the begining can take a great deal of time. Days, in case not weeks, of cautious planning and hard function will often be needed, not in order to speak of time this takes to fully realize all of the elaborate concepts involved in the construction. Of course this particular assumes that you have got already gained an effective knowing of the mechanics associated with human anatomy and locomotion and have already healed the considerable hurdles included in learning to design. To help simplify the particular down sides of rigging, MAXON has established the particular character object, which enables you to definitely immediately add an expertly designed skeletal rig for your own model simply by sketching upon predefined templates to get components such as spines, arms, legs, hands plus fingers. In just the few clicks, voila! You have got yourself a completely built and articulated rig that would have used a very long period to create yourself. After producing the rig, you make use of handles to customize plus adjust it to suit the proportions of the particular model. During this procedure, any adjustments made in order to the rig will immediately be reflected symmetrically upon the other side along with the ability to change it off. To join the mesh to the particular rig, you merely drag the particular icon from the nylon uppers into the binding component of the rig : CINEMA 4D will utilize intelligent auto-weighting to the particular points on the nylon uppers (which you are free to customize later). As soon as done, you will end up being off and animating within a fraction of the particular time it might have used you traditionally. Simply click on to build a brand new rig, pictured here following to a simple design. Drag around the circular handles to make the particular rig fit the nylon uppers precisely. Soon you’re prepared to begin posing plus animating. Bipedal rigs usually share similar characteristics, varying mostly in where the particular joints are placed. Nevertheless, as you might anticipate, significant differences exist in between bipeds, quadrupeds or millipedes. Therefore, the character item contains templates for numerous different types of animals such as bipeds, quadrupeds, fish, insects, birds plus reptiles. You can develop your own personal rig templates to get others to make use of. Additional themes are being created that will be implemented within the future by MAXON and others. Components can be combined as properly, so if you’re functioning on a model associated with the winged horse Pegasus, you can add the particular wings component to the quadruped rig. There are usually also rigs in CINEMA 4D, which are ideal for common motion catch and animation interchange types for example BVH, FBX plus Mixamo. Once a personality rig is to establish, you might want to make use of the exciting brand new CMotion object. CMotion can be excellent to create stroll cycles and, in reality, many different kinds associated with cyclical motion. With CMotion you are able in order to create a customized stroll cycle for your personality by adding hubs plus targets. Once you complete, you can apply that will motion to the personality and make it stick to a spline path all through your scene. This can be all done without getting to worry about the particular massive amounts of keyframes and f-curves that are usually ordinarily necessary when carrying out this kind of function. There’s also a brand new muscle system in R13: muscle objects can end up being placed in your design and anchored to the rig. The muscles are usually used to deform the particular mesh or skin through the character and simply by default, these are set in order to render. Their visibility may easily be turned away from since, probably, you will certainly only use them in order to affect the mesh. Here is a good example associated with how to use muscle tissue: You can place 1 where the bicep must be and tell it in order to develop when the forearm curls while lifting the heavy object. In this particular manner, you can duplicate the effect of the component of an arm increasing the size of as the muscle flexes beneath the skin. An efficient example of using muscle tissue in R13 is noticeable on this render associated with a walking dinosaur. Subwoofer Surface Spreading CINEMA 4D R13 now includes a good advanced Sub-Surface Scattering (or SSS) shader. SSS can be useful in accurately object rendering surfaces that absorb plus diffuse light within their particular interior. Did you actually put your hand more than a flashlight? Using an effective enough flashlight, you’ll observe that the light can be absorbed to some level by your flesh so that your hand seems in order to almost glow with the particular light. Why’s that? Considering that some of the lighting penetrates the surface associated with your skin, it actually is then diffused or even scattered within your hands. That is a great example of what SSS achieves enhanced realism; this can be seen upon many surfaces including plant life, marble, milk and thin-skinned aliens. Various amounts associated with SSS on a design of a horse. XRefs R13 has made significant improvements to XRefs (external references) which are really useful, specially when working within a collaborative environment upon large-scale projects. Imagine the particular project is a technology fiction movie that occurs on a space place. You may have somebody working on the home furniture while another artist produces a robot that moves about in the scene. Nevertheless another person might end up being working on the device panels and so upon. But precisely how would a person work concurrently on the particular project with a restricted deadline? Well, you can pass the files about to all the group members so everybody can do their part, yet as you can visualize, that would be a good extremely inefficient way in order to do it. Merging different projects into one can be also time-consuming with the particular added potential to backfire if the wrong data files are mistakenly incorporated. When you might have guessed, XRefs would be the method to go. Simply place, XRefs are references in order to other Cinema 4D tasks that are embedded within a “master project”. (Other design programs use the particular same term. ) To get example, the individual creating the robot could create his file be a good XRef inside of the particular master space station task. In this way, he or she is able to keep on working on the automaton, even as the sleep of the project can be done. Inside the learn project, it will probably be constantly up-to-date whenever the XRef can be changed or saved. A person can work with a good XRef just as a person would some other object, simply by animating its components, incorporating materials into it or even applying expressions into this. Similarly, the furniture, instrumentation and even the illumination rigs and textured items can all be XRefs, all coming together within one grand file exactly where one could have a look at just how the scene is arriving together just by starting it. When importing a good XRef from an outdoors source, you are capable to decide whether a person want to import the animation or materials. To get instance, suppose the automaton has a little antenna that twirls around upon the top from the particular head. The person who also created the XRef can set this up outwardly, but you might desire to ignore it, since well as any components that were applied in order to it, and choose in order to import a stripped lower, untextured version of the particular XRef instead. You can even determine whether any changes produced to the XRef in the master project will influence the reference or stay only inside the learn project. When Objects Clash R13 also includes the new Collision Deformer which usually, when applied to the subject, will deform the mesh accordingly when this collides with another item. This can be helpful when making things such as mattresses and cushions. To get example if something large is set down upon a bed, such since a bowling ball or even a character’s rear finish, the collision deformer will certainly cause the mattress in order to interact with the collider and its mesh can be going to be deformed accordingly. Within the crash deformer’s parameters, there are usually options to make a good object bounce back within shape after a crash (as it would within the case of the mattress), or maintain the particular new deformed shape : useful in making factors like footsteps or car tire tracks in the snowfall. The checkerboard surface can be deformed by the world due to the crash deformer Incidentally, the crash deformer is not centered on soft body design, but rather on angles. This means that the effect does not need you to set upward physics simulations. There’s A lot more There exists a great deal more that is brand new in CINEMA 4D R13. Here are a couple of other features that I actually think are key enhancements. There are many stereoscopic enhancements, so if you are doing 3D you’ll certainly want to upgrade. These types of include the opportunity in order to convert any camera in order to some parallel, on-axis, off axis or radial stereoscopic digital camera. Stereo images can furthermore be previewed directly within the 3D editor plus may be rendered since merged stereoscopic images or even separate images for every camera. The picture viewers now also supports the particular playing of stereo makes. New Anti-Aliasing filters right now allow you to accomplish higher quality results simply by using the advanced Mitchell and Gauss algorithms. Currently known for its user-friendly user interface, R13 contains a quantity of improvements. New cursor-based navigation uses the place you click as the particular point of interest whenever zooming and rotating Program. Drawing. Bitmap model. Within the past, the viewport would pivot around the thing that was selected and if this particular were far from exactly what you were viewing, navigating around the portion associated with the model you had been looking at might end up being difficult and confusing. Upward to now, I believe this cursor-based navigation can be good way to move and much more dependable in its results. Python and COFFEE scripting vocabulary integration has also already been improved. Scripting languages provide users immense power within customizing and extending the particular capabilities of Cinema 4D to ensure that experienced programmers and developers may create customizable solutions to get specific tasks and apply them into their sewerlines. Notably, Python plug-ins plus scripts now appear together with those created using C++ and COFFEE APIs.
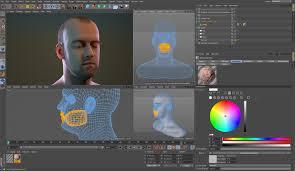
CINEMA 4D had been experienced at exchanging data along with After Effects. Past variations of the program permitted you to definitely result entire AE compositions comprehensive with 3D camera movement, lights, object buffers and also 3D coordinates of aeroplanes that can be inter-changeable out for Consequences levels. Version 13 contributes in order to this by adding assistance for CINEMA 4D’s phase object, time marker foreign trade and support for twenty nine. 97 frame rates. Bottom line CINEMA 4D has turn out to be a mature and able product that steadily provides improvements. The new functions such as the bodily renderer, character object, CMotion, SSS, XRefs are all of innovations that are helpful, important and will conserve you time. Depending upon the work you perform, you are able in order to choose from several tastes of CINEMA 4D. Leading has got the essentials to get you began. Then there’s Broadcast plus Visualize and lastly the particular Mother of all CINEMA 4D packages, Studio, which usually has everything the some other packages include and a lot more, such as the particular character tools. In situation you are thinking regarding doing character animation, a person should get Studio. To get those considering doing movement graphics and broadcast style, however, CINEMA 4D Send out should cover all the particular bases. It retails to get $1, 695. Upgrades through CINEMA 4D Broadcast Edition 12 are $695. Studio sells for $3, 695 and the upgrade through Version 12 is $995. You should consider obtaining the Annual Licensing choice, or MSA. It’s essentially a yearly subscription, which usually entitles you to all of upgrades. It costs $650 for Studio, so a person find yourself saving around $350 in the normal upgrade cost. Regardless of what edition you get, CINEMA 4D has certainly earned the place among the many respectable 3D software rooms out there. Actually this has recently been called a recipient of the particular Computer Graphics World SIGGRAPH 2011 Silver Edge Prize.
0 notes
Text
PROTOTYPE
And then there is suddenly flooding of ideas in your mind that you want to design an app or a website of so and so project or may be your firm that provides e-service. This stage of initiation requires amount of implementation which is done then. Certain types of design or you may say demo is required which are made from earlier available information from other user. This will make your new design more easily and fast and also give you some taste that might be missing in your thoughts that will serve as a berry to your cream.
So prototype is basically a model to your website or your app that will help you give visual and functional interface enhancement and help you build your app or website more attractive and audacious according to your need to test the initial and main function of the website or a mobile application.
ADVANTAGES OF PROTOTYPE
1. Before translating to code this will test or enhance and give you the best user interface for your app or website.
2. You can make all the necessary changes over here and may help you avoid the costly changes that might occur in future. So you will be cost benefited from prototype.
3. Apart from this if you are a start up then prototype may help you win the finance of the investor’s team.
HOW TO CREATE A PROTOTYPE?
It can be anything from a paper sketch, to a clickable HTML prototype. However, typically when people talk about a prototype they are referring to an interactive prototype of some kind which allows users to navigate from page to page and use functionality such as drop down menus.
There are numerous ways to create a prototype. It can be I form of powerpoint, pdfs or even in form of word documents. Setting aside these old orthodox ways to create prototypes, in the present generation there are several other smart tools that will help you create some interactive prototype, increasing the effectiveness and attractiveness of you website or your application.
TOOLS USED TO CREATE PROTOTYPE
1. Origami https://origami.design/
Origami has helped in design and building of products like Facebook, Messenger and Instagram. Copy anything from Sketch and paste native layers into Origami Studio. Then quickly adjust, add behavior and animate any layer property without going back. Show off your designs in presentations in full screen, on a number of different devices.
2. Webflow https://webflow.com/
Webflow, Inc. is an American company, based in San Francisco,that provides software as a service for website building and hosting. Their online visual editor platform allows users to design, build, and launch websites.
3. Marvel https://marvelapp.com/
Wireframe, design and prototype fast with this intuitive design and prototyping tools. Instantly generate design specs and connect integrations that power up your workflow. From low to high-fidelity, Marvel supports you every step of the way.
4. Vectr https://vectr.com/
Vectr is a free graphics software used to create vector graphics easily and intuitively. It's a simple yet powerful web and desktop cross-platform tool to bring your designs into reality.
5. Sketch https://www.sketch.com/
Built on the best of macOS technologies, giving you familiarity, power and performance where you need it most. Sketch’s interface automatically adapts to show you the tools you need, and gets out of the way when you need to focus.
For more details and queries fee free to contact us: http://orainfotech.com/
0 notes