#availabilityzone
Explore tagged Tumblr posts
Visit Tumblr Blog
Explore Tumblr blogs with no restrictions, modern design and the best experience.
Last Seen Tumblr Blogs


Fun Fact
Total funding amounts to $125.3M.
Text
AWS CloudTrail Monitors S3 Express One Zone Data Events
AWS CloudTrail
AWS CloudTrail is used to keep track of data events that occur in the Amazon S3 Express One Zone.
AWS introduced you to Amazon S3 Express One Zone, a single-Availability Zone (AZ) storage class designed to provide constant single-digit millisecond data access for your most frequently accessed data and latency-sensitive applications. It is intended to provide up to ten times higher performance than S3 Standard and is ideally suited for demanding applications. S3 directory buckets are used by S3 Express One Zone to store items in a single AZ.
In addition to bucket-level activities like CreateBucket and DeleteBucket that were previously supported, S3 Express One Zone now supports AWS CloudTrail data event logging, enabling you to monitor all object-level operations like PutObject, GetObject, and DeleteObject. In addition to allowing you to benefit from S3 Express One Zone’s 50% cheaper request costs than the S3 Standard storage class, this also enables auditing for governance and compliance.
This new feature allows you to easily identify the source of the API calls and immediately ascertain which S3 Express One Zone items were created, read, updated, or removed. You can immediately take steps to block access if you find evidence of unauthorised S3 Express One Zone object access. Moreover, rule-based processes that are activated by data events can be created using the CloudTrail connection with Amazon EventBridge.
S3 Express One Zone data events logging with CloudTrail
You open the Amazon S3 console first. You will make an S3 bucket by following the instructions for creating a directory bucket, selecting Directory as the bucket type and apne1-az4 as the availability zone. You can type s3express-one-zone-cloudtrail in the Base Name field, and the Availability Zone ID of the Availability Zone is automatically appended as a suffix to produce the final name. Lastly, you click Create bucket and tick the box indicating that data is kept in a single availability zone.
Now you open the CloudTrail console and enable data event tracking for S3 Express One Zone. You put in the name and start the CloudTrail trail that monitors my S3 directory bucket’s activities.
You can choose Data events with Advanced event pickers enabled under Step 2: Choose log events.
S3 Express is the data event type you have selected. To manage data events for every S3 directory bucket, you can select Log all events as my log selector template.
But you just want events for my S3 directory bucket, s3express-one-zone-cloudtrail–apne1-az4–x-s3, to be logged by the event data store. Here, you specify the ARN of my directory bucket and pick Custom as the log selection template.
Complete Step 3 by reviewing and creating. You currently have CloudTrail configured for logging.
S3 Express One Zone data event tracking with CloudTrail in action
You retrieve and upload files to my S3 directory bucket using the S3 interface
Log files are published by CloudTrail to an S3 bucket in a gzip archive, where they are arranged in a hierarchical structure according to the bucket name, account ID, region, and date. You list the bucket connected to my Trail and get the log files for the test date using the AWS CLI.
Let’s look over these files for the PutObject event. You can see the PutObject event type when you open the first file. As you remember, you only uploaded twice: once through the CLI and once through the S3 console in a web browser. This event relates to my upload using the S3 console because the userAgent property, which indicates the type of source that made the API call, points to a browser.
Upon examining the third file pertaining to the event that corresponds to the PutObject command issued through the AWS CLI, I have noticed a slight variation in the userAgent attribute. It alludes to the AWS CLI in this instance.
Let’s now examine the GetObject event found in file number two. This event appears to be related to my download via the S3 console, as you can see that the event type is GetObject and the userAgent relates to a browser.
Let me now demonstrate the event in the fourth file, including specifics about the GetObject command you issued using the AWS CLI. The eventName and userAgent appear to be as intended.
Important information
Starting out The CloudTrail console, CLI, or SDKs can be used to setup CloudTrail data event tracking for S3 Express One Zone.
Regions: All AWS Regions with current availability for S3 Express One Zone can use CloudTrail data event logging.
Activity tracking: You may record object-level actions like Put, Get, and Delete objects as well as bucket-level actions like CreateBucket and DeleteBucket using CloudTrail data event logging for S3 Express One Zone.
CloudTrail pricing
Cost: Just like other S3 storage classes, the amount you pay for S3 Express One Zone data event logging in CloudTrail is determined by how many events you log and how long you keep the logs. Visit the AWS CloudTrail Pricing page to learn more.
For S3 Express One Zone, you may activate CloudTrail data event logging to streamline governance and compliance for your high-performance storage.
Read more on Govindhtech.com
#dataevents#awscloudtrail#AmazonS3#availabilityzone#createbucket#deletebucket#API#AWSCLI#NEWS#technology#technologynews#technologytrends#govindhtech
0 notes
Link
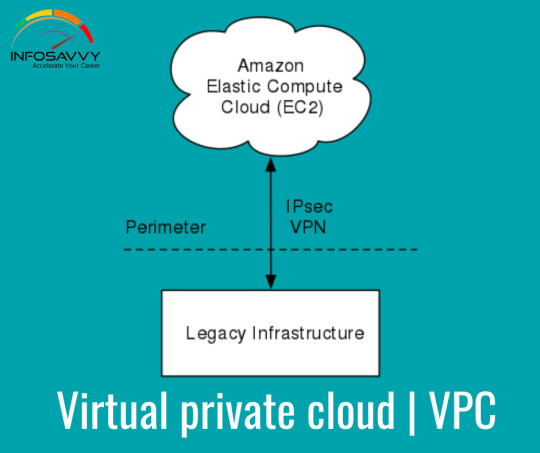
Overview of an Amazon Virtual Private Cloud Virtual service provides the networking layer of EC2. A VPC is a virtual network that can contain EC2 instances as well as network resources for other AWS services. By default, every VPC is isolated from all other networks.
Read More : https://www.info-savvy.com/overview-of-an-amazon-virtual-private-cloud/
0 notes
Photo

CloudFormationでVPC&Subnet作成 https://ift.tt/2svGjrK
こんにちは、risakoです! 最近寒くなってきましたね
最近は体調を崩し気味なので、よく寝てよく食べて風邪を引かないように気をつけています

前回は、EC2を自動で増やしたり減らし��くれるAWS Auto Scalingについてご紹介しました! 今回は、AWS CloudFormation(以下、CloudFormation)について簡単ではありますがご紹介します。
AWS CloudFormationを知ったきっかけ
このサービスを使い始めたきっかけは、一度設定したAWS Elemental MediaLiveを来年も使うかもしれない….と思った時に、そのまま残しておいては料金がかかってしまうためCloudFormationで書いてbacklog等メモで残しておけばいいのでは?との発想からでした。つまりは、節約のためです!

ちなみに、CloudFormationの利用自体は無料です! テンプレートに従って構築された各AWSサービスに対して課金されるようです。
そもそもAWS CloudFormationとは
AWS CloudFormation は、関連する AWS リソースの集約を整った予測可能な方法でプロビジョニングおよび更新し、開発者やシステム管理者が容易にそれらを作成、管理できるようにします。お客様は、AWS CloudFormation のサンプルテンプレートを使用したり、独自のテンプレートを作成したりして、AWS リソースと、アプリケーションを実行するために必要な関連するすべての依存関係やランタイムパラメータを記述できます。AWS のサービスをプロビジョニングする順番を見つけたり、依存関係が機能するように細かく注意したりする必要はありません。 参考:https://aws.amazon.com/jp/cloudformation/features/
すごくいいなと思ったところは、ベストプラクティスが盛り込まれたテンプレートで、1度作成してしまえば同じ構成を再現できるということです

VPC&Subnet作成
テンプレートを参考に複数同時にVPCとSubnetを作成してみたいと思います。 VPCとSubnetはコンソール上でも作成が簡単なので、CloufFormationでも簡単に作成できます。且つ、一緒に作成もできてしまうので時間短縮にもなります!
VPCテンプレート(YAML)
Type: AWS::EC2::VPC Properties: CidrBlock: String EnableDnsHostnames: Boolean EnableDnsSupport: Boolean InstanceTenancy: String Tags: - Tag
必須事項
CidrBlock
Subnetテンプレート(YAML)
Type: AWS::EC2::Subnet Properties: AssignIpv6AddressOnCreation: Boolean AvailabilityZone: String CidrBlock: String Ipv6CidrBlock: String MapPublicIpOnLaunch: Boolean Tags: - Tag VpcId: String
必須事項
CidrBlock
VPCID
実際に作成してみる
Resources: myVPC1: Type: 'AWS::EC2::VPC' Properties: CidrBlock: 10.15.0.0/16 EnableDnsSupport: 'false' EnableDnsHostnames: 'false' Tags: - Key: Name Value: testA myVPC2: Type: 'AWS::EC2::VPC' Properties: CidrBlock: 10.30.0.0/16 EnableDnsSupport: 'false' EnableDnsHostnames: 'false' Tags: - Key: Name Value: testB PublicSubnetA: Type: AWS::EC2::Subnet Properties: VpcId: Ref: myVPC2 CidrBlock: 10.30.0.0/24 AvailabilityZone: "ap-northeast-1a" Tags: - Key: Name Value: test-public PrivateSubnetB: Type: AWS::EC2::Subnet Properties: VpcId: Ref: myVPC1 CidrBlock: 10.15.0.0/24 AvailabilityZone: "ap-northeast-1c" Tags: - Key: Name Value: test-private
コンソールで確認してみる
VPC
名前:TestA CIDR: 0.15.0.0/16

名前:TestB CIDR:10.30.0.0/16

Subnet
名前:test-public AZ:ap-northeast-1a 紐づいているVPC:testB

名前:test-private AZ:ap-northeast-1c 紐づいているVPC:testA

CloudFormationに記述した通りに作成できているのが確認できました!
今回使用したテンプレートを保存しておけば次にVPCを作成するときに便利です! また、既存の名前やCIDRを入力してしまうとうまく作成されないので注意です

今回もお読みいただきありがとうございました

参考資料
AWS ドキュメントAWS::EC2::VPC https://docs.aws.amazon.com/ja_jp/AWSCloudFormation/latest/UserGuide/aws-resource-ec2-vpc.html
AWS ドキュメント AWS::EC2::Subnet https://docs.aws.amazon.com/ja_jp/AWSCloudFormation/latest/UserGuide/aws-resource-ec2-subnet.html
AWS Black Belt Online Seminar [AWS Cllud Formation] https://www.slideshare.net/AmazonWebServicesJapan/aws-black-belt-online-seminar-2016-aws-cloudformation
元記事はこちら
「CloudFormationでVPC&Subnet作成」
December 02, 2019 at 12:00PM
0 notes
Text
Effective bash/jq: Displaying All The AZs
I wrote the following script the other day because A) text is always superior to a screenshot, B) C-r is a thing, and C) I can't seem to find where Amazon actually publicly documents their AZs.
I wanted to share because I think it shows a couple of techniques which I don't see very often in scripts as well as yet again proving that it's good to know the tools you use.
#!/usr/bin/env bash { cat availability-zones || { for region in $( cat regions || { aws ec2 describe-regions --output=text --query \ 'Regions[].RegionName' | tee regions } ) do aws --region="$region" ec2 describe-availability-zones | jq '.AvailabilityZones[]|{ZoneName,RegionName}' | tee -a availability-zones done } } | jq -Ss 'reduce .[] as $item ( {}; .[$item.RegionName].azs += [$item.ZoneName] )'
cat availability-zones || … | tee -a availability-zones
This is the first bit that I think is both clever and useful. I use it twice in this script. Once here and the second one with the regions output. The idea is to use a file as a cache with cat's exit code being used to figure out whether the cache needs to be populated or not. To re-query the regions you just rm availability-zones regions and rerun the command. If you're happy with the regions you found but you want to re-query the zones you can just rm availability-zones and be good to go from there.
The key is to use cat on the one hand and tee on the other. tee is so fantastically useful and everyone should be aware of it. I'm an especially huge fan lately of the tee <<<"charnock" stephen idiom to both populate a file with a string while also printing it my screen. Very useful in my CD pipelines.
The next bit that I think is cool is the use of --query on my aws commands.
… aws ec2 describe-regions --output=text --query 'Regions[].RegionName' | …
Unfortunately you then see me immediately turn around and fall back to jq like a coward because JMESPath just does not compute for me. And really more so because jq is general whereas JMESPath only helps me in awscli.
Nevertheless I'm sure it's more efficient (for some definition of the word) to encode my JSON response processing in --query if I can rather than starting up the separate process (although I don't think I can measure jq's startup time.).
I also really like the use of jq's -S and -s flags here.
… | jq -Ss 'reduce .[] as $item ( {}; .[$item.RegionName].azs += [$item.ZoneName] )' …
If you're unfamiliar with them -S means sort keys and -s means slurp all input into an array before processing it. -s is getting me the ability to suck all the responses together into a single array so I can reduce it and -S is making it so that the humans I'm pasting this text to can easily find what they're looking for.
Just for kicks here's a fully parallelized version of the same code:
#!/usr/bin/env bash { cat availability-zones || { parallel aws --region='{}' ec2 describe-availability-zones ::: $( cat regions || { aws ec2 describe-regions --output=text \ --query 'Regions[].RegionName' | tee regions } ) | jq '.AvailabilityZones[]|{ZoneName,RegionName}' | tee -a availability-zones } } | jq -Ss 'reduce .[] as $item ( {}; .[$item.RegionName].azs += [$item.ZoneName] )'
Just because, you know, 😍 parallel 😍.
Cheers.
0 notes
Text
2019/08/19-25
*8月23日のAWSの大規模障害でMultiAZでも突然ALB(ELB)が特定条件で500エラーを返しはじめたという話 https://blog.hirokiky.org/entry/2019/08/23/200749 >ALBを利用させているAZから、特定のAZを消すと問題なく動作するように >なりました。 ALBの設定で配置する対象のサブネットを変更しました >(VPCのサブネットはAvailabilityZoneに紐付いています)。
*AWS障害���大部分の復旧完了 原因は「サーバの過熱」 https://www.itmedia.co.jp/news/articles/1908/23/news117.html >同社によると問題が起きたのは、「Amazon Elastic Compute Cloud」(EC2) >の東京リージョンを構成する4つのデータセンター(アベイラビリティー >ゾーン、AZ)の内の1カ所。AZ内の制御システムに問題が発生し、複数の >冗長化冷却システムに障害が起きたという。結果として、AZ内の少数の >EC2サーバが過熱状態となり、障害として表面化したとしている。
*2019年8月23日に発生したAWS東京リージョンの障害に関してのご報告 https://www.serverworks.co.jp/news/20190823_aws_news.html ><原因> >AWS側の冷却システム故障によるものとなります。 >特定のAZ(AZ ID: apne1-az4)に於いて発生しました。
*サーバー障害の対象のアベイラビリティーゾーンにあったか調べる方法 https://hacknote.jp/archives/52126/ >ap-northeast-1aやap-northeast-1cなどと表示されているアベイラビリティ >ーゾーンは実はアカウントごとに違うものが設定されている場合があります。
>アカウント間でアベイラビリティーゾーンを調整するには、アベイラビリティ >ーゾーンの一意で一貫性のある識別子である AZ ID を使用する必要があり >ます。たとえば、use1-az1 は、us-east-1 リージョンの AZ ID で、すべての >AWS アカウント��同じ場所になります。
>VPCより、サブネットの詳細を表示、以下を確認します。
*AWSのAZ障害で影響を受けた・受けなかったの設計の違い。サーバレス最高! http://gs2.hatenablog.com/entry/2019/08/23/232534 >GS2 は フルサーバレスアーキテクチャ で設計・実装されています。 >つまり、API Gateway や AWS Lambda、DynamoDB といったフルマネージド >サービスを組み合わせてサービスを作っているわけです。
*https://dev.classmethod.jp/cloud/aws/careful-multi-az-elb/ https://internet.watch.impress.co.jp/docs/news/1202068.html >影響を受けるのは、「Apache HTTP Web Server 2.4.41」より前の >バージョン。クロスサイトスクリプティングの脆弱性(CVE-2019-10092) >、メモリ破壊の脆弱性(CVE-2019-10081)、潜在的なオープン >リダイレクトの脆弱性(CVE-2019-10098)などが存在する。
>これらの脆弱性を修正したApache HTTP Web Server 2.4.41が >8月14日にリリースされている。J
*ゲームを題材に学ぶ 内部構造から理解するMySQL 第1回 DBサーバの構造を知ろう! http://gihyo.jp/dev/serial/01/game_mysql/0001 >インメモリDBのI/O単位はレコード単位であるため,ページ単位でI/Oが >起こるRDBMSに比べ,無駄なI/Oが軽減されるということにあります。
0 notes
Text
Faster File Distribution with HDFS and S3
In the Hadoop world there is almost always more than one way to accomplish a task. I prefer the platform because it's very unlikely I'm ever backed into a corner when working on a solution.
Hadoop has the ability to decouple storage from compute. The various distributed storage solutions supported all come with their own set of strong points and trade-offs. I often find myself needing to copy data back and forth between HDFS on AWS EMR and AWS S3 for performance reasons.
S3 is a great place to keep a master dataset as it can be used among many clusters without affect the performance of any one of them; it also comes with 11 9s of durability meaning it's one of the most unlikely places for data to go missing or become corrupt.
HDFS is where I find the best performance when running queries. If the workload will take long enough it's worth the time to copy a given dataset off of S3 and onto HDFS; any derivative results can then be transferred back onto S3 before the EMR cluster is terminated.
In this post I'll examine a number of different methods for copying data off of S3 and onto HDFS and see which is the fastest.
AWS EMR, Up & Running
To start, I'll launch an 11-node EMR cluster. I'll use the m3.xlarge instance type with 1 master node, 5 core nodes (these will make up the HDFS cluster) and 5 task nodes (these will run MapReduce jobs). I'm using spot pricing which often reduces the cost of the instances by 75-80% depending on market conditions. Both the EMR cluster and the S3 bucket are located in Ireland.
$ aws emr create-cluster --applications Name=Hadoop \ Name=Hive \ Name=Presto \ --auto-scaling-role EMR_AutoScaling_DefaultRole \ --ebs-root-volume-size 10 \ --ec2-attributes '{ "KeyName": "emr", "InstanceProfile": "EMR_EC2_DefaultRole", "AvailabilityZone": "eu-west-1c", "EmrManagedSlaveSecurityGroup": "sg-89cd3eff", "EmrManagedMasterSecurityGroup": "sg-d4cc3fa2"}' \ --enable-debugging \ --instance-groups '[{ "InstanceCount": 5, "BidPrice": "OnDemandPrice", "InstanceGroupType": "CORE", "InstanceType": "m3.xlarge", "Name": "Core - 2" },{ "InstanceCount": 5, "BidPrice": "OnDemandPrice", "InstanceGroupType": "TASK", "InstanceType": "m3.xlarge", "Name": "Task - 3" },{ "InstanceCount": 1, "BidPrice": "OnDemandPrice", "InstanceGroupType": "MASTER", "InstanceType": "m3.xlarge", "Name": "Master - 1" }]' \ --log-uri 's3n://aws-logs-591231097547-eu-west-1/elasticmapreduce/' \ --name 'My cluster' \ --region eu-west-1 \ --release-label emr-5.21.0 \ --scale-down-behavior TERMINATE_AT_TASK_COMPLETION \ --service-role EMR_DefaultRole \ --termination-protected
After a few minutes the cluster has been launched and bootstrapped and I'm able to SSH in.
$ ssh -i ~/.ssh/emr.pem \ [email protected]
__| __|_ ) _| ( / Amazon Linux AMI ___|\___|___| https://aws.amazon.com/amazon-linux-ami/2018.03-release-notes/ 1 package(s) needed for security, out of 9 available Run "sudo yum update" to apply all updates. EEEEEEEEEEEEEEEEEEEE MMMMMMMM MMMMMMMM RRRRRRRRRRRRRRR E::::::::::::::::::E M:::::::M M:::::::M R::::::::::::::R EE:::::EEEEEEEEE:::E M::::::::M M::::::::M R:::::RRRRRR:::::R E::::E EEEEE M:::::::::M M:::::::::M RR::::R R::::R E::::E M::::::M:::M M:::M::::::M R:::R R::::R E:::::EEEEEEEEEE M:::::M M:::M M:::M M:::::M R:::RRRRRR:::::R E::::::::::::::E M:::::M M:::M:::M M:::::M R:::::::::::RR E:::::EEEEEEEEEE M:::::M M:::::M M:::::M R:::RRRRRR::::R E::::E M:::::M M:::M M:::::M R:::R R::::R E::::E EEEEE M:::::M MMM M:::::M R:::R R::::R EE:::::EEEEEEEE::::E M:::::M M:::::M R:::R R::::R E::::::::::::::::::E M:::::M M:::::M RR::::R R::::R EEEEEEEEEEEEEEEEEEEE MMMMMMM MMMMMMM RRRRRRR RRRRRR
The five core nodes each have 68.95 GB of capacity that together create 344.75 GB of capacity across the HDFS cluster.
$ hdfs dfsadmin -report \ | grep 'Configured Capacity'
Configured Capacity: 370168258560 (344.75 GB) Configured Capacity: 74033651712 (68.95 GB) Configured Capacity: 74033651712 (68.95 GB) Configured Capacity: 74033651712 (68.95 GB) Configured Capacity: 74033651712 (68.95 GB) Configured Capacity: 74033651712 (68.95 GB)
The dataset I'll be using in this benchmark is a data dump I've produced of 1.1 billion taxi trips conducted in New York City over a six year period. The Billion Taxi Rides in Redshift blog post goes into detail on how I put this dataset together. This dataset is approximately 86 GB in ORC format spread across 56 files. The typical ORC file is ~1.6 GB in size.
I'll create a filename manifest that I'll use for various operations below. I'll exclude the S3 URL prefix as these names will also be used to address files on HDFS as well.
000000_0 000001_0 000002_0 000003_0 000004_0 000005_0 000006_0 000007_0 000008_0 000009_0 000010_0 000011_0 000012_0 000013_0 000014_0 000015_0 000016_0 000017_0 000018_0 000019_0 000020_0 000021_0 000022_0 000023_0 000024_0 000025_0 000026_0 000027_0 000028_0 000029_0 000030_0 000031_0 000032_0 000033_0 000034_0 000035_0 000036_0 000037_0 000038_0 000039_0 000040_0 000041_0 000042_0 000043_0 000044_0 000045_0 000046_0 000047_0 000048_0 000049_0 000050_0 000051_0 000052_0 000053_0 000054_0 000055_0
I'll adjust the AWS CLI's configuration to allow for up to 100 concurrent requests at any one time.
$ aws configure set \ default.s3.max_concurrent_requests \ 100
The disk space on the master node cannot hold the entire 86 GB worth of ORC files so I'll download, import onto HDFS and remove each file one at a time. This will allow me to maintain enough working disk space on the master node.
$ hdfs dfs -mkdir /orc $ time (for FILE in `cat files`; do aws s3 cp s3://<bucket>/orc/$FILE ./ hdfs dfs -copyFromLocal $FILE /orc/ rm $FILE done)
The above completed 15 minutes and 57 seconds.
The HDFS CLI uses the JVM which comes with a fair amount of overhead. In my HDFS CLI benchmark I found the alternative CLI gohdfs could save a lot of start-up time as it is written in GoLang and doesn't run on the JVM. Below I've run the same operation using gohdfs.
$ wget -c -O gohdfs.tar.gz \ https://github.com/colinmarc/hdfs/releases/download/v2.0.0/gohdfs-v2.0.0-linux-amd64.tar.gz $ tar xvf gohdfs.tar.gz
I'll clear out the previously downloaded dataset off HDFS first so there is enough space on the cluster going forward. With triple replication, 86 GB turns into 258 GB on disk and there is only 344.75 GB of HDFS capacity in total.
$ hdfs dfs -rm -r -skipTrash /orc $ hdfs dfs -mkdir /orc $ time (for FILE in `cat files`; do aws s3 cp s3://<bucket>/orc/$FILE ./ gohdfs-v2.0.0-linux-amd64/hdfs put \ $FILE \ hdfs://ip-10-10-207-160.eu-west-1.compute.internal:8020/orc/ rm $FILE done)
The above took 27 minutes and 40 seconds. I wasn't expecting this client to be almost twice as slow as the HDFS CLI. S3 provides consistent performance when I've run other tools multiple times so I suspect either the code behind the put functionality could be optimised or there might be a more appropriate endpoint for copying multi-gigabyte files onto HDFS. As of this writing I can't find support for copying from S3 to HDFS directly with resorting to a file system fuse.
The HDFS CLI does support copying from S3 to HDFS directly. Below I'll copy the 56 ORC files to HDFS straight from S3. I'll set the concurrent process limit to 8.
$ hdfs dfs -rm -r -skipTrash /orc $ hdfs dfs -mkdir /orc $ time (cat files \ | xargs -n 1 \ -P 8 \ -I % \ hdfs dfs -cp s3://<bucket>/orc/% /orc/)
The above took 14 minutes and 17 seconds. There wasn't much of an improvement over simply copying the files down one at a time and uploading them to HDFS.
I'll try the above command again but set the concurrency limit to 16 processes. Note, this is running on the master node which has 15 GB of RAM and the following will use what little memory capacity is left on the machine.
$ hdfs dfs -rm -r -skipTrash /orc $ hdfs dfs -mkdir /orc $ time (cat files \ | xargs -n 1 \ -P 16 \ -I % \ hdfs dfs -cp s3://<bucket>/orc/% /orc/)
The above took 14 minutes and 36 seconds. Again, a very similar time despite a higher concurrency limit. The effective transfer rate was ~98.9 MB/s off of S3. HDFS is configured for triple redundancy but I expect there is a lot more throughput available with a cluster of this size.
DistCp (distributed copy) is bundled with Hadoop and uses MapReduce to copy files in a distributed manner. It can work with HDFS, AWS S3, Azure Blob Storage and Google Cloud Storage. It can break up the downloading and importing across the task nodes so all five machines can work on a single job instead of the master node being the single machine downloading and importing onto HDFS.
$ hdfs dfs -rm -r -skipTrash /orc $ hdfs dfs -mkdir /orc $ time (hadoop distcp s3://<bucket>/orc/* /orc)
The above completed in 6 minutes and 16 seconds. A huge improvement over the previous methods.
On AWS EMR, there is a tool called S3DistCp that aims to provide the functionality of Hadoop's DistCp but in a fashion optimised for S3. Like DistCp, it uses MapReduce for executing its operations.
$ hdfs dfs -rm -r -skipTrash /orc $ hdfs dfs -mkdir /orc $ time (s3-dist-cp \ --src=s3://<bucket>/orc/ \ --dest=hdfs:///orc/)
The above completed in 5 minutes and 59 seconds. This gives an effective throughput of ~241 MB/s off of S3. There wasn't a huge performance increase over DistCp and I suspect neither tool can greatly out-perform the other.
I did come across settings to increase the chunk size from 128 MB to 1 GB, which would be useful for larger files but enough tooling in the Hadoop ecosystem will suffer from ballooning memory requirements with files over 2 GB that it is very rare to see files larger than this in any sensibly-deployed production environment. S3 usually has low connection setup latency so I can't see this being a huge overhead.
With the above its now understood that both DistCp and S3DistCp can leverage a cluster's task nodes to import data from S3 onto HDFS quickly. I'm going to see how well these tools scale with a 21-node m3.xlarge cluster. This cluster will have 1 master node, 10 core nodes and 10 task nodes.
$ aws emr create-cluster \ --applications Name=Hadoop \ Name=Hive \ Name=Presto \ --auto-scaling-role EMR_AutoScaling_DefaultRole \ --ebs-root-volume-size 10 \ --ec2-attributes '{ "KeyName": "emr", "InstanceProfile": "EMR_EC2_DefaultRole", "AvailabilityZone": "eu-west-1c", "EmrManagedSlaveSecurityGroup": "sg-89cd3eff", "EmrManagedMasterSecurityGroup": "sg-d4cc3fa2"}' \ --enable-debugging \ --instance-groups '[{ "InstanceCount": 1, "BidPrice": "OnDemandPrice", "InstanceGroupType": "MASTER", "InstanceType": "m3.xlarge", "Name": "Master - 1" },{ "InstanceCount": 10, "BidPrice": "OnDemandPrice", "InstanceGroupType": "CORE", "InstanceType": "m3.xlarge", "Name": "Core - 2" },{ "InstanceCount": 10, "BidPrice": "OnDemandPrice", "InstanceGroupType": "TASK", "InstanceType": "m3.xlarge", "Name": "Task - 3" }]' \ --log-uri 's3n://aws-logs-591231097547-eu-west-1/elasticmapreduce/' \ --name 'My cluster' \ --region eu-west-1 \ --release-label emr-5.21.0 \ --scale-down-behavior TERMINATE_AT_TASK_COMPLETION \ --service-role EMR_DefaultRole \ --termination-protected
With the new EMR cluster up and running I can SSH into it.
$ ssh -i ~/.ssh/emr.pem \ [email protected]
Each core node on the HDFS cluster still has 68.95 GB of capacity but the ten machines combined create 689.49 GB of HDFS storage capacity.
$ hdfs dfsadmin -report \ | grep 'Configured Capacity'
Configured Capacity: 740336517120 (689.49 GB) Configured Capacity: 74033651712 (68.95 GB) Configured Capacity: 74033651712 (68.95 GB) Configured Capacity: 74033651712 (68.95 GB) Configured Capacity: 74033651712 (68.95 GB) Configured Capacity: 74033651712 (68.95 GB) Configured Capacity: 74033651712 (68.95 GB) Configured Capacity: 74033651712 (68.95 GB) Configured Capacity: 74033651712 (68.95 GB) Configured Capacity: 74033651712 (68.95 GB) Configured Capacity: 74033651712 (68.95 GB)
I'll run S3DistCp first.
$ hdfs dfs -mkdir /orc $ time (s3-dist-cp \ --src=s3://<bucket>/orc/ \ --dest=hdfs:///orc/)
The above completed in 4 minutes and 56 seconds. This is an improvement over the 11-node cluster but not the 2x improvement I was expecting.
Below is DistCp running on the 21-node cluster.
$ hdfs dfs -rm -r -skipTrash /orc $ hdfs dfs -mkdir /orc $ time (hadoop distcp s3://<bucket>/orc/* /orc)
The above completed in 4 minutes and 44 seconds.
The performance ratio between these two tools is more or less consistent between cluster sizes. Its a shame neither showed linear scaling with twice the number of core and task nodes.
Here is a recap of the transfer times seen in this post.
Duration Transfer Method 27m40s gohdfs, Sequentially 15m57s HDFS DFS CLI, Sequentially 14m36s HDFS DFS CLI, Concurrently x 16 14m17s HDFS DFS CLI, Concurrently x 8 6m16s Hadoop DistCp, 11-Node Cluster 5m59s S3DistCp, 11-Node Cluster 4m56s S3DistCp, 21-Node Cluster 4m44s Hadoop DistCp, 21-Node Cluster
Why Use HDFS At All?
S3 is excellent for durability and doesn't suffer performance-wise if you have one cluster or ten clusters pointed at it. S3 also works as well as HDFS when appending records to a dataset. Both of the following queries will run without issue.
$ presto-cli \ --schema default \ --catalog hive
INSERT INTO trips_hdfs SELECT * from trips_hdfs LIMIT 10;
INSERT INTO trips_s3 SELECT * from trips_s3 LIMIT 10;
I've heard arguments that S3 is as fast as HDFS but I've never witnessed this in my time with both technologies. Below I'll run a benchmark on the 1.1 billion taxi trips. I'll have one table using S3-backed data and another table using HDFS-backed data. This was run on the 11-node cluster. I ran each query multiple times and recorded the fastest times.
This is the HDFS-backed table.
CREATE EXTERNAL TABLE trips_hdfs ( trip_id INT, vendor_id STRING, pickup_datetime TIMESTAMP, dropoff_datetime TIMESTAMP, store_and_fwd_flag STRING, rate_code_id SMALLINT, pickup_longitude DOUBLE, pickup_latitude DOUBLE, dropoff_longitude DOUBLE, dropoff_latitude DOUBLE, passenger_count SMALLINT, trip_distance DOUBLE, fare_amount DOUBLE, extra DOUBLE, mta_tax DOUBLE, tip_amount DOUBLE, tolls_amount DOUBLE, ehail_fee DOUBLE, improvement_surcharge DOUBLE, total_amount DOUBLE, payment_type STRING, trip_type SMALLINT, pickup STRING, dropoff STRING, cab_type STRING, precipitation SMALLINT, snow_depth SMALLINT, snowfall SMALLINT, max_temperature SMALLINT, min_temperature SMALLINT, average_wind_speed SMALLINT, pickup_nyct2010_gid SMALLINT, pickup_ctlabel STRING, pickup_borocode SMALLINT, pickup_boroname STRING, pickup_ct2010 STRING, pickup_boroct2010 STRING, pickup_cdeligibil STRING, pickup_ntacode STRING, pickup_ntaname STRING, pickup_puma STRING, dropoff_nyct2010_gid SMALLINT, dropoff_ctlabel STRING, dropoff_borocode SMALLINT, dropoff_boroname STRING, dropoff_ct2010 STRING, dropoff_boroct2010 STRING, dropoff_cdeligibil STRING, dropoff_ntacode STRING, dropoff_ntaname STRING, dropoff_puma STRING ) STORED AS orc LOCATION '/orc/';
This is the S3-backed table.
CREATE EXTERNAL TABLE trips_s3 ( trip_id INT, vendor_id STRING, pickup_datetime TIMESTAMP, dropoff_datetime TIMESTAMP, store_and_fwd_flag STRING, rate_code_id SMALLINT, pickup_longitude DOUBLE, pickup_latitude DOUBLE, dropoff_longitude DOUBLE, dropoff_latitude DOUBLE, passenger_count SMALLINT, trip_distance DOUBLE, fare_amount DOUBLE, extra DOUBLE, mta_tax DOUBLE, tip_amount DOUBLE, tolls_amount DOUBLE, ehail_fee DOUBLE, improvement_surcharge DOUBLE, total_amount DOUBLE, payment_type STRING, trip_type SMALLINT, pickup STRING, dropoff STRING, cab_type STRING, precipitation SMALLINT, snow_depth SMALLINT, snowfall SMALLINT, max_temperature SMALLINT, min_temperature SMALLINT, average_wind_speed SMALLINT, pickup_nyct2010_gid SMALLINT, pickup_ctlabel STRING, pickup_borocode SMALLINT, pickup_boroname STRING, pickup_ct2010 STRING, pickup_boroct2010 STRING, pickup_cdeligibil STRING, pickup_ntacode STRING, pickup_ntaname STRING, pickup_puma STRING, dropoff_nyct2010_gid SMALLINT, dropoff_ctlabel STRING, dropoff_borocode SMALLINT, dropoff_boroname STRING, dropoff_ct2010 STRING, dropoff_boroct2010 STRING, dropoff_cdeligibil STRING, dropoff_ntacode STRING, dropoff_ntaname STRING, dropoff_puma STRING ) STORED AS orc LOCATION 's3://<bucket>/orc/';
I'll use Presto to run the benchmarks.
$ presto-cli \ --schema default \ --catalog hive
The following four queries were run on the HDFS-backed table.
The following completed in 6.77 seconds.
SELECT cab_type, count(*) FROM trips_hdfs GROUP BY cab_type;
The following completed in 10.97 seconds.
SELECT passenger_count, avg(total_amount) FROM trips_hdfs GROUP BY passenger_count;
The following completed in 13.38 seconds.
SELECT passenger_count, year(pickup_datetime), count(*) FROM trips_hdfs GROUP BY passenger_count, year(pickup_datetime);
The following completed in 19.82 seconds.
SELECT passenger_count, year(pickup_datetime) trip_year, round(trip_distance), count(*) trips FROM trips_hdfs GROUP BY passenger_count, year(pickup_datetime), round(trip_distance) ORDER BY trip_year, trips desc;
The following four queries were run on the S3-backed table.
The following completed in 10.82 seconds.
SELECT cab_type, count(*) FROM trips_s3 GROUP BY cab_type;
The following completed in 14.73 seconds.
SELECT passenger_count, avg(total_amount) FROM trips_s3 GROUP BY passenger_count;
The following completed in 19.19 seconds.
SELECT passenger_count, year(pickup_datetime), count(*) FROM trips_s3 GROUP BY passenger_count, year(pickup_datetime);
The following completed in 24.61 seconds.
SELECT passenger_count, year(pickup_datetime) trip_year, round(trip_distance), count(*) trips FROM trips_s3 GROUP BY passenger_count, year(pickup_datetime), round(trip_distance) ORDER BY trip_year, trips desc;
This is a recap of the query times above.
HDFS on AWS EMR AWS S3 Speed Up Query 6.77s 10.82s 1.6x Query 1 10.97s 14.73s 1.34x Query 2 13.38s 19.19s 1.43x Query 3 19.82s 24.61s 1.24x Query 4
The HDFS-backed queries were anywhere from 1.24x to 1.6x faster than the S3-backed queries.
DataTau published first on DataTau
0 notes
Photo

Store infrequently accessed S3 objects in ONEZONE_IA class storage, less expensive because it stores data in only one Availability Zone: https://buff.ly/2vEwSri https://buff.ly/2HKSCGy⠀ .⠀ .⠀ .⠀ .⠀ .⠀ .⠀ .⠀ .⠀ .⠀ .⠀ #aws #amazonwebservices #cloud #cloudcomputing #awscloud #amazoncloud #amazon #s3 #amazons3 #onezoneai #storage #availabilityzone #cloudstorage @awscloud https://ift.tt/2HGzSrG
0 notes
Link
Introduction to VPC Elastic Network Interfaces is an elastic network interface (ENI) allows an instance to communicate with other network resources including AWS services, other instances, on-premises servers, and the Internet.
Read More : https://www.info-savvy.com/introduction-to-vpc-elastic-network-interfaces/
#addresses#AvailabilityZones#CIDRblock#ElasticNetworkInterfaces#InboundRules#instance#InternetGateways#OutboundRules#onlinetraining&certification#AWSTraining
0 notes
Text
Overview of an Amazon Virtual Private Cloud
Overview of an Amazon Virtual Private Cloud Virtual service provides the networking layer of EC2. A VPC is a virtual network that can contain EC2 instances as well as network resources for other AWS services. By default, every VPC is isolated from all other networks.
Read More : https://www.info-savvy.com/overview-of-an-amazon-virtual-private-cloud/
#addresses#availability#AvailabilityZones#CIDRblock#instances#ip#network#prefix#SubnetCIDRBlocks#onlinetraining&certification#AWSTraining
0 notes
Text
Introduction to VPC Elastic Network Interfaces

Introduction to VPC Elastic Network Interfaces is an elastic network interface (ENI) allows an instance to communicate with other network resources including AWS services, other instances, on-premises servers, and the Internet.
Read More : https://www.info-savvy.com/introduction-to-vpc-elastic-network-interfaces/
#addresses#AvailabilityZones#CIDRblock#ElasticNetworkInterfaces#InboundRules#AWSTraining#onlinetraining&certification#awscertification#onlinecourses
0 notes
Link
You will learn into this regarding cloud computing and their six advantages as well as types of cloud computing in detail.
Read More : https://www.info-savvy.com/introduction-to-cloud-computing-and-aws/
#types of cloud computing#AvailabilityZones#AWSRegions#AWSSecurity#BenefitsofAWSSecurity#CloudComputing#CloudComputingDeploymentModels#CloudComputingModels#GlobalInfrastructure#InfrastructureasaService#ITresources
0 notes
Photo

AWS CloudFormationでEC2インスタンスのログがAmazon CloudWatch logsで確認できるようにする https://ift.tt/33zfnVY
AWS CloudFormation(CFn)でEC2インスタンスを作成・管理する際にユーザーデータやAWS::CloudFormation::Initタイプを利用したメタデータで環境構築するのが便利なのですが、スタック作成・更新時のログはEC2インスタンス内にあるため、確認が面倒です。
EC2のログをAmazon CloudWatch Logsへ送信する仕組みとして「CloudWatch Logs エージェント」があると知ったのでCFnでEC2インスタンスを管理する際に利用できるテンプレートを作成してみました。
CloudWatch Logs エージェントのリファレンス – Amazon CloudWatch Logs https://docs.aws.amazon.com/ja_jp/AmazonCloudWatch/latest/logs/AgentReference.html
前提
AWSアカウントがある
AWS CLIがインストール済みで利用可能
CFn、EC2関連の権限がある
テンプレート
下記で作成したテンプレートにawslogsを利用する定義を追加しました。
AWS::CloudFormation::Init タイプを使ってEC2インスタンスの環境構築ができるようにしてみた – Qiita https://cloudpack.media/48540
EC2インスタンスを起動するVPCやサブネットは既存のリソースを利用する前提となります。 SSHアクセスする際のキーペアは事前に作成し、セキュリティグループはインスタンスとあわせて作成しています。 作成するリージョンは検証なので、us-east-1のみとしています。
cfn-template.yaml
Parameters: VpcId: Type: AWS::EC2::VPC::Id SubnetId: Type: AWS::EC2::Subnet::Id EC2KeyPairName: Type: AWS::EC2::KeyPair::KeyName InstanceType: Type: String Default: t3.small MyInstanceSSHCidrIp: Type: String Default: '0.0.0.0/0' Mappings: AWSRegionToAMI: us-east-1: HVM64: ami-0080e4c5bc078760e Resources: MyInstanceSecurityGroup: Type: AWS::EC2::SecurityGroup Properties: GroupName: !Join - " " - - !Ref AWS::StackName - "SecurityGroup" GroupDescription: "MyInstance SecurityGroup" VpcId: !Ref VpcId SecurityGroupEgress: - CidrIp: "0.0.0.0/0" IpProtocol: "-1" SecurityGroupIngress: - CidrIp: !Ref MyInstanceSSHCidrIp Description: !Join - " " - - !Ref AWS::StackName - "SSH Port" IpProtocol: "tcp" FromPort: 22 ToPort: 22 Tags: - Key: "Name" Value: !Join - " " - - !Ref AWS::StackName - "SecurityGroup" MyInstanceIAMRole: Type: "AWS::IAM::Role" Properties: AssumeRolePolicyDocument: Version: "2012-10-17" Statement: - Effect: "Allow" Principal: Service: - "ec2.amazonaws.com" Action: - "sts:AssumeRole" Path: "/" Policies: - PolicyName: "root" PolicyDocument: Version: "2012-10-17" Statement: - Effect: "Allow" Action: - "logs:CreateLogGroup" - "logs:CreateLogStream" - "logs:PutLogEvents" - "logs:DescribeLogStreams" Resource: "arn:aws:logs:*:*:*" MyInstanceIAMInstanceProfile: Type: "AWS::IAM::InstanceProfile" Properties: Path: "/" Roles: - Ref: MyInstanceIAMRole DependsOn: MyInstanceIAMRole MyInstance: Type: AWS::EC2::Instance Metadata: AWS::CloudFormation::Init: config: packages: yum: awslogs: [] files: /etc/awslogs/awslogs.conf: content: !Sub | [general] state_file = /var/lib/awslogs/agent-state [/var/log/cloud-init-output.log] datetime_format = %Y-%m-%d %H:%M:%S.%f file = /var/log/cloud-init-output.log buffer_duration = 5000 log_stream_name = {instance_id}/cloud-init-output.log initial_position = start_of_file log_group_name = /aws/ec2/${AWS::StackName} [/var/log/cfn-init.log] datetime_format = %Y-%m-%d %H:%M:%S.%f file = /var/log/cfn-init.log buffer_duration = 5000 log_stream_name = {instance_id}/cfn-init.log initial_position = start_of_file log_group_name = /aws/ec2/${AWS::StackName} [/var/log/cfn-init-cmd.log] datetime_format = %Y-%m-%d %H:%M:%S.%f file = /var/log/cfn-init-cmd.log buffer_duration = 5000 log_stream_name = {instance_id}/cfn-init-cmd.log initial_position = start_of_file log_group_name = /aws/ec2/${AWS::StackName} [/var/log/cfn-hup.log] datetime_format = %Y-%m-%d %H:%M:%S.%f file = /var/log/cfn-hup.log buffer_duration = 5000 log_stream_name = {instance_id}/cfn-hup.log initial_position = start_of_file log_group_name = /aws/ec2/${AWS::StackName} mode: "000644" owner: "root" group: "root" /etc/cfn/cfn-hup.conf: content: !Sub | [main] stack = ${AWS::StackName} region = ${AWS::Region} mode: "000400" owner: "root" group: "root" /etc/cfn/hooks.d/cfn-auto-reloader.conf: content: !Sub | [cfn-auto-reloader-hook] triggers = post.update path = Resources.MyInstance.Metadata.AWS::CloudFormation::Init action = /opt/aws/bin/cfn-init -v --stack ${AWS::StackName} --resource MyInstance --region ${AWS::Region} runas = root mode: "000400" owner: "root" group: "root" commands: test: command: "echo $STACK_NAME test" env: STACK_NAME: !Ref AWS::StackName services: sysvinit: cfn-hup: enabled: "true" files: - /etc/cfn/cfn-hup.conf - /etc/cfn/hooks.d/cfn-auto-reloader.conf awslogs: enabled: "true" packages: - awslogs files: - /etc/awslogs/awslogs.conf Properties: InstanceType: !Ref InstanceType KeyName: !Ref EC2KeyPairName ImageId: !FindInMap [ AWSRegionToAMI, !Ref "AWS::Region", HVM64 ] IamInstanceProfile: !Ref MyInstanceIAMInstanceProfile NetworkInterfaces: - AssociatePublicIpAddress: True DeviceIndex: 0 GroupSet: - !Ref MyInstanceSecurityGroup SubnetId: !Ref SubnetId Tags: - Key: 'Name' Value: !Ref AWS::StackName UserData: Fn::Base64: !Sub | #!/bin/bash echo "start UserData" /opt/aws/bin/cfn-init --stack ${AWS::StackName} --resource MyInstance --region ${AWS::Region} /opt/aws/bin/cfn-signal -e $? --stack ${AWS::StackName} --resource MyInstance --region ${AWS::Region} echo "finish UserData" CreationPolicy: ResourceSignal: Timeout: PT5M Outputs: ClientInstanceId: Value: !Ref MyInstance ClientPublicIp: Value: !GetAtt MyInstance.PublicIp
ポイント
IAMロールを作成する
EC2インスタンスからAmazon CloudWatch Logsへログを送るのに権限が必要となるためIAMロールを作成します。 必要となる権限については下記を参考にしました。
クイックスタート: 実行中の EC2 Linux インスタンスに CloudWatch Logs エージェントをインストールして設定する – Amazon CloudWatch Logs https://docs.aws.amazon.com/ja_jp/AmazonCloudWatch/latest/logs/QuickStartEC2Instance.html
cfn-template.yaml_一部抜粋
MyInstanceIAMRole: Type: "AWS::IAM::Role" Properties: AssumeRolePolicyDocument: Version: "2012-10-17" Statement: - Effect: "Allow" Principal: Service: - "ec2.amazonaws.com" Action: - "sts:AssumeRole" Path: "/" Policies: - PolicyName: "root" PolicyDocument: Version: "2012-10-17" Statement: - Effect: "Allow" Action: - "logs:CreateLogGroup" - "logs:CreateLogStream" - "logs:PutLogEvents" - "logs:DescribeLogStreams" Resource: "arn:aws:logs:*:*:*" MyInstanceIAMInstanceProfile: Type: "AWS::IAM::InstanceProfile" Properties: Path: "/" Roles: - Ref: MyInstanceIAMRole DependsOn: MyInstanceIAMRole MyInstance: Type: AWS::EC2::Instance (略) Properties: InstanceType: !Ref InstanceType KeyName: !Ref EC2KeyPairName ImageId: !FindInMap [ AWSRegionToAMI, !Ref "AWS::Region", HVM64 ] IamInstanceProfile: !Ref MyInstanceIAMInstanceProfile (略)
awslogs パッケージを利用する
CloudWatch Logs エージェントはawslogsパッケージとして提供されています。awslogsパッケージはAmazon LinuxとUbuntuに対応しています。
パッケージのインストール、設定ファイル、サービス起動はメタデータで定義して設定変更できるようにしました。 /etc/awslogs/awslogs.confファイルでAmazon CloudWatch Logsに出力するログファイルを定義します。log_stream_nameやlog_group_name は任意で指定が可能です。 ここでは/var/log/内に出力されるメタデータやユーザーデータによる処理のログを対象としました。
cfn-template.yaml_一部抜粋
MyInstance: Type: AWS::EC2::Instance Metadata: AWS::CloudFormation::Init: config: packages: yum: awslogs: [] files: /etc/awslogs/awslogs.conf: content: !Sub | [general] state_file = /var/lib/awslogs/agent-state [/var/log/cloud-init-output.log] datetime_format = %Y-%m-%d %H:%M:%S.%f file = /var/log/cloud-init-output.log buffer_duration = 5000 log_stream_name = {instance_id}/cloud-init-output.log initial_position = start_of_file log_group_name = /aws/ec2/${AWS::StackName} [/var/log/cfn-init.log] datetime_format = %Y-%m-%d %H:%M:%S.%f file = /var/log/cfn-init.log buffer_duration = 5000 log_stream_name = {instance_id}/cfn-init.log initial_position = start_of_file log_group_name = /aws/ec2/${AWS::StackName} [/var/log/cfn-init-cmd.log] datetime_format = %Y-%m-%d %H:%M:%S.%f file = /var/log/cfn-init-cmd.log buffer_duration = 5000 log_stream_name = {instance_id}/cfn-init-cmd.log initial_position = start_of_file log_group_name = /aws/ec2/${AWS::StackName} [/var/log/cfn-hup.log] datetime_format = %Y-%m-%d %H:%M:%S.%f file = /var/log/cfn-hup.log buffer_duration = 5000 log_stream_name = {instance_id}/cfn-hup.log initial_position = start_of_file log_group_name = /aws/ec2/${AWS::StackName} mode: "000644" owner: "root" group: "root" (略) services: sysvinit: (略) awslogs: enabled: "true" packages: - awslogs files: - /etc/awslogs/awslogs.conf
利用方法
パラメータ値を取得
キーペア
EC2インスタンスへSSHログインするのに利用するキーペアを作成します。 既存のキーペアを利用する場合は作成不要です。
# Create KeyPair > aws ec2 create-key-pair \ --key-name cfn-awslogs-test-ec2-key \ --query "KeyMaterial" \ --output text > cfn-awslogs-test-ec2-key.pem > chmod 400 cfn-awslogs-test-ec2-key.pem
VPC、サブネット
既存のVPC、サブネット配下にEC2インスタンスを作成する前提ですので各IDを取得します。
# VpcId > aws ec2 describe-vpcs \ --query "Vpcs" [ { "CidrBlock": "172.31.0.0/16", "DhcpOptionsId": "dopt-b06bd8c8", "State": "available", "VpcId": "vpc-xxxxxxxx", "OwnerId": "xxxxxxxxxxxx", "InstanceTenancy": "default", "CidrBlockAssociationSet": [ { "AssociationId": "vpc-cidr-assoc-2b23e646", "CidrBlock": "172.31.0.0/16", "CidrBlockState": { "State": "associated" } } ], "IsDefault": true }, ] # SubnetId > aws ec2 describe-subnets \ --filters '{"Name": "vpc-id", "Values": ["vpc-xxxxxxxx"]}' \ --query "Subnets" [ { "AvailabilityZone": "us-east-1a", "AvailabilityZoneId": "use1-az2", "AvailableIpAddressCount": 4089, "CidrBlock": "172.31.80.0/20", "DefaultForAz": true, "MapPublicIpOnLaunch": true, "State": "available", "SubnetId": "subnet-xxxxxxxx", "VpcId": "vpc-xxxxxxxx", "OwnerId": "xxxxxxxxxxxx", "AssignIpv6AddressOnCreation": false, "Ipv6CidrBlockAssociationSet": [], "SubnetArn": "arn:aws:ec2:us-east-1:xxxxxxxxxxxx:subnet/subnet-xxxxxxxx" }, ]
自身のグローバルIP
SSHアクセスするためのセキュリティグループに指定するIPアドレスを取得します。 ここではifconfig.ioを利用していますが他の手段でもOKです。
## GlobalIP > curl ifconfig.io xxx.xxx.xxx.xxx
スタック作成
aws cloudformation create-stackコマンドを利用してスタック作成します。 AWSマネジメントコンソールから作成してもOKです。
> aws cloudformation create-stack \ --stack-name cfn-awslogs-test \ --template-body file://cfn-template.yaml \ --capabilities CAPABILITY_IAM \ --region us-east-1 \ --parameters '[ { "ParameterKey": "VpcId", "ParameterValue": "vpc-xxxxxxxx" }, { "ParameterKey": "SubnetId", "ParameterValue": "subnet-xxxxxxxx" }, { "ParameterKey": "EC2KeyPairName", "ParameterValue": "cfn-awslogs-test-ec2-key" }, { "ParameterKey": "MyInstanceSSHCidrIp", "ParameterValue": "xxx.xxx.xxx.xxx/32" } ]'
スタック作成結果を確認
スタック作成ができたか確認します。
> aws cloudformation describe-stacks \ --stack-name cfn-awslogs-test { "Stacks": [ { "StackId": "arn:aws:cloudformation:us-east-1:xxxxxxxxxxxx:stack/cfn-awslogs-test/f1e864b0-a9fd-11e9-aa93-12ccfe651680", "StackName": "cfn-awslogs-test", "Parameters": [ { "ParameterKey": "MyInstanceSSHCidrIp", "ParameterValue": "xxx.xxx.xxx.xxx/32" }, { "ParameterKey": "VpcId", "ParameterValue": "vpc-xxxxxxxx" }, { "ParameterKey": "EC2KeyPairName", "ParameterValue": "cfn-init-test-ec2-key" }, { "ParameterKey": "SubnetId", "ParameterValue": "subnet-xxxxxxxx" }, { "ParameterKey": "InstanceType", "ParameterValue": "t3.small" } ], "CreationTime": "2019-07-19T08:19:36.199Z", "RollbackConfiguration": {}, "StackStatus": "CREATE_COMPLETE", "DisableRollback": false, "NotificationARNs": [], "Capabilities": [ "CAPABILITY_IAM" ], "Outputs": [ { "OutputKey": "ClientPublicIp", "OutputValue": "xxx.xxx.xxx.xxx" }, { "OutputKey": "ClientInstanceId", "OutputValue": "i-xxxxxxxxxxxxxxxxx" } ], "Tags": [], "EnableTerminationProtection": false, "DriftInformation": { "StackDriftStatus": "NOT_CHECKED" } } ] }
Amazon CloudWatch logsでログを確認する
> aws logs describe-log-streams \ --log-group-name /aws/ec2/cfn-awslogs-test \ --query "logGroups[*].logGroupName" [ "i-xxxxxxxxxxxxxxxxx/cfn-hup.log", "i-xxxxxxxxxxxxxxxxx/cfn-init-cmd.log", "i-xxxxxxxxxxxxxxxxx/cfn-init.log", "i-xxxxxxxxxxxxxxxxx/cloud-init-output.log" ] > aws logs get-log-events \ --log-group-name /aws/ec2/cfn-awslogs-test \ --log-stream-name i-xxxxxxxxxxxxxxxxx/cfn-hup.log \ --query "events[*].message" [ "2019-07-19 08:22:57,542 [DEBUG] CloudFormation client initialized with endpoint https://cloudformation.us-east-1.amazonaws.com", "2019-07-19 08:22:57,543 [DEBUG] Creating /var/lib/cfn-hup/data", "2019-07-19 08:22:57,551 [INFO] No umask value specified in config file. Using the default one: 022", "2019-07-19 08:37:57,714 [INFO] cfn-hup processing is alive." ] > aws logs get-log-events \ --log-group-name /aws/ec2/cfn-awslogs-test \ --log-stream-name i-xxxxxxxxxxxxxxxxx/cfn-init-cmd.log \ --query "events[*].message" \ [ "2019-07-19 08:22:49,803 P2190 [INFO] ************************************************************", "2019-07-19 08:22:49,803 P2190 [INFO] ConfigSet default", "2019-07-19 08:22:49,804 P2190 [INFO] ++++++++++++++++++++++++++++++++++++++++++++++++++++++++++++", "2019-07-19 08:22:49,804 P2190 [INFO] Config config", "2019-07-19 08:22:55,092 P2190 [INFO] ============================================================", "2019-07-19 08:22:55,092 P2190 [INFO] yum install awslogs", "2019-07-19 08:22:56,958 P2190 [INFO] -----------------------Command Output-----------------------", "2019-07-19 08:22:56,958 P2190 [INFO] \tLoaded plugins: priorities, update-motd, upgrade-helper", "2019-07-19 08:22:56,958 P2190 [INFO] \tResolving Dependencies", "2019-07-19 08:22:56,958 P2190 [INFO] \t--> Running transaction check", "2019-07-19 08:22:56,958 P2190 [INFO] \t---> Package awslogs.noarch 0:1.1.4-1.12.amzn1 will be installed", "2019-07-19 08:22:56,958 P2190 [INFO] \t--> Processing Dependency: aws-cli-plugin-cloudwatch-logs(python27) for package: awslogs-1.1.4-1.12.amzn1.noarch", "2019-07-19 08:22:56,959 P2190 [INFO] \t--> Running transaction check", "2019-07-19 08:22:56,959 P2190 [INFO] \t---> Package aws-cli-plugin-cloudwatch-logs.noarch 0:1.4.4-1.16.amzn1 will be installed", "2019-07-19 08:22:56,959 P2190 [INFO] \t--> Finished Dependency Resolution", "2019-07-19 08:22:56,959 P2190 [INFO] \t", "2019-07-19 08:22:56,959 P2190 [INFO] \tDependencies Resolved", "2019-07-19 08:22:56,959 P2190 [INFO] \t", "2019-07-19 08:22:56,959 P2190 [INFO] \t================================================================================", "2019-07-19 08:22:56,959 P2190 [INFO] \t Package Arch Version Repository Size", "2019-07-19 08:22:56,959 P2190 [INFO] \t================================================================================", "2019-07-19 08:22:56,959 P2190 [INFO] \tInstalling:", "2019-07-19 08:22:56,959 P2190 [INFO] \t awslogs noarch 1.1.4-1.12.amzn1 amzn-main 9.2 k", "2019-07-19 08:22:56,959 P2190 [INFO] \tInstalling for dependencies:", "2019-07-19 08:22:56,960 P2190 [INFO] \t aws-cli-plugin-cloudwatch-logs noarch 1.4.4-1.16.amzn1 amzn-main 71 k", "2019-07-19 08:22:56,960 P2190 [INFO] \t", "2019-07-19 08:22:56,960 P2190 [INFO] \tTransaction Summary", "2019-07-19 08:22:56,960 P2190 [INFO] \t================================================================================", "2019-07-19 08:22:56,960 P2190 [INFO] \tInstall 1 Package (+1 Dependent package)", "2019-07-19 08:22:56,960 P2190 [INFO] \t", "2019-07-19 08:22:56,960 P2190 [INFO] \tTotal download size: 81 k", "2019-07-19 08:22:56,960 P2190 [INFO] \tInstalled size: 246 k", "2019-07-19 08:22:56,960 P2190 [INFO] \tDownloading packages:", "2019-07-19 08:22:56,960 P2190 [INFO] \t--------------------------------------------------------------------------------", "2019-07-19 08:22:56,960 P2190 [INFO] \tTotal 250 kB/s | 81 kB 00:00 ", "2019-07-19 08:22:56,960 P2190 [INFO] \tRunning transaction check", "2019-07-19 08:22:56,961 P2190 [INFO] \tRunning transaction test", "2019-07-19 08:22:56,961 P2190 [INFO] \tTransaction test succeeded", "2019-07-19 08:22:56,961 P2190 [INFO] \tRunning transaction", "2019-07-19 08:22:56,961 P2190 [INFO] \t Installing : aws-cli-plugin-cloudwatch-logs-1.4.4-1.16.amzn1.noarch 1/2 ", "2019-07-19 08:22:56,961 P2190 [INFO] \t Installing : awslogs-1.1.4-1.12.amzn1.noarch 2/2 ", "2019-07-19 08:22:56,961 P2190 [INFO] \t Verifying : awslogs-1.1.4-1.12.amzn1.noarch 1/2 ", "2019-07-19 08:22:56,961 P2190 [INFO] \t Verifying : aws-cli-plugin-cloudwatch-logs-1.4.4-1.16.amzn1.noarch 2/2 ", "2019-07-19 08:22:56,961 P2190 [INFO] \t", "2019-07-19 08:22:56,962 P2190 [INFO] \tInstalled:", "2019-07-19 08:22:56,962 P2190 [INFO] \t awslogs.noarch 0:1.1.4-1.12.amzn1 ", "2019-07-19 08:22:56,962 P2190 [INFO] \t", "2019-07-19 08:22:56,962 P2190 [INFO] \tDependency Installed:", "2019-07-19 08:22:56,962 P2190 [INFO] \t aws-cli-plugin-cloudwatch-logs.noarch 0:1.4.4-1.16.amzn1 ", "2019-07-19 08:22:56,962 P2190 [INFO] \t", "2019-07-19 08:22:56,962 P2190 [INFO] \tComplete!", "2019-07-19 08:22:56,962 P2190 [INFO] ------------------------------------------------------------", "2019-07-19 08:22:56,962 P2190 [INFO] Completed successfully.", "2019-07-19 08:22:56,965 P2190 [INFO] ============================================================", "2019-07-19 08:22:56,965 P2190 [INFO] Command test", "2019-07-19 08:22:56,969 P2190 [INFO] -----------------------Command Output-----------------------", "2019-07-19 08:22:56,969 P2190 [INFO] \tcfn-awslogs-test test", "2019-07-19 08:22:56,969 P2190 [INFO] ------------------------------------------------------------", "2019-07-19 08:22:56,970 P2190 [INFO] Completed successfully." ] > aws logs get-log-events \ --log-group-name /aws/ec2/cfn-awslogs-test \ --log-stream-name i-xxxxxxxxxxxxxxxxx/cfn-init.log \ --query "events[*].message" [ "2019-07-19 08:22:49,801 [INFO] -----------------------Starting build-----------------------", "2019-07-19 08:22:49,802 [INFO] Running configSets: default", "2019-07-19 08:22:49,803 [INFO] Running configSet default", "2019-07-19 08:22:49,804 [INFO] Running config config", "2019-07-19 08:22:56,962 [INFO] Yum installed [u'awslogs']", "2019-07-19 08:22:56,970 [INFO] Command test succeeded", "2019-07-19 08:22:56,975 [INFO] enabled service cfn-hup", "2019-07-19 08:22:57,568 [INFO] Restarted cfn-hup successfully", "2019-07-19 08:22:57,607 [INFO] enabled service awslogs", "2019-07-19 08:22:59,648 [INFO] Restarted awslogs successfully", "2019-07-19 08:22:59,649 [INFO] ConfigSets completed", "2019-07-19 08:22:59,650 [INFO] -----------------------Build complete-----------------------", "2019-07-19 08:23:00,249 [DEBUG] CloudFormation client initialized with endpoint https://cloudformation.us-east-1.amazonaws.com", "2019-07-19 08:23:00,250 [DEBUG] Signaling resource MyInstance in stack cfn-awslogs-test with unique ID i-xxxxxxxxxxxxxxxxx and status SUCCESS" ] > aws logs get-log-events \ --log-group-name /aws/ec2/cfn-awslogs-test \ --log-stream-name i-xxxxxxxxxxxxxxxxx/cloud-init-output.log \ --query "events[*].message" (略) "Updated:\n java-1.7.0-openjdk.x86_64 1:1.7.0.211-2.6.17.1.79.amzn1 \n kernel-tools.x86_64 0:4.14.128-87.105.amzn1 \n perl.x86_64 4:5.16.3-294.43.amzn1 \n perl-Pod-Escapes.noarch 1:1.04-294.43.amzn1 \n perl-libs.x86_64 4:5.16.3-294.43.amzn1 \n perl-macros.x86_64 4:5.16.3-294.43.amzn1 \n python27-jinja2.noarch 0:2.7.2-3.16.amzn1 \n wget.x86_64 0:1.18-5.30.amzn1 \n", "Complete!", "Cloud-init v. 0.7.6 running 'modules:final' at Fri, 19 Jul 2019 08:22:49 +0000. Up 20.37 seconds.", "start UserData", "finish UserData", "Cloud-init v. 0.7.6 finished at Fri, 19 Jul 2019 08:23:00 +0000. Datasource DataSourceEc2. Up 31.51 seconds" ]
まとめ
CloudWatch Logs エージェントを利用することでCFnでEC2インスタンス作成・更新時のログをAmazon CloudWatch Logsへ出力することができました。 個人的にはこれでCFnで実行エラーによるロールバックでEC2インスタンスが削除されてログが確認できない悲しみがなくなって満足です^^
参考
CloudWatch Logs エージェントのリファレンス – Amazon CloudWatch Logs https://docs.aws.amazon.com/ja_jp/AmazonCloudWatch/latest/logs/AgentReference.html
AWS::CloudFormation::Init タイプを使ってEC2インスタンスの環境構築ができるようにしてみた – Qiita https://cloudpack.media/48540
クイックスタート: 実行中の EC2 Linux インスタンスに CloudWatch Logs エージェントをインストールして設定する – Amazon CloudWatch Logs https://docs.aws.amazon.com/ja_jp/AmazonCloudWatch/latest/logs/QuickStartEC2Instance.html
元記事はこちら
「AWS CloudFormationでEC2インスタンスのログがAmazon CloudWatch logsで確認できるようにする」
August 14, 2019 at 12:00PM
0 notes
Photo

AWS::CloudFormation::Init タイプを使ってEC2インスタンスの環境構築ができるようにしてみた https://ift.tt/2P2V4wW
cloudpack あら便利カレンダー 2019の記事となります。誕生秘話はこちら。
AWS CloudFormation(CFn)でEC2インスタンスを作成するのに、AWS::CloudFormation::Initタイプを利用すると、インスタンス起動後にパッケージのインストールやファイル作成、コマンド実行を含めることができて便利そうだったのでお試ししてみました。
個人的に一番のメリットはスタック更新時にメタデータの変更も検知して再実行させることができる点です。
AWS::CloudFormation::Init – AWS CloudFormation https://docs.aws.amazon.com/ja_jp/AWSCloudFormation/latest/UserGuide/aws-resource-init.html
利用するのにいくつかのドキュメントを渡り歩く必要があったので、必要最低限のテンプレートと利用方法、ポイントをまとめました。
前提
AWSアカウントがある
AWS CLIがインストール済みで利用可能
CFn、EC2関連の権限がある
テンプレート
EC2インスタンスを作成・管理するテンプレートとなります。
EC2インスタンスを起動するVPCやサブネットは既存のリソースを利用前提となります。 SSHアクセスする際のキーペアは事前に作成し、セキュリティグループはインスタンスとあわせて作成しています。 作成するリージョンは検証なので、us-east-1のみとしています。
cfn-template.yaml
Parameters: VpcId: Type: AWS::EC2::VPC::Id SubnetId: Type: AWS::EC2::Subnet::Id EC2KeyPairName: Type: AWS::EC2::KeyPair::KeyName InstanceType: Type: String Default: t3.small MyInstanceSSHCidrIp: Type: String Default: '0.0.0.0/0' Mappings: AWSRegionToAMI: us-east-1: HVM64: ami-0080e4c5bc078760e Resources: MyInstanceSecurityGroup: Type: AWS::EC2::SecurityGroup Properties: GroupName: !Join - " " - - !Ref AWS::StackName - "SecurityGroup" GroupDescription: "MyInstance SecurityGroup" VpcId: !Ref VpcId SecurityGroupEgress: - CidrIp: "0.0.0.0/0" IpProtocol: "-1" SecurityGroupIngress: - CidrIp: !Ref MyInstanceSSHCidrIp Description: !Join - " " - - !Ref AWS::StackName - "SSH Port" IpProtocol: "tcp" FromPort: 22 ToPort: 22 Tags: - Key: "Name" Value: !Join - " " - - !Ref AWS::StackName - "SecurityGroup" MyInstance: Type: AWS::EC2::Instance Metadata: AWS::CloudFormation::Init: config: files: /etc/cfn/cfn-hup.conf: content: !Sub | [main] stack = ${AWS::StackName} region = ${AWS::Region} interval = 1 mode: "000400" owner: "root" group: "root" /etc/cfn/hooks.d/cfn-auto-reloader.conf: content: !Sub | [cfn-auto-reloader-hook] triggers = post.update path = Resources.MyInstance.Metadata.AWS::CloudFormation::Init action = /opt/aws/bin/cfn-init -v --stack ${AWS::StackName} --resource MyInstance --region ${AWS::Region} runas = root mode: "000400" owner: "root" group: "root" commands: test: command: "echo $STACK_NAME test" env: STACK_NAME: !Ref AWS::StackName services: sysvinit: cfn-hup: enabled: "true" files: - /etc/cfn/cfn-hup.conf - /etc/cfn/hooks.d/cfn-auto-reloader.conf Properties: InstanceType: !Ref InstanceType KeyName: !Ref EC2KeyPairName ImageId: !FindInMap [ AWSRegionToAMI, !Ref "AWS::Region", HVM64 ] IamInstanceProfile: !Ref AWS::NoValue NetworkInterfaces: - AssociatePublicIpAddress: True DeviceIndex: 0 GroupSet: - !Ref MyInstanceSecurityGroup SubnetId: !Ref SubnetId Tags: - Key: 'Name' Value: !Ref AWS::StackName UserData: Fn::Base64: !Sub | #!/bin/bash echo "start UserData" /opt/aws/bin/cfn-init --stack ${AWS::StackName} --resource MyInstance --region ${AWS::Region} /opt/aws/bin/cfn-signal -e $? --stack ${AWS::StackName} --resource MyInstance --region ${AWS::Region} echo "finish UserData" CreationPolicy: ResourceSignal: Timeout: PT5M Outputs: ClientInstanceId: Value: !Ref MyInstance ClientPublicIp: Value: !GetAtt MyInstance.PublicIp
ポイント
AWS::CloudFormation::Initタイプを利用する
AWS::CloudFormation::Initタイプを利用すると、EC2インスタンスでcfn-initヘルパースクリプト用のメタデータとして取り込まれて実行されます。 cfn-initヘルパースクリプトはメタデータに応じて以下のような操作を行います。
CFnのメタデータの取得と解析
パッケージのインストール
ディスクへのファイルの書き込み
Linux/UNIXグループ・ユーザー作成
ソースのダウンロード・展開
コマンド実行
サービスの有効化/無効化と開始/停止
詳しくは下記が参考になります。
AWS::CloudFormation::Init – AWS CloudFormation https://docs.aws.amazon.com/ja_jp/AWSCloudFormation/latest/UserGuide/aws-resource-init.html
cfn-init – AWS CloudFormation https://docs.aws.amazon.com/ja_jp/AWSCloudFormation/latest/UserGuide/cfn-init.html
今回のテンプレートではメタデータでファイル書き込み、コマンド実行とサービス有効化する定義をしています。詳細は後ほど。
cfn-template.yaml_一部抜粋
MyInstance: Type: AWS::EC2::Instance Metadata: AWS::CloudFormation::Init: config: files: /etc/cfn/cfn-hup.conf: content: !Sub | [main] stack = ${AWS::StackName} region = ${AWS::Region} interval = 1 mode: "000400" owner: "root" group: "root" /etc/cfn/hooks.d/cfn-auto-reloader.conf: (略) commands: test: command: "echo $STACK_NAME test2" env: STACK_NAME: !Ref AWS::StackName services: sysvinit: cfn-hup: (略)
cfn-init ヘルパースクリプトをUserDataで実行する
AWS::CloudFormation::Initタイプを利用してメタデータを定義しただけだと、スタック作成時にcfn-initヘルパースクリプトは実行されないため、ユーザーデータを定義して実行します。 ユーザーデータについては下記が参考になります。
Linux インスタンスでの起動時のコマンドの実行 – Amazon Elastic Compute Cloud https://docs.aws.amazon.com/ja_jp/AWSEC2/latest/UserGuide/user-data.html
今回のテンプレートでは/opt/aws/bin/cfn-initでエラーとなった場合、リソース作成失敗となるように/opt/aws/bin/cfn-signalも実行するようにしています。/opt/aws/bin/cfn-signalを利用する場合には、CreationPolicyを定義しておく必要があります。 cfn-signalヘルパースクリプトについては下記が参考になります。
cfn-signal – AWS CloudFormation https://docs.aws.amazon.com/ja_jp/AWSCloudFormation/latest/UserGuide/cfn-signal.html
cfn-template.yaml_一部抜粋
MyInstance: (略) Properties: (略) UserData: Fn::Base64: !Sub | #!/bin/bash echo "start UserData" /opt/aws/bin/cfn-init --stack ${AWS::StackName} --resource MyInstance --region ${AWS::Region} /opt/aws/bin/cfn-signal -e $? --stack ${AWS::StackName} --resource MyInstance --region ${AWS::Region} echo "finish UserData" CreationPolicy: ResourceSignal: Timeout: PT5M
cfn-hup ヘルパーでメタデータ更新時に対応する
メタデータとユーザーデータの定義だけだと、メタデータを変更してスタック更新しても変更が検知されず、EC2インスタンスに反映されないため、cfn-hup ヘルパーを利用する必要があります。cfn-hupヘルパーはEC2インスタンスでデーモンとして実行が可能です。 cfn-hupデーモンを実行するためにはcfn-hup.confとhooks.confファイルを用意する必要があるため、メタデータで定義しています。 cfn-hupヘルパーについては下記が参考になります。
cfn-hup – AWS CloudFormation https://docs.aws.amazon.com/ja_jp/AWSCloudFormation/latest/UserGuide/cfn-hup.html
cfn-template.yaml_一部抜粋
MyInstance: Type: AWS::EC2::Instance Metadata: AWS::CloudFormation::Init: config: files: /etc/cfn/cfn-hup.conf: content: !Sub | [main] stack = ${AWS::StackName} region = ${AWS::Region} interval = 1 mode: "000400" owner: "root" group: "root" /etc/cfn/hooks.d/cfn-auto-reloader.conf: content: !Sub | [cfn-auto-reloader-hook] triggers = post.update path = Resources.MyInstance.Metadata.AWS::CloudFormation::Init action = /opt/aws/bin/cfn-init -v --stack ${AWS::StackName} --resource MyInstance --region ${AWS::Region} runas = root mode: "000400" owner: "root" group: "root" commands: (略) services: sysvinit: cfn-hup: enabled: "true" files: - /etc/cfn/cfn-hup.conf - /etc/cfn/hooks.d/cfn-auto-reloader.conf
利用方法
パラメータ値を取得
キーペア
EC2インスタンスへSSHログインするのに利用するキーペアを作成します。 既存のキーペアを利用する場合は作成不要です。
# Create KeyPair > aws ec2 create-key-pair \ --key-name cfn-init-test-ec2-key \ --query "KeyMaterial" \ --output text > cfn-init-test-ec2-key.pem > chmod 400 cfn-init-test-ec2-key.pem
VPC、サブネット
既存のVPC、サブネット配下にEC2インスタンスを作成する前提ですので各IDを取得します。
# VpcId > aws ec2 describe-vpcs \ --query "Vpcs" [ { "CidrBlock": "172.31.0.0/16", "DhcpOptionsId": "dopt-b06bd8c8", "State": "available", "VpcId": "vpc-xxxxxxxx", "OwnerId": "xxxxxxxxxxxx", "InstanceTenancy": "default", "CidrBlockAssociationSet": [ { "AssociationId": "vpc-cidr-assoc-2b23e646", "CidrBlock": "172.31.0.0/16", "CidrBlockState": { "State": "associated" } } ], "IsDefault": true }, ] # SubnetId > aws ec2 describe-subnets \ --filters '{"Name": "vpc-id", "Values": ["vpc-xxxxxxxx"]}' \ --query "Subnets" [ { "AvailabilityZone": "us-east-1a", "AvailabilityZoneId": "use1-az2", "AvailableIpAddressCount": 4089, "CidrBlock": "172.31.80.0/20", "DefaultForAz": true, "MapPublicIpOnLaunch": true, "State": "available", "SubnetId": "subnet-xxxxxxxx", "VpcId": "vpc-xxxxxxxx", "OwnerId": "xxxxxxxxxxxx", "AssignIpv6AddressOnCreation": false, "Ipv6CidrBlockAssociationSet": [], "SubnetArn": "arn:aws:ec2:us-east-1:xxxxxxxxxxxx:subnet/subnet-xxxxxxxx" }, ]
自身のグローバルIP
SSHアクセスするためのセキュリティグループに指定するIPアドレスを取得します。 ここではifconfig.ioを利用していますが他の手段でもOKです。
## GlobalIP > curl ifconfig.io xxx.xxx.xxx.xxx
スタック作成
aws cloudformation create-stackコマンドを利用してスタック作成します。 AWSマネジメントコンソールから作成してもOKです。
> aws cloudformation create-stack \ --stack-name cfn-init-test \ --template-body file://cfn-init-template.yaml \ --capabilities CAPABILITY_IAM \ --region us-east-1 \ --parameters '[ { "ParameterKey": "VpcId", "ParameterValue": "vpc-xxxxxxxx" }, { "ParameterKey": "SubnetId", "ParameterValue": "subnet-xxxxxxxx" }, { "ParameterKey": "EC2KeyPairName", "ParameterValue": "cfn-init-test-ec2-key" }, { "ParameterKey": "MyInstanceSSHCidrIp", "ParameterValue": "xxx.xxx.xxx.xxx/32" } ]'
スタック作成結果を確認
スタック作成ができたか確認します。
> aws cloudformation describe-stacks \ --stack-name cfn-init-test { "Stacks": [ { "StackId": "arn:aws:cloudformation:us-east-1:xxxxxxxxxxxx:stack/cfn-init-test/a1dc6aa0-a9e6-11e9-b171-0a515b01a4a4", "StackName": "cfn-init-test", "Parameters": [ { "ParameterKey": "MyInstanceSSHCidrIp", "ParameterValue": "xxx.xxx.xxx.xxx/32" }, { "ParameterKey": "VpcId", "ParameterValue": "vpc-xxxxxxxx" }, { "ParameterKey": "EC2KeyPairName", "ParameterValue": "cfn-init-test-ec2-key" }, { "ParameterKey": "SubnetId", "ParameterValue": "subnet-xxxxxxxx" }, { "ParameterKey": "InstanceType", "ParameterValue": "t3.small" } ], "CreationTime": "2019-07-19T05:32:43.477Z", "RollbackConfiguration": {}, "StackStatus": "CREATE_COMPLETE", "DisableRollback": false, "NotificationARNs": [], "Capabilities": [ "CAPABILITY_IAM" ], "Outputs": [ { "OutputKey": "ClientPublicIp", "OutputValue": "xxx.xxx.xxx.xxx" }, { "OutputKey": "ClientInstanceId", "OutputValue": "i-xxxxxxxxxxxxxxxxx" } ], "Tags": [], "EnableTerminationProtection": false, "DriftInformation": { "StackDriftStatus": "NOT_CHECKED" } } ] }
EC2インスタンスで確認
テンプレートのOutputsでEC2インスタンスのIPアドレス(‘ClientPublicIp’ )が出力されるようにしているので、SSHログインして各ログを確認します。 CFnでEC2インスタンスを作成するといくつかのログファイルが作成されますが、下記のファイル確認しておくとだいたいは把握できます。
> ssh -i cfn-init-test-ec2-key.pem [email protected] $ cat /var/log/cfn-init.log 2019-07-19 06:53:00,454 [INFO] -----------------------Starting build----------------------- 2019-07-19 06:53:00,455 [INFO] Running configSets: default 2019-07-19 06:53:00,455 [INFO] Running configSet default 2019-07-19 06:53:00,456 [INFO] Running config config 2019-07-19 06:53:00,460 [INFO] Command test succeeded 2019-07-19 06:53:00,467 [INFO] enabled service cfn-hup 2019-07-19 06:53:00,768 [INFO] Restarted cfn-hup successfully 2019-07-19 06:53:00,769 [INFO] ConfigSets completed 2019-07-19 06:53:00,769 [INFO] -----------------------Build complete----------------------- 2019-07-19 06:53:01,055 [DEBUG] CloudFormation client initialized with endpoint https://cloudformation.us-east-1.amazonaws.com 2019-07-19 06:53:01,055 [DEBUG] Signaling resource MyInstance in stack cfn-init-test with unique ID i-xxxxxxxxxxxxxxxxx and status SUCCESS $ cat /var/log/cfn-init-cmd.log 2019-07-19 06:53:00,455 P2208 [INFO] ************************************************************ 2019-07-19 06:53:00,455 P2208 [INFO] ConfigSet default 2019-07-19 06:53:00,456 P2208 [INFO] ++++++++++++++++++++++++++++++++++++++++++++++++++++++++++++ 2019-07-19 06:53:00,456 P2208 [INFO] Config config 2019-07-19 06:53:00,457 P2208 [INFO] ============================================================ 2019-07-19 06:53:00,457 P2208 [INFO] Command test 2019-07-19 06:53:00,460 P2208 [INFO] -----------------------Command Output----------------------- 2019-07-19 06:53:00,460 P2208 [INFO] cfn-init-test test 2019-07-19 06:53:00,460 P2208 [INFO] ------------------------------------------------------------ 2019-07-19 06:53:00,460 P2208 [INFO] Completed successfully. $ cat /var/log/cloud-init-output.log (略) Updated: java-1.7.0-openjdk.x86_64 1:1.7.0.211-2.6.17.1.79.amzn1 kernel-tools.x86_64 0:4.14.128-87.105.amzn1 perl.x86_64 4:5.16.3-294.43.amzn1 perl-Pod-Escapes.noarch 1:1.04-294.43.amzn1 perl-libs.x86_64 4:5.16.3-294.43.amzn1 perl-macros.x86_64 4:5.16.3-294.43.amzn1 python27-jinja2.noarch 0:2.7.2-3.16.amzn1 wget.x86_64 0:1.18-5.30.amzn1 Complete! Cloud-init v. 0.7.6 running 'modules:final' at Fri, 19 Jul 2019 05:33:29 +0000. Up 19.60 seconds. start UserData finish UserData Cloud-init v. 0.7.6 finished at Fri, 19 Jul 2019 05:33:31 +0000. Datasource DataSourceEc2. Up 20.79 seconds
スタック更新に関わるログとファイルは以下となります。 cfn-hupデーモンが定期的にCFnスタックのメタデータを取得しmetadata_db.jsonに保存、メタデータとファイルに差分があるとcfn-auto-reloader.confで指定したアクション(コマンド)が実行される仕組みになっています。 なので、スタック作成後、cfn-hupデーモンが1度もメタデータ取得していないタイミングでスタック更新しても、metadata_db.jsonが存在していないと変更が検知されないみたいです。(1敗
$ cat /var/log/cfn-hup.log 2019-07-19 06:53:00,750 [DEBUG] CloudFormation client initialized with endpoint https://cloudformation.us-east-1.amazonaws.com 2019-07-19 06:53:00,750 [DEBUG] Creating /var/lib/cfn-hup/data 2019-07-19 06:53:00,756 [INFO] No umask value specified in config file. Using the default one: 022 $ sudo cat /var/lib/cfn-hup/data/metadata_db.json {"cfn-auto-reloader-hook|Resources.MyInstance.Metadata.AWS::CloudFormation::Init": {"config": {"files": {"/etc/cfn/cfn-hup.conf": {"owner": "root", "content": "[main]\nstack = cfn-init-test\nregion = us-east-1\ninterval = 1\n", "group": "root", "mode": "000400"}, "/etc/cfn/hooks.d/cfn-auto-reloader.conf": {"owner": "root", "content": "[cfn-auto-reloader-hook]\ntriggers = post.update\npath = Resources.MyInstance.Metadata.AWS::CloudFormation::Init\naction = /opt/aws/bin/cfn-init -v --stack cfn-init-test --resource MyInstance --region us-east-1\nrunas = root\n", "group": "root", "mode": "000400"}}, "services": {"sysvinit": {"cfn-hup": {"files": ["/etc/cfn/cfn-hup.conf", "/etc/cfn/hooks.d/cfn-auto-reloader.conf"], "enabled": "true"}}}, "commands": {"test": {"command": "echo $STACK_NAME test", "env": {"STACK_NAME": "cfn-init-test"}}}}}}
メタデータを編集してスタック更新する
メタデータに実行するコマンドを追加してスタック更新してみます。
cfn-template.yaml_一部抜粋
(略) commands: test: command: "echo $STACK_NAME test" env: STACK_NAME: !Ref AWS::StackName test2: command: "echo $STACK_NAME test2" env: STACK_NAME: !Ref AWS::StackName (略)
aws cloudformation update-stackコマンドを実行してスタック更新します。
> aws cloudformation update-stack \ --stack-name cfn-init-test \ --template-body file://cfn-init-template.yaml \ --capabilities CAPABILITY_IAM \ --region us-east-1 \ --parameters '[ { "ParameterKey": "VpcId", "ParameterValue": "vpc-xxxxxxxx" }, { "ParameterKey": "SubnetId", "ParameterValue": "subnet-xxxxxxxx" }, { "ParameterKey": "EC2KeyPairName", "ParameterValue": "cfn-init-test-ec2-key" }, { "ParameterKey": "MyInstanceSSHCidrIp", "ParameterValue": "xxx.xxx.xxx.xxx/32" } ]'
スタック更新結果を確認
> aws cloudformation describe-stacks \ --stack-name cfn-init-test { "Stacks": [ { "StackId": "arn:aws:cloudformation:us-east-1:xxxxxxxxxxxx:stack/cfn-init-test/a1dc6aa0-a9e6-11e9-b171-0a515b01a4a4", "StackName": "cfn-init-test", "Parameters": [ { "ParameterKey": "MyInstanceSSHCidrIp", "ParameterValue": "xxx.xxx.xxx.xxx/32" }, { "ParameterKey": "VpcId", "ParameterValue": "vpc-xxxxxxxx" }, { "ParameterKey": "EC2KeyPairName", "ParameterValue": "cfn-init-test-ec2-key" }, { "ParameterKey": "SubnetId", "ParameterValue": "subnet-xxxxxxxx" }, { "ParameterKey": "InstanceType", "ParameterValue": "t3.small" } ], "CreationTime": "2019-07-19T05:32:43.477Z", "LastUpdatedTime": "2019-07-19T05:41:40.446Z", "RollbackConfiguration": {}, "StackStatus": "UPDATE_COMPLETE", "DisableRollback": false, "NotificationARNs": [], "Capabilities": [ "CAPABILITY_IAM" ], "Outputs": [ { "OutputKey": "ClientPublicIp", "OutputValue": "xxx.xxx.xxx.xxx" }, { "OutputKey": "ClientInstanceId", "OutputValue": "i-xxxxxxxxxxxxxxxxx" } ], "Tags": [], "EnableTerminationProtection": false, "DriftInformation": { "StackDriftStatus": "NOT_CHECKED" } } ] }
EC2インスタンスで確認
CFnのリソース更新されてもEC2インスタンス側への変更反映は、cfn-hupヘルパーが担当しますので、反映にはタイムラグが発生します。cfn-hupヘルパーがメタデータの変更確認する間隔は初期設定で15分となっており、/etc/cfn/cfn-hup.conf ファイルのintervalで指定ができます。(今回は1分で指定)
cfn-hup – AWS CloudFormation https://docs.aws.amazon.com/ja_jp/AWSCloudFormation/latest/UserGuide/cfn-hup.html
> ssh -i cfn-init-test-ec2-key.pem [email protected] $ cat /var/log/cfn-init.log 2019-07-19 06:53:00,454 [INFO] -----------------------Starting build----------------------- 2019-07-19 06:53:00,455 [INFO] Running configSets: default 2019-07-19 06:53:00,455 [INFO] Running configSet default 2019-07-19 06:53:00,456 [INFO] Running config config 2019-07-19 06:53:00,460 [INFO] Command test succeeded 2019-07-19 06:53:00,467 [INFO] enabled service cfn-hup 2019-07-19 06:53:00,768 [INFO] Restarted cfn-hup successfully 2019-07-19 06:53:00,769 [INFO] ConfigSets completed 2019-07-19 06:53:00,769 [INFO] -----------------------Build complete----------------------- 2019-07-19 06:53:01,055 [DEBUG] CloudFormation client initialized with endpoint https://cloudformation.us-east-1.amazonaws.com 2019-07-19 06:53:01,055 [DEBUG] Signaling resource MyInstance in stack cfn-init-test with unique ID i-xxxxxxxxxxxxxxxxx and status SUCCESS 2019-07-19 06:56:01,457 [DEBUG] CloudFormation client initialized with endpoint https://cloudformation.us-east-1.amazonaws.com 2019-07-19 06:56:01,458 [DEBUG] Describing resource MyInstance in stack cfn-init-test 2019-07-19 06:56:01,522 [INFO] -----------------------Starting build----------------------- 2019-07-19 06:56:01,523 [DEBUG] Not setting a reboot trigger as scheduling support is not available 2019-07-19 06:56:01,524 [INFO] Running configSets: default 2019-07-19 06:56:01,525 [INFO] Running configSet default 2019-07-19 06:56:01,525 [INFO] Running config config 2019-07-19 06:56:01,526 [DEBUG] No packages specified 2019-07-19 06:56:01,526 [DEBUG] No groups specified 2019-07-19 06:56:01,526 [DEBUG] No users specified 2019-07-19 06:56:01,526 [DEBUG] No sources specified 2019-07-19 06:56:01,526 [DEBUG] /etc/cfn/cfn-hup.conf already exists 2019-07-19 06:56:01,526 [DEBUG] Moving /etc/cfn/cfn-hup.conf to /etc/cfn/cfn-hup.conf.bak 2019-07-19 06:56:01,526 [DEBUG] Writing content to /etc/cfn/cfn-hup.conf 2019-07-19 06:56:01,526 [DEBUG] Setting mode for /etc/cfn/cfn-hup.conf to 000400 2019-07-19 06:56:01,526 [DEBUG] Setting owner 0 and group 0 for /etc/cfn/cfn-hup.conf 2019-07-19 06:56:01,527 [DEBUG] /etc/cfn/hooks.d/cfn-auto-reloader.conf already exists 2019-07-19 06:56:01,527 [DEBUG] Moving /etc/cfn/hooks.d/cfn-auto-reloader.conf to /etc/cfn/hooks.d/cfn-auto-reloader.conf.bak 2019-07-19 06:56:01,527 [DEBUG] Writing content to /etc/cfn/hooks.d/cfn-auto-reloader.conf 2019-07-19 06:56:01,527 [DEBUG] Setting mode for /etc/cfn/hooks.d/cfn-auto-reloader.conf to 000400 2019-07-19 06:56:01,527 [DEBUG] Setting owner 0 and group 0 for /etc/cfn/hooks.d/cfn-auto-reloader.conf 2019-07-19 06:56:01,527 [DEBUG] Running command test 2019-07-19 06:56:01,527 [DEBUG] No test for command test 2019-07-19 06:56:01,531 [INFO] Command test succeeded 2019-07-19 06:56:01,531 [DEBUG] Command test output: cfn-init-test test 2019-07-19 06:56:01,531 [DEBUG] Running command test2 2019-07-19 06:56:01,531 [DEBUG] No test for command test2 2019-07-19 06:56:01,535 [INFO] Command test2 succeeded 2019-07-19 06:56:01,536 [DEBUG] Command test2 output: cfn-init-test test! 2019-07-19 06:56:01,536 [DEBUG] Using service modifier: /sbin/chkconfig 2019-07-19 06:56:01,536 [DEBUG] Setting service cfn-hup to enabled 2019-07-19 06:56:01,538 [INFO] enabled service cfn-hup 2019-07-19 06:56:01,539 [DEBUG] Not modifying running state of service cfn-hup 2019-07-19 06:56:01,539 [INFO] ConfigSets completed 2019-07-19 06:56:01,539 [DEBUG] Not clearing reboot trigger as scheduling support is not available 2019-07-19 06:56:01,539 [INFO] -----------------------Build complete----------------------- $ cat /var/log/cfn-init-cmd.log 2019-07-19 06:53:00,455 P2208 [INFO] ************************************************************ 2019-07-19 06:53:00,455 P2208 [INFO] ConfigSet default 2019-07-19 06:53:00,456 P2208 [INFO] ++++++++++++++++++++++++++++++++++++++++++++++++++++++++++++ 2019-07-19 06:53:00,456 P2208 [INFO] Config config 2019-07-19 06:53:00,457 P2208 [INFO] ============================================================ 2019-07-19 06:53:00,457 P2208 [INFO] Command test 2019-07-19 06:53:00,460 P2208 [INFO] -----------------------Command Output----------------------- 2019-07-19 06:53:00,460 P2208 [INFO] cfn-init-test test 2019-07-19 06:53:00,460 P2208 [INFO] ------------------------------------------------------------ 2019-07-19 06:53:00,460 P2208 [INFO] Completed successfully. 2019-07-19 06:56:01,525 P2337 [INFO] ************************************************************ 2019-07-19 06:56:01,525 P2337 [INFO] ConfigSet default 2019-07-19 06:56:01,525 P2337 [INFO] ++++++++++++++++++++++++++++++++++++++++++++++++++++++++++++ 2019-07-19 06:56:01,526 P2337 [INFO] Config config 2019-07-19 06:56:01,527 P2337 [INFO] ============================================================ 2019-07-19 06:56:01,527 P2337 [INFO] Command test 2019-07-19 06:56:01,530 P2337 [INFO] -----------------------Command Output----------------------- 2019-07-19 06:56:01,531 P2337 [INFO] cfn-init-test test 2019-07-19 06:56:01,531 P2337 [INFO] ------------------------------------------------------------ 2019-07-19 06:56:01,531 P2337 [INFO] Completed successfully. 2019-07-19 06:56:01,531 P2337 [INFO] ============================================================ 2019-07-19 06:56:01,531 P2337 [INFO] Command test2 2019-07-19 06:56:01,535 P2337 [INFO] -----------------------Command Output----------------------- 2019-07-19 06:56:01,535 P2337 [INFO] cfn-init-test test! 2019-07-19 06:56:01,535 P2337 [INFO] ------------------------------------------------------------ 2019-07-19 06:56:01,535 P2337 [INFO] Completed successfully. $ cat /var/log/cloud-init-output.log (略) Updated: java-1.7.0-openjdk.x86_64 1:1.7.0.211-2.6.17.1.79.amzn1 kernel-tools.x86_64 0:4.14.128-87.105.amzn1 perl.x86_64 4:5.16.3-294.43.amzn1 perl-Pod-Escapes.noarch 1:1.04-294.43.amzn1 perl-libs.x86_64 4:5.16.3-294.43.amzn1 perl-macros.x86_64 4:5.16.3-294.43.amzn1 python27-jinja2.noarch 0:2.7.2-3.16.amzn1 wget.x86_64 0:1.18-5.30.amzn1 Complete! Cloud-init v. 0.7.6 running 'modules:final' at Fri, 19 Jul 2019 06:52:59 +0000. Up 18.81 seconds. start UserData finish UserData Cloud-init v. 0.7.6 finished at Fri, 19 Jul 2019 06:53:01 +0000. Datasource DataSourceEc2. Up 20.07 seconds
メタデータに追加したコマンドが実行されるのを確認できました。 やったぜ。
スタック更新時にメタデータで定義しているすべての処理を実行したくない場合、Configsetを用いるとグルーピングや実行順の制御をして特定の処理ができます。詳細は下記をご参考ください。
AWS::CloudFormation::Init – AWS CloudFormation https://docs.aws.amazon.com/ja_jp/AWSCloudFormation/latest/UserGuide/aws-resource-init.html
まとめ
CFnでEC2インスタンスを作成する際に、インスタンス起動後の処理もテンプレートで定義して管理できる仕組みになっていますので、非常に使い勝手が良さそうです。
参考
AWS::CloudFormation::Init – AWS CloudFormation https://docs.aws.amazon.com/ja_jp/AWSCloudFormation/latest/UserGuide/aws-resource-init.html
AWS::CloudFormation::Init – AWS CloudFormation https://docs.aws.amazon.com/ja_jp/AWSCloudFormation/latest/UserGuide/aws-resource-init.html
cfn-init – AWS CloudFormation https://docs.aws.amazon.com/ja_jp/AWSCloudFormation/latest/UserGuide/cfn-init.html
Linux インスタンスでの起動時のコマンドの実行 – Amazon Elastic Compute Cloud https://docs.aws.amazon.com/ja_jp/AWSEC2/latest/UserGuide/user-data.html
cfn-signal – AWS CloudFormation https://docs.aws.amazon.com/ja_jp/AWSCloudFormation/latest/UserGuide/cfn-signal.html
cfn-hup – AWS CloudFormation https://docs.aws.amazon.com/ja_jp/AWSCloudFormation/latest/UserGuide/cfn-hup.html
元記事はこちら
「AWS::CloudFormation::Init タイプを使ってEC2インスタンスの環境構築ができるようにしてみた」
August 13, 2019 at 02:00PM
0 notes
Photo

AWS SDK for Python(boto3)でAmazon Managed Blockchainのブロックチェーンネットワークを作成してみた http://bit.ly/2QO67Y5
Amazon Managed Blockchainでブロックチェーンネットワークを構築するのにAWS CloudFormationを利用したいなぁとドキュメントを読んでみたらリソースがありませんでした。oh… AWS CloudFormationのカスタムリソースを利用すれば管理できるので、まずはAWS SDKでAmazon Managed Blockchainが取り扱えるのか確認してみました。
AWS CloudFormationのカスタムリソースについては下記が参考になります。
カスタムリソース – AWS CloudFormation https://docs.aws.amazon.com/ja_jp/AWSCloudFormation/latest/UserGuide/template-custom-resources.html
CloudFormationで提供されていない処理をカスタムリソースで作ってみた。 | DevelopersIO https://dev.classmethod.jp/cloud/aws/cfn-api-custom/
AWS CloudFormationでCognitoユーザープールをMFAのTOTPを有効にして作成する – Qiita https://cloudpack.media/44573
Amazon Managed Blockchainってなんぞ?
Amazon Managed Blockchainってなんぞ?という方は下記をご参考ください。
Amazon Managed BlockchainがリリースされたのでHyperledger Fabricも合わせて情報をまとめてみた – Qiita https://cloudpack.media/46950
前提
今回はAmazon Managed Blockchainのネットワーク、メンバー、ノードがAWS SDKで作成できるかの確認のみとなります。セキュリティグループ、インタフェースVPCエンドポイントやHyperledger Fabricの設定などは行いません。
AWSアカウントがある
AWSアカウントに以下の作成権限がある
Managed Blockchainネットワーク
AWS CLIのaws configure コマンドでアカウント設定済み
ネットワーク構築して動作確認するまでの手順は下記が参考になります。
Amazon Managed BlockchainでHyperledger Fabricのブロックチェーンネットワークを構築してみた – Qiita https://cloudpack.media/46963
AWS SDK for Python(boto3)でAmazon Managed BlockchainのAPIが提供されてる
ドキュメントを確認してみたらAWS SDKでAmazon Managed BlockchainのAPIが提供されていました。
boto/boto3: AWS SDK for Python https://github.com/boto/boto3
ManagedBlockchain — Boto 3 Docs 1.9.152 documentation https://boto3.amazonaws.com/v1/documentation/api/latest/reference/services/managedblockchain.html
Python環境の用意
Pipenvを利用したことがなかったので、ついでに初利用します(趣味)。 仮想環境じゃなくてもOKです。
Pipenvを使ったPython開発まとめ – Qiita https://qiita.com/y-tsutsu/items/54c10e0b2c6b565c887a
# pipenvがインストールされてなかったら > pip install pipenv (略) Installing collected packages: virtualenv, virtualenv-clone, pipenv Successfully installed pipenv-2018.11.26 virtualenv-16.6.0 virtualenv-clone-0.5.3 # 仮想環境の作成 > pipenv --python 3.7 Creating a virtualenv for this project… Pipfile: /Users/xxx/dev/aws/managed-blockchain-use-sdk/Pipfile Using /Users/xxx/.anyenv/envs/pyenv/versions/3.7.0/bin/python3 (3.7.0) to create virtualenv… ⠴ Creating virtual environment... (略) ✓ Successfully created virtual environment! Virtualenv location: /Users/xxx/.local/share/virtualenvs/managed-blockchain-use-sdk-ijMKrYxz Creating a Pipfile for this project… # boto3のインストール > pipenv install boto3 Installing boto3… ⠴ Installing... (略) # 仮想環境へ入る > pipenv shell Launching subshell in virtual environment… Welcome to fish, the friendly interactive shell
AWS SDK for Python(boto3)を利用して実装
ドキュメントを参考にネットワークなどを作成、取得できるか確認します。
ManagedBlockchain — Boto 3 Docs 1.9.152 documentation https://boto3.amazonaws.com/v1/documentation/api/latest/reference/services/managedblockchain.html
ネットワークとメンバーの作成
create_network でネットワーク作成できます。パラメータはAWS CLIとほぼ同じなので下記が参考になります。 AWS CLIと同じく最初のメンバーも合わせて作成する必要があります。
Amazon Managed BlockchainでHyperledger Fabricのブロックチェーンネットワークを構築してみた – Qiita https://cloudpack.media/46963
create_network.py
import boto3 client = boto3.client("managedblockchain") def create_network(): new_network = client.create_network( ClientRequestToken="string", Name="TestNetwork", Description="TestNetworkDescription", Framework="HYPERLEDGER_FABRIC", FrameworkVersion="1.2", FrameworkConfiguration={ "Fabric": { "Edition": "STARTER" } }, VotingPolicy={ "ApprovalThresholdPolicy": { "ThresholdPercentage": 50, "ProposalDurationInHours": 24, "ThresholdComparator": "GREATER_THAN" } }, MemberConfiguration={ "Name": "org1", "Description": "Org1 first member of network", "FrameworkConfiguration": { "Fabric": { "AdminUsername": "AdminUser", "AdminPassword": "Password123" } } } ) print(new_network)
実行するとネットワークとメンバーの作成が開始されてNetworkId とMemberId が得られます。
> python create_network.py {'ResponseMetadata': {'RequestId': 'xxxxxxxx-xxxx-xxxx-xxxx-xxxxxxxxxxxx', 'HTTPStatusCode': 200, 'HTTPHeaders': {'date': 'Tue, 21 May 2019 03:24:32 GMT', 'content-type': 'application/json', 'content-length': '86', 'connection': 'keep-alive', 'x-amzn-requestid': 'xxxxxxxx-xxxx-xxxx-xxxx-xxxxxxxxxxxx', 'x-amz-apigw-id': 'xxxxxxxxxxxxxxx=', 'x-amzn-trace-id': 'Root=1-xxxxxxxx-xxxxxxxxxxxxxxxxxxxxxxxx; Sampled=0'}, 'RetryAttempts': 0}, 'NetworkId': 'n-XXXXXXXXXXXXXXXXXXXXXXXXXX', 'MemberId': 'm-XXXXXXXXXXXXXXXXXXXXXXXXXX'}
ネットワーク情報の取得
list_networks でネットワーク情報が取得できます。 パラメータ指定することで検索もできるみたいです。
list_network.py
import boto3 client = boto3.client("managedblockchain") def list_network(): networks = client.list_networks( # Name="Test" # Name="string", # Framework="HYPERLEDGER_FABRIC", # Status="CREATING"|"AVAILABLE"|"CREATE_FAILED"|"DELETING"|"DELETED", # MaxResults=123, # NextToken="string" ) print(networks) list_networks()
> python list_network.py [{'Id': 'n-XXXXXXXXXXXXXXXXXXXXXXXXXX', 'Name': 'TestNetwork', 'Description': 'TestNetworkDescription', 'Framework': 'HYPERLEDGER_FABRIC', 'FrameworkVersion': '1.2', 'Status': 'CREATING', 'CreationDate': datetime.datetime(2019, 5, 21, 3, 24, 31, 929000, tzinfo=tzutc())}]
ノードの作成
create_node でノード作成ができます。ClientRequestToken に関しては指定しない場合自動生成してくれるとのことでした。手動での生成方法は未調査です。
create_node.py
import boto3 client = boto3.client("managedblockchain") def create_node(): new_node = client.create_node( # ClientRequestToken='string', NetworkId='n-5QBOS5ULTVEZZG6EMIPLPRSSQA', MemberId='m-OMLBOQIAMJDDPJV3FVGIAVUGBE', NodeConfiguration={ 'InstanceType': 'bc.t3.small', 'AvailabilityZone': 'us-east-1a' } ) print(new_node) create_node()
> python create_node.py {'ResponseMetadata': {'RequestId': 'xxxxxxxx-xxxx-xxxx-xxxx-xxxxxxxxxxxx', 'HTTPStatusCode': 200, 'HTTPHeaders': {'date': 'Tue, 21 May 2019 04:04:44 GMT', 'content-type': 'application/json', 'content-length': '42', 'connection': 'keep-alive', 'x-amzn-requestid': 'xxxxxxxx-xxxx-xxxx-xxxx-xxxxxxxxxxxx', 'x-amz-apigw-id': 'xxxxxxxxxxxxxxx=', 'x-amzn-trace-id': 'Root=1-xxxxxxxx-xxxxxxxxxxxxxxxxxxxxxxxx;Sampled=0'}, 'RetryAttempts': 0}, 'NodeId': 'nd-XXXXXXXXXXXXXXXXXXXXXXXXXX'}
ネットワーク、メンバーが作成中(Status がCREATING )の場合は作成できませんでした。
ネットワーク、メンバー作成中に実行
> python create_node.py Traceback (most recent call last): File "main.py", line 43, in <module> 'AvailabilityZone': 'us-east-1a' File "/Users/xxx/.local/share/virtualenvs/managed-blockchain-use-sdk-ijMKrYxz/lib/python3.7/site-packages/botocore/client.py", line 357, in _api_call return self._make_api_call(operation_name, kwargs) File "/Users/xxx/.local/share/virtualenvs/managed-blockchain-use-sdk-ijMKrYxz/lib/python3.7/site-packages/botocore/client.py", line 661, in _make_api_call raise error_class(parsed_response, operation_name) botocore.errorfactory.ResourceNotReadyException: An error occurred (ResourceNotReadyException) when calling the CreateNode operation: Member m-XXXXXXXXXXXXXXXXXXXXXXXXXX is in CREATING. you cannot create nodes at this time..
メンバー情報の取得
list_members でメンバーが取得できます。NetworkId が必須となります。
list_members.py
import boto3 client = boto3.client("managedblockchain") def list_members(): members = client.list_members( NetworkId="n-XXXXXXXXXXXXXXXXXXXXXXXXXX" # Name="string", # Status="CREATING"|"AVAILABLE"|"CREATE_FAILED"|"DELETING"|"DELETED", # IsOwned=True|False, # MaxResults=123, # NextToken="string" ) print(members["Members"]) list_members()
> pyhton list_members.py [{'Id': 'm-XXXXXXXXXXXXXXXXXXXXXXXXXX', 'Name': 'demo', 'Description': 'demo member', 'Status': 'AVAILABLE', 'CreationDate': datetime.datetime(2019, 5, 21, 3, 24, 32, 271000, tzinfo=tzutc()), 'IsOwned': True}]
ノード情報の取得
list_nodes でノードが取得できます。NetworkId 、MemberId が必須となります。
list_nodes.py
import boto3 client = boto3.client("managedblockchain") def list_nodes(): nodes = client.list_nodes( NetworkId="n-XXXXXXXXXXXXXXXXXXXXXXXXXX", MemberId="m-XXXXXXXXXXXXXXXXXXXXXXXXXX" # Status="CREATING"|"AVAILABLE"|"CREATE_FAILED"|"DELETING"|"DELETED"|"FAILED", # MaxResults=123, # NextToken="string" ) print(nodes["Nodes"]) list_nodes()
> pyhton list_nodes.py [{'Id': 'nd-XXXXXXXXXXXXXXXXXXXXXXXXXX', 'Status': 'AVAILABLE', 'CreationDate': datetime.datetime(2019, 5, 21, 4, 4, 44, 468000, tzinfo=tzutc()), 'AvailabilityZone': 'us-east-1a', 'InstanceType': 'bc.t3.small'}]
特にハマることもなくboto3を利用してネットワーク、メンバー、ノードを作成するこ���ができました。 これで、AWS CloudFormationのカスタムリソースを利用してリソース管理することができそうです。 ただ、ネットワークとメンバー作成に20分程度かかるので、その��受処理などがAWS CloudFormationで実現できるのか、ちょっと心配です。(未調査)
参考
カスタムリソース – AWS CloudFormation https://docs.aws.amazon.com/ja_jp/AWSCloudFormation/latest/UserGuide/template-custom-resources.html
CloudFormationで提供されていない処理をカスタムリソースで作ってみた。 | DevelopersIO https://dev.classmethod.jp/cloud/aws/cfn-api-custom/
AWS CloudFormationでCognitoユーザープールをMFAのTOTPを有効にして作成する – Qiita https://cloudpack.media/44573
boto/boto3: AWS SDK for Python https://github.com/boto/boto3
ManagedBlockchain — Boto 3 Docs 1.9.152 documentation https://boto3.amazonaws.com/v1/documentation/api/latest/reference/services/managedblockchain.html
Amazon Managed BlockchainがリリースされたのでHyperledger Fabricも合わせて情報をまとめてみた – Qiita https://cloudpack.media/46950
Amazon Managed BlockchainでHyperledger Fabricのブロックチェーンネットワークを構築してみた – Qiita https://cloudpack.media/46963
Pipenvを使ったPython開発まとめ – Qiita https://qiita.com/y-tsutsu/items/54c10e0b2c6b565c887a
Amazon Managed BlockchainでHyperledger Fabricのブロックチェーンネットワークを構築してみた – Qiita https://cloudpack.media/46963
元記事はこちら
「AWS SDK for Python(boto3)でAmazon Managed Blockchainのブロックチェーンネットワークを作成してみた」
June 05, 2019 at 12:00PM
0 notes
Photo

Amazon Managed BlockchainでHyperledger Fabricのブロックチェーンネットワークを構築してみた http://bit.ly/2WWjRCF
Amazon Managed Blockchainが2019/05/01にリリースされたのでさっそくお試ししてみました。
Amazon Managed BlockchainやHyperledger Fabricってなんぞ?という方は下記に情報をまとめていますので、ご参考ください。
Amazon Managed BlockchainがリリースされたのでHyperledger Fabricも合わせて情報をまとめてみた – Qiita https://cloudpack.media/46950
はじめに
基本的には公式のチュートリアルに沿えばブロックチェーンネットワークを構築して利用することが確認できます。 日本語訳がまだありませんが、Google翻訳さんでなんとかなります。
Get Started Creating a Hyperledger Fabric Blockchain Network Using Amazon Managed Blockchain – Amazon Managed Blockchain https://docs.aws.amazon.com/managed-blockchain/latest/managementguide/managed-blockchain-get-started-tutorial.html
ドキュメントの変更履歴を確認すると2019/04/08更新までとなっており、Preview時点の情報のままとなっている箇所があり所々でハマります。(2019/05/07時点) そのへんも含めて手順をまとめました。
Document History for Amazon Managed Blockchain Management Guide – Amazon Managed Blockchain https://docs.aws.amazon.com/managed-blockchain/latest/managementguide/managed-blockchain-management-guide-doc-history.html
前提
AWSアカウントがある
AWSアカウントに以下の作成権限がある
インターフェイスVPCエンドポイント
セキュリティグループ
Managed Blockchainネットワーク
EC2インスタンス
AWS CLIがインストールされている
aws configure コマンドでアカウント設定済み
詳細な前提条件については下記が参考になります。
Prerequisites and Considerations – Amazon Managed Blockchain https://docs.aws.amazon.com/managed-blockchain/latest/managementguide/get-started-prerequisites.html
ネットワーク構成
これから作成するブロックチェーンネットワークの構成を確認してきます。 こちらのドキュメントにある図がわかりやすかったです。
Key Concepts: Managed Blockchain Networks, Members, and Peer Nodes – Amazon Managed Blockchain https://docs.aws.amazon.com/managed-blockchain/latest/managementguide/network-components.html

IBMさんのドキュメントにある図と合わせてみるとよりわかりやすいです。 Hyperledger Fabricでいう会社・組織 がAmazon Managed Blockchainではメンバーと呼ばれています。
Hyperledger Fabric 入門, 第 1 回: 基本的な構成 https://www.ibm.com/developerworks/jp/cloud/library/cl-hyperledger-fabric-basic-1/index.html

構築手順
チュートリアルにはAWSマネジメントコンソールとAWS CLIを利用した2パターンの手順が用意されています。 AWSマネジメントコンソールではできない作業があるため、今回はターミナル上で作業が完結するようにし���した。
AWS CLIをインストール or アップデートする
AWS CLIでAmazon Managed Blockchain関連のコマンドが実行できるように、AWS CLIをインストールもしくはアップデートします。pip コマンド実行はグローバルか(venvなどを利用して)仮想環境下で行うかはお好みで。 インストール or アップデート後、aws managedblockchain help コマンドが実行できたら完了です。
# インストール > pip install awscli # アップデート > pip install --upgrade awscli Successfully installed awscli-1.16.153 botocore-1.12.143 s3transfer-0.2.0 You are using pip version 19.0.3, however version 19.1.1 is available. > aws --version aws-cli/1.16.153 Python/3.6.6 Darwin/18.5.0 botocore/1.12.143 > aws managedblockchain help MANAGEDBLOCKCHAIN() MANAGEDBLOCKCHAIN() NAME managedblockchain - DESCRIPTION AVAILABLE COMMANDS o create-member (略)
初回インストールもしくはアカウントを設定していない場合は、aws configure コマンドで利用するアカウントを設定してください。
> aws configure
詳しくはGitHubリポジトリをご参考ください。
aws/aws-cli: Universal Command Line Interface for Amazon Web Services https://github.com/aws/aws-cli
リージョンとAWSアカウントの指定
現在、バージニア北部リージョンのみで提供されているためus-east-1 を指定する必要があります。(2019/05/07時点) .aws/credentials ファイルの[default] 以外でアクセスする場合はaws コマンドで--profile を指定してください。 .aws/credentials ファイルでregion を指定していない場合は、コマンドで--region を指定してください。
ネットワークとメンバーを作成する
aws managedblockchain create-network コマンドを利用して、ブロックチェーンネットワークとメンバーを作成します。
注意点
ブロックチェーンフレームワークの選択
ブロックチェーンフレームワークは現在、Hyperledger Fabricのみ選択可能で、バージョンはv1.2となります。Hyperledger Fabricの最新バージョンはv1.4 (厳密にはv1.4.1 )となります。(2019/05/07時点)
What’s new in v1.4 — hyperledger-fabricdocs master documentation https://hyperledger-fabric.readthedocs.io/en/release-1.4/whatsnew.html
メンバーの作成
ネットワーク作成時に最初のメンバーを--member-configuration オプションで一緒に作成する必要があります。
管理者ユーザー情報の指定
CAを作成するため、管理者ユーザーの名前とパスワードを指定する必要があります。パスワードは8文字以上で、少なくとも1つの数字と1つの大文字を含める必要があります。
チュートリアルのコマンドサンプルに間違いあり
チュートリアルにあるコマンドサンプルには以下の間違いがあったのでご注意ください。(2019/05/07時点)
--network-configuration オプションは存在しない。(多分Preview時代の名残^^)
パラメータ値をJSON指定する場合、シングルクォーテーション' 括りの内ではバックスラッシュ\ はいらない
コマンドの実行
コマンドの以下オプションは任意で指定ください。そのままでも実行できます。
--name: ネットワーク名
--description: ネットワークの説明
--framework-configuration
Fabric.Edition: ネットワークの規模(STARTER or STANDARD )
Editionによりメンバー数や料金設定が異なります
参考) https://aws.amazon.com/jp/managed-blockchain/pricing/
--voting-policy
ApprovalThresholdPolicy: 提案の承認条件
参考) https://docs.aws.amazon.com/managed-blockchain/latest/managementguide/managed-blockchain-proposals.html
--member-configuration
Name: メンバー名
Description: メンバーの説明
FrameworkConfiguration.Fabric
AdminUsername: CA管理者ユーザー名
AdminPassword: CA管理者ユーザーのパスワード
コマンド実行を実行して成功するとネットワークとメンバー作成が開始されて、NetworkId とMemberId がレスポンスとして得られます。
> aws managedblockchain create-network \ --name TestNetwork \ --description TestNetworkDescription \ --framework HYPERLEDGER_FABRIC \ --framework-version 1.2 \ --framework-configuration '{"Fabric": {"Edition": "STARTER"}}' \ --voting-policy ' { "ApprovalThresholdPolicy": { "ThresholdPercentage": 50, "ProposalDurationInHours": 24, "ThresholdComparator": "GREATER_THAN" } }' \ --member-configuration ' { "Name": "org1", "Description": "Org1 first member of network", "FrameworkConfiguration": { "Fabric": { "AdminUsername": "AdminUser", "AdminPassword": "Password123" } } }' { "NetworkId": "n-XXXXXXXXXXXXXXXXXXXXXXXXXX", "MemberId": "m-XXXXXXXXXXXXXXXXXXXXXXXXXX" }
AWSマネジメントコンソールでみるとネットワークとメンバーを作成中なのが確認できます。 作成完了までに20分程度かかりました。


以下のコマンドでネットワーク情報が取得できます。 n-XXXXXXXXXXXXXXXXXXXXXXXXXX はaws managedblockchain create-network で得られたNetworkId に置き換えてください。
> aws managedblockchain get-network \ --network-id n-XXXXXXXXXXXXXXXXXXXXXXXXXX { "Network": { "Id": "n-XXXXXXXXXXXXXXXXXXXXXXXXXX", "Name": "TestNetwork", "Description": "TestNetworkDescription", "Framework": "HYPERLEDGER_FABRIC", "FrameworkVersion": "1.2", "FrameworkAttributes": { "Fabric": { "OrderingServiceEndpoint": "orderer.n-xxxxxxxxxxxxxxxxxxxxxxxxxx.managedblockchain.us-east-1.amazonaws.com:30001", "Edition": "STARTER" } }, "VpcEndpointServiceName": "com.amazonaws.us-east-1.managedblockchain.n-xxxxxxxxxxxxxxxxxxxxxxxxxx", "VotingPolicy": { "ApprovalThresholdPolicy": { "ThresholdPercentage": 50, "ProposalDurationInHours": 24, "ThresholdComparator": "GREATER_THAN" } }, "Status": "AVAILABLE", "CreationDate": "2019-05-07T06:30:04.975Z" } }
セキュリティグループを作成する
Amazon Managed Blockchainで利用するセキュリティグループを作成します。
セキュリティグループの設定内容は下記に詳しくあります。
Configuring Security Groups – Amazon Managed Blockchain https://docs.aws.amazon.com/managed-blockchain/latest/managementguide/managed-blockchain-security-sgs.html
【注意】参考にしているのはチュートリアルなので、最低限必要となるルール設定になります。
aws ec2 describe-vpcs コマンドでVPCのVpcId を取得します。 VPCが複数ある場合、専用のVPCを作成したい場合は任意で選択・作成してください。ここでは最初から存在するVPCを利用します。
> aws ec2 describe-vpcs \ --query "Vpcs" [ { "CidrBlock": "xxx.xxx.0.0/16", "DhcpOptionsId": "dopt-xxxxxxxx", "State": "available", "VpcId": "vpc-xxxxxxxx", "InstanceTenancy": "default", "CidrBlockAssociationSet": [ { "AssociationId": "vpc-cidr-assoc-xxxxxxxx", "CidrBlock": "xxx.xxx.0.0/16", "CidrBlockState": { "State": "associated" } } ], "IsDefault": true } ]
セキュリティグループを作成して、インバウンドにルールを追加します。
追加する設定は以下となります。 Orderer、CA、Peerが利用するポートは固定ではないため(おそらく)、リソース作成時に確認する必要があります。
In/Out Type Source Inbound SSH(Port 22) [自身のグローバルIP]/32 EC2インスタンスへのログイン用 Inbound Custom TCP(Port 30001) 0.0.0.0/0 Ordererへのアクセス用 Inbound Custom TCP(Port 30002) 0.0.0.0/0 CAへのアクセス用 Inbound Custom TCP(Port 30003-30004) 0.0.0.0/0 Peerへのアクセス用
【注意】--cidr はお試し設定となっていますので、必要に応じて見直してください。
# Ordererエンドポイントの取得 > aws managedblockchain get-network \ --network-id n-XXXXXXXXXXXXXXXXXXXXXXXXXX \ --query "Network.FrameworkAttributes.Fabric.OrderingServiceEndpoint" "orderer.n-xxxxxxxxxxxxxxxxxxxxxxxxxx.managedblockchain.us-east-1.amazonaws.com:30001" # CAエンドポイントの取得 > aws managedblockchain get-member \ --network-id n-XXXXXXXXXXXXXXXXXXXXXXXXXX \ --member-id m-XXXXXXXXXXXXXXXXXXXXXXXXXX \ --query "Member.FrameworkAttributes.Fabric.CaEndpoint" "ca.m-xxxxxxxxxxxxxxxxxxxxxxxxxx.n-xxxxxxxxxxxxxxxxxxxxxxxxxx.managedblockchain.us-east-1.amazonaws.com:30002" # セキュリティグループ作成 # --group-nameと--descriptionは任意でどうぞ > aws ec2 create-security-group \ --group-name mb-test \ --description "Managed Blockchain Test" \ --vpc-id vpc-xxxxxxxx { "GroupId": "sg-xxxxxxxxxxxxxxxxx" } # セキュリティグループにインバウンド設定追加 # SSH > aws ec2 authorize-security-group-ingress \ --group-id sg-xxxxxxxxxxxxxxxxx \ --protocol tcp \ --port 22 \ --cidr [自身のグローバルIP]/32 # Ordererエンドポイント > aws ec2 authorize-security-group-ingress \ --group-id sg-xxxxxxxxxxxxxxxxx \ --protocol tcp \ --port 30001 \ --cidr 0.0.0.0/0 # CAエンドポイント > aws ec2 authorize-security-group-ingress \ --group-id sg-xxxxxxxxxxxxxxxxx \ --protocol tcp \ --port 30002 \ --cidr 0.0.0.0/0
インターフェイスVPCエンドポイントを作成・設定する
Hyperledger Fabricクライアントとして利用するEC2インスタンスが、Hyperledger Fabricエンド��イントへアクセスできるようにaws ec2 create-vpc-endpoint コマンドでインターフェイスVPCエンドポイント(AWS PrivateLink)を作成します。
コマンドの詳細は下記が参考になります。
create-vpc-endpoint — AWS CLI 1.16.154 Command Reference https://docs.aws.amazon.com/cli/latest/reference/ec2/create-vpc-endpoint.html
指定するパラメータ
--security-group-ids には、さきほど作成したセキュリティグループのIDを指定します。 --subnet-ids もエンドポイントを利用するのに必須となるので、以下コマンドでサブネット情報を取得して利用するサブネットのID(SubnetId )を指定します。
aws ec2 describe-subnets \ --query "Subnets" [ { "AvailabilityZone": "us-west-1a", "AvailableIpAddressCount": 4091, "CidrBlock": "xxx.xxx.xxx.0/20", "DefaultForAz": true, "MapPublicIpOnLaunch": true, "State": "available", "SubnetId": "subnet-xxxxxxxx", "VpcId": "vpc-xxxxxxxx", "AssignIpv6AddressOnCreation": false, "Ipv6CidrBlockAssociationSet": [] }, (略) ]
--service-name に指定するVPCエンドポイントは以下コマンドで取得します。
> aws managedblockchain get-network \ --network-id n-XXXXXXXXXXXXXXXXXXXXXXXXXX \ --query "Network.VpcEndpointServiceName" "com.amazonaws.us-east-1.managedblockchain.n-xxxxxxxxxxxxxxxxxxxxxxxxxx"
インターフェイスVPCエンドポイントはプライベートDNS名を有効にする必要があるので、--private-dns-enabled オプションを利用します。--private-dns-enabled を指定するには--vpc-endpoint-type でエンドポイントタイプをInterface にする必要があります。
コマンドの実行
> aws ec2 create-vpc-endpoint \ --vpc-id vpc-xxxxxxxx \ --security-group-ids sg-xxxxxxxxxxxxxxxxx \ --subnet-ids subnet-xxxxxxxx \ --service-name com.amazonaws.us-east-1.managedblockchain.n-xxxxxxxxxxxxxxxxxxxxxxxxxx \ --vpc-endpoint-type Interface \ --private-dns-enabled { "VpcEndpoint": { "VpcEndpointId": "vpce-xxxxxxxxxxxxxxxxx", "VpcEndpointType": "Interface", "VpcId": "vpc-xxxxxxxx", "ServiceName": "com.amazonaws.us-east-1.managedblockchain.n-xxxxxxxxxxxxxxxxxxxxxxxxxx", "State": "pending", "RouteTableIds": [], "SubnetIds": [ "subnet-xxxxxxxx" ], "Groups": [ { "GroupId": "sg-xxxxxxxxxxxxxxxxx", "GroupName": "mb-test" } ], "PrivateDnsEnabled": true, "NetworkInterfaceIds": [ "eni-xxxxxxxxxxxxxxxxx" ], "DnsEntries": [ (略) ], "CreationTimestamp": "2019-05-07T08:57:17.000Z" } }
インターフェイスVPCエンドポイントの作成には少し時間がかかるので、以下コマンドでステータスを確認します。State がpending からavailable に変わればOKです。 VPCエンドポイントが複数ある場合は、--query オプションを指定せずにコマンドを実行して確認してください。
> aws ec2 describe-vpc-endpoints \ --vpc-endpoint-ids vpce-xxxxxxxxxxxxxxxxx \ --query "VpcEndpoints[0].State" "available"
ここまでで、Hyperledger Fabricネットワークで必要となるOrderer、CAが作成できました。 続けて、Hyperledger Fabric Clientをセットアップして、Peerノードを追加します。
Hyperledger Fabric Clientのセットアップ
EC2インスタンスを起動する
EC2インスタンスを起動してHyperledger Fabric Clientをセットアップします。
EC2インスタンスの起動手順は下記を参考にしました。
チュートリアル: AWS Command Line Interface を使用して Amazon EC2 開発環境をデプロイする – AWS Command Line Interface https://docs.aws.amazon.com/ja_jp/cli/latest/userguide/cli-chap-tutorial.html#tutorial-launch-and-connect
AMIはAmazon Linux2(ami-0de53d8956e8dcf80)にしています。 --security-group-ids には、さきほど作成したセキュリティグループのIDを指定します。 --subnet-id には、インターフェイスVPCエンドポイントと同じサブネットのIDを指定します。
# キーペア作成 > cd 任意のディレクトリ > aws ec2 create-key-pair \ --key-name mb-test-ec2-key \ --query "KeyMaterial" \ --output text > mb-test-ec2-key.pem > chmod 400 mb-test-ec2-key.pem # EC2インスタンス起動 > aws ec2 run-instances \ --image-id ami-0de53d8956e8dcf80 \ --security-group-ids sg-xxxxxxxxxxxxxxxxx \ --subnet-id subnet-xxxxxxxx \ --count 1 \ --instance-type t2.micro \ --key-name mb-test-ec2-key \ --query "Instances[0].InstanceId" "i-xxxxxxxxxxxxxxxxx" # インスタンスのパブリックIPアドレスを取得 # --instance-idsを作成したインスタンスのIDに置き換える > aws ec2 describe-instances \ --instance-ids i-xxxxxxxxxxxxxxxxx \ --query "Reservations[0].Instances[0].PublicIpAddress" "xxx.xxx.xxx.xxx" # SSHでEC2インスタンスにログイン # xxx.xxx.xxx.xxxは取得したインスタンスのパブリックIPアドレスに置き換える > ssh -i mb-test-ec2-key.pem [email protected] __| __|_ ) _| ( / Amazon Linux 2 AMI ___|\___|___| https://aws.amazon.com/amazon-linux-2/ 1 package(s) needed for security, out of 3 available Run "sudo yum update" to apply all updates. [ec2-user@ip-xxx-xxx-xxx-xxx ~]$
EC2インスタンスに必要なパッケージをインストールする
EC2インスタンスにDockerやGO言語など必要となるパッケージをインストールします。
EC2インスタンス
$ sudo yum update -y $ sudo yum install -y telnet $ sudo yum -y install emacs $ sudo yum install -y docker $ sudo service docker start $ sudo usermod -a -G docker ec2-user $ exit
usermodを有効化するのにいったんログアウトします。再ログイン後、Docker Compose、GO言語をインストールします。 インストールするパッケージはチュートリアルのままですが、今回はtelnet とemacs は利用しないのでインストールしなくてもOKです。(中の人はemacs推しなんですかねw)
# SSHでEC2インスタンスにログイン # xxx.xxx.xxx.xxxは取得したインスタンスのパブリックIPアドレスに置き換える > ssh -i mb-test-ec2-key.pem [email protected]
EC2インスタンス
# Docker Composeのインストール $ sudo curl -L \ https://github.com/docker/compose/releases/download/1.20.0/docker-compose-`uname \ -s`-`uname -m` -o /usr/local/bin/docker-compose $ sudo chmod a+x /usr/local/bin/docker-compose $ sudo yum install libtool -y # GO言語のインストール $ wget https://dl.google.com/go/go1.10.3.linux-amd64.tar.gz $ tar -xzf go1.10.3.linux-amd64.tar.gz $ sudo mv go /usr/local $ sudo yum install libtool-ltdl-devel -y $ sudo yum install git -y # 環境変数の設定 $ cat >> ~/.bash_profile << "EOF" # GOROOT is the location where Go package is installed on your system export GOROOT=/usr/local/go # GOPATH is the location of your work directory export GOPATH=$HOME/go # Update PATH so that you can access the go binary system wide export PATH=$GOROOT/bin:$PATH export PATH=$PATH:/home/ec2-user/go/src/github.com/hyperledger/fabric-ca/bin EOF # 環境変数の読み込み $ source ~/.bash_profile
必要となるパッケージがインストールできたかを確認します。
EC2インスタンス
$ docker --version Docker version 18.06.1-ce, build e68fc7a215d7133c34aa18e3b72b4a21fd0c6136 $ docker-compose --version docker-compose version 1.20.0, build ca8d3c6 $ go version go version go1.10.3 linux/amd64
AWS CLIのアップデートと初期設定
アップデート
Amazon Linux2(ami-0de53d8956e8dcf80 )のyum でインストールできるAWS CLIのバージョンが古いため、pip を利用して最新のバージョンにします。(2019/05/07時点)
以下が参考になりました。
Linux に AWS CLI をインストールする – AWS Command Line Interface https://docs.aws.amazon.com/ja_jp/cli/latest/userguide/install-linux.html
Amazon Linux に AWS CLI をインストールする – AWS Command Line Interface https://docs.aws.amazon.com/ja_jp/cli/latest/userguide/install-linux-al2017.html
EC2インスタンス
# pipのインストール $ curl -O https://bootstrap.pypa.io/get-pip.py $ python get-pip.py --user $ pip --version pip 19.1.1 from /home/ec2-user/.local/lib/python2.7/site-packages/pip (python 2.7) $ pip install --upgrade --user awscli Successfully installed awscli-1.16.153 botocore-1.12.143 s3transfer-0.2.0 # パスがとおるように環境変数を設定 $ cat >> ~/.bash_profile << "EOF" export PATH=/home/ec2-user/.local/bin:$PATH EOF # 環境変数の読み込み $ source ~/.bash_profile aws --version aws-cli/1.16.153 Python/2.7.14 Linux/4.14.104-95.84.amzn2.x86_64 botocore/1.12.143 $ aws managedblockchain help MANAGEDBLOCKCHAIN() MANAGEDBLOCKCHAIN() NAME managedblockchain - DESCRIPTION (略)
設定
AWS CLIの初期設定を行います。リージョンにus-east-1 を指定しておきます。
EC2インスタンス
$ aws configure
Hyperledger Fabric CAエンドポイントへの接続確認
作成済みのインターフェイスVPCエンドポイントを利用して、Hyperledger Fabric CAエンドポイントに接続できるか確認します。
EC2インスタンス
# CAエンドポイントの取得 $ aws managedblockchain get-member \ --network-id n-XXXXXXXXXXXXXXXXXXXXXXXXXX \ --member-id m-XXXXXXXXXXXXXXXXXXXXXXXXXX \ --query "Member.FrameworkAttributes.Fabric.CaEndpoint" "ca.m-xxxxxxxxxxxxxxxxxxxxxxxxxx.n-xxxxxxxxxxxxxxxxxxxxxxxxxx.managedblockchain.us-east-1.amazonaws.com:30002" # 接続確認 # https://[CaEndpoint]/cainfo にアクセスして接続を確認する $ curl https://ca.m-xxxxxxxxxxxxxxxxxxxxxxxxxx.n-xxxxxxxxxxxxxxxxxxxxxxxxxx.managedblockchain.us-east-1.amazonaws.com:30002/cainfo -k {"result":{"CAName":"m-XXXXXXXXXXXXXXXXXXXXXXXXXX","CAChain":"(略)","Version":"1.2.1-snapshot-"}
Hyperledger Fabric CAクライアントを構成する
CAへアクセスするためのクライアントを構成します。
EC2インスタンス
$ go get -u github.com/hyperledger/fabric-ca/cmd/... $ cd /home/ec2-user/go/src/github.com/hyperledger/fabric-ca $ git fetch $ git checkout release-1.2 Branch 'release-1.2' set up to track remote branch 'release-1.2' from 'origin'. Switched to a new branch 'release-1.2' $ make fabric-ca-client Building fabric-ca-client in bin directory ... Built bin/fabric-ca-client
チュートリアルで必要となるサンプルリポジトリを取得します。
EC2インスタンス
$ cd /home/ec2-user $ git clone https://github.com/hyperledger/fabric-samples.git
Hyperledger Fabric CLI用のDockerコンテナを起動する
PeerノードなどにアクセスするためのDockerコンテナを起動します。yamlファイルの内容はそのままでOKです。
EC2インスタンス
$ cd ~/ $ cat >> ~/docker-compose-cli.yaml << "EOF" version: '2' services: cli: container_name: cli image: hyperledger/fabric-tools:1.2.0 tty: true environment: - GOPATH=/opt/gopath - CORE_VM_ENDPOINT=unix:///host/var/run/docker.sock - CORE_LOGGING_LEVEL=info - CORE_PEER_ID=cli - CORE_CHAINCODE_KEEPALIVE=10 working_dir: /opt/gopath/src/github.com/hyperledger/fabric/peer command: /bin/bash volumes: - /var/run/:/host/var/run/ - /home/ec2-user/fabric-samples/chaincode:/opt/gopath/src/github.com/ - /home/ec2-user:/opt/home EOF # Dockerコンテナの起動 $ docker-compose -f ~/docker-compose-cli.yaml up -d Creating network "ec2user_default" with the default driver Pulling cli (hyperledger/fabric-tools:1.2.0)... (略) Status: Downloaded newer image for hyperledger/fabric-tools:1.2.0 Creating cli ... done # Dockerサービスが起動していなくてコンテナが立ち上がらなかったら $ sudo service docker start
Hyperledger Fabricのネットワークを設定する
Peerノード追加やアクセスするのに必要となる設定をします。
メンバー管理者をCAに登録する
証明書ファイルを用意する
EC2インスタンス
$ aws s3 cp s3://us-east-1.managedblockchain/etc/managedblockchain-tls-chain.pem /home/ec2-user/managedblockchain-tls-chain.pem # ファイルが正しいかチェック # 証明書情報が表示されたらOK $ openssl x509 -noout -text \ -in /home/ec2-user/managedblockchain-tls-chain.pem Certificate: (略)
メンバー管理者をCAに登録する
fabric-ca-client enroll コマンドでCAエンドポイントに対して管理者ユーザーと証明書ファイルを指定してメンバー管理者をCAに登録します。 -u オプションのAdminUsername とAdminPassword、CAEndpointAndPort を置き換えてください。
EC2インスタンス
# CAエンドポイントの取得 $ aws managedblockchain get-member \ --network-id n-XXXXXXXXXXXXXXXXXXXXXXXXXX \ --member-id m-XXXXXXXXXXXXXXXXXXXXXXXXXX \ --query "Member.FrameworkAttributes.Fabric.CaEndpoint" "ca.m-xxxxxxxxxxxxxxxxxxxxxxxxxx.n-xxxxxxxxxxxxxxxxxxxxxxxxxx.managedblockchain.us-east-1.amazonaws.com:30002" # AdminUsername、AdminPassword、CAEndpointAndPortを置き換えて実行 $ fabric-ca-client enroll \ -u https://AdminUsername:AdminPassword@CAEndpointAndPort \ --tls.certfiles /home/ec2-user/managedblockchain-tls-chain.pem \ -M /home/ec2-user/admin-msp 2019/05/07 09:57:50 [INFO] Created a default configuration file at /home/ec2-user/.fabric-ca-client/fabric-ca-client-config.yaml 2019/05/07 09:57:50 [INFO] TLS Enabled 2019/05/07 09:57:50 [INFO] generating key: &{A:ecdsa S:256} 2019/05/07 09:57:50 [INFO] encoded CSR 2019/05/07 09:57:51 [INFO] Stored client certificate at /home/ec2-user/admin-msp/signcerts/cert.pem 2019/05/07 09:57:51 [INFO] Stored root CA certificate at /home/ec2-user/admin-msp/cacerts/ca-m-xxxxxxxxxxxxxxxxxxxxxxxxxx-n-xxxxxxxxxxxxxxxxxxxxxxxxxx-managedblockchain-us-east-1-amazonaws-com-30002.pem
fabric-ca-client enroll コマンドが実行できたら、証明書ファイルをコピーします。
EC2インスタンス
$ cp -r admin-msp/signcerts admin-msp/admincerts
これで、Membership Service Provider(MSP)として機能するようになります。 MSPはネットワーク内で証明書の発行や検証、ユーザ認証などを行います。MSPに関する詳細は下記が詳しいです。
Hyperledger Fabric 入門, 第 4 回: Membership Service Provider https://www.ibm.com/developerworks/jp/cloud/library/cl-hyperledger-fabric-basic-4/index.html?ca=drs-
Hyperledger FabricのMSPについて – Qiita https://qiita.com/Ruly714/items/bdd76cf73195e62228e9
Peerノードを作成する
Hyperledger Fabricのネットワークを構築するのに欠かせないPeerノードを作成します。 ざっくりいうとPeerにはトランザクションを検証して署名する(Endorsement Peer)、自身の台帳に書き込む(Committing Peer)2つの役割があります。Peerの役割については下記が詳しいです。
Hyperledger Fabric 入門, 第 2 回: Peer/チャネル/Endorsement Policy の解説 https://www.ibm.com/developerworks/jp/cloud/library/cl-hyperledger-fabric-basic-2/index.html
Peerノード作成時に利用するインスタンスタイプを指定する必要があります。 Amazon Managed Blockchainで利用できるインスタンスタイプについては下記が参考になります。
Amazon Managed Blockchain Instance Types https://aws.amazon.com/jp/managed-blockchain/instance-types/
EC2インスタンス
# Peerノードの作成 $ aws managedblockchain create-node \ --network-id n-XXXXXXXXXXXXXXXXXXXXXXXXXX \ --member-id m-XXXXXXXXXXXXXXXXXXXXXXXXXX \ --node-configuration InstanceType=bc.t3.small,AvailabilityZone=us-east-1a { "NodeId": "nd-XXXXXXXXXXXXXXXXXXXXXXXXXX" } # Peerノードの情報取得 $ aws managedblockchain get-node \ --network-id n-XXXXXXXXXXXXXXXXXXXXXXXXXX \ --member-id m-XXXXXXXXXXXXXXXXXXXXXXXXXX \ --node-id nd-XXXXXXXXXXXXXXXXXXXXXXXXXX { "Node": { "NetworkId": "n-XXXXXXXXXXXXXXXXXXXXXXXXXX", "Status": "AVAILABLE", "AvailabilityZone": "us-east-1a", "FrameworkAttributes": { "Fabric": { "PeerEndpoint": "nd-xxxxxxxxxxxxxxxxxxxxxxxxxx.m-xxxxxxxxxxxxxxxxxxxxxxxxxx.n-xxxxxxxxxxxxxxxxxxxxxxxxxx.managedblockchain.us-east-1.amazonaws.com:30003", "PeerEventEndpoint": "nd-xxxxxxxxxxxxxxxxxxxxxxxxxx.m-xxxxxxxxxxxxxxxxxxxxxxxxxx.n-xxxxxxxxxxxxxxxxxxxxxxxxxx.managedblockchain.us-east-1.amazonaws.com:30004" } }, "MemberId": "m-XXXXXXXXXXXXXXXXXXXXXXXXXX", "Id": "nd-XXXXXXXXXXXXXXXXXXXXXXXXXX", "CreationDate": "2019-05-08T02:57:12.168Z", "InstanceType": "bc.t3.small" } }
Status がAVAILABLE になったら作成完了です。
Peerノードへアクセスできるようにセキュリティグループに設定を追加します。 --cidr はお試し設定となっていますので、各自見直してください。
EC2インスタンス
$ aws ec2 authorize-security-group-ingress \ --group-id sg-xxxxxxxxxxxxxxxxx \ --protocol tcp \ --port 30003-30004 \ --cidr 0.0.0.0/0
チャネルを作成する
Hyperledger FabricではPeerが持つ台帳を共有する範囲をチャネルという機能で制御しています。チャネルはブロックチェーンネットワーク内に作られた仮想ネットワークで、特定の参加者間だけで台帳が共有できます。詳しくは下記が参考になります。
Hyperledger Fabric 入門, 第 2 回: Peer/チャネル/Endorsement Policy の解説 https://www.ibm.com/developerworks/jp/cloud/library/cl-hyperledger-fabric-basic-2/index.html
チャネル構成を定義する
チャネル構成はconfigtx というトランザクションで管理されます。 トランザクションを作成するのにconfigtx.yaml を用意します。MemberID は自身のものに書き換えてください。 MSPDir のパスが/opt/home/admin-msp となっていますが、Dockerコンテナ内のパスなのでそのままでOKです。
EC2インスタンス
# MemberIDを書き換える $ cat >> ~/configtx.yaml << "EOF" Organizations: - &Org1 Name: MemberID ID: MemberID MSPDir: /opt/home/admin-msp AnchorPeers: - Host: Port: Application: &ApplicationDefaults Organizations: Profiles: OneOrgChannel: Consortium: AWSSystemConsortium Application: <<: *ApplicationDefaults Organizations: - *Org1 EOF
cli configtxgen コマンドを実行してconfigtx.yaml ファイルからconfigtx ピアブロックを作成します。パスが/opt/home/ となっていますが、Dockerコンテナ内のパスになります。
EC2インスタンス
$ docker exec cli configtxgen \ -outputCreateChannelTx /opt/home/mychannel.pb \ -profile OneOrgChannel \ -channelID mychannel \ --configPath /opt/home/ 2019-05-08 03:09:39.954 UTC [common/tools/configtxgen] main -> INFO 001 Loading configuration 2019-05-08 03:09:39.960 UTC [common/tools/configtxgen] doOutputChannelCreateTx -> INFO 002 Generating new channel configtx 2019-05-08 03:09:39.960 UTC [common/tools/configtxgen/encoder] NewApplicationGroup -> WARN 003 Default policy emission is deprecated, please include policy specificiations for the application group in configtx.yaml 2019-05-08 03:09:39.962 UTC [common/tools/configtxgen/encoder] NewApplicationOrgGroup -> WARN 004 Default policy emission is deprecated, please include policy specificiations for the application org group m-XXXXXXXXXXXXXXXXXXXXXXXXXX in configtx.yaml 2019-05-08 03:09:39.964 UTC [common/tools/configtxgen] doOutputChannelCreateTx -> INFO 005 Writing new channel tx
ログにWARN が出力されますが、エラーではないのでスルーでOKです。 WARN の内容はデフォルトのポリシー発行は非推奨です。configtx.yamlにアプリケーショングループのポリシー仕様を含めてください。 (Google翻訳) だそうです。
チャネルを作成する
チャネルを作成する前に環境変数を設定します。MSP、ORDERER、PEER の値は自身の環境のに置き換えてください。
EC2インスタンス
# MSP=MemberID $ aws managedblockchain list-members \ --network-id n-XXXXXXXXXXXXXXXXXXXXXXXXXX \ --query "Members[0].Id" "m-XXXXXXXXXXXXXXXXXXXXXXXXXX" # ORDERER=OrderingServiceEndpoint $ aws managedblockchain get-network \ --network-id n-XXXXXXXXXXXXXXXXXXXXXXXXXX \ --query "Network.FrameworkAttributes.Fabric.OrderingServiceEndpoint" "orderer.n-xxxxxxxxxxxxxxxxxxxxxxxxxx.n.managedblockchain.us-east-1.amazonaws.com:30001" # PEER=PeerNodeEndpoint $ aws managedblockchain get-node \ --network-id n-XXXXXXXXXXXXXXXXXXXXXXXXXX \ --member-id m-XXXXXXXXXXXXXXXXXXXXXXXXXX \ --node-id nd-XXXXXXXXXXXXXXXXXXXXXXXXXX \ --query "Node.FrameworkAttributes.Fabric.PeerEndpoint" "nd-xxxxxxxxxxxxxxxxxxxxxxxxxx.n.m-xxxxxxxxxxxxxxxxxxxxxxxxxx.n.n-xxxxxxxxxxxxxxxxxxxxxxxxxx.n.managedblockchain.us-east-1.amazonaws.com:30003" # 環境変数の設定 # MemberID、OrderingServiceEndpoint、PeerNodeEndpointを↑で取得した値に書き換える $ cat >> ~/.bash_profile << "EOF" export MSP_PATH=/opt/home/admin-msp export MSP=MemberID export ORDERER=OrderingServiceEndpoint export PEER=PeerNodeEndpoint EOF # 環境変数の読み込み $ source ~/.bash_profile
環境変数の設定と読み込みができたらcli peer channel createコマンドを実行してチャネルを作成します。
EC2インスタンス
$ docker exec -e "CORE_PEER_TLS_ENABLED=true" \ -e "CORE_PEER_TLS_ROOTCERT_FILE=/opt/home/managedblockchain-tls-chain.pem" \ -e "CORE_PEER_ADDRESS=$PEER" \ -e "CORE_PEER_LOCALMSPID=$MSP" \ -e "CORE_PEER_MSPCONFIGPATH=$MSP_PATH" \ cli peer channel create -c mychannel \ -f /opt/home/mychannel.pb -o $ORDERER \ --cafile /opt/home/managedblockchain-tls-chain.pem --tls 2019-05-08 03:13:38.298 UTC [channelCmd] InitCmdFactory -> INFO 001 Endorser and orderer connections initialized 2019-05-08 03:13:38.441 UTC [cli/common] readBlock -> INFO 002 Got status: &{NOT_FOUND} 2019-05-08 03:13:38.456 UTC [channelCmd] InitCmdFactory -> INFO 003 Endorser and orderer connections initialized 2019-05-08 03:13:38.658 UTC [cli/common] readBlock -> INFO 004 Got status: &{NOT_FOUND} 2019-05-08 03:13:38.668 UTC [channelCmd] InitCmdFactory -> INFO 005 Endorser and orderer connections initialized 2019-05-08 03:13:38.870 UTC [cli/common] readBlock -> INFO 006 Got status: &{NOT_FOUND} 2019-05-08 03:13:38.881 UTC [channelCmd] InitCmdFactory -> INFO 007 Endorser and orderer connections initialized 2019-05-08 03:13:39.083 UTC [cli/common] readBlock -> INFO 008 Got status: &{NOT_FOUND} 2019-05-08 03:13:39.094 UTC [channelCmd] InitCmdFactory -> INFO 009 Endorser and orderer connections initialized 2019-05-08 03:13:39.296 UTC [cli/common] readBlock -> INFO 00a Got status: &{NOT_FOUND} 2019-05-08 03:13:39.307 UTC [channelCmd] InitCmdFactory -> INFO 00b Endorser and orderer connections initialized 2019-05-08 03:13:39.509 UTC [cli/common] readBlock -> INFO 00c Got status: &{NOT_FOUND} 2019-05-08 03:13:39.520 UTC [channelCmd] InitCmdFactory -> INFO 00d Endorser and orderer connections initialized 2019-05-08 03:13:39.724 UTC [cli/common] readBlock -> INFO 00e Got status: &{NOT_FOUND} 2019-05-08 03:13:39.735 UTC [channelCmd] InitCmdFactory -> INFO 00f Endorser and orderer connections initialized 2019-05-08 03:13:39.937 UTC [cli/common] readBlock -> INFO 010 Got status: &{NOT_FOUND} 2019-05-08 03:13:39.946 UTC [channelCmd] InitCmdFactory -> INFO 011 Endorser and orderer connections initialized 2019-05-08 03:13:40.148 UTC [cli/common] readBlock -> INFO 012 Got status: &{NOT_FOUND} 2019-05-08 03:13:40.159 UTC [channelCmd] InitCmdFactory -> INFO 013 Endorser and orderer connections initialized 2019-05-08 03:13:40.362 UTC [cli/common] readBlock -> INFO 014 Got status: &{NOT_FOUND} 2019-05-08 03:13:40.373 UTC [channelCmd] InitCmdFactory -> INFO 015 Endorser and orderer connections initialized 2019-05-08 03:13:40.575 UTC [cli/common] readBlock -> INFO 016 Got status: &{NOT_FOUND} 2019-05-08 03:13:40.585 UTC [channelCmd] InitCmdFactory -> INFO 017 Endorser and orderer connections initialized 2019-05-08 03:13:40.789 UTC [cli/common] readBlock -> INFO 018 Received block: 0
Got status: &{NOT_FOUND} が気になりますが、気にせずにcli peer channel joinコマンドを実行してチャネルにPeerノードを参加させます。
EC2インスタンス
$ docker exec -e "CORE_PEER_TLS_ENABLED=true" \ -e "CORE_PEER_TLS_ROOTCERT_FILE=/opt/home/managedblockchain-tls-chain.pem" \ -e "CORE_PEER_ADDRESS=$PEER" \ -e "CORE_PEER_LOCALMSPID=$MSP" \ -e "CORE_PEER_MSPCONFIGPATH=$MSP_PATH" \ cli peer channel join -b mychannel.block \ -o $ORDERER \ --cafile /opt/home/managedblockchain-tls-chain.pem --tls 2019-05-08 03:14:32.878 UTC [channelCmd] InitCmdFactory -> INFO 001 Endorser and orderer connections initialized 2019-05-08 03:14:33.141 UTC [channelCmd] executeJoin -> INFO 002 Successfully submitted proposal to join channel
Successfully submitted proposal to join channel とログ出力されたので、チャネル作成とPeerノードの参加ができました。
チェーンコードをインストールして実行する
チェーンコードとはEthereumでいうところのスマートコントラクトになります。チェーンコードはGo、Node.js、Javaのプログラム言語で開発できます。Peerにデプロイして、ブロックチェーンネットワーク上の台帳へ情報書き込み・読み込みする処理が実装できます。詳細は下記が参考になります。
Hyperledger Fabric 入門, 第 5 回: チェーンコードの書き方 https://www.ibm.com/developerworks/jp/cloud/library/cl-hyperledger-fabric-basic-5/index.html
チェーンコードの実装
チュートリアルにあるサンプルを利用します。下記が実装となります。
fabric/chaincode_example02.go at v0.6 · hyperledger/fabric https://github.com/hyperledger/fabric/blob/v0.6/examples/chaincode/go/chaincode_example02/chaincode_example02.go
チェーンコードには4つの関数(init 、invoke 、query 、main )が必要になります。
init
チェーンコードをデプロイ(instantiate )、アップデート(upgrade )する際に呼び出される
サンプルではa とb というキーで数値を保持するように実装されています
invoke
台帳の更新時に呼び出させる
サンプルではパラメータで指定されたとおりに数値を移動する実装がされています
例) a からbへ10 を移動する
query
台帳の参照時に呼び出させ���
サンプルではa またはb の値を取得する実装がされています
台帳へアクセスするときに利用できるAPIが用意されています。(一部)
単一キーの操作
PutState(Key string)
GutState(Key string)
DelState(Key string)
キー範囲照会
GetStateByRange(startKey string, endkey string)
非キー指定による照会
GetQueryResult(query string)
変更履歴の照会
GetHistoryForKey(key string)
こちらの記事も参考になりました。
Hyperledger Fabric のチェーンコードを実装する – Qiita https://qiita.com/kyrieleison/items/9368ed8a5254588c89b6
HyperLedger Fabric v1.1でchaincodeを実行する – Qiita https://qiita.com/yukike/items/f3654bae36e8c68e1f6c
チェーンコードのデプロイ
cli peer chaincode install コマンドでチェーンコードをPeerにインストールします。 -n でチェーンコード名、-v でバージョン、-p で実装のファイルパスを指定します。
EC2インスタンス
$ docker exec -e "CORE_PEER_TLS_ENABLED=true" \ -e "CORE_PEER_TLS_ROOTCERT_FILE=/opt/home/managedblockchain-tls-chain.pem" \ -e "CORE_PEER_LOCALMSPID=$MSP" \ -e "CORE_PEER_MSPCONFIGPATH=$MSP_PATH" \ -e "CORE_PEER_ADDRESS=$PEER" \ cli peer chaincode install \ -n mycc -v v0 -p github.com/chaincode_example02/go 2019-05-08 04:01:55.501 UTC [chaincodeCmd] checkChaincodeCmdParams -> INFO 001 Using default escc 2019-05-08 04:01:55.502 UTC [chaincodeCmd] checkChaincodeCmdParams -> INFO 002 Using default vscc 2019-05-08 04:01:56.031 UTC [chaincodeCmd] install -> INFO 003 Installed remotely response:<status:200 payload:"OK" >
cli peer chaincode instantiate コマンドでチェーンコードをチャネル上で初期化(デプロイ)します。
instantiate 実行時はチェーンコードのInit メソッドが呼び出されます。 -c オプションでチェーンコードへ引き渡すパラメータを指定します。Args の最初にinit を指定していますが、これはチェーンコードのInit メソッドの第1パラメータfunction string として受け取り、2つ目からがargs []string として扱われます。
EC2インスタンス
$ docker exec -e "CORE_PEER_TLS_ENABLED=true" \ -e "CORE_PEER_TLS_ROOTCERT_FILE=/opt/home/managedblockchain-tls-chain.pem" \ -e "CORE_PEER_LOCALMSPID=$MSP" \ -e "CORE_PEER_MSPCONFIGPATH=$MSP_PATH" \ -e "CORE_PEER_ADDRESS=$PEER" \ cli peer chaincode instantiate \ -o $ORDERER -C mychannel \ -n mycc -v v0 \ -c '{"Args":["init","a","100","b","200"]}' \ --cafile /opt/home/managedblockchain-tls-chain.pem --tls 2019-05-08 04:02:37.231 UTC [chaincodeCmd] checkChaincodeCmdParams -> INFO 001 Using default escc 2019-05-08 04:02:37.231 UTC [chaincodeCmd] checkChaincodeCmdParams -> INFO 002 Using default vscc # 数秒応答が返ってこなくなるけどそのまま待つ
チェーンコードがデプロイされたかcli peer chaincode list コマンドで確認できます。
EC2インスタンス
$ docker exec -e "CORE_PEER_TLS_ENABLED=true" \ -e "CORE_PEER_TLS_ROOTCERT_FILE=/opt/home/managedblockchain-tls-chain.pem" \ -e "CORE_PEER_LOCALMSPID=$MSP" \ -e "CORE_PEER_MSPCONFIGPATH=$MSP_PATH" \ -e "CORE_PEER_ADDRESS=$PEER" \ cli peer chaincode list --instantiated \ -o $ORDERER -C mychannel \ --cafile /opt/home/managedblockchain-tls-chain.pem --tls Get instantiated chaincodes on channel mychannel: Name: mycc, Version: v0, Path: github.com/chaincode_example02/go, Escc: escc, Vscc: vscc
チェーンコードの実行
cli peer chaincode query コマンドで台帳の情報が参照できます。 query 実行時はチェーンコードのQuery メソッドが呼び出されます。-c オプションの挙動は初期化(デプロイ)と同様となります。
EC2インスタンス
$ docker exec -e "CORE_PEER_TLS_ENABLED=true" \ -e "CORE_PEER_TLS_ROOTCERT_FILE=/opt/home/managedblockchain-tls-chain.pem" \ -e "CORE_PEER_ADDRESS=$PEER" \ -e "CORE_PEER_LOCALMSPID=$MSP" \ -e "CORE_PEER_MSPCONFIGPATH=$MSP_PATH" \ cli peer chaincode query \ -C mychannel \ -n mycc -c '{"Args":["query","a"]}' 100
cli peer chaincode invokeコマンドで台帳の情報を更新します。 invoke 実行時はチェーンコードのInvoke メソッドが呼び出されます。-c オプションの挙動は初期化(デプロイ)と同様となります。
EC2インスタンス
$ docker exec -e "CORE_PEER_TLS_ENABLED=true" \ -e "CORE_PEER_TLS_ROOTCERT_FILE=/opt/home/managedblockchain-tls-chain.pem" \ -e "CORE_PEER_ADDRESS=$PEER" \ -e "CORE_PEER_LOCALMSPID=$MSP" \ -e "CORE_PEER_MSPCONFIGPATH=$MSP_PATH" \ cli peer chaincode invoke \ -C mychannel \ -n mycc -c '{"Args":["invoke","a","b","10"]}' \ -o $ORDERER \ --cafile /opt/home/managedblockchain-tls-chain.pem --tls 2019-05-08 04:04:47.514 UTC [chaincodeCmd] chaincodeInvokeOrQuery -> INFO 001 Chaincode invoke successful. result: status:200
正常に実行されたのでキーa からb へ数値を10 移動させることができたはずです。 cli peer chaincode query コマンドを実行して確認してみます。
EC2インスタンス
$ docker exec -e "CORE_PEER_TLS_ENABLED=true" \ -e "CORE_PEER_TLS_ROOTCERT_FILE=/opt/home/managedblockchain-tls-chain.pem" \ -e "CORE_PEER_ADDRESS=$PEER" \ -e "CORE_PEER_LOCALMSPID=$MSP" \ -e "CORE_PEER_MSPCONFIGPATH=$MSP_PATH" \ cli peer chaincode query \ -C mychannel \ -n mycc -c '{"Args":["query","a"]}' 90 $ docker exec -e "CORE_PEER_TLS_ENABLED=true" \ -e "CORE_PEER_TLS_ROOTCERT_FILE=/opt/home/managedblockchain-tls-chain.pem" \ -e "CORE_PEER_ADDRESS=$PEER" \ -e "CORE_PEER_LOCALMSPID=$MSP" \ -e "CORE_PEER_MSPCONFIGPATH=$MSP_PATH" \ cli peer chaincode query \ -C mychannel \ -n mycc -c '{"Args":["query","b"]}' 210
やったぜ。
これでAmazon Managed Blockchainを利用してHyperledger Fabricのブロックチェーンネットワークを構築してトランザクション実行するところまでが確認できました。ネットワークに他のメンバーを招待する手順については今回割愛します。
つかってみて
フルマネージドなサービスだけあって、インフラに関してはクライアント用のEC2インスタンスを除き、裏でなにが動作しているのか意識せずにブロックチェーンネットワークが構築できました。
ただ、チャネル作成やチェーンコードのデプロイなどはAWSマネジメントコンソールでは実行できず、Hyperledger Fabricに関する知識がないと利用するのが難しいこともわかりました。
Oracle Cloudのフルマネージドサービスだと、ブラウザ上でチェーンコードの管理まで行うことができるので、より敷居が下がっていて使いやすくなりそうです。今後、Ethereumフレームワークが利用できるようになると考えると、なおのことに。。。ぜひとも追随していただきたいところです。
Oracle Blockchain Cloud Service 触ってみた(Dataspiderとの連携もちょっと紹介) – Qiita https://qiita.com/Yosuke_Sakaue/items/159d86fb5022426d4bce
Azure Blockchain WorkbenchでHello Blockchain! – Qiita https://qiita.com/shingo_kawahara/items/6acceac42ec2701bf336
参考
Amazon Managed BlockchainがリリースされたのでHyperledger Fabricも合わせて情報をまとめてみた – Qiita https://cloudpack.media/46950
Get Started Creating a Hyperledger Fabric Blockchain Network Using Amazon Managed Blockchain – Amazon Managed Blockchain https://docs.aws.amazon.com/managed-blockchain/latest/managementguide/managed-blockchain-get-started-tutorial.html
Document History for Amazon Managed Blockchain Management Guide – Amazon Managed Blockchain https://docs.aws.amazon.com/managed-blockchain/latest/managementguide/managed-blockchain-management-guide-doc-history.html
Prerequisites and Considerations – Amazon Managed Blockchain https://docs.aws.amazon.com/managed-blockchain/latest/managementguide/get-started-prerequisites.html
aws/aws-cli: Universal Command Line Interface for Amazon Web Services https://github.com/aws/aws-cli
What’s new in v1.4 — hyperledger-fabricdocs master documentation https://hyperledger-fabric.readthedocs.io/en/release-1.4/whatsnew.html
Configuring Security Groups – Amazon Managed Blockchain https://docs.aws.amazon.com/managed-blockchain/latest/managementguide/managed-blockchain-security-sgs.html
create-vpc-endpoint — AWS CLI 1.16.154 Command Reference https://docs.aws.amazon.com/cli/latest/reference/ec2/create-vpc-endpoint.html
チュートリアル: AWS Command Line Interface を使用して Amazon EC2 開発環境をデプロイする – AWS Command Line Interface https://docs.aws.amazon.com/ja_jp/cli/latest/userguide/cli-chap-tutorial.html#tutorial-launch-and-connect
Linux に AWS CLI をインストールする – AWS Command Line Interface https://docs.aws.amazon.com/ja_jp/cli/latest/userguide/install-linux.html
Amazon Linux に AWS CLI をインストールする – AWS Command Line Interface https://docs.aws.amazon.com/ja_jp/cli/latest/userguide/install-linux-al2017.html
Hyperledger Fabric 入門, 第 4 回: Membership Service Provider https://www.ibm.com/developerworks/jp/cloud/library/cl-hyperledger-fabric-basic-4/index.html?ca=drs-
Hyperledger FabricのMSPについて – Qiita https://qiita.com/Ruly714/items/bdd76cf73195e62228e9
Hyperledger Fabric 入門, 第 2 回: Peer/チャネル/Endorsement Policy の解説 https://www.ibm.com/developerworks/jp/cloud/library/cl-hyperledger-fabric-basic-2/index.html
Amazon Managed Blockchain Instance Types https://aws.amazon.com/jp/managed-blockchain/instance-types/
Hyperledger Fabric 入門, 第 5 回: チェーンコードの書き方 https://www.ibm.com/developerworks/jp/cloud/library/cl-hyperledger-fabric-basic-5/index.html
fabric/chaincode_example02.go at v0.6 · hyperledger/fabric https://github.com/hyperledger/fabric/blob/v0.6/examples/chaincode/go/chaincode_example02/chaincode_example02.go
Hyperledger Fabric のチェーンコードを実装する – Qiita https://qiita.com/kyrieleison/items/9368ed8a5254588c89b6
HyperLedger Fabric v1.1でchaincodeを実行する – Qiita https://qiita.com/yukike/items/f3654bae36e8c68e1f6c
AWSセキュリティグループ設定をコマンド(aws-cli)でやる – Qiita https://qiita.com/S-T/items/3d4197bbed1022ccac43
Oracle Blockchain Cloud Service 触ってみた(Dataspiderとの連携もちょっと紹介) – Qiita https://qiita.com/Yosuke_Sakaue/items/159d86fb5022426d4bce
Azure Blockchain WorkbenchでHello Blockchain! – Qiita https://qiita.com/shingo_kawahara/items/6acceac42ec2701bf336
Amazon Managed Blockchain Pricing https://aws.amazon.com/jp/managed-blockchain/pricing/
Work with Proposals – Amazon Managed Blockchain https://docs.aws.amazon.com/managed-blockchain/latest/managementguide/managed-blockchain-proposals.html
元記事はこちら
「Amazon Managed BlockchainでHyperledger Fabricのブロックチェーンネットワークを構築してみた」
May 22, 2019 at 02:00PM
0 notes
Photo

Amazon Managed Blockchain(Preview)をお試ししてみた(2019/04/09アップデート対応) http://bit.ly/2VY0OXP
前回、Amazon Managed Blockchainを利用してHyperledger Fabricのブロックチェーンネットワークを構築するのに必要となる情報をまとめましたが、今回は実際に構築してお試ししてみました。
Amazon Managed Blockchain(Preview)をお試しする前に関連情報をまとめてみた – Qiita https://cloudpack.media/46630
注意事項
Amazon Managed Blockchain(Preview)が現在(2019/04/08時点)、メンテナンス中となります。 メンテナンスが完了しました。(2019/04/09 16時頃)
メンテナンス完了後(2019/04/09 13時予定)にAPIに変更があり、各種ドキュメントがアップデートされるとアナウンスされているため、本記事の内容が速攻で使えなくなる可能性があります(´・ω・`)
2019/04/10 追記
2019/04/09のメンテナンス完了後にアップデートされた内容を反映しました。
2019/04/09 追記
2019/04/05から実施されていたメンテナンスが完了し、アップデートがあったのでまとめました。
Amazon Managed Blockchain(Preview)がアップデートしたので確認してみた(2019/04/09) – Qiita https://cloudpack.media/46657
はじめに
基本的には公式のチュートリアルどおりに進めることができます。日本語訳がまだありませんが、Google翻訳さんでなんとかなります。
What Is Amazon Managed Blockchain? – Amazon Managed Blockchain https://docs.aws.amazon.com/managed-blockchain/latest/managementguide/what-is-managed-blockchain.html
記事としては、2番煎じになりますので下記もご参考ください。 追記 2019/04/09完了のメンテナンスで下記記事の一部手順が変更となっているためご注意ください。
Hyperledger Fabric in AWS Managed Blockchain Part 1 ~プレビュー版~ https://medium.com/@yuyasugano/hyperledger-fabric-in-aws-managed-blockchain-part-1-%E3%83%97%E3%83%AC%E3%83%93%E3%83%A5%E3%83%BC%E7%89%88-38192776342e
Hyperledger Fabric in Amazon Managed Blockchain Part 2~プレビュー版~ https://medium.com/@yuyasugano/hyperledger-fabric-in-amazon-managed-blockchain-part-2-%E3%83%97%E3%83%AC%E3%83%93%E3%83%A5%E3%83%BC%E7%89%88-ce4944bc6703
前提
AWSアカウントがある
Amazon Managed BlockchainのPreviewにサインアップして利用が可能
AWSアカウントに以下の作成権限がある
インターフェイスVPCエンドポイント
セキュリティグループ
Managed Blockchainネットワーク
EC2インスタンス
AWS CLIがインストールされている
aws configure コマンドでアカウント設定済み
> aws --version aws-cli/2.0.0dev0 Python/3.6.6 Darwin/18.5.0 botocore/1.12.48
詳細な前提条件については下記が参考になります。
Prerequisites and Considerations – Amazon Managed Blockchain https://docs.aws.amazon.com/managed-blockchain/latest/managementguide/get-started-prerequisites.html
Previewにサインアップ
Amazon Managed BlockchainのPreviewにサインアップしていない場合、下記URLからサインアップします。
AmazonManagedBlockchainPreview https://pages.awscloud.com/AmazonManagedBlockchain-preview.html
申請にはAWSのアカウントID(12桁)が必要となります。 申請が承認されるとApproved: Amazon Managed Blockchain Preview という件名でメールが届き、AWSマネジメントコンソールからAmazon Managed BlockchainのPreview版が利用できるようになります。
構築手順
基本的には公式ドキュメントのチュートリアルどおりにすすめて環境を構築します。
Step 1: Create the Network and First Member – Amazon Managed Blockchain https://docs.aws.amazon.com/managed-blockchain/latest/managementguide/get-started-create-network.html
AWSマネジメントコンソールからも作業はできますが、コマンドを叩く機会のほうが多いのでターミナル上で作業をすすめます。
Managed Blockchain用のCLIコマンドをインストールする
現在、Managed BlockchainはPreviewとなるため(2019/04/04時点)、AWS CLIにコマンドが含まれていません。以下のS3バケットからJSONファイルを取得してManaged Blockchain用のコマンドが利用できるようにします。
注意 2019/04/09のメンテナンス完了以前に下記コマンドを実行している場合、再度service-2.json ファイルを取得してaws configure add-model コマンドを再実行する必要があります。
> aws s3 cp s3://us-east-1.managedblockchain-preview/etc/service-2.json . > aws configure add-model --service-model file://service-2.json > aws managedblockchain help MANAGEDBLOCKCHAIN() MANAGEDBLOCKCHAIN() NAME managedblockchain - DESCRIPTION Use the Amazon Managed Blockchain service to set up, deploy, manage, and scale blockchain networks using popular open source frameworks like Hyperledger Fabric and Ethereum. AVAILABLE COMMANDS o create-member (略)
リージョンとAWSアカウントの指定
Previewだとバージニア北部リージョンのみで提供されているのでus-east-1 を指定する必要があります。.aws/credentials ファイルの[default] 以外でアクセスする場合はaws コマンドで--profile を指定してください。
ネットワークとメンバーを作成する
PreviewだとブロックチェーンフレームワークはHyperledger Fabricのみ選択可能で、バージョンは1.2 となります。Hyperledger Fabricの最新バージョンは1.4 となります。(2019/04/04時点)
What’s new in v1.4 — hyperledger-fabricdocs master documentation https://hyperledger-fabric.readthedocs.io/en/release-1.4/whatsnew.html
最初のメンバーを--member-configuration オプションで一緒に作成する必要があります。 ネットワーク名とメンバー名は任意でどうぞ。
認証局(CA)を作成するため、管理者のユーザー名とパスワードを指定する必要があります。パスワードは8文字以上で、少なくとも1つの数字と1つの大文字を含める必要があります。
コマンド実行に成功するとNetworkId とMemberId がレスポンスとして得られて、作成が開始されます。
注意 公式ドキュメントのコマンドサンプルには以下の間違いがあったので、ご注意ください。(2019/04/10時点)
--network-configuration オプションは2019/04/09のアップデートでなくなってる
パラメータをJSON指定する場合、シングルクォーテーション' 括りの内ではバックスラッシュ\ はいらない
> aws managedblockchain create-network \ --name TestNetwork \ --description TestNetworkDescription \ --framework HYPERLEDGER_FABRIC \ --framework-version 1.2 \ --framework-configuration '{"Fabric": {"Edition": "STARTER"}}' \ --voting-policy ' { "ApprovalThresholdPolicy": { "ThresholdPercentage": 50, "ProposalDurationInHours": 24, "ThresholdComparator": "GREATER_THAN" } }' \ --member-configuration ' { "Name": "org1", "Description": "Org1 first member of network", "FrameworkConfiguration": { "Fabric": { "AdminUsername": "AdminUser", "AdminPassword": "Password123" } } }' { "NetworkId": "n-XXXXXXXXXXXXXXXXXXXXXXXXXX", "MemberId": "m-XXXXXXXXXXXXXXXXXXXXXXXXXX" }
AWSマネジメントコンソールでみるとネットワークとメンバーが作成中なのが確認できます。 作成完了までに20分程度かかりました。

CLIでは以下のコマンドでネットワーク情報を確認ができます。
> aws managedblockchain get-network \ --network-id n-XXXXXXXXXXXXXXXXXXXXXXXXXX { "Network": { "Id": "n-XXXXXXXXXXXXXXXXXXXXXXXXXX", "Name": "KaiTestNetwork", "Description": "TestNetworkDescription", "Framework": "HYPERLEDGER_FABRIC", "FrameworkVersion": "1.2", "FrameworkAttributes": { "Fabric": { "Edition": "STARTER" } }, "VpcEndpointServiceName": "com.amazonaws.us-east-1.managedblockchain.n-XXXXXXXXXXXXXXXXXXXXXXXXXX", "VotingPolicy": { "ApprovalThresholdPolicy": { "ThresholdPercentage": 50, "ProposalDurationInHours": 24, "ThresholdComparator": "GREATER_THAN" } }, "Status": "CREATING", "CreationDate": "2019-04-10T12:24:26.364000+09:00" } }
セキュリティグループを作成する
Amazon Managed Blockchainで作成されたネットワークへアクセスするのに必要となるセキュリティグループを作成します。
セキュリティグループの設定内容は下記に詳しくあります。
Prerequisites and Considerations – Amazon Managed Blockchain https://docs.aws.amazon.com/managed-blockchain/latest/managementguide/get-started-prerequisites.html
aws ec2 describe-vpcs コマンドでネットワークを構築するのに利用するVPCのVpcId を取得します。
> aws ec2 describe-vpcs \ --query "Vpcs" [ { "CidrBlock": "xxx.xxx.0.0/16", "DhcpOptionsId": "dopt-a70d74dc", "State": "available", "VpcId": "vpc-xxxxxxxx", "InstanceTenancy": "default", "CidrBlockAssociationSet": [ { "AssociationId": "vpc-cidr-assoc-xxxxxxxx", "CidrBlock": "xxx.xxx.0.0/16", "CidrBlockState": { "State": "associated" } } ], "IsDefault": true } ]
Amazon Managed Blockchainで利用するセキュリティグループを作成して、インバウンドに設定を追加します。
追加する設定は以下となります。 Orderer、CA、Peerが利用するポートは固定ではないため、リソース作成時に確認する必要があります。
In/Out Type Source Inbound SSH(Port 22) [自身のグローバルIP]/32 EC2インスタンスへのログイン用 Inbound Custom TCP(Port 30001) 0.0.0.0/0 Ordererへのアクセス用 Inbound Custom TCP(Port 30002) 0.0.0.0/0 CAへのアクセス用 Inbound Custom TCP(Port 30003-30004) 0.0.0.0/0 Peerへのアクセス用
--cidr はお試し設定となっていますので、各自見直してください。
# Ordererエンドポイントの取得 > aws managedblockchain get-network \ --network-id n-XXXXXXXXXXXXXXXXXXXXXXXXXX \ --query "Network.FrameworkAttributes.Fabric.OrderingServiceEndpoint" "orderer.n-XXXXXXXXXXXXXXXXXXXXXXXXXX.managedblockchain.us-east-1.amazonaws.com:30001" # CAエンドポイントの取得 > aws managedblockchain get-member \ --network-id n-XXXXXXXXXXXXXXXXXXXXXXXXXX \ --member-id m-XXXXXXXXXXXXXXXXXXXXXXXXXX \ --query "Member.FrameworkAttributes.Fabric.CaEndpoint" "ca.m-XXXXXXXXXXXXXXXXXXXXXXXXXX.n-XXXXXXXXXXXXXXXXXXXXXXXXXX.managedblockchain.us-east-1.amazonaws.com:30002" # セキュリティグループ作成 > aws ec2 create-security-group \ --group-name mb-test \ --description "Managed Blockchain Test" \ --vpc-id vpc-xxxxxxxx { "GroupId": "sg-xxxxxxxxxxxxxxxxx" } # セキュリティグループにインバウンド設定追加 > aws ec2 authorize-security-group-ingress \ --group-id sg-xxxxxxxxxxxxxxxxx \ --protocol tcp \ --port 22 \ --cidr xxx.xxx.xxx.xxx/32 > aws ec2 authorize-security-group-ingress \ --group-id sg-xxxxxxxxxxxxxxxxx \ --protocol tcp \ --port 30001 \ --cidr 0.0.0.0/0 > aws ec2 authorize-security-group-ingress \ --group-id sg-xxxxxxxxxxxxxxxxx \ --protocol tcp \ --port 30002 \ --cidr 0.0.0.0/0
インターフェイスVPCエンドポイントを作成・設定する
Hyperledger Fabricクライアントとして利用するEC2インスタンスが、Hyperledger Fabricエンドポイントへアクセスできるようにaws ec2 create-vpc-endpoint コマンドでインターフェイスVPCエンドポイント(AWS PrivateLink)を作成します。
コマンドの詳細は下記が参考になります。
create-vpc-endpoint — AWS CLI 1.16.137 Command Reference https://docs.aws.amazon.com/cli/latest/reference/ec2/create-vpc-endpoint.html
指定するパラメータ
--security-group-ids には、さきほど作成したセキュリティグループのIDを指定します。
--subnet-ids もエンドポイントを利用するのに必須となるので、以下コマンドでサブネット情報を取得して利用するサブネットのIDを指定します。
aws ec2 describe-subnets \ --query "Subnets" [ { "AvailabilityZone": "us-west-1a", "AvailableIpAddressCount": 4091, "CidrBlock": "xxx.xxx.xxx.0/20", "DefaultForAz": true, "MapPublicIpOnLaunch": true, "State": "available", "SubnetId": "subnet-xxxxxxxx", "VpcId": "vpc-xxxxxxxx", "AssignIpv6AddressOnCreation": false, "Ipv6CidrBlockAssociationSet": [] }, (略) ]
--service-name に指定するエンドポイントは以下コマンドで取得します。
> aws managedblockchain get-network \ --network-id n-XXXXXXXXXXXXXXXXXXXXXXXXXX \ --query "Network.VpcEndpointServiceName" "com.amazonaws.us-east-1.managedblockchain.n-XXXXXXXXXXXXXXXXXXXXXXXXXX"
インターフェイスVPCエンドポイントはプライベートDNS名を有効にする必要があるので、--private-dns-enabled オプションを利用します。--private-dns-enabled を指定するには--vpc-endpoint-type でエンドポイントタイプをInterface にする必要があります。
コマンドの実行
> aws ec2 create-vpc-endpoint \ --vpc-id vpc-xxxxxxxx \ --security-group-ids sg-xxxxxxxxxxxxxxxxx \ --subnet-ids subnet-xxxxxxxx \ --service-name com.amazonaws.us-east-1.managedblockchain.n-XXXXXXXXXXXXXXXXXXXXXXXXXX \ --vpc-endpoint-type Interface \ --private-dns-enabled { "VpcEndpoint": { "VpcEndpointId": "vpce-xxxxxxxxxxxxxxxxx", "VpcEndpointType": "Interface", "VpcId": "vpc-xxxxxxxx", "ServiceName": "com.amazonaws.us-east-1.managedblockchain.n-XXXXXXXXXXXXXXXXXXXXXXXXXX", "State": "pending", "RouteTableIds": [], "SubnetIds": [ "subnet-xxxxxxxx" ], "Groups": [ { "GroupId": "sg-xxxxxxxxxxxxxxxxx", "GroupName": "mb-test" } ], "PrivateDnsEnabled": true, "NetworkInterfaceIds": [ "eni-xxxxxxxxxxxxxxxxx" ], "DnsEntries": [ (略) ], "CreationTimestamp": "2019-04-10T04:43:35+00:00" } }
インターフェイスVPCエンドポイントの作成には少し時間がかかるので、以下コマンドでステータスを確認します。State がpending からavailable に変わればOKです。 ※VPCエンドポイントが複数ある場合は、--query を外して確認してください。
> aws ec2 describe-vpc-endpoints \ --vpc-endpoint-ids vpce-xxxxxxxxxxxxxxxxx \ --query "VpcEndpoints[0].State" "available"
ここまでで、Hyperledger Fabricネットワークで必要となるOrderer、CAが作成できました。 続けて、Hyperledger Fabric Clientをセットアップして、Peerノードを追加します。
Hyperledger Fabric Clientのセットアップ
EC2インスタンスを起動する
EC2インスタンスを起動してHyperledger Fabric Clientをセットアップします。
EC2インスタンスの起動手順は下記を参考にしました。
チュートリアル: AWS Command Line Interface を使用して Amazon EC2 開発環境をデプロイする – AWS Command Line Interface https://docs.aws.amazon.com/ja_jp/cli/latest/userguide/cli-chap-tutorial.html#tutorial-launch-and-connect
AMIは最新のAmazon Linux2にしています。 --security-group-ids には、さきほど作成したセキュリティグループのIDを指定します。 --subnet-id には、インターフェイスVPCエンドポイントと同じサブネットのIDを指定します。
# キーペア作成 > aws ec2 create-key-pair \ --key-name mb-test-ec2-key \ --query "KeyMaterial" \ --output text > mb-test-ec2-key.pem > chmod 400 mb-test-ec2-key.pem # EC2インスタンス起動 > aws ec2 run-instances \ --image-id ami-0de53d8956e8dcf80 \ --security-group-ids sg-xxxxxxxxxxxxxxxxx \ --subnet-id subnet-xxxxxxxx \ --count 1 \ --instance-type t2.micro \ --key-name mb-test-ec2-key \ --query "Instances[0].InstanceId" "i-xxxxxxxxxxxxxxxxx" # インスタンスのパブリックIPアドレスを取得 > aws ec2 describe-instances \ --instance-ids i-xxxxxxxxxxxxxxxxx \ --query "Reservations[0].Instances[0].PublicIpAddress" "xxx.xxx.xxx.xxx" # SSHでEC2インスタンスにログイン > ssh -i mb-test-ec2-key.pem [email protected] __| __|_ ) _| ( / Amazon Linux 2 AMI ___|\___|___| https://aws.amazon.com/amazon-linux-2/ 1 package(s) needed for security, out of 3 available Run "sudo yum update" to apply all updates. [ec2-user@ip-xxx-xxx-xxx-xxx ~]$
EC2インスタンスに必要なパッケージをインストールする
EC2インスタンスにDockerやGO言語など必要となるパッケージをインストールします。
EC2インスタンス
$ sudo yum update -y $ sudo yum install -y telnet $ sudo yum -y install emacs $ sudo yum install -y docker $ sudo service docker start $ sudo usermod -a -G docker ec2-user $ exit
usermodを有効化するのにいったんログアウトします。再ログイン後、Docker Compose、GO言語をインストールします。
EC2インスタンス
# Docker Composeのインストール $ sudo curl -L \ https://github.com/docker/compose/releases/download/1.20.0/docker-compose-`uname \ -s`-`uname -m` -o /usr/local/bin/docker-compose $ sudo chmod a+x /usr/local/bin/docker-compose $ sudo yum install libtool -y # GO言語のインストール $ wget https://dl.google.com/go/go1.10.3.linux-amd64.tar.gz $ tar -xzf go1.10.3.linux-amd64.tar.gz $ sudo mv go /usr/local $ sudo yum install libtool-ltdl-devel -y $ sudo yum install git -y # 環境変数の設定 $ cat >> ~/.bash_profile << "EOF" # GOROOT is the location where Go package is installed on your system export GOROOT=/usr/local/go # GOPATH is the location of your work directory export GOPATH=$HOME/go # Update PATH so that you can access the go binary system wide export PATH=$GOROOT/bin:$PATH export PATH=$PATH:/home/ec2-user/go/src/github.com/hyperledger/fabric-ca/bin EOF # 環境変数の読み込み $ source ~/.bash_profile
必要となるパッケージがインストールできたか確認します。
EC2インスタンス
$ docker --version Docker version 18.06.1-ce, build e68fc7a215d7133c34aa18e3b72b4a21fd0c6136 $ docker-compose --version docker-compose version 1.20.0, build ca8d3c6 $ go version go version go1.10.3 linux/amd64
AWS CLIの初期設定を行います。リージョンもus-east-1 で指定しておきます。 あわせてmanagedblockchain コマンドが利用できるようにします。
注意 2019/04/09のメンテナンス完了以前に下記コマンドを実行している場合、再度service-2.json ファイルを取得してaws configure add-model コマンドを再実行する必要があります。
EC2インスタンス
$ aws configure $ aws s3 cp s3://us-east-1.managedblockchain-preview/etc/service-2.json . $ aws configure add-model --service-model file://service-2.json $ aws managedblockchain help MANAGEDBLOCKCHAIN() MANAGEDBLOCKCHAIN() NAME managedblockchain - (略)
Hyperledger Fabric CAエンドポイントへの接続確認
作成済みのインターフェイスVPCエンドポイントを利用して、Hyperledger Fabric CAエンドポイントに接続できるか確認します。
EC2インスタンス
# CAエンドポイントの取得 $ aws managedblockchain get-member \ --network-id n-XXXXXXXXXXXXXXXXXXXXXXXXXX \ --member-id m-XXXXXXXXXXXXXXXXXXXXXXXXXX \ --query "Member.FrameworkAttributes.Fabric.CaEndpoint" "ca.m-XXXXXXXXXXXXXXXXXXXXXXXXXX.n-XXXXXXXXXXXXXXXXXXXXXXXXXX.managedblockchain.us-east-1.amazonaws.com:30002" # 接続確認 # https://[CaEndpoint]/cainfo にアクセス $ curl https://ca.m-XXXXXXXXXXXXXXXXXXXXXXXXXX.n-XXXXXXXXXXXXXXXXXXXXXXXXXX.managedblockchain.us-east-1.amazonaws.com:30002/cainfo -k {"result":{"CAName":"m-XXXXXXXXXXXXXXXXXXXXXXXXXX","CAChain":"xxxxx==","Version":"1.2.1-snapshot-"}
Hyperledger Fabric CAクライアントを構成する
CAへアクセスするためのクライアントを構成します。
EC2インスタンス
$ go get -u github.com/hyperledger/fabric-ca/cmd/... $ cd /home/ec2-user/go/src/github.com/hyperledger/fabric-ca $ git fetch $ git checkout release-1.2 Branch 'release-1.2' set up to track remote branch 'release-1.2' from 'origin'. Switched to a new branch 'release-1.2' $ make fabric-ca-client Building fabric-ca-client in bin directory ... Built bin/fabric-ca-client
Hyperledger Fabric CLI用のDockerコンテナを起動する
PeerノードなどにアクセスするためのDockerコンテナを起動します。yamlファイルの内容はそのままでOKです。
EC2インスタンス
$ cd ~/ $ cat >> ~/docker-compose-cli.yaml << "EOF" version: '2' services: cli: container_name: cli image: hyperledger/fabric-tools:1.2.0 tty: true environment: - GOPATH=/opt/gopath - CORE_VM_ENDPOINT=unix:///host/var/run/docker.sock - CORE_LOGGING_LEVEL=info - CORE_PEER_ID=cli - CORE_CHAINCODE_KEEPALIVE=10 working_dir: /opt/gopath/src/github.com/hyperledger/fabric/peer command: /bin/bash volumes: - /var/run/:/host/var/run/ - /home/ec2-user/fabric-samples/chaincode:/opt/gopath/src/github.com/ - /home/ec2-user:/opt/home EOF # Dockerコンテナの起動 $ docker-compose -f ~/docker-compose-cli.yaml up -d Creating network "ec2user_default" with the default driver Pulling cli (hyperledger/fabric-tools:1.2.0)... (略) Creating cli ... done # Dockerサービスが起動していなかったら $ sudo service docker start
Hyperledger Fabricのネットワークを設定する
Peerノード追加やアクセスするのに必要となる設定をします。
メンバー管理者をCAに登録する
証明書ファイルを用意する
注意 2019/04/09のメンテナンス完了以前にmanagedblockchain-tls-chain.pem ファイルを取得していた場合、証明書ファイルが更新されているため、再度取得する必要があります。
EC2インスタンス
$ aws s3 cp s3://us-east-1.managedblockchain-preview/etc/managedblockchain-tls-chain.pem /home/ec2-user/managedblockchain-tls-chain.pem # ファイルが正しいかチェック # 証明書情報が表示されたらOK $ openssl x509 -noout -text \ -in /home/ec2-user/managedblockchain-tls-chain.pem Certificate: (略)
メンバー管理者をCAに登録する
fabric-ca-client enroll コマンドでCAエンドポイントに対して管理者アカウントと証明書ファイルを指定してメンバー管理者をCAに登録します。 -u オプションのAdminUsername とAdminPassword、CAEndpointAndPort を置き換えてください。
EC2インスタンス
# CAエンドポイントの取得 $ aws managedblockchain get-member \ --network-id n-XXXXXXXXXXXXXXXXXXXXXXXXXX \ --member-id m-XXXXXXXXXXXXXXXXXXXXXXXXXX \ --query "Member.FrameworkAttributes.Fabric.CaEndpoint" "ca.m-XXXXXXXXXXXXXXXXXXXXXXXXXX.n-XXXXXXXXXXXXXXXXXXXXXXXXXX.managedblockchain.us-east-1.amazonaws.com:30002" # AdminUsername、AdminPassword、CAEndpointAndPortを置き換えて実行 $ fabric-ca-client enroll \ -u https://AdminUsername:AdminPassword@CAEndpointAndPort \ --tls.certfiles /home/ec2-user/managedblockchain-tls-chain.pem \ -M /home/ec2-user/admin-msp 2019/04/03 07:39:58 [INFO] Created a default configuration file at /home/ec2-user/.fabric-ca-client/fabric-ca-client-config.yaml 2019/04/03 07:39:58 [INFO] TLS Enabled 2019/04/03 07:39:58 [INFO] generating key: &{A:ecdsa S:256} 2019/04/03 07:39:58 [INFO] encoded CSR 2019/04/03 07:39:58 [INFO] Stored client certificate at /home/ec2-user/admin-msp/signcerts/cert.pem 2019/04/03 07:39:58 [INFO] Stored root CA certificate at /home/ec2-user/admin-msp/cacerts/ca-m-XXXXXXXXXXXXXXXXXXXXXXXXXX-n-XXXXXXXXXXXXXXXXXXXXXXXXXX-managedblockchain-us-east-1-amazonaws-com-30002.pem
fabric-ca-client enroll コマンドが実行できたら、証明書ファイルをコピーします。
EC2インスタンス
$ cp -r admin-msp/signcerts admin-msp/admincerts
これで、Membership Service Provider(MSP)として機能するようになります。 MSPはネットワーク内で証明書の発行や検証、ユーザ認証などを行います。MSPに関する詳細は下記が詳しいです。
Hyperledger Fabric 入門, 第 4 回: Membership Service Provider https://www.ibm.com/developerworks/jp/cloud/library/cl-hyperledger-fabric-basic-4/index.html?ca=drs-
Hyperledger FabricのMSPについて – Qiita https://qiita.com/Ruly714/items/bdd76cf73195e62228e9
Peerノードを作成する
Hyperledger Fabricのネットワークを構築するのに欠かせないPeerノードを作成します。 ざっくりいうとPeerにはトランザクションを検証して署名する(Endorsement Peer)、自身の台帳に書き込む(Committing Peer)2つの役割があります。Peerの役割については下記が詳しいです。
Hyperledger Fabric 入門, 第 2 回: Peer/チャネル/Endorsement Policy の解説 https://www.ibm.com/developerworks/jp/cloud/library/cl-hyperledger-fabric-basic-2/index.html
Amazon Managed Blockchainで利用できるインスタンスタイプについては下記が参考になります。
Amazon Managed Blockchain Instance Types https://aws.amazon.com/jp/managed-blockchain/instance-types/
注意 2019/04/09のメンテナンス完了後から、--node-configuration で指定するパラメータからDataVolumeSize が削除されました。
EC2インスタンス
# Peerノードの作成 $ aws managedblockchain create-node \ --network-id n-XXXXXXXXXXXXXXXXXXXXXXXXXX \ --member-id m-XXXXXXXXXXXXXXXXXXXXXXXXXX \ --node-configuration InstanceType=bc.t3.small,AvailabilityZone=us-east-1a { "NodeId": "nd-XXXXXXXXXXXXXXXXXXXXXXXXXX" } # Peerノードの情報取得 $ aws managedblockchain get-node \ --network-id n-XXXXXXXXXXXXXXXXXXXXXXXXXX \ --member-id m-XXXXXXXXXXXXXXXXXXXXXXXXXX \ --node-id nd-XXXXXXXXXXXXXXXXXXXXXXXXXX { "Node": { "Status": "AVAILABLE", "AvailabilityZone": "us-east-1a", "FrameworkAttributes": { "Fabric": { "PeerEndpoint": "nd-XXXXXXXXXXXXXXXXXXXXXXXXXX.m-XXXXXXXXXXXXXXXXXXXXXXXXXX.n-XXXXXXXXXXXXXXXXXXXXXXXXXX.managedblockchain.us-east-1.amazonaws.com:30003", "PeerEventEndpoint": "nd-XXXXXXXXXXXXXXXXXXXXXXXXXX.m-XXXXXXXXXXXXXXXXXXXXXXXXXX.n-XXXXXXXXXXXXXXXXXXXXXXXXXX.managedblockchain.us-east-1.amazonaws.com:30004" } }, "InstanceType": "bc.t3.small", "CreationDate": 1554872383.615, "Id": "nd-XXXXXXXXXXXXXXXXXXXXXXXXXX" } }
Peerノードへアクセスできるようにセキュリティグループに設定を追加します。 --cidr はお試し設定となっていますので、各自見直してください。
EC2インスタンス
$ aws ec2 authorize-security-group-ingress \ --group-id sg-xxxxxxxxxxxxxxxxx \ --protocol tcp \ --port 30003-30004 \ --cidr 0.0.0.0/0
チャネルを作成する
Hyperledger FabricではPeerが持つ台帳を共有する範囲をチャネルという機能で制御しています。ブロックチェーンネットワーク内に作られた仮想ネットワークで、特定の参加者間だけで台帳やクライアントアプリを制御できます。下記が参考になります。
Hyperledger Fabric 入門, 第 2 回: Peer/チャネル/Endorsement Policy の解説 https://www.ibm.com/developerworks/jp/cloud/library/cl-hyperledger-fabric-basic-2/index.html
チャネル構成を定義する
チャネル構成はconfigtx というトランザクションで管理されます。 トランザクションを作成するのにconfigtx.yaml を用意します。MemberID は自身のものに書き換えてください。 MSPDir のパスが/opt/home/admin-msp となっていますが、Dockerコンテナ内のパスなのでそのままでOKです。
EC2インスタンス
# MemberIDを書き換える $ cat >> ~/configtx.yaml << "EOF" Organizations: - &Org1 Name: MemberID ID: MemberID MSPDir: /opt/home/admin-msp AnchorPeers: - Host: Port: Application: &ApplicationDefaults Organizations: Profiles: OneOrgChannel: Consortium: AWSSystemConsortium Application: <<: *ApplicationDefaults Organizations: - *Org1 EOF
cli configtxgen コマンドを実行してconfigtx.yaml ファイルからconfigtxピアブロックを作成します。パスが/opt/home/ となっていますが、Dockerコンテナ内のパスなのでそのままでOKです。WARN が出力されますが、エラーではないのでスルーでOKです。
EC2インスタンス
$ docker exec cli configtxgen \ -outputCreateChannelTx /opt/home/mychannel.pb \ -profile OneOrgChannel \ -channelID mychannel \ --configPath /opt/home/ 2019-04-10 05:06:00.014 UTC [common/tools/configtxgen] main -> INFO 001 Loading configuration 2019-04-10 05:06:00.019 UTC [common/tools/configtxgen] doOutputChannelCreateTx -> INFO 002 Generating new channel configtx 2019-04-10 05:06:00.020 UTC [common/tools/configtxgen/encoder] NewApplicationGroup -> WARN 003 Default policy emission is deprecated, please include policy specificiations for the application group in configtx.yaml 2019-04-10 05:06:00.021 UTC [common/tools/configtxgen/encoder] NewApplicationOrgGroup -> WARN 004 Default policy emission is deprecated, please include policy specificiations for the application org group m-XXXXXXXXXXXXXXXXXXXXXXXXXX in configtx.yaml 2019-04-10 05:06:00.023 UTC [common/tools/configtxgen] doOutputChannelCreateTx -> INFO 005 Writing new channel tx
チャネルを作成する
チャネルを作成する前に環境変数を設定します。MSP、ORDERER、PEER の値は自身の環境の値に置き換えてください。
EC2インスタンス
# MSP=MemberID $ aws managedblockchain list-members \ --network-id n-XXXXXXXXXXXXXXXXXXXXXXXXXX \ --query "Members[0].Id" # ORDERER=OrderingServiceEndpoint $ aws managedblockchain get-network \ --network-id n-XXXXXXXXXXXXXXXXXXXXXXXXXX \ --query "Network.FrameworkAttributes.Fabric.OrderingServiceEndpoint" PEER=PeerNodeEndpoint $ aws managedblockchain get-node \ --network-id n-XXXXXXXXXXXXXXXXXXXXXXXXXX \ --member-id m-XXXXXXXXXXXXXXXXXXXXXXXXXX \ --node-id nd-XXXXXXXXXXXXXXXXXXXXXXXXXX \ --query "Node.FrameworkAttributes.Fabric.PeerEndpoint" # 環境変数の設定 # MemberID、OrderingServiceEndpoint、PeerNodeEndpointを↑で取得した値に書き換える $ cat >> ~/.bash_profile << "EOF" export MSP_PATH=/opt/home/admin-msp export MSP=MemberID export ORDERER=OrderingServiceEndpoint export PEER=PeerNodeEndpoint EOF # 環境変数の読み込み $ source ~/.bash_profile
環境変数の設定と読み込みができたらcli peer channel create コマンドを実行してチャネルを作成します。
EC2インスタンス
$ docker exec -e "CORE_PEER_TLS_ENABLED=true" \ -e "CORE_PEER_TLS_ROOTCERT_FILE=/opt/home/managedblockchain-tls-chain.pem" \ -e "CORE_PEER_ADDRESS=$PEER" \ -e "CORE_PEER_LOCALMSPID=$MSP" \ -e "CORE_PEER_MSPCONFIGPATH=$MSP_PATH" \ cli peer channel create -c mychannel \ -f /opt/home/mychannel.pb -o $ORDERER \ --cafile /opt/home/managedblockchain-tls-chain.pem \ --tls 2019-04-03 09:20:38.496 UTC [channelCmd] InitCmdFactory -> INFO 001 Endorser and orderer connections initialized 2019-04-03 09:20:38.593 UTC [cli/common] readBlock -> INFO 002 Got status: &{NOT_FOUND} 2019-04-03 09:20:38.605 UTC [channelCmd] InitCmdFactory -> INFO 003 Endorser and orderer connections initialized 2019-04-03 09:20:38.811 UTC [cli/common] readBlock -> INFO 004 Got status: &{NOT_FOUND} 2019-04-03 09:20:38.823 UTC [channelCmd] InitCmdFactory -> INFO 005 Endorser and orderer connections initialized 2019-04-03 09:20:39.026 UTC [cli/common] readBlock -> INFO 006 Got status: &{NOT_FOUND} 2019-04-03 09:20:39.037 UTC [channelCmd] InitCmdFactory -> INFO 007 Endorser and orderer connections initialized 2019-04-03 09:20:39.239 UTC [cli/common] readBlock -> INFO 008 Got status: &{NOT_FOUND} 2019-04-03 09:20:39.250 UTC [channelCmd] InitCmdFactory -> INFO 009 Endorser and orderer connections initialized 2019-04-03 09:20:39.453 UTC [cli/common] readBlock -> INFO 00a Got status: &{NOT_FOUND} 2019-04-03 09:20:39.464 UTC [channelCmd] InitCmdFactory -> INFO 00b Endorser and orderer connections initialized 2019-04-03 09:20:39.666 UTC [cli/common] readBlock -> INFO 00c Got status: &{NOT_FOUND} 2019-04-03 09:20:39.677 UTC [channelCmd] InitCmdFactory -> INFO 00d Endorser and orderer connections initialized 2019-04-03 09:20:39.879 UTC [cli/common] readBlock -> INFO 00e Got status: &{NOT_FOUND} 2019-04-03 09:20:39.889 UTC [channelCmd] InitCmdFactory -> INFO 00f Endorser and orderer connections initialized 2019-04-03 09:20:40.092 UTC [cli/common] readBlock -> INFO 010 Got status: &{NOT_FOUND} 2019-04-03 09:20:40.103 UTC [channelCmd] InitCmdFactory -> INFO 011 Endorser and orderer connections initialized 2019-04-03 09:20:40.306 UTC [cli/common] readBlock -> INFO 012 Got status: &{NOT_FOUND} 2019-04-03 09:20:40.316 UTC [channelCmd] InitCmdFactory -> INFO 013 Endorser and orderer connections initialized 2019-04-03 09:20:40.519 UTC [cli/common] readBlock -> INFO 014 Got status: &{NOT_FOUND} 2019-04-03 09:20:40.531 UTC [channelCmd] InitCmdFactory -> INFO 015 Endorser and orderer connections initialized 2019-04-03 09:20:40.733 UTC [cli/common] readBlock -> INFO 016 Got status: &{NOT_FOUND} 2019-04-03 09:20:40.744 UTC [channelCmd] InitCmdFactory -> INFO 017 Endorser and orderer connections initialized 2019-04-03 09:20:40.962 UTC [cli/common] readBlock -> INFO 018 Received block: 0
status: &{NOT_FOUND} が気になりますが、気にせずにcli peer channel join コマンドを実行してチャネルにPeerノードを参加させます。
EC2インスタンス
$ docker exec -e "CORE_PEER_TLS_ENABLED=true" \ -e "CORE_PEER_TLS_ROOTCERT_FILE=/opt/home/managedblockchain-tls-chain.pem" \ -e "CORE_PEER_ADDRESS=$PEER" \ -e "CORE_PEER_LOCALMSPID=$MSP" \ -e "CORE_PEER_MSPCONFIGPATH=$MSP_PATH" \ cli peer channel join -b mychannel.block \ -o $ORDERER \ --cafile /opt/home/managedblockchain-tls-chain.pem \ --tls 2019-04-03 09:23:56.063 UTC [channelCmd] InitCmdFactory -> INFO 001 Endorser and orderer connections initialized 2019-04-03 09:23:56.100 UTC [channelCmd] executeJoin -> INFO 002 Successfully submitted proposal to join channel
Successfully submitted proposal to join channel とログ出力されたので、チャネル作成とPeerノードの参加ができました。
チェーンコードをインストールして実行する
チェーンコードとはイーサリアムなどでいうところのスマートコントラクトになります。チェーンコードはGo、Node.js、Javaのプログラム言語で開発できます。Peerにデプロイして、ブロックチェーンネットワーク上の台帳への情報書き込み・読み込み処理を実装します。詳細は下記が参考になります。
Hyperledger Fabric 入門, 第 5 回: チェーンコードの書き方 https://www.ibm.com/developerworks/jp/cloud/library/cl-hyperledger-fabric-basic-5/index.html
チェーンコードの実装
チュートリアルにあるサンプルを利用します。下記が実装となります。
fabric/chaincode_example02.go at v0.6 · hyperledger/fabric https://github.com/hyperledger/fabric/blob/v0.6/examples/chaincode/go/chaincode_example02/chaincode_example02.go
チェーンコードには4つの関数(init 、invoke 、query 、main)が必要になります。
init
チェーンコードをデプロイ(instantiate )、アップデート(upgrade)する際に呼び出される
サンプルではa とb というキーで数値を保持するように実装されています
invoke
台帳の更新時に呼び出させる
サンプルではパラメータで指定されたとおりに数値を移動する実装がされています
例) a から b へ10 移動する
query
台帳の参照時に呼び出させる
サンプルではa またはb の値を取得する実装がされています
台帳へアクセスするときに利用できるAPIが用意されています。(一部)
単一キーの操作
PutState(Key string)
GutState(Key string)
DelState(Key string)
キー範囲照会
GetStateByRange(startKey string, endkey string)
非キー指定による照会
GetQueryResult(query string)
変更履歴の照会
GetHistoryForKey(key string)
こちらの記事も参考になりました。
Hyperledger Fabric のチェーンコードを実装する – Qiita https://qiita.com/kyrieleison/items/9368ed8a5254588c89b6
HyperLedger Fabric v1.1でchaincodeを実行する – Qiita https://qiita.com/yukike/items/f3654bae36e8c68e1f6c
チェーンコードのデプロイ
cli peer chaincode install コマンドでチェーンコードをPeerにインストールします。 -n でチェーンコード名、-v でバージョン、-p で実装のファイルパスを指定します。
EC2インスタンス
$ docker exec -e "CORE_PEER_TLS_ENABLED=true" \ -e "CORE_PEER_TLS_ROOTCERT_FILE=/opt/home/managedblockchain-tls-chain.pem" \ -e "CORE_PEER_LOCALMSPID=$MSP" \ -e "CORE_PEER_MSPCONFIGPATH=$MSP_PATH" \ -e "CORE_PEER_ADDRESS=$PEER" \ cli peer chaincode install \ -n mycc -v v0 -p github.com/chaincode_example02/go 2019-04-04 01:14:04.245 UTC [chaincodeCmd] checkChaincodeCmdParams -> INFO 001 Using default escc 2019-04-04 01:14:04.245 UTC [chaincodeCmd] checkChaincodeCmdParams -> INFO 002 Using default vscc 2019-04-04 01:14:05.330 UTC [chaincodeCmd] install -> INFO 003 Installed remotely response:<status:200 payload:"OK" >
cli peer chaincode instantiate コマンドでチェーンコードをチャネル上で初期化(デプロイ)します。
instantiate 実行時はチェーンコードのInit メソッドが呼び出されます。 -c オプションでチェーンコードへ引き渡すパラメータを指定します。パラメータの最初にinit を指定していますが、これはチェーンコードのInit メソッドでfunction string として受け取り、2つ目からがargs []string として扱われます。
EC2インスタンス
$ docker exec -e "CORE_PEER_TLS_ENABLED=true" \ -e "CORE_PEER_TLS_ROOTCERT_FILE=/opt/home/managedblockchain-tls-chain.pem" \ -e "CORE_PEER_LOCALMSPID=$MSP" \ -e "CORE_PEER_MSPCONFIGPATH=$MSP_PATH" \ -e "CORE_PEER_ADDRESS=$PEER" \ cli peer chaincode instantiate \ -o $ORDERER -C mychannel \ -n mycc -v v0 \ -c '{"Args":["init","a","100","b","200"]}' \ --cafile /opt/home/managedblockchain-tls-chain.pem --tls 2019-04-04 01:15:33.594 UTC [chaincodeCmd] checkChaincodeCmdParams -> INFO 001 Using default escc 2019-04-04 01:15:33.594 UTC [chaincodeCmd] checkChaincodeCmdParams -> INFO 002 Using default vscc
チェーンコードがデプロイされたかcli peer chaincode list コマンドで確認できます。
EC2インスタンス
$ docker exec -e "CORE_PEER_TLS_ENABLED=true" \ -e "CORE_PEER_TLS_ROOTCERT_FILE=/opt/home/managedblockchain-tls-chain.pem" \ -e "CORE_PEER_LOCALMSPID=$MSP" \ -e "CORE_PEER_MSPCONFIGPATH=$MSP_PATH" \ -e "CORE_PEER_ADDRESS=$PEER" \ cli peer chaincode list --instantiated \ -o $ORDERER -C mychannel \ --cafile /opt/home/managedblockchain-tls-chain.pem --tls Get instantiated chaincodes on channel mychannel: Name: mycc, Version: v0, Path: github.com/chaincode_example02/go, Escc: escc, Vscc: vscc
チェーンコードの実行
cli peer chaincode query コマンドで台帳の情報が参照できます。 query 実行時はチェーンコードのQuery メソッドが呼び出されます。
EC2インスタンス
$ docker exec -e "CORE_PEER_TLS_ENABLED=true" \ -e "CORE_PEER_TLS_ROOTCERT_FILE=/opt/home/managedblockchain-tls-chain.pem" \ -e "CORE_PEER_ADDRESS=$PEER" \ -e "CORE_PEER_LOCALMSPID=$MSP" \ -e "CORE_PEER_MSPCONFIGPATH=$MSP_PATH" \ cli peer chaincode query \ -C mychannel \ -n mycc -c '{"Args":["query","a"]}' 100
cli peer chaincode invokeコマンドで台帳の情報を更新します。 invoke 実行時はチェーンコードのInvoke メソッドが呼び出されます。
EC2インスタンス
$ docker exec -e "CORE_PEER_TLS_ENABLED=true" \ -e "CORE_PEER_TLS_ROOTCERT_FILE=/opt/home/managedblockchain-tls-chain.pem" \ -e "CORE_PEER_ADDRESS=$PEER" \ -e "CORE_PEER_LOCALMSPID=$MSP" \ -e "CORE_PEER_MSPCONFIGPATH=$MSP_PATH" \ cli peer chaincode invoke \ -C mychannel \ -n mycc -c '{"Args":["invoke","a","b","10"]}' \ -o $ORDERER --cafile /opt/home/managedblockchain-tls-chain.pem --tls 2019-04-04 01:25:39.699 UTC [chaincodeCmd] chaincodeInvokeOrQuery -> INFO 001 Chaincode invoke successful. result: status:200
これでキーa からb へ数値を10 移動させることができたはずなので確認してみます。
EC2インスタンス
$ docker exec -e "CORE_PEER_TLS_ENABLED=true" \ -e "CORE_PEER_TLS_ROOTCERT_FILE=/opt/home/managedblockchain-tls-chain.pem" \ -e "CORE_PEER_ADDRESS=$PEER" \ -e "CORE_PEER_LOCALMSPID=$MSP" \ -e "CORE_PEER_MSPCONFIGPATH=$MSP_PATH" \ cli peer chaincode query \ -C mychannel \ -n mycc -c '{"Args":["query","a"]}' 90 $ docker exec -e "CORE_PEER_TLS_ENABLED=true" \ -e "CORE_PEER_TLS_ROOTCERT_FILE=/opt/home/managedblockchain-tls-chain.pem" \ -e "CORE_PEER_ADDRESS=$PEER" \ -e "CORE_PEER_LOCALMSPID=$MSP" \ -e "CORE_PEER_MSPCONFIGPATH=$MSP_PATH" \ cli peer chaincode query \ -C mychannel \ -n mycc -c '{"Args":["query","b"]}' 210
やったぜ。
これでAmazon Managed Blockchainを利用してHyperledger Fabricのブロックチェーンネットワークを構築してトランザクションを実行するところまで確認ができました。
まだPreviewだからでしょうが、ネットワークを構築するのにAWSマネジメントコンソールだけで完結せず、Hyperledger Fabricを知らないと構築するには難易度が高いですが、今後の機能拡張に期待です。
参考
Amazon Managed Blockchain(Preview)をお試しする前に関連情報をまとめてみた – Qiita https://cloudpack.media/46663
What Is Amazon Managed Blockchain? – Amazon Managed Blockchain https://docs.aws.amazon.com/managed-blockchain/latest/managementguide/what-is-managed-blockchain.html
Hyperledger Fabric in AWS Managed Blockchain Part 1 ~プレビュー版~ https://medium.com/@yuyasugano/hyperledger-fabric-in-aws-managed-blockchain-part-1-%E3%83%97%E3%83%AC%E3%83%93%E3%83%A5%E3%83%BC%E7%89%88-38192776342e
Hyperledger Fabric in Amazon Managed Blockchain Part 2~プレビュー版~ https://medium.com/@yuyasugano/hyperledger-fabric-in-amazon-managed-blockchain-part-2-%E3%83%97%E3%83%AC%E3%83%93%E3%83%A5%E3%83%BC%E7%89%88-ce4944bc6703
Prerequisites and Considerations – Amazon Managed Blockchain https://docs.aws.amazon.com/managed-blockchain/latest/managementguide/get-started-prerequisites.html
AmazonManagedBlockchainPreview https://pages.awscloud.com/AmazonManagedBlockchain-preview.html
Step 1: Create the Network and First Member – Amazon Managed Blockchain https://docs.aws.amazon.com/managed-blockchain/latest/managementguide/get-started-create-network.html
What’s new in v1.4 — hyperledger-fabricdocs master documentation https://hyperledger-fabric.readthedocs.io/en/release-1.4/whatsnew.html
create-vpc-endpoint — AWS CLI 1.16.137 Command Reference https://docs.aws.amazon.com/cli/latest/reference/ec2/create-vpc-endpoint.html
チュートリアル: AWS Command Line Interface を使用して Amazon EC2 開発環境をデプロイする – AWS Command Line Interface https://docs.aws.amazon.com/ja_jp/cli/latest/userguide/cli-chap-tutorial.html#tutorial-launch-and-connect
Hyperledger Fabric 入門, 第 4 回: Membership Service Provider https://www.ibm.com/developerworks/jp/cloud/library/cl-hyperledger-fabric-basic-4/index.html?ca=drs-
Hyperledger FabricのMSPについて – Qiita https://qiita.com/Ruly714/items/bdd76cf73195e62228e9
Hyperledger Fabric 入門, 第 2 回: Peer/チャネル/Endorsement Policy の解説 https://www.ibm.com/developerworks/jp/cloud/library/cl-hyperledger-fabric-basic-2/index.html
Amazon Managed Blockchain Instance Types https://aws.amazon.com/jp/managed-blockchain/instance-types/
Hyperledger Fabric 入門, 第 5 回: チェーンコードの書き方 https://www.ibm.com/developerworks/jp/cloud/library/cl-hyperledger-fabric-basic-5/index.html
fabric/chaincode_example02.go at v0.6 · hyperledger/fabric https://github.com/hyperledger/fabric/blob/v0.6/examples/chaincode/go/chaincode_example02/chaincode_example02.go
Hyperledger Fabric のチェーンコードを実装する – Qiita https://qiita.com/kyrieleison/items/9368ed8a5254588c89b6
HyperLedger Fabric v1.1でchaincodeを実行する – Qiita https://qiita.com/yukike/items/f3654bae36e8c68e1f6c
AWSセキュリティグループ設定をコマンド(aws-cli)でやる – Qiita https://qiita.com/S-T/items/3d4197bbed1022ccac43
元記事はこちら
「Amazon Managed Blockchain(Preview)をお試ししてみた(2019/04/09アップデート対応)」
April 23, 2019 at 12:00PM
0 notes