#average function in excel average formula in excel how to use excel average function excel average function
Explore tagged Tumblr posts
Visit Tumblr Blog
Explore Tumblr blogs with no restrictions, modern design and the best experience.
Last Seen Tumblr Blogs


Fun Fact
Tumblr has been banned in Indonesia for providing people with access to pornographic content.
Text
Making of Monday - Tracking Word Counts
On Making of Monday, we share behind the scenes of one of our works past, present, or future. All the little things that would fit into a DVD bonus content section: cut scenes, outlines, director's writer's commentary, or basically any thing that didn't make it into the final version. Send me an ask if you're interested in knowing little details about any particular fic!
This week, I decided to show my word count spreadsheet that I've been meticulously using and crafting for coming up on two years now. It wasn't built in a day, and I'm almost constantly tweaking it to make it look nice and functional as I keep writing.
Uh, fair warning. This is not a very exciting post. Unless you like numbers and data, like I do.

For the sake of my own sanity, I started a new Excel document for the new year. This is my Summary page for the year 2024. I have pages created already for each month but hide them when it isn't that month. I'll show the Overview page next after I've explained what you're looking at.
So what you see here is my monthly and annual writing totals. This only takes into account new words written, although the start number at the top of each yearly column includes my running word count. Each month's number is automatically updated from the corresponding month's page, and added up in the total column.
On the side, I have fun projections. So if I wanted to write x number of words per year, not counting the words I have already written, I would need to write y number of words per month with an average of z number of words per day. It's not something I pay too much attention to, just for fun. Below that is a projection of if I write the NaNoWriMo daily count (1667 words per day) or 1000 words per day, how much that would add up to at the end of the year.
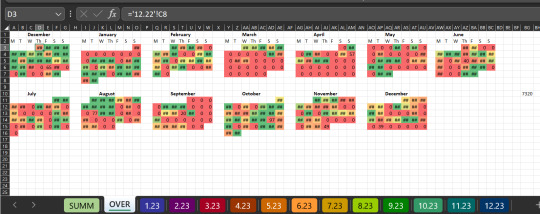
This is the Overview page from last year (2023) plus December 2022 which is when I switched over from my previous Google Sheets document. Additionally at the bottom you can see the different monthly pages that are not hidden (I color coded them because I was bored one day).
This page keeps track of my daily totals in the form of a color gradient, linked to the monthly pages to get the totals.
Solid Red = 0
Solid Yellow = 1000
Solid Green = 1667 (NaNoWriMo Daily; 50,000 words in a 30 day month)
Originally, the idea was to be able to look at it and see if there were time periods that I wasn't writing as well due to being busy for various reasons, so I could be able to predict in the future what conditions weren't great for writing. But an interesting side effect is it's also able to track my good days and my bad days for health reasons.
That random number you see on the right side is my highest daily word count. I was curious about it, but I couldn't figure out a way to make it look pretty and fit in with everything else.
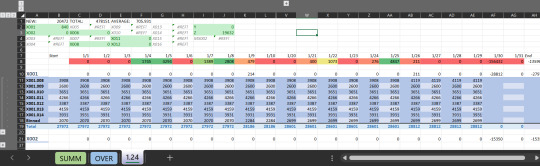
This is my month page, divided by each individual project. Y is series or event with multiple fics involved, Z is one-shots, two-shots, or very short fics. The greyed out ones at the top are ones I'm not actively working on, the ones in green are fics that I am either actively working on or trying to work on.
Also at the top are the new words added each month (which is the cell used in other pages to keep track of the monthly number), the total words in all my documents, and the daily average for the month.
The color gradient at the top for each day follows the same pattern as before; Solid Red = 0, Solid Yellow = 1000, Solid Green = 1667+
I keep track of the word count for each chapter, add the total, subtract it from the previous day, and boom, that's my daily total. If there are times where I delete things, I throw it into a document called "Binned" to balance the numbers. That way, I never subtract from the amount of words I've written, only add.
While it may look like a very simple sheet, it is very messy with formulas, conditional formatting, etc. If I were more skilled at Excel, I could probably improve it even more, but at this point, there's very little maintenance needed to keep it going and I can focus on actually writing.
In theory.
#making of monday#writing process#no i didn't almost forget to post this#what are you talking about?#this might only make sense in my own brain
8 notes
·
View notes
Text
Mastering Excel: Grayson Garelick Shares Essential Tips and Tricks for Beginners

In today's data-driven world, proficiency in Microsoft Excel is a valuable skill that can open doors to countless opportunities in various industries. Whether you're a student, a professional, or an entrepreneur, mastering Excel can significantly enhance your productivity, efficiency, and decision-making capabilities. To help beginners embark on their journey to Excel mastery, seasoned Excel expert Grayson Garelick shares some essential tips and tricks that lay the foundation for success.
Get Comfortable with the Basics: Before diving into advanced features, it's crucial to familiarize yourself with the basics of Excel. Learn how to navigate the interface, enter data, and perform simple calculations using formulas like SUM, AVERAGE, and COUNT. Understanding these foundational concepts will set you up for success as you progress to more complex tasks.
Explore Keyboard Shortcuts: Excel offers a plethora of keyboard shortcuts that can save you time and streamline your workflow. Take the time to learn commonly used shortcuts for tasks like copying and pasting, formatting cells, and navigating between worksheets. Memorizing these shortcuts will make you more efficient and productive in Excel.
Practice Regularly: Like any skill, proficiency in Excel comes with practice. Dedicate time each day to practice using Excel and experimenting with different features and functions. The more you practice, the more comfortable and confident you'll become in navigating Excel and performing various tasks.
Utilize Online Resources: Take advantage of the wealth of online resources available to learn Excel. Websites like Microsoft's official Excel help center, YouTube tutorials, and online courses offer valuable insights and guidance for beginners. Additionally, forums and communities like Stack Overflow and Reddit can be excellent places to ask questions and seek advice from experienced Excel users.
Master Essential Formulas and Functions: Formulas and functions are the backbone of Excel's functionality, allowing you to perform calculations, manipulate data, and analyze trends. Start by mastering essential formulas like VLOOKUP, SUMIF, and IFERROR, which are commonly used in data analysis and reporting. As you become more comfortable with these formulas, you can explore more advanced functions to expand your skill set further.
Learn Data Visualization Techniques: Excel offers powerful tools for visualizing data, such as charts, graphs, and pivot tables. Learning how to create visually compelling and informative visualizations can help you communicate insights effectively and make informed decisions based on your data. Experiment with different chart types and formatting options to find the best visualization for your data.
Stay Organized: Keeping your Excel workbooks organized is essential for efficiency and productivity. Use descriptive file names and folder structures to easily locate and access your files. Within your workbooks, use clear and consistent naming conventions for sheets, ranges, and cells. Additionally, consider using color coding and formatting techniques to visually distinguish different types of data.
Stay Updated: Excel is continuously evolving, with new features and updates released regularly. Stay informed about the latest developments by subscribing to Excel-related blogs, newsletters, and forums. Keeping up-to-date with the latest features and best practices will ensure that you're maximizing Excel's potential and staying ahead of the curve.
By following these tips and tricks shared by Excel expert Grayson Garelick, beginners can lay a solid foundation for mastering Excel and unlocking its full potential. With dedication, practice, and a willingness to learn, anyone can become proficient in Excel and leverage its powerful capabilities to excel in their personal and professional endeavors.
2 notes
·
View notes
Text
hiiiii first of all thank you for saying they're pretty <33 !! I tried my best afskhgsk (this is the post anon is referring to)
How I made my ao3 wrapped:
I'm not saying this is the best or even the most convenient way to do any of this, I'm just going to share the system I came up with, hopefully something here is useful or helpful!
There are 3 parts to this system:
1. Bookmarks
3. The spreadsheet
3. The charts
- Bookmarks:
I use bookmarks for everything (and they're always private). I bookmark every fic I read with the tag "Read" and the tag of the year I'm in, like "2024". This is incredibly useful since you can filter through your bookmarks and it keeps everything neat and tidy
- The Spreadsheet:
I'm scared of Excel, I'm sorry. So I use Notion, because I already use it for everything else in my life and to me it's much easier to handle (and it looks cuter)
I tried to make my spreadsheet in the least complicated way possible because I'm not tech savvy at all
It's just a basic table, without any manual formulas. Sadly this will sound kinda incomprehensible if you aren't familiar with Notion, but it's really simple once you look into it
The spreadsheet has 9 columns (between brackets I'll put the type of column they are):
- Date I finished it [Date]
- Title [Name]
- Fandom [Select]
- Ship [Multi-Select]
- Words [Number]
- Tags [Multi-Select]
- Rating [Select]
- Year of publication [Select]
- Month I finished it in [Select]
It ends up looking something like this:
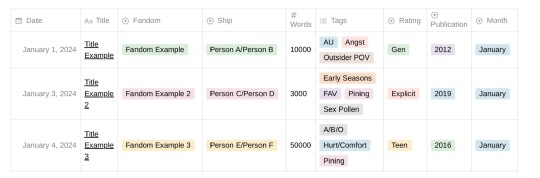
These are the parameters I chose to track, but you may be interested in tracking other things!
Most of these columns are [Select] or [Multi-Select], and in Notion that means they function with tags. For example inside the column "Rating" I can choose between the tags "Gen", "Teen", "Mature", or "Explicit". In the column "Year of Publication" I have a tag for every year. In the column "Fandom" I have a tag for every fandom I read about. And so on and so forth!
In the "Tags" column I have a selection of tags I personally want to track/I know I read a lot about. So I don't have a tag for every tag the fic had in AO3. For example, since I mainly read Spn fics, I have tags like "Weechesters", "Early Seasons", "Late Seasons", "Post-Finale", etc, because that's something I was interested in keeping organized. I also have kink-specific tags, and in this column I have the "FAV" tag as well
At the bottom of the table it will tell you the number of rows it has, which in this table means the number of fics. And the "Words" column, since it's a [Number] type of column, will let you do all kinds of automatic calculations with all the existing fics (like Sum, Average, Max, etc) - that's how I get stuff like the words I read in total, the words I read every month, the longest fic, etc
I can then filter the table through the different aspects of the columns in any way I want to get the different data I need to make the charts. In a way, it functions similarly to how filtering through tags works in AO3
Another great thing about Notion tables is that each entry is a page in itself, meaning you can click on it and it will open a page where you can write stuff. I use that to add: 1) the name of the author, 2) a link to the fic, 3) a downloaded epub of the fic, 4) any thoughts or review
I usually add a fic to the spreadsheet right after I finish it, but sometimes I wait until I've accumulated a couple of fics in my "Read" Bookmarks, and then I do them all together in a batch
- The Charts:
I make them with Canva - it has a feature where you can add and edit graphs and charts (all the info, the colors, etc). So first I collect the data I want by filtering the spreadsheet in different ways, and then I manually make the charts on Canva (if you're not familiar with the app don't worry it's kinda intuitive, and there are tutorials about everything)
And that's all! I came up with this system completely by myself and if you're reading this and you also track your fics but you use Excel or something maybe you're thinking what the hell is this girl even doing, but it works really well for me and I'm really happy with it afdhsafskh
English is not my first language so I apologize if there are any mistakes, I hope I made sense <3
#I could say more things but I didn't want to clutter the post#but I'll add two things here. like a PS lmao#I have another tag in the Tags column to mark my all-time favorites to diferenciate them from the regular “fav” ones#also I have a whole system inside this called “Special Awards 🏅”#by which I give certain fics a medal when they mark a special achievement or milestone#like “first fic I read of X ship” “fic that marked 1 million words read this year” “last fic I read in 2023” etc etc lmao#and they get their little medal icon in the Tags column. it's a big deal okay ! serious stuff....#ao3 wrapped#fic#⚝
5 notes
·
View notes
Text
Top 30 Excel Formulas and Functions You Should Know

Microsoft Excel stands as a powerhouse, and at the heart of its prowess lies a tool that transforms raw data into meaningful insights — Formulas. These dynamic instructions, initiated with the humble equal sign (=), unleash a spectrum of functions, from basic arithmetic operations to intricate statistical analyses.
Join us on a journey to unravel the mysteries of Microsoft Excel Formulas, where we’ll delve into their diverse functionalities, explore how they automate tasks, and understand their pivotal role in data analysis and manipulation.
What is an Excel Formula?
In Microsoft Excel, a formula is more than just an equation; it’s an expression that operates on values within a range of cells. These formulas execute calculations, from basic arithmetic operations like addition and subtraction to more complex tasks such as calculating averages, percentages, and manipulating date and time values.
In Microsoft Excel, both formulas and functions are essential tools for performing calculations and manipulating data within a spreadsheet. While the terms “formula” and “function” are often used interchangeably, they have distinct meanings in the context of Excel.
Excel formula: a formula in Excel is an expression that performs a calculation on values in a range of cells. Formulas can be simple or complex, involving various mathematical operations, cell references, and functions. Formulas always begin with an equal sign (=), indicating to Excel that it should interpret the following characters as a formula. For example, a simple addition formula to add the values in cells A1 and B1 would be written as =A1 + B1.
In essence, a formula is a user-created instruction that Excel follows to calculate a result based on the provided data.
Excel function: a function, on the other hand, is a predefined formula built into Excel. Functions are designed to perform specific tasks or calculations and are categorized into various types, such as mathematical, statistical, logical, text, date and time, and more. Functions are like ready-made tools that users can utilize to simplify complex calculations without having to write out the entire formula manually.
Functions are typically written with a specific syntax and may have arguments (input values) that define their behavior. For example, the SUM function is used to add up a range of values. The formula =SUM(A1:A5) would sum the values in cells A1 through A5.
Differences: The key difference lies in their origin and nature:
Formula: It is a user-created expression or set of instructions for performing calculations.
Function: It is a predefined operation or task built into Excel, designed to simplify common calculations.
In summary, while all functions are formulas, not all formulas are functions. Formulas encompass a broader range of expressions, including those that users create themselves, whereas functions specifically refer to predefined operations provided by Excel for various tasks.
How to use formulas in Excel
Choose a cell: Select the target cell for your calculation.
Enter an equal sign (=): Initiate the formula with the equal sign.
Enter the address of a cell or select from the list: Specify the cells involved in the calculation.
Enter an operator: Use operators like +, -, *, / for your mathematical operations.
Press Enter: Execute the formula.
Basic Arithmetic Operations
Click on the cell where you want the result to appear.
Type the equal sign (=).
Enter the formula using cell references and operators (e.g., =A1+B1).
Using Functions
Excel provides numerous built-in functions for various purposes (e.g., SUM, AVERAGE, IF).
Type the equal sign (=).
Start typing the function name (e.g., =SUM().
Enter the range or values the function should operate on.
Close the function with a closing parenthesis.
AutoSum Feature
Select the cell below or to the right of the data you want to sum.
Click the AutoSum button (Σ) on the toolbar.
Excel will automatically suggest a range. Press Enter to apply the formula.
Common Excel Functions
SUM: Adds up a range of numbers (e.g., =SUM(A1:A5)).
AVERAGE: Calculates the average of a range (e.g., =AVERAGE(B1:B10)).
IF: Performs a conditional test and returns different values based on the condition (e.g., =IF(A1>50, “Yes”, “No”)).
VLOOKUP: Searches for a value in the first column of a table and returns a value in the same row (e.g., =VLOOKUP(“ProductX”, A1:B10, 2, FALSE)).
Dragging and Copying Formulas
After entering a formula, you can use the fill handle (a small square at the bottom-right corner of the selected cell) to copy it to adjacent cells.
Click and drag the fill handle to cover the desired range.
Absolute and Relative References
Relative Reference: When you copy a formula, cell references adjust relative to their new location (e.g., A1 becomes B1 if you copy the formula one column to the right).
Absolute Reference: Use a $ sign before the column or row reference to make it absolute (e.g., $A$1 won’t change when copied).
Error Checking
Excel provides error checking features. If a formula contains an error, a small green triangle appears in the top-left corner of the cell. Click on it for options to correct the error.
Formula Auditing Tools
Excel offers tools like Trace Precedents and Trace Dependents to visualize and understand complex formulas.
By following these steps, you can effectively use formulas in Excel to perform calculations and analyze data in your spreadsheets.
Top most useful MS Excel formulas
SUM
The SUM formula is fundamental, adding up all the numerical values within a specified range. This is useful for calculating totals, such as the sum of sales figures or expenses in a given period. Formula: =SUM(range)
AVERAGE
AVERAGE computes the mean of a range of numbers, providing a quick way to assess the central tendency of a dataset. It is commonly used to find the average score or rating. Formula: =AVERAGE(range)
COUNT
COUNT tallies the number of cells in a range containing numerical data. This is handy for tasks like counting the number of completed tasks in a to-do list. Formula: =COUNT(range)
MAX
MAX identifies the highest value in a range, helping users find the peak performance, maximum sales, or the highest recorded temperature, for instance. Formula: =MAX(range)
MIN
On the flip side, MIN locates the lowest value in a range. It’s useful for finding the minimum stock levels, lowest test scores, or minimum temperatures. Formula: =MIN(range)
IF
The IF formula introduces conditional logic into Excel. It returns one value if a given condition is true and another if false. For example, it can be employed to categorize students as “Pass” or “Fail” based on their scores. Formula: =IF(logical_test, value_if_true, value_if_false)
VLOOKUP
VLOOKUP searches for a value in the first column of a table and returns a corresponding value from another column. This is often used for tasks like retrieving product prices based on product codes. Formula: =VLOOKUP(lookup_value, table_array, col_index_num, [range_lookup])
HLOOKUP
Similar to VLOOKUP, HLOOKUP searches for a value in the first row of a table and returns a corresponding value from another row. It’s useful when dealing with datasets organized horizontally. Formula: =HLOOKUP(lookup_value, table_array, row_index_num, [range_lookup])
INDEX and MATCH
INDEX and MATCH together offer a powerful alternative to VLOOKUP. INDEX returns the value in a specified row and column intersection based on the MATCH function, allowing for more flexible searches. Formula: =INDEX(return_range, MATCH(lookup_value, lookup_range, 0), MATCH(lookup_value, lookup_range, 0))
CONCATENATE
CONCATENATE joins together two or more text strings. This is useful for combining first and last names or merging text with predefined phrases. Formula: =CONCATENATE(text1, [text2], …)
LEFT
LEFT extracts a specified number of characters from the beginning of a text string. For instance, it can be used to extract area codes from phone numbers. Formula: =LEFT(text, num_chars)
RIGHT
Conversely, RIGHT extracts a specified number of characters from the end of a text string. This is handy for capturing file extensions from filenames. Formula: =RIGHT(text, num_chars)
LEN
LEN returns the number of characters in a text string. It’s beneficial when you need to limit the length of input in a cell, such as for usernames or passwords. Formula: =LEN(text)
TRIM
TRIM removes extra spaces from a text string. It’s useful for cleaning up data, especially when dealing with imported or copied text. Formula: =TRIM(text)
LOWER
LOWER converts text to lowercase. This can be helpful for standardizing text data, ensuring consistency in naming conventions. Formula: =LOWER(text)
UPPER
Conversely, UPPER converts text to uppercase. It’s useful for making text stand out or adhering to specific formatting requirements. Formula: =UPPER(text)
PROPER
PROPER capitalizes the first letter of each word in a text string. This is beneficial for enhancing the presentation of names and titles. Formula: =PROPER(text)
IFERROR
IFERROR is employed to handle errors in formulas. It returns a specified value if a formula results in an error, ensuring that error messages are replaced with more user-friendly responses. Formula: =IFERROR(formula, value_if_error)
COUNTIF
COUNTIF counts the number of cells within a range that meet a single condition. This is valuable for situations where you need to quantify occurrences based on a specific criterion. Formula: =COUNTIF(range, criteria)
SUMIF
SUMIF adds the cells specified by a given condition. For example, it can be used to calculate the total sales for a particular product. Formula: =SUMIF(range, criteria, [sum_range])
COUNTIFS
COUNTIFS extends the functionality of COUNTIF, allowing users to count cells based on multiple conditions. This is useful for more complex data analysis tasks. Formula: =COUNTIFS(range1, criteria1, [range2, criteria2], …)
SUMIFS
Similar to COUNTIFS, SUMIFS adds cells based on multiple conditions. This is often used for intricate financial or sales analyses. Formula: =SUMIFS(sum_range, range1, criteria1, [range2, criteria2], …)
DATE
The DATE formula returns the serial number of a date. It’s helpful for various date-related calculations and is often used in conjunction with other date functions. Formula: =DATE(year, month, day)
NOW
NOW returns the current date and time. This dynamic function is useful for tracking when a particular calculation or data entry occurred. Formula: =NOW()
TODAY
TODAY, in contrast to NOW, returns only the current date. It’s frequently used for date stamping or for calculating durations. Formula: =TODAY()
TEXT
TEXT converts a value to text in a specific format. This is useful for presenting dates or numbers in a more readable or standardized way. Formula: =TEXT(value, format_text)
IFNA
IFNA is used in combination with VLOOKUP to handle #N/A errors. It returns a specified value if the VLOOKUP result is not available, preventing error messages from disrupting the spreadsheet. Formula: =IFNA(value, value_if_na)
OFFSET
OFFSET is a versatile formula that returns a sum of a specified number of rows and columns from a starting cell. It’s useful for dynamic range calculations. Formula: =OFFSET(starting_cell, rows, columns, [height], [width])
INDEX-MATCH-MATCH
This combination of functions is an advanced alternative to VLOOKUP and HLOOKUP. It allows users to find a value at the intersection of a specified row and column based on two matching criteria. Formula: =INDEX(return_range, MATCH(lookup_value1, lookup_range1, 0), MATCH(lookup_value2, lookup_range2, 0))
HYPERLINK
HYPERLINK creates clickable links in Excel. This is useful for creating navigation within a spreadsheet or linking to external documents or websites, enhancing the interactivity of the spreadsheet. Formula: =HYPERLINK(link_location, [friendly_name])
These Excel formulas cover a broad range of functionalities, from basic arithmetic and text manipulation to complex data analysis and lookup operations. They are essential tools for users working with data in various capacities.
Conclusion
Embarking on the journey of Excel formulas opens doors to a realm of unparalleled data manipulation and analysis. In the intricate dance of numbers, Excel emerges as the choreographer, and formulas, its nimble performers, transform raw data into valuable insights. From the fundamental SUM to the sophisticated INDEX-MATCH-MATCH, these formulas orchestrate a symphony of calculations, ensuring efficiency and precision in every keystroke.
Excel’s prowess lies not just in its computational abilities but in its user-friendly interface that empowers individuals, irrespective of their mathematical prowess, to delve into the depths of data manipulation. Each formula, an instrument in this orchestra, brings a unique set of capabilities, allowing users to craft tailored solutions for diverse tasks — from simple arithmetic to complex lookup operations.
The journey doesn’t end here; it evolves with every new formula mastered and every data challenge conquered. Excel, with its arsenal of functions, becomes not just a spreadsheet software but a dynamic toolkit for those seeking to navigate the vast seas of data. So, embrace the power of formulas, chart your course through the Excel landscape, and let each formula be a stepping stone toward data mastery.
Interesting headings:
Affiliate marketing case studies
Bonuses
Reviews
2 notes
·
View notes
Text
Mastering Excel Basics: 10 Essential Tips for Spreadsheet Success

I. Introduction
In this section, you will introduce the blog post by emphasizing the importance of Excel in various aspects of life and work. You will highlight the significance of mastering the basics of Excel for efficient usage of spreadsheets. This will set the tone for the rest of the blog post. II. Tip 1: Navigating the Excel Interface
This section will guide readers on navigating the Excel interface effectively. It will explain the key elements of the Excel interface, such as the ribbon, menus, and toolbars. You will provide tips on customizing the interface based on individual preferences, improving productivity while working with Excel. III. Tip 2: Creating and Formatting Cells
In this section, you will explain the process of creating and formatting cells in Excel. You will cover essential aspects such as adjusting column width, merging cells, and applying borders. This will help readers make their spreadsheets visually appealing and organized. IV. Tip 3: Working with Formulas and Functions
This section will introduce readers to the concept of formulas and functions in Excel. You will explain basic mathematical operations, referencing cells, and using common functions like SUM, AVERAGE, and COUNT. Practical examples and shortcuts will be shared to simplify the creation of formulas. V. Tip 4: Sorting and Filtering Data
Here, you will demonstrate how to sort data in ascending or descending order in Excel. Additionally, you will explain the benefits of filtering data to focus on specific information. Tips on applying multiple criteria and using advanced filtering options will be provided. VI. Tip 5: Data Validation and Error Handling
This section will discuss the importance of data validation in Excel to ensure accurate data entry. You will share techniques for setting validation rules and creating custom error messages. Furthermore, insights on handling errors, such as using error checking and the IFERROR function, will be provided. VII. Tip 6: Working with Worksheets and Workbooks
In this section, you will guide readers on managing multiple worksheets within an Excel workbook. Techniques for rearranging, renaming, and grouping worksheets will be explained. Additionally, tips on linking data between worksheets and workbooks for efficient data management will be shared. VIII. Tip 7: Using Charts and Graphs
This section will highlight the power of visualizing data with charts and graphs in Excel. Readers will be walked through the process of creating various chart types, such as bar graphs, line charts, and pie charts. Suggestions for customizing and formatting charts to effectively convey information will be offered. IX. Tip 8: Applying Basic Analysis Tools
Here, you will introduce readers to basic analysis tools in Excel, including sorting, filtering, and conditional formatting. The benefits of using these tools to gain insights from data will be discussed. Practical examples of analyzing data using these features will be provided. X. Tip 9: Enhancing Productivity with Shortcuts
In this section, you will share a selection of useful keyboard shortcuts in Excel to streamline common tasks. Time-saving shortcuts for navigation, formatting, and formula entry will be highlighted. Readers will be encouraged to practice and incorporate these shortcuts into their workflow. XI. Tip 10: Troubleshooting Common Issues
This section will address common issues that users may encounter while working in Excel. Troubleshooting tips for issues like formula errors, data inconsistencies, and printing problems will be provided. Resources and recommendations for further assistance will also be given.
Microsoft Excel Basics Microsoft Excel is a powerful and versatile tool that provides numerous benefits for individuals and organizations across various industries. This conclusion highlights the fundamental aspects of Microsoft Excel and its importance in everyday tasks. Firstly, Excel serves as a comprehensive spreadsheet program that allows users to organize and analyze data efficiently. Its wide range of functions, formulas, and formatting options enable users to perform complex calculations, create visually appealing charts and graphs, and manipulate data with ease.
Excel’s intuitive interface and user-friendly features make it accessible to users of all skill levels. Secondly, Excel enhances productivity and saves time by automating repetitive tasks through the use of macros and advanced formulas. It enables users to create templates and apply them to new data sets, thereby streamlining workflows and reducing errors. Additionally, Excel facilitates collaboration and data sharing by providing options for data import/export, real-time co-authoring, and integration with other Microsoft Office applications. Moreover, Excel is a valuable tool for financial analysis, budgeting, and forecasting. It enables individuals and businesses to track expenses, manage budgets, and generate accurate financial reports. Excel’s built-in financial functions and tools make it an indispensable asset for finance professionals, enabling them to make informed decisions based on reliable data. Furthermore, Excel is widely used in various industries such as finance, accounting, marketing, and project management. Its versatility allows it to adapt to different business needs, making it a universal tool for data manipulation and analysis. Proficiency in Excel is often a prerequisite for many job positions, and acquiring Excel skills can significantly enhance one’s employability
In this article, we’ll cover the fundamental capabilities in the Lace, which is what the primary menu bar in Succeed is called. Things in the lace contain gatherings of symbols that carry out comparable roles. These incorporate :
File Home Insert Page Layout Formulas Data Review View
File

The Record menu is the furthest left thing in the Succeed strip. The Record strip things empower you to perform document the executives capabilities, including open, save, close, and print. You likewise utilize the Document menu to import from outside sources into Succeed, alongside choices that permit you to change Succeed itself.
Expert Tip: The Document menu doesn’t show up as a lace in Succeed for Macintosh. All things being equal, the Document menu shows up in the Application Menu Bar.
Home

The Home menu is the second menu in the Succeed menu bar. The Home lace things incorporate choices for arranging textual style, variety, restrictive designing, channel, number sort, and that’s only the tip of the iceberg. This multitude of capabilities help one in performing different viable computations.
Expert Tip: Attempt the Configuration Painter. It permits you to duplicate the designing starting with one cell then onto the next, which can be an incredible efficient device.
Insert

As the name recommends, the Supplement menu assists you with embedding different choices and things into a Succeed calculation sheet. You can embed different things going from turn table to picture, cut craftsmanship, shapes, screen shots, diagrams and charts, text box, header and footer, images, condition, and that’s only the tip of the iceberg.
Expert Tip: You can likewise embed hyperlinks and even guides utilizing the Supplement menu.
Page Layout

Once more, the name recommends the assortment of capabilities on the Page Format menu. You’ll see numerous choices for arranging pages for survey and printing — including page size, edges, tones and text styles, etc. You can likewise tweak cell level and width on the Page Design menu.
Expert Tip: You can add a foundation to an assortment of cells — or even your whole bookkeeping sheet. Simply click Foundation and select the picture you need to utilize.
Formulas

The Recipes menu is where you track down all the calculating choices. Succeed accompanies heaps of equations including monetary, intelligent, text, date and time, query and reference, and math and geometry.
Expert Tip: You can name cells or scopes of cells – this can make it more straightforward to modify your recipes.
Data

The Information menu likewise contains numerous significant capabilities in Succeed, incorporating imports and associations with data sets. You likewise access the sort, channel, eliminate copies, information approval, solidification, bunch, ungroup, and subtotal capabilities on the Information menu.
Expert Tip: Utilize the Information Approval capability to guarantee consistency in cells.
Review

Prior in this article, we referenced Succeed’s capacity to team up on calculation sheets. The Survey menu is where a significant number of those errands happen. You can offer remarks in cells for your associates, check spelling, track changes, and even limit authorization involving things in the Audit menu.
Expert Tip: Utilize the Offer Exercise manual connect to impart to your associates!
View

On the View menu, you tweak the manner in which accounting sheets show up on your screen. Choices incorporate showing matrix lines between cells, flipping the recipe bar and headings, and that’s only the tip of the iceberg. This menu additionally gives you choices to view and record macros, also — macros let you record normal advances you perform so you don’t need to rehash exactly the same things again and again!
Expert Tip: Utilize the Freeze Top Line or Freeze First Segment, and they will wait while you look at endlessly pages of numbers.
Conclusion In the concluding section, you will recap the 10 essential tips for mastering Excel basics. Readers will be encouraged to apply these tips to improve their spreadsheet skills and achieve success. The importance of continuous learning and exploration of advanced Excel features will be emphasized. By explaining each outline in detail, the blog post will provide valuable insights and practical guidance to readers looking to master Excel basics and succeed with their spreadsheets.
Microsoft Excel is an essential tool for data management, analysis, and productivity improvement. Its diverse range of features, ease of use, and widespread applicability make it an indispensable asset for individuals and organizations alike. By mastering the basics of Excel, users can unlock its full potential and gain a competitive edge in the digital age.
2 notes
·
View notes
Text
Excel Like a Pro: The Ultimate Guide to Microsoft Excel Mastery
If you've ever felt overwhelmed looking at an Excel spreadsheet, you're not alone. Microsoft Excel can look intimidating with all its formulas, charts, tables, and tabs. But here’s the thing — once you master it, Excel becomes one of the most powerful tools you’ll ever use. Whether you're managing personal finances, analyzing data, or building dashboards for work, Excel has you covered.
So, how do you go from being an Excel rookie to someone who uses pivot tables in their sleep?
Simple. By learning from the Microsoft Excel: Ultimate Mastery from Beginner to Pro course — a comprehensive program designed to turn even the most hesitant users into Excel power users.
Let’s break down why this course is worth your time and how it can transform your skills from basic to brilliant.
Why Excel Mastery Matters in 2025 (and Beyond)
Excel is not just a tool. It’s practically a language spoken across all industries — from finance and marketing to healthcare and logistics. Here's what makes it essential:
Universal Application: Almost every job requires some level of data entry, reporting, or analysis.
Efficiency & Productivity: Mastering Excel helps you complete tasks faster and more accurately.
Career Advancement: Proficiency in Excel is a highly sought-after skill that can help you stand out.
Smarter Decision Making: With Excel, you can visualize data, forecast trends, and make data-driven decisions.
So, whether you're job hunting, starting a business, or looking to automate repetitive tasks, mastering Excel is a smart move.
What Makes This Excel Course So Effective?
There are tons of Excel tutorials out there, so why choose this one? The Microsoft Excel: Ultimate Mastery from Beginner to Pro course on Korshub is different. Here’s how:
✅ All-in-One Learning Path
Instead of bouncing between YouTube videos and random blog posts, this course gives you a structured, progressive roadmap. It starts with the basics like formatting cells and quickly moves into advanced territory like macros and data analysis.
✅ Hands-On Learning with Real-Life Examples
You won’t just learn how to use VLOOKUP or SUMIF — you’ll use them in real-world scenarios that simulate actual workplace tasks. That means what you learn is immediately applicable.
✅ Latest Excel 2021 Features Covered
With tools and techniques updated for Microsoft Excel 2021, this course ensures you're learning the most relevant and up-to-date content. Features like dynamic arrays, XLOOKUP, and improved charting functionalities are all part of the package.
✅ Lifetime Access with Future Updates
Once enrolled, you’ll have lifetime access to the course. Whenever there’s a new Excel update, you’ll be the first to know and learn how to use it.
What You’ll Learn — A Peek into the Curriculum
Here’s a quick overview of the skills you'll gain from beginner to pro level:
🟢 Beginner Essentials
Navigating Excel’s interface
Formatting cells and worksheets
Basic formulas and functions (SUM, AVERAGE, COUNT)
Sorting and filtering data
Creating and formatting simple charts
🔵 Intermediate Proficiency
Conditional formatting
Data validation
Pivot tables and Pivot charts
Logical functions like IF, AND, OR
Lookup functions (VLOOKUP, HLOOKUP, XLOOKUP)
🟣 Advanced Excel Techniques
Data visualization dashboards
Advanced charts (combo, waterfall, histogram)
What-If analysis (Goal Seek, Scenario Manager)
Named ranges and data tables
Working with large datasets
🔴 Excel Power Tools
Power Query & Power Pivot
Macros and VBA basics
Automating reports
Connecting Excel to other data sources
Advanced data modeling and forecasting
Real-World Applications: How Excel Helps You Every Day
You might be wondering, "Will I really use all this?" The short answer: YES.
Here’s how Excel shows up in real life:
For Students: Organize study schedules, calculate GPA, track expenses.
For Freelancers: Invoice clients, calculate earnings, manage projects.
For Office Workers: Analyze sales data, create performance dashboards, generate automated reports.
For Small Business Owners: Track inventory, monitor cash flow, create financial projections.
And the best part? Once you’ve taken the Microsoft Excel: Ultimate Mastery from Beginner to Pro course, you’ll be doing all this with ease and speed.
Who Is This Course For?
This course is designed for everyone — regardless of your background or experience. Here's who will benefit most:
Absolute Beginners: No prior Excel knowledge needed.
Intermediate Users: Fill in knowledge gaps and explore new features.
Business Professionals: Improve productivity and data analysis.
Job Seekers: Boost your resume with a high-demand skill.
Entrepreneurs: Manage and grow your business more efficiently.
Key Features That Set This Course Apart
🌟 20+ Hours of Engaging Video Content
Packed with digestible lessons that keep you motivated.
🌟 Downloadable Resources & Workbooks
Practice what you learn with ready-to-use files.
🌟 Quizzes & Real-World Projects
Put your skills to the test with interactive assignments.
🌟 Certificate of Completion
Showcase your achievement and add it to your LinkedIn profile.
What Students Are Saying
"I thought Excel was only for accountants. After taking this course, I use it for everything — budgeting, planning, even my side hustle. Totally worth it!" — Priya M., Freelancer
"I landed a job partly because of the Excel dashboard I built as part of this course. Hiring managers were impressed!" — Jason T., Data Analyst
"This course is like having a mentor walk you through Excel step-by-step. I finally understand formulas, charts, and even macros!" — Alisha R., College Student
How to Get Started
Ready to transform how you work with data?
It only takes a few minutes to enroll in the Microsoft Excel: Ultimate Mastery from Beginner to Pro course. From there, you can start learning at your own pace — pause, rewind, practice — and gradually build mastery.
Excel Tips to Keep in Your Back Pocket
To give you a head start, here are a few tips that’ll instantly improve your Excel game:
CTRL + Arrow Keys: Jump quickly across large datasets.
Use Named Ranges: They make formulas easier to read and manage.
Combine Functions: Nest IF, AND, OR for powerful logical analysis.
Flash Fill: Excel predicts and completes repetitive entries for you.
Use Tables for Dynamic Ranges: Automatically updates data references when new rows are added.
Of course, all these tricks (and hundreds more) are covered inside the course!
Final Thoughts: Excel Isn’t Optional Anymore
Whether you're building your career, managing your own business, or simply trying to stay organized, Excel is one skill that pays for itself many times over. And you don’t need to spend months trying to figure it all out.
With the Microsoft Excel: Ultimate Mastery from Beginner to Pro course, you’ll go from confused to confident — unlocking the full power of spreadsheets, dashboards, and data automation.
0 notes
Text
A Thorough Manual for Addressing Common Excel Mistakes
For everyday computations, financial modeling and data analysis, Microsoft Excel is a powerhouse. Still, even experienced users can run into annoying mistake notices halting advancement. Knowing these mistakes, their origins, and how to fix them will help you save time and headaches. We will delve in this guide on the most often occurring Excel problems, their causes and workable corrective solutions. This article will guide you with surety around Excel's quirks whether you are a professional or just starting.
1. #DIV/0! Error: Division by Zero
The #DIV/0! error appears when a formula attempts to divide a number by zero or an empty cell. Excel cannot process division by zero, as it’s mathematically undefined.
Why It Happens
A formula like =A1/B1 where B1 is zero or blank.
Referencing a cell with no value in the denominator.
Using functions like AVERAGE on a range with no valid numeric data.
How to Fix It
Check the Denominator: Ensure the cell in the denominator (e.g., B1) contains a non-zero value. If it’s blank, you might need to input a value or adjust your data.
Use IFERROR: Wrap your formula in IFERROR to handle the error gracefully. For example: =IFERROR(A1/B1, "Not Divisible") returns "Not Divisible" instead of the error.
Use IF to Avoid Zero: Use =IF(B1=0, "Not Divisible", A1/B1) to check if the denominator is zero before performing the division.
Pro Tip
To prevent this error across a large dataset, use conditional formatting to highlight cells with zero values in the denominator, making them easier to spot.
2. #VALUE! Error: Invalid Data Type
The #VALUE! error occurs when Excel encounters an invalid data type in a formula, such as text where a number is expected.
Why It Happens
Performing calculations with cells containing text (e.g., =A1+B1 where A1 contains "text").
Incorrect arguments in functions, like using a text string in a mathematical function.
Hidden spaces or non-numeric characters in cells that look like numbers.
How to Fix It
Verify Data Types: Check the cells referenced in the formula. Use ISNUMBER(A1) to confirm if a cell contains a number.
Clean Data: Remove hidden spaces or characters using the TRIM or CLEAN functions. For example, =TRIM(A1) removes leading/trailing spaces.
Convert Text to Numbers: If numbers are stored as text, select the cells, click the error indicator (yellow diamond), and choose “Convert to Number.”
Pro Tip
Use the VALUE function to convert text that looks like a number into an actual number: =VALUE(A1).
3. #REF! Error: Invalid Cell Reference
The #REF! error indicates that a formula refers to a cell that is no longer valid, often due to deleted rows, columns, or worksheets.
Why It Happens
Deleting a cell, row, or column referenced in a formula.
Moving or copying a formula to a location where referenced cells don’t exist.
Referencing a closed workbook or a moved external file.
How to Fix It
Check References: Review the formula to identify missing references. Excel’s formula auditing tools (Trace Precedents/Dependents) can help.
Undo Deletions: If you recently deleted cells, use Ctrl+Z to undo the action and restore the reference.
Update Links: If the error stems from an external workbook, ensure the linked file is accessible or update the reference path.
Pro Tip
Before deleting rows or columns, check if they’re referenced in formulas using the “Find & Select” tool to search for cell references.
4. #NAME? Error: Unrecognized Text in a Formula
The #NAME? error appears when Excel doesn’t recognize text in a formula, often due to typos or missing add-ins.
Why It Happens
Misspelling a function name (e.g., =SUMM(A1:A10) instead of =SUM(A1:A10)).
Using a named range that doesn’t exist.
Referencing a function from an add-in that isn’t enabled (e.g., Analysis ToolPak).
How to Fix It
Check Spelling: Double-check function names and ensure they’re correct. Excel’s formula autofill can help avoid typos.
Verify Named Ranges: Go to Formulas > Name Manager to confirm the named range exists and is correctly defined.
Enable Add-ins: If using specialized functions, ensure the relevant add-in is enabled via File > Options > Add-ins.
Pro Tip
Use Excel’s Formula AutoComplete feature to select functions and avoid spelling errors.
5. #N/A Error: Value Not Available
The #N/A error typically occurs in lookup functions like VLOOKUP or INDEX/MATCH when the searched value isn’t found.
Why It Happens
The lookup value doesn’t exist in the source data.
Mismatched data types (e.g., text vs. number) in the lookup column.
Incorrect range references in lookup formulas.
How to Fix It
Verify Lookup Value: Ensure the value you’re searching for exists in the lookup range.
Check Data Consistency: Ensure the lookup value and source data have the same format (e.g., both are numbers or text).
Use IFERROR: Wrap the formula in IFERROR to display a custom message, like =IFERROR(VLOOKUP(A1, B1:C10, 2, FALSE), "Not Found").
Pro Tip
Use MATCH to test if the lookup value exists in the range before running the full formula.
6. #NUM! Error: Invalid Numeric Values
The #NUM! error appears when a formula contains invalid numeric values, such as calculations that exceed Excel’s limits.
Why It Happens
Calculations producing numbers too large or too small for Excel to handle.
Invalid arguments in functions like SQRT (e.g., =SQRT(-1)).
Iterative calculations failing to converge.
How to Fix It
Check Formula Inputs: Ensure inputs are within acceptable ranges. For example, use ABS to avoid negative numbers in SQRT.
Adjust Iteration Settings: If using iterative calculations, go to File > Options > Formulas and adjust the maximum iterations or change limit.
Simplify Formulas: Break complex calculations into smaller steps to identify the problematic part.
Pro Tip
Use IF to validate inputs before performing calculations, like =IF(A1>=0, SQRT(A1), "Invalid Input").
7. #NULL! Error: Invalid Range Intersection
The #NULL! error is rare and occurs when a formula specifies an invalid intersection of ranges.
Why It Happens
Using a space instead of a comma or colon in a formula (e.g., =SUM(A1 A10) instead of =SUM(A1:A10)).
Incorrectly referencing multiple ranges that don’t intersect.
How to Fix It
Check Syntax: Ensure you’re using the correct operator (: for ranges, , for separate arguments).
Review Range References: Confirm that referenced ranges intersect or are correctly defined.
Pro Tip
Use Excel’s formula bar to carefully review syntax, as small typos can trigger this error.
8. General Troubleshooting Tips
Beyond specific error fixes, here are some universal strategies to prevent and resolve Excel errors:
Use Formula Auditing Tools: Found under the Formulas tab, tools like Trace Precedents and Evaluate Formula can pinpoint error sources.
Validate Data: Use Data Validation to restrict cell inputs to specific types, reducing errors like #VALUE!.
Keep Backups: Save a copy of your workbook before making major changes to avoid losing data due to #REF! errors.
Update Excel: Ensure you’re using the latest version of Excel, as updates often fix bugs and improve error handling.
Conclusion
Excel errors can be daunting, but they’re often straightforward to resolve once you understand their causes. By systematically checking formulas, data types, and references, you can quickly get back to your work. Bookmark this guide for the next time an error pops up, and you’ll be solving issues like a pro in no time. Have a specific Excel error you’re struggling with? Drop a comment below, and let’s troubleshoot it together!
0 notes
Text
Locked Up and Waiting for You - Part 2 [29M, 26F][BDSM, Male Dom, Cheating Wife, Anal]
(This is a true story. All participants involved in both parts of this story were consenting adults who enjoyed themselves very much. Names have been changed, obviously.)(There are other smaller applicable tags throughout this story that I didn’t put in the title for spacing reasons. They include #spanking, #cheating, #assplay, #watersports, #cumplay, #humiliation, #degradation, #roleplay, #creampie, and #exhibitionism.)
Welcome back, Sneaky Reader! I hope you enjoyed Part 1. I know it was a long one; there is just so much detail I remember from that day. If you haven’t read Part 1, you might want to.
Sometimes the most memorable sexual experiences are the ones that only happened once. I thought I might fuck Aussie in the cage again, but when she left I figured that one time was it. Never again would I have a bad girl, naked in a cage, wanting to be there, locked up and waiting for me.
I’ve never been so happy to be wrong.
Aussie had left me for another man about a year before I met Mikayla (not her real name). She was a coworker - I know “Don’t fuck your coworkers!” But, let’s be honest about that. Almost everyone has heard that advice, and many have ignored it. Coworkers are people you spend a huge chunk of time with, you’re going to get to know them, and, odds are, you’ll end up attracted to one that’s also attracted to you. Fuck you coworkers, just don’t be a complete idiot about it. I can damn-near guarantee that you - yes, you Sneaky Reader - know someone who married someone they worked with. You don’t think they restrained themselves until one left the job, do you?
Unfortunately, Mikayla was already married. But, it’s okay to find someone attractive - married or not. She was petite and had an average build with nice curves and long, black hair that hung down to the small of her back. She was half-Chinese and covered in tattoos. I think she said she had over 30. She worked in a support role for my function at work - not like an assistant, more like an operations associate. The attraction was immediate for me though. She was an absolute smokeshow, and I knew I wanted her.
But, there was no way she was into me. I was sure of it.
Have you ever been talking to someone, and thought that you were just talking? That no one was trying to flirt?
Soon after we started working together, we started going to the work cafeteria for lunch together. We would talk about her marriage… and how single I was. We would talk about her glory days… and what my dates were like. We would talk about how she sometimes missed the freedom to do what, or who, she wanted… and how she was jealous I could do just that. I had a house to myself, I was good-looking, I was funny and had a way with words. “I like talking to you at work,” she said, “Why don’t we text outside of work too?”
We exchanged numbers.
I sent her a text with my name.
She sent me a text I could use as a contact photo for her.
It was a mirror-selfie. She was naked. Standing with her legs slightly spread. Grinning and biting her lip and winking.
She stood up from the table we had been eating at. “I got a meeting. Text you when I’m out.”
I snuck glimpses of that pic the rest of the afternoon. She finally texted me about 10 minutes before I clocked out. “How many times have you looked at that since I sent it?”
“I’d have to create a log and a complicated-ass excel formula to give you an accurate number.”
“Complicated? This ass?” A picture of her bending over in front of the same full-length mirror from the first pic appeared on my phone. “Well, I do have complications,” she conceded, “but my husband won’t ask questions if I just tell him I’ll be with multiple coworkers at a happy hour.”
Sometimes, affairs start in such an effortless way. Thank you, God or Goddess of Affairs, whoever you are.
Now, you might be expecting there to be some kind of build-up here. But nothing really changed for the first month or so. We just sexted. A lot. We discussed fantasies, what would happen when we met, but there were so many barriers to actually being able to meet. But, that was okay. The spark was certainly there.
Mikayla told me about her and her husband’s relationship. Things started off great, they married fast, and had a kid soon after that. It’s a classic story, but so is the often dead bedroom that follows. “We basically only fuck on holidays and our anniversary.” The romance had faded over time. “I know I’m partially guilty of that too, but when I plan something, it doesn’t work out. When he plans something, it doesn’t work out. Same with initiating.”
So, she started cheating. Here’s the thing that people who hate cheaters and cheating do not understand: It absolutely is usually easier. Cheater-haters will say to just break up, just divorce, just don’t do it, just yada yada yada. They are living in an idealistic world and unable to handle the reality of this one. Mikayla had a fully functional family with a partner who put in as much effort as she did. Sex was the only real issue: she wanted it much more than her husband did. The cheater-haters out there will say she was selfish, that she should have done all those other things instead of cheating. Which is more selfish? Blowing everything up in her life, his life, et al. because she wanted a better sex life? Or not fucking all that up, safely hooking up with someone else - meeting her needs, and keeping all that at an arm’s length? The correct answer is obvious.*
I wasn’t her first coworker of interest. She always made it clear with people she knew from her every day life that “this is all this is going to be. I’m not looking for something that lasts.” She was experienced with affairs, and I was single and interested. Why would I say no? She told me her stories, which only further convinced me that this would be fun for both of us. She had a fantastic story about meeting two men in a hotel bar on a work trip that ended in her first double-penetration, but this isn’t the time for that story, nor is it mine to tell.
Over time, she learned about some of my wilder stories. I have always been a fan of the idea of telling someone what you’ve already done. Maybe they’ll want to try it. If they don’t, they’ll tell you that too. I had told other partners after Aussie about the cage, and none expressed any interest in it. A couple outright hated the idea - including the woman I’d eventually marry. And, that’s all fine. I personally find it difficult to really enjoy myself if my partner isn’t also enjoying themselves.
I also told Mikayla about the cage. I don’t know if I told her all the details I could remember from Part 1, but she got most of the story, for sure. I told her about the ad. I told her about the emails. I told her about the butt plug, the anal masturbation, the porn, the squirting, coating Aussie in cum. Every time I told her a new detail, she seemed to get more interested and flustered. We were sitting in the cafe at work when I was telling her this. It was the kind of place that you nearly had to shout at each other at the table to be heard, but nobody 5 feet away could hear you.
I told her about all of that on a Wednesday. Halfway through the conversation, she pulled up her phone, texted someone, and set her phone down. A few minutes after I had finished, she checked her phone. “I told my husband that I have a happy hour with colleagues tomorrow.”
“And the bar you’re going to is a house on the other side of the city with a cage you’re hoping to get fucked in?” I joked.
“Exactly,” she replied, starting right at me with a hunger in her eyes.
We made plans that would work around my end of day. There was a chance that I wouldn’t be able to leave when my shift was supposed to be over, but she almost always had a hard stop time. I gave her my address and told her where my spare key was. She could let herself in, feel free to play with the dog for a while, and I’d text her when I was leaving if she needed to prep. Sure enough, I ended up stuck fixing a problem for another department, and she was able to leave right on time. I texted her to tell her that I’d be at least half-an-hour late.
She simply replied with a cute picture of her with my dog on the couch. “I’ll see you soon! No rush.” A second text followed. “I probably can get away with getting home as late as 10. We don’t need to rush anything,” with a smiling devil emoji added.
I hadn't planned on rushing a single thing. I wanted to savor my time with her. Every text exchange between her and I made me crave her. But it also made it abundantly clear to me that she was missing something, needing something herself - something that toys and fantasies and porn and smut couldn't really replicate for her. I had every intention of giving her everything she wanted.
I pulled in front of my house behind her car. My dog saw me pull up and began barking while standing on the back of the couch and watching me through the window. I grabbed my things from my car, went inside, and greeted and fed my dog. I let her into the backyard and left her access to the doggie door so she could lounge outside to her heart's content.
Mikayla was obviously in the spare room waiting for me. I assumed that she might have been sitting on the new couch I had put in there, even though I had set up the cage before I went in to work. Maybe she hadn't already changed and sat there in her work attire. I fully expect to have to take her lanyard from around her neck (although part of me wanted my cum to land on the plastic casing with her badge in it). That is not how I found her. I opened the door and was greeted with "Hi, master." Her voice was not bratty but it was submissive and eager to please.
I looked through the slats into the cage and saw her sitting on her heels with her knees to the floor. She was wearing a leather corset with harnesses clipped atop a pair of medium fishnet stockings. She had on sleeves that matched the stockings. Her breasts were exposed and pushed up by the outfit, and her pierced nipples appeared cold and needing to be tasted. I wanted to feel the cool barbells on my lips and tongue. I could see that she wasn't wearing any form of underwear. She had left her glasses on, and somehow that really completed the look. I noticed that she had a bag sitting in the couch beside her purse that wasn't her work backpack. I wondered what was in the bag.
"Master, huh?" I replied. "I like that. What should I call you?"
"Whatever you want, Master."
"I may have to think of something really quick," I said undoing my button-up.
"You can call me 'pet' or 'slave' if you like, Master."
"Pet?" I mused, shaking my head no. "I am too white, and you are too not for me to feel comfortable with 'slave.'"
"I have another idea, Master. May I ask you a question?"
"Yes."
"How many women have you fucked?"
Truth be told, I have no idea; I never bothered to count. I always thought of guys that counted as deeply insecure and perpetually driven to push that number further. I never wanted to be like that. I wanted to enjoy sex for the sake of pleasure, not because my own ego wanted more and more and more. I thought about my answer, trying to rapidly figure a guess before I said, "About 40, I think."
She blushed and squirmed a little like hearing the number turned her on further. "May I be called '41,' Master?" I smirked at the thought. She could see it on my face.
"I've never thought about reducing a collection of holes..." I said, removing my shirt then undoing my belt, "...as just a number, 41, but I think I like that."
"If Master is happy, 41 is happy."
I knew for this playtime, I needed to control myself, to not just fuck her until I came. I knew she had expectations. But I wanted to tear the rest of my clothes off, pull her out of her confinement, and fuck her until I groaned into her mouth that I was filling her married pussy. I had to make resisting that urge as fun as giving into it would have been.
To distract myself from my urge to strip my pants off and demolish her, I turned my attention to the extra bag sitting on my couch. "And this is?" I asked, walking to the bag and picking it up. I could feel that there were several items in it.
"Several things, Master. Some of which I thought we could use, if it would please you."
I opened the bag and set it back down on the couch. The first thing I pulled out was a fairly nice Nikon camera. "You want me to take your picture, 41."
"Yes, Master. You can film me too."
"How do I know your husband won't see these pictures or videos?"
"I keep my memory cards in a secret place, Master. There's a special compartment I sewed into the side of the bag to hide it. The memory card is already in the camera for you though."
I turned the camera on. "Is there anything on this memory card already?"
"Yes, Master."
I opened the picture files. There were pictures she'd taken of herself in various poses and outfits. Then there were two photos, close ups of her face. I opened the first. "Whose cock is this in front of your face, 41?" I asked turning the screen so she could see it.
"That's my husband's cock, Master."
I clicked to the next picture. It was a still image like the first. Her husband had clearly taken both from his point of view. The first was of her looking at the camera with her mouth open and tongue out. He was fully erect, but she wasn't touching it. She looked happy. In the second, his cock was on her tongue. The tip of it was barely inside her mouth, but the tip of her tongue had to have been touching the base. He couldn't be more than 3, maybe 3.5 inches fully erect. "It's small," I said.
"That's one reason I'm here, Master." She had never really discussed her husband's size before. I only knew he was thin and blue-collar with a low libido.
"And he doesn't know you're here?"
"A man with a dick that small and a sex drive that low doesn't deserve to know where I am, Master. Or what is about to happen to me." Jesus fucking Christ. That was wild, cruel, and hot. She was going to make this hard on me.
I turned to her and took a photo of her where she sat. I knelt in front of the cage and took two pics. One with the slat clearing obscuring some of her, the other was with the lens up to the cage. She looked right at the camera for both without otherwise moving. The satisfied look on her face was one of the sexiest things I ever saw on her - better than her outfit or any other she'd show me in the future. "We will take many more pictures, don't worry, 41."
"Yes, Master."
I went back to the bag, setting the camera on the couch. The next thing I pulled out was a gallon size ZipLock with a bulb enema and matching anal douche. "What are these for, 41?"
"I prepped so you could fuck me in the ass, Master."
I set them beside the bag and then pulled out a clear plastic case. Inside was foam packing. Two butt plugs sat in two slots, but there was an empty slot, the middle one, was empty. A medium sized, flared silicone plug was missing. "Should I assume that the missing plug from this case is in your asshole, 41?"
"Yes, Master. My ass is plugged."
I reached for the camera. "Turn around and show me." She spun around in the cage, sticking her ass into the air showing her plugged hole. I took a few pictures of her like that. I opened the cage to take a couple more. "Turn around. Back into how you were sitting." She did, and I took more pics of her with the cage door open. I closed the cage and set the camera back within reach.
"What are your limits, 41?"
She said the two most common and added, "No marks above my collar. I can hide any others with my pajamas, Master."
"If I mark your ass with welts from my belt..."
"I can hide them, Master."
"If your small-dicked husband sees them?"
"He'll kick me out, and I'll come back here to you for more fucking punishment, Master."
"You have a filthy mouth, 41."
"I know, Master."
I stood up, pulled out my cock, and grabbed the camera. "Come here, 41. You know what I expect you to do. Look happy while you do it. For the camera."
"I will be happy while I do it, Master. I am so fucking happy right now."
"That's a good collection of holes. A very good number." I slid my cock between two slats, snapped several pictures as she crawled to me and took my cock into her mouth. I turned the camera into video mode and filmed her worshiping my cock. I filmed for a while, then went back to pictures.
A strange urge took over me. "I'll be back, 41." I took my cock from her, pulled up and fastened my pants, and walked to my bathroom. I cleaned my asshole with my bidet and dried it with a towel. I walked back to the cage to find her where I left her, on all fours waiting for my cock. I opened the cage. "I want you to eat my ass, 41. Come out and be a good collection of holes."
I turned to face my desk and kicked off my shoes. Mikayla stood up behind me, wrapped her hands around my waist and undid my pants. I let her pull my pants and boxers down, and I stepped out of them. "Ask me to bend over for you."
"Please, Master, will you bend over for me?"
"I need to be convinced you want it. Beg. Be explicit, 41. You do have a filthy mouth after all."
"Master, I, your 41st whore, nothing more than a collection of holes for your joy, am begging you please, lean forward and let me taste your asshole."
"More."
"I need to put my tongue on your ass. I need your tongue in my ass. It's my only purpose at the moment. Please, Master, let me rim you. Let me make you feel good."
"Have you ever rimmed your husband?"
"No, Master."
"Why not?"
"His cock is too small. He only lasts a few minutes at most. He never touches me when I need him to. He doesn't deserve it, Master. And I'm sure he's not as clean as you are."
I leaned forward and spread my legs open. "You only get a taste right now. Caress my cock and balls and ass as you do it." She got down to her knees spread my right ass cheek with one hand, and caressed where I asked and like I asked with her other. "Lick," I commanded. "I want to feel your nose in my ass crack, 41."
"Yes, Master." And that's exactly what she did. She started to stroke me at one point, but I stopped her, back to teasing caressing. Satisfied that she was talented for me, I told her to stand up and get back.
I walked to the couch, knelt on it and rested my chest and head on the cushions. My ass was in the air and spread apart enough to give her full access. "Devour my asshole, 41. Rim me enough that you never feel obligated to rim your husband for as long as you are married." She didn't even get out a "Yes, Master." She dove into it. To this day, I have never been rimmed like that. Her tongue was so far inside my ass, and all over my taint and asshole and cheeks, it was like I unleashed an inner-ass-eating slut inside her. I could feel my cock leaking precum and tingling like if I let her go for just a few minutes longer, she'd have made me cum with just her tongue, just like that. "Good job, 41. It's time for you to lay here," I said motioning to the couch.
I stood before her. She had a look in her eyes. Wild, unleashed. "Spit in my face, Master," she said. "Please?" I didn't even think about it. I just did it. She then smeared my spit all over her face like she was using it to clean my ass off of her mouth, nose, and chin. When her eyes were closed, I quickly slipped two fingers into her cunt. It startled her, and she was dripping wet.
"Open," I said. She opened her mouth and I spit inside it. "Swish it around." She did, and my fingers made a come hither motion inside her. I could feel the hard plug against the back of my fingers. "Swallow." And she did. "Lay on the couch, facedown, your holes need to be eaten." I slid my fingers out of her, and she practically flung herself to the couch. With equal enthusiasm, I spread open her asscheeks to see the plug. I took it out slowly. It was clean. A trail of lube clung to it and a large drop of it dripped out of her barely opened asshole.
"Master?" she said, waiting for my acknowledgement.
"41?"
"Please put it back in. Then pull it out. Hard."
I did. I slid it into her, with my fingers between her greedy asshole and the base of the plug. I felt her hole take it in. A moment later, I yanked it out. "Fuck!" she screamed. "Master," she said, "it's ready for your cock."
"Your asshole?"
"Yes!" she loudly groaned, begging for it.
"But I haven't had your pussy yet," I said.
"My pussy isn't important. It's yours whenever you want it," I was positioning myself for entry. "Shove your co..."
My cock slid all the way in her ass. She trembled as it went in. She tensed up, cried, and screamed, "Fuck!" I held it for a moment. "Fuck me it feels good!” I started to pull myself back slowly, to build up the thrusts. “Don’t go slow, Master,” she whispered. “Fuck my ass hard.” I took that as a license to fuck her asshole like I would have taken her pussy.
“Well, it is just a hole on just another whore,” I whispered into her ear as I pinned her down, fucked her asshole hard. The lube sticking to my hips and her ass made a sticky slapping sound, I could feel it clinging to me. She never bothered to slide her hand to her clit while I took her like that.
After a few minutes of a hard pounding, she blurted out, “Let me taste it, Master!”
I stopped on a hard thrust as far into her ass as I could go. “Taste what?”
“Let me suck my fucking asshole off your hard cock!” she moaned. “Please, Master! I need to.”
I slid myself out of her ass slowly. I looked down at her asshole, it was a little reddened and sore looking. Her as was red from me pounding into her. Her asshole wouldn’t close all the way. I wanted to see her gape for me, but she whirled around too quickly. Before I knew it, her right hand was gripped around the base of my cock and the head and shaft were between her lips. She sucked on it like she was rabid, like she needed to suck my cock to survive, to give her a new life. She held it deep in her throat several times. She gagged. She spat that thick, phlegmy deep-throat drool all over my cock and balls. I was so slick I could barely feel her gripping me with her hand, stroking me. “How do you want to cum, Master? Please, tell me how you want to cum. Wherever you want. Please, Master.” she stroked my cock and stared directly into my eyes the whole time she begged.
“Show me your asshole,” I said, grabbing the camera. “We need to document how used it is.” I picked up the camera, and she spun around, holding her cheeks open clearing the view to her ruined rear-end. “Look back at me as you gape it,” I said. She stuck her ass in the air, spread her cheeks wide, and looked back at me with her head on the cushion. “Hold that pose,” I said.
I went to my desk, and rifled through the top, skinny drawer. I grabbed a sharpie. “You need a special mark, 41. And we need pics of it.” An evil giggle snuck out of her like she knew exactly what I was going to do. “Yes, Master,” she said through laughs.
I wrote the number 41 on her right ass cheek and took more pictures.
“Get on your back,” I said, “and give me your married cunt.” She damn near flipped into position. I approached her with the sharpie and camera still in-hand. I wrote the number 41 on her stomach above her bush. “Put your legs in the air, and take hold.” She did and I could see just how wet she was. With how wet I was, I wasn’t sure that I’d feel anything when I shoved myself into her. But, goddamnit, she was fucking perfect. Not too tight, but not broken open. I pressed my hands down beside her head and I pounded deep into her. She looked up at me, and it was almost like she couldn’t speak. Her face was red, eyes tearing up, and she mouthed the words, “Fuck, Master.”
I couldn’t resist. I spat into her mouth and fucked her harder and faster than I feel like I’ve ever fucked any woman. I couldn’t feel it coming on until it hit me like a fucking truck in my balls. I pulled out and quickly grabbed my cock with my right hand. I straightened up. I barely felt anything with the first spurts came out. Drops flung everywhere, no care for aim or destination. The furthest from me a drop landed was at the base of her throat. Another drop landed just to the side of her pierced left nipple. A thicker rope of cum followed and splashed down, drawing a line from her navel to the number I’d written on her. I could feel myself throbbing smaller droplet cumshots after that, not my normal built-up thicker ropes.
As I started to cum, her hand shot down to her pussy, she slid three fingers in, and fingered herself. She laid there, violently fingering her used, married pussy and trembling all over. I couldn’t tell if she was cumming or just being violent to her own genitalia. She screamed like she was in pain and her hand slowed down. The tendons in her neck tensed. Her skin appeared to flush all over. I stepped back to see a puddle of her juices and lube soaking the couch. She let her legs fall down and stiffen up, and her hand slid out to her clit when she rubbed much slower than she had been fingering herself.
Somehow, I had the presence of mind to grab the camera. I got a few blurry shots, and a couple good ones, of her cumming hard. When she finally relaxed, I took more photos of her - especially focused on the number I had written on her and the fluids seeping from her and covering her. When she asked what I was doing, I replied, “Capturing how fucking beautiful you look.” She smiled and blushed like I was the first boy to ever tell her that.
We both ended up in the shower after that. She had to rinse cum out of her hair, but it wasn’t very late when we got out. We ended up cuddling naked on the couch watching YouTube for a little more than an hour while her hair dried.. We ended up making out, but this was far less violent and far more tender. She was in a gentle mood, and I matched that. I managed to get hard again, and we had sweet sex - the kind of sex that feels like having a dessert you are too full, too spent to have, but you slowly savor it regardless. Another hour or so later, we both got dressed and I walked her out to her car.
Our affair lasted a few months until a realignment at work pushed her into working for another department. We saw each other a few more times after that, but it slowly fizzled over time. We did have another wild story I'll tease in the bonus, but overall, it was a straightforward, let's-meet-and-fuck affair. I wasn't under any delusion that it would be more than that.
Her and I have spoken since, and she actually reaffirmed that it was me telling her about Aussie in the cage that made her want to see me. Yes, we did use the cage two other times. The second was more conventional, and the third was as another fantasy for her, but it only lasted a few moments: conventional sex, but she wanted me to piss on her while she was inside the cage after. Fortunately for everyone involved, she wasn't like Aussie where getting pissed on made her want to leave her partner.
However, I do still think about coming home and finding her that first time - "I'm locked up and waiting for you, Master."
The End
Bonus: The other Mikayla story I'll share involves three different kinds of showers: outdoor, rain, and golden.
*Extra rating continued from above: Now, am I saying that all cheating can be excused? Or that all cheaters are justified? No, of course not. Like most ethical quandaries, it’s a spectrum. I have certainly done my fair share of unjustified cheating (e.g. with Belle), and been with unjustified cheaters (e.g. with Aussie). My point is simple: I find absolutist nonsense about cheating and cheaters annoying. If it’s not your thing, don’t do it but also don’t butt-in on someone else’s joy just because you don’t approve.
0 notes
Text
Best Paints for Humid Climates in South India: A Regional Guide.

Summary:
This blog by C Valley guides you in choosing the best paints for humid climates in South India, highlighting moisture-resistant, premium paints for South Indian homes. It features expert tips, recommended products like textured wall paint, and solutions to common humidity issues—making your home painting long-lasting and stylish with the best wall paint choices.
Humidity is lovely when it’s in the air, not on your walls.
If you reside in South India—Chennai, Kochi, Mangalore, or anywhere in between—you’re well aware of what humidity can do. It’s not only the hot, sweaty summers and monsoon stickiness; it’s also those quiet, insidious issues like damp spots, peeling paint, and moldy corners. That’s why selecting the best paints for humid climates in South India isn’t merely a style choice—it’s a survival tactic for your walls.
And that’s where C Valley comes in. We get the struggles of coastal and tropical living. Our premium paints for South Indian homes are carefully designed to fight moisture, defeat fungal growth, and still look amazing, year after year.
Let’s dig into how to keep your interiors looking fresh, functional, and fabulous—even when the humidity’s working overtime.
Why Regular Paints Don’t Work in Humid Regions
In urban areas such as Chennai, Kochi, or Puducherry, the relative humidity averages 70–90%. That’s a tremendous amount of moisture bearing down on your walls. Most ordinary paints won’t survive—cracking, bubbling, and discolouring within a few seasons.
Here’s what humidity usually does:
Peeling and flaking of wall paint
Damp spots that won’t disappear
Fungal and mold growth, particularly on ceilings and corners
Foul smells and unhealthy indoor air
In order to safeguard your house and keep your interiors damage-free, you require the best wall paint suitable for this type of climate.
What to Expect in Paints in Humid Climates
Let’s discuss what you need to look for in paints best used under high humidity before we provide suggestions:
Water resistance – prevents water from seeping in before it does
Anti-fungal/anti-microbial properties – to stop the growth of mold and mildew
Durability – can withstand the wear of tropical weather
Low VOC and breathable formulations – improved air quality and reduced dampness trapping
Easy maintenance – washable finishes that remain fresh for longer
C Valley’s Regional Favorites: Top Paints for Humid Weather in South India
Here’s our handpicked guide to the top C Valley paints that South Indian homeowners love:
1. C Valley Weather Guard – Exterior Defence par Excellence
Humidity does not only harm interiors—it begins from the outside. That’s why we suggest Weather Guard, our high-grade weather-resistant exterior paint. With great water repellency, UV resistance, and anti-fungal technology, it performs like a protective shield against coastal rain, salty atmosphere, and strong sun.
Suitable for homes in: Chennai, Mangalore, Vizag, Pondicherry
2. C Valley Interior Shield – For Interiors that Breathe
Our Interior Shield paint is specifically for tropical interiors. It has anti-fungal ingredients, a low-VOC formula, and a stunning matte finish that lets the walls breathe. The outcome? A healthier home and walls that remain looking fresh and clean even in humid conditions.
Ideal for: Living rooms, bedrooms, kitchens, and corridors
3. C Valley LuxGuard – Washable & Mold-Resistant
For dampness-prone areas—such as bathrooms, dining rooms, or even coastal-facing walls—LuxGuard is the best solution. This textured wall paint has style and substance. It fights fungus, is washable, and provides a luxurious texture that camouflages small imperfections on the wall.
Best suited for: Houses in Kochi, Alleppey, Kanyakumari, or Goa
4. C Valley ColourCare Primer – The Unsung Hero
Don’t underemphasize the strength of a good primer. Our ColourCare Primer fills porous surfaces, promotes improved topcoat adhesion, and provides a base barrier to moisture. Always begin here if you desire lasting results in damp locations.
Top Home Painting Hints for Humid Areas
Now that you know which paints to apply to your walls, here are some professional hints on how to maximize your home painting endeavor in a damp area:
Dry the Surface Properly – Always paint on dry walls. Use fans or a dehumidifier if necessary.
Fix Leaks & Cracks – Seepage behind the paint will result in misery.
Employ Mold-Resistant Putty & Primer – Everything begins with the foundation.
Do Not Paint During Monsoons – Opt for the dry season to cure and bond better.
Select the Proper Finish – Eggshell and matte finishes breathe better; glossy paints clean easily.
Why South Indian Homes Trust C Valley
With unpredictable weather, increased humidity, and new interior trends, house painting isn’t so simple anymore. Now, homeowners need aesthetics + performance. And at C Valley, we provide both.
Why we’re the top choice:
Large selection of best wall paints for all climates
Long-lasting finishes with low maintenance
Specialty paints for humid climates
Professional colour advice and application tips
Quality, durability, and design commitment
Whether you’re residing near the sea or in the Western Ghats, C Valley has the perfect paint for your walls and climate.
Final Word
Humidity shouldn’t dictate how your home looks—or how often you repaint it. With the best paints for humid climates in South India, you can enjoy interiors that feel fresh, clean, and beautiful all year long.
Choose paints that protect, breathe, and elevate. Choose C Valley—because your home deserves nothing less than premium protection with impeccable style.
0 notes
Text
Mastering Excel: Unlocking the Power of Advanced Formulas
In the world of data analysis and management, Microsoft Excel has long been a trusted companion for professionals across various industries. While the software’s basic functionality is well-known, many users often overlook the true power that lies within its advanced formulas. In this blog post, we’ll dive deep into the realm of Excel’s advanced formulas, exploring how they can streamline your workflow, enhance your data analysis, and unlock new levels of productivity.
Understanding the Basics of Excel Formulas At the core of Excel’s functionality are its formulas, which allow users to perform a wide range of calculations and manipulations on their data. The standard formulas, such as SUM, AVERAGE, and COUNT, are well-known and widely used. However, Excel’s advanced formulas take things to the next level, providing more sophisticated and customizable solutions to complex problems.
The Power of Excel’s Advanced Formulas Excel’s advanced formulas are like a toolbox filled with specialized tools, each designed to tackle specific data-related challenges. These formulas offer a level of complexity and flexibility that can significantly enhance your analytical capabilities. Let’s explore some of the most powerful advanced formulas and how they can benefit your work:
VLOOKUP: This formula is a game-changer when it comes to cross-referencing data across different tables or worksheets. By using the VLOOKUP function, you can quickly find and retrieve corresponding values, making it a valuable tool for data consolidation and reporting.
SUMIFS and COUNTIFS: These advanced formulas allow you to perform complex conditional summations and counts, respectively. They enable you to aggregate data based on multiple criteria, providing a more targeted and insightful analysis.
INDEX and MATCH: The combination of these two formulas is a powerful way to look up and retrieve data from a range of cells, even if the data is not organized in a traditional table format. This is particularly useful when dealing with dynamic or non-standardized data sources.
PIVOT TABLES: While not a formula per se, pivot tables are an advanced feature in Excel that allows you to quickly analyze and summarize large datasets. By organizing and aggregating data in a flexible manner, pivot tables enable you to uncover insights and trends that may not be readily apparent in the raw data.
ARRAY FORMULAS: Array formulas are a unique and powerful type of formula that can perform operations on entire arrays of data, rather than individual cells. They are particularly useful for complex calculations, data manipulation, and statistical analysis.
OFFSET and INDIRECT: These advanced formulas provide dynamic and flexible ways to reference and manipulate cell ranges, making them valuable for tasks such as creating interactive dashboards, automating reports, and building complex financial models.
LOOKUP and CHOOSE: The LOOKUP formula allows you to search for a value in a range and return a corresponding value, while the CHOOSE formula lets you select a value from a list based on an index number. These formulas can be particularly useful for data lookup and decision-making processes.
Mastering Advanced Formulas: Practical Applications Now that you’ve been introduced to some of the most powerful advanced formulas in Excel, let’s explore how you can apply them to real-world scenarios:
Financial Analysis: Advanced formulas can be invaluable in financial modeling and forecasting. For example, you can use SUMIFS to calculate total revenue or expenses based on multiple criteria, such as product category, region, or time period.
Sales Reporting: Combine VLOOKUP and SUMIFS to create comprehensive sales reports that consolidate data from multiple sources, allowing you to analyze performance, identify trends, and make informed decisions.
Inventory Management: Use advanced formulas to track and manage your inventory, automating calculations for reorder points, stock levels, and more. This can help you optimize your supply chain and minimize the risk of stockouts or overstocking.
HR and Payroll: Advanced formulas can streamline HR and payroll processes, such as calculating overtime pay, deductions, and employee benefits. SUMIFS and COUNTIFS can be particularly useful in these scenarios.
Data Validation: Leverage advanced formulas to implement data validation rules, ensuring the integrity and accuracy of your data. This can include checks for duplicate entries, data range validation, and more.
Project Management: Utilize advanced formulas to track project timelines, budgets, and resource allocation. Formulas like DATEDIF and NETWORKDAYS can help you monitor progress and identify potential bottlenecks.
Marketing Analytics: Advanced formulas can be used to analyze marketing data, such as campaign performance, lead generation, and customer retention. Formulas like CONCATENATE and TRIM can help you clean and prepare data for analysis.
Mastering the Art of Advanced Formulas Becoming proficient in Excel’s advanced formulas requires a combination of practice, patience, and a willingness to explore. Start by familiarizing yourself with the basic syntax and structure of each formula, then experiment with different use cases to understand their full potential. Many online resources, such as tutorial videos and Excel forums, can be invaluable in your learning journey.
As you become more comfortable with advanced formulas, consider creating your own custom formulas or combining multiple functions to tackle complex problems. Embrace the creative aspect of Excel and challenge yourself to find innovative solutions that streamline your workflow and enhance your data analysis capabilities.
Conclusion: Excel’s advanced formulas are the keys to unlocking the true power of the software. By mastering these specialized tools, you can transform your data analysis, reporting, and decision-making processes, ultimately leading to increased productivity, better-informed decisions, and a more efficient work environment. Take the time to explore and experiment with Excel’s advanced formulas, and you’ll soon discover a world of new possibilities at your fingertips.
0 notes
Text
What Basic Computer Skills Are Essential in Today's World?

In our increasingly digital society, mastering basic computer skills is as vital as learning to read or write. Whether you're applying for a job, managing personal tasks, or staying connected, these skills empower you to navigate the modern world confidently. Let’s explore the essential computer skills everyone should have in 2024, along with practical tips to build them.
1. Hardware Fundamentals
What to Know:
Recognize core components: monitor, keyboard, mouse, CPU, and ports (USB, HDMI).
Use peripheral devices like printers and external drives.
Perform basic maintenance: restarting devices, cleaning hardware, and troubleshooting simple issues (e.g., unresponsive keyboard).
Why It Matters: Understanding hardware prevents frustration and helps you solve minor problems independently.
2. Operating System Mastery
Key Skills:
File Management: Create, organize, and delete files/folders. Learn to use search functions effectively.
System Settings: Adjust display, sound, Wi-Fi, and user accounts.
Software Installation: Safely download and install trusted applications.
Pro Tip: Use keyboard shortcuts (e.g., Ctrl+C/Cmd+C for copy, Ctrl+V/Cmd+V for paste) to save time.
3. Internet & Email Proficiency
Essentials:
Web Browsing: Navigate browsers like Chrome or Safari; bookmark frequently used sites.
Effective Searching: Use keywords and filters to find reliable information quickly.
Email Management: Compose, reply, attach files, and organize your inbox.
Cloud Basics: Store and share files via Google Drive, Dropbox, or iCloud.
Why It Matters: From online banking to remote work, internet skills are indispensable.
4. Cybersecurity Essentials
Critical Practices:
Strong Passwords: Use a mix of letters, numbers, and symbols. Consider a password manager.
Phishing Awareness: Avoid suspicious links or requests for personal information.
Software Updates: Regularly update OS and apps to patch security vulnerabilities.
Two-Factor Authentication (2FA): Add an extra layer of security to accounts.
Did You Know? 94% of malware is delivered via email—stay vigilant!
5. Productivity Software Basics
Must-Learn Tools:
Word Processing: Format documents in Microsoft Word or Google Docs.
Spreadsheets: Track budgets or data with Excel/Google Sheets (learn basic formulas like SUM and AVERAGE).
Presentations: Design slides in PowerPoint or Canva for school, work, or personal projects.
Example: Use spreadsheets to plan a monthly budget or analyze household expenses.
6. Digital Communication Tools
Key Platforms:
Video Conferencing: Join calls on Zoom or Teams; master muting, screen sharing, and virtual backgrounds.
Messaging Apps: Use Slack, WhatsApp, or Discord for quick communication.
Social Media Literacy: Share content responsibly, adjust privacy settings, and spot misinformation.
Why It Matters: Clear digital communication is crucial for collaboration and networking.
7. Basic Troubleshooting
DIY Fixes:
Restart Devices: Resolves many glitches instantly.
Check Connections: Ensure Wi-Fi, cables, or Bluetooth are active.
Use Online Resources: Search error messages or visit forums like Microsoft Support.
Pro Tip: Bookmark troubleshooting guides for common issues.
8. Data Management
Best Practices:
Organize Files: Use folders and clear naming conventions (e.g., “2024_Taxes”).
Backup Data: Regularly save copies to external drives or cloud storage.
Avoid Data Loss: Learn to recover files from the Recycle Bin/Trash.
Stat: 60% of companies that lose data shut down within 6 months—backups are lifesavers!
9. Adaptability & Continuous Learning
Stay Ahead:
Explore New Tools: Experiment with apps like ChatGPT or Canva.
Leverage Free Resources: Platforms like Khan Academy or LinkedIn Learning offer courses on emerging tech.
Join Communities: Engage with groups on Reddit (e.g., r/techsupport) or local workshops.
Growth Mindset: Tech evolves fast—embrace curiosity and lifelong learning.
How to Build These Skills
Start Small: Focus on one skill at a time (e.g., mastering email).
Practice Daily: Apply skills to real tasks (e.g., create a resume in Word).
Use Free Resources:
Google Digital Garage: Free courses on digital literacy.
YouTube Tutorials: Visual guides for hands-on learning.
Local Libraries: Often host free tech workshops.
The Bottom Line
Basic computer skills unlock opportunities in education, careers, and daily life. From safeguarding your data to collaborating globally, these competencies are non-negotiable in 2024. Remember, every expert started as a beginner—take it one step at a time, and soon you’ll navigate the digital world with ease.
Your Challenge: Pick one skill from this list and spend 15 minutes a day practicing it. Share your progress in the comments—we’re rooting for you! 💻✨
Need help with a specific skill? Ask below! Let’s build a community of tech-savvy learners.
0 notes
Text
How to Learn Power BI: A Step-by-Step Guide
Power BI is a powerful business intelligence tool that allows users to analyze data and create interactive reports. Whether you’re a beginner or looking to enhance your skills, learning Power BI can open doors to career opportunities in data analytics and business intelligence. For those looking to enhance their skills, Power BI Online Training & Placement programs offer comprehensive education and job placement assistance, making it easier to master this tool and advance your career.

Here’s a step-by-step guide to mastering Power BI.
Step 1: Understand What Power BI Is
Power BI is a Microsoft tool designed for data analysis and visualization. It consists of three main components:
Power BI Desktop – Used for building reports and dashboards.
Power BI Service – A cloud-based platform for sharing and collaborating on reports.
Power BI Mobile – Allows users to access reports on smartphones and tablets.
Familiarizing yourself with these components will give you a clear understanding of Power BI’s capabilities.
Step 2: Install Power BI Desktop
Power BI Desktop is free to download from the Microsoft website. It’s the primary tool used to create reports and dashboards. Installing it on your computer is the first step to hands-on learning.
Step 3: Learn the Power BI Interface
Once installed, explore the Power BI interface, including:
Home Ribbon – Where you access basic tools like importing data and formatting visuals.
Data Pane – Displays the data tables and fields available for reporting.
Visualizations Pane – Contains different chart types, tables, and custom visuals.
Report Canvas – The workspace where you design and organize your reports.
Getting comfortable with the interface will make learning easier.
Step 4: Import and Transform Data
Power BI allows you to connect to various data sources like Excel, SQL databases, and cloud applications. Learning how to:
Import data from multiple sources.
Use Power Query Editor to clean and shape data.
Handle missing values, remove duplicates, and structure data for analysis. It’s simpler to master this tool and progress your profession with the help of Best Online Training & Placement programs, which provide thorough instruction and job placement support to anyone seeking to improve their talents.

Data transformation is a crucial step in building accurate and meaningful reports.
Step 5: Create Visualizations
Power BI provides multiple visualization options, including:
Bar charts, pie charts, and line graphs.
Tables, matrices, and cards.
Maps and custom visuals from the Power BI marketplace.
Experimenting with different visualizations helps you present data effectively.
Step 6: Learn DAX (Data Analysis Expressions)
DAX is a formula language used in Power BI to create calculated columns, measures, and custom calculations. Some key DAX functions include:
SUM() – Adds values in a column.
AVERAGE() – Calculates the average of a set of values.
IF() – Creates conditional calculations.
Mastering DAX enables you to perform advanced data analysis.
Step 7: Build and Publish Reports
Once you’ve created a report, learn how to:
Organize multiple pages in a dashboard.
Add filters and slicers for interactive analysis.
Publish reports to Power BI Service for sharing and collaboration.
Publishing reports makes them accessible to teams and decision-makers.
Step 8: Explore Power BI Service and Cloud Features
Power BI Service allows you to:
Schedule automatic data refreshes.
Share dashboards with team members.
Implement row-level security for restricted data access.
Learning cloud-based features enhances collaboration and security in Power BI.
Step 9: Join Power BI Communities
Engaging with the Power BI community can help you stay updated with new features and best practices. You can:
Follow the Microsoft Power BI blog for updates.
Participate in Power BI forums and LinkedIn groups.
Attend webinars and join Power BI user groups.
Networking with other Power BI users can provide valuable insights and learning opportunities.
Step 10: Get Certified and Keep Practicing
If you want to showcase your expertise, consider obtaining a Microsoft Power BI Certification (PL-300: Power BI Data Analyst). Certification enhances your resume and validates your skills.
To stay ahead, keep practicing by working on real-world datasets, building dashboards, and experimenting with advanced Power BI features. Continuous learning is the key to becoming a Power BI expert.
By following these steps, you can systematically learn Power BI and develop the skills needed to analyze and visualize data effectively. Happy learning!
0 notes
Text
Power BI Training | Power BI Online Training in Hyderabad
How to Use DAX in Power BI for Advanced Analytics

Power BI Training is a leading tool in the field of data analytics and visualization, providing businesses with the insights they need to make informed decisions. One of its most powerful features is Data Analysis Expressions (DAX), a formula language that allows users to create advanced calculations and models. This article explores how DAX can be used in Power BI for advanced analytics, unlocking its full potential for data professionals. Power BI Online Training in Hyderabad
Understanding DAX Basics
DAX is specifically designed for data modelling in Power BI, Excel, and SQL Server Analysis Services. It enables users to go beyond basic aggregations by crafting custom calculations. Some key features of DAX include:
Functions: DAX includes a wide range of functions for mathematical, statistical, and text operations.
Context Awareness: DAX formulas work within two contexts—row context and filter context—allowing calculations on both individual rows and filtered data sets.
Custom Calculations: Users can create calculated columns for static results or measures for dynamic, on-the-fly calculations.
These capabilities make DAX essential for building robust and interactive analytics in Power BI Training.
Essential DAX Functions for Advanced Analytics
To perform advanced analytics, it’s important to understand some key DAX functions that are widely used in Power BI projects.
CALCULATE Function
The CALCULATE function is incredibly versatile, enabling users to modify filter contexts dynamically. For instance, you can compute sales for specific time periods or conditions.
FILTER Function
FILTER allows users to narrow down data to meet certain criteria. This is particularly useful when working with subsets of data for detailed analysis.
Time Intelligence Functions
DAX provides built-in time intelligence functions like TOTALYTD (Year-to-Date totals), DATESBETWEEN (for custom date ranges), and PREVIOUSMONTH (to analyze historical trends). These functions make temporal data analysis more straightforward.
RANKX Function
RANKX is used to rank items, such as products or customers, based on specific metrics like sales or profitability. This is especially useful for comparisons and performance evaluations.
Applications of DAX in Advanced Analytics
With a solid understanding of DAX functions, professionals can tackle complex analytical tasks. Here are some practical applications: Power BI Online Training in Hyderabad
Customer Segmentation
DAX allows you to categorize customers into segments based on their purchasing behaviour. For example, customers can be classified as high-value, medium-value, or low-value based on their total spending. This segmentation provides actionable insights for targeted marketing campaigns.
Profitability Analysis
DAX helps businesses calculate profitability metrics dynamically. For instance, by dividing total profit by revenue, companies can monitor profit margins across products, regions, or time periods.
Trend Forecasting
Using rolling averages or moving totals, DAX enables businesses to identify trends and patterns in data. For instance, calculating a 30-day rolling average for sales can reveal performance fluctuations over time.
Best Practices for Using DAX
Understand Contexts
Context plays a critical role in DAX. Filter and row contexts impact how calculations are performed, so understanding these concepts is essential for accurate results.
Optimize Performance
Complex DAX formulas can slow down report performance. It’s best to use efficient functions and keep calculations as streamlined as possible.
Use Variables
Variables, defined using the VAR keyword, can improve formula readability and performance. By storing intermediate results, variables also make troubleshooting easier.
Test Formulas Step-by-Step
When building advanced analytics, test DAX formulas incrementally. This approach ensures accuracy and simplifies debugging.
Conclusion
Mastering DAX in Power BI is essential for unlocking advanced analytics capabilities. Whether it’s customer segmentation, profitability analysis, or trend forecasting, DAX empowers professionals to extract deeper insights and build more interactive dashboards. By learning and applying key DAX functions, understanding contexts, and following best practices, users can take their Power BI skills to the next level.
Start small with basic calculations and gradually progress to more complex scenarios. With consistent practice, you’ll be well on your way to mastering DAX and creating impactful analytics that drive decision-making.
Visualpath is the Leading and Best Institute for learning in Hyderabad. We provide Power BI Course Online. You will get the best course at an affordable cost.
Attend Free Demo
Call on – +91-9989971070
Blog: https://visualpathblogs.com/
What’s App: https://www.whatsapp.com/catalog/919989971070/
Visit: https://www.visualpath.in/powerbi-training.html
#Power BI Training#Power BI Online Training#Power BI Course Online#Power BI Training in Hyderabad#Power BI Training in Ameerpet#Power BI Training Institute in Hyderabad#Power BI Online Training Hyderabad#Power BI Course in Hyderabad
1 note
·
View note
Text
Boost Your Power BI Skills with This DAX Guide | Memetic Solutions
DAX (Data Analysis Expressions) is a powerful formula language used in Power BI to create custom calculations and data models. Understanding DAX is crucial for anyone looking to harness the full potential of Power BI for data analysis. Here's an easy-to-follow guide to help you dive into DAX functions, their applications, and how they can transform your data insights.
What Are DAX Functions?
DAX is a formula language specifically designed for Power BI, Excel, and Analysis Services. It enables you to create calculated columns, measures, and tables to derive deeper insights from your data.
Key Types of DAX Functions: -
Aggregation Functions: Perform calculations like SUM, AVERAGE, MIN, and MAX on your data. Example: SUM(Sales[Revenue]) adds up all revenue in the "Sales" table.
Filter Functions: Create calculations that filter data dynamically. Example: FILTER(Sales, Sales[Category] = "Electronics") isolates sales for electronics.
Time Intelligence Functions: Analyze data across different time periods. Example: TOTALYTD(Sales[Revenue], Dates[Date]) calculates year-to-date revenue.
Logical Functions: Perform conditional checks and comparisons. Example: IF(Sales[Revenue] > 10000, "High", "Low") categorizes revenue.
Text Functions: Manipulate and format text data. Example: CONCATENATE(Sales[Region], " - ", Sales[Category]) combines region and category names.
Mathematical Functions: Perform advanced mathematical calculations. Example: ROUND(Sales[Revenue], 2) rounds revenue to two decimal places.
Why Learn DAX?
Enhanced Insights: Allows you to perform in-depth data analysis. Custom Reports: Create highly customized and interactive dashboards. Data Modeling: Helps in building robust and efficient data models. Tips for Learning DAX Start with basic functions like SUM, AVERAGE, and COUNT.
Gradually explore advanced concepts like CALCULATE and RELATED.
Practice writing and testing functions in Power BI Desktop.
Refer to the DAX Function Reference regularly for detailed explanations.
DAX formulas Are Used In: -
Measures: Measures are dynamic calculations that adjust based on the context within your reports, such as filters and slicers. They are essential for aggregating data, like summing sales or calculating averages.
Calculated Tables: Calculated tables are created using DAX formulas and are particularly useful when you need a new table based on existing data. They allow for data modeling without requiring additional data imports.
Calculated Columns: Calculated columns add new data to existing tables by applying a DAX formula to each row. They are useful for creating new information from existing data.
Row-Level Security (RLS): RLS restricts data access for specified users, ensuring that individuals can only view data pertinent to their roles. DAX formulas define these security filters.
Conclusion:
Mastering DAX functions can take your data analysis skills to the next level, allowing you to extract actionable insights and build powerful dashboards. Begin your journey by experimenting with basic functions and gradually dive into more complex ones.
For more in-depth guidance and tutorials, visit our website Memetic Solutions!
#DAXFunctions#PowerBI#DataAnalysis#DataModeling#BusinessIntelligence#LearnDAX#PowerBIUsers#DataInsights#DataVisualization#Analytics
0 notes
Text
Unlock Advanced Excel Secrets with GVT Academy

Excel stands out as an incredibly versatile tool for organizing, analyzing, and visualizing data. Whether you are working in finance, marketing, or data analysis, mastering Excel can significantly boost your productivity and decision-making capabilities. At GVT Academy, we offer top-notch Advanced Excel training in Noida, empowering professionals to unlock Excel’s full potential. In this article, we’ll share some of the advanced Excel secrets that every professional should know, whether you're an Excel novice or a seasoned user looking to refine your skills.
1. Mastering Pivot Tables for Data Analysis
Pivot Tables stand out as one of Excel's most versatile and impactful tools for data analysis. This tool allows you to summarize large datasets quickly, enabling you to analyze and report data efficiently. Advanced Excel training in Noida can teach you how to create dynamic Pivot Tables that allow for deeper insights. With Pivot Tables, you can group data, calculate averages, totals, and percentages, and filter the data in multiple ways. This is essential for anyone working with large datasets and reporting requirements.
2. Advanced Functions and Formulas
Excel is packed with a variety of functions and formulas that can simplify complex calculations. While SUM and AVERAGE are often the go-to functions, Excel has advanced formulas such as INDEX & MATCH, IFERROR, VLOOKUP, and XLOOKUP. These can be used to perform data lookups, error handling, and complex conditional logic in your spreadsheets.
At GVT Academy, we dive deeper into Advanced Excel training to help you understand how to combine functions for more complex operations. Learning how to use these functions together will enable you to automate calculations and reduce errors, saving time and effort in the process.
3. Power Query for Data Importing and Transformation
Power Query in Excel enables users to link, import, and organize data from multiple sources efficiently. With Power Query, you can automatically refresh data and perform advanced data transformations like filtering, merging, and splitting columns. Whether you’re working with large databases or external data sources, Power Query simplifies these tasks and makes the process much more efficient.
If you’re new to Power Query, Advanced Excel training in Noida at GVT Academy can provide you with hands-on experience in setting up Power Query to transform raw data into a format that’s ready for analysis.
4. Data Validation and Conditional Formatting
Data validation ensures that the data entered into your Excel sheet meets specific criteria, preventing errors. With this feature, you can restrict values to specific ranges, create drop-down lists, and even set custom validation rules. Additionally, conditional formatting lets you highlight specific cells based on certain conditions, such as cells that are greater than a particular value or cells with duplicate entries.
Learning how to use these tools effectively will ensure that your data remains accurate and easy to read, and will help prevent mistakes when inputting or analyzing data.
5. Macros and VBA Programming
If you regularly perform repetitive tasks, learning how to record macros or write VBA (Visual Basic for Applications) code can save you hours. Macros automate tasks like formatting, calculations, and report generation with a single click. VBA programming takes it a step further by allowing you to create custom functions and more complex automation.
At GVT Academy, we offer specialized training on how to harness the power of macros and VBA, giving you the skills to automate almost any process in Excel. This is particularly beneficial for professionals looking to improve workflow efficiency.
6. Advanced Charting Techniques
While Excel offers basic charts like bar and line graphs, its advanced charting capabilities are often underutilized. Learning to create dynamic charts, such as sparklines, heat maps, and waterfall charts, can significantly enhance your ability to present complex data visually. Customizing chart axes, formatting, and adding trendlines can make your data visualization more impactful.
GVT Academy’s Advanced Excel training covers these techniques in detail, allowing professionals to master the art of visual storytelling through data.
7. Excel for Business Intelligence
Excel is also a powerful tool for business intelligence when combined with tools like Power Pivot and Power BI. Power Pivot allows you to analyze massive datasets by creating relationships between tables, and Power BI extends these capabilities with interactive dashboards and reporting.
For professionals looking to dive into business intelligence, Excel and Advanced Excel training in Noida at GVT Academy offers practical guidance on integrating these tools with Excel, giving you a competitive edge in the workplace.
Conclusion
Excel goes far beyond being just a basic spreadsheet application. With the right training, it can become your go-to solution for data analysis, reporting, and business intelligence. GVT Academy’s Advanced Excel training in Noida equips professionals with the skills they need to excel in today’s data-driven world. By mastering these advanced features, you’ll enhance your productivity, reduce errors, and make better, data-backed decisions.
Elevate your Excel expertise by enrolling in GVT Academy’s Advanced Excel training in Noida and discover its true potential!
0 notes
Text
Mastering Microsoft Excel: Unlock Your Potential Today
In today’s fast-paced world, Microsoft Excel is more than just a spreadsheet application; it’s a powerhouse that simplifies data organization, analysis, and visualization. Whether you’re a student, business professional, or entrepreneur, learning Excel can be the key to unlocking new opportunities.
This article dives deep into why Microsoft Excel is the ultimate productivity tool, exploring its benefits, essential features, and tips for beginners to get started. If you're searching for beginner-friendly Excel guides, easy Excel tutorials, or the best Excel tips and tricks, you’re in the right place!
Why Learn Microsoft Excel?
Here’s why Microsoft Excel is a must-have skill:
Widely Used Across IndustriesFrom finance to education, Excel for business is a universal tool. Companies rely on Excel for tasks like budgeting, reporting, and data analysis.
Improves ProductivityAutomation features like formulas and macros save hours of manual work. Excel streamlines repetitive tasks, making it a go-to solution for improving efficiency.
Enhances Decision-MakingData visualization in Excel transforms complex datasets into easy-to-understand charts and graphs. This clarity helps stakeholders make informed decisions.
Boosts Career OpportunitiesMastering Excel for beginners can lead to roles such as data analyst, financial planner, or administrative assistant. Advanced Excel knowledge can even propel you into high-paying positions like business intelligence analyst.
Key Features of Microsoft Excel
1. Formulas and Functions
Excel offers a wide range of formulas, from basic arithmetic to advanced financial calculations. Popular functions like VLOOKUP, IF Statements, and SUM simplify data handling.
2. Data Visualization
Using charts and graphs in Excel, you can turn raw data into stunning visuals. Options like pie charts, line graphs, and histograms are perfect for presentations and reports.
3. Pivot Tables
Pivot tables are a lifesaver for summarizing large datasets. They allow you to filter, sort, and analyze data effortlessly.
4. Macros
For those diving into advanced Excel techniques, macros enable task automation. They are particularly useful for repetitive tasks like formatting or data entry.
5. Conditional Formatting
Highlight important data points with conditional formatting. This feature is ideal for identifying trends or outliers in datasets.
Top Keywords to Focus On
When searching for Microsoft Excel tutorials or resources, these related terms can guide you:
Basic Excel for beginners
Advanced Excel tips
Excel shortcuts
How to use Excel formulas
Learn Excel step by step
Getting Started: A Beginner’s Guide to Microsoft Excel
Step 1: Understand the Interface
Familiarize yourself with the Excel Ribbon, which includes tabs like Home, Insert, and Data.
Explore the workbook layout, including sheets, rows, and columns.
Step 2: Master Basic Formulas
Start with simple formulas such as:
=SUM(A1:A10): Adds up numbers in a range.
=AVERAGE(B1:B10): Calculates the average.
=IF(C1>10, "Yes", "No"): Returns a result based on a condition.
Step 3: Learn Formatting
Use cell formatting to adjust font size, colors, and borders.
Apply conditional formatting to highlight key metrics.
Step 4: Experiment with Charts
Visualize data by creating bar charts, pie charts, or scatter plots. Use the Insert Chart feature for a variety of options.
Step 5: Practice with Templates
Explore free Excel templates for budgeting, project tracking, and invoicing.
Advanced Excel Tips for Professionals
1. Use Pivot Tables Like a Pro
Drag and drop fields to create dynamic reports.
Use slicers for interactive data filtering.
2. Automate with Macros
Record and run macros to save time on repetitive tasks. For example, create a macro to automate formatting for monthly reports.
3. Master Power Query
Connect and clean data from multiple sources using Power Query. This tool simplifies data preparation for analysis.
4. Learn Excel Shortcuts
Speed up your workflow with these essential shortcuts:
Ctrl + C / Ctrl + V: Copy and paste.
Ctrl + Z: Undo.
Alt + F1: Insert a default chart.
5. Explore Data Analysis Add-Ins
Add-ins like Solver and Analysis ToolPak make complex calculations easier.
How to Use Microsoft Excel for Specific Purposes
1. For Personal Finance
Track expenses, create budgets, and plan savings using Excel spreadsheets. Download templates to get started quickly.
2. For Business Reporting
Generate dashboards and financial reports in Excel to present data to stakeholders. Use pivot tables and conditional formatting for enhanced clarity.
3. For Data Analysis
Analyze trends, calculate forecasts, and perform statistical analysis in Excel. Features like regression analysis make it ideal for data scientists.
4. For Project Management
Plan projects, track milestones, and monitor progress with Excel Gantt charts or task trackers.
Top Searches for Microsoft Excel (2024)
Looking to improve your Excel skills? Here are the most searched keywords related to Microsoft Excel in 2024:
Excel for beginners free course
Microsoft Excel training online
Best Excel tutorials for professionals
How to create pivot tables in Excel
Learn advanced Excel formulas
How to Learn Microsoft Excel Effectively
Take Online CoursesPlatforms like Udemy offer comprehensive Excel training for beginners and advanced users alike.
Practice with Real-World ScenariosCreate spreadsheets for personal or professional tasks to solidify your learning.
Join Excel CommunitiesParticipate in forums like Reddit or LinkedIn groups to exchange tips and solutions.
Use YouTube TutorialsSearch for step-by-step video guides on topics like Excel functions and shortcuts.
Get CertifiedConsider taking the Microsoft Office Specialist Excel Certification exam to validate your expertise.
Conclusion
Whether you’re starting from scratch or refining your skills, Microsoft Excel is an essential tool for anyone looking to improve productivity and data management. With its endless features and applications, Excel empowers users to make informed decisions, save time, and boost their careers.
So, why wait? Start learning Microsoft Excel today, and unlock a world of opportunities! Remember, the journey begins with a single spreadsheet.
0 notes