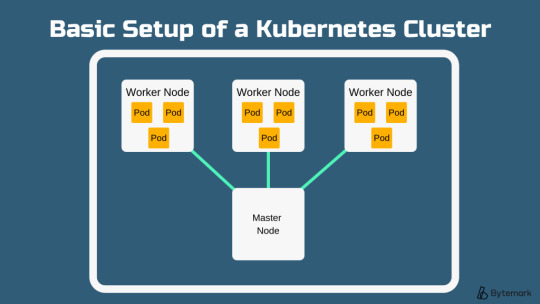
#basic setup of kubernetes cluster
Explore tagged Tumblr posts
Visit Tumblr Blog
Explore Tumblr blogs with no restrictions, modern design and the best experience.
Last Seen Tumblr Blogs


Fun Fact
BuzzFeed published a report claiming that Tumblr was utilized as a distribution channel for Russian agents to influence American voting habits during the 2016 presidential election in Feb 2018.
Text
DevOps Course Online for Beginners and Professionals
Introduction: Why DevOps Skills Matter Today
In today's fast-paced digital world, businesses rely on faster software delivery and reliable systems. DevOps, short for Development and Operations, offers a practical solution to achieve this. It’s no longer just a trend; it’s a necessity for IT teams across all industries. From startups to enterprise giants, organizations are actively seeking professionals with strong DevOps skills.
Whether you're a beginner exploring career opportunities in IT or a seasoned professional looking to upskill, DevOps training online is your gateway to success. In this blog, we’ll walk you through everything you need to know about enrolling in a DevOps course online, from fundamentals to tools, certifications, and job placements.
What Is DevOps?
Definition and Core Principles
DevOps is a cultural and technical movement that unites software development and IT operations. It aims to shorten the software development lifecycle, ensuring faster delivery and higher-quality applications.
Core principles include:
Automation: Minimizing manual processes through scripting and tools
Continuous Integration/Continuous Deployment (CI/CD): Rapid code integration and release
Collaboration: Breaking down silos between dev, QA, and ops
Monitoring: Constant tracking of application performance and system health
These practices help businesses innovate faster and respond quickly to customer needs.
Why Choose a DevOps Course Online?
Accessibility and Flexibility
With DevOps training online, learners can access material anytime, anywhere. Whether you're working full-time or managing other responsibilities, online learning offers flexibility.
Updated Curriculum
A high-quality DevOps online course includes the latest tools and techniques used in the industry today, such as:
Jenkins
Docker
Kubernetes
Git and GitHub
Terraform
Ansible
Prometheus and Grafana
You get hands-on experience using real-world DevOps automation tools, making your learning practical and job-ready.
Job-Focused Learning
Courses that offer DevOps training with placement often include resume building, mock interviews, and one-on-one mentoring, equipping you with everything you need to land a job.
Who Should Enroll in a DevOps Online Course?
DevOps training is suitable for:
Freshers looking to start a tech career
System admins upgrading their skills
Software developers wanting to automate and deploy faster
IT professionals interested in cloud and infrastructure management
If you're curious about modern IT processes and enjoy problem-solving, DevOps is for you.
What You’ll Learn in a DevOps Training Program
1. Introduction to DevOps Concepts
DevOps lifecycle
Agile and Scrum methodologies
Collaboration between development and operations teams
2. Version Control Using Git
Git basics and repository setup
Branching, merging, and pull requests
Integrating Git with DevOps pipelines
3. CI/CD with Jenkins
Pipeline creation
Integration with Git
Automating builds and test cases
4. Containerization with Docker
Creating Docker images and containers
Docker Compose and registries
Real-time deployment examples
5. Orchestration with Kubernetes
Cluster architecture
Pods, services, and deployments
Scaling and rolling updates
6. Configuration Management with Ansible
Writing playbooks
Managing inventories
Automating infrastructure setup
7. Infrastructure as Code with Terraform
Deploying cloud resources
Writing reusable modules
State management and versioning
8. Monitoring and Logging
Using Prometheus and Grafana
Alerts and dashboards
Log management practices
This hands-on approach ensures learners are not just reading slides but working with real tools.
Real-World Projects You’ll Build
A good DevOps training and certification program includes projects like:
CI/CD pipeline from scratch
Deploying a containerized application on Kubernetes
Infrastructure provisioning on AWS or Azure using Terraform
Monitoring systems with Prometheus and Grafana
These projects simulate real-world problems, boosting both your confidence and your resume.
The Value of DevOps Certification
Why It Matters
Certification adds credibility to your skills and shows employers you're job-ready. A DevOps certification can be a powerful tool when applying for roles such as:
DevOps Engineer
Site Reliability Engineer (SRE)
Build & Release Engineer
Automation Engineer
Cloud DevOps Engineer
Courses that include DevOps training and placement also support your job search with interview preparation and job referrals.
Career Opportunities and Salary Trends
High Demand, High Pay
According to industry reports, DevOps engineers are among the highest-paid roles in IT. Average salaries range from $90,000 to $140,000 annually, depending on experience and region.
Industries hiring DevOps professionals include:
Healthcare
Finance
E-commerce
Telecommunications
Software as a Service (SaaS)
With the right DevOps bootcamp online, you’ll be prepared to meet these opportunities head-on.
Step-by-Step Guide to Getting Started
Step 1: Assess Your Current Skill Level
Understand your background. If you're a beginner, start with fundamentals. Professionals can skip ahead to advanced modules.
Step 2: Choose the Right DevOps Online Course
Look for these features:
Structured curriculum
Hands-on labs
Real-world projects
Mentorship
DevOps training with placement support
Step 3: Build a Portfolio
Document your projects on GitHub to show potential employers your work.
Step 4: Get Certified
Choose a respected DevOps certification to validate your skills.
Step 5: Apply for Jobs
Use placement support services or apply directly. Showcase your portfolio and certifications confidently.
Common DevOps Tools You’ll Master
Tool
Use Case
Git
Source control and version tracking
Jenkins
CI/CD pipeline automation
Docker
Application containerization
Kubernetes
Container orchestration
Terraform
Infrastructure as Code
Ansible
Configuration management
Prometheus
Monitoring and alerting
Grafana
Dashboard creation for system metrics
Mastering these DevOps automation tools equips you to handle end-to-end automation pipelines in real-world environments.
Why H2K Infosys for DevOps Training?
H2K Infosys offers one of the best DevOps training online programs with:
Expert-led sessions
Practical labs and tools
Real-world projects
Resume building and interview support
DevOps training with placement assistance
Their courses are designed to help both beginners and professionals transition into high-paying roles smoothly.
Key Takeaways
DevOps combines development and operations for faster, reliable software delivery
Online courses offer flexible, hands-on learning with real-world tools
A DevOps course online is ideal for career starters and upskillers alike
Real projects, certifications, and placement support boost job readiness
DevOps is one of the most in-demand and well-paying IT domains today
Conclusion
Ready to build a future-proof career in tech? Enroll in H2K Infosys’ DevOps course online for hands-on training, real-world projects, and career-focused support. Learn the tools that top companies use and get placement-ready today.
#devops training#devops training online#devops online training#devops training and certification#devops training with placement#devops online course#best devops training online#devops training and placement#devops course online#devops bootcamp online#DevOps automation tools
0 notes
Text
SRE Roadmap: Your Complete Guide to Becoming a Site Reliability Engineer in 2025
In today’s rapidly evolving tech landscape, Site Reliability Engineering (SRE) has become one of the most in-demand roles across industries. As organizations scale and systems become more complex, the need for professionals who can bridge the gap between development and operations is critical. If you’re looking to start or transition into a career in SRE, this comprehensive SRE roadmap will guide you step by step in 2025.

Why Follow an SRE Roadmap?
The field of SRE is broad, encompassing skills from DevOps, software engineering, cloud computing, and system administration. A well-structured SRE roadmap helps you:
Understand what skills are essential at each stage.
Avoid wasting time on non-relevant tools or technologies.
Stay up to date with industry standards and best practices.
Get job-ready with the right certifications and hands-on experience.
SRE Roadmap: Step-by-Step Guide
🔹 Phase 1: Foundation (Beginner Level)
Key Focus Areas:
Linux Fundamentals – Learn the command line, shell scripting, and process management.
Networking Basics – Understand DNS, HTTP/HTTPS, TCP/IP, firewalls, and load balancing.
Version Control – Master Git and GitHub for collaboration.
Programming Languages – Start with Python or Go for scripting and automation tasks.
Tools to Learn:
Git
Visual Studio Code
Postman (for APIs)
Recommended Resources:
"The Linux Command Line" by William Shotts
GitHub Learning Lab
🔹 Phase 2: Core SRE Skills (Intermediate Level)
Key Focus Areas:
Configuration Management – Learn tools like Ansible, Puppet, or Chef.
Containers & Orchestration – Understand Docker and Kubernetes.
CI/CD Pipelines – Use Jenkins, GitLab CI, or GitHub Actions.
Monitoring & Logging – Get familiar with Prometheus, Grafana, ELK Stack, or Datadog.
Cloud Platforms – Gain hands-on experience with AWS, GCP, or Azure.
Certifications to Consider:
AWS Certified SysOps Administrator
Certified Kubernetes Administrator (CKA)
Google Cloud Professional SRE
🔹 Phase 3: Advanced Practices (Expert Level)
Key Focus Areas:
Site Reliability Principles – Learn about SLIs, SLOs, SLAs, and Error Budgets.
Incident Management – Practice runbooks, on-call rotations, and postmortems.
Infrastructure as Code (IaC) – Master Terraform or Pulumi.
Scalability and Resilience Engineering – Understand fault tolerance, redundancy, and chaos engineering.
Tools to Explore:
Terraform
Chaos Monkey (for chaos testing)
PagerDuty / OpsGenie
Real-World Experience Matters
While theory is important, hands-on experience is what truly sets you apart. Here are some tips:
Set up your own Kubernetes cluster.
Contribute to open-source SRE tools.
Create a portfolio of automation scripts and dashboards.
Simulate incidents to test your monitoring setup.
Final Thoughts
Following this SRE roadmap will provide you with a clear and structured path to break into or grow in the field of Site Reliability Engineering. With the right mix of foundational skills, real-world projects, and continuous learning, you'll be ready to take on the challenges of building reliable, scalable systems.
Ready to Get Certified?
Take your next step with our SRE Certification Course and fast-track your career with expert training, real-world projects, and globally recognized credentials.
0 notes
Text
EKS Dashboard: Kubernetes cluster Access over AWS Regions

Kubernetes cluster visibility may be centralised across AWS regions and accounts using EKS Dashboard.
EKS Dashboard
EKS Dashboard is a new AWS feature. A centralised display allows cluster administrators and cloud architects monitor their Kubernetes clusters organisationally. Its major goal is to give clients a single view of clusters across AWS Regions and accounts. This single view helps track cluster inventories, compliance, operational activity planning, and version updates.
The EKS Dashboard helps companies scale Kubernetes deployments. Multiple clusters are often run for data sovereignty, business continuity, or better availability. This distributed technique makes visibility and control difficult, especially in decentralised systems with several regions and accounts. Clients have traditionally used external products for centralised cluster visibility. Third-party solutions' identification and access setup, licensing costs, and ongoing maintenance added complexity.
The EKS Dashboard simplifies this procedure with native AWS Console dashboard features. It offers data about clusters, regulated node groups, and EKS add-ons. Dashboard insights include cluster health indicators, predicted extended support EKS control plane charges, support status, account, version, and cluster distribution by region. Automatic filtering lets users explore certain data points. This feature makes clusters easier to find and focus on.
A brief tour of the EKS Dashboard shows tabular, graphical, and map representations of Kubernetes clusters. Advanced search and filtering are offered. There are several widgets for cluster visualisation. You can visualise managed node groups by AMI versions, launch templates, and instance type distribution. You can also map your clusters worldwide. Data from the dashboard can be exported for study or custom reports.
Setting up EKS Dashboard
According to reports, EKS Dashboard setup is easy. AWS Organisation management and administrator accounts grant clients access to the EKS interface Dashboard. Turning on trusted access on the organization's Amazon EKS settings page is the only setup requirement. Dashboard settings allow trusted access. The management account can view the Dashboard with trusted access. The official AWS Documentation provides setup and configuration details.
Importantly, the EKS Dashboard is not limited to Amazon EKS clusters. It can also provide visibility into linked Kubernetes clusters on-site or on other cloud providers. Even while hybrid or multi-cloud clusters may have inferior data quality than native Amazon EKS clusters, this functionality provides uniform visibility for enterprises.
Availability
The EKS Dashboard is currently available in the US East (N. Virginia). Use it to integrate data from all commercial AWS Regions. No additional fees apply to the EKS Dashboard.
This new functionality emphasises AWS's commitment to simplifying Kubernetes operations. To let clients focus on app development and growth, infrastructure management is removed.
Finally, the native AWS EKS Dashboard provides a unified view of Kubernetes clusters across accounts and regions. It provides basic visibility for linked non-EKS clusters, comprehensive visualisations, extensive insights, and quick setup at no additional cost.
#EKSDashboard#Kubernetesclusters#AmazonEKS#AmazonEKSclusters#AmazonEKSDashboard#AWSRegions#technology#technews#technologynews#news#govindhtech
0 notes
Text
Next Steps After an AI Proof of Concept: Scaling AI for Enterprise

Completing an ai proof of concept can feel like a milestone, yet the real transformation happens when you take those learnings to scale. Scaling AI for broader enterprise adoption involves bridging cultural, technical, and strategic gaps. It demands robust data pipelines, cross-functional collaboration, and continuous improvement cycles. This blog outlines how to capitalize on pilot success, from refining architecture to measuring ROI across more complex use cases.
1. Reviewing Pilot Outcomes and Lessons
1.1 Stakeholder Debrief Once the pilot ends, gather data scientists, business leads, and key users to discuss what went right or wrong. Pinpoint the pilot’s exact ROI, user acceptance levels, and areas needing improvement.
1.2 Goal Alignment Adjust enterprise-level KPIs based on pilot discoveries. If the pilot lowered manual data-processing time by 30%, consider scaling that success across adjacent processes.
2. Architecting for Enterprise Scale
Data Infrastructure Upgrades: Transition from local or limited pilot setups to robust, possibly cloud-based data lakes or warehouses.
High-Availability & Redundancy: Ensure continuous operation for mission-critical tasks; load balancing, auto-scaling clusters, and backup strategies become crucial.
Security Enhancements: Larger scopes might handle more sensitive data, necessitating advanced encryption, identity management, and compliance checks.
The leap from a pilot that might use minimal resources to enterprise-level usage can be significant. Plan for resource spikes, advanced monitoring, and cost management.
3. Integrating with Existing Systems
3.1 API-First Strategy APIs facilitate smooth communication between the AI solution and internal CRMs, ERPs, or third-party platforms. Ensuring stable, well-documented APIs reduces friction for teams that rely on the AI’s data or insights.
3.2 Orchestration & Automation Tools like Kubernetes or Docker containers ensure each AI component (data ingestion, model inference, logging) remains modular, scalable, and portable across different runtime environments.
4. Team Expansion and Training
Upskilling Existing Staff: The pilot’s success fosters an appetite for more AI-driven initiatives. Offering training for business analysts or domain experts can help them interpret AI outputs effectively.
Dedicated AI Roles: Data scientists, MLOps engineers, or AI product managers might be needed once the solution extends enterprise-wide.
Communication & Collaboration: Maintain cross-department synergy to avoid confusion over how new AI-driven data or processes integrate with daily workflows.
5. Monitoring, Maintenance, and Continuous Improvement
Real-Time Dashboards: For scaled deployments, track performance, usage metrics, and anomalies.
Automated Model Retraining: If data patterns shift, frequent updates keep AI predictions accurate.
Feedback Channels: Ongoing suggestions from end-users or domain teams refine the solution over time.
6. Sustaining ROI and Value Expansion
6.1 ROI Tracking Even post-deployment, ROI measurement is essential. Evaluate cost savings, revenue boosts, or intangible benefits (like staff satisfaction). This data justifies further enhancements or expansions.
6.2 New Use Cases An initial AI agent or analytics solution might find synergy in other departments—customer support chatbots could expand into internal helpdesk solutions, or supply chain forecasting might link to finance for better budgeting. Each scenario multiplies the enterprise’s net gain from adopting AI.
6.3 Multi-Stage Roadmap Formulate a multi-year plan for advanced functionalities—like introducing Agentic AI for dynamic decision-making or linking to generative AI for content creation. This keeps momentum strong and budgets realistic.
7. Partnering with Experts for Scale
While a pilot may be handled in-house or through basic partnerships, scaling often demands robust external expertise. Collaboration with specialized AI consulting providers can streamline:
Architecture Audits: Ensuring your environment is stable, secure, and capable of high availability.
Tool & Framework Recommendations: Adopting or switching to more enterprise-grade solutions.
Strategic Roadmapping: Plotting out advanced goals like agentic AI for multi-agent collaboration, or edge AI for real-time local decision-making.
Conclusion
Completing an ai proof of concept is an excellent start. However, the real gains materialize when you integrate those findings into large-scale implementations. This process involves upgrading your infrastructure, refining processes for continuous deployment, and furthering staff education. By focusing on synergy between technical design, organizational alignment, and robust governance, your AI solutions can evolve from a small pilot to a powerful, enterprise-wide engine driving data-driven success. Whether you stay with AI Agents or move toward more advanced agentic approaches, scaling AI effectively ensures your organization remains at the forefront of innovation.
0 notes
Text
Introduction Too much monitoring and alert fatigue is a serious issue for today's engineering teams. Nowadays, there are several open-source and third-party solutions available to help you sort through the noise. It always seems too good to be true, and it probably is. However, as Kubernetes deployments have grown in complexity and size, performance optimization and observability have become critical to guaranteeing optimal resource usage and early issue identification. Kubernetes events give unique and unambiguous information about cluster health and performance. And in these days of too much data, they also give clear insight with minimal noise. In this article, we will learn about Kubernetes events and their importance, their types, and how to access them. What is a Kubernetes Event? A Kubernetes event is an object that displays what is going on inside a cluster, node, pod, or container. These items are typically created in reaction to changes that occur inside your K8s system. The Kubernetes API Server allows all key components to generate these events. In general, each event includes a log message. However, they are quite different and have no other effect on one another. Importance of Kubernetes Events When any of the resources that Kubernetes manages changes, it broadcasts an event. These events frequently provide crucial metadata about the object that caused them, such as the event category (Normal, Warning, Error), as well as the reason. This data is often saved in etcd and made available by running specific kubectl commands. These events help us understand what happened behind the scenes when an entity entered a given state. You may also obtain an aggregated list of all events by running kubectl get events. Events are produced by every part of a cluster, therefore as your Kubernetes environment grows, so will the amount of events your system produces. Furthermore, every change in your system generates events, and even healthy and normal operations require changes in a perfectly running system. This means that a big proportion of the events created by your clusters are purely informative and may not be relevant when debugging an issue. Monitoring Kubernetes Events Monitoring Kubernetes events can help you identify issues with pod scheduling, resource limits, access to external volumes, and other elements of your Kubernetes setup. Events give rich contextual hints that will assist you in troubleshooting these issues and ensuring system health, allowing you to keep your Kubernetes-based apps and infrastructure stable, reliable, and efficient. How to Identify Which Kubernetes Events are Important Naturally, there are a variety of events that may be relevant to your Kubernetes setup, and various issues may arise when Kubernetes or your cloud platform executes basic functions. Let's get into each main event. Failed Events The kube-scheduler in Kubernetes schedules pods, which contain containers that operate your application on available nodes. The kubelet monitors the node's resource use and guarantees that containers execute as intended. The building of the underlying container fails when the kube-scheduler fails to schedule a pod, causing the kubelet to generate a warning event. Eviction Events Eviction events are another crucial event to keep track of since they indicate when a node removes running pods. The most typical reason for an eviction event is a node's insufficient incompressible resources, such as RAM or storage. The kubelet generates resource-exhaustion eviction events on the affected node. In case Kubernetes determines that a pod is utilizing more incompressible resources than what its runtime permits, it can remove the pod from its node and arrange for a new time slot. Volume Events A directory holding data (like an external library) that a pod may access and expose to its containers so they can carry out their workloads with any necessary dependencies is known as a Kubernetes volume.
Separating this linked data from the pod offers a failsafe way for retaining information if the pod breaks, as well as facilitating data exchange amongst containers on the same pod. When Kubernetes assigns a volume to a new pod, it first detaches it from the node it is presently on, attaches it to the required node, and then mounts it onto a pod. Unready Node Events Node readiness is one of the requirements that the node's kubelet consistently returns as true or false. The kubelet creates unready node events when a node transitions from ready to not ready, indicating that it is not ready for pod scheduling. How to Access Kubernetes Events Metrics, logs, and events may be exported from Kubernetes for observability. With a variety of methods at your fingertips, events may be a valuable source of information about what's going on in your services. Kubernetes does not have built-in functionality for accessing, storing, or forwarding long-term events. It stores it for a brief period of time before cleaning it up. However, Kubernetes event logs may be retrieved directly from the cluster using Kubectl and collected or monitored using a logging tool. Running the kubectl describe command on a given cluster resource will provide a list of its events. A more general approach is to use the kubectl get events command, which lists the events of specified resources or the whole cluster. Many free and commercial third-party solutions assist in providing visibility and reporting Kubernetes cluster events. Let's look at some free, open-source tools and how they may be used to monitor your Kubernetes installation: KubeWatch KubeWatch is an excellent open-source solution for monitoring and broadcasting K8s events to third-party applications and webhooks. You may set it up to deliver notifications to Slack channels when major status changes occur. You may also use it to transmit events to analytics and alerting systems such as Prometheus. Events Exporter The Kubernetes Events Exporter is a good alternative to K8s' native observing mechanisms. It allows you to constantly monitor K8s events and list them as needed. It also extracts a number of metrics from the data it collects, such as event counts and unique event counts, and offers a simple monitoring configuration. EventRouter EventRouter is another excellent open-source solution for gathering Kubernetes events. It is simple to build up and seeks to stream Kubernetes events to numerous sources, as described in its documentation. However, like KubeWatch, it does not have querying or persistent capabilities. To get the full experience, you should link it to a third-party storage and analysis tool. Conclusion Kubernetes events provide an excellent approach to monitor and improve the performance of your K8s clusters. They become more effective when combined with realistic tactics and vast toolsets. I hope this article helps you to understand the importance of Kubernetes events and how to get the most out of them.
0 notes
Text
Monitoring Systems and Services with Prometheus
In today’s IT landscape, monitoring systems and services is not just important—it’s critical. With the rise of microservices, cloud-native architectures, and distributed systems, ensuring application uptime and performance has become more complex. Enter Prometheus, an open-source monitoring and alerting toolkit designed for modern systems.
What is Prometheus?
Prometheus is a powerful, feature-rich, and highly scalable monitoring system. It excels at collecting metrics, providing a flexible query language, and integrating seamlessly with a wide variety of systems. Developed originally by SoundCloud, it is now a Cloud Native Computing Foundation (CNCF) project.
Key Features of Prometheus
Multi-dimensional data model: Metrics are stored with key-value pairs (labels), allowing granular and flexible querying.
Pull-based scraping: Prometheus pulls metrics from defined endpoints, ensuring better control over the data.
Powerful query language (PromQL): Prometheus Query Language enables robust metric analysis.
Time-series database: It stores all data as time-stamped, making historical analysis and trend monitoring straightforward.
Alerting capabilities: Prometheus integrates with Alertmanager to provide notifications for defined thresholds or anomalies.
How Prometheus Works
Scraping Metrics: Prometheus scrapes metrics from targets (applications, services, or systems) by accessing exposed HTTP endpoints, typically /metrics.
Data Storage: The collected metrics are stored in Prometheus’s time-series database.
Querying with PromQL: Users can run queries to analyze trends, generate graphs, or inspect metrics for anomalies.
Alerting: Based on queries, Prometheus can trigger alerts via the Alertmanager, which supports integrations with tools like Slack, PagerDuty, and email.
Use Cases of Prometheus
Infrastructure Monitoring: Track CPU, memory, disk usage, and network performance of your servers and VMs.
Application Monitoring: Monitor application health, API latencies, error rates, and user request patterns.
Kubernetes Monitoring: Gain insights into Kubernetes clusters, including pod status, resource utilization, and deployments.
Business Metrics: Measure success indicators such as transactions per second, user growth, or conversion rates.
Getting Started with Prometheus
Install Prometheus: Download and install Prometheus from its official site.
Set up Scrape Targets: Define the endpoints of the services you want to monitor in the prometheus.yml configuration file.
Run Prometheus: Start the server, and it will begin collecting metrics.
Visualize Metrics: Use Prometheus’s web UI, Grafana (a popular visualization tool), or command-line queries for visualization and analysis.
Integrating Prometheus with Grafana
While Prometheus provides a basic web interface, its true potential shines when paired with Grafana for rich and interactive dashboards. Grafana supports PromQL natively and allows you to create stunning visualizations of your metrics.
Benefits of Using Prometheus
Open Source: Freely available, with a vast and active community.
Scalable: Works efficiently for both small setups and enterprise-level infrastructures.
Extensible: Compatible with many exporters, enabling monitoring of databases, message queues, and more.
Alerts and Insights: Real-time monitoring and customizable alerts ensure minimal downtime.
Challenges and How to Overcome Them
High Cardinality: Too many unique label combinations can lead to resource overuse. Optimize your labels to avoid this.
Scaling: Use Prometheus federation or remote storage solutions to handle extremely large environments.
Learning Curve: PromQL and setup can be complex initially, but online documentation and the Prometheus community offer ample resources.
Final Thoughts
Prometheus has transformed the way modern systems and services are monitored. Its powerful features, extensibility, and open-source nature make it a go-to choice for organizations of all sizes. Whether you’re monitoring a single server or a multi-cloud deployment, Prometheus can scale to meet your needs.
If you’re looking to harness the power of Prometheus for your systems, explore HawkStack’s monitoring solutions. Our expert team ensures seamless integration and optimized monitoring for all your infrastructure needs.
Ready to get started? Contact us today! www.hawkstack.com
#redhatcourses#information technology#containerorchestration#kubernetes#docker#linux#container#containersecurity#dockerswarm
0 notes
Text
Docker Kubernetes: Simplifying Container Management and Scaling with Ease
If you're diving into the world of containerization, you've probably come across terms like Docker and Kubernetes more times than you can count. These two technologies are the backbone of modern software development, especially when it comes to creating scalable, efficient, and manageable applications. Docker Kubernetes are often mentioned together because they complement each other so well. But what exactly do they do, and why are they so essential for developers today?
In this blog, we’ll walk through the essentials of Docker Kubernetes, exploring why they’re a game-changer in managing and scaling applications. By the end, you’ll have a clear understanding of how they work together and how learning about them can elevate your software development journey.
What Is Docker?
Let’s start with Docker. It’s a tool designed to make it easier to create, deploy, and run applications by using containers. Containers package up an application and its dependencies into a single, lightweight unit. Think of it as a portable environment that contains everything your app needs to run, from libraries to settings, without relying on the host’s operating system.
Using Docker means you can run your application consistently across different environments, whether it’s on your local machine, on a virtual server, or in the cloud. This consistency reduces the classic “it works on my machine” issue that developers often face.
Key Benefits of Docker
Portability: Docker containers can run on any environment, making your applications truly cross-platform.
Efficiency: Containers are lightweight and use fewer resources compared to virtual machines.
Isolation: Each container runs in its isolated environment, meaning fewer compatibility issues.
Understanding Kubernetes
Now that we’ve covered Docker, let’s move on to Kubernetes. Developed by Google, Kubernetes is an open-source platform designed to manage containerized applications across a cluster of machines. In simple terms, it takes care of scaling and deploying your Docker containers, making sure they’re always up and running as needed.
Kubernetes simplifies the process of managing multiple containers, balancing loads, and ensuring that your application stays online even if parts of it fail. If Docker helps you create and run containers, Kubernetes helps you manage and scale them across multiple servers seamlessly.
Key Benefits of Kubernetes
Scalability: Easily scale applications up or down based on demand.
Self-Healing: If a container fails, Kubernetes automatically replaces it with a new one.
Load Balancing: Kubernetes distributes traffic evenly to avoid overloading any container.
Why Pair Docker with Kubernetes?
When combined, Docker Kubernetes provide a comprehensive solution for modern application development. Docker handles the packaging and containerization of your application, while Kubernetes manages these containers at scale. For businesses and developers, using these two tools together is often the best way to streamline development, simplify deployment, and manage application workloads effectively.
For example, if you’re building a microservices-based application, you can use Docker to create containers for each service and use Kubernetes to manage those containers. This setup allows for high availability and easier maintenance, as each service can be updated independently without disrupting the rest of the application.
Getting Started with Docker Kubernetes
To get started with Docker Kubernetes, you’ll need to understand the basic architecture of each tool. Here’s a breakdown of some essential components:
1. Docker Images and Containers
Docker Image: The blueprint for your container, containing everything needed to run an application.
Docker Container: The running instance of a Docker Image, isolated and lightweight.
2. Kubernetes Pods and Nodes
Pod: The smallest unit in Kubernetes that can host one or more containers.
Node: A physical or virtual machine that runs Kubernetes Pods.
3. Cluster: A group of nodes working together to run containers managed by Kubernetes.
With this setup, Docker Kubernetes enable seamless deployment, scaling, and management of applications.
Key Use Cases for Docker Kubernetes
Microservices Architecture
By separating each function of an application into individual containers, Docker Kubernetes make it easy to manage, deploy, and scale each service independently.
Continuous Integration and Continuous Deployment (CI/CD)
Docker Kubernetes are often used in CI/CD pipelines, enabling fast, consistent builds, testing, and deployment.
High Availability Applications
Kubernetes ensures your application remains available, balancing traffic and restarting containers as needed.
DevOps and Automation
Docker Kubernetes play a central role in the DevOps process, supporting automation, efficiency, and flexibility.
Key Concepts to Learn in Docker Kubernetes
Container Orchestration: Learning how to manage containers efficiently across a cluster.
Service Discovery and Load Balancing: Ensuring users are directed to the right container.
Scaling and Self-Healing: Automatically adjusting the number of containers and replacing failed ones.
Best Practices for Using Docker Kubernetes
Resource Management: Define resources for each container to prevent overuse.
Security: Use Kubernetes tools like Role-Based Access Control (RBAC) and secrets management.
Monitor and Optimize: Use monitoring tools like Prometheus and Grafana to keep track of performance.
Conclusion: Why Learn Docker Kubernetes?
Whether you’re a developer or a business, adopting Docker Kubernetes can significantly enhance your application’s reliability, scalability, and performance. Learning Docker Kubernetes opens up possibilities for building robust, cloud-native applications that can scale with ease. If you’re aiming to create applications that need to handle high traffic and large-scale deployments, there’s no better combination.
Docker Kubernetes offers a modern, efficient way to develop, deploy, and manage applications in today's fast-paced tech world. By mastering these technologies, you’re setting yourself up for success in a cloud-driven, containerized future.
0 notes
Link
Besides connection, our major focus would be on how to set up Kubernetes on the Linux system. Steps to install Kubernetes Cluster Requirements The major requirements are stated below regarding the setup process. Master: 2 GB RAM 2 Cores of CPU Slave/ Node: 1 GB RAM 1 Core of CPU 1.Install Kubernetes The below steps mentioned to be executed on both the master and node machines.
0 notes
Text
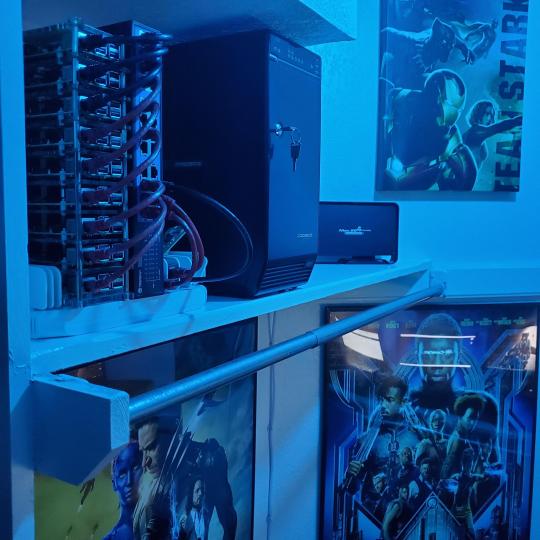
My Homelab/Office 2020 - DFW Quarantine Edition
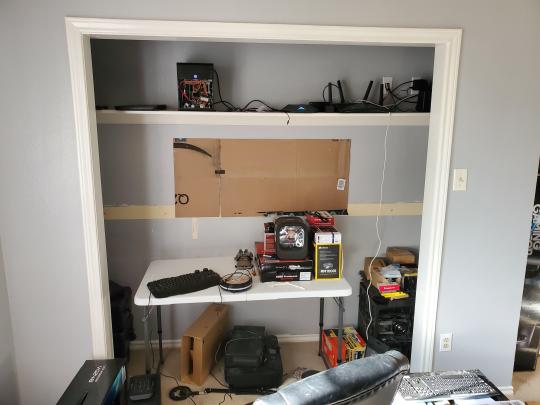
Moved into our first home almost a year ago (October 2019), I picked out a room that had 2 closets for my media/game/office area. Since the room isn't massive, I decided to build a desk into closet #1 to save on space. Here 1 of 2 shelves was ripped off, the back area was repainted gray. A piece of card board was hung to represent my 49 inch monitor and this setup also gave an idea how high I needed the desk.
On my top shelf this was the initial drop for all my Cat6 cabling in the house, I did 5 more runs after this (WAN is dropped here as well).
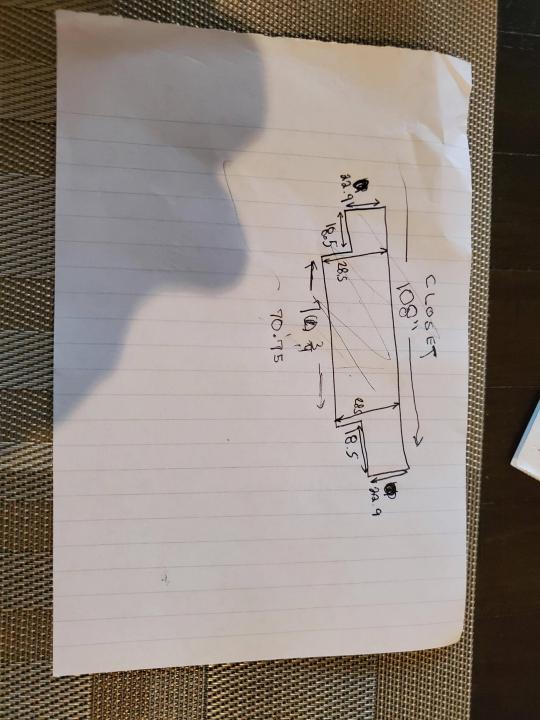
I measured the closet and then went to Home Depot to grab a countertop. Based on the dimensions, it needed to be cut into an object shape you would see on Tetris.

Getting to work, cutting the countertop.
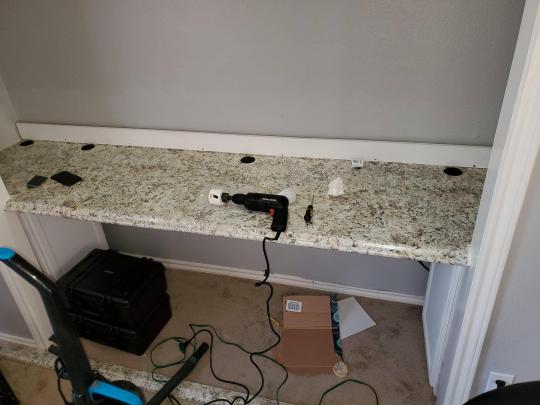
My father-in-law helped me cut it to size in the driveway and then we framed the closet, added in kitchen cabinets to the bottom (used for storage and to hide a UPS). We ran electrical sockets inside the closet. I bought and painted 2 kitchen cabinets which I use for storage under my desk as well.

The holes allowed me to run cables under my desk much easier, I learned many of these techniques on Battlestations subreddit and Setup Wars on Youtube. My daughter was a good helper when it came to finding studs.
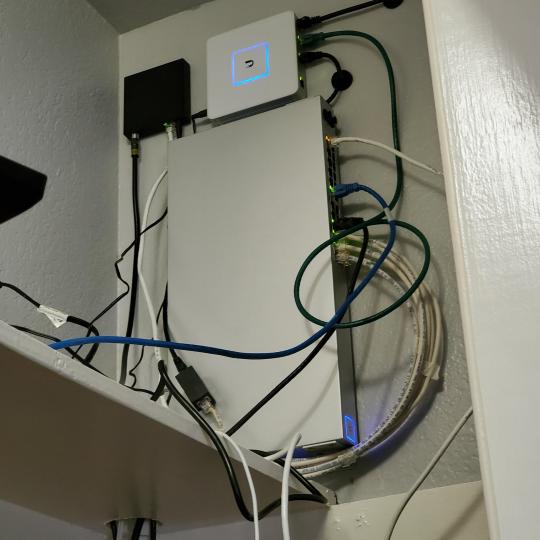
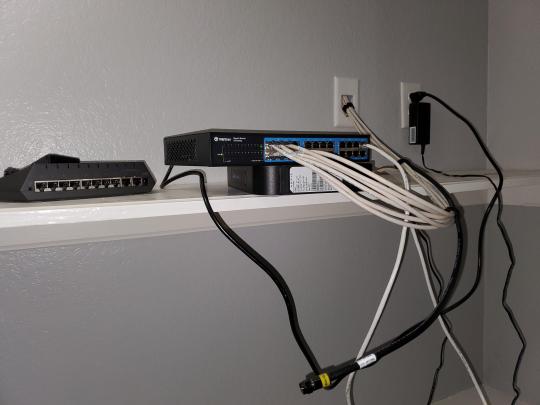
Some of my cousins are networking engineers, they advised me to go with Unifi devices. Here I mounted my Unifi 16 port switch, my Unifi Security Gateway (I'll try out pfSense sometime down the line), and my HD Homerun (big antenna is in the attic). I have Cat6 drops in each room in the house, so everything runs here. On my USG, I have both a LAN #2 and a LAN #1 line running to the 2nd closet in this room (server room). This shot is before the cable management.
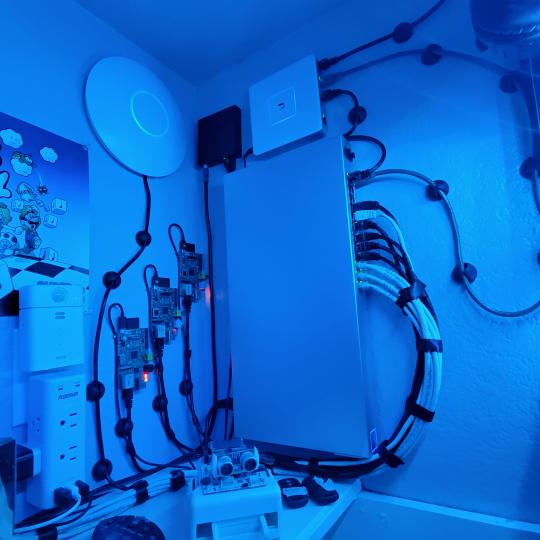
Cable management completed in closet #1. Added an access point and connected 3 old Raspberry Pi devices I had laying around (1 for PiHole - Adblocker, 1 for Unbound - Recursive DNS server, and 1 for Privoxy - Non Caching web proxy).

Rats nest of wires under my desk. I mounted an amplifier, optical DVD ROM drive, a USB hub that takes input from up to 4 computers (allows me to switch between servers in closet #2 with my USB mic, camera, keyboard, headset always functioning), and a small pull out drawer.

Cable management complete, night shot with with Nanoleaf wall lights. Unifi controller is mounted under the bookshelf, allows me to keep tabs on the network. I have a tablet on each side of the door frame (apps run on there that monitor my self hosted web services). I drilled a 3 inch hole on my desk to fit a grommet wireless phone charger. All my smart lights are either running on a schedule or turn on/off via an Alexa command. All of our smart devices across the house and outside, run on its on VLAN for segmentation purposes.

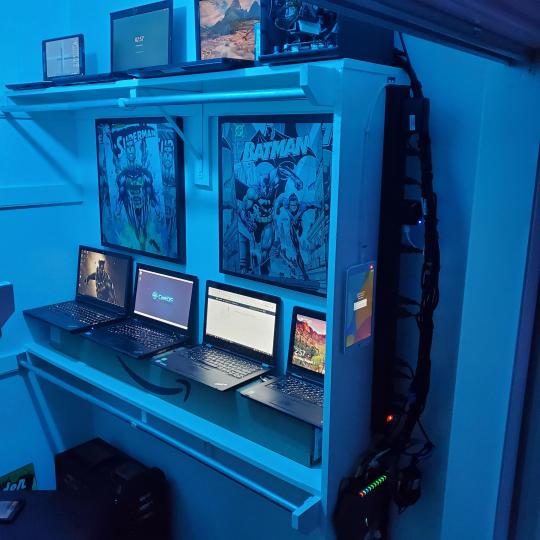
Quick shot with desk light off. I'm thinking in the future of doing a build that will mount to the wall (where "game over" is shown).

Wooting One keyboard with custom keycaps and Swiftpoint Z mouse, plus Stream Deck (I'm going to make a gaming comeback one day!).

Good wallpapers are hard to find with this resolution so pieced together my own.

Speakers and books at inside corner of desk.

Speakers and books at inside corner of desk.

Closet #2, first look (this is in the same room but off to the other side). Ran a few CAT6 cables from closet #1, into the attic and dropped here (one on LAN #1, the other on LAN #2 for USG). Had to add electrical sockets as well.
I have owned a ton of Thinkpads since my IBM days, I figured I could test hooking them all up and having them all specialize in different functions (yes, I have a Proxmox box but it's a decommissioned HP Microserver on the top shelf which is getting repurposed with TrueNAS_core). If you're wondering what OSes run on these laptops: Windows 10, Ubuntu, CentOS, AntiX. All of these units are hardwired into my managed Netgear 10gigabit switch (only my servers on the floor have 10 gigabit NICs useful to pass data between the two). Power strip is also mounted on the right side, next to another tablet used for monitoring. These laptop screens are usually turned off.
Computing inventory in image:
Lenovo Yoga Y500, Lenovo Thinkpad T420, Lenovo Thinkpad T430s, Lenovo Thinkpad Yoga 12, Lenovo Thinkpad Yoga 14, Lenovo Thinkpad W541 (used to self host my webservices), Lenovo S10-3T, and HP Microserver N54L

Left side of closet #2
**moved these Pis and unmanaged switch to outside part of closet**
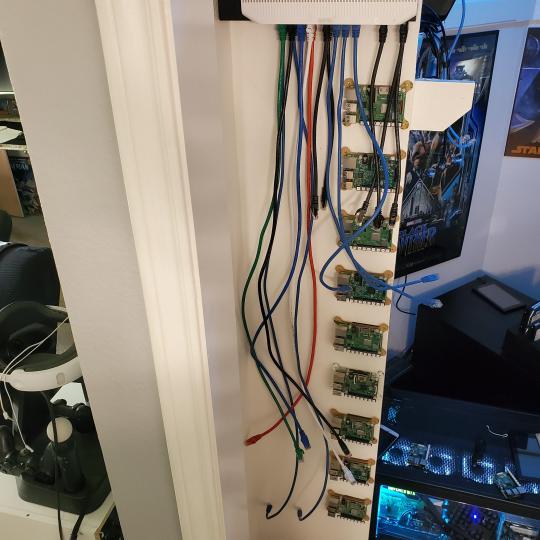
Since I have a bunch of Raspberry Pi 3s, I decided recently to get started with Kubernetes clusters (my time is limited but hoping to have everything going by the holidays 2020) via Rancher, headless. The next image will show the rest of the Pis but in total:
9x Raspberry Pi 3 and 2x Raspberry Pi 4
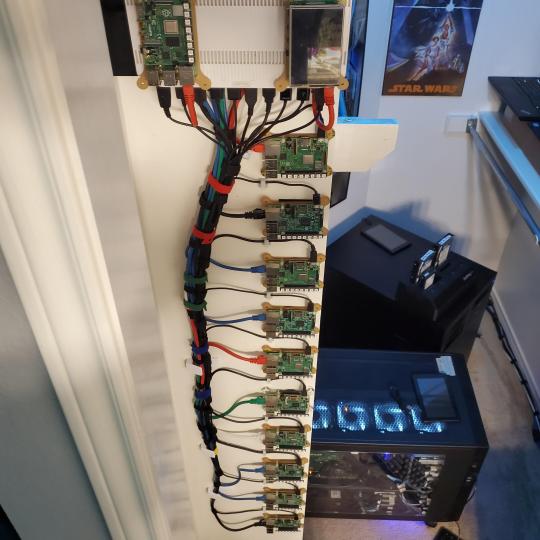
2nd shot with cable management. The idea is to get K3s going, there's Blinkt installed on each Pi, lights will indicate how many pods per node. The Pis are hardwired into a switch which is on LAN #2 (USG). I might also try out Docker Swarm simultaneously on my x86/x64 laptops. Here's my compose generic template (have to re-do the configs at a later data) but gives you an idea of the type of web services I am looking to run: https://gist.github.com/antoinesylvia/3af241cbfa1179ed7806d2cc1c67bd31
20 percent of my web services today run on Docker, the other 80 percent are native installs on Linux and or Windows. Looking to get that up to 90 percent by the summer of 2021.
Basic flow to call web services:
User <--> my.domain (Cloudflare 1st level) <--> (NGINX on-prem, using Auth_Request module with 2FA to unlock backend services) <--> App <--> DB.
If you ever need ideas for what apps to self-host: https://github.com/awesome-selfhosted/awesome-selfhosted

Homelabs get hot, so I had the HVAC folks to come out and install an exhaust in the ceiling and dampers in the attic.

I built my servers in the garage this past winter/spring, a little each night when my daughter allowed me to. The SLI build is actually for Parsec (think of it as a self hosted Stadia but authentication servers are still controlled by a 3rd party), I had the GPUs for years and never really used them until now.
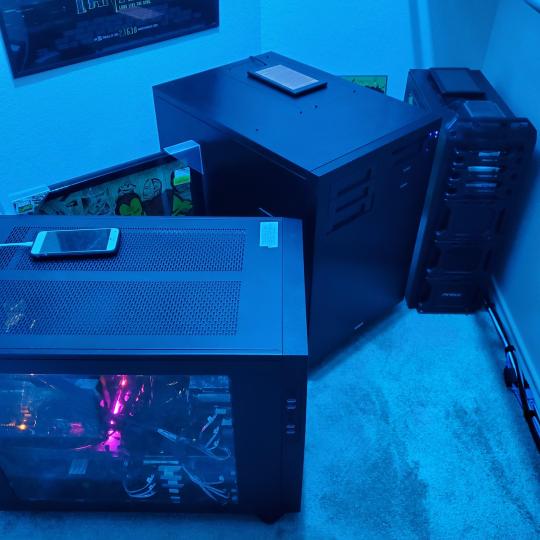
Completed image of my 2 recent builds and old build from 2011.
Retroplex (left machine) - Intel 6850 i7 (6 core, 12 thread), GTX 1080, and 96GB DDR4 RAM. Powers the gaming experience.
Metroplex (middle machine) - AMD Threadripper 1950x (16 core, 32 thread), p2000 GPU, 128GB DDR4 RAM.
HQ 2011 (right machine) - AMD Bulldozer 8150 (8 cores), generic GPU (just so it can boot), 32GB DDR3 RAM.

I've been working and labbing so much, I haven't even connected my projector or installed a TV since moving in here 11 months ago. I'm also looking to get some VR going, headset and sensors are connected to my gaming server in closet #2. Anyhow, you see all my PS4 and retro consoles I had growing up such as Atari 2600, NES, Sega Genesis/32X, PS1, Dreamcast, PS2, PS3 and Game Gear. The joysticks are for emulation projects, I use a Front End called AttractMode and script out my own themes (building out a digital history gaming museum).

My longest CAT6 drop, from closet #1 to the opposite side of the room. Had to get in a very tight space in my attic to make this happen, I'm 6'8" for context. This allows me to connect this cord to my Unifi Flex Mini, so I can hardware my consoles (PS4, PS5 soon)

Homelab area includes a space for my daughter. She loves pressing power buttons on my servers on the floor, so I had to install decoy buttons and move the real buttons to the backside.
Next project, a bartop with a Raspberry Pi (Retropie project) which will be housed in an iCade shell, swapping out all the buttons. Always have tech projects going on. Small steps each day with limited time.
6 notes
·
View notes
Text
Strangulating bare-metal infrastructure to Containers
Change is inevitable. Change for the better is a full-time job ~ Adlai Stevenson I
We run a successful digital platform for one of our clients. It manages huge amounts of data aggregation and analysis in Out of Home advertising domain.
The platform had been running successfully for a while. Our original implementation was focused on time to market. As it expanded across geographies and impact, we decided to shift our infrastructure to containers for reasons outlined later in the post. Our day to day operations and release cadence needed to remain unaffected during this migration. To ensure those goals, we chose an approach of incremental strangulation to make the shift.
Strangler pattern is an established pattern that has been used in the software industry at various levels of abstraction. Documented by Microsoft and talked about by Martin Fowler are just two examples. The basic premise is to build an incremental replacement for an existing system or sub-system. The approach often involves creating a Strangler Facade that abstracts both existing and new implementations consistently. As features are re-implemented with improvements behind the facade, the traffic or calls are incrementally routed via new implementation. This approach is taken until all the traffic/calls go only via new implementation and old implementation can be deprecated. We applied the same approach to gradually rebuild the infrastructure in a fundamentally different way. Because of the approach taken our production disruption was under a few minutes.
This writeup will explore some of the scaffolding we did to enable the transition and the approach leading to a quick switch over with confidence. We will also talk about tech stack from an infrastructure point of view and the shift that we brought in. We believe the approach is generic enough to be applied across a wide array of deployments.
The as-is
###Infrastructure
We rely on Amazon Web Service to do the heavy lifting for infrastructure. At the same time, we try to stay away from cloud-provider lock-in by using components that are open source or can be hosted independently if needed. Our infrastructure consisted of services in double digits, at least 3 different data stores, messaging queues, an elaborate centralized logging setup (Elastic-search, Logstash and Kibana) as well as monitoring cluster with (Grafana and Prometheus). The provisioning and deployments were automated with Ansible. A combination of queues and load balancers provided us with the capability to scale services. Databases were configured with replica sets with automated failovers. The service deployment topology across servers was pre-determined and configured manually in Ansible config. Auto-scaling was not built into the design because our traffic and user-base are pretty stable and we have reasonable forewarning for a capacity change. All machines were bare-metal machines and multiple services co-existed on each machine. All servers were organized across various VPCs and subnets for security fencing and were accessible only via bastion instance.
###Release cadence
Delivering code to production early and frequently is core to the way we work. All the code added within a sprint is released to production at the end. Some features can span across sprints. The feature toggle service allows features to be enabled/disable in various environments. We are a fairly large team divided into small cohesive streams. To manage release cadence across all streams, we trigger an auto-release to our UAT environment at a fixed schedule at the end of the sprint. The point-in-time snapshot of the git master is released. We do a subsequent automated deploy to production that is triggered manually.
CI and release pipelines
Code and release pipelines are managed in Gitlab. Each service has GitLab pipelines to test, build, package and deploy. Before the infrastructure migration, the deployment folder was co-located with source code to tag/version deployment and code together. The deploy pipelines in GitLab triggered Ansible deployment that deployed binary to various environments.
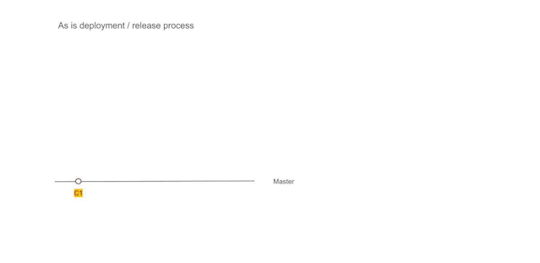
Figure 1 — The as-is release process with Ansible + BareMetal combination
The gaps
While we had a very stable infrastructure and matured deployment process, we had aspirations which required some changes to the existing infrastructure. This section will outline some of the gaps and aspirations.
Cost of adding a new service
Adding a new service meant that we needed to replicate and setup deployment scripts for the service. We also needed to plan deployment topology. This planning required taking into account the existing machine loads, resource requirements as well as the resource needs of the new service. When required new hardware was provisioned. Even with that, we couldn’t dynamically optimize infrastructure use. All of this required precious time to be spent planning the deployment structure and changes to the configuration.
Lack of service isolation
Multiple services ran on each box without any isolation or sandboxing. A bug in service could fill up the disk with logs and have a cascading effect on other services. We addressed these issues with automated checks both at package time and runtime however our services were always susceptible to noisy neighbour issue without service sandboxing.
Multi-AZ deployments
High availability setup required meticulous planning. While we had a multi-node deployment for each component, we did not have a safeguard against an availability zone failure. Planning for an availability zone required leveraging Amazon Web Service’s constructs which would have locked us in deeper into the AWS infrastructure. We wanted to address this without a significant lock-in.
Lack of artefact promotion
Our release process was centred around branches, not artefacts. Every auto-release created a branch called RELEASE that was promoted across environments. Artefacts were rebuilt on the branch. This isn’t ideal as a change in an external dependency within the same version can cause a failure in a rare scenario. Artefact versioning and promotion are more ideal in our opinion. There is higher confidence attached to releasing a tested binary.
Need for a low-cost spin-up of environment
As we expanded into more geographical regions rapidly, spinning up full-fledged environments quickly became crucial. In addition to that without infrastructure optimization, the cost continued to mount up, leaving a lot of room for optimization. If we could re-use the underlying hardware across environments, we could reduce operational costs.
Provisioning cost at deployment time
Any significant changes to the underlying machine were made during deployment time. This effectively meant that we paid the cost of provisioning during deployments. This led to longer deployment downtime in some cases.
Considering containers & Kubernetes
It was possible to address most of the existing gaps in the infrastructure with additional changes. For instance, Route53 would have allowed us to set up services for high availability across AZs, extending Ansible would have enabled multi-AZ support and changing build pipelines and scripts could have brought in artefact promotion.
However, containers, specifically Kubernetes solved a lot of those issues either out of the box or with small effort. Using KOps also allowed us to remained cloud-agnostic for a large part. We decided that moving to containers will provide the much-needed service isolation as well as other benefits including lower cost of operation with higher availability.
Since containers differ significantly in how they are packaged and deployed. We needed an approach that had a minimum or zero impact to the day to day operations and ongoing production releases. This required some thinking and planning. Rest of the post covers an overview of our thinking, approach and the results.
The infrastructure strangulation
A big change like this warrants experimentation and confidence that it will meet all our needs with reasonable trade-offs. So we decided to adopt the process incrementally. The strangulation approach was a great fit for an incremental rollout. It helped in assessing all the aspects early on. It also gave us enough time to get everyone on the team up to speed. Having a good operating knowledge of deployment and infrastructure concerns across the team is crucial for us. The whole team collectively owns the production, deployments and infrastructure setup. We rotate on responsibilities and production support.
Our plan was a multi-step process. Each step was designed to give us more confidence and incremental improvement without disrupting the existing deployment and release process. We also prioritized the most uncertain areas first to ensure that we address the biggest issues at the start itself.
We chose Helm as the Kubernetes package manager to help us with the deployments and image management. The images were stored and scanned in AWS ECR.
The first service
We picked the most complicated service as the first candidate for migration. A change was required to augment the packaging step. In addition to the existing binary file, we added a step to generate a docker image as well. Once the service was packaged and ready to be deployed, we provisioned the underlying Kubernetes infrastructure to deploy our containers. We could deploy only one service at this point but that was ok to prove the correctness of the approach. We updated GitLab pipelines to enable dual deploy. Upon code check-in, the binary would get deployed to existing test environments as well as to new Kubernetes setup.
Some of the things we gained out of these steps were the confidence of reliably converting our services into Docker images and the fact that dual deploy could work automatically without any disruption to existing work.
Migrating logging & monitoring
The second step was to prove that our logging and monitoring stack could continue to work with containers. To address this, we provisioned new servers for both logging and monitoring. We also evaluated Loki to see if we could converge tooling for logging and monitoring. However, due to various gaps in Loki given our need, we stayed with ElasticSearch stack. We did replace logstash and filebeat with Fluentd. This helped us address some of the issues that we had seen with filebeat our old infrastructure. Monitoring had new dashboards for the Kubernetes setup as we now cared about both pods as well in addition to host machine health.
At the end of the step, we had a functioning logging and monitoring stack which could show data for a single Kubernetes service container as well across logical service/component. It made us confident about the observability of our infrastructure. We kept new and old logging & monitoring infrastructure separate to keep the migration overhead out of the picture. Our approach was to keep both of them alive in parallel until the end of the data retention period.
Addressing stateful components
One of the key ingredients for strangulation was to make any changes to stateful components post initial migration. This way, both the new and old infrastructure can point to the same data stores and reflect/update data state uniformly.
So as part of this step, we configured newly deployed service to point to existing data stores and ensure that all read/writes worked seamlessly and reflected on both infrastructures.
Deployment repository and pipeline replication
With one service and support system ready, we extracted out a generic way to build images with docker files and deployment to new infrastructure. These steps could be used to add dual-deployment to all services. We also changed our deployment approach. In a new setup, the deployment code lived in a separate repository where each environment and region was represented by a branch example uk-qa,uk-prod or in-qa etc. These branches carried the variables for the region + environment. In addition to that, we provisioned a Hashicorp Vault to manage secrets and introduced structure to retrieve them by region + environment combination. We introduced namespaces to accommodate multiple environments over the same underlying hardware.
Crowd-sourced migration of services
Once we had basic building blocks ready, the next big step was to convert all our remaining services to have a dual deployment step for new infrastructure. This was an opportunity to familiarize the team with new infrastructure. So we organized a session where people paired up to migrate one service per pair. This introduced everyone to docker files, new deployment pipelines and infrastructure setup.
Because the process was jointly driven by the whole team, we migrated all the services to have dual deployment path in a couple of days. At the end of the process, we had all services ready to be deployed across two environments concurrently.
Test environment migration
At this point, we did a shift and updated the Nameservers with updated DNS for our QA and UAT environments. The existing domain started pointing to Kubernetes setup. Once the setup was stable, we decommissioned the old infrastructure. We also removed old GitLab pipelines. Forcing only Kubernetes setup for all test environments forced us to address the issues promptly.
In a couple of days, we were running all our test environments across Kubernetes. Each team member stepped up to address the fault lines that surfaced. Running this only on test environments for a couple of sprints gave us enough feedback and confidence in our ability to understand and handle issues.
Establishing dual deployment cadence
While we were running Kubernetes on the test environment, the production was still on old infrastructure and dual deployments were working as expected. We continued to release to production in the old style.
We would generate images that could be deployed to production but they were not deployed and merely archived.
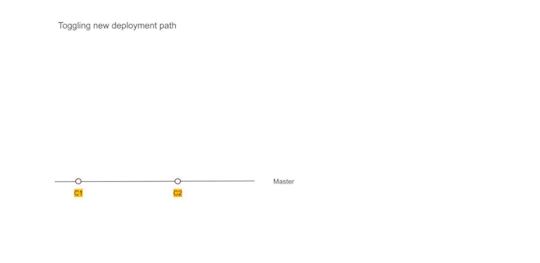
Figure 2 — Using Dual deployment to toggle deployment path to new infrastructure
As the test environment ran on Kubernetes and got stabilized, we used the time to establish dual deployment cadence across all non-prod environments.
Troubleshooting and strengthening
Before migrating to the production we spent time addressing and assessing a few things.
We updated the liveness and readiness probes for various services with the right values to ensure that long-running DB migrations don’t cause container shutdown/respawn. We eventually pulled out migrations into separate containers which could run as a job in Kubernetes rather than as a service.
We spent time establishing the right container sizing. This was driven by data from our old monitoring dashboards and the resource peaks from the past gave us a good idea of the ceiling in terms of the baseline of resources needed. We planned enough headroom considering the roll out updates for services.
We setup ECR scanning to ensure that we get notified about any vulnerabilities in our images in time so that we can address them promptly.
We ran security scans to ensure that the new infrastructure is not vulnerable to attacks that we might have overlooked.
We addressed a few performance and application issues. Particularly for batch processes, which were split across servers running the same component. This wasn’t possible in Kubernetes setup, as each instance of a service container feeds off the same central config. So we generated multiple images that were responsible for part of batch jobs and they were identified and deployed as separate containers.
Upgrading production passively
Finally, with all the testing we were confident about rolling out Kubernetes setup to the production environment. We provisioned all the underlying infrastructure across multiple availability zones and deployed services to them. The infrastructure ran in parallel and connected to all the production data stores but it did not have a public domain configured to access it. Days before going live the TTL for our DNS records was reduced to a few minutes. Next 72 hours gave us enough time to refresh this across all DNS servers.
Meanwhile, we tested and ensured that things worked as expected using an alternate hostname. Once everything was ready, we were ready for DNS switchover without any user disruption or impact.
DNS record update
The go-live switch-over involved updating the nameservers’ DNS record to point to the API gateway fronting Kubernetes infrastructure. An alternate domain name continued to point to the old infrastructure to preserve access. It remained on standby for two weeks to provide a fallback option. However, with all the testing and setup, the switch over went smooth. Eventually, the old infrastructure was decommissioned and old GitLab pipelines deleted.

Figure 3 — DNS record update to toggle from legacy infrastructure to containerized setup
We kept old logs and monitoring data stores until the end of the retention period to be able to query them in case of a need. Post-go-live the new monitoring and logging stack continued to provide needed support capabilities and visibility.
Observations and results
Post-migration, time to create environments has reduced drastically and we can reuse the underlying hardware more optimally. Our production runs all services in HA mode without an increase in the cost. We are set up across multiple availability zones. Our data stores are replicated across AZs as well although they are managed outside the Kubernetes setup. Kubernetes had a learning curve and it required a few significant architectural changes, however, because we planned for an incremental rollout with coexistence in mind, we could take our time to change, test and build confidence across the team. While it may be a bit early to conclude, the transition has been seamless and benefits are evident.
2 notes
·
View notes
Text
Kubernetes vs Docker
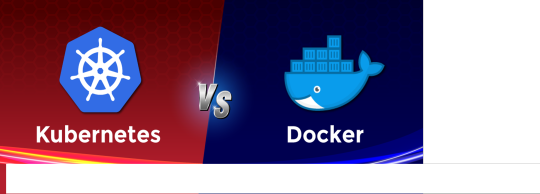
Kubernetes and Docker are two different technologies that serve different purposes, but they are often used together in containerized applications.
1.Docker is a containerization platform that allows developers to package their applications and dependencies into a single container image. This image can then be deployed to any environment that supports Docker, such as a local machine, a virtual machine, or a cloud platform.
2.Kubernetes, on the other hand, is a container orchestration platform that automates the deployment, scaling, and management of containerized applications. It allows users to manage large clusters of containers across multiple hosts, providing features such as load balancing, service discovery, and self-healing.
In other words, Docker is a tool for building and packaging container images, while Kubernetes is a tool for deploying and managing those containers in a cluster.
Here are some key differences between Kubernetes and Docker:
Purpose: Docker is a containerization platform, while Kubernetes is a container orchestration platform.
Scope: Docker focuses on packaging and deploying individual containers, while Kubernetes focuses on managing large clusters of containers.
Features: Docker provides container image management and basic orchestration features, while Kubernetes provides advanced orchestration features such as load balancing, scaling, and self-healing.
Complexity: Docker is relatively simple to use and can be used on its own, while Kubernetes is more complex and requires more setup and configuration.
In summary, while Docker and Kubernetes are both important tools in the world of containerized applications, they serve different purposes and are used in different parts of the application lifecycle.
Visit our Website For more: https://www.doremonlabs.com/
0 notes
Text
I guess it’s time for my first cursed programming post.
I have too many computers at home. In between my laptops, servers, virtual machines, and devboards I have about 15.
This makes distributing tasks between them kinda hard. I can SSH or RDP into most of them but they don’t have the same software setup or filesystem. That’s my core problem.
The traditional options fit into three categories. You have workload tools like Kubernetes, job based tools like Slurm, and finally provisioning tools like Ansible (there are other options but they aren’t general purpose). Kubernetes is the popular option based on Google’s experience developing Borg and Omega. Slurm is a old classic used in high performance computing. Ansible is a tool for setting up servers (we’ll see why I included it later).
Kubernetes is designed to pack long running workloads onto a cluster of servers based on based on a simple(ish) requirements format. Most of the workloads are services like web servers and databases. It does this using containers as the basic unit.
Slurm is a bit different. Slurm solves the problem of letting a group of users run script shaped programs on a cluster of computers. Slurm is used in scientific computing to run jobs on big supercomputers.
Ansible runs short lived commands to change the configuration of computers. It’s more used to setting up software like Kubernetes or Slurm.
The first two solve the core problem of “you can’t buy a bigger computer” beyond a certain scale. Ansible solves the problem of sitting down and setting up 200 computers all the same way is a mind numbing exercise.
But all three are fundamentally about running a command on a group of systems. Each are a way of looking at a weird series of computers as if they are a single system.
But back to my initial problem. I want to run medium to long lived applications on my fleet of computers. They all have different filesystems and they run different operating systems as well.
Slurm assumes a common network filesystem so that’s not a ideal solution for me.
Kubernetes distributes containers and it doesn’t like Windows.
Ansible copies the requirements over the network (normally via SSH). It doesn’t have tools to manage longer running jobs though.
So none fit my requirements perfectly.
So that’s the basics. Let’s see what I come up with. I’d also accept suggestions if my reasoning and understanding are stupid (quite possible).
0 notes
Text
IaC Sights into IBM Cloud Edge VPC Deployable Architecture

VPC Management
An examination of the IaC features of the edge VPC using deployable architecture on IBM Cloud. Many organizations now find themselves forced to create a secure and customizable virtual private cloud (VPC) environment within a single region due to the constantly changing nature of cloud infrastructure. This need is met by the VPC landing zone deployable architectures, which provide a collection of initial templates that may be easily customized to meet your unique needs.
Utilizing Infrastructure as Code (IaC) concepts, the VPC Landing Zone deployable architecture enables you to describe your infrastructure in code and automate its deployment. This method facilitates updating and managing your edge VPC setup while also encouraging uniformity across deployments.
The adaptability of the VPC Landing Zone is one of its main advantages. The starting templates are simply customizable to meet the unique requirements of your organisation. This can entail making changes to security and network setups as well as adding more resources like load balancers or block volumes. You may immediately get started with the following patterns, which are starter templates.
Edge VPC setup
Pattern of landing zone VPCs: Installs a basic IBM Cloud VPC architecture devoid of any computational resources, such as Red Hat OpenShift clusters or VSIs.
QuickStart virtual server instances (VSI) pattern: In the management VPC, a jump server VSI is deployed alongside an edge VPC with one VSI.
QuickStart ROKS pattern: One ROKS cluster with two worker nodes is deployed in a workload VPC using the Quick Start ROKS pattern.
Virtual server (VSI) pattern: In every VPC, deploys the same virtual servers over the VSI subnet layer.
Red Hat Open Shift pattern: Every VPC’s VSI subnet tier has an identical cluster deployed per the Red Hat Open Shift Kubernetes (ROKS) design.
VPC Patterns that adhere to recommended standards
To arrange and oversee cloud services and VPCs, establish a resource group.
Configure Cloud Object Storage instances to hold Activity Tracker data and flow logs.
This makes it possible to store flow logs and Activity Tracker data for a long time and analyze them.
Keep your encryption keys in situations of Key Protect or Hyper Protect Crypto Services. This gives the management of encryption keys a safe, convenient location.
Establish a workload VPC for executing programmes and services, and a management VPC for monitoring and controlling network traffic.
Using a transit gateway, link the workload and management VPCs.
Install flow log collectors in every VPC to gather and examine information about network traffic. This offers visibility and insights on the performance and trends of network traffic.
Put in place the appropriate networking rules to enable VPC, instance, and service connectivity.
Route tables, network ACLs, and security groups are examples of these.
Configure each VPC’s VPEs for Cloud Object Storage.
This allows each VPC to have private and secure access to Cloud Object Storage.
Activate the management VPC VPN gateway.
This allows the management VPC and on-premises networks to communicate securely and encrypted.
Patterns of landing zones
To acquire a thorough grasp of the fundamental ideas and uses of the Landing Zone patterns, let’s investigate them.
First, the VPC Pattern
Being a modular solution that provides a strong base upon which to develop or deploy compute resources as needed, the VPC Pattern architecture stands out. This design gives you the ability to add more compute resources, such as Red Hat OpenShift clusters or virtual private islands (VSIs), to your cloud environment. This method not only makes the deployment process easier, but it also makes sure that your cloud infrastructure is safe and flexible enough to meet the changing demands of your projects.
The VSI pattern QuickStart with edge VPC
Deploying an edge VPC with a load balancer inside and one VSI in each of the three subnets is the Quickstart VSI pattern pattern. It also has a jump server VSI that exposes a public floating IP address in the management VPC. It’s vital to remember that this design, while helpful for getting started quickly, does not ensure high availability or validation within the IBM Cloud for Financial Services framework.
ROKS pattern QuickStart
A security group, an allow-all ACL, and a management VPC with a single subnet make up the Quickstart ROKS pattern pattern. The Workload VPC features a security group, an allow-all ACL, and two subnets located in two distinct availability zones. There is a Transit Gateway that connects the workload and management VPCs.
In the workload VPC, a single ROKS cluster with two worker nodes and an enabled public endpoint is also present. The cluster keys are encrypted using Key Protect for further protection, and a Cloud Object Storage instance is configured as a prerequisite for the ROKS cluster.
Pattern of virtual servers
Within the IBM Cloud environment, the VSI pattern architecture in question facilitates the establishment of a VSI on a VPC landing zone. One essential part of IBM Cloud’s secure infrastructure services is the VPC landing zone, which is made to offer a safe platform for workload deployment and management. For the purpose of building a secure infrastructure with virtual servers to perform workloads on a VPC network, the VSI on VPC landing zone architecture was created expressly.
Pattern of Red Hat OpenShift
The architecture of the ROKS pattern facilitates the establishment and implementation of a Red Hat OpenShift Container Platform in a single-region configuration inside a VPC landing zone on IBM Cloud.
This makes it possible to administer and run container apps in a safe, isolated environment that offers the tools and services required to maintain their functionality.
Because all components are located inside the same geographic region, a single-region architecture lowers latency and boosts performance for applications deployed within this environment.
It also makes the OpenShift platform easier to set up and operate.
Organizations can rapidly and effectively deploy and manage their container apps in a safe and scalable environment by utilizing IBM Cloud’s VPC landing zone to set up and manage their container infrastructure.
Read more on govindhtech.com
#IBMCloud#redhatopenshift#vpcnetwork#vpcmanagement#VPC#news#technews#technology#technologynews#technologytrends
0 notes
Text
Aws fargate startup time

AWS FARGATE STARTUP TIME FULL
AWS FARGATE STARTUP TIME WINDOWS
Prices are showing as of just now in $/hour, on a basis of the listed 0.0506 vCPU/h and 0.0127 GB/h: Fargate Let’s compare with on-demand EC2 pricing in the us-east-1 region. Right now, the pricing model doesn’t seem to support this. you’re running a standard AMI with no further setup - you should be looking at Fargate, let Amazon solve the bin-packing problem, and don’t pay for an entire EC2 instance just to run a single container/task. The AWS vision for Fargate basically seems to be if you don’t have custom requirements for your EC2 instance - i.e. One interesting new service just launched is AWS Cloud9, a “cloud based IDE” which runs on top of an EC2 instance to build, run and debug your code, maybe not fit for all purposes but with some nice AWS integration, a handy tool.
AWS FARGATE STARTUP TIME WINDOWS
Of course there were plenty other announcements relevant to EC2/ECS users, like updates to RDS Aurora, windows server containers, etc. Just as with serverless, of course there are VMs under the hood (just now this sits on top of ECS, but later will introduce an EKS option), but in this case AWS takes care of them for you, so you can focus on the container(s) you want to run, and let AWS worry about allocating them to an EC2 instance. Run containers without managing servers or clusters Azure Container Service), on AWS you were previously left managing your own Kubernetes cluster.įargate on the other hand is something a bit different, a bit more novel. One is EKS ( Amazon Elastic Container Service for Kubernetes), in a way a means of remedying AWS’s first-mover disadvantage in container orchestration - while they have had a capable platform in ECS for some time, Kubernetes has emerged as an industry standard, and while other cloud providers can offer managed Kubernetes solutions (e.g. With the recent deluge of announcements, AWS have included a couple of key compute novelties. Lambda is containers in disguise with elastic scaling (and the mask slips when you start to look at caching and container reuse - e.g. EC2 is at the root of it all Batch is a way of firing off EC2 instances for batch workloads ECS is running containers on EC2.
AWS FARGATE STARTUP TIME FULL
AWS has a bewildering array of services, so much so that the full page service dropdown now has a scrollbar, but when it comes to compute, these effectively all boil down to different flavours of VMs and containers.
0 notes
Text
Setup a multi-master Kubernetes cluster with kubeadm
Setup a multi-master Kubernetes cluster with kubeadm #kubernetes #k8s #k3s #docker #devops #clustering
Kubernetes is a system designed to manage containerized applications built within Docker containers in a clustered environment. It provides basic mechanisms for deployment, maintenance and scaling of applications on public, private or hybrid setups, means, it handles the entire life cycle of a containerized application. It also has intelligence of self-healing features where containers can be…

View On WordPress
0 notes
Text
Getting Started with OpenShift: Environment Setup
OpenShift is a powerful Kubernetes-based platform that allows you to develop, deploy, and manage containerized applications. This guide will walk you through setting up an OpenShift environment on different platforms, including your local machine and various cloud services.
Table of Contents
1. [Prerequisites]
2. [Setting Up OpenShift on a Local Machine](#setting-up-openshift-on-a-local-machine)
- [Minishift]
- [CodeReady Containers]
3. [Setting Up OpenShift on the Cloud]
- [Red Hat OpenShift on AWS]
- [Red Hat OpenShift on Azure]
- [Red Hat OpenShift on Google Cloud Platform]
4. [Common Troubleshooting Tips]
5. [Conclusion]
Prerequisites
Before you begin, ensure you have the following prerequisites in place:
- A computer with a modern operating system (Windows, macOS, or Linux).
- Sufficient memory and CPU resources (at least 8GB RAM and 4 CPUs recommended).
- Admin/root access to your machine.
- Basic understanding of containerization and Kubernetes concepts.
Setting Up OpenShift on a Local Machine
Minishift
Minishift is a tool that helps you run OpenShift locally by launching a single-node OpenShift cluster inside a virtual machine.
Step-by-Step Guide
1. Install Dependencies
- VirtualBox: Download and install VirtualBox from [here](https://www.virtualbox.org/).
- Minishift: Download Minishift from the [official release page](https://github.com/minishift/minishift/releases) and add it to your PATH.
2. Start Minishift
Open a terminal and start Minishift:
```sh
minishift start
```
3. Access OpenShift Console
Once Minishift is running, you can access the OpenShift console at `https://192.168.99.100:8443/console` (the IP might vary, check your terminal output for the exact address).

CodeReady Containers
CodeReady Containers (CRC) provides a minimal, preconfigured OpenShift cluster on your local machine, optimized for testing and development.
Step-by-Step Guide
1. Install CRC
- Download CRC from the [Red Hat Developers website](https://developers.redhat.com/products/codeready-containers/overview).
- Install CRC and add it to your PATH.
2. Set Up CRC
- Run the setup command:
```sh
crc setup
```
3. Start CRC
- Start the CRC instance:
```sh
crc start
```
4. Access OpenShift Console
Access the OpenShift web console at the URL provided in the terminal output.

Setting Up OpenShift on the Cloud
Red Hat OpenShift on AWS
Red Hat OpenShift on AWS (ROSA) provides a fully-managed OpenShift service.
Step-by-Step Guide
1. Sign Up for ROSA
- Create a Red Hat account and AWS account if you don't have them.
- Log in to the [Red Hat OpenShift Console](https://cloud.redhat.com/openshift) and navigate to the AWS section.
2. Create a Cluster
- Follow the on-screen instructions to create a new OpenShift cluster on AWS.
3. Access the Cluster
- Once the cluster is up and running, access the OpenShift web console via the provided URL.

Red Hat OpenShift on Azure
Red Hat OpenShift on Azure (ARO) offers a managed OpenShift service integrated with Azure.
Step-by-Step Guide
1. Sign Up for ARO
- Ensure you have a Red Hat and Azure account.
- Navigate to the Azure portal and search for Red Hat OpenShift.
2. Create a Cluster
- Follow the wizard to set up a new OpenShift cluster.
3. Access the Cluster
- Use the URL provided to access the OpenShift web console.

Red Hat OpenShift on Google Cloud Platform
OpenShift on Google Cloud Platform (GCP) allows you to deploy OpenShift clusters managed by Red Hat on GCP infrastructure.
Step-by-Step Guide
1. Sign Up for OpenShift on GCP
- Set up a Red Hat and Google Cloud account.
- Go to the OpenShift on GCP section on the Red Hat OpenShift Console.
2. Create a Cluster
- Follow the instructions to deploy a new cluster on GCP.
3. Access the Cluster
- Access the OpenShift web console using the provided URL.

Common Troubleshooting Tips
- Networking Issues: Ensure that your firewall allows traffic on necessary ports (e.g., 8443 for the web console).
- Resource Limits: Check that your local machine or cloud instance has sufficient resources.
- Logs and Diagnostics: Use `oc logs` and `oc adm diagnostics` commands to troubleshoot issues.
Conclusion
Setting up an OpenShift environment can vary depending on your platform, but with the steps provided above, you should be able to get up and running smoothly. Whether you choose to run OpenShift locally or on the cloud, the flexibility and power of OpenShift will enhance your containerized application development and deployment process.
[OpenShift](https://example.com/openshift.png)
For further reading and more detailed instructions, refer to the www.qcsdclabs.com
#redhatcourses#information technology#linux#container#docker#kubernetes#containerorchestration#containersecurity#dockerswarm#aws
0 notes