#beginner blender guide
Explore tagged Tumblr posts
Visit Tumblr Blog
Explore Tumblr blogs with no restrictions, modern design and the best experience.
Last Seen Tumblr Blogs


Fun Fact
There are dozens of funny blogs to kill time on Tumblr.
Note
Hallo! Love your stuff! Hope things are well. If i may be asked, do you have recommendations for someone wanting to learn Blender but don't know where to start? Anyways- take care!
Before we begin, the most important key is F3 It is a search function, to find actions and tools you need. Just keep that in mind. _________________________________________________ I recommend starting by printing out a list of hotkeys and taping it up next to your monitor. For instance, here are some basic important ones you'll use all the time: R - Rotate S - Scale G - Grab/move A - Select All X - Delete Ctrl+Z - Undo Ctrl+Shift+Z - Redo E - Extrude new vertices F - Fill/connect vertices
_______________________________________________ You primarily move your view using the Middle button on your mouse: Middle click + drag - Rotate view around focus Shift + Middle Click + drag - Pan view Alt + Middle Click - Choose a focus ______________________________________________ When you open blender, you begin in Object Mode. You'll find the default cube in the center of the screen. If you click on it, you'll be able to use many of the above hotkeys to manipulate the whole object. Hit tab to switch to Edit Mode, and you'll find that you can select and manipulate individual vertices within that object. Many hotkeys act differently depending on which mode you're in, but you'll most often want to be in Edit mode. ____________________________________________ That's my beginner setup guide. I recommend just going into blender and trying each of these things for a bit. Past that point, you may be ready to google questions you have. (I recommend eventually watching all the "100 blender tips" videos you can find on Youtube. I binged dozens and kept learning useful things the whole time)
43 notes
·
View notes
Text
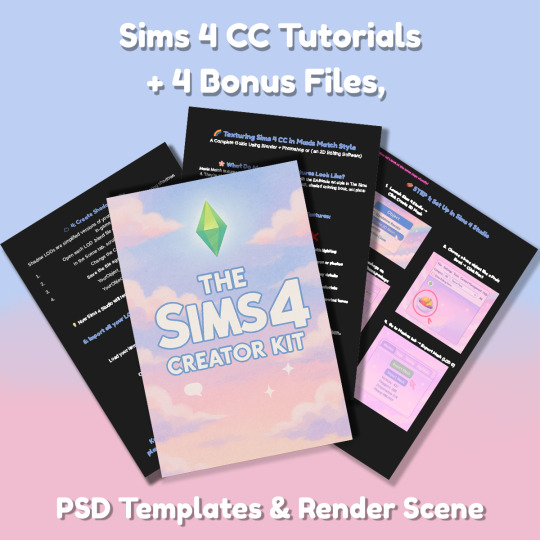
Sims 4 CC Kit — Make Your Own Lights, Decor, Clutter & Textures
Ever wanted to create Sims 4 clutter or decor CC but got stuck?
This kit is for you.
It’s a step-by-step guide that shows you how I make my own Sims 4 decor CC — lights, clutter, textures — in a way that I found works for me. You get guides, cheatsheets, templates, and my personal workflow that I’ve figured out through trial & error.
This probably isn’t the “proper” way of creating CC — but it’s how I learned, and it works and I use it every single time I create something new.
⚠️ Just to be clear:
This is a written tutorial kit, not a video or image course.
BUT — I’ve included some visuals, some screenshots & cheatsheets to help you follow along but its alot of written stuff. It would also be beneficial for you to have some basic knowledge of blender.
✅ What You Get:
Decor, clutter, lights CC Creation Guide
Shadow Mesh Tutorial
Mesh Cleanup Workflow
LOD Creation Steps
Maxis Match Texturing Cheat Sheet
Alpha Textures Basics
Vertex Paint for Lights Guide
Custom Thumbnail Tutorial
Normal & Specular Map Basics
Blender Basics Recap
Sims 4 Studio Quick Fix Cheatsheet
Blender Hotkeys Cheatsheet
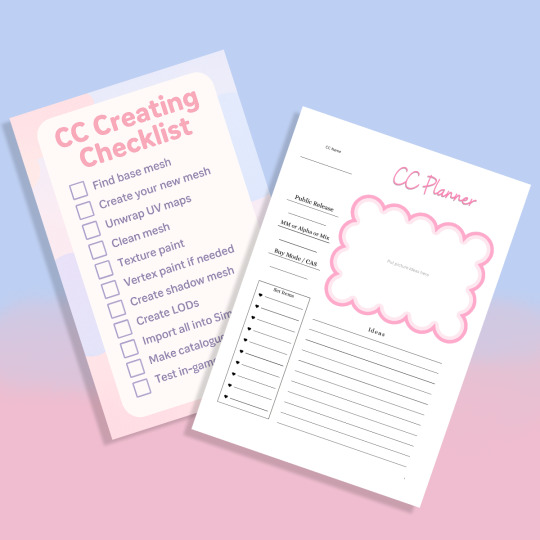
CC Planner to organize your ideas
CC Creating Checklist
PSD Thumbnail Templates (Decor)
Blank Normal & Specular Maps
Blender Render Setup File for Catalog Thumbnails
Texture Tips & Tricks
🎯 Why You’ll Love This:
No fluff — real steps, real help
Written for beginners who know basic Blender but need a hand
Includes a little bit of visual guides, printables & templates
Saves you HOURS of googling random problems
Helps you actually finish your CC & get it in-game
🖤 This is for you if:
You know basic Blender stuff (grab, rotate, edit mode) Got 3D Models you want to put into The Sims 4
You want to make clutter, decor CC and lights (not clothes or CAS yet)
You’re tired of tutorials that make you more confused
PS: Accessories & Clothing Creator Kits are coming soon.
If you get stuck, you can always join my Discord
(link’s on www.simmerkate.com).
Get Here (xx)
181 notes
·
View notes
Text
STICKY POST: ULTIMATE(ISH) GUIDE(S) TO SIMS 4 CC-MAKING; OR, A COMPREHENSIVE COMPENDIUM OF TUTORIALS, INSTRUCTIONAL MATERIALS, & FELLOW COMPILATIONS OF A LIKEWISE NATURE
In which I list a fuckton of tutorials, guides, and lists of such, each written, curated, and crafted by people far more talented than I.
More will be added as I find them.
---
@teanmoon's CC Guides - Includes tutorials on cloning, uv_1, weights, bump and specular maps, bi-color hair, and a Blender Cheat Sheet. High poly 'creators' have little excuse to churn out high poly, non-optimized garbage when they can lean on bump maps. (I know those can only do so much for more complex meshes, but for objects, texture maps can do SO much heavy-lifting).
@vintagesimstress's CC Guides - Includes tutorials on using Blender to create objects and clothing, especially for people who are just getting started.
@eliavah's uv-1 adjustment tutorial. Haven't tried this myself yet, but after glancing through it, it's something I will surely want to keep bookmarked.
@simlaughlove's CC Tutorials List - Includes many tutorials handily laid out by category on everything from object texturing to CAS morphs.
@thefoxburyinstitute's Nav Page - This blog is nonstop Sims 4 resources for e v e r y t h i n g. READ THIS POST FIRST as a guide on how to actually... nav.
@simsresourcehub's Tags List - What it says on the tin.
Transferring Weights in Blender 3.3.1 - Over at Sims4Studio forums.
@trillyke's List of Tutorials - Good ones!
@sims4tutorials - *GRAND GESTURES*
@katverse's Huge List of Tutorials - Tutorials on eeeverything.
@thatsimslady's Massive List of Tutorials - 31 pages????? Damn.
@kouukie's Sims 4 CAS with Marvelous Designer Tutorial - YouTube video!
@rusticottage's Gifmaking Tutorial - I love Sims gifs tbh.
@cowplant-pizza' Boes' Editing Masterlist - Includes stuff for Reshade, PSDs, PS Actions, and how to use them.
@melonsloth's Deco Sim Tutorial - Using SimRipper
@depthofpixels's Deco Sim Tutorial - Using SimRipper
@azuhrasims' Guide to Posing Sims - Includes how to pose sims, and handy workarounds! Super great for beginners and longtime users.
@radioactivedotcom's Guide to Posing - Includes additional posing resources. NOT for beginners.
@madameriasims4's Add a Flame to Your Basegame Candle - Great for mood lighting and historical gameplay!
@syboubou's Making a Lamp Start to Finish - a video tutorial
MORE BELOW:
Adding Lit DST to Fireplace
New image ref for default overrides
Make an RGB Spec for Objects
Bake a shadow onto your object in Blender
Linking all bedding to a single frame
Cutouts for Doors/Windows/Archways
Making objects see-through/glass
Making lamps light correctly
Give an object transparency (add an alpha)
Make a candle w/ multiple flames
Change LOD viewing distance
942 notes
·
View notes
Text
Self-use Sims 3 CC Tutorials List
Here is a list of tutorials from which I learn to convert/create sims 3 cc in a few months (and as a poor English speaker). I think it might help someone who also wants to try making things for sims 3 but doesn't know where to start, though it's been 15 years from the game release and even Inzoi is coming hahah.
The list covers objects, clothes, hairs and eyes. I know there're lots of tutorials not listed here, that's because I haven't tried them in my projects by hand. But The list will be updated with new things I learn. Most tutorials are in English. Thanks to all these creators for sharing their precious knowledge!
Sorry for the miserable format, cuz I wrote them in Patreon and paste here. You can also read it there, free of course.
Where I find tutorials
sims 3 tutorial hub
ts3 creators cave and its discord
Mod the sims tutorial wiki and the forum
pis3update tutorials tag
General
CC basic concepts by nightosphere (for clothes, most knowledge is shared with objects)
Tools
TSRW guide by apple (for objects, most knowledge is shared with clothes)
Blender
shortcut by Blender Guru
beginner tutorial for version 2.5, 2.8, 3.0, 4.0
3.5入门教程 (youtube / bilibili)
设置切换语言快捷键 change language shortcut settings
图片取色器网站
Mesh ToolKit with Seam Fixer for all ages
Topaz gigapixel AI guide / higher quality texture
Texture
Nicer bake / bake in blender 2.78
Bake in blender 2.93
Make normal map
small size blank texture
Reasons for black blocks on baked image
Adjust texture color without losing quality
Object
clone obejcts with S3OC
4t3
Functional Objects
Functional bed
TSRW setting
Combining Textures for Objects with Multiple Textures
Add normal map to objects
Introduction to slot categories
Add slots in TSRW
Edit in-door shadow or occluders in TSRW / Talks about 3 kinds of in-game shadow by Pocci
Clothes
4t3 by nightosphere
Reduce polycount / fix seams, holes, shadows or normals
Bone reference rule
Avoid milkshape workflow / adjust bone assignment and morphs in blender
Manually fix bone in blender
Convert between ages/body meshes
TSRW check list
Fix long clothes clip with body
Fix holes on morphs (easier in blender)
Extrude collars
Create texture in PS
Avoid TSRW workflow / CTU tutorial
Hairs
Avoid milkshape and TSRW workflow / delete backfaces / handmade morphs / DABOOBS guide
Keys pointing to in-game blank textures to save file size (for DABOOBS not TSRW)
Reduce polycount
4t3
Fix weird seam lines on hairs from s4s
Fix pigtail issue
Eyes
Convert contacts to default eyes
244 notes
·
View notes
Text
Resources for Creating: My Go-To things.
Update: I’ll be updating the list on this page from now on, since Tumblr can’t handle so many hyper-links in one post, on Dreamwidth - right here, so I won't have to update it multiple times. Please note: I keep updating this list, and updates aren't showing up on reblogs. Please check the original post for the most up to date list.
Sooo this is going to be a long comprehensive list. I got back to this game after a long time and with a different computer, with a dedicated graphics card, hurray! It made me want to return to making things, so while gathering back all the necessary stuff, I've complied this list. It might be is updated as I go along, but these are the main things I use. Maby one day i'll even finish something. So here are my go-to resources & tutorials; I'm posting it here for safekeeping, and hopefully others will find it helpful. Everything that's listed is here free. So many wonderful things for free under the cut.
Programs – General:
Creating: Blender. Blender Addons: 3D Print Toolbox – comes with blender, enable it from within the program. Originally for 3d printing. Good for fixing flipped normals, and some quick general repairs. Source Tools And source tools wiki – for exporting as SMD!!!! (SimPe: to enable bump maps for the mesh on import). GMDC Addon for Blender 4.0+ by Nopke.
GIMP. GIMP Addons: G'MIC-Qt. Resynthesizer. Nvidia dds?. Doesn’t it come with Gimp?
Other: Nvidia Texture Tools Exporter (iirc it works with all graphic cards that are compatible, doesn’t require Nvidia). For making Normal / Bump / Cube Maps. For high quality compression.
NormalMaps - Online, For making all types of maps, has good setting menus. A very cool tool.
Converting: Umodel, for Unreal Engine (Static meshes: export as gtlf.2. Animated meshes: export as psk. Requires Add-on). AssetStudio, for Unity. AC Viewer, self implied (+ USD Addon for blender). QuickBMS* and support forum, for basically everything else. (don't forget the required scrips, down the same page). *I haven’t tested it fully yet, but it was recommended here. A tutorial for it is listed further down. Works like a charm.
UV Mapping: UV Mapper, Classic (free) and the most recent Demo (for visualization).
Programs – Sims:
Never Mind the Bollox, Here's Osab and MAGIkarp to the rescue!
Latest version of SimPe, works with a non-default installation path. Chris Hatch's updates.
Home Crafter installation, Post by Huge Lunatic at Sims2Artists.
Repository Wizard, by Pick'N'Mix Mods. A game changer.
DBPF Compare, by Pick'N'Mix Mods.
Object Relocator, also by Pick'N'Mix Mods.
SMD Tools, by Lazy Duchess.
The Compressorizer, by JFade – Lazy Duchess's edit.
Bulk Rename Utility, to change file names in well, bulk. As explained by io here.
Lot Adjustor, by Mootilda at MTS.
Tutorials:
Override the game's graphic settings via Nvidia, as explained by iCad. The settings to Nvidia Profile Inspector she linked to at MTS have been deleted for some reason, here they are via WebArchive.
Meshing in Blender:
Mesh Optimization Info (and links), by Crisps&Kerosene.
Additional - Reducing Polycount:
Tutorial, by Flaming-Chickens (another username on other sites perhaps?)
Edge – Un-subdivide, a quick one by CG Link.
Transfer high poly details to low poly object in Blender, by 3Dnot2D.
Shrinkwrap Modifier - Blender Tutorial for Beginners - Basics, by in2vert.
Placeholder for this Addon that I want to try but haven't found, something for AR that was on facebook's defunct AR.
Scaling tips, by Blender Secrets.
How to fix inverted/ flipped normals, by ipaintsmallthings.
Converting: How to Extract 3D Models, Textures, Music from Unreal Engine Games, by iwanMods.
Extract 2D/3D/SFX Unity Assets fast & easy from your Unity Game, by iwanMods as well.
How to use QuickBMS, by darkhorse.
Guide to Converting 3t2 and 4t2 Part 01 and Part 02, by Chiaroscuro/tenlittlepandas.
Converting TS4 Windows and Doors, by Crisps&Kerosene.
Using Different Material Maps as Shading/Details for Base Texture, in Gimp or Blender, by Pineapple Forest & Crisps&Kerosene: https://www.tumblr.com/crispsandkerosene/764893644571525120/great-info-thats-the-reason-some-conversions?source=share
Texture Editing in GIMP:
Using Gimp Add-ons: G'MicQT. Resynthesizer. Both by Davies Media Design. This guy's channel for Gimp in general – here's a good one to begin with. And another one about layer masks.
Making a texture Tile Seamless: 1. My favorite - How to Make Seamless Textures for Cinema 4D - 3 Levels of Photoshop Wizardry using iPhone Photos, by School of Motion.
2. Simple Trick for More Realistic Texture Patterns in GIMP, by Davies Media Design – Quick and simple, using the Resynthesizer plugin. Good for patterns.
Making walls in SimPe out of a square texture, with minimal quality loss. To be written.
SimPe: Cloneable Objects: A List of Good Objects for Cloning, by IgnorantBliss at MTS.
Huge Lunatic's Tutorials, Her website.
Object Creation for Absolute Beginners, by Moune.
Sims 2 start to finish Object Creation Tutorial, by JWoods, Numenor, Lethe_s & IgnorantBliss.
The Material Definition (TXMT) Guide, by PixelHate – very comprehensive. Part 5 is about Bump/ Normal maps.
Null (Texture-less) Groups, by Skell. For bodyshop, for Objects see an elaboration by Midge the Tree below.
Crisps&Kerosene discovered how to add specular maps to objects! It's incredible there are still new things to discover in this ancient game.
More on Specular Maps, by Pineapple Forest.
Making new flooring & walls with SimPE, by Charisa. Includes adding Bump/Normal maps. She added a file to clone from in the comments below. It works for normal maps as well. Here's cool discovery in the game files.
Expanding footprint: a mini tutorial, by Deedee.
How to add correct drop shadows to objects, by Yuxi, via Wayback Machine.
Making Objects Viewable in Neighborhood View, by iCad.
Making Objects Visible In Build/Buy Mode, Invisible In Live Mode, by Midge the Tree.
Making Seasons-Friendly Trees, by Echo.
Io/ Serabiet's resources list, mainly for Bodyshop but not just.
Pineapple Forest's Tutorials, useful tips for efficiency and optimization.
MTS modding forum in General.
The Sims 2 Tutorials, on Tumblr. A database, is more updated.
Sims2Artists tutorials section.
LeeFish modding forum.
Garden of Shadows, Tree of Knowledge section.
Troubleshooting: What to do if you get a System.OutOfMemoryException Error, SimPe Forum, via WayBack Machine. Thank you @fanseelamb for the find.
How to read object error logs: I just want to know what causes it!!, by Episims.
Common TS2 errors, by Midge the Tree.
General game fuckery: How to Stop Sims 2 Crashing (Memory Allocation Fix and 4GB Patch Repair), by Jessa.
Graphics card problems, LeeFish forum.
Graphics help - DIY, by Kiri. How to fix faulty Texture Memory allocation, and the problems that stem from it. Tumblr can't handle anymore hyper links so here it is: https://celebkiriedhel.tumblr.com/post/189431721483/graphics-help-diy
General: Switching between save folders without renaming them, by Nopke.
Resources:
3D Models Online*: Various furniture designers' websites: Porada, Zanotta, Muuto, Hay, Poltrona Frau, many luxury furniture designer basically.
3D Warehouse, belongs to Sketchfab (get the Collada files).
Scan the World.
Wikimedia Commons. And more.
*(NOT OPTIMIZED).
Textures: Architextures.
Fabrics & Wallpapers: Natural Stones: Wall Plasters:
iCad's Woods. Shastakiss's Cluedo Metals, Yeti Metals, Pirate Woods. Goat's Woods.
Textures from other games: Dishonored, Thieve and much more, by Saricoya at GoS. Dreamfell by io.
Resource sharing threads at Garden of Shadows.
SimPe - General: CEP Extras list, HugeLunatic at Sims2Artists.
TXMT settings for different materials, by Hafiseazale.
Extended SimStandardMaterial Shader for the Sims 2 + Optionally Brighter Sims, by Crisps&Kerosene.
Custom CubeMaps, by Crisps&Kerosene.
Shiny TXMT Settings & Cube Maps Packs, by Pineapple Forest.
Build/ Buy: Templates for Recoloring Maxis items; MTS Templates sction, Hafiseazale (+cc), ZeroDark.
Template for Seasonal Trees, Gwenke at Sims2Artists.
Making Roof Recolors, Tutorial & template by Numenor, great template by iCad.
Pack for making food clutter usable, by DeeDee.
CAS: Default Makeup Packages - BYO Packages, by Huge Lunatic.
Body shape, Io/Serabiet on Tumblr.
Skin template, Io/Serabiet on Tumblr.
Hair texture, iCad.
Color Actions, Pooklet on Tumblr.
That's it for now.
Edit: forgot about CEP extras. Added more links. Edit 02: Added Troubleshooting section under tutorials.
#ts2#ts2 resources#ts2 creation resources#ts2 resources for creators#the sims 2#sims 2#resources#ts2 cc#sims 2 cc#the sims 2 cc#well its cc related#sims 2 resources#the sims 2 resources
67 notes
·
View notes
Text
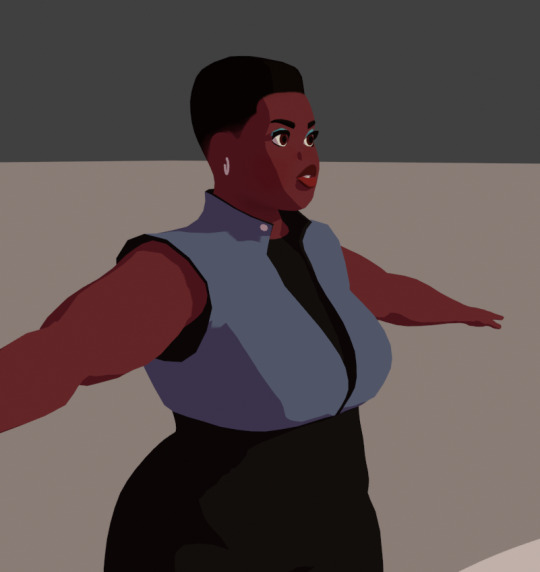
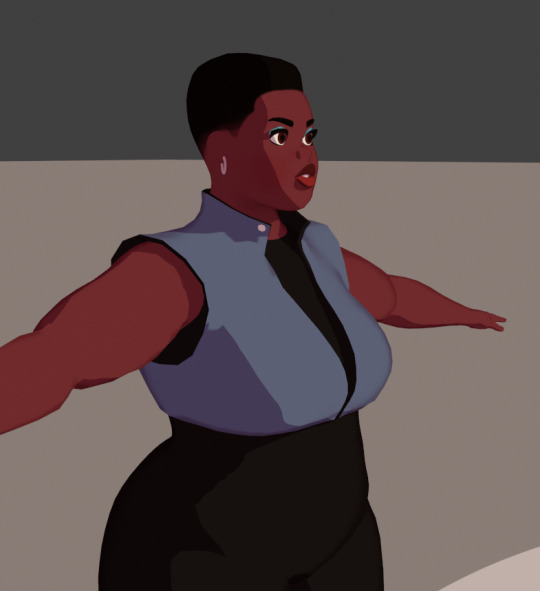
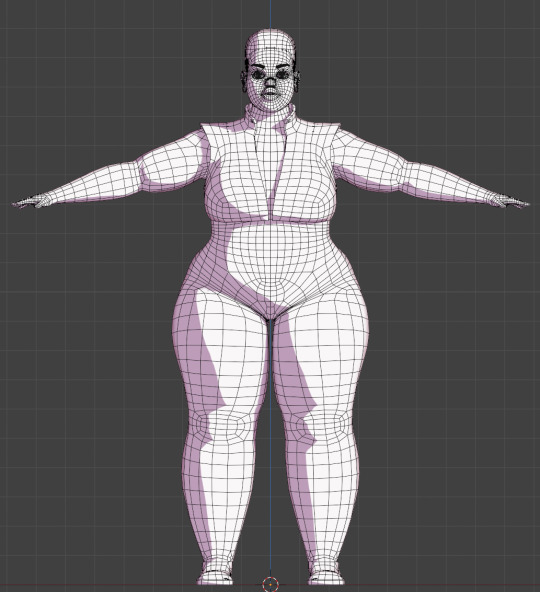
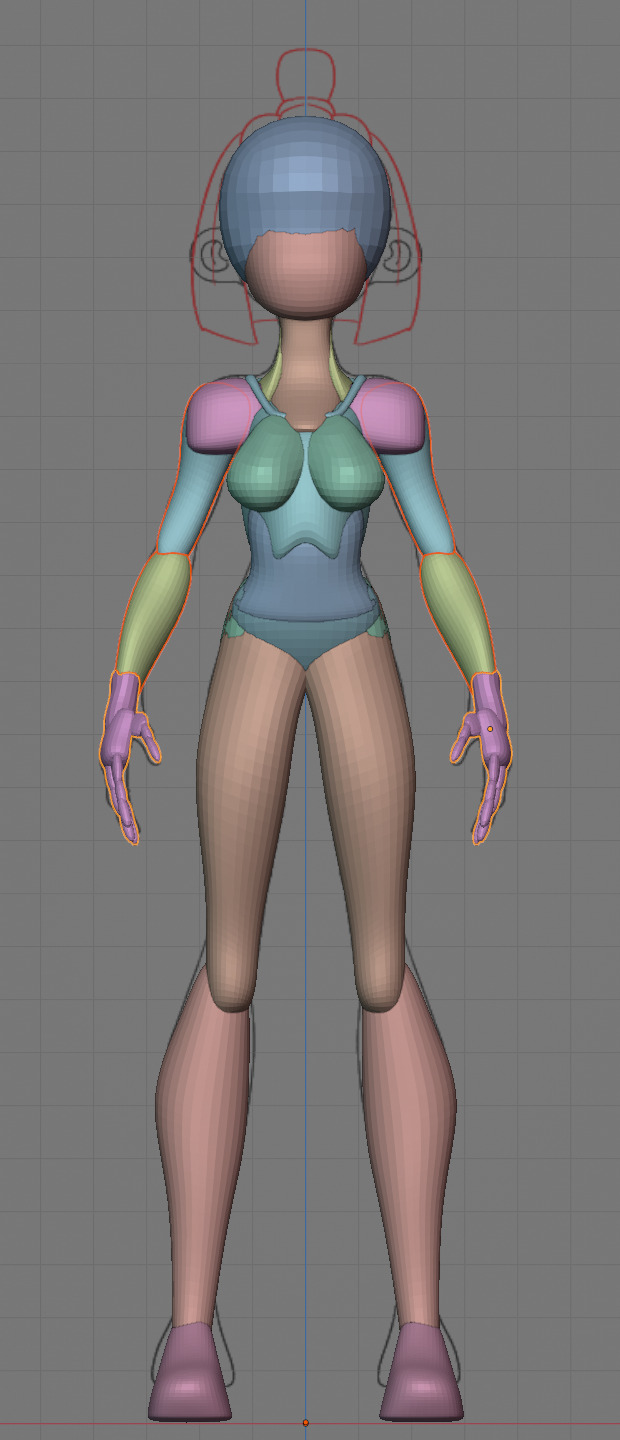
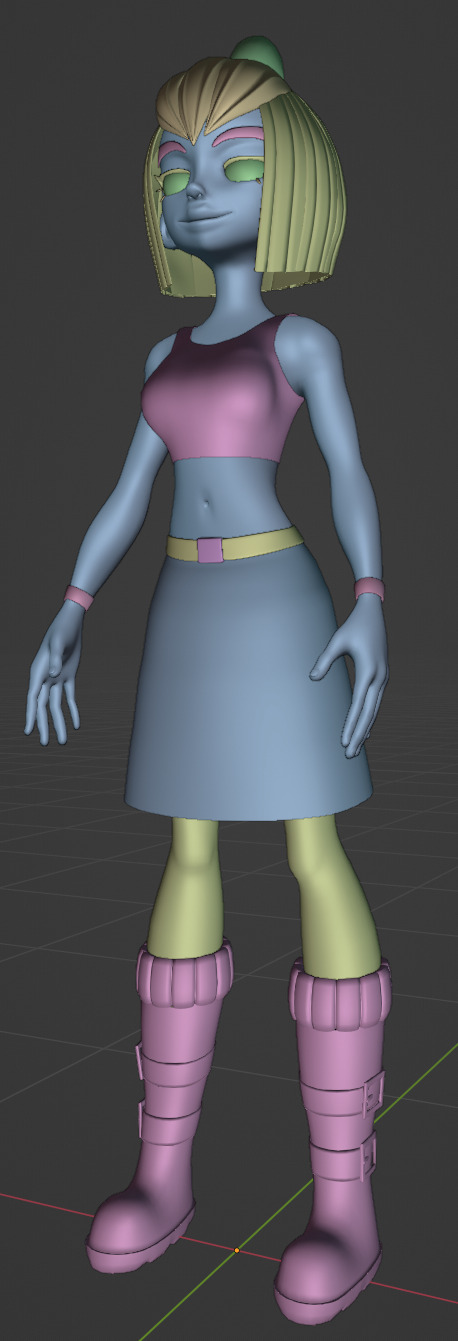
My model appeared on the Tumblr radar! I appreciate all the comments! It was interesting to hear that multiple people didn't realize it was a 3D model. I work a full-time job and modeling in Blender is one of my hobbies. Whenever I look back at my earliest models, I'm always shocked at my improvement. I look forward to seeing where I'll be at a year from now.
Multiple people asked how I was able to get my cel shader to look good. I've learned a lot from watching multiple videos and reading various blogs over the years. Here are a few things that I did for this model.
To start, here is how my shader graph looks like.
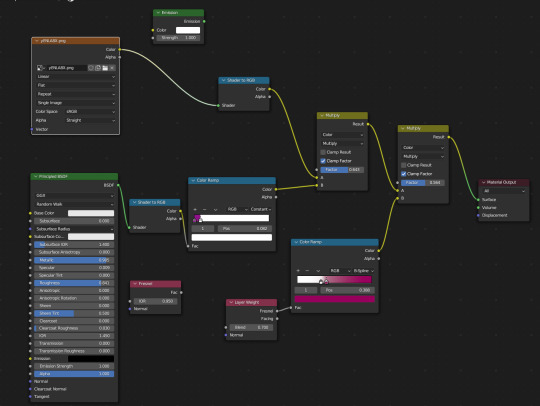
I have the Layer Weight plugged into the Color Ramp. This creates a soft outline around the model so that when objects of the same color overlap, it doesn't look flat. I've been experimenting with the options, but as of now, I like the way the B-Spline option looks.
Something else that I change is the shadow color on the color ramp. By default, it's set to black. This always felt dull to me, so I will usually change it to a magenta or purple. I also keep an Emission node ready so I can switch the model to all white. This mostly helps when modeling so I can see how the light will interact with the model in this style. Adjusting the settings of the light also improves the shadows.
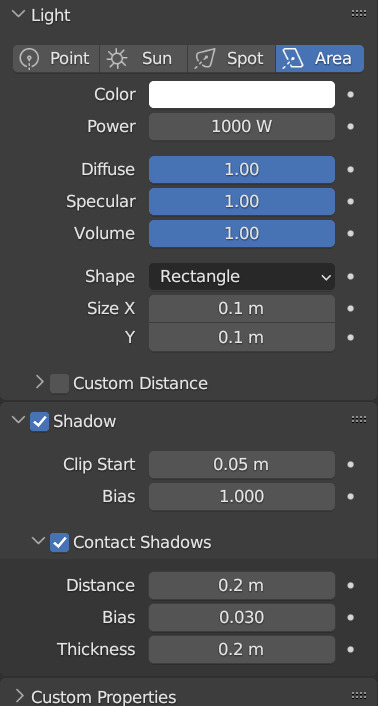
Also, change the Color Management from Filmic to Standard. This ensures that the colors you're using to paint your model will look the same in the viewport. This option can be found at the bottom of the Render Properties.
Check out these resources for more useful tips. Also, the props are from a Synty pack. I picked them up years ago when they were on sale.
Anime Shading In Blender (INTRODUCTION) Lightning Boy Shader - Beginner Guide - Shading & Modeling Tips
Synty™ Store - 3D Assets for Games (Unity + Unreal) – Synty Store
#3dmodeling#character modeling#cel shaded#blender3d#character design#character art#plus size art#tutorial#blender#original character
122 notes
·
View notes
Text
Road to 3D- Sam Manson (Part 2):
Character Modeling


Part 1: Model Sheet
Welcome to the second and final part of this project. Since people have asked how I do my models, I decided to make a write-up on how I approach these things using the example of a model of Sam Manson. The first part focused on how I make a model sheet fo a 3d model the second part focus just on the modeling. There are many more things about how to create a fully realized 3d character that I could make whole other chapters for, like UV unwrapping, texturing, shading and rigging, but I don't have enough knowledge past the fundamentals on these topics that could warrant their own seperate posts.
Additional stuff before I continue:
I use Blender for all my model
This not a beginners guide or something similar, it would be helpful to already know the general workflow of a modeling, how to use Blender and know different terminology like edgeflow, retopology etc.
If you are a beginner and want to learn more about character modeling I recommend the videoseries "Modeling for Animation" by Dikko on Youtube
Maybe I make some reference some tricks from this videoseries
That's it, let's go!


My first step is always the block-out phase. The block-out phase is what the construction lines and the first sketch in a drawing are. I align the frontview and sideview from the model sheet I made in part 1 with the z-axis (the blue line in the images above) and roughly shape out the forms with primitive forms. For this I mostly use a cube with a subdivide modifier.


Having a modelsheet without the clothes obscuring the body makes it much easier the get the form right. The block-out phase is one of the most important steps, if it looks good than I have practically half the work done. This is also a good opportunity to practice anatomy.

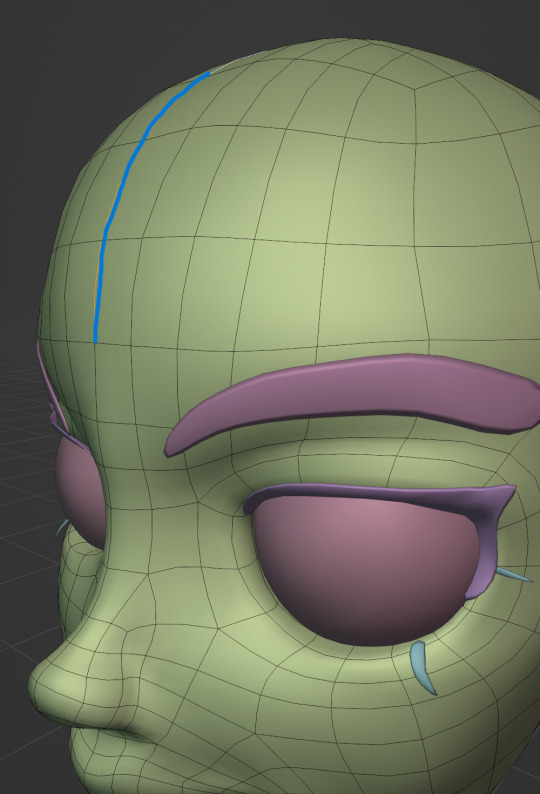
After this stage I continue with the head. First of all, don't forget to add the mirror modifier so I just need to model half of the model. There are different methods to approach modeling the head, like sculpt the head first, retopologize and than bake all the deatails onto the retopologized head. I actually prefer to polymodel the head especially when I have a good model sheet. I practially trace the lineart from the model sheet by extruding vertices, once from the frontview and once from the sideview. The most important points are the form of the eyes, the mouth, the form of the face and the jawline. The head block-out is used as an anchor point for the shrinkwrap modifier so that the traced forms actually look like they belong to a 3d form and not 2d lines floating space. From this point on it's just connecting everything, pull and push vertices so it looks like a 3d head and make sure the edgeflow is good. (It's also helpful to know how the planes of the head look like) After that I add the eyelashes, eyebrow, eyes and the ears, now it looks like something!
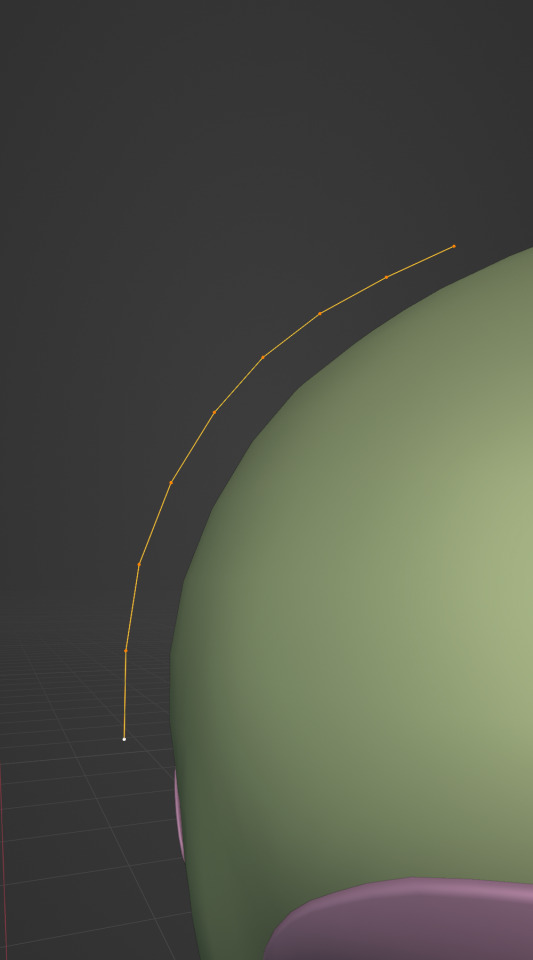
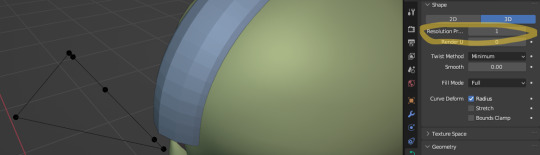
Now comes the hair. For the hair I used the "curve trick" like mentioned in the video series I recommended. Here is a tip to save time: I choose some edges from the head, duplicate and seperate it from the mesh. I convert this seperated line into a curve and choose a beziercircle as a bevel geometry. This is now the perfect foundation to model the hair further. One thing I needed a long time to notice: To get the beziercircle to a perfect square or in this case a triangle lower the Resolution U to 1 in the shape options. Now I just convert the curves into a mesh and add details and the head is done!
With the head finished I continue with the body. Remember how I wrote with a good block-out half of the work ist finished? Well, for this step I practically just use the smooth brush in sculpt mode and smooth everything out so everything looks connected. Then I retopologize the body and that's it. Well, ok there is a little bit more to it: Before smoothing things out I join the block-out part to a single mesh and remesh it with the remash modifier expept for the hands. I prefer to polymodel the hands seperatly without worrying about the rest of the body because they are difficult to model. I reattach them later. Speaking of reattaching, I make sure that the connection points have the same number of vertices while I retopologize/polymodel. To ensure that, I often use the following trick visualized with a simple example ( which is also described in the video series):

I want to reduce the amount of edges at the bottom of this plane, for this I merge 3 vertices from the middle into 1 vertice seen in the left image. After that I can select the blue marked edges from the center image and dissolve them. The result, which you can see on the right, is a nice clean edgeflow with a reduction in the number of edges.

After modeling every part I attach them together and I have a finished bodymesh the work with.

Now onto the clothes, for this I use the model sheet with clothes as reference. Having a retopologized body makes it easier to model simple stuff like e.g. Sam's shirt. On the left image the marked faces of the the bodymesh already looks like a shirt. I just need to duplicate and seperate this area, clean it up a little and the shirt is basically finished. The more complex stuff like the boots I need to polymodel around the bodymesh.

With that the modeling part is done! Now comes the things I said above: uv unwrapping, texture painting, rigging and shading. These are whole other topics I cannot go deeper because I'm still learning how to do these things but I hope my little write-up about how I appoach character modeling was enough to learn one thing or two.
Thank you for your time and thank for reading!
#3d modeling process#3d model#blender#danny phantom#sam manson#long post#my animation#my art#art resources
239 notes
·
View notes
Text

I made a guide on how to edit CC preset heads from Mass Effect Andromeda in Blender and import them into the game. For those wanting something a bit more customisable than what the game has to offer. I also tried to make it as beginner friendly as possible.
Find it right here
#mass effect#mass effect andromeda#mea#mea mods#mass effect mods#my mods#not really a mod but idk what else to tag it as
32 notes
·
View notes
Note
I love your blender models, I've been trying to get into it but I thought I'd ask if you had any recommendations for learning it or should I just try feeling it out myself?
Thank you <3
Personally I really enjoy learning by doing so I found that jumping straight into just trying to make the stuff I wanted to make and figuring stuff out for myself (occasionally watching tutorials if I got really stuck) worked really well for me. Would definitely recommend looking up some basic beginner guides to start with, though :D
22 notes
·
View notes
Note
Are there any psx blender tutorials that you would recommend or for you was it more of a "I just learned how to model via blender might as well make something low poly"?
Oh yeah, I actually did a lot of research on how to do PSX-style stuff. Because outside the models themselves, there's some hardware limitations unique to PS1 that give it that specific look. Some good videos on that are: https://www.youtube.com/watch?v=BvfrewlWrss and https://www.youtube.com/watch?v=cUiyph17F3A . If you want to get into the very technical/mathematical aspects of it - Acerola just did one here: https://www.youtube.com/watch?v=y84bG19sg6U
The modeling was easier since I'm used to doing higher poly stuff, so it was just a matter of doing less. Tbh, my model and texture resolutions are higher than PS1, but I chose to play with that.
To learn how to model using limits they would have had in the PS1 era, you can reference actual PS1 models here: https://www.models-resource.com/playstation/ - You can download a bunch, bring them into Blender, and check out the poly count/texture sizes.
Reviewing assets someone else made is a good way of learning. An artist I really like who also makes tutorials on low-poly modeling and texturing is Stark Crafts on Youtube. Here's a good one where he goes through how to turn yourself into a low-poly character: https://www.youtube.com/watch?v=D47_JIAcGIM He also has some free assets you can download and learn from here: https://starkcrafts.itch.io/
Another low poly artist I really like who has a bunch of models viewable on Sketchfab is Elbolillo - https://sketchfab.com/3d-models/6twelve-8c2c49cab08e402d8681434a4ade4ed0. I've purchased so many of his assets, and he makes a lot for free too - https://elbolilloduro.itch.io/ - definitely recommend supporting him if you can.
For texturing, there's a shader for Substance Painter that I really like called pixel8r2 - you can get it here https://actiondawg.itch.io/pixel8r2 - really speeds up the process. But if you can't afford that or don't have Substance, this is a good tutorial that does it with paint.NET which is free - https://www.youtube.com/watch?v=nHqLn8AsN5k .
Outside of modeling and texturing, there are other aspects that give something the psx "look" - for instance vertex snapping/wobbling, affline mapping (warping of the texture itself), etc. The videos I linked in the first paragraph would go over what those things are. When I started I used this really good asset pack from Drips to dupe those things in Blender - you can buy that here - https://superhivemarket.com/products/dripspsxefx---lofi-playstation-1-effects That creator also has a channel with a tutorial on how to do the affline mapping in Blender with geo nodes here - https://www.youtube.com/watch?v=TtkkBz1ryIE
Finally, this is a (silent) tutorial from a fantastic artist who shows you how to model/texture/composite a PS1-style scene in Blender - https://www.youtube.com/watch?v=sNgSiLOIW70 - that one is really beginner-friendly, and she shows some free add-ons for things like vertex snapping. She sells a guide on it here - https://buymeacoffee.com/dreamyrobot/e/271588
Hope this helps! :)
15 notes
·
View notes
Text

So you want to make a sims render: a beginner's guide
But what does that even mean? What do you need to start?
To get started with sims renders, you'll need the following programs:
Blender 3.6 - to render your sims
Blender 2.7 - to export poses, accessories and objects from s4s
Sims Ripper - to rip your sims to prepare them for blender
Sims 4 Studio - to export poses, accessories and objects for your renders
All of these programs are FREE to download and use!
Blender outputs fantastic renders depending on your settings, but you'll probably want to edit them after the fact.
For editing, I recommend:
Photoshop
GIMP
Photopea
I'll be posting editing tutorials in Photoshop, but any of these programs will get the job done.
Stay tuned for in-depth tutorials on using Blender, Sims ripper and Sims 4 Studio!
#salemsims tutorial#render school tutorial#sims 4 render tutorial#sims 4 blender tutorial#blender#sims ripper#sims 4 studio#resources#ts4#sims 4#sims
333 notes
·
View notes
Note
hello! i really love your art & animations! i'm not sure if someone has asked this already but: what do you use to animate? & how long have you been animating for? do u know of any tutorials/classes? (i'm a beginner learning on my own atm!)
hi ! thanks a lot :D
Software wise it depends, procreate for the little sketchy animations, toon boom story board and harmony for bigger projects, sometimes blender even ^^ and unity for work, but its special for video games, i even animated a lot on photoshop when i started !!! never again !!!
i composite in after effect or premiere, depending on what needs to be done, sometimes both for big stuff, but if youre learning animation, focus on the basics before the aesthetics (you can fumble your way into compositing way more easily than anim)
ive been animating on and off for 5 years, 3 of wich were in animation school (during which we surprisingly did not animate much lmao) i got this film out of it tho lol
as for tutos....
i cannot recomend enough The Animator's survival guide, you ccan find the free pdf on the internet, and a bunch of people explaining and showcasing it on yt, its basically the bible for 2d animation
this vid is also very good to get a feel of animation, and the basics, the guy also has v good classes on his channel
but basically the best way to learn is to animate ! a lot ! and look at animations you like, download them and look at them frame by frame : how does the timing work, how doess that character moves, etc
ACT IT OUT ! FILM YOURSELF IN YOUR ROOM DOING STUPID SHIT ! ANIMATE IT ! (believe me, im as sad as you that this is the answer to good anim... but it is...)
and what kind of anim do you like to make ! fights ? chara acting ? sfx ? theres a LOT in which you can specialize (if making a living out of it is your goal) so play around in a cheap/free/cracked software and see what you like and what works for you !
animation is a very complete field : you gotta know perspective, anatomy, acting, composition, exercising any of these skills ultimately makes your animations better !
3d anim is a whole other can of worm, but (IMO) still requires 2d basics,
TO CONCLUDE :
just go ham on doing weird shit and consume, consume,consume animation : short gobelin/carlarts films, all of richard williams filmography, obscure russian animated movies from the 70's, youll ALWAYS learn something, thats how you learn best
Happy creating !! animation is AMAZING the way i felt the first time i made something that MOVES ? unparralleled
#THE PURE JOY EVERY TIME I HIT PLAY FOR THE FIRST TIME ON AN ANIM ???#animation#2d animation#art#artists on tumblr#digital art#watch a lot of youtube animators also#they ave a lot of little tricks timing/economical wise
50 notes
·
View notes
Note
I just found your blog and I'm amazed!! I love all the dolls and familiars<3
I'm curious, how did you learn sculpting and how long have you been doing it for? I'd like to learn some basics myself, if only to make some extra parts for what I already have:)
thank you!
i can't give very good tips for learning, since sculpting is not something i've ever actively studied, but something that i've always been doing and gradually gotten better at. crafting has been my hyperfixation since i was a toddler, so my skills have developed organically by doing all kinds of projects.
i started sculpting digitally a bit over a year ago now. my partner had just taken a course in 3d modeling, so they relayed some basic information about blender's functions, like modifiers and the edit mode, to me. i think i watched one youtube tutorial about the sculpt mode, and then just started fucking around and finding out. i found it quite beginner-friendly, and would encourage people to go experiment, with or without a guide. i've also answered some doll-specific questions in the asks tag, and am happy to answer more.
22 notes
·
View notes
Text
Is there an up to date written guide somewhere on how to extract, convert, edit & import WoW textures for your own client... I vaguely know the stages but the details elude me and I'm still a beginner dunce when it comes to using Blender
(for Epsilon in this case, not retail)
21 notes
·
View notes
Text
Upcoming events at Sims 2 Shenanigans!
Still struggling to get anything done, but these are the workshops for February: Saturday, February 1st at 10:00 (GMT -6)- Mini-Workshop: Setting up Milkshape
Host: Ocelotekatl Topic: Getting started in Milkshape Tools needed: Milkshape Approximate time: Less than 1 hour Suggested for: Beginners
This is a very short, basic workshop about setting Milkshape up to work better for Simming. Topics covered include: • Unchecking Auto-Smooth • Editing joint size • Removing unnecessary plug-ins • Editing your shortcuts • Adding useful plug-ins
Saturday, February 15th at 10:00 (GMT -6)- Slots: A Spacetime Odyssey (Part 1)
Host: Ocelotekatl Topic: Getting started in Milkshape Tools needed: Milkshape Approximate time: 1-1.5 hours Suggested for: Beginners
A comprehensive guide to adding container slots to your object (in two parts). Part 1 incudes: • What are container slots? How do you add them? • Adding blocks to the CRES • Finding the slot’s coordinates in Blender and adding them • Modifying the bones #STR Saturday, February 22nd at 10:00 (GMT -6)- Slots: A Spacetime Odyssey (Part 1)
Host: Ocelotekatl Topic: Getting started in Milkshape Tools needed: Milkshape Approximate time: 1-1.5 hours Suggested for: Beginners
A comprehensive guide to adding container slots to your object (in two parts). Part 2 incudes: • Linking the SLOT and OBJD resources • Adding containers to the SLOT • Double-checking your work • Testing & Troubleshooting
To RSVP or check your local time, check the event thingy at the top of the Discord.
If you haven’t joined yet, why aren’t you a member of the most amazing creator’s Discord ever? To join, click here: https://discord.gg/tkNzjgsSTS Saturday, Ferbuary 1st at 10:00 (GMT -6)- Frank ‘N Mesh (Part 2) This workshop is about frankenmeshing (or taking components from two meshes and putting them together).
Part 2 includes:
• Adding morphs with Mesh Toolkit • Creating a recolor & linking • In-game testing As always, materials will be provided in the workshop post. To join Sims 2 Shenanigans, click here: https://discord.gg/tkNzjgsSTS Already joined and interested in the event? To RSVP or check the event thingy for your local time, click here: https:// discord.com/events/ 904954828940275753/133062980625734049
8 notes
·
View notes
Text
Written version of @thornowl's baking texture-based items for 4t3 conversion tutorial. (Part 1)
Yes, the original video is very useful and I think it's worth checking out for everyone who plans to do 4t3 conversions, especially in MM style. But, in my opinion, the realization is too messy, it took me a long time to understand what actually to do. So I made written tutorial, because many people prefer this format (and because my amazing mutual @nectar-cellar was interested in it). Hope you will find it useful. I had to split this tutorial into 2 parts because of the picture limit.
What You Will Need:
Knowing the basics of converting process: how to extract ts4 meshes and textures, how to make your own multiplier/mask/specular, how to import stuff to TSRW, etc. (@nightospheresims has a good tutorial for beginners: here or here, also don't forget about @sims3tutorialhub!).
Knowledge of basics blender controls and navigation: how to move and rotate the camera, basic shortcuts, how to change mode, editor type, viewport shading, rendering type, etc. (check Grennie's tutorial here, and "Helpful guides when you're a noob" from there too).
Required programs and resources: - Sims 4 Studio. - TS4 body mesh & texture(s), that you want to convert, I use @atomiclight's mix gloves for this tutorial. Also there will be some tip that I learned from converting Sentate's Audrey Corset Set. - Blender (I use version 2.79). - Photoshop (or any other 2D editor, that supports masks and .dds format). - TS3 Bodies template & UV map templates. - Plain normal & specular map, if you don't want to make your own. - TSRW.

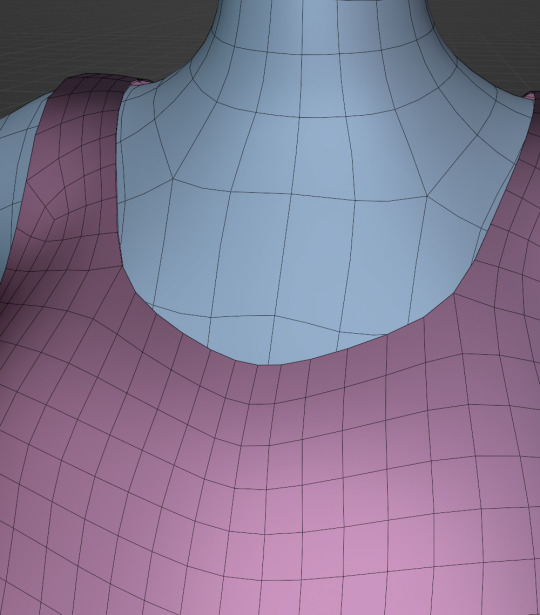
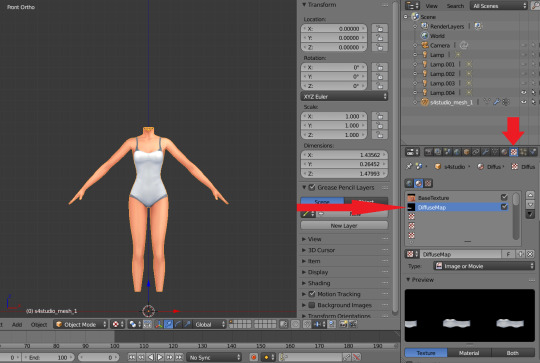
STEP 1: ADDING MESHES AND TEXTURES IN BLENDER, PREPARING MESH FOR BAKING.
I already exported all the gloves presets that I want from S4S. And because they don`t have their own mesh, I exported base game swimsuit (you can also export mesh from any other stuff, that 100% is painted on body) I exported it like this: Open S4S → Create 3D mesh → Find it with filters→ Next → Save the package wherever you're want→ go to Meshes tab and press Export.
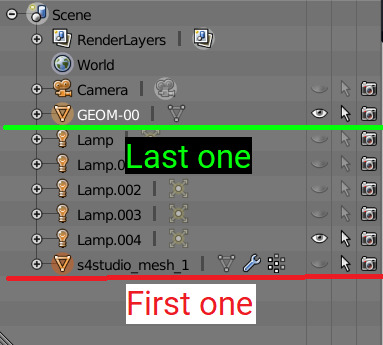
Open .blend file with ts4 swimsuit, delete the "rig" (you don't need it) and merge all other groups - Shift + click on them and press Ctrl+J on 3D viewport.
You need to export our gloves texture and remove swimsuit texture, go to Textures tab and in small window select "DiffuseMap": If you don't see DiffuseMap texture, switch type of texture data to "Show material textures" (brown-ish circle).
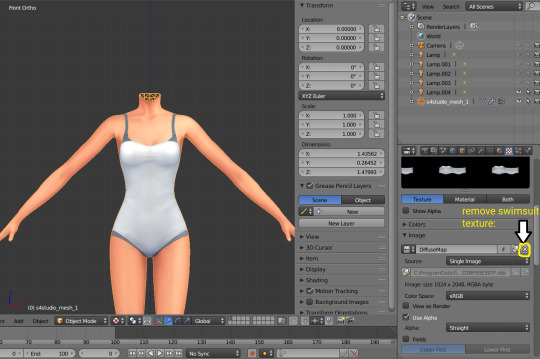
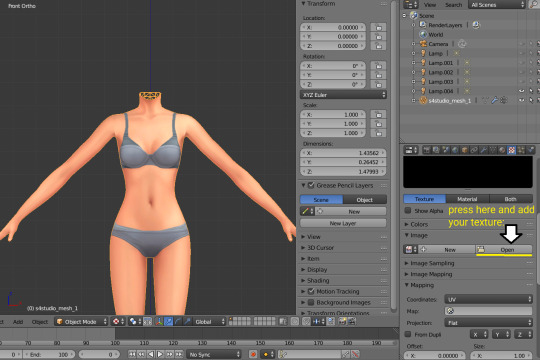

6. In the same way you need to remove skin texture, because you don't need it, only select BaseTexture instead of Diffuse:

7. Import your Sims 3 body, also I merged the top and bottom, because TS4 mesh is full body too:

Tip: if your stuff have 3D parts, separate them in their own group(s) and hide them from baking (you can bake them separately and/or tweak them in Photoshop):
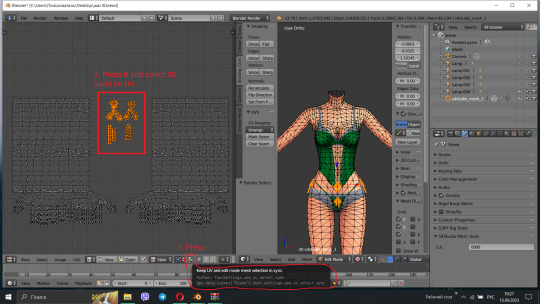

STEP 2: SHRINKWRAPPING THE TS4 MESH.
In this case it would be really easy to adapt TS4 body mesh to TS3, because they are very similar, for stuff that partially 3D (like dresses) or in case with non-standard bodies (like Venus Curves by Venusprincess) it would be harder, so I don`t cover this in this tutorial.
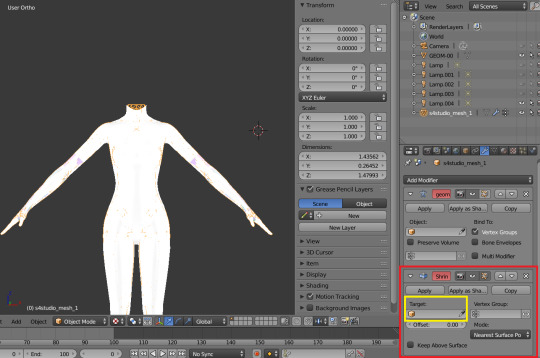
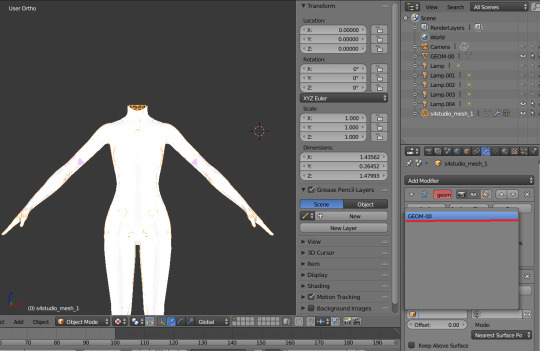
Select TS4 body, go to Modifiers tab, usually there are already applied modifier "geom_skin", just ignore it and in the "Add Modifier" window select Shrinkwrap modifier.
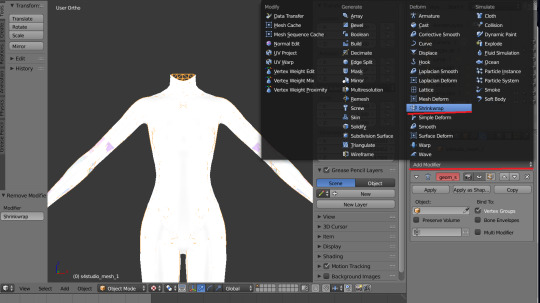
2. In the Target tab select TS3 body group:
This is how TS4 mesh is supposed to look with this modifier, you may also apply modifier, but it's not necessary:

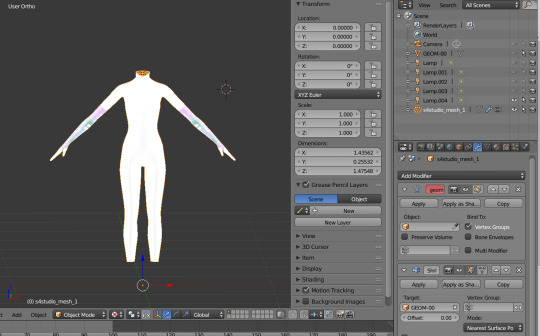
3. After that you need to hide TS3 Body mesh and now we're going to baking.
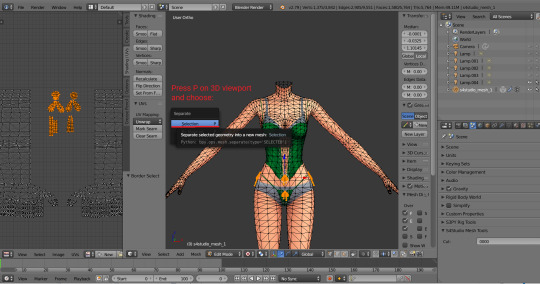
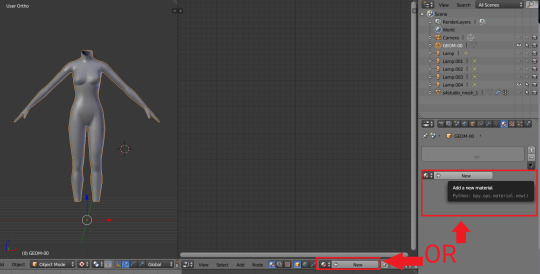
STEP 3: ASSIGNING MATERIALS.
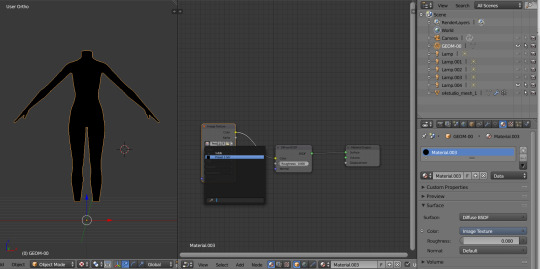
First of all, you need 2 windows — with your 3D viewport and with Node Editor, also you need to switch rendering type to Cycles Render. After you set it, select TS4 mesh, open Materials tab and press Use Nodes button:

2. After that two small boxes should appear on the Node editor tab. Then press Shift+A and select Texture → Image texture:

3. Connect node that you already added with Diffuse BSDF node, by connecting yellow dot (socket) named Color of Image texture to the same socket of Diffuse BSDF node. After that click on the image icon and find your texture:

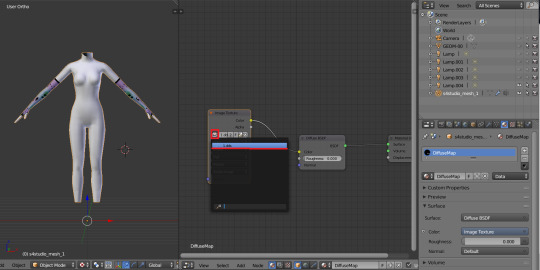
Don't worry about the black spots, we will fix that later.
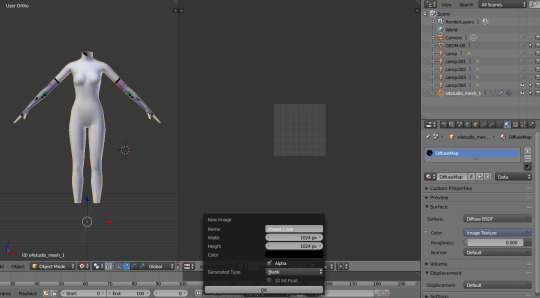
4. Go to UV/Image editor and create new image for your bake, it must be 1024x1024 size or, if you want HQ texture - 2048x2048 or 4096x4096, but today I use non-HQ. After that, hide TS4 body and unhide TS3 body:
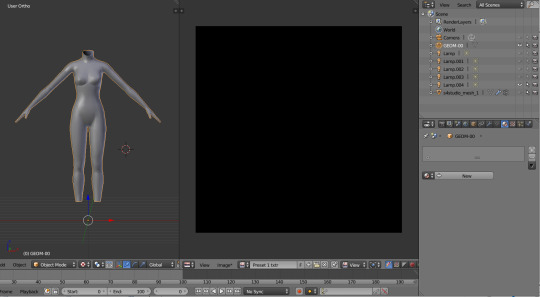
5. Go to Node Editor, create new material and assign our newly created image to ts3 body the same way, that we did with ts4 mesh and original texture:
6. Press Shift + Click on the TS4 body firstly, and TS3 body lastly. It`s an really important step, because without it baking wasn't work right way.
STEP 4: BAKING THE TEXTURE.
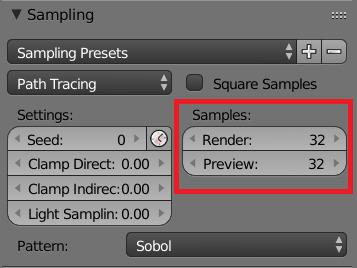
7. First of all, go to the Render tab and change default settings to the following:
Sampling Tab:
Bake Tab:
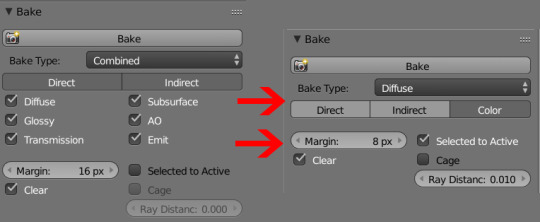
8.After that press Bake button and wait for it.
9. Look at the result, great, doesn't it?:

10. Save this texture as .png... But wait, that's not all! we need to bake alpha, so we can remove that black body texture in Photoshop later.
But that will come in part 2...
119 notes
·
View notes