#beginner-friendly coding
Explore tagged Tumblr posts
Visit Tumblr Blog
Explore Tumblr blogs with no restrictions, modern design and the best experience.
Last Seen Tumblr Blogs


Fun Fact
There were a total of 171.5 billion posts on Tumblr in 2019.
Text
How to Create Your First API in Minutes
Introduction Whether you’re a budding developer or an entrepreneur with a brilliant product idea, understanding how to build an API (Application Programming Interface) can unlock a whole new level of power and integration for your app or website. Sounds intimidating? Don’t worry—this guide breaks it down step by step and shows you how to create your first API in minutes, even if you’re new to…
0 notes
Text
music making followerrrrs i have a question for you about. programs and soundfonts and where to get them/utilise them
getting ahead of myself perhaps (though i likely need the extra time for. practice. given my musical ability is 'can play both hands on the piano so long as you don't scare me with anything above a child's level') but wondering what the 'reccomendation for amateurs' is wrt: making something that sounds snes-adjacent.
i have a copy of the.... well named... program Magix Music Maker from a charity bundle years ago, and some vague knowledge of famitracker. So while i'd like some software suggestions im not totally out on my ass on that one. but no idea how i use/get soundfonts/custom instruments tbh.
where i'm actually going to need to utilise this is like. a ways off so it's not urgent, i've got time to learn-- but mostly I know what I *need* is the ability to get something sounding 16-bit, and to be able to seperate out the channels, play them individually, slow them down, chop them up, etc. And my budget is Nil so I'm going to shoulder this myself where I can, since even if I could get my hands on the stems/channels of someone else's royalty-free stuff, intentionally mangling it feels a touch rude if i'm otherwise using it wholesale(?)
#notttt going to google for this because trying to ask for beginner friendly advice on reddit or forums is like getting blood from a stone#so hopefully uh. i mean there's a few of you out there. mutuals feel free to dm me if you want to get your claws in me abt this#but yeah im literally in 'on paper planning' stage rn (staying my fucking hand away from coding until i have some FLOWCHARTS...)#much to my own chagrin as someone who likes to just bruteforce things and fuck about. but i'm realising i'll want something that lets me#make both 16 bit music (think: zelda-y for flavour) for all of about... genuinely two tracks? plus a cache of sound effects#as for whether this will materialise any time soon? i mean i hope! i would like to think i've scaled down the scope enough! christ!#but right now im resource gathering. yknow how it is.#lucabytetalks#also if you're shy you can send an anon i dont mind. remember i do have anon on since i know how it is with being scared on line
15 notes
·
View notes
Text
finally caved and installed linux on my windows 10 laptop after microsoft kept annoying me with pop-ups and it didn't take as long as I anticipated, actually surprisingly pleasant experience
#I've been using wsl at work#so that might've helped#also having a graphical installer#and I chose debian because I read it was widely used and beginner friendly#we'll see if I run into any problems once I try to install more than the basics#having to download and then install a .deb for vs code was interesting#actually used the terminal for that one#the only annoying things I've found so far are visual#I just went with the default gnome desktop and the title bars are massive!#also I can only scale 100% or 200%#so it's either too big or too small#I've settled for 200% with smaller fonts for now#maybe I'll try some different desktop environments later#if you've read this far feel free to send me your favourite :D
2 notes
·
View notes
Note
what’s fantasy high ?^^
Fantasy High is a DnD show on yt ^^!!!!! its like, small town queer mystery, found family type shit about 6 teenagers in a school for adventurers!!!! <33
season 2 used to be behind a paywall but since season 3 is on the horizon (NEXT MONTH AHHH) theyre releasing s2 on yt now tooooo!!!
#its soooo fun and also so beginner friendly when it comes to dnd#it does have slight Scooby Doo Mystery Incorporated vibes in some ways /pos#the character arcs are insanely well done the relationships feel well developed and real despite it being improv#its a lot shorter compared to a lot of dnd shows (cough cough critical role) and iiiii love it#2/3rds of the girls are in wlw relationships and theyre done WELLLLL#ALSO RIZ GUKGAK MY BEST FRIEND RIZ GUKGAK. SO AUTISTIC CODED AND ALSO LIKE THE FIRST AROACE CHARACTER I SAW IN MEDIA EVER ILY RIZ GUKGAK#not to say that the queerness of thw show is the main draw bc its NOT the mystery is compelling the worldbuilding is cozy#it really does just feel like a cohesive stoey#and then s2 is batshit INSANE but the mystery is still sooooo good#this is me not so subtly pitching Fantasy High to u btw Bdksbdj#chex tag#beverly says stuff#fantasy high#asks
15 notes
·
View notes
Text
YES THIS EXACTLY!! As someone who’s an artist i find coding so creatively fulfilling! while coding wise all i do is html and css for my neocities, you can be so creative with it!! especially on personal websites that you make from scratch. Like have you seen the pages people make for shits and giggles?? Shrine pages are the best!! and it’s just someone yapping or sharing photos of their favorite blorbos.
Like OP i think having a good teacher that rly lets u go wild makes a world of difference. Having the freedom to make something that you yourself enjoy while you’re learning is pivotal. I also think a lot of people get shooed away because of how hard it may seem and if your just watching videos to teach yourself it’s hard to tell where your code goes wrong if ur just starting out :/
I don’t usually talk about coding on main, but I really think people would enjoy it more if they were taught what they could do as well as how to code. Like you can build anything. Anything at all you could possibly want. Programming can be a creative medium for the logically minded, and coding classes almost never actually embrace that.
I’ve built so many projects just from silly jokes. Made a whole joke text adventure game about being trapped in an elevator with some game characters. The discord bots I maintain to this day started as “haha what if [Game NPC] was in our server”. If an idea strikes me as fun I’ll code it, the same way an artist will draw a silly doodle or a writer will write a funny joke fic. It’s not just a get a job skill, you actively create things with code. So create! And have fun doing it!
I really think that’s the secret to truly enjoying programming. I love it, it’s a passion of mine. And it’s all because my first teacher set me free to create with it. He would let me expand on assignments however I wanted when I finished early and encouraged exploring what else I could do. If more people taught coding like that, I think there would be so many more who shared my passion for it.
#i agree with this so hard#everyone make a neocities#learn html if ur starting out#it’s very beginner friendly i think#or try making a shitty game#just go out there and make things#coding#programming
1K notes
·
View notes
Text
Learn Future-Ready Skills to Lead Tomorrow’s Tech World
Get future-ready with skills that employers demand! From coding to digital strategy, My Growth Crafter’s programs prepare students for emerging tech roles with a focus on innovation, adaptability, and creativity.

#python course for students#python coding bootcamp#automate with python#python data science basics#beginner-friendly python training
0 notes
Text
is strawpage a good place to store blinkies and stamps? or does it have a character limit?
0 notes
Text
Needing to read beginner guides to set up stuff that I do every day & very deeply at work just because I'm in a new language/framework is so annoying. Like yes, I know, I shouldn't try to unit test things that use extension methods, I'm not!! Just tell me how to mock shit you bastard!
#unity suck btw#i dont need beginner friendly i need a debugger in an ide lmfao#adventures in coding#csharp#unity
0 notes
Text
HARVARD UNIVERSITY OFFERS FREE ONLINE PYTHON COURSE: ENROLL NOW!
#learn coding with Harvard's CS50 series#Harvard University free Python programming course#learn Python programming with Harvard University#beginner-friendly Python course from Harvard University#CS50’s Introduction to Programming with Python#free online programming course by Harvard University
1 note
·
View note
Text
Cracking the Coding Conundrum: My Experience with The AZcode
Learning to code has always intrigued me, but the plethora of resources and seemingly complex languages felt overwhelming. Looking for a structured yet approachable guide, I discovered "The AZ Code," an all-encompassing ebook designed to take beginners from absolute zero to coding proficiency. Since diving into "The AZ Code," I've been pleasantly surprised by its clear explanations, engaging exercises, and well-organized structure. It's the perfect roadmap for anyone, like me, who wants to unlock the world of coding without feeling intimidated.

A Beginner-Friendly Approach to Coding
"The AZ Code" doesn't assume any prior coding knowledge. It starts with the fundamental building blocks and gradually progresses to more complex concepts. Here's what initially appealed to me:
Breaking Down the Basics: The ebook starts with the very basics of coding, explaining key concepts like variables, data types, and control flow in a clear and concise way. This strong foundation ensures a solid understanding before moving on to more advanced topics.
Learn by Doing: "The AZ Code" isn't just theory. It incorporates engaging and practical exercises after each section, allowing you to put your newfound knowledge into practice and solidify your understanding.
Variety of Programming Languages: The ebook introduces you to multiple popular programming languages, such as Python and Javascript. This broadens your coding skillset and allows you to choose the language best suited for your interests.
A Step-by-Step Journey to Coding Proficiency
"The AZ Code" takes you on a structured journey, guiding you through the fundamentals and gradually progressing to more complex concepts. Here's how it's benefitted my learning:
Logical Progression: The ebook builds on previously learned concepts, creating a logical progression that reinforces your understanding. This structured approach prevents feeling overwhelmed by complex topics.
Clear and Concise Explanations: The language used in the ebook is clear, concise, and easy to understand, even for complete beginners. Technical jargon is explained effectively, making it accessible to anyone.
Engaging and Interactive Learning: The exercises and interactive elements within the ebook keep you engaged and motivated to learn. It feels less like studying a textbook and more like an interactive coding adventure.
Important Disclaimer: Dedication is Key
While "The AZ Code" provides an excellent foundation, mastering coding requires dedication and practice. Be prepared to invest time and effort alongside the guidance offered by the ebook.
Unlocking the World of Coding
"The AZ Code" isn't just an ebook; it's a gateway to the exciting world of coding. It provides a structured, beginner-friendly approach that makes learning to code accessible and enjoyable. With its clear explanations, practical exercises, and engaging format, "The AZ Code" has been instrumental in my coding journey, and I highly recommend it to anyone looking to take their first steps into the world of programming.
Start Your Coding Journey Today with The AZ Code
If you've ever been curious about coding but felt intimidated, "The AZ Code" is the perfect place to start. It offers a clear, engaging, and beginner-friendly approach that will equip you with the fundamental skills and confidence to embark on your coding adventure.
0 notes
Text
I saw a poll earlier about participation in regular in-person activities, with numbers that make me wonder if a lot of people don't know what the options are or how to find them. Here are some that I have always found welcoming to new people; for me, these are ways to leave my apartment and get some human interaction without having to make much conversation (there is a reasonable amount of that if you want it, but since it's understood that you are there to do an activity, the thing you are doing is the point rather than pure socializing). A search for "[activity] [location]" should tell you what's available in your area.
Contra dancing: This goes at the top and gets explanation because it's my favorite. I grew up doing this and love it very very much; I always look for local dances when I move somewhere new. Most dances are very beginner-friendly (though there are some exceptions), and zero dance experience is required to participate. Many will include a lesson for beginners in the half-hour before the main event starts, and there are always instructions throughout the evening. You truly do not need to know anything going in. The convention is to switch partners throughout the night, and it's completely okay to attend alone and ask people you don't know to dance. Try Contra Dancing has a search tool by zip code. Typically $8-15.
Community theatre tech: Acting is an option if that's your thing, but in my experience, tech is easier if you're looking for an activity because there's not usually competition--you often can just volunteer without needing to worry about auditions or casting. Roles like run crew (where you move set between scenes and such) don't require any prior knowledge, and plenty of the other tasks can be learned with a little training. If you turn up reliably, the word will spread--good techies are invaluable. Free to participate.
Community band or chorus: Prior experience in playing an instrument is necessary for the band; for singing, it depends on the type of chorus. Some are auditioned, others are just thrilled by any participation. May require dues.
Shapenote singing: A more niche one and another of my personal favorites (I ignore the religious lyrics and treat them as poetry). This can take some time to pick up, but many places have a small monthly sing that is very welcoming to new people. fasola.org has lots of information about the tradition and where to sing. Free, optional donations accepted.
Library events: Find your local public library's website and look for a calendar or events page to see if anything appeals. Typically free.
Crafting groups: Yarn stores and other craft supply places often have regular open gatherings (typically free) and/or classes (may cost money for teaching and supplies).
Games: If you have a local game store, check their website for events. Or search "[location] [chess club]" or whatever is your thing. Usually free.
Dance: Depends on what is available in your area. A studio where I am has a monthly swing dance, with beginner lessons before, for $10.
Sports: I don't really do these but they presumably exist and can be found like the other things.
The important thing is to just go do the thing. It will probably feel awkward the first time--that's normal! These are all spaces where the point is for people to show up and participate. They want you to be there, and they want you to come back! Otherwise they can't keep existing. Several of these (contra dancing, shapenote, a lot of crafting groups) are especially excited about new people and younger participants and will be thrilled to teach you how to do the thing. And the only way to make it feel comfortable is to plow through the first awkwardness and go back until you decide if you actually enjoy it or not. When you find a thing you like, keep going, and after a little while you end up with a community of people to see regularly who share your interests. This is what humans are supposed to do.
334 notes
·
View notes
Text
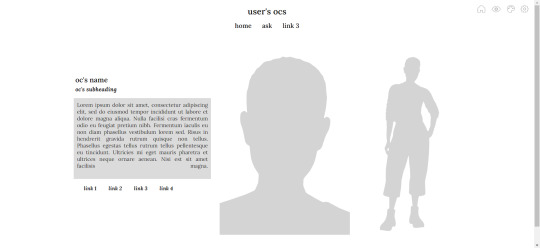
sims character page code
hii, ages ago i made a simple but customisable character page to try and get the hang of html and css, so i thought i'd release it. all of the instructions are within the code! the code will look like the first pic when you put it in your page but you can play around with it to get different looks. i tried to make it as beginner friendly as possible so even if you have no code knowledge you should be able to follow it :) but if not, don't hesitate to send me an ask!
preview | download code
#ts4#page theme#character page#code#you can also use this if you're not a sims blog i guess lol#hope it all makes sense#i'm notoriously bad at explaining things#if you use it please let me know i would love to see it in action :)<#posting this from my phone hope it looks ok
1K notes
·
View notes
Note
Hiya! I know you get this a lot, but I wanted to start off by saying how much I ADORE your work and that I genuinely cannot WAIT for day 3 of Mushroom Oasis. Your artstyle is so pleasing on the eyes! ٩(^‿^)۶ You might have been asked this before, but I was just wondering what programs you used when programming/making your visual novels ^^’
I love writing stories/drawing and I had loads of ideas bustling about making visual novels but have no idea where to actually start…
MUCH LOVE 💗💗💗💗
I use Ren'Py! It's incredibly beginner friendly and truth be told, coding is not my forte. I mostly looked at how my friend did it for Lift Your Spirits and kinda just worked with what I understood at the time!
Most of the time this is me working in Ren'Py:
Dev ramble under cut:
I know the question didn't explicitly ask but just a teensy bit of unsolicited advice, I recommend starting with a script!
You can't make a visual novel without the novel part done first, and it helps to see if you really have something good enough for a finished game before investing the time and energy into artwork, coding, et cetera. You can even start writing before you figure out how to use Ren'Py, as the script can help motivate you to finish what you started! At least that's how it worked for me!
#cheea chatter#bts#also join game jams!!#working with a deadline is a great motivator#plus helps people find your game thats catered to their interest#itchio has plenty of jams too esp in the VN category
351 notes
·
View notes
Text
AI continues to be useful, annoying everyone
Okay, look - as much as I've been fairly on the side of "this is actually a pretty incredible technology that does have lots of actual practical uses if used correctly and with knowledge of its shortfalls" throughout the ongoing "AI era", I must admit - I don't use it as a tool too much myself.
I am all too aware of how small errors can slip in here and there, even in output that seems above the level, and, perhaps more importantly, I still have a bit of that personal pride in being able to do things myself! I like the feeling that I have learned a skill, done research on how to do a thing and then deployed that knowledge to get the result I want. It's the bread and butter of working in tech, after all.
But here's the thing, once you move beyond beginner level Python courses and well-documented windows applications. There will often be times when you will want to achieve a very particular thing, which involves working with a specialist application. This will usually be an application written for domain experts of this specialization, and so it will not be user-friendly, and it will certainly not be "outsider-friendly".
So you will download the application. Maybe it's on the command line, has some light scripting involved in a language you've never used, or just has a byzantine shorthand command structure. There is a reference document - thankfully the authors are not that insane - but there are very few examples, and none doing exactly what you want. In order to do the useful thing you want to do, they expect you to understand how the application/platform/scripting language works, to the extent that you can apply it in a novel context.
Which is all fine and well, and normally I would not recommend anybody use a tool at length unless they have taken the time to understand it to the degree at which they know what they are doing. Except I do not wish to use the tool at length, I wish to do one, singular operation, as part of a larger project, and then never touch it again. It is unfortunately not worth my time for me to sink a few hours into learning a technology that you will use once for twenty seconds and then never again.
So you spend time scouring the specialist forums, pulling up a few syntax examples you find randomly of their code and trying to string together the example commands in the docs. If you're lucky, and the syntax has enough in common with something you're familiar with, you should be able to bodge together something that works in 15-20 minutes.
But if you're not lucky, the next step would have been signing up to that forum, or making a post on that subreddit, creating a thread called "Hey, newbie here, needing help with..." and then waiting 24-48 hours to hear back from somebody probably some years-deep veteran looking down on you with scorn for not having put in the effort to learn their Thing, setting aside the fact that you have no reason to normally. It's annoying, disruptive, and takes time.
Now I can ask ChatGPT, and it will have ingested all those docs, all those forums, and it will give you a correct answer in 20 seconds about what you were doing wrong. Because friends, this is where a powerful attention model excels, because you are not asking it to manage a complex system, but to collate complex sources into a simple synthesis. The LLM has already trained in this inference, and it can reproduce it in the blink of an eye, and then deliver information about this inference in the form of a user dialog.
When people say that AI is the future of tutoring, this is what it means. Instead of waiting days to get a reply from a bored human expert, the machine knowledge blender has already got it ready to retrieve via a natural language query, with all the followup Q&A to expand your own knowledge you could desire. And the great thing about applying this to code or scripting syntax is that you can immediately verify whether the output is correct but running it and seeing if it performs as expected, so a lot of the danger is reduced (not that any modern mainstream attention model is likely to make a mistake on something as simple a single line command unless it's something barely documented online, that is).
It's incredibly useful, and it outdoes the capacity of any individual human researcher, as well as the latency of existing human experts. That's something you can't argue we've ever had better before, in any context, and it's something you can actively make use of today. And I will, because it's too good not to - despite my pride.
130 notes
·
View notes
Text

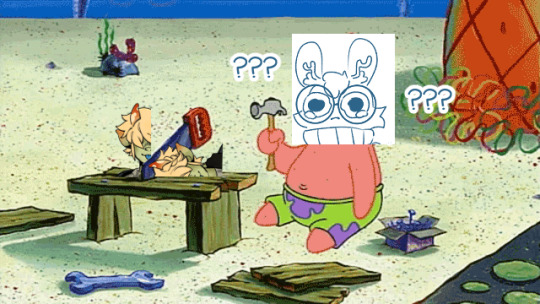
My fan made Animation vs Coding part 2
Do you think stick figure AI would "assume" data type of all number to be float, double, or decimal?
...What? This is not a well-known fun fact outside STEM community?
So many people have this problem, someone made a whole webpage explaining it.
More organic explanation here; Defining a right data type is a big deal in programming. At least the programmer who manually assign it float/double would know why it went wrong.
JavaScript, however, will automatically assign an appropriate data type, and is advertised to be more beginner-friendly... Can you see why this became a meme?
0.1 and 0.2 will be considered double data type, which can't be accurate expressed in base 2.
There is only (1/2), (1/4), (1/8), ... ,(1/(2 power n)) in base 2.
It can't accurately express (1/10 and 2/10), but it still makes a very good approximation. That is why it is only 0.00000000000000004 off.
This is why in most statistic analysis and calculator use decimal data type. Or banking uses fixed-point numbers data. They both have their limitation; Decimal requires more computing power, which mean more specialized device. While fixed-point works fine with money because it's transferring money, not doing maths. It would never have to deal with 0.3333333... dollar.
Do you know what language is from the same family as JavaScript? That's right, it's Flash's programming language, ActionScript.
I told you my Computer Science grade was horrid, but this is very basic, so I am more confident explaining it.
#animation vs education#ava/m#ave#alan becker#animator vs animation#animation vs coding#wdragon work#sketch#ava yellow#ava orange#ava tsc#ava tco#ava alan becker#ava noogai#ava the chosen one#ava the second coming
115 notes
·
View notes
Text


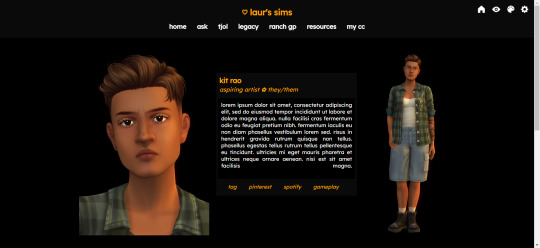
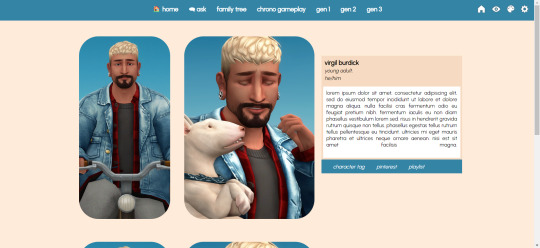
⋆✴︎˚。 my first doc 🖤
my first doc is a javascript - free muse page that might have even the most devoted google doc user fooled ! i'm super proud of how this page turned out ; it's super easy to navigate , fully annotated to help u make ur own customizations , and has a beginner friendly coloring structure so u only have to put ur hex codes in once ! this page should be pretty much good to go but please let me know if u encounter any issues and i'll get on troubleshooting asap !
as always , pretty please give this post a like or reblog if u intend on using this code or if u just want to be a supportive hottie ! love u all bigly ; be sure to pet a cute animal today ! mwuah !

𓊈 ⋆✴︎˚。 PAGE FEATURES ... 𓊉
realistic google doc layout design
fully annotated code w/ helpful breakdowns of content locations to avoid a lot of unnecessary scrolling
root css styling removes the need to repeatedly copy and paste hex codes ... think more or less the same way a tumblr theme would work .
100% no javascript
useful styling guide within the code
section for rules
section for personal links
three main images to decorate ur page
full list of credits , inspo , image sizes , and fonts are listed within the doc containing the code
🎃 guess what ??? this theme is free ! download it with a free member account on patreon or directly from mediafire here .

⋆✴︎˚。 click the source link to view a live preview !
#rph#rpt#indie rph#rp theme#indie rp theme#muse page#free muse page#free theme#rec#page#mine#for patrons#for patreons
231 notes
·
View notes