#best tutorials
Explore tagged Tumblr posts
Visit Tumblr Blog
Explore Tumblr blogs with no restrictions, modern design and the best experience.
Last Seen Tumblr Blogs


Fun Fact
In Q3 of 2020, 31% of US users access the Tumblr app daily.
Text
hey so i've been working on a lot of things (and also second guessing myself a lot because perfectionism) but here's some very random sneak peeks if y'all are interested!!

#and happy black history month!!#how are we already entering into the final week :((#also#i've been inspired to write some 'creating deco cc' tutorials#i saw someone ask where they could find some easy-to-follow ones on x and i thought why not???#i'm far from the best but i can do lil sumn sumn i suppose
1K notes
·
View notes
Text

little gift🩷
I thought it would've been cute if ivan tried to make something himself since I'm sure till would've appreciated this type of gift. and ivan gives till something he would've never expected. a little crocheted sprout accessory for till's headphones since he wears them a lot><
#alnst#alien stage#alnst ivan#ivan alien stage#alnst till#till alien stage#ivantill#에이스테#ivan doing his best to learn craft by youtibe tutorials#he is whipped#till is also whipped#they should be tupid and in love#because i said so
664 notes
·
View notes
Text


God, I'm jumping in the deep end It's more fun to swim in Heard the risk is drownin', but I'm gonna take it I'm gonna take it 💕
#bucktommy#bucktommyedit#bucktommy gif#vicki's gifs#911edit#adventures in gifmaking#baby's first lyric gifset! lol#dailykinley#loafrunners#911 spoilers#my gifs#911 abc#buck x tommy#bucktommy kiss#evan buckley#tommy kinard#tevan#*gifs#the 20 tommy fans#lyric edit#lyric gifset#lyric gif#911 7x04#911 8x11#911 8x06#911 8x15#gracie abrams lyrics#huge shoutout to abi (tommykinard) and her gif tutorials <3#the coloring is not exactly matching but this is the best I can do rn lol im new to this haha
474 notes
·
View notes
Note
i love how you draw the sans Aus so much
genuinely i want to draw them like you (not exactly the same but i hope you get what i mean)
(sorry if this was submitted twice, my computer was acting weird)
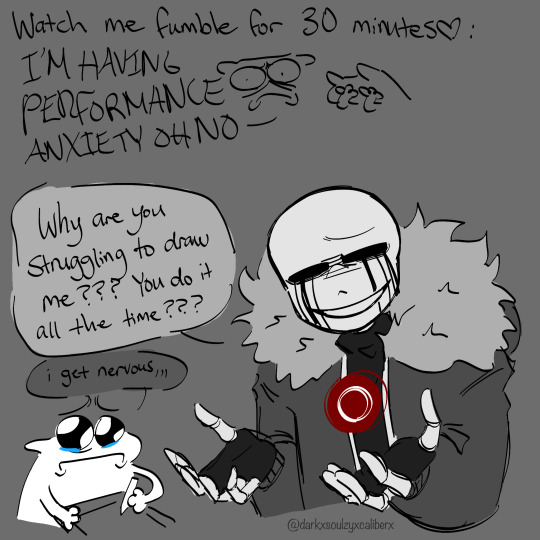
I recorded my process of how I sorta draw them ofshdjchsxuvhfneld
#darkzyx#undertale au#undertale fandom#utmv#killer sans#utmv fandom#tutorial except not because I just scribble for a brief amount of time#and just hope for the best#whenever people ask me about my process#I honestly just pray it works and fucking scribble man#like the amount of me using the transform tool should be illegal
721 notes
·
View notes
Text
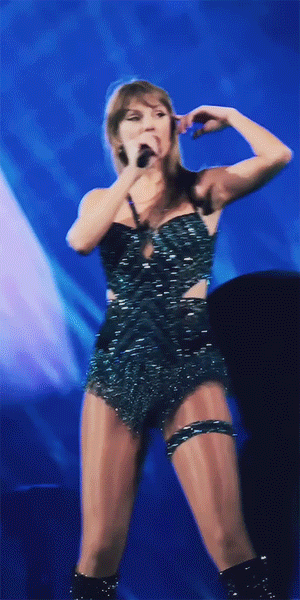
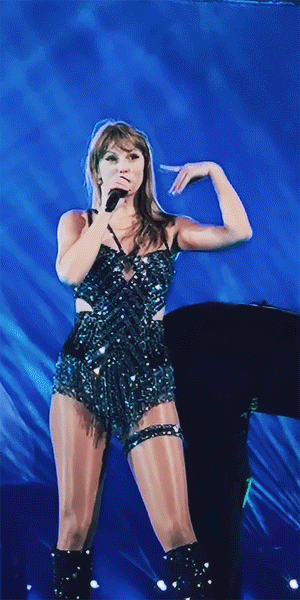
warsaw n3
#found a lifechanging gif sharpening tutorial#taylor swift#tswiftedit#taylorswiftedit#tscreators#tsedit#tswiftgif#candy swift#the swiftie tag#userrcmanticpoetry#networkthirteen#tswiftdaily#usertaylorswiftdaily#mine.#tegan .gif#warsaw n3#song: midnight rain#midnight rain#era: midnights#midnights#era: eras#the eras tour#best of teg#100.#200.#500.
591 notes
·
View notes
Text
how to grub your karkat
or you can use this for any other plush or if you wanna make a whole new plush entirely or whatever

disclaimer im not a professional in any sense of the word and theres anything technical im doing wrong or you think you can do it better by all means dont hold back
Things you’ll need
sewing machine unless youre really dedicated but doing it by hand is gonna be an agonizing feat i promise. I just used a straight stitch for everything
Fabrics: for the main body i suggest a minky or something soft, for the inner lining something in the same color as the main body and ideally with some stretch, and anything black for the legs. Less than a yard of each will do
if youre using minky or anything furry get a lint roller. Trust me
stuffing, i used polyfil
threads that match your fabrics
good fabric scissors
sewing needle for hand sewing/fixes
karkat plush (optional)

Heres the pattern i came up with! They are numbered for your convenience and pieces with the same numbers are going to be part of the same row of segments. cut everything out on the black lines (Make sure when you’re printing to fit the image to the page size.) on the left we have the belly pieces, the right is the main body, and we have the foot in between
Im using a relatively thin minky fabric, im sure you can use whatever but something with some fluffiness kinda helps to mask any imperfections in the sewing. When drawing out your patterns keep in mind what direction your fibers settle in and try to keep it consistent
On the wrong side of the fabric measure out at least a half inch seam allowance around each piece of the pattern, i used a centimeter and that worked but had me sweatin a bit.

For the main body pieces fold your fabric in half before you cut so you can have 2 of each segment that are mirrored to each other, i also extended all of the #1 pieces an additional centimeter/half inch at the top so we can fold them over at the very end. I highly suggest numbering the insides of all the cut pieces, especially in a way where you will remember what direction they are each meant to sit

After you’ve numbered all your pieces, set them aside and start making your feet!
Each of the 6 legs is made of two pieces, but i because i only had a swatch of the black minky i made up for the rest with some random black scrap fabric from an old project. Try to keep your fabric consistent if you can lol
I didnt give these pieces any more seam allowance on the fabric but i recommend adding a centimeter or half inch to the base of it to extend the length and have some more wiggle room

like so
Instead of cutting out 12 individual pieces and struggling to stitch them all together i started with 6, then pinning each piece real tight with the right/furry side down onto my secondary fabric, and slowly stitching around the shape real close to the edges- DO NOT CLOSE THE FLAT SIDE as we are going to stuff the feet through here

Now cut the shape out of the fabric and repeat till you have 6 feet

Now flip those bad boys inside out, stuff up, and if you wanna you can match them to their best pairs

now grab a pair of feeties and your #1 pieces and line them up, in this picture my belly #1 piece is shorter bc i forgot to add the extra centimeter and i recut that once i realized. Line those sides up with the right/furry parts touching and with the feet in between, flip it around to make sure everything's sitting the way you want it

Note. i didnt realize until later but i sewed my feet in upside down. save yourself the time it takes to fix it and dont make the same mistake
Straight stitch these layers together and repeat with the next two segments our good friends #2 & #3

Repeat this for the #2 and #3 sections but NOT THE #4, that part doesnt need feet! just line those edges up right/furry sides together and sew


the secret to the squish of the suit is making this inner lining from another fabric and stuffing it! I used what i had leftover from a stretchy red fabric for a kanaya skirt. For this we need to make a new pattern for each section, making sure it follows the curve of the round edge but the piece itself is shorter, almost like youre removing the seam allowance you added. Mine is a centimeter shorter on the top and on the bottom and reaches to the middle

Make one of these for each numbered segment,you only need to make half the pattern and you can fold your fabric in half on a crease and you end up with one symmetrical piece (bars)

Now you need to pin these pieces right on top of the wrong side of your numbered furry sections and line up the straight edges like so (disclaimer for LOTS OF SCARY NEEDLES !!)

Admittedly i didnt estimate how long these pieces needed to be very accurately and overshot it a bit, if you start pinning it from the middle and continue outwards on either side thatll ensure its not too lose and you can cut off any excess after
The only exception is piece #1, if you recall we gave this #1 section extra seam allowance. This is so we can sew down that excess at the neck later and hide any of the inside that might show once its all put together. Do not connect the top edge to the inner lining! Since i added an extra centimeter earlier im gonna leave that hanging and pin + sew down the inner lining a centimeter lower than the top edge. LEAVE THE CURVED EDGES OPEN! DONT SEW THEM TOGETHER! those stay open to stuff

Straight stitch the lined up edges together

Now you have all these skinned pieces of little freak and we need to connect all these segments together making sure to sew UNDER the existing stitches so we dont see those on the outside when its all put together


Inside looks like a bit of a mess but thats fine bc its not the part that matters
Now stuff it! you might need a stick or pencil or something long and thin to get stuffing into the middle bits

Now thats its stuffed you can finally close those curved edges. Try not to sew over a thick mound of stuffing, push it in a little further to give yourself some space and you can fluff it back out after everythings closed. I cut off that excess lining fabric after sewing

Ough… they filleted my boy…
Finally, match up all the edges and lines and HAND SEW them right sides together. You will destroy your machine trying to work around that stuffing i promise. You also have an excuse to get up from your work desk and sew on a couch or smth. I used a standard backstitch for a tight finish and again, make sure you sew under any existing stitches so they arent visible on the outside!

Speaking of the outside, once you stitch everything together you can very gently flip this sucker inside out

This is @hatamonu’s cat Cocaina, aka Coco. Her perfectly square figure made it into my grub files somehow so shes essential to the tutorial

Check the fit and all thats left to do is roughly baste stitch down that excess neck fabric onto the stuffed lining and youre set! I gave the thread slight tugs as i went to tighten the opening a bit put dont tighten it too much

tadaaaaa

It fits pretty snug but starts to slip a bit with motion. Heres a bounce test

If you do shake your baby make sure to safety pin the plush to the suit so he doesnt prematurely shed his exosekeleton
Now spread that baby fever and show your baby to the world


pics from the ALA 2025 homestuck meetup and supplied by para.dox.cos
Tysm for coming along this ride with me especially if you followed the prototype journey on twitter, much thanks to my more sewing savvy friend for the solution to my grub dilemma and for helping me design and build my dolorosa cosplay <3 much love and hopefully many more homestuck cosplays and meetups to come in the future!
#homestuck#homestuck cosplay#karkat plush#karkat#karkat vantas#cosplay#tutorial#homestuck grub plush#plush pattern#long post#ALA 2025#anime los angeles#dolorosa#the dolorosa#apologies if this is hard to follow or utterly incomprehensible please note i am making shit up as i go and results may vary#feel free to ask any clarifying questions and ill do my best to answer#no i will not be selling these#technically i have more minky left than i know what to do with but the cost would have to justify the pain in the ass it all was to complet#and i dont think anyone will pay that price#send me suggestions of red characters to make plushes out of
424 notes
·
View notes
Text

too busy to draw today so here is a picture of my lovely cat penny everyone say hi penny
#she is absorbing the nature#cat#hi penny#my cat#cats of tumblr#aww the scrunkly#double tap now if you'd skrunkly the when#HELP ME why is this my post w the most notes#i love her#little baby#inktober#cute cats#catposting#catblr#tortie#kitty#tortoiseshell cat#penny the cat#kitty cat#kittyposting#cute#cute animals#pets#pet#RAAAAGGGHH#if ur reading this u should watch next to normal slime tutorial on youtube its the best musical ever made
949 notes
·
View notes
Note
I love the way you draw bodies sm! They're always so fluid and unique!! Do you have any tips?? (other than the super obvious look at a reference lol)
hi thank u!! rather than just looking at refs, i explained how i actually use them here in a big old post, and how i keep those poses fluid!
another tip tho, and a more recent thing i’ve been doing, is that i use a ref just to decide a general idea for a pose and then pick my favorite lines either within the reference already or i make up my own


^^ for above, i very loosely used the reference at all. it just gave me an idea to start with for a pose and then i picked dramatic curves i really wanted to do and pushed the pose to show those lines.
a lot of my fluidity comes from caring more about those lines showing in the pose than the pose or anatomy actually making sense LOL

this is a more direct reference !! i liked the angle and the point of the knees, so i started there and then exaggerated what i wanted to draw more swoopy :3

additionally helps line confidence to use as few lines as possible.
it makes a lot of organic swishes and pretty lines if u try to keep each section of a limb or whatever to just a few strokes. 2-3 if ur really wanting to push it!
#qna#nok talks#hope this helps! it’s one of my least coherent explanations HAHAH#but truly tho my best poses and art are just me repeating shapes i find fun..#i love that specific curve of the side of the ribs and spine.. or the calf..#quick tutorial#drawing
569 notes
·
View notes
Text

Quick Guide: Stay Safe While Downloading Sims 4 CC & Mods
I just published a quick guide to help you download Sims 4 CC & mods safely. ⚠️ From trusted sources to spotting red flags. Keep your game clean and secure! 😊
Read it now
#avoid malware in sims 4 mods#how to avoid malware sims 4 mods#how to download mods safely sims 4#patreon sims 4 cc download#safe sims 4 cc creators#safe sims 4 download sites#sims 4 cc best practices#sims 4 cc community guide#sims 4 cc download checklist#sims 4 cc education#sims 4 cc folder structure#sims 4 cc mod manager#sims 4 cc mod security tips#sims 4 cc mods support guide#sims 4 cc protection#sims 4 cc safe download#sims 4 cc safe hosting platforms#sims 4 cc safety guide#sims 4 cc safety tutorial#sims 4 cc virus warning#sims 4 cc zip file tips#sims 4 custom content security#sims 4 custom content tips#sims 4 mod folder organization#sims 4 mod malware prevention#sims 4 mod safety#sims 4 mod safety checklist#sims 4 modding guide#sims 4 mods antivirus#sims 4 script mod warning
281 notes
·
View notes
Text

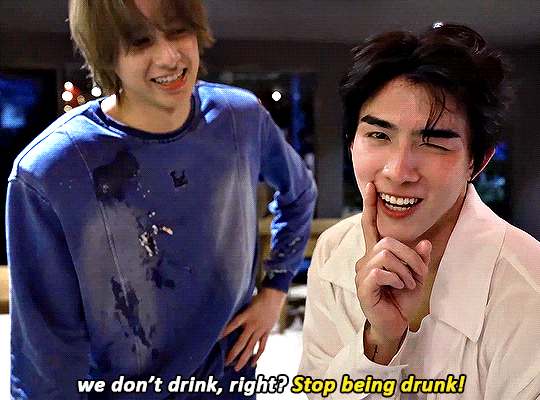


🍺(๑///๑) ⊹。˚ Top Form [01.04 BTS]

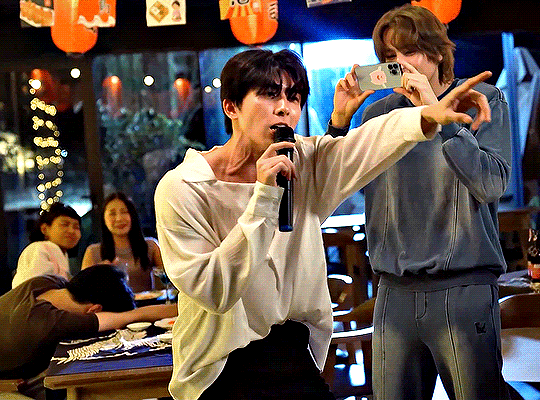

#top form#top form the series#smartboom#smart chisanupong#boom raweewit#tortigifs#adorable#boom is so frikin cute#i love him#thai bl#bl series#bl drama#im not sure some of this was translated correctly but i did my best#HOWEVER i love the way i colored this and the only thing that could make it better for me is if i could blur the text but#i cant find a tutorial for that
211 notes
·
View notes
Text

Fanart ive made of @burrotello AU 🫶 (and tadc/md lol) i love the designs and concept so much 😭😭
#my art#fanart#kryzuuna#murder drones#sdn#serial designation n#murder drones n#n md#tadc pomni#pomni#the amazing digital circus#the amazing digital fight club#its a bojack horseman reference btw#i tried my best at this old anime style but im still not really good at it 😔 i need tutorial
1K notes
·
View notes
Text
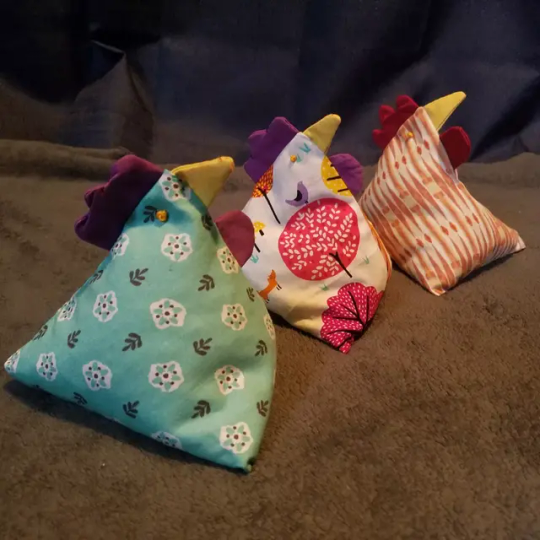

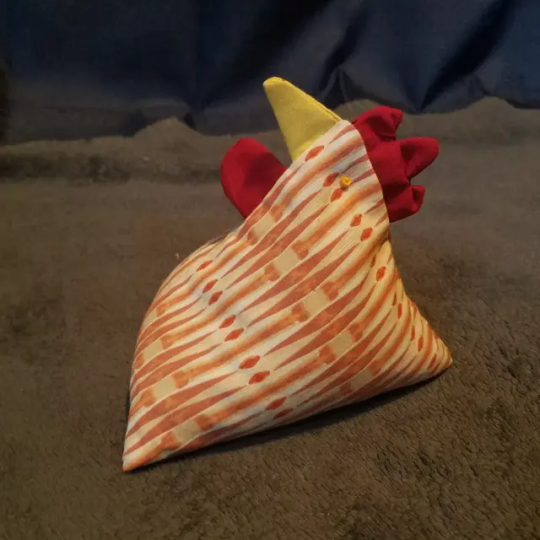
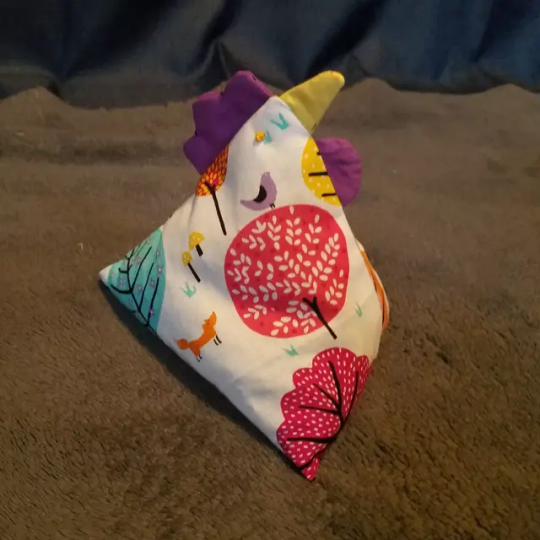
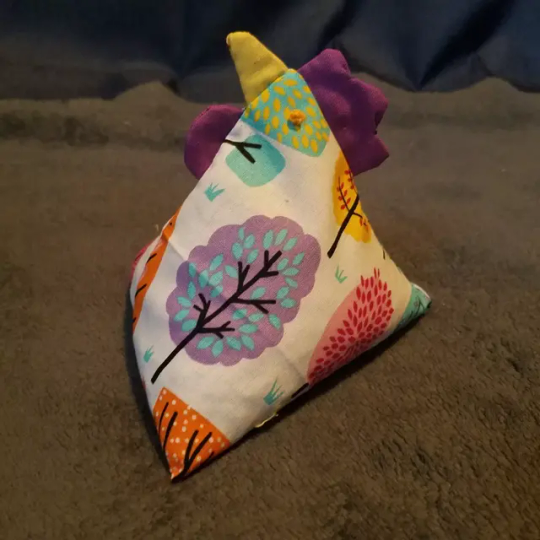
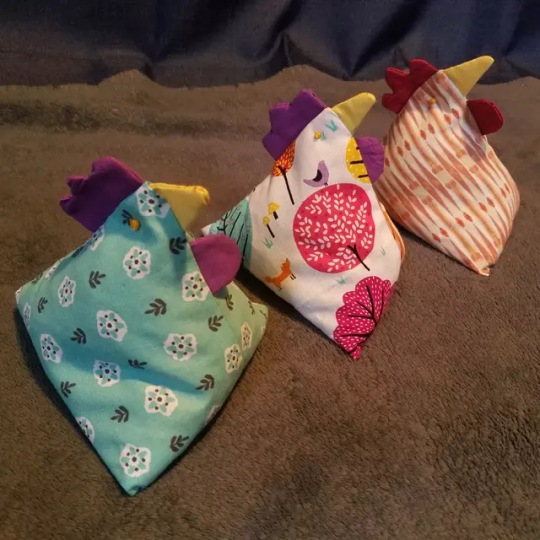
Forgot to post these simple little chicken hacky sacks/heat packs i made for my siblings for christmas. 100% cotton and filled with sunflower seeds (the chickens did NOT appreciate me borrowing from their stash but i was out of rice) so they can be heated up for hand warmers or to ease aches and pains
(or for balancing it on your head i guess)
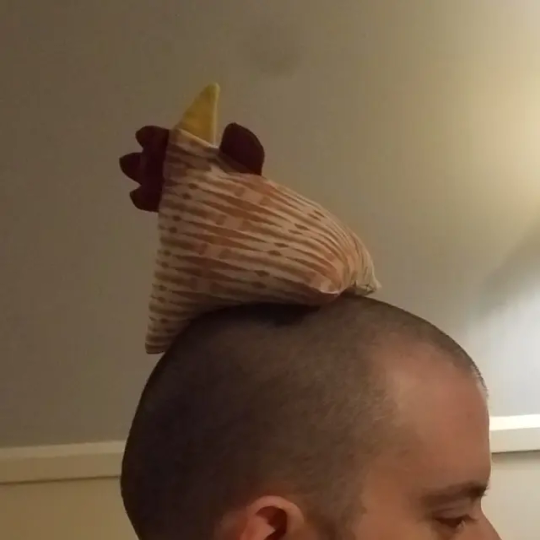
#brother why#chickens#tiny fluffy dinosaurs#the BEST animals#chickenblr#sewing#hacky sacks#they are so easy to make#maybe I'll make a tutorial if i make some more#arts and crafts#textiles#makenna made a thing
1K notes
·
View notes
Note
Hello so I really like your art style and the way you draw the transformers. And I was wondering if I could ask how did you learn how to draw them?
And do you have any tips for beginners?
Also read the fic btw and it’s genuinely one of the best things I’ve read. So keep up the good work and take breaks when you need too.
There're definitely ppl who can explain it better than me, like @bloominglegumes in this post here , but I here's a bit about how I approach it!


That's basically how I visualize it. It also helps to have reference when you're first starting out. Transformers are wacky to draw cause u need knowledge of organic and inorganic shapes and how they mesh. Personally I try not to let my guys look too stiff. I try to keep lines curved, even if they look straight on first inspection. Technically not realistic since they're made of metal, but it just looks better.
#Hope that helps!#Maybe not the most comprehensive but that's just how I do it#There are definitely also more resources out there#best advice tho is practice and have fun lol#transformers#drawing#tutorial#kinda
230 notes
·
View notes
Text

—the crux of you
✦ partner piece ✦ series ✦ details below the cut!


#ffxiv#final fantasy xiv#ff14#final fantasy 14#ffxiv art#aymeric de borel#warrior of light#wolmeric#aymeric x wol#aureia malathar#art tag#hi hello this took me ALL OF MAY#it's done wooooooohooooooo#ty to rue for getting me screenshot refs of aymeric's impossible armour (what is with this gear like SERIOUSLY what is with it)#and to han for helping with the tiles/reflection situation#you're the best! <3 <3#i wanted to do something for aureia and aymeric that encapsulated their whole relationship#it doesn't work out in the end#ishgard was simpler for them#the war with garlemald tears them apart#idk aaaaaa there's something about having the happy ishgard section in the rain/snow after a storm#(yes the snow is there you can't really see it lmao it's supposed to be slushy snow/rain)#and then the dawn of an end when they reach the ghimlyt dark#i watched an art tutorial in april that was like - “reflections are an easy way to add instant drama”#and I said “oh really?? CHALLENGE ACCEPTED”#i don't think this is what the art teacher actually meant hahahaha
88 notes
·
View notes
Note
I really really love your art!!
How did you learn to draw so well? Did you take any specific classes or watch any tutorials?
Do you use a mouse or a touchpad?
What hand postion do you use? Every time I try to draw my hand aches :(
Sorry for the all the questions, I just really love your art style
I've been drawing since I was a kid so majority of it i just self-taught and learn by experience. Influenced mostly by video games and outlet for emotions/thoughts. I used to draw with only a mouse and a shitty old computer (I loved it anyway), the same way you just browse and stuff, except you have to control your own hand's stability.
I was drawing with a mouse for years and it does tend to give me wrist and elbow pain, however, this is why it's important to rest, stretch, and exercise it to avoid carpal tunnel and other major problems.
Nowadays, even with a pen and tablet, I control both movements from shoulders and wrist depending on what I'm doing, using the whole arm for movement. I always have stabilizers set to ZERO, but that's because I've grown used to it and comfortably a long time ago.
#messyr#there are alot of great teachers and tutorials out there and online. but the best teacher you're gonna get is experience.
58 notes
·
View notes
Text
complete beginner's guide to [kpop] giffing, as explained by me!
keep in mind everyone has a different style and process, so there are some things in mine that may not feel intuitive or helpful - if so, don't include it! if you can make the gif, and have fun doing it, that's good enough. this post also assumes interest in specifically kpop giffing, but can for the most part apply to other content as well. i would just recommend different sharpening and coloring for those.
separated by headings (not images, since i need those... for examples) - if you are skipping to a specific section, look for the orange text of what you are looking for!
table of contents: - picking your programs - additional tools and programs (optional) - finding files - importing to photoshop (vapoursynth, screencaps, etc) - photoshop shortcuts and actions - sharpening - coloring - export settings - posting on tumblr
programs:
if you already have photoshop / your giffing program installed and set up, go ahead. if you don't, i would recommend looking here to get photoshop. please make sure you follow instructions carefully and safely! i do know photopea is an alternative people use, and i'm sure there are others. i unfortunately don't know any tutorials to link and probably won't be much help in regards to those programs, but i'm sure there are some floating around on tumblr!
my gif process uses photoshop, so this tutorial assumes that as well. if you use a different one, you might be able to transfer this to what you use, i'm not really sure :(
additional tools and programs: - handbrake: upscaler, found here. i make my own settings and generally only use this on lower quality sources to give vapoursynth a better chance with encoding in higher quality. - davinci resolve: a program i use to make clips appear 60fps when they are choppy or too few frames for the gif to look nice, and occasionally to do pre-photoshop coloring! i use the free version. i do not use this all the time and it is a big program, so definitely don't get it if you think you'd forget to / not want to use it. - yt-dlp: open source, downloads pretty much any file i could want quite well. i use this for most of my downloads and for subtitles as well. does require some knowledge of code, or, at the very least, willingness to troubleshoot set-up. find it here! i can share the command lines i run for: video, audio, vid + sub. - 4k+ downloader: what most people use for youtube-source sets, i believe. you have a limited number of downloads per day on the free version, thus the other downloading programs. - jdownloader2: no limit but sometimes a little slow or will refuse to download because of not being logged into an account, etc. a good download alternative if you plan on downloading a lot and yt-dlp is too much. - vlc: free program, standard on some devices, good for viewing files. - mpv: excellent file viewing, can also deinterlace and screencap (if you do not have / use vapoursynth) - vapoursynth: mac users beware, it's not optimized or set up and is a huge headache. windows users, once you get it set up, it's golden.
finding files, what to look for, and how to use them: how to use is explained here, with a focus on smooth and nice speeds! but finding the file is the first step, so let's head there.
stages: k24hrs (invite only, feel free to private dm or send an ask off anon for a file - i will do my best to get it to you); kpopbuzzhub; sharing korea torrent (requires a torrent app); twitter (shrghkqud (only has recent files) and a few other uploaders, requires much more active searching). there are a few other places you can look, but it is often more trouble than it is worth (or costs $). i am also always willing to help people find materials, so you can ask me to help you look for something or to link a source i used for whatever set.
music videos: also sometimes on k24hrs. i use vimeo a lot (color graders, directors, etc., will upload clearer versions). sharemania.us has some kpop mvs, typically bigger groups (i.e. blackpink). this is a place i check for ggs. and if none of these places or searching for torrents on btdigg, or on google in korean works, i just download the highest quality setting from youtube.
other types: like vlogs and fancams, normally directly downloaded from youtube, instagram, or twitter using yt-dlp or sites specifically for the app (i.e. twittervideodownloader).
what do i look for? 1080i for stages (or 1080p) are often super nice as they're a .ts. 2160p/4k is often ideal, but it also depends on your computer and what you are comfortable working with! generally - not always due to ai upscale - a bigger file size (in the gbs, high mbs like 800) is better and has more detail that will look clear when you work on it. older stages (2nd gen and before, some 3rd gen) and music videos often always are lower quality due to camera quality, and much harder to find. if you have to use the youtube upload for a stage, it is definitely doable, but it may be slightly disappointing in the quality you want to achieve. it depends on what you're comfortable posting and making!
how do i use them? if you use vapoursynth, scenedetect (encode/process whole video) or timestamp (just a small clip) your file - if upscaling, using davinci resolve, or any other pre-processing, do that first. it will pull up a resizer and a program and once you encode, it will give you an output file using the size and settings you put. this will import to photoshop. if using mpv or another screencapping method, take your screencaps (again, all pre-processing first) and prepare to import. there are two ways to do that for screencaps. you can also just watch whatever you downloaded, i'm guilty of downloading concert files just for fun 😅
in the next sections, i will be using four different files of varying quality and sources to explain my steps. hopefully that is helpful!
example file 1 (4k and 60fps, obtained using yt-dlp) example file 2 (1080i, obtained from k24hrs) example file 3 (1080p HD, obtained using yt-dlp) example file 4 (pulled from the gg archive i use, master)
importing to photoshop (vapoursynth and mpv explained): using example file 1, i am processing in vapoursynth - i always do one extra second before and after the clip i actually want so it doesn't cut off any frames i'd like. i adjust my sizes based on what works best for tumblr (540px for wide, 268px for 2 column, and 178 for 3 column). i always use finesharp 1.5 (this setting is up to you! i used to use .7, so totally ok if it changes over time, too!) when you export in vapoursynth, you need the y4m header. i use export to mov preset.
when importing to photoshop using a video (so vapoursynth, video files, not screencaps):


i recommend making your selected range a little bigger than the frames you want so they don't accidentally not get included. delete any extra frames while in the frame animation and then turn it into video timeline. i turn all my layers into a smart object (select them all by clicking the bottom layer and then shift-clicking the top one, or use (on windows) ctrl + alt + a to have it select faster). set timeline framerate (if you want to, i always use 60).


now your smart object is ready to sharpen and color!
using example file 2, i am processing mpv - i hit 'd' until deinterlace is on 'auto'. find the clip you'd like and hit your screencap shortcut (alt+s) for me - your screencaps should be super clear, it depends on how you set up your software (if mpv, what compression you told it). screencaps can take up a ton of storage so i recommend only screencapping what you need and deleting them after. when you hit your shortcut, play the file to the end of the clip you went and hit the screencap shortcut again to stop. your frames should be in the folder you designated as pngs now. delete extra frames now!
you now have two options: import as is, which can be a little slow, or turn them into dicom files. importing as is is done through stack. it will prompt you to select what is being loaded - change Use: to folder, and let it process. it will be slow. hit ok when the file list updates.

when it is done loading: create frame animation -> make frames from layers -> reverse frames. i would crop now using the crop tool for processing speed, and then proceed to do video timeline, smart object, and frame rate. when cropping: on the top, above your document names, the second image should show up on the crop tool - this can set your dimensions. i zoom and crop screencaps using this.


the other option is DICOM files, and what i use. when you have your pngs, do alt + d in the folder (windows), type cmd, and run this command: ren *.* *.dcm. press enter. it will update the files. on macOs, just rename the file type to .dcm.

then, import as so (it will prompt you to select the folder your .dcm are in, and will not work if the files are not actually DICOM). i find it much faster than the stack import. crop when it is done importing for processing time, like the other screencap import style.

create frame animation -> make frames from layers -> video timeline -> smart object from layers -> 60 fps.
photoshop shortcuts and actions: (windows) - ctrl + alt + a: select all layers - ctrl + shift + alt + w: export as image - ctrl + alt + shift + s: save for web (legacy) - this is the gif one!
actions are imported or created, i've shared my sharpening ones before. there are plenty you can find (or make) for a variety of things, such as aligning objects to a fixed position on all docs, doing the screencap reverse and import for you, etc. they are imported using load actions - select the [downloaded] .atn file and it'll pop up.

sharpening: explained here, and has my actions (feel free to use). very important to the quality and clarity of the gif. the better the file, the clearer a gif looks, sharpening can only do so much. play around during this step!
coloring: very much the most personal taste stage of giffing. i explain my process here. in kpop giffing, we tend to focus on unwhitewashing. other giffing tends to be more aesthetic tastes and fun since the source has better colors to work with.
export settings: these are what i use! you need the 256 colors. i do not recommend lossy or interlaced. i think bicubic sharper is the clearest i have tried.

posting on tumblr: use these dimensions FOR GIFS. edits can be different. height is up to you - i would not go over 800, but i think my quality looks weird past 600 range anyways.

example gifs: yeji, from example file #1, imported using vs. uses no. 1 sharpening (altered) from my pack. colored. zhanghao, from example file #2, imported using mpv and the load via stack. uses no. 4 sharpening (altered) from my pack. colored. taeyeon, from example file #3, imported using mpv and the load via dicom. uses no. 1 sharpening from my pack. colored. eunbi, from example file #4, imported using vs. uses no. 2 sharpening from my pack. colored.


if your gifs don't look how you want right away, that's okay! it takes time. my first ones were not great either. i am always improving on and working on my gifs. good luck and have fun hehe ♡
#i do not feel that qualified to answer this so caveat im not the best. and please also take ideas from my lovely moots and their resource#tags and tutorials / shared things. they are all so good#m:tutorial#resources#long post#flashing tw#userdoyeons#awekslook#ninitual#useroro tuserflora#useranusia#userchoi
85 notes
·
View notes