#bokeh master
Explore tagged Tumblr posts
Visit Tumblr Blog
Explore Tumblr blogs with no restrictions, modern design and the best experience.
Last Seen Tumblr Blogs


Fun Fact
Tumblr.com rank in the US is 25.
Photo


The Starry 🌟 Firey 🔥 Bubbly 🫧 Effect Pack (CSP) is done!
This one took a lot outta me, so I’ll be making this post short and sweet: Eleven brushes for Clip Studio only! Free with instructions included! You can support me monthly if you enjoy these! Here are the past brush 2023 drops!
Texture & Clothing Decorations Pack (Clip Studio) | Tails Tails Tails Support+ Pack (Clip Studio) | Tails Tails Tails Pack (Clip Studio) | Galactic Brushes (for Clip Studio!) | Super Bokeh Brushes (Clip Studio) | Rainbow Burst Brushes | Shiny Sparkly Jewelry Pack | Shiny Sparkly Jewelry Pack Plus (+Only) | Grunge Brushes (Krita) | Valentines Lace | Twiggy Patterns & Brushes | Grunge Brushes (Support+ Only) | The Pack With Cracks | 2022 Brushes & Patterns Master List | And the freebies tag!
9K notes
·
View notes
Text
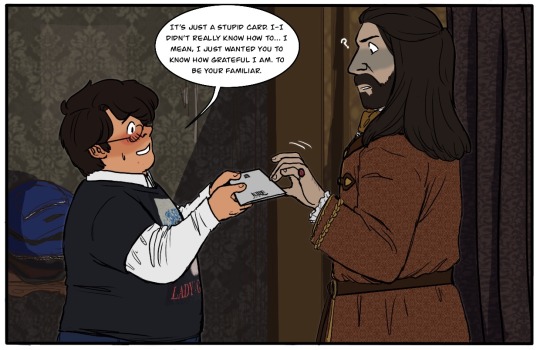


The Card~
Has anyone stopped thinking about this since it happened? No? Me neither.
(ID in alt and under cut)
ID: 1a. Shot from within Guillermo's room under the stairs as Nandor, in his usual belted coat but with his hair half up in a ponytail rather than a bun, holds the curtain aside with one arm. He announces, "You may keep your shit and do your human things in here." Guillermo, 19 years old with fluffy overgrown hair in a side part and a pimply chin, ducks around him to step inside. He is wearing a black lady gaga shirt over a white button up and jeans, has a duffel bag slung over his chest, and a backpack hanging on one shoulder. He stares into the sad little room, unable to muster any enthusiasm as he replies "Oh... Um." 1b. Reverse shot behind Nandor's shoulder, the tiny room's faded walls, bare yellowed mattress, and single abandoned pillow visible in the background. Nandor turns in profile to the viewer and imperiously demands, "I will allow you two minutes to settle your affairs, then I expect you to begin dusting the fancy room as it has begun to grow bunnies." Guillermo, having stepped into the room and pulled off his duffel bag, turns back to him with a nervous smile and says "Of course! Thank you, Nandor." Nandor replies, "You will address me as 'sir' or 'master,' Greenberg." Guillermo corrects him, "It's Guillermo. Sir." Nandor snaps, "Whatever." 1c. Reverse shot, Nandor standing in the doorway holding the curtain open, gesturing with his finger as he turns to leave. He scolds, "A familiar is not expected to be correcting a vampire! I will see you in two minutes; try not to die until then." From offscreen, Guillermo calls out "Oh, wait- uh, Master?" 1d. Close up on Nandor as Guillermo continues, "I got you something." Nandor whips his head back around in not-unpleasant surprise, starry eyes landing directly on Guillermo for the first time.
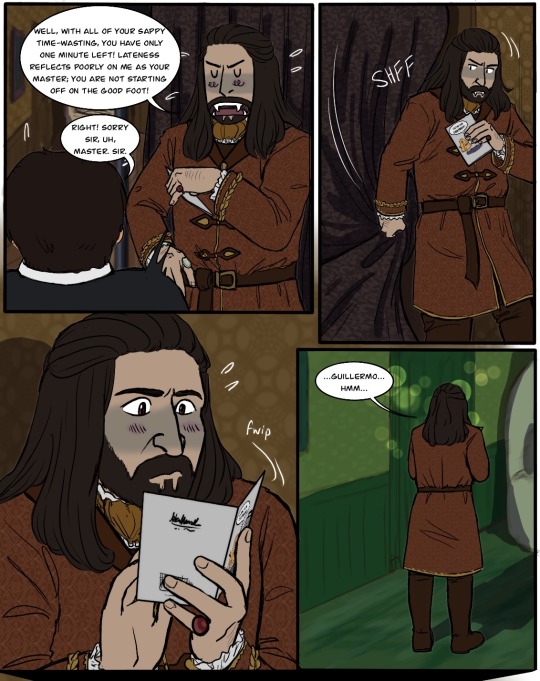
2. Wide shot of them both in profile, the entryway between the familiar's room and the main hall dividing the space between them. Guillermo, having deposited his bags, steps toward Nandor with a greeting card held out in both hands. Blushing, and with his eyes fixed on the card rather than Nandor's face, Guillermo stammers, "It's just a stupid card, I-I didn't really know how to... I mean, I just wanted you to know how grateful I am. To be your familiar." Nandor reaches out for the card with one careful hand, fingers splayed and head held back as if he thought it might explode. His fingers meet the card precisely where the two rooms meet.
3a. Close up of Nandor's hand holding the card, which has a smiling cartoon cheese block saying 'You're the Gratest!" to a cartoon cheese grater, which looks delighted and surprised. Offscreen, Guillermo says "Thank you for choosing me." 3b. Repeat. Nandor flips open the card to see Guillermo's handwritten inscription: "To be a vampire is my dream. But to be your familiar will be my honor. Thank you for this opportunity. -Guillermo". 3c. Close up on the top half of Nandor's face as he rears back slightly in surprise, cheeks flushed, eyes wide and shining with delight. The background turns a buttery yellow dotted with bokeh lights, the words 'my honor' repeating again and again throughout.
4a. Zoom out, shot from behind Guillermo's shoulder. Nandor flips the card closed and flips it toward his chest, free hand planting itself on his hip to feign indifference despite his fluster. He sputters, "Well, with all of your sappy time-wasting, you have only one minute left! Lateness reflects poorly on me as your master; you are not starting off on the good foot!" Guillermo startles to attention in the foreground, stammering out, "Right! Sorry sir, uh, master, sir." 4b. Shot from the hallway as Nandor steps out of Guillermo's room and sternly closes the curtain behind him, still holding the card to his chest with his free hand. 4c. Close up as Nandor hunches his shoulders protectively and raises the opened card up close to his face with a flustered and urgent expression, as if trying to read it in secret. 4d. Full body of Nandor from behind as he stands alone in the foyer, a long shadow stretching out in front of him as the room is lit green around him - Guillermo's color. A few bokeh lights float aimlessly around Nandor's head as he reads the card again, murmuring thoughtfully to himself, "...Guillermo...hmmm..."
5a. A few horizontal black bars indicate the passage of time. 5b. Shot inside a wardrobe, the door cracked open to let a beam of light fall inside. Stowed between hanging coats is a small wooden chest with the lid raised halfway up. Inside are a few hanging pendants, a roll of parchment, a golden fork, a discarded shirt, a few expired coupons, a folded letter with Nandor's name written on the front in Farsi, and Guillermo's card. It is front and center, illuminated by the beam of light, and clearly well-read, the spine creased and corners slightly dog-eared. Offscreen, Nandor calls, "Guillermo! You have destroyed a spider house, now where will she sleep??" Guillermo stutters out a confused apology, "I-? I'm sorry, Master!" Nandor continues, "That is one demerit for you, and one more year as my familiar!" Carved surreptitiously into the shelf in the wardrobe is the word 'end'. It's the end of the comic. /end ID
#wwdits#nandermo#mlm#wwdits s5e8#wwdits season 5#nandor the relentless#guillermo de la cruz#2009 guillermo#shadowsart#what we do in the shadows#what we do in the shadows fx#my art#fanart#fan comic#image described#card is from the hallmark website and me and indashadows used the same pun dkjhfkjfhfs
2K notes
·
View notes
Text
Limbus Company and its visual portrayal of female characters, an essay
Limbus Company, and by extent, Project Moon has been a great example of how female characters are visually portrayed. In this article, I’ll try to dissect why and how, focusing on Limbus Company as it has by far the largest amount of images I can talk about. Let’s dive in.
Disclaimer: I'm by no means a professional so please, PLEASE don't clown on this i.e mention the summer controversy. I have a personal trauma on that and do not wish to revisit it. I know it's practically impossible to ask from tumblr, but still.
Visually portraying a subject
Where to start? At the very beginning, of course. Portraying a subject visually (not talking about female characters in specific yet) has a number of things attached to it. Perhaps the first question one can ask themselves is this:
Where do I want the focus to be?
Now, you can be short and say ‘the subject, of course’, but even then, that won’t often be precise enough. Let’s say you have a butterfly as your subject. Do you want the focus to be on its beautiful wings? Or its curious multi-faceted eyes, or its roll-up tongue? What do you want the viewer to notice immediately?
Arguably, even photos of landscapes have at least one point of focus. The pretty waterfall, the vast mountains, the green pastures or the starry sky. Some have the focus split up in two, where both the lake and the mountains are to be spotted immediately.
How focus can be created
There are multiple ways focus can be drawn to a specific part or to a specific subject.
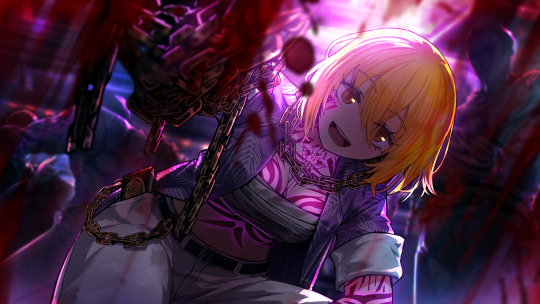
One way is to simply make everything but your point of focus uninteresting. A common effect used is the Bokeh, which blurs out the background so that it will automatically appear as less interesting and more as a faded bunch of colors that contrasts with the point of focus which is sharply shot in HD. You can also make the background to be a flat color, like black or white. Some pieces of art additionally add colored shapes or lines behind the subject as to accentuate it further.
(an example of Bokeh. In addition, the direction in which another character looks shows what our main subject is, who is actually positioned off-center.)
You can also just…fill the space with the subject, as in a close-up of the thing in question. Following the previous butterfly example, it’s like only showing a small part of its wings, enlarged to comparatively huge proportions. This is also seen in portraits and to a lesser extent, similar art like waist-ups.
The eye is immediately drawn to what we should look at, which is the character who’s front and center in the image. Secondarily the blood. Her hair also uses the next point below: color.
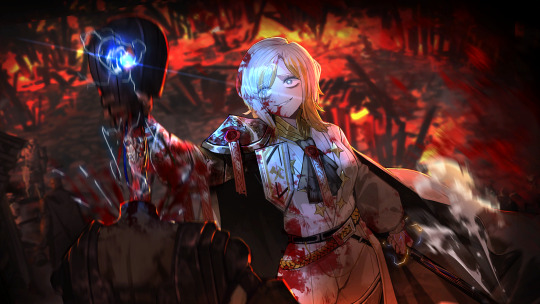
If you’re working with color, then color is an excellent way to bring the focus to a subject. Bright colors and contrasts can be used, like what’s done here:
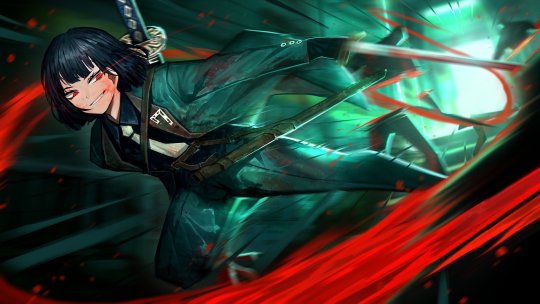
The bright red forms a direct contrast to the green that dominates the color pallette. It thus leads the eye to the red areas - aka the blood the character is spilling as well as her face, which is technically a tint of red. The red returning in her eyes which have a small trail, and on her bloodied face, as well as the yellow of her tie, further help to bring focus to her face and her expression. (Other than that, this image also has classic cartoon speed lines, which are minor but do help).
Light is also something I should mention. Using the image from above, the character is actually rushing towards the darker areas of the image. The light is coming from where she seemed to come from, judging by the speed lines and the trail of red we just saw in all its glory. The light forms a line around the subject which keeps said subject’s green uniform from blending into the darkness and the green of the image.
There is a specific technique called chiaroscuro (lit. ‘light-dark’) which is totally a real thing that even old masters like Rembrandt have used to bring focus. The gist of it is that the painting has very bright areas which is the subject, surrounded by dark areas, with not much in between. This technique is often used to make scenes more dramatic, and to immediately show us what the artist wants us to see, without any possible doubt. It’s like putting a spotlight on your head in a dark room. Chiaroscuro is also seen in Limbus:
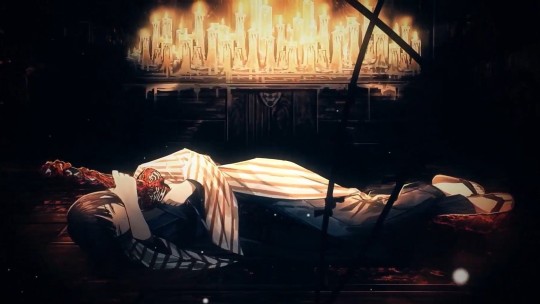
You can’t actually see much of the room our subject is in. The only light is coming from the candles, illuminating the top part of our subject. The other, darker half is much harder to see the details of. This makes it so that the eye is led from either the character towards the source of the light (the candles) or in reverse, both of which are possible and valid because in both cases, we ignore the pitch black part of the artwork.
How to create focus with characters (in specific)
Now, humans and humanoids are fascinating subjects to focus on, because there are so many situations a person can be in, and so much stuff a person can be. Are they the commander of a spaceship? A medieval ruler? An overworked office clerk? There are specific things that more or less pertain to humanoid characters more. I’m going into two aspects, clothing and posing - I’m aware there’s more, but for the sake of making this not longer than it is I’m going into only those two.
1. Clothing
What someone wears makes up a considerable part of how they’re seen and what they are presumed to be. This is also a large part of stereotyping. If you're wearing a t-shirt with pants, sunglasses, and have a camera around your neck, chances are people think you’re a tourist. To them, it likely won’t matter if you are, they will perceive you as one anyway. This is also important here: you might want to pretend you don’t know anything about the portrayed character or show their image to an unknowing friend and see what they think that the character is.
And that brings me to this point that I have seen so many times with female characters: their description/role not directly matching with how they are supposed to look if that were true. I’m talking about the battle-hardened veteran without muscles or scars of both kinds (even if adequate healing/scar removal is available in the setting). I’m talking about the scientist with a leotard under their lab coat. However, I’m not saying they should look a certain way or be the same - that’d be boring - I’m saying that…hey, it might make the viewer not take the character as serious as you want them to be.
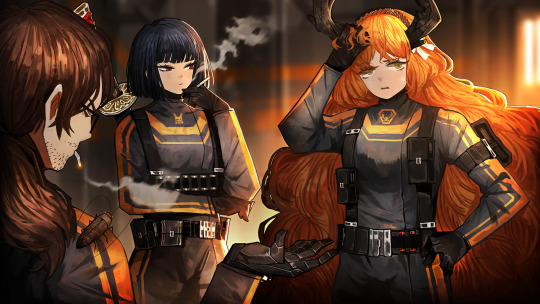
The way clothing is built up can also serve as a way to bring focus to a specific aspect. Which will most often be either the boobs or the butt (or both) in the case of female characters. Look at this (non-Project Moon) example.
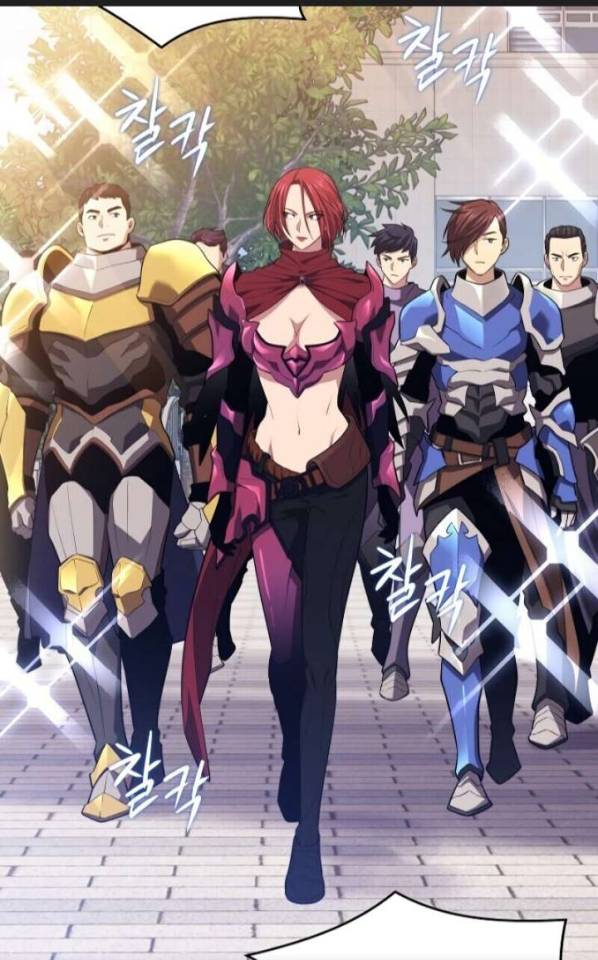
The woman in the front (obviously the focus due to the place she is standing in being squarely in the middle, and her red hair standing out) is the leader of that squad…as well as the strongest in battle. Without any protection of vital organs. With a shape under her boobs that would stab her fatally in the liver if she does as little as bend over.
The way her clothing is built up also brings the focus to her boobs - not only with how they’re prominently on display, but also with the shape the top and the fabric covering her shoulders makes. In a similar vein, her ‘pants’ and the belt all lead the eye downwards to her crotch as well. Furthermore, her thigh highs look skin-tight, bringing secondary focus to her legs, of course.
And last but not least. The guys behind her are actually properly armored from the neck down, making them somewhat more of a homogenous whole… in theory. The different body types, hair, and colors of the armor of the right and left dude make them stand out slightly more, which in turn only accentuates this ridiculous difference.
I don’t really have many Project Moon-originating images on hand that are similar to this. Every time we’ve had an ID with a female character being the leader of their group (of which we’ve had surprisingly many, actually - Don has two Section Director IDs to boot) they have usually been posing alone, or well, posing…their full uptie art normally shows a moment when they’re beating their enemy into a pulp instead of posing for the camera like in the above image. This is really consistent with the other half of the playable characters, who are male.
I want to give a special mention to two characters despite that. Faust and Rodion are both known as the more well-endowed characters, but from their IDs and E.G.O it is treated as something that’s there rather than something to be exploited.
The blue glint is the highlight here, illuminating her blood-stained clothing but also finding its equal in her small, blue eyes. I have found eyes like this and expressions like this to be quite rare on female characters. Just look at her and her face. She’s completely lost it, wrapped in twisted and warped euphoria of the moment of ‘purging’ another ‘heretic’ - and from the looks of it, the last one on the scene. She’s not even trying to clean her own clothing or face, or expose her boobs. That’s not what matters to her image, showing any kind of skin doesn’t add to her character. She’s caught in this violent moment, having her victim completely in her literal grip - not even her eyes are looking at the camera. This image showcases the violent and sadistic nature of the character.

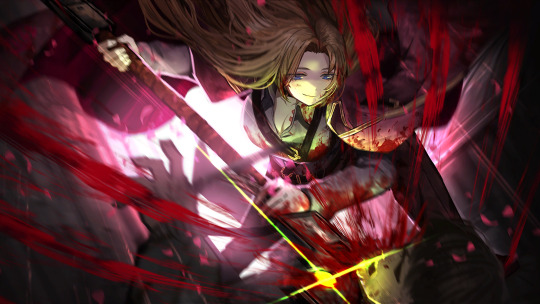
I find this art to be a curious thing. The background is actually rather bright, making the inverse true: the character is dressed in dark clothing, so that’s what the focus is on instead. Her coat flared out in such a way it can almost be mistaken for the underside of her long hair, making her seem even larger (something certain animals use when threatened to scare others into leaving). Her actual figure is thus more obscured, it only being a few tones darker. The thing that keeps her from being a dark blob in the foreground is her sword, large enough to be an odachi. Because she’s unsheathing it, the glint that comes from the blade immediately draws attention - arguably away from her partially unbuttoned top. The animation of this in the game supports this: no boob jiggle, just her standing calmly in the moment she’s just about to unsheathe her sword.
Because I’m going to use this example further in this thing, keep this one on hand.
An image that’s again in the middle of the action. Rosespanner Workshop Director Rodion is right now turning an enemy into an unrecognizable stain on the pavement with her huge weapon. The highlight is her weapon again, but this time it actually serves as a secondary source of light, illuminating her face. The yellow coloration of this secondary light source also makes the whole thing more interesting than if it just had the background light that serves a similar purpose as it did in the first image of this post. Even though the image has a heavy pinkish tint, the red that splatters all over the scene is still very much present and they draw the eye back to the yellow light. While her pose is ambiguous, it keeps things vague by not putting any sort of focus on her lower body. In any other piece of media this pose would be viewed from another angle, as to profit from as much of her body’s curves. Not here. Her killing an enemy with visible ease is important. Not her pose. This sounds logical, doesn’t it?
2. Posing
Which brings me to this. The way a character is posed also plays a part in their portrayal. It is possible to accentuate certain body parts with this - like when a character brings their hand to their chin, or the way their legs are posed. No matter the actual scene that’s meant, the way the character is posed is a factor that decides how it’s viewed and where the focus lies. Most often I’ve found this to be when a character is shown wielding a weapon, but their ‘battle pose’ being rather something that accentuates their bare skin, or their little clothing that does the same thing.
Is your character actually showing that they’re dangerous through being shown fighting…or are they just sexily posing with a weapon in their hands to add a sense of ‘danger’? Some can be highly difficult to distinguish. Some CGs can show the middle of the action yet the way the character is posed still brings the focus away from the violence or brings a secondary focus to it. Unfortunately I don’t have examples of those on hand but I know they exist.
A character just posing with a weapon isn’t wrong - I draw that all the time - but when the focus is brought to a character’s boobs and/or butt with the pose the character is in, it will be kind of obvious (even if it isn’t true) that sexualizing those features of the character what the artist is really intending to do instead of showing how dangerous she is with the weapon.
I’m going to use this image from Echocalypse as an example. I regularly take poses like this as a reference point and then attempt to make them more realistic, or, funnily, point out their weirdness by putting a male character in it. Often I do this by using them for a different, more appropriately clothed character. This goes to show that clothing can already decide a lot in posing itself.

This character is posing with a weapon, a…particularly huge odachi in this case (I thought it was a staff at first until I saw the hilt). Which is exactly the same what Rodion is doing up there in the image we already handled. Yet, there are subtle differences between that image and this one, and it’s actually more minor than you think it is (disregarding the thematics of the pieces). Both characters…
are posing with an odachi of similar size (assuming that both characters are of similar height for ease of comparison) as opposed to being locked in battle; theoretically making the focus more on how pretty they look
have long hair (that, minus the bun and the bangs, have a similar cut) that makes their silhouette appear larger than it is
do have a relatively bright and sort-of detailed background going on
have large boobs
are unsheathing their weapon just slightly
However, to get to our first difference, we need to get back to point 1: clothing. Using the same two images, the largest difference is clothing. Kurokumo Rodion is wearing all-black clothing that covers her from the head down except for the unbuttoned top. If I had to describe what the other girl is wearing, I’d say she’s wearing a piece of armor on one of her arms, a flowered collar, thigh highs but no footwear otherwise, and something…obviously lingerie/bikini derived. I’m actually not sure if that’s a tail or part of the clothing.
But to return to our point: posing. The pose of Kurokumo Rodion is actually fairly neutral. She’s just standing there, menacingly! (I should note that their normal character talksprites are also just standing there neutrally) No, literally. Anyone with working legs and arms, can reproduce that. Just give them a sword prop and you’re done. Coat cape optional. The way she is standing does convey some sort of subtle confidence, however, just like the way she is actually looking down (at the viewer). It’s likely you’ll see the sword first for the reasons I mentioned when first discussing the piece above and then look at her from top to bottom as usual.
The way our other girl is posed…is a little harder to replicate in real life to say the least. Not only is this a floating pose (i.e you’d need support), the way her body is bent sharply brings the focus upon her boobs and butt. The human body is actually rather flexible, depending on how you’re built of course, but even so I do doubt whether anyone can do this pose even if they could somehow float in mid-air. Or do this lying down. I (someone with joints that are a little too flexible for my own good) haven’t tried and highkey don’t want to. The thigh and upper leg that is prominently on display, along with the way her body curves leads the eye to her butt or downwards towards her legs and feet.
Her facial expression is neutral, but I get some sort of… ‘dreamy’ vibe from it from the traditional anime-like proportions (huge eyes, tiny nose and mouth). Almost as if she’s doing puppy-eyes to beg for candy or something. It’s, well, what most people call to be a ‘babyface’. Kurokumo Rodion is also in ‘anime-style’ and her facial proportions are still a little bit unrealistic, but I do dare to say they’re more realistic than those of the other girl.
Also, small sidepath. What do you think the second girl is based off? One would judge from her tail that it must be some sort of water creature but whether she’s a shark or any other kind of sea creature isn’t really obvious. Would it surprise you if I told you she’s based on a bake-kujira, a SKELETON-whale (which sounds cool as all hell)? Without any kind of skeleton-parts worked into her design? To be fair, I wouldn’t have guessed it either if it were not for her canonical description.
Also, one last note about that latter image. I think that an odachi of that format would be extremely tricky to unsheathe in such a pose, because of the distance between your arms. Her arm that actually unsheathes the thing is also obviously reaching out, so she’d need more strength to do that than what the look of her arms suggest.
Speaking about arms…
On paper, our Limbus girls would have all the reason to have twig arms. After all, the City allows one to get stronger without visually changing their physique much. One can carry around huge weapons like chainsaws, lances and zweihanders without visible muscles. And yet. And yet.
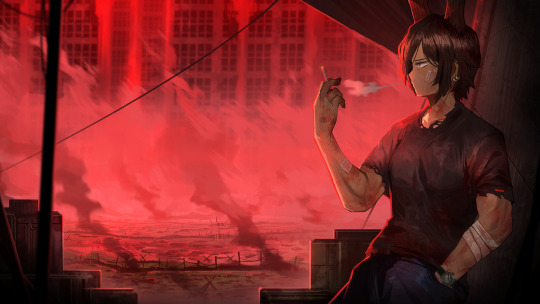
One of the few times bare arms are seen (most art prefers to cover them up - for Limbus standards, this would be the ultimate fanservice thing), it becomes very clear that they at least have a basic tone. Like, the basicest of basic efforts is done to make them not look malnourished. Even if this girl above is not like, the strongest of the world (for as far as we know...) the muscles she does have are very lovingly shaded and detailed.
To end this, I’ll showcase something one last time with a funny in-game example: Roseate Desire. Roseate Desire is an E.G.O which wraps the wearer in pink ribbons and is highly implied to especially speak to the sin of Lust (which is the affinity of the attack). In the game, this E.G.O is given to two characters, a girl and a guy. In any other gacha game, it would only be given to girls.
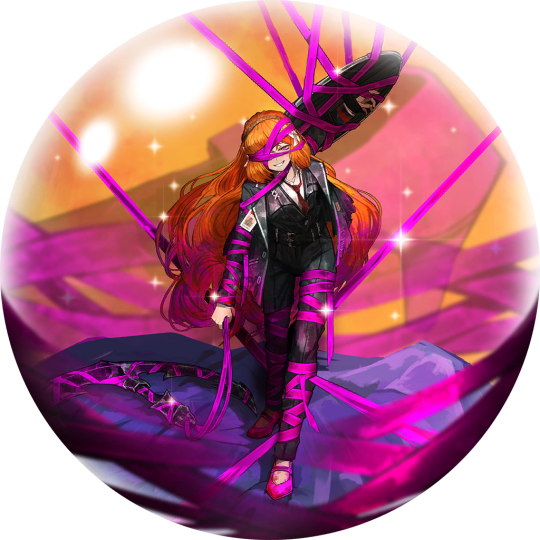
While bent over and with a happy expression, she’s still coming to get you. How can you tell? For one, the huge anchor she has with her is within her hand (i.e opposed to it being tied up next to her or something like that), and the shield that’s tied to her arm. Despite being wrapped up, she does still look as if a portion of her is still in control, and her attack suggests the same.

Hong Lu wearing it always makes me grin. He does wear clawed gloves and his fingers are arched, that’s true, but the way he’s strung up like a puppet makes it so that he can’t even get you with those. The manner in which he is posed and his head is tilted is highly reminiscent of how one would pose a marionette. And ingame properly he doesn’t even use these claws in close combat! He wraps up the enemy in the pink ribbons with doll-like movement. Even the way he’s covered evokes a sense of powerlessness, like he’s led on by the ribbons instead of controlling them.
I think this example, along with the others, is implicative of how Project Moon’s visual portrayal of female characters is done so well. They’re equally portrayed as the male characters, if not arguably more powerful, and there’s an equal roster of 6 to 6. They’re not overtly sexualized by bare skin or impossible poses while the men are covered up in a sensible pose. These are characters designed for their personality and role first, not with fanservice or money in mind first. Even the female NPCs fit within this rule, even though they have less art to go from. When you have a game which had 97% completion on the story and a mere 64% on the systems (i.e monetization) it would kind of figure that character designs fall in line with the role the character fulfills, is it not?
244 notes
·
View notes
Text

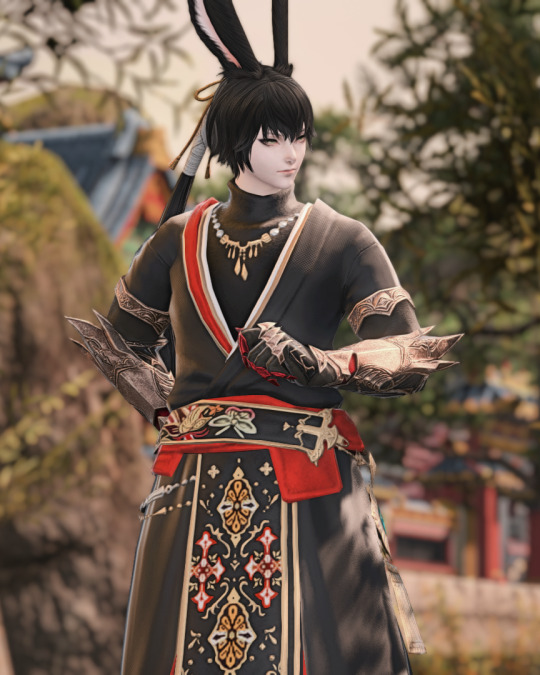


Obsidian Clouds | Li Shen
» Love&deepspace Cosplay Glamour «
This seems to be the closest I can get to Master of Fate recolor... Used the glowy green weapons to mimic the bamboo combat effects, but could be replaced with anything.
Head: Yakaku Kamidome - jet black / metallic gold Body: Rakshasa Dogi of Healing - jet black Hands: Abyssos Armguards of Healing - soot black Legs: Rakshasa Tsutsu-hakama of Healing - default Feet: Replica Sky Pirate's Boots of Aiming - jet black
Earring: The Emperor's New Earrings Neck: The Emperor's New Necklace Wrists: The Emperor's New Bracelet Right Ring: The Emperor's New Ring Left Ring: The Emperor's New Ring
Main Hand: Palaka Pendulums - default Off Hand: --
Fashion Accessory: -- Minion: -- Mount: -- Location: Shirogane
Shader: Faeberry Bokeh
#ffxiv#ffxiv glamour#ffxiv viera#ffxiv sage#eorzea collection#valkaseltzer#valkariel ilmarë#viera#veena#sage#healers#darks/blacks/greys#reds/oranges/browns#golds/yellows#no mogstation items#no seasonal items#eastern glamour#cosplay glamour#divine glamour
19 notes
·
View notes
Text
Yvette Heiser - How Mastering Photography Fundamentals Can Improve Your Night-Time Food Shots
Night-time food photography presents both challenges and opportunities for photographers looking to capture the delicious allure of culinary creations. With low light conditions and the need for effective composition, mastering the fundamentals of photography becomes essential. Yvette Heiser - Mastering Night-time Food Photography provides valuable tips and techniques for overcoming these challenges and capturing stunning food shots even in the darkest settings.

Understanding the Importance of Photography Fundamentals
Photography fundamentals encompass essential concepts such as exposure, composition, lighting, and focus. By mastering these foundational elements, photographers can effectively capture the essence of their subjects—especially in challenging conditions like nighttime settings. Yvette Heiser - Click with Confidence: Mastering Photography Fundamentals offers valuable insights into these core principles, helping photographers build a solid foundation for capturing stunning images in any environment.
1. Exposure: Balancing Light and Darkness
Exposure refers to the amount of light that reaches your camera sensor, affecting how bright or dark your image appears. In night-time food photography, achieving the right exposure is crucial to highlight details while avoiding overly dark or washed-out images.
Key Tips for Managing Exposure:
Use a Wide Aperture: A wide aperture (e.g., f/2.8 or f/4) allows more light to enter the camera, making it easier to shoot in low-light conditions. This also creates a beautiful background blur (bokeh) that emphasizes your subject.
Adjust ISO Settings: Increasing your ISO sensitivity can help capture images in low light. However, be cautious—higher ISO settings can introduce noise. Aim for the lowest ISO that allows you to achieve a properly exposed image.
Utilize Longer Shutter Speeds: Slowing down your shutter speed allows more light to hit the sensor. Use a tripod to stabilize your camera during longer exposures, preventing motion blur.
2. Lighting: Creating Atmosphere and Mood
Effective lighting is crucial in night-time photography, as it sets the mood and enhances the visual appeal of your food shots. Natural light may be limited, so understanding how to manipulate artificial light sources is essential.
Lighting Techniques for Night-Time Food Photography:
Use Soft Light: Soft, diffused lighting is ideal for food photography. Consider using softboxes or LED lights with diffusers to create even lighting without harsh shadows.
Incorporate Ambient Light: Utilize available ambient light sources—such as candles, string lights, or lamps—to create a warm and inviting atmosphere. Experiment with different angles to see how the light interacts with your subject.
Control Shadows: Be mindful of shadows in your composition. Use reflectors (like white foam boards) to bounce light onto darker areas, ensuring your food remains enticing and well-lit.
3. Composition: Framing Your Subject
Composition is the art of positioning elements within your frame to craft a visually engaging and harmonious photograph. Effective composition can draw attention to the food while providing context about the setting.
Tips for Strong Composition in Night-Time Food Photography:
Rule of Thirds: Use the rule of thirds by dividing your frame into a 3x3 grid. Place your main subject along these lines or at their intersections to create balance and interest.
Frames Within Frames: Use elements in your environment (like plates or utensils) to create frames within your composition. This technique adds depth and guides the viewer’s eye toward the main subject.
Negative Space: Incorporate negative space around your food subject to emphasize it further. This technique helps prevent clutter and allows viewers to focus on the dish itself.
4. Focus: Sharpening Your Subject
Achieving sharp focus on your culinary subject is vital in food photography. In low-light conditions, it can be challenging to maintain focus, but mastering this skill will elevate your night-time shots.
Focus Techniques for Crisp Images:
Manual Focus: In low-light situations, autofocus may struggle. Switch to manual focus to ensure precise control over which elements are sharp in your image.
Use a Tripod: A tripod stabilizes your camera and helps achieve sharper images, especially when using slower shutter speeds. This is particularly useful for night-time photography where motion blur can easily occur.
Focus on Key Details: Highlight specific features of the dish—such as texture or garnishes—by focusing closely on those areas. This adds visual interest and draws attention to the quality of the food.
Mastering photography fundamentals is essential for anyone looking to improve their night-time food shots. By understanding exposure, lighting, composition, and focus, photographers can create stunning images that showcase their culinary creations in the best possible light. With practice and experimentation, you’ll find that these fundamental skills not only enhance your night-time photography but also enrich your overall photographic journey. So grab your camera, experiment with these techniques, and watch as your night-time food photography transforms into mouthwatering works of art!
#wedding#pictures#camera#moments#photographytips#photographer#photography#childphotography#yvette heiser#events
6 notes
·
View notes
Text
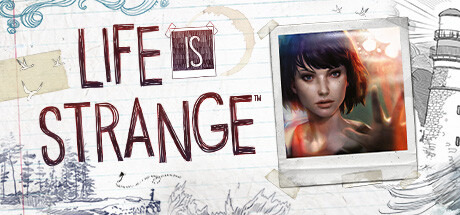
RJ's Platinum Collection #34: Life is Strange
Achieved on 7/22/2023 at 12:11 AM
I first played Life is Strange back when it came out on PC, and then I played it again back on my old PS4. You'd think playing a game twice would be enough?
Nope! I decided to once again play Life is Strange on my PS5, but this time I was gonna get the Platinum trophy. That's how much I love the story of Life is Strange!
And guess what? I got this Platinum all in one day.
Life is Strange puts you in the shoes of Max Caulfield, a student at a fancy boarding school who aspires to be a famous photographer. One day, Max witnesses her childhood friend Chloe being murdered, and discovers she has the power to rewind time, which she uses to go back and save Chloe. Max and Chloe end up using Max's powers to investigate the mystery behind the disappearance of Chloe's friend Rachel - and the origins of a mysterious apocalyptic storm that Max has visions of devastating the town of Arcadia Bay.
Ok, so I'm not even gonna pretend that this Platinum isn't insanely easy. All you got to do is make sure to find all 10 optional opportunities for Max to take pictures of stuff in each of the game's five episodes. I just used the trophy guide on PSN Profiles, snapping up all the optional photographs as they came along, while also enjoying the story, which I ended up playing through in its entirety in less than a whole day. I started at about 11:30 in the morning, and by the time I finished the game and unlocked the Platinum trophy, it was eleven minutes past midnight that same night.
1/61: Macro Eyes - Take optional photo #1 in Episode 1.
2/61: Wide Angles - Take optional photo #2 in Episode 1.
3/61: Telephotogenic - Take optional photo #3 in Episode 1.
4/61: Close-Ups - Take optional photo #4 in Episode 1.
5/61: Red Eye - Take optional photo #5 in Episode 1.
6/61: Focused - Take optional photo #6 in Episode 1.
7/61: Zoomed In - Take optional photo #7 in Episode 1.
8/61: Focal Pointed - Take optional photo #8 in Episode 1.
9/61: Maximum Aperture - Take optional photo #9 in Episode 1.
10/61: Light Leak - Take optional photo #10 in Episode 1.
11/61: Visionary - Take all optional photos in Episode 1.
12/61: Chrysalis - Complete Episode 1: "Chrysalis".
13/61: Field of View - Take optional photo #1 in Episode 2.
14/61: Full Exposure - Take optional photo #2 in Episode 2.
15/61: Processor - Take optional photo #3 in Episode 2.
16/61: Image Stabilizer - Take optional photo #4 in Episode 2.
17/61: Compressed - Take optional photo #5 in Episode 2.
18/61: Pixelated - Take optional photo #6 in Episode 2.
19/61: Dynamic Range - Take optional photo #7 in Episode 2.
20/61: Colorized - Take optional photo #8 in Episode 2.
21/61: Meter Made - Take optional photo #9 in Episode 2.
22/61: Resolution Revolution - Take optional photo #10 in Episode 2.
23/61: Lab Master - Take all optional photos in Episode 2.
24/61: Out of Time - Complete Episode 2: "Out of Time".
25/61: Parallax View - Take optional photo #1 in Episode 3.
26/61: Lenscrafted - Take optional photo #2 in Episode 3.
27/61: The Reflex - Take optional photo #3 in Episode 3.
28/61: Histogrammar - Take optional photo #4 in Episode 3.
29/61: Bokeh - Take optional photo #5 in Episode 3.
30/61: Pinholed - Take optional photo #6 in Episode 3.
31/61: RAW Strength - Take optional photo #7 in Episode 3.
32/61: Viewfinder - Take optional photo #8 in Episode 3.
33/61: Optican - Take optional photo #9 in Episode 3.
34/61: Flash! - Take optional photo #10 in Episode 3.
35/61: Camera Eye - Take all optional photos in Episode 3.
36/61: Chaos Theory - Complete Episode 3: "Chaos Theory".
37/61: Ambient - Take optional photo #1 in Episode 4.
38/61: Time-Lapsed - Take optional photo #2 in Episode 4.
39/61: Balance - Take optional photo #3 in Episode 4.
40/61: Rangefinder - Take optional photo #4 in Episode 4.
41/61: Gamma Value - Take optional photo #5 in Episode 4.
42/61: Dioptric Power - Take optional photo #6 in Episode 4.
43/61: Fisheye - Take optional photo #7 in Episode 4.
44/61: Manually Exposed - Take optional photo #8 in Episode 4.
45/61: Slideshow - Take optional photo #9 in Episode 4.
46/61: Tripod - Take optional photo #10 in Episode 4.
47/61: Shutterbug - Take all optional photos in Episode 4.
48/61: Dark Room - Complete Episode 4: "Dark Room".
49/61: Incandescent - Take optional photo #1 in Episode 5.
50/61: Night Vision - Take optional photo #2 in Episode 5.
51/61: Framed - Take optional photo #3 in Episode 5.
52/61: Camera Obscura - Take optional photo #4 in Episode 5.
53/61: Blowup - Take optional photo #5 in Episode 5.
54/61: Iris - Take optional photo #6 in Episode 5.
55/61: Sensor - Take optional photo #7 in Episode 5.
56/61: On Display - Take optional photo #8 in Episode 5.
57/61: Light Meter - Take optional photo #9 in Episode 5.
58/61: Silhouettes - Take optional photo #10 in Episode 5.
59/61: Selfie Awareness - Take all optional photos in Episode 5.
60/61: Polarized - Complete Episode 5: "Polarized".
61/61: What If? - Unlock all trophies in Life is Strange.
If you're going for the Life is Strange Platinum, it's one of the easiest Platinums you can do. There are no major story-based trophies, so you can play the game however you want. All you gotta do is make sure to pick up all the optional photographs.
I love Life is Strange. It's dialogue is super dated, and it's not perfect, but I still think it has one of the best stories in video games.
Rating: 9/10
#playstation#ps5#ps4#playstation trophies#trophy hunting#platinum trophy#life is strange#life is strange 1#max caulfield#chloe price
2 notes
·
View notes
Text
LensCraft Mastery: Elevate Your Photography Skills to the Next Level

Photography is more than just pressing a button; it’s an art, a science, and a means of storytelling. LensCraft Mastery is a comprehensive guide designed to help photographers—whether beginners or seasoned professionals—unlock their full creative potential. This tutorial series delves into the intricate aspects of photography, from mastering the fundamentals of exposure and composition to exploring advanced techniques in lighting, post-processing, and storytelling through imagery.
Why LensCraft Mastery?
The name LensCraft Mastery symbolizes the fusion of technical expertise (Lens) with artistic craftsmanship (Craft). Photography is both a technical discipline and an expressive medium, requiring a balance between understanding camera mechanics and developing an artistic vision. This tutorial series aims to bridge that gap by offering structured, easy-to-follow lessons that cater to all levels of experience.
1. Mastering the Basics of Photography
For those new to photography, LensCraft Mastery begins with the fundamental concepts that form the backbone of great photography:
Exposure Triangle: The Key to Perfectly Lit Photos
Aperture: Understanding how f-stops affect depth of field and light intake.
Shutter Speed: Capturing motion creatively, from freezing action to long exposures.
ISO: Controlling sensor sensitivity for optimal brightness without excessive noise.
Composition Techniques: Crafting Visually Stunning Images
Rule of Thirds: Placing subjects strategically for balanced compositions.
Leading Lines: Drawing the viewer’s eye to the subject.
Framing & Negative Space: Enhancing depth and focus in a photograph.
2. Advanced Photography Techniques
Once the basics are mastered, LensCraft Mastery delves into techniques that can take your photography to a professional level.
Understanding Light & Shadows
The role of natural light vs. artificial lighting in photography.
How to use soft light for flattering portraits and harsh light for dramatic effects.
Mastering golden hour and blue hour photography.
Camera Settings & Manual Mode
How to use manual focus for precision.
Customizing white balance for accurate color reproduction.
Shooting in RAW vs. JPEG and when to use each format.
3. Specialized Photography Genres
Photography is a vast field, and LensCraft Mastery explores different genres, allowing photographers to find their niche.
Portrait Photography
How to pose subjects naturally for candid and professional shots.
Best lenses for portrait photography (prime vs. zoom).
Background blur (bokeh) techniques for dreamy aesthetics.
Landscape Photography
Composition techniques for breathtaking vistas.
Use of ND (neutral density) filters for long exposures.
How to capture the perfect sunrise and sunset.
Street Photography
Capturing the essence of everyday life.
Ethical considerations in photographing strangers.
How to blend into the scene for natural compositions.
Wildlife & Macro Photography
Tips for photographing animals in motion.
Choosing the best gear for close-up macro shots.
Patience and planning for capturing rare moments.
4. The Power of Post-Processing
A great photo doesn’t always end with the camera—post-processing is essential for refining images. LensCraft Mastery provides in-depth tutorials on:
Adobe Lightroom & Photoshop Editing
Adjusting exposure, contrast, and white balance for balanced images.
Retouching techniques for portraits and landscapes.
Removing unwanted elements and enhancing details.
Mobile Editing for On-the-Go Photography
Best apps for editing (Snapseed, VSCO, Lightroom Mobile).
Color grading techniques for a unique aesthetic.
Quick retouching methods for social media-ready images.
5. Developing a Photographer’s Mindset
Photography is more than just technical skill—it requires creativity, patience, and an eye for detail. LensCraft Mastery helps photographers develop a storytelling approach, teaching how to:
Capture emotions and narratives within a single frame.
Use minimalism and abstract photography to create intriguing images.
Experiment with angles and perspectives to bring a fresh outlook to everyday scenes.
6. Monetizing Your Photography Skills
For those looking to turn their passion into a profession, LensCraft Mastery includes insights on:
How to start a photography business and build a portfolio.
Selling photos online (stock photography, prints, NFTs).
Social media strategies to grow an audience and attract clients.
Final Thoughts
Whether you’re just starting or looking to refine your craft, LensCraft Mastery offers a structured, engaging, and practical way to enhance your photography skills. By blending technical knowledge, artistic creativity, and real-world applications, this tutorial series is designed to empower photographers at every stage of their journey.
Start mastering your craft today and turn your vision into reality—one frame at a time. 📸✨
2 notes
·
View notes
Text
pairing: Yukong & Qingni (familial; sfw) (mentioned Yukong/Caiyi)
wc: 965
“Your mother loved mung bean soda, you see…”
Qingni asks about Caiyi, and Yukong grants her the scattered pieces of a memory.
———
“Tell me about Caiyi—about mom.”
It had become habitual, Qingni’s nightly prompt. Her words were goading, her eyes alight with a wealth of questions, and Yukong had not the fortitude to deny her.
“There was the time we overturned old Yao Fen’s jiaozi cart—”
“I know that one already.” Qingni leaned forward in her chair, fingers curling into the table cloth with youthful urgency. Her porcelain dinner plate displaced noisily with her jostling, ears flicking when she pried further, “Tell me about your skyfaring days.”
The words rang through the room like a temple bell; Yukong glanced down at her own plate, the leavings of rice and steamed fish losing their appeal now that her stomach churned. It was that old, mangled feeling, the dogged urge to turn tail, press a hand to her bruised heart and split the skies with her anguish.
Not even in her dreams did the stars shout back, apologize, but Qingni faced her now—eager, and present. Yukong swallowed the bitter tang of it, chasing down the pulp with a sip of wine, and dabbed at her lips.
“Have I told you about the time Caiyi and I snuck into the westside hangar?”
Qingni shook her head, eyes wide, already entranced—they shimmered emerald like the nexus of Yukong’s favorite constellation, one much too far, though never fading. “It was your mother’s idea to sneak past the patrolling Cloud Knights and commandeer the Helm Master’s own starskiff.”
Yukong had been terrified then. They were still ground crew, but she was smitten with the night sky, longing to glide through the cosmos, weightless. Caiyi had wanted to prove herself, keen to show off her early mastery. Precocious and steadfast and charming she always was—one tilt of her head, and Yukong was trailing close behind. The way her face lit up, too, illuminated spectral by the dashboard light, was a summon of its own.
“The Helm Master’s starskiff?” Qingni cocked her head with intrigue. “That sounds… exciting.”
Yukong narrowed her eyes, rolling the stem of her wine glass between her fingertips. “This is a precautionary tale, mind you.”
Precautionary, and yet Yukong had been winded with the thrill of it all, clinging tightly to Caiyi’s beige jumper as she led them through each memorized drill. The busy skyway below glittered, a bokeh mosaic of flashing lights—the cockpit had been silent, Caiyi’s nose scrunched in concentration, and Yukong thought, for perhaps the hundredth time, that she ought to kiss her.
Kaleidoscopic, the roving world beyond set her silhouette ablaze, and Yukong’s amusement had melted to that of thrashing hunger.
“Did you get caught?”
The apt line of questioning left Yukong humored; she laughed softly, hoping to mask the unearthed tremble in her voice. “We nearly made it out unscathed, but we fumbled somewhere near the wrought iron gates.”
It had been a quarter past midnight when they returned—Caiyi’s grin toothy, her grip strong. She wrapped her fingers around Yukong’s wrist and dragged her along; their hushed, giddy laughter filled the spaces between her ribs, leaving her lightheaded, agog. It was somewhere near the wrought iron gates that Yukong found her gall.
The floodlights of the runway had reflected off the silken sheen of Caiyi’s hair when Yukong stopped her short, tugging her backwards until they were flush, until she could taste her laughter on the tip of her tongue.
Caiyi’s silt-dusted boots squeaked loudly on the tarmac when Yukong kissed her, right beside the wrought iron gates. She held moonlight in her hands for the very first time, right beside the wrought iron gates…
“Mom?” Qingni questioned her silence with a note of concern, frowning deep enough for Yukong to clear her throat sharply. “What happened after you left the starskiff?”
She couldn’t set herself to rights if she tried, not when the time-warped memories still singed with the same scarring heat. These were the details she could not bear to disclose. The look of confusion when Yukong had pulled back—or had it been awe? Caiyi’s wide-eyed stare and her halted question—the guardsmen had come, charging the place like they were errant fugitives.
The somber walk back to headquarters, her shifting glances, her ruddy cheeks. When all was said and done, they were lucky to still be employed; Caiyi’s skill had been praised despite the circumstances, but all Yukong could spare her mind to was how she was to grovel for breaking their promise of friendship.
Rejection would have looked glorious on Caiyi’s face too, Yukong had been most certain.
“Well… we got off with no more than a write up and a stern talking to, and Caiyi offered to buy me a drink for the trouble.”
They had marched in silence back to the dormitories, pausing by the flickering vending machine near the showers. Caiyi looked uncertain, shy of all things, but she hadn’t said a word, merely reaching out to offer Yukong a sip of her drink.
Hopeful might have been the word—hopeful was the flash in her eyes—but Yukong had been a coward then, tossing back a hearty gulp of earthy seltzer and wincing it down with her swelled longing. Petulant fear held her tongue; their time seemed bountiful, and such a false sense of laxity bolstered her abeyance.
Yukong never did get the words unstuck from the back of her teeth, and Guangyuan joined their ranks the following week.
“Your mother loved mung bean soda, you see… I never had the heart to tell her it wasn’t quite to my taste.”
Qingni pushed away from the table, looking affronted. “It’s been ages since then, right? You really ought to give it another try, mom.”
She was steadfast and determined, the round of her cheeks dimpling—a spitting image. Yukong raised her glass, snorting into the rim, chest restricting with advent. “Perhaps you’re right.”
19 notes
·
View notes
Text
Choosing Focus for Artistic Expression
Beyond technical considerations, focus can be a powerful tool for artistic expression:
Selective Focus:
By deliberately choosing a specific area to be in focus and allowing the rest to blur, you can draw attention to a particular subject or element within the frame. This technique is commonly used in portrait and still life photography.
Bokeh:
Bokeh refers to the aesthetic quality of the out-of-focus areas in an image. It's created by using a wide aperture, resulting in a pleasing, soft background blur that can add a dreamy or ethereal quality to a photograph.
Mastering focus in photography is a journey that requires a combination of technical knowledge, practice, and a keen artistic eye. By understanding the different types of focus, choosing the right focus mode for each situation, and incorporating advanced techniques, you can take your photography to new heights.
Remember, there are no strict rules when it comes to focus in photography. It's a creative decision that should be guided by your vision and the story you want to tell through your images. So, pick up your camera, experiment with different focus techniques, and let your creativity flow through the lens. Happy shooting!
2 notes
·
View notes
Text
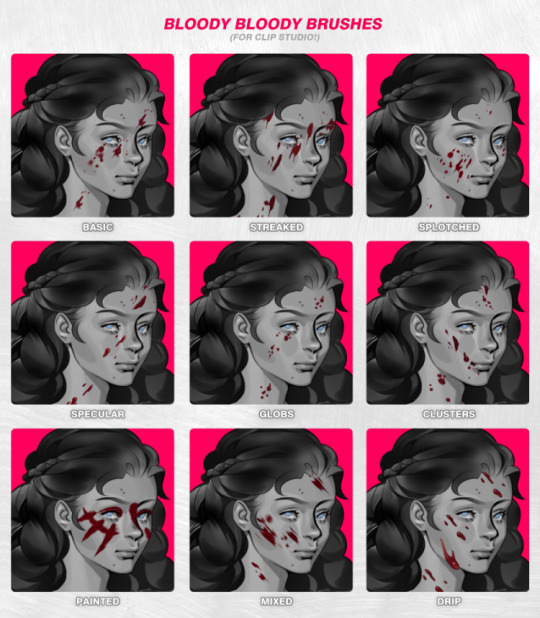

Bloody Bloody Brushes Pack is up! The base color and highlight are editable, so you can use them for any liquids, stains, and fluids; go nuts. The spread and size can be adjusted as usual, too. It was very labor-intensive lol so please make full use of this freebie pack.
Missed the last ones? Here comes the list:
The Starry 🌟 Firey 🔥 Bubbly 🫧 Effect Pack (CSP) | Texture & Clothing Decorations Pack (Clip Studio) | Tails Tails Tails Support+ Pack (Clip Studio) | Tails Tails Tails Pack (Clip Studio) | Galactic Brushes (for Clip Studio!) | Super Bokeh Brushes (Clip Studio) | Rainbow Burst Brushes | Shiny Sparkly Jewelry Pack | Shiny Sparkly Jewelry Pack Plus (+Only) | Grunge Brushes (Krita) | Valentines Lace | Twiggy Patterns & Brushes | Grunge Brushes (Support+ Only) | The Pack With Cracks | 2022 Brushes & Patterns Master List | And the freebies tag!
2K notes
·
View notes
Text
Pumpkin Patch Photography Tips and Techniques
Pumpkin Patch Photography, fall is best seen in the beauty of a pumpkin patch. These places are excellent for photographers because of the bright orange pumpkins, warm sunshine, and rural settings. Some core skills can be invaluable, whether you're shooting your family, sharing content online, or working with clients. With these tips, let's learn how to take amazing images at the pumpkin patch.
Pumpkin Patch Photography: The Best Moments Are Usually During Sunrise or Sunset
To get great magic pumpkin patch photography, look for the special light best seen just after sunrise and before the sun is fully set. Since the sun is lower in autumn, it gives a soft, warm shine that brings out the beautiful colors in pumpkins, leaves, and things we wear. Midday light often leads to very bright highlights and very dark shadows, which do not look good on people in photos. If you need to take pictures at midday, pick areas with more shade or use a reflector to make brightness and contrast easier on your subject.
Scout the Patch Before You Shoot
Walk around the pumpkin patch before your shoot to spot good spots for your pictures. Try to include things such as old wagons, hay bales, cornstalks, scarecrows, and fences in your photos to enrich your photos. Notice if the background is messy or busy; too much going on there can distract from your main subject. A rectilinear approach, neatly lined-up pumpkins, and a soft background can direct the viewer's eye to the primary interest. Look for
Interestingly, they are the pumpkins that might provide a special twist.
Keep Your Gear Simple and Purposeful
Great pumpkin patch photos can be taken with whatever camera you have. DSLRs and mirrorless models with a 50mm f/1.8 prime lens produce great background bokeh, but smartphones can produce impressive photos when handled with care. The main thing is to realize what your tools can do best. A little tripod can help out on your own or with the camera on timer, and keeping lens wipes handy helps keep everything clean while you work outside. A portable reflector or diffuser can assist with lighting, so it's great for portraits. A cozy blanket or a rustic basket can make your pictures more unique.
Mastering Composition in the Pumpkin Patch
A good composition turns a plain image into something special. Use the rule of thirds to make your subject stand away from the center of the photo. Rows of pumpkins, fences, or paths can guide the viewer's attention in your photo. Try placing your camera inside or between pumpkins or shooting through branches to make your photos more interesting. Experiment with the angle you use for each photo to avoid making them all the same; taking pictures from the top, below, and face-on produces different views.
Photographing pumpkins doesn't mean just standing and shooting upwards. Some of the most interesting pictures are made by changing your angle. By crouching nearby, you can snap cozy pics that feel close to your child, and taking photographs from down on the ground helps you catch the vast expanse of their playground and the beautiful color of the sky. Standing on high ground or using a drone for flying shots makes the rows of pumpkins look even more interesting and impressive. Moving around your subject and changing the camera's height can help you find what looks best.
Encourage Natural Poses for Authentic Photos
Staged poses can look awkward and rigid, mostly with children. Focus on taking pictures that show people being themselves and expressing genuine feelings. Invite kids to run in the pumpkin patch, grab a pumpkin, or sit on the hay bales to play or enjoy the laughs. Two or more people can look happier and more genuine in family-friendly spots by holding hands, playing around, or selecting something together for the photo. If you have someone do a small activity, they often enjoy themselves and look more natural in the pictures.
Dress for the Season (and the Shot)
Your subjects' clothes can strongly affect the mood and look of your pumpkin patch pictures. Colors such as beige, olive green, burnt orange, and deep red work nicely with fall colors. You can wear denim and cute sweaters to give it more style and match the season. Trying to hide your workout with bright or neon clothing can draw more attention than you want. All the details, such as layers, boots, scarves, and flannels, are beautiful and help create a cozy fall mood. Choose a matching bag that is easy for any outfit changes.
Don't Overlook the Small Details
Though wide shots and portraits are essential, the shots that stay with us often notice small details. Take photos of a toddler holding a tiny pumpkin, shoes stained with soil worn on a trail, or a gourd with a special texture. Choose props that show something about the place, for example, a cup of hot cider, a scarecrow in a field, or an old farm sign. Little details like these add to the atmosphere and make the story more detailed.
Editing with an Autumn Ambience
The result you want in your photos can be achieved with good post-processing and enhancing autumn mood. Adobe Lightroom, Capture One, and Snapseed allows you to change exposure, contrast, and white balance. Bumping up the warmth may make your photos appear more seasonal and pleasing. Adjust how much contrast and clarity to make textures stand out without making the picture feel too strong. Be careful not to exaggerate the orange colors in your photographs because this may make the result seem unusual. Adding a soft vignette helps point the viewer's attention to your subject and makes the image feel cozy.
Photographing Children at the Pumpkin Patch
Kids usually make pumpkin patch photos wonderful because of their unexpected and fun energy. Give them space to explore and take pictures as they move around. Their natural expressions when they laugh, play, or see a large pumpkin can make the picture more special than a formal pose. Pack nutrition, water, and a small toy they can play with to smooth the trip. When your camera is set manually, keeping the shutter speed high prevents movement blur. If you use a smartphone, burst mode will quickly take several photos in a row; choose the best one.
Don't Overcrowd the Space, and Be Thoughtful
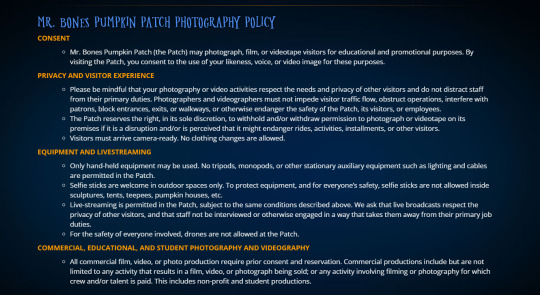
Since pumpkin patches are mainly private businesses, they always obey their guidelines and treat their property respectfully. Use only the suggested paths, do not climb on any displays unless allowed, and clean any mess you make. When photographing professionally or using your images in business, verify if you need to pay for location rights. By being nice, you make yourself welcome to return and give a good example to those around you. A little attempt at being courteous makes the community areas comfortable for everyone.
Embrace the Fall Spirit and Have Fun
Shooting in a pumpkin patch is really about having fun during the fall. Whether at a styled shoot or having a fun day, your goal is to save the lighthearted spirit of the season in pictures. Don't be too concerned with being perfect. Oftentimes, the images we love most are of someone with a leaf in their hair or a pumpkin that isn't standing straight. Let the imperfections, jokes, and short-lived moments of fall bring you happiness. A dash of imagination and notice of small details will help your pumpkin patch photos look stunning and stay in your mind.
–
Pumpkin patch photography offers a perfect way to capture the magic of fall with warm, rustic backdrops, playful props, and golden light. For further insights, you're welcome to browse our website. https://mrbonespumpkinpatch.com/photography-policy/.
Capture unforgettable autumn memories with creative pumpkin patch photography for families, couples, and kids.
#Mr Bones Pumpkin Patch#Pumpkin Patch Blogs#Jennifer L Pumpkin#Pumpkin patch photography tips#Fall photography#Autumn photography#Pumpkin patch photoshoot#Family photography#Seasonal photography#Outdoor photography#Photography composition#Kids fall photos#Pumpkin patch portraits
0 notes
Text
Essential 7 Tips for Taking Professional Portraits: A Beginner’s Guide

Essential 7 Tips for Taking Professional Portraits: A Beginner’s Guide
Essential 7 Tips for Taking Professional Portraits: A Beginner’s Guide
Taking professional portraits is an art form that involves more than just pressing a camera button. Whether you are an aspiring photographer or simply looking to improve your skills, understanding how to shoot professional portraits will allow you to capture stunning images that stand out. This beginner’s guide will walk you through the essential tips for perfecting your portrait photography.
1. Master the Art of Lighting in Professional Portrait Photography
Lighting is one of the most crucial elements when learning how to shoot professional portraits. Without proper lighting, your images may fall flat, regardless of the quality of your camera or lens.
Natural Light
For beginners, natural light is often the easiest and most cost-effective lighting option. The golden hour, which occurs just after sunrise or before sunset, provides soft, warm light that’s perfect for portraits. Position your subject near a window to make the most of available daylight.
Artificial Lighting
If you want more control over your lighting, artificial light sources such as softboxes or ring lights are invaluable. These tools create soft, flattering light, which is ideal for creating professional-level portraits.
When learning how to shoot professional portraits, it’s essential to experiment with different light sources to see how they affect your images. The key is to avoid harsh shadows and ensure your subject’s face is evenly lit.
2. Camera Settings: Understanding the Fundamentals
The next step in learning how to shoot professional portraits is mastering your camera settings. Understanding your settings will help you create high-quality portraits every time.
Aperture
A wide aperture (low f-number, such as f/2.8 or f/4) is key to creating beautiful, blurred backgrounds (also known as bokeh) and ensuring that your subject is sharp while
the background remains out of focus. This technique is commonly used in professional portrait photography to make the subject stand out.
Shutter Speed
To avoid motion blur, set your shutter speed to 1/125 or faster. For portraits, a faster shutter speed ensures that your image is sharp and your subject is in perfect focus.
ISO
Always keep your ISO as low as possible to avoid grain in your portraits. A range of 100-400 works best in most situations. If you’re shooting in lower light, you can increase the ISO, but be cautious of introducing noise into your images.
3. Composition: Framing Your Subject for a Professional Look
Composition plays a major role in how to shoot professional portraits. The way you frame your subject can transform an ordinary shot into an extraordinary one.
The Rule of Thirds
One of the most important composition techniques is the rule of thirds. Imagine a grid of two horizontal and two vertical lines dividing the image into nine equal sections. Place your subject along these lines, particularly the eyes, which should fall along the top horizontal line.
Background Matters
When learning how to shoot professional portraits, never underestimate the power of a clean background. A busy, cluttered background can distract from your subject. Choose a background that is simple and complements your subject, whether it’s a nature backdrop or a clean studio backdrop.
4. Connect with Your Subject for a Genuine Portrait
Great portraits go beyond the technical aspects of photography. A great portrait captures the personality and emotion of the subject. Knowing how to shoot professional portraits requires a deep connection with your subject to create authentic images.
Build Rapport
Before you start shooting, engage with your subject. A little small talk can go a long way in helping them feel comfortable in front of the camera. A relaxed subject will result in more natural expressions.
Encourage Natural Poses
While posing can be useful, it’s important to let your subject move naturally. Ask them to adjust their posture or shift their weight slightly to avoid stiff poses. Small changes like tilting the head can add grace and sophistication to the portrait.
Capture Emotions
A big part of how to shoot professional portraits is capturing real, genuine emotions. Whether it’s a smile, a look of contemplation, or a burst of laughter, aim to freeze real moments that reflect your subject’s personality.
5. Details Matter: Focusing on the Small Things
When learning how to shoot professional portraits, attention to detail can elevate your images. Small adjustments in hair, clothing, and posture can make a huge difference in the final result.
Clothing Choices
The clothing your subject wears should not distract from their face. Solid colors work best, while busy patterns can pull attention away from the subject. Encourage your subject to wear clothes that complement their skin tone and the background.
Hair and Makeup
Ensure that your subject’s hair is tidy, and their makeup (if applicable) is even. Small details like stray hairs or uneven makeup can distract from the focus of the portrait.
Eyes
The eyes are crucial in a portrait. Sharp, in-focus eyes convey a sense of connection and engagement with the viewer. Direct your subject to look into the lens or towards a point off-camera for a more candid and engaging look.
6. Choosing the Right Lens for Professional Portraits
Selecting the right lens is vital for how to shoot professional portraits. A 50mm or 85mm prime lens is ideal for portraiture because it provides a flattering perspective and produces beautiful bokeh. The wide aperture of these lenses creates a shallow depth of field, which helps isolate the subject from the background.
Why Prime Lenses?
Prime lenses are preferred for portraits because they offer excellent sharpness and clarity. Their wide apertures help in creating that smooth, blurred background that every professional portrait needs.
7. Post-Processing: Enhance Your Portraits
Post-processing is the final step in how to shoot professional portraits. After taking your photos, use photo-editing software like Adobe Lightroom or Photoshop to refine your images and bring them to life.
Adjust Exposure
Ensure that your exposure is balanced. If your images are underexposed or overexposed, correct the levels to bring back detail in shadows and highlights.
Retouching Skin
Subtle skin retouching can enhance the quality of your portrait, but be sure not to overdo it. A light touch is necessary to keep the image looking natural while reducing blemishes or skin imperfections.
Enhance the Colors
Increase the vibrancy and saturation slightly to make your portrait pop, but keep it natural. You want to enhance the image, not make it look overly processed.
8. Conclusion: Trust The Lens India for Professional Portrait Photography
Now that you know the essentials of how to shoot professional portraits, it’s time to practice! However, if you’re looking to have professional-quality portraits taken, The Lens India is here to help. We specialize in offering high-quality photography services, ensuring that every portrait captures the true essence of our clients.
Whether you need family portraits, corporate headshots, or personal artistic portraits, our team at The Lens India will provide you with top-notch results. Let us help you create timeless memories with our professional photography services!
FAQ: How to Shoot Professional Portraits
1.What are the best lighting techniques for shooting professional portraits?
Use natural light during the golden hour or artificial light like softboxes for more control. Ensure even lighting and avoid harsh shadows.
2.What camera settings should I use when learning how to shoot professional portraits?
Use a wide aperture (f/2.8 or f/4), fast shutter speed (1/125+), and low ISO (100-400) for clear, sharp portraits.
3.How can I compose my shots for professional portraits?
Use the rule of thirds and position the subject’s eyes along the top horizontal line. Keep the background simple and uncluttered.
4. How do I make my subject feel comfortable for a genuine portrait?
Engage with your subject, encourage natural poses, and create a relaxed environment to capture authentic emotions.
5.What details should I pay attention to for a professional-looking portrait?
A 50mm or 85mm prime lens is ideal for sharpness, flattering perspective, and beautiful background blur.
6. What lens is best for shooting professional portraits?
Focus on lighting, camera settings, composition, connecting with your subject, and post-processing.
7. How should I edit my portraits to make them look professional?
Adjust exposure, subtly retouch skin, and enhance colors without over-processing for a polished look.
8. Can I hire a professional photographer for portraits?
Yes, The Lens India offers expert portrait photography services for high-quality results.
Stay Inspired and Informed!
Follow The Lens India on social media for more captivating content, photography insights, and the latest updates:
Instagram: @thelensindia – Explore stunning visuals and behind-the-scenes stories!
Facebook: The Lens India – Join the conversation and never miss a post!
Let’s build a community of creators and storytellers together!
The Lens India
Tirupati Co-op Housing Society, Tirupati Campus, Phase – 2, Bldg – B8, F.no 402, Adarsh Colony Rd no -2,Tingre nagar,
Vishrantwadi Pune, Maharashtra 411015
Visit Us : https://thelensindia.com
Email Us : [email protected]
Our Social Presence :
Facebook — https://www.facebook.com/thelensindiaphotography/
Instagram — https://www.instagram.com/thelensindia
#PortraitPhotography#PhotographyTips#BeginnerPhotography#PhotographyGuide#PhotographyBasics#PhotographySkills#ProPhotographyTips#PhotographyInspiration#PhotographyForBeginners#TheLensIndia#PortraitLightingTips#CameraSettingsForPortraits#ProfessionalPortraits#HowToShootPortraits#PortraitComposition#PhotographyLighting#LensForPortraits#PhotographyPostProcessing#NaturalLightPortraits#GoldenHourPhotography
0 notes
Text
What Lens for Food Photography? A Complete (and Delicious) Guide by Ibrahim at Spinthiras Media
(Originally published on SpinthirasMedia.com — Dubai’s leading food photography studio.)
Introduction: Why Your Lens Choice is as Important as the Dish Itself
At Spinthiras Media, we know that great food photography isn’t just about snapping a quick pic — it’s about choosing the right lens to make every dish look irresistible. Whether you’re a restaurant owner, a food blogger, or just someone who wants their homemade meals to look Insta-worthy, this guide will help you pick the perfect lens for mouth-watering shots.

Why Your Lens Matters More Than Your Filter Game
Think of your lens as the salt of food photography — it enhances everything. The wrong lens can make even the most decadent chocolate cake look like a sad pancake. The right one? It turns a simple salad into a textural masterpiece.
Here’s why lens choice is a big deal:
✔ Sharpness & Detail — You want to see every sprinkle, drizzle, and crumb. ✔ Bokeh (Fancy Blur) — That dreamy background blur makes your dish pop. ✔ Color & Light Handling — Because no one likes washed-out hummus.

Prime Lenses: The Secret Weapon of Food Photographers
Prime lenses (fixed focal length) are like the VIPs of food photography. They’re sharp, fast, and give you that creamy background blur that makes food look irresistible.
1. The “Nifty Fifty” — 50mm f/1.8
Best for: Overhead flat lays, 45-degree shots.
Why we love it: Affordable, lightweight, and perfect for beginners.
Dubai foodie bonus: Great for capturing those luxurious brunch spreads in all their glory.
2. The Flattering 85mm f/1.8
Best for: Close-ups with dreamy bokeh.
Why we love it: Makes even a simple shawarma look like a work of art.
Pro move from Spinthiras Media: Ideal for restaurant menu photography — because no one resists a well-shot biryani.3. The Macro Master — 100mm f/2.8
Best for: Extreme close-ups (think honey dripping off baklava).
Why we love it: Captures every sesame seed on your burger bun.
Dubai photographer tip: If you’re a product photographer in Dubai, this lens is gold for food packaging shots.

Zoom Lenses: For When You Need to Move Fast
Not all heroes wear capes — some carry zoom lenses. These are perfect for dynamic shoots where you can’t keep switching lenses (like when you’re dodging waiters in a busy Dubai café).
1. The Versatile 24–70mm f/2.8
Best for: Everything from wide restaurant shots to detailed plating.
Why we love it: One lens to rule them all (or at least most food shoots).
2. The Long-Range 70–200mm f/2.8
Best for: Shooting from a distance (great for candid kitchen shots).
Ibrahim’s tip: If you’re a food photographer in Dubai working in tight spaces, this might be overkill — but it’s amazing for outdoor setups.
Macro Lenses: Because Details Sell
Ever wondered how professional food photography makes every grain of saffron look like gold? Macro lenses.
Perfect for:
Melting cheese pulls
Glossy chocolate drips
Dubai’s intricate desserts (looking at you, kunafa)

How to Choose the Best Lens for Your Food Photography
Before you max out your credit card, ask yourself:
What’s my shooting style?
Overhead? 50mm.
Close-ups? 100mm Macro.
Restaurant scenes? 24–70mm zoom.
2. What’s my budget?
Start with a 50mm f/1.8 (it’s cheap and brilliant).
Upgrade later to a macro or fast zoom.
3. Where am I shooting?
Tiny Dubai café? Prime lens.
Spacious studio? Zoom or macro.
(Bonus tip frm Spinthiras Media: If you’re hiring a photographer for food in Dubai, ask what lenses they use. The right gear = better photos.)
Final Bite: Lens Recommendations for Every Level

Hungry for More? Let Spinthiras Media Handle It!
If all this lens talk has you dizzy (or just hungry), maybe it’s time to call in the experts. At Spinthiras Media, led by Ibrahim, we’re some of the top food photographers in Dubai, and we know our lenses like chefs know their knives.
📸 Need mouthwatering food photos that sell? Contact us today!
1 note
·
View note
Text
Embarking on an AI-driven Smartphone Photography Journey with the All-new AI HONOR Image Engine

Johannesburg 18 March 2025 – With smartphone usage scenarios continuing to diversify, from portrait photography to telephoto imagery and quick snapshots, consumers expect versatile photography capabilities from a single device. Understanding this evolving demand, global technology brand, HONOR, has dedicated efforts to fine-tune its smartphones' hardware and software components to ensure unparalleled image quality.
Recognising the pivotal role of AI in enhancing photography capabilities on the software front, HONOR has been evolving its AI-driven Image Engine to push smartphone photography boundaries. First introduced in 2021, the original HONOR Image Engine used AI to blend images from multiple lenses for sharper results. The second version added Millisecond Falcon Capture and Ultra-fusion Computational Optics, boosting speed and image quality. Now, with the AI-powered HONOR Image Engine, integrated into the Magic7 Series, HONOR introduces the industry’s first on-device plus cloud mobile imaging system, offering advanced features that master light and shadow for stunning photos.
The AI HONOR Image Engine features three specialised large models: the Light and Shadow Portrait Model for static scenes, the Telephoto Enhancement Model for sharp, detailed images, and the Capture Enhancement Model for better motion shots. Together, these models elevate the Magic7 Series, offering advanced AI-driven photography that covers action, portraits, and telephoto shots for an immersive, cutting-edge experience.
Mastering Light and Shadow
HONOR transforms smartphone portrait photography with the AI HONOR Image Engine, integrating the Light and Shadow Portrait and Telephoto Enhancement Models. This system powers advanced features such as AI-enhanced Portrait, All-scenario Harcourt Portrait, AI Super Zoom, and Stage Mode, featured in the HONOR Magic7 Series.
The AI-enhanced Portrait offers ultra-high-definition portraits across a 1X to 6X focal length, enhancing image quality with AI Resolution Enhancement, noise reduction, and dynamic pixel adjustments. It optimises lighting for better clarity in both well-lit and low-light conditions, enhancing dynamic range and colour transitions for more natural, detailed portraits.
Stage Mode, powered by the Light and Shadow Portrait Model, captures high-quality performance moments with refined exposure and vivid colors, even in complex lighting like concerts and festivals. The AI-enabled bokeh effect replicates real optical systems, ensuring sharp subjects with smooth background transitions.
The All-Scenario Harcourt Portrait feature provides studio-like image quality at any distance, now with a 6X focal length for greater flexibility. It refines skin tones and facial details while preserving natural characteristics, making it ideal for stunning, professional-looking portraits.
Enhancing Versatility with AI Super Zoom for Scenery Capture
The HONOR Magic7 Pro boasts the HONOR AI Falcon Camera Systems featuring a pioneering 200MP Telephoto Camera with the advanced 1/1.4” telephoto sensor and a large f/2.6 aperture. To achieve professional telephoto lens standards, HONOR has crafted a proprietary structure that includes a dual lens group with an aspherical lens that aids in reducing stray light, minimising dispersion, and enhancing overall optical performance.
By merging cutting-edge hardware with the Telephoto Enhancement Large Model on cloud, HONOR introduces the groundbreaking AI Super Zoom feature, designed for framing the breathtaking beauty of sceneries including natural landscape. This feature enables remarkable focal lengths ranging from 30x to 100x along with AI-enhanced resolution, allowing users to capture detailed, sharp images even at significant distances.
The Telephoto Enhancement Large Model on the cloud is capable of driving 12.4 billion parameters data to enhance image quality and generate vivid details at high speed. To achieve this, the cloud large model processes data 1270 billion for each shot.
Advancing Intent Recognition for Precise Movement Capturing
Tailored for diverse motion scenarios, the AI HONOR Image Engine seamlessly integrates the Capture Enhancement Large Model, enhancing the image quality of moving scenes through AI Motion Sensing Capture and HD Super Burst. The AI Motion Sensing Capture, powered by an AI-driven intent recognition engine, excels at capturing precise motion shots by analyzing and identifying subject movements.
Through capabilities like subject detection and facial evaluation, this engine swiftly recognises various shooting subjects, from humans to beloved pets like cats and dogs, while discerning subtle facial expressions and body gestures, enabling users to effortlessly capture cherished moments with their companions using AI Motion Sensing Capture.
Acknowledging the increasing popularity of sports photography, HONOR has consistently advanced its hardware and software to improve capture speed and image clarity, empowering users to capture professional sports image.
Additionally, the new HD Super Burst feature enables users to capture rapid sequences at 10 frames per second, expanding opportunities for snapshot photography on smartphones. Whether it’s capturing a leisurely jog or thrilling sports events such as a swimming competition, the feature enables the camera to swiftly detect and predict the movement of shooting subjects, empowering users to capture moments with unparalleled clarity and precision on every shot, regardless of the setting or intensity of the action.
HONOR Sets New AI Standards in Smartphone Photography
HONOR is steadfast in its mission to redefine the standards of AI excellence within smartphone photography, striving to provide users with the utmost intelligent capturing experience. Powered by the potent AI HONOR Image Engine, the HONOR Magic7 Series empowers users to embark on a holistic AI-centric photography journey, catering to the varied and evolving photography needs of users. Pioneering groundbreaking advancements in smartphone photography, HONOR stands out as the first smartphone manufacturer to seamlessly fuse the capabilities of cloud AI and on-device AI within mobile imaging, underscoring its unwavering dedication to establishing new benchmarks within the industry.
End.
0 notes
Text


This month's brush pack — Beads & Bracelets — is up!
Someone once asked if a bracelet brush is possible and the answer is: yes, with many hours of painful testing and tweaking! You can adjust size & spacing even. Go grab these brushes and fancy-up your character's clothes. Here are the past packs:
Bloody Bloody Brushes | The Starry 🌟 Firey 🔥 Bubbly 🫧 Effect Pack (CSP) | Texture & Clothing Decorations Pack (Clip Studio) | Tails Tails Tails Support+ Pack (Clip Studio) | Tails Tails Tails Pack (Clip Studio) | Galactic Brushes (for Clip Studio!) | Super Bokeh Brushes (Clip Studio) | Rainbow Burst Brushes | Shiny Sparkly Jewelry Pack | Shiny Sparkly Jewelry Pack Plus (+Only) | Grunge Brushes (Krita) | Valentines Lace | Twiggy Patterns & Brushes | Grunge Brushes (Support+ Only) | The Pack With Cracks | 2022 Brushes & Patterns Master List | And the freebies tag!
171 notes
·
View notes
Text
23 Best Data Visualization Tools You Can't Miss!

In the age of big data, the ability to transform raw information into compelling visual stories is paramount. Data visualization tools are the key to unlocking insights, communicating complex patterns, and driving data-driven decisions. Whether you're a seasoned data scientist or just starting your journey, having the right tools at your disposal is essential. Let's explore 23 of the best data visualization tools that can help you bring your data to life!
Interactive and Dashboard Tools:
Tableau: A powerful and intuitive tool for creating interactive dashboards and visualizations. Ideal for business intelligence and data exploration.
Power BI: Microsoft's business analytics tool, offering interactive dashboards and rich visualizations. Seamless integration with other Microsoft products.
Looker: A Google Cloud platform for data exploration and visualization. Excellent for creating shareable dashboards and reports.
Domo: A cloud-based platform for business intelligence and data visualization, known for its user-friendly interface.
Sisense: An end-to-end analytics platform that simplifies complex data analysis and visualization.
Qlik Sense: An associative data indexing engine that allows users to explore data freely and discover hidden relationships.
Programming Libraries (Python & R):
Matplotlib (Python): A foundational library for creating static, animated, and interactive visualizations in Python.
Seaborn (Python): Built on top of Matplotlib, Seaborn provides a high-level interface for creating informative statistical graphics.
Plotly (Python & R): A versatile library for creating interactive and web-based visualizations.
Bokeh (Python): Focuses on creating interactive web visualizations for large datasets.
ggplot2 (R): A powerful and elegant visualization package for R, known for its grammar of graphics approach.
Web-Based and Cloud Tools:
Google Data Studio (Looker Studio): A free web-based tool for creating interactive dashboards and reports.
Datawrapper: A user-friendly tool for creating charts and maps for online publications.
Infogram: A web-based tool for creating infographics, charts, and maps.
ChartBlocks: A simple tool for creating charts and graphs without coding.
Specialized Tools:
Gephi: A tool for visualizing and analyzing networks and graphs.
Cytoscape: A software platform for visualizing complex networks, particularly biological networks.
RAWGraphs: A web application to create custom vector-based visualizations from spreadsheet data.
Carto: A location intelligence platform for creating interactive maps and spatial analysis.
Kepler.gl: A high-performance web-based application for visualizing large-scale geospatial data.
Open-Source and Free Tools:
Vega-Lite: A high-level grammar of interactive graphics, built on top of Vega.
Apache Superset: A modern, enterprise-ready business intelligence web application.
Metabase: An open-source business intelligence tool that lets you ask questions about your data and display answers in useful formats.
Choosing the Right Tool:
The best tool for you depends on your specific needs, data complexity, and technical skills. Consider factors like:
Ease of Use: How intuitive is the interface?
Data Connectivity: Can it connect to your data sources?
Visualization Types: Does it offer the charts and graphs you need?
Interactivity: Does it allow for interactive exploration?
Collaboration: Can you share and collaborate on visualizations?
Cost: Is it free, subscription-based, or a one-time purchase?
Enhance Your Data Visualization Skills with Xaltius Academy's Data Science and AI Program:
Mastering data visualization is a crucial skill for any aspiring data scientist. Xaltius Academy's Data Science and AI Program equips you with the knowledge and practical experience to leverage these powerful tools effectively.
Key benefits of the program:
Comprehensive Training: Learn to use Python libraries like Matplotlib and Seaborn for creating compelling visualizations.
Hands-on Projects: Apply your skills to real-world datasets and build a strong portfolio.
Expert Instructors: Learn from experienced data scientists who are passionate about data visualization.
Industry-Relevant Curriculum: Stay up-to-date with the latest trends and technologies.
Career Support: Receive guidance and support to launch your data science career.
By exploring these tools and honing your skills, you can transform data into actionable insights and communicate your findings with clarity and impact. Happy visualizing!
0 notes