#bootable partition manager
Explore tagged Tumblr posts
Visit Tumblr Blog
Explore Tumblr blogs with no restrictions, modern design and the best experience.
Last Seen Tumblr Blogs


Fun Fact
Celebrities use Tumblr as well.
Text
Repair Your PC and Access Your Data with Active@ Data Studio
Active@ Data Studio provides you with a useful set of tools for accessing your data and repairing your PC in the event that Windows fails to start up and you cannot find any other way to access your data.
#disk utilities#disk manager#partition manager#partition recovery#bootable usb#burn cd#burn dvd#burn iso#cd burner#dvd burner#iso burner#clone disk#file recovery#data recovery#undelete#password recovery#backup#backup software#backup and restore#data backup#winpe#disk burner#burn disk#boot disk#erase disk#erase hard drive#wipe disk#disk image#create partition#unformat
0 notes
Text

05.09.24
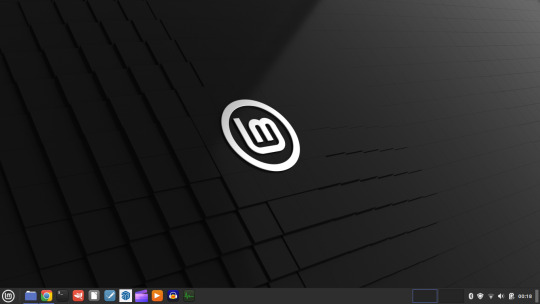
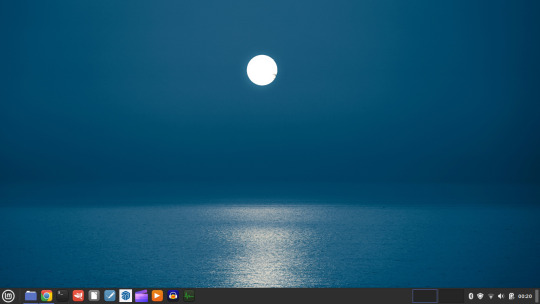
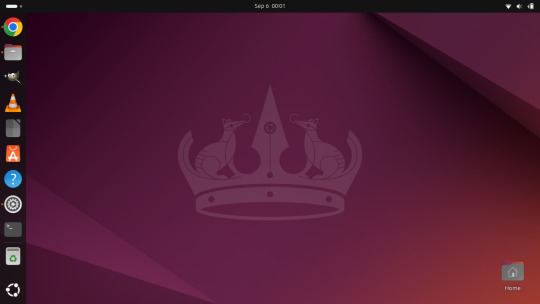
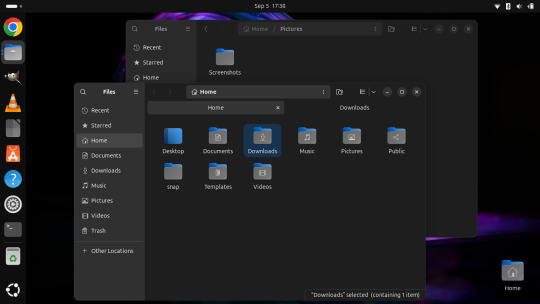
Linux laptop project 2024.
I decided to upgrade my old laptop by making it a Linux dual boot system. I had never done this before. I downloaded the ISO files for Linux Mint 22 'Wilma' and Ubuntu 24.04.1 'Noble Numbat' LTS.
The selected files include the standard desktop environments for each, Cinnamon, for Linux Mint and GNOME for Ubuntu.
Then using the built in USB disk creator on Linux Mint, I created bootable USBs, one for Linux Mint and one for Ubuntu. I decided to install Linux Mint first. The installation includes creating partitions and I used the installation partition creator to create a 25 Giga-byte partition in which I installed Linux Mint. The installation went ahead smoothly, and when it completed, I booted up Linux Mint. It looked perfect.
See screenshots below.


I then installed GParted, which is a more powerful partition manager to create the additional partitions I needed. I created a 25 Giga-byte partition for Ubuntu, two other 25 Giga-byte partitions and I hundred Giga-byte data partition formatting them all using ext4.
I then installed Ubuntu. During the installation, I selected the extended install, rather than the minimal install, so I had a full Ubuntu desktop installation on the second partition on my laptop hard drive. This all went well and at the end of it all I had a system which could boot either Linux Mint or Ubuntu.


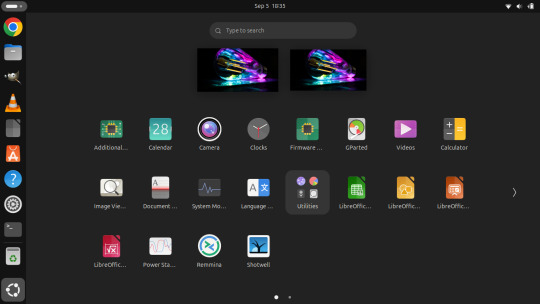


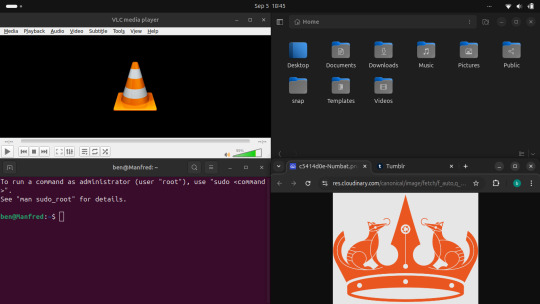
After installation, I booted each system up individually and updated them with the latest updates available, and then I installed necessary software that I wanted such as the Google Chrome Browser, Audacity, VLC Media Player, GIMP, Asunder CD ripper.
I also reinstalled the Chrome web apps for Microsoft Clipchamp and Trimble SketchUp web.
The majority of software bundled on these Linux distros is already preinstalled. I then had fun tweaking each install and making them look how I wanted.
Here is a list of some of the tasks I did in both installs:
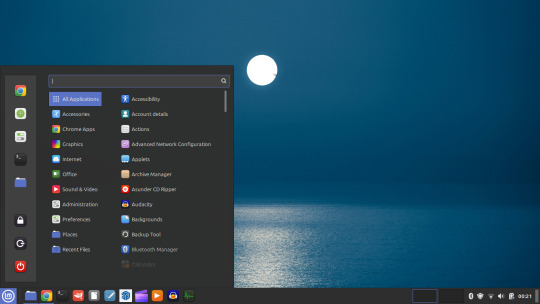
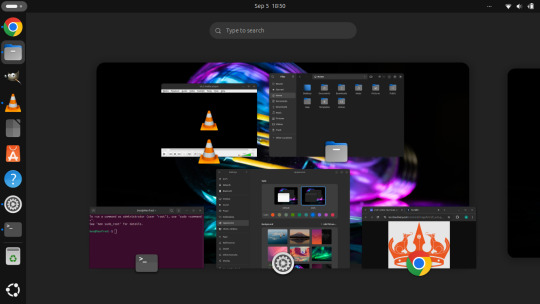
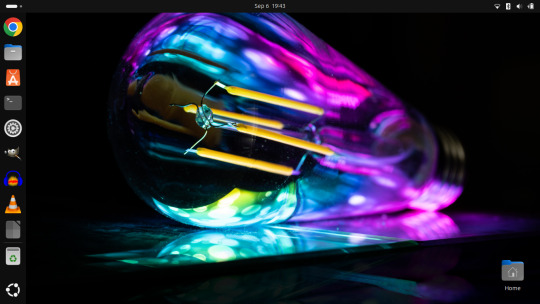
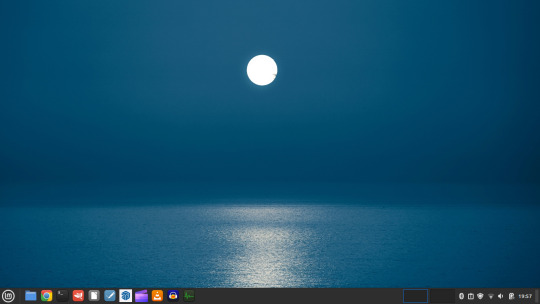
- configuring the desktop environment to my liking, e.g. background, theme colour, dark theme (Ubuntu) mixed colour scheme (Mint). - added Bluetooth devices (headphones, Mini-Rig speaker) - added the printer device - dual booted into each one to check them out!
-
After this, Dad wanted to finish the set-up in such a way that I could link my local laptop Documents, Downloads, Pictures, Music and Video folders directly to the data partition, which would mean that I could access those folders automatically from any installed Linux distributions, however this didn't quite go to plan and messed some things up, so we decided to re-install both operating systems again and I repeated all the previous steps and left out the folder sharing part for now.
-
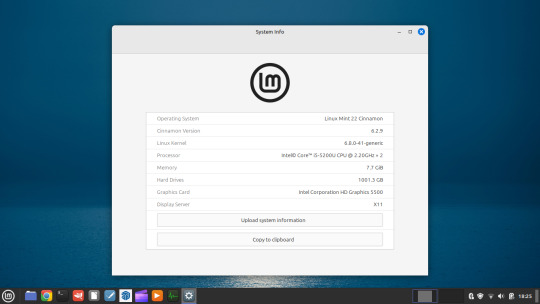
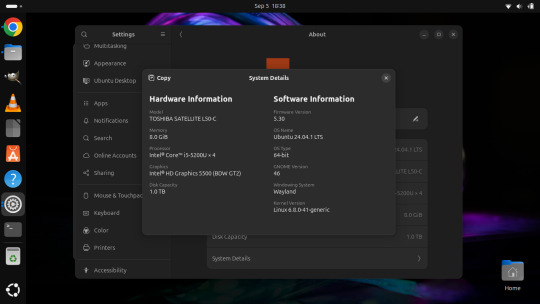
The images underneath show the final desktop installs with my various theme and desktop personalisation's applied and all the installed apps.
Here is a screenshot of the 'GNOME image viewer' in Mint and Ubuntu.

Ubuntu Linux is celebrating its 20th anniversary with a web post.
See link below:
https://ubuntu.com/20years
For more information about the Linux laptop project, search 'Linux' on my Tumblr blog!
6 notes
·
View notes
Text
With the increasing use of computers for data storage throughout the world, data recovery remains an important process that retrieves lost, inaccessible, corrupted, formatted or damaged data from main drives as well as removable media, secondary storage of files when a user cannot access them in any normal way.The recovery may have become impossible due to logical or physical damage to the file system that prevents its retrieval in a normal way. There are many companies in the market who offers software who that offer extensive features for the benefit of the users.The review is focused on EaseUS data recovery software. You can download this free data recovery software to recover your lost data.Supported File TypesWhen compared with other recovery software, this software offers a variety of options. The cutting-edge EaseUS Data Recovery Wizard not only recovers lost data on Windows computers but also Mac that has been lost under various types of data loss situation such as formatting, deletion, system crash, damaged hard drive, lost partition and virus attacks.The software also supports data recovery of different media devices such as Android phones and laptops.Supported DevicesWhen compared with other recovery software, this software offers a wide range of options. The cutting-edge EaseUS Data Recovery Wizard not only recovers lost data on Windows computers but also Mac that has been lost under various types of data loss situation such as formatting, deletion, system crash, damaged hard drive, lost partition and virus attacks.The software also supports data recovery of different media devices such as Android phones and laptops.Recover Any DataWith this software, it has become possible for the user to recover any type of data as the company offers different types of tools to achieve the desired result. For example, all-inclusive EaseUS Partition Master, a professional hard disk management solution, and tool included in this software manages the full capacity of the hard drive with available disk space without risking the source data.In addition, the EaseUS Todo Backup software protects the personal and business digital life from destructive disasters, as well as recovers all types of crucial information from backups after any disaster.Bootable Media SupportThis software not only offers offline support after its download on PC but also offers bootable media support for the people who prefer the method. In addition, it also offers various useful tools such as file syncing solution, PC transfer software as well as Windows and Mac system care for your computerImport/Export Scanning ResultsData recovery remains an important part of the maintenance of various electronic data storage devices such as PC, laptops, Android, and others.It is a fact that this software not only monitors, detects, executes and evaluates computing system in a regular manner but also enables the user to print scanning results for further study. In addition, this software enables the user to import or export scanning results in a systematic format.In any knowledge economy, the core competency of almost all sectors is highly dependent on the input, storage, and output of required data or information. In such a situation, the accidental or intentional loss or deletion of information represents an irretrievable loss and in such conditions, data recovery offers the best way to retrieve the deleted or formatted information.
0 notes
Text
Slimjaro Reviews Australia (Honest Customer Reviews 2025) Must Check Once Before Buying!
Introduction
Linux enthusiasts are always on the lookout for lightweight, fast, and efficient operating systems that can breathe new life into older hardware or provide a streamlined experience on modern machines. Slimjaro Reviews is one such distribution that has gained attention for its minimalistic approach while retaining the power of Arch Linux.
In this detailed Slimjaro review, we’ll explore its features, performance, installation process, software availability, and overall usability to help you decide if it’s the right choice for your needs.
What is Slimjaro?
Slimjaro is a lightweight Linux distribution based on Arch Linux and Manjaro. It is designed to be fast, minimal, and highly customizable while maintaining the stability and rolling-release model of Arch. Unlike standard Manjaro, which comes with a full suite of pre-installed applications, Slimjaro strips away unnecessary packages, offering a leaner experience ideal for:
Older or low-spec computers
Users who prefer a minimal setup
Developers and advanced users who want control over their system
Key Features of Slimjaro
Lightweight & Fast – Uses fewer system resources than standard Manjaro.
Arch-Based – Benefits from the Arch User Repository (AUR) and rolling updates.
Multiple Desktop Environments – Offers Xfce, Openbox, and LXQt for flexibility.
Minimal Pre-Installed Software – Only essential apps are included, allowing users to customize their setup.
Manjaro Tools – Retains useful utilities like Manjaro Hardware Detection (MHWD) and Pamac package manager.
Slimjaro Performance Review
One of the biggest selling points of Slimjaro is its performance. Let’s break down how it performs in different scenarios.
1. System Resource Usage
Compared to standard Manjaro or Ubuntu, Slimjaro consumes significantly less RAM and CPU at idle:
OS
Idle RAM Usage
Idle CPU Usage
Boot Time
Slimjaro (Xfce)
~250-350 MB
1-3%
~15-20 sec
Manjaro (Xfce)
~500-600 MB
2-5%
~20-25 sec
Ubuntu (GNOME)
~800-1000 MB
5-10%
~30-40 sec
This makes Slimjaro an excellent choice for older PCs, netbooks, or lightweight workstations.
2. Gaming & Multimedia Performance
Thanks to its minimal background processes, Slimjaro can improve gaming performance on weaker hardware. However, since it doesn’t come with proprietary drivers pre-installed, users must manually install:
Graphics Drivers (NVIDIA/AMD via MHWD)
Multimedia Codecs (Optional but recommended)
Once configured, Slimjaro performs well for emulation, indie games, and even some AAA titles via Steam (Proton).
3. Responsiveness & Stability
Unlike some ultra-lightweight distros that sacrifice stability, Slimjaro maintains a good balance. It rarely crashes, and the rolling-release model ensures up-to-date software without major system-breaking updates.
Installation Process
Slimjaro provides a user-friendly Calamares installer, similar to Manjaro. Here’s a quick overview:
Download the ISO from the official Slimjaro website.
Create a bootable USB using tools like Slimjaro Reviews Australia
or Rufus.
Boot into Live Environment to test before installing.
Run Calamares Installer – Configure partitions, user accounts, and timezone.
Reboot & Enjoy – The system boots into a clean, minimal desktop.
Note: Unlike Manjaro, Slimjaro doesn’t include many pre-installed apps, so users must manually install additional software post-installation.
Software & Package Management
Since Slimjaro is Arch-based, it supports:
Pamac (GUI Package Manager) – Easy access to AUR and official repos.
Pacman (CLI) – For advanced users who prefer terminal commands.
AUR Support – Install virtually any Linux software.
Default Apps in Slimjaro
Slimjaro keeps things minimal:
File Manager: Thunar (Xfce), PCManFM (LXQt)
Web Browser: Firefox (minimal setup)
Text Editor: Mousepad (Xfce), FeatherPad (LXQt)
Terminal: Xfce Terminal, QTerminal (LXQt)
Users can easily install additional software like:
Office: LibreOffice, OnlyOffice
Multimedia: VLC, MPV
Development: VS Code, Neovim
Desktop Environment Options
Slimjaro offers multiple lightweight desktop environments:
1. Xfce Edition
Best for: Balanced performance and customization.
Pros: Stable, highly configurable, good for beginners.
Cons: Slightly heavier than Openbox/LXQt.
2. Openbox Edition
Best for: Ultra-minimalist users who love keyboard-driven workflows.
Pros: Extremely lightweight Slimjaro Chemist Warehouse.
Cons: Requires manual configuration (tint2 panel, menu editors).
3. LXQt Edition
Best for: Users who want a modern but lightweight experience.
Pros: Qt-based, clean interface, good for mid-range systems.
Cons: Fewer customization options than Xfce.
Pros & Cons of Slimjaro
✅ Pros
✔ Lightweight & Fast – Great for old hardware. ✔ Arch + AUR Support – Access to the latest software. ✔ Customizable – Start with a minimal base and build up. ✔ Stable Rolling Release – No need for major upgrades.
❌ Cons
✖ Not for Beginners – Requires some Linux knowledge. ✖ Limited Default Apps – Needs manual software installation. ✖ Less Polished Than Manjaro – Fewer pre-configured settings.
LIMITED TIME OFFER: -
Visite Here: -https://slimjarocanada.ca/
1 note
·
View note
Text
Hello, Xia!
Today I upgraded my Linux Mint desktop from Wilma (version 22) to Xia (version 22.1). The upgrade itself went very smoothly. After it was done, however, I decided to rename the mount point for my home directory ... because the old (autogenerated) name was ridiculously long and awkward.
The rename didn't go smoothly. I broke the Xia install so badly that I couldn't log in. Luckily I still have a bootable partition with Virginia (version 21.3) installed. I booted Virginia and used it to repair my mistake.
According to Wikipedia, "Xia" is a surname and the name of several dynasties. Unlike all the other Linux Mint codenames, it doesn't seem to be a feminine given name. I guess the release manager goofed!
#war stories#open source#linux mint#virginia#wilma#system administration#codename#upgrade#accomplishments#onomastics#ubuntu#linux#new release#partition
1 note
·
View note
Video
youtube
Discover the EASY Way to Install LINUX Without the Hassle!
*Linux For DevOps:* https://www.youtube.com/playlist?list=PLGj4aMqxhpL6qwlxRuVljjIxvNoMy-W91 *Linux For DevOps: Beginner Level:* https://www.youtube.com/playlist?list=PLGj4aMqxhpL5bLDvXBIpOmS_Vh6U8tjM0 *Linux For DevOps: Intermediate Level:* https://www.youtube.com/playlist?list=PLGj4aMqxhpL79czyihLsCRXHePzY0zQuv ***************************** * Discover the EASY Way to Install LINUX Without the Hassle! * 🎥: https://youtu.be/V7ZOuK6o5KQ *****************************
Linux is a powerful, versatile operating system widely used for servers, development environments, and personal computing. If you're new to Linux, this guide will walk you through the installation process and initial setup to get you started.
Why Choose Linux? - Free and Open Source: Most Linux distributions are completely free to use. - Customizable: Tailor your operating system to your needs. - Secure and Reliable: Preferred for servers and development due to robust security. - Community Support: A vast, active community to help with troubleshooting and learning.
Step 1: Choose a Linux Distribution Popular Linux distributions include: - Ubuntu: Beginner-friendly and widely supported. - Fedora: Cutting-edge features for developers. - Debian: Stable and ideal for servers. - Linux Mint: Great for transitioning from Windows. - CentOS Stream: Suitable for enterprise environments.
Step 2: Download the ISO File 1. Visit the official website of your chosen Linux distribution. 2. Download the appropriate ISO file for your system (32-bit or 64-bit).
Step 3: Create a Bootable USB Drive To install Linux, you'll need a bootable USB drive: 1. Use tools like Rufus (Windows), Etcher, or UNetbootin to create a bootable USB. 2. Select the downloaded ISO file and the USB drive, then start the process.
Step 4: Install Linux 1. Insert the bootable USB into your computer and restart. 2. Access the BIOS/UEFI menu (usually by pressing `F2`, `F12`, `Esc`, or `Del` during startup). 3. Set the USB drive as the first boot device. 4. Follow the installation wizard to: - Select your language. - Partition your disk (use “Automatic” if unsure). - Create a user account and set a password.
Step 5: Perform Initial Setup After installation: 1. Update the System: ```bash sudo apt update && sudo apt upgrade -y # For Debian-based systems sudo dnf update # For Fedora-based systems ``` 2. Install Essential Software: - Text editors: `nano`, `vim`. - Browsers: `Firefox`, `Chromium`. - Development tools: `git`, `gcc`.
3. Enable Firewall: ```bash sudo ufw enable # Uncomplicated Firewall ```
4. Learn Basic Commands: - File navigation: `ls`, `cd`. - File management: `cp`, `mv`, `rm`. - Viewing files: `cat`, `less`.
Tips for Beginners - Experiment with a Live Environment before installing. - Use VirtualBox or VMware to practice Linux in a virtual machine. - Join forums like Ubuntu Forums, Reddit’s r/linux, or Linux Questions for support.
Linux installation, Linux beginner guide, Linux setup, how to install Linux, Linux for beginners, Linux distributions, Ubuntu installation, Linux Mint setup, Fedora installation guide, Linux tips
#Linux #LinuxForBeginners #Ubuntu #LinuxMint #Fedora #LinuxTips #OpenSource #LinuxInstallation #TechGuide #LinuxSetup #ClouDolus #ClouDolusPro
ubuntu,Getting Started with Linux Installation and Basic Setup,linux tutorial for beginners,open source,linux terminal,distrotube,ubuntu is bad,linux tutorial,linux for beginners,linux commands,Linux installation,Linux beginner guide,Linux setup,how to install Linux,Linux for beginners,Linux distributions,Ubuntu installation,Fedora installation guide,Linux tips,cloudolus,cloudoluspro,free,Linux,Linux for DevOps,Linux basics,DevOps basics,cloud computing,DevOps skills,Linux tutorial,Linux scripting,Linux automation,Linux shell scripting,Linux in DevOps,Ubuntu,CentOS,Red Hat Linux,DevOps tools,ClouDolus,DevOps career,Linux commands for beginners,Introduction to Linux for DevOps: Why It’s Essential,devops tutorial for beginners,learn devops,devops tutorial,Who Should Learn Linux for DevOps?,Why You Should Learn Linux for DevOps,Why Linux is Critical in DevOps,Why Linux Essential?,What Is Linux Overview?,What Linux Key Features?,What Linux Key Benefits?,What Is Linux Overview? Linux for DevOps,Linux for cloud,Linux training,devops tutorial Linux,Linux commands for beginners ubuntu,cloud computing Linux for DevOps
***************************** *Follow Me* https://www.facebook.com/cloudolus/ | https://www.facebook.com/groups/cloudolus | https://www.linkedin.com/groups/14347089/ | https://www.instagram.com/cloudolus/ | https://twitter.com/cloudolus | https://www.pinterest.com/cloudolus/ | https://www.youtube.com/@cloudolus | https://www.youtube.com/@ClouDolusPro | https://discord.gg/GBMt4PDK | https://www.tumblr.com/cloudolus | https://cloudolus.blogspot.com/ | https://t.me/cloudolus | https://www.whatsapp.com/channel/0029VadSJdv9hXFAu3acAu0r | https://chat.whatsapp.com/D6I4JafCUVhGihV7wpryP2 *****************************
*🔔Subscribe & Stay Updated:* Don't forget to subscribe and hit the bell icon to receive notifications and stay updated on our latest videos, tutorials & playlists! *ClouDolus:* https://www.youtube.com/@cloudolus *ClouDolus AWS DevOps:* https://www.youtube.com/@ClouDolusPro *THANKS FOR BEING A PART OF ClouDolus! 🙌✨*
#youtube#ubuntuGetting Started with Linux Installation and Basic Setuplinux tutorial for beginnersopen sourcelinux terminaldistrotubeubuntu is badlin
0 notes
Text
Starting out with void linux
Hey hey! welcome back. This is my first post that's not an introduction.
So i've been into linux for almost a year, and since then i've learned a lot. But i haven't limited my options to linux only, but also to other unix systems like bsd. When i was browsing r/unix, i saw someone commenting that one should try void linux, because its similar to bsd in a way: its minimalistic, transparent and easy to understand. its very good for those who are willing to start out with linux by learning how it works.
Its main features are the xbps package manager (you cant install programs via source code compiling like in gentoo) and the fact it uses runit as the init system, which (i think) is supposed to be some weird hybrid between systemd and sysvinit.
So yesterday i decided to give a try and made a bootable usb stick. its relatively easy to install. the hardest thing would be you having to know how to partition your system in a way that actually fits your needs, but even that is explained in the official documentation. Wi-fi support works surprisingly good by default, even better than debian.
I started out from nothing and decided to install i3wm in it, but since i had no prior knowledge in twms, i went to the arch wiki (void's official site said you can consult things there) to see how to install and configure it, and i also looked up yt videos. its nice that you can work on a pc with just a keyboard, not needing to use a mouse. reminds me a lot of those old keyboard-only portable computers. they're kinda cute.
As for the programs...i installed xfce's thunar file browser but it was a bit faulty. i couldn't access the trash bin to recover/delete files. i think i should install mate's caja or something? maybe.
Firefox works nice ig, but if you want really basic web browsing, like browsing sites that dont include js, you should try midori or lynx with framebuffer enabled (havent tried this one. only plain lynx on debian's cli). if i want to listen to a song or something i can use smtube and it doesnt consume much resources. a basic libreoffice install works wonderfully!! my 1.3 ghz cpu could handle calc (linux excel) better and without lagging than let's say debian...
So that was all guys. Can't see what the future awaits for me. maybe i should try openbsd/netbsd sometime soon. they interest me a lot. I hope you all enjoyed reading this. stay safe and see you soon!
1 note
·
View note
Text
With the increasing use of computers for data storage throughout the world, data recovery remains an important process that retrieves lost, inaccessible, corrupted, formatted or damaged data from main drives as well as removable media, secondary storage of files when a user cannot access them in any normal way.The recovery may have become impossible due to logical or physical damage to the file system that prevents its retrieval in a normal way. There are many companies in the market who offers software who that offer extensive features for the benefit of the users.The review is focused on EaseUS data recovery software. You can download this free data recovery software to recover your lost data.Supported File TypesWhen compared with other recovery software, this software offers a variety of options. The cutting-edge EaseUS Data Recovery Wizard not only recovers lost data on Windows computers but also Mac that has been lost under various types of data loss situation such as formatting, deletion, system crash, damaged hard drive, lost partition and virus attacks.The software also supports data recovery of different media devices such as Android phones and laptops.Supported DevicesWhen compared with other recovery software, this software offers a wide range of options. The cutting-edge EaseUS Data Recovery Wizard not only recovers lost data on Windows computers but also Mac that has been lost under various types of data loss situation such as formatting, deletion, system crash, damaged hard drive, lost partition and virus attacks.The software also supports data recovery of different media devices such as Android phones and laptops.Recover Any DataWith this software, it has become possible for the user to recover any type of data as the company offers different types of tools to achieve the desired result. For example, all-inclusive EaseUS Partition Master, a professional hard disk management solution, and tool included in this software manages the full capacity of the hard drive with available disk space without risking the source data.In addition, the EaseUS Todo Backup software protects the personal and business digital life from destructive disasters, as well as recovers all types of crucial information from backups after any disaster.Bootable Media SupportThis software not only offers offline support after its download on PC but also offers bootable media support for the people who prefer the method. In addition, it also offers various useful tools such as file syncing solution, PC transfer software as well as Windows and Mac system care for your computerImport/Export Scanning ResultsData recovery remains an important part of the maintenance of various electronic data storage devices such as PC, laptops, Android, and others.It is a fact that this software not only monitors, detects, executes and evaluates computing system in a regular manner but also enables the user to print scanning results for further study. In addition, this software enables the user to import or export scanning results in a systematic format.In any knowledge economy, the core competency of almost all sectors is highly dependent on the input, storage, and output of required data or information. In such a situation, the accidental or intentional loss or deletion of information represents an irretrievable loss and in such conditions, data recovery offers the best way to retrieve the deleted or formatted information.
0 notes
Text
minitool partition wizard crack

MiniTool Partition Wizard is one of the best partition managers. It covers all the functions of the Free. It embeds advanced partitioning technologies like merge Partition, converting NTFS to FAT32, changing cluster size, and converting dynamic disk to basic to hexpressionalusers.
MiniTool Partition Wizard Professional must be considered the best HDD Manager Software for everyone using the Windows operating system, whether Windows XP or Windows 10. Software professional disk management utilities can perform advanced tasks like resizing/Moving Partition, Merge partitions, splitting a single partition into multiple partitions, and Creating, Copying, Format, and Delete. Partition, etc., with a couple of mouse clicks!
The software helps you convert partition format like FAT MBR Disk, GPT Disk, copy & convert Dynamic Disk, change cluster size, change label, partition id, serial number, set Partition as logical or primary, copy entire Partition to unallocated space with high-performance file-by-file moving technology & Copy an entire disk to a different disk quickly and easily with data clone technology.
The software supports Linux Ext2, Ext3, Ext4 file systems, 32bit/64bit Windows OS, up to 32 HDDs in one system, and even HDD with up to 2TB max of volume size. MiniTool offers greater flexibility. It makes changes on Partition without rebooting the system, with no option for data loss ,thanks to recovery mode.
Features of MiniTool Partition Wizard Pro Ultimate
Extend System Partition
Copy Disk Partition
Recover Lost Partition
Migrate OS to SSD
Convert Dynamic Disk to Basic
Basic Management
Convert Disk Partition Table
Convert File System
Bootable Media Builder
System Requirements and Technical Details
Supported OS: Windows 11, Windows 10, Windows 8.1, Windows 7
RAM (Memory): 2 GB RAM (4 GB recommended)
Free Hard Disk Space: 200 MB or more
0 notes
Text
Top Data Transfer Software for PC: Streamlining Your Data Migration Process
In today’s digital world, transferring data between PCs is a common necessity for individuals and businesses alike. Whether you're upgrading to a new computer, backing up important files, or sharing data with colleagues, having the right data transfer software can make the process efficient and hassle-free. Here’s a comprehensive look at some of the best data transfer software for PCs, along with their features and benefits.
1. EaseUS Todo PCTrans
Overview: EaseUS Todo PCTrans is a user-friendly data transfer tool designed to simplify the process of moving files, applications, and settings from one PC to another. It supports various transfer methods, including over a network, via an image file, or directly from hard drive to hard drive.
Key Features:
Transfer files, applications, and user accounts.
Migrate data via network connection or image file.
Supports Windows 10/8.1/8/7/Vista/XP.
Free and paid versions available.
Benefits: EaseUS Todo PCTrans is particularly useful for non-technical users due to its intuitive interface and straightforward transfer process. The tool ensures that all data is accurately migrated without the need for manual intervention.
2. Laplink PCmover
Overview: Laplink PCmover is a powerful software that allows you to transfer files, applications, and settings from one PC to another. It’s the only software recommended by Microsoft for transferring files from one Windows PC to another.
Key Features:
Move files, settings, and applications seamlessly.
Supports direct transfer via a Laplink USB cable, network, or file transfer.
Includes a transfer assistant for easy migration.
Compatible with Windows 10, 8.1, 8, 7, Vista, and XP.
Benefits: PCmover is known for its comprehensive transfer capabilities, making it an ideal choice for businesses and individuals who need to ensure a complete migration. Its ability to transfer not just files but also applications and settings saves significant time and effort.
3. Acronis True Image
Overview: Acronis True Image is a robust backup and data transfer solution that offers reliable protection for your data. It enables you to clone your hard drive, making it easy to transfer all your files and applications to a new PC.
Key Features:
Full image backup and disk cloning.
Supports both local and cloud backups.
Advanced ransomware protection.
Compatible with Windows and Mac.
Benefits: Acronis True Image provides a comprehensive approach to data transfer and backup. Its disk cloning feature ensures that you can create an exact replica of your hard drive, making it simple to migrate your entire system to a new PC.
4. Paragon Drive Copy
Overview: Paragon Drive Copy is a versatile data migration tool that allows you to copy, move, or clone your hard drive. It’s designed to handle complex transfer scenarios, such as migrating to different hardware configurations.
Key Features:
Clone entire hard drives or specific partitions.
Create a bootable backup of your system.
Migrate data to new or different hardware.
Compatible with Windows 10, 8.1, 8, 7, Vista, and XP.
Benefits: Paragon Drive Copy is particularly useful for advanced users who need to handle more complex migration tasks. Its ability to create bootable backups ensures that you can restore your system quickly in case of failure.
5. MiniTool Partition Wizard
Overview: MiniTool Partition Wizard is a comprehensive disk management tool that includes data transfer capabilities. It allows you to migrate your OS to a new drive, clone disks, and manage disk partitions with ease.
Key Features:
Migrate OS to SSD or HDD.
Clone entire disks or individual partitions.
Manage disk partitions (resize, move, merge, split).
Supports Windows 10/8.1/8/7/Vista/XP.
Benefits: MiniTool Partition Wizard combines powerful disk management features with data transfer capabilities, making it an excellent choice for users who need a versatile tool for managing and migrating their data.
Conclusion
Choosing the right data transfer software for your PC can greatly simplify the process of migrating files, applications, and settings. Each of the tools mentioned above offers unique features and benefits, catering to different needs and levels of technical expertise. Whether you're looking for a straightforward solution like EaseUS Todo PCTrans or a more advanced tool like Paragon Drive Copy, there’s a data transfer software that can help ensure a smooth and efficient transition. Investing in reliable data transfer software not only saves time but also ensures that your valuable data is securely and accurately migrated to your new system.
0 notes
Text
Setting Up a Home Server: A Comprehensive Guide
In today’s digital age, having a home server can be a game-changer. It allows you to centralize your data, stream media, and even host your own websites or applications. Setting up a home server may seem daunting, but with the right guidance, it can be a rewarding and empowering experience. In this blog post, we’ll walk you through the steps to set up your very own home server.
Choosing the Right Hardware
The first step in setting up a home server is to select the appropriate hardware. The hardware you choose will depend on your specific needs and budget. Here are some factors to consider:
Processor: The processor, or CPU, is the heart of your server. Look for a processor with multiple cores and a decent clock speed to ensure smooth performance.
RAM: The amount of RAM you need will depend on the tasks you plan to perform on your server. As a general rule, aim for at least 4GB of RAM, but 8GB or more is recommended for more demanding applications.
Storage: The storage capacity of your server will determine how much data you can store. Consider using a high-capacity hard drive or a combination of hard drives in a RAID configuration for redundancy and improved performance.
Operating System: Choose an operating system that suits your needs. Popular options include Windows Server, Linux (e.g., Ubuntu Server, CentOS), or even a NAS (Network Attached Storage) operating system like FreeNAS or Synology DSM.
Setting Up the Server Hardware
Once you’ve selected your hardware, it’s time to set up the physical server. Follow these steps:
Assemble the Hardware: Carefully follow the instructions provided with your server components to assemble the hardware. This may involve installing the CPU, RAM, and storage drives.
Connect the Cables: Connect the necessary cables, such as the power cable, network cable, and any additional cables required for your specific setup.
Install the Operating System: Follow the installation instructions for your chosen operating system. This may involve creating bootable media, partitioning the storage, and configuring the initial settings.
Configuring the Server Software
With the hardware set up, it’s time to configure the server software. The specific steps will vary depending on the operating system you’ve chosen, but here are some general guidelines:
Update the Operating System: Ensure that your operating system is up-to-date by installing the latest security patches and updates.
Set Up Network Settings: Configure the network settings, such as the server’s IP address, subnet mask, and default gateway, to ensure it can communicate with your home network.
Install and Configure Services: Depending on your needs, you may want to install and configure various services, such as a web server (e.g., Apache or Nginx), a file server (e.g., Samba or NFS), a media server (e.g., Plex or Emby), or a database server (e.g., MySQL or PostgreSQL).
Secure the Server: Implement security measures, such as setting up a firewall, enabling two-factor authentication, and regularly updating your server’s software to protect against potential threats.
Accessing and Managing the Server
Once your server is set up and configured, you’ll need to learn how to access and manage it. Here are some tips:
Remote Access: Depending on your server’s operating system, you may be able to access it remotely using a web-based interface, a desktop client, or a command-line tool. This allows you to manage your server from anywhere.
Backup and Restore: Implement a reliable backup strategy to protect your data. This may involve using a cloud-based backup service or setting up a local backup solution.
Monitoring and Maintenance: Monitor your server’s performance, logs, and resource usage to ensure it’s running smoothly. Regularly maintain your server by applying updates, managing user accounts, and addressing any issues that arise.
Practical Applications for a Home Server
A home server can be used for a variety of purposes, including:
File Storage and Sharing: Use your home server as a central storage location for your files, documents, and media, making them accessible to all devices on your home network.
Media Streaming: Turn your home server into a media hub by hosting your personal media library and streaming it to various devices throughout your home.
Web Hosting: Host your own websites, web applications, or even a personal blog on your home server, giving you full control over your online presence.
Backup and Disaster Recovery: Utilize your home server as a backup solution, ensuring your important data is safe and secure in the event of a hardware failure or other disaster.
Home Automation: Integrate your home server with smart home devices and services, allowing you to centralize and automate various aspects of your home.
0 notes
Text
How to Move Windows to Another Drive [2024 Updated] - Technology Org
New Post has been published on https://thedigitalinsider.com/how-to-move-windows-to-another-drive-2024-updated-technology-org/
How to Move Windows to Another Drive [2024 Updated] - Technology Org
Whether you’ve snagged a new SSD or aim to switch to a roomier drive, the real question is “How to move windows to another drive?” But worry not. This guide shares the complete knowledge of transferring Windows, aka “cloning,” to a new drive with three methods without losing data.
We’ve also shared the prep steps in the drive cloning process and dished out insights on the effort and time each method demands, empowering you to make a savvy decision. So, let’s transfer Windows to a new hard drive now!
Part 1: When Do You Need to Move Windows to Another Drive?
You may need to transfer Windows to new hard drive, such as a larger one, to fix the insufficient disk space issue. Or want to move Windows to another drive, like an SSD, due to the advantages it offers over HDDs, such as:
Ensure a notably faster and more efficient startup with quick data reading and writing speeds.
Offers faster data access speeds, providing quicker application loading and heightened system responsiveness.
Have no moving parts, thus reducing the risk of mechanical failures.
Provide shock resistance for increased durability.
Contributes to energy efficiency due to lower power consumption.
Part 2: Preparation Before Moving Windows to Another Drive
Before you move Windows 11 to another drive or downgrade to an older OS version, preparing beforehand is wise to prevent boot errors. Here’s what you need to do:
Backup Your Data – Back up your valuable data on the target disk, as the Windows migration involves rewriting the entire disk.
Get a Larger Drive – Choose a new disk with more capacity than your current drive and keep 30% to 40% of free space on the system disk. This is to maintain high-level computer performance and stability.
Set Up the New Disk – Install the new disk using a SATA Cable to your PC, then initialize it to MBR or GPT (the same disk type as the source OS drive). If the target drive is old, clear all existing data and partitions.
Choose an OS Migration Tool – Select an efficient tool according to your technical knowledge to move Windows installation to another drive.
Part 3: Three Methods to Move Windows to Another Drive
We’ve delved into three ways to move Windows 10 to another drive. You can either use a cloning tool to copy the OS from an HDD to an SSD or create a system image and recover it on an SSD. Another choice is to go for the easiest route with a third-party Partition Manager tool. Check out the detailed steps below, which we’ve shared in detail for each method:
Method 1: 4DDiG Partition Manager
Time
25 -30 minutes
Ease of Use
Beginner-friendly
Tools
4DDiG Partition Manager and your new drive
Drawback
Priced at $9.9 on Christmas Sale
For beginners, the top choice is 4DDiG Partition Manager, which provides a one-click solution to move Windows installation to another drive without reinstalling the system. This versatile tool also efficiently clones your entire hard drive for seamless data backup, so there is no need to prepare a bootable USB. More than just that, it provides many more benefits, such as:
Recover deleted, repair RAW, and restore formatted partitions.
Repairs bad sectors and offers comprehensive disk care.
Resize, merge, split, create, delete, and format partitions to optimize disk space.
Transfer windows to new hard drive without losing any data.
Follow the instructions below to move Windows 11 to another drive with the help of this tool:
Step 1: Install the tool on your computer and connect the new drive to your PC.
Step 2: Launch the tool, click “Start,” and choose the new drive as the target disk.
Step 3: Confirm the source disk (selected by default) and acknowledge the overwrite warning by clicking “Sure” and “Start.”
Step 4: Based on the drive size, it will take some time to transfer Windows to new hard drive. You can check the migration speed, elapsed time, and related data in the meanwhile. Press “Finish” when the OS transfer is complete.
Method 2: Windows System Image Tool
Time
40-50 minutes
Tools
Windows inbuilt System Image tool, bootable USB, and new drive
Ease of Use
Medium
Cost
Free
Drawbacks
Time-consuming backup and setup; carries a risk of data loss or corruption.
For professional users who don’t mind the manual steps, another effective method involves using a Windows System Image to move Windows 10 to another drive. Start by creating a system image backup, then a recovery USB, and finally, restore the system image to a new drive. Here’s how to move Windows to another drive with detailed steps using the Windows System Image tool:
Step 1: Create a System Image Backup
Connect an empty external drive (SSD or HDD) to your computer.
Open “Control Panel” and head to “System and Security.”
Choose “Backup and Restore,” select “Create a system image,” then tap “Start backup.”
Choose a destination drive with enough space for the system image backup and click “Next.”
Opt for either “Let Windows choose” or “Let me choose” to select what to backup. Click “Next.”
Finally, tap “Save settings and run backup” to generate the system image.
Step 2: Create a Recovery USB
Plug in a USB to your computer.
In the Control Panel, type “ Create a recovery drive” and click on it to open.
Mark “Back up system files to the recovery drive.” Hit “Next.”
Choose the USB as the target, click “Next,” and follow the onscreen instructions to complete the process.
Step 3: Move Windows to Another Drive
Turn off your computer, open its case, and remove the old hard drive.
Connect the recovery USB and external drive to your PC with the system image backup instead.
Reboot the system, press F2/Del for BIOS, and set the PC to boot from the USB recovery drive.
On the “Windows Setup” screen, click “Next,” set language, keyboard, etc., then click “Next.”
Head to “Repair your computer” and choose “Troubleshoot.”
Select “Advanced options,” then tap“System Image Recovery.”
The newest backup will appear; if it fails, pick the right one from the external drive and click “Next.”
Check “Format and repartition disks” and click “Next.”
Confirm by clicking “Yes” and “Finish” to move Windows installation to another drive.
Wait for the system recovery to finish, reboot, and Windows will start automatically.
Method 3: Clonezilla
Time
4-5 hours for a 1TB drive
Tools
Clonezilla, bootable USB, and external drive
Ease of Use
Difficult
Cost
Free
Drawbacks
Time-consuming; Requires advanced tech skills; Cloning can fail due to bad disk sectors.
Another option to move Windows 11 to another drive is by cloning the entire disk. You can do this through an open and free-source cloning tool like Clonezilla. It will clone the OS, applications, and data from your disk, so you don’t need a backup. You can also use Clonezilla as a backup tool to clone your disk data before using the System Image or 4DDiG tool. Here’s how to transfer Windows to new hard drive with Clonezilla:
Step 1: Reduce Partition Size (Optional)
You must reduce the partition size if you’re using Clonezilla to move Windows to another drive that is smaller. But if the destination drive is equal to or larger than the source drive, skip this step. Here’s what to do to reduce partition size:
Press the “Windows + R” keys and type in “diskmgmt.msc.” Press Enter to open Disk Management.
Right-click the main volume (C:) and select “Shrink Volume.”
Adjust the volume size to shrink and tap “Shrink.”
After shrinking, you’ll see unallocated space. Right-click on the unallocated space and select “New Simple Volume” to create a new partition or leave it unallocated for the cloning process.
Step 2: Download Clonezilla and Prepare a Bootable USB
Visit the Clonezilla download page, choose the ISO option, and click “Download.”
Visit the Rufus website and download the latest version of the tool to create a bootable USB.
Launch the tool, select your USB, click “Select,” choose the Clonezilla ISO, click “Open,” and hit Start.
Step 3: Clone Windows to Another Drive
Connect your new drive to your computer.
Boot your computer using the bootable USB. When Clonezilla loads, hit “Enter” for default settings.
Choose your language, select “Don’t touch keymap,” and start Clonezilla.
Opt for “Beginner mode,” pick “disk_to_local_disk local_disk_to_local_disk_clone,” and press “Enter.”
Choose the source and target drives and decide whether to check or skip the source file system.
Choose “reboot/shut down/etc” when everything is finished.
Confirm the cloning process by typing Y thrice. Press “Enter” each time. This is to confirm everything’s good with the cloning process, data overwrite in cloning, and getting the boot loader cloned (for a bootable Windows drive). Next, the software will move Windows 10 to another drive by cloning.
Conclusion
In our comprehensive guide on how to move Windows to another drive, we’ve covered three methods catering to diverse technical skills. If you’re not tech-savvy, the ultimate choice is 4DDiG Partition Manager.
This user-friendly tool is a time and effort-saver, offering a one-click Windows OS migration to SSD sans the hassle of reinstalling. It’s also efficient at cloning your entire hard drive for data backup, eliminating the need for a bootable USB.
#2024#applications#back up#backup#Christmas#clone#comprehensive#computer#control panel#data#data backup#data loss#delete#efficiency#energy#energy efficiency#Featured technology news#GPT#hard drive#hdd#how#how to#insights#ISO#it#keyboard#language#loader#management#merge
0 notes
Photo

@earthcurve this is from like seven years ago, and while i do still have that laptop and the os/2 partition is still functional i cant exactly remember how i did it lol.
i think i actually just installed it in a vm first and then copied the image onto the real machine, setting up the os2 partition from within windows using dfsee. i may have just done the first phase of the installation on the vm, the part where you set up partitions and copy the initial files over and then let the rest of the install run on the machine natively. the warp server for business install cd is actually bootable but the ide drivers are very outdated and i never could get a usb floppy drive to work reliably on that machine to make updated os/2 install boot disks. you'll definitely need the danis506 drivers to make the hard drive work. it took weeks to track down all the drivers i needed, i may be able to find them again if you need it. i also had a second os/2 partition on that machine with a very basic os/2 install on it for maintenance, think of it like safe mode in windows. getting that up and running may have been what i did first. i think an ecomstation install dvd may have come into play at some point too. its a very cobbled together system with files from various os/2 versions. i'll get the thing out and boot it up tomorrow to see if it brings back any memories.
you will definitely need to familiarize yourself with: - dfsee (an os/2 compatible disk partitioning program available for most operating systems) - airboot (an os/2 compatible boot manager also compatible with most modern systems) - danis506 (the modern hard disk driver package for os/2 based systems) - bootos2 (a utility to make a bootable os/2 partition, think of it like "format /s" for dos, but with more options) - the ecomstation fat32 driver is also useful. there are other fat32 drivers but this one is read/write and seems very reliable. not sure if it's actually openly available through normal means tho.
i'd definitely recommended making the system dual-boot with windows or something else (i guess linux would work) because you will need an easy way to get files on and off of the computer before networking and usb are up and running under os/2 (that's why the fat32 drivers are useful, os/2 handles fat16 really weird and windows can't handle hpfs. i guess you could also pull the hard drive out and put it in another computer, i may have done that, like i said it was a while ago i can't really remember.
if you want to take the lazy way out ecomstation will install perfectly off of the default install cd, im sure arcaos would too.
/tagged/os2 /tagged/os/2 and floydsoldblog.tumblr.com/tagged/os2 might have useful information

the gang’s in a higher resolution!
113 notes
·
View notes
Text
With the increasing use of computers for data storage throughout the world, data recovery remains an important process that retrieves lost, inaccessible, corrupted, formatted or damaged data from main drives as well as removable media, secondary storage of files when a user cannot access them in any normal way.The recovery may have become impossible due to logical or physical damage to the file system that prevents its retrieval in a normal way. There are many companies in the market who offers software who that offer extensive features for the benefit of the users.The review is focused on EaseUS data recovery software. You can download this free data recovery software to recover your lost data.Supported File TypesWhen compared with other recovery software, this software offers a variety of options. The cutting-edge EaseUS Data Recovery Wizard not only recovers lost data on Windows computers but also Mac that has been lost under various types of data loss situation such as formatting, deletion, system crash, damaged hard drive, lost partition and virus attacks.The software also supports data recovery of different media devices such as Android phones and laptops.Supported DevicesWhen compared with other recovery software, this software offers a wide range of options. The cutting-edge EaseUS Data Recovery Wizard not only recovers lost data on Windows computers but also Mac that has been lost under various types of data loss situation such as formatting, deletion, system crash, damaged hard drive, lost partition and virus attacks.The software also supports data recovery of different media devices such as Android phones and laptops.Recover Any DataWith this software, it has become possible for the user to recover any type of data as the company offers different types of tools to achieve the desired result. For example, all-inclusive EaseUS Partition Master, a professional hard disk management solution, and tool included in this software manages the full capacity of the hard drive with available disk space without risking the source data.In addition, the EaseUS Todo Backup software protects the personal and business digital life from destructive disasters, as well as recovers all types of crucial information from backups after any disaster.Bootable Media SupportThis software not only offers offline support after its download on PC but also offers bootable media support for the people who prefer the method. In addition, it also offers various useful tools such as file syncing solution, PC transfer software as well as Windows and Mac system care for your computerImport/Export Scanning ResultsData recovery remains an important part of the maintenance of various electronic data storage devices such as PC, laptops, Android, and others.It is a fact that this software not only monitors, detects, executes and evaluates computing system in a regular manner but also enables the user to print scanning results for further study. In addition, this software enables the user to import or export scanning results in a systematic format.In any knowledge economy, the core competency of almost all sectors is highly dependent on the input, storage, and output of required data or information. In such a situation, the accidental or intentional loss or deletion of information represents an irretrievable loss and in such conditions, data recovery offers the best way to retrieve the deleted or formatted information.
0 notes
Text
I am having an absolute shit of a time with one of my new pc components & have been troubleshooting and painstakingly moving shit around for literally 7 and a half hours now but NO progress at all -_-
#don’t bother reading these tags actually they’re long and incomprehensible#my new motherboard is UEFI not BIOS so my usual SSD is apparently not a valid bootable drive. so I had to fucking..#make an installable windows 10 drive out of a usb using my shitass slow half-dead laptop which took 2 hours#then install it on my new M2 to use that for booting instead of the SSD#but I don’t wanna deal with fresh windows 10 and all the messing with settings bullshittery#so I tried cloning my SSD system to my new M2#but it won’t work while I’m currently hosting windows on that M2.. you have to clone a drive to another drive while not using either#so I tried installing windows on one of my hard disk drives so that I could boot from that & deal with the other two#but incredibly. even tho it’s UEFI and therefore the right type of drive for this#it still doesn’t count as bootable and does not show up in the boot priority list#so I was like ok whatever. and formatted the HDD and cloned the SSD to it#but now the partitions are all fucked up and idk what to do with partitions they’re fucked#I hate windows so much I hate it soooo so much#I just wanna play warframe is that so goddamn hard to ask??#I should’ve just manually moved things bit by but & dealt with the sucky experience of personalising windows#bc it almost definitely would’ve taken less time#I feel like this is even less fun but if I do manage it it’ll be better than the alternative#I literally JUST had to do a fresh windows install 4 months ago and I don’t wanna do it again this soon.. I’ve not recovered from it yet..
18 notes
·
View notes
Link
Active@ Data Studio presents the ultimate set of tools for many different kinds of jobs such as data recovery, secure data erasure, disk imaging and backup. The latest version adds even more utilities to Boot Disk: Far, Notepad++, and WinMerge.
#disk utilities#disk manager#partition manager#partition recovery#bootable usb#burn cd#burn dvd#burn iso
1 note
·
View note