#brush cutter attachment
Text
60v, brushless dc, 2.5Ah, lightweight frame, toolless breakdown....

he may still call me "boy", but my dad sure knows the way to a girl's heart
#shoutout to the door to door guy who left the neighborhood because he saw me carry this in#and three minutes later heard maniacal laughter from the backyard#in my best Clarkson: POWWAAAAAAAAAAAAAAHHHHH#now i gotta get my hands on a brush cutter attachment#or for maximum coolness an older Poulan two stroke that can take the big brush blades#aj.txt
1 note
·
View note
Text
Explore our diverse selection of brush cutters at Sprayman.in, your premier destination for top-quality agricultural equipment. Designed to tackle tough vegetation with ease, our brush cutters offer superior performance and durability. Whether you're clearing overgrown areas, maintaining landscapes, or managing weeds, our range of brush cutters delivers reliable results. With various models available, including petrol-powered and electric options, you can find the perfect brush cutter to suit your specific needs. Invest in a Sprayman brush cutter today and experience efficient and effortless vegetation management for your agricultural or landscaping projects.
0 notes
Link

Hand Grass Cutter with Wheels, Wheel Brush Cutter, Push Type Grass Cutter, HAND PUSH GRASS CUTTER, HAND PUSH BRUSHCUTTER, 4 Stroke Hand Push Brush, Trolley Brush Cutter, wheel brush cutter price in india, brush cutter wheel kit, honda trolley brush cutter, 4 stroke trolley brush cutter, honda wheel brush cutter, brush cutter machine, brush cutter with wheels in india, honda brush cutter, brush cutter trolley ,grass cutter wheel, trolley type brush cutter, wheel type brush cutter, trolley hand push brush cutter, gt shakti trolley brush cutter, push type brush cutter, honda trolley brush cutter , trolly brush cutter and weeder , trolley grass cutter , wheel grass cutter, brush cutter, grass cutter, grass cutting machine, grass cutting machine price, crop cutter, grass trimmer, brushcutter blades, stihl brush cutter, brush cutter machine, honda brush cutter, husqvarna brush cutter, brush cutter price, grass cutter price, brush cutter attachment, honda grass cutting machine, bush cutting machine, wheat cutting machine, weed cutter machine, kisankraft brush cutter, small grass cutting machine for home, village grass cutter machine price, honda brush cutter price, brush cutter machine price, lawn cutting machine, grass cutting machine petrol, garden grass cutting machine, manual grass cutting machine, honda grass cutting machine price, garden cutting machine, grass cutter blades, paddy cutter, wheat cutter, lawn trimmer, manual grass cutter, makita brush cutter, lawn cutter, stihl grass cutter, petrol brush cutter, best brush cutter, heavy duty brush cutter, honda grass cutter, types of grass cutting machine, amazon grass cutter, grass cutting machine amazon, manual grass cutting machine amazon, hand grass cutter machine price, heavy duty brush cutter price, industrial grass cutting machines, best grass cutter, honda backpack brush cutter in india, 52cc petrol backpack brush cutter price in india, honda backpack brush cutter price in india, honda brush cutter 4 stroke price, honda brush cutter blade price, 4 stroke brush cutter price in india, kisankraft backpack brush cutter, backpack brush cutter 4 stroke, backpack brush cutter with weeder, honda backpack brush cutter price in india, backpack multi crop brush cutter with tiller attachment 4-stroke, backpack brush cutter with tiller
#wheel brush cutter#honda trolley brush cutter#trolley brush cutter india#brush cutter trolley attachment#4 stroke wheeled brush cutter#trolly brush cutter and weeder#hand push brush cutter#wheel brush cutter price in india#trolley brush cutter#4 Stroke Crop Harvester#Grass Cutter#Brush Cutter#Trolley Hand Push Brush Cutter#brush cutter wheel attachment#4 stroke trolley brush cutter#brush cutter attachments#4 stroke brush cutter#trolley brush cutter coimbatore
1 note
·
View note
Note
What's the process like for slab building mugs? I've only done them on the wheel before and i was wondering how hard it is to get a smooth rotational symmetry when you don't have the wheel helping you
they’re pretty straightforward, but they definitely take practice. and I think an aspect of slab building (and hand building in general) is that it’s not going to be perfect. I had to learn to accept that and to love it for what it is
I use two tools to get my slab-built mugs nice and round:
1. a turntable/banding wheel. spinning it as I’m refining the shape helps keep it round, just like wheel-thrown pottery
and

2. The Cone
The Cone can be any cylinder that’s narrower at the bottom at wider at the top, and the right size to fit in your mug. just press it in and shape the rim to it, don’t leave it in the mug as the clay shrinks
but here’s the whole slab-building process!
under the cut

1. roll out clay.
this time I cut it straight from the bag so it’s air-bubble free, but otherwise it should be wedged first. I use a rolling pin with measured rings on the ends so I can easily roll it out 1/4” thick

2. I used to use a cardboard template and a pin tool for this (you can find the templates online and print them, or you can cut up a disposable cardboard cup to make a template)
but I upgraded to cutters a little while ago and I love them.
remember also to cut out a circle for the bottom of the mug.

3. smooth
4. let sit for a couple hours, or put it in front of a fan for awhile, so it’s not too floppy to work with. it should be flexible, workable, but not floppy. it shouldn’t crack if bent but it should stand up on its own once you’ve got it in a circular shape

5. I usually make a handle right before starting to build the mug, so it’s firm enough to work with by the time I’m done with the cylinder part of the mug. I prefer handle-making tools, rather than pulling them by hand

6. cut the mug edges at a 45 degree angle. you can eyeball it or use a tool. remember to flip the slab before cutting the other side, so they line up lol. I only made that mistake once.
I used to not do this step but my seams are a lot cleaner now.

7. score and slip, then join. once I’ve blended the two sides together a bit with my fingers, I like to use a soft rubber rib to smooth out the seam on the inside and outside, adding extra slip to fill any little gaps. it’ll be ugly at first, just keep refining it!

8. score and slip to attach the bottom piece to the cylinder. I add extra slip around the inside of the mug where the bottom attaches, and once I’ve flipped the mug back over, I smooth the extra slip along the seam on the inside with a brush or sponge, to help fill any gaps and attach everything nicely
9. here I usually use The Cone. the rim is going to warp again as I add my handle, so I’ll use the cone again later. it’s just helpful to have the rim round before adding a handle

10. attach handle. I like to attach them over the seam so as to leave the rest of the mug as smooth as possible for decorating
11. use The Cone again, refine the rim, cover mug with plastic and leave until leather hard

12. trim it, clean it up, etc (here’s one I prepared earlier!)

and here’s your mug!
#ask#asks#pottery#greenware#slab built pottery#slab building#hand built pottery#hand building#gif#tutorial#fairly silly#I’m sure I’m over explaining but whatever that’s what my brain wants rn
99 notes
·
View notes
Text
Secret Admirer
Again, huge shout out to @killingthecringe and @shadowsfascination. I appreciate their patience, their tallent, and their expertise 💜💜💜
--------
With Shadow, Amy has come to realize that no matter where they are, no matter what is happening, there always seems to be flowers.
“Watcha looking at?”
She watches him breath deeply, coming back into himself. Behind them, Sonic and Tails still go over the plan, but the words seem to tumble and fade away as she watches him gesture toward the tree he’s standing under.
“It’s pretty,” Amy walks closer, “What is it?”
“Acacia.”
“What’s it mean?”
She can see Shadow pause before he finally faces her. His ear twitches, his brow furrows. She can’t help but giggle.
“Most plants have meanings and things attached to them, like how a color rose means a type of love, or how chrysanthemums are for mourning. I know a lot of meanings of flowers, but even then, I really only know the ones that grow near home.” Amy toes the dirt, and suddenly, she finds herself unable to look Shadow in the eye, “But I know you like all different kinds of plants, so I figured maybe...”
The silence stretches. Amy bites back a sigh, wondering why she bothered. She looks out across the flat plains of Mazuri and pretends the smell of hot soil and the gentle breeze bending the grasses can overcome the awkwardness she feels welling up inside of her.
She doesn’t know why she keeps trying.
He doesn’t really like to talk anyway.
“Secret affections.”
Amy turns to face him, but Shadow is already walking back towards the others, and she finds herself standing alone under the Acacia tree.
---
She brings him flowers.
She brings him flowers, and she can’t rightly say why. Maybe it’s because she always wanted someone to bring her flowers, or, perhaps, it has something to do with the fact that no matter what, they always seem to be nearby.
“What’s this one?”
Amy watched as Shadow turned just enough to see, his hands still spreading wood chips at the base of a rose bush.
“Muguet.”
“And what’s it mean?”
He sits back, taking her hand in his as he brings the flower closer so as to breathe it in. Her hand tingles where his fingers meet skin.
“Health and prosperity,” he said, almost to himself, “but I’ve also read it means discretion.”
Amy wrinkles her nose. “What a weird thing for a flower to say.”
Shadow just looks at her, and she waves her free hand.
“I mean- like when I give someone flowers, why would I put in there that I’m trying not to say something that would hurt their feelings? Or- why would I give them a flower that says I’m not going to betray their secret?”
She watched as Shadow chewed on the inside of his lip, and it surprised her how hard it was to pull her eyes away when he finally spoke at last.
“Discretion also means the freedom to choose.” He took the bouquet of flowers from her and held them gently in his hands. “And in regards to secrets… perhaps it is more a matter of trust than anything else.”
—--
One day, he shows up at her house with a bouquet of lavender.
It's unprompted. She wasn't even suppose to be home. There he stands though, holding a garden's worth of blooms in his arms as if he was supposed to be there. Strangely enough, it feels right to her, too.
“They’re beautiful,” Amy whispers as she brushes her hands down on her corduroy apron before cradling the flowers. “And they smell amazing. Did you grow these?”
He nods. Amy can feel his eyes on her as she rushes to get a vase. When she places them on the sill of the kitchen bay window, surrounded by dusty cookie cutters and used piping bags, she watches his eyes crinkle around the edges.
“I actually can tell you what these symbolize, you know!” she says with a grin.
The hint of a smile is gone.
Amy laughs. “I know, I keep pestering you about plants, but remember, I did tell you I’m better at the stuff that grows locally.”
She watches as he swallows.
“And what do they mean?”
Amy cocks her head. “Depends on who you ask. I’ve always read that it meant devotion, and I’ve seen them be used in love and protection spells, but-”
“But?”
She’s not sure what it is about his tone, but suddenly, she stalls. His eyes are wide and wild, fixated right on her, and she cannot help but be taken by how brightly they shine in the light of the kitchen.
There’s a flutter in her chest. She realizes she’s giggling and looks away as she coughs instead.
“There’s this weird story claiming that the asp that bit Cleopatra hid under a lavender bush, so some people think it means distrust.”
Shadow scoffs.
“Yeah, I know. I don’t like that story either.”
Amy swears he rocks forward on his heels, as if he were about to step forward, but then, instead, he rocks back.
“What do you prefer to think?”
She hums, turning to take one of the flowers from the vase. “I personally prefer them to symbolize devotion. Their root systems are strong, they can survive in a lot of different environments, and so long as they are given proper care, they’ll never die.”
Amy breaks the stem down, taking the flower and tucking it behind Shadow’s ear. She laughs as it twitches, yet still, for some reason, her hands twist nervously around and around the rest of the stem in her hand.
“You?” She smiles, stepping back again, “What do you think?”
Shadow raises one hand toward the sprig behind his ear. It hovers there before gently touching down, light fingertips brushing the petals.
His eyes never leave hers.
“I, too, prefer the symbolism of devotion.”
Amy’s nervous fingers twist the final knot in the stem running through her fingers, sealing the circle as he smiles.
#shadamy#library#shadamy week 2023#secret admirer#shadow the hedgehog#amy rose#i do love me some language of flowers
40 notes
·
View notes
Text
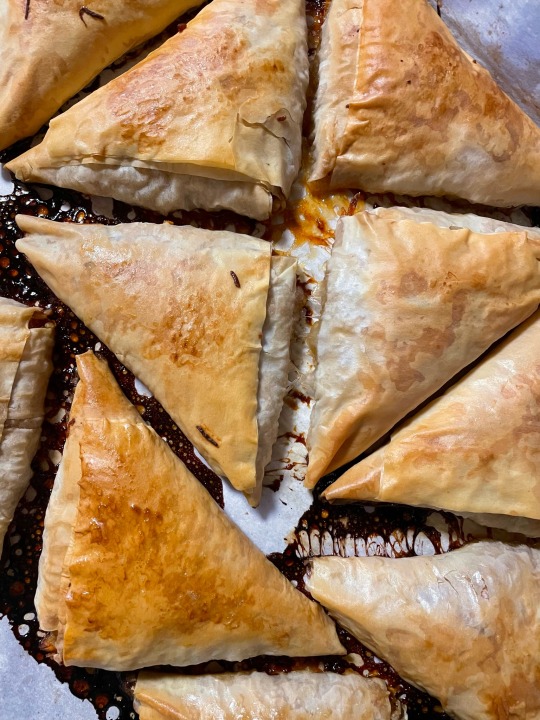
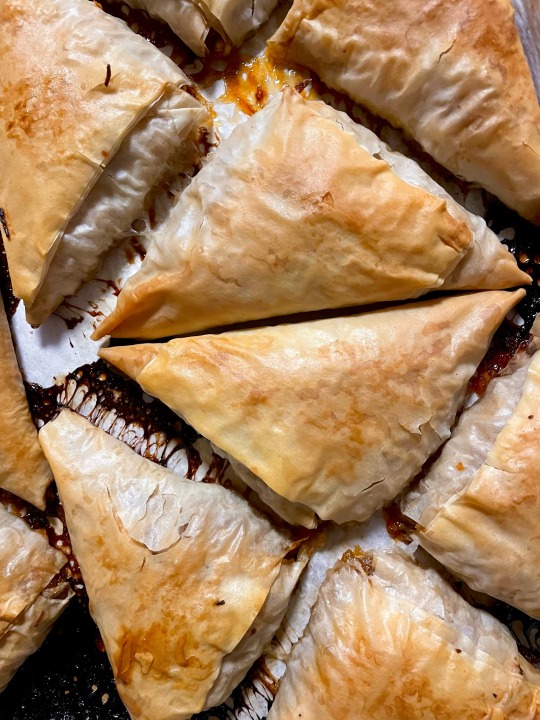
Made κολοκυθόπιτα (Greek pumpkin pies) the other day! I’ll also include a recipe below!
Ingredients
3-4 small food grade whole pumpkins
2 cups sugar (preferably brown sugar)
4 tablespoons honey
½ teaspoon ground cloves
2 teaspoons ground cinnamon
3 tablespoons olive oil
¾ cup rice
phyllo dough
half stick of butter
When you plan to make kolokithopita, you will want to transfer your frozen phyllo dough to the fridge to thaw for a couple hours before taking it out of the package and laying it on the counter with a paper towel lightly misted with water laid on top. The premade frozen stuff is completely fine, I do not in any way implore you to make your own phyllo as it is very time consuming and the premade stuff tastes just as good (but also not stopping you from doing so if you really wanted!). In any case, once you have your phyllo at room temperature, take the rice and soak it in very hot water for 30 minutes. (I usually boil some water in the kettle for tea and then pouring it over the rice, covering it with something so less steam escapes) While waiting, this is a good time to grate the pumpkins to use in your filling (you will want to cut off the stem, peel/cut the skin off, and discard the seeds). You will want about 2-3 pounds of grated pumpkin, and maybe some help, unless you wanted to go for the record of world's fastest pumpkin grater while gaining arms of steel. (The texture of Greek pumpkin pie is different than other pumpkin pies since you have to grate the meat which is why you shouldn’t buy puréed pumpkin. The other thing to note is that you can actually do this with most any squash! Doesn’t have to be pumpkin; zucchini is also a common Greek base for kolokithopita, just to give you more ideas if you wanted to experiment.)
To prepare the filling, mix together the grated pumpkin, sugar, honey, ground clove, ground cinnamon, and olive oil. Drain the rice after it has soaked for 30 minutes, and mix it into this lovely slimy saccharine mixture of autumn-in-a-bowl, setting it aside once the ingredients are combined.
Congratulations, it’s now time to work with the phyllo! Take half a stick of butter and melt it and have it ready on the side. Gently take two to three sheets of phyllo from the stack of dough and lay it on the counter or cutting board. (I usually use three sheets) You will then want to take a food brush and coat the entire side facing up with butter. Once it’s coated take a knife or pizza cutter and cut strips into the phyllo in thirds or fourths if you have the phyllo sheets in horizontal orientation, in half or thirds if you have it in vertical orientation. (The pictures show pies that we did cuts in fourths on the horizontal layout) Go back to your mixture of filling and scoop out a mound of filling that can fit into your cupped palm – it’s always better to be a bit generous with the filling. Gently squeeze out some of the excess liquid and place this filling at the bottom of one of the strips of phyllo and grab the bottom right corner and fold to the opposite side to make what looks like a triangle attached to the rest of the strip. Do this again but now with the corner of that triangle that’s on the left hand side, and bring it up to the opposite end. Keep repeating this fold until you have a triangle shaped pastry that completely encases your filling. This fold can be hard for some people to immediately understand and you might be really slow at it. Don’t worry if it’s a bit wonky, it will still taste fine in the end! Below I have a video that hopefully demonstrates that fold better.
Keep repeating this with new sheets of phyllo (butter, cut, fill, fold… butter, cut, fill, fold…) until you’ve used all your filling or run out of dough. Each completed pie should be set onto a baking tray lined with parchment paper, set about half an inch apart. Before sticking it in the oven, brush the tops of all the pies with the rest of the melted butter, then bake at 375º for 45 minutes - 1 hour, until golden brown. My last caution is to not burn your mouth when inevitably digging in as soon as the timer goes off. Hope you enjoy, ευχαριστώ!
#wanted to post this since a lot of people seemed to like the spanakopita recipe i had that one time#recipe#recipes#greek food#greek baking#greek cooking#greek
134 notes
·
View notes
Text
Steddiemas Day One
December 1st - Deck the Halls
Buying and decorating a tree, decorating the house, hanging lights, mistletoes, holiday display wars, etc.
@steddiemas
Going to do my best to write/draw some fun things for these but this first prompt matched really well with a recent fic of mine If it's Just till St. Patrick's Day
(I understand since it's not *new* it may not get reblogged)
2023 RedLegumes Steddiemas 1 2 3 4 5 6 10 SteddieHolidayDrabbles 1 2 3 4 6 8 9 10
⍋↟⍋⋆꙳•̩❅‧͙❆ ͙͛ ˚₊⋆⍋↟⍋
The end of November crept up sooner than Eddie'd expected. Anyone around and available was invited to go tree cutting with the Byers. It was a whole thing involving saws, a Christmas tree farm, and copious amounts of hot chocolate. Eddie got some cut greenery himself, with the thought that it wouldn’t hurt to have a little solstice spirit.
After what felt like an impossible task, finding a tree that Will, El, and Joyce all liked (Hopper and Max being the indifferent parties), they finally chose one. After all of Max's sass and sarcasm, wandering the hillside for the perfect pine, she and Lucas were elected tree cutters. They both came away sticky with sap and the others promptly stuck crap they found to them. They ended up covered in pine needles, old receipts, and candy bar wrappers much to everyone else's amusement. Hopper, Eddie, and Steve hauled the tree back down to the farm's outpost to be wrapped and strapped to the roof of their SUV.
Eddie knew his arrangement with Steve wasn't one they necessarily wanted to share with the family. It was frankly, a bit more sexual than he wanted to explain. Steve had mentioned something similar on Black Friday. But Eddie had always been flirty with Steve… Stopping now would be suspicious, he thought smugly. So Eddie stayed flirty and found himself rewarded. Passing cocoa, brushing hands, getting tugged back into the trees for chocolatey tasting kisses... Eddie felt full of crackling fire that Steve kept building.
Mature after the cut - Explicit on AO3 ノ¬‿¬ ノ ⋆꙳•̩❅‧͙❆ ͙͛ ˚₊⋆
Steve had driven, and there was an understanding that they were headed back to his place that night. Eddie hopped in the passenger's seat after 'goodbyes' and profuse 'thank yous' to the Byers-Hopper fam for including them. It was a bit of a drive to get back to Hawkins, part of why they had 'carpooled’ together.
When they got on the road again, Eddie began to fiddle with the stereo, and Steve staunchly insisted on no Christmas music until December officially began the next day.
Eddie held his hands up off the console in surrender. "Wasn't gonna baby girl.”
After a long drive with Eddie and Steve approved tunes, they reached Steve's place. He pulled the Beemer into a detached garage not far from what appeared to be the home it belonged to. Eddie followed Steve out of the garage as he closed the door behind them. They used the stairs on the outside of the building to climb up and enter Steve's 'studio' apartment above. Steve entered first and briefly stood awkwardly at the door while Eddie walked in. Looking around, Eddie was just thankful the bathroom had a door. There was a small fridge, stovetop, and microwave with some cabinets along the back wall that counted as the ‘kitchen.’ The sad excuse for a kitchenette very much looked to have been slapped together and attached to that wall as an afterthought. There was no way the small shower/toilet space was up to any sort of building code either.
Eddie looked around, and while Steve appeared to have kept it clean it was… "So fucking ugly."
"Yeah. Apparently the owner finished this space as a room for his son when he was a teen." Steve ran a hand over the plaid wallpaper. "That was in the 80s. Guy left it exactly as his son had it." Steve's smile looked forlorn. "But it was furnished and cheap and wasn't the back of my car. So…" Steve gestured around the space.
Eddie kissed her on the cheek and poked around while Steve took off her boots and jacket. He saw a few femme pieces that hung in the open wardrobe, a couple of tops and way in back what looked like a sundress. Eddie felt as though his heart strings had been directly tugged, and hard at that.
He turned back to look at her, sitting on the bed, watching him. Her hair brushed her shoulders, all bounce and shine. She is such a sun kissed babe… Eddie already thought Steve was beautiful. One hundred percent Earth angel vibes. Now why the fuck am I wandering around when I could be wrapped around her right now? He kicked off his own shoes by the door and shrugged off his coat, onto the floor. Eddie waltzed over, straddled her legs, and sat onto Steve’s lap. He kissed her with the fire burning in him still. The fire they built up that evening from all those small touches out in the crisp, piney air.
Steve worked her hands up under Eddie's shirt and touched all the scars he never did. She worked the shirt off, over his head, and began kissing his chest. She rested her lips against his nipple before pausing and looking back up at him. Big brown eyes through long lashes.
"Christ, baby. What's that look supposed to mean?"
"Mmmm just wondering how sensitive your nipples are. Do you like them played with?"
"Angel, I'll get 'em pierced for you if you like, just don't stop kissing me?" He already ached to have her keep going. Steve batted her eyelashes and licked his nipple. Her tongue was pointed as she played with the hard tip. Circling and practically flicking it. "Fuck," Eddie murmured. It was definitely working for him. Steve seemed to like his response as she lightly sucked it, carefully setting her teeth on his nip to pull back gently. He moaned, and she bucked up against him. So this is turning her on too.
"Can you take me tonight gorgeous," she asked.
"I can try…" Eddie hesitated. He wasn't prepped to bottom, but Steve hadn't seemed to care that much before…
Steve read it on his face. She laid a hand on Eddie’s cheek. “You can go do whatever you think you need, but I don't… um don't worry about being… ah, pristine?"
Eddie giggled and got up off her lap. "I don't think anyone has ever called me pristine, princess. But I'll be back with you in a minute."
He watched her blush deepen when he said princess. She seems to really like the right gendered terms. Good to know. He did a quick clean in Steve's terribly tight bathroom and came back out to see her standing, waiting for him. Nude. She held a condom up.
Eddie bit his lip. "You're negative."
"Yes."
"And I trust you."
"Sounds like a question.” Steve laughed and shook her head. "It's not a problem."
Eddie stared longer at the circular package. "Wait." He walked over to her and relieved her of the prophylactic, tossing it onto the nearby desk. "I want to, bare."
Steve's eyes widened a little as their arms worked around one another. They pulled each other in closely, chest to chest. "I've never been in without one."
"Even girls?"
"Especially girls," Steve chuckled.
Eddie took in a deep breath and pulled out of Steve’s embrace. He began to strip the clothes he still had on. “That's a perk to this whole exclusive hookup deal right? So let's go for it.” Eddie bent over, braced on the bed. “Like this okay?"
Steve’s eyes raked over him, slack jawed. “Uh, yeah. If you’re comfortable?”
Eddie laughed. “I don’t want you to comfort me angel. I want you to fuck me.”
Keep reading on AO3
#steddie#eddie munson#steve harrington#ao3 fanfic#i write things#smut#eventual trans fem steve Harrington#future stevie Harrington#trans fems can be tops is this fics secret agenda#found family#Steve's still hungry#happy ending#stranger things#the whole gang#cuffing season#christmas tree#xmas#winter solstice#christmas tree farm#happy holidays!#steddiemas
9 notes
·
View notes
Text
Ughhhh I’m so frustrated with my job right now
. I have been trying to get them to train me in as a manager for a good few months now with them humming and hawing about “yeah maybe,” and “oh there could be an opening at this location” then promising that I’d be trained on at that location then backpedaling in that. I’ve been shown how to do everything from cashiering, selling animals, Picking orders, animal counts and stock counts, animal maintenance in quarantine and new arrivals rooms, fish care galore and have been shown how to access and prints out any number of papers the pet care staff need along with ordering supplies and have been shown how to go about the safe for change orders for the registers but STILL it feels like their dragging their feat about actually training me on. And NOW corporate decides now is a good time to step on the stores toes even MORE via cutting hours for the staff of which are there for your PARTIME ONLY ACCEPTING BULLSHIT status ANYWAYS!!! I’m sosooooo frustrated over this all it didn’t help that they had 4 other store managers from OUTSIDE locations come to the store today and “help” our location while also tearing into what tiny contributions the rest of my coworkers left about the bagging station to make it feel friendly and livable for us! No cute sketches on display or little doodles by the other coworkers about fish and other pets like now it’s gonna be brick and mortar boring bland bullshit who do they think they are? Why do they think it’s okay to be the way that they are????!!
Not to mention the hellish training we have to go through and the monthly videos what job makes you do monthly videos? Quizzes at the end? I’m frustrated and angry over the feat dragging and the “veg assured” treatment of the animals not to mention the vet we have attached to our store and I can’t leave an actual review because I don’t want to be out of a job but Aaauuggh !!!! Bettas in cups!!! When we have open tanks!!!! Beardies and leopards housed as multiples!!!! Hamsters housed as multiples!!! Selling CONURES of all birds at the prices they are?!!!
Not to mention the PEOPLE you have to deal with there? The regular customers who think it’s all on you? YOU as a member of the STAFF???!! As if we have ANY communication with ANYONE higher than our store manager? Bro I haven’t even talked face to face a full conversation with our LAST district manager!!!! I wouldn’t even KNOW how to get in contact with HR!!! And what if I did? Brought up the complaints who fucking cares? It would be brushed off and ignored like the reviews I see buried under “teehee my ╲╲╲┏╮┏╮╲╲╲╲╲╲╲╲╲ ╲╲╭┛┻┛┻╮╲╲╲╲╲╭━╮ ▅━╯▋┈▋┈┃╲╲╲╲╲╰╮┃ ┣━━━━━╯╰━━━━━╮┃┃ ╰━━━━┓┈┈┈┈┈┈┈┗╯┃ ╲╲╲╲╲┃┏┓┏━┳┳┓┏━╯ ╲╲╲╲╲┗┛┗┛╲┗┛┗┛╲╲ likes it there” five star reviews.
I’m so angry!!! I’m trying so hard I work so hard and I get “maybe here let’s talk about something else” sort of attitude! And I can’t bring it up with anyone because I’ll either get forced to leave or the person I confide in leaves! So many store managers have left and so many of the other managers above me have also left and I’m thinking I might have to too if this doesn’t go through.
How much longer do I wait? How much longer do I tolerate this until I leave? I’m so frustrated!!! Cooly cutter AUGH nonsense- follow the other locations via visuals bull!!! I’m so fricken done but I can’t be done!!!
Someone please help me.
#rant#review#pet fart#that one blue animal store#job review#frustrated#jobseekers#job hunting#management
5 notes
·
View notes
Note
I adore your artstyle! And the little 2D figure you made! May I ask how you made it??
AAwh thank you!!! I'm an armature when it comes to sculpting but I'll do my best to explain my process. Disclaimer: this is my way of sculpting and I do recommend looking at youtube videos by more skilled artist in this profession to get a better idea��:
First you need these tools: Oven baked clay (or air dry clay), foil, aluminum wire of your size/choice, wire cutters, any additional sculpting tools of your choice (I recommend those brushes with rubber tips to smooth places you can't reach), white Gesso paint, paint, & super glue!!
Before you start, make sure you have your idea of what you want to make!! Have a sketch with you or any photo reference you need. If you start with the head I highly recommend to use the foil to make the shape of the head first. Helps you save up clay & keeps your figure light!! Do this same step for the base of the body & limbs!! For the limbs though cut a wire first & then place foil over it. the wire will help hold/attach the limb to the body!! The wire is honestly the best to use if you got little accessories you want your character to hold!! (I used one to stick the mic to 2D's hand). Make a hole in the bottom of the head & then use a wire in place of a neck to attach the base to the head (You can cover up parts of the wire to clay). Make sure you holes & pieces of wire sticking out from each limb to base for attachment as well. Should look something like this :

Smooth any parts you want before sticking it in the oven (or letting it air dry!!) the rest is just painting and patients!! Put 2-3 layers of gesso to make it easier to paint and then glue it all to together once it's done!!!
Hope this helps!! I do apologize, I'm not the best at step by steps!!!
25 notes
·
View notes
Text

A chocolate lover’s recipe for the classic Jewish cookie.
Love Sabra (the Israeli liqueur that tastes like chocolate and orange)? Then this is the hamantaschen for you. Chocolate lovers will love the rich chocolaty dough filled with orange marmalade. These hamentashen are little chocolate-citrus pleasures.
Prep time: 30 minutes
Cook time: 12 minutes
Serves: makes 3 1/2 dozen 3" cookies
INGREDIENTS
3 ¼ cups sifted all-purpose flour
1 ½ cups cocoa powder
2 teaspoons baking powder
¾ cup oil
1 cup white granulated sugar
3 eggs
¼ cup orange juice
¼ teaspoon salt
1 teaspoon vanilla
1 teaspoon orange extract or liquor
Orange Marmalade for filling
PREPARATION
Combine sifted flour, cocoa powder and baking powder in a medium bowl and set aside.
In a mixer fitted with the paddle attachment, blend oil, sugar, and salt starting on low speed, gradually increase speed to high, until creamed. Add eggs one at a time and continue beating until well blended. Reduce speed to low. Add a little bit of the flour to thicken the mixture. Add orange juice slowly, alternating with the rest of the flour and cocoa powder. Add vanilla and orange extract and beat until well combined.
Cover with plastic and refrigerate for at least one hour until firm.
Preheat oven to 375°. Line 2 large sheet pans with parchment paper.
When dough is firm enough to work with, remove from refrigerator on a well floured surface roll out until dough is about ⅛-inch thick. Cut out the dough with a 3-inch round cookie cutter.
Place rounds on prepared sheet pan. Spoon about a tablespoon orange marmalade into the center of the rounds. Fold the dough around the cup to make a triangular shape. You can brush the inside edge of the dough with light egg wash if you want to help keep the sides sticking.
Bake for 10-12 minutes, turning half way through baking.
More Here
17 notes
·
View notes
Note
Hi Nora! I'm kinda obsessed with your clay figurines that I want to give it a try myself!
What tools and material do you use? Do you have any good tutorial or tips you'd recommend?
Thanks in advance and love your art! ✨
Hi! I use "Original Sculpey oven-bake clay" color white.
It's a nice clay that never hardens untill you bake it (you need a specific oven for art use only, dont bake in oven you cook food in! It's toxic) I got some during sales that are like 5y old open and are still good as new.
The clay get soft by kneading with your hands, if it gets too soft i let it rest 10 min.
Need to say that I use this clay for 2 reasons:
1. it was the first "professional" clay i got when I was 15, I honestly only know this clay
2. it never dries out and therefore I can work on it calmly and start over whenever I want.
The other tools are things I got randomly.

various tools to help smooth the surfaces, cut, pierce, and do shapes I could not do with only my fingers (expecially with tiny builds).
cutter, i use it to shape the figure, like I'm carving wood.
After baking i use sand paper to clean everything, the last one i use is an extra fine, the black ones are for fine wood works i think.
brush is for cleaning dust, use a mask when sanding and cleaning.


I also use some silicon molds to help making the shape of the head, love them!
I personally make a little sketch on paper to visualize what I want to make and especially to display the size and proportions I want to have.
I work as with my art with simple shapes like this


I also sketch on them (even when they are not baked) to see if I get the "vibes" right lol
Also use metal wire to get the body and head to attach before baking.
If you need some more info feel free to chat ^^
24 notes
·
View notes
Text
We got to do art stuff today.
In my city we have a event where all the artisans and crafts people open there homes and workshops. People go by car and visit them like a craft scavenger hunt where we can chat and buy stuff directly from them. Today we saw a glassblowing make a ornament which was neat. He had giant glass cheers and apples and pumpkins and hand sized globes, cups and bowls. We got to see a clay studio where they gave us hot chocolate and snacks with beautiful pieces with actual gold on them and various pots. With our third destination being a glass artisan who does things such as glass windows.
She let us practice cutting pieces of glass with various types of cutters which scores a groove as you push it away from you. Then you take these wide pliers with a Red line in the middle, line it up and just press down on the begining of your score which will(if you've done it properly) snap the glass cleanly along the line. Where you then shape it a little more using a sander thing with a sponge(the name escapes me).
Then you line each piece with this copper tape, brush the copper with this chemical then take a sauntering iron and a metal wire to drip and line the lines and attach all the pieces together. It was lots of fun.
My sister made this one.

And I made these two.


Guess what they are down below. Two of them are probably easy to guess. The third might be a bit more difficult.
She gave ys goulash to eat which honestly looks like pasta with meat. It was warm and delicious.
We also learned my mom used to do stained glass. And that my grandma Abu and titi made the stained glass lamp shade that struggles to fit on light bulbs. We knew she'd liked stained glass...just not that she MADE IT. Thank you Salmon, Idaho for thise classes. My third sister knew though.
6 notes
·
View notes
Text
Unwrapping Holiday Cheer on a Budget: 10 Dollar Tree Gift Ideas That Wow
The holidays are a time for joy, togetherness, and... oh no, the gift budget is shrinking faster than a gingerbread house in a rainstorm! Fear not, festive friends, for the Dollar Tree, that magical realm of $1 treasures, is here to sleigh your gifting woes. With aisles brimming with hidden gems and enough creativity to fuel a thousand Pinterest boards, you can score amazing gifts that'll warm hearts without emptying your wallet. So, grab your reusable tote bag (because sustainability!), channel your inner elf, and let's dive into 10 Dollar Tree delights that'll make this holiday season sparkle, even on a shoestring budget.

1. Pamper Me Pretty:
Everyone deserves a little self-care indulgence, and Dollar Tree's beauty section is a treasure trove of pampering picks. Grab a set of glittery bath bombs for a fizzy, fragrant escape, or curate a mini spa kit with silky sleep masks, cucumber eye patches, and aromatherapy shower steamers. Add a touch of luxury with scented hand lotions and bath salts, and don't forget the finishing touch: fuzzy socks and nail polish in festive hues. Wrap it all up in a cute basket or fabric pouch, and voila! A spa day waiting to happen, for under $10!
2. Game On!:
Unleash the inner game enthusiast with a DIY game night box. Fill a decorative box with Dollar Tree's bounty: classic card games like Uno and Phase 10, miniature versions of popular board games, dice for impromptu Yahtzee sessions, and even blank playing cards for endless creativity (think Mad Libs or charades!). Throw in some festive snacks and drinks, and you've got a recipe for laughter-filled evenings all winter long.
3. Movie Magic:
Cinematic escapism awaits on the Dollar Tree shelves! Grab a selection of family-friendly or genre-specific DVDs (horror for the thrill-seekers, rom-coms for the hopeless romantics!), cozy popcorn buckets, and packs of microwaveable movie snacks. Add a plush throw blanket and some twinkle lights for ambiance, and boom! Instant home theater experience, ready to transport your loved ones to faraway lands (or just the couch next door).
Dollar Tree DVDs, popcorn buckets, microwaveable movie snacks, plush throw blanket, and twinkle lights
4. Master Chef in the Making:
For the budding culinary connoisseur, a DIY baking kit is the perfect present. Fill a jar with dry ingredients for a simple cake or cookie mix, layer in sprinkles and icing, and tie it up with a cheerful ribbon. Add a cute spatula or cookie cutter for an extra touch, and attach a recipe card for baking fun. Bonus points for creating personalized labels with the recipient's name and your secret family recipe!
5. Green Thumbs Rejoice!:
Nurture those green thumbs with a DIY terrarium kit. Grab a small glass container, some decorative pebbles, and artificial succulents or air plants (no watering worries!). Add tiny figurines or fairy lights for an enchanting touch, and package it in a decorative box. This low-maintenance plant haven is perfect for office desks or apartment dwellers, and it's a gift that keeps on giving (at least until the air plant needs a spritz!).
Dollar Tree terrarium kit with glass container, decorative pebbles, artificial succulents, air plants, tiny figurines, fairy lights, and decorative box
6. Cozy Comfort Corner:
Snuggle up and read the winter blues away with a cozy reading kit. Fill a basket with plush throws, fuzzy socks, and a selection of books from Dollar Tree's surprisingly diverse literary offerings. Choose classics, contemporary fiction, or even cookbooks for the foodie in your life. Add a cute mug and a bag of hot cocoa mix, and you've got the perfect antidote to a chilly winter day.
7. Craftastic Creations:
Unleash the inner artist with a DIY craft kit. Dollar Tree's craft section is an explosion of colorful possibilities. Grab some blank canvases, paint, and brushes, or get creative with wood crafts, jewelry making kits, or even tie-dye supplies. Throw in some decorative stickers, glitter, and pom-poms for extra pizazz, and let the imaginations run wild! This gift is perfect for kids, adults, and anyone who loves to get their hands messy (in the best way possible!).
8. Teacher's Toolbox of Treasures:
Show your appreciation for the educators in your life with a personalized "Teacher's Toolbox of Treasures." Fill a decorative container with helpful little trinkets and essentials to make their day-to-day lives a little brighter. Think coffee mug warmers, colorful sticky notes, fun pens and markers, even mini staplers. Add a pack of thank-you cards for students to express their gratitude, and throw in a cute stress ball or mini succulent for moments of zen amidst the lesson planning. This thoughtful and practical gift says "thank you" in a hundred different ways.
9. Get Crafty with Cards:
Don't underestimate the power of a handmade card! Dollar Tree's greeting card aisle is a treasure trove of blank cards, colorful tissue paper, stickers, and embellishments. Let the creativity flow: create unique pop-up designs, use glitter and glue to add sparkle, or write heartfelt messages inside. A personalized card shows you put thought and effort into the gift, and it's a keepsake that can be cherished long after the holidays are over.
10. Stocking Stuffers Galore:
No holiday season is complete without the joy of overflowing stockings! Dollar Tree Compass is a stocking stuffer paradise, with options for everyone. Grab festive candy canes and chocolates, tiny trinkets and toys, fun socks and hair accessories. For the tech-savvy, consider mini phone chargers or earbuds. For the bookworms, bookmarks and small notebooks are perfect. Don't forget the practical picks: hand warmers, lip balm, even mini first-aid kits. Mix and match with creativity, and let the stockings overflow with holiday cheer, all for a fraction of the cost.
Remember, the true magic of Dollar Tree gifts lies in the thoughtfulness and personalization. Take the time to choose items that your loved ones will truly appreciate, and don't be afraid to get creative. Add a handwritten note, wrap it in festive paper (Dollar Tree has that too!), and watch your budget-friendly gifts spark joy and laughter this holiday season. So, spread the cheer, embrace the magic of the $1, and let Dollar Tree help you weave unforgettable holiday memories, one treasure at a time.
Bonus Tip: Get the whole family involved! Make Dollar Tree shopping a treasure hunt, have kids pick out gifts for their friends and teachers, and let everyone's creativity run wild. Who knows, you might just discover some hidden talents and create holiday memories that will last a lifetime.
Happy gifting, and happy holidays!
2 notes
·
View notes
Text
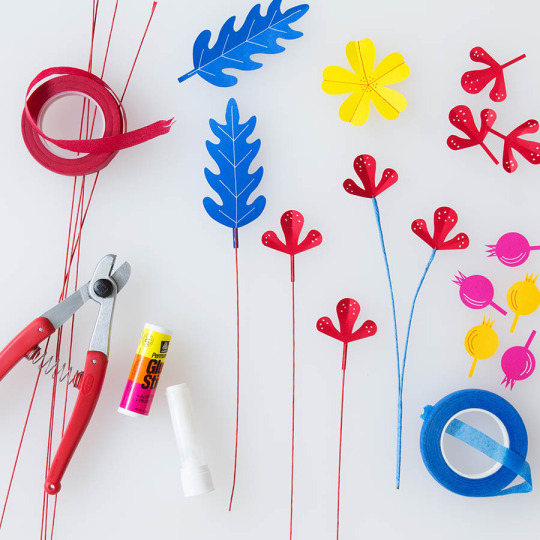
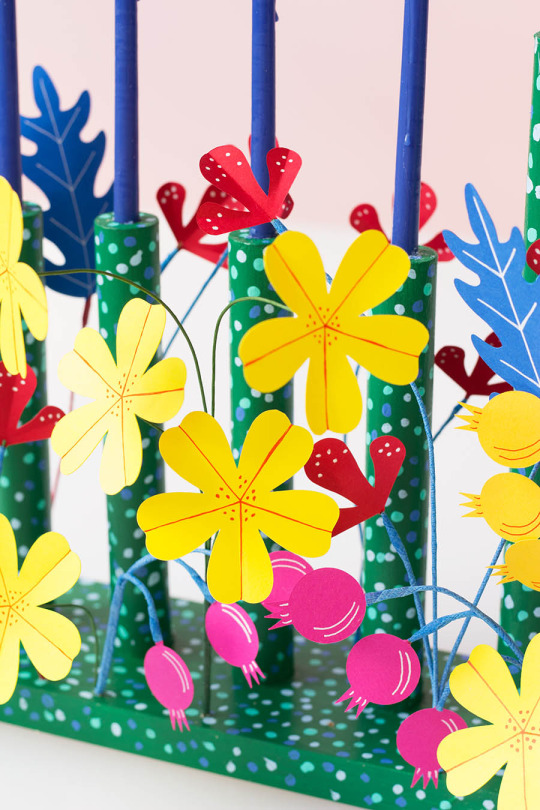
Josef Frank Inspired Menorah

Project by David Stark:
Chanukah is most often a blue and white affair, sometimes with a little silver thrown in, sometimes a little gold. But in ruminating on the holiday, we couldn’t help but ask ourselves: “Why does it need to be?”
Now, we know that the bold, floral prints of Josef Frank are, perhaps, not the most likely of Chanukah inspirations, but that’s exactly the point. We turned to a pattern we love entitled, “Vegetable Tree” as inspiration for this vibrant menorah – the perfect pop of color as we move into the darker winter months! We chose colored papers and floral shapes influenced by the motifs and palettes found in the print and are thrilled to share this how-to with you!

We opted to make our menorah base. But, it would be equally as charming to use a classic menorah you already own and wrap the wire stems around it. Or, pick up an affordable one and paint it! (Thank you to Just Scandinavian for loaning us this great Josef Frank fabric!) ––David Stark
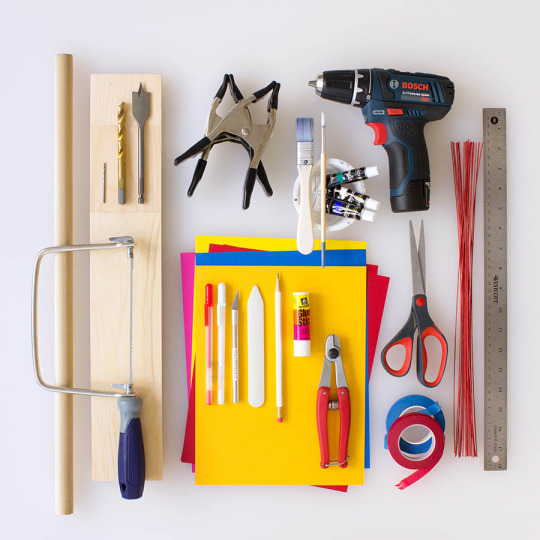
SUPPLIES
1” x 4” wood board (cut to 20”)
Coping saw (or other hand saw) and clamps
Two 1” dowel rods (either 36” or 48” long)
Drill with 1”, 3/8”, and 1/16” drill bits
Ruler and pencil
Acrylic paint and paint brushes
Red and white gel pens
Scissors and craft knife
Permanent glue stick or hot glue gun
Wire cutters
Bone folder
20-gauge straight wire (any color)
Various colors floral tape (we used: red, green, blue)
Various colors cover-weight paper (we used: red, hot pink, yellow, orange, blue)
Chanukah candles or LED candles
Craft cutter machine (optional)
PDF template (Link to download in Step 1 below)
INSTRUCTIONS
Step 1
Download the PDF template.
Using your ruler, find the center of the wood board and measure nine 2” intervals along that center line. Using your drill with the 1” drill bit, drill approximately ¼” deep holes at each mark. Use clamps to secure the board in place if needed.

Step 2
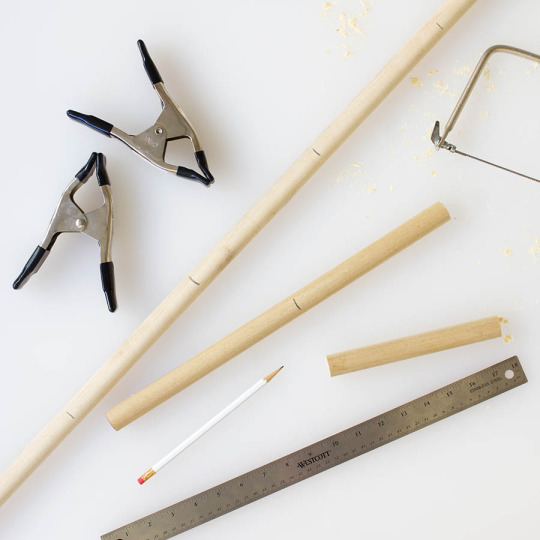
Using your ruler, measure eight 7” and one 9.5” lengths of dowel. Use your saw to cut each piece, being sure to cut as straight as possible. Use clamps to secure the dowels in place if needed.
Step 3
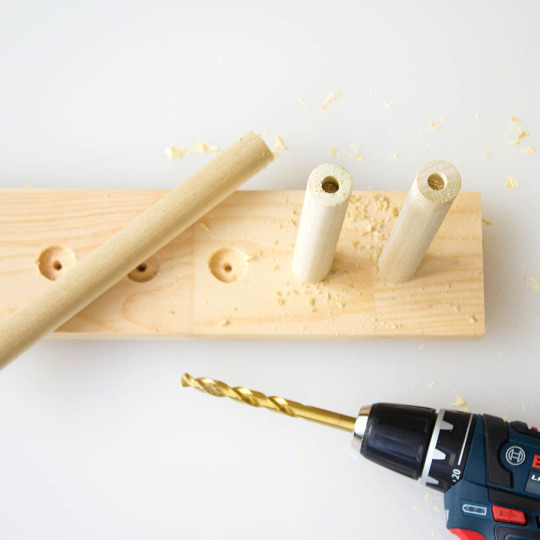
Assemble the menorah base by placing four 7” dowels at each end and the 9.5” dowel in the center. You may need to twist the dowels to secure them in place. Next, using your drill with the 3/8” drill bit, drill approximately ¼” deep holes on the end of each dowel. (3/8” is the width of our Chanukah candles, check yours before you begin and drill the appropriate size holes.)
Step 4
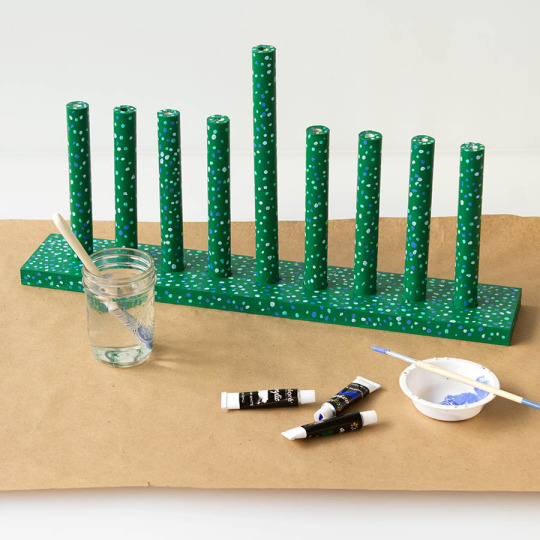
Paint your menorah! We painted a base color of dark green and added pale blue, turquoise, and grey dots. Allow the paint to dry fully.
Step 5
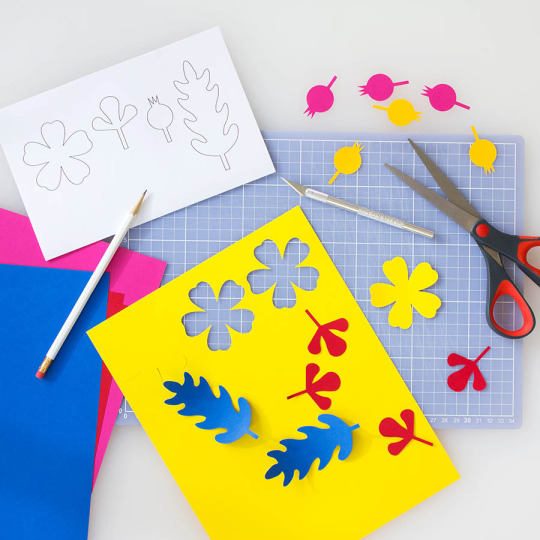
Use the template provided to cut out multiples of each shape. Or, use the SVG file to cut using a craft cutter.
Step 6
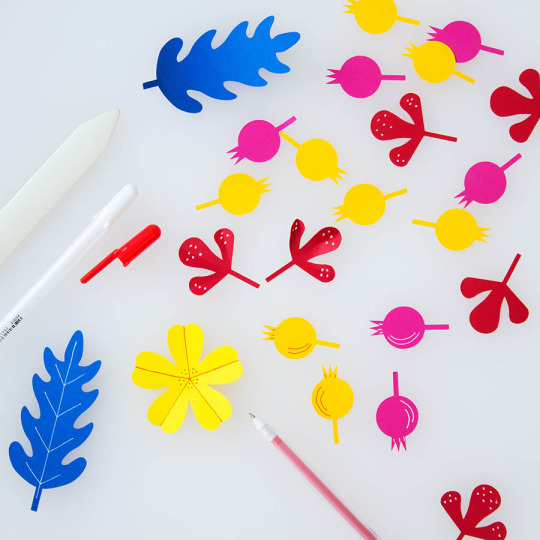
Using the red and white gel pens, add decorative details to the shapes and fold down the center or along each petal using a bone folder to press the crease.
Step 7
Apply a heavy layer of glue stick (or a line of hot glue) to the tab portion of each shape and press the wire into the glue. Once dry, cover the connection and the remaining length of wire with floral tape, occasionally attaching the wire stems together. For the yellow flowers, bend the wire and attach to the back of the flowers with hot glue.
Step 8

Using your drill with the 1/16” drill bit, drill holes into the menorah base and insert the wire stems into the holes. If you are using a menorah you already own, simply wrap the wires around it. We opted to keep our flowers low and pulled away from the candles. Be mindful of this when you are assembling. Dripped wax will not alight paper, but be cautious of the flames. We recommend if you are using this menorah with small children in the house, to use LED candles.


3 notes
·
View notes
Text
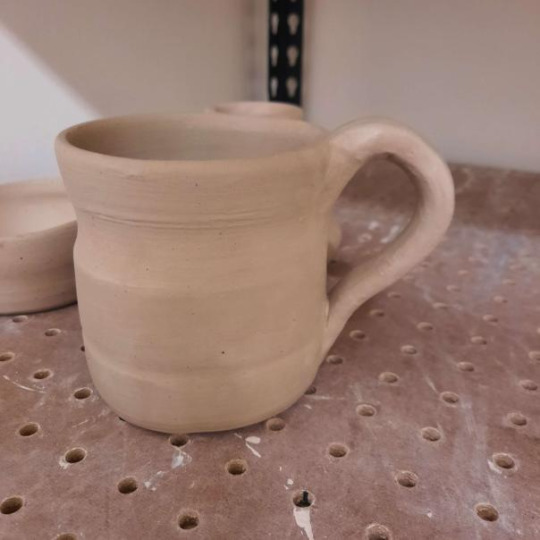

Really happy with how last night's ceramics class went - I've got a couple of other pieces ready to be bisque fired as well (you can just see them in the background), but I'm particularly pleased with these three.
The mug was my first try attaching a handle to a piece - I feel pretty confident that it's on there securely, but I'm a little worried that the handle needed to dry a little more before attaching to keep it from slumping while it waits to be fired. But, regardless of final handle shape, I'm going to have a mug I made myself!
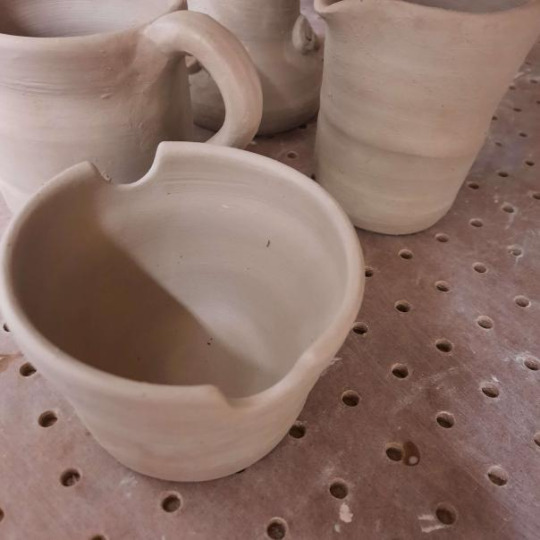
The pitcher started off as trying to make a tall mug, but I hit the top rim just as I was taking it off the wheel, so I leaned into it and made the wonky bit of the rim into a pour spout. I'm very proud of myself on this one for remembering to line the handle up with the spout, and I think I got the consistency of the clay a little better to keep the shape while it dries.
The last piece is going to be a new water dish for painting - I've made it bottom-heavy to be more stable than the jam jar I usually use, and I cut into the rim to create a built-in brush rest. I'm not sure which I'm more pleased with - that I got the placement and height of the cutouts aligned, or that I remembered to hold a sponge on the other side of the rim so that I didn't end up accidentally shoving the cutter into my hand.
Hoping they turn out well in the bisque firing (there's also a small dish I'm going to paint up as a 'new cat' present for my mom, but it's a fairly plain shape - I'm focusing more on the decoration for that one)
4 notes
·
View notes
Text
what women may do — marco + euphemia.
location. effie’s apartment in chinatown. | time. seven-thirty p.m. | for. marco ricci.

“Before you do anything, try this and tell me what you think.”
It was too easy with him, too easy to smile and surrender to this facsimile of domesticity. an illusion with no definite lines in the sand, no strings attached. That was what she wanted right? Except she was violating her own accord. Guilty of treasonous thoughts of some shared cookie cutter future that neither of them currently wanted, let alone were ready for.
It was too easy standing in front of the stove with a spoon in her hand like it was an extension of her arm, stirring a method around in the sizzling cheese sneaking out the sides of the bread. She was made for this, the care, the softness that she hadn’t allowed herself to feel after separating from her husband —— she was perfectly fine alone, but the last seven years had been a wonder to come back to actual home with someone she loved dearly waiting for her. Now she had made a friend of another man —— and a lover of him as well; all the pleasures without the consequences ( and so if there was a peace huddled into the cusp of her sternum, then that was surely the cause —— and not the feather-breath brush of lips up her exposed neck ). “I may not be a hot shot chef like you, but I’m no fucking slouch okay —— I got this.” She shrugged into the wedging of the spatula turning beneath the crisped-golden edge of the bread to push it onto the other side. It was all brilliant, butter-gleaming along with the cheddar tilting toward that melting ooze that strung between teeth and tasted and felt like comfort.
There was no hint of black in the brown; the half of the bun casing the simplicity and perfection of a grilled cheese sandwich done right was all bronzed, brushed from end to end with the right amount of coating. Euphemia nudged the edge of it, testing the give of the filling, noting the soggy corners still pressed flat to the warm part of the skillet. “My sister taught me this when she used to take care of me since I hated our nannies and would raise all kinds of hell —— anyway, she’s always been a perfectionist and even when it came to grilled cheese she absolutely dominated. Till this day it’s been my lifelong comfort meal.”

9 notes
·
View notes
Last Seen Blogs


