#cc making tutorials
Explore tagged Tumblr posts
Visit Tumblr Blog
Explore Tumblr blogs with no restrictions, modern design and the best experience.
Last Seen Tumblr Blogs


Fun Fact
Tumblr has 16.74 million mobile monthly users in the US.
Text
youtube
Well here's another tutorial, on how i make my shadow maps using gimp. Closed caption available!
Edit 22-03-2025: This was made using gimp 2.XXX. Im not sure exactly which one but, the later 2.XXX versions are pretty much the same.
14 notes
·
View notes
Text

A child of war, a fallen leader of the nation and a mysterious check-taker. What they gonna do?
(Click for better quality!)
Also version without text cus i still liked it

#dream smp#dsmp#dreamwastaken#tommyinnit#wilbur soot#of course all c! not cc!#artists on tumblr#digital art#wonderful scary lighting#:) hehe#will waited 12 years to came back i waited 3 years to draw this#also please#this is just art of my favorite charasters#lets not bring drama here#pretty please#also! if you see that it have troubles with quality no u not#i just figuring out how to make it look good give me time(and tutorials)
189 notes
·
View notes
Text
tips for 4t3 converters/CAS clothing creators
3 main things:
non-recolorable presets
DDS. settings
Adult to Teen conversions
disclaimer: i'm not a CC expert, but these are things i've noticed and learned these last couple months converting cc. special thanks to thornowl and the other converters in the TS3 Creators Cave discord.
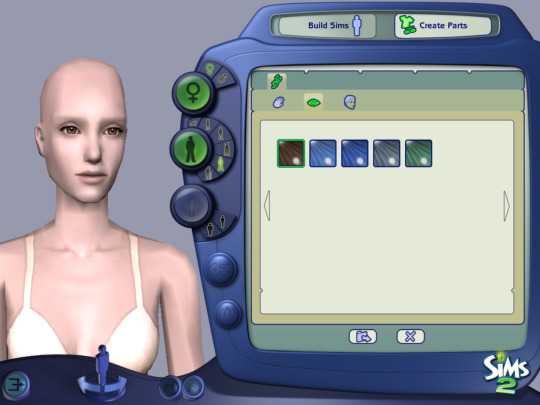
Non-recolorable presets:
we obviously know that ts4 lacks a CASt tool, so ts4 creators rely on recolors. In my conversions, I do include a couple of the item's recolors. these usually are patterns that CASt does not have.
one thing I've noticed more and more converters doing is putting such item recolors in the 'Overlay' tab in TSRW.
let me show you what that looks like for a non-recolorable preset:
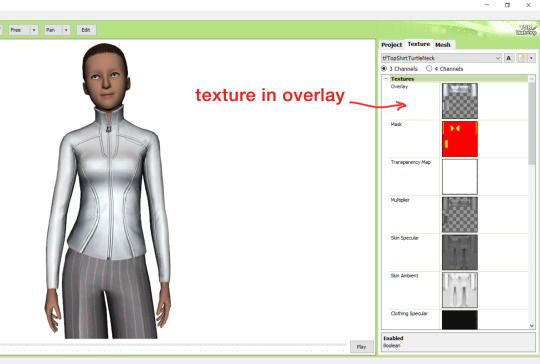
it looks over-saturated, and almost crunchy. but there's another place you can import the recolor into: stencils.
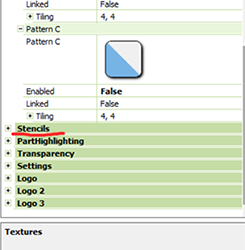
stencils will be found at the bottom, under patterns. hit the plus sign next to stencils to open it.
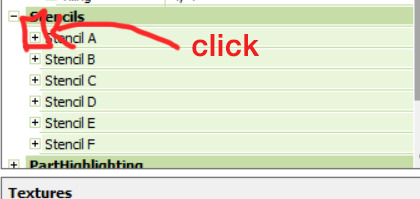
opening it will show you this:
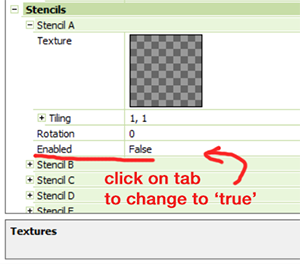
by default, it will be enabled as false. import your recolor into the texture tab as you would do for any other texture tab. make sure you tick the 'false' to 'true.' stencils override overlays, so if you want to use an overlay, enable stencils back to 'false.'
here's what the recolor imported into stencils looks like:

here's the two side by side:
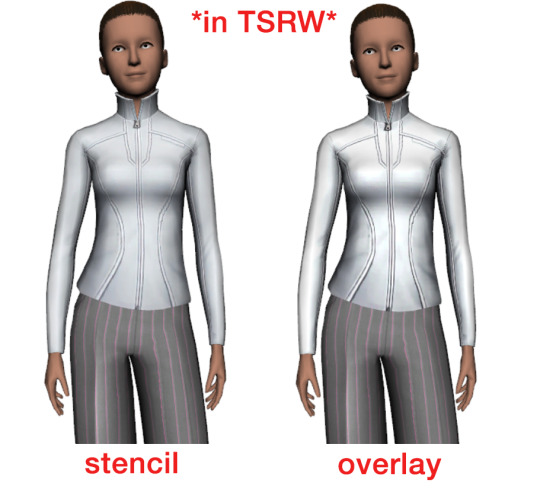
see how different they are? let's see how they are in game:
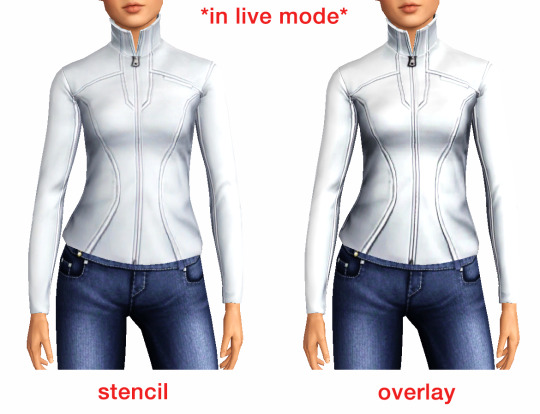
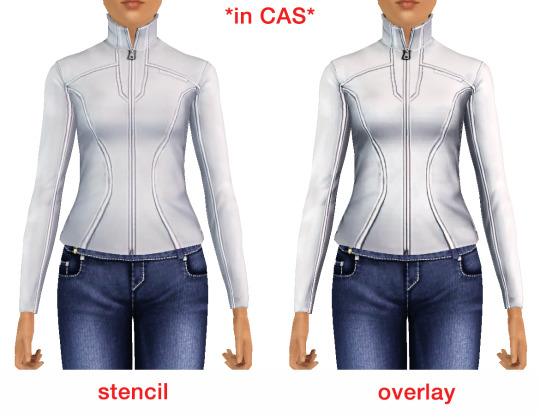
click on the pictures to really see the difference in quality. since TS3 uses DDS. format, it compresses the texture, which results in the crunchy texture. importing the recolor into the overlay tab makes the DDS. compression more noticeable. it ultimately is up to you and whichever one you prefer, but do keep it in mind.
the overlay tab is good for small details that you want to maintain on all recolorable presets, like zippers, buttons, tags, etc. just look at EA clothes for reference, especially their shoes and male clothes.
another thing you can see from the images are the bumps on the mesh. doing normal maps can help you keep those same details on the recolorable presets without importing the recolors.
-----------------
DDS. settings:
something I also see and used to do myself is bloat package files with large file sizes, specifically normal and specular maps, as well as masks. the Sims 3 Tutorial Hub provides a link to plain maps, but the file sizes are unnecessarily big.
let's look at some of EA's maps in TSRW:
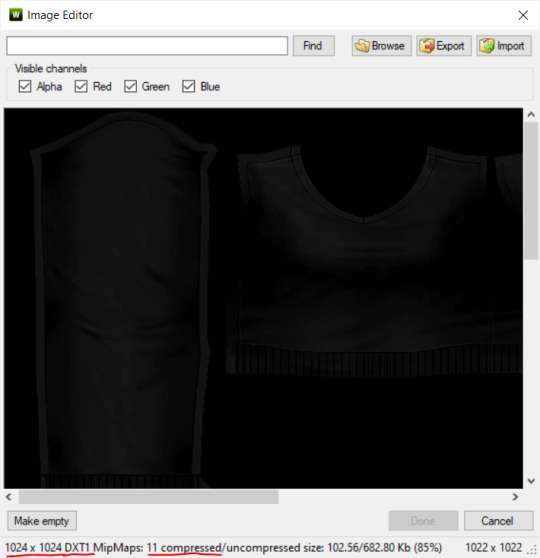
here's the specular from one of the basegame sweaters. notice the image size, DXT format, and compression size.
a lot of converters don't want the shine on regular clothes, so we use a plain, black specular map. but ask yourself, why do you need a 1024 x 1024 purely black specular map with no details?
let's try sizing it down:
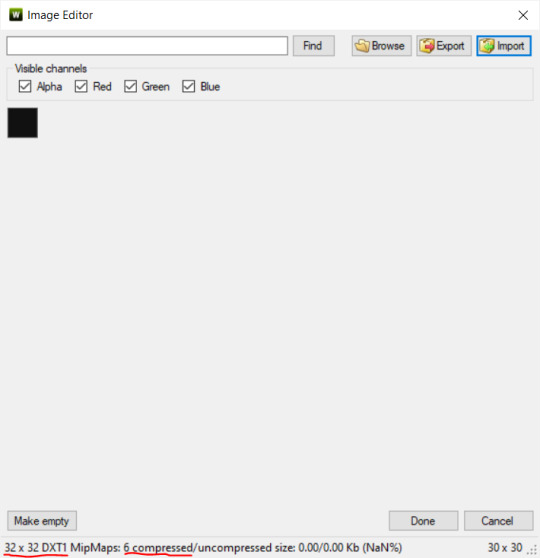
notice the difference between the image and compression size. instead of bloating the package file, we can keep it down by using a 32x32 plain black specular map instead, since there aren't details we want from the specular map.
same goes for normal maps:
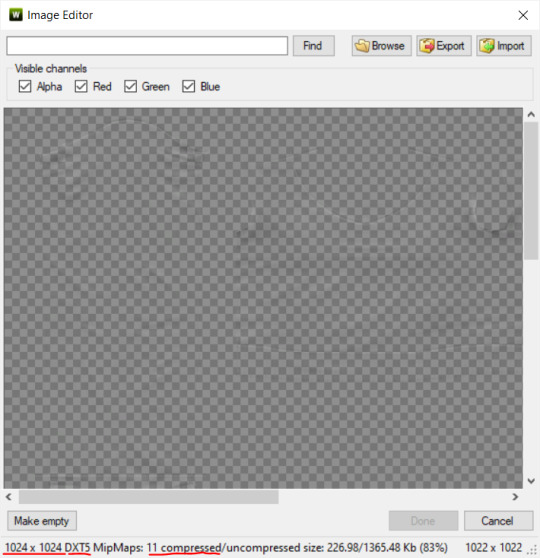
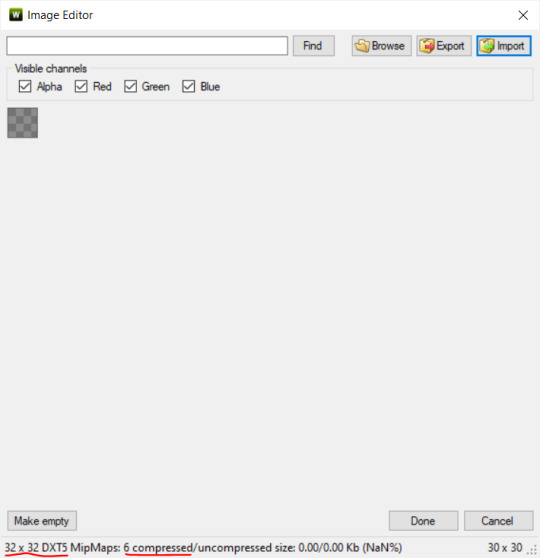
and masks (meant for 1 channel only):

now, notice how I underlined the info about DXT MipMaps. see how the normal map has a different number there compared to the specular map and mask.
the reason these textures use different DXT is because of the colors and alpha channel.
here's how my DDS. settings appear when saving:
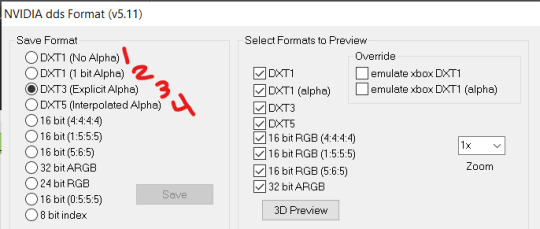
DXT1 (no alpha): this keeps only the 3 color channels and has the strongest compression. it results in half the file size as DXT3/5. 3 channel masks should be saved with this, as they don't need an alpha channel.
DXT1 (1 bit alpha): this includes an alpha, but only black or white. it also results in half the file size as DXT3/5.
DXT3: this one is rarely used for TS3 textures. it really is only used for overlays. it compresses the same as DXT5, but may not be the best for images with smooth-blended alpha regions (Neely).
DXT5: multipliers and normal (bump) maps should only EVER be saved with this. it's best for colors but has a larger file size. this is why it's important to reduce the multiplier and normal map image size, especially if you don't make a normal map.
if you DO decide to do a specular and normal map, they should be regular image size, 1024x1024, and saved in the right format.
here is more information on which textures should use which compression.
-----------------
Adult to Teen Conversions:
the default for converters is obviously AF and AM. a lot of people want the items for teens too. I've seen several converters just enable it in TSRW:
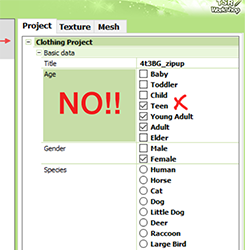
please don't do this. it's honestly the lazy route. you can hardly ever get away this, specifically because of the body differences between adult and teen.
some major issues with this include gaps, seams, and unnatural body characteristics:
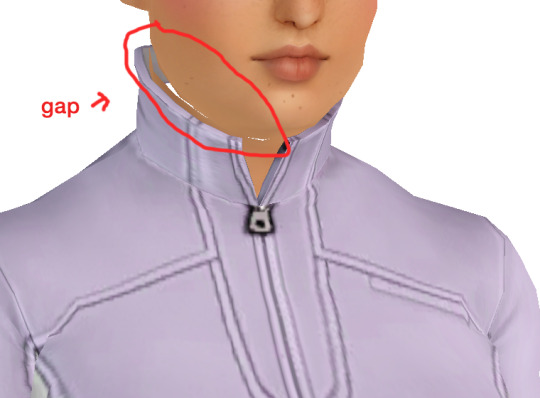
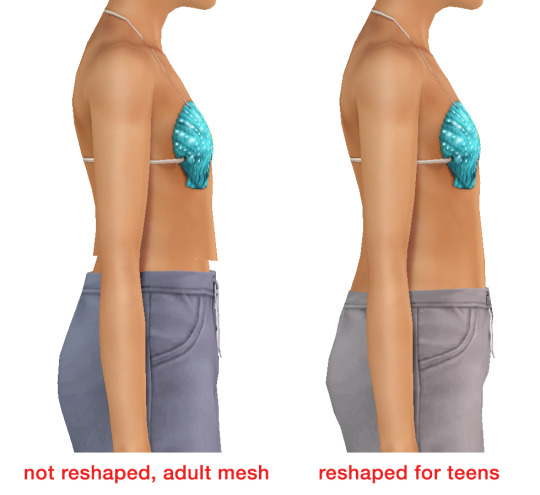
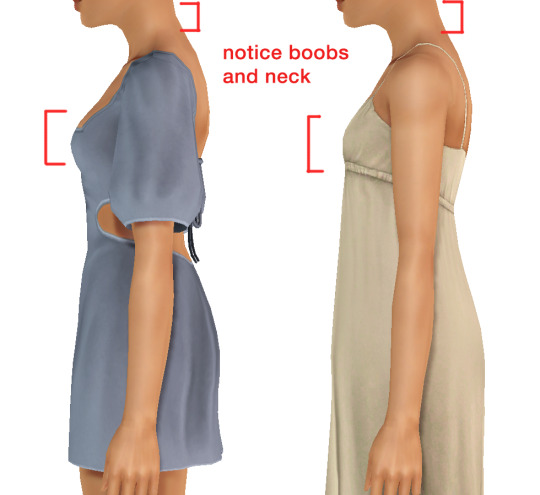
so please, either skip the teen mesh entirely or spend the time reshaping the mesh. @/sweetdevil-sims has a great tutorial on converting meshes from AF to TF here. the inevitable seams on TF meshes are also now fixed, thanks to @/thornowl with their new version of mesh toolkit.
@pis3update
---------------
here are reduced file sizes and corrected settings of the plain mask, specular, and normal:
download
Sources:
Neely, G. ‘Buckaroo’. Working with DDS/DXT Files. Available at: https://www.buckarooshangar.com/flightgear/tut_dds.html (Accessed: 28 May 2024).
181 notes
·
View notes
Text

📗 The Sims 4 Flawless Posters Tutorial | Beginner Friendly
READ ON PATREON (FREE)
This is basically a comprehensive tutorial on making flawless posters. I know a lot of simmers start their modding journey with custom paintings and it can feel a bit overwhelming at first.
But don't worry, I'm here to make everything crystal clear and show you just how easy it really is. With just a little guidance, anyone can create amazing CC right from the start! So, if you’ve always wanted to make posters for The Sims 4 but didn't know how, this is your chance! 😊
I would love to hear your feedback on this tutorial! And feel free to share it with other simmers to help them create perfect posters as well!
#sims 4#sims 4 mods#sims 4 cc#ts4 cc#sims 4 sexy#sims 4 wall art#sims 4 wall decor#sims 4 aesthetic#sims 4 interior decor#sims 4 custom content#sims 4 creator#sims 4 decor#the sims 4#ts4#ts4cc#sims 4 download#sims 4 cute#ts4 deco cc#ts4 decor#simblr#sims 4 tutorial#ts4 tutorial#sims 4 how to make posters#sims 4 poster tutorial#sims 4 painting tutorial#cc tutorial#making posters is easy lol (it really is!)
78 notes
·
View notes
Text
I dunno who the hell is paywalling sims 4 cc making tutorials now but i hope they never have a good nights sleep ever again
What is this gate keepy behavior thats disgusting
#i've been contemplating for a while to make written tutorials for everything i know simply because i struggled for so long with#shitty video Tutorials of people claiming to teach but going -#um i'll just speed through the most important step okay- I've actually cried before because of this shit#i dont know much about making cc i still have no idea how to make specific things like shoes but i want to share what i know atleast#FOR FREE
25 notes
·
View notes
Text
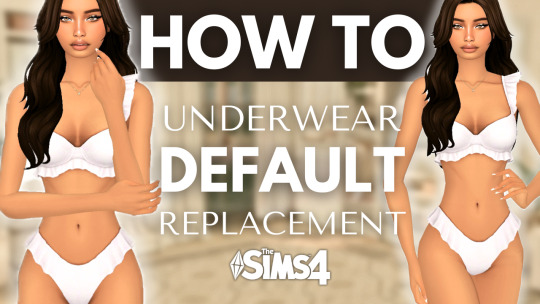
How to create Underwear Default Replacement from ANY CC | Sims 4 CAS | (Also for WW!)
Hello, my loves! ☁️🍸 In today's video, I'll be guiding you through a step-by-step tutorial on creating a Sims 4 underwear default replacement. Get ready to follow along as we customize and personalize your game like never before! Let’s dive in! ✨
You can watch the video here: [x]
I am using examples from @sentate and @bbygyal123 🤍
#the sims 4#sims 4#the sims#sims 4 mods#sims 4 cc#sims 4 custom content#sims 4 maxis match#sims 4 best cc#sims 4 cc finds#sims 4 cc haul#how to make underwear default replacement#underwear cc#how to underwear cc#sims 4 tutorial#sims 4 video#sims 4 youtube
23 notes
·
View notes
Text
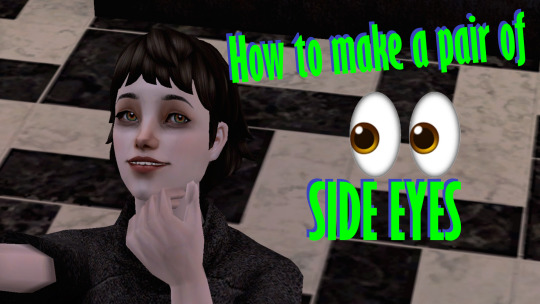
A quick tutorial for something you might never need, but might be interested in: side eyes!
What the heck are those?
A pair of 'side eyes' is, effectively, a pair of 'contacts' your sims can wear. They will cover the eyes that they have only cosmetically. And they aren't even a new thing either!

fkn enormous gif sweet jesus
They are super easy to make, so you might as well know how to do it, in case you need them!
A pair of side eyes will make any sim wearing them look as if they are quite literally, "👀"
You can of course, get a sim to do this with any number of poseboxes that contain face gestures (here's one for example)
But, what if you wanted just the 👀 look, layered on top of whatever other motions/face gestures your sim already had?
That's where a pair of side eyes comes in.

They are very useful for preview pictures and storytelling.
IDK what else you would use them for, but that's what I use them for.
Let's go!
~~~~~~~~~~~~~~~~~~~~~~~~~~~~~~~~~~~~~~~~~~~~~~~~~~~~~~~~~

open yer bodyshop
Unless you've already extracted your eye texture, you will need to grab that. Most likely, you will be making your side eyes from your defaults. Mine are these.
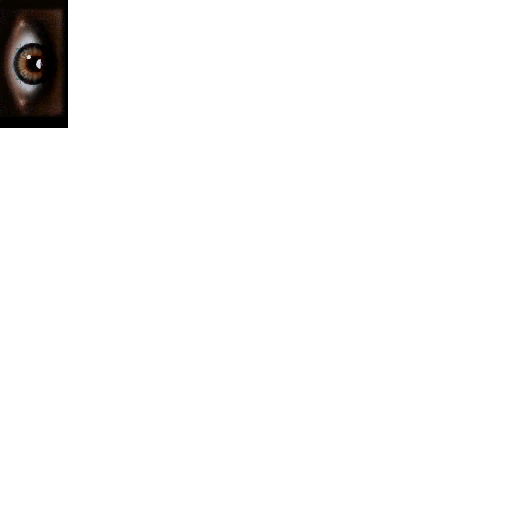
this is the eye texture
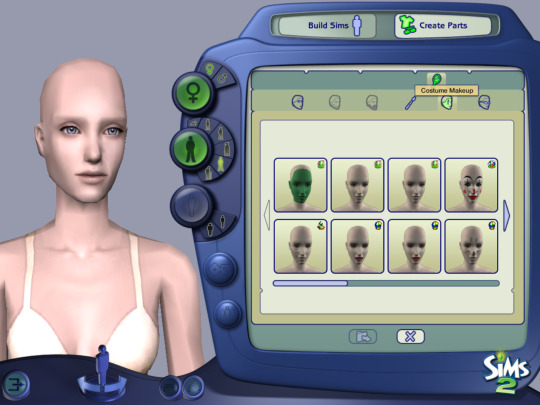
You could make your side eyes as costume makeup. If you don't ever make CC yourself, a personal use pair of side eyes as costume makeup should work for you just fine.
Costume makeup wears over any other makeup your sim is wearing.

HOWEVER, I like to use mine as a blush. Specifically, a multi-layerable blush. If you want to do that too, just make sure you make your side eyes multi-layerable.
But as far as effectiveness goes, costume makeup or multi-layerable blush work exactly the same.

Pick your poison and extract the project
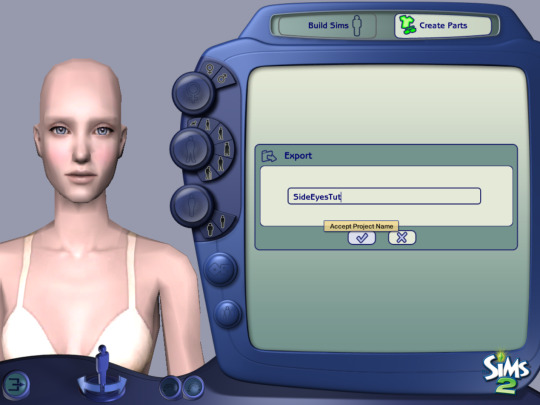
Name it

Now that we have a project package, we have some files to look at
The SWATCH
The TEXTURE
and the ALPHA
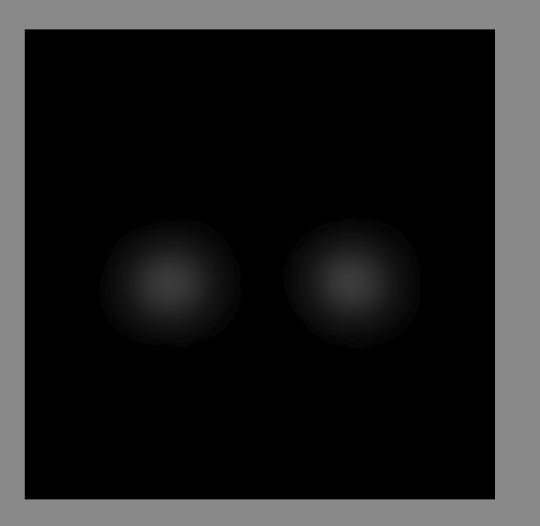
This is what my alpha looks like.
When it comes to the UVmapping of a TS2 face, the eyes are mapped in the upper left corner. So, we will need to change this alpha to reflect that
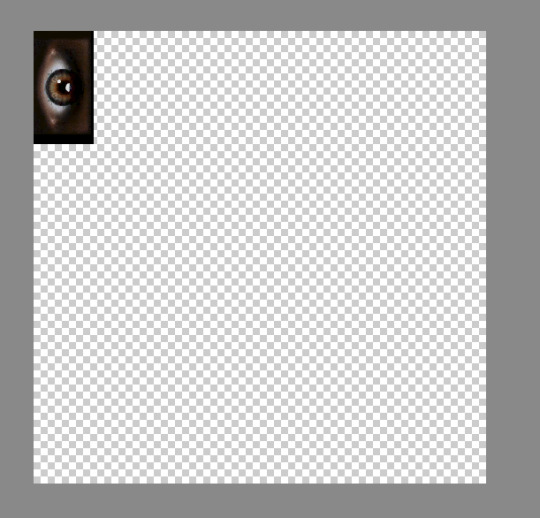
This is the texture for the eyes. See how it's in the upper left corner like I mentioned?
Make that black and white (white for yes texture, black for no texture) and BOOM. Save.

This is our blush texture

Copy and paste the eye texture on it and save
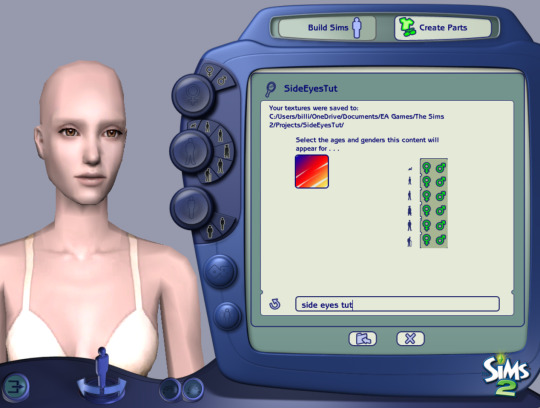
Look! You have basically made a pair of contacts. Also a useful thing to know if you need to do that.
We want them to look 👀 however

We are going to take that eye texture and move it UP ^^^
Not a lot! 3 clicks, maybe 5. Whatever you feel gives you a result you like

A little or a lot! The choice is yours fack why is this gif so dang big

And there! A pair of side eyes for you.


And some action shots to showcase how they work.
I hope you find this helpful!
21 notes
·
View notes
Text
guys milkshape is really scary. is anyone else scared. are there any 4t2 conversion tutorials that work for versions of blender 3.0+
#i’m fighting for my life. all of the menu options have changed and i cannot get this hair to export with the materials#making sims 2 cc is fun because every tutorial has screenshots of programs that haven’t looked Like That since 2008#and now no one is making new tutorials bc everyone already knows how to make cc!!!!!!!!!!#i fear i may have just got here too late. it’s over for me and i’m not gonna make it. unless someone has a tutorial i can follow please god#spirit box
10 notes
·
View notes
Text

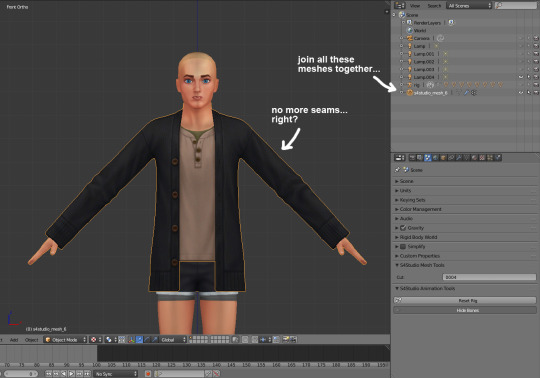
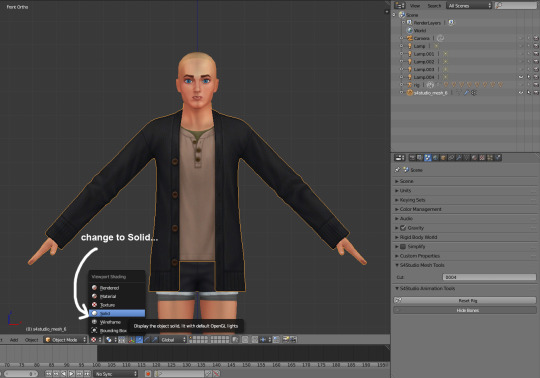

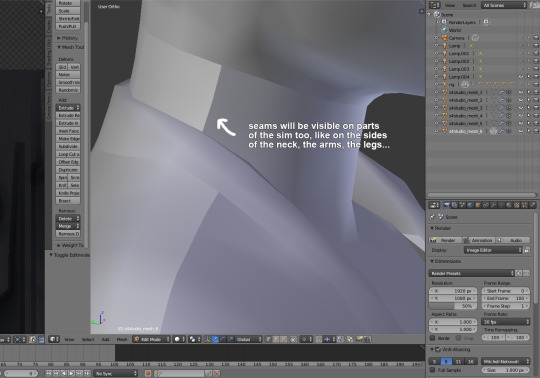

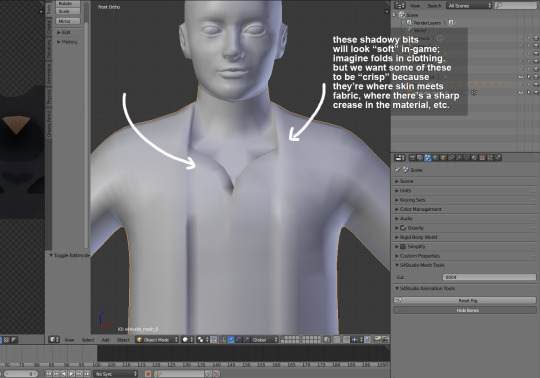
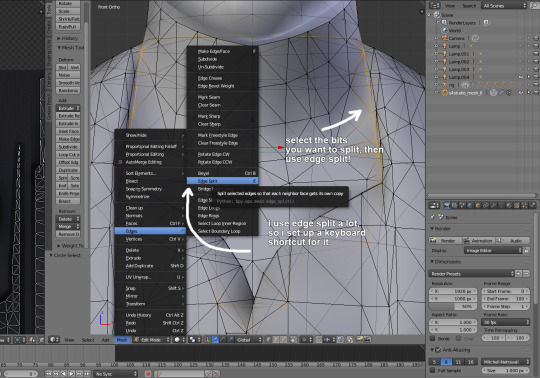

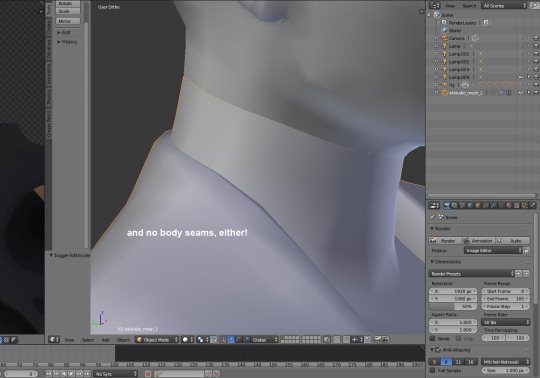
i've been making custom content for almost a year now, so i thought it might be helpful to start sharing little things i've learned to do in blender! i created this step-by-step guide on how to remove seams from a maxis mesh and how to edge split parts of meshes which should appear "crisp." i think they really help to make custom content look neater in-game.
you don't need to do this if you're making recolors, but if you export the mesh from sims 4 studio (i.e. to make something from a pack base game compatible), these seams will appear.
i hope this is helpful for others who are starting off editing maxis meshes themselves! 💪💪
#let me know if this is like. an obvious tip. lol#i never saw it in tutorials so i thought i would share :3c#oh god i have to think of a new tag.#tips and tutorials#there. descriptive.#also this assumes that you know a lot of blender basics.. if anyone is interested in like a toe to tip ''how i make cc'' thing i can do tha
102 notes
·
View notes
Text
learned that uv_1 map is affected by in game sliders so i was able to fix this hair piece by learning how transfer vertex weights and now the hair is able to work on my fat sims without any distortions…so happy 🙏🏾🙏🏾

#if i didn’t figure this out i would have had to get rid of this curl that literally makes the hair omg#but…#there was no way i was gonna settle for less and make a hair that doesn’t even work on my sims which are 99% fat#therefore i think cc creators that never continuously learn how to make their craft/meshes better are fatphobic assholes!!!#y’all don’t bother to sit down and look at a fucking tutorial but steady wanna profit from your incompetence 🤔🫵🏾#i thought it was weights that was fucking up so i was transferring and deleting weights but that wasn’t helping until i learned otherwise 😭#also found a shit ton of other tutorials that i need to learn and incorporate into my work 🙏🏾#🪐 speaking
14 notes
·
View notes
Text
The other post was getting long, and this is a different sword, so here you go:

I actually fucking finished a mesh edit!!!!! Well, at least the meshing part. This thing has parts from three different sword meshes. Tomorrow it's on to texturing hell. I've never textured anything before in my LIFE, and I just know it's going to be miserable, lmao.
Especially since I assume I'm going to have to make a new uv map and I don't know shit about that. But I at the very least need a texture for renders, and this sword is low-poly enough that I could probably make it an in-game accessory too.
#morrigan.txt#wip#blender wip#in case anyone is curious: the blade is from natalia auditore's alucard sword. the cross guard is a shorter/wider version of part of the#crossguard from moriel's diego sword (which is actually wolf's rapier mesh) and the hilt is also from there.#the loop is from tinkle's rapier build/buy object from their pirate cc set. But I made it skinnier and longer iirc.#if I could I would gladly use the existing textures for the blade and hilt but idk if I can do that.#I'm gonna have to go searching for tutorials to find out how to deal with UV maps.#the only uv stuff I've done is converting build/buy objects to cas accessories which doesn't really count bc I wasn't changing the mesh.#I don't think I could share this publicly unfortunately. I would be breaking all three of the og creators' TOUs.#but ofc that assumes I can ever actually finish this lmao.#I'm gonna try tomorrow tho!!#this might end up being sigmar's sword for the seven of swords edit??#maybe.#it's simple but I like it.#sorry I haven't posted any actual sims content in a few days. I've been hyperfocusing on these fucking swords lmao.#I've learned a lot about blender though which is a plus lmao.#fingers crossed I can get this into s4s without having to update my game. bc I made it in 3.3.6 but apparently I need 3.6??#and hopefully the version of s4s I have is compatible with 3.6 cause last time I tried to import something from 3.3 it gave me an error.#so if it's not compatible with either then I'm fucked lmao.#and I really don't wanna have to update my game for this.#oh well. at least I can make blender edits without needing to get it in-game.
9 notes
·
View notes
Text


I want to learn to make cc but everything I want to make into cc looks challenging af for a beginner lol
#I really want to make the second one mainly for the rainbow heart chain#Shit is so cute#ramblings#I almost considered commissioning someone but like I already don't pay for cc#And I feel like making it myself would be Moore rewarding LOL#Idk how I'm going to go about this though#Tutorials are confusing especially since I'd want it to be an original mesh#Not an edit
5 notes
·
View notes
Text
gods i wish i knew how to blender properly i have this hat i made that i really wish i could put in the sims 4 but i couldnt figure out anything other than forming the hat and ultimately gave up
#didnt help i tried going for a cat hat instead of a regular hat#except i had to have royally fucked something up because i couldnt figure out how to do the depth map or whatever it was either#the blue and red thing#and then the texture didnt work and i couldnt get the thing imported with s4s and it was a disaster#ts4#the sims 4 cc#WAIT#I MENTIONED THE BLENDER INCIDENT BEFORE???#WHEN WAS THAT#yknow it also doesnt help when all the beginner tutorials dont make sense to me nor are they the right version of blender#☼︎ rants#i suppose this is a rant#☼ rants in the tags
4 notes
·
View notes
Text
Whenever i look at trials of navigator i always wonder what it feels like for new player who are unaware of like 50% of the map/boss mechanics
#one time my friend failed is3 run because he didn't know that hitting the flagpole sarkaz would wake up all the sleeping sarkaz#sometimes i wonder if arknights need to make every event mechanic tutorial easy to access#i know it is pointless when intermezzi/side story exist but there are events which can't be accessed yet and players are also limited on#how many sidestory that can be unlocked each week#on the other hand#it will only allow hypergryph to make some degenerate map that combines multiple map mechanics because now they are under assumption#that most player know about some of those#oh lets not forget that the only way to learn about OD map mechanic is through the annihilation map#and old cc map which both can only be accessed on certain time#and this mechanic was later used in is4
7 notes
·
View notes
Text
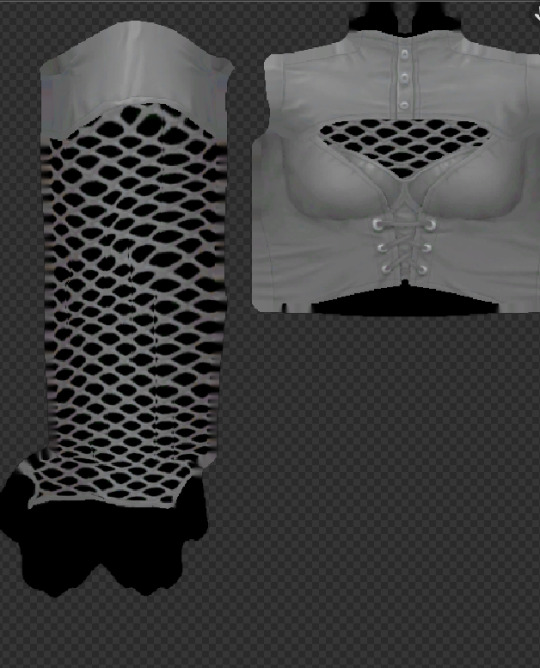
TIL that what was making my bake textures get all wonky on arms and legs was, guess what, the version of blender I was using 🫠
This is how it gets on blender 3.6, it looks like it has some "cuts" on the texture and the dumbass me would go to PS to fix it:
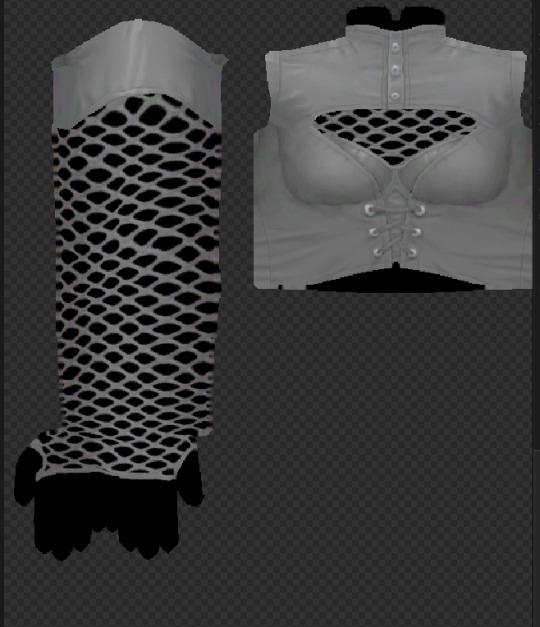
And this is the blender 2.79 counterpart, with the same bake setup. The net still looks kinda distorted in the image but it looks fine in the mesh and that's what it matters!
Btw, I came to this finding while I'm writing a translation to the thornowl bake tutorial, since I've always used blender 3.0 and forward I thought that it just did that to arms and legs.
6 notes
·
View notes
Text

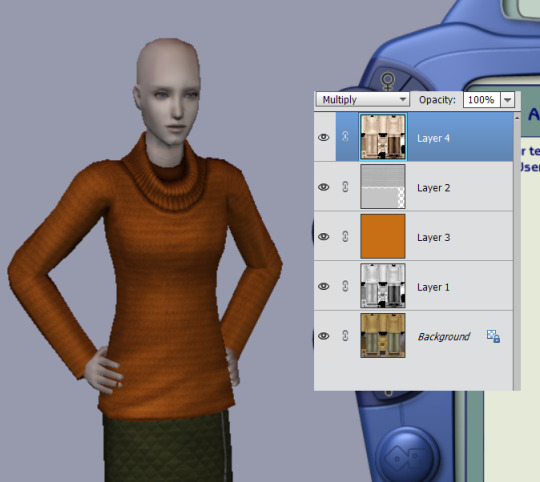
Little tips and trick thing?
If you are retexturing/recoloring and you're looking to make an orange or yellow color, try layering a beige/light brown texture on top instead of grey. On the left - a grey base texture, Multiply, 100%
On the right - @pooklet's Volatile on my base texture, Multiply, 100%
Helps your yellowy and orangey colors not look as pewp?
#cc making discussions#idk i like orange but it i don't like it when it looks like caca#sims 2 tutorial
66 notes
·
View notes