#ts4cc tutorials
Explore tagged Tumblr posts
Visit Tumblr Blog
Explore Tumblr blogs with no restrictions, modern design and the best experience.
Last Seen Tumblr Blogs


Fun Fact
Total funding amounts to $125.3M.
Text
youtube
Well here's another tutorial, on how i make my shadow maps using gimp. Closed caption available!
Edit 22-03-2025: This was made using gimp 2.XXX. Im not sure exactly which one but, the later 2.XXX versions are pretty much the same.
14 notes
·
View notes
Text
Since the new eyelash update is here, I'm gonna teach you how to convert old eyelash cc into the new eyelash option!
First of all, we will need the Sims 4 Studio. The download link can be found here: https://sims4studio.com/board/6/download-sims-studio-open-version
Now, head into the app and click the "My Projects" button on the main menu.

Open the eyelash file (.package file) you want to convert. I'll just pick a random one for reference. Once you picked the one you want, hit open.
You will be directed into the studio, which will look like this:

Now on the right side of the screen, find the CATEGORIES button and click on it.

Once there, change the OUTFIT TYPE to MASK DETAIL EYELASHES and APPLY TO ALL SWATCHES. Save the file, and the .package file will be updated in your game. Also, make sure to double check in-game before continuing with your other custom content.

As you can see in my game, It worked! Hopefully it works for all of you, too.

And that's about it. Thanks for reading all the way.
And by the way, If you're going to distribute these publicly without the original creators consent, just don't do it. This is meant for private use only or for content creators who want to convert their eyelashes into the new eyelash section.
EDIT: As trillyke has said, This does not work with eyelashes in the glasses section as they will collide with rings and most of the accessories
#sims-4-custom-content#ts4#thesims4#customcontent#ts4cc#the sims 4 cc#the sims 4 custom content#tutorial#the sims 4#the sims community#the sims cc#sims#sims 4#simblr
4K notes
·
View notes
Text

IF YOU CAN'T ENABLE CC 🌸
Sul sul ^^
After today updates, I wasn't able to enable CC again. It doesn't matter how many times I closed and launched the game.
So I remembered that this had already happened to me before.
If you're going through the same problem, this is how you can fix it:
🌸🌸🌸🌸🌸🌸🌸🌸
HOW TO ENABLE CC AGAIN:
1- On the game home page, in the bottom right corner of the screen, you can see what the current game version is. After today's update, mine was: 1.108.318.1020. Launch the game and check the number that appears for you.
2- In your game folder (Documents>Electronic Arts> The Sims 4) you'll find a file called "GameVersion". There will be a number.
The number in that file has to match the current game version number.
When I opened mine, it was "1.107.151.1020". So I just updated it to "1.108.318.1020" and saved. Then when I launched the game I could enable CC again.
Note 1: There's a "space" before the number in "GameVersion" (as if it were a paragraph). Keep that space. Change the numbers exactly where they are.
Note 2: If you prefer, before changing the number, make a backup copy of "GameVersion" just in case. It won't harm your game, but it's better, just to prevent and make it safer.
💎 If you want a tutorial video, I made one about it some time ago. You can watch it here :)
🌸🌸🌸🌸🌸🌸🌸🌸
ALSO IMPORTANT AFTER UPDATES:
Remember to delete "localthumbcache". You can find the tutorial here.
🌸🌸🌸🌸🌸🌸🌸🌸
I'm currently checking my CC to see if they're still working.
If anything, I'll let you know :)
I hope it helps you if you're having any problems :)
Happy Simming ^^
3K notes
·
View notes
Text


Shop Sign Wall Lights - UPDATED 15 May 2025
I put together a few sets of shop sign wall lights. But there are instructions. I kept some swatches as a default white color so that you could pick which color you want the light to be while in live mode. This saved on the file size of the package file because the more textures a file has, the more bloated the file size is.
I had some fun with some shop names although I mainly included generic titles in both English and Simlish.
DOWNLOAD for FREE: SFS
OR at Patreon*
*You must be over 18 to access my Patreon page.
INSTRUCTIONS ON CHANGING LIGHT COLORS
Once you place the light in build mode, then go to live mode. Click on the light and you will get the following pie menu.

Select SET COLOR AND INTENSITY and then choose THIS LIGHT. The color options will then appear so you can select which color you want.

If you use the name signs along with the Awning Lights, make sure to place the name on top of the awning so when you select the color picker, the correct sign changes colors. The other option is to place the name separate from the awning, go to live mode and change the color, then go back to build mode and add the awning light you want.
Enable the bb.moveobjects on cheat and then you can make adjustments to location and size of objects. You can adjust the position of the light on the wall by depressing the Alt key while placing the sign (on PC). You can adjust the size of the item by depressing the Shift key and either [ (for smaller) or ] (for bigger) (on PC).
CREDITS
Awning Shop Lights - 19 swatches of various awning wall lights. 18 are pre-colored and one is white so you can change the color yourself in game.
Candy Shop Lights - 20 swatches
Pottery Shop Lights - 25 swatches
Tattoo Shop Lights - 21 swatches
Enjoy!
Creations by SexyIrish7
These cc objects are new 3d meshes created using Blender and Sims 4 Studio.
Polygon Count: 6
All CC have:
*Ability to search catalog using search terms: sexyirish7 and si7
*Customized thumbnail
*******
CREDITS:
Software credits:
Sims 4 Studio v. 3.2.4.1 (Star): https://sims4studio.com
Blender 4.0: https://www.blender.org/download/
GIMP v. 2.10.34: https://www.gimp.org/
Inkscape v. 1.2: https://inkscape.org/
Thank you to the creators and moderators producing tutorials and answering questions!
*******
Model and Image credits:
Mesh created by me.
Simlish font credit to Franzilla: https://modthesims.info/
Image credits:
Awning Lights Image credits: Modified image from Adobe Stock
Candy Shop Image credits:
Swatches 1-3: Image by pch.vector on Freepik https://www.freepik.com/free-vector/christmas-candies-symbols-set-neon-style_11241813.htm#fromView=search&page=1&position=26&uuid=8b541325-0e62-4e37-9468-6bacd30f8963&query=neon+lollipop+candy
Swatches 4-8: Image by gstudioimagen on Freepik https://www.freepik.com/free-vector/sweet-candy-neon-seamless-pattern_5595774.htm#fromView=search&page=2&position=30&uuid=e2259de5-014d-4d04-af87-1198ee0f35e2&query=%40gstudioimagen+neon
https://www.freepik.com/free-vector/sweet-candy-neon-seamless-pattern_5595775.htm#fromView=search&page=1&position=27&uuid=e2259de5-014d-4d04-af87-1198ee0f35e2&query=%40gstudioimagen+neon
Swatches 9-10: Image by openclipart.org https://all-free-download.com/free-vector/download/peppermint_candy_clip_art_13182.html
https://all-free-download.com/free-vector/download/round_candy_with_stick_card_on_pink_background_6823183.html
Swatch 11: Image by All-free-download.com https://all-free-download.com/free-vector/download/round_candy_with_stick_card_on_pink_background_6823183.html
Swatches 12: Image by katemangostar on Freepik https://www.freepik.com/free-vector/ice-cream-cart-neon-sign_3238564.htm#fromView=search&page=8&position=42&uuid=2f82b4d1-5ca8-449c-ae22-4573861ebcb0&query=neon+sign+retail
Pottery Shop Image credits:
Swatch 1: Crafting icons created by andinur - Flaticon https://www.flaticon.com/free-icon/pottery_17392031
Swatch 2: Image by katemangostar via Freepik https://www.freepik.com/free-vector/aquarius-neon-sign_5561944.htm#fromView=search&page=2&position=5&uuid=c55e5e21-0550-46f0-b9be-cfa85ff38796&query=Ceramic+Neon
Swatch 3-4: Pottery icons created by Smashicons - Flaticon https://www.flaticon.com/free-icon/vase_3760867
https://www.flaticon.com/free-icon/vase_3760970
Swatch 5: Icon by istar_design_bureau via Freepik https://www.freepik.com/icon/pottery_1958438#fromView=search&page=2&position=20&uuid=096084ae-13fe-429c-a419-e6e13ccd37b9
Swatch 6:Icons by Eucalyp - Flaticon https://www.flaticon.com/free-icon/pottery_6552610
Swatch 7: Icon by berkahicon via Freepik https://www.freepik.com/icon/spin_13785816#fromView=search&page=2&position=0&uuid=096084ae-13fe-429c-a419-e6e13ccd37b9
Swatches 8-11: Icons by Freepik https://www.freepik.com/icon/pottery_8540816#fromView=search&page=3&position=43&uuid=096084ae-13fe-429c-a419-e6e13ccd37b9
https://www.flaticon.com/free-icon/machine_9200546
https://www.flaticon.com/free-icon/vase_8838322
https://www.flaticon.com/free-icon/pottery_3305262
Tattoo Shop Image credits:
Swatch 1: Modified Image by katemangostar on Freepik https://www.freepik.com/free-vector/tattoo-salon-neon-text-with-tattoo-machine-neon-sign-night-bright-advertisement_2438198.htm?log-in=email
Swatch 2: Image by Nippy Custom https://www.nippycustom.com/products/tattoo-neon-sign
Swatches 3-5: Image by bohlam via Vecteezy https://www.vecteezy.com/vector-art/2185717-tattoo-studio-neon-signs-style-text-vector
https://www.vecteezy.com/vector-art/34210463-neon-sign-tattoo-studio-with-brick-wall-background-vector
*******
TOU:
Do not re-upload and claim as your own
Do not re-upload and hide behind a paywall
*******
Changelog:
15.05.2025
*Updated swatches for compatibility with slotted signs.
*Added wall deco slot so that signs can be stacked on slotted signs for Awning Signs
*Added swatches with inverted images for Candy, Pottery, and Tattoo Shop Signs.
#the sims 4 cc#ts4cc#sims 4 cc#the sims 4#wall decor#sims 4#ts4#lights#wall lights#signs#shop signs#retail#pottery#ceramics#tattoo#ink#candy#lollipop#sweets#sugar#light tutorial#sexyirish7#updated cc#featured
304 notes
·
View notes
Text

Sims 4 Mod Folder Organizer + Icon DLL (Downloadable Folder Template Included!)
Hey Simmers! 💛
I’m excited to share something a little different today — not new custom content (CC), but a downloadable folder setup and icon system to help you organize all the Sims 4 CC and mods you already have.
✨ What’s Included
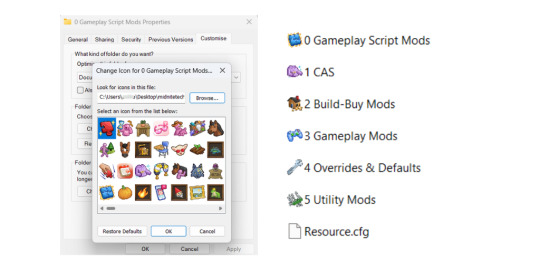
✅ A clean, pre-built folder template to keep your Mods folder tidy and script-friendly ✅ A custom-made icon DLL file with over 900 Sims 4 folder icons, so you can apply cute, matching icons to each folder on your computer (Windows) ✅ A detailed guide on organizing, troubleshooting, and clear instructions
💡 Important: This is NOT CC or Gameplay Mods!
You’re not downloading any Sims 4 content itself — this is just an external tool to help you organize your existing CC and mods on your computer more easily.
📁 Folder Template Categories
The folder template includes suggested categories like:
CAS Mods
Build/Buy Mods
Script Mods
Utilities
Gameplay Mods
Visual & UI Tweaks
…and more! You can adjust or expand them however you like to fit your own collection.
🛠 How to Use
1️⃣ Download and unzip the folder template. 2️⃣ Move your existing CC and mods into the matching folders. 3️⃣ Use the included .dll to apply cute folder icons (Windows only). 4️⃣ Keep your Mods folder cleaner, easier to manage, and easier to update!

⚠ Reminder The .dll file doesn’t go inside your Sims 4 Mods folder or into the game — it’s used outside the game on your computer folders, like your Sims 4 Mods folder or any other folders you want to decorate.
You can store the .dll anywhere on your computer — but if you move or delete it later, the folder icons you’ve applied will stop displaying. So be sure to keep it in a permanent, safe location.
✅ The download also includes a detailed guide with:
Step-by-step instructions for applying the folder icons using the .dll
A troubleshooting section if anything isn’t working as expected
Tips and recommendations for organizing your custom content (CC) and mods for easier management
📥 Note on Downloading
When you download the folder template and .dll, make sure to extract the zip to a new, separate folder — I recommend creating a fresh folder just for this setup. That way, you can organize your mods and CC cleanly without accidentally mixing the template folders into your existing Mods folder. Once you’ve organized everything, you can move your files into your actual Sims 4 Mods folder as needed.
Thank you so much for supporting me — I hope this helps you keep your Sims 4 setup tidy and stress-free. 💛
PATREON (✅ (free for all members)
115 notes
·
View notes
Text

(ts4) cc making testing guide
we've been making cc for a longg time and figured it would be good to share how we test our own cc and make sure it works for as many sims as possible! the guide will be based on a loose understanding already of s4s.

remove the original shadow, specular, and normal maps!!! a lot of the base items you start on do have their own speculars (what makes it shiny), shadow maps (false shadows to make it look better), and normal maps (extra details outside the plain texture). very rarely those will work exactly with what new item you're making, so be sure to REMOVE them! double triple check that they're empty by clicking "Make Blank" in s4s. if your mesh is shiny even after removing the specular and there's already no normal, you need to upload just a blank 1024x2048 png to it to remove the shininess.
having weight transfer issues? try subdivision! sometimes when using "nearest vertex" weight transfers your CC can well.. goof up in CAS and be reallyyy spiky. those are the vertices that have screwed weights and smoothing out the weight transfer by subdividing it will help tremendously. subdividing will just double the amount of poly you have - imagine you're folding a piece of paper. your UV is small if you just fold your paper 4 times thus not much room for morphing wiggle room in your weights. fold that paper 16 times? that's a lot more coverage and wiggle room for morphs!
test on multiple sims - maxis defaults, cc presets, skintones, etc! more the merrier! just remember that everyone's sim is not like the standard female/male sim bases a lot of cc making is done on. you'll want to check how it looks on larger sims, different skintones (not just white to tan!), the opposite body frames, even on CC presets to see how well the weights are working. not everyone uses the same CC, so take it as a bouncing off point on what needs to be adjusted to work as best as possible. not everything is going to work perfectly! there's a lot of different mods that can make extreme changes you just can't account for if you're going for a general audience. it also helps to load different sims to try your CC on. sometimes you get a red herring where it works on the first sim you load up! all of the sudden everyone loads it up and it's not working at all. that's just ts4 for you, so watch out!
update your CC's tags! go through each and every category of your package to make sure it aligns to what it even is! make sure it appears in the right outfit category, not meant for kids, whether it should be on in the shower or not, and TAKE THAT ALLOW FOR RANDOM TICK OFF! not everyone knows how to use s4s and shouldn't be expected to go through all their CC to fix the tags so it works properly for your game
don't just stand there, make them walk! a lot of CC can look perfectly fine on a still model, but you can find a LOT of issues just by loading a walk cycle in CAS to see if there's any weight issues, clipping, or anything really odd that shouldn't be happening. people who use CC in their gameplay will be having their sims walk, talk, sit, and animate, so be sure they're just not gonna flash everybody or got some polygons stuck in their teeth!
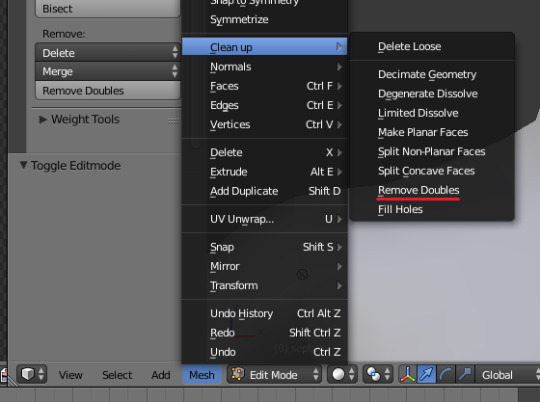
exporting a s4s mesh? let's clean it up! for some reason when you export a s4s mesh, there will be extra polygons that can easily be removed in blender. in this tutorial, we'll be using 2.7. this really helps on high poly meshes and remove any conflicting UVs that can make clipping issues.
we hope that helps! this is based on our private guide for people who test our own CC, which you should definitely try to reach out to others to test it out. each computer is unique and something can pop up you wouldn't ever come across - it doesn't hurt to try work out all the kinks before publishing! if you need some more help or starting point, we even have our own resource pack that has great references and items that will make your process go easier. good luck to your CC making journey <3
96 notes
·
View notes
Text
youtube
♡ How to move Eyelash CC to new Eyelash category in 30 seconds ♡
It's super simple to move all of your existing eyelash CC to the new category in CAS using Sims 4 Studio ♡ྀི ₊
#sims 4#ts4#ts4cc#the sims community#ts4ccfinds#ts4 lookbook#sims lookbook#ts4 hair#ts4 maxis match#the sims 4#ts4 cas#ts4 simblr#ts4 gameplay#ts4 legacy#ts4 screenshots#simblr#ts4 tutorial#ts4 eyelashes#Youtube
161 notes
·
View notes
Text

*Tutorial* How to make outfits for "👻Invisibles and Skeletons💀"
Hi! I'm so happy that you are enjoying my CC "👻Invisibles and Skeletons💀." I got a request about how to make outfits for 💀👻. Thank you for your interest! So I'm making the tutorial. If you are interested, please check the tutorials on my Patreon.
*CC
👻Invisibles👻
💀Skeletons💀
💀Skeletons Hair Useable Body Version💀
👻Outfits for Invisibles and Skeletons💀
*Tutorial
📝Easy Way
📝Step-by-step. 1
FOLLOW ME on X Twitter / Patreon / Curseforge Thank you for your support. If you like my CC pls like and reblogging💝
@sssvitlanz @maxismatchccworld @mmfinds @maxismatch4sims @gncc @mmoutfitters @love4sims4 @sims-4-maxis-match @sims4downloads @alwaysfreecc
46 notes
·
View notes
Text
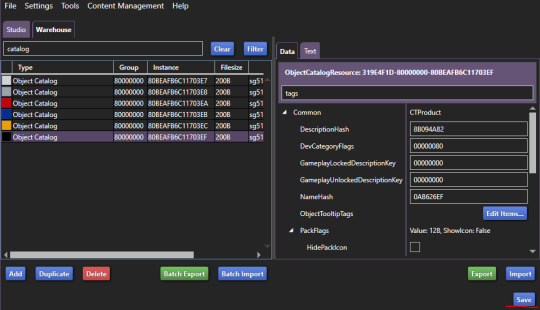
Move Deco Cars to the Transportation Category
Hello! When I was looking for the answer on how to make this happen, I couldn't find a straight forward tutorial. Instead, I found a couple bits and fucked around in S4S and pieced it together so, I wanted to put out a quick straightforward tutorial so others don't have to do the same.
You'll just need S4S for this. On the main screen, click "My Projects" and then select your deco car file.

Now, go to the "Warehouse" tab. This is in the top left next to the Studio tab.

In the filter search bar type in "catalog" and then click "Filter." Then, click on the first one. On the right hand side, type "Tags" in the filter.

Scroll down on the right side and click the "Edit Items" button next to "Tags."

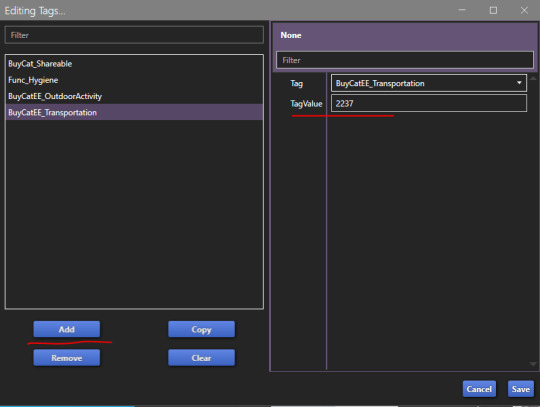
In the window that opens, click "Add" on the left hand side. Then, in the "TagValue" box on the right hand side, type in 2237, and then hit tab on your keyboard. Once you tab away, it will automatically update the "Tag" box directly above that to say "BuyCatEE_Transportation" Click the save button.
Now, you just need to repeat these steps for every "Object Catalog" entry your item has. There's one for each swatch. Make sure to save your package file when you're done!
Congrats, your deco car is in the transportation category in the build mode catalog now!

If they're currently showing in a category like Decor>Sculptures or Activites and Skills>Outdoors and you'd no longer like them to appear there now that they'll be in the transportation category, you can fix that quickly on the "Studio" tab.
While on the "Studio" tab, click the "Tags" tab on the right hand side. Uncheck any categories you no longer want the item to be in, and then click the "Apply To All Swatches" button. Again, don't forget to save when you're done.

That's it! It's actually really easy, it just gets a bit time consuming depending on how many swatches your deco car has, and how many deco cars you have. The build mode categories being nice and clean and not seeing items repeated across multiple sections is so nice though. 10 out of 10 Highly Recommend

74 notes
·
View notes
Text
How To Fix The Placement of Eyelashes (In The Glasses Category)
We know the latest Sims 4 patch (2024-08-08) broke the placement of eyelashes found in the glasses category. Here is a method to fix them and place them in the Eyelash category.
NOTE: This is only a placement fix. If your eyelashes conflicted with glasses before and the eyelashes could not be worn at the same time as glasses, you will still have a conflict between the two items. Eyelashes in the glasses category are usually mapped in the same texture space as glasses, so now you will get texture bleeding from the eyelashes to the glasses. This is NOT a fix for that issue. To fix that issue, you'd need to use Blender to move the textures.
For this method, you do not need to know how to use Blender. You need Sims 4 Studio. If you do not have it, you can download it from here.
I've tried this method myself, and it works. Here it is, step-by-step:
In Sims 4 Studio, open the package file (eyelashes) you want to convert. These should be eyelashes in the Glasses category. The easiest way to do this is to find the file in your mods folder and move it to its own folder before you start, so it'll be less difficult to locate. You can also set the properties of package files to open automatically in S4S when you double-click on them. (That's what I've done, because I make a lot of CC)
We'll call this package the original package. Once it is opened in S4S, click on the "Meshes" tab and export the mesh. Save it somewhere you can find it easily
Next, click on the "Textures" tab and export the textures of the swatches you want to add to your package. Make sure you export the "Diffuse" texture (even if you don't export anything else). Save your exported textures somewhere you can easily find them again.
You can also export the custom thumbnail, if your original package has one. You can find it on the right side of the screen on the "Textures" tab. Again, save this in a place where you can easily find it later.
Go to the "Categories" tab and scroll all the way to the bottom. You should see three items; Allow for Random, Restrict Opposite Gender and Restrict Opposite Frame. Make note of which boxes are ticked or unticked in your original package.
Close the original package by returning to the Main Menu of Sims 4 Studio. You don't need to save the original package, as you haven't made any changes to it.
On the main menu screen of S4S, go to the CAS section (bottom left) and choose "Create 3D Mesh" and then click the large blue CAS button.
Search for the base game eyelashes. You should see a drop-down menu called "Part Type" near the top of the window, in the middle. Choose "Eyelashes" from this menu. In the main part of the window, the in-game eyelashes should appear. Click on the one you want, and it should turn blue.
Click the "Next" button.
You will be prompted to save your new package. Give it a name (preferably one that includes your creator name, so you can find it again) and save it in your Mods folder, or whichever sub-folder within your Mods folder that you like to use for CC making.
In your new package, click on the "Meshes" tab and import the mesh you exported from the original package. Look for a dropdown menu where it says "LOD 0" (you have just replaced LOD 0). Now click on "LOD 1" and then import the mesh to this LOD as well. LOD stands for "Level Of Detail" and you might see higher numbered LODs looking degraded. Don't panic. This is normal.
Save your package, but don't close it.
Go back to the "Textures" tab and import the textures you exported from your original package file. You can import the custom thumbnails during this step too.
Save your package again. Do not close it.
In the menu at the top of your Sims 4 Studio window, look for one called "Tools", click on it and scroll down until you see "Modding" and click on that. A sub-menu will appear. Scroll down the sub-menu until you find "Glass Shader (CAS)" and click on that. You should get a notification that X number of shaders have been changed to SimGlass. Click OK.
Save your package.
Go to the "Categories" tab, scroll all the way to the bottom of the window, and make sure the same boxes are ticked/unticked as in your original package. If something is ticked in your new package that was unticked in your original package, this may cause your new item to not show up for one gender or the other once you get it into CAS.
Save one final time.
Open your game and test your package. Your new lashes should appear in the eyelash category in game.
136 notes
·
View notes
Text

📗 The Sims 4 Flawless Posters Tutorial | Beginner Friendly
READ ON PATREON (FREE)
This is basically a comprehensive tutorial on making flawless posters. I know a lot of simmers start their modding journey with custom paintings and it can feel a bit overwhelming at first.
But don't worry, I'm here to make everything crystal clear and show you just how easy it really is. With just a little guidance, anyone can create amazing CC right from the start! So, if you’ve always wanted to make posters for The Sims 4 but didn't know how, this is your chance! 😊
I would love to hear your feedback on this tutorial! And feel free to share it with other simmers to help them create perfect posters as well!
#sims 4#sims 4 mods#sims 4 cc#ts4 cc#sims 4 sexy#sims 4 wall art#sims 4 wall decor#sims 4 aesthetic#sims 4 interior decor#sims 4 custom content#sims 4 creator#sims 4 decor#the sims 4#ts4#ts4cc#sims 4 download#sims 4 cute#ts4 deco cc#ts4 decor#simblr#sims 4 tutorial#ts4 tutorial#sims 4 how to make posters#sims 4 poster tutorial#sims 4 painting tutorial#cc tutorial#making posters is easy lol (it really is!)
78 notes
·
View notes
Text
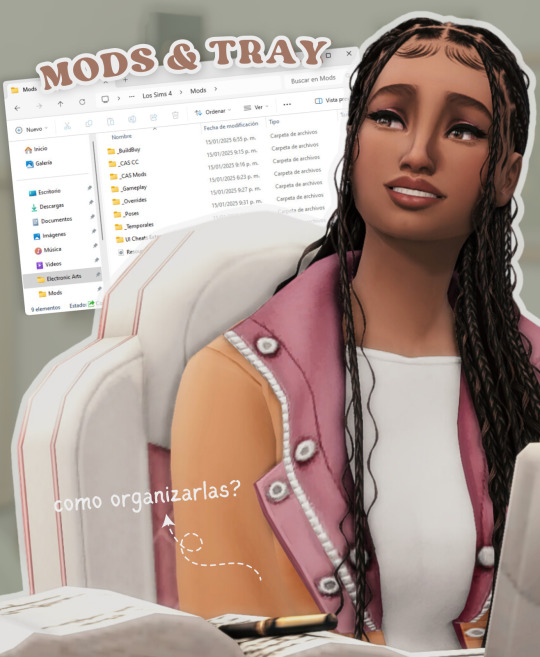
todo lo que necesitas saber sobre las carpetas mods y tray en los sims 4
aprende cómo usar y organizar las carpetas mods y tray en los sims 4 para personalizar tu juego y compartir tus creaciones fácilmente. no te pierdas los próximos videos!
ver video aquí
#ver video#the sims 4#los sims 4#sims 4#the sims#sims#ts4#ts4 cc#simmer#simblr#ts4cc#ts4mm#ts4 custom content#the sims 4 custom content#sims 4 custom content#sims 4 cc#sims 4 maxis match#cc finds#ts4 cc finds#tianaberrie#cc haul#sims 4 aesthetic#maxis match#sims 4 tutorial#sims 4 2025#sims 4 serie#ts4 tutorial#los sims 4 tutorial#sims 4 mods#sims 4 tray
29 notes
·
View notes
Text

Straightening Labels for Recolors: A Tutorial
I made a tutorial with plenty of pictures to show how I get perfectly straight labels to apply to my retextures. PDF file; French version coming soon! Link under the cut.
Here!
#sims 4 custom content#sims 4 cc#ts4 cc#s4cc#ts4cc#sims custom content#custom content#sims 4 horses#mycc#ts4 horses#sims 4 resources#ts4 resources#sims 4 tutorial#ts4 tutorial#sims 4 tutorials
19 notes
·
View notes
Text
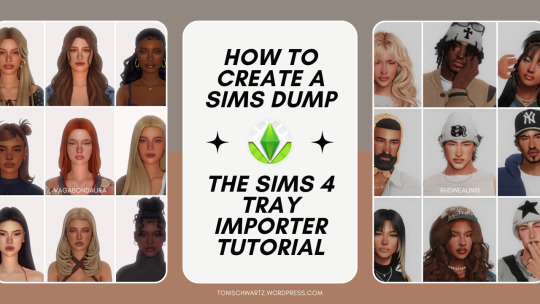
How To Create And Upload A Sims Dump Using The Sims 4 Tray Importer
If you’re a PC player and a Custom Content lover like me, you probably know your way around Tumblr and Patreon. Have you ever seen Sim dumps?
Sim dumps are when a player creates a Sim (or several Sims) and upload them to either Patreon, SimFileShare, Google Drive or another file upload platform, and it’s always a .zip file that contains the files necessary for the Sim and their respective CC to show up in your game.
Here are some examples:
If you want to create your own Sims dumps but you don't know how the tray importer works or where to start - I wrote a tutorial on how to do exactly that!
Read it here: https://tonischwartz.wordpress.com/2024/05/08/how-to-create-and-upload-a-sims-dump-using-the-sims-4-tray-importer/
Photos used in the banner are Sims made by vagabondaura and rhdweauni0
#the sims 4#the sims#simstumblr#the sims 4 cc#sims 4 custom content#sims 4 mods#ts4cc#cas cc#tray importer#tutorial#ts4#blog#sim dump#how to#how to use sims 4 tray importer
71 notes
·
View notes
Text
🎓 WE NEED TO STANDARDIZE OUR FILENAMES!
☠️ REMINDER: Double-check Patreon for updates!
"CAS Filters" brought a bunch of new folks to my Patreon and one of them had the nerve, nay the audacity, to ask for assistance with filenames!
I AM A CATDAMN ROCKET SCIENTIST! I HAVE NO TIME FOR PHEASANT QUESTI- I'M KIDDING! 😹
I like the theatrics. I should have been in thea- haven't we been here before? 🎭
I figured since I publicly criticize improper filenames, I might as well try to help. Yeah! That's my story! 😹
#sejianistutoring#the sims 4#ts4#sims 4#the sims 4 cc#ts4cc#ts4 cc#sims 4 cc#the sims 4 custom content#ts4 custom content#sims 4 custom content#the sims 4 mods#ts4 mods#sims 4 mods#the sims 4 cas#ts4 cas#sims 4 cas#the sims 4 tutorial#ts4 tutorial#sims 4 tutorial
8 notes
·
View notes
Text
(Pro?) Posing tips
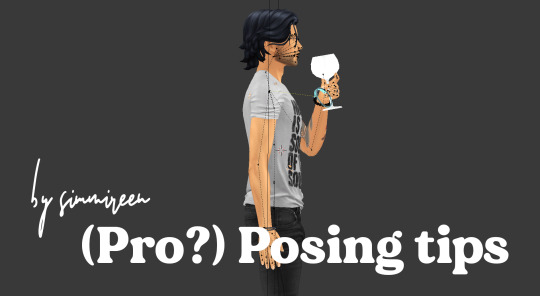
It doesn’t matter if you are a beginner or if you already have made your way into blender. As a posemaker myself, I know how hard it is to make a realistic pose - here a few tips you have to think of when making poses, to get your pose to the next level.
(I use shibuisims sunflower rigs for my poses, but in base they work the same as the rigs you export from sims4studio, they only have some handy IK controls)
At first: take your time for details. The base of my poses are mostly done very quickly, but it’s all in the details. Fingers, face, mouth, hips. Take your time for the details. Details can make or fail a pose.
Simripper double textures If you make poses for your own story or edit, you mostly make them with your own textures (through simripper) right? But if you want to also send them to the community to download and use, don’t get rid of the original rig textures bij importing your own sim textures. By toggling off and on the textures under your rig in the scene menu, you can see how poses look on your own sims, but also on the ‘default sim rig texture’.
Elbows and shoulders and relaxation. I think I can best show this in pictures. If holding something we almost never raise our elbows unnatural high. They mostly are more ‘relaxed’ to our body. Lower the elbows! (It’s always good to have a little space for thicker sims ofcourse).


Can you see the difference? Hands I think these are the hardest to do. I still struggle with them sometimes. But the best thing to get the best hands is to have a reference OR make the hand yourself in relaxing state. I see it mostly in a pose in an ‘idle’ state that hands are cramped or straightened. Unless you want this in your pose, try to make a hand in relaxed state.
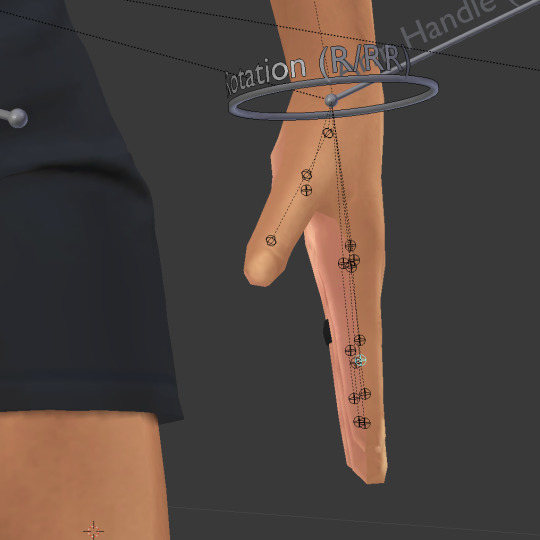
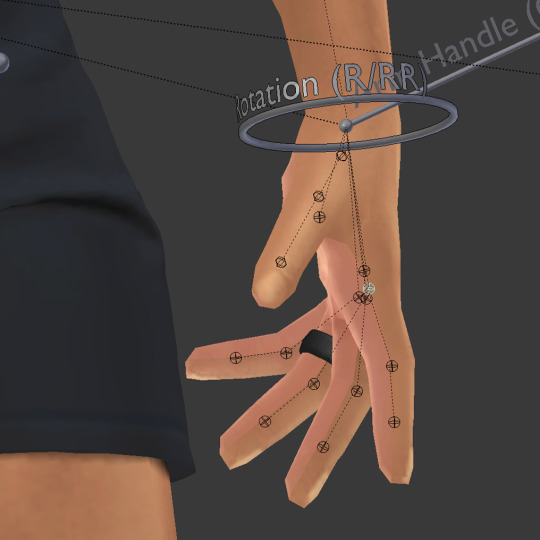

Straightened, cramped or relaxed?
Shoulders I hope every posemaker that makes poses for already a while know this, but I think it's the most important step in starting making poses. Please, start your arm movements (mostly if you want to raise the arms) in the b_R_clavicle or b_L_clavicle joints.


Shoulders are important!
Weight It’s so important in realistic poses to add our gravity. I think this mostly checks out for holding other sims, piggyback poses etc. If you take someone on your back, your back struggles too right? It's heavy! Try to lower that b_ROOT_bind just a little more as what you expect to do in a pose. Don’t forget gravity always pulls us down!

Only a very small distance from the ground is needed sometimes.


Gravity holds our arms down too in 'relaxed' state.
Stiffnes Maybe we can add this to weight aswell, but as humans ourselves, if we are standing ‘idle’. We never stand right up with a straight back, feet perfectly straight next to each other. It’s the same if we sit on a chair, most of us hang a little to the back or to the front. Try to add that in your pose, if you do that - it’s immediately a less stiff pose!
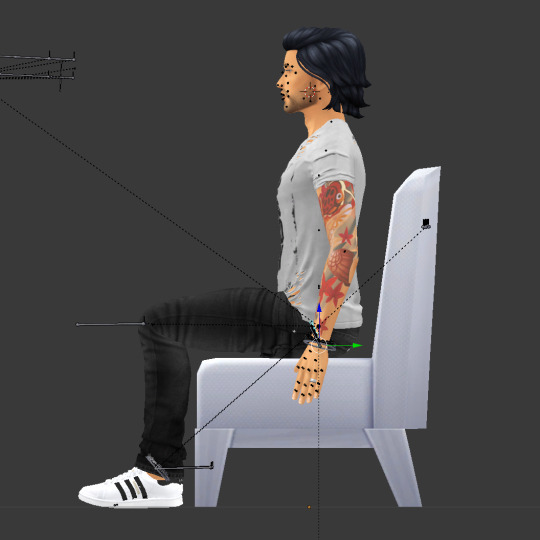

It's only a slight bend in the back joints, but it already looks more natural.
Just remember, you learn by doing and watching. So I hope I can add some more insights to you, as a posemaker for a few years now, to make your poses even better and more realistic. Ofcourse, sims rigs have their limitations, but that's what makes them sims, right? You can find some more simmireen tips on posepack consistency for sharing your poses here
@ts4-poses
#sims4#sims4tutorial#sims 4 poses#ts4poses#ts4 poses#thesims4#ts4cc#simmireen#ts4-poses#posemaker#sims4poses#posepack#ts4#tutorial#posemakingtutorial
370 notes
·
View notes