#celebrity recipes
Photo
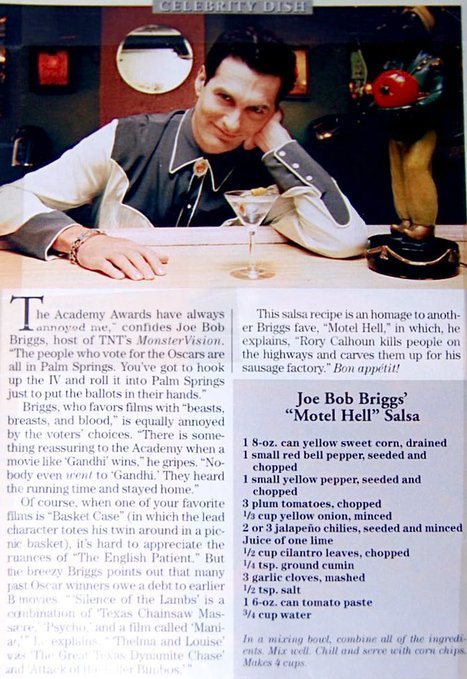
From TV Guide, March 22, 1997.
23 notes
·
View notes
Link
Jewel Staite’s show Family Law wrapped filming and she’s returned to blogging.
Her earliest post is from August 2014 with a select few, more recent ones, categorized by Recipes, Ramblings, and Traveling Opu. This means if you want to read her posts in order you have to manually select them from the bottom menu (this is easiest to do on desktop).

Despite the almost 10 years of dates, most of the months only feature one post and the archive is short due to no content for entire months. It really depends on how busy she was at the time between working, attending conventions, and raising a family.
If you like family recipes, love Jewel, or just long for old-school blogging when people wrote about whatever they wanted for however long they wanted with no concern about tags or social media pushes, settle in and give it a browse.

#jewel staite#so weird#disney so weird#so weird disney#family law#twitter#recipes#celebrity foods#celebrity recipes#family recipes
4 notes
·
View notes
Photo
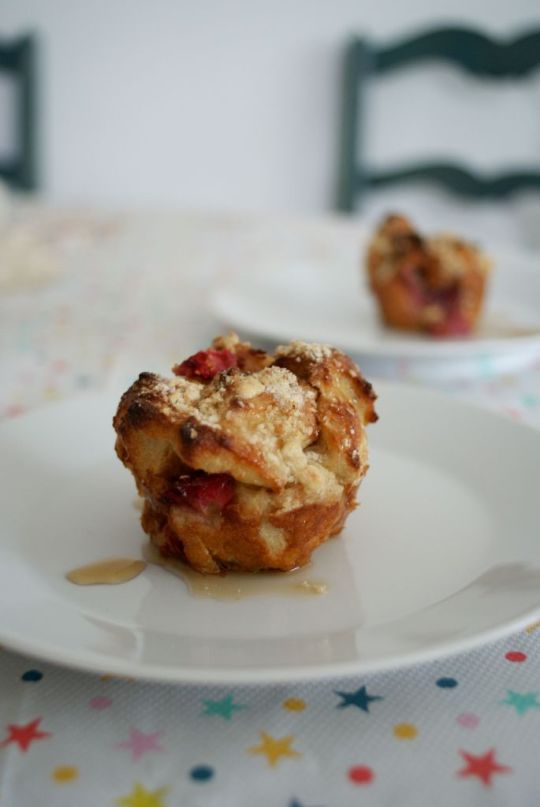
Strawberry-Miso French-Toast Muffins
By Nigella Lawson
Makes 6 muffins
Ingredients
For the miso strawberries:
½ tsp white miso
½ tsp water
1-1½ tsp sugar
3 big strawberries or 6 small strawberries
For the French toast muffins
5 slices white sandwich bread/brioche
3 eggs
1 tbsp milk
1 tsp vanilla
1 tbsp sugar
Butter for greasing
For the streusel
2 tbsp flour
½ tbsp sugar
½ tbsp butter
Instructions
Put the miso and water in a mixing bowl and kind of mash them together into a slurry without lumps. Wash then chop the strawberries into chunks then toss them in the miso liquid along with the sugar. If your strawberries are a bit watery and flavourless add more sugar and taste to make sure they are sweet. Set aside to macerate.
In another mixing bowl, beat the eggs, milk, vanilla and sugar until well combined. Chop the bread into small squares then throw them into the egg-mix, jostle them around so they are totally coated, then – if you're not scared of raw egg – taste a piece just to make sure the flavours are balanced.
Now's the hard part – the waiting. Leave the bread and strawberries to soak for 30 minutes. It's a long time, yes I agree, but believe me, so worth it!
Meanwhile, so you can keep yourself busy, make the streusel. This is a really quick streusel, a few tablespoon scoops of each and rub them together with your finger tips until it all resembles fine breadcrumbs.
Preheat the oven to 180°C/350°F. Grease 6 holes of a muffin tray.
Pour the strawberries and all the miso and juice into the bread mixture and gently combine. Use your (clean) hands for this, it's the only way. It will look like a lot of French toast but it will all squeeze into the muffin holes, I promise! Divide the bread and strawberries between the muffin holes and squash them together. Top with the streusel then bake for 25-30 minutes until the bread and streusel are lovely and golden. Serve with maple syrup, yoghurt, Nutella, and enjoy your luxury bruncheon.
3 notes
·
View notes
Text
I made my go-to strata to bring to my grandma's birthday lunch! This is another recipe from Joy Philbin and, like all her others, it's simple to make and is YUMMY! Seriously, this was the first strata recipe I ever tried when I found it several years ago and I've never bothered with any other. You can't go wrong with the combination of bacon, cheese, and spinach! I've said it before and I'll say it again: Mrs. Philbin needs to come out with a cookbook!
JOY PHILBIN'S BACON, EGG, AND CHEESE STRATA
For the Filling:
1 10 oz. box chopped frozen spinach, thawed and squeezed dry
1/2 lb. thick bacon, cooked and crumbled
1 small yellow onion, chopped
1 t. minced garlic (optional)*
1/4 t. black pepper
1/2 t. salt
A pinch of nutmeg
8 cups cubed Italian or Ciabatta bread
2 cups shredded sharp cheddar cheese
For the Egg Mixture:
12 eggs
1/2 t. black pepper
1 t. salt
2 1/2 cups milk or half-and-half
2 T. Dijon mustard
*Both Joy and I leave out the garlic if we're making this for breakfast, as neither of us like garlic in the morning, but we'll throw it in if the strata is being served for brunch, lunch, or dinner.
In a skillet, sauté the onion until translucent, about four minutes. Add the spinach, garlic if using, and sauté over low heat. Stir in the salt, pepper, nutmeg, and crumbled bacon. Remove the skillet from the heat.
In a bowl, whisk together the eggs, salt and pepper, milk or half-and-half, and Dijon mustard. Set aside.
Butter a 9X13 Pyrex dish. Layer half of the bread cubes into it, followed by half of the cheese and half of the bacon-spinach mixture. Repeat with remaining ingredients. Pour the egg mixture evenly over the strata. Cover the dish with foil and place in the fridge for at least two hours and up to overnight.
Preheat the oven to 350 degrees F.
Bake the strata uncovered for 45 minutes to an hour or until the top is golden brown and the egg mixture is set. Start checking at the 45-minute mark to make sure it’s cooked. Let the strata rest for 10 minutes before slicing and serving.
#feedingcreatively#Strata#Overnight Breakfast#Brunch Dish#Breakfast for Dinner#Celebrity Recipes#Regis Philbin#Remembering Regis#Joy Philbin#Joy and Regis Philbin#Joy Philbin Recipes#New York Recipes#Bacon Egg and Cheese#BEC#Bacon Egg and Cheese Strata
1 note
·
View note
Text
F.R.I.E.N.D.S Actor Courteney Cox Shares Recipe Of "The Best Cookie" She's Ever Had
When it comes to treats that can never get boring, chocolate chip cookies definitely top the list. It is an absolute delight to dip these cookies in a glass of cold or warm milk before munching them. Cookies are perfect for breakfast while they don’t disappoint us in the evening either. Basically, cookies can be enjoyed any time of the day. Baking is not everyone’s cup of tea and that is why most…

View On WordPress
#celebrity recipes#chocolate chip#chocolate cookie recipe#chocolate cookies#cookies#courteney cox#recipes
0 notes
Text
Paul Hollywood's Brownies
I recently read Dorie Greenspan’s review of a brownie recipe from Paul Hollywood’s new cookbook Bake: My Best Ever Recipes for the Classics. Dorie raved about the brownies which contain three kinds of chocolate (milk, semisweet, and bittersweet). The brownies also contain cacao nibs (aka cocoa nibs), dried bits of unsweetened cacao beans. I trust Dorie implicitly and was intrigued when she explained how the nibs added an edgily pure chocolate flavor and retained their crunchy texture throughout the baking process. I totally agree and really loved the way the finished brownies looked with the little nib flecks sprinkled about.
This recipe is somewhat flexible. I didn’t have any milk chocolate in the house so I replaced it with more semisweet chocolate and the brownies were just fine. These relatively thin brownies are deeply chocolate in flavor, dense and fudgy in texture, and they have that shiny, crackly top that everyone loves. I can’t stay away from them!
Fun fact - the brownie batter is much darker in color than the finished brownies are so you have to wait until the brownies are baked to see the beautiful color contrast of the dark nibs against the shiny, crackly tops. I think they’re Stunning!
Enjoy!
Items used to make this recipe:
(affiliate links)
cacao nibs (aka cocoa nibs) https://amzn.to/3MrhX7n
pure vanilla extract https://amzn.to/3rQIaTv
9x13 professional cake pan https://amzn.to/3SZGrXQ
flat parchments sheets https://amzn.to/3g5D571
Baker’s Joy baking spray https://amzn.to/3TzCB7Z
Bake: My Best Ever Recipes for the Classics by Paul Hollywood https://amzn.to/3VpMzKu
Paul Hollywood’s Brownies
makes a 9x13 cake pan
Printable Recipe
Ingredients
8 ounces (225g) semisweet chocolate, chopped
16 tablespoons (225g) unsalted butter, cut in pieces
3 large eggs (150g), room temperature
1 cups plus 2 tablespoons (225g) superfine sugar (see notes below)
2/3 cup (75g) all purpose flour
1 teaspoon baking powder
1/2 teaspoon fine salt
1 teaspoon pure vanilla extract
1/2 cup milk chocolate chips
1/2 cup bittersweet chocolate chips
1 tablespoon cacao nibs
Directions
Preheat oven to 350F and place rack in center position.
Line a 9x13-inch commercial cake pan with a parchment paper sling. Use a baking spray (like Baker’s Joy) to coat any part of the pan that isn’t covered with parchment paper.
In a glass or metal bowl suspended over a pan of simmering water, melt semisweet chocolate and butter together, stirring occasionally (see notes below); remove the bowl from the heat and allow the mixture to cool for at least 10 minutes.
In a small bowl, whisk together the flour, baking powder, and salt; set aside.
In the bowl of a stand mixer fitted with a flat paddle attachment, beat the eggs and sugar on medium-high speed until thick and very light in color. Alternatively, beat using a hand mixer for about 8 minutes.
Turn off mixer and add the cooled chocolate mixture; beat on low speed just until combined (a few streaks may remain).
Turn off mixer and add flour mixture and pure vanilla extract; beat on low speed until most of the dry ingredients are incorporated.
Remove bowl from stand mixer and fold in the milk and bittersweet chocolate chips by hand; being sure all dry ingredient are incorporated.
Pour batter into prepared pan and spread into an even layer; sprinkle the cacao nibs evenly over the surface of the batter.
Bake for 20-30 minutes until a toothpick inserted in the center of the brownies comes out clean (a crumb or two is fine). You many need to check in a couple of spots if you hit a pocket of melted chocolate.
Remove pan from oven and allow brownies to cool completely in the pan.
Remove brownies by lifting the sling straight out of the pan and transfer to a cutting board. Store leftovers between layers of wax or parchment paper in an airtight container.
Notes
If you don’t have superfine sugar, you can substitute an equal amoujnt of granulated sugar.
For brownies, I suggest you use a professional quality metal cake pan. If you choose to use a glass, stoneware, or ceramic pan, lower your oven temp by 25F.
In Step 2: I lined my pan with a sling of flat parchment paper. Flat parchment sheets are much easier to handle than rolled parchment. I spray the pan with a little nonstick cooking spray before adding the parchment sling - the spray will “glue” the parchment in place, yet remain easy to remove after baking. Any exposed pan edges that are not covered with parchment should be sprayed with nonstick baking spray (this is my favorite).
In Step 3: When melting the butter and semisweet chocolate together, be sure the water is barely simmering and don’t let the bottom of the glass or metal bowl touch the water in the saucepan below.
This recipe calls for 3 kinds of chocolate - milk, semisweet, and bittersweet. I didn’t have any milk chocolate so I replaced it with additional semisweet and was very happy with the results.
When folding the chocolate chips into the batter, I used two different chip sizes and really liked the texture each brought to the finished brownies. Half of the chips were mini and the other half were a flat discs (about the size of 2-3 standard chocolate chips).
Paul uses a hand mixer to beat the eggs and sugar in this recipe for 8 minutes! Dorie recommends the much faster method of using a stand mixer fitted with the paddle attachment - there’s a reason why I’m such a Dorie fan!
Crispy brownie edges are my favorite, true or false? True!
adapted from Bake: My Best Ever Recipes for the Classics by Paul Hollywood
0 notes
Text

Cupcakes!
#percy jackson#pjo tv show#pjo#percy jackon and the olympians#I just finished reading the series for the first time#and the way I laugh-cried my way through the whole thing…#pjo spoilers#to celebrate have percy x2 making blue cupcakes!#(annabeth and tyson’s recipe of course!)#…now to go read the heroes of olympus haha!
402 notes
·
View notes
Text
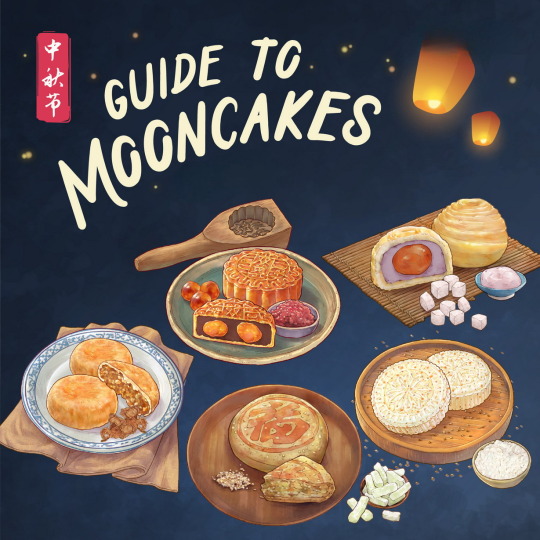
The Mid-Autumn Festival (中秋节), a Chinese celebratory season observed by many East and Southeast Asians, has begun. Held on the 15th day of the eighth lunar month, which is in the middle of autumn, the festival marks the end of the season’s harvest and is a time to appreciate the moon at its fullest and brightest. Besides feasting eyes on the moon and lanterns of different shapes and sizes, Mooncakes (月饼), a rich pastry with all sorts of fillings, are undoubtedly the main highlight of the festival and are traditionally shared among family and friends.
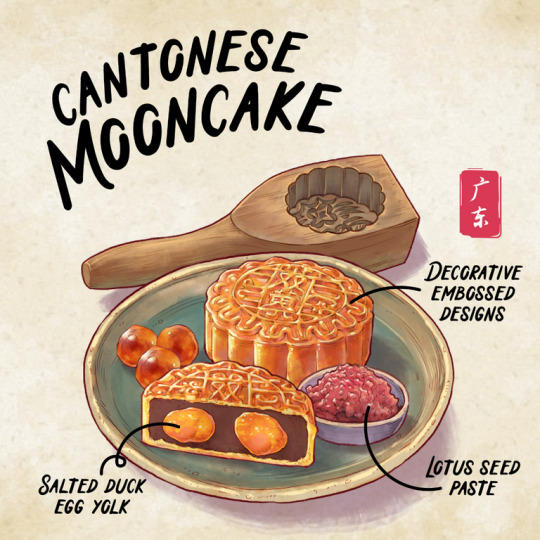
The Cantonese Mooncake (广式月饼) is the most commonly found traditional mooncake in Singapore. Its fillings consist of lotus seed or red bean paste and usually include one, two or four salted duck egg yolks. Many would also be familiar with the snow skin variant that was created in Hong Kong in the 1960s as a healthier alternative to traditional baked mooncakes. The fillings and a ball of dough are traditionally pressed into a wooden mould, which embosses intricate wordings of the pastry shop’s name or stuffing on top of the pastry.
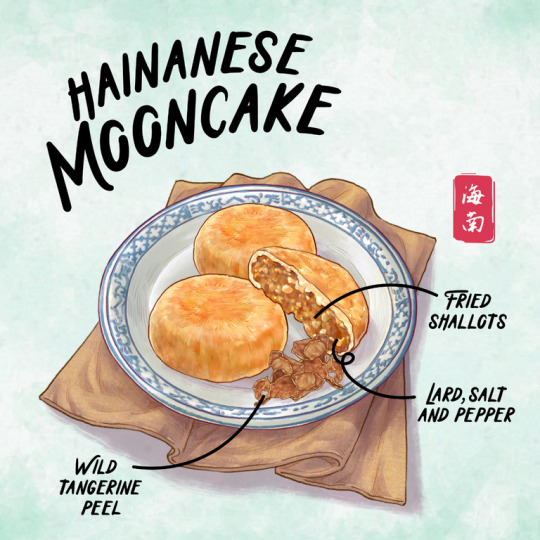
A mooncake with various flavours such as rich, savoury-sweet and peppery, the Hainanese Mooncake (海南月饼), also known as Su Yan Bing (酥盐饼) is traditionally filled with ingredients such as fried shallots, lard, salt, white pepper, rose-flavoured white sugar, sesame seeds, melon seeds and dried wild tangerine skin peel. The filling is encased in a thin crust made with flour, salt and lard.
The Hakka Mooncake (客家月饼) is also called Yu Gao (月糕) and is a flat, snow-white disc that is typically made with cooked glutinous rice flour and sugar, giving it a crumbly and powdery texture. It is usually embellished with more intricate designs, often with animals and flowers. Although it doesn’t usually contain any fillings, some come with candied winter melon, desiccated coconut and sesame seeds mixed with glutinous rice flour, sugar, margarine and water.

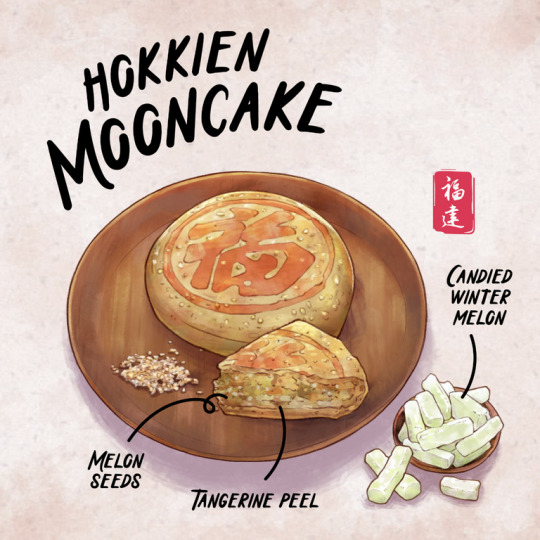
Easily distinguishable by the red stamp of Chinese characters on the top of the crust and its white disc-shaped pastry which resembles a bright moon, the Hokkien Mooncake (福建月饼) consists of a dry and sweet filling that is made of candied winter melon, tangerine peel, melon seeds, sugar, and cooked with lard or peanut oil. A less common type is a savoury version with minced meat filling. Once known as Scholar Cakes (状元糕), they were given to those who took part in the Imperial examinations. Today, it is given as a symbol of good luck to those who are about to sit for their exams.
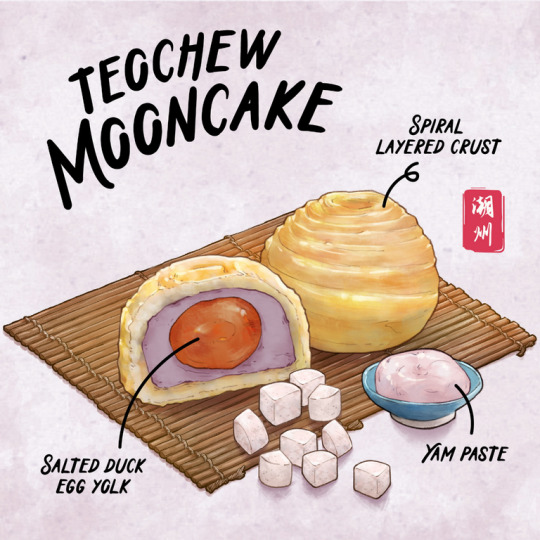
Many would be familiar with the Teochew Mooncakes (潮州月饼). It has a crispy, spiral-layered crust that crumbles easily. It originated from the Chaoshan (潮汕) area in Guangdong Province and typically consists of yam paste and a salted duck egg yolk. Other traditional versions of the Teochew mooncake are still made by old school bakeries in Singapore. For example, La Bia (朥饼 or lard biscuit), where ‘La’ refers to pork oil, has a thinner, flaky crust with a thick mung bean or red bean filling. There are also alternative fillings including red bean, mung bean or lotus seed paste. There is also a steamed version of the typically baked Teochew mooncake, called La Gao (朥糕). It can either be served plain or with a mung bean filling.
A Snow Skin Mooncake (冰皮月饼) variant was created in Hong Kong in the 1960s as a healthier alternative to traditional baked mooncakes. Similar to mochi, its crust is made of glutinous rice flour and varies in colour, based on the flavours used. And unlike traditional mooncakes, these are best served cold!
youtube
Mooncake information and drawings courtesy of Ministry of Culture, Community and Youth.
#Mid-Autumn Festival#中秋节#Mooncake Festival#农历八月十五#Chinese Culture#Chinese Tradition#Celebration#Mooncake#月饼#Cantonese Mooncake#广式月饼#Hainanese Mooncake#海南月饼#Hakka Mooncake#客家月饼#Hokkien Mooncake#福建月饼#Teochew Mooncake#潮州月饼#Snow Skin Mooncake#冰皮月饼#Recipe#Video#Youtube#Snack#Dessert#Asian Food#Food#Buffetlicious
115 notes
·
View notes
Text


An adaption of Porter’s Seasonal Celebrations Cookbook’s pickled plums (in the Michaelmas chapter) using foraged American Persimmons.
Visit @portersposse to view the explorations of the cookbook @msgraveyarddirt and I had with friends for a year or two awhile back.
#Porters Seasonal Celebrations Cookbook#seasonal cooking#cooking#recipes#english cuisine#English cookery#American persimmons#foraging#arkansas river valley#Ozark foothills#preserving#michaelmas
49 notes
·
View notes
Photo
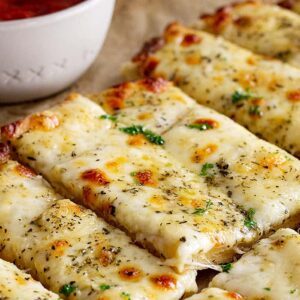
Cheese Breadsticks - Countryside Cravings
#breadsticks#cheese#bread#recipes#food photography#appetizers#parties#gatherings#celebrations#comfort food#crowd pleasers
57 notes
·
View notes
Photo

Patriotic Red, White, and Blue Puppy Chow - Three Olives Branch
#USA#4th of July#red white blue#stars#puppy chow#recipes#parties#celebrations#summer#patriotic holidays
34 notes
·
View notes
Text
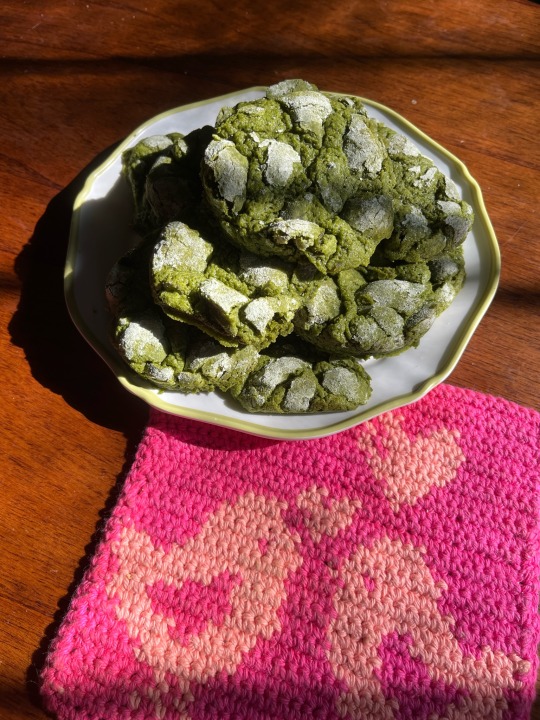
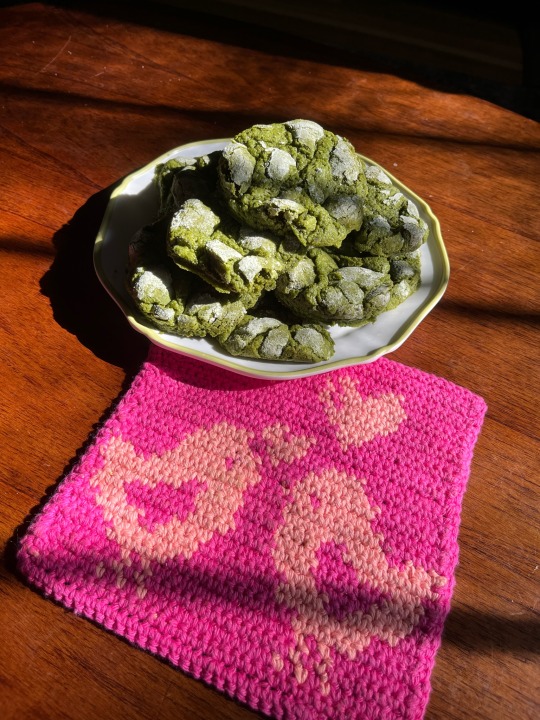
plate of matcha crinkle cookies + little lesbian bird crochet hot pad sav made 4 me and lauren when we moved in together :,,)
#it’s been the better part of a year since we moved in together and almost FIVE since we started dating isn’t that nuts#half a decade !#they were 2 celebrate my gf finishing her final exams for year 1 of grad school!!!!#hehehe#i’m so prouddd#personal#recovery#recipe
44 notes
·
View notes
Photo

Coffee and Dark Chocolate Celebration Cake
#coffee#dark chocolate#celebration#birthday#cake#food#dessert#layer#recipe#icing#chocolate#macarons#color#cupcakesandcouscous
271 notes
·
View notes
Note
I’m dumb af, which username is Jason in ur wip lol
he’s PippinWasFramed! (tim and steph are also in there; everyone else is a standard gotham npc)
#also taking a leaf from fey i think jason’s only on reddit for baking recipes and as a google substitute for random questions#tim’s on there to cause problems for himself#and steph is in all the celebrity gossip and reality tv subs#because she doesn’t have time to keep up with all that on her own. she is busy#asks#my fic
21 notes
·
View notes
Note
I love how everone is just giving their thanks giving recipies now lol. What do you do for thanks giving? How about vasco and machete? If thanks giving even exsists in your sadge dog universe
.
#by all means share your weird seasonal recipes with me#I'm Finnish and the dogs are Italian and thanksgiving is overwhelmingly North American tradition#it isn't celebrated here#answered#anonymous
121 notes
·
View notes
Text

Hey #StarTrekProdigy fans! Here's a fun, sweet treat I crafted when the show was first premiering - Murf Jellies! And here's EXACTLY how to make them!
First, you'll want to select your Jello. Blue and Purple are the best colors, but the flavor is up to you. Personally, I like berry flavors! So I chose those. (I ended up not using Grape) You'll also need a small muffin mold, metal or silicone works best.

You'll want to start by making the purple color of your choice, heat 1 cup of water until it's at a rolling boil before adding the powder. Whisk this quickly for two minutes (don't let it burn!) before adding 1 cup of cold water.


While it's still hot, pour small amounts of it into the tops of the molds, being careful not to go above the halfway point. However the ratio of purple-to-blue can be personalized. Also don't spill it on the counter like I did because it left a stain.

Set the trays into your fridge for about an hour. Because the amount of jello is small in the molds, it should solidify quite quickly. Here you can see it balanced upon the mountain of tortillas we have in our fridge

Once the jellies are solid enough, start making the blue color. Use the exact same ratio of boiling+cold water. I went with 1 cup so it stays nice and firm


Now this part is where especially young cadets will want a captain's help - you'll want to use a spoon over the already-solid purple layer, and pour the blue *over* the spoon. This is so the blue doesn't completely dissolve the purple, but the colors will still mix.


Here's a before-after of adding the blue layer. Be careful with the hot gelatin not to burn yourself, and wear an apron because it can get messy!

Set this layer in the fridge exactly as you did the first one. However I recommend leaving it for an extra half hour to make sure it's nice and solid.
Finally, once the Murfs are ready to be removed, fill a sink or baking tray with warm (NOT HOT) water. Gently set the murf tray in the water. This allows the edges of the gelatin to come free from the mold

At this point, you can turn the tin over onto a pan or plate, or remove the jellies with a careful spoon or hand.
So there you have it, Murf Jellies and how to make them! I hope you folks have fun with this! Now if anyone needs me, I'll be snacking.

24 notes
·
View notes
Last Seen Blogs

zoomanatomico
ZoomAnatómico


teambakerst
This Is How I Show My Love

contentcollectivestudio
Studio Feed

nightraiderwrites
I write stuff!