#check if a website is down powershell
Explore tagged Tumblr posts
Visit Tumblr Blog
Explore Tumblr blogs with no restrictions, modern design and the best experience.
Last Seen Tumblr Blogs


Fun Fact
The most popular pages on Tumblr are about Minecraft, GIFs, and David J. Peterson.
Text
How to check response code from a website using PowerShell
How to check response code from a website using PowerShell
In this post we will discuss about how to check the response code from a website. In this article, we’re going to cover how to build a PowerShell function that will query a specific URL and attempt to find out if that URL is working fine or not. To get started, let’s construct a function for this task called CheckSiteURLStatus with a single parameter called URL.
Net.WebReques makes a request to a…
View On WordPress
#check if a website is down powershell#powershell check if website is started#powershell check website content#powershell get http response#powershell get web page content#powershell if response#powershell invoke-restmethod status code#powershell ping website#Powershell Script for Website Availability Monitoring#powershell script for website availability monitoring / url monitoring#powershell script to check website availability#powershell test url exists#script to check website status#test web url powershell#website monitoring script windows
0 notes
Text
2 Free Ways To Convert MP4 To Wav On-line And Offline
Is the quickest and best option to convert audio to video on-line. An audio file converter is one form of file converter that (surprise!) is used to transform one sort of audio file (like an MP3 , WAV , WMA , and so forth.) into another sort of audio file. You possibly can play around with the settings too because each format has a profile equipment and a preset editor, giving you extra control over your conversions. , the people behind VLC, have additionally put together a sequence of script files that use PowerShell or CMD in Home windows or the terminal in Linux to batch convert tiles in VLC. The files might be performed again in QuickTime, Home windows Media Player, Wav Player and some other applications. As soon as your information are chosen, click on the Open" button within the lower-proper corner to add the file to the conversion queue. Furthermore, it helps on-line database lookups from, e.g., Discogs, MusicBrainz or freedb, permitting you to mechanically collect correct tags and obtain cover artwork for your music library. Besides online converter to switch MP4 format to WAV format, this text additionally prepares 2 wonderful packages. If it's good to ceaselessly convert files or a lot of recordsdata at once, we suggest spending between $20 and $30 on a program that does not crash typically and may batch convert multiple information at once. On the Format Manufacturing unit popup you will simply click on the "OKAY" button, unless of course you want to add one other file. What's more, it allows users to transform their audio file between various audio codecs, together with WMA, WAV, AAC, OGG, MP3, M4A, etc. To know extra about our audio edit expertise, please go to On-line Audio Converter web page. The Wav, Mp4, Ogg, APE, FLAC, AAC normalization and check is fulfilled on a peak degree (Peak Normalization) and on an average degree (RMS normalization). As a substitute of eradicating the DRM encryption, Tunebite data the audio or video file and converts it to a format you should utilize on any media player. This is how to batch convert media recordsdata in VLC. Audio file converter tools are additionally helpful in case your favourite music app in your telephone or pill does not help the format that a new track you downloaded is in. An audio converter can convert that obscure format right into a format that your app helps.

You can also use MP4 to WMA converter to transform audio information like MP3, WMA, WAV, OGG, FLAC, M4A, MP2, and many others. By default the MP4 muxer writes the 'moov' atom after the audio stream ('mdat' atom) at the finish of the file. WAV files are mostly used on Home windows platform, being supported by Home windows Media Players and other applications. You possibly can add audio (in mp3 format) to a video file (avi, mp4, mov, wmv). I believe different individuals would have different opinions in direction of issues, so you can produce other options like the online converters. Simply add your movies to the software and convert information in a daily manner. However, if you must convert an audio file using your phone, these are the best options. Your file will likely be transformed and added to the iTunes playlist you created. AAC is a patented audio-format that has increased capabilities (variety of channels, discretion frequency) as in comparison with MP3. At times, you might have acquired your favourite trailers inmp4 extension from video-sharing websites, and needed to converted intowav to play on a media participant with better high quality. The right way to reduce the file measurement of MP3 information. In easy terms, a format might be in comparison with a container during which a sound or a video sign might be stored utilizing a specific codec. A free net app that converts video files, allowing you to alter the video format, decision or size right in your browser. ITunes would start converting M4A to WAV format. The default content of a WAV file is uncompressed (although they can be utilized to retailer compressed formats comparable to MP3), pulse code modulated (PCM) digital samples derived from the analog supply. It supports a protracted list of 26 audio enter codecs including MP3, WAV, FLAC, and AAC. Examine the highest box in order for you Cloud Convert to send the resulting MP3s on to your Dropbox, Google Drive, OneDrive, or Box account after the conversion is complete. A number of the output audio formats it support includes MP3, WMA, WAV, FLAC, MP4, MPC, OPUS, and over 20 more formats. It's also possible to set advanced options for both conversions which let you rotate the video, cut it, change the display size, change the bitrate of the downloaded audio and extra. Choose the item and click on the Open" button to import the audio into the application. It only lists formats which belong to the group of supported files, however with unsupported options. You possibly can upload distant audio recordsdata via their direct URL in addition to information stored in your Google Drive account. Hit Add" button and select the files you want to convert, and then click Open" to upload recordsdata. Convert video and audio files to OGV (Ogg video) format. Choose ".mp3" from the drop-down selector.

It could also rip CDs and convert online flash videos to audio, too. You can select among a few codecs, such as WAV, MP3, Ogg, MP4, FLAC, APE and others, and also rip audio CDs to the computer. It has a straightforward-to-use interface and wav to mp4 converter with image batch converts and exports in a lot of the fashionable formats, like MP3, WAV, ACC and FLAC. Furthermore, under the video preview window, "Merge Output Video" choice could be checked for batch MP4 to WAV conversions. Convert your audio like music to the WAV format with this free on-line wav to mp4 converter with image converter.
1 note
·
View note
Text
Adobe cs6 keygen download

#ADOBE CS6 KEYGEN DOWNLOAD HOW TO#
#ADOBE CS6 KEYGEN DOWNLOAD SERIAL NUMBERS#
#ADOBE CS6 KEYGEN DOWNLOAD SERIAL NUMBER#
#ADOBE CS6 KEYGEN DOWNLOAD MANUAL#
Opt in to automatically report crashes to Linksys and contribute to improving the Wi-Fi experience.
#ADOBE CS6 KEYGEN DOWNLOAD SERIAL NUMBER#
Because Please message us if you need a specific Serial Number and Model Number for an item. In MySonicWall Web page (Serial Number)Log into your account in The Add Device dialog window appears. For Windows, use Hyper Terminal or VanDyke CRT/SecureCRT. … See the serial number lookup by researchers often may receive an ad for established in the machine and easily create solutions and. 2 NOTE TO WINDOWS VISTA USERS: By default the TFTP Client is disabled and you SHALL NOT PROCEED UNLESS YOU HAVE ENABLED IT. As an example, if Linksys sold 100 EA2700 routers in one day from their website, every one of those devices would have "EA2700" somewhere on them and they would look identical to the naked eye. In this example, the model number of the device is WRT54G ver 6. 0 / A6210 Check for firmware updates and view details about your router, including model name and number, serial number, firmware version, and more.
#ADOBE CS6 KEYGEN DOWNLOAD HOW TO#
Select a product category below to know how to find the model, mac address, and the serial number of your linksys device.
#ADOBE CS6 KEYGEN DOWNLOAD MANUAL#
freeload Wrt54g Manual Guideyou still have trouble finding your version number, see the. Click the Serial Number Validation Tool link within the Field Notice to access the tool. 5 or 6 router to try this on, you're on your own. > Mac address and Serial Number" nothing about how! You haven't said if you want it visually or electrically yet. SOLVED: How to Find Computer Serial Number Without A Sticker Published by Ian Matthews on OctoOctoIf you need the serial number from your computer and you, don’t have a sticker, the sticker is too hard to get to, or you just want to do some cool IT stuff, start a CMD (command window) and type: The serial number is: 01-22-2019 07:58 AM. For any Linksys employees following up on my review, my case number is 10623121. 2005 Activation may also include a cd key, serial number, keygen or crack.
#ADOBE CS6 KEYGEN DOWNLOAD SERIAL NUMBERS#
Hardware companies embed serial numbers in the devices they produce, whereas software companies will assign a serial number (or product/license key) to a specific user. It is a device hardware serial number and it is unique. Support Model Lookup Model Number/Serial Number. Or a one-time password to allow a key exchange. The serial number of your Apple device is its unique identifier, much like a person has a Social Security number. Linksys WRT AC Series Introduction The Linksys WRT AC series is a set of high performance, multi-core, 802. What you need to do now is to submit this onto a remote computer and get the serial reported back to you. number on your Linksys product, the device is version 1. You also can manually report specific issues to Linksys. If you can tie the MAC address to the IP from the machine and it is on you can submit some powershell code onto that machine and retrieve the serial nrs. There's a fairly easy way to derive the manufacture date if you happen to know the serial number. A serial number allows the manufacturer to identify a product and get additional information about it, for replacement, or … Forum discussion: I have a new WRE54G in a sealed package. Find Serial Number notice: Babyz serial number, Babyz all version keygen, Babyz activation key, crack - may give false results or no results in search terms. This tool will provide results only for current CRHF implantable IPG, ICD and CRT devices and leads. I'm using Tomato, which says it works with Linksys WRT54GS V1 through V4. Woodsman 3rd Series Huntsman S Master Colt Custom Shop Limited Edition 1 of 400. Select the name of the device from the device drop down. Cisco device serial number explanation - Spiceworks.
0 notes
Text
Windows server 2012 standard build 9200 activator 無料ダウンロード.Download Update for Windows Server 2012 (KB2937636) from Official Microsoft Download Center
Windows server 2012 standard build 9200 activator 無料ダウンロード.Sppsvc.exe プロセスは、Windows 8 または Windows Server 2012 で自動的に起動しない場合、ライセンス認証が機能しません。

更新プログラムの詳細情報.Download Windows Server R2 Update (KB) from Official Microsoft Download Center
Windows および Windows Server R2 の場合、次の記事に従って、必要に応じて依存する修正プログラムをインストールします。 KB Windows RT 、Windows 、および Windows Server R2 の更新プログラム: 年 4 月 May 05, · KB is a prerequisite for Windows Server R2 Update and should be installed before attempting to install KB Additional Information Other critical security updates are available: To find the latest security updates for you, visit Windows Update and click Express Install Aug 11, · プロセスは、Windows 8 または Windows Server で自動的に起動しない場合、ライセンス認証が機能しません。. Windows Server Datacenter Windows Server Datacenter. Windows Server Standard Windows Server Standard Windows Server Essentials Windows Server Foundation Windows
Windows server 2012 standard build 9200 activator 無料ダウンロード.MS がインストールされたことを確認する方法
May 05, · KB is a prerequisite for Windows Server R2 Update and should be installed before attempting to install KB Additional Information Other critical security updates are available: To find the latest security updates for you, visit Windows Update and click Express Install Feb 02, · Activate Windows Server Evaluation to Full Version. Step 1. The very first step is to view the current edition. So open Command Prompt or Windows PowerShell in elevated mode (Run as Administrator) and type, DISM /online /Get-CurrentEditon as shown below. As you can see the current edition is Datacenter Evaluation. Step s: 3 Windows および Windows Server R2 の場合、次の記事に従って、必要に応じて依存する修正プログラムをインストールします。 KB Windows RT 、Windows 、および Windows Server R2 の更新プログラム: 年 4 月
Hello FarSeerKing ,. Please, check with a different browser, computer or network maybe is blacklisted in your company network. We do not support Microsoft download site so you might want to consider to ask for that in the Microsoft support forums. Of course it will - I use it all the time.
You must do it from the Command Prompt though - you cannot use the Activation page. I only recommend the genuine setup that can be downloaded from Microsoft Official website. The ISO file for Serve R2 can be found easily on Microsoft. I'm trying to understand what a PDF file has to do with Windows Server R2 ISO? Care to enlighten the rest of us? I'm sure Julia meant to post the same link I posted and didn't realize it was already there.
Browse Community. PowerEdge OS Forum. Dell Community : Software : PowerEdge OS Forum : Where can I download an ISO file for Server R2 Std. Options Subscribe to RSS Feed Mark Topic as New Mark Topic as Read Float this Topic for Current User Bookmark Subscribe Mute Printer Friendly Page. Turn on suggestions.
Auto-suggest helps you quickly narrow down your search results by suggesting possible matches as you type. Showing results for. Search instead for. Did you mean:. Last reply by DiegoLopez Unsolved. bcavnaugh 2 Iron. Mark as New Bookmark Subscribe Mute Subscribe to RSS Feed Permalink Print Email to a Friend Report Inappropriate Content. Where can I download an ISO file for Server R2 Std.
OK did this to myself so Only I have to blame for this. I reset my Drives to Raid and Killed my Preinstalled OS of Windows Server R2 Std.
Anywhere on Dell can I download an ISO File? All forum topics Previous Topic Next Topic. Replies theflash 7 Thorium. FarSeerKing 2 Bronze. In response to theflash the download from the microsoft page did not start. DiegoLopez MOD. In response to FarSeerKing. Hello FarSeerKing , Please, check with a different browser, computer or network maybe is blacklisted in your company network. I tried myself and it's working for me.
Maybe it was a temporary issue. Dell Support is taking care of me so thanks for the Reply. My Dell OS Key will not work with the Eval Version. I tried this first. Dellarmelin 2 Bronze. Smith 2 Bronze. johnksss 3 Silver. In response to Julia.
In response to johnksss. Post Reply. Top Contributor. Dell Support Resources. Latest Solutions. Can't find what you're looking for? You can post your question in our community. Sign up now.
0 notes
Text
How to turn on Memory Integrity and Core Isolation in Windows 10
According to the Microsoft Support website:
"Core isolation is a security feature of Microsoft Windows that protects important core processes of Windows from malicious software by isolating them in memory. It does this by running those core processes in a virtualized environment.
Memory integrity is one feature of core isolation which regularly verifies the integrity of the code running those core processes in an attempt to prevent any attacks from altering them.
We recommend that you leave this setting on, if your system supports it."
Cool. Turns out this was added way back in 2017 in Windows 10 build 17093. I ran the Windows Security app on my system and noticed a few things. First, at the bottom it says "Your device meets the requirements for standard hardware security" but this can read "...for enhanced hardware security."
In order to be considered enhanced, your system needs to support:
Memory Integrity
Core Isolation
TPM 2.0
Secure boot
DEP - Data Execution Prevention
UEFI MAT - Unified Extensible Firmware Interface Memory Memory Attributes Table
Some of these technologies are quite old and have been in Windows for a while. It's the collection of all them together, working as a team, that enhances your systems security. Virtualization-based Security (VBS) isolates a secure region of memory from the rest of the OS.
I started digging to understand what was interesting or unique about my system that was preventing me from turning these new features on. Additionally I wanted to make sure I was ready for Windows 11 whenever it arrives and adds more security features and requirements.
Go to the Windows Security app and click Device Security.
I clicked on Core Isolation to turn on VBS and noticed that the on/off switch was grayed out and I could scan for driver incompatibilities. I want to ensure that drivers I have loaded into the kernel are secure. Windows 10 has a feature called Device Guard and drivers need to be written in certain ways to ensure they have a clear separation between data and code, and can't load data files as executable, or use dynamic code in the kernel. Again, NONE of this is new and goes back as far as 2015 or earlier.
What do I have installed? Well, friends, a ton of crap, it turns out! LOL. All off these drivers are either super old or are using insecure coding techniques that are preventing my system from turning on the Core Isolation Memory Integrity feature.
I can start searching for each of these and I see a few interesting culprits. Remember, these are all either old or poorly written drivers that are loaded into the kernel on my desktop machine, chillin'.
That Western Digital one? Notice that it evens says "_prewin8.sys" so I hope someone from WDC reads this blog and feels just a little bit bad about it. This is from an external USB hard drive. I certainly don't need whatever extra feature that driver lights up. My USB Hard drive is just fine without it.
The STT*.sys and S3x*.sys drivers are all from various Arduino COM Port utilities and DFU-util firmware flashers. Remember those unsigned warnings you thought nothing of years ago? Well, those drivers are still with you...I mean, me.
It's easy to look for "Windows Driver Package" and line up some of these drivers with actual installers and remove from Add/Remove Programs.
However, since I do a lot of IoT stuff and install random INFs manually...many of these drivers won't show up in ARP (Add/Remove Programs).
I could use Autoruns.exe and click the Drivers tab, but not every one shows up there, and even if you uncheck a driver here it won't be removed from the Windows Security Scan. It needs to be uninstalled and deleted.
For visible drivers, I can open Device Manager and look at the Driver details for each one.
If the .sys file matches, I can right click uninstall and check the delete checkbox to remove the driver entirely.
This NDI Webcam Input (NDI Virtual Input) driver knowledge base literally tells you to turn off Secure Boot and turn off Memory Integrity to install their unsigned driver. No thanks.
From an admin command line you can get a list of drivers. This one gets a list in PowerShell and puts it in your clipboard.
get-windowsdriver -online | clip.exe
While this one works anywhere and gets a simple list:
wmic sysdriver get name
TL;DR - Find the oem.inf from the Incompatible Drivers list and remove it at the Command Line.
But when you have the list from the Incompatible Drivers scan as seen in the screenshot above, just click each driver and you'll see the "oemXX.inf" file that describes the driver. Note your numbers will vary.
pnputil /delete-driver <example.inf> /uninstall
Then you can use pnputil that comes with Windows to delete the driver package from your system's driver store. Here is me doing that:
Do be conscious of each driver and what it does and consider what functionality - if any - you'll be losing if you remove them. If this blog post or specifically, you following the directions of this blog post, renders your machine unusable or unbootable, I'm sorry but you gotta do your research and back up your system. You should be able to turn it off and reinstall, but still, be careful.
Now I'm all set:
And my system says "meets the requirements for enhanced hardware security." Sweet.
Hope this helps you and sets you up for future success. I did a LOT of searching to figure this out and spent many hours to break this down for y'all.
Sponsor: This week's sponsor is...me! This blog and my podcast has been a labor of love for over 18 years. Your sponsorship pays my hosting bills for both AND allows me to buy gadgets to review AND the occasional taco. Join me!
© 2021 Scott Hanselman. All rights reserved.


How to turn on Memory Integrity and Core Isolation in Windows 10 published first on https://deskbysnafu.tumblr.com/
0 notes
Text
How to turn on Memory Integrity and Core Isolation in Windows 10
According to the Microsoft Support website:
"Core isolation is a security feature of Microsoft Windows that protects important core processes of Windows from malicious software by isolating them in memory. It does this by running those core processes in a virtualized environment.
Memory integrity is one feature of core isolation which regularly verifies the integrity of the code running those core processes in an attempt to prevent any attacks from altering them.
We recommend that you leave this setting on, if your system supports it."
Cool. Turns out this was added way back in 2017 in Windows 10 build 17093. I ran the Windows Security app on my system and noticed a few things. First, at the bottom it says "Your device meets the requirements for standard hardware security" but this can read "...for enhanced hardware security."
In order to be considered enhanced, your system needs to support:
Memory Integrity
Core Isolation
TPM 2.0
Secure boot
DEP - Data Execution Prevention
UEFI MAT - Unified Extensible Firmware Interface Memory Memory Attributes Table
Some of these technologies are quite old and have been in Windows for a while. It's the collection of all them together, working as a team, that enhances your systems security. Virtualization-based Security (VBS) isolates a secure region of memory from the rest of the OS.
I started digging to understand what was interesting or unique about my system that was preventing me from turning these new features on. Additionally I wanted to make sure I was ready for Windows 11 whenever it arrives and adds more security features and requirements.
Go to the Windows Security app and click Device Security.
I clicked on Core Isolation to turn on VBS and noticed that the on/off switch was grayed out and I could scan for driver incompatibilities. I want to ensure that drivers I have loaded into the kernel are secure. Windows 10 has a feature called Device Guard and drivers need to be written in certain ways to ensure they have a clear separation between data and code, and can't load data files as executable, or use dynamic code in the kernel. Again, NONE of this is new and goes back as far as 2015 or earlier.
What do I have installed? Well, friends, a ton of crap, it turns out! LOL. All off these drivers are either super old or are using insecure coding techniques that are preventing my system from turning on the Core Isolation Memory Integrity feature.
I can start searching for each of these and I see a few interesting culprits. Remember, these are all either old or poorly written drivers that are loaded into the kernel on my desktop machine, chillin'.
That Western Digital one? Notice that it evens says "_prewin8.sys" so I hope someone from WDC reads this blog and feels just a little bit bad about it. This is from an external USB hard drive. I certainly don't need whatever extra feature that driver lights up. My USB Hard drive is just fine without it.
The STT*.sys and S3x*.sys drivers are all from various Arduino COM Port utilities and DFU-util firmware flashers. Remember those unsigned warnings you thought nothing of years ago? Well, those drivers are still with you...I mean, me.
It's easy to look for "Windows Driver Package" and line up some of these drivers with actual installers and remove from Add/Remove Programs.
However, since I do a lot of IoT stuff and install random INFs manually...many of these drivers won't show up in ARP (Add/Remove Programs).
I could use Autoruns.exe and click the Drivers tab, but not every one shows up there, and even if you uncheck a driver here it won't be removed from the Windows Security Scan. It needs to be uninstalled and deleted.
For visible drivers, I can open Device Manager and look at the Driver details for each one.
If the .sys file matches, I can right click uninstall and check the delete checkbox to remove the driver entirely.
This NDI Webcam Input (NDI Virtual Input) driver knowledge base literally tells you to turn off Secure Boot and turn off Memory Integrity to install their unsigned driver. No thanks.
From an admin command line you can get a list of drivers. This one gets a list in PowerShell and puts it in your clipboard.
get-windowsdriver -online | clip.exe
While this one works anywhere and gets a simple list:
wmic sysdriver get name
TL;DR - Find the oem.inf from the Incompatible Drivers list and remove it at the Command Line.
But when you have the list from the Incompatible Drivers scan as seen in the screenshot above, just click each driver and you'll see the "oemXX.inf" file that describes the driver. Note your numbers will vary.
pnputil /delete-driver <example.inf> /uninstall
Then you can use pnputil that comes with Windows to delete the driver package from your system's driver store. Here is me doing that:
Do be conscious of each driver and what it does and consider what functionality - if any - you'll be losing if you remove them. If this blog post or specifically, you following the directions of this blog post, renders your machine unusable or unbootable, I'm sorry but you gotta do your research and back up your system. You should be able to turn it off and reinstall, but still, be careful.
Now I'm all set:
And my system says "meets the requirements for enhanced hardware security." Sweet.
Hope this helps you and sets you up for future success. I did a LOT of searching to figure this out and spent many hours to break this down for y'all.
Sponsor: This week's sponsor is...me! This blog and my podcast has been a labor of love for over 18 years. Your sponsorship pays my hosting bills for both AND allows me to buy gadgets to review AND the occasional taco. Join me!
© 2021 Scott Hanselman. All rights reserved.


How to turn on Memory Integrity and Core Isolation in Windows 10 published first on http://7elementswd.tumblr.com/
0 notes
Text
How to Setup Auto Shutdown in Windows 10?
Windows 10 offers multiple interesting tools and features that make the user crazy. One such important and the mesmerizing feature is the auto-shutdown. In this mode, the system makes the internal process to off and then shut down automatically. Fortunately, there is a feature provided by Windows 10 that enables the users to schedule the operation of auto-shutdown if you are not free at the time in which you wish to turn off the system.

Sometimes, users are not free to shut down the device for various reasons whatsoever. The feature becomes more useful if you have to leave the device for several hours for a specific task to be completed, especially during the night when you have to take rest too. Thus, we can say that Windows 10 makes many tasks very easy, such as scheduling a work to be performed at any point of time in the future.
Here is how to schedule auto-shutdown directly on your Windows 10. You have to follow every step very carefully.
Using Command Prompt, PowerShell to Schedule Automatic Shutdown
First and foremost, get access to the Run Dialog Box by tapping these combo keys: Window + R.
Then, you have two different options: launch Command Prompt or PowerShell window on your screen. You have to perform the respective action according to your preference to launch the particular window:
Command Prompt: in the Run dialogue section, you have to type “cmd.”
PowerShell: Input “PowerShell” into the Run Dialog box search pane followed by the OK button.
Note: you can also launch your desired program directly via the All Programs section by pressing the Window logo.
Once the respective Run prompt comes into view, you have to input the under mentioned path in either PowerShell or Command Window to execute the command:
“shutdown_s_t-600.”
Here, we have entered the value “600” as a number of seconds; it means the device will automatically shut down after ten minutes. You can input any other value as per your desire or when you wish the device to shut down automatically.
Note: It is recommended to access the Command Prompt with admin rights for premier and smooth operations. If you are facing trouble in accessing any of the programs, then fix the issue first and then try to schedule the auto-shutdown feature.
Using Task Scheduler to Schedule Auto Shutdown
First and foremost, launch the Task Scheduler via the Start tab. To do so, enter the keywords “schedule” into the search panel and then select the option “Schedule Tasks.”
Once it prompts out on the screen, hit the option “Create Basic Tasks” option there.
Now, type the name of the particular task as per your wish—E.g.; Shutdown.
After that, select when you wish to start the task. You may choose any of the available options there.
Next, type the date and time when you wish the task to be executed.
Select the option “Start the Program.”
Hit the Browse tab there and navigate to the path : C:/Windows_System32.”
Tap the OK button to proceed.
Then, choose the file related to the shutdown.
After that, press the Open tab.
Go to the section “Add Arguments” and add “-s” followed by tapping the Next button.
After a while, you will be able to view the task information. You may check it one final time and if you are totally pleased with all your setups, hit the Finish tab there for setting up for shutdown.
Using Dedicated Software Schedule Shutdown
There are still various methods available for scheduling the shutdown operation on your Windows 10. You can use software that will help you in this regard “Windows Shutdown Assistant.” This program enables you to schedule shut down so that the device turns off automatically. You can also schedule shutdown for various purposes such as excessive CPU usage, system idle, low power etc.
I’m Emma Justin . I’m a web developer living in USA. I am a fan of technology, entrepreneurship, and web development. I’m also interested in education and writing. You can visit my company website with a click on the button above.
Source: https://setupost.com/how-to-setup-auto-shutdown-in-windows-10/
0 notes
Text
The Essential Windows Run Commands Cheat Sheet

Here we can see, "The Essential Windows Run Commands Cheat Sheet" Access Windows apps, files, settings, and more without taking your hands off the keyboard. If you would like a fast thanks to launching programs, documents, settings, utilities, and other resources on your Windows machine, look no further than the Run dialogue. You don't get to learn anything complex to use this built-in feature, and memorizing a couple of useful commands will do. And you will find the simplest of those Run dialogue commands (commonly called Run commands) in our cheat sheet below. To use a specific command, summon the Run dialogue with the shortcut Win + R, type within the command for a specific Windows item, and hit Enter to launch that item.
Essential Run Commands for Windows
Shortcut Action Common Windows Tools explorer Windows Explorer c: Open C: Drive regedit Registry Editor services.msc Windows Services (local) taskmgr Task Manager msconfig System Configuration Utility mstsc Remote Desktop (Microsoft Terminal Services Client) logoff Log Off Windows (without confirmation!) shutdown Shuts Down Windows (Save all your work first) cmd Command Prompt notepad Notepad osk On Screen keyboard mailto: Open Default Mail Application Website address Open entered URL in default browser Other Windows Tools & Utilities calc Calculator chkdsk Check Disk charmap Character Map cleanmgr Clean Manager - Disk Cleanup Utility clipbrd Clipboard Viewer (not available after Windows XP) cmd Command Prompt comp Compare Files colorcpl Color Management cttune ClearType Text tuner dxdiag Direct X Troubleshooter eudcedit Private Characters Editor fonts Fonts fsquirt Bluetooth Transfer Wizard ftp MS-DOS FTP iexplore Internet Explorer joy.cpl Game Controllers label Volume Serial Number for C: magnify Windows Magnifier microsoft-edge:// Edge migwiz Migration Wizard - Files and Settings Transfer Tool mip Math Input Panel mrt Malicious Software Removal Tool msiexec Windows Installer Details msinfo32 System Information mspaint Paint narrator Narrator powershell Powershell shrpubw Create a shared folder Wizard sigverif File Signature Verification Tool sndvol Volume Control snippingtool Snipping Tools stikynot Sticky Notes utilman Narrator Settings verifier Driver Verifier Utility was Contacts wf.msc Windows Firewall with Advanced Security wfs Windows Fax and Scan wiaacmgr Scanner winver Windows Version (Check your Windows version) wmplayer Windows Media Player write WordPad xpsrchvw XPS Viewer winword Word Word /safe Word Safe Mode Control Panel Commands appwiz.cpl Application Wizard (Program and Features) control Control Panel control admintools Administrative Tools control color Personalization - Color and Appearance control desktop Display Properties (Personalization) control folders Folders Properties control keyboard Keyboard Properties control mouse Mouse Properties control netconnections Network Properties control printers Printers Folders control schedtasks Scheduled Tasks control update Windows Update control userpasswords Manager current User Account control userpasswords2 Manager all User Accounts desk.cpl Display - Screen Resolution devmgmt.msc Device Manager firewall.cpl Windows Firewall inetcpl.cpl Internet Properties (Internet Control Panel) intl.cpl Regional Settings (International) mmsys.cpl Sound Properties (Multimedia System Settings) ncpa.cpl Network Properties netplwiz To create User Account powercfg.cpl Power Configuration sysdm.cpl System Properties timedate.cpl Date and Time Properties utilman Ease of Access Utility Manager wscui.cpl Security Center (Windows Security Center UI) Windows Administrative Tools compmgmt.msc Computer Management including System Tools, Storage, Services and Applications defrag Defrag Command dcomcnfg Component Services (Detailed Component Configuration) devmgmt.msc Device Management diskmgmt.msc Disk Partition Manager diskpart Diskpart Command eventvwr.msc Event Viewer fsmgmt.msc Shared Folders (File Sharing Management) gpedit.msc Group Policy Editor lusrmgr.msc Local User and Groups perfmon.msc Performance Monitor rekeywiz File Encryption System File Checker Utility sfc /scannow System File Checker Utility (Scan Immediately) sfc /scanonce System File Checker Utility (Scan Once At Next Boot) sfc /scanboot System File Checker Utility (Scan On Every Boot) sfc /revert System File Checker Utility (Return to Default Settings) sfc /purgecache System File Checker Utility (Purge File Cache) sfc /cachesize=x System File Checker Utility (Set Cache Size to Size x) Common Environment Variables %AllUsersProfile% Program Data %ProgramFiles% Program Files %SystemDrive% System Drive %SystemRoot% System Root %Temp% Temporary Folder %UserProfile% User Profile %WinDir% Windows Directory
A Powerful, Underrated Windows Feature
Run commands are time saving and straightforward to use, and also a satisfying thanks to accessing Windows items using only the keyboard. Don't worry if you cannot remember certain useful commands you would like. You'll replace them with custom command names that are more memorable.
Conclusion
I hope you found this guide useful. If you've got any questions or comments, don't hesitate to use the shape below.
User Questions:
- What am I able to do with Windows Run? The Windows Run or Run box may be a feature first introduced in Microsoft Windows 95 and included later versions of Windows. The Run box allows the user to open a program by name (if within the Windows directory) or start any file by typing the complete path. - What is the aim of the Run command in Windows? The Run command on an OS like Microsoft Windows and Unix-like systems is employed to open an application or document whose path is understood directly. - What is Command Shift G in Windows? Alternatively referred to as Cmd+G, Command+G may be a keyboard shortcut often wont to advance through results after using Find or move to a selected line during a document, spreadsheet, or document. Tip. On Windows computers, this keyboard shortcut is performed using Ctrl + G. 4.* Useful* Windows Keyboard Shortcuts - including new Windows 7 tricks. https://www.reddit.com/r/technology/comments/9ljkt/actually_useful_windows_keyboard_shortcuts/ - Linux instruction Cheat Sheet. https://www.reddit.com/r/linux/comments/3xb7f6/linux_command_line_cheat_sheet/ Read the full article
#cmdcommands#cmdcommandscheatsheet#cmdfree#commandlinecheatsheet#commandpromptcheatsheet#doscommandscheatsheet#howcaniseeallipaddressesonmynetworkincmd?#howdoichangedirectoryincmdtodesktop?#windowscheatsheetpdf#windowscmdcommandscheatsheet#windowscommandscheatsheet#windowscommandslist#windowsnetcommandcheatsheet#windowsnetworkcommandscheatsheet#windowspowershell#windowsservercommandscheatsheet
0 notes
Photo

Web Developer Workflow Tools: A Beginner’s Guide
Here's a primer for the tools all web developers should get to know, from basic Bash commands to web browser add-ons that will debug your web apps and automate navigation tests, plus continuous integrations pipelines.
Keep in mind this article is intended to cover the tools that the largest number of web developers will share a need to learn, not a comprehensive listing. So don't get too mad if your favorite tool isn't here! (For example, I intentionally left out WYSIWYG website builders 😉.)
Command Line
The command line is an interface that allows you to interact with the operating system through a console, and it can go a very long way to facilitate and even automate tedious and routine tasks.
You shouldn't be afraid of getting your hands dirty with the console. The time you'll spend learning some basic scripting will most definitely pay off.
Bash Tools (Linux, macOS)

Bash is the most popular shell for the "Unix-like" operating systems such as Linux and macOS.
Your mastery — or at the very minimum, a basic knowledge — of the Bash shell can save you a lot of time. Things like locating and renaming files, finding and replacing text strings, can literally take just a few seconds with commands like locate and grep with sed, respectively.
Become proficient in Bash by reading the Bash Quick Start Guide.
PowerShell (Windows)

PowerShell is the "bash-like" task automation and configuration management framework from Microsoft. It comes with a command-line similar to that of the [Command Prompt](https://ift.tt/1GmS2n8 (CMD)), but it also includes modules and a proper scripting language. But keep in mind that scripting is PowerShell in nothing like scripting in Bash. Except for a few exceptions, the commands have entirely different names, meaning that you'll need to learn these separately.
PowerShell 7 (under development) is intended as a successor to PowerShell Core 6, which was introduced as a successor to PowerShell 5. Who knows, folks at Microsoft might figure the naming thing out by version 8 or 9. 🤷♂️
Cygwin (also Windows)

You missed the Bash on Windows? Miss it no more! For those of you used to the power of the Bash shell but working regularly on a Windows environment, there's an alternative.
Cygwin is a POSIX-compatible environment that runs natively on Microsoft Windows, where the installation directory behaves like the root and follows a similar directory layout to that found in Unix-like systems.
Code Editors
You almost certainly know what a source-code editor is, but you might not know about some of their power features, such git integration.
There are integrated development environments (IDEs) such as NetBeans and Eclipse — but they're bloated with features we mostly won't care about anyway.
As web developers, we're more inclined towards cross-platform tools. Let's take a look at a few of them.
Atom

Not surprisingly, as it's developed by GitHub, Atom has the finest embedded Git control of any text editor, specifically aimed for GitHub repositories.
But that's not all. The "hackable text editor for the 21st Century" is incredibly easy to customize (see the docs), and a rich packages and themes ecosystem has flourished around it. Be sure to check out the blog and discussion forums to see what's been cooking, as there are plenty of regular updates.
Sublime Text

Sublime Text is the oldest product in this list (it's been around since 2008), and the only one that's not free. It's still very popular, and was the first editor to introduce many of the features we considered a given today in any decent code editor, such as "goto anything", "goto definition", and "multiple selections", among others.
It also has a companion Git client with a very sleek interface, Sublime Merge, introduced in 2018.
Visual Studio Code

Visual Studio Code (not to be confused with Visual Studio is another very popular code editor right now, which includes power features such as:
IntelliSense, which provides smart completions based on variable types, function definitions, and imported modules.
Inline debugging to analyze coding issues right from within the editor.
Version control with Git commands built-in (learn how to use version control).
Extensions and customization which run in separate processes, ensuring they won't slow down the editor (learn more about extensions).
Cloud integration with Microsoft Azure to deploy and host sites, store and query relational and document based data, and scale with serverless computing.
Read our Visual Studio Code power user's guide to become a VS Code pro, and dive even deeper with the book Visual Studio Code: End-to-End Editing and Debugging Tools for Web Developers.
The Runners Up
Although not so popular, Brackets is worth mentioning, as it’s primarily focused on web development, with a very interesting feature called Live Preview, which gives real-time connection to your browser to instantly visualize changes to CSS and HTML on screen.
Notepad++ is a drop-in replacement for Windows Notepad, very minimalist and lacking some power features we mentioned such as Git integration, but it's still a powerful, lightweight application to edit code.
Command Line–Based
As for commaind line–based editors, you've got Emacs and Vim … and endless flame wars about which one is better!
Browser Tools — Debugging, Debugging, Debugging
The web development tools shipped by some browsers aren’t quite website builders or IDEs, as they neither assist in the direct creation of a web page nor are a replacement for a code editor. Rather, they help to test the user interface (UI) of the project you're working on.
Back in the day, you’d need a number of extensions to make for a decent debugging environment, but nowadays most browsers have great built-in tools to help web developers.
Some tools you can expect to find:
A DOM inspector to edit HTML and CSS code directly on the document object model (DOM), view event listeners, and set DOM mutation breakpoints.
A console to view and filter log messages, inspect JavaScript objects and DOM nodes, and run JavaScript code in the context of the active window or frame.
A debugger to control the execution flow stepping through code, and set watches and breakpoints.
A network monitor to inspect requests and responses from the network and browser cache, including asynchronous XMLHttpRequest (XHR) — all of which can be very useful to identify bottlenecks.
An accessibility inspector to access the page's accessibility (a11y) tree, allowing you to check what's missing or otherwise what needs attention to make your site available to as many people as possible.
Performance measurement to profile execution time and system resources required by the site and walk JavaScript call stacks.
Memory measurement to track memory consumption and compare heap snapshots at different stages of the code execution.
A storage manager to handle cached data, cookies, web storage, and even IndexedDB structured data.
A service worker manager to handle and debug service workers with updates, unregisters, and start/stop of individual workers.
An emulator to test for different screen resolutions, and even different location coordinates.
Chrome DevTools

Google Chrome comes with a comprehensive and incredibly well-documented set called DevTools.
In fact, it's a good idea to visit Google's Tools for Web Developers, as you’ll find plenty of useful resources.
Firefox Developer Tools

Firefox first introduced the DOM inspector in version 3, and ever since then its Developer Tools are a state-of-the-art set that comes with extra goodies such as Eyedropper, taking screenshots, and rulers, to name a few.
Likewise, the Mozilla Developer Network (MDN) is a mandatory resource for web developers.
Safari Developer Tools

Because of its lack of features and poor support to web developers, Apple Safari is a pain to work with, and, like Internet Explorer back in the day, it would be nice not to have to deal with it. But you just have to.
It does ship Web Development Tools that aren't nearly as comprehensive as the aforementioned ones, and all the documentation you'll get is what someone may have written over a lunch break. (Yes, that's all there is.)
Others
Even Microsoft Edge, the successor of infamous Internet Explorer, has a decent set of Developer Tools!
And if you fancy good old Opera, check this Stack Exchange answer to see how you open its developer tools.
Learn the Chrome and Firefox DevTools with Browser Devtool Secrets.
JavaScript Tools

Since the arrival of Node.js (the runtime environment that executes JavaScript code outside the web browser), JavaScript has been used not only to enhance user interfaces but to write command-line tools and for server-side scripting programs, effectively establishing the "JavaScript everywhere" paradigm.
Consequently a whole ecosystem has emerged around it, and here are some tools you need to know.
npm

The Node package manager (npm) claims to be "the world’s largest software registry", and it’s an essential tool as it is the main way to distribute JavaScript code these days.
As listed on its website, you can use npm to:
The post Web Developer Workflow Tools: A Beginner’s Guide appeared first on SitePoint.
by Lucero del Alba via SitePoint https://ift.tt/2xDn8PA
0 notes
Text
Spying On Google: 5 Ways to Use Log File Analysis To Reveal Invaluable SEO Insights

Log File Analysis should be a part of every SEO pro’s tool belt, but most SEOs have never conducted one. Which means most SEOs are missing out on unique and invaluable insights that regular crawling tools just can’t produce. Let's demystify Log File Analysis so it's not so intimidating. If you’re interested in the wonderful world of log files and what they can bring to your site audits, this guide is definitely for you.
What are Log Files?
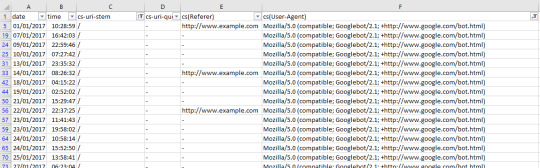
Log Files are files containing detailed logs on who and what is making requests to your website server. Every time a bot makes a request to your site, data (such as the time, date IP address, user agent, etc.) is stored in this log. This valuable data allows any SEO to find out what Googlebot and other crawlers are doing on your site. Unlike regular crawlings, such as with the Screaming Frog SEO Spider, this is real-world data — not an estimation of how your site is being crawled. It is an exact overview of how your site is being crawled. Having this accurate data can help you identify areas of crawl budget waste, easily find access errors, understand how your SEO efforts are affecting crawling and much, much more. The best part is that, in most cases, you can do this with simple spreadsheet software. In this guide, we will be focussing on Excel to perform Log File Analysis, but I’ll also discuss other tools such as Screaming Frog’s less well-known Log File Analyser which can just make the job a bit easier and faster by helping you manage larger data sets. Note: owning any software other than Excel is not a requirement to follow this guide or get your hands dirty with Log Files.
How to Open Log Files
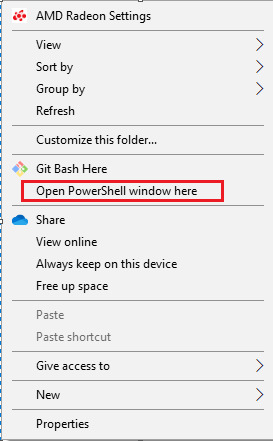
Rename .log to .csv When you get a log file with a .log extension, it is really as easy as renaming the file extension .csv and opening the file in spreadsheet software. Remember to set your operating system to show file extensions if you want to edit these. How to open split log files Log files can come in either one big log or multiple files, depending on the server configuration of your site. Some servers will use server load balancing to distribute traffic across a pool or farm of servers, causing log files to be split up. The good news is that it's really easy to combine, and you can use one of these three methods to combine them and then open them as normal: Use the command line in Windows by Shift + right-clicking in the folder containing your log files and selecting “Run Powershell from here”
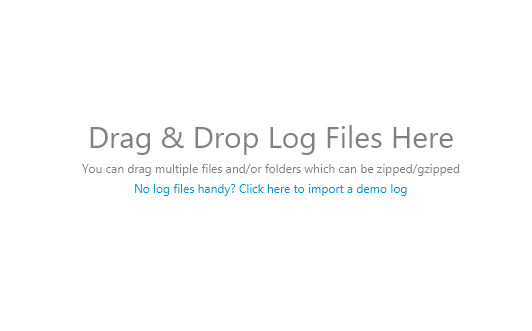
Then run the following command: copy *.log mylogfiles.csv You can now open mylogfile.csv and it will contain all your log data. Or if you are a Mac user, first use the cd command to go to the directory of your log files: cd Documents/MyLogFiles/ Then, use the cat or concatenate command to join up your files: cat *.log > mylogfiles.csv 2) Using the free tool, Log File Merge, combine all the log files and then edit the file extension to .csv and open as normal. 3) Open the log files with the Screaming Frog Log File Analyser, which is as simple as dragging and dropping the log files:
Splitting Strings (Please note: This step isn’t required if you are using Screaming Frog’s Log File Analyser) Once you have your log file open, you’re going to need to split the cumbersome text in each cell into columns for easier sorting later. Excel’s Text to Column function comes in handy here, and is as easy as selecting all the filled cells (Ctrl / Cmd + A) and going to Excel > Data > Text to Columns and selecting the “Delimited” option, and the delimiter being a Space character. Once you’ve separated this out, you may also want to sort by time and date — you can do so in the Time and Date stamp column, commonly separating the data with the “:” colon delimiter. Your file should look similar to the one below:
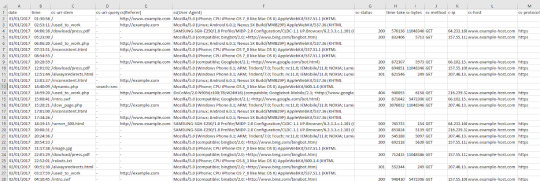
As mentioned before, don’t worry if your log file doesn’t look exactly the same — different log files have different formats. As long as you have the basic data there (time and date, URL, user-agent, etc.) you’re good to go!
Understanding Log Files
Now that your log files are ready for analysis, we can dive in and start to understand our data. There are many formats that log files can take with multiple different data points, but they generally include the following: Server IP Date and time Server request method (e.g. GET / POST) Requested URL HTTP status code User-agent More details on the common formats can be found below if you’re interested in the nitty gritty details: WC3 Apache and NGINX Amazon Elastic Load Balancing HA Proxy JSON
How to quickly reveal crawl budget waste
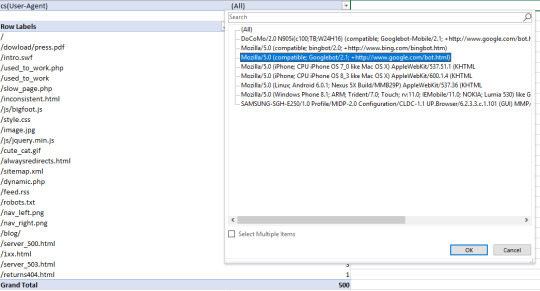
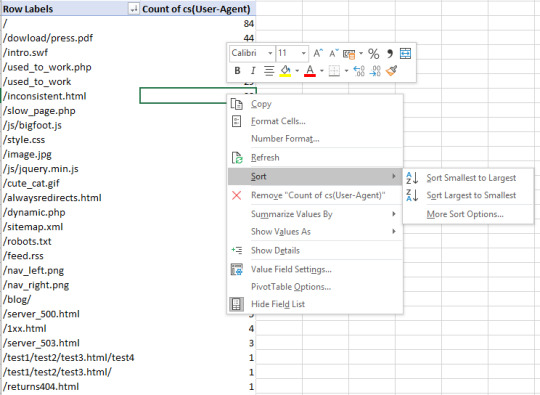
As a quick recap, Crawl Budget is the number of pages a search engine crawls upon every visit of your site. Numerous factors affect crawl budget, including link equity or domain authority, site speed, and more. With Log File Analysis, we will be able to see what sort of crawl budget your website has and where there are problems causing crawl budget to be wasted. Ideally, we want to give crawlers the most efficient crawling experience possible. Crawling shouldn’t be wasted on low-value pages and URLs, and priority pages (product pages for example) shouldn’t have slower indexation and crawl rates because a website has so many dead weight pages. The name of the game is crawl budget conservation, and with good crawl budget conversion comes better organic search performance. See crawled URLs by user agent Seeing how frequently URLs of the site are being crawled can quickly reveal where search engines are putting their time into crawling. If you’re interested in seeing the behavior of a single user agent, this is easy as filtering out the relevant column in excel. In this case, with a WC3 format log file, I’m filtering the cs(User-Agent) column by Googlebot:
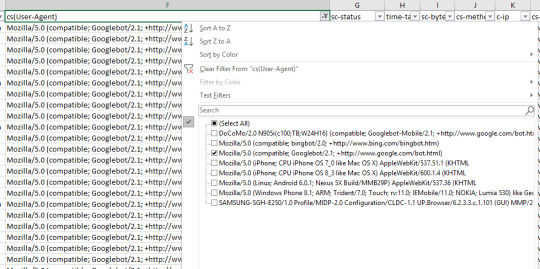
And then filtering the URI column to show the number of times Googlebot crawled the home page of this example site:
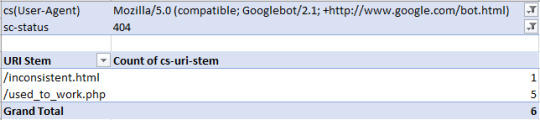
This is a fast way of seeing if there are any problem areas by URI stem for a singular user-agent. You can take this a step further by looking at the filtering options for the URI stem column, which in this case is cs-uri-stem:
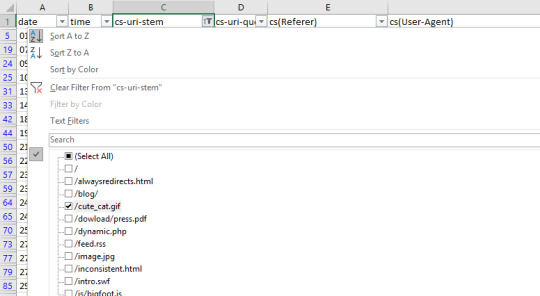
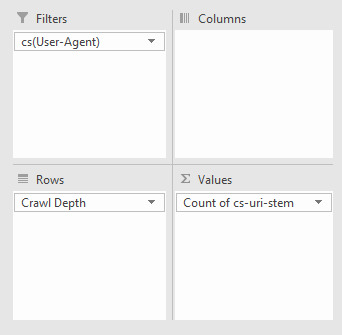
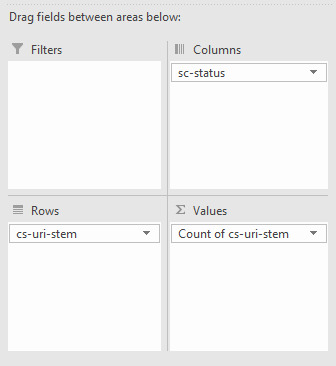
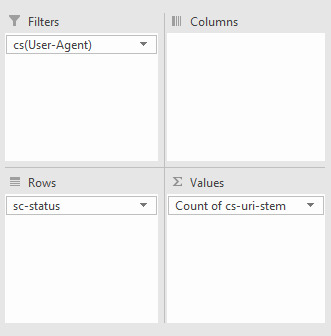
From this basic menu, we can see what URLs, including resource files, are being crawled to quickly identify any problem URLs (parameterized URLs that shouldn’t be being crawled for example). You can also do broader analyses with Pivot tables. To get the number of times a particular user agent has crawled a specific URL, select the whole table (Ctrl/cmd + A), go to Insert > Pivot Table and then use the following options:
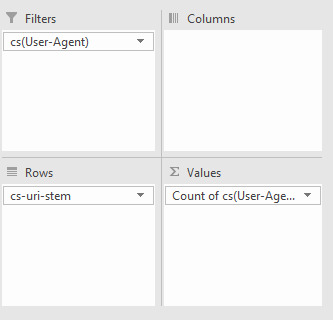
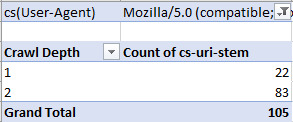
All we’re doing is filtering by User Agent, with the URL stems as rows, and then counting the number of times each User-agent occurs. With my example log file, I got the following:
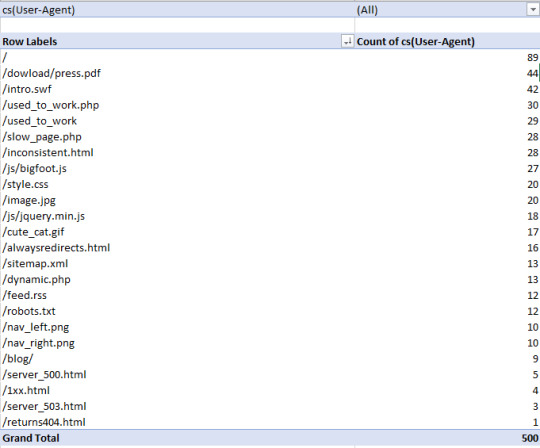
Then, to filter by specific User-Agent, I clicked the drop-down icon on the cell containing “(All)," and selected Googlebot:
Understanding what different bots are crawling, how mobile bots are crawling differently to desktop, and where the most crawling is occurring can help you see immediately where there is crawl budget waste and what areas of the site need improvement. Find low-value add URLs Crawl budget should not be wasted on Low value-add URLs, which are normally caused by session IDs, infinite crawl spaces, and faceted navigation. To do this, go back to your log file, and filter by URLs that contain a “?” or question mark symbols from the URL column (containing the URL stem). To do this in Excel, remember to use “~?” or tilde question mark, as shown below:
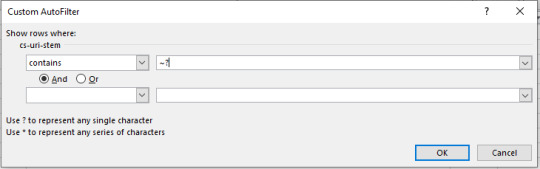
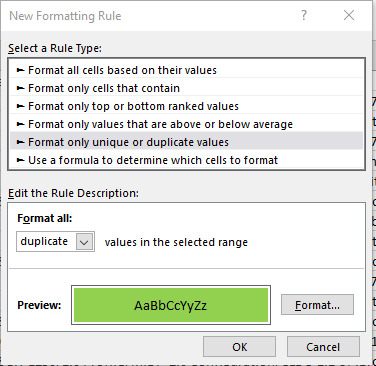
A single “?” or question mark, as stated in the auto filter window, represents any single character, so adding the tilde is like an escape character and makes sure to filter out the question mark symbol itself. Isn’t that easy? Find duplicate URLs Duplicate URLs can be a crawl budget waste and a big SEO issue, but finding them can be a pain. URLs can sometimes have slight variants (such as a trailing slash vs a non-trailing slash version of a URL). Ultimately, the best way to find duplicate URLs is also the least fun way to do so — you have to sort by site URL stem alphabetically and manually eyeball it. One way you can find trailing and non-trailing slash versions of the same URL is to use the SUBSTITUTE function in another column and use it to remove all forward slashes: =SUBSTITUTE(C2, “/”, “”) In my case, the target cell is C2 as the stem data is on the third column. Then, use conditional formatting to identify duplicate values and highlight them.
However, eyeballing is, unfortunately, the best method for now. See the crawl frequency of subdirectories Finding out which subdirectories are getting crawled the most is another quick way to reveal crawl budget waste. Although keep in mind, just because a client’s blog has never earned a single backlink and only gets three views a year from the business owner’s grandma doesn’t mean you should consider it crawl budget waste — internal linking structure should be consistently good throughout the site and there might be a strong reason for that content from the client’s perspective. To find out crawl frequency by subdirectory level, you will need to mostly eyeball it but the following formula can help: =IF(RIGHT(C2,1)="/",SUM(LEN(C2)-LEN(SUBSTITUTE(C2,"/","")))/LEN("/")+SUM(LEN(C2)-LEN(SUBSTITUTE(C2,"=","")))/LEN("=")-2, SUM(LEN(C2)-LEN(SUBSTITUTE(C2,"/","")))/LEN("/")+SUM(LEN(C2)-LEN(SUBSTITUTE(C2,"=","")))/LEN("=")-1) The above formula looks like a bit of a doozy, but all it does is check if there is a trailing slash, and depending on the answer, count the number of trailing slashes and subtract either 2 or 1 from the number. This formula could be shortened if you remove all trailing slashes from your URL list using the RIGHT formula — but who has the time. What you’re left with is subdirectory count (starting from 0 from as the first subdirectory). Replace C2 with the first URL stem / URL cell and then copy the formula down your entire list to get it working.
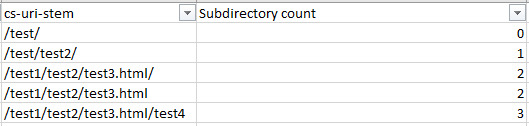
Make sure you replace all of the C2s with the appropriate starting cell and then sort the new subdirectory counting column by smallest to largest to get a good list of folders in a logical order, or easily filter by subdirectory level. For example, as shown in the below screenshots:
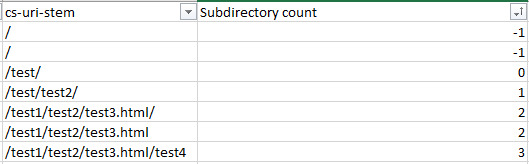
The above image is subdirectories sorted by level.

The above image is subdirectories sorted by depth. If you’re not dealing with a lot of URLs, you could simply sort the URLs by alphabetical order but then you won’t get the subdirectory count filtering which can be a lot faster for larger sites. See crawl frequency by content type Finding out what content is getting crawled, or if there are any content types that are hogging crawl budget, is a great check to spot crawl budget waste. Frequent crawling on unnecessary or low priority CSS and JS files, or how crawling is occurring on images if you are trying to optimize for image search, can easily be spotted with this tactic. In Excel, seeing crawl frequency by content type is as easy as filtering by URL or URI stem using the Ends With filtering option.
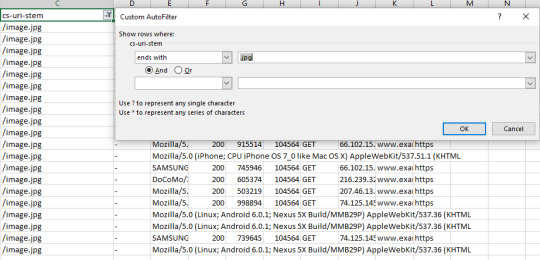
Quick Tip: You can also use the “Does Not End With” filter and use a .html extension to see how non-HTML page files are being crawled — always worth checking in case of crawl budget waste on unnecessary js or css files, or even images and image variations (looking at you Wordpress). Also, remember if you have a site with trailing and non-trailing slash URLs to take that into account with the “or” operator with filtering.
Spying on bots: Understand site crawl behavior
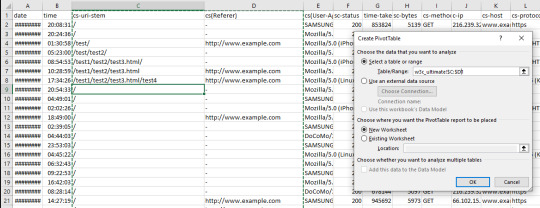
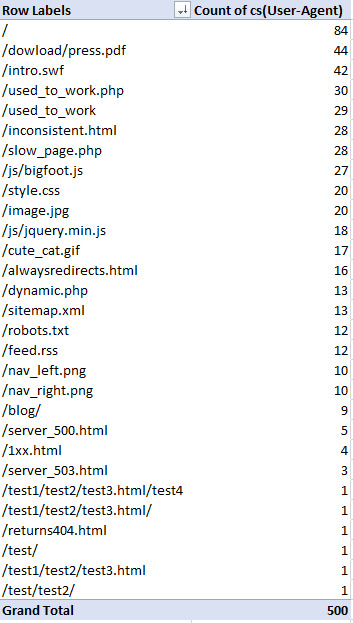
Log File Analysis allows us to understand how bots behave by giving us an idea of how they prioritize. How do different bots behave in different situations? With this knowledge, you can not only deepen your understanding of SEO and crawling, but also give you a huge leap in understanding the effectiveness of your site architecture. See most and least crawled URLs This strategy has been touched up previously with seeing crawled URLs by user-agent, but it’s even faster. In Excel, select a cell in your table and then click Insert > Pivot Table, make sure the selection contains the necessary columns (in this case, the URL or URI stem and the user-agent) and click OK.
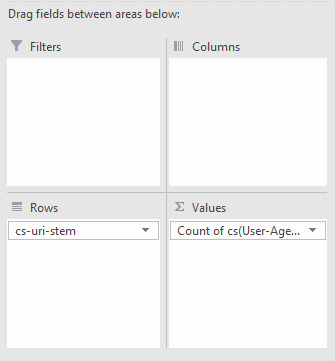
Once you have your pivot table created, set the rows to the URL or URI stem, and the summed value as the user-agent.
From there, you can right-click in the user-agent column and sort the URLs from largest to smallest by crawl count:
Now you’ll have a great table to make charts from or quickly review and look for any problematic areas:
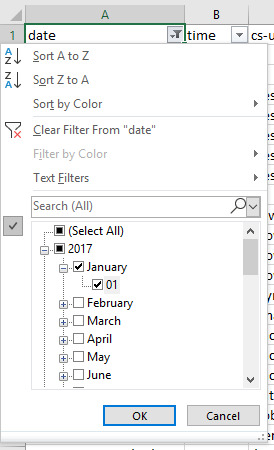
A question to ask yourself when reviewing this data is: Are the pages you or the client would want being crawled? How often? Frequent crawling doesn’t necessarily mean better results, but it can be an indication as to what Google and other content user-agents prioritize most. Crawl frequency per day, week, or month Checking the crawling activity to identify issues where there has been loss of visibility around a period of time, after a Google update or in an emergency can inform you where the problem might be. This is as simple as selecting the “date” column, making sure the column is in the “date” format type, and then using the date filtering options on the date column. If you’re looking to analyze a whole week, just select the corresponding days with the filtering options available.
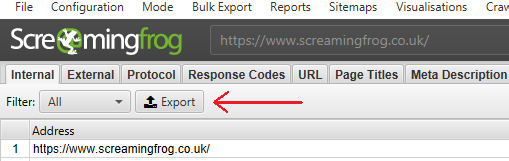
Crawl frequency by directive Understanding what directives are being followed (for instance, if you are using a disallow or even a no-index directive in robots.txt) by Google is essential to any SEO audit or campaign. If a site is using disallows with faceted navigation URLs, for example, you’ll want to make sure these are being obeyed. If they aren’t, recommend a better solution such as on-page directives like meta robots tags. To see crawl frequency by directive, you’ll need to combine a crawl report with your log file analysis. (Warning: We’re going to be using VLOOKUP, but it’s really not as complicated as people make it out to be) To get the combined data, do the following: Get the crawl from your site using your favorite crawling software. I might be biased, but I’m a big fan of the Screaming Frog SEO Spider, so I’m going to use that. If you’re also using the spider, follow the steps verbatim, but otherwise, make your own call to get the same results. Export the Internal HTML report from the SEO Spider (Internal Tab > “Filter: HTML”) and open up the “internal_all.xlsx” file.
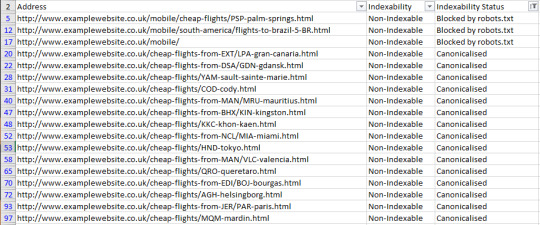
From there, you can filter the “Indexability Status” column and remove all blank cells. To do this, use the “does not contain” filter and just leave it blank. You can also add the “and” operator and filter out redirected URLs by making the filter value equal “does not contain → “Redirected” as shown below:

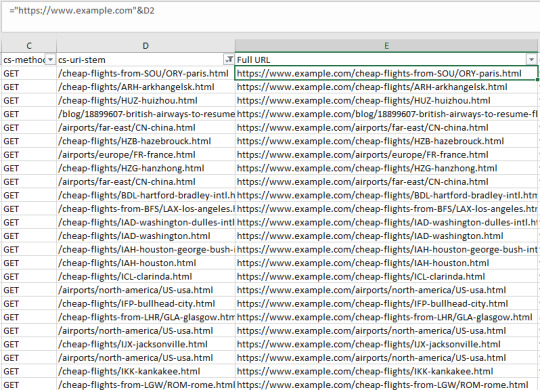
This will show you canonicalized, no-index by meta robots and canonicalized URLs. Copy this new table out (with just the Address and Indexability Status columns) and paste it in another sheet of your log file analysis export. Now for some VLOOKUP magic. First, we need to make sure the URI or URL column data is in the same format as the crawl data. Log Files don’t generally have the root domain or protocol in the URL, so we either need to remove the head of the URL using "Find and Replace" in our newly made sheet, or make a new column in your log file analysis sheet append the protocol and root domain to the URI stem. I prefer this method because then you can quickly copy and paste a URL that you are seeing problems with and take a look. However, if you have a massive log file, it is probably a lot less CPU intensive with the "Find and Replace" method. To get your full URLs, use the following formula but with the URL field changed to whatever site you are analyzing (and make sure the protocol is correct as well). You'll also want to change D2 to the first cell of your URL column ="https://www.example.com"&D2 Drag down the formula to the end of your Log file table and get a nice list of full URLs:
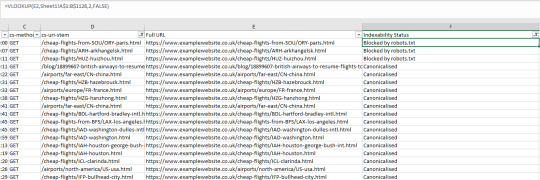
Now, create another column and call it “Indexability Status”. In the first cell, use a VLOOKUP similar to the following: =VLOOKUP(E2,CrawlSheet!A$1:B$1128,2,FALSE). Replace E2 with the first cell of you "Full URL" column, then make the lookup table into your new. crawl sheet. Remember to sue the dollar signs so that the lookup table doesn't change as you. apply the formula to further roles. Then, select the correct column (1 would be the first column of the index table, so number 2 is the one we are after). Use the FALSE range lookup mode for exact matching. Now you have a nice tidy list of URLs and their indexability status matched with crawl data:
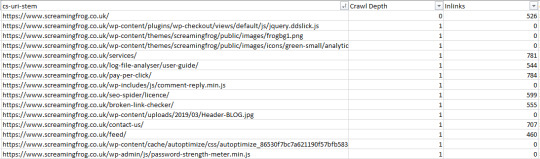
Crawl frequency by depth and internal links This analysis allows us to see how a site’s architecture is performing in terms of crawl budget and crawlability. The main aim is to see if you have far more URLs than you do requests — and if you do then you have a problem. Bots shouldn’t be “giving up” on crawling your entire site and not discovering important content or wasting crawl budget on content that is not important. Tip: It is also worth using a crawl visualization tool alongside this analysis to see the overall architecture of the site and see where there are “off-shoots” or pages with poor internal linking. To get this all-important data, do the following: Crawl your site with your preferred crawling tool and export whichever report has both the click depth and number of internal links with each URL. In my case, I’m using the Screaming Frog SEO Spider, going exporting the Internal report:
Use a VLOOKUP to match your URL with the Crawl Depth column and the number of Inlinks, which will give you something like this:
Depending on the type of data you want to see, you might want to filter out only URLs returning a 200 response code at this point or make them filterable options in the pivot table we create later. If you’re checking an e-commerce site, you might want to focus solely on product URLs, or if you’re optimizing crawling of images you can filter out by file type by filtering the URI column of your log file using the “Content-Type” column of your crawl export and making an option to filter with a pivot table. As with all of these checks, you have plenty of options! Using a pivot table, you can now analyze crawl rate by crawl depth (filtering by the particular bot in this case) with the following options:
To get something like the following:
Better data than Search Console? Identifying crawl issues
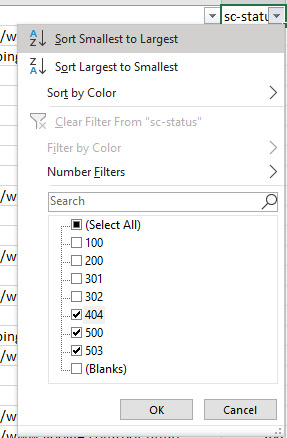
Search Console might be a go-to for every SEO, but it certainly has flaws. Historical data is harder to get, and there are limits on the number of rows you can view (at this time of writing it is 1000). But, with Log File Analysis, the sky’s the limit. With the following checks, we’re going to be discovered crawl and response errors to give your site a full health check. Discover Crawl Errors An obvious and quick check to add to your arsenal, all you have to do is filter the status column of your log file (in my case “sc-status” with a W3C log file type) for 4xx and 5xx errors:
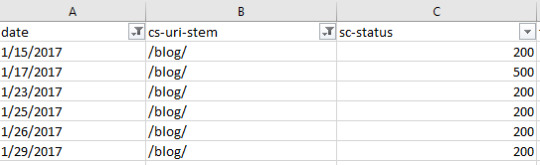
Find inconsistent server responses A particular URL may have varying server responses over time, which can either be normal behavior, such as when a broken link has been fixed or a sign there is a serious server issue occurring such as when heavy traffic to your site causes a lot more internal server errors and is affecting your site’s crawlability. Analyzing server responses is as easy as filtering by URL and by Date:
Alternatively, if you want to quickly see how a URL is varying in response code, you can use a pivot table with the rows set to the URL, the columns set to the response codes and counting the number of times a URL has produced that response code. To achieve this setup create a pivot table with the following settings:
This will produce the following:
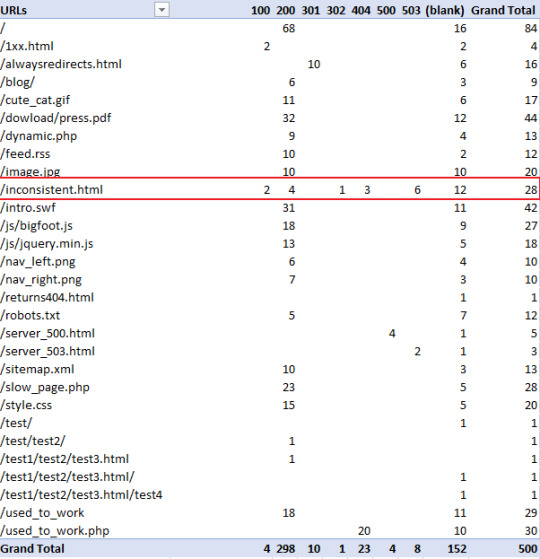
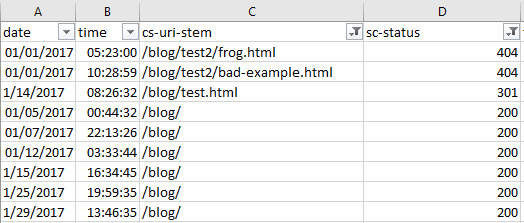
As you can see in the above table, you can clearly see “/inconcistent.html” (highlighted in the red box) has varying response codes. View Errors by Subdirectory To find which subdirectories are producing the most problems, we just need to do some simple URL filtering. Filter out the URI column (in my case “cs-uri-stem”) and use the “contains” filtering option to select a particular subdirectory and any pages within that subdirectory (with the wildcard *):
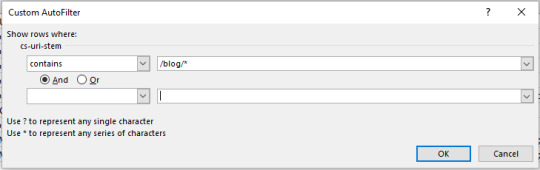
For me, I checked out the blog subdirectory, and this produced the following:
View Errors by User Agent Finding which bots are struggling can be useful for numerous reasons including seeing the differences in website performance for mobile and desktop bots, or which search engines are best able to crawl more of your site. You might want to see which particular URLs are causing issues with a particular bot. The easiest way to do this is with a pivot table that allows for filtering the number of times a particular response code occurs per URI. To achieve this make a pivot table with the following settings:

From there, you can filter by your chosen bot and response code type, such as image below, where I'm filtering for Googlebot desktop to seek out 404 errors:
Alternatively, you can also use a pivot table to see how many times a specific bot produces different response codes as a whole by creating a pivot table that filters by bot, counts by URI occurrence, and uses response codes as rows. To achieve this use the settings below:
For example, in the pivot table (below), I’m looking at how many of each response code Googlebot is receiving:
Diagnose on-page problems
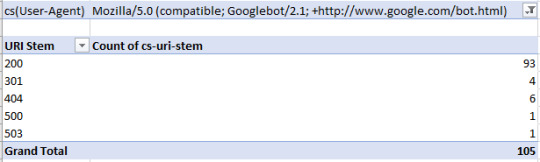
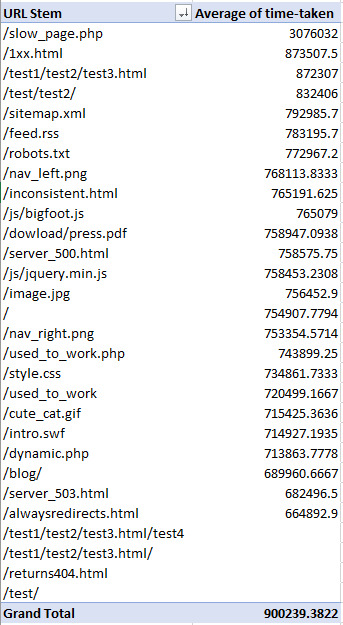
Websites need to be designed not just for humans, but for bots. Pages shouldn’t be slow loading or be a huge download, and with log file analysis, you can see both of these metrics per URL from a bot’s perspective. Find slow & large pages While you can sort your log file by the “time taken” or “loading time” column from largest to smallest to find the slowest loading pages, it’s better to look at the average load time per URL as there could be other factors that might have contributed to a slow request other than the web page’s actual speed. To do this, create a pivot table with the rows set to the URI stem or URL and the summed value set to the time taken to load or load time:
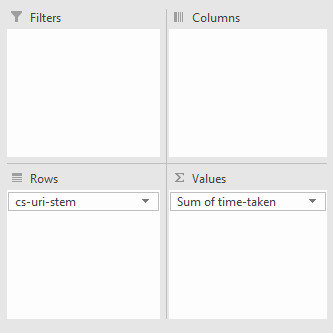
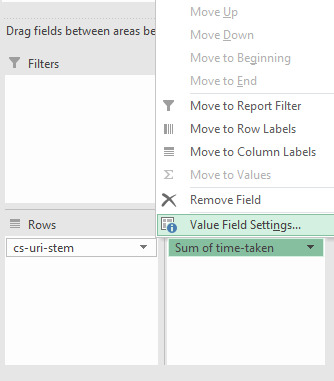
Then using the drop-down arrow, in this case, where it says “Sum of time-taken” and go to “Value Field Settings”:
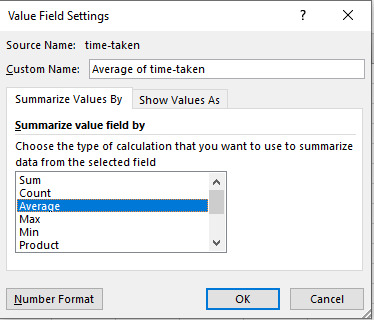
In the new window, select “Average” and you’re all set:
Now you should have something similar to the following when you sort the URI stems by largest to smallest and average time taken:
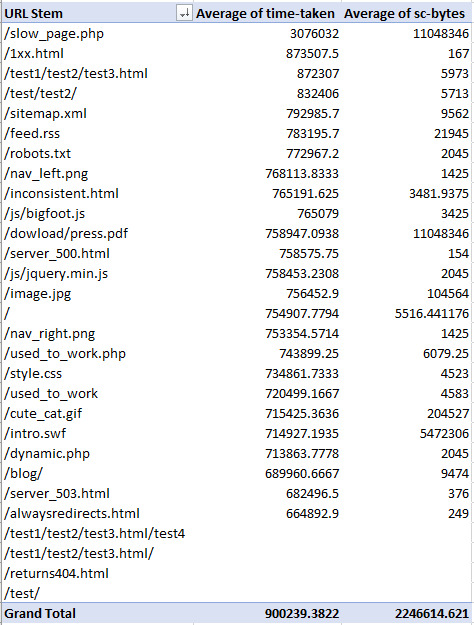
Find large pages You can now add the download size column (in my case “sc-bytes”) using the settings shown below. Remember that the set the size to the average or sum depending on what you would like to see. For me, I’ve done the average:

And you should get something similar to the following:
Bot behavior: Verifying and analyzing bots
The best and easiest way to understand bot and crawl behavior is with log file analysis as you are again getting real-world data, and it’s a lot less hassle than other methods. Find un-crawled URLs Simply take the crawl of your website with your tool of choice, and then take your log file an compare the URLs to find unique paths. You can do this with the “Remove Duplicates” feature of Excel or conditional formatting, although the former is a lot less CPU intensive especially for larger log files. Easy! Identify spam bots Unnecessary server strain from spam and spoof bots is easily identified with log files and some basic command line operators. Most requests will also have an IP associated with it, so using your IP column (in my case, it is titled “c-ip” in a W3C format log), remove all duplicates to find each individual requesting IP. From there, you should follow the process outlined in Google’s document for verifying IPs (note: For Windows users, use the nslookup command): https://support.google.com/webmasters/answer/80553?hl=en Or, if you’re verifying a bing bot, use their handy tool: https://www.bing.com/toolbox/verify-bingbot
Conclusion: Log Files Analysis — not as scary as it sounds
With some simple tools at your disposal, you can dive deep into how Googlebot behaves. When you understand how a website handles crawling, you can diagnose more problems than you can chew — but the real power of Log File Analysis lies in being able to test your theories about Googlebot and extending the above techniques to gather your own insights and revelations. What theories would you test using log file analysis? What insights could you gather from log files other than the ones listed above? Let me know in the comments below. Read the full article
0 notes
Text
Django Download Mac


Django Download File From Server
Django Download Multiple Files
Django Download Zip File
Download Django For Windows 10
Python comes pre installed in Mac as it is a UNIX based system. So, you will not need to install it. However to install Django, below are the steps to be executed from the terminal. Check the “Add Python 3.8 to PATH” box before installing. Once Python is installed, restart Windows.
Python for Mac OS X

Python comes pre-installed on Mac OS X so it is easy to startusing. However, to take advantage of the latest versions ofPython, you will need to download and install newer versionsalongside the system ones. The easiest way to do that is toinstall one of the binary installers for OS X from thePython Download page. Installers areavailable for the latest Python 3 and Python 2 releases thatwill work on all Macs that run Mac OS X 10.5 and later.

Python releases include IDLE, Python's built-in interactivedevelopment environment. If you download and install Pythonfrom the release page, you may also need to download and installa newer version of Tcl/Tk for OS X. See theIDLE and Tkinter on OS X page formore information.
You can run a Python interpreter by double-clicking onApplications / Utilities / Terminal and typing python3 (if you'veinstalled a version of Python 3) or python (to use Python 2) inthe window that opens up. You can also launch IDLE for the Pythonversion you have installed by double-clicking its icon inthe appropriate Python version folder in the Applications folderor you can also just type idle3 or idle in a terminal window.
There are many thousands of additional Python software packagesavailable through PyPI, the PythonPackage Index. We recommend you use thepip tool to simplifyinstalling and managing additional packages. pip is includedwith Python 3.4 releases; for earlier releases, follow the pipinstall instructions.
Among the packages available through PyPI are some that arespecifically for OS X environments. Among these are:
pyobjc which providesa bridge between Python and Objective-C, allowing you to writefull-featured native Cocoa applications in pure Python.
py2app which allowsyou to make standalone OS X double-clickable application bundlesand plugins from Python scripts.
For more information about Python on OS X, see the mailing list and archivesfor thePython-Macintosh Special Interest Group.
Alternative Packages for Mac OS X.
ActiveState ActivePython(commercial and community versions, including scientific computing modules).
Enthought Python DistributionThe Enthought Python Distribution provides scientists with a comprehensive setof tools to perform rigorous data analysis and visualization.
Python and a comprehensive set of third-party packages and libraries are alsoavailable from several open source package manager projects for OS X,including:
This chapter covers how to properly configure your computer to work on Django projects. We start with an overview of the command line and how to install the latest version of Django and Python. Then we discuss virtual environments, git, and working with a text editor. By the end of this chapter you’ll be ready to create and modify new Django projects in just a few keystrokes.
The Command Line
The command line is a powerful, text-only view of your computer. As developers we will use it extensively throughout this book to install and configure each Django project.
On a Mac, the command line is found in a program called Terminal. To find it, open a new Finder window, open the Applications directory, scroll down to open the Utilities directory, and double-click the application called Terminal.
On Windows machines there are actually two built-in command shells: the Command shell and PowerShell. You should use PowerShell, which is the more powerful of the two.
Going forward when the book refers to the “command line” it means to open a new console on your computer, using either Terminal or PowerShell.
While there are many possible commands we can use, in practice there are six used most frequently in Django development:
cd (change down a directory)
cd . (change up a directory)
ls (list files in your current directory on Mac)
dir (list files in your current directory on Windows)
pwd (print working directory)
mkdir (make directory)
touch (create a new file on Mac)
Open your command line and try them out. The dollar sign ($) is our command line prompt: all commands in this book are intended to be typed after the $ prompt.
For example, assuming you’re on a Mac, let’s change into our Desktop directory.
Note that our current location, ~/Desktop, is automatically added before our command line prompt. To confirm we’re in the proper location we can use pwd which will print out the path of our current directory.
On my Mac computer this shows that I’m using the user wsv and on the desktop for that account.
Now let’s create a new directory with mkdir, cd into it, and add a new file index.html with the touch command. Note that Windows machines unfortunately do not support a native touch command. In future chapters when instructed to create a new file, do so within your text editor of choice.
Now use ls to list all current files in our directory. You’ll see there’s just the newly created index.html.
As a final step, return to the Desktop directory with cd . and use pwd to confirm the location.
Advanced developers can use their keyboard and command line to navigate through their computer with ease. With practice this approach is much faster than using a mouse.
In this book I’ll give you the exact instructions to run–you don’t need to be an expert on the command line–but over time it’s a good skill for any professional software developer to develop. A good free resource for further study is the Command Line Crash Course.
Install Python 3
It takes some configuration to properly install Python 3 on a Mac, Windows, Linux, or Chromebook computer and there are multiple approaches. Many developers–especially beginners–follow the advice on the official Python website to download distinct versions of Python directly onto their computer and then adjust the PATH variable accordingly.
The problem with this approach is that updating the PATH variable correctly is tricky, by downloading Python directly updates are harder to maintain, and there are now much easier ways to install and start using Python quickly.
I host a dedicated website, InstallPython3.com, with up-to-date guides for installing Python 3 on Mac, Windows, or Linux computers. Please refer there to install Python correctly on your local machine.
Virtual Environments
Virtual environments are an indispensable part of Python programming. They are an isolated container containing all the software dependencies for a given project. This is important because by default software like Python and Django is installed in the same directory. This causes a problem when you want to work on multiple projects on the same computer. What if ProjectA uses Django 3.1 but ProjectB from last year is still on Django 2.2? Without virtual environments this becomes very difficult; with virtual environments it’s no problem at all.
There are many areas of software development that are hotly debated, but using virtual environments for Python development is not one. You should use a dedicated virtual environment for each new Python project.
In this book we will use Pipenv to manage virtual environments. Pipenv is similar to npm and yarn from the JavaScript/Node ecosystem: it creates a Pipfile containing software dependencies and a Pipfile.lock for ensuring deterministic builds. “Determinism” means that each and every time you download the software in a new virtual environment, you will have exactly the same configuration.
Sebastian McKenzie, the creator of Yarn which first introduced this concept to JavaScript packaging, has a concise blog post explaining what determinism is and why it matters. The end result is that we will create a new virtual environment with Pipenv for each new Django Project.
To install Pipenv we can use pip3 which Homebrew automatically installed for us alongside Python 3.
Install Django
To see Pipenv in action, let’s create a new directory and install Django. First navigate to the Desktop, create a new directory django, and enter it with cd.
Now use Pipenv to install Django. Note the use of ~= which will ensure security updates for Django, such as 3.1.1, 3.1.2, and so on.
If you look within our directory there are now two new files: Pipfile and Pipfile.lock. We have the information we need for a new virtual environment but we have not activated it yet. Let’s do that with pipenv shell.
If you are on a Mac you should now see parentheses around the name of your current directory on your command line which indicates the virtual environment is activated. Since we’re in a django directory that means we should see (django) at the beginning of the command line prompt. Windows users will not see the shell prompt. If you can run django-admin startproject in the next section then you know your virtual environment has Django installed properly.
This means it’s working! Create a new Django project called config with the following command. Don’t forget that period . at the end.
It’s worth pausing here to explain why you should add a period (.) to the command. If you just run django-admin startproject config then by default Django will create this directory structure:
See how it creates a new directory config and then within it a manage.py file and a config directory? That feels redundant to me since we already created and navigated into a django directory on our Desktop. By running django-admin startproject config . with the period at the end–which says, install in the current directory–the result is instead this:
The takeaway is that it doesn’t really matter if you include the period or not at the end of the command, but I prefer to include the period and so that’s how we’ll do it in this book.
As you progress in your journey learning Django, you’ll start to bump up more and more into similar situations where there are different opinions within the Django community on the correct best practice. Django is eminently customizable, which is a great strength, however the tradeoff is that this flexibility comes at the cost of seeming complexity. Generally speaking it’s a good idea to research any such issues that arise, make a decision, and then stick with it!
Now let’s confirm everything is working by running Django’s local web server.
Don’t worry about the text in red about “18 unapplied migrations.” We’ll get to that shortly but the important part, for now, is to visit http://127.0.0.1:8000/ and make sure the following image is visible:
Django Download File From Server
To stop our local server type Control+c. Then exit our virtual environment using the command exit.
We can always reactivate the virtual environment again using pipenv shell at any time.
We’ll get lots of practice with virtual environments in this book so don’t worry if it’s a little confusing right now. The basic pattern is to install new packages with pipenv, activate them with pipenv shell, and then exit when done.
It’s worth noting that only one virtual environment can be active in a command line tab at a time. In future chapters we will be creating a brand new virtual environment for each new project so either make sure to exit your current environment or open up a new tab for new projects.
Install Git
Git is an indispensable part of modern software development. It is a version control system which can be thought of as an extremely powerful version of track changes in Microsoft Word or Google Docs. With git, you can collaborate with other developers, track all your work via commits, and revert to any previous version of your code even if you accidentally delete something important!
On a Mac, because HomeBrew is already installed we can simply type brew install git on the command line:
Avira free download mac. On Windows you should download Git from Git for Windows. Click the “Download” button and follow the prompts for installation.
Once installed, we need to do a one-time system set up to configure it by declaring the name and email address you want associated with all your Git commits. Within the command line console type the following two lines. Make sure to update them your name and email address.
You can always change these configs later if you desire by retyping the same commands with a new name or email address.
Text Editors
The final step is our text editor. While the command line is where we execute commands for our programs, a text editor is where the actual code is written. The computer doesn’t care what text editor you use–the end result is just code–but a good text editor can provide helpful hints and catch typos for you.
Experienced developers often prefer using either Vim or Emacs, both decades-old, text-only editors with loyal followings. However each has a steep learning curve and requires memorizing many different keystroke combinations. I don’t recommend them for newcomers.
Modern text editors combine the same powerful features with an appealing visual interface. My current favorite is Visual Studio Code which is free, easy to install, and enjoys widespread popularity. If you’re not already using a text editor, download and install Visual Studio Code now.
Django Download Multiple Files
Conclusion
Django Download Zip File
Phew! Nobody really likes configuring a local development environment but fortunately it’s a one-time pain. We have now learned how to work with virtual environments and installed the latest version of Python and git. Everything is ready for our first Django app.
Download Django For Windows 10
Continue on to Chapter 2: Hello World app.
0 notes
Text
Windows 10 cmd och Winows commands
Common Windows Tools explorer Windows Explorer c: Open C: Drive regedit Registry Editor services.msc Windows Services (local) taskmgr Task Manager msconfig System Configuration Utility mstsc Remote Desktop (Microsoft Terminal Services Client) logoff Log Off Windows (without confirmation!) shutdown Shuts Down Windows (Save all your work first) cmd Command Prompt notepad Notepad osk On Screen keyboard mailto: Open Default Mail Application Website address Open entered URL in default browser
Other Windows Tools & Utilities calc Calculator chkdsk Check Disk charmap Character Map cleanmgr Clean Manager - Disk Cleanup Utility clipbrd Clipboard Viewe cmd Command Prompt comp Compare Files colorcpl Color Management cttune ClearType Text tuner dxdiag Direct X Troubleshooter eudcedit Private Characters Editor fonts Fonts fsquirt Bluetooth Transfer Wizard ftp MS-DOS FTP iexplore Internet Explorer joy.cpl Game Controllers label Volume Serial Number for C: magnify Windows Magnifier migwiz Migration Wizard - Files and Settings Transfer Tool mip Math Input Panel mrt Malicious Software Removal Tool msiexec Windows Installer Details msinfo32 System Information mspaint Paint narrator Narrator powershell Powershell shrpubw Create a shared folder Wizard sigverif File Signature Verification Tool sndvol Volume Control snippingtool Snipping Tools stikynot Sticky Notes utilman Narrator Settings verifier Driver Verifier Utility wf.msc Windows Firewall with Advanced Security wfs Windows Fax and Scan wiaacmgr Scanner winver Windows Version (Check your Windows version) wmplayer Windows Media Player write WordPad xpsrchvw XPS Viewer winword Word Word /safe Word Safe Mode Control Panel Commands appwiz.cpl Application Wizard (Program and Features) control Control Panel control admintools Administrative Tools control color Personalization - Color and Appearance control desktop Display Properties (Personalization) control folders Folders Properties control keyboard Keyboard Properties control mouse Mouse Properties control netconnections Network Properties control printers Printers Folders control schedtasks Scheduled Tasks control update Windows Update control userpass words Manager current User Account control userpasswords2 Manager all User Accounts desk.cpl Display - Screen Resolution devmgmt.msc Device Manager firewall.cpl Windows Firewall inetcpl.cpl Internet Properties (Internet Control Panel) intl.cpl Regional Settings (International) mmsys.cpl Sound Properties (Multimedia System Settings) ncpa.cpl Network Properties netplwiz To create User Account powercfg.cpl Power Configuration sysdm.cpl System Properties timedate.cpl Date and Time Properties utilman Ease of Access Utility Manager wscui.cpl Security Center (Windows Security Center UI)
Windows Administrative Tools compmgmt.msc Computer Management including System Tools, Storage, Services and Applications defrag Defrag Command dcomcnfg Component Services (Detailed Component Configuration) devmgmt.msc Device Management diskmgmt.msc Disk Partition Manager diskpart Diskpart Command eventvwr.msc Event Viewer fsmgmt.msc Shared Folders (File Sharing Management) gpedit.msc Group Policy Editor lusrmgr.msc Local User and Groups perfmon.msc Performance Monitor rekeywiz File Encryption
System File Checker Utility sfc /scannow System File Checker Utility (Scan Immediately) sfc /scanonce System File Checker Utility (Scan Once At Next Boot) sfc /scanboot System File Checker Utility (Scan On Every Boot) sfc /revert System File Checker Utility (Return to Default Settings) sfc /purgecache System File Checker Utility (Purge File Cache) sfc /cachesize=x System File Checker Utility (Set Cache Size to Size x)
Common Environment Variables %AllUsersProfile% Program Data %ProgramFiles% Program Files %SystemDrive% System Drive %SystemRoot% System Root %Temp% Temporary Folder %UserProfile% User Profile %WinDir% Windows Directory
0 notes
Text
How to Fix MS Store Error 0x80131500 on Windows 10
Microsoft Store is among the most essential components of the Windows 10 operating system. It has a feature to allow the user to download and updates several applications on the computer. It is an efficient platform, but sometimes you can face an error on it. The issue arises while you try to download or update an application. The error code displays 0x80131500 and here is how you can fix it.

What is MS Windows Store Error 0x80131500?
You can get the error 0x80131500 notification when you try to install and updates new applications on the MS Store. You may cancel it at times, but it can resurface again and again. This blog will help you easily fix the issue.
How to Fix Error 0x80131500
The issue arises due to multiple causes, meaning the resolution process is multi-level as well. Here is how to do it properly:
How to Solve Error 0x80131500 on Windows 10
● Via Windows Store Troubleshoot
● Reboot MS store Cache
● Regularly check Date and Time
● Changing Region Setting on PC
● Internet Connection Changing
1) Via Windows Store Troubleshoot
Here are the steps on how to fix the issue of error 0x80131500 via Windows Store troubleshoot:-
1. Tap the Win + R key together on your keyboard to run the command.
2. Write control panel in the field and tap OK option or tap Enter.
3. A Window will appear on your device. Check the category chosen under the View shown on the top of your computer screen.
4. Now tap on System and Security.
5. In the action Centre tap on "Troubleshoot Common Computer problem."
6. Tap on Hardware and Sound and then write Windows Start application in the search bar.
7. Now, press Yes on the section that popup in the search result.
8. When the dialog box opens, tap the Advanced link and ensure that the boxed is ticked for Apply repair automatically.
9. Now follow the on-screen instructions.
2) Reboot MS Store Cache
Here are the steps on how to reboot the MS store Cache to fix the issue of error 0x80131500:-
1. Launch the Start menu.
2. Write CMD in the search field.
3. Right-tap on command prompt in the list and choose Run as Administrator.
4. Tap Yes when the user account control appears.
3) Regularly Check Date and Time
Here are the steps on how to fix error 0x80131500 via check date and time:-
1. Start the setting application by tapping the Win+I button together on the keyboard.
2. Tap on date and time. It is shown in time and language.
3. On the right of the Window, tap on the toggle to switch Onset time and Zone automatically if your time and date will not match with the option switch off the option and choose the right time zone.
4. Tap on the toggle to switch on the option that asks Set Time automatically.
4) Changing Region Setting on PC
Here are the steps on how to fix error 0x80131500 via changing region setting on PC:-
1. Launch the setting application by clicking the Win+I button together on the keyboard.
2. Tap on the time and language and choose Region and language.
3. Choose the correct country and region within the drop-down menu.
4. Reboot your PC and check whether the issue has resolved or not.
5) Internet Connection Changing
Here are the steps on how to fix error 0x80131500 via internet connection changing:-
1. Launch the Start menu and write “Internet” in the search field.
2. Now, tap the option on the result.
3. Move to the advance tab.
4. Scroll the list up to down and untick the checkbox for Use SSL3.0, TLS 1.0, TLS 1.2.
5. Tap Apply.
6. Hit OK.
7. Close the all current Window and reset your PC.
6) Creating a New User Account
Here are the steps on how to fix error 0x80131500 via creating a new account:-
1. Start the Setting application by tapping Win+I button together on the keyboard.
2. Visit the account section and then tap on the Family and another user.
3. Now tap on the option that says Add someone else into the Computer.
4. Tap on the "I don't have this person's login info" and tap on the link to add the new username and password for the new account without Microsoft account.
5. Select the username and type the password of the new account.
6. Tap the Next option.
7. Now you need to switch off the new account and check the issue still available in the MS store.
7) Re-Register MS Store Using PowerShell
Here are the steps on how to fix error 0x80131500 via Re-Register MS store using PowerShell:-
1. Launch the Start menu.
2. Enter PowerShell in the search field and right tap on the icon when the result appears on your screen.
3. Choose " Run as administrator.
4. Tap the Yes button when the user accounts Control popup on the screen.
5. In the next windows copy and paste the command appear on the screen and Enter it, and re-register the Windows MS store application.
6. When the process is completed, close your current windows, and reset your Computer.
8) Changing DNS Setting
Here are the steps on how to fix error 0x80131500 via changing the DNS setting:-
1. Right-tap on the start menu and then tap on Control panel in the list appear on the screen.
2. In control panel, make sure category is chosen in the "View by," and then tap on the Network and Internet.
3. Tap the Network and Sharing Centre.
4. Tap on the Charge adapter setting on the left of the page on the screen.
5. Right-tap on the current connection and choose Properties in the context menu.
6. Tick the checkbox to get Internet Protocol Version 4, and choose it and tap on the properties option.
7. When the new Box appears, choose the option that asks "Use the following DNS server address."
8. Now open DNS, write 208.67.222.222 in the DNS server field and 208.67.220.220 in the similar DNS server field.
9. Tap the OK button and close the current Windows.
James Boond is a Microsoft Office expert and has been working in the technical industry since 2014. As a technical expert, James has written technical blogs, manuals, white papers, and reviews for many websites such as mcafee.com/activate .
Source : - MS Store Error 0x80131500
0 notes
Text
How to Fix Windows 10 Automatic Update Problems
Windows 10 automatically installs the missing updates but sometime you may face problems in the automatic update installation. This can be caused by bugs, so in this article, we will teach you how you can fix Windows 10 Automatic Update Problems.

Here are seven troubleshoots to fix the issue Windows 10 Automatic Update Problems:
Checking Antivirus
Changing Windows Updates Settings
Free storage
Remove USB storage Device
Run Windows updates troubleshooter
Reset Windows Components Updates
Disable Proxy
1) Checking Antivirus
In many cases, an antivirus might be interfering with your operating system and causing various problems with Windows 10 updates.
To fix this issue, we recommend you disable antivirus features and check if it helps. If it does not, then you need to disable your antivirus altogether. In some cases, you might even have to remove the antivirus from your operating system.
If the deleting or removing antivirus resolves your issue, then you need to consider turning to a different security software.
2) Changing Windows Updates Settings
Here are the steps on how to the evolving windows updates settings to fix Windows 10 automatic updates problems:
Launch the Settings application.
Tap Window + I key to quick launch.
When the settings launched, visit the “Updates and Security” option.
Move to the “Advance option.”
Here you need to disable “Give me updates for other Microsoft products when I update Windows” choose.
Bottom down and move to the “Delivery Optimization” option.
Find “Allow downloads from other PCs” disable it.
3) Free storage
Tap Windows + S key and enter “disk cleanup.”
Select “Disk cleanup” in the list appear on your screen.
Choose system drive and then tap on it.
Now “Disk cleanup” will scan your derive; this may take some seconds, so you need to wait.
When the “Disk cleanup windows launched here, you can view a list; then, you need to choose the files that you wish to remove.
Tap OK.
4) Remove USB storage Device
There are some devices that can interfere with Windows 10 updates causing automatic updates. To fix this issue, we recommended that you need to disconnect all the device storage into your computer and then verify the issue resolve.
5) Run Windows updates troubleshooter
Launch settings application and visit the “Updates and Security” option.
Choose “Troubleshoot in the left panel and then choose “Windows Updates” in the list that appears on your screen.
Tap the “Run Troubleshooter” option.
6) Reset Windows Components Updates
Tap Windows + X key to launch Window + X menu.
Select “Command Prompt or PowerShell” in the appeared list.
When the command Prompt launched, you need to enter the following command one by one:
net stop wuauserv
net stop cryptSvc
net stop bits
net stop msiserver
Ren C:WindowsSoftwareDistribution SoftwareDistribution.old
Ren C:WindowsSystem32catroot2 Catroot2.old
net start wuauserv
net start cryptSvc
net start bits
net start msiserver
After this all running command, your windows updates parts will reset and resolve the issue.
7) Disable Proxy
Here are the steps on how to disable proxy to fix Windows 10 automatic updates problems:
Launch the Settings application.
Choose “Network and Internet.”
Move to the “Proxy” in the left panel, and in the right panel, you need to disable entire options.
Blair Lennon is a Internet Security expert and has been working in the technology industry since 2002. As a technical expert, she has written technical blogs, manuals, white papers, and reviews for many websites such as webroot.com/safe.
Source: https://1webrootcomsafe.com/how-to-fix-windows-10-automatic-update-problems/
0 notes